

Page 1
ME 3P20 RC
Italiano
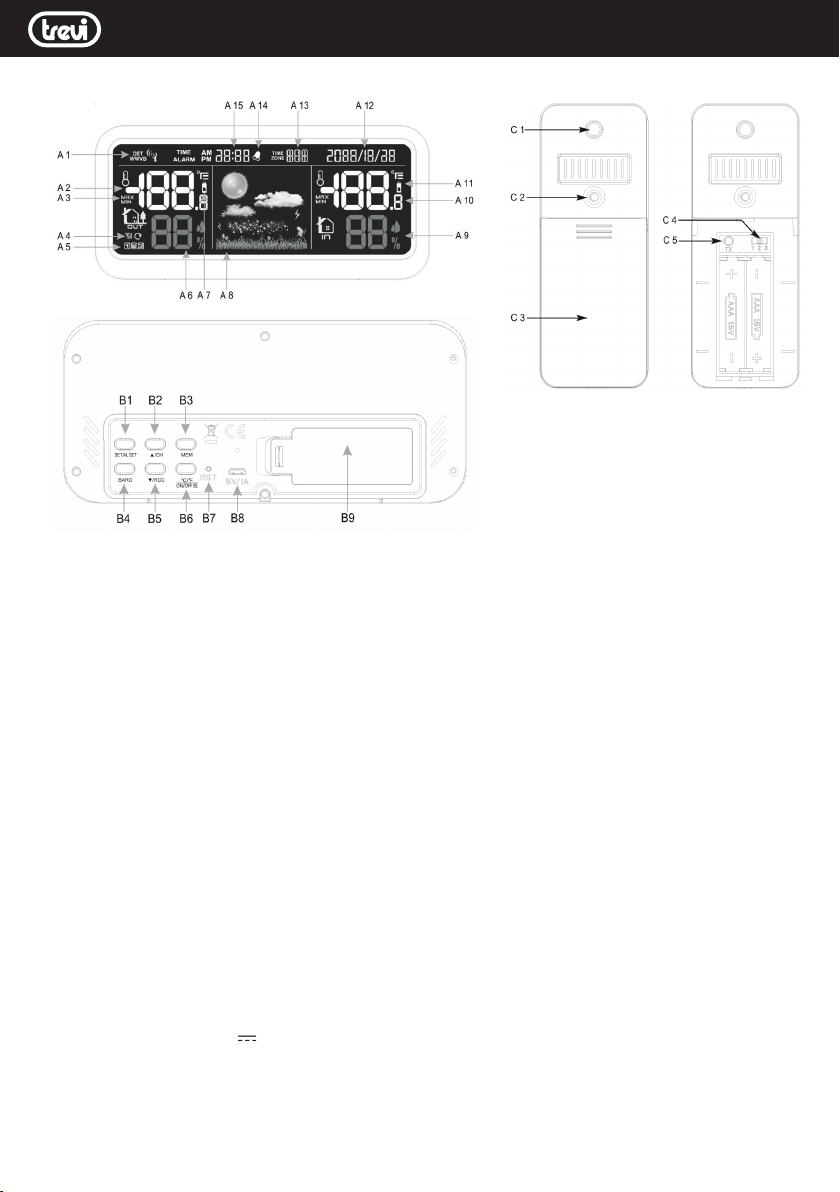
DESCRIZIONE FUNZIONI E COMANDI
A1. Icona radiocontrollo RCC
A2. Temperatura esterna
A3. Memoria MAX/MIN
A4. Icona segnale sensore esterno
A5. Canale di trasmissione sensore esterno
A6. Umidità esterna
A7. Indicazione batteria scarica sensore esterno
A8. Previsione meteo
A9. Umidità interna
A10. Temperatura interna
A11. Indicazione batteria scarica stazione meteo
A12. Datario
A13. Fuso orario / Time zone
A14. Icona allarme attivo
A15. Orologio /Orario allarme
B1. Tasto SET/AL SET
B2. Tasto UP/CH
B3. Tasto MEM
B4. Tasto BARO
B5. Tasto DOWN/RCC
B6. Tasto C/F / BL
B7. Tasto RST
B8. Connettore alimentazione 5V 1A
B9. Vano batterie 2x 1,5V AAA (batterie non fornite)
C1. Foro per installazione a muro
C2. Led indicatore di funzionamento
C3. Vano batterie 2x 1,5V AAA (batterie non fornite)
C4. Selettore del canale di trasmissione
C5. Tasto TX, trasmissione dei dati
ALIMENTAZIONE STAZIONE METEO
Aprire il vano batterie (B9) posto sul retro dell’apparecchio
ed inserire due batterie formato “AAA” rispettando le polarità
indicate.
In alternativa inserire la presa dell’alimentatore esterno nella
presa B8, inserire l’alimentatore in una presa di rete.
ALIMENTAZIONE SENSORE ESTERNO
Aprire il vano batterie (C3) posto sul retro dell’apparecchio,
ed inserire due batterie formato “AAA” rispettando le polarità
indicate.
Nota: la visualizzazione delle icone A7 o A11 indica che le
batterie del sensore esterno o della stazione meteo sono
in esaurimento.
IMPOSTAZIONE SENSORE ESTERNO
Questa stazione meteo è predisposta per comunicare con tre
sensori esterni. Uno di questi viene fornito con l’apparecchio,
i restanti due sono opzionali.
1. Alimentare la stazione meteo come descritto nel paragrafo
ALIMENTAZIONE STAZIONE METEO.
2. Inserire le batterie nel sensore esterno, posizionare il
selettore(C4) sul canale di trasmissione desiderato (1,
2 o 3). Automaticamente verranno trasmessi i dati alla
stazione meteo.
3. Premere il tasto UP/CH(B2) piu’ volte per selezionare il
canale impostato sul sensore esterno. In sequenza viene
selezionato il canale 1, il canale 2, il canale 3 oppure la
visualizzazione sequenziale dei 3 canali (icona freccia
rotante). In caso di non ricezione del segnale sul display
viene mostrato il carattere --.
1
Page 2

ME 3P20 RC
Nota1: in caso di mancata comunicazione tra stazione meteo e sensore esterno e’ necessario premere a lungo il tasto
UP(B2) fino alla comparsa sul display dell’icona di ricezione segnale dal sensore esterno. E’ poi necessario aspettare
alcuni minuti che il collegamento venga effettuato. In alternativa e’ necessario ripetere i passi dal 1 al 3 sopra descritti.
Nota2: Posizionare la stazione meteo lontana da apparecchi che generano campi magnetici quali cellulari, televisori ecc....
Italiano
VISUALIZZAZIONE ORARIO TRAMITE RADIO CONTROLLO
Questo apparecchio è dotato di un ricevitore in grado di ricevere il segnale orario del Physikalisch Technische Bundesanstalt
Braunschweig (Germania centrale) ricevibile in un raggio di 1500Km.
1. Tenere premuto il tasto DOWN/RCC(B5) della stazione meteo, il simbolo(A1) del radio controllo lampeggerà ed entro 24
ore verrà visualizzato il segnale orario del radio controllo.
Questa stazione meteo e’ dotata anche di funzione DST, correzione automatica dell’ora legale tramite radiocontrollo.
Nota1: quando il simbolo del radio controllo lampeggiante appare sul display non è possibile effettuare nessuna regolazione
manuale.
Nota2: quando il simbolo rimane acceso fisso significa che il segnale e’ stato correttamente ricevuto.
Nota3: l’orario viene trasmesso dalla Germania centrale, quindi se ci troviamo in un paese con orario diverso da quello
della Germania è necessario impostare il fuso orario manualmente.
Note4: posizionare la stazione meteo lontana da apparecchi che generano campi magnetici quali cellulari, televisori ecc....
Non in tutte le zone d’Europa può essere possibile ricevere il segnale del radiocontrollo. In questo caso è necessario
impostare l’ora manualmente.
REGOLAZIONE MANUALE DELL’OROLOGIO
1. Tenere premuto il tasto SET (B1) per entrare nella regolazione manuale dell’orologio.
2. Impostare la correzione UTC del fuso orario della vostra regione tramite i tasti UP (B2) o DOWN (B5). E’ possibile
selezionare tra -1, 0, +1(questa impostazione serve per una corretta ricezione dell’orario da radiocontrollo, per l’Italia
selezionare 0).
3. Premere il tasto SET (B1), sul display comincerà a lampeggiare la visualizzazione dell’orario in 12/24 ore.
4. Impostare la visualizzazione dell’orario in 12/24 ore tramite i tasti UP (B2) o DOWN (B5).
5. Premere il tasto SET (B1), sul display cominceranno a lampeggiare le ore.
6. Impostare le ore tramite i tasti UP (B2) o DOWN (B5).
7. Premere il tasto SET (B1), sul display cominceranno a lampeggiare i minuti.
8. Impostare i minuti tramite i tasti UP (B2) o DOWN (B5).
9. Premere il tasto SET (B1), sul display comincerà a lampeggiare l’anno.
10. Impostare l’anno tramite i tasti UP (B2) o DOWN (B5).
11. Premere il tasto SET (B1), sul display comincerà a lampeggiare il mese.
12. Impostare il mese tramite i tasti UP (B2) o DOWN (B5).
13. Premere il tasto SET (B1), sul display comincerà a lampeggiare il giorno.
14. Impostare il giorno tramite i tasti UP (B2) o DOWN (B5).
15. Premere il tasto SET (B1), sul display comincerà a lampeggiare la lingua in cui si desidera visualizzare il giorno corrente.
16. Impostare la lingua tramite i tasti UP (B2) o DOWN (B5).
17. Premere il tasto SET (B1) per terminare la regolazione manuale dell’orologio.
REGOLAZIONE DELL’ALLARME
1. Premere una volta il tasto SET(B1) per visualizzare l’Allarme (A15). Premerlo di nuovo per tornare a visualizzare l’ora corrente.
2. Durante la visualizzazione dell’allarme tenere premuto il tasto SET(B1),sul display l’ora d’allarme incomincia a lampeggiare.
3. Premere i tasti UP (B2) o DOWN (B5) per regolare l’ora.
4. Premere il tasto SET(B1), sul display i minuti dell’allarme incominciano a lampeggiare.
5. Premere i tasti UP (B2) o DOWN (B5) per regolare i minuti.
6. Premere il tasto SET(B1) per terminare la regolazione dell’allarme.
7. Per attivare l’allarme premere il tasto SET(B1); durante la visualizzazione dell’allarme premere i tasti UP (B2) o DOWN
(B5). Comparirà l’icona di una campana (A14) per indicare che l’allarme e’ attivo.
8. Per spegnere la suoneria dell’allarme premere un tasto qualsiasi. Se non disattivata, la suoneria si spegne automaticamente dopo 2 minuti.
2
Page 3

ME 3P20 RC
Italiano
PREVISIONI METEREOLOGICHE
Il barometro digitale rileva automaticamente le variazioni di pressione atmosferica visualizzando di conseguenza il simbolo
di previsione metereologica (A8). Tale previsione riguarda le 12/24 ore successive.
Per esempio: se il barometro rileva un’alta pressione, sul display apparirà il simbolo del sole, ma esternamente potrebbe
piovere, perchè la previsione riguarda le 12/24 ore successive.
Le previsioni metereologiche possono assumere 5 differenti visualizzazioni:
Soleggiato TemporalePioggiaNuvolosoParzialmente nuvoloso
N.B. I simboli di previsione metereologica possono non riflettere le attuali condizioni del tempo. Essi si riferiscono esclusivamente a condizioni future.
Le previsioni possono non essere sicure al 100% a causa di vari fattori.
Il costruttore non è responsabile di eventuali danni o situazioni causati da una previsione errata.
TEMPERATURA E UMIDITÀ INTERNA/ESTERNA - VALORI MIN/MAX - PRESSIONE BAROMETRICA
Nel riquadro IN (a destra) e’ indicata la temperature e umidita’ interna, nel riquadro OUT (a sinistra) e’ indicata la temperatura
e umidita’ rilevata dal sensore esterno.
Premere il tasto C/F (B6) per selezionare l’unità di misura della temperatura in °C o °F.
Valori minimi/massimi della giornata: premere il tasto MEM(B3), sul display viene mostrato il valore max di temperatura/
umidita’ registrati nella giornata; premere di nuovo il tasto MEM(B3), viene mostrato il valore minimo di temperatura/umidita’.
Durante la visualizzazione dei valori minimi/massimi, premendo a lungo il tasto MEM(B3) vengono cancellati i dati registrati
e si avvia un nuovo calcolo dei valori medi quotidiani.
Valore della pressione atmosferica: premere il tasto BARO(B4), nel riquadro A15 e A13 verra’ visualizzato il valore di
pressione corrente hPa. Premere di nuovo il tasto BARO(B4) per tornare a visualizzare la data.
Premendo a lungo il tasto BARO(B4) e’ possibile regolare il valore della pressione atmosferica per ottenere una migliore
indicazione delle previsioni meteo.
REGOLAZIONE DELLA RETROILLUMINAZIONE
Con alimentazione a batterie la retroilluminazione del display si attiva ogni volta che si preme un tasto per poi spegnersi
automaticamente dopo 8 secondi.
Con alimentazione da alimentatore esterno, la retroilluminazione e’ sempre attiva; premere a lungo il tasto BL(B6) fino ad
udire un beep per attivare lo spegnimento della retroilluminazione automatica dopo 8 secondi. Premerlo di nuovo a lungo
per riattivare la retroillumiazione sempre accesa.
RIPRISTINO DELLA STAZIONE METEO
In caso di funzionamento anomalo premere il tasto RST(B7) per ripristinare il corretto funzionamento (verranno perse le
impostazioni effettuate).
DATI TECNICI
Stazione meteo: ............................da -10°C a +50°C
Umidità interna: .............................da 20% a 95%
Sensore esterno: ........................... da -40°C a +60°C
Canali: ..........................................max. 3 sensori esterni
Ricezione segnale radio controllo: .77,5 KHz
Trasmissione: ...............................30m, RF 433MHz, 10mW
Avanzamento unitario: ...................0,1°C per la temperatura - 1% per l’umidità
Alimentazione unità principale:.......2xAAA batterie (non fornite) - Alimentatore 230V 50Hz / 5V 1A in dotazione
Alimentazione sensore esterno: ..... 2xAAA batterie (non fornite)
3
Page 4

ME 3P20 RC
English
DESCRIPTION OF CONTROL
A1. RCC radio control icon
A2. External temperature
A3. MAX / MIN memory
A4. External sensor signal icon
A5. External sensor transmission channel
A6. External humidity
A7. External sensor low battery indication
A8. Weather forecast
A9. Internal humidity
A10. Internal temperature
A11. Weather station low battery indication
A12. Daters
A13. Time zone / Time zone
A14. Active alarm icon
A15. Clock / Alarm Time
B1. SET / AL SET button
B2. UP / CH button
B3. MEM key
B4. BARO button
B5. DOWN / RCC button
B6. C / F / BL key
B7. RST button
B8. 5V
B9. 2x 1.5V AAA battery compartment (batteries not supplied)
C1. Hole for wall installation
C2. Operating indicator LED
C3. 2x 1.5V AAA battery compartment (batteries not supplied)
C4. Transmission channel selector
C5. TX key, data transmission
1A power connector
WEATHER STATION
Open the battery compartment (B9) on the back of the appliance and insert two “AAA” size batteries observing the indicated
polarities.
Alternatively, insert the socket of the external power supply into socket B8, insert the power supply into a mains socket.
EXTERNAL SENSOR
Open the battery compartment (C3) on the back of the appliance, and insert two “AAA” size batteries observing the indicated
polarities.
Note: the display of the A7 or A11 icons indicates that the batteries of the external sensor or weather station are low.
EXTERNAL SENSOR SETUP
This weather station is set up to communicate with three external sensors. One of these is supplied with the appliance, the
remaining two are optional.
1. Power the weather station as described in the paragraph “WEATHER STATION”.
2. Insert the batteries in the external sensor, place the selector (C4) on the desired transmission channel (1, 2 or 3). The
data will be automatically transmitted to the weather station.
3. Press the UP / CH (B2) button repeatedly to select the channel set on the external sensor. In sequence, channel 1, channel
2, channel 3 or the sequential display of the 3 channels (rotating arrow icon) is selected. If the signal is not received,
the character is shown on the display.
Note: in case of lack of communication between the weather station and the external sensor it is necessary to press the UP
key (B2) for a long time until the signal reception icon appears on the display from the external sensor. It is then necessary
to wait a few minutes for the connection to be made. Alternatively, it is necessary to repeat steps 1 to 3 described above.
Note: Position the weather station away from devices that generate magnetic fields such as mobile phones, televisions, etc.
4
Page 5

ME 3P20 RC
English
TIME DISPLAY BY RADIO CONTROL
This device is equipped with a receiver capable of receiving the time signal of the Physikalisch Technische Bundesanstalt
Braunschweig (central Germany) receivable within a radius of 1500Km.
1. Press and hold the DOWN / RCC button (B5) of the weather station, the symbol (A1) of the radio control will flash and
within 24 hours the time signal of the radio control will be displayed.
This weather station is also equipped with DST function, automatic correction of daylight saving time via radio control.
Note1: when the flashing radio control symbol appears on the display, no manual adjustment is possible.
Note2: when the symbol remains on, it means that the signal has been correctly received.
Note3: the time is transmitted from central Germany, so if we are in a country with a different time than Germany it is
necessary to set the time zone manually.
Note4: position the weather station away from devices that generate magnetic fields such as mobile phones, televisions, etc.
Not all areas of Europe may be able to receive the radio control signal. In this case it is necessary to set the time manually.
CLOCK MANUAL ADJUSTMENT
1. Press and hold the SET button (B1) to enter manual clock adjustment.
2. Set the UTC correction of the time zone of your region using the UP (B2) or DOWN (B5) keys. It is possible to select
between -1, 0, +1 (this setting is used to correctly receive the time from radio control, for Italy select 0).
3. Press the SET button (B1), the display will start to flash in 12/24 hours on the display.
4. Set the time display in 12/24 hours using the UP (B2) or DOWN (B5) keys.
5. Press the SET button (B1), the hours will start to flash on the display.
6. Set the hours using the UP (B2) or DOWN (B5) keys.
7. Press the SET button (B1), the minutes will start to flash on the display.
8. Set the minutes using the UP (B2) or DOWN (B5) keys.
9. Press the SET button (B1), the year will begin to flash on the display.
10. Set the year using the UP (B2) or DOWN (B5) keys.
11. Press the SET button (B1), the month will begin to flash on the display.
12. Set the month using the UP (B2) or DOWN (B5) keys.
13. Press the SET button (B1), the day will begin to flash on the display.
14. Set the day using the UP (B2) or DOWN (B5) keys.
15. Press the SET key (B1), the language in which you want to display the current day will start to flash on the display.
16. Set the language using the UP (B2) or DOWN (B5) keys.
17. Press the SET button (B1) to end manual clock adjustment.
ALARM ADJUSTMENT
1. Press the SET button (B1) once to display the Alarm (A15). Press it again to return to displaying the current time.
2. While the alarm is displayed, keep the SET key (B1) pressed, the alarm time on the display starts to flash.
3. Press the UP (B2) or DOWN (B5) keys to adjust the time.
4. Press the SET button (B1), the minutes of the alarm will start to flash on the display.
5. Press the UP (B2) or DOWN (B5) keys to set the minutes.
6. Press the SET button (B1) to end the alarm adjustment.
7. To activate the alarm, press the SET button (B1); while the alarm is displayed, press the UP (B2) or DOWN (B5) keys. A
bell icon (A14) will appear to indicate that the alarm is active.
8. To turn off the alarm ringtone, press any key. If not deactivated, the ringer automatically turns off after 2 minutes.
5
Page 6
ME 3P20 RC
English
WEATHER FORECAST
The digital barometer automatically detects changes in atmospheric pressure and consequently displays the weather forecast
symbol (A8). This forecast concerns the following 12/24 hours.
For example: if the barometer detects a high pressure, the sun symbol will appear on the display, but outside it may rain,
because the forecast is for the next 12/24 hours.
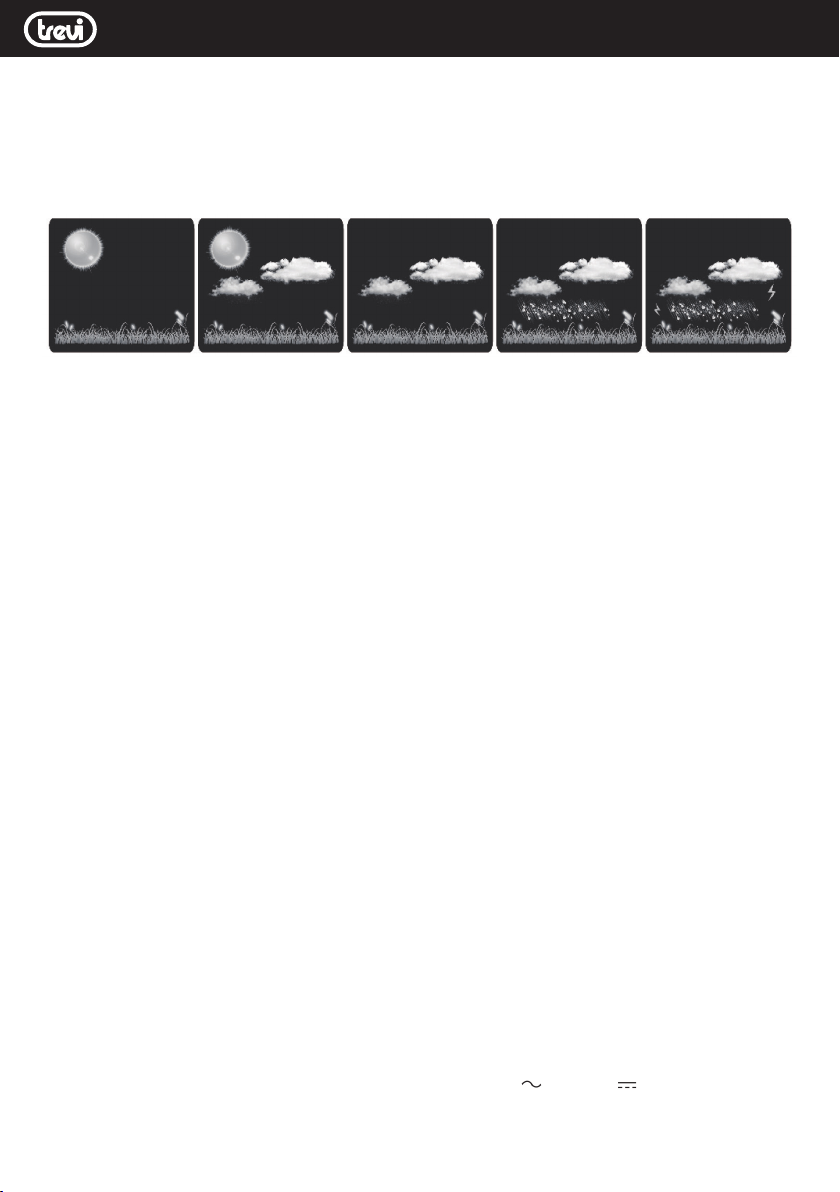
Weather forecasts can take 5 different views:
Sunny StormyRainyCloudyPartly claudy
N.B. Weather forecast symbols may not reflect current weather conditions. They refer only to future conditions.
Forecasts may not be 100% safe due to various factors.
The manufacturer is not responsible for any damage or situations caused by an incorrect forecast.
TEMPERATURE AND INTERNAL / EXTERNAL HUMIDITY - MIN / MAX VALUES - BAROMETRIC PRESSURE
In the IN box (on the right) the temperature and internal humidity are indicated, in the OUT box (on the left) the temperature
and humidity indicated by the external sensor is indicated.
Press the C / F (B6) button to select the temperature unit in ° C or ° F.
Minimum / maximum values of the day: press the MEM key (B3), the display shows the maximum temperature / humidity
value recorded during the day; press the MEM key (B3) again, the minimum temperature / humidity value is shown.
While displaying the minimum / maximum values, pressing the MEM key (B3) for a long time deletes the recorded data and
starts a new calculation of the average daily values.
Atmospheric pressure value: press the BARO key (B4), in the A15 and A13 box the current pressure value hPa will be
displayed. Press the BARO button (B4) again to return to the date display.
By long pressing the BARO key (B4) it is possible to adjust the atmospheric pressure value to obtain a better indication of
the weather forecast.
ADJUSTMENT OF THE BACKLIGHT
With battery power the backlight of the display is activated every time a key is pressed and then it turns off automatically
after 8 seconds.
With power supply from external power supply, the backlight is always active; press the BL key (B6) for a long time until
you hear a beep to activate the automatic backlight turn-off after 8 seconds. Press it again a long time to reactivate the
backlight always on.
RESTORATION OF THE WEATHER STATION
In the event of abnormal operation, press the RST key (B7) to restore correct operation (the settings made will be lost).
TECHNICAL DATA
Weather station: ............................................................................... from -10 ° C to + 50 ° C
Internal humidity: .............................................................................. from 20% to 95%
External sensor: ............................................................................... from -40 ° C to + 60 ° C
Channels: ............................................................................... max. 3 external sensors
Radio control signal reception: .......................................................... 77.5 KHz
Transmission: ............................................................................... 30m, RF 433MHz, 10mW
Unit feed rate: ............................................................................... 0.1 ° C for temperature - 1% for humidity
Main unit power supply: .................................................................... 2xAAA batteries (not supplied)
............................................................................... 230V 50Hz / 5V 1A power supply included
External sensor power supply: ........................................................... 2xAAA batteries (not supplied)
6
Page 7

ME 3P20 RC
Français
DESCRIPTION DES COMMANDES
A1. Commande radio RCC
A2. Température extérieure
A3. Mémoire MAX / MIN
A4. Icône de signal du capteur externe
A5. Canal de transmission du capteur externe
A6. Humidité extérieure
A7. Indication de batterie faible du capteur externe
A8. Prévisions météorologiques
A9. Humidité interne
A10. Température interne
A11. Indication de batterie faible de la station météo
A12. Daters
A13. Fuseau horaire / Fuseau horaire
A14. Icône d’alarme active
A15. Horloge / Heure d’alarme
B1. Touche SET / AL SET
B2. Touche UP / CH
B3. Touche MEM
B4. Bouton BARO
B5. Bouton DOWN / RCC
B6. Touche C / F / BL
B7. Bouton RST
B8. Connecteur d’alimentation 5V
B9. Compartiment à piles 2x 1,5V AAA (piles non fournies)
C1. Trou pour installation murale
C2. Voyant de fonctionnement LED
C3. Compartiment à piles 2x 1,5V AAA (piles non fournies)
C4. Sélecteur de canal de transmission
C5. Touche TX, transmission de données
1A
ALIMENTATION DE LA STATION MÉTÉO
Ouvrez le compartiment à piles (B9) à l’arrière de l’appareil et insérez deux piles de taille “AAA” en respectant les polarités
indiquées.
Alternativement, insérez la prise de l’alimentation externe dans la prise B8, insérez l’alimentation dans une prise secteur.
ALIMENTATION DE CAPTEUR EXTERNE
Ouvrez le compartiment à piles (C3) à l’arrière de l’appareil et insérez deux piles de taille “AAA” en respectant les polarités
indiquées.
Remarque: l’affichage des icônes A7 ou A11 indique que les piles du capteur externe ou de la station météo sont faibles.
CONFIGURATION DU CAPTEUR EXTERNE
Cette station météo est configurée pour communiquer avec trois capteurs externes. L’un d’eux est fourni avec l’appareil,
les deux autres sont en option.
1. Alimentez la station météo comme décrit au paragraphe “STATION MÉTÉO”.
2. Insérez les piles dans le capteur externe, placez le sélecteur (C4) sur le canal de transmission souhaité (1, 2 ou 3). Les
données seront transmises automatiquement à la station météo.
3. Appuyez plusieurs fois sur le bouton UP / CH (B2) pour sélectionner le canal défini sur le capteur externe. En séquence,
le canal 1, le canal 2, le canal 3 ou l’affichage séquentiel des 3 canaux (icône de flèche rotative) est sélectionné. Si le
signal n’est pas reçu, le caractère s’affiche à l’écran.
Remarque: en cas de manque de communication entre la station météo et le capteur externe, il est nécessaire d’appuyer
longuement sur la touche UP (B2) jusqu’à ce que l’icône de réception du signal apparaisse sur l’écran du capteur externe.
Il faut alors attendre quelques minutes que la connexion soit établie. Alternativement, il est nécessaire de répéter les étapes
1 à 3 décrites ci-dessus.
7
Page 8

ME 3P20 RC
Français
AFFICHAGE DE L’HEURE PAR RADIOCOMMANDE
Cet appareil est équipé d’un récepteur capable de recevoir le signal horaire de la Physikalisch Technische Bundesanstalt
Braunschweig (centre de l’Allemagne) pouvant être reçu dans un rayon de 1500 km.
1. Appuyez sur le bouton DOWN / RCC (B5) de la station météo et maintenez-le enfoncé, le symbole (A1) de la radiocommande clignote et dans les 24 heures, le signal horaire de la radiocommande s’affiche.
Cette station météo est également équipée de la fonction DST, correction automatique de l’heure d’été via la radiocommande.
Remarque 1: lorsque le symbole de la radiocommande clignotant apparaît à l’écran, aucun réglage manuel n’est possible.
Remarque 2: lorsque le symbole reste allumé, cela signifie que le signal a été correctement reçu.
Note3: l’heure est transmise depuis le centre de l’Allemagne, donc si nous sommes dans un pays avec une heure différente
de l’Allemagne, il est nécessaire de régler le fuseau horaire manuellement.
Remarque 4: éloignez la station météo des appareils générant des champs magnétiques tels que les téléphones portables,
les téléviseurs, etc.
Toutes les régions d’Europe ne peuvent pas recevoir le signal de radiocommande. Dans ce cas, il est nécessaire de régler
l’heure manuellement.
RÉGLAGE MANUEL DE L’HORLOGE
1. Appuyez sur le bouton SET (B1) et maintenez-le enfoncé pour accéder au réglage manuel de l’horloge.
2. Réglez la correction UTC du fuseau horaire de votre région à l’aide des touches UP (B2) ou DOWN (B5). Il est possible
de sélectionner entre -1, 0, +1 (ce paramètre est utilisé pour recevoir correctement l’heure de la radiocommande, pour
l’Italie sélectionnez 0).
3. Appuyez sur le bouton SET (B1), l’affichage commencera à clignoter dans 12/24 heures sur l’affichage.
4. Réglez l’affichage de l’heure sur 12/24 heures à l’aide des touches UP (B2) ou DOWN (B5).
5. Appuyez sur le bouton SET (B1), les heures commenceront à clignoter sur l’affichage.
6. Réglez les heures à l’aide des touches UP (B2) ou DOWN (B5).
7. Appuyez sur le bouton SET (B1), les minutes commenceront à clignoter sur l’affichage.
8. Réglez les minutes à l’aide des touches UP (B2) ou DOWN (B5).
9. Appuyez sur le bouton SET (B1), l’année commencera à clignoter sur l’affichage.
10. Réglez l’année à l’aide des touches UP (B2) ou DOWN (B5).
11. Appuyez sur le bouton SET (B1), le mois commencera à clignoter sur l’affichage.
12. Réglez le mois à l’aide des touches UP (B2) ou DOWN (B5).
13. Appuyez sur le bouton SET (B1), le jour commencera à clignoter sur l’affichage.
14. Réglez le jour à l’aide des touches UP (B2) ou DOWN (B5).
15. Appuyez sur la touche SET (B1), la langue dans laquelle vous souhaitez afficher le jour actuel commencera à clignoter
sur l’affichage.
16. Définissez la langue à l’aide des touches UP (B2) ou DOWN (B5).
17. Appuyez sur le bouton SET (B1) pour terminer le réglage manuel de l’horloge.
RÉGLAGE DE L’ALARME
1. Appuyez une fois sur le bouton SET (B1) pour afficher l’alarme (A15). Appuyez à nouveau pour revenir à l’affichage de
l’heure actuelle.
2. Pendant que l’alarme est affichée, maintenez la touche SET (B1) enfoncée, l’heure de l’alarme sur l’affichage commence
à clignoter.
3. Appuyez sur les touches UP (B2) ou DOWN (B5) pour régler l’heure.
4. Appuyez sur le bouton SET (B1), les minutes de l’alarme commenceront à clignoter sur l’affichage.
5. Appuyez sur les touches UP (B2) ou DOWN (B5) pour régler les minutes.
6. Appuyez sur le bouton SET (B1) pour terminer le réglage de l’alarme.
7. Pour activer l’alarme, appuyez sur le bouton SET (B1); pendant que l’alarme est affichée, appuyez sur les touches HAUT
(B2) ou BAS (B5). Une icône de cloche (A14) apparaîtra pour indiquer que l’alarme est active.
8. Pour désactiver la sonnerie d’alarme, appuyez sur n’importe quelle touche. S’il n’est pas désactivé, la sonnerie s’éteint
automatiquement au bout de 2 minutes.
8
Page 9
ME 3P20 RC
Français
PRÉVISIONS MÉTÉOROLOGIQUES
Le baromètre numérique détecte automatiquement les changements de pression atmosphérique et affiche par conséquent
le symbole de prévision météorologique (A8). Cette prévision concerne les 12/24 heures suivantes.
Par exemple: si le baromètre détecte une haute pression, le symbole du soleil apparaîtra sur l’affichage, mais à l’extérieur
il peut pleuvoir, car la prévision est pour les 12/24 prochaines heures.
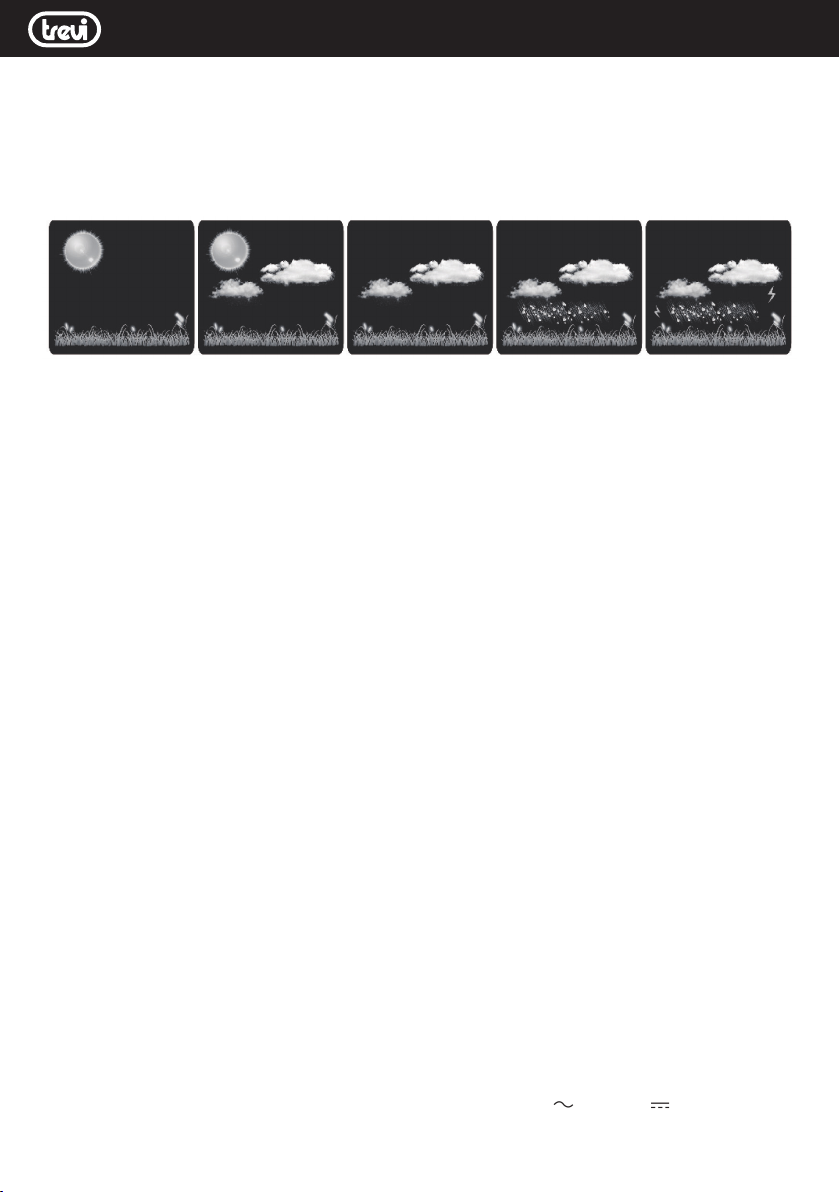
Les prévisions météorologiques peuvent prendre 5 vues différentes:
N.B. Les symboles des prévisions météorologiques peuvent ne pas refléter les conditions météorologiques actuelles. Ils
se réfèrent uniquement aux conditions futures.
Les prévisions peuvent ne pas être sûres à 100% en raison de divers facteurs.
Le fabricant n’est pas responsable des dommages ou des situations causés par une prévision incorrecte.
TEMPÉRATURE ET HUMIDITÉ INTERNE / EXTERNE - VALEURS MIN / MAX - PRESSION BAROMÉTRIQUE
Dans la case IN (à droite) la température et l’humidité interne sont indiquées, dans la case OUT (à gauche) la température
et l’humidité indiquées par le capteur externe sont indiquées.
Appuyez sur le bouton C / F (B6) pour sélectionner l’unité de température en ° C ou ° F.
Valeurs minimales / maximales du jour: appuyez sur la touche MEM (B3), l’écran affiche la valeur maximale de température
/ humidité enregistrée pendant la journée; appuyez à nouveau sur la touche MEM (B3), la valeur minimale de température
/ humidité s’affiche.
Pendant l’affichage des valeurs minimales / maximales, une pression prolongée sur la touche MEM (B3) supprime les
données enregistrées et démarre un nouveau calcul des valeurs quotidiennes moyennes.
Valeur de pression atmosphérique: appuyez sur la touche BARO (B4), dans la case A15 et A13 la valeur de pression actuelle
hPa sera affichée. Appuyez à nouveau sur le bouton BARO (B4) pour revenir à l’affichage de la date.
En appuyant longuement sur la touche BARO (B4), il est possible d’ajuster la valeur de la pression atmosphérique pour
obtenir une meilleure indication des prévisions météorologiques.
RÉGLAGE DU RÉTROÉCLAIRAGE
Lorsque la batterie est alimentée, le rétroéclairage de l’écran est activé à chaque pression sur une touche, puis il s’éteint
automatiquement après 8 secondes.
Avec une alimentation provenant d’une alimentation externe, le rétroéclairage est toujours actif; appuyez longuement sur
la touche BL (B6) jusqu’à ce que vous entendiez un bip pour activer l’extinction automatique du rétroéclairage après 8
secondes. Appuyez de nouveau longuement pour réactiver le rétroéclairage toujours allumé.
RESTAURATION DE LA STATION MÉTÉO
En cas de fonctionnement anormal, appuyez sur la touche RST (B7) pour rétablir le bon fonctionnement (les réglages
effectués seront perdus).
DONNÉES TECHNIQUES
Station météo: ............................................................................... de -10 ° C à + 50 ° C
Humidité interne: ............................................................................... de 20% à 95%
Capteur externe: ............................................................................... de -40 ° C à + 60 ° C
Canaux: ............................................................................... max. 3 capteurs externes
Réception du signal de commande radio: .......................................... 77,5 KHz
Transmission: ............................................................................... 30 m, RF 433 MHz, 10 mW
Débit d’alimentation de l’unité: ........................................................... 0,1 ° C pour la température - 1% pour l’humidité
Alimentation de l’unité principale: 2 piles AAA (non fournies) - Alimentation 230V 50Hz / 5V 1A incluse
Alimentation du capteur externe: ........................................................ 2 piles AAA (non fournies)
9
Page 10

ME 3P20 RC
Deutsch
BESCHREIBUNG DER KONTROLLE
A1. RCC-Funksteuerung
A2. Außentemperatur
A3. MAX / MIN-Speicher
A4. Symbol für externes Sensorsignal
A5. Übertragungskanal für externen Sensor
A6. Außenluftfeuchtigkeit
A7. Anzeige für niedrigen Batteriestand des externen Sensors
A8. Wettervorhersage
A9. Innenfeuchtigkeit
A10. Innentemperatur
A11. Anzeige für niedrigen Batteriestand der Wetterstation
A12. Daten
A13. Zeitzone / Zeitzone
A14. Aktives Alarmsymbol
A15. Uhr / Weckzeit
B1. SET / AL SET-Taste
B2. UP / CH-Taste
B3. MEM-Taste
B4. BARO-Taste
B5. DOWN / RCC-Taste
B6. C / F / BL-Taste
B7. RST-Taste
B8. 5V 1A Stromanschluss
B9. 2x 1,5 V AAA-Batteriefach (Batterien nicht im Lieferumfang enthalten)
C1. Loch für Wandmontage
C2. Betriebsanzeige-LED
C3. 2x 1,5 V AAA-Batteriefach (Batterien nicht im Lieferumfang enthalten)
C4. Übertragungskanal-Wahlschalter
C5. TX-Taste, Datenübertragung
WETTERSTATION STROMVERSORGUNG
Öffnen Sie das Batteriefach (B9) auf der Rückseite des Geräts und legen Sie zwei Batterien der Größe “AAA” unter Beachtung
der angegebenen Polaritäten ein.
Alternativ stecken Sie die Buchse des externen Netzteils in die Buchse B8, stecken Sie das Netzteil in eine Netzsteckdose.
EXTERNE SENSORVERSORGUNG
Öffnen Sie das Batteriefach (C3) auf der Rückseite des Geräts und legen Sie zwei Batterien der Größe “AAA” unter Beachtung
der angegebenen Polaritäten ein.
Hinweis: Die Anzeige der Symbole A7 oder A11 zeigt an, dass die Batterien des externen Sensors oder der Wetterstation
schwach sind.
EXTERNAL SENSOR SETUP
Diese Wetterstation ist für die Kommunikation mit drei externen Sensoren eingerichtet. Eine davon wird mit dem Gerät
geliefert, die anderen beiden sind optional.
1. Schalten Sie die Wetterstation wie im Abschnitt “WETTERSTATION” beschrieben ein.
2. Legen Sie die Batterien in den externen Sensor ein und stellen Sie den Wahlschalter (C4) auf den gewünschten Übertragungskanal (1, 2 oder 3). Die Daten werden automatisch an die Wetterstation übertragen.
3. Drücken Sie wiederholt die Taste UP / CH (B2), um den am externen Sensor eingestellten Kanal auszuwählen. In der
Reihenfolge wird Kanal 1, Kanal 2, Kanal 3 oder die sequentielle Anzeige der 3 Kanäle (rotierendes Pfeilsymbol)
ausgewählt. Wird das Signal nicht empfangen, wird das Zeichen im Display angezeigt.
Hinweis: Bei fehlender Kommunikation zwischen Wetterstation und externem Sensor muss die UP-Taste (B2) so lange
gedrückt werden, bis das Symbol für den Signalempfang auf dem Display des externen Sensors angezeigt wird. Es
ist dann notwendig, einige Minuten zu warten, bis die Verbindung hergestellt ist. Alternativ ist es notwendig, die oben
10
Page 11

ME 3P20 RC
beschriebenen Schritte 1 bis 3 zu wiederholen.
Hinweis: Stellen Sie die Wetterstation nicht in der Nähe von Geräten auf, die Magnetfelder erzeugen, z. B. Mobiltelefone,
Fernseher usw.
Deutsch
ZEITANZEIGE DURCH FUNKSTEUERUNG
Dieses Gerät ist mit einem Empfänger ausgestattet, der das Zeitsignal der Physikalisch Technischen Bundesanstalt Braunschweig empfangen kann, das im Umkreis von 1500 km empfangen werden kann.
1. Halten Sie die DOWN / RCC-Taste (B5) der Wetterstation gedrückt, das Symbol (A1) der Funksteuerung blinkt und innerhalb
von 24 Stunden wird das Zeitsignal der Funksteuerung angezeigt.
Diese Wetterstation ist auch mit einer Sommerzeitfunktion ausgestattet, die die Sommerzeit automatisch über eine Funksteuerung korrigiert.
Hinweis 1: Wenn das blinkende Symbol für die Funksteuerung im Display angezeigt wird, ist keine manuelle Einstellung
möglich.
Hinweis 2: Wenn das Symbol weiterhin leuchtet, bedeutet dies, dass das Signal korrekt empfangen wurde.
Hinweis 3: Die Uhrzeit wird von Mitteldeutschland aus übertragen. Wenn Sie sich also in einem Land befinden, dessen
Uhrzeit von der deutschen Zeit abweicht, müssen Sie die Zeitzone manuell einstellen.
Hinweis 4: Stellen Sie die Wetterstation nicht in der Nähe von Geräten auf, die Magnetfelder erzeugen, z. B. Mobiltelefone,
Fernseher usw.
Möglicherweise können nicht alle Regionen Europas das Funksignal empfangen. In diesem Fall muss die Uhrzeit manuell
eingestellt werden.
UHR MANUELLE EINSTELLUNG
1. Halten Sie die SET-Taste (B1) gedrückt, um die manuelle Uhreinstellung aufzurufen.
2. Stellen Sie die UTC-Korrektur der Zeitzone Ihrer Region mit den Tasten UP (B2) oder DOWN (B5) ein. Sie können zwischen
-1, 0 und +1 wählen (diese Einstellung wird verwendet, um die Uhrzeit von der Funksteuerung korrekt zu empfangen,
für Italien wählen Sie 0).
3. Drücken Sie die SET-Taste (B1). Die Anzeige beginnt nach 12/24 Stunden auf dem Display zu blinken.
4. Stellen Sie die Zeitanzeige mit den Tasten UP (B2) oder DOWN (B5) auf 12/24 Stunden ein.
5. Drücken Sie die SET-Taste (B1). Die Stunden beginnen im Display zu blinken.
6. Stellen Sie die Stunden mit den Tasten UP (B2) oder DOWN (B5) ein.
7. Drücken Sie die SET-Taste (B1). Die Minuten beginnen im Display zu blinken.
8. Stellen Sie die Minuten mit den Tasten UP (B2) oder DOWN (B5) ein.
9. Drücken Sie die SET-Taste (B1). Die Jahreszahl beginnt im Display zu blinken.
10. Stellen Sie das Jahr mit den Tasten UP (B2) oder DOWN (B5) ein.
11. Drücken Sie die SET-Taste (B1). Der Monat beginnt im Display zu blinken.
12. Stellen Sie den Monat mit den Tasten UP (B2) oder DOWN (B5) ein.
13. Drücken Sie die SET-Taste (B1). Der Tag beginnt im Display zu blinken.
14. Stellen Sie den Tag mit den Tasten UP (B2) oder DOWN (B5) ein.
15. Drücken Sie die SET-Taste (B1). Die Sprache, in der Sie den aktuellen Tag anzeigen möchten, beginnt im Display zu blinken.
16. Stellen Sie die Sprache mit den Tasten UP (B2) oder DOWN (B5) ein.
17. Drücken Sie die SET-Taste (B1), um die manuelle Uhreinstellung zu beenden.
ALARMEINSTELLUNG
1. Drücken Sie die SET-Taste (B1) einmal, um den Alarm (A15) anzuzeigen. Drücken Sie erneut, um zur Anzeige der aktuellen
Uhrzeit zurückzukehren.
2. Während der Alarm angezeigt wird, halten Sie die SET-Taste (B1) gedrückt. Die Alarmzeit auf dem Display beginnt zu blinken.
3. Drücken Sie die Tasten UP (B2) oder DOWN (B5), um die Zeit einzustellen.
4. Drücken Sie die SET-Taste (B1). Die Minuten des Alarms beginnen im Display zu blinken.
5. Drücken Sie die Tasten UP (B2) oder DOWN (B5), um die Minuten einzustellen.
6. Drücken Sie die SET-Taste (B1), um die Alarmeinstellung zu beenden.
7. Um den Alarm zu aktivieren, drücken Sie die SET-Taste (B1); Während der Alarm angezeigt wird, drücken Sie die Tasten
UP (B2) oder DOWN (B5). Ein Glockensymbol (A14) zeigt an, dass der Alarm aktiv ist.
8. Um den Alarmton auszuschalten, drücken Sie eine beliebige Taste. Wenn nicht deaktiviert, wird der Rufton nach 2 Minuten
automatisch ausgeschaltet.
11
Page 12

ME 3P20 RC
Deutsch
WETTERVORHERSAGE
Das digitale Barometer erkennt automatisch Änderungen des Luftdrucks und zeigt infolgedessen das WettervorhersageSymbol (A8) an. Diese Vorhersage betrifft die folgenden 12/24 Stunden.
Beispiel: Wenn das Barometer einen hohen Druck feststellt, wird das Sonnensymbol auf dem Display angezeigt. Draußen
kann es jedoch regnen, da die Vorhersage für die nächsten 12/24 Stunden gilt.
Wettervorhersagen können 5 verschiedene Ansichten haben:
N.B. Die Wettervorhersage-Symbole spiegeln möglicherweise nicht die aktuellen Wetterbedingungen wider. Sie beziehen
sich nur auf zukünftige Bedingungen.
Prognosen sind aufgrund verschiedener Faktoren möglicherweise nicht 100% sicher.
Der Hersteller haftet nicht für Schäden oder Situationen, die durch eine falsche Vorhersage verursacht wurden.
TEMPERATUR UND INTERNE / EXTERNE FEUCHTIGKEIT - MIN / MAX-WERTE - BAROMETRISCHER DRUCK
In der IN-Box (rechts) werden die Temperatur und die innere Luftfeuchtigkeit angezeigt, in der OUT-Box (links) die Temperatur
und die Feuchtigkeit, die vom externen Sensor angezeigt werden.
Drücken Sie die Taste C / F (B6), um die Temperatureinheit in ° C oder ° F auszuwählen.
Minimal- / Maximalwerte des Tages: Drücken Sie die MEM-Taste (B3). Das Display zeigt den maximalen Temperatur- / Feuchtigkeitswert an, der während des Tages aufgezeichnet wurde. Drücken Sie die MEM-Taste (B3) erneut, um den minimalen
Temperatur- / Feuchtigkeitswert anzuzeigen.
Während der Anzeige der Minimal- / Maximalwerte werden durch langes Drücken der Taste MEM (B3) die aufgezeichneten
Daten gelöscht und eine neue Berechnung der durchschnittlichen Tageswerte gestar tet.
Atmosphärendruckwert: Drücken Sie die BARO-Taste (B4). In den Feldern A15 und A13 wird der aktuelle Druckwert hPa
angezeigt. Drücken Sie die BARO-Taste (B4) erneut, um zur Datumsanzeige zurückzukehren.
Durch langes Drücken der BARO-Taste (B4) kann der Luftdruckwert angepasst werden, um eine bessere Anzeige der
Wettervorhersage zu erhalten.
EINSTELLUNG DER HINTERGRUNDBELEUCHTUNG
Bei Batteriebetrieb wird die Hintergrundbeleuchtung des Displays bei jedem Tastendruck aktiviert und schaltet sich nach 8
Sekunden automatisch aus.
Bei Stromversorgung über externes Netzteil ist die Hintergrundbeleuchtung immer aktiv. Drücken Sie die BL-Taste (B6) so
lange, bis Sie einen Piepton hören, um die automatische Abschaltung der Hintergrundbeleuchtung nach 8 Sekunden zu
aktivieren. Drücken Sie die Taste erneut lange, um die Hintergrundbeleuchtung wieder einzuschalten.
WIEDERHERSTELLUNG DER WETTERSTATION
Drücken Sie im Falle eines abnormalen Betriebs die RST-Taste (B7), um den korrekten Betrieb wiederherzustellen (die
vorgenommenen Einstellungen gehen verloren).
TECHNISCHE DATEN
Wetterstation: ............................................................................... von -10 ° C bis + 50 ° C
Innenfeuchtigkeit: .............................................................................. von 20% bis 95%
Externer Sensor: ............................................................................... von -40 ° C bis + 60 ° C
Kanäle: ............................................................................... max. 3 externe Sensoren
Empfang des Funksignals: ................................................................. 77,5 kHz
Übertragung: ............................................................................... 30 m, RF 433 MHz, 10 mW
Vorschubgeschwindigkeit: ................................................................. 0,1 ° C für Temperatur - 1% für Luftfeuchtigkeit
Stromversorgung der Haupteinheit: 2xAAA Batterien (nicht mitgeliefert) - 230V 50Hz / 5V 1A Netzteil enthalten
Externe Sensorversorgung: ............................................................... 2xAAA Batterien (nicht mitgeliefert)
12
Page 13

ME 3P20 RC
Español
DESCRIPCIÓN DE CONTROL
A1. Control de radio RCC
A2. Temperatura exterior
A3. Memoria MAX / MIN
A4. Icono de señal del sensor externo
A5. Canal de transmisión del sensor externo
A6. Humedad externa
A7. Indicación de batería baja del sensor externo
A8. Pronóstico del tiempo
A9. Humedad interna
A10. Temperatura interna
A11. Indicador de batería baja de estación meteorológica
A12. Fechadores
A13. Zona horaria / zona horaria
A14. Icono de alarma activa
A15. Hora de reloj / alarma
B1. Botón SET / AL SET
B2. Botón UP / CH
B3. Tecla MEM
B4. Botón BARO
B5. Botón DOWN / RCC
B6. Tecla C / F / BL
B7. Botón RST
B8. Conector de alimentación 5V 1A
B9. Compartimentos de batería 2 x AAA 1.5V (baterías no incluidas)
C1. Agujero para instalación en pared
C2. LED indicador de funcionamiento
C3. Compartimentos de batería 2 x AAA 1.5V (baterías no incluidas)
C4. Selector de canal de transmisión
C5. Tecla TX, transmisión de datos
FUENTE DE ALIMENTACIÓN
Abra el compartimento de la batería (B9) en la parte posterior del aparato e inserte dos baterías de tamaño “AAA” observando las polaridades indicadas.
Alternativamente, inserte la toma de la fuente de alimentación externa en la toma B8, inserte la fuente de alimentación en
una toma de corriente.
SUMINISTRO DE SENSOR EXTERNO
Abra el compartimento de la batería (C3) en la parte posterior del aparato e inserte dos baterías de tamaño “AAA” observando las polaridades indicadas.
Nota: la visualización de los iconos A7 o A11 indica que las baterías del sensor externo o la estación meteorológica están
bajas.
CONFIGURACIÓN DE SENSOR EXTERNO
Esta estación meteorológica está configurada para comunicarse con tres sensores externos. Uno de estos se suministra
con el aparato, los dos restantes son opcionales.
1. Encienda la estación meteorológica como se describe en el párrafo “ESTACIÓN METEOROLÓGICA”.
2. Inserte las baterías en el sensor externo, coloque el selector (C4) en el canal de transmisión deseado (1, 2 o 3). Los
datos se transmitirán automáticamente a la estación meteorológica.
3. Presione el botón UP / CH (B2) varias veces para seleccionar el canal configurado en el sensor externo. En secuencia,
se selecciona el canal 1, el canal 2, el canal 3 o la visualización secuencial de los 3 canales (icono de flecha giratoria).
Si no se recibe la señal, el carácter se muestra en la pantalla.
Nota: en caso de falta de comunicación entre la estación meteorológica y el sensor externo, es necesario presionar la
tecla UP (B2) durante mucho tiempo hasta que aparezca el icono de recepción de señal en la pantalla del sensor externo.
13
Page 14

ME 3P20 RC
Entonces es necesario esperar unos minutos para que se realice la conexión. Alternativamente, es necesario repetir los
pasos 1 a 3 descritos anteriormente.
Nota: Coloque la estación meteorológica lejos de dispositivos que generen campos magnéticos como teléfonos móviles,
televisores, etc.
Español
PANTALLA DE TIEMPO POR RADIO CONTROL
Este dispositivo está equipado con un receptor capaz de recibir la señal horaria del Physikalisch Technische Bundesanstalt
Braunschweig (centro de Alemania) por cobrar dentro de un radio de 1500 km.
1. Mantenga presionado el botón DOWN / RCC (B5) de la estación meteorológica, el símbolo (A1) del control de radio
parpadeará y dentro de las 24 horas se mostrará la señal horaria del control de radio.
Esta estación meteorológica también está equipada con la función DST, corrección automática del horario de verano a
través del control de radio.
Nota 1: cuando aparece el símbolo de control de radio parpadeante en la pantalla, no es posible realizar ningún ajuste manual.
Nota 2: cuando el símbolo permanece encendido, significa que la señal se ha recibido correctamente.
Nota 3: la hora se transmite desde el centro de Alemania, por lo que si estamos en un país con una hora diferente a la de
Alemania, es necesario establecer la zona horaria manualmente.
Nota 4: coloque la estación meteorológica lejos de dispositivos que generan campos magnéticos como teléfonos móviles,
televisores, etc.
No todas las áreas de Europa pueden recibir la señal de control de radio. En este caso, es necesario configurar la hora
manualmente.
AJUSTE MANUAL DEL RELOJ
1. Mantenga presionado el botón SET (B1) para ingresar el ajuste manual del reloj.
2. Configure la corrección UTC de la zona horaria de su región con las teclas UP (B2) o DOWN (B5). Es posible seleccionar entre -1, 0, +1 (esta configuración se utiliza para recibir correctamente el tiempo del control de radio, para Italia
seleccione 0).
3. Presione el botón SET (B1), la pantalla comenzará a parpadear en 12/24 horas en la pantalla.
4. Configure la visualización de la hora en 12/24 horas con las teclas UP (B2) o DOWN (B5).
5. Presione el botón SET (B1), las horas comenzarán a parpadear en la pantalla.
6. Configure las horas con las teclas UP (B2) o DOWN (B5).
7. Presione el botón SET (B1), los minutos comenzarán a parpadear en la pantalla.
8. Configure los minutos con las teclas UP (B2) o DOWN (B5).
9. Presione el botón SET (B1), el año comenzará a parpadear en la pantalla.
10. Configure el año con las teclas UP (B2) o DOWN (B5).
11. Presione el botón SET (B1), el mes comenzará a parpadear en la pantalla.
12. Configure el mes con las teclas UP (B2) o DOWN (B5).
13. Presione el botón SET (B1), el día comenzará a parpadear en la pantalla.
14. Configure el día con las teclas UP (B2) o DOWN (B5).
15. Presione la tecla SET (B1), el idioma en el que desea mostrar el día actual comenzará a parpadear en la pantalla.
16. Configure el idioma con las teclas UP (B2) o DOWN (B5).
17. Presione el botón SET (B1) para finalizar el ajuste manual del reloj.
AJUSTE DE ALARMA
1. Presione el botón SET (B1) una vez para visualizar la alarma (A15). Presiónelo nuevamente para volver a mostrar la
hora actual.
2. Mientras se muestra la alarma, mantenga presionada la tecla SET (B1), la hora de la alarma en la pantalla comienza a
parpadear.
3. Presione las teclas UP (B2) o DOWN (B5) para ajustar la hora.
4. Presione el botón SET (B1), los minutos de la alarma comenzarán a parpadear en la pantalla.
5. Presione las teclas UP (B2) o DOWN (B5) para configurar los minutos.
6. Presione el botón SET (B1) para finalizar el ajuste de la alarma.
7. Para activar la alarma, presione el botón SET (B1); Mientras se muestra la alarma, presione las teclas UP (B2) o DOWN
(B5). Aparecerá un icono de campana (A14) para indicar que la alarma está activa.
8. Para desactivar el tono de llamada de la alarma, presione cualquier tecla. Si no está desactivado, el timbre se apaga
automáticamente después de 2 minutos.
14
Page 15
ME 3P20 RC
Español
PRONÓSTICO DEL TIEMPO
El barómetro digital detecta automáticamente los cambios en la presión atmosférica y, en consecuencia, muestra el símbolo
del pronóstico del tiempo (A8). Este pronóstico se refiere a las siguientes 12/24 horas.
Por ejemplo: si el barómetro detecta una presión alta, aparecerá el símbolo del sol en la pantalla, pero afuera puede llover,
porque el pronóstico es para las próximas 12/24 horas.
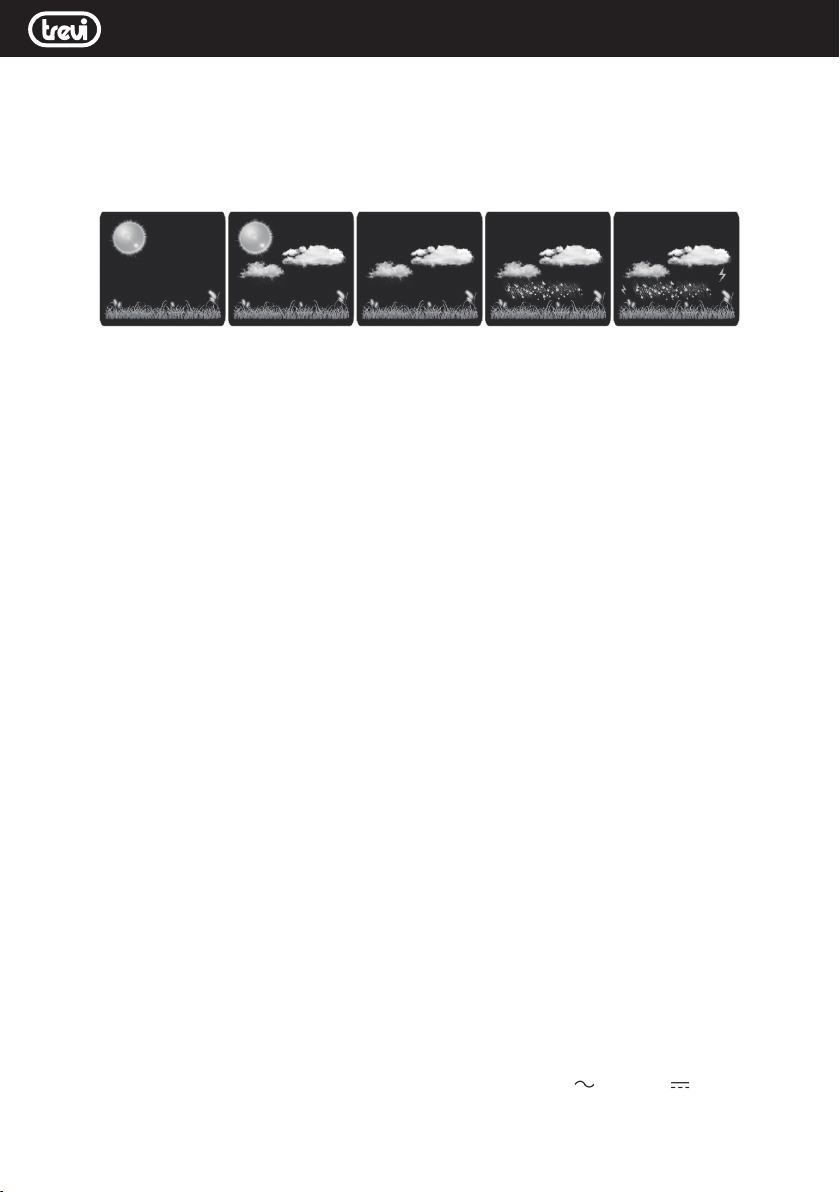
Los pronósticos del tiempo pueden tener 5 vistas diferentes:
nótese bien Los símbolos de pronóstico del tiempo pueden no reflejar las condiciones climáticas actuales. Se refieren
solo a condiciones futuras.
Los pronósticos pueden no ser 100% seguros debido a varios factores.
El fabricante no es responsable de ningún daño o situación causada por un pronóstico incorrecto.
TEMPERATURA Y HUMEDAD INTERNA / EXTERNA - VALORES MIN / MAX - PRESIÓN BAROMÉTRICA
En el cuadro de IN (a la derecha) se indican la temperatura y la humedad interna, en el cuadro de OUT (a la izquierda) se
indica la temperatura y la humedad indicadas por el sensor externo.
Presione el botón C / F (B6) para seleccionar la unidad de temperatura en ° C o ° F.
Valores mínimos / máximos del día: presione la tecla MEM (B3), la pantalla muestra el valor máximo de temperatura / humedad
registrado durante el día; presione la tecla MEM (B3) nuevamente, se muestra el valor mínimo de temperatura / humedad.
Mientras se muestran los valores mínimos / máximos, al presionar la tecla MEM (B3) durante mucho tiempo se eliminan
los datos grabados y se inicia un nuevo cálculo de los valores diarios promedio.
Valor de presión atmosférica: presione la tecla BARO (B4), en el cuadro A15 y A13 se mostrará el valor de presión actual
hPa. Presione el botón BARO (B4) nuevamente para volver a la visualización de la fecha.
Al presionar prolongadamente la tecla BARO (B4) es posible ajustar el valor de la presión atmosférica para obtener una
mejor indicación del pronóstico del tiempo.
AJUSTE DE LA LUZ DE FONDO
Con la energía de la batería, la luz de fondo de la pantalla se activa cada vez que se presiona una tecla y luego se apaga
automáticamente después de 8 segundos.
Con la fuente de alimentación de una fuente de alimentación externa, la luz de fondo siempre está activa; presione la tecla
BL (B6) durante mucho tiempo hasta que escuche un pitido para activar el apagado automático de la luz de fondo después
de 8 segundos. Presiónelo nuevamente durante mucho tiempo para reactivar la luz de fondo siempre encendida.
RESTAURACIÓN DE LA ESTACIÓN METEOROLÓGICA
En caso de funcionamiento anormal, presione la tecla RST (B7) para restaurar el funcionamiento correcto (se perderán
los ajustes realizados).
DATOS TÉCNICOS
Estación meteorológica: .................................................................... de -10 ° C a + 50 ° C
Humedad interna: .............................................................................. del 20% al 95%
Sensor externo: ............................................................................... de -40 ° C a + 60 ° C
Canales: ............................................................................... máx. 3 sensores externos
Recepción de señal de radio control: ................................................. 77.5 KHz
Transmisión: ............................................................................... 30m, RF 433MHz, 10mW
Velocidad de alimentación de la unidad: .............................................0.1 ° C para temperatura - 1% para humedad
Fuente de alimentación de la unidad principal: .................................... 2 pilas AAA (no incluidas)
............................................................................... adaptor 230V 50Hz / 5V 1A incluido
Fuente de alimentación del sensor externo: ........................................ 2 pilas AAA (no incluidas)
15
Page 16
ME 3P20 RC
Avvertenze - Warnings
INFORMAZIONI AGLI UTENTI ai sensi del Decreto Legislativo N° 49 del 14 Marzo 2014
“Attuazione della Direttiva 2012/19/UE sui rifiuti di apparecchiature elettriche ed elettroniche (RAEE)”
Il simbolo del cassonetto barrato riportato sull’apparecchiatura indica che il prodotto alla fine della propria vita utile deve
essere raccolto separatamente dagli altri rifiuti. L’utente dovrà, pertanto, conferire l’apparecchiatura integra dei componenti
essenziali giunta a fine vita agli idonei centri di raccolta differenziata dei rifiuti elettronici ed elettrotecnici, oppure riconsegnarla
al rivenditore al momento dell’acquisto di nuova apparecchiatura di tipo equivalente, in ragione di uno a uno, oppure 1 a
zero per le apparecchiature aventi lato maggiore inferiore a 25 cm. L’adeguata raccolta differenziata per l’avvio successivo
dell’apparecchiatura dimessa al riciclaggio, al trattamento e allo smaltimento ambientale compatibile contribuisce ad evitare
possibili effetti negativi sull’ambiente e sulla salute e favorisce il riciclo dei materiali di cui è composta l’apparecchiatura. Lo
smaltimento abusivo del prodotto da parte dell’utente comporta l’applicazione delle sanzioni amministrative di cui al D.Lgs
n. Decreto Legislativo N° 49 del 14 Marzo 2014.
Precautions for correct disposal of the product
The symbol shown on the equipment indicates that waste must be disposed of in “separate collection” and so the product
must not be disposed of together with urban waste.
The user must take the product to special “separate waste collection centres” provided by local government, or deliver it to
the retailer against the purchase of a new product.
Separate collection of waste and subsequent treatment, recycling and disposal operations promotes the production of
equipment with recycled materials and limits negative effects on the environment and on health caused by improper
handling of waste.
Illegal disposal of the product leads to the enforcement of administrative penalties.
Recommandations pour l’élimination correcte du produit
Le symbole figurant sur l’appareil indique que le produit fait l’objet d’une “ collecte séparée “. C’est pourquoi, le produit ne
doit pas être éliminé avec les déchets urbains.
L’utilisateur doit remettre le produit auprès de “ décharges spécialisées de collecte séparée “ prévues par les autorités locales,
ou bien le rendre au revendeur quand il achètera un nouvel appareil équivalent.
La collecte séparée du produit et les opérations successives de traitement, recyclage et élimination favorisent la production
d’appareils composés par des matériaux recyclés ainsi que permettent d’éviter des effets négatifs sur l’environnement et
sur la santé des personnes suite à une gestion impropre du déchet.
Toute élimination abusive du produit entraîne l’application de sanctions administratives.
16
Page 17
ME 3P20 RC
Hinweise zur ordnungsgemäßen Entsorgung des Produkts
Das auf dem Gerät angebrachte Symbol weist darauf hin, dass das Altgerät “getrennt zu sammeln” ist und das Produkt
daher nicht zusammen mit dem Gemeindeabfall entsorgt werden darf.
Der Benutzer muss das Produkt zu den entsprechenden, von der Gemeindeverwaltung eingerichteten “Wertstoffsammelstellen” bringen oder dem Händler beim Kauf eines neuen Produkts übergeben.
Die getrennte Müllsammlung und anschließende Aufbereitung, Wiederverwertung und Entsorgung fördern die Herstellung
von Geräten unter Verwendung wiederverwerteter Materialien und vermindern die negativen Auswirkungen auf die Umwelt
und Gesundheit in Folge einer falschen Müllverwaltung.
Die widerrechtliche Entsorgung des Produkts führt zur Auferlegung von Verwaltungsstrafen.
Advertencias para la correcta eliminación del producto
El símbolo que aparece en el aparato indica que el residuo debe ser objeto de “recogida selectiva” por tanto el producto no
se debe eliminar junto con residuos urbanos.
El usuario deberá entregar el producto a los “centros de recogida selectiva” creados por las administraciones municipales
o bien al distribuidor cuando adquiera un nuevo producto.
La recogida selectiva del residuo y las sucesivas operaciones de tratamiento, recuperación y eliminación favorecen la
fabricación de aparatos con materiales reciclados y limitan los efectos negativos en el medio ambiente y la salud causados
por una gestión incorrecta del residuo.
La eliminación abusiva del producto da lugar a la aplicación de sanciones administrativas.
Avvertenze - Warnings
17
Page 18

ME 3P20 RC
Garanzia - Warranty
GARANZIA
1. L’apparecchio è garantito per 24 mesi dalla data di fabbricazione indicata sull’etichetta applicata sul prodotto.
2. La garanzia si applica solo ad apparecchi, non manomessi, riparati da centri assistenza TREVI, essa comprende la
riparazione dei componenti per difetti di fabbricazione con l’esclusione di etichette, manopole e parti aspor tabili.
3. TREVI non risponde di danni diretti o indiretti a cose e/o persone causati dall’uso o sospensione d’uso dell’apparecchio.
WARRANTY
1. This unit is guaranteed for a period of 24 months from the date of production printed on the product itself or on label on
product.
2. The warranty is valid only if the unit has not been tampered with. The warrantyis valid only at authorized TREVI assistance
centres, that will repair manufacturing defects, excluded replacement of labels and removable parts.
3. TREVI is not liable for damage to people or things caused by the use of this unit or by the interruption in the use of this unit.
GARANTIE
1. L’appareil est garanti pendant une période de 24 mois à compter de la date de fabrication indiquée sur l’étiquette appliquée
sur le produit.
2. La garantie ne s’applique qu’à des appareils utilisés dans des conditions normales, réparés chez les centres d’assistance
TREVI ; elle comprend la réparation des éléments pour des défauts de fabrication, à l’exception des étiquettes, des
boutons ou des parties amovibles.
3. TREVI ne peut être pas tenue responsable pour tout dommage direct ou indirect aux choses et/ou aux personnes dérivant
de l’utilisation ou suspension de l’utilisation de l’appareil.
GARANTIE
1. Die Garantiezeit für das Gerät beträgt 24 Monate ab dem Herstellungsdatum, das auf dem am Produkt angebrachten
Etikett angegeben ist.
2. Die Garantie ist nur für Geräte gültig, an denen keine selbst ausgeführten Reparaturen erfolgt sind. Die Geräte müssen
von den Kundendienststellen der Firma TREVI repariert werden. Die Garantie umfasst die Reparatur von Bestandteilen
aufgrund von Herstellungsfehlern und schließt Etiketten, Bedienungsknöpfe und -tasten sowie abnehmbare Teile aus.
3. Die Firma TREVI haftet nicht für Personen- und/oder Sachschäden, die direkt oder indirekt durch den Betrieb oder den
längeren Nichtgebrauch des Geräts verursacht wurden.
GARANTÍA
1. El aparato está garantizado durante 24 meses desde la fecha de fabricación indicada en la etiqueta aplicada sobre el
producto.
2. La garantía se aplica solamente en aparatos, no alterados, reparados por centros de asistencia TREVI, e incluye la
reparación de los componentes por defectos de fabricación con la exclusión de etiquetas, botones y partes que se
pueden extraer.
3. TREVI no responde por daños directos o indirectos a cosas y/o personas causados por el uso o suspensión de uso del
aparato.
18
Page 19

ME 3P20 RC
19
Page 20
ME 3P20 RC
DICHIARAZIONE DI CONFORMITÀ UE SEMPLIFICATA
Il fabbricante TREVI dichiara che il tipo di apparecchiatura radio
ME 3P20 RC è conforme alla direttiva 2014 / 53 / UE.
Il testo completo della dichiarazione di conformità EU è disponibile al
seguente indirizzo Internet
https://www.trevi.it/dms/zidi/TREVI/DOCME3P20RC.pdf
SIMPLIFIED EU DECLARATION OF CONFORMITY
Hereby TREVI Spa declares that the radio equipment type
ME 3P20 RC is in compliance with directive 2014 / 53 / EU.
The full text of the EU declaration of conformity is available at the
following internet address
https://www.trevi.it/dms/zidi/TREVI/DOCME3P20RC.pdf
TREVI S.p.A. - Strada Consolare Rimini-San Marino 62, 47924 Rimini (RN) Italy
Tel. 0541-756420 - Fax 0541-756430 - E.mail [email protected] - www.trevi.it
MADE IN CHINA
 Loading...