

Page 1
ME 3P08 RC
it
STAZIONE METEO
CON SENSORE ESTERNO
eng
METEO STATION WITH
EXTERNAL SENSOR
fra
THERMOMÈTRE NUMÉRIQUE
AVEC CAPTEUR EXTERNE
1
2
3
deu
DIGITALTHERMOMETER
MIT AUSSENSENSOR
esp
TERMOMETRO DIGITAL
COM SENSOR EXTERNO
96
108
11
4
5
7
12
13
1
Page 2

ME 3P08 RC
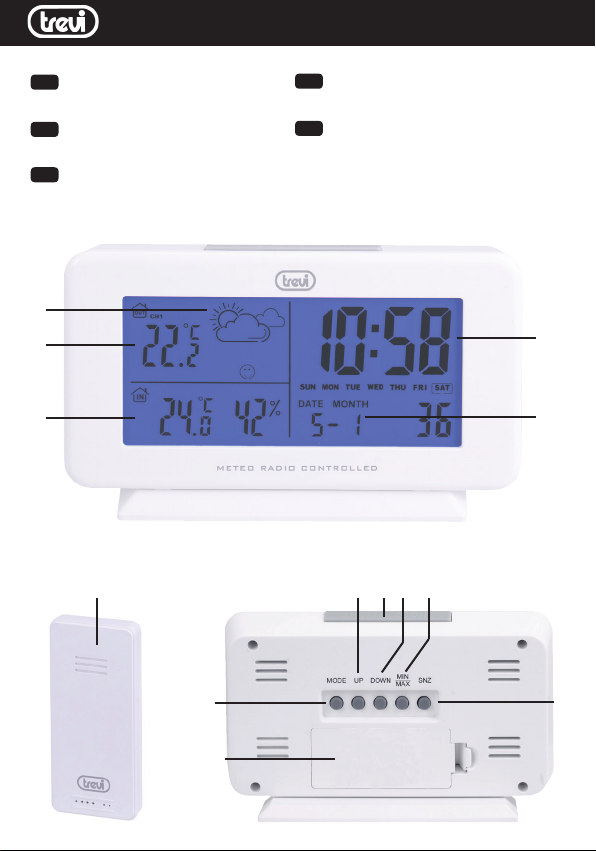
DESCRIZIONE COMANDI
1. Icone simboli meteorologici
2. Temperatura sensore esterno
3. Temperatura/umidità interna
4. Orologio
5. Data
6. Sensore esterno
7. Tasto MODE
8. Tasto UP
9. Tasto SNOOZE/LIGHT
10. Tasto DOWN
11. Tasto MIN/MAX
12. Tasto SNZ
13. Vano batterie
ALIMENTAZIONE STAZIONE METEO
Aprire il vano batterie (13) posto sul retro dell’apparecchio ed inserire due batterie formato “AAA”
rispettando le polarità indicate.
SENSORE ESTERNO
Aprire il vano batterie posto sul retro dell’apparecchio, ed inserire due batterie formato “AAA”
rispettando le polarità indicate.
Il sensore esterno e’ impostato di fabbrica sul
canale 1 ed automaticamente si collega con la
stazione meteo. In caso di mancata indicazione
della temperatura esterna, verificare che sia selezionato il canale 1 (icona CH1 vicino al simbolo
della casa ). In caso contrario premere il tasto
UP(8) fino alla selezione di CH1.
VISUALIZZAZIONE ORARIO TRAMITE
RADIO CONTROLLO
Questo apparecchio è dotato di un ricevitore in
grado di ricevere il segnale orario del Physikalisch
Technische Bundesanstalt Braunschweig (Germania centrale) ricevibile in un raggio di 1500Km.
Alla prima accensione, dopo 3 minuti, la stazione
meteo inizierà a ricercare il segnale di controllo
(icona segnale di controllo lampeggiante).
- Durante la ricerca del segnale di controllo
tenere premuto il tasto DOWN (10) per alcuni
secondi per disattivare la funzione di ricerca
automatica.
- Premere il tasto DOWN per alcuni secondi per
attivare la funzione di ricerca automatica del
segnale di controllo.
Italiano
Una volta agganciato il segnale di controllo l’icona
apparirà fissa.
FUSO ORARIO
L’orario viene trasmesso dalla Germania centrale,
quindi se ci troviamo in un paese con orario
diverso da quello della Germania è necessario impostare il fuso orario (vedi paragrafo successivo).
Non in tutte le zone d’europa può essere possibile
ricevere il segnale del radiocontrollo. In questo caso è
necessario impostare l’ora manualmente.
REGOLAZIONE MANUALE DELL’OROLOGIO
1. Tenere premuto il tasto MODE (7) fino a
quando sul display lampeggia l’anno corrente
da impostare.
2. Impostare l’anno tramite i tasti UP (8) o DOWN
(10).
3. Premere il tasto MODE (7), sul display comincerà a lampeggiare il mese.
4. Impostare il mese tramite i tasti UP (8) o
DOWN (10).
5. Premere il tasto MODE (7), sul display cominceranno a lampeggiare il giorno.
6. Impostare il giorno tramite i tasti UP (8) o
DOWN (10).
7. Premere il tasto MODE (7), sul display comincerà a lampeggiare 12/24Hr.
8. Impostare la visualizzazione dell’ora 12/24H
tramite i tasti UP (8) o DOWN (10).
9. Premere il tasto MODE (7), sul display comincerà a lampeggiare il fuso orario.
10. Impostare il fuso orario tramite i tasti UP (8)
o DOWN (10).
11. Premere il tasto MODE (7), sul display comincerà a lampeggiare l’ora.
12. Impostare l’ora tramite i tasti UP (8) o DOWN
(10).
13. Premere il tasto MODE (7), sul display comincerà a lampeggiare i minuti.
14. Impostare i minuti tramite i tasti UP (8) o
DOWN (10).
REGOLAZIONE ALLARME
1. Premere il tasto MODE(7), il display mostrerà
2
Page 3
ME 3P08 RC
la funzione allarme (AL) per alcuni secondi.
2. Durante la visualizzazione dell’allar me, premere a lungo il tasto MODE(7) per regolare l’ora
e i minuti a cui l’allarme si attiverà e il tempo
in minuti di snooze (riattivazione allarme).
Premere il tasto MODE(7) per confermare.
3. Durante la visualizzazione dell’allarme (premere il tasto MODE) premere il tasto UP(8)
per attivare l’allarme, sul display comparirà
l’icona dell’allarme. Ripremerlo per disattivare
l’allarme.
4. Per disattivare temporaneamente l’allarme,
premere il tasto SNZ/LI GHT (9). L’allarme
riprenderà a suonare dopo i minuti di
snooze impostati.
5. Per disattivare definitivamente l’allarme
premere il tasto UP(8).
PREVISIONI METEREOLOGICHE
Il barometro digitale rileva automaticamente le
variazioni di pressione atmosferica visualizzando
di conseguenza il simbolo di previsione metereologica (1). Tale previsione riguarda le 12/24
ore successive.
Per esempio: se il barometro rileva un’alta
pressione, sul display apparirà il simbolo del
sole, ma esternamente potrebbe piovere, perchè
la previsione riguarda le 12/24 ore successive.
N.B. I simboli di previsione metereologica possono
non riflettere le attuali condizioni del tempo. Essi si
riferiscono esclusivamente a condizioni future.
Le previsioni possono non essere sicure al 100% a
causa di vari fattori.
Il costruttore non è responsabile di eventuali danni o
situazioni causati da una previsione errata.
TEMPERATURA E UMIDITÀ INTERNA/
ESTERNA
L’indicazione relativa alla temperatura esterna si
trova in alto nel display (2), mentre il valore di temperatura ed umidità interna è indicato in basso (3).
Premere il tasto DOWN (10) per selezionare l’unità
di misura della temperatura in °C o °F.
MEMORIZZAZIONE TEMPERATURA MASSIMA E MINIMA
1. Premere in sequenza il tasto MAX/MIN(11),
sul diplay verrà visualizzato il picco della
Italiano
temperatura MAX e MIN memorizzata.
2. Tenere premuto il tasto MAX/MIN(11)per
cancellare la memorizzazione.
ICONE GRADO COMFORT
Sono presenti 3 icone (simboleggiate da delle
faccine) che rappresentano il livello di confort
temperatura/umidità:
Secco:umidità sotto il 40%
Comfort ideale:temperatura tra 20/28°, umidità
tra 40/70%
Umido: umidità superiore al 70%
Nessuna indicazione: temperatura inferiore ai 20°
o superiore ai 28°, umidità compresa nei valori
di comfort.
DATI TECNICI
Stazione meteo: ............ da 0°C a+50°C
Umidità interna: ............ da 20% a 95%
Sensore esterno: ........... da -20°C a+60°C
Ricezione segnale radio controllo:77,5 KHz
Trasmissione: ............... 30m, RF 433MHz, 10mW
Avanzamento unitario:0,1°C per la temperatura
1% per l’umidità
Alimentazione: .............. 2xAAA stazione meteo
2xAAA sensore esterno
INFORMAZIONI AGLI UTENTI ai sensi del
Decreto Legislativo N° 49 del 14 Marzo
2014
“Attuazione della Direttiva 2012/19/UE sui rifiuti di
apparecchiature elettriche ed elettroniche (RAEE)”
Il simbolo del cassonetto barrato riportato sull’apparecchiatura indica che il prodotto alla fine della propria
vita utile deve essere raccolto separatamente dagli altri
rifiuti. L’utente dovrà, per tanto, conferire l’apparecchiatura
integra dei componenti essenziali giunta a fine vita agli
idonei centri di raccolta differenziata dei rifiuti elettronici
ed elettrotecnici, oppure riconsegnarla al rivenditore al
momento dell’acquisto di nuova apparecchiatura di tipo
equivalente, in ragione di uno a uno, oppure 1 a zero per
le apparecchiature aventi lato maggiore inferiore a 25 cm.
L’adeguata raccolta differenziata per l’avvio successivo
dell’apparecchiatura dimessa al riciclaggio, al trattamento
e allo smaltimento ambientale compatibile contribuisce
ad evitare possibili effetti negativi sull’ambiente e sulla
salute e favorisce il riciclo dei materiali di cui è composta
l’apparecchiatura. Lo smaltimento abusivo del prodotto
da parte dell’utente compor ta l’applicazione delle sanzioni
amministrative di cui al D.Lgs n. Decreto Legislativo N° 49
del 14 Marzo 2014.
3
Page 4

ME 3P08 RC
COMMANDS DESCRIPTION
1. Weather symbols icons
2. External sensor temperature
3. Internal temperature / humidity
4. Clock
5. Date
6. External sensor
7. MODE button
8. UP button
9. SNOOZE / LIGHT button
10. DOWN key
11. MIN / MAX button
12. SNZ button
13. Battery compartment
WEATHER STATION POWER SUPPLY
Open the battery compar tment (13) on the back of
the appliance and insert two “AAA” size batteries
observing the indicated polarities.
EXTERNAL SENSOR
Open the battery compartment on the back of
the appliance, and insert two “AAA” size batteries
observing the indicated polarities.
The external sensor is factory set on channel 1 and
automatically connects with the weather station,
push UP button to change channel.
TIME DISPLAY BY RADIO CONTROL
This device is equipped with a receiver capable
of receiving the time signal of the Physikalisch
Technische Bundesanstalt Braunschweig (central
Germany) receivable within a radius of 1500Km.
At the first power-up, after 3 minutes, the weather
station will start searching for the control signal
(flashing control signal icon).
- While searching for the control signal, keep the
DOWN key (10) pressed for a few seconds to
deactivate the automatic search function.
- Press the DOWN key for a few seconds to
activate the automatic control signal search
function.
Once the control signal is attached, the icon will
appear fixed.
English
TIME ZONE
The time is transmitted from central Germany, so
if we are in a country with a different time than
Germany, we need to set the time zone (see next
paragraph).
Not all areas of Europe may be able to receive the
radio control signal. In this case it is necessary to set
the time manually.
CLOCK MANUAL ADJUSTMENT
1. Keep the MODE button (7) pressed until the
current year to be set flashes on the display.
2. Set the year using the UP (8) or DOWN (10)
keys.
3. Press the MODE button (7), the month will
begin to flash on the display.
4. Set the month using the UP (8) or DOWN (10)
keys.
5. Press the MODE button (7), the day will begin
to flash on the display.
6. Set the day using the UP (8) or DOWN (10)
keys.
7. Press the MODE button (7), 12 / 24Hr will
start to flash on the display.
8. Set the 12 / 24H time display using the UP (8)
or DOWN (10) keys.
9. Press the MODE button (7), the time zone will
begin to flash on the display.
10. Set the time zone using the UP (8) or DOWN
(10) keys.
11. Press the MODE button (7), the time will begin
to flash on the display.
12. Set the time using the UP (8) or DOWN (10)
keys.
13. Press the MODE button (7), the minutes will
start to flash on the display.
14. Set the minutes using the UP (8) or DOWN
(10) keys.
ALARM ADJUSTMENT
1. Press the MODE button (7), the display
will show the alarm function (AL) for a few
seconds.
2. During the alarm display, long press the MODE
button (7) to adjust the time and the minutes
to which the alarm will activate and the time in
4
Page 5
ME 3P08 RC
minutes of snooze (alarm reactivation). Press
the MODE button (7) to confirm.
3. During the alarm display (press the MODE key)
press the UP key (8) to activate the alarm, the
alarm icon will appear on the display. Press it
again to deactivate the alarm.
4. To temporarily turn off the alarm, press the
SNZ / LIGHT button (9). The alarm will resume
sounding after the set snooze minutes.
5. To definitively deactivate the alarm press the
UP key (8).
WEATHER FORECAST
The digital barometer automatically detects changes in atmospheric pressure and consequently
displays the weather forecast symbol (1). This
forecast concerns the following 12/24 hours.
For example: if the barometer detects a high pressure, the sun symbol will appear on the display,
but outside it may rain, because the forecast is for
the next 12/24 hours.
N.B. Weather forecast symbols may not reflect current
weather conditions. They refer only to future conditions.
Forecasts may not be 100% safe due to various factors.
The manufacturer is not responsible for any damage or
situations caused by an incorrect forecast.
TEMPERATURE AND INTERNAL / EXTERNAL MOISTURE
The indication relating to the outside temperature
is located at the top of the display (2), while the
temperature and internal humidity value is shown
below (3).
Press the DOWN key (10) to select the temperature
unit of measurement in ° C or ° F.
MAXIMUM AND MINIMUM TEMPERATURE
STORAGE
1. Press the MAX / MIN key (11) in sequence,
the stored MAX and MIN temperature peak
will be displayed on the display.
2. Press and hold the MAX / MIN key (11) to
cancel the recording.
COMFORT GRADE ICONS
There are 3 icons (symbolized by smilies) that
represent the comfort level temperature / humidity:
Dry: humidity below 40%
English
Ideal comfort: temperature between 20/28 °,
humidity between 40/70%
Moist: humidity over 70%
No indication: temperature below 20 ° or above
28 °, humidity included in comfort values.
TECHNICAL DATA
Weather station: ......from 0 ° C to + 50 ° C
Internal humidity: .... from 20% to 95%
External sensor: ...... from -20 ° C to + 60 ° C
Radio control signal reception: 77.5 KHz
Transmission: .........30m, RF 433MHz, 10mW
Unit feed rate: ......... 0.1 ° C for the temperature
...............................1% for humidity
Power supply: .........2xAAA weather station
...............................2xAAA external sensor
Precautions for correct
disposal of the product.
The symbol shown on the equipment
indicates that waste must be disposed of in “separate collection” and so the product must not be
disposed of together with urban waste.
The user must take the product to special “separate waste collection centres” provided by local
government, or deliver it to the retailer against the
purchase of a new product.
Separate collection of waste and subsequent
treatment, recycling and disposal operations
promotes the production of equipment with
recycled materials and limits negative effects on
the environment and on health caused by improper
handling of waste.
Illegal disposal of the product leads to the enforcement of administrative penalties.
5
Page 6

ME 3P08 RC
DESCRIPTION DES COMMANDES
1. Icônes de symboles météo
2. Température du capteur externe
3. Température interne / humidité
4. Horloge
5. Date
6. Capteur externe
7. Bouton MODE
8. Bouton UP
9. Bouton SNOOZE / LIGHT
10. Touche DOWN
11. Bouton MIN / MAX
12. Bouton SNZ
13. Compartiment à piles
ALIMENTATION ELECTRIQUE DE LA STATION METEO
Ouvrez le compartiment à piles (13) à l’arrière de
l’appareil et insérez deux piles «AAA» en respectant les polarités indiquées.
CAPTEUR EXTERNE
Ouvrez le compartiment à piles situé à l’arrière
de l’appareil et insérez deux piles «AAA» en
respectant les polarités indiquées.
AFFICHAGE DU TEMPS PAR RADIO
CONTROL
Cet appareil est équipé d’un récepteur capable
de recevoir le signal de l’heure du Physikalisch
Technische Bundesanstalt Braunschweig (Allemagne centrale) pouvant être reçu dans un rayon
de 1500 km.
À la première mise sous tension, après 3 minutes,
la station météo commencera à rechercher le
signal de contrôle (icône de signal de contrôle
clignotant).
- Lors de la recherche du signal de commande,
maintenez la touche DOWN (10) enfoncée
pendant quelques secondes pour désactiver
la fonction de recherche automatique.
- Appuyez sur la touche DOWN pendant
quelques secondes pour activer la fonction
de recherche du signal de commande automatique.
Une fois que le signal de contrôle est attaché,
l’icône apparaîtra fixe.
Francaise
FUSEAU HORAIRE
L’heure est transmise depuis le centre de l’Allemagne. Par conséquent, si vous vous trouvez dans
un pays dont l’heure est différente de celle de
l’Allemagne, vous devez définir le fuseau horaire
(voir paragraphe suivant).
Toutes les régions d’Europe ne peuvent pas recevoir le
signal de radiocommande. Dans ce cas, il est nécessaire
de régler l’heure manuellement.
RÉGLAGE MANUEL D’HORLOGE
1. Maintenez le bouton MODE (7) enfoncé
jusqu’à ce que l’année à définir clignote à
l’écran.
2. Réglez l’année à l’aide des touches UP (8) ou
DOWN (10).
3. Appuyez sur le bouton MODE (7), le mois
commencera à clignoter à l’écran.
4. Réglez le mois à l’aide des touches UP (8) ou
DOWN (10).
5. Appuyez sur le bouton MODE (7), le jour
commence à clignoter à l’écran.
6. Réglez le jour à l’aide des touches UP (8) ou
DOWN (10).
7. Appuyez sur le bouton MODE (7), 12 / 24H
commencera à clignoter à l’écran.
8. Réglez l’affichage de l’heure 12 / 24H à l’aide
des touches UP (8) ou DOWN (10).
9. Appuyez sur le bouton MODE (7), le fuseau
horaire commencera à clignoter à l’écran.
10. Définissez le fuseau horaire à l’aide des
touches UP (8) ou DOWN (10).
11. Appuyez sur le bouton MODE (7), l’heure
commencera à clignoter à l’écran.
12. Réglez l’heure à l’aide des touches UP (8) ou
DOWN (10).
13. Appuyez sur le bouton MODE (7), les minutes
commencent à clignoter à l’écran.
14. Réglez les minutes à l’aide des touches UP
(8) ou DOWN (10).
6
Page 7

ME 3P08 RC
AJUSTEMENT D’ALARME
1. Appuyez sur le bouton MODE (7), l’écran affichera la
fonction d’alarme (AL) pendant quelques secondes.
2. Pendant l’affichage de l’alarme, appuyez longuement
sur le bouton MODE (7) pour régler l’heure et les
minutes d’activation de l’alarme, ainsi que l’heure
en minutes de répétition (réactivation de l’alarme).
Appuyez sur le bouton MODE (7) pour confirmer.
3. Pendant l’affichage de l’alarme (appuyez sur la touche
MODE), appuyez sur la touche UP (8) pour activer
l’alarme. L’icône d’alarme apparaît à l’écran. Appuyez
à nouveau pour désactiver l’alarme.
4. Pour désactiver temporairement l’alarme, appuyez sur
le bouton SNZ / LIGHT (9). L’alarme reprendra après
les minutes de répétition réglées.
5. Pour désactiver définitivement l’alarme, appuyez sur
la touche UP (8).
PRÉVISIONS MÉTÉOROLOGIQUES
Le baromètre numérique détecte automatiquement
les changements de pression atmosphérique et
affiche par conséquent le symbole de prévision
météorologique (1). Cette prévision concerne les
12/24 heures suivantes.
Par exemple: si le baromètre détecte une pression
élevée, le symbole du soleil apparaît à l’écran,
mais il peut pleuvoir à l’extérieur, car la prévision
est pour les 12/24 prochaines heures.
N.B. Les symboles de prévisions météorologiques peuvent ne pas refléter les conditions météorologiques actuelles. Ils se réfèrent uniquement aux conditions futures.
Les prévisions peuvent ne pas être 100% sûres en raison
de divers facteurs.
Le fabricant n’est pas responsable des dommages ou
des situations causés par une prévision erronée.
TEMPERATURE ET HUMIDITE INTERNE
/ EXTERNE
L’indication relative à la température extérieure
est située en haut de l’écran (2), tandis que les
valeurs de température et d’humidité interne sont
indiquées ci-dessous (3).
Appuyez sur la touche DOWN (10) pour sélectionner l’unité de mesure de la température en
° C ou en ° F.
STOCKAGE DE TEMPÉRATURES MAXIMALES ET MINIMALES
1. Appuyez successivement sur la touche MAX
/ MIN (11), les pics de température MAX et
Francaise
MIN enregistrés s’affichent à l’écran.
2. Appuyez sur la touche MAX / MIN (11) et
maintenez-la enfoncée pour annuler l’enregistrement.
ICÔNES DE CONFORT
Il y a 3 icônes (symbolisées par des smileys) qui
représentent le niveau de confort température
/ humidité:
Sec: humidité inférieure à 40%
Confort idéal: température entre 20/28 °, humidité
entre 40/70%
Humide: humidité supérieure à 70%
Aucune indication: température inférieure à 20 °
C ou supérieure à 28 ° C, humidité incluse dans
les valeurs de confort.
DONNÉES TECHNIQUES
Station météo: ........de 0 ° C à + 50 ° C
Humidité interne: .....de 20% à 95%
Capteur externe: ...... de -20 ° C à + 60 ° C
Réception du signal de contrôle radio: 77,5 KHz
Transmission: 30 m, RF 433 MHz, 10 mW
Débit unitaire: ..........0,1 ° C pour la température
...............................1% pour l’humidité
Alimentation: ........... station météo 2xAAA
...............................Capteur externe 2xAA
Recommandations pour
l’élimination correcte du produit.
Le symbole figurant sur l’appareil indique que le produit
fait l’objet d’une “collecte séparée“. C’est pourquoi,
le produit ne doit pas être éliminé avec les déchets
urbains.
L’utilisateur doit remettre le produit auprès de “décharges spécialisées de collecte séparée“ prévues par les
autorités locales, ou bien le rendre au revendeur quand il
achètera un nouvel appareil équivalent.
La collecte séparée du produit et les opérations successives de traitement, recyclage et élimination favorisent
la production d’appareils composés par des matériaux
recyclés ainsi que permettent d’éviter des effets négatifs
sur l’environnement et sur la santé des personnes suite
à une gestion impropre du déchet.
Toute élimination abusive du produit entraîne l’application de sanctions administratives.
7
Page 8

ME 3P08 RC
BESCHREIBUNG DER BEFEHLE
1. Wettersymbole Symbole
2. Temperatur des externen Sensors
3. Innentemperatur / Luftfeuchtigkeit
4. Uhr
5. Datum
6. Externer Sensor
7. MODE-Taste
8. UP-Taste
9. SNOOZE / LIGHT-Taste
10. AB-Taste
11. MIN / MAX-Taste
12. SNZ-Taste
13. Batteriefach
WETTERSTATION STROMVERSORGUNG
Öffnen Sie das Batteriefach (13) auf der Rückseite
des Geräts und legen Sie zwei AAA-Batterien unter
Beachtung der angegebenen Polaritäten ein.
EXTERNER SENSOR
Öffnen Sie das Batteriefach auf der Rückseite
des Geräts und legen Sie zwei AAA-Batterien
unter Beachtung der angegebenen Polaritäten ein.
ZEITANZEIGE DURCH FUNKSTEUERUNG
Dieses Gerät ist mit einem Empfänger ausgestattet,
der das Zeitsignal der Physikalisch Technischen
Bundesanstalt Braunschweig empfangen kann,
das in einem Umkreis von 1500 km empfangen
werden kann.
Beim ersten Einschalten, nach 3 Minuten, sucht die
Wetterstation nach dem Steuersignal (blinkendes
Steuersignalsymbol).
- Halten Sie während der Suche nach dem
Steuersignal die AB-Taste (10) einige Sekunden lang gedrückt, um die automatische
Suchfunktion zu deaktivieren.
- Drücken Sie einige Sekunden lang die ABTaste, um die automatische Suche nach
Steuersignalen zu aktivieren.
Sobald das Steuersignal angeschlossen ist, wird
das Symbol fest angezeigt.
Deutsch
ZEITZONE
Die Zeit wird aus Mitteldeutschland übertragen.
Wenn wir uns also in einem Land befinden, dessen
Zeit von der deutschen Zeit abweicht, müssen wir
die Zeitzone einstellen (siehe nächster Absatz).
Möglicherweise können nicht alle Regionen Europas das
Funksignal empfangen. In diesem Fall muss die Uhrzeit
manuell eingestellt werden.
UHR MANUELLE EINSTELLUNG
1. Halten Sie die MODE-Taste (7) gedrückt, bis
das aktuell einzustellende Jahr im Display
blinkt.
2. Stellen Sie das Jahr mit den Tasten UP (8)
oder DOWN (10) ein.
3. Drücken Sie die MODE-Taste (7). Der Monat
beginnt im Display zu blinken.
4. Stellen Sie den Monat mit den Tasten UP (8)
oder DOWN (10) ein.
5. Drücken Sie die MODE-Taste (7). Der Tag
beginnt im Display zu blinken.
6. Stellen Sie den Tag mit den Tasten AP (8) oder
DOWN (10) ein.
7. Drücken Sie die MODE-Taste (7). 12 / 24Hr
beginnt im Display zu blinken.
8. Stellen Sie die 12 / 24H-Zeitanzeige mit den
Tasten UP (8) oder DOWN (10) ein.
9. Drücken Sie die MODE-Taste (7). Die Zeitzone
beginnt im Display zu blinken.
10. Stellen Sie die Zeitzone mit den Tasten AP (8)
oder DOWN (10) ein.
11. Drücken Sie die MODE-Taste (7). Die Uhrzeit
beginnt im Display zu blinken.
12. Stellen Sie die Uhrzeit mit den Tasten AP (8)
oder DOWN (10) ein.
13. Drücken Sie die MODE-Taste (7). Die Minuten
beginnen im Display zu blinken.
14. Stellen Sie die Minuten mit den Tasten UP (8)
oder DOWN (10) ein.
ALARMEINSTELLUNG
1. Drücken Sie die MODE-Taste (7). Das Display
zeigt einige Sekunden lang die Alarmfunktion
(AL) an.
8
Page 9
ME 3P08 RC
2. Drücken Sie während der Alarmanzeige lange
die MODE-Taste (7), um die Zeit und die
Minuten einzustellen, bis zu denen der Alarm
aktiviert wird, sowie die Zeit in Minuten nach
dem Schlummern (Reaktivierung des Alarms).
Drücken Sie zur Bestätigung die MODE-Taste
(7).
3. Drücken Sie während der Alarmanzeige (drücken Sie die Taste MODE) die Taste UP (8),
um den Alarm zu aktivieren. Das Alarmsymbol
wird auf dem Display angezeigt. Drücken Sie
erneut, um den Alarm zu deaktivieren.
4. Um den Alarm vorübergehend auszuschalten,
drücken Sie die Taste SNZ / LIGHT (9). Der
Alarm ertönt nach den eingestellten Schlummerminuten wieder.
5. Um den Alarm endgültig zu deaktivieren,
drücken Sie die UP-Taste (8).
WETTERVORHERSAGE
Das digitale Barometer erkennt automatisch Änderungen des Luftdr ucks und zeigt infolgedessen
das Wettervorhersage-Symbol (1) an. Diese
Vorhersage betrifft die folgenden 12/24 Stunden.
Beispiel: Wenn das Barometer einen hohen Druck
feststellt, wird das Sonnensymbol auf dem Display
angezeigt. Draußen kann es jedoch regnen, da die
Vorhersage für die nächsten 12/24 Stunden gilt.
N.B. Die Wettervorhersage-Symbole spiegeln möglicherweise nicht die aktuellen Wetterbedingungen wider.
Sie beziehen sich nur auf zukünftige Bedingungen.
Prognosen sind aufgrund verschiedener Faktoren
möglicherweise nicht 100% sicher.
Der Hersteller haftet nicht für Schäden oder Situationen,
die durch eine falsche Vorhersage verursacht wurden.
TEMPERATUR UND INTERNE / EXTERNE
FEUCHTIGKEIT
Die Anzeige für die Außentemperatur befindet sich
oben auf dem Display (2), während der Wert für
Temperatur und interne Luftfeuchtigkeit unten
angezeigt wird (3).
Drücken Sie die AB-Taste (10), um die Maßeinheit
für die Temperatur in ° C oder ° F auszuwählen.
MAXIMALE UND MINIMALE TEMPERATUR
LAGERUNG
1. Drücken Sie nacheinander die MAX / MIN-
Deutsch
Taste (11). Die gespeicherten MAX- und
MIN-Temperaturspitzen werden auf dem
Display angezeigt.
2. Halten Sie die MAX / MIN-Taste (11) gedrückt,
um die Aufnahme abzubrechen.
COMFORT GRADE ICONS
Es gibt 3 Symbole (durch Smilies symbolisiert),
die die Komfortstufe Temperatur / Luftfeuchtigkeit
darstellen:
Trocken: Luftfeuchtigkeit unter 40%
Idealer Komfort: Temperatur zwischen 20/28 °,
Luftfeuchtigkeit zwischen 40/70%
Feuchtigkeit: Luftfeuchtigkeit über 70%
Keine Angabe: Temperatur unter 20 ° oder über
28 °, Luftfeuchtigkeit in Komfortwer ten enthalten.
TECHNISCHE DATEN
Wetterstation: ..........von 0 ° C bis + 50 ° C
Innenfeuchtigkeit: .... von 20% bis 95%
Externer Sensor: ..... von -20 ° C bis + 60 ° C
Empfang des Funksignals: 77,5 kHz
Übertragung: 30 m, RF 433 MHz, 10 mW
Vorschubgeschwindigkeit: ................................
................................0,1 ° C für die Temperatur
...............................1% für Luftfeuchtigkeit
Stromversorgung: ... 2xAAA Wetterstation
...............................2xAAA externer Sensor
Hinweise zur ordnungsgemäßen
Entsorgung des Produkts
Das auf dem Gerät angebrachte Symbol weist darauf
hin, dass das Altgerät “getrennt zu sammeln” ist und
das Produkt daher nicht zusammen mit dem Gemeindeabfall entsorgt werden darf.
Der Benutzer muss das Produkt zu den entsprechenden,
von der Gemeindeverwaltung eingerichteten “Wertstoffsammelstellen” bringen oder dem Händler beim Kauf
eines neuen Produkts übergeben.
Die getrennte Müllsammlung und anschließende
Aufbereitung, Wiederverwer tung und Entsorgung fördern
die Herstellung von Geräten unter Verwendung wiederverwerteter Materialien und vermindern die negativen
Auswirkungen auf die Umwelt und Gesundheit in Folge
einer falschen Müllverwaltung.
Die widerrechtliche Entsorgung des Produkts führt zur
Auferlegung von Verwaltungsstrafen.
9
Page 10

ME 3P08 RC
DESCRIPCION DE LOS COMANDOS
1. Iconos de símbolos del tiempo
2. Temperatura del sensor externo
3. Temperatura interna / humedad
4. Reloj
5. Fecha
6. Sensor externo
7. Botón MODE
8. Botón UP
9. Botón SNOOZE / LIGHT
10. Tecla DOWN
11. Botón MIN / MAX
12. Botón SNZ
13. Compartimiento de la batería
ESTACIÓN METEOROLÓGICA FUENTE DE
ALIMENTACIÓN
Abra el compartimiento de la batería (13) en la
parte posterior del aparato e inserte dos baterías
de tamaño “AAA” observando las polaridades
indicadas.
SENSOR EXTERNO
Abra el compartimiento de la batería en la parte
posterior del aparato e inserte dos baterías
de tamaño “AAA” observando las polaridades
indicadas.
PANTALLA DE TIEMPO POR CONTROL
DE RADIO
Este dispositivo está equipado con un receptor
capaz de recibir la señal horaria del Physikalisch
Technische Bundesanstalt Braunschweig (Alemania central) que se puede recibir en un radio
de 1500 km.
En el primer encendido, después de 3 minutos,
la estación meteorológica comenzará a buscar
la señal de control (icono de señal de control
parpadeante).
- Mientras busca la señal de control, mantenga
presionada la tecla ABAJO (10) durante
unos segundos para desactivar la función de
búsqueda automática.
- Presione la tecla ABAJO durante unos segundos para activar la función de búsqueda
automática de señales de control.
Una vez que se adjunta la señal de control, el
Espanol
icono aparecerá fijo.
ZONA HORARIA
La hora se transmite desde el centro de Alemania,
por lo que si estamos en un país con una hora
diferente a la de Alemania, debemos configurar
la zona horaria (ver el siguiente párrafo).
No todas las áreas de Europa pueden recibir la señal
de control de radio. En este caso es necesario ajustar
la hora manualmente.
AJUSTE MANUAL DE RELOJ
1. Mantenga presionado el botón MODE (7)
hasta que el año actual a configurar parpadee
en la pantalla.
2. Ajuste el año con las teclas UP (8) o DOWN
(10).
3. Presione el botón MODE (7), el mes comenzará a parpadear en la pantalla.
4. Ajuste el mes con las teclas UP (8) o DOWN
(10).
5. Presione el botón MODE (7), el día comenzará
a destellar en la pantalla.
6. Ajuste el día con las teclas UP (8) o DOWN
(10).
7. Presione el botón MODE (7), 12 / 24Hr
comenzará a parpadear en la pantalla.
8. Configure la pantalla de tiempo de 12 / 24H
con las teclas UP (8) o DOWN (10).
9. Presione el botón MODE (7), la zona horaria
comenzará a parpadear en la pantalla.
10. Configure la zona horaria con las teclas UP
(8) o DOWN (10).
11. Presione el botón MODE (7), el tiempo comenzará a parpadear en la pantalla.
12. Ajuste la hora con las teclas UP (8) o DOWN
(10).
13. Presione el botón MODE (7), los minutos
comenzarán a parpadear en la pantalla.
14. Ajuste los minutos con las teclas UP (8) o
DOWN (10).
10
Page 11
ME 3P08 RC
AJUSTE DE ALARMA
1. Presione el botón MODE (7), la pantalla
mostrará la función de alarma (AL) durante
unos segundos.
2. Durante la visualización de la alarma, mantenga presionado el botón MODE (7) para
ajustar la hora y los minutos a los que se
activará la alarma y la hora en minutos de
alarma (reactivación de alarma). Pulse el
botón MODE (7) para confirmar.
3. Durante la visualización de la alarma (presione
la tecla MODE) presione la tecla ARRIBA (8)
para activar la alarma, el ícono de la alarma
aparecerá en la pantalla. Púlselo nuevamente
para desactivar la alarma.
4. Para apagar temporalmente la alarma, presione el botón SNZ / LIGHT (9). La alarma volverá
a sonar después de los minutos de repetición
programados.
5. Para desactivar definitivamente la alarma,
presione la tecla ARRIBA (8).
PRONÓSTICO DEL TIEMPO
El barómetro digital detecta automáticamente
los cambios en la presión atmosférica y, en
consecuencia, muestra el símbolo de pronóstico
del tiempo (1). Este pronóstico se refiere a las
siguientes 12/24 horas.
Por ejemplo: si el barómetro detecta una presión
alta, el símbolo del sol aparecerá en la pantalla,
pero afuera puede llover, porque el pronóstico es
para las próximas 12/24 horas.
Nótese bien Los símbolos de pronóstico del tiempo
pueden no reflejar las condiciones meteorológicas
actuales. Se refieren solo a condiciones futuras.
Las previsiones pueden no ser 100% seguras debido
a varios factores.
El fabricante no es responsable por daños o situaciones
causadas por un pronóstico incorrecto.
TEMPERATURA Y HUMEDAD INTERNA /
EXTERNA
La indicación relativa a la temperatura exterior
se encuentra en la parte superior de la pantalla
(2), mientras que los valores de temperatura y
humedad interna se muestran a continuación (3).
Presione la tecla ABAJO (10) para seleccionar
Espanol
la unidad de temperatura de medida en ° C o ° F.
ALMACENAMIENTO DE TEMPERATURA
MÁXIMA Y MÍNIMA
1. Presione la tecla MAX / MIN (11) en secuencia, el pico de temperatura MAX y MIN
almacenado se mostrará en la pantalla.
2. Mantenga presionada la tecla MAX / MIN (11)
para cancelar la grabación.
ICONOS DE GRADO DE CONFORT
Hay 3 iconos (simbolizados por caritas) que representan el nivel de confort temperatura / humedad:
Seco: humedad inferior al 40%.
Comodidad ideal: temperatura entre 20/28 °,
humedad entre 40/70%.
Húmedo: humedad superior al 70%.
Sin indicación: temperatura inferior a 20 ° o
superior a 28 °, humedad incluida en los valores
de confort.
DATOS TÉCNICOS
Estación meteorológica: de 0 ° C a + 50 ° C.
Humedad interna: ....del 20% al 95%.
Sensor externo: .......de -20 ° C a + 60 ° C
Recepción de señal de radio control: 77,5 kHz.
Transmisión: 30m, RF 433MHz, 10mW
Velocidad de alimentación de la unidad:
...............................0.1 ° C para la temperatura
...............................1% para humedad
Alimentación: estación meteorológica 2xAAA
...............................Sensor externo 2xAAA
Advertencias para la correcta eliminación del
producto.
El símbolo que aparece en el aparato indica que el
residuo debe ser objeto de “recogida selectiva” por
tanto el producto no se debe eliminar junto con residuos
urbanos.
El usuario deberá entregar el producto a los “centros de
recogida selectiva” creados por las administraciones
municipales o bien al distribuidor cuando adquiera un
nuevo producto.
La recogida selectiva del residuo y las sucesivas
operaciones de tratamiento, recuperación y eliminación
favorecen la fabricación de aparatos con materiales
reciclados y limitan los efectos negativos en el medio
ambiente y la salud causados por una gestión incorrecta
11
Page 12
GARANZIA
1. L’apparecchio è garantito per 24 mesi dalla data di
fabbricazione indicata sull’etichetta applicata sul
prodotto.
2. La garanzia si applica solo ad apparecchi, non
manomessi, riparati da centri assistenza TREVI, essa
comprende la riparazione dei componenti per difetti di
fabbricazione con l’esclusione di etichette, manopole
e parti aspor tabili.
3. TREVI non risponde di danni diretti o indiretti a cose
e/o persone causati dall’uso o sospensione d’uso
dell’apparecchio.
WARRANTY
1. This unit is guaranteed for a period of 24 months from
the date of production
printed on the product itself or on label on product.
2. The warranty is valid only if the unit has not been
tampered with. The warrantyis valid only at authorized
TREVI assistance centres, that will repair manufacturing defects, excluded replacement of labels and
removable parts.
3. TREVI is not liable for damage to people or things
caused by the use of this unit
or by the interruption in the use of this unit
GARANTIE
1. L’appareil est garanti pendant une période de 24
mois à compter de la date de fabrication indiquée
sur l’étiquette appliquée sur le produit Italiano.
2. La garantie ne s’applique qu’à des appareils utilisés
dans des conditions normales, réparés chez les
centres d’assistance TREVI ; elle comprend la réparation des éléments pour des défauts de fabrication, à
l’exception des étiquettes, des boutons ou des parties
amovibles.
3. TREVI ne peut être pas tenue responsable pour tout
dommage direct ou indirect aux choses et/ou aux
personnes dérivant de l’utilisation ou suspension de
l’utilisation de l’appareil.
GARANTIE
1. Die Garantiezeit für das Gerät beträgt 24 Monate ab
dem Herstellungsdatum, das auf dem am Produkt
angebrachten Etikett angegeben ist.
2. Die Garantie ist nur für Geräte gültig, an denen keine
selbst ausgeführten Reparaturen erfolgt sind. Die
Geräte müssen von den Kundendienststellen der
Firma TREVI repariert werden. Die Garantie umfasst
die Reparatur von Bestandteilen aufgrund von Herstellungsfehlern und schließt Etiketten, Bedienungsknöpfe
und -tasten sowie abnehmbare Teile aus.
3. Die Firma TREVI haftet nicht für Personen- und/oder
Sachschäden, die direkt oder indirekt durch den
Betrieb oder den längeren Nichtgebrauch des Geräts
verursacht wurden.
GARANTÍA
1. El aparato está garantizado durante 24 meses desde
la fecha de fabricación indicada en la etiqueta aplicada
sobre el producto.
Italiano
2. La garantía se aplica solamente en aparatos, no
alterados, reparados por centros de asistencia TREVI,
e incluye la reparación de los componentes por
defectos de fabricación con la exclusión de etiquetas,
botones y partes que se pueden extraer.
3. TREVI no responde por daños directos o indirectos a
cosas y/o personas causados por el uso o suspensión de uso del aparato.
Dichiarazione di Conformità UE Semplificata
Il fabbricante TREVI dichiara che il tipo di
ME 3P08 RC è conforme alla direttiva 2014/53/UE.
Il testo completo della dichiarazione di conformità
UE e’ disponibile al seguente indirizzo Internet
https://www.trevi.it/dms/zidi/TREVI/DOCME3P08RC.pdf
Hereby Trevi Spa declares that the radio equipment
The full text of the EU declaration of conformity is
https://www.trevi.it/dms/zidi/TREVI/DOCME3P08RC.pdf
apparecchiatura radio
Simplified EU Declaration Of Conformity
is in compliance with Directive 2014/53/EU.
type ME 3P08 RC
available at the following internet address
TREVI S.p.A. Strada Consolare Rimini-San Marino, 62 - 47924 Rimini (Rn) Italy Tel. 0541-756420 - Fax 0541-756430 E.mail [email protected] - www.trevi.it
Made In China
 Loading...