

Page 1
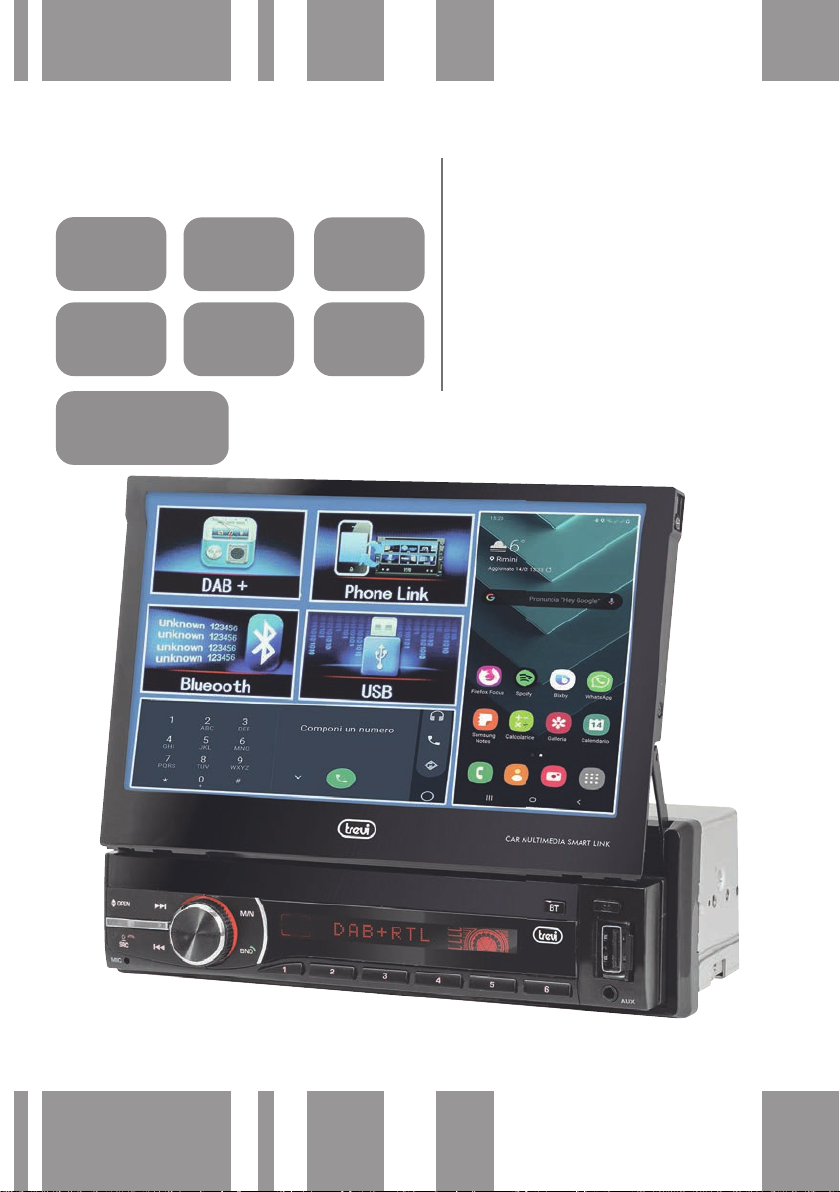
MDV 6380 DAB
CARD E DISPLAY 7" TOUCH SCREEN
TOUCH
SCREEN
DAB / FM
BLUETOOTH
MICRO SD
ANDROID MIRROR
LINK
USB
PARKING
CAMERA
CAR VIDEO SYSTEM WITH DAB SINTO
RDS, BLUETOOTH, USB/SD CARD IN
A/V IN
AUX IN
SISTEMA CAR VIDEO CON SINTO
DAB, RDS, BLUETOOTH, USB/SD
Manuale d'uso e collegamento
AND 7" TOUCH SCREEN DISPLAY
Instruction manual
* Per informazioni integrative e aggiornamenti di questo prodotto vedi: www.trevi.it
* For additional information and updates of this product see: www.trevi.it
Immagi ne simulat a a scopo ill ustrat ivo
Page 2

ITALIANO
MDV 6380 DAB
NOTE D’USO
• Ascoltare a volume alto per lungo tempo, potrebbe danneggiare il vostro udito.
• Evitare di posizionare il riproduttore:
- Vicino a campi magnetici.
- Vicino a fonti di calore come caloriferi e stufe.
- In luoghi molto umidi come stanze da bagno, piscine, ecc...
- In luoghi molto polverosi.
- In luoghi soggetti a forti vibrazioni.
• Posizionare l’apparecchio in modo che ai suoi lati ci sia sempre abbastanza spazio per la
libera circolazione di aria.
• Se dei liquidi penetrano all’interno dell’apparecchio portare l’apparecchio al più vicino centro
assistenza autorizzato TREVI.
• Controllare sempre prima di ricaricare l’apparecchio, che i cavi di alimentazione e di
collegamento siano installati correttamente.
• Nessuna sorgente di fiamma nuda, quali candele accese, dovrebbe essere posta
sull’apparecchio.
• L’apparecchio non deve essere esposto a stillicidio o a spruzzi d’acqua e nessun oggetto
pieno di liquido, quali vasi, deve essere posto sull’apparecchio.
• Conservare il presente manuale per futuri riferimenti.
Per la pulizia si consiglia l’uso di un panno morbido , leggermente inumidito. Evitate solventi o sostanze abrasive.
Importante
La buona costruzione di questo apparecchio ne garantisce per lungo tempo il perfetto funzionamento . Se tuttavia
dovesse presentarsi qualche inconv eniente, sarà opportuno consultare il più vicino Centro Assistenza autorizzato.
TREVI persegue una politica di continua ricerca e sviluppo. Pertanto i prodotti possono presentare caratteristiche
diverse da quelle descritte.
Nota per il corretto uso e funzionamento dell'autoradio:
Se il frontale non è inserito correttamente, i comandi non funzionano e il pannello stesso potrebbe staccarsi e cadere. Si r accomanda perciò di assicurarsi sempre del perfetto inserimento del frontale prima di usare l'apparecchio.
• Non toccare i contatti del frontalino e dell'unità centrale per evitare di piegarli e di sporcarli.
• Se dovesse essere necessaria la pulizia dei contatti eseguirla con un cotton fioc leggermente inbevuto di alcool.
Fate estrema attenzione a non piegare i contatti a molla dell'unità centrale durante l'operazione di pulizia.
• Non esporre il frontalino ai raggi solari o a forti fonti di calore per evitare la sua deformazione e/o malfunzionamenti.
• Non fare cadere il frontalino e evitare forti urti.
• Non pulire il frontalino con solventi o altre sostanze chimiche corrosive, utilizzare un panno leggermente
inumidito.
INFORMAZIONI SULLA SICUREZZA
1. Il prodotto è stato progettato per visualizzare i filmati video a veicolo fermo (con freno a mano inserito).
2. Rispettare i collegamenti elettrici come da schema di collegamento.
3. Per la sicurezza di chi guida il prodotto deve funzionare per visualizzare i filmati video solo a veicolo fermo
(con freno a mano inserito) e quindi non manomettere o modificare il collegamento d' installazione.
4. Utilizzare solamente parti contenute nella confezione. L'uso di parti non incluse può causare danneggiamenti
o malfunzionamenti.
5. Se l'angolo di installazione dell'unità è maggiore di 30°, l'apparecchio potrebbe non fornire le sue ottime
performance.
6. Non ostruire con fili o altre parti la zona di raffreddamento dell'unità posta sul retro. L'ostruzione potrebbe
comportare un riscaldamento eccessivo e quindi il suo danneggiamento.
2
Page 3
ITALIANO
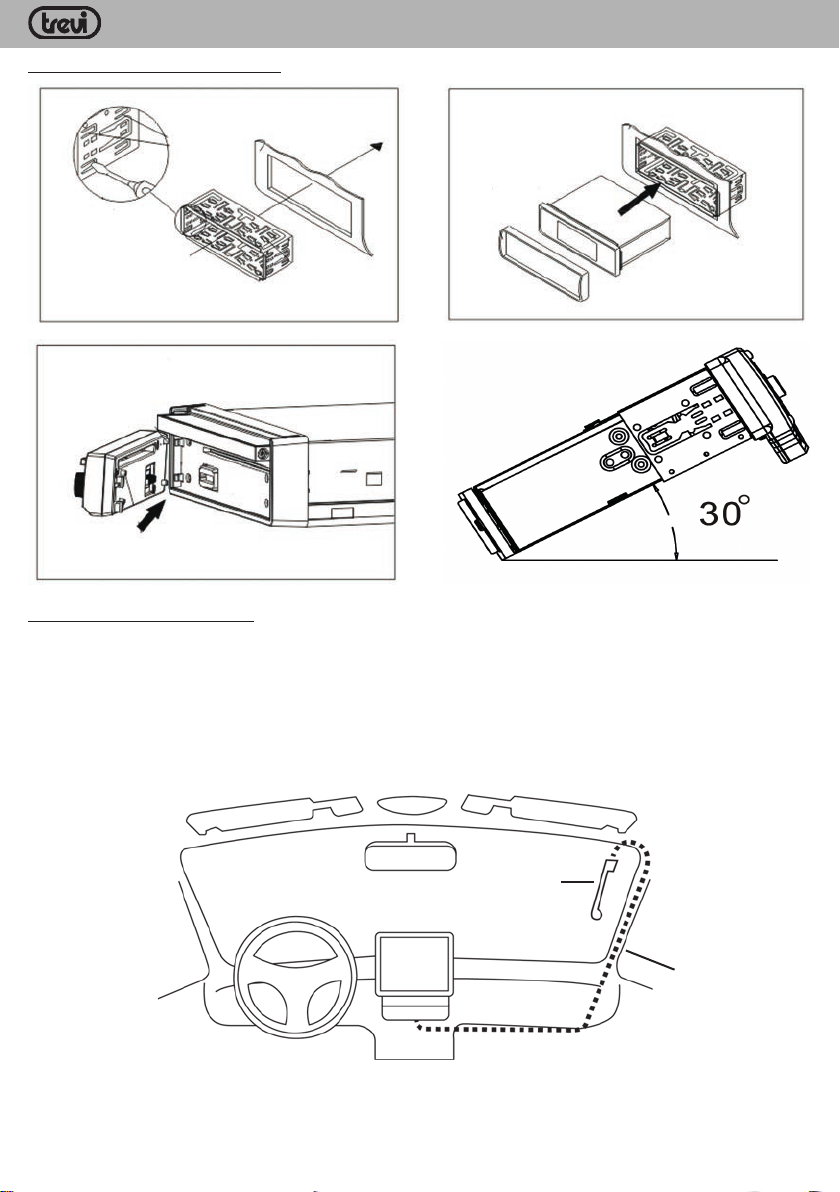
ESEMPIO DI INSTALLAZIONE
MDV 6380 DAB
Installazione antenna DAB
Per questa operazione rivolgersi ad un installatore professionale.
1. L'antenna DAB fornita richiede installazione su parabrezza anteriore in posizione verticale (vedi figura).
2. Pulire il vetro nel punto in cui si desidera applicare l'antenna.
3. Rimuovere con attenzione la pellicola a protezione dell'adesivo sull'antenna e posizionarla nel punto scelto.
L'antenna deve essere posizionata in modo che il contatto di massa possa essere steso sulla carrozzeria
metallica dell'auto (non e' necessario rimuovere la vernice).
4. Posizionare il cav o (lunghezza 3 mt.) all'interno del cruscotto auto fino a raggiungere la posizione dell'autoradio.
Collegare il cavo nell'ingresso antenna DAB ed assicurarlo avvitando il connettore.
Antenna DAB
Suggerimento
di percorso del
cavo antenna
Attenzione:
- Non installare l'antenna in una posizione che ostacola la visuale del conducente.
- Non posizionare il cavo e l'antenna dove potrebbero interferire con il buon funzionamento di AirBag
o altri dispositivi di sicurezza o dove potrebbero ostacolare la guida del veicolo.
- L'utilizzo su vetri schermati riduce le prestazioni dell'antenna.
3
Page 4
ITALIANO
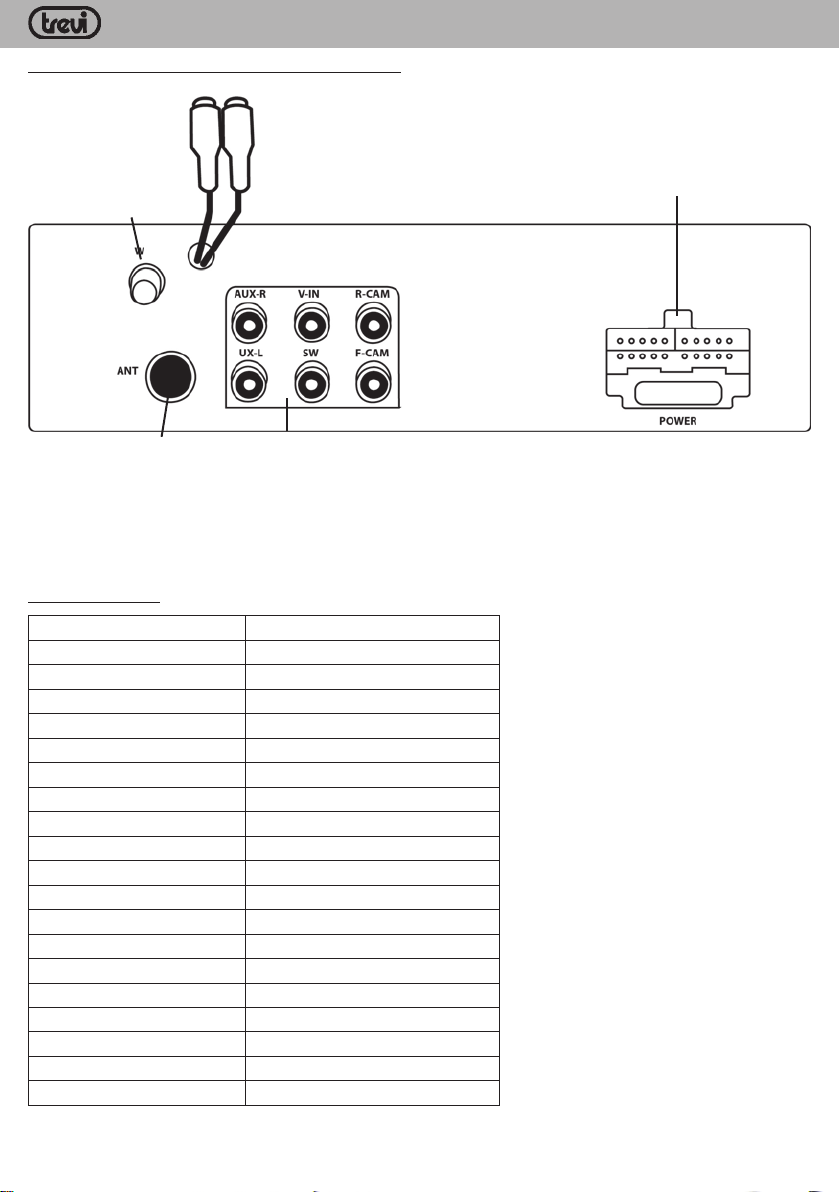
COLLEGAMENTI AUTORADIO POSTERIORI
Uscita video per
monitor esterni
Ingresso Antenna
DAB
MDV 6380 DAB
Adattatore
connettore ISO
FUSE 15A
Ingresso Antenna
FM
AUX-R: Ingresso audio canale destro
AUX-L: Ingresso audio canale sinistro
V-IN: Ingresso video
SW: uscita sub woofer
R-CAM: ingresso telecamera vista posteriore
F-CAM: ingresso telecamera vista frontale
Connettore ISO
Rosso Accensione +12V
Nero (dimensione maggiore) Massa
Nero (dimensione minore) Comandi volante (non utilizzato)
Giallo Batteria +12V
Bianco Altoparlante sinistro frontale (+)
Bianco/Nero Altoparlante sinistro frontale (-)
Grigio Altoparlante destro frontale (+)
Grigio/Nero Altoparlante destro frontale (-)
Verde Altoparlante sinistro posteriore (+)
Verde/Nero Altoparlante sinistro posteriore (-)
Viola Altoparlante destro posteriore (+)
Viola/Nero Altoparlante destro posteriore (-)
Blu Alimentazione antenna
Rosa Controllo telecamera posteriore
Grigio Comandi volante (non utilizzato)
Verde Comandi volante (non utilizzato)
Arancio Retroilluminazione cruscotto
Marrone Controllo freno a mano
Presa RCA rossa Uscita audio preamplificata destra
Presa RCA bianca Uscita audio preamplificata sinistra
4
Page 5
ITALIANO
MDV 6380 DAB
Collegare l'autoradio tramite il connettore ISO.
Per un corretto collegamento del connettore ISO, controllare i seguenti collegamenti:
al filo Giallo devono arrivare i 12V permanenti della batteria;
al filo Rosso devono arrivare i 12V dal quadro chiave d'accensione.
In questo modo l'autoradio si accende solo con la chiave inserita nel quadro.
Se dopo aver collegato l'autoradio utilizzando il connettore ISO questa non si accende, occorre f are un ponte fra
il filo Giallo e il filo Rosso (rivolgersi ad un elettrauto).
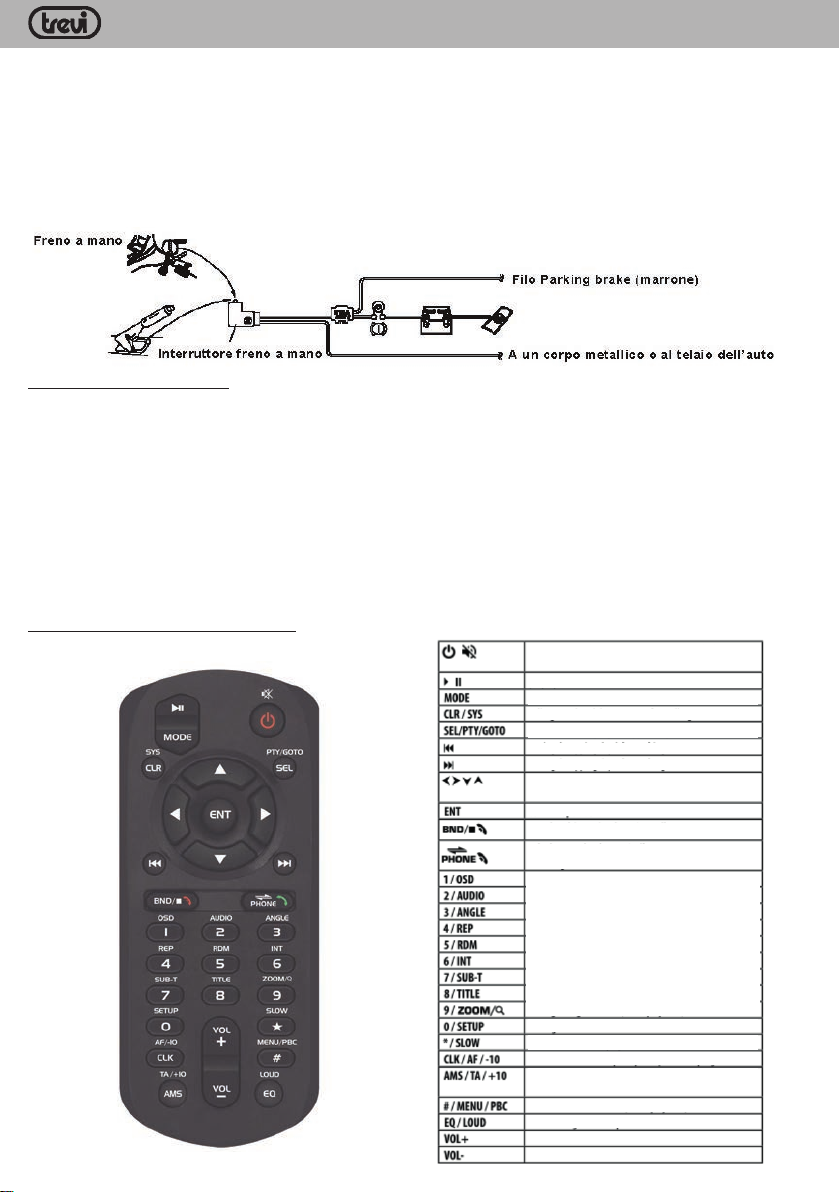
Collegare il filo Marrone all'interruttore del freno a mano come da immagine sottostante; se il filo non viene
collegato non sarà possibile vedere nessun video sullo Schermo LCD.
ALTRI COLLEGAMENTI
1. È possibile amplificare il segnale audio in uscita, collegando le uscite RCA AUDIO OUT-R e AUDIO OUT-L
ad un amplificatore, e le sue uscite collegarle agli speaker anteriori o posteriori.
2. È possiblile collegare un Subwoofer, collegando l'uscita SUB ad un amplificatore se il Subwoofer è passivo o
direttamente al Subwoofer se questo è attivo.
3. È possibile installare monitor aggiuntivi nella parte posteriore dell'autovettura, collegandoli all'uscita VIDEO
OUT (prese RCA gialle)
4. È possiblile collegare una videocamera di parcheggio, collegandola allapresa R-CAM. È necessario collegare
il filo Rosa BACKSIGHT ai 12V della retromarcia; in questo modo , una v olta inserita la retromarcia, l'autoradio
commuterà automaticamente sull'ingresso R-CAM trasmettendo l'immagine della videocamera.
5. È possiblile collegare una sorgente audio/video, collegando il video all'ingresso V-IN e l'audio agli ingressi
AUX R e AUX L.
DESCRIZIONE TELECOMANDO
Accensione/spegnimento/funzione MUTE
Lettura/pausa
Selezione sorgente
Cancellazione numero chiamante
Selezione/PTY/Funzione GOTO
Traccia/Sintonia precedente
Traccia/Sintonia successiva
Movimento cursore menu'/Regolazione
inclinazione monitor LCD
Conferma
Selezione banda/Chiusura chiamata
Passaggio chiamata da radio a telefono
Tasti numerici, se premuti a lungo hanno
varie funzioni (vedi paragra successivi)
Menu' impostazioni
Lettura video rallentata
Orologio/Funzione AF/Salto 10 tracce prec.
Ricerca stazioni / TA / Salto 10 tracce succ.
Menu' principale multimedia
Regolazione equalizzazione audio/loud
Regolazione volume +
Regolazione volume -
5
Page 6
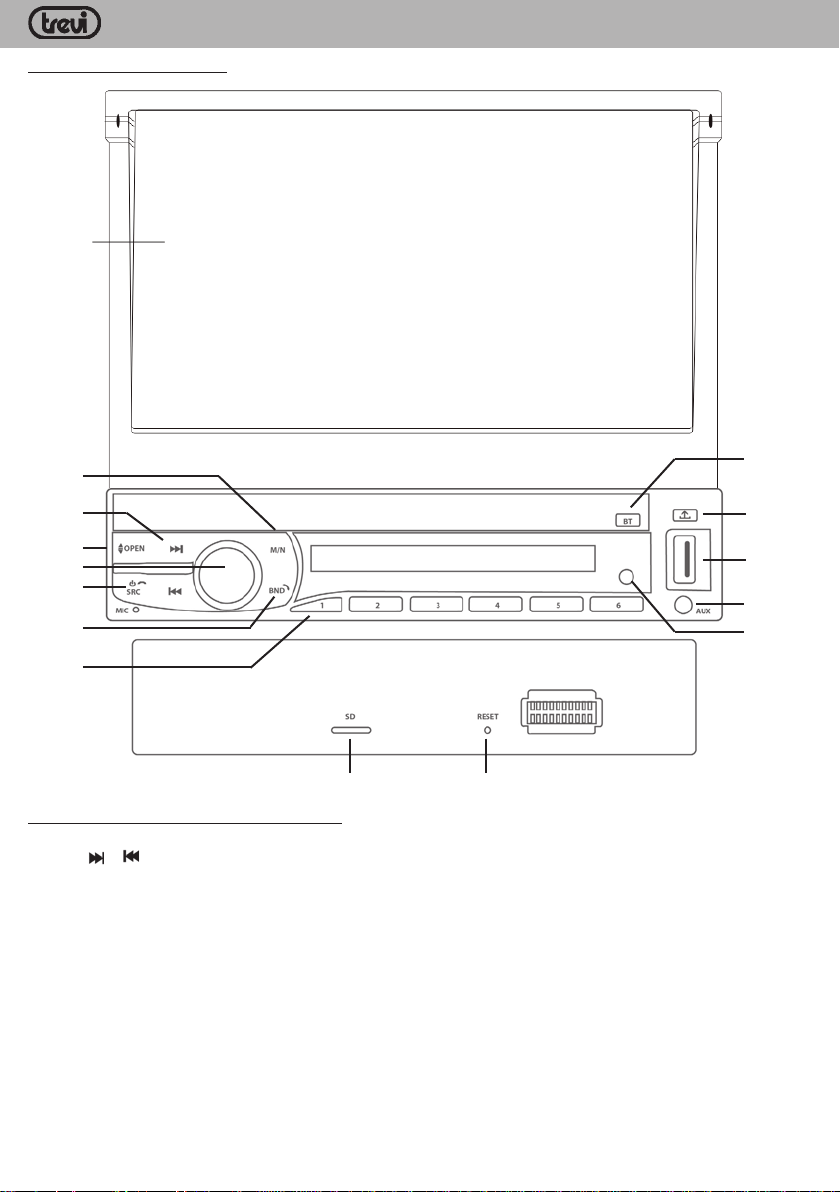
PANNELLO FRONTALE
15
ITALIANO
MDV 6380 DAB
1
2
3
4
5
6
7
1413
8
9
10
11
12
DESCRIZIONE PANELLO FRONTALE
1. Tasto M/N, richiamo schermata HOME (a display aperto)
2. Tasti
3. Tasto OPEN, aper tura schermo LCD, se premuto a lungo regola l'inclinazione dello schermo LCD quando
4. Controllo VOL/SEL, regolazione volume / attivazione menù regolazioni audio
5. T asto PWR/SRC, accensione/spegnimento unità, selezione sorgente audio, chiusura con versazione telefonica
6. Tasto BAND, selezione banda radio FM, apertura conversazione telefonica
7. Tasti 1-6, richiamo delle stazioni radio memorizzate
8. Tasto BT, richiamo diretto della funzione Bluetooth
9. Tasto REL, estrazione mini frontalino
10. Presa USB, lettore di apparecchi esterni dotati di presa USB
11. Ingresso AUX IN
12. IR, ricevitore segnale telecomando
13. Ingresso SD Card, lettore di schede memoria di tipo microSD
14. Tasto RESET
15. Schermo LCD
e , selezione file successivo/precedente
aperto
6
Page 7
ITALIANO
MDV 6380 DAB
ACCENSIONE
ACCENSIONE E SPEGNIMENTO
Premere il tasto POWER (5) sul frontale dell'autoradio o il tasto POWER (1) sul telecomando per accendere
l'autoradio.
Premere a lungo il tasto POWER (5) sul frontale dell'autoradio o il tasto POWER (1) sul telecomando per spegnere l'autoradio.
APERTURA E CHIUSURA SCHERMO LCD 7" E CAMBIO ANGOLAZIONE SCHERMO
Premere il tasto OPEN (3) sul frontale dell'autoradio per attivare l'apertura completamente motorizzata dello schermo.
Premete il tasto OPEN (3) sul frontale dell'autoradio per chiudere lo schermo LCD.
Premere a lungo il tasto OPEN (3) per regolare l'angolazione dello schermo LCD (sono disponibili diverse angolazioni).
Nota: per un corretto funzionamento di apertura e chiusura del display,l'autoradio non deve essere montata con
un'inclinazione superiore al 30%.
SELEZIONE SORGENTE
Con autoradio accesa e display aperto premere il tasto SRC(5) sul frontale dell'autoradio o il tasto SOURCE (7)
del telecomando per selezionare la sorgente da riprodurre. Le sorgenti disponibili sono: RADIO, RADIO DAB+,
PHONE LINK, USB, CARD , AV IN, BLUET OO TH. Le sorgenti USB e CARD sono disponibili solo se sono presenti
i relativi supporti.
(Vedi anche paragrafo SORGENTI E MENU PRINCIPALE)
CONTROLLI AUDIO
CONTROLLO VOLUME, BILANCIAMENTO E FADER
Premere ripetutamente il controllo volume (4) sul frontale dell'autoradio per effettuare le seguenti regolazioni:
VOLUME, equalizzazione predefinita EQ, LOUDNESS, AUDIO, bilanciamento canale sinistro/destro e fader
avanti/dietro (FIELD), regolazioni DISPLAY.
La funzione LOUDNESS esalta i toni bassi garantendovi un ascolto migliore.
Ruotare il controllo volume VOL/SEL (4) in senso orario/antioraio per aumentare/diminuire il livello del volume
o effettuare le altre regolazioni tramite touch screen. La regolazione volume si può effettuare con i tasti VOL+ e
VOL- (12) del telecomando.
FUNZIONE MUTE
Premere il tasto MUTE (1) del telecomando per escludere momentaneamente l'audio. Premerlo nuovamente per
ripristinare le condizioni iniziali.
FUNZIONE EQ
Premere il tasto EQ (3) del telecomando per applicare all’ascolto di qualsiasi sorgente, delle equalizzazioni sonore
predefinite scegliendo tra STANDARD, CLASSIC, ROCK, POP, JAZZ, ELECTRIC, CUSTOM.
Queste equalizzazioni si differenziano tra loro nelle impostazioni dei toni alti e dei toni bassi.
SORGENTI E MENU IMPOSTAZIONI
Premere l'icona in alto a sinistra dello schermo LCD per entrare nella selezione delle sorgenti e nel menu
impostazioni.
- Toccare l'immagine relativa alla sorgente che si desidera riprodurre.
- Toccare l'icona WALLPAPER per selezionare differenti sfondi sul monitor.
- Toccare l'icona F-CAM per visionare il video della telecamera con vista frontale (se installata).
- Toccare la dicitura SETUP per entrare nel menu delle impostazioni, selezionare l'icona relativa alle impostazioni
che si desidera modificare (premere le frecce rosse su/giu per far apparire ulteriori voci di impostazione).
SYSTEM
Area: selezione dell'area di uso dell'autoradio (standard Europa).
Language: scelta della lingua dei menu'.
F-Cam (Camera frontale): se attiv o, con camera frontale correttamente installata, abilita la visione per 10 secondi
della camera frontale nel passaggio da retromarcia a marcia normale dell'auto (default OFF).
Rear camera (Camera posteriore): abilitazione della camera di parcheggio se installata (Backsight).
7
Page 8

ITALIANO
Headlamp detection: regolazione della luminosità del display in base all'accensione della luce di cortesia dell'auto
(se viene effettuato il collegamento del filo arancione Headlight Detect).
Brake detection (Sensore freno a mano): abilita/disabilita la visione dei video anche in assenza di collegamento
all'interruttore del freno a mano.
Subwoofer: abilita/disabilita l'uscita SUB per subwoofer.
Beep: abilita/disabilita il suono ad ogni tocco del touch o pressione dei pulsanti.
AUDIO
Regolazioni impostazioni audio.
EQ: toccare sullo schermo LCD la voce corrispondente per applicare all’ascolto di qualsiasi sorgente, delle equalizzazioni sonore predefinite scegliendo tra STANDARD, CLASSIC, ROCK, POP, JAZZ, ELECTRIC, UTENTE.
Field: regolazione di Balance e Fader.
Loudness: toccare sullo schermo LCD la voce ON/OFF per attivare/disattivare il loudness.
DISPLAY
Type: e' possibile selezionare delle regolazione predefinite per il display.
Adjust: e' possibile effettuare regolazioni di vario tipo riguardanti il display.
MEDIA
Aspect ratio: e' possibile selezionare tra il rapporto video 4:3 e 16:9.
BT BLUETOOTH
Bluetooth: abilita/disabilita BT.
Name: nome BT da associare all'autoradio (CAR-KIT default).
PIN code: codice di protezione se richiesto durante il collegamento (Default 0000).
Auto link (Collegamento automatico): l'autoradio si collega automaticamente all'ultimo dispositivo associato.
Auto answer (Risposta automatica): l'autoradio apre automaticamente la chiamata in arrivo sul telefono.
Auto loading records: l'autoradio sincronizza il registro chiamate.
Auto loading phonebooks: l'autoradio sincronizza la rubrica.
Call volume (Suoneria chiamata): attiva un allarme sonoro per le chiamate in arrivo.
MDV 6380 DAB
TIME
Display mode: formato della data
Display format: formato ora 12/24H
Adjust: impostazione di data ed ora.
LIGHT
Backlight adjust: regolazione della luminosità display in base alle impostazioni display selezionate oppure in
combinazione con la funzione Headlamp detection
Color light: selezione del colore della retroilluminazione (Auto, Manual o Primar y); con Auto il colore viene
cambiato in maniera automatica dopo un certo tempo (Auto Cycle time). Con Man ual e' possibile selezionare il
colore preferito (RGB). Con Primary e' possibile selezionare il colore preferito tra quelli disponibili (Color choice).
SWC
Attiva le impostazioni per comandi al volante (non fornito).
VERSION
Versione software dell'autoradio.
8
Page 9
ITALIANO
MDV 6380 DAB
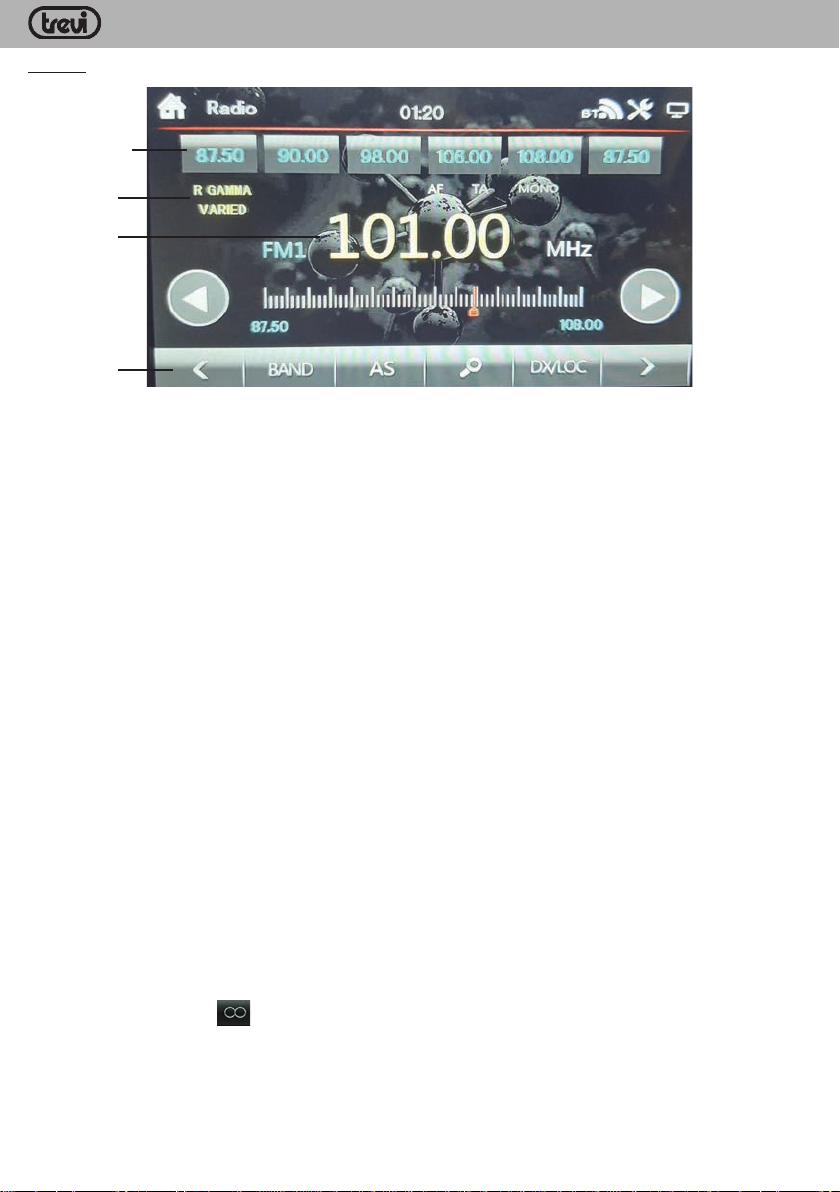
RADIO
Radio
memorizzate
Informazioni
RDS
Frequenza
sintonizzata
T asti Touch
screen
Per i comandi e' possibile utilizzare direttamente il touch screen (scorrere a destra e sinistra la barra
tasti per vedere ulteriori tasti funzione).
SINTONIA
Selezionare la banda di frequenza (FM1, FM2, FM3, AM1, AM2) che si desidera ascoltare con il tasto BAND.
Premere il tasto > per aumentare di 0,05MHz la frequenza visualizzata.
Premere il tasto < per diminuire di 0,05MHz la frequenza visualizzata.
Premere il tasto 4 per sintonizzarsi sulla stazione successiva con buon segnale a quella visualizzata.
Premere il tasto 3 per per sintonizzarsi sulla stazione precedente con buon segnale a quella visualizzata.
Premere i tasti del tastierino numerico da 1 a 6 per selezionare le stazioni radio memorizzate.
MEMORIZZAZIONE MANUALE DELLE STAZIONI
Sintonizzarsi sulla stazione desiderata come precedentemente descritto.
Tenere premuto un tasto (sul frontale o sul telecomando) da 1 a 6 relativo alla posizione in cui si vuole memorizzare la stazione o toccare a lungo il relativo numero sullo schermo LCD, fino a che la radio emette un beep e
la stazione verrà automaticamente memorizzata.
Ripetete la procedura per memorizzare le stazioni in tutte le bande.
MEMORIZZAZIONE AUTOMATICA DELLE STAZIONI
Premere il tasto AS per avviare la scansione automatica delle stazioni; l'autoradio memorizzer à le stazioni radio
più forti in quella banda fino ad occupare tutte le memorizzazioni possibili (18 in FM). Al termine della scansione
la radio riprodurrà alcuni secondi diogni radio memorizzata.
LOCAL
Questa funzione aumenta la sensibilità della radio durante la ricerca, selezionando le stazioni con il segnale più forte.
Premete il tasto DX/LOC sullo schermo per avviare la funzione; sul display apparirà l’indicazione LOC.
Premete nuovamente il tasto per disattivare la funzione; sul display scomparirà l’indicazione LOC.
STEREO
Questa funzione attiva/disattiva la modalità Stereo durante l'ascolto.
Premete il tasto con icona
Premete nuovamente il tasto per disattivare la funzione; sul display comparirà l'indicazione MONO.
AF FREQUENZE ALTERNATIVE
Questa funzione riceve la lista delle frequenze alternative dell'emittente e si sintonizza automaticamente su
quella con il segnale migliore.
Premere il tasto AF per attivare questa funzione (sul display compare l'indicazione AF).
Quando il segnale della stazione che si sta ascoltando peggiora, l'indicatore AF comincia a lampeggiare, l'autoradio
sullo schermo per attivare la funzione; sul display apparirà l'indicazione ST.
9
Page 10
ITALIANO
controlla la lista delle frequenze alternative trasmesse dalla stazione e si risintonizza su quella con segnale migliore.
Nota: in condizioni di scarso segnale la funzione AF può generare piccole interruzioni di ricezione. Questo
è dovuto al tempo necessario per agganciare la frequenza alternativa. Se questo dovesse risultare un
problema si consiglia di disinserire la funzione.
TA INFORMAZIONI SUL TRAFFICO
Questa funzione attiva la ricezione automatica dei notiziari sul traffico.
Premere il tasto TA per attivare questa funzione (sul display compare l'indicazione TA).
Se la stazione che si sta ascoltando non trasmette notiziari sul traffico, l'autoradio cercherà automaticamente
una stazione che li trasmette.
Quando un bollettino sul traffico inizia il volume viene automaticamente aumentato. Al termine del bollettino il
volume torna alle condizioni iniziali.
MDV 6380 DAB
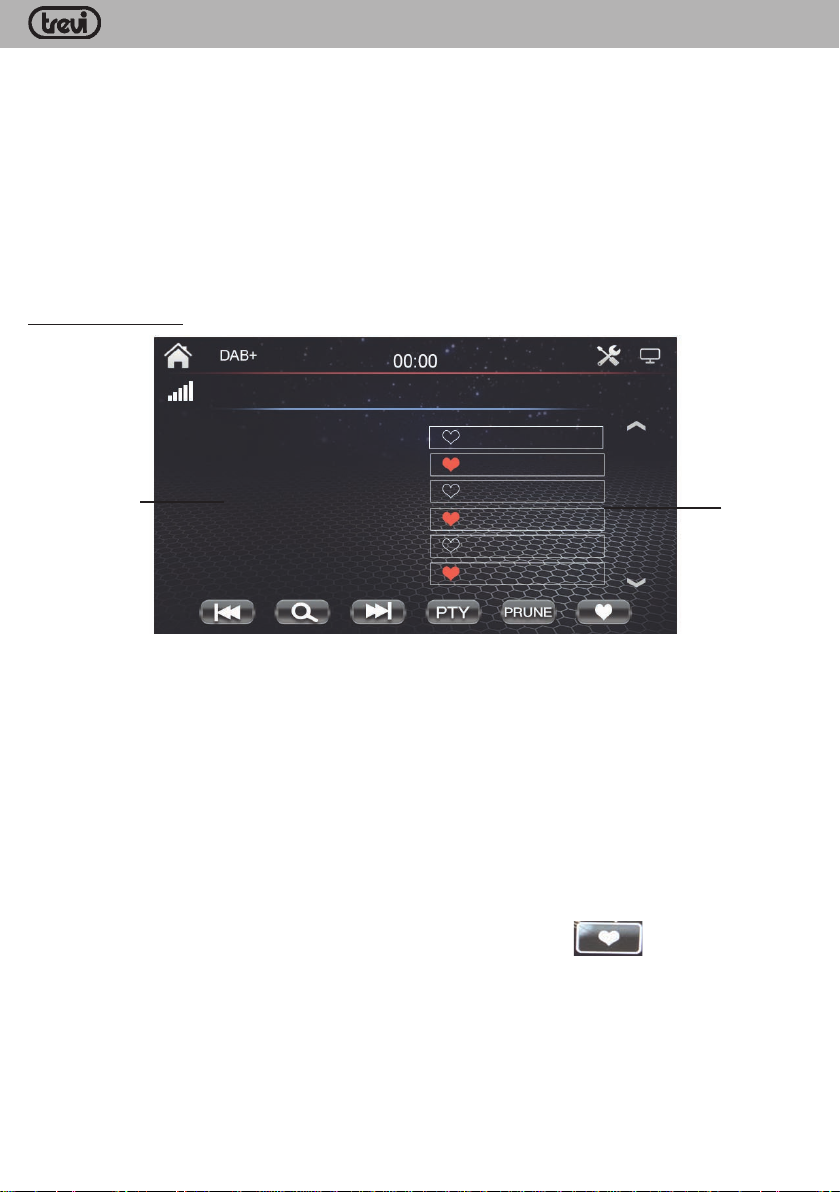
RADIO DAB/DAB+
Informazioni
radio in
riproduzione
Elenco radio
disponibili
MEMORIZZAZIONE AUTOMATICA DELLE STAZIONI
Premere il tasto LENTE INGRANDIMENTO per avviare la scansione automatica delle stazioni.
SINTONIA
Richiamare direttamente dall'elenco delle radio disponibili, la stazione che si desidera ascoltare.
PTY
Premere il tasto PTY e selezionare la tematica desiderata; nell'elenco delle radio verranno evidenziate le radio
corrispondenti alla tematica scelta.
PRUNE
Permette di eliminare dalle lista delle stazioni memorizzate tutte le radio trovate ma non disponibili (scarso segnale).
LISTA RADIO PREFERITE
Per creare una lista di radio preferite premere il tasto touch screen con icona
10
Page 11
ITALIANO
MDV 6380 DAB
INGRESSO USB/SD CARD
RIPRODUZIONE E ARRESTO
Inserire una microSD Card nell'ingresso SD Card (13) posto dietro al frontalino dell'autoradio.
Inserite un dispositivo USB nella presa USB (10) posto sul frontale dell'autoradio; la riproduzione partirà automaticamente.
Nota: l'autoradio potrebbe non supportare alcuni apparecchi esterni con presa USB, questo è dovuto
all'incompatibilità dei processori.
Premere il tasto
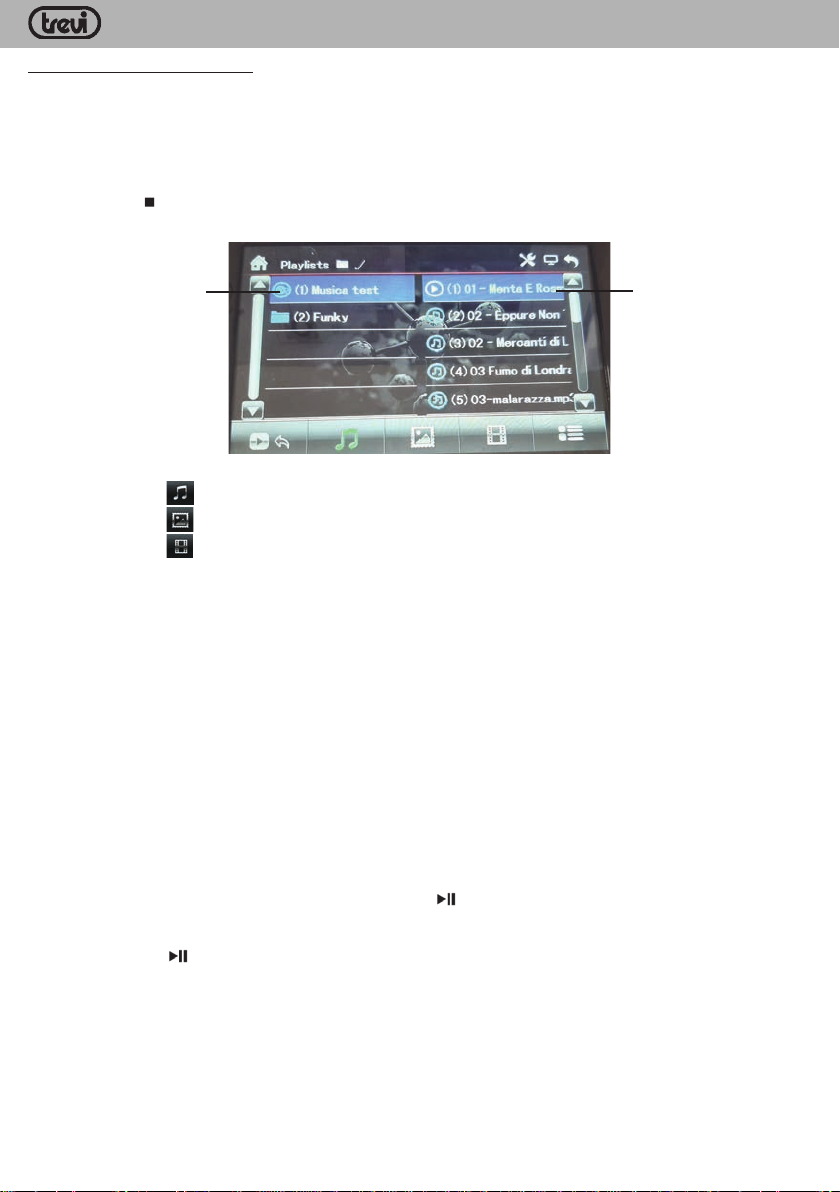
Si mostrerà una videata come la seguente:
per fermare la riproduzione e visualizzare la lista delle cartelle e delle tracce disponibili.
Selezionare l'icona
Selezionare l'icona
Selezionare l'icona
Elenco
cartelle
per l'ascolto di brani musicali.
per la visione di immagini.
per la visione di video.
Elenco file
Note:
Tutte le funzioni attivabili direttamente dal telecomando sono attivabili anche dai comandi touch
screen sul display quando presenti.
Le funzioni descritte si riferiscono alla riproduzione delle tracce video. Alcune di queste fuznioni sono
presenti anche per la riproduzione delle tracce audio, ma possono presentarsi in modo diverso.
In caso di riproduzione di immagini o video se il filo Marrone PARKING è correttamente collegato
all'interruttore del freno a mano, non sarà possibile vedere nessuna immagine sullo schermo con auto
in movimento. Occorre fermarsi e azionare il freno a mano.
SALTO ALLA TRACCIA SEGUENTE/PRECEDENTE
1. Premere il tasto 9 per passare alla traccia precedente.
2. Premere il tasto : per passare alla traccia seguente.
RICERCA VELOCE
1. Premere piu' volte a lungo il tasto 9(11) del telecomando per far indietreggiare velocemente la traccia.
2. Premere piu' volte a lungo il tasto :(11) del telecomando per far avanzare velocemente la traccia.
3. Per tornare alla riproduzione normale premere il tasto
(10).
FUNZIONE PAUSA
1. Premere il tasto (9) sul telecomando per fermare momentaneamente la riproduzione e ottenere un fermo
immagine.
2. Premerlo di nuovo per ripristinare la riproduzione.
FUNZIONE RIPETIZIONE E RIPRODUZIONE
1. Premere piu' volte a lungo il tasto numerico 4/REP (4) del telecomando per ripetere la stessa traccia (1), il
contenuto di una cartella (DIR), tutte le ttracce presenti (ALL).
2. Premere a lungo il tasto numerico 5/RDM(4) per attivare la riproduzione casuale delle tracce. Ripremerlo a
lungo per tornare alla normale riproduzione.
11
Page 12
ITALIANO
MDV 6380 DAB
FUNZIONE AV IN
La funzione AV IN permette di riprodurre una sorgente esterna audio/video collegata all'ingresso A V IN sul retro
dell'autoradio oppure una sorgente audio collegata all'ingresso AUX IN sul frontale dell'autoradio.
In caso di segnale audio su entrambe le entrate verrà data la precedenza al segnale AUX IN posteriore.
In caso di assenza di video verrà mostrata la scritta NO VIDEO.
Nota: se il filo Marrone PARKING è correttamente collegato all'interruttore del freno a mano, non sarà
possibile vedere nessuna immagine sullo Schermo. Occorre fermarsi e azionare il freno a mano.
FUNZIONE BLUETOOTH (modalità HANDS-FREE)
È possibile effettuare chiamate dal proprio cellulare in modalità HANDS-FREE (in modalità libera) grazie alla
compatibiltà con il sistema internazionale wireless Bluetooth.
- Quando si effettua una chiamata, parlare con voce forte e chiara.
- Per avere una condizione ottimale prima di effettuare o ricevere una chiamata, chiudere i finestrini dell'automobile.
- La voce può essere riprodotta in maniera distorta nel caso in cui ci siano problemi di campo telefonico.
- L'utilizzo della funzione HANDS-FREE dipende dalla compatibilità parziale/totale del telefono cellulare.
- Assicurarsi che nel proprio telefono cellulare sia disponibile la connessione tramite Bluetooth, altrimenti
consultare il manuale del proprio telefono cellulare.
CONNESSIONE
1. Attivare la funzione Bluetooth dal vostro telefono cellulare ed effettuare la ricerca dei dispositivi Bluetooth.
2. Selezionare il dispositivo CAR KIT che corrisponde all'autoradio.
3. Inserire il codice a 4 cifre "0000" se richiesto.
EFFETTUARE UNA CHIAMATA
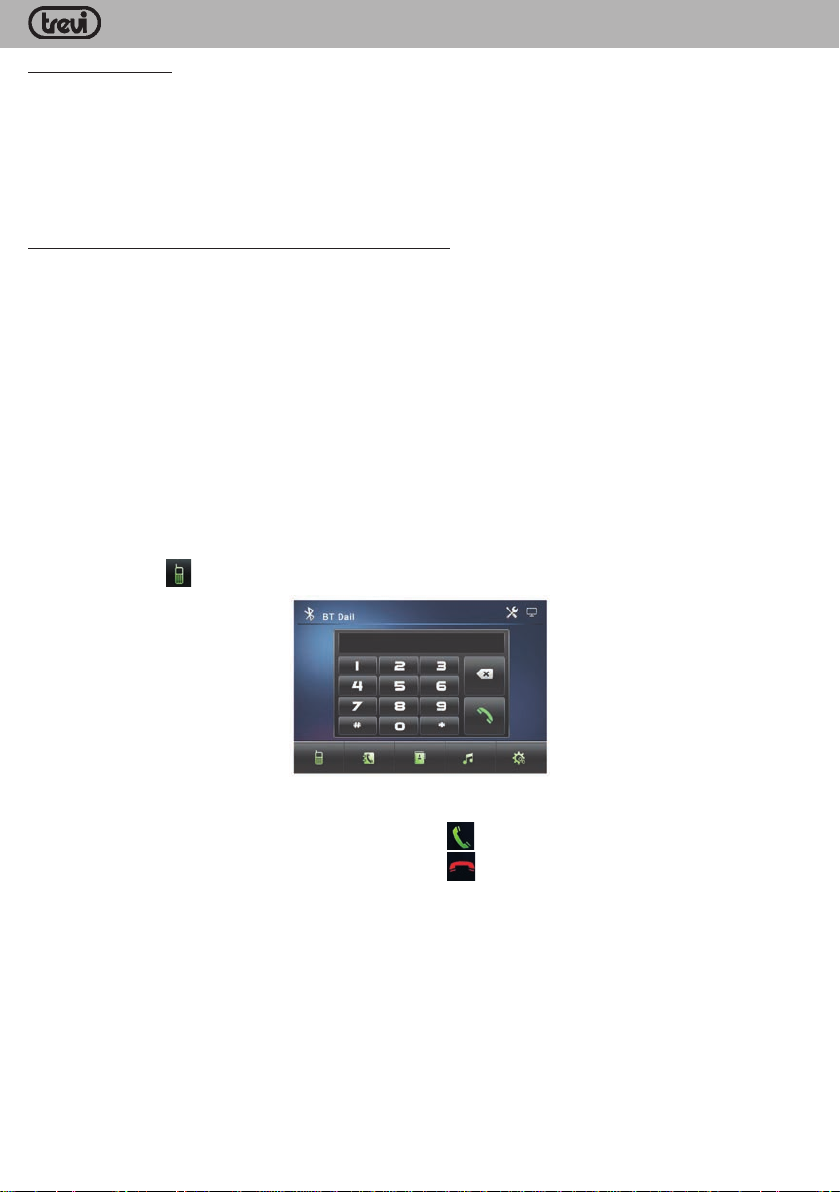
1. Premere l'icona
. Comparirà la seguente schermata:
2. Effettuare una chiamata telefonica dall'autoradio immettendo il numero da chiamare tramite i Tasti numerici
del telecomando o direttamente sullo schermo LCD.
3. Toccare lo schermo LCD in corrispondenza del simbolo
4. Toccare lo schermo LCD in corrispondenza del simbolo
12
sul per avviare la chiamata.
per terminare la chiamata.
Page 13
ITALIANO
EFFETTUARE UNA CHIAMATA DAI NUMERI MEMORIZZATI
È possibile selezionare il numero ed effettuare una chiamata di una persona dalla lista delle chiamate effettuate ,
ricevute, o perse.
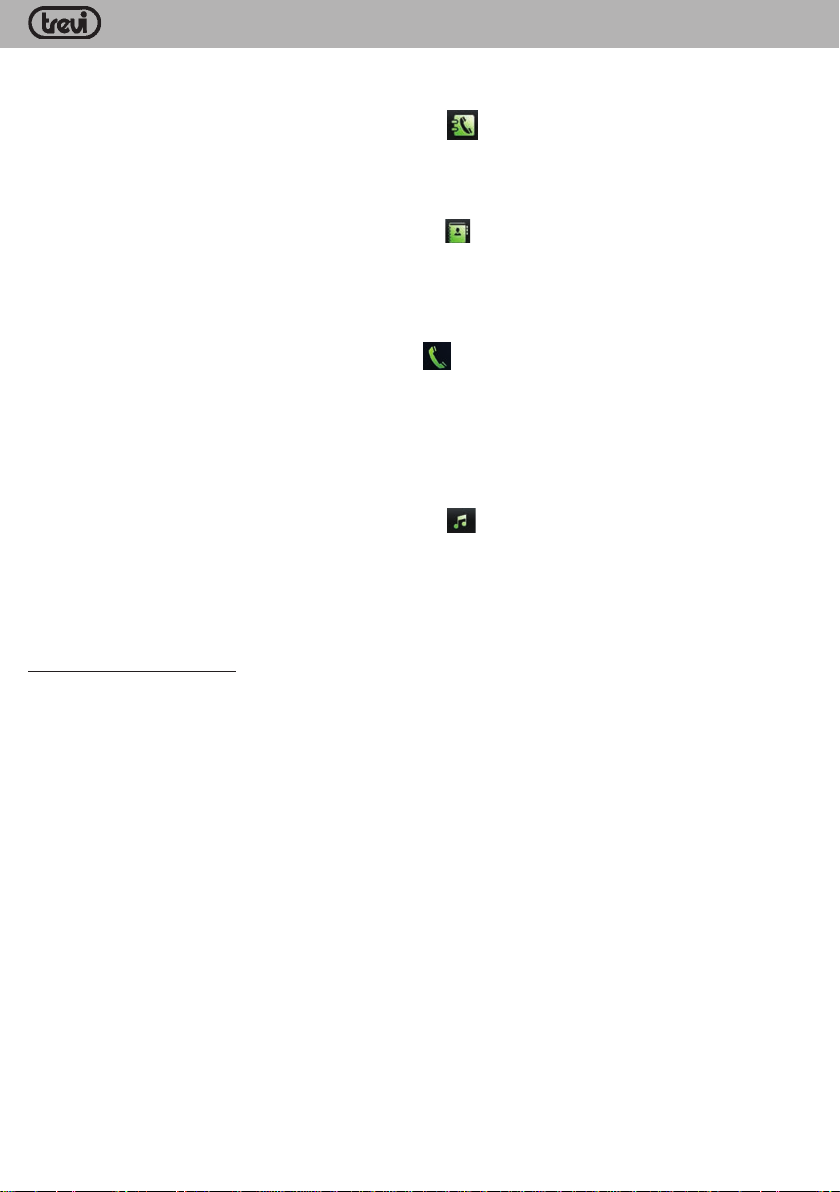
1. Toccare lo schermo LCD in corrispondenza del simbolo
ricevute o perse. Tappare 2 volte sul nome/numero che si desidera chiamare.
EFFETTUARE UNA CHIAMATA DAI NUMERI IN RUBRICA
È possibile selezionare il numero ed effettuare una chiamata di una persona dalla rubrica.
1 Toccare lo schermo LCD in corrispondenza del simbolo
2 volte sul nome/numero che si desidera chiamare.
RICEZIONE DI UNA CHIAMATA
Quando si riceve una chiamata, s'interromperà la riproduzione della sorgente in visione o ascolto e l'autoradio
emetterà la suoneria dall'impianto audio dell'automobile.
Toccare lo schermo LCD in corrispondenza sul simbolo
L'audio della vostra chiamata sarà udibile dalle casse del vostro impianto.
Al termine della chiamata, l'autoradio riprenderà la riproduzione della sorgente in visione o ascolto da dove era
stata interrotta.
RIPRODUZIONE FILE AUDIO TRAMITE BLUETOOTH
Tramite la connessione Bluetooth è possibile ascoltare le tracce musicali presenti nel vostro telefono cellulare
(se compatibile con il protocollo A2DP) direttamente tramite l'impianto audio dell'automobile.
1. Toccare lo schermo LCD in corrispondenza del simbolo
2. Avviare la riproduzione delle tracce audio del vostro telefono cellulare. Utilizzare i comandi di riproduzione
(play/pausa e salto traccia) presenti sullo schermo LCD.
Note: la riproduzione file tramite Bluetooth non funziona con le tracce video.
L'autoradio riproduce solo file audio con telefoni cellulari compatibili con il protocollo A2DP. Consultare
il manuale del proprio telefono cellulare.
per visionare la lista delle chiamate effettuate,
per visionare i numeri salvati in rubrica. Tappare
per avviare la chiamata.
.
MDV 6380 DAB
FUNZIONE PHONE LINK
La funzione PHONE LINK permette di collegare e controllare uno smartphone Android tramite il touch screen
dell'autoradio. E' possibile anche visualizzare sul display dell'autoradio lo schermo dello smartphone.
1. Effettuare il collegamento Bluetooth come descritto nel capitolo precedente.
2. Selezionare la funzione PHONE LINK dal menu' principale.
3. Cercare ed installare l'applicazione AUT OLINK V ehicle multimedia entertainment da Play store, in alternativa
scansionare il QR code GOOGLE che appare sul display dell'autoradio.
4. Abilitare sul proprio smartphone l'opzione USB debugging (vedi manuale di istruzioni del telefono) e collegare
tramite apposito cavo lo smartphone Android alla presa USB dell'autoradio.
5. Dare il consenso alle varie richieste dell'applicazione Autolink. Sul display dell'autoradio verrà visualizzato lo
schermo dello smartphone, a questo punto e' possibile controllare il telefono tramite il touch screen dell'autoradio.
Nota: i passi da 3 a 5 si devono effettuare solo al primo collegamento.
Nota: si raccomanda di non visualizzare video durante la guida per evitare pericolose distrazioni.
E' possibile utilizzare applicazioni dedicate all'uso dello smartphone durante la guida come ANDROID AUTO
o WAZE che permettono un controllo facile ed essenziale delle funzioni principali del telefono (riproduzione
musicale, navigatore, chiamate telefoniche e app di messaggistica) senza distrazioni dalla guida. Per maggiori
informazioni si rimanda al sito dei programmatori delle varie app.
Nota1: Trevi non si ritiene responsabile per app di terze parti che possano danneggiare il corretto funzionamento dell'autoradio).
Nota2: si ricorda che l'uso dello smartphone alla guida e' vietato e pesantemente sanzionato.
13
Page 14

ITALIANO
MDV 6380 DAB
CARATTERISTICHE TECNICHE
GENERALI
Alimentazione: ....................................................................................12V (10,8-13,8V)
Assorbimento max ..............................................................................10A
Potenza di uscita massima: ................................................................50W x4
Impedenza degli altoparlanti: ..............................................................4 - 8ohm per canale
Banda di frequenza:............................................................................FM 87,5 - 108MHz
............................................................................................................AM 522 - 1620 KHz
............................................................................................................DAB/DAB+ 174 - 240 MHz
Potenza max. di trasmissione BT: .......................................................0,8mW
Frequenza di trasmissione BT: ...........................................................2,4 GHz
NOTA
TREVI persegue una politica di continuo miglioramento dei prodotti. Per tale motivo le caratteristiche tecniche
sono soggette a modifiche senza preavviso.
14
Page 15

ENGLISH
MDV 6380 DAB
USE NOTES
• Listening at high volumes for a long time may damage your hearing.
• Avoid placing the player:
- Near magnetic fields.
- Near heat sources such as heaters and stoves.
- In very humid places such as bathrooms, swimming pools, etc ...
- In very dusty places.
- In places subject to strong vibrations.
• Position the appliance so that there is always enough space on its sides free air circulation.
• If liquids penetrate inside the appliance , bring the appliance to the nearest center authorized TREVI assistance.
• Always check before recharging the appliance that the power and connection are installed correctly.
• No naked flame sources, such as lighted candles, should be placed on the unit.
• The appliance must not be e xposed to dripping or splashing water and no objects full of liquid, such as v ases,
must be placed on the appliance.
• Keep this manual for future reference.
For cleaning, we recommend the use of a soft, slightly moistened cloth. Avoid solvents or abrasive substances.
Important
The good construction of this appliance guarantees perfect operation for a long time. However , should any inconvenience arise, it is advisable to consult the nearest authorized Service Center.
TREVI pursues a policy of continuous research and development. Therefore the products may have different
characteristics from those described.
Note for the correct use and operation of the car radio:
If the front is not inserted correctly, the controls do not work and the panel itself ma y come off and f all. It is there-
fore recommended to always make sure that the front panel is perfectly inserted before using the appliance.
• Do not touch the contacts of the front panel and the central unit to avoid bending and dirtying them.
• If it is necessary to clean the contacts, perform it with a cotton swab slightly soaked in alcohol. Be extremely
careful not to bend the spring contacts of the central unit during the cleaning operation.
• Do not expose the front panel to sunlight or strong sources of heat to avoid its deformation and / or malfunctions.
• Do not drop the faceplate and avoid strong impacts.
• Do not clean the faceplate with solvents or other corrosive chemicals, use a slightly dampened cloth.
SAFETY INFORMATION
1. The product has been designed to display video footage when the vehicle is stationary (with the handbrake
engaged).
2. Respect the electrical connections as per the connection diagram.
3. F or the safety of the driver , the product must work to displa y video clips only when the vehicle is stationary (with
the handbrake engaged) and therefore must not tamper with or modify the installation connection.
4. Use only parts contained in the package. The use of parts not included can cause damage or malfunctions.
5. If the installation angle of the unit is greater than 30 °, the appliance may not perform very well.
6. Do not block the cooling area of the unit on the rear with wires or other par ts. The obstruction could lead to
excessive heating and therefore its damage.
15
Page 16
ENGLISH
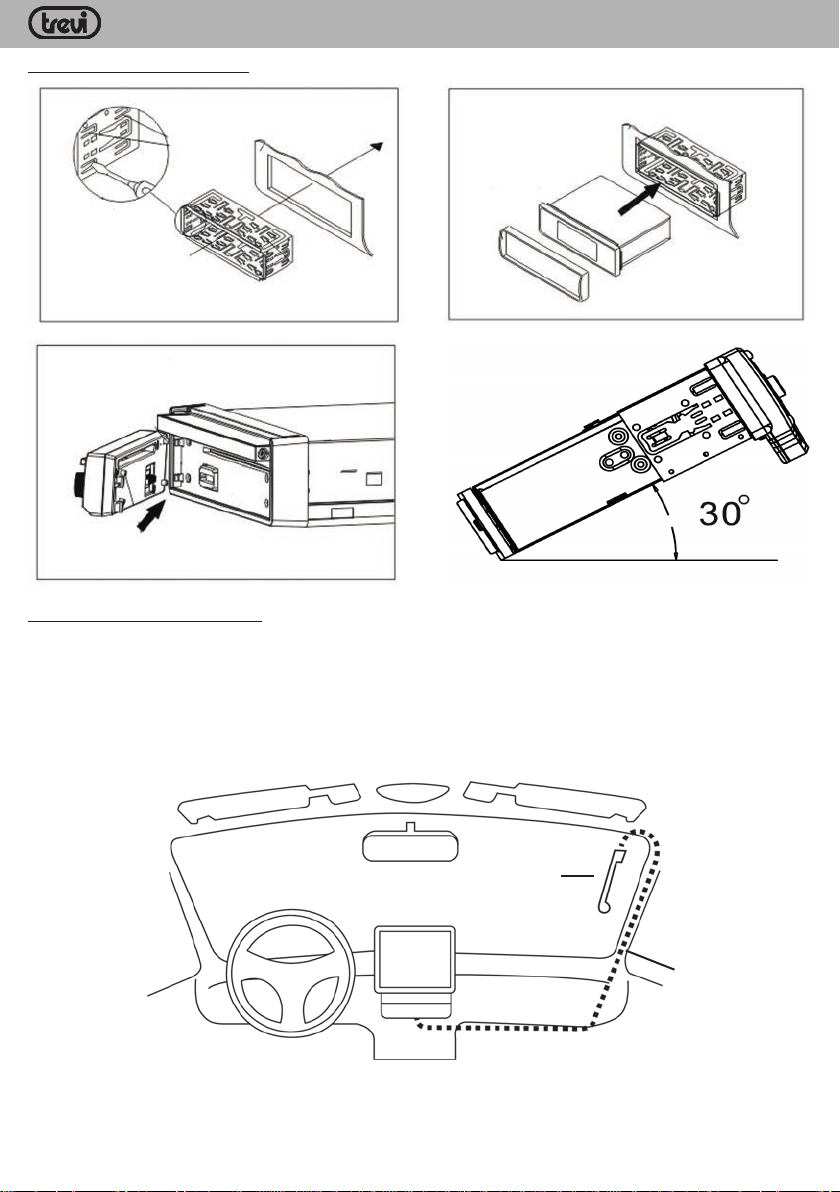
INSTALLATION EXAMPLE
MDV 6380 DAB
Installation of DAB antenna
For this operation, contact a professional installer.
1. The DAB antenna supplied requires installation on the front windscreen in a vertical position (see figure).
2. Clean the glass where you want to attach the antenna.
3. Carefully remov e the protectiv e film from the adhesive on the antenna and place it in the chosen location. The
antenna must be positioned so that the ground contact can be spread on the metal body of the car (it is not
necessary to remove the paint).
4. Position the cable (length 3 m) inside the car dashboard until you reach the position of the radio. Connect the
cable to the DAB antenna input and secure it by screwing the connector.
DAB antenna
Antenna cable
Caution:
- Do not install the antenna in a position that obstructs the driver's view.
- Do not place the cable and the antenna where they could interfere with the proper functioning of the
AirBag or other safety devices or where they could impede the driving of the vehicle.
- The use on shielded glass reduces the antenna performance.
16
Page 17
ENGLISH
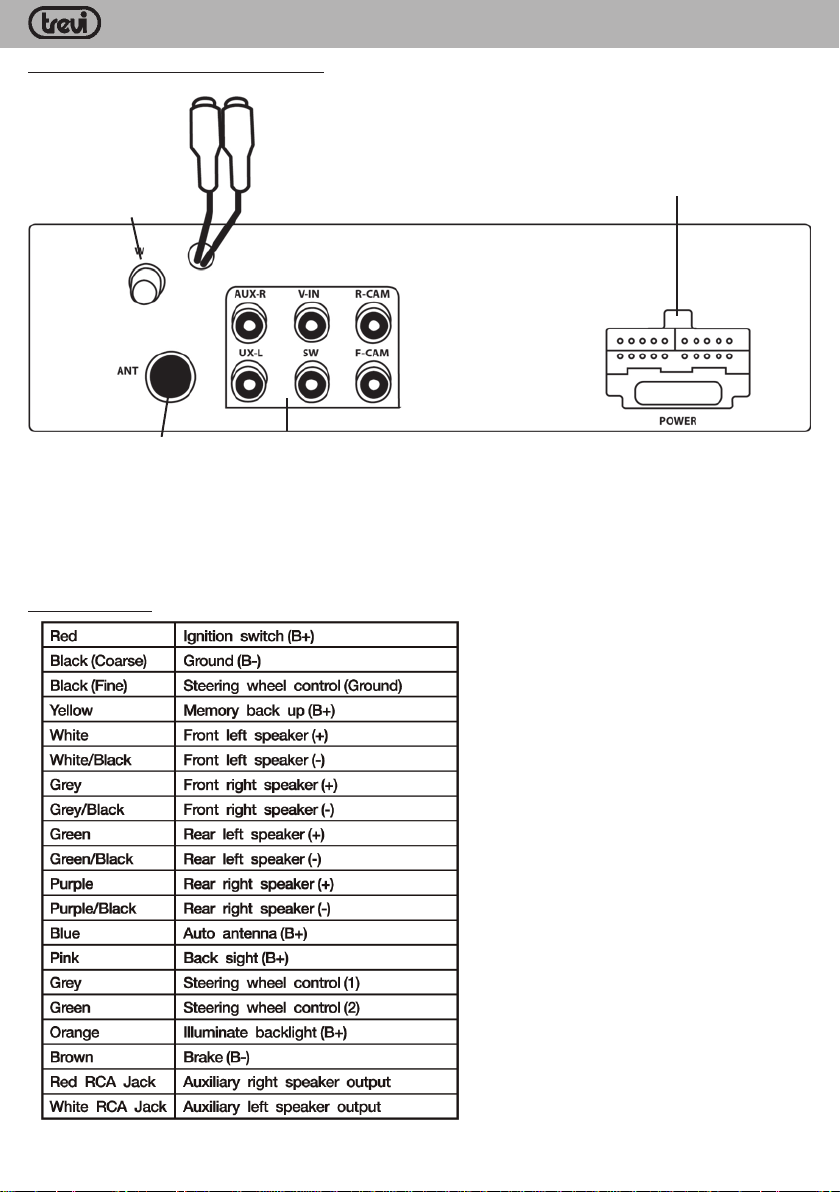
REAR CAR RADIO CONNECTIONS
RCA monitor
video out
MDV 6380 DAB
DAB antenna
input
FM antenna input
ISO conenctor
ISO connector
FUSE 15A
AUX-R: Right channel audio input
AUX-L: Left channel audio input
V -IN: Video input
SW: subwoofer output
R-CAM: rear view camera input
F-CAM: front view camera input
17
Page 18
ENGLISH
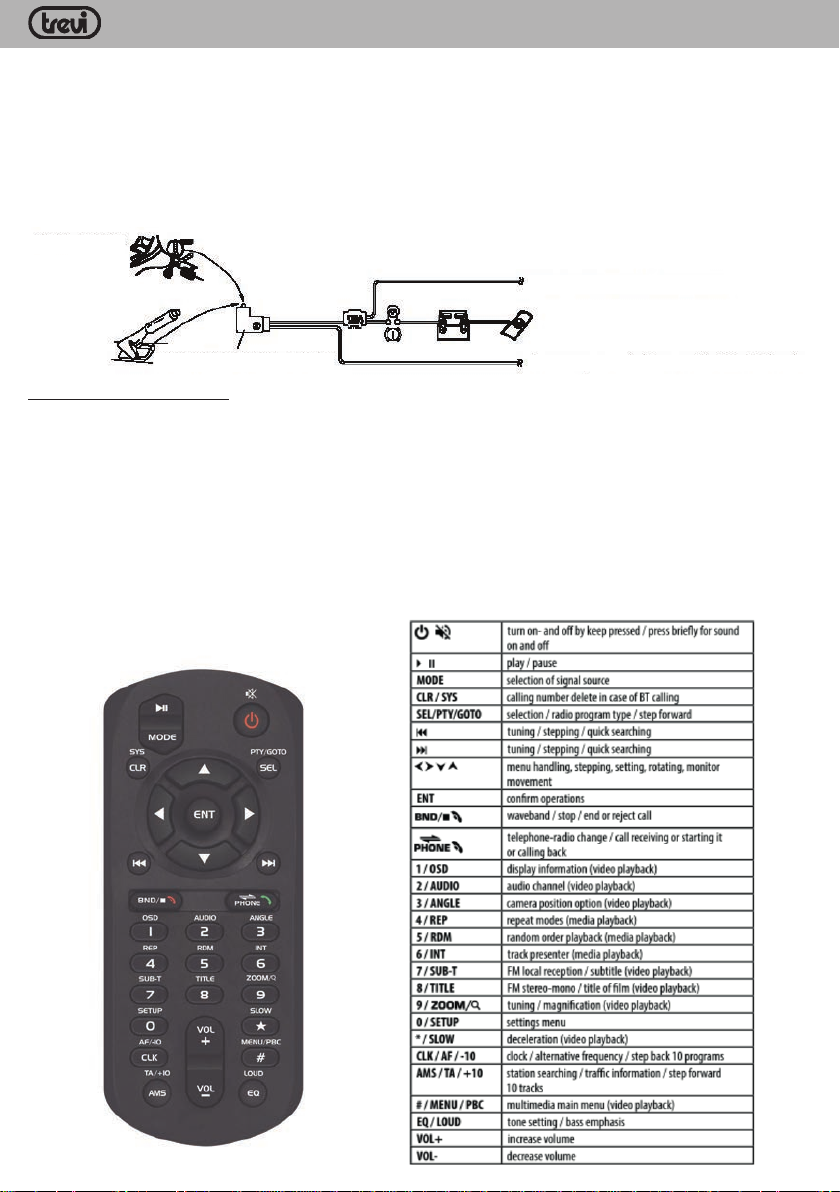
Connect the car radio via the ISO connector.
For a correct connection of the ISO connector, check the following connections:
the yellow 12V battery must arrive at the yellow wire;
the red wire must reach 12V from the ignition key panel.
In this way the radio can only be turned on with the key inserted in the panel.
If after connecting the car radio using the ISO connector it does not turn on, make a bridge between the yellow
and the red wire (contact an electrician).
Connect the Brown wire to the handbrake switch as sho wn in the image belo w; if the wire is not connected it will
not be possible to see any video on the LCD screen.
PARKING BRAKE
PARKING BRAKE CABLE (BROWN)
MDV 6380 DAB
PARKING BRAKE SWITCH
CAR GROUND
OTHER CONNECTIONS
1. It is possible to amplify the audio output signal by connecting the RCA AUDIO OUT-R and AUDIO OUT-L
outputs to an amplifier, and its outputs connect them to the front or rear speakers.
2. It is possible to connect a Subwoofer, by connecting the SUB output to an amplifier if the Subw oofer is passiv e
or directly to the Subwoofer if it is active.
3. Additional monitors can be installed in the rear of the car by connecting them to the VIDEO OUT (yellow RCA
sockets)
4. A parking camera can be connected by connecting it to the R-CAM socket. It is necessary to connect the Rosa
BACKSIGHT wire to the 12V of the rev erse gear; in this way, once the rev erse gear is engaged, the radio will
automatically switch to the R-CAM input transmitting the image of the video camera.
5. It is possible to connect an audio / video source by connecting the video to the V-IN input and the audio to the
AUX R and AUX L inputs.
18
Page 19
FRONT PANEL
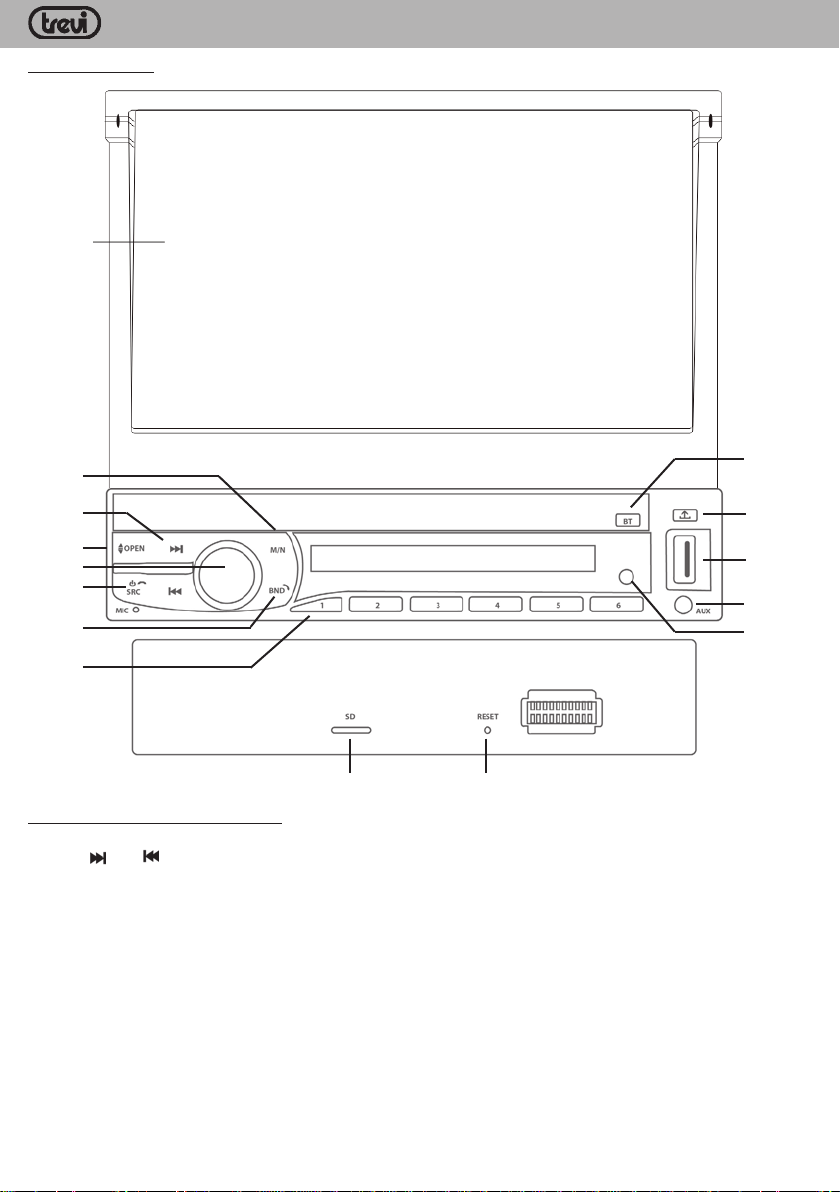
15
ENGLISH
MDV 6380 DAB
1
2
3
4
5
6
7
1413
8
9
10
11
12
FRONT PANEL DESCRIPTION
1. M / N key, HOME screen recall (with the display open)
2. Keys
3. OPEN key, opening the LCD screen, if pressed for a long time it adjusts the inclination of the LCD screen
4. VOL / SEL control, volume adjustment / audio adjustment menu activation
5. PWR / SRC key, unit on / off, audio source selection, telephone conversation closure
6. BAND key, FM radio band selection, telephone conversation opening
7. Keys 1-6, recalling stored radio stations
8. BT button, direct call of the Bluetooth function
9. REL key, mini front panel extraction
10. USB socket, reader of external devices equipped with USB socket
11. AUX IN input
12. IR, remote control signal receiver
13. SD Card input, microSD memory card reader
14. RESET button
15. LCD screen
and , next / previous file selection
when open
19
Page 20
ENGLISH
MDV 6380 DAB
POWER ON
SWITCHING ON AND OFF
Press the POWER button (5) on the front of the car radio or the POWER button (1) on the remote control to
switch on the car radio.
Long press the POWER button (5) on the front of the car radio or the POWER button (1) on the remote control
to switch off the car radio.
OPENING AND CLOSING THE 7 "LCD SCREEN AND CHANGING THE SCREEN ANGLE
Press the OPEN button (3) on the front of the radio to activate the fully motorized opening of the screen.
Press the OPEN button (3) on the front of the car radio to close the LCD screen.
Long press the OPEN button (3) to adjust the angle of the LCD screen (different angles are available).
Note: for correct opening and closing of the display, the radio must not be mounted with an inclination greater
than 30%.
SOURCE SELECTION
With the radio on and the display open, press the SRC button (5) on the front of the radio or the SOURCE b utton
(7) on the remote control to select the source to be played. The available sources are: RADIO, DAB + RADIO,
PHONE LINK, USB, CARD, AV IN, BLUETOOTH. USB and CARD sources are available only if their suppor ts
are present.
(See also paragraph SOURCES AND MAIN MENU)
AUDIO CONTROLS
VOLUME, BALANCE AND FADER CONTROL
Repeatedly press the volume control (4) on the front of the car radio to make the following adjustments: VOLUME, default EQ equalization, LOUDNESS, A UDIO, left / right channel balance and forward / back fader (FIELD),
DISPLAY adjustments.
The LOUDNESS function enhances the low tones ensuring a better listening.
Turn the VOL / SEL volume control (4) clockwise / anticlockwise to increase / decrease the v olume le v el or mak e
other adjustments via the touch screen. The volume can be adjusted with the VOL + and VOL- (12) buttons on
the remote control.
MUTE FUNCTION
Press the MUTE button (1) on the remote control to temporarily mute the sound. Press it again to restore the
initial conditions.
EQ FUNCTION
Press the EQ button (3) on the remote control to apply predefined sound equalizations to any source, choosing
from STANDARD, CLASSIC, ROCK, POP, JAZZ, ELECTRIC, CUSTOM.
These equalizations differ from each other in the high and low tones settings.
SOURCES AND SETTINGS MENU
Press the icon at the top left of the LCD screen to enter the source selection and settings menu.
- Touch the image of the source you want to play.
- Touch the WALLPAPER icon to select different backgrounds on the monitor.
- Touch the F-CAM icon to view the video of the front view camera (if installed).
- Touch the word SETUP to enter the settings menu, select the icon relating to the settings you want to modify
(press the red arrows up / down to bring up further setting items).
SYSTEM
Area: selection of the area of use of the radio (standard Europe).
Language: choice of menu language.
F-Cam (Front camera): if activ e, with the front camera correctly installed, it enab les viewing f or 10 seconds of the
front camera in the transition from reverse to normal driving of the car (default OFF).
Rear camera: enabling the parking camera if installed (Backsight).
20
Page 21

ENGLISH
Headlamp detection: adjustment of the display brightness based on the car's courtesy light turning on (if the
orange Headlight Detect wire is connected).
Brake detection (handbrake sensor): enables / disables the video viewing even in the absence of connection to
the handbrake switch.
Subwoofer: Enable / disable the SUB output for subwoofer.
Beep: enable / disable the sound with each touch of the touch or pressing the buttons.
AUDIO
Audio settings adjustments.
EQ: touch the corresponding item on the LCD screen to apply predefined sound equalizations to any source,
choosing from STANDARD, CLASSIC, ROCK, POP, JAZZ, ELECTRIC, USER.
Field: adjustment of Balance and Fader.
Loudness: touch the ON / OFF item on the LCD screen to activate / deactivate loudness.
DISPLAY
Type: it is possible to select predefined settings for the display.
Adjust: it is possible to make various types of adjustments regarding the display.
MEDIA
Aspect ratio: it is possible to select between the 4: 3 and 16: 9 video ratio.
BT BLUETOOTH
Bluetooth: enable / disable BT.
Name: BT name to be associated with the car radio (CAR-KIT default).
PIN code: protection code if requested during connection (Default 0000).
Auto link: the car radio automatically connects to the last paired device.
Auto answer: The car radio automatically opens the incoming call on the phone.
Auto loading records: the car radio synchronizes the call log.
Auto loading phonebooks: the car radio synchronizes the phone book.
Call volume: Activates an audible alarm for incoming calls.
MDV 6380 DAB
TIME
Display mode: date format
Display format: 12 / 24H time format
Adjust: setting the date and time.
LIGHT
Backlight adjust: adjustment of the displa y brightness according to the selected display settings or in combination
with the Headlamp detection function
Color light: selection of the backlight color (A uto, Man ual or Primary); with Auto the color is changed automatically
after a certain time (Auto Cycle time). With Manual it is possible to select the preferred color (RGB). With
Primary it is possible to select the preferred color among those available (Color choice).
SWC
Activate settings for steering wheel controls (not supplied).
VERSION
Car radio software version.
21
Page 22
ENGLISH
MDV 6380 DAB
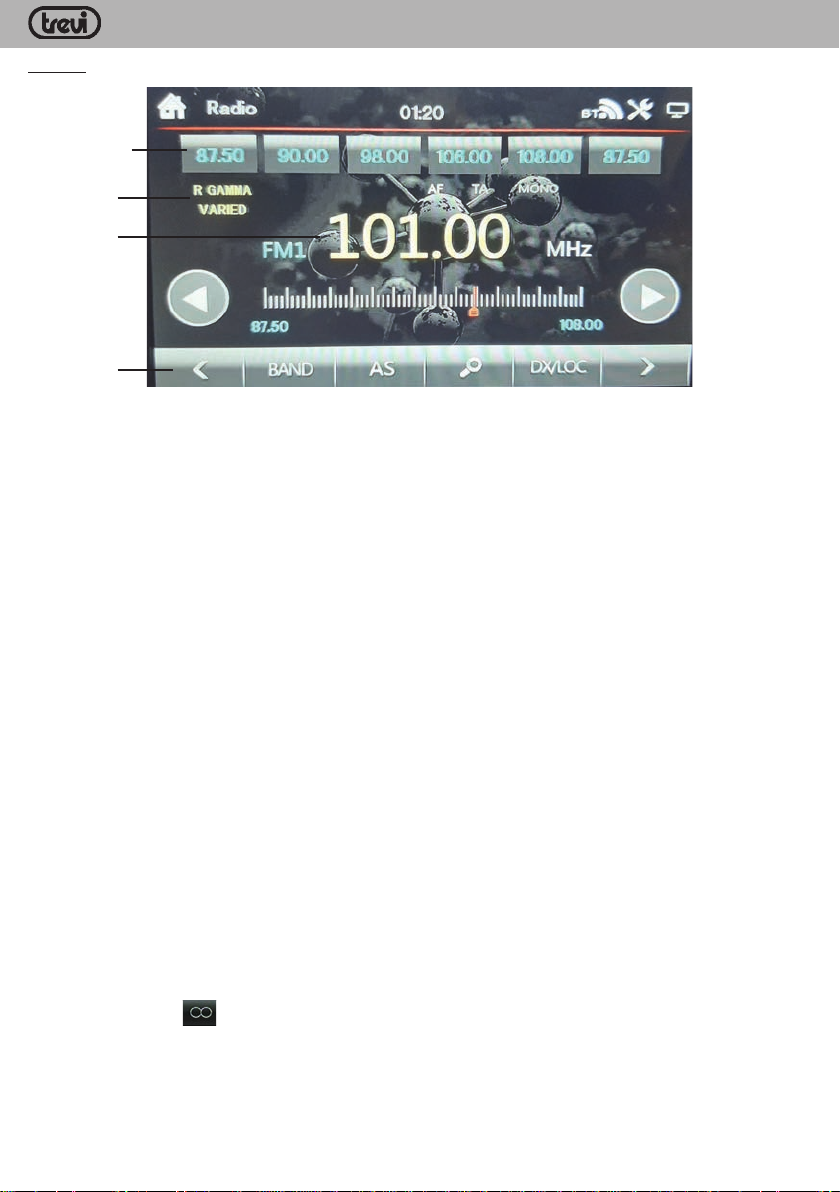
RADIO
Stored radio
RDS info
Tuned
frequency
Touch
screen keys
For the controls it is possible to use the touch screen directly (scroll the key bar to the right and left to
see further function keys).
TUNING
Select the frequency band (FM1, FM2, FM3, AM1, AM2) you want to listen to with the BAND button.
Press the > key to increase the displayed frequency by 0.05MHz.
Press the < button to decrease the displayed frequency by 0.05MHz.
Press button 4 to tune in to the next station with a good signal to the one displayed.
Press key 3 to tune in to the previous station with a good signal to the one displayed.
Press the numeric keypad keys 1 to 6 to select the stored radio stations.
MANUAL STORAGE OF STATIONS
Tune in to the desired station as previously described.
Press and hold a button (on the front or on the remote control) from 1 to 6 relative to the position where you want
to store the station or touch the number on the LCD screen for a long time, until the radio beeps and the station
is automatically memorized .
Repeat the procedure to store stations in all bands.
AUTOMATIC STORAGE OF STATIONS
Press the AS button to start the automatic station scan; the radio will memorize the strongest radio stations in
that band until it occupies all possible memorizations (18 in FM). When the scan is complete, the radio will play
a few seconds for each stored radio.
LOCAL
This function increases the sensitivity of the radio during the search by selecting the stations with the strongest
signal.
Press the DX / LOC key on the screen to start the function; LOC will appear on the display.
Press the button again to deactivate the function; LOC will disappear from the display.
STEREO
This function activates / deactivates the Stereo mode while listening.
Press the icon button
Press the button again to deactivate the function; MONO will appear on the display.
22
on the screen to activate the function; ST will appear on the display.
Page 23
ENGLISH
AF ALTERNATIVE FREQUENCIES
This function receives the list of alternative frequencies of the station and automatically tunes to the one with
the best signal.
Press the AF button to activate this function (the indication AF appears on the display).
When the signal of the station you are listening to gets worse, the AF indicator starts to flash, the car radio checks
the list of alternative frequencies transmitted by the station and retunes to the one with the best signal.
Note: in low signal conditions the AF function can generate small reception interruptions. This is due to the time
required to engage the alternative frequency. If this is a problem, it is advisable to deactivate the function.
T A TRAFFIC INFORMATION
This function activates the automatic reception of traffic announcements.
Press the TA button to activate this function (the TA indication appears on the display).
If the station you are listening to does not broadcast traffic news, the radio will automatically search for a station
that broadcasts them.
When a traffic report starts the volume is automatically increased. At the end of the bulletin the volume returns
to the initial conditions.
MDV 6380 DAB
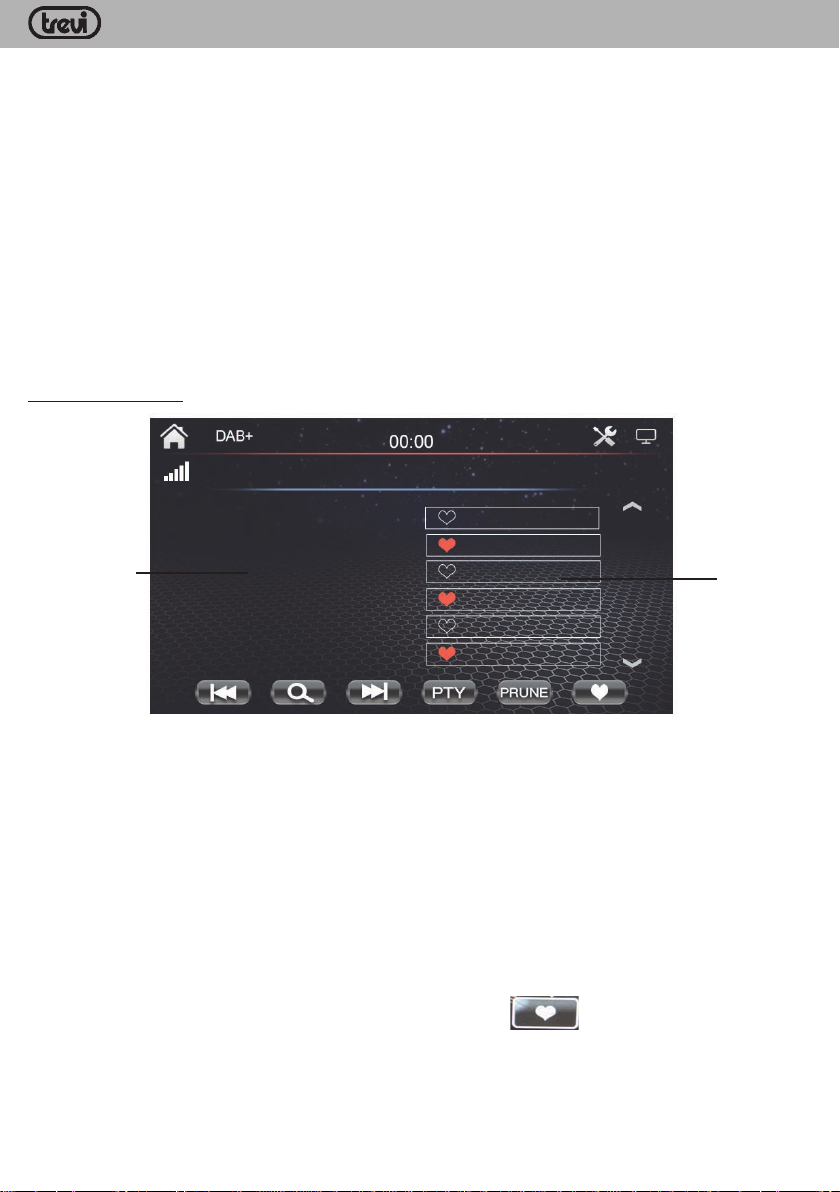
DAB/DAB+ RADIO
Radio
information
AUTOMATIC STORAGE OF STATIONS
Press the MAGNIFYING LENS button to start the automatic station scan.
TUNING
Call the station you want to listen to directly from the list of available radios.
PTY
Press the PTY button and select the desired topic; in the radio list the r adios corresponding to the chosen theme
will be highlighted.
PRUNE
Allows you to delete all the radios found but not available from the list of stored stations (poor signal).
FAVORITE RADIO LIST
To create a list of favorite radios, press the icon touch screen button
Radio list
23
Page 24
ENGLISH
MDV 6380 DAB
USB / SD CARD INPUT
REPRODUCTION AND ARREST
Insert a microSD Card into the SD Card input (13) located behind the front of the car radio.
Insert a USB device into the USB socket (10) located on the front of the car radio; playback will start automatically .
Note: the car radio may not support some external devices with USB socket, this is due to the incompatibility of
the processors.
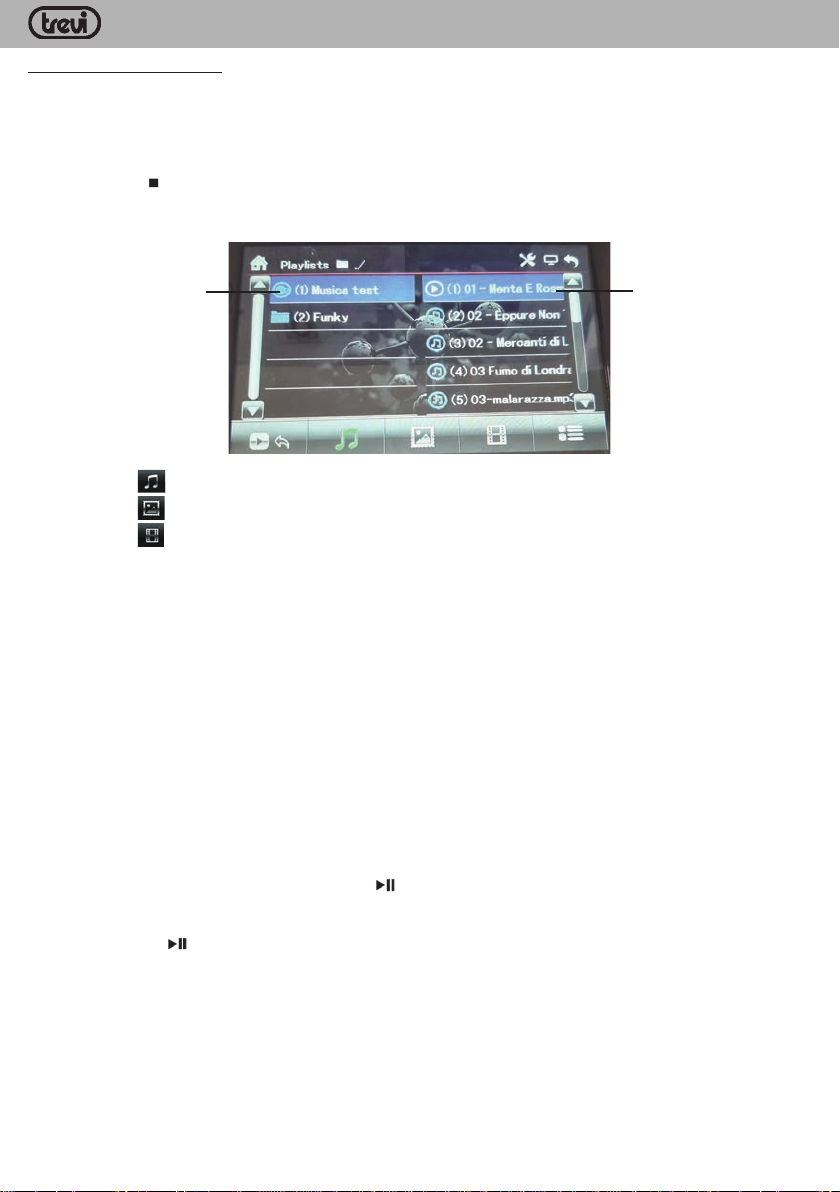
Press the button
A screen like the following will be shown:
to stop playback and display the list of available folders and tracks.
Folder
Select the icon
Select the icon
Select the icon
Note:
All functions that can be activated directly from the remote control can also be activated from the
touch screen controls on the display when present.
The functions described refer to the playback of video tracks. Some of these functions are also
present for the reproduction of the audio tracks, but they can be presented in a different way.
If images or videos are played if the Brown PARKING wire is correctly connected to the handbrake
switch, it will not be possible to see any image on the screen with the car in motion. You must stop and
apply the handbrake.
JUMP TO THE NEXT / PREVIOUS TRACK
1. Press the 9 button to move to the previous track.
2. Press the button: to go to the next track.
QUICK SEARCH
1. Press several times the button 9 (11) on the remote control to fast reverse the track.
2. Press several times the button: (11) on the remote control to fast forward the track.
3. To return to normal playback, press the button
for listening to music.
for viewing images.
for watching videos.
(9).
Files
PAUSE FUNCTION
1. Press the button
2. Press it again to restore playback.
REPEAT AND REPRODUCTION FUNCTION
1. Press several times the numeric button 4 / REP (4) on the remote control to repeat the same track (1), the
contents of a folder (DIR), all the tracks present (ALL).
2. Long press number button 5 / RDM (4) to activate random track playback. Long press it again to return to
normal playback.
24
(9) on the remote control to momentarily stop playback and obtain a still image.
Page 25
ENGLISH
MDV 6380 DAB
AV IN FUNCTION
The AV IN function allo ws you to play an external audio / video source connected to the AV IN input on the rear
of the car radio or an audio source connected to the AUX IN input on the front of the car radio.
In case of audio signal on both inputs, priority will be given to the rear AUX IN signal.
If there is no video, the word NO VIDEO will be shown.
Note: if the PARKING Brown wire is correctly connected to the handbrake switch, no image can be seen on the
Screen. You must stop and apply the handbrake.
BLUETOOTH FUNCTION (HANDS-FREE mode)
You can make calls from your mobile phone in HANDS-FREE mode (in free mode) thanks to the compatibility
with the international Bluetooth wireless system.
- When making a call, speak loud and clear.
- For optimum condition before making or receiving a call, close the car windows.
- The voice can be reproduced in a distorted way in case of telephone field problems.
- The use of the HANDS-FREE function depends on the partial / total compatibility of the mobile phone.
- Make sure that the connection via Bluetooth is available in your mobile phone, otherwise consult the manual
of your mobile phone.
CONNECTION
1. Activate the Bluetooth function from your mobile phone and search for Bluetooth devices.
2. Select the CAR KIT device that corresponds to the car radio.
3. Enter the 4-digit code "0000" if required.
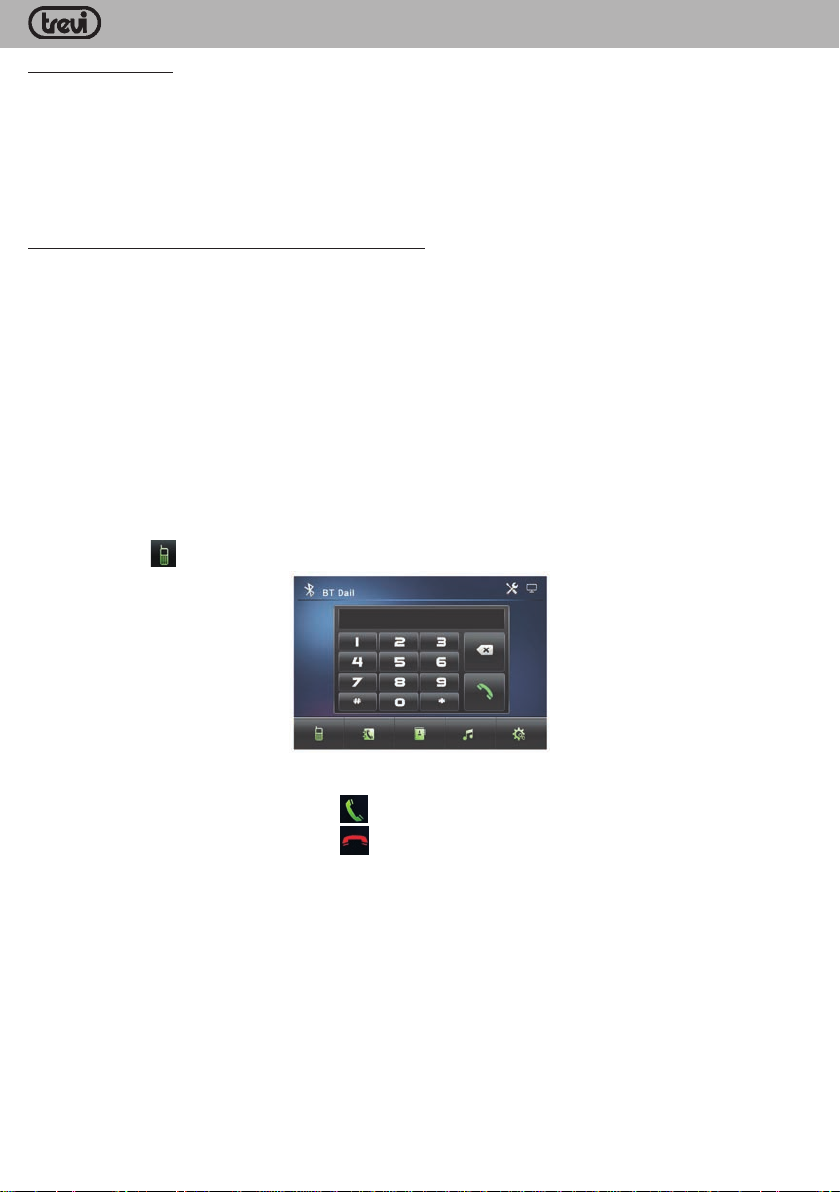
MAKE A CALL
1. Press the icon
. The following screen will appear:
2. Make a phone call from the car radio by entering the number to call using the numeric buttons on the remote
control or directly on the LCD screen.
3. Touch the LCD screen next to the symbol
4. Touch the LCD screen next to the symbol
on to start the call.
to end the call.
25
Page 26
ENGLISH
MAKE A CALL FROM STORED NUMBERS
You can select the number and make a call from a person from the list of calls made, received, or missed.
1. Touch the LCD screen ne xt to the symbol
the name / number you want to call.
MAKE A CALL FROM THE NUMBERS IN THE PHONE BOOK
You can select the number and make a call to a person from the phone book.
1 Touch the LCD screen next to the symbol
name / number you want to call.
RECEIVING A CALL
When a call is received, the playback of the source will be interrupted in viewing or listening and the radio will
emit the ringer from the car audio system.
Touch the LCD screen next to the symbol
The audio of your call will be audible from the speakers of your system.
At the end of the call, the radio will resume playback of the source in viewing or listening from where it was
interrupted.
PLAYING AUDIO FILES VIA BLUETOOTH
Using the Bluetooth connection, you can listen to the music tracks on your mobile phone (if compatible with the
A2DP protocol) directly through the car audio system.
1. Touch the LCD screen next to the symbol
2. Start playing the audio tracks of your mobile phone. Use the playback controls (play / pause and track jump)
on the LCD screen.
Note: file playback via Bluetooth does not work with video tracks.
The car radio only plays audio files with A2DP-compatible mobile phones. Consult the manual of your mobile phone.
to view the list of calls made, received or missed. Tap twice on
to view the numbers saved in the phone book. Tap twice on the
to start the call.
.
MDV 6380 DAB
PHONE LINK FUNCTION
The PHONE LINK function allows you to connect and control an Android smartphone via the car radio touch
screen. It is also possible to display the smartphone screen on the car radio display.
1. Make the Bluetooth connection as described in the previous chapter.
2. Select the PHONE LINK function from the main menu.
3. Search and install the A UTOLINK Vehicle multimedia entertainment application from the Play store, alternatively
scan the GOOGLE QR code that appears on the car radio display.
4. Enable the USB debugging option on your smartphone (see the phone's instruction manual) and connect the
Android smartphone to the USB socket on the car radio using the appropriate cable.
5. Give consent to the various requests of the Autolink application. The smartphone screen will be displayed on
the car radio display, at this point you can control the phone via the car radio touch screen.
Note: steps 3 to 5 must be carried out only at the first connection.
Note: it is recommended not to display videos while driving to avoid dangerous distractions.
It is possible to use applications dedicated to the use of the smartphone while driving such as ANDROID AUTO
or WAZE that allow easy and essential control of the main functions of the phone (music playback, navigator,
phone calls and messaging apps) without distraction from driving. For more information, see the website of the
programmers of the various apps.
Note1: T revi is not responsible for third party apps that can damage the correct functioning of the car radio).
Note2: please note that the use of the smartphone while driving is prohibited and heavily sanctioned.
26
Page 27

ENGLISH
MDV 6380 DAB
TECHNICAL FEATURES
GENERAL
Power supply: ........................................................12V (10.8-13.8V)
Absorption: .......................................................................... max 10A
Maximum output power: .......................................................50W x4
Speaker impedance: .......................................4 - 8ohm per channel
Frequency band: ..................................................FM 87.5 - 108MHz
...................................................................... AM 522 - 1620 KHz
........................................................ DAB / DAB + 174 - 240 MHz
Max power BT transmission: ................................................. 0.8mW
BT transmission frequency: .................................................2.4 GHz
NOTE
TREVI pursues a policy of continuous product improvement. For this reason, the technical characteristics are
subject to change without notice.
27
Page 28

NOTE
MDV 6380 DAB
28
Page 29

NOTE
MDV 6380 DAB
29
Page 30
CORRECT DISPOSAL
INFORMAZIONI AGLI UTENTI ai sensi del Decreto Legislativo N° 49 del 14 Marzo 2014
“Attuazione della Direttiva 2012/19/UE sui rifiuti di apparecchiature elettriche ed elettroniche (RAEE)”
Il simbolo del cassonetto barrato riportato sull’apparecchiatura indica che il prodotto alla fine della propria vita
utile deve essere raccolto separatamente dagli altri rifiuti. L’utente dovrà, pertanto, conferire l’apparecchiatura
integra dei componenti essenziali giunta a fine vita agli idonei centri di raccolta differenziata dei rifiuti elettronici
ed elettrotecnici, oppure riconsegnarla al rivenditore al momento dell’acquisto di nuova apparecchiatura di tipo
equivalente, in ragione di uno a uno, oppure 1 a zero per le apparecchiature aventi lato maggiore inferiore a 25
cm. L’adeguata raccolta differenziata per l’avvio successivo dell’apparecchiatura dimessa al riciclaggio, al trattamento e allo smaltimento ambientale compatibile contribuisce ad evitare possibili effetti negativi sull’ambiente
e sulla salute e favorisce il riciclo dei materiali di cui è composta l’apparecchiatura. Lo smaltimento abusivo del
prodotto da parte dell’utente comporta l’applicazione delle sanzioni amministrative di cui al D.Lgs n. Decreto
Legislativo N° 49 del 14 Marzo 2014.
Precautions for correct disposal of the product.
The symbol shown on the equipment indicates that waste must be disposed of in “separate collection” and so
the product must not be disposed of together with urban waste.
The user must take the product to special “separate waste collection centres” provided by local government, or
deliver it to the retailer against the purchase of a new product.
Separate collection of waste and subsequent treatment, recycling and disposal operations promotes the production of equipment with recycled materials and limits negative effects on the environment and on health caused
by improper handling of waste.
Illegal disposal of the product leads to the enforcement of administrative penalties.
MDV 6380 DAB
Recommandations pour l’élimination correcte du produit.
Le symbole figurant sur l’appareil indique que le produit fait l’objet d’une “ collecte séparée “. C’est pourquoi, le
produit ne doit pas être éliminé avec les déchets urbains.
L’utilisateur doit remettre le produit auprès de “ décharges spécialisées de collecte séparée “ prévues par les
autorités locales, ou bien le rendre au revendeur quand il achètera un nouvel appareil équivalent.
La collecte séparée du produit et les opérations successives de traitement, recyclage et élimination favorisent
la production d’appareils composés par des matériaux recyclés ainsi que permettent d’éviter des effets négatifs
sur l’environnement et sur la santé des personnes suite à une gestion impropre du déchet.
Toute élimination abusive du produit entraîne l’application de sanctions administratives.
30
Page 31
CORRECT DISPOSAL
Hinweise zur ordnungsgemäßen Entsorgung des Produkts.
Das auf dem Gerät angebrachte Symbol weist darauf hin, dass das Altgerät “getrennt zu sammeln” ist und das
Produkt daher nicht zusammen mit dem Gemeindeabfall entsorgt werden darf.
Der Benutzer muss das Produkt zu den entsprechenden, von der Gemeinde verwaltung eingerichteten “Wertstoffsammelstellen” bringen oder dem Händler beim Kauf eines neuen Produkts übergeben.
Die getrennte Müllsammlung und anschließende Aufbereitung, Wiederverwertung und Entsorgung fördern
die Herstellung von Geräten unter Verwendung wiederverwerteter Materialien und vermindern die negativen
Auswirkungen auf die Umwelt und Gesundheit in Folge einer falschen Müllverwaltung.
Die widerrechtliche Entsorgung des Produkts führt zur Auferlegung von Verwaltungsstrafen.
Advertencias para la correcta eliminación del producto.
El símbolo que aparece en el aparato indica que el residuo debe ser objeto de “recogida selectiva” por tanto el
producto no se debe eliminar junto con residuos urbanos.
El usuario deberá entregar el producto a los “centros de recogida selectiva” creados por las administraciones
municipales o bien al distribuidor cuando adquiera un nuevo producto.
La recogida selectiva del residuo y las sucesivas operaciones de tratamiento, recuperación y eliminación favorecen la fabricación de aparatos con materiales reciclados y limitan los efectos negativos en el medio ambiente
y la salud causados por una gestión incorrecta del residuo.
La eliminación abusiva del producto da lugar a la aplicación de sanciones administrativas.
MDV 6380 DAB
Advertências para a correcta demolição do produto.
O símbolo indicado na aparelhagem indica que o resíduo deve ser objecto de “recolha separada” portanto o
produto não deve ser desmantelado junto dos resíduos urbanos.
O utilizador deverá entregar o produto nos apropriados “centros de recolha diferenciada” predispostos pelas
administrações comunais, ou entregá-lo ao revendedor em troca de uma compra de um novo produto.
A recolha diferenciada do resíduo e as sucessivas operações de tratamento, recuperação e desmantelamento
favorecem a produção de aparelhagens com materiais reciclados e limitam os efeitos negativos no ambiente e
na saúde causados por uma gestão imprópria do resíduo.
O desmantelamento abusivo do produto comporta a aplicação de sanções administrativas.
Προειδοποιήσεις για τη σωστή διάθεση του προϊόντος.
Το σύμβολο που απεικονίζεται επάνω στη συσκευή υποδεικνύει ότι το απόβλητο πρέπει να αποτελέσει
αντικείμενο “χωριστής συλλογής” ως εκ τούτου το προϊόν δεν πρέπει να διατίθεται μαζί με τα αστικά απόβλητα.
Ο χρήστης θα πρέπει να παραδώσει το προϊόν στα ειδικά “κέντρα διαφοροποιημένης συλλογής” που έχουν
διευθετηθεί από τις δημοτικές διοικήσεις, ή να το παραδώσει στο κατάστημα πώλησης με την αγορά ενός νέου
προϊόντος.
Η διαφοροποιημένη συλλογή του αποβλήτου και οι ακόλουθες επεμβάσεις επεξεργασίας, ανάκτησης και
διάθεσης βοηθούν την παραγωγή συσκευών με ανακυκλωμένα υλικά και περιορίζουν τις αρνητικές επιπτώσεις
για το περιβάλλον και την υγεία που προκαλούνται από την ακατάλληλη διαχείριση του αποβλήτου.
Η αυθαίρετη διάθεση του προϊόντος συνεπάγεται την εφαρμογή διοικητικών κυρώσεων.
31
Page 32
Strada Consolare Rimini-San Marino, 62 47924 Rimini (RN) Italy
T el. 0541/756420 - Fax 0541/756430 - www .tre vi.it - e-mail: inf [email protected]
DICHIARAZIONE DI CONFORMITÀ UE
SEMPLIFICATA
Il fabbricante TREVI dichiara che il tipo di apparecchiatura radio MDV6380DAB è conforme alla
direttiva 2014/53/UE.
Il testo completo della dichiarazione di conformità
EU è disponibile al seguente indirizzo Internet
https://www.trevi.it/dms/zidi/TREVI/DOCMDV6380DAB.pdf
EN If you will not find your language on the instruction manual,
please go on our website www.tre vi.it to find it
SIMPLIFIED EU DECLARATION OF
CONFORMITY
Hereby TREVI Spa declares that the radio
equipment type MDV6380DAB is in compliance
with directive 2014/53/EU.
The full text of the EU declaration of conformity is
available at the following internet address
https://www.trevi.it/dms/zidi/TREVI/DOCMDV6380DAB.pdf
CHINA
Made in
3232
 Loading...