

Page 1
LTV 2016HD
16” HD LED TV with DVB-T/CI
Page 2
Power Cord C onn ection
AV Conne ctio n
YPbPr C onne ction
Antennas Connectio n
8
9
9
8
7
7
10
10
3
3
SAFET Y
PRECA UTIO NS
2
1
PREFACE
FRONT AND
CONNE CTIO NS
OF THE TV
6
4
5
REMOTE CONTROL
6
INSTALLATION
BASIC
IN THE CARTON
5
3
7
15
20
Selec t Inpu t Source
Sound Menu
BACK
OSD menu
Pictu re Men u
Channel Men u
16
18
1
14
Remote cont rol se tup
29
Media (Multimedia) Menu
23
Lock Menu
25
Setup Menu
28
ATV/SCART/HD MI/AV/YP bPr/PC Menu
DTV Men u
16
Page 3
8
32
34
9
35
10
If you're having
problems
Your TV's
specification
Wall mounting
assembly
instruction
2
Page 4
1. PREFACE
Thank you for buying this TV ! Ple ase read this man ual throughly be fore o perating the TV.
Make su re the TV was n ot dam aged i n transit. Shou ld the TV is d amag ed, do n ot install
your de aler. Check t hat you have a ll the accessor ies accord ing to t he model.
it and co ntac t
2. SAFETY PRECAUTIONS
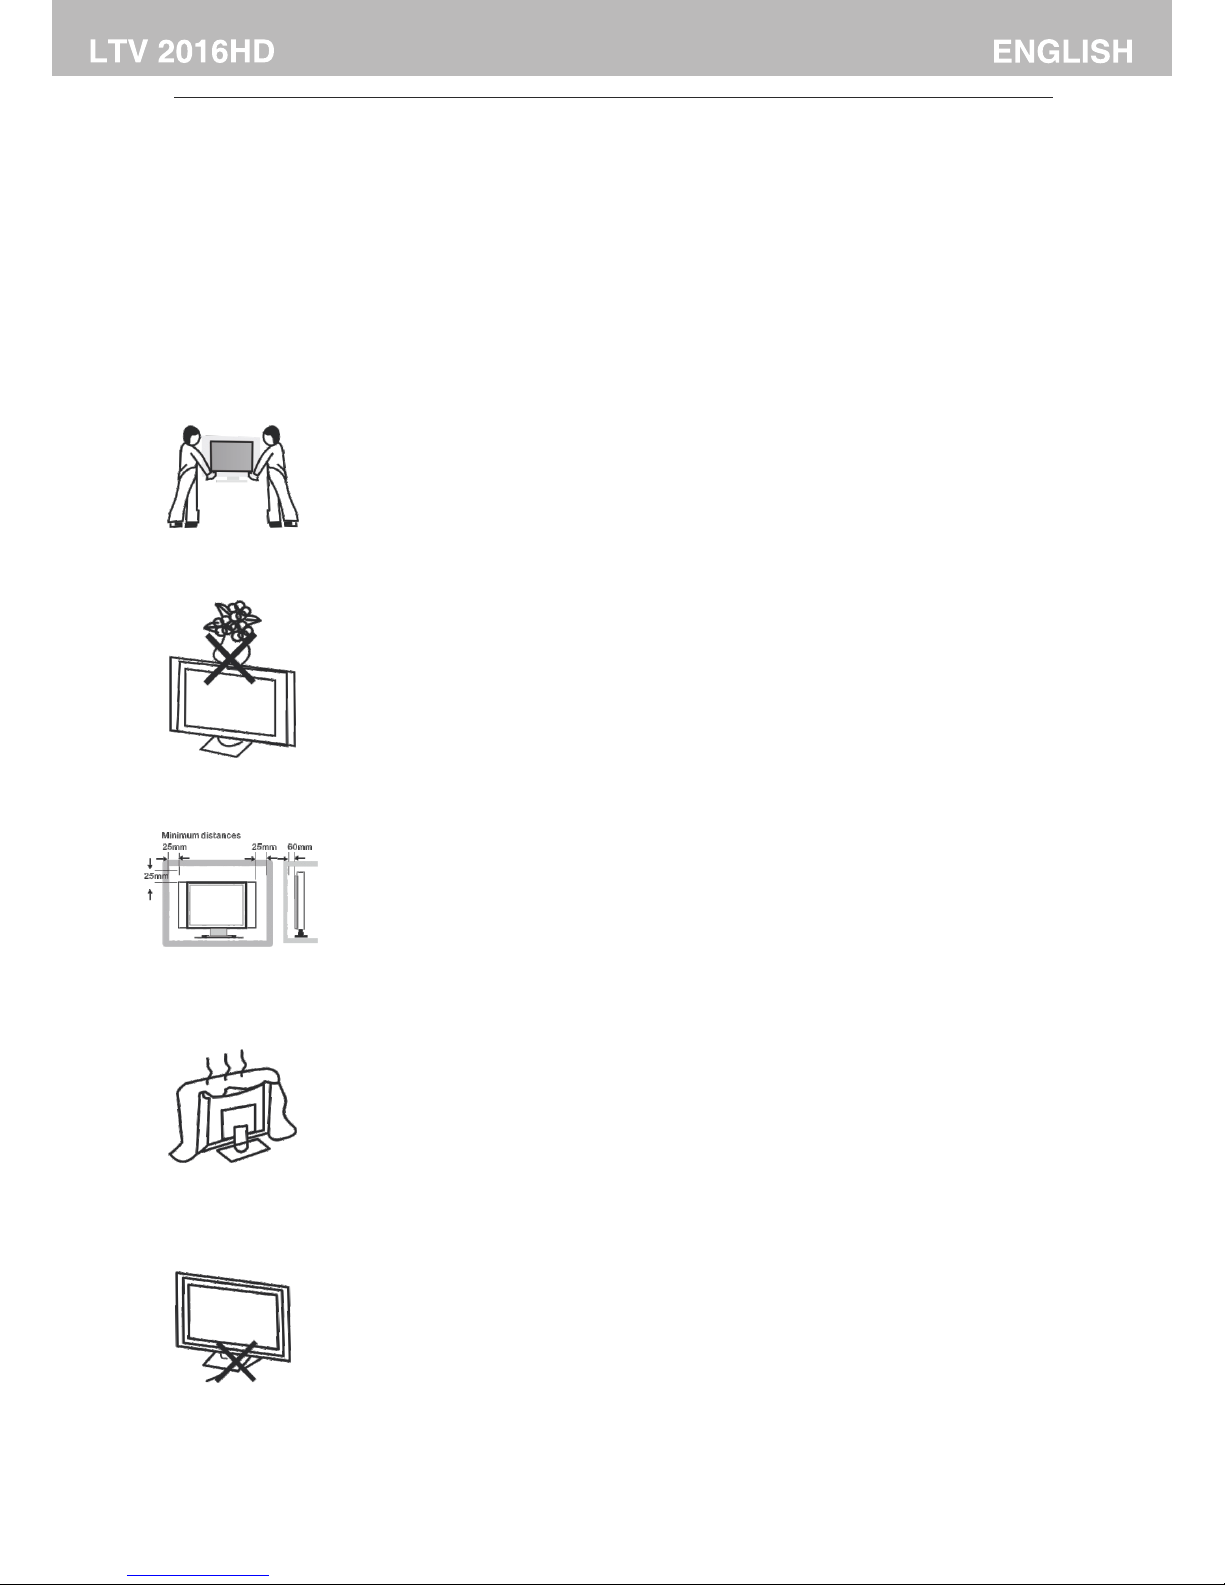
Power cord an d cables mus t be pro perly rout ed and protected to prevent
people from s tepp ing on them an d caus ing th e TV to fall.
Put the TV on a sta ble surface.
Do not pl ace any material o n the TV.
Do not bl ock or cover t he ven tila tion o peni ngs on the TV.
If you ha ve a wall moun t, che ck tha t it is steady.
Do not use the with fixtures othe r than those provided or
suggested by the manufac ture r.
TV
3
Page 5
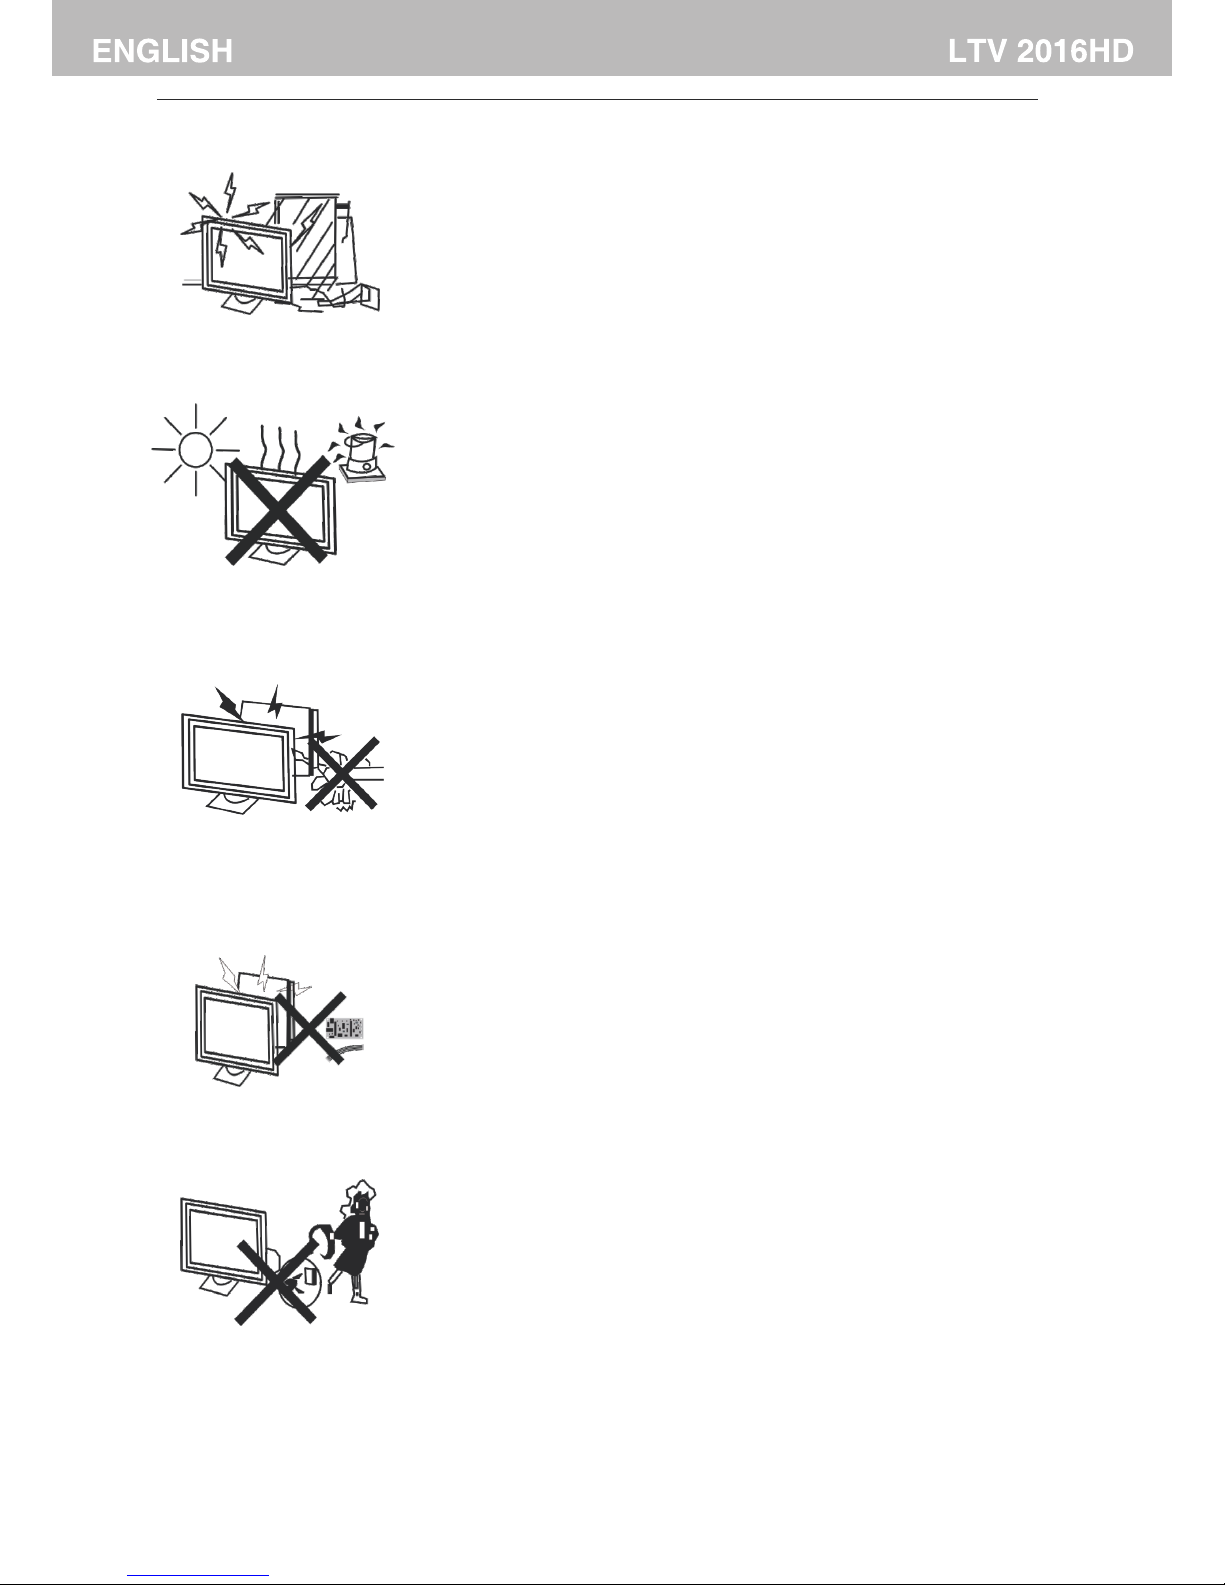
Keep the TV dry and aw ay from humi dity.
Keep the TV away fro m heat sources
.
Unplug the befo re cle anin g it. Do n ot use solvent or liquidTV to clean
the TV.
Only clean th e TV wi th a soft and dr y clot h.
In case o f troubleshooting, d o not use spar e part s other than t hose
suggested by
the manufac ture r. Usin g inad equa te spare par ts can
shocks, sho rt-c ircu its fire or ot her incidents.lead to elect ric
Unplug the TV during lighten ing st orms or when unused for lo ng periods
of time .
4
Page 6
3. IN THE CARTON
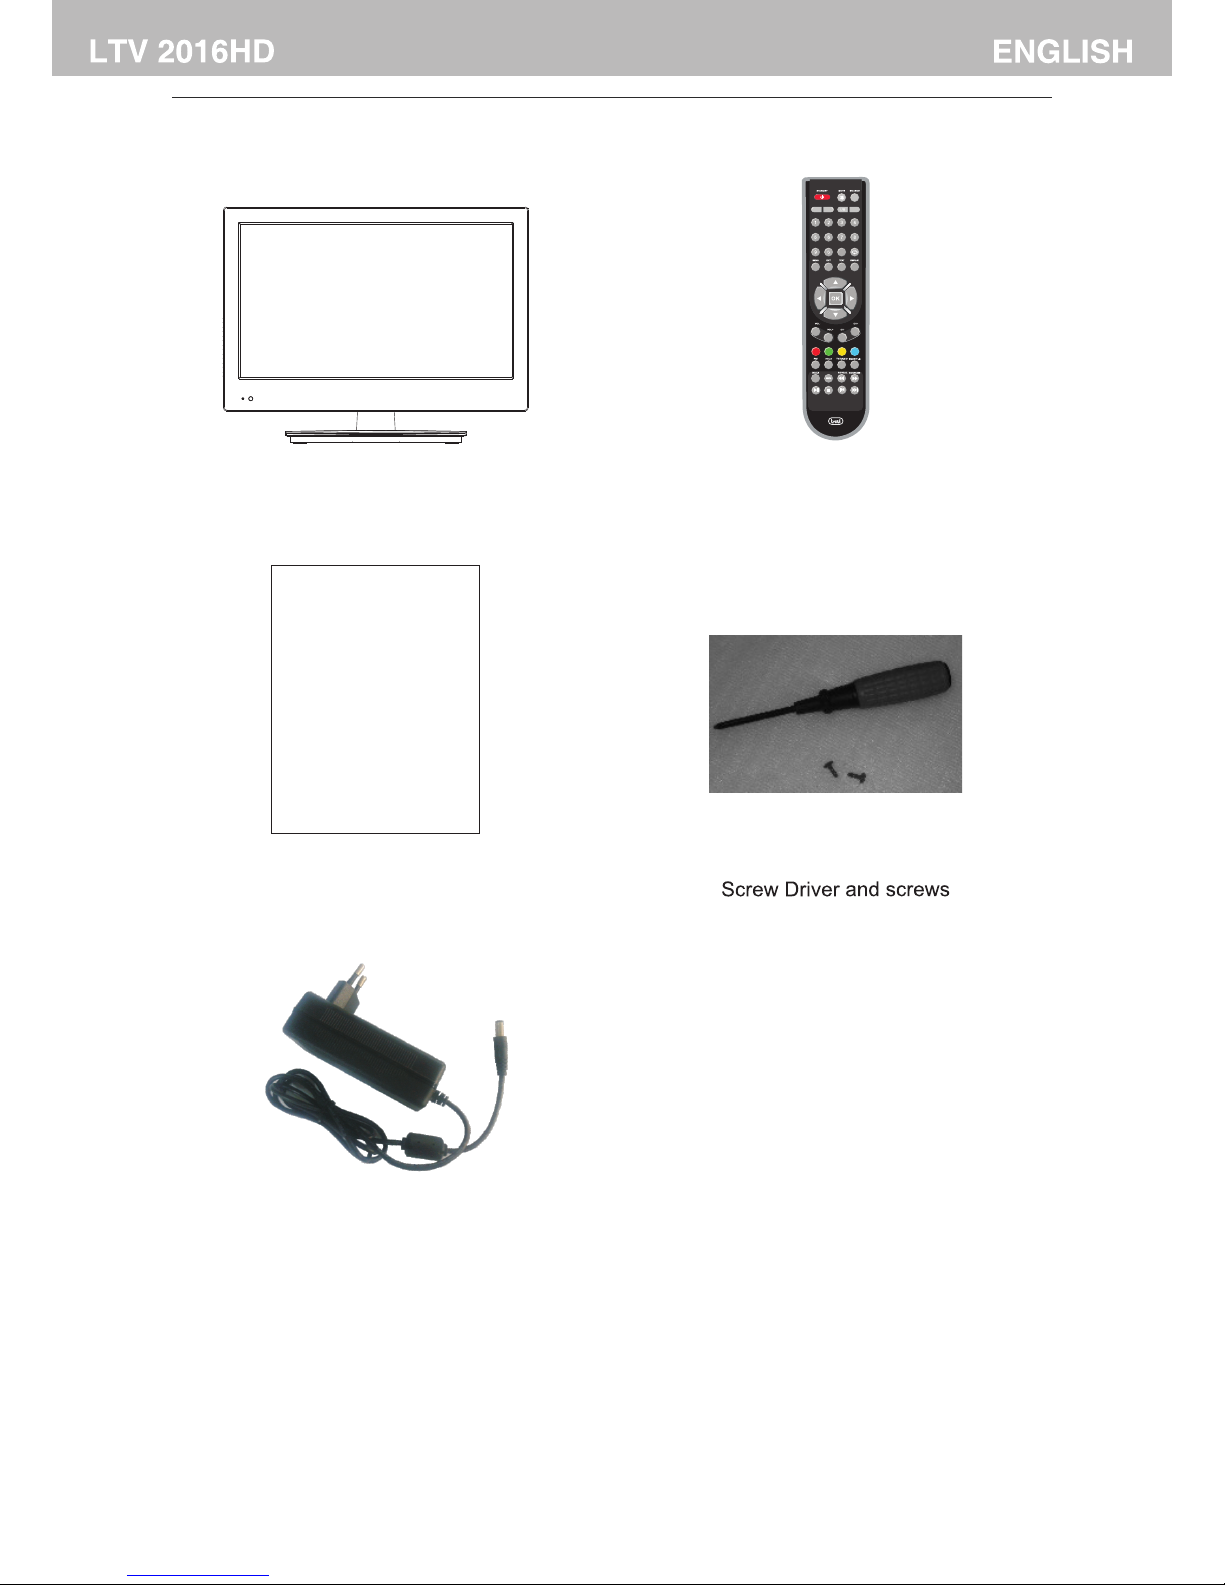
Remote Control
User Manual
User Manual
TV SET
5
Switch Adaptor
DTV PC
AUDIO
SLEEP
ASPECT
Page 7
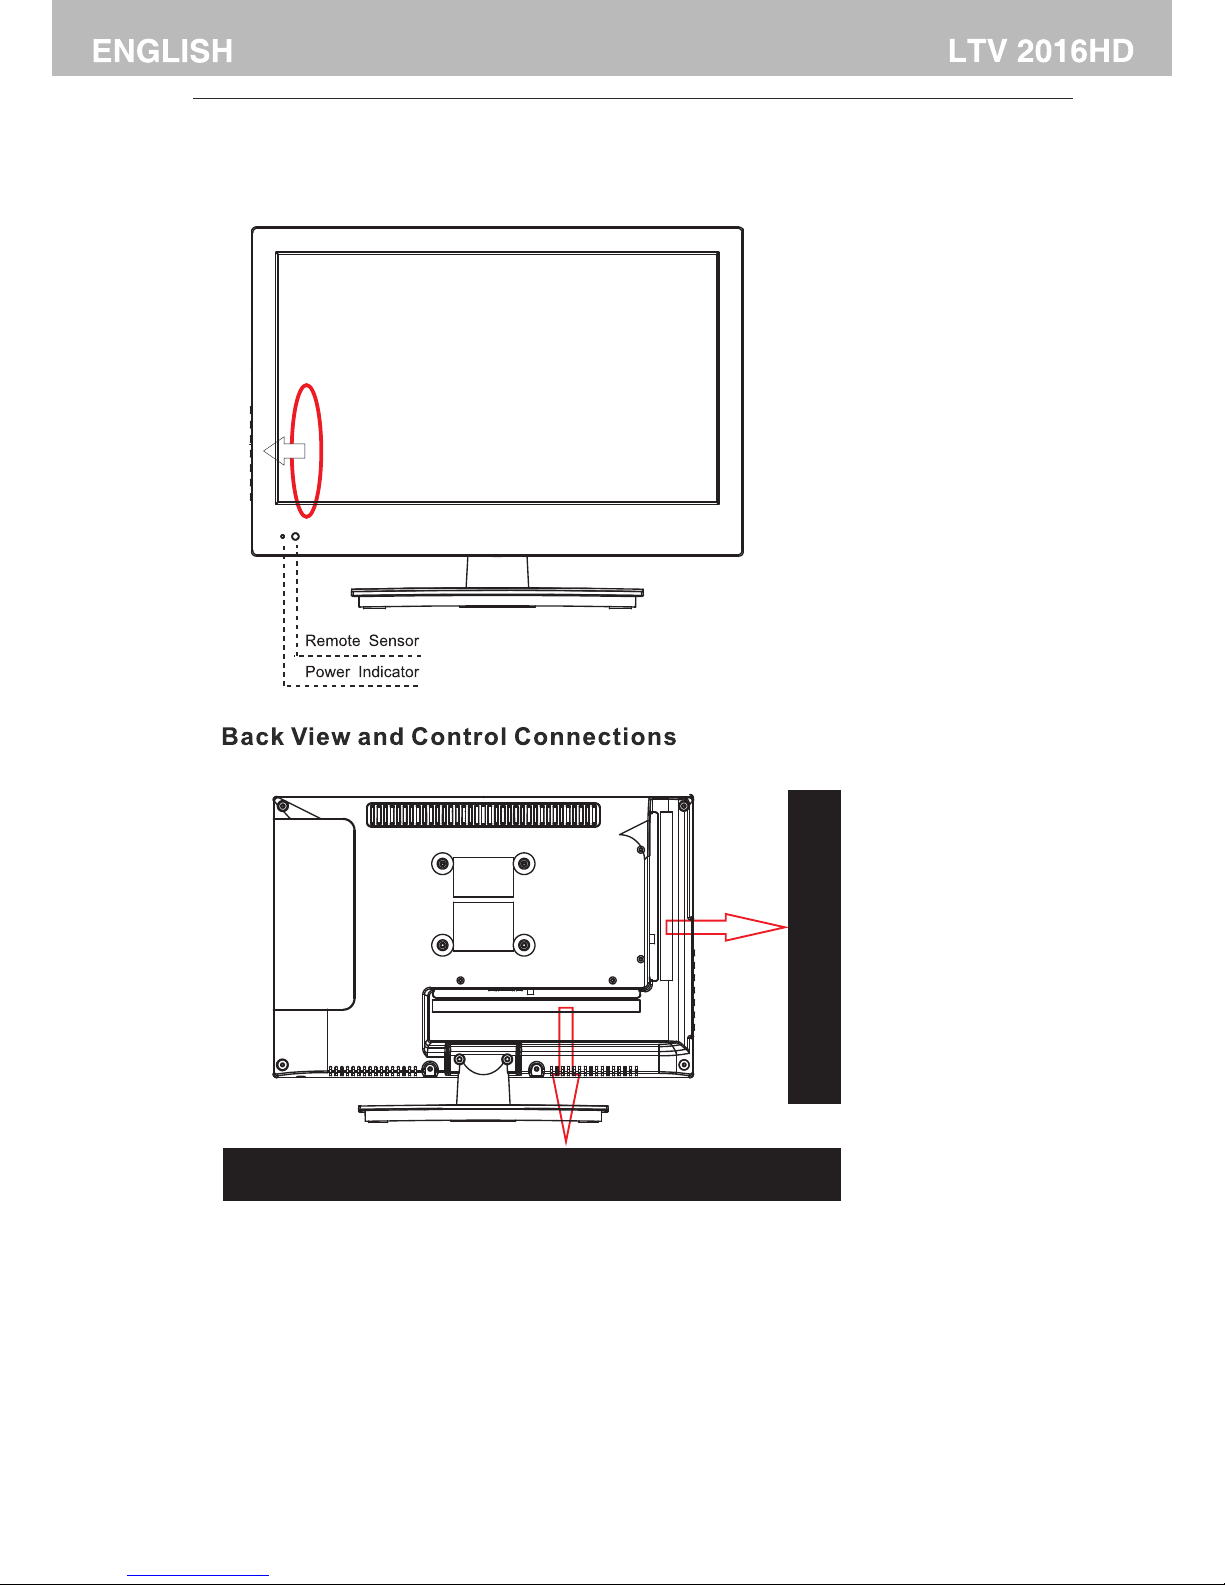
1.DC IN:Main power input.
2.Headphone:Connect the earphone.
3.PC AUDIO: Connect the Audio output jack of PC.
4.VGA: Connect the PC-RGB output jack of PC.
5.YPbPr: Connect the YPbP r out put j ack o f DVD .
6.SCART: Co nne ct th e SCA RT jack of VCR or DVD.
7.Vi deo : Con nec t the V IDE O out put j ack o f DVD .
.R/L: Connect the R/L audi o out put j ack o f DVD .8
.Coax:Connect the SPDIF
1 .RF: Connect the antenna.
11.HD MI: C onn ect t he HD MI ou tpu t jac k of DV D.
12.USB: Connect to portable USB device.
13.CI: Connect to the CI card.
9 a suitable amplifier.
0
4.FRONT AND BACK CONNECTIONS OF LED TV
6
STANDBY
SOUR CE
MENU
CH-
CH+
VOL-
VOL+
HDMIRF USBCoax CI
VGA
Head
phone
PC
Audio
Video
R
L
SCART
YPbPr
DC IN
Page 8
Power Cord Connection
5. BASIC AINSTALL TION
Antennas Connection
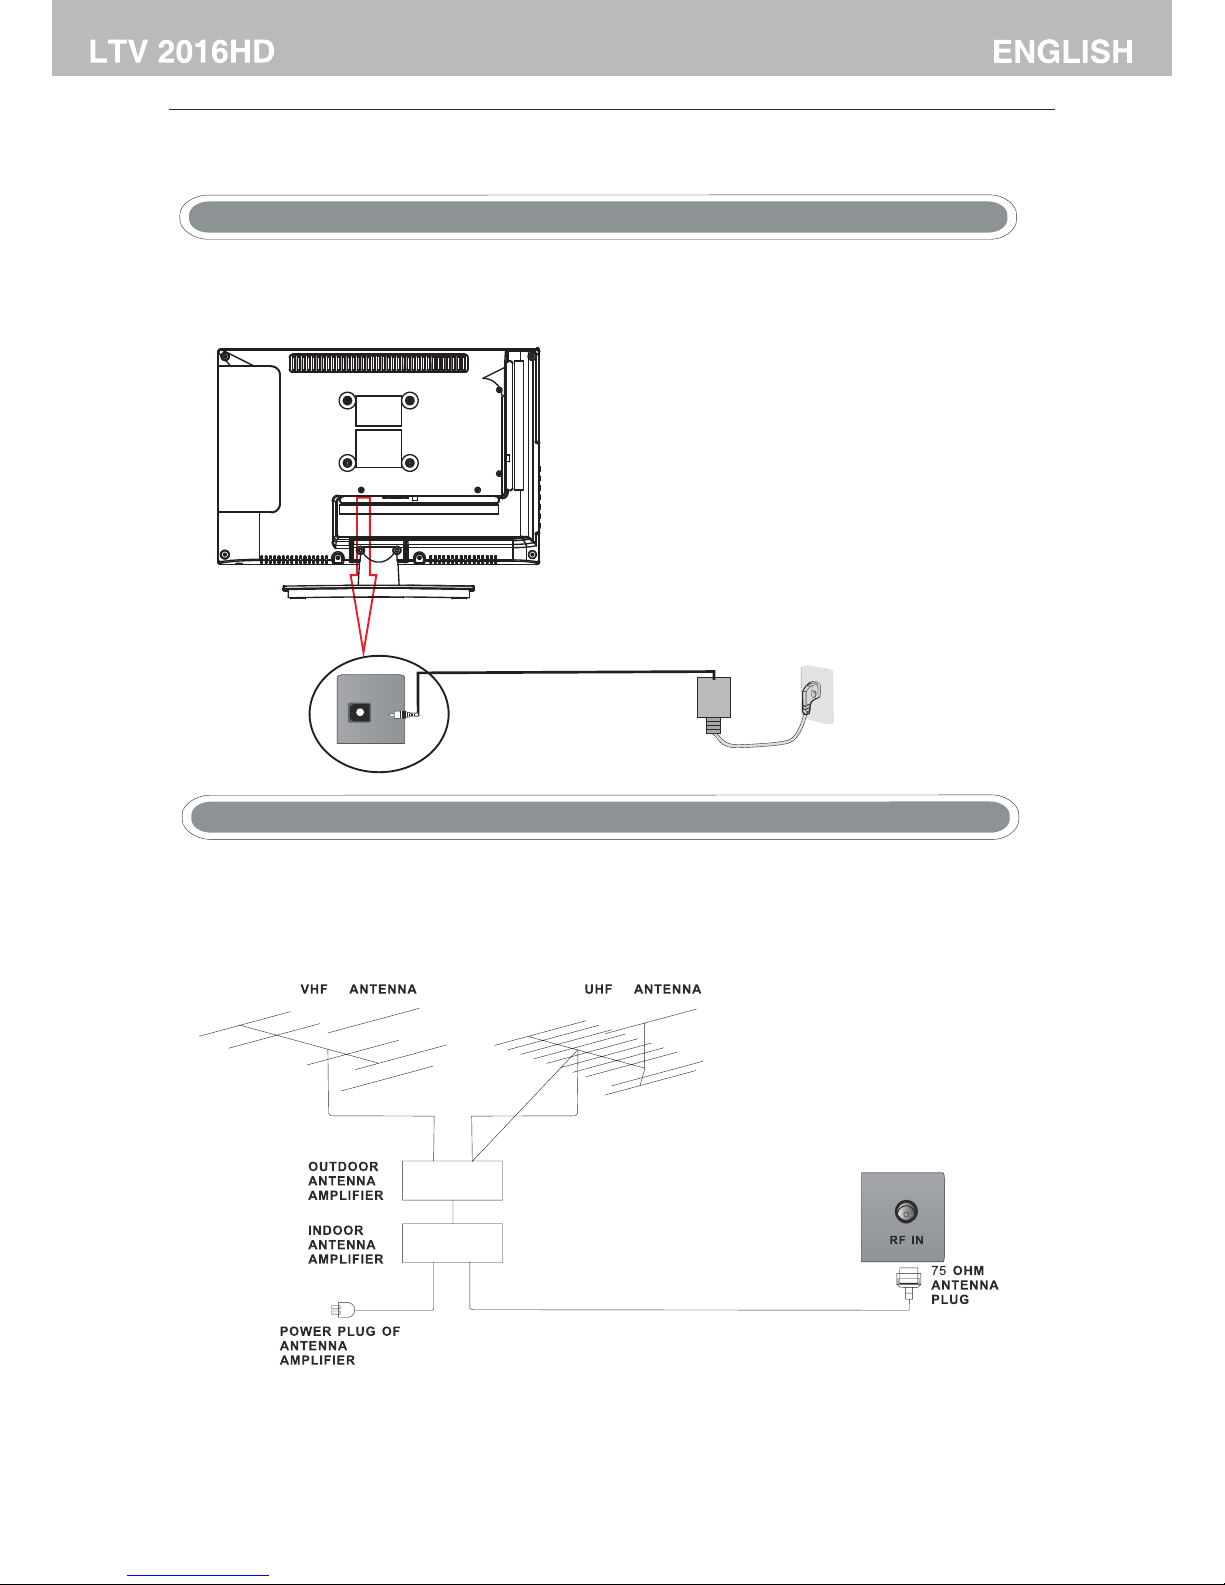
- Connect the power cord and AC adaptor correctly as shown.
- Press the STAND BY swit ch of y our TV to switch the unit on. The po wer i ndi cat or on t he
front panel lights up in green or blue.
To ensure good picture and sound, TV a nte nna s yst em ne eds t o be in sta lle d. The an ten na sy ste m as
shown can be sourced from TV eq uip men t sho ps, w hic h wil l pro vid e ser vic e for c orr ect i nst all ati on
and connection. After installation, insert the 75-OHM antenna plug into the antenna jack as shown.
7
AC Adaptor
POWER Cord
DC IN
Page 9
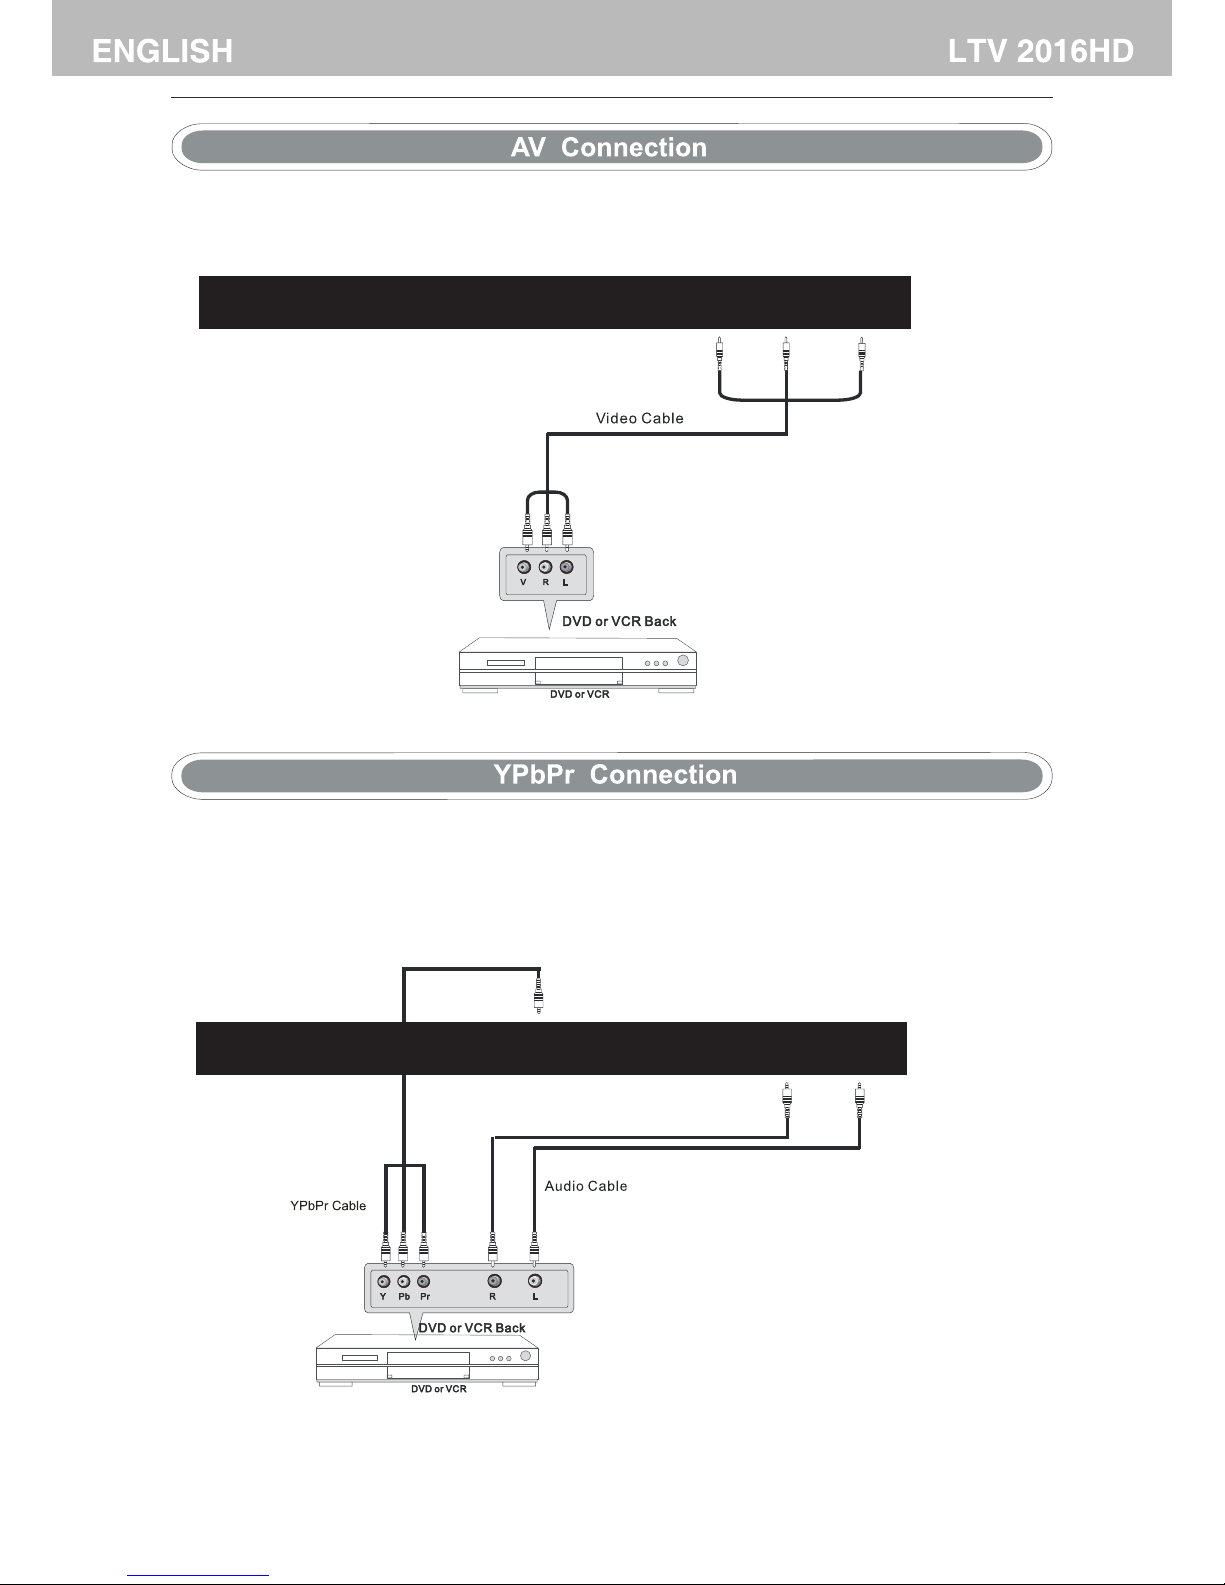
Connect the VIDEO and AUD IO ou tpu t jac k of th e DVD o r VCR t o the AV IN jac ks on t he se t usi ng
the RCA cable (Yello w [vi deo ], Wh ite a nd RE D [le ft & Ri ght a udi o]).
Select the AV inpu t source using the SOURCE button on the remot e con tro l.
Connect the YP bPr/YCbCr output of the DVD or VCR to the YP bPr input on the set.The picture
quality is improved co mpa red t o con nec tin g a reg ula r VCR t o the v ide o inp ut. C onn ect t he Aud io ou tput of
the DVD or VCR to the Audio inp ut ja cks o n the s et us ing t he RC A cabl e.( 3.5 mm pl ug- 2 X RCA pl ug)
Match the jacks col our s: Y is gre en, P b is bl ue, P r is re d, Aud io le ft is white and Audio right in red.
Select YP bPr i nput source using the SOURCE button on the remot e con tro l.
8
PC
Audio
Head
phone
VGA
Video
R
L
SCART
YPbPr
DC IN
PC
Audio
Head
phone
VGA
Video
R
L
SCART
YPbPr
DC IN
Page 10
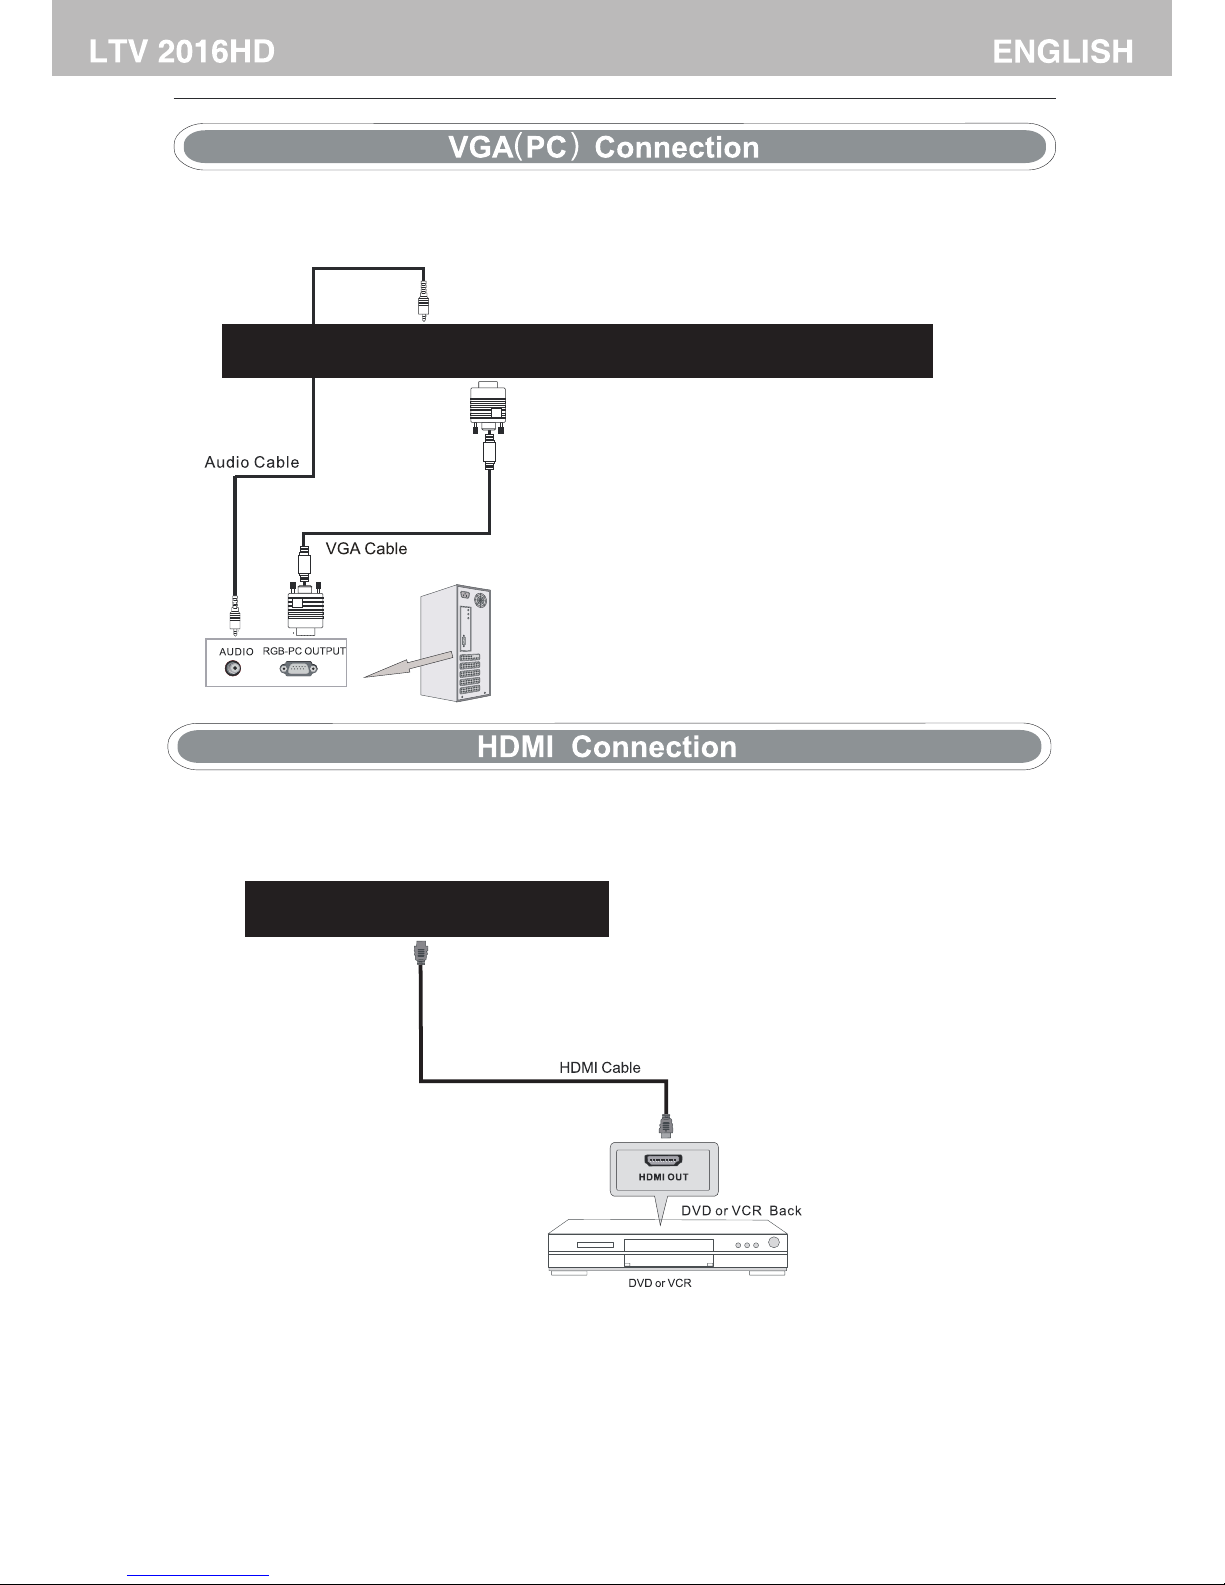
Connect the RGB output of the PC to the VGA jack on the set. Connect the AUDIO output of the PC to the PC
AUDIO jack on the set. Select the PC input source using button on the remote control.SOURCE
HDMI connection allows the user to transfer both audio and video control signals through one cable only.
These signals are transferred in digital.
9
HDMIRF USBCoax CI
PC
Audio
Head
phone
VGA
Video
R
L
SCART
YPbPr
DC IN
Page 11
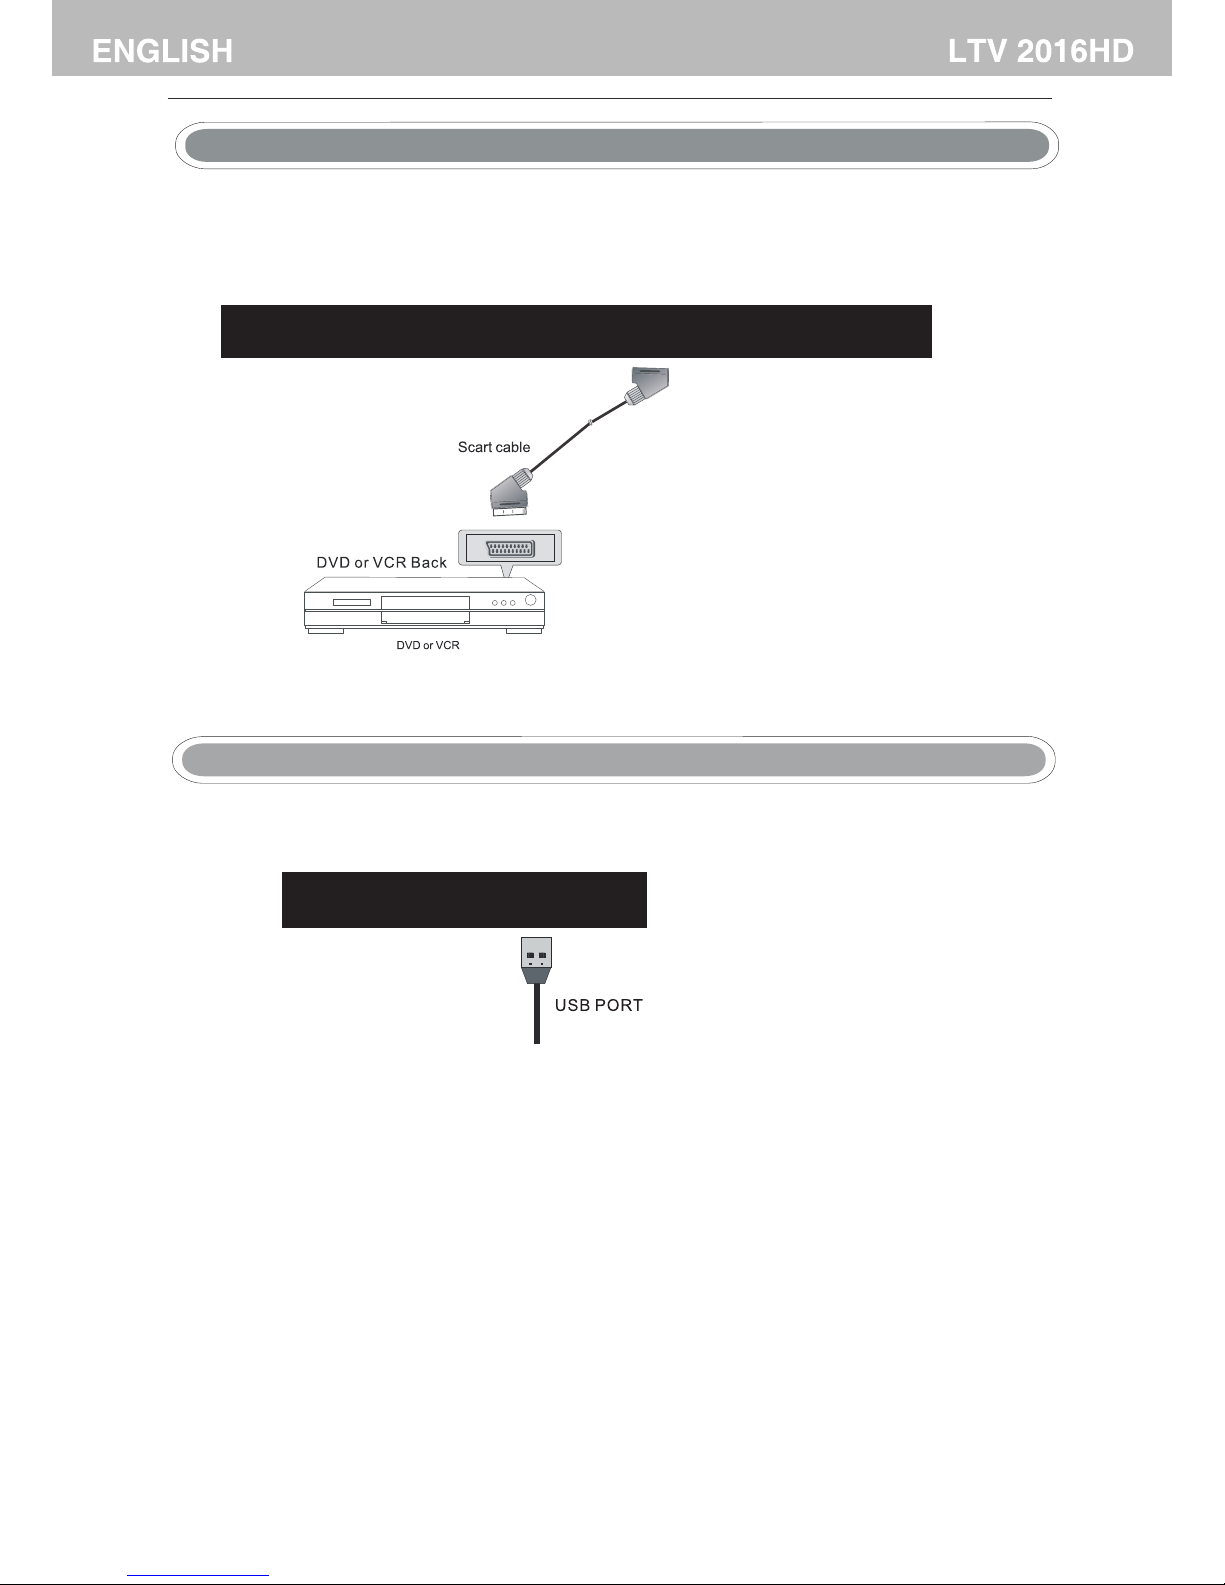
Connect the SCART con nec tor o n the e xte rna l vid eo de vic e to th e SCA RT conn ect or on t he LE D TV
using a SCART cabl e.
ConnectionSCART
USB: Connect to portable usb device.
MEDIA Connection
10
HDMIRF USBCoax CI
PC
Audio
Head
phone
VGA
Video
R
L
SCART
YPbPr
DC IN
Page 12
DTV PC
AUD IO
SLE EP
6. REMOTE CONTROL
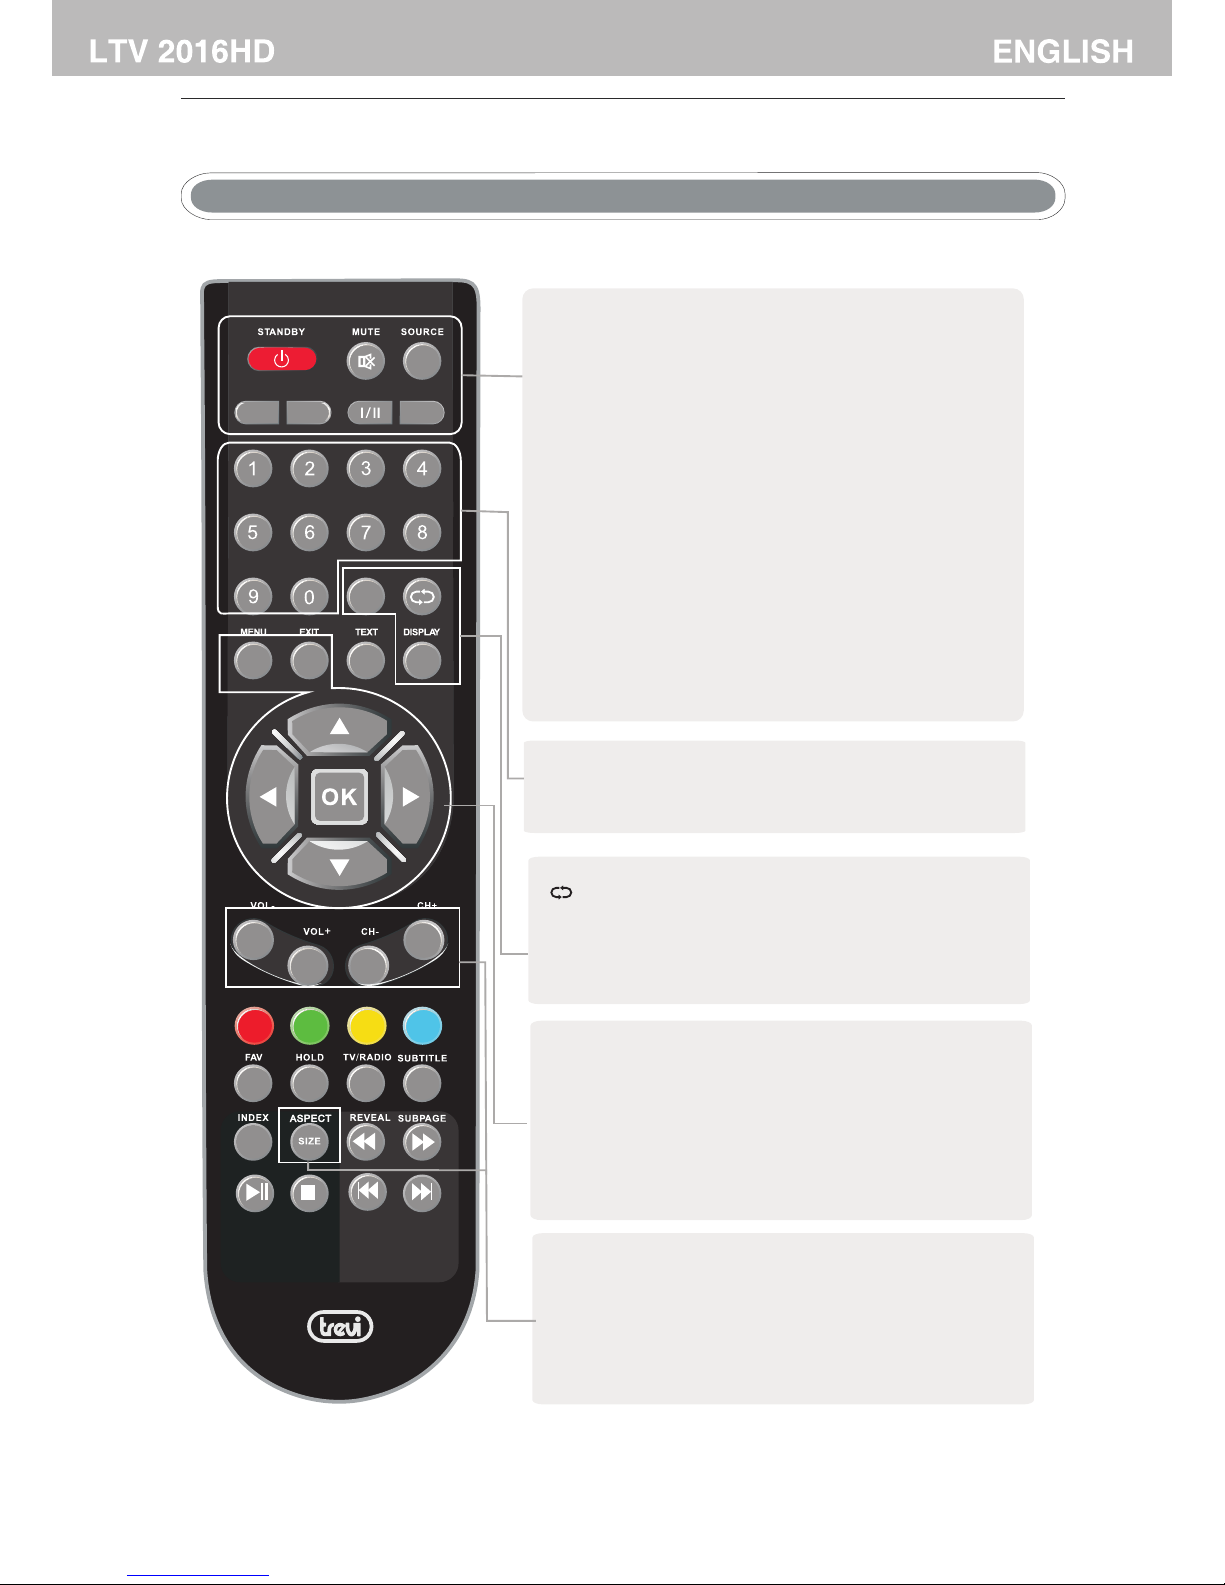
Remote control instructions
11
STAND BY
MUTE
Pres s to mu te th e sound. Pre ss ag ain o r press V + to
unmu te th e TV.
SOUR CE
Pres s to cy cle t hrough the i npu t sou rce.
Pres s "STAND BY" b utt on to turn sta ndb y mod e on or off .
DTV
Press to se lec t PC mo de.
I/II
Pres s to se arc h the NICAM mo des .
SLEE P
Sele ct am oun t of time. Let y our TV tu rn off au tom ati cally.
Press to se lec t DTV m ode .
PC
NUMB ER BU TTONS
Pres s 0-9 t o sel ect a TV ch annel dire ctl y whe n you are
watc hin g TV. Th e cha nne l cha nge aft er 2 se con ds.
THUM BST ICK (▲/▼/◄/►/OK)
Allo ws yo u to na vigate the o n-s cre en menus and
adju st th e sys tem settin gs to y our p refer enc e.
MENU
Brin gs up t he ma in TV men u to the scree n.
EXIT
Exit t he ma in TV men u to th e screen.
VOL+ /VO L-
Pres s to in cre ase/decr eas e the s ound level .
CH+/ CH-
Pres s to sc an th rough chan nel s.
ASPE CT
Pres s thi s but ton to chang t he as pec t of your T V.
Retu rn to t he pr evious cha nne l vie wed.
DISP LAY
Pres s to di spl ay the sourc e and c han nel’s i nformati on.
Remote control instruction in TV mode
Page 13
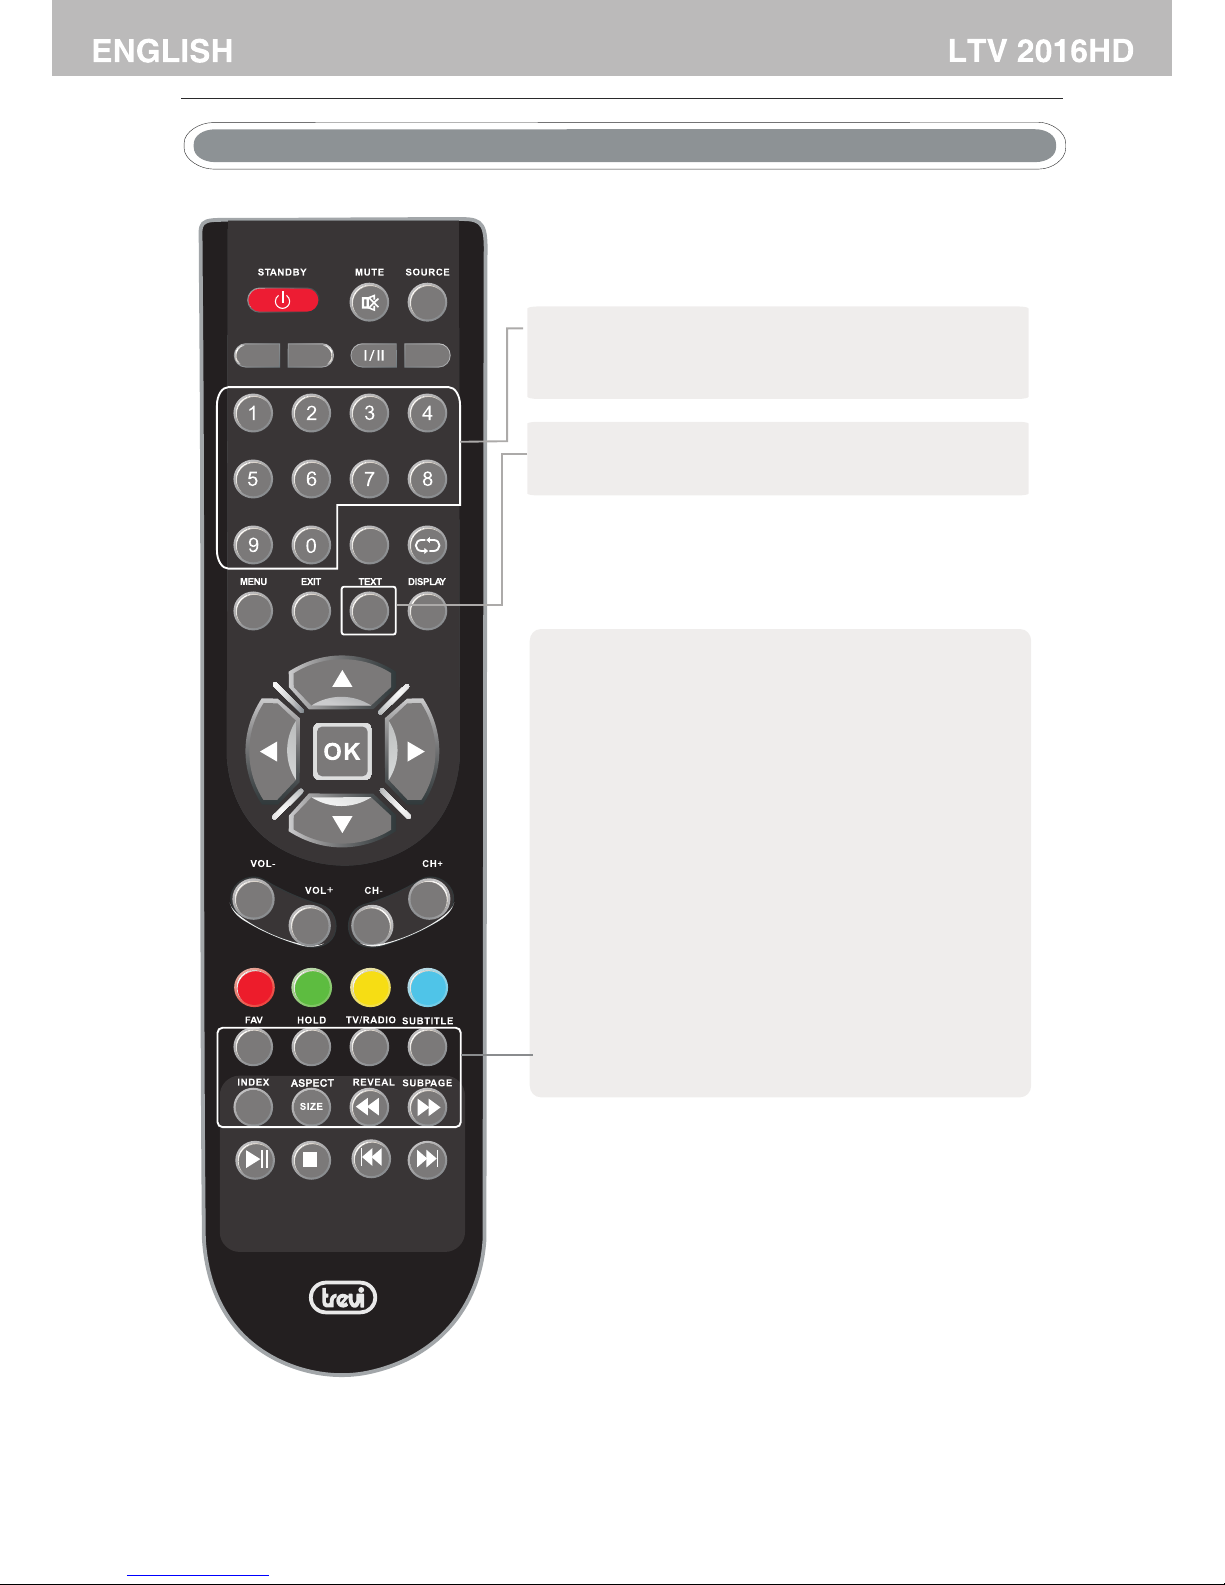
DTV P C
AUD IO
SLE EP
Remote control instructions
12
NUMBER BU TTONS
Press 0-9 t o sel ect a t ele text page.
TEXT
Press to sw itc h bet wee n TV a nd Telete xt mo de.
SUBTITL E
To display su bti tle .
HOLD
Freeze th e cur ren t pag e.
SIZE
Change th e pic tur e siz e.
REVEAL
Reveal or h ide t he hi dde n wor ds.
INDEX
Request i nde x pag e whe n ind ex link is valid.
SUBPAGE
TELETEX T Subpage.
Remote control instruction in TELETEXT mode
Page 14
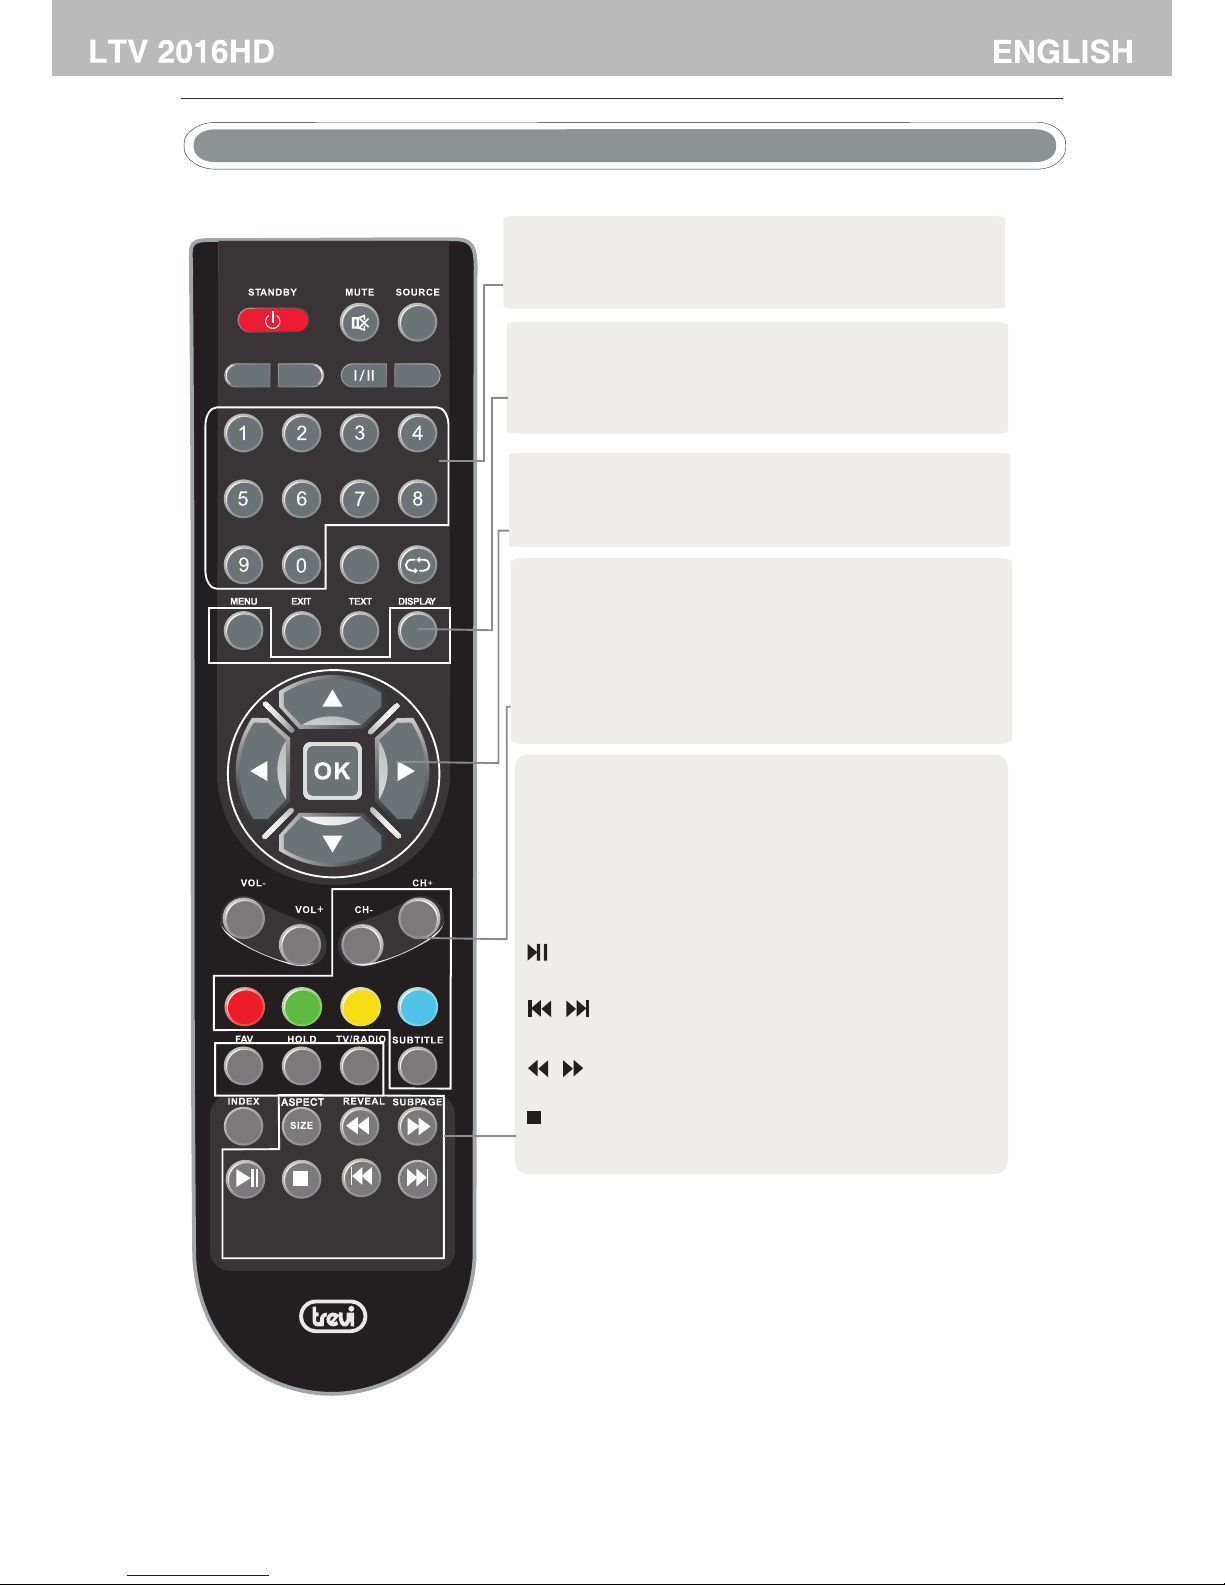
DTV P C
AUD IO
SLE EP
NUMBER BU TTONS
Press 0-9 t o sel ect a c han nel .
TV MENU
Brings up t he ma in DT V men u to th e screen.
DISPLAY
Press to di spl ay th e sou rce a nd channel ’s informa tio n.
SIZE
Change the picture format.
FAV
Press to increase/decrease your favourite program in
DTV mode.
TV/RADIO
Select TV or Radio modes.
PLAY/PAUSE in TIMESHIFT and MEDIA mode.
Jump to previous and next track in MEDIA mode.
Fast reverse and forward key in MEDIA mode.
Stop in MEDIA mode or exit the REC or TIMESHIFT mode.
Remote control instruction in DTV mode
THUMBST ICK (▲/▼/◄/ ►/O K )
Allows yo u to na vig ate t he on -screen me nus a nd
adjust th e sys tem s ett ings to your pref ere nce .
CH+/CH-
When watc hin g a cha nne l, ch anges the ch ann el.
COLOUR BU TTONS
Colour bu tto ns ( re spe cti vely red, gr een , yel low a nd bl ue )
used in a few s ub- men us.
SUBTITL E
To display su bti tle .
13
Remote control instructions
Page 15
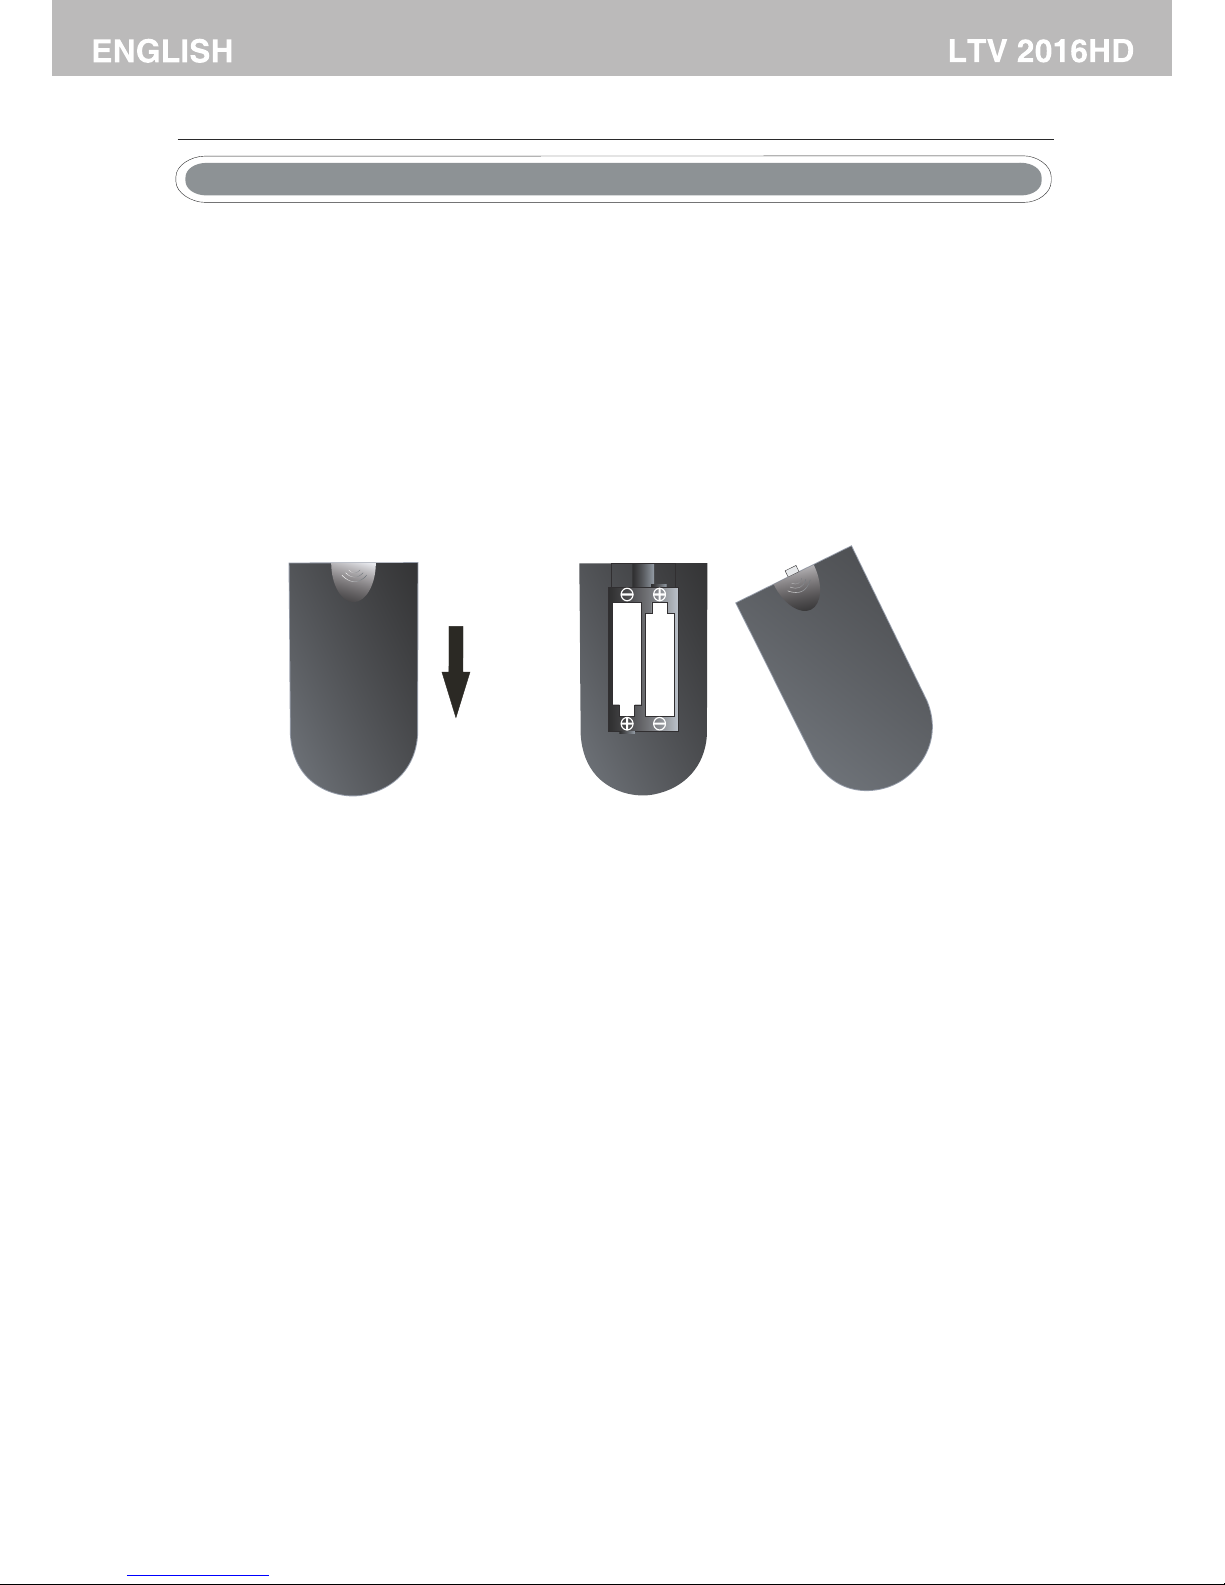
Remote control setup
1. Open the cove r.
2. Your remote req uir es 2X AA A Batt eri es. W hen i nse rti ng the batteries, make su re co rre ct po lar ity
marks"+ "an d "-" o n the b att eri es ma tch t he di agram as shown within the b att ery c omp art men t.
3. Replace the b att ery c ove r.
To prevent batte ry le aka ge wh ich m ay re sul t in bo dil y injury or damage to the rem ote :
1. Install a ll ba tteries corr ect ly, and as ma rke d on the remote co ntr ol.
2. Do not mix ba tte ries: (OLD and N EW or C ARBON and ALKAL INE , etc)
Remove bat ter ies when the rem ote i s not used for a lon g tim e.
3. Reco mme nde d use ALKALINE ty pe ba tteries.
14
Page 16

Basic Operation
Press SOURC E butt on on th e remote control to display t he inp ut sou rce li st
▼ / ▲
.
Press button to sel ect th e inpu t source you want to watch.
Press OK butt on to en ter th e input source.
Press EXIT bu tton t o quit .
SOURCE
ATV
AV
PC
YPbPr
SCART
HDMI
Select Input Source
USB
SOUR CE:Ex it
DTV
15
Page 17
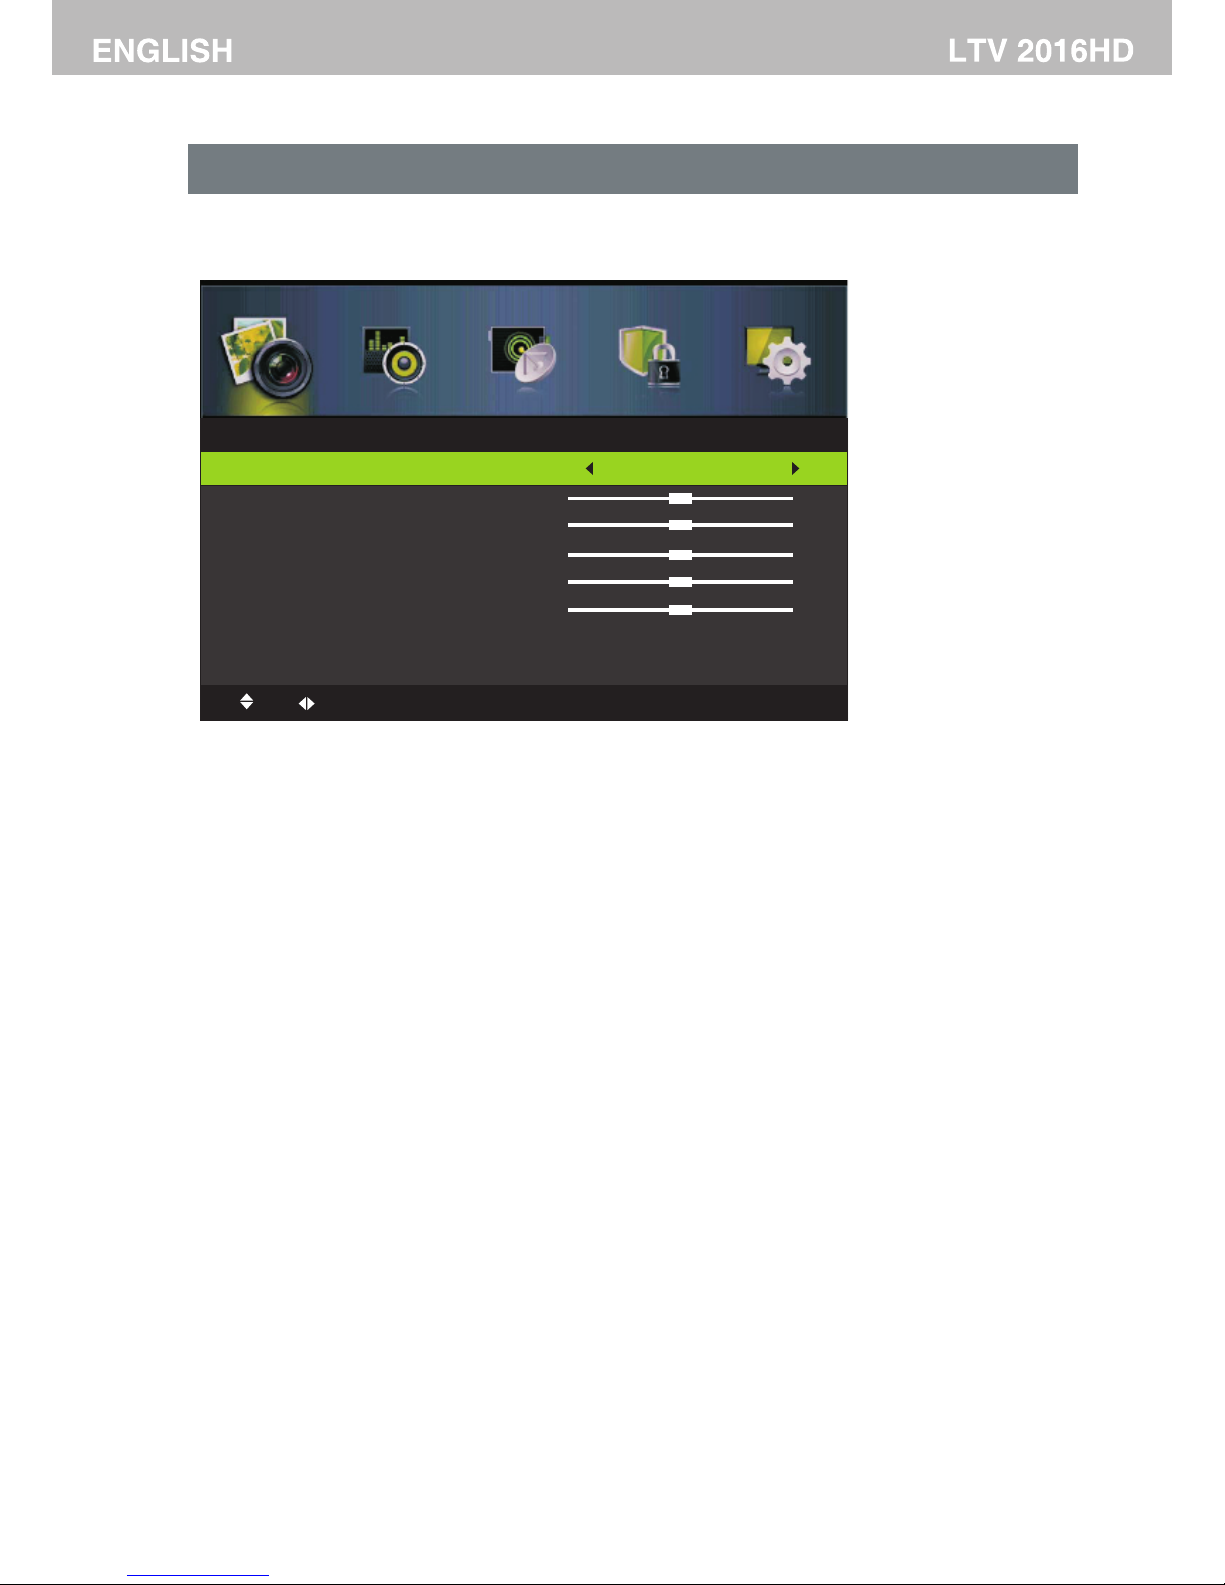
Picture Menu
Pres s MENU bu tt on to d is pla y th e main me nu.
Pres s ◄ / ► butto n to s ele ct P ICTUR E in the ma in menu ,it wil l hi ghl ig ht th e fi rst opt ion.
Brig htnes s
Pres s ▼ / ▲ butto n to s ele ct P ictur e Mode, t hen pre ss O K b ut ton to en ter sub -menu .P res s ▼ / ▲ bu tto n to s elect .
(Avail able Pi ct ure m od e: Dy na mic, St andar d,Mil d, Per so nal ).
You ca n chang e the val ue o f con tr ast, br ightn ess, co lor and s ha rpn es s whe n th e pictu re is in Pe rsona l mo de.
TIPS : You can pre ss P MOD E bu tto n on t he remo te cont rol to ch an ge th e Pi ctu re M ode dir ectly.
Pict ure Mod e
Pres s ▼ / ▲ butto n to s ele ct B right ness, then pr es s OK bu tton to e nter su b-men u. Pre ss ◄ / ► b utt on t o adjus t.
Cont rast
Pres s ▼ / ▲ butto n to s ele ct C ontra st,th en pres s OK bu tt on to ent er sub- menu. Pr ess ◄ / ► b ut ton t o ad just.
Pres s ▼ / ▲ butto n to s ele ct S harpn ess,t hen pre ss ◄ / ► b utt on t o adj us t.
Shar pness
Pres s ▼ / ▲ butto n to s ele ct C olor Tempe ratur e,the n pr ess ◄ / ► b ut ton to se lect. ( Av ailab le Colo r Temp er atu re :
Stan dard, Co ol, Warm ).
Colo r Tem p
3. Afte r finis hi ng yo ur a dju st ment, P ress ME NU butt on t o ret ur n bac k to t he prev ious me nu.
1. Pre ss ▼ / ▲ butt on t o sel ec t the opt ion tha t you wan t to a dju st i n the P IC TURE me nu.
2. Pre ss ◄ / ► button t o adjus t.
Satu ratio n
Adju st the sa tu rat io n of th e co lor bas ed on you r own lik e.
Hue
Use in c ompen sa tin g co lor c ha nged wi th the tr ansmi ss ion i n th e NTS C co de.
Pres s ▼ / ▲ butto n to s ele ct ,the n press ◄ / ► b ut ton t o se lect. ( Av ailab le Aspe ct R ati o: Ful l, Zoom1 ,Zoom 2,4:3 ).Aspe ct Rati o
Aspe ct Rati o
16
Picture
Picture Mod e
Brightnes s
Contrast
Sharpness
Saturatio n
Hue
Color Temp
Aspect Rati o
Mov e
Adj ust
MEN U:
Ret urn
EXI T:Ex it
Standard
Standard
Full
50
50
50
50
0
Page 18
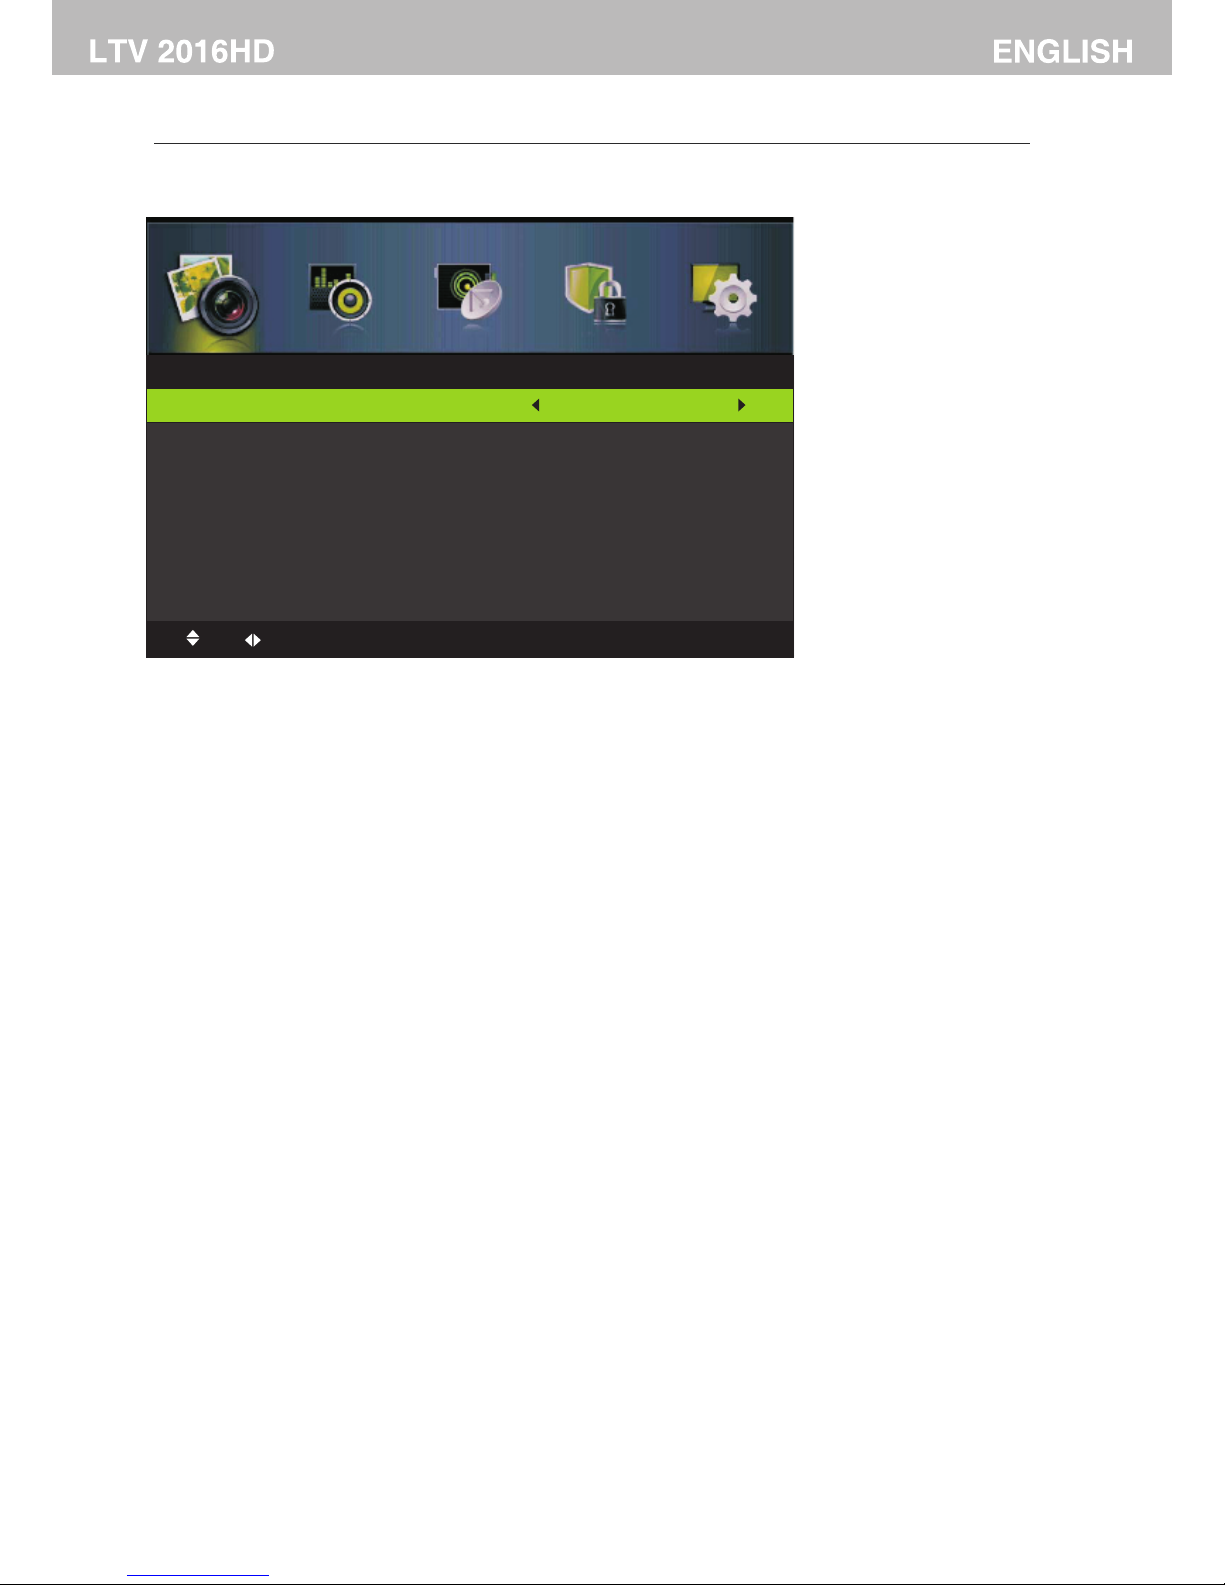
Adva nced Se tt ing s
NR
MPEG NR
Dynamic Con tras t
Mov e
Adj ust
MEN U:
Ret urn
EXI T:Ex it
Medium
Adva nced Se tt ing s
Medium
Medium
17
Pres s ▼ / ▲ butto n to s ele ct N R(Noi se Redu ction ), the n pr ess ◄ / ► b ut ton to se lect. (Ava ila bl e opt io ns: Off,Wea k,
Medi um,St ro ng) .
NR(N oise Re du cti on )
Pres s ▼ / ▲ butto n to s ele ct M PEG NR( Noise R educt io n), th en pr es s ◄ / ► butto n to sele ct. (Avai la ble o pt ion s:
Off,Weak ,M edi um ,St ro ng).
MPEG N R(Noi se R edu ct ion)
Pres s ▼ / ▲ butto n to s ele ct ,the n press ◄ / ► b ut ton t o se lect. ( Av ailab le opti on s: Off, We ak
,Med ium,S tr ong ).
Dyna mic Con tr ast
Dyna mic Con tr ast
Page 19
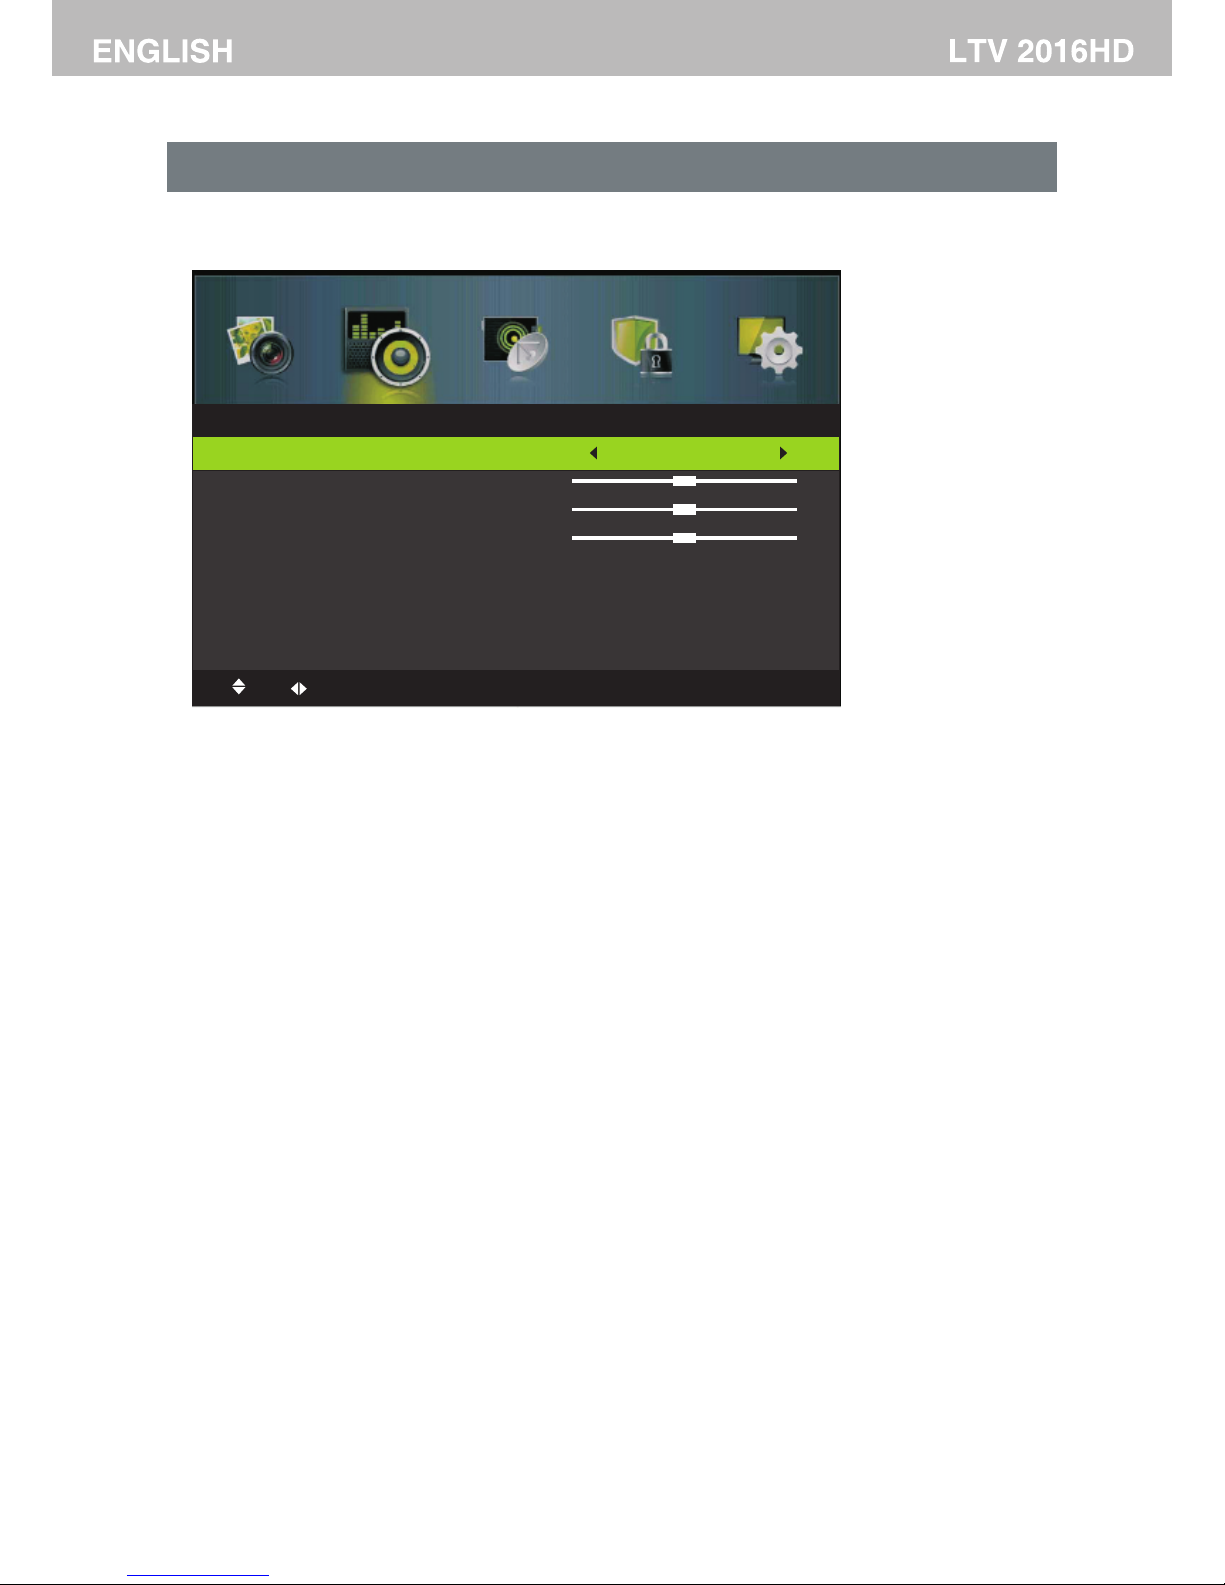
Sound Menu
Pres s MENU bu tt on to d is pla y th e main me nu.
Pres s ◄ / ► butto n to s ele ct S ound in t he main m enu,i t wi ll hi gh lig ht t he firs t optio n.
3. Afte r finis hi ng yo ur a dju st ment, P ress ME NU butt on t o ret ur n bac k to t he prev ious me nu.
1. Pre ss ▼ / ▲ butt on t o sel ec t the opt ion tha t you wan t to a dju st i n the S OU ND menu .
2. Pre ss ◄ / ► butt on t o adj us t.
Select
Back Adjust
Trebl e
Bass
Pres s ▼ / ▲ butto n to s ele ct B ass,t hen pre ss OK b ut ton t o en ter sub -menu .Pres s ◄ / ► bu tto n to a dju st .
Pres s ▼ / ▲ butto n to s ele ct Tr eble, then pr ess OK bu tto n to e nter su b-men u.Pre ss ◄ / ► b utt on t o adj us t.
(Avail able So un d mod e: S tan da rd,Mu sic,M ovie, Pe rso na l).
You ca n chang e the val ue o f Treb le a nd Ba ss w hen the s ound is i n Perso na l mod e.
TIPS : You can pre ss S MOD E bu tto n on t he remo te cont rol to ch an ge th e So und M od e direc tly.
Pres s ▼ / ▲ butto n to s ele ct S ound Mo de, the n press OK but to n to ente r sub-m enu.P re ss ▼ / ▲ bu tt on to sel ect.
Soun d Mode
Bala nce
Pres s ▼ / ▲ butto n to s ele ct B alanc e,the n press OK but to n to ente r sub-m enu.P re ss ◄ / ► bu tt on to a dj ust.
SOUND
Mov e
Adj ust
MEN U:
Ret urn
EXI T:Ex it
Sound Mode
Treble
Bass
Balance
Surround So und
EQ Setting
AVL
SPDIF
Off
PCM
Standard
Off
Surr ound So un d
Pres s ▼ / ▲ butto n to s ele ct ,the n press ◄ / ► b ut ton t o se lect On o r Off.Surr ound So un d
18
0
0
0
Page 20
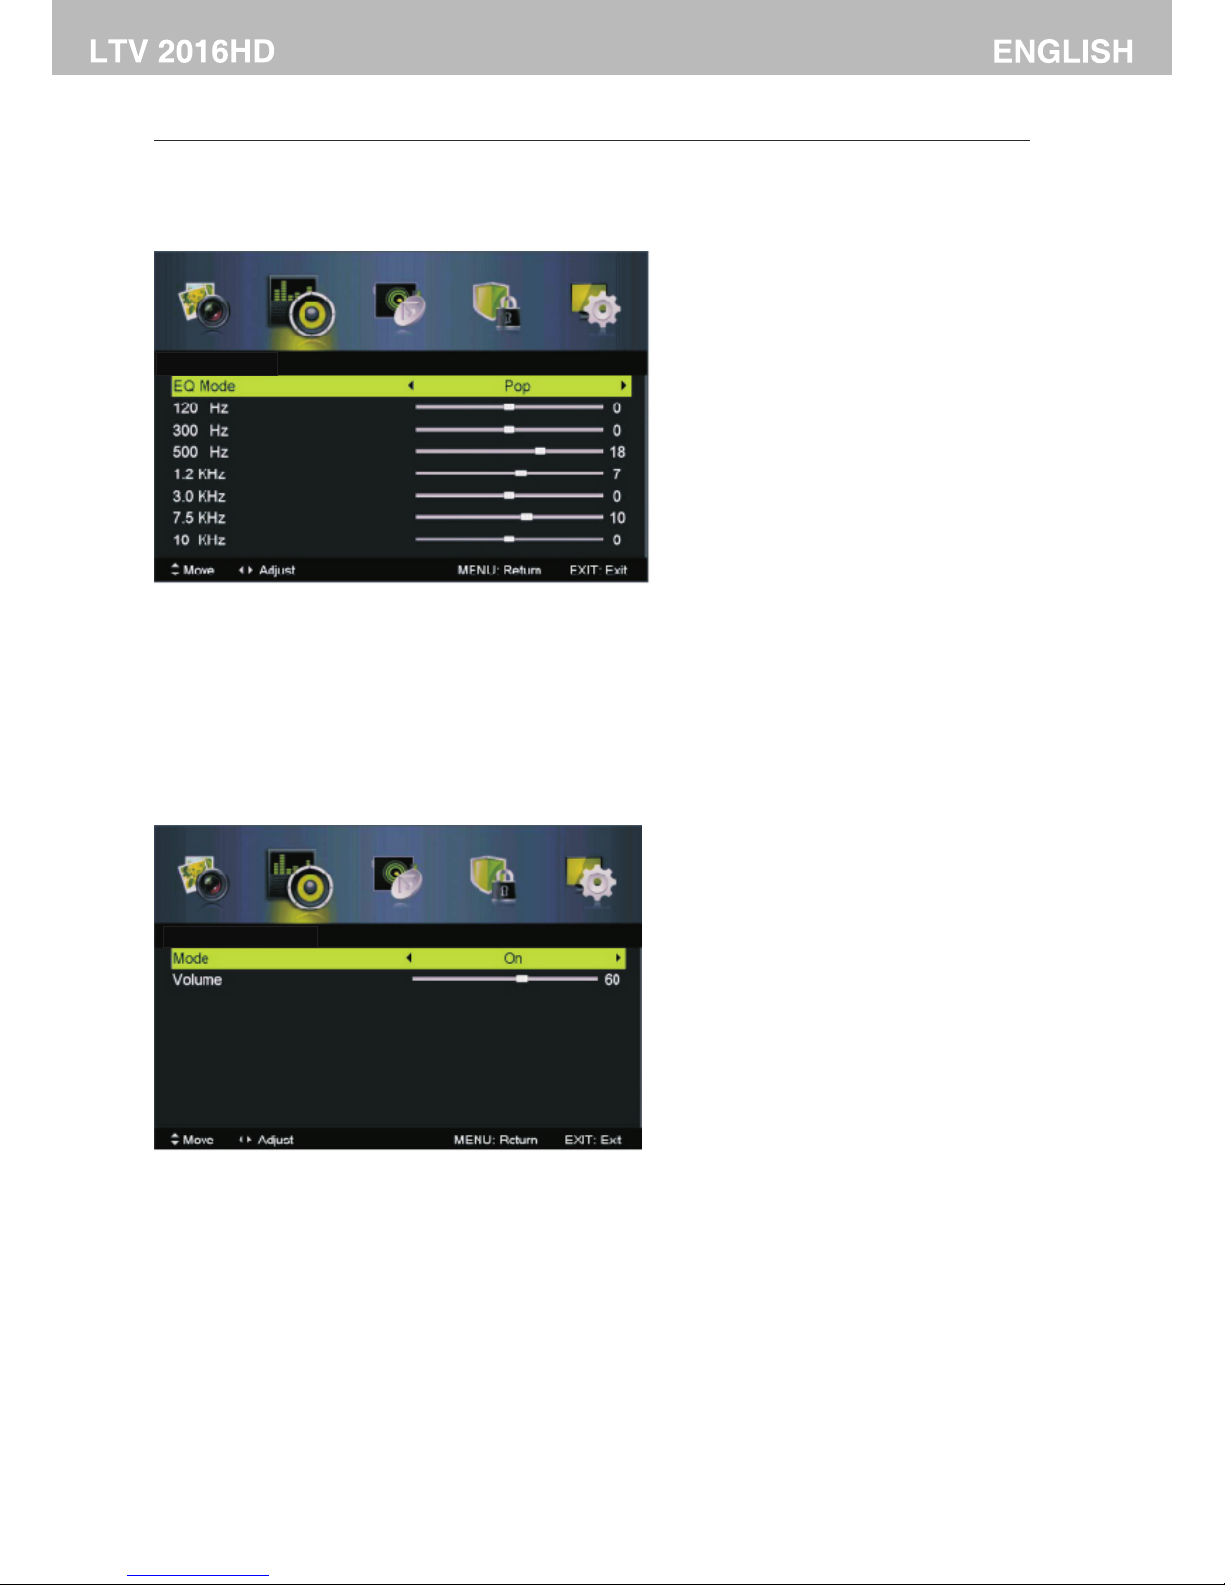
EQ Set ting
EQ Set ting, t he n pre ss O K/Pres s ▼ / ▲ butto n to s ele ct ►but ton to en te r sub me nu.
AVL
Pres s ▼ / ▲ butto n to s ele ct ,then pr es s ◄ / ► but to n to sele ct On or Off.AVL
Pres s ▼ / ▲ butto n to s ele ct ,the n press ◄ / ► b ut ton t o se lect Off, Auto, PCM.SPDI F
SPDI F
Audi o Descr ip tio n
, th en pr es s OK/Pres s ▼ / ▲ butto n to s ele ct ►but ton to en te r sub me nu.Audi o Descr ip tio n
Soun d Typ e
Pres s ▼ / ▲ butto n to s ele ct ,the n press ◄ / ► b ut ton t o se lect .Soun d Typ e
19
EQ Set ting
Audi o Descr ip tio n
Page 21
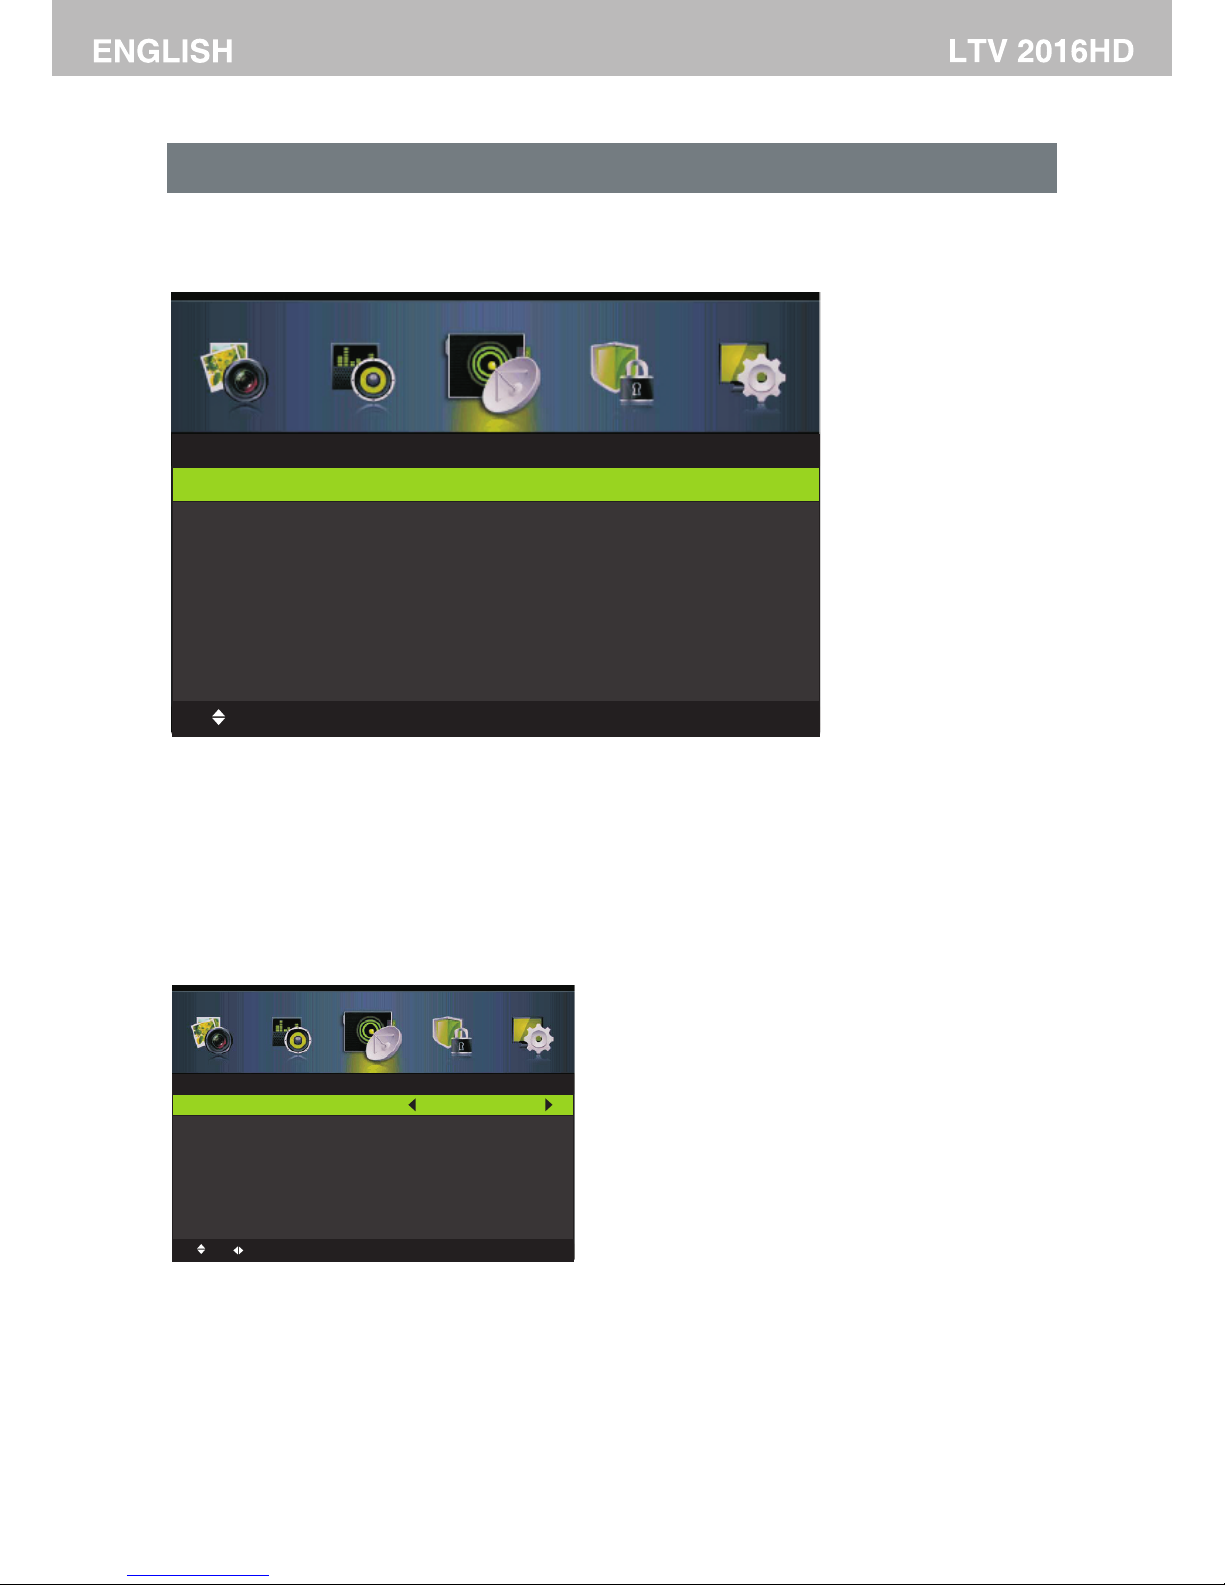
Channel Menu
Pres s MENU bu tt on to d is pla y th e main me nu.
Pres s ◄ / ► butto n to s ele ct C HANNE L in the ma in menu ,it wil l hi ghl ig ht th e fi rst opt ion.
Mov e
OK: Sel ec t
MEN U:
Ret urn
EXI T:Ex it
Channel
Manual Scan
Channel Edi t
Common Inte rfac e
Signal Info rmat ion
Auto Scan
3. Afte r finis hi ng yo ur a dju st ment, Press M ENU but to n to re tu rn ba ck t o the pre vious m enu.
1. Pre ss ▼ / ▲ butt on t o sel ec t the opt ion tha t you wan t to a dju st i n the C HA NNEL me nu.
2. Pre ss ◄ / ► butt on t o adj us t.
20
Pres s ▼ / ▲ butto n to s ele ct ,the n press ◄ / ► b ut ton t o se lect Air o r Cable .Tuner Type
Tuner Type
Auto S can
, then p ress OK /
(The d efaul t pa ssw or d is 00 00 )
Pres s ▼ / ▲ butto n to s ele ct ►but ton to en te r sub me nu.Auto S can
Move
Adju st
MENU :
Retu rn
EXIT :Exi t
Auto S can
Cou ntry
Mod e
Sta rt
DTV +ATV
Ita ly
Page 22
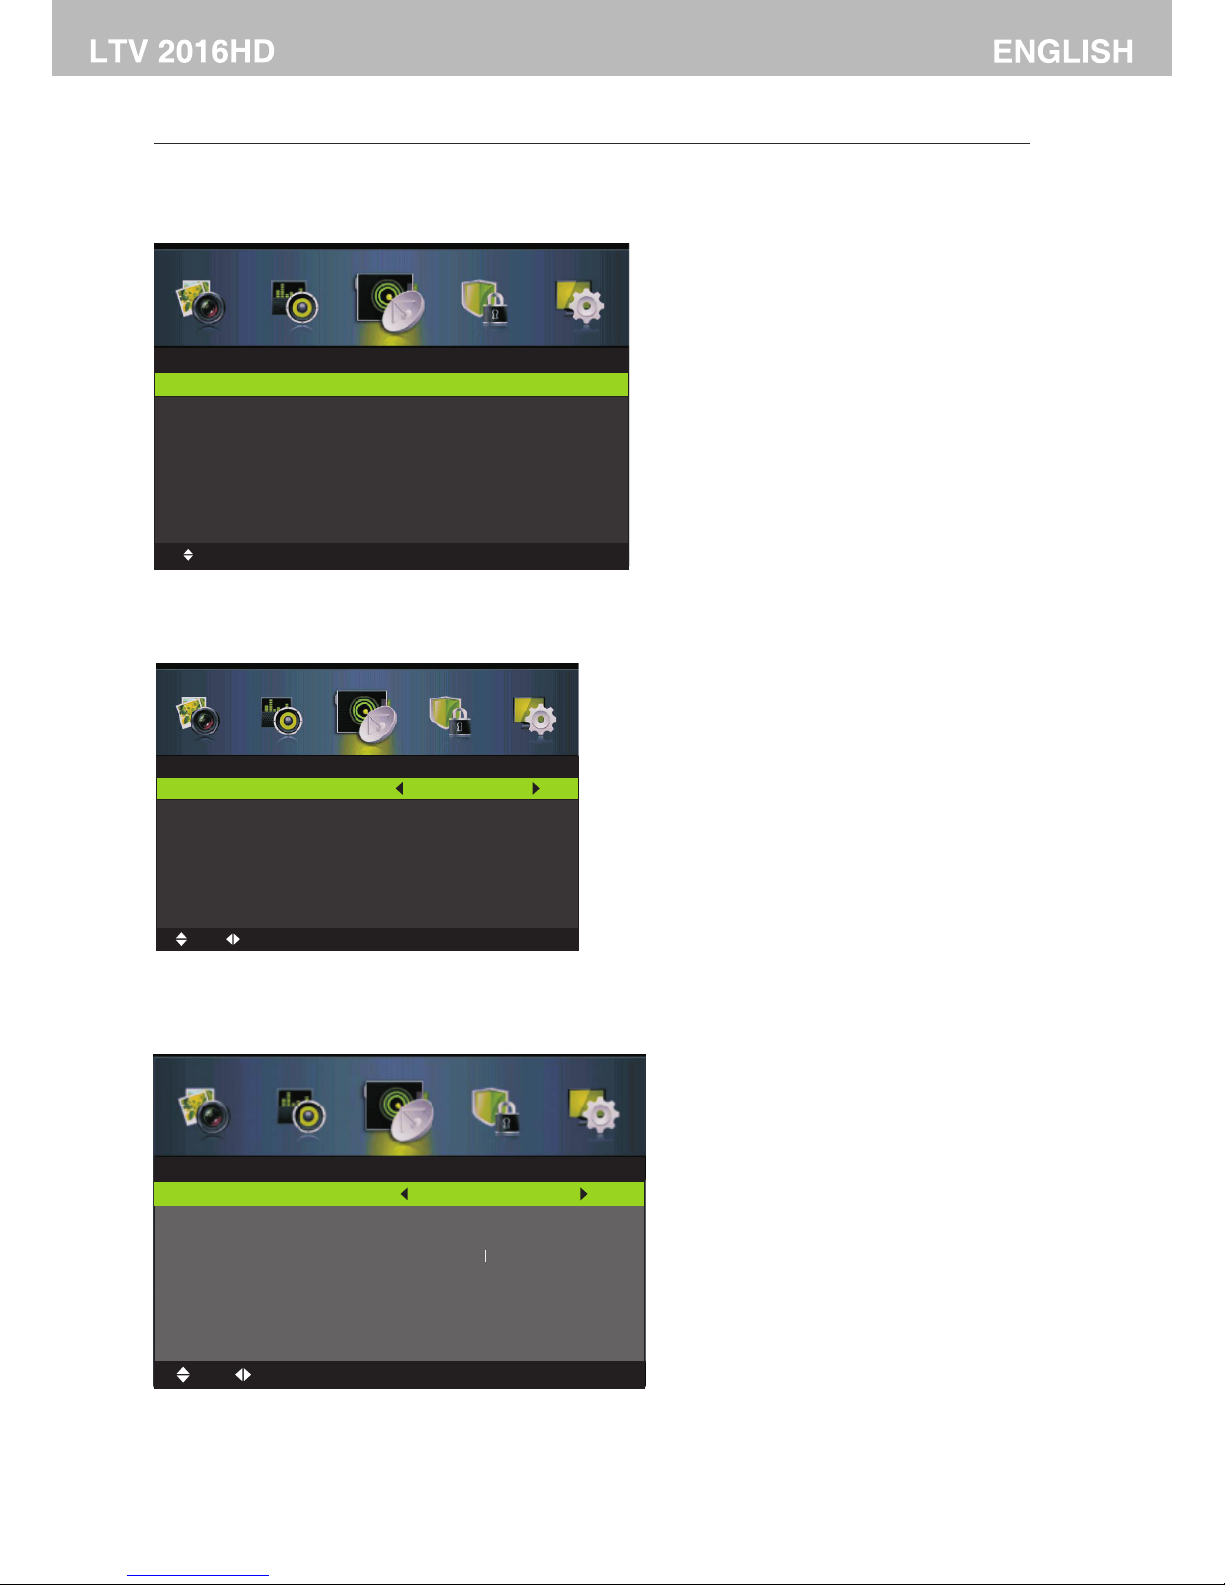
Manu al Scan
, then p res s OK/Pres s ▼ / ▲ butto n to s ele ct ►butto n to ente r su bme nu .Manu al Scan
Digi tal Man ua l Sca n
Pres s butt on to sel ec t Dig it al Ma nu al Scan , then pr ess OK/
▼ / ▲ ► b ut ton to en ter sub menu.
Anal og Manu al S can
Pres s butt on to sel ec t , then p ress OK /
▼ / ▲ ► b ut ton to en ter sub menu.Anal og Manu al S can
Mov e
OK: Se lect
MEN U:
Ret urn
EXI T:Exi t
Manual Scan
Digita l Ma nu al S ca n
Analog M an ua l Sc an
21
Anal og Manu al S can
Anal og Scan 855. 20 MHz
Chan nel to Sa ve
Colo r Syste m
Soun d Syste m
AFC
Star t
CH00 5
PAL
Off
Mov e
Fin e tune
MEN U:
Ret urn
EXI T:Ex it
0-9 : Input
Digita l Sc an
Start
Freque nc y
Streng th
Digi tal Man ua l Sca n
CH21
0
Mov e
Adj ust
MEN U:
Ret urn
EXI T: x itE
0-9 : Input
474.00 M Hz
Page 23
Mov e
Pag e
OK:
Sel ect
EXI T:Ex it
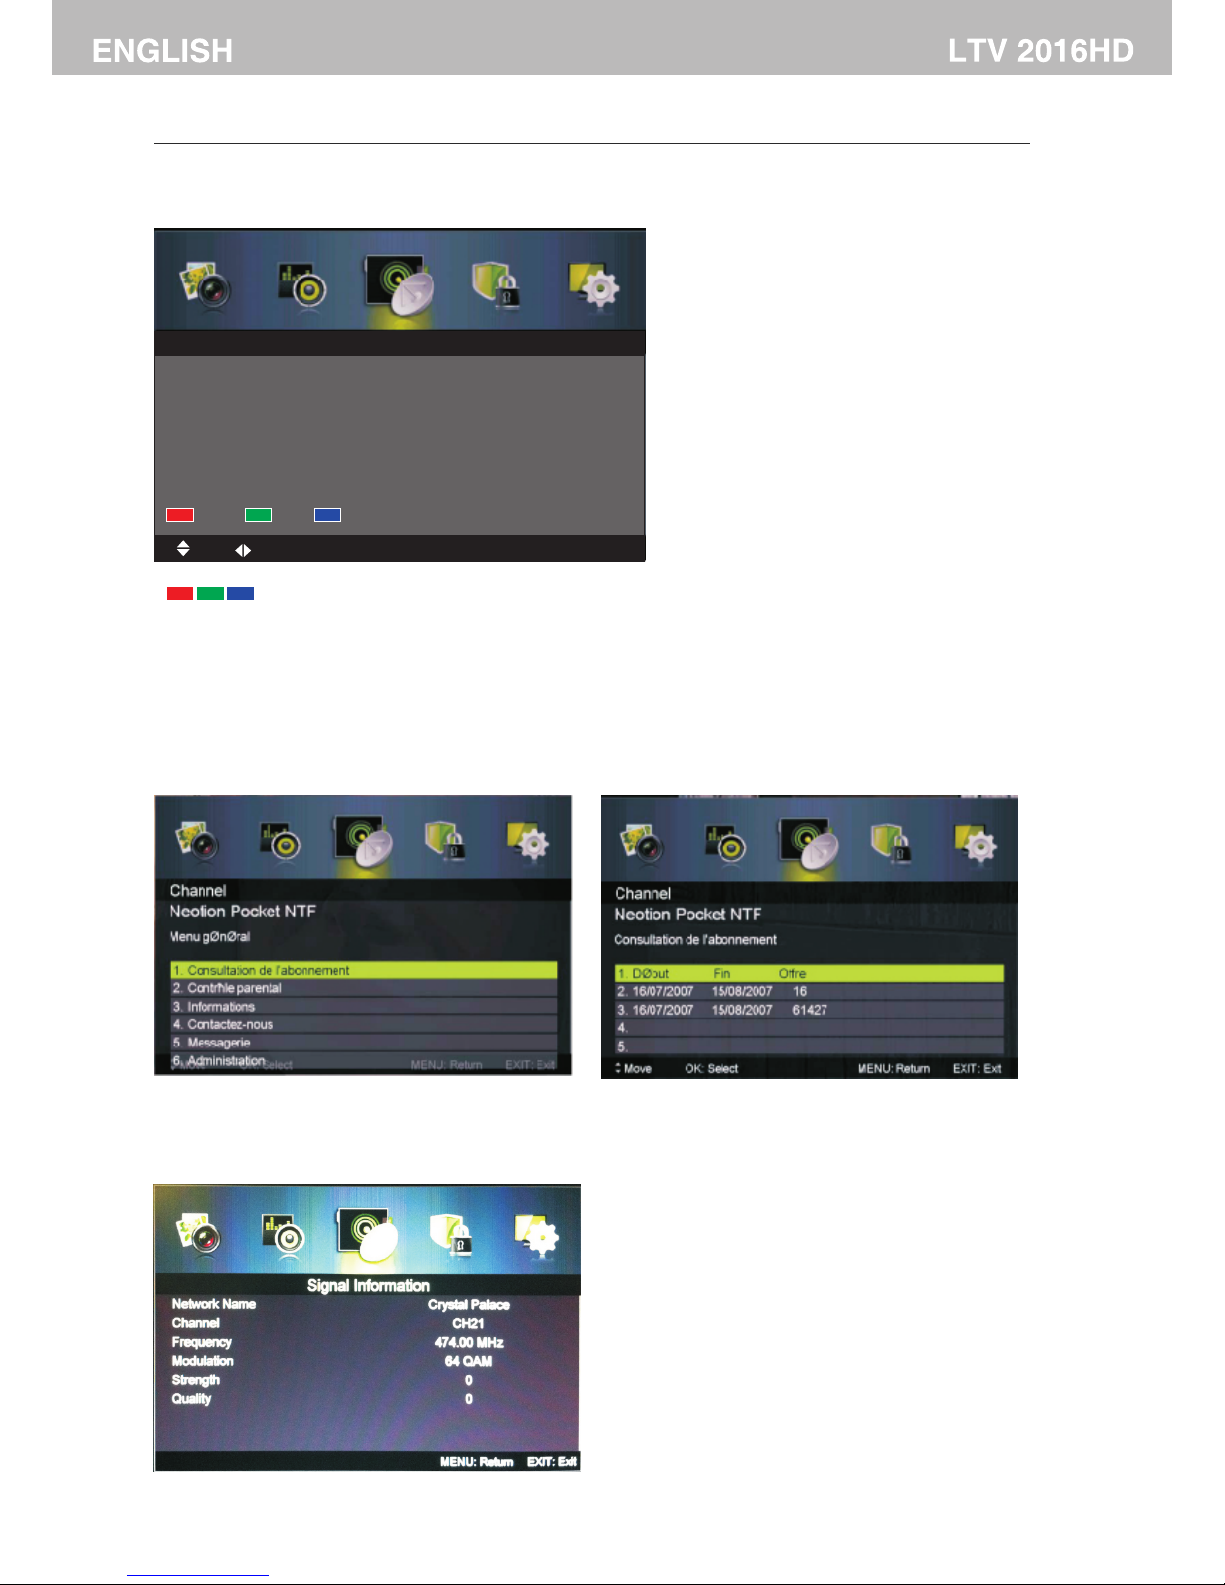
Chan nel Edi t
, the n press O K/Pres s ▼ / ▲ butto n to s ele ct ►butt on t o ent er s ubm en u.Cha nnel Ed it
The thre e co lor ed k ey is the s hortc ut key fo r progr am min g th e cha nn el.
Firs t press ▼ / ▲ to h igh li ght the c hanne l you wan t to dele te o r mov e or s kip , th en:
Pres s the butt on to del et e the c ha nne l.
Pres s the butt on to ski p th e sel ec t cha nn el.
(You r TV s et will s ki p the c ha nne l au tomat icall y when us ing CH+ /- t o vie w th e cha nn els.)
Pres s the butt on to to se t th e cha nn el to m ov ing sta te. the n press ▼ / ▲ to m ove
it to th e posit io n you w an t to pu t.
Red
Gree n
Blue
Comm on inte rf ace
, then p ress OK /Pres s ▼ / ▲ butto n to s ele ct ►but ton to en te r sub me nu.Comm on inte rf ace
Only a vaila bl e whe n th ere i s Cl c ard und er DTV.
Sign al lnfo rm ati on
Pres s
abou t the sig na l. On ly a vai la ble whe n there i s signa l under D TV.
▼ / ▲but ton to se le ct Si gn al Info rmati on, the n press t he O K but ton to se e the det ai l inf or mat io n
Chan nel Edi t
MEN U:
Ret urn
Del ete
Ski p
22
Mov e
001 BB C ONE
002
003
007
BBC TWO
SBS ON E
BBC CH OICE
010 BB C TE XT
011 BBC NEW S 24
030 SB S HD
Page 24
Lock Menu
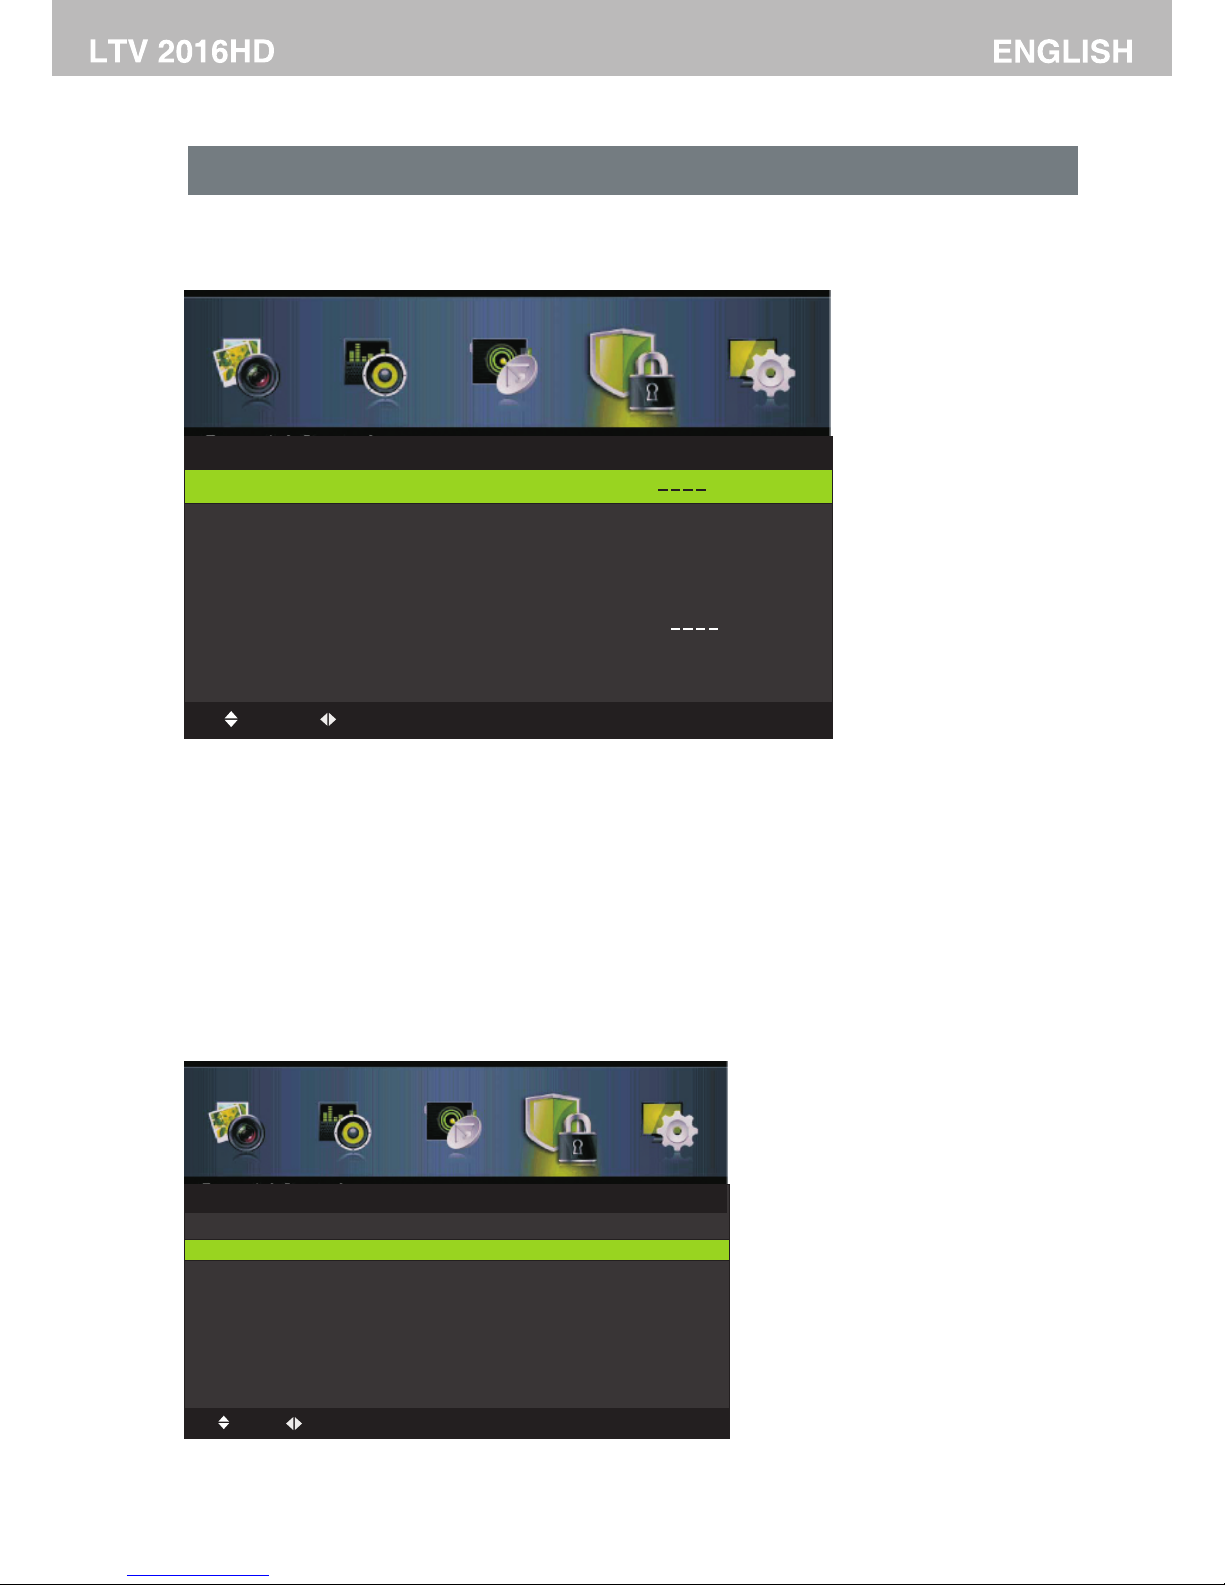
Pres s MENU bu tt on to d is pla y th e main me nu.
Pres s ◄ / ► butto n to s ele ct L OCK in th e main me nu,it w il l hig hl igh t th e first o ption .
LOCK System
Mov e
MEN U:
Ret urn
EXI T:Ex it
Enter Passw ord
Enable
Channel Loc ks
Lock Keypad
New Passwor d
Clear Lock
On
On
3. Afte r finis hi ng yo ur a dju st ment, P ress ME NU butt on t o ret ur n bac k to t he prev ious me nu.
1. Pre ss ▼ / ▲ butt on t o sel ec t the opt ion tha t you wan t to a dju st i n the L OC K menu. (Defa ult Pas sw ord :0 000 )
2. Pre ss ◄ / ► butt on t o adj us t.
Ente r Passw or d
Pres s ▼ / ▲ butto n to s ele ct , then p ress OK b utt on t o make th e follo wing 4 op ti ons v al id.
(Def ault pa ss wor d is ‘ 000 0’ .)
Ente r Passw or d
Enab le
Pres s ▼ / ▲ butto n to s ele ct ,the n press ◄ / ► b ut ton t o se lect On o r Off.Enab le
Chan nel Loc ks ,Pa re nta l Ra ting an d Lock Ke ypad ar e avail ab le wh en E nab le i s On
Chan nel Loc ks
, then pr ess ok/Pres s ▼ / ▲ butto n to s ele ct ►but ton to en te r sub me nu.Cha nn el Lock s
Hotel mode
23
LOCK System
Mov e
OK: Se lect
MEN U:
Ret urn
EXI T:Ex it
Sele ct ch annel (s) t o lock.
001 BB C ONE
002 BB C TWO
003 SB S ONE
007 BB C CHO ICE
010 BB C TEXT
011 BBC NEW S 24
030 SB S HD
Adj ust
Pag e
Page 25

Lock K eypad
Set to p reven t it f rom b ei ng us ed b y young c hild re n,or ot he r une xp ect ed u sage.
Pres s ▼ / ▲ butto n to s ele ct L ock Key pad , the n press ◄ / ► bu tto n to s ele c On o r Offt.
New Pa sswor d
Pres s ▼ / ▲ butto n to s ele ct N ew Pass wor,,t hen ent er a 4-di gi tal n um ber y ou w ant to se t twice
Clea r Lock
, th en p res s Pres s ▼ / ▲ butto n to s ele ct ◄ / ► butt on to sel ec t.Clea r Lock
Hote l Mode
, t he n pre ss O K/Pres s ▼ / ▲ butto n to s ele ct ►butto n to ente r subme nu.Hote l Mode
Hotel Mode
Active Hotel Mode
Max Vol.
Default Vol.
Source Lock
Default Source
Default Dtv Program
Default Atv Program
Backup To USB
Restore From USB
Recall
Mov e
Adj ust
EXI T:Ex it
On
100
20
DTV
001
01
24
Page 26
Setup Menu
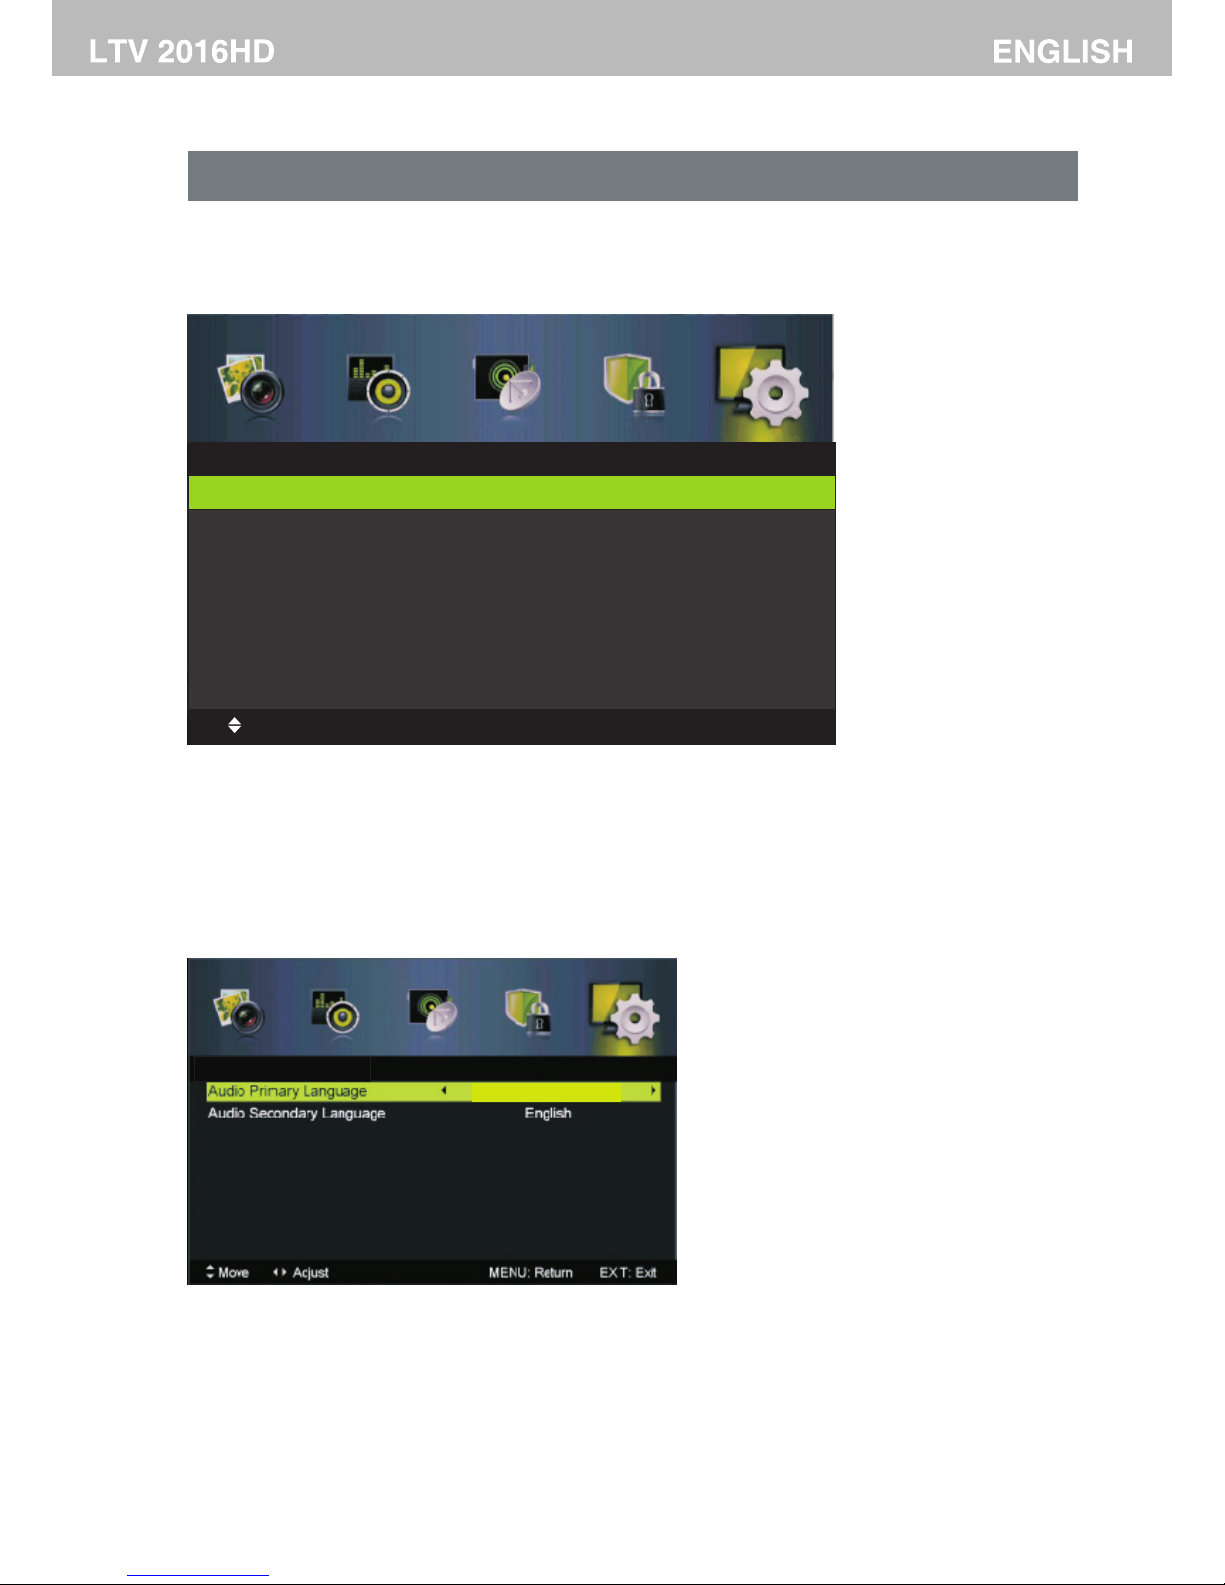
Pres s MENU bu tt on to d is pla y th e main me nu.
Pres s ◄ / ► butto n to s ele ct S ETUP in t he main m enu, it w il l hig hl igh t th e first o ption .
Steup
Mov e
MEN U:
Ret urn
EXI T:Ex it
OSD Languag e English
Audio Langu age
Subtitle
Teletext
Time Settings
First Time Set up
Reset
Software Up date (USB )
OSD La nguag e
Pres s ▼ / ▲ butto n to s ele ct th ▼ / ▲ /◄ / ►bu tt on
to sel ect .
OSD La nguag e, en pre ss OK butt on t o ent er s ub- me nu. P ress
OSD La nguag e
Audi o Langu ag e
the n pre ss O K Press ▼ / ▲ bu tt on to s el ect butt on to ent er s ubm en u.Audi o Langu ag e,
Pres s ▼ / ▲ /◄ / ► b utt on t o sel ec t the Audi o Prima ry Lang ua ge an d Aud io Se co nda ry L angua ge
25
Ital iano
Audi o Langu ag e
Page 27
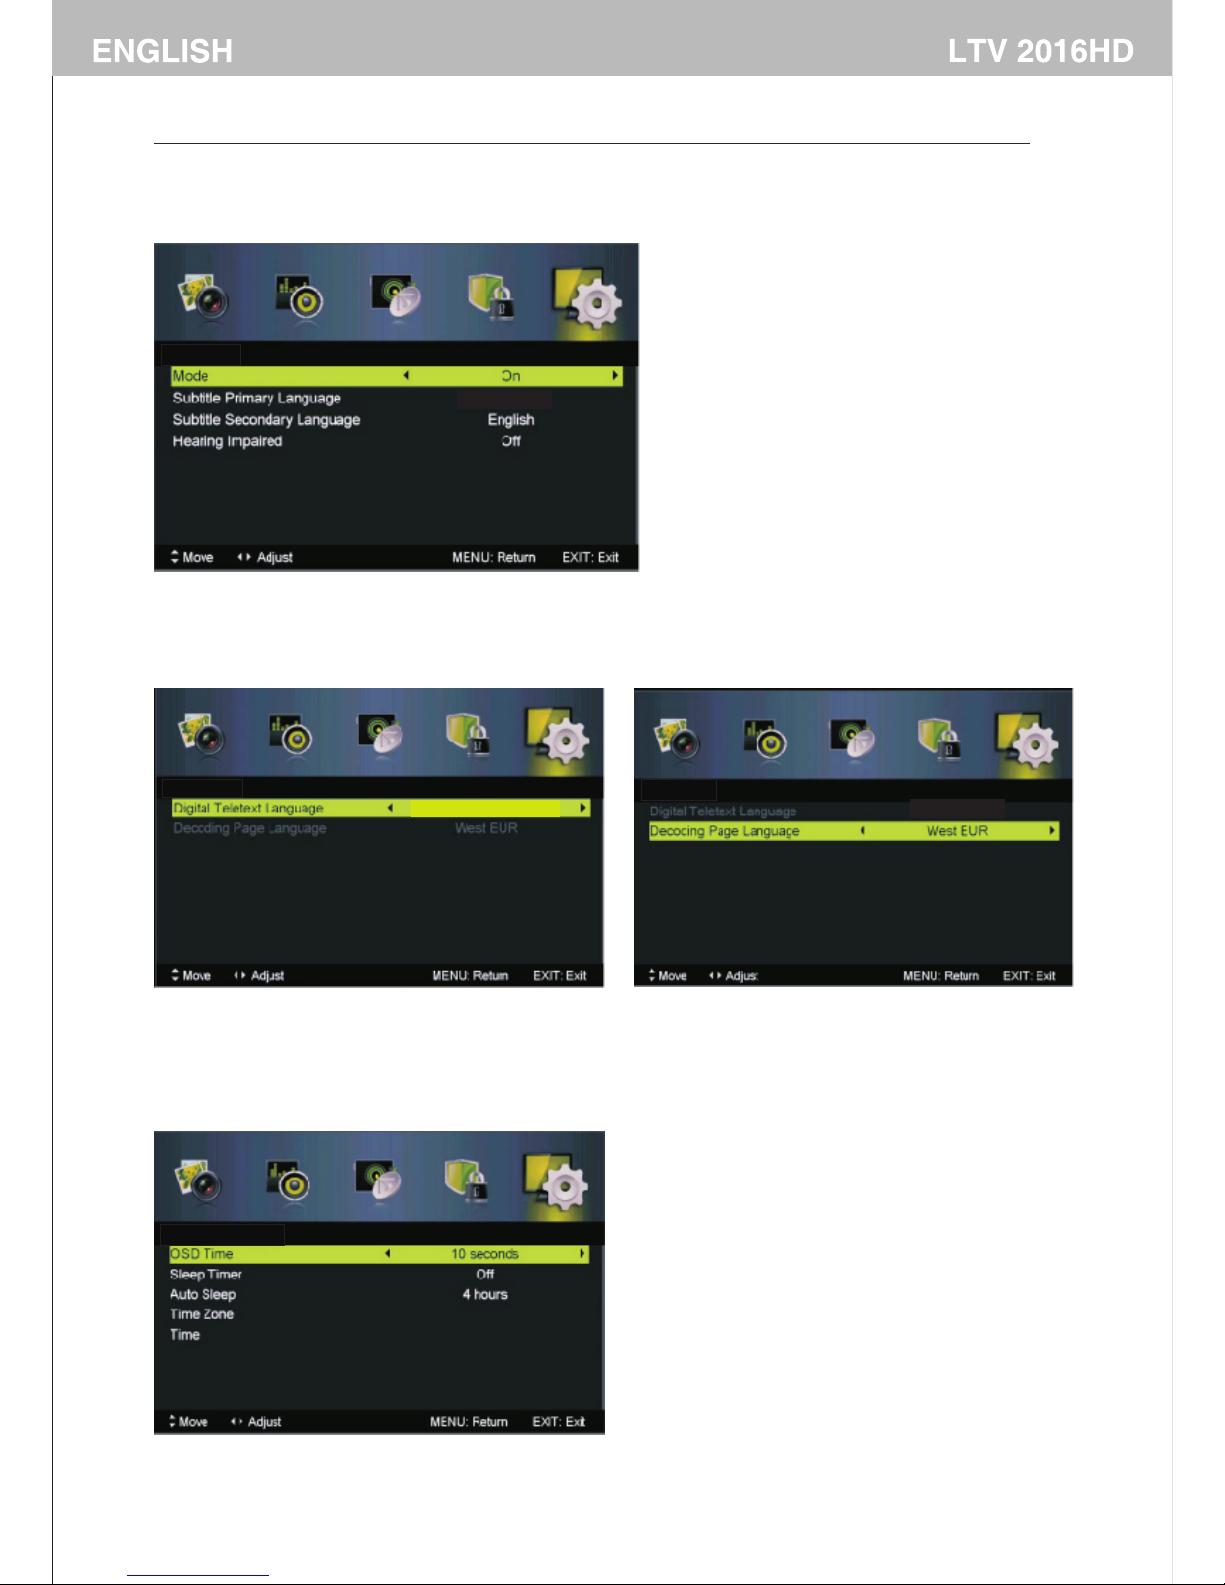
Subt itle
then p ress OK Pres s ▼ / ▲ butto n to s ele ct butt on to ent er s ubm en u.Subt itle,
Teletex t
Adju st Teletext s et tin gs . Only av aila bl e under D TV and ATV sour ce .
Pres s ▼ / ▲butt on t o sel ec t Tele text, t hen pre ss OK/► butt on to ent er subm en u.
Unde r DTV sou rc e,p re ss◄ / ►bu tton to s elect D igita l Tele te xt La ng uag e
Unde r ATV so urce, pr ess ◄ / ► bu tton to s elect D ecodi ng Page L an gua ge
Time Set tings
then p ress OK Pres s ▼ / ▲ butto n to s ele ct butt on to ent er s ubm en u.Ti me S ett in gs,
26
Ital iano
Ital iano
Ital iano
Subt itle
Teletex t
Time Set tings
Teletex t
Page 28
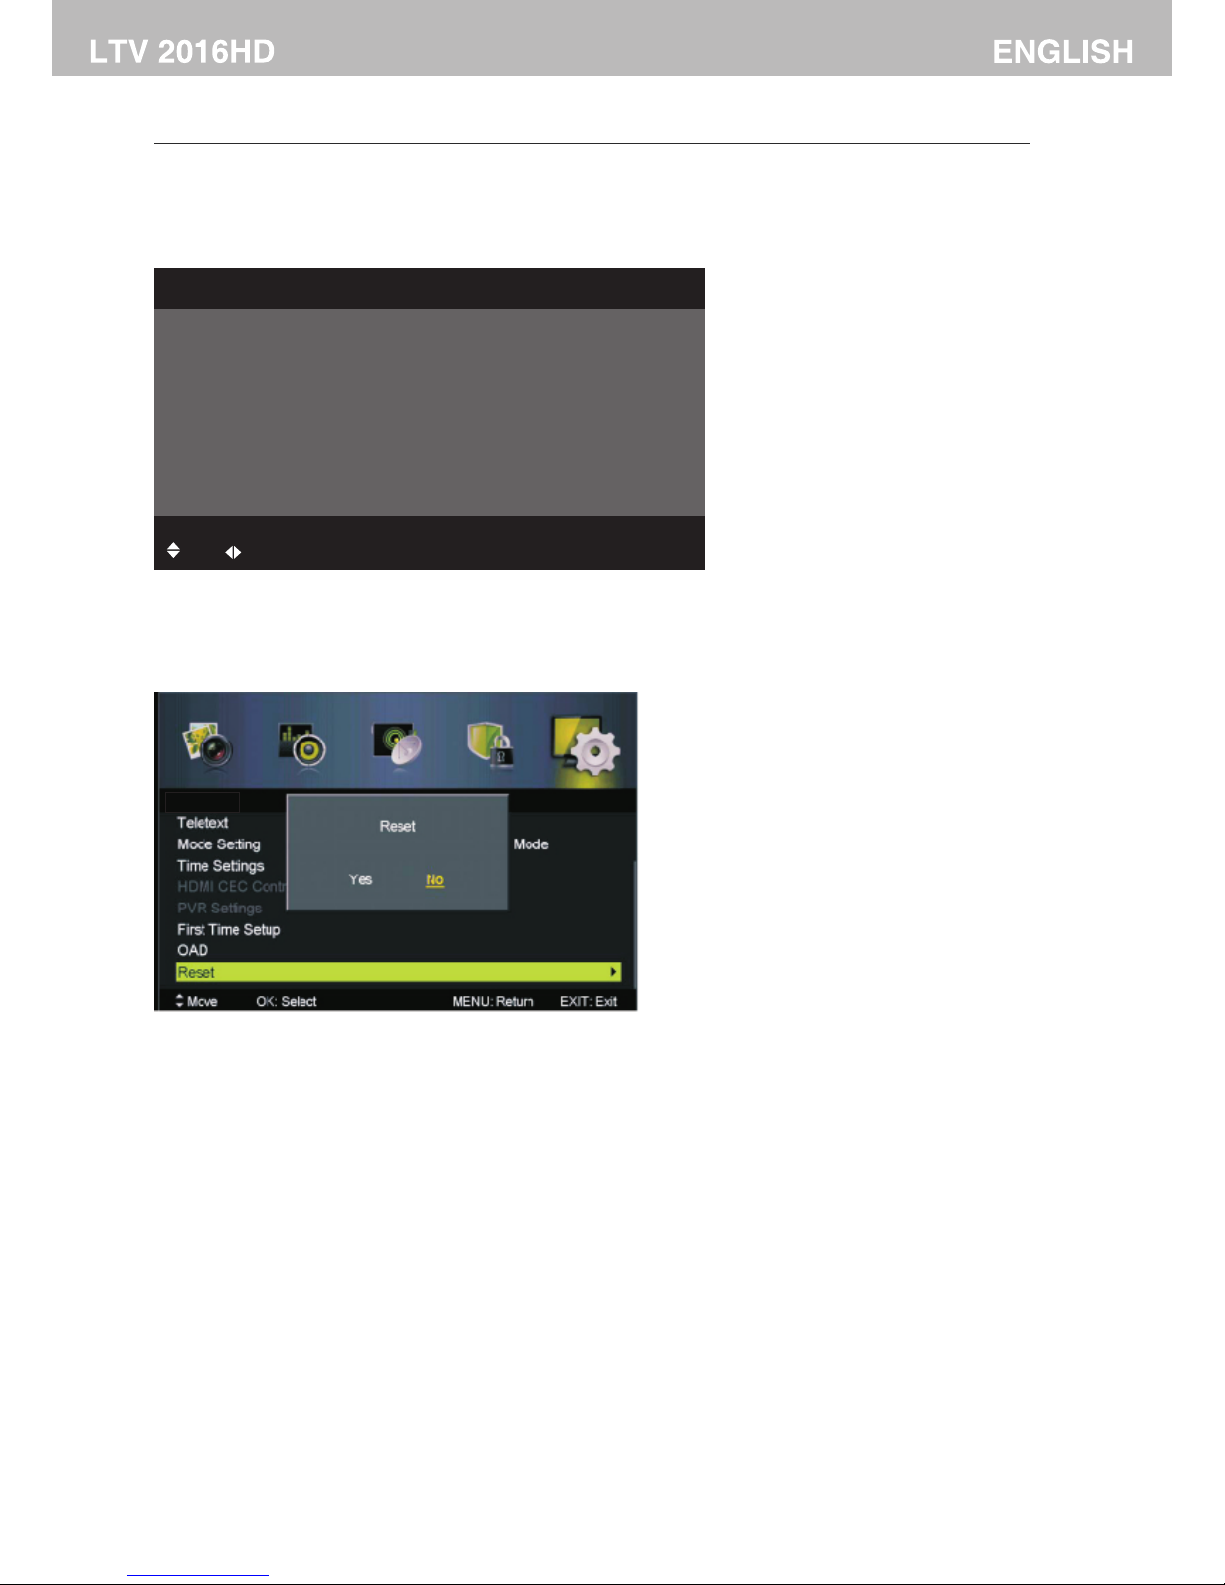
Firs t Time Set up
Pres s ▼ / ▲ butto n to s ele ct F irst ti me Setu p, then p re ss bu tt on to e nt er (Def ault Pa ss wor d: 000 0)OK .
Rese t
Pres s ▼ / ▲ butto n to s ele ct R eset, t hen pre ss OK b ut ton t o en ter
If you a re sure t o re set ,p res s Yes to r eset
First Time Setup
OSD Langua ge English
Country Italy
Auto Scan DTV+ATV
Start
Mov e
Adj ust
MEN U:
Ret urn
EXI T:Ex it
27
Soft ware Up da te( US B)
This m enu let s yo u ins ta ll th e so ftwar e/fir mw are o nt o the tel evisi on.
Page 29
28
Page 30
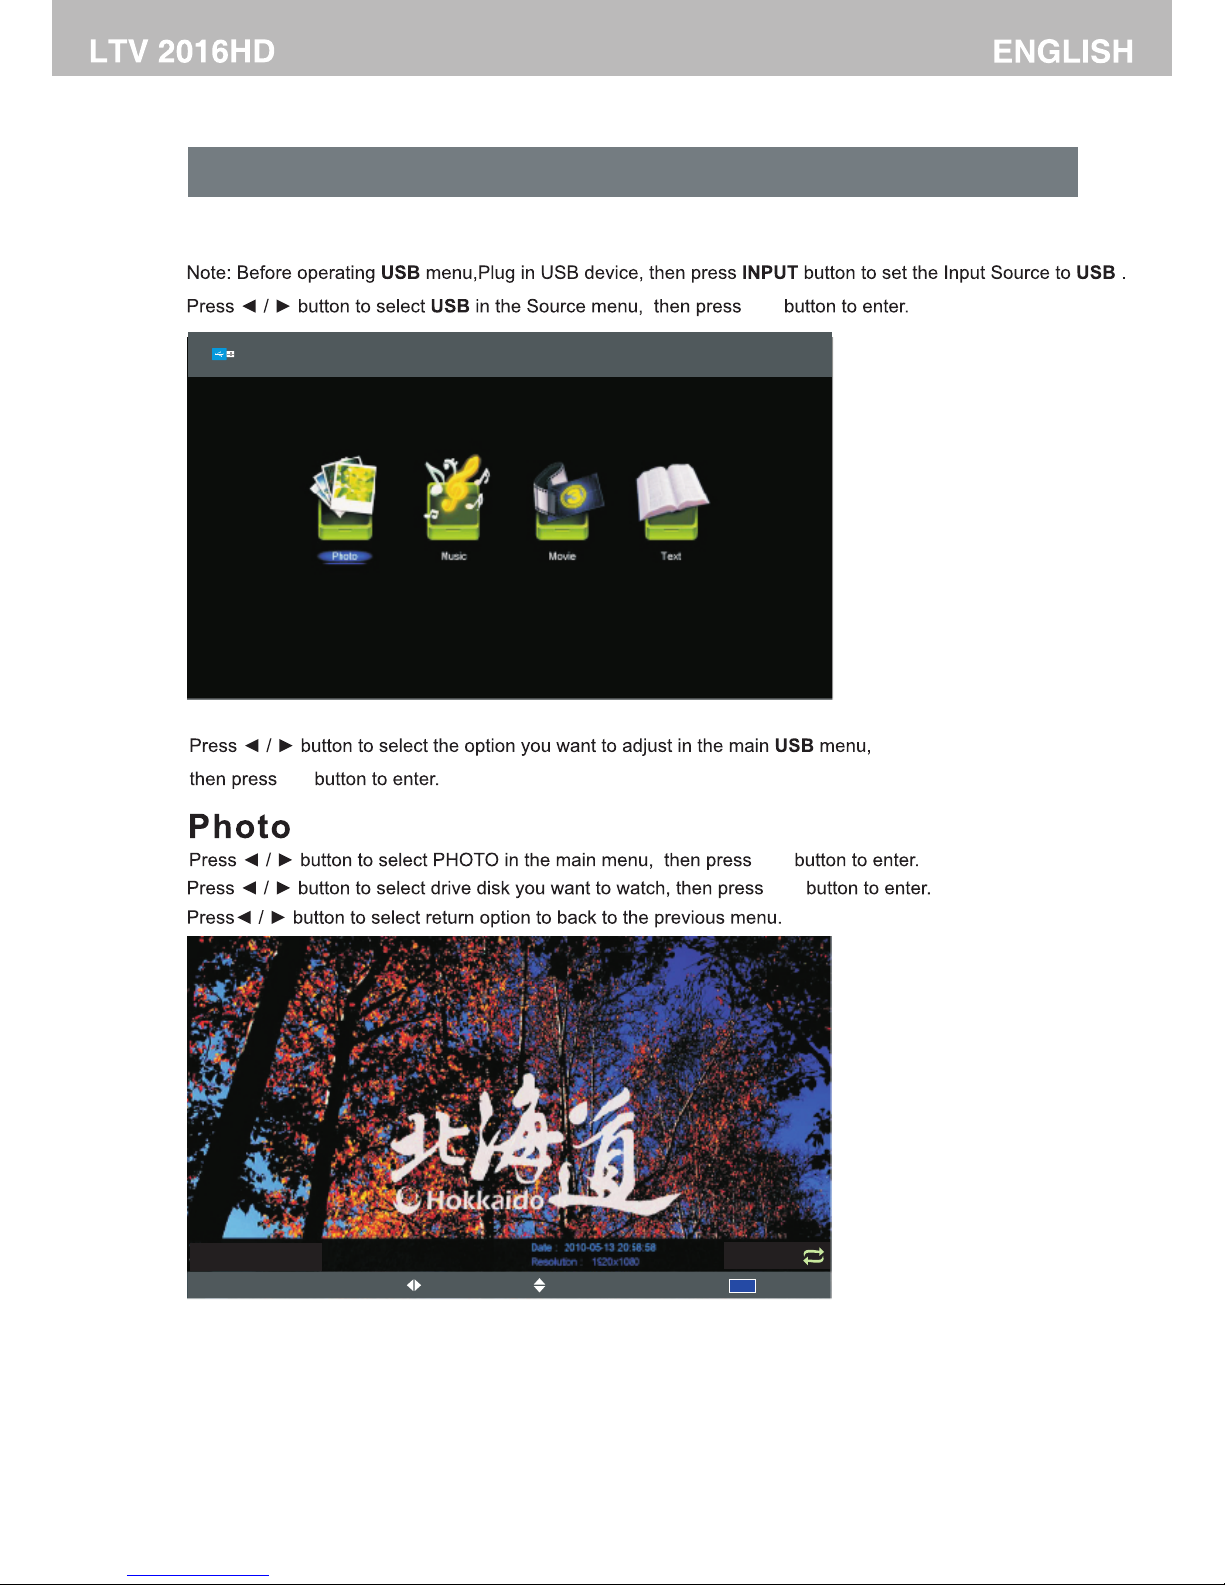
Media Menu
29
OK
OK
OK
ok
1/4 3
12. jpg
Pre vious /Nex t
OK Sl ide Sho w/Sin gleVi ew
Qui ck Menu
EXI T Back
Rot ate
Page 31
30
ok
ok
ok
ok
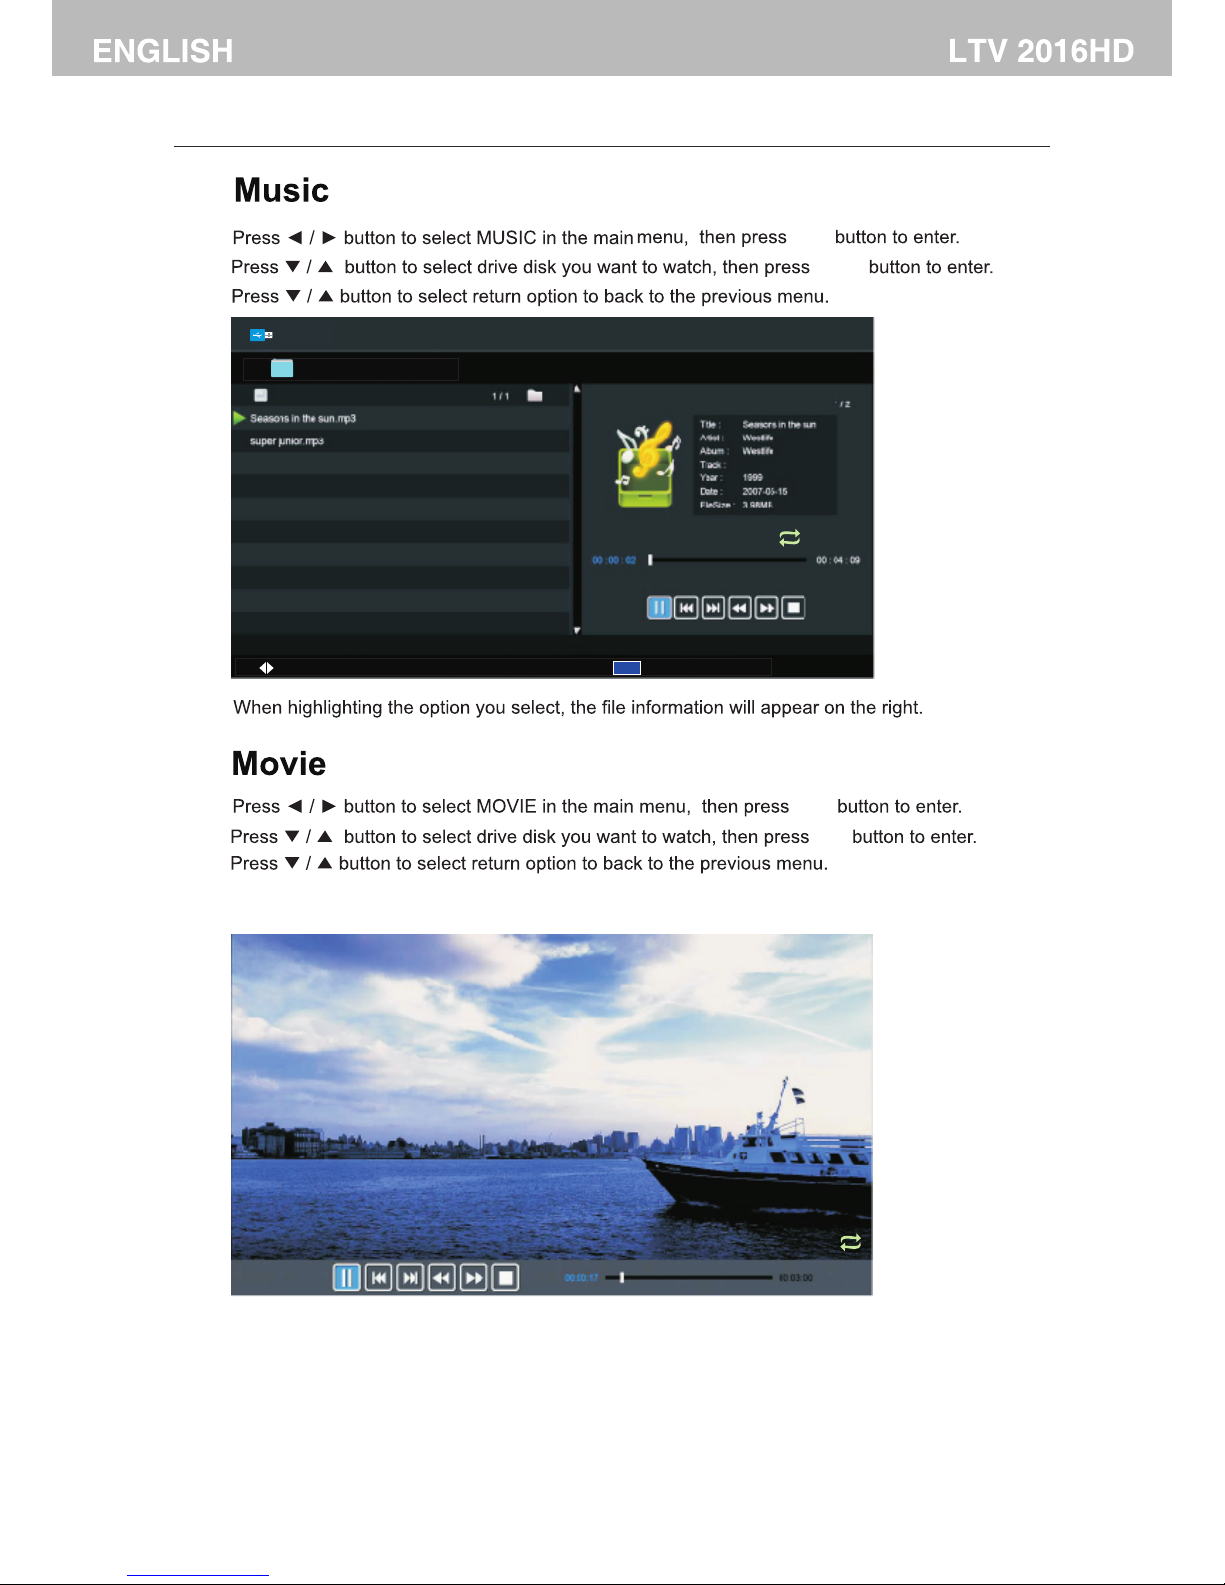
Music
USB1 /seas on s in th e su n.mp3
Mov e
CH+ /- File List
OK Se lect
Qui ck Menu
EXI T Retur n
Page 32
31
Pre vious /Next
EXI T Back
0-9 : Goto Pa ge
Qui ck Menu
ok
ok
Mov e
Cha nge Pag e
Qui ck Menu
EXI T Return
OK: S el ect
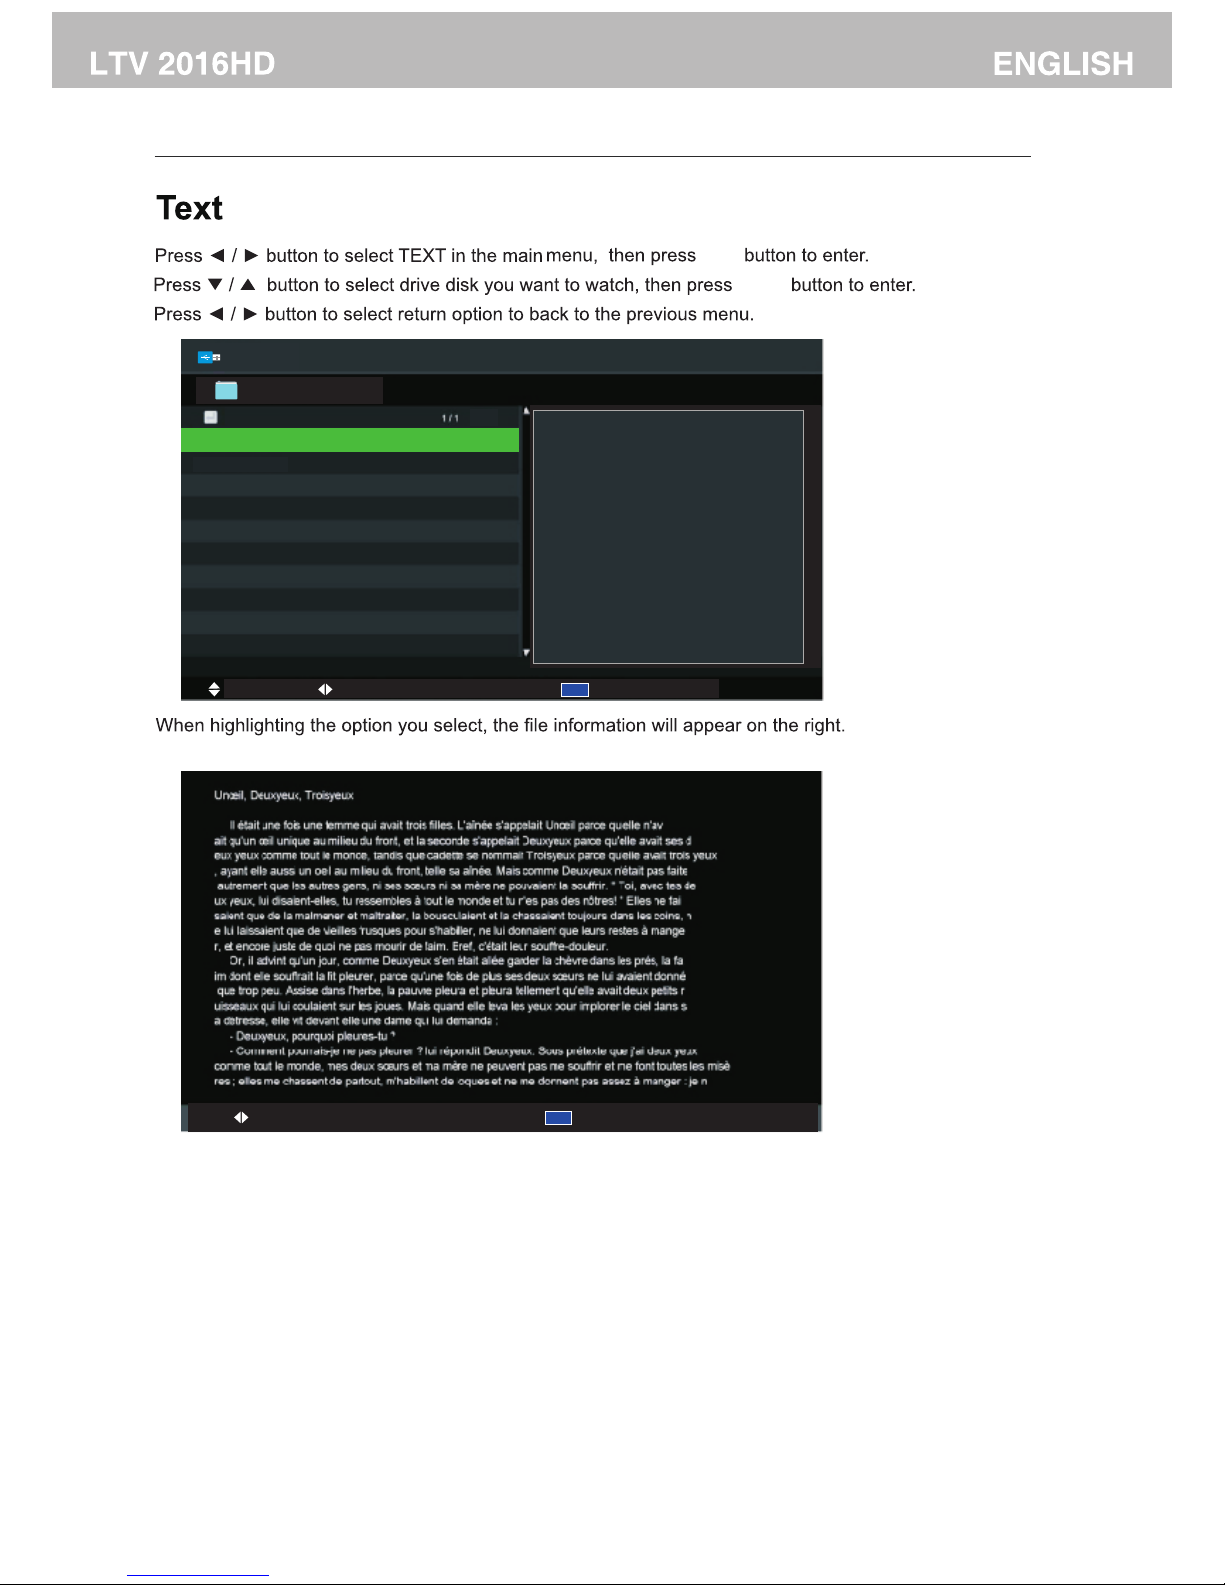
Text
USB1 /TEXE /1 0 Mos t Un iqu e Fa ll Date I deas TXT.tx t
FREN CH TXT.txt
10 Mos t Uniqu e Fa ll Da te I dea s
10 Mos t Uniqu e Fa ll Da te I dea s TX T.tx t
If yo u are bee n datin g your bo yfrie nd
for o ver a yea r,it mig ht be dif fi cu lt to s pice
up yo ur date n ights .Roma ntic di nners
and s troll ing dow n the str eets ha nd in han d
are g reat, but you r boyfr iend an d you may
wan t to try so methi ng more e xciti ng.
Mov e
Cha nge Pag e
OK Se lect
Qui ck Menu
EXI T Retur n
Page 33

If you're having problems
If you are havin g problems with your TV, carr y out the following c heck s first.
If you are still h aving problems, unplu g your TV and contact the se rvice centre.
There is no so und a nd no p icture comin g fro m my TV.
-Check tha t you h ave connecte d the TV power cord pr ope rly a nd switched th e wal l socket on.
-Check tha t the p ower switch at the re ar of t he TV is set t o " ON .
-Check tha t you h ave turned on th e POW ER bu tton on your TV.
-Check the p ict ure contrast a nd br igh tness settin g.
There is a nor mal p ict ure but no sound c omi ng fr om my TV.
-Check tha t you r TV is not mu ted o r has t he volume down .
-Switch th e cha nnel, the prob lem m ay be w ith the channe l you 're o n, not the TV.
-Check tha t you r audio cable in put h as be en plugged in pr ope rly. If you a re us ing a n
external a mplifier .
The remote c ont rol d oes not work.
-Check to se e if th ere i s any objec t bet wee n your TV (s uch a s a pie ce of furnitur e) th at
could bloc k the r emote contro l fro m con necting with t he se nso r on your TV.
-Have you pu t the b atteries int o the r emo te control the r igh t way ? ( So + to + and - to -)
-Correct r emo te operating m ode w as se t (such as TV or VC R).
-The TV is no t positioned i n bri ght s unlight.
-Tr y fitting new ba tte rie s if none of the abo ve wo rk.
The TV has tur ned o ff su ddenly.
-Check tha t you h ave not set the sleep t ime r.
-Check tha t you h ave not set the timer t o con trol the socke t whi ch ha s your TV po wer
cord on.
-Check tha t you h ave not set auto stan dby w ith the broadc ast s ign al source whic h is
connecte d to yo ur TV.
The pictur e on my T V app ears slowly af ter I h ave s witched it on.
This is norm al. The image t ake s a few s econds to appe ar af ter y ou have switch ed th e
TV on. Pleas e con tac t your service c ent re if picture ha s not a ppe ared after fiv e min ute s.
There is no or p oor q ual ity colour or a po or pi ctu re on my TV.
-Change th e col our setting on t he PI CTU RE MENU.
-Keep a dist anc e between your TV an d any VCR you may be u sin g
-Tr y watching ano the r cha nnel. Th e pro blem may be with t he ch ann el you're watc hin g.
-Are the vid eo ca bles install ed pr ope rly?
-Change th e set ting of pictur e bri ght ness on PICTUR E MEN U.
There are ho riz ont al and vertica l bar s on th e screen, the pi ctu re is s haking.
-Check if an y sig nal interfer enc e act ivities is goi ng on n ear by, such as a n ele ctrical
applianc e or po wer tool is in ope rat ion .
The recept ion i s poo r on some channe ls.
-The TV cha nnel you're wa tch ing m ay be having pro ble ms. Change to an oth er ch annel
and see if the s ame i s happening.
-TV broadc ast ing signal is we ak or h as be en interrupt ed.
-Check whe the r signal sourc es ha ve an y possible int erf ere nce.
There are li nes o r str eaks on the pict ure s.
-Check if th ere i s any damage to th e aer ial o n the roof, try to c han ge th e direction of t he
aerial to re cei ve a better sign al.
One of the TV' s spe ake rs does not work .
-Check the s oun d balance sett ing o n SOU ND MENU.
"
Problems and how to fix them
32
Page 34

If you're having problems
Note: This page only refer to Video Graphics adaptor (VGA) problems.
-Chan ge the reso lution, ho rizonta l or vertic al freque ncy
-Chec k whether t he signal c able is connect ed from the P C to your TV p roperly.
-Chec k the signa l input sou rce is conn ecte d properl y.
of your s ource(PC et c. ) .
There i s a vertica l bar or stri pe on my TV scr een.
-Turn on th e auto conf igure or ch ange the ho rizonta l or vertic al fre quency po sition.
Scree n colours a ren't app earing as t hey shoul d be or singl e colour.
-Chec k if the vide o signal ca ble is conn ecte d properl y.
-Rein stall you r PC video ca rd if the sig nal so urce is fro m your comp uter.
Maintaining your TV
If you clean your TV care fully a nd regu larly, it helps your TV to las t longe r. Make su re
you turn the power off an d unplu g the pow er cord o n your TV before you begin to
clean it.
Cleaning the screen
1. Here's a great way to keep the dust off your screen. Wet a soft cloth in a mixture of
lukewarm water and a small amount of fabric softener o r washi ng-up l iquid . Wring
the cloth until it's almost dry and then use it to wi pe the sc reen.
2. Make sure there is no excess water on your TV when you have finished cleaning it.
Cleaning the plastic parts of your TV
Wipe the plastic parts of your TV with a so ft, dry, lint-free cloth. Do not use a wet clot h.
If you are going to be away for a while
If you are not going to use your TV fo r a while ( such as w hen you go on
holiday), you should unplug the power cord from the socket an d disco nnect
your aerial to protect your TV a gains t possible damage from lightning or
power surges.
Problems and how to fix them
The sig nal is out of r ange.
33
Page 35
Your TV's specification
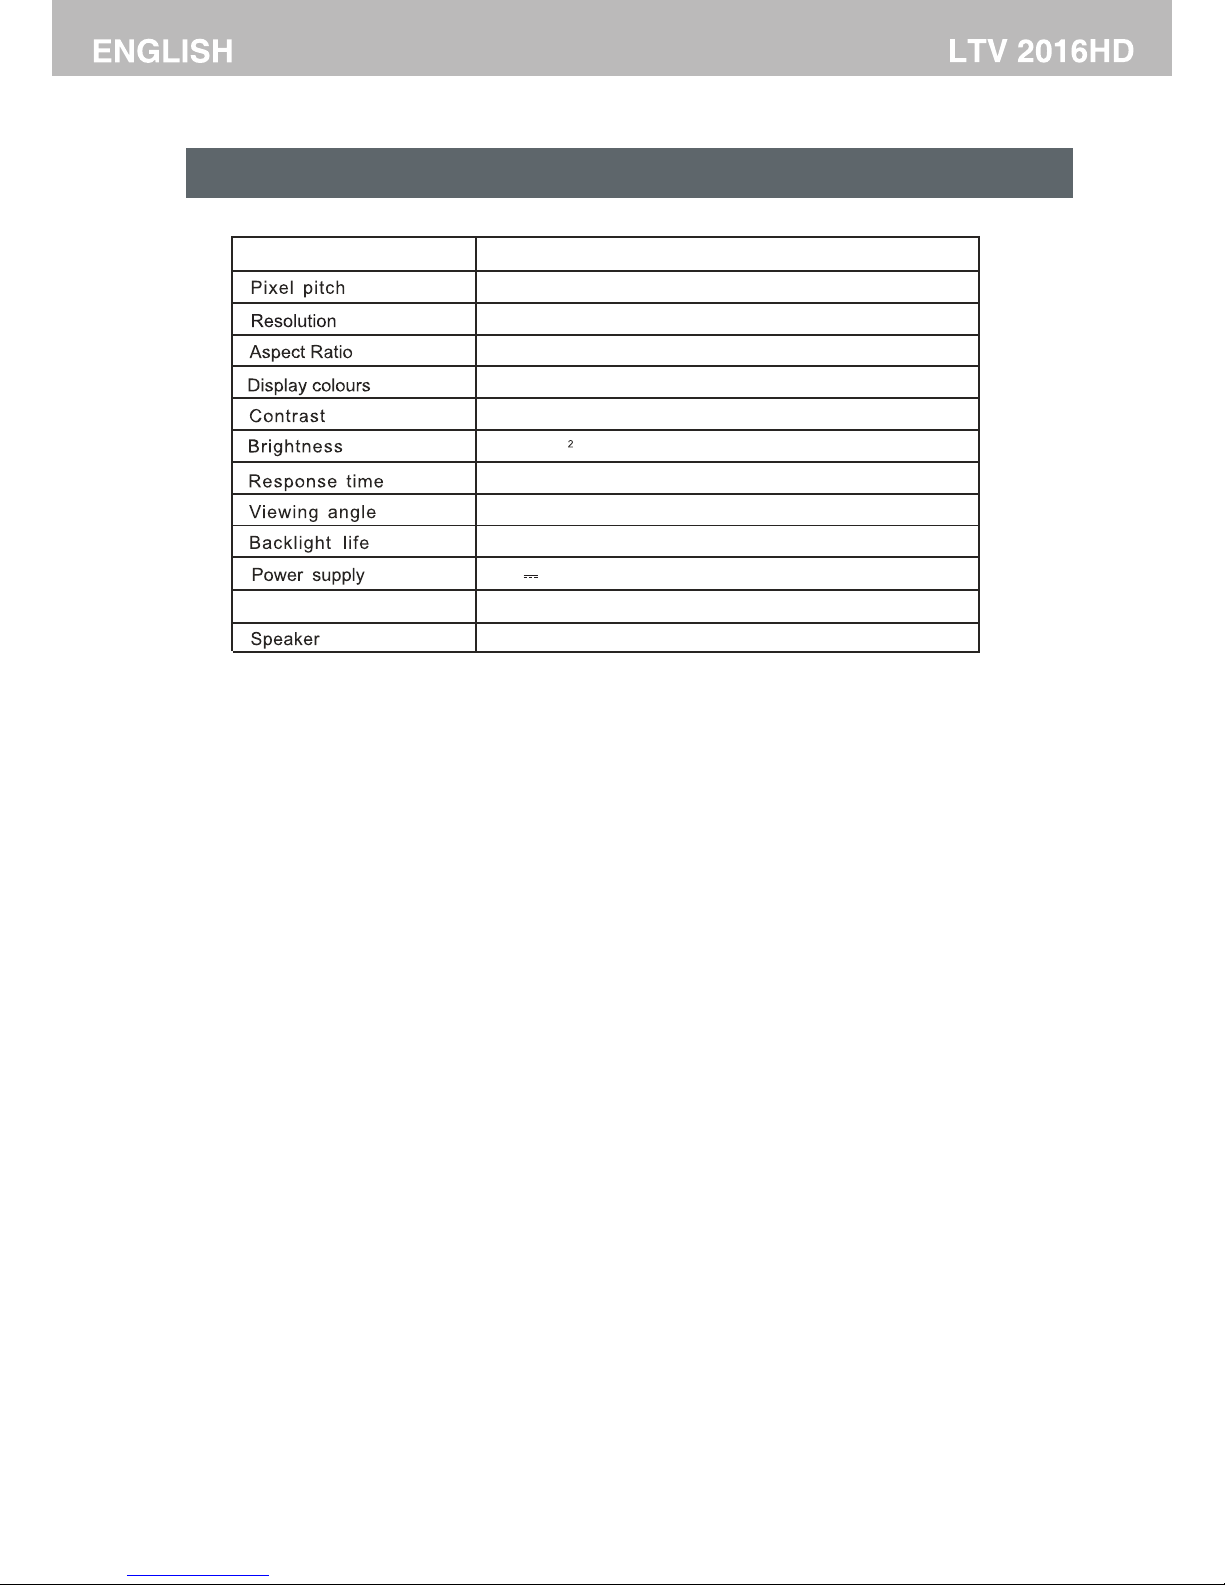
Th i s m a n u al i s o n l y f o r y o ur r eference, any chang e to the desig n an d sp e c i fication will not
be adv i s e d.
0.252 ( H ) x ( V)0.252
1366 x 76 8
16: 9
16.7M
500:1
200 cd m/
5 ms
90( H) /50( V)
2x3 W
16 inch
Power consumption
Panel
12V 2A
50,00 0 hours
24 W
34
Page 36
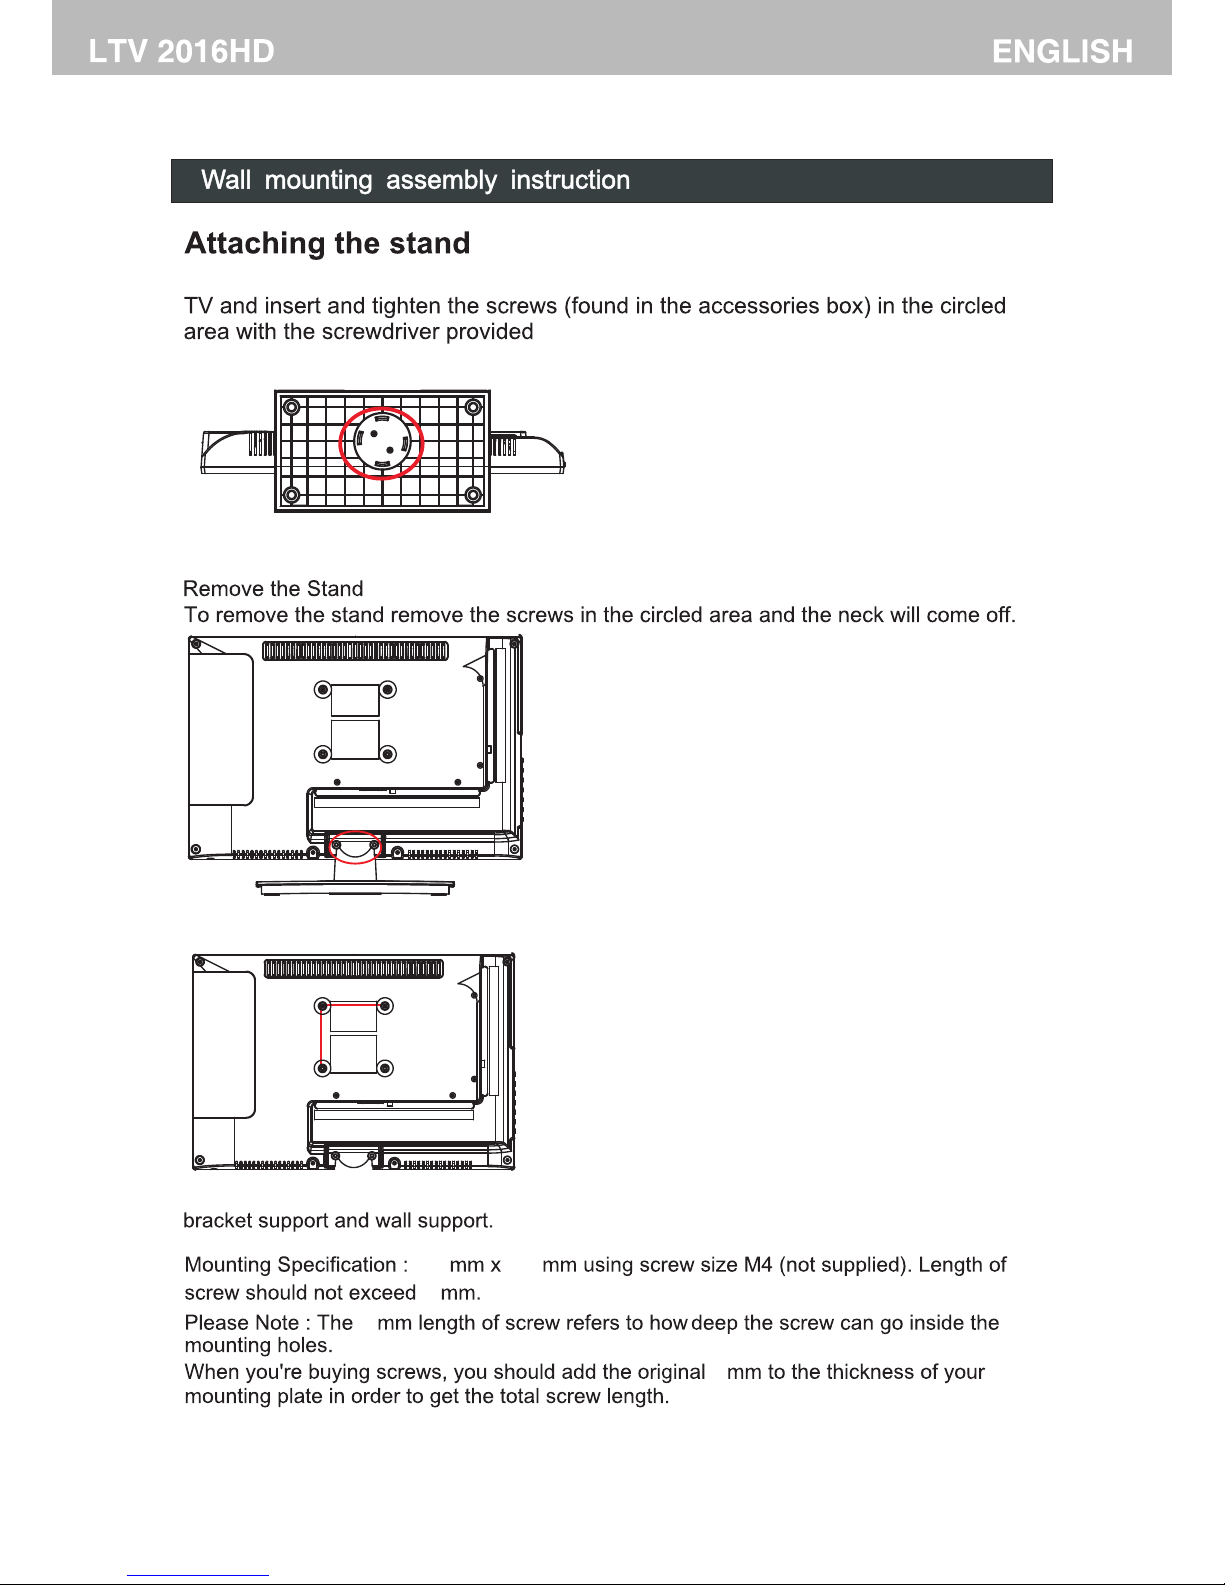
Place the device face down on a protective surf ace.Place the stand on the neck of the
Wall-mounting the device
If you are mounting the devi ce,p lace c onsu lt a qua lified installer for further insturct ions o n
6
6
6
75mm
75mm
35
75 75
 Loading...