

Page 1
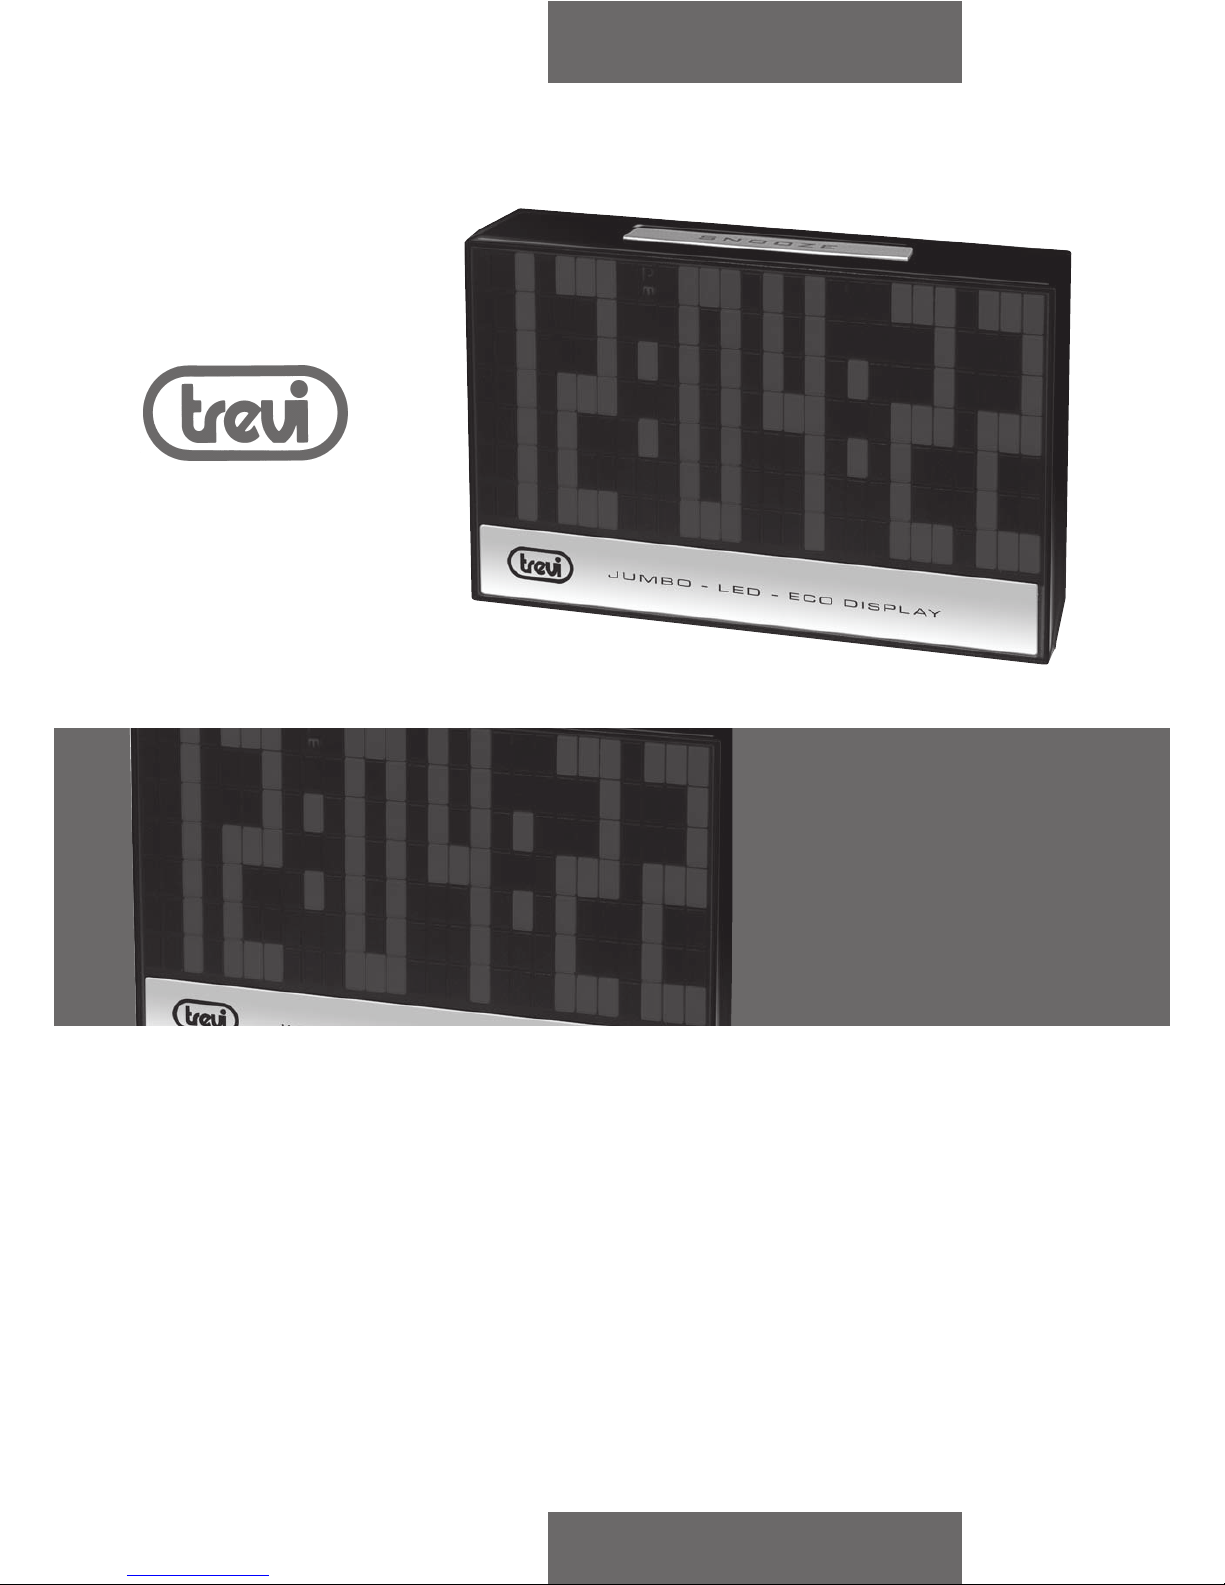
LED
3325
OROLOGIO DIGITALE LED
Manuale d'uso e collegamento
DIGITAL LED CLOCK
Instruction Manual
Page 2
2
LED 3325
ITALIANO
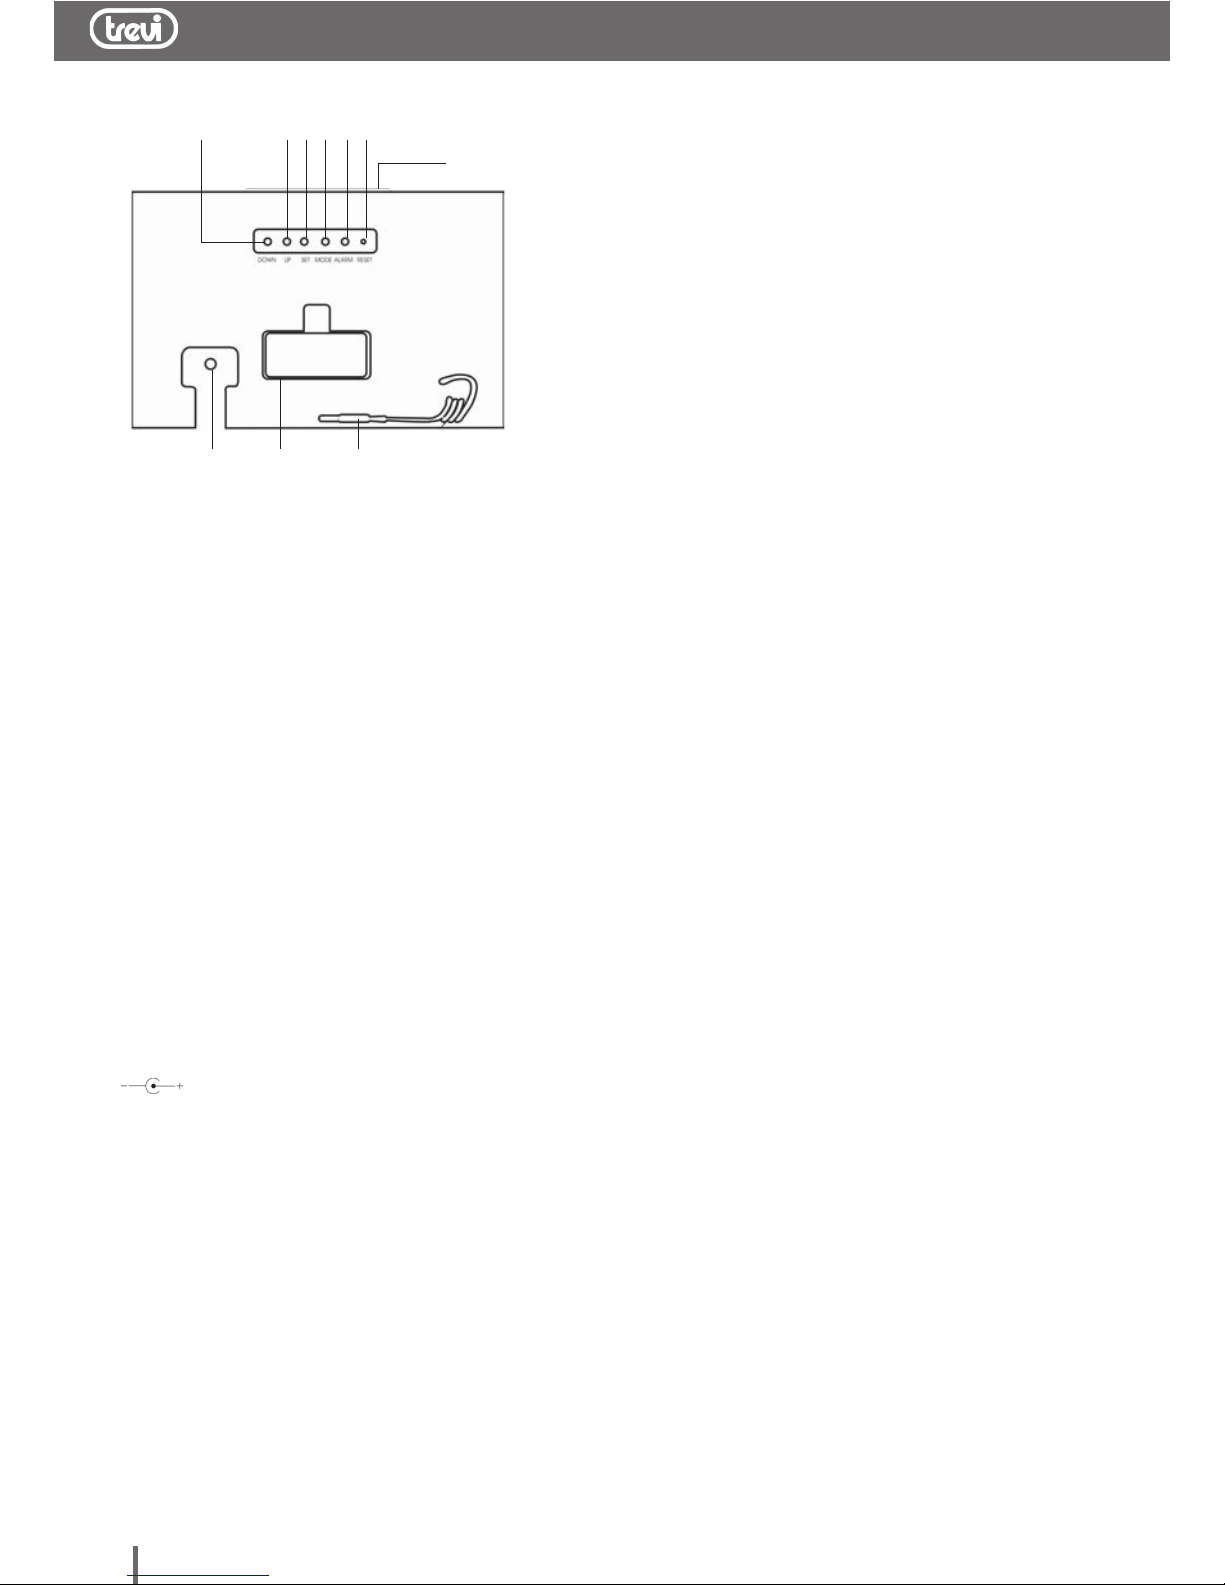
1. Tasto DOWN, regolazione ora/minuti
2. Tasto UP, regolazione ora/minuti,
visualizzazione gradi °C o °F
3. Tasto SET, regolazione dell’orario 12/
24HR, le ore/minuti, l’anno, il mese/
giorno
4. Tasto MODE, regolazione sveglia
5. Tasto ALARM, attivazione alarme
6. RESET, reimposta i valori di fabbrica
7. Ingresso alimentazione DC 6V
8. Vano batterie 2 x AAA
9. Sensore termometro
10. Tasto SNOOZE, spegnimento temporaneo
dell'allarme
ALIMENTAZIONE
- Inserite 2 batterie formato “AAA” nel vano (8)
rispettando le polarità indicate. Rimuovere le
batterie se non utilizzate l'apparecchio per un
lungo periodo di tempo.
- Collegare l’alimentatore esterno D.C. 6 V
alla presa di alimentazione (7), inserire
la spina del cavetto di alimentazione
in una presa di corrente 230V 50Hz.
REGOLAZIONE OROLOGIO
1. Premere il tasto DOWN (1), per visualizzare
l’orario nel formato 12h/24h.
2. Premere il tasto SET (3), sul display l’ora in
comincia a lampeggiare.
- Impostare l’ora tramite i tasti UP (2) o DOWN (1).
3. Premere il tasto SET (3), sul display i minuti
incominciano a lampeggiare.
- Impostare i minuti tramite i tasti UP (2) o DOWN (1).
4. Premere il tasto SET (3), sul display l’anno
incomincia a lampeggiare.
- Impostare l’anno tramite i tasti UP (2) o
DOWN (1).
5. Premere il tasto SET (3), sul display il
giorno incomincia a lampeggiare.
- Impostare il giorno tramite i tasti UP (2) o
DOWN (1).
6. Premere il tasto SET (3), sul display il mese
incomincia a lampeggiare.
- Impostare il mese tramite i tasti UP (2) o
DOWN (1).
7. Premere nuovamente il tasto SET (3) per
confermare.
REGOLAZIONE ALLARME / SNOOZE
1. Premere il tasto MODE (4), sul display verrà
visualizzato l’orario seguito dalla scritta "AL"
- Impostare l’ora tramite i tasti UP (2) o DOWN
(1).
2. Premere il tasto SET (3), sul display i minuti
incominciano a lampeggiare.
- Impostare i minuti tramite i tasti UP (2) o DOWN (1).
3. Premere il tasto SET (3), successivamente
comparirà la scritta "SN" sul display.
- Impostare l’intervallo di tempo SNOOZE tra
mite i tasti UP (6) o DOWN (7) tra 1 e 59 minuti.
ATTIVAZIONE DELL’ ALLARME
1. Premere una volta il tasto ALARM (5) per
attivare l’icona allarme“AL".
2. Premere nuovamente il ALARM (5) per
disattivare l’allarme.
FUNZIONE SNOOZE
Ad allarme attivato facendo pressione sul tasto
SNOOZE (10) potete disattivare momentaneamente l'allarme. A tempo scaduto l’allarme ri-
prenderà a suonare.
SELEZIONE GRADI CELSIUS - FAHRENHEIT
- Premere in sequenza il tasto UP (2) per
visualizzare la temperatura in gradi Celsius
°C (scala europea) o in gradi Fahrenheit
°F(scala inglese e americana).
DATI TECNICI
Alimentazione: ....... 2 batterie "AAA"
DC 6V / 230V 50Hz
Dimensioni:............ 200 x 132 x 55 mm
.1 .2 .3 .4 .5 .6
.8 .9.7
.10
Page 3
3
LED 3325
ENGLISH
MAIN FUNCTION
This LED clock offers 5 main functions
- Time
- Temperature
- Alarm
- Snooze
- Calendar
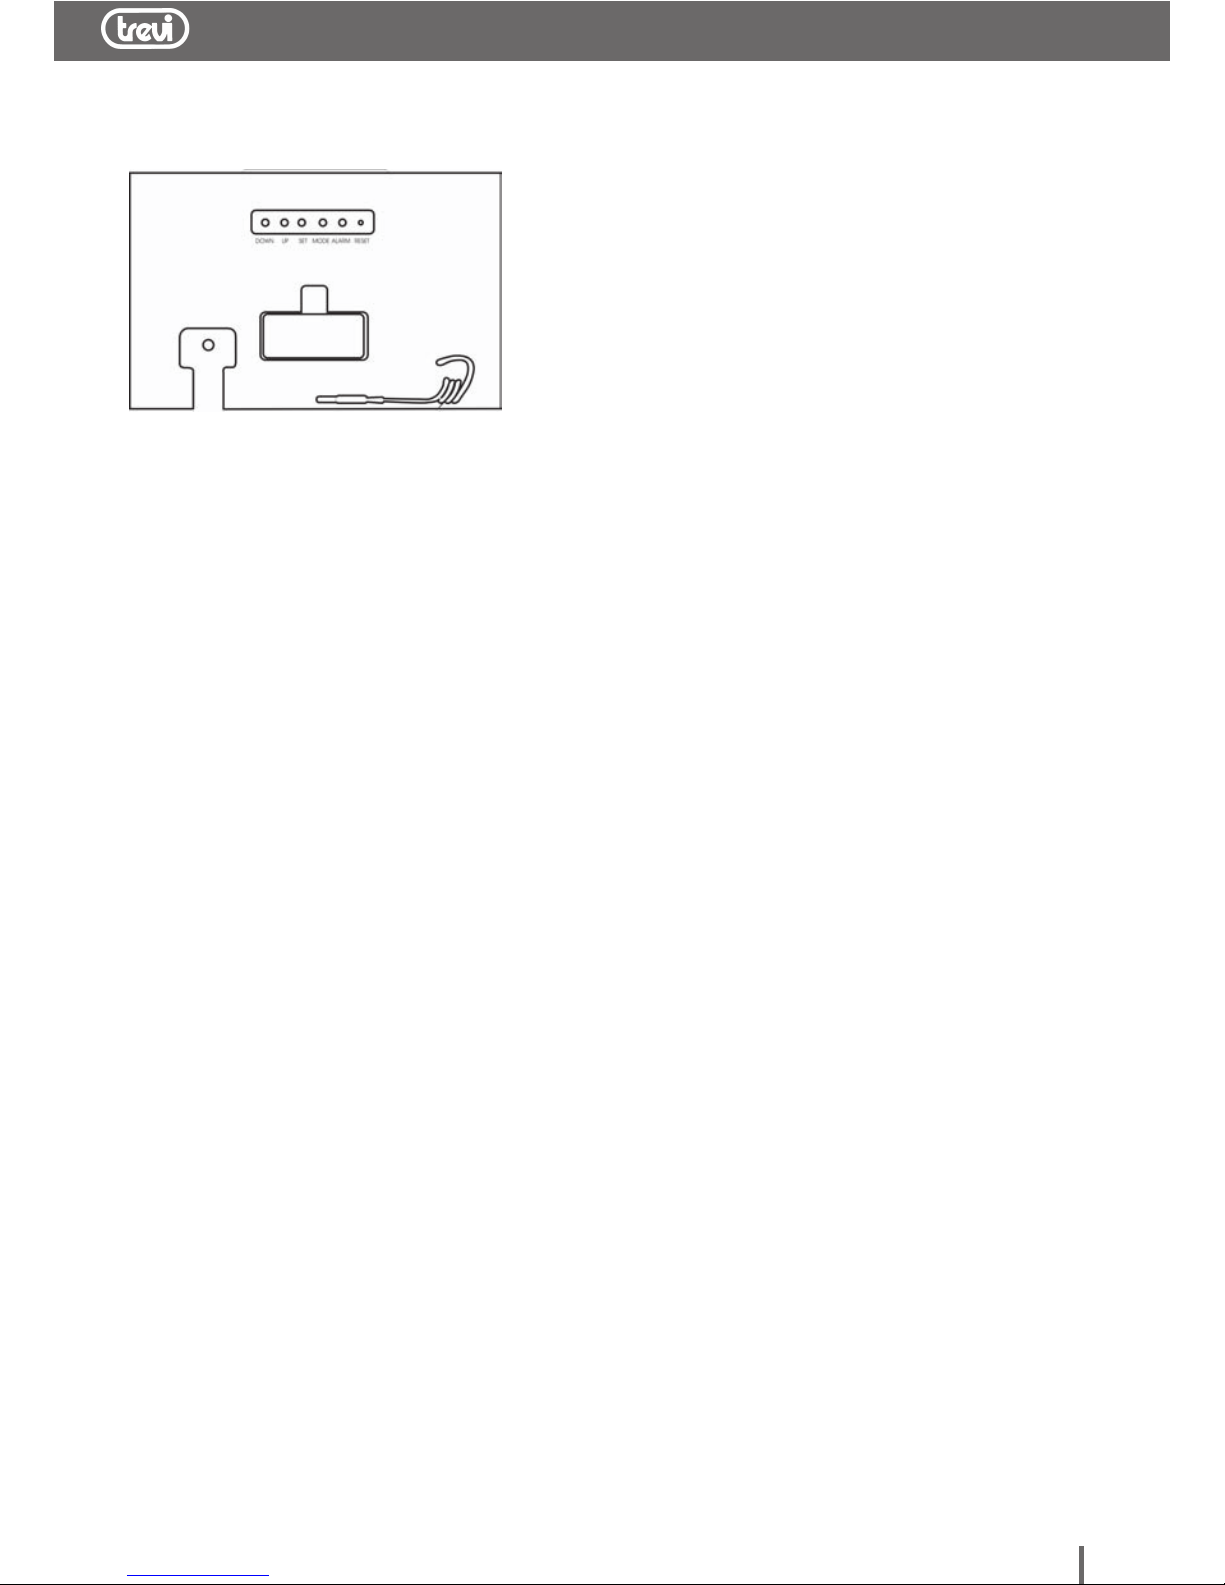
The seven functional keys are:
MODE,
SET,UP,DOWN,ALARM,RESET,SNOOZE.
KEY FUNCTIONS IN NORMAL MODE
SET: Press SET button to set the hour,
minute, year, month and date.
MODE:Press MODE button to enter
the alarm setting mode
UP: Press UP button to toggle between °C/°F.
DOWN: Press DOWN button to toggle
between 12/24
ALARM:Press ALARM button to turn on/off the
alarm function
SNOOZE:Press SNOOZE button to check the
alarm time and the alarm month, date.
OPERATION
1. Time and the date setting
Under the normal mode, press and hold
SET button 2 seconds to enter time setting.
Sequence of time setting is: Hour à
MinuteàYear (from
2008.1.1~2099.12.31)àMonthà Date àExit.
2. Alarm setting
Under the normal mode, press Mode button
to enter alarm setting mode
Press and hold the Mode button to set the
hour, and then press the SET button to set
the minute, press the SET button once
again to set the snooze time. The sequence
of setting is HouràMinuteàExit . Press
MODE or SET button to confirm the set
time. When ringing, click "SNOOZE" key
once to enter 1 minute snooze states. Exit if
any other key is clicked.
3. Check the snooze time, month and date
Under the normal mode, press SNOOZE
button one time to check the alarm time,
press twice during 3 seconds to check the
alarm month and date.
4. 12/24 switchable
Under the normal mode, press DOWN key
to toggle 12/24,"PM" will be light if it is 12
hour format.
5. °C/°F switchable
Press UP button to toggle between °C/°F.
6. The display switches automatically
between time and temperature.
The time display 6 seconds, the temperatu
re display 3 seconds.
7. The batteries are used for time-running, if
you unplug the adaptor and keep the
batteries inside, next time
when you plug in, the time display will be
updated to present time. In contrast, if you
take out the batteries and next time plug in,
the time display will be 12:00:00 as default.
NOTE: DIMMER (Low brightness during the
night): 22:00~5:59;
At 6:00 am LED will resume normal
brightness
Page 4
4
LED 3325
FRANCAISE
.1 .2 .3 .4 .5 .6
.8 .9.7
.10
DESCRIPTION DES COMMANDES
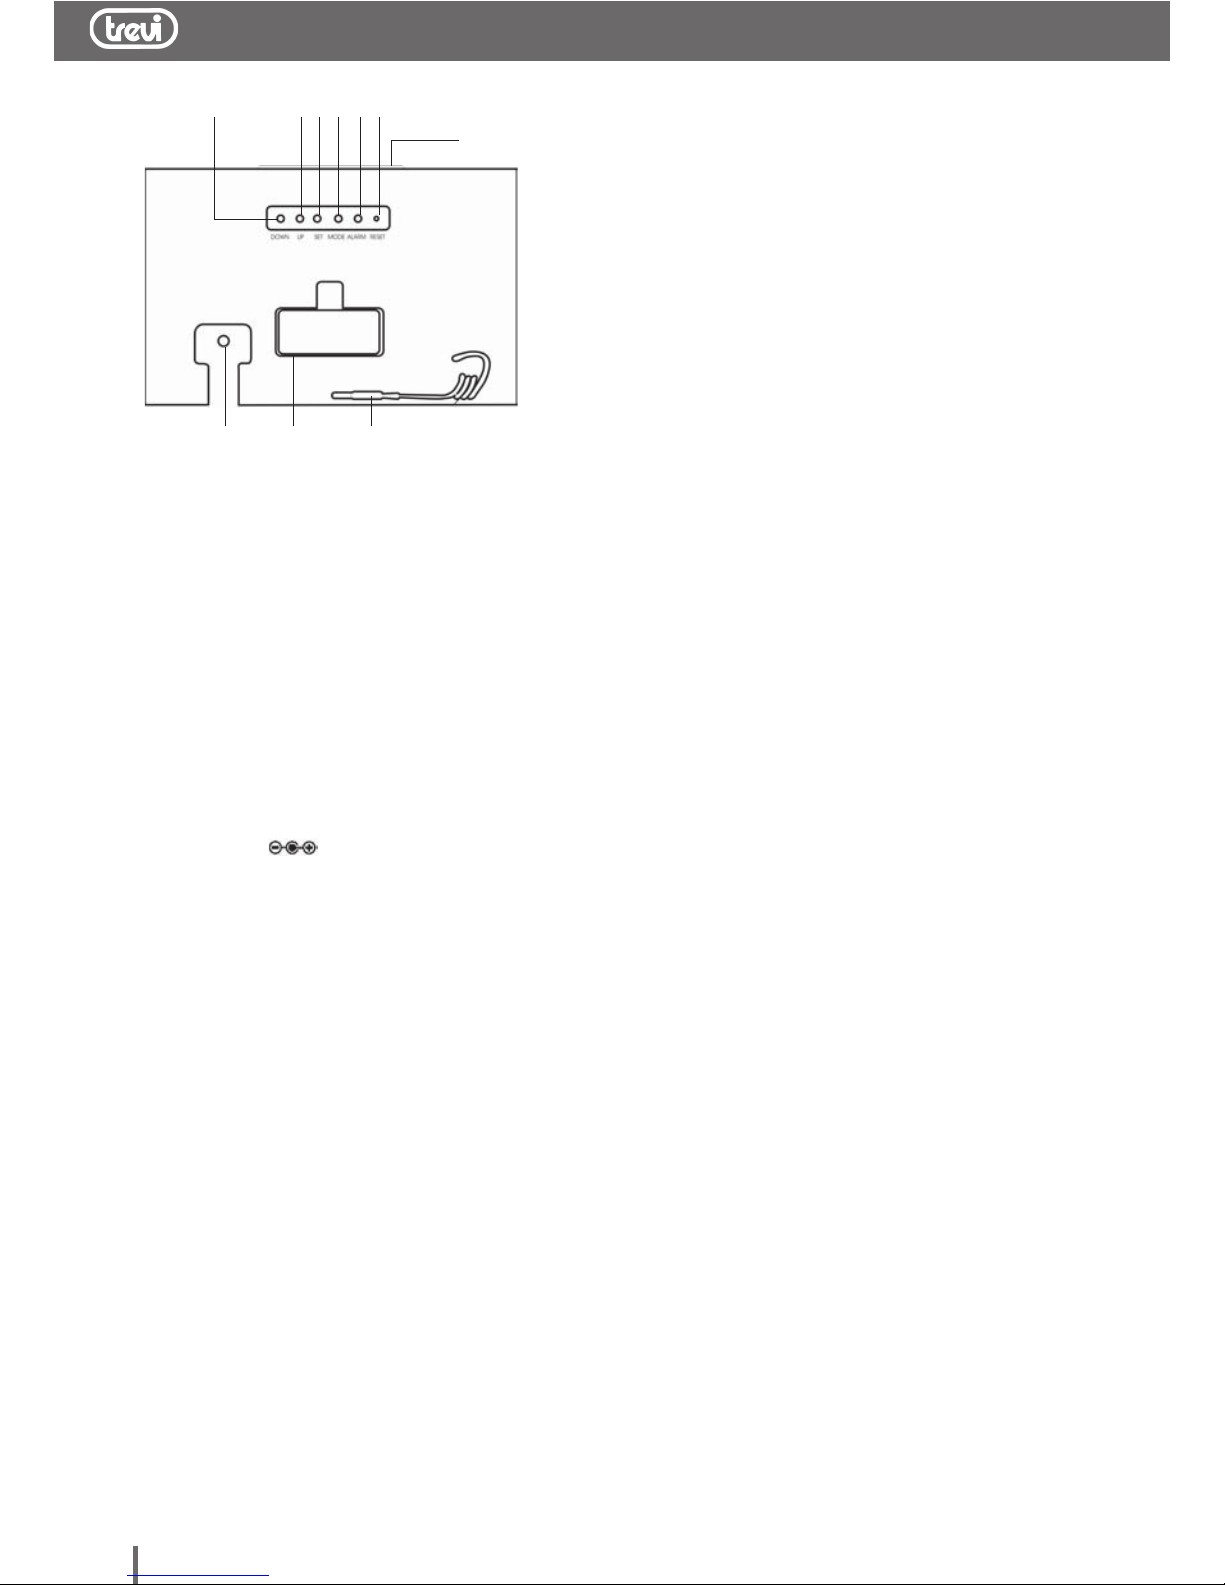
1. Touche DOWN, réglage heure/minutes
2. Touche UP, réglage heure/minutes/degrés °C
ou °F
3. Touche SET, appuyez plusieurs fois pour
afficher l’horaire 12/24 H, les heures/
minutes, l’année, le mois/jour.
4. Touche MODE, appuyez pour régler
l’alarme
5. Touche ALARM, activation/désactivation
alarme
6. Touche RESET,
7. Prise DC 6V .
8. Logement des piles 2 x AAA
9. Capteur extérieur
10. Touche SNOOZE, interruption momentanée
de l’alarme.
ALIMENTATION
- Introduisez 2 piles au format « AAA » dans le
logement (8) respectant la polarité indiquée.
Enlevez les piles si l’appareil n’est pas utilisé
pendant une longue période.
- Connectez l'alimentateur externe DC 6V à la
prise d'alimentation (7).
RÉGLAGE DE L’HORLOGE
1. Appuyez sur la touche DOWN (1) pour
afficher l’horaire au format 12h/24h.
2. Appuyez sur la touche SET (3), l’heure
commence à clignoter sur l’afficheur.
- Sélectionnez l’heure en utilisant les touches
UP (2) ou DOWN (1).
3. Appuyez sur la touche SET (3), les minutes
commencent à clignoter sur l’afficheur.
- Sélectionnez les minutes en utilisant les
touches UP (2) ou DOWN (1).
4. Appuyez sur la touche SET (3), l’année
commence à clignoter sur l’afficheur.
- Sélectionnez l’année en utilisant les touches
UP (2) ou DOWN (1).
5. Appuyez sur la touche SET (3), le jour
commence à clignoter sur l’afficheur.
- Sélectionnez le jour en utilisant les touches
UP (2) ou DOWN (1).
6. Appuyez sur la touche SET (3), le mois
commence à clignoter sur l’afficheur.
- Sélectionnez le mois en utilisant les touches
UP (2) ou DOWN (1).
7. Appuyez à nouveau sur la touche SET (3)
pour confirmer.
RÉGLAGE ALARME/SNOOZE
1. Appuyez sur la touche MODE (4), l’heure
commence à clignoter sur l’afficheur.
- Sélectionnez l’heure en utilisant les touches
UP (2) ou DOWN (1).
2. Appuyez sur la touche SET (3), les minutes
commencent à clignoter sur l’afficheur.
- Sélectionnez les minutes en utilisant les
touches UP (2) ou DOWN (1).
3. Appuyez sur la touche SET (3), l’icône
SNOOZE “SN” s’affiche.
- Sélectionnez l’intervalle de temps SNOOZE
(1 à 59 minutes) en utilisant les touches UP
ACTIVATION DE L’ALARME
1. Appuyez sur la touche ALARM (5) : l’icône
de l’alarme “AL” s’affiche.
2. Appuyez à nouveau sur la touche UP (6)
pour désactiver l’alarme.
FONCTION SNOOZE
Une fois l’alarme activée, appuyez sur le touche
SNOOZE (10) quelconque pour la désactiver
momentanément. Le temps écoulé, l’alarme
recommence à sonner.
SÉLECTION DES DEGRÉS CELSIUS FAHRENHEIT
- Appuyez plusieurs fois sur la touche UP (2)
pour afficher la température en degrés
Celsius °C (échelle européenne) ou en
degrés Fahrenheit °F (échelle anglaise et
américaine).
Alimentation: .......... 2 piles "AAA"
DC 6V / 230V 50Hz
Dimensions: ........... 200 x 132 x 55 mm
Page 5
5
LED 3325
DEUTSCH
.1 .2 .3 .4 .5 .6
.8 .9.7
.10
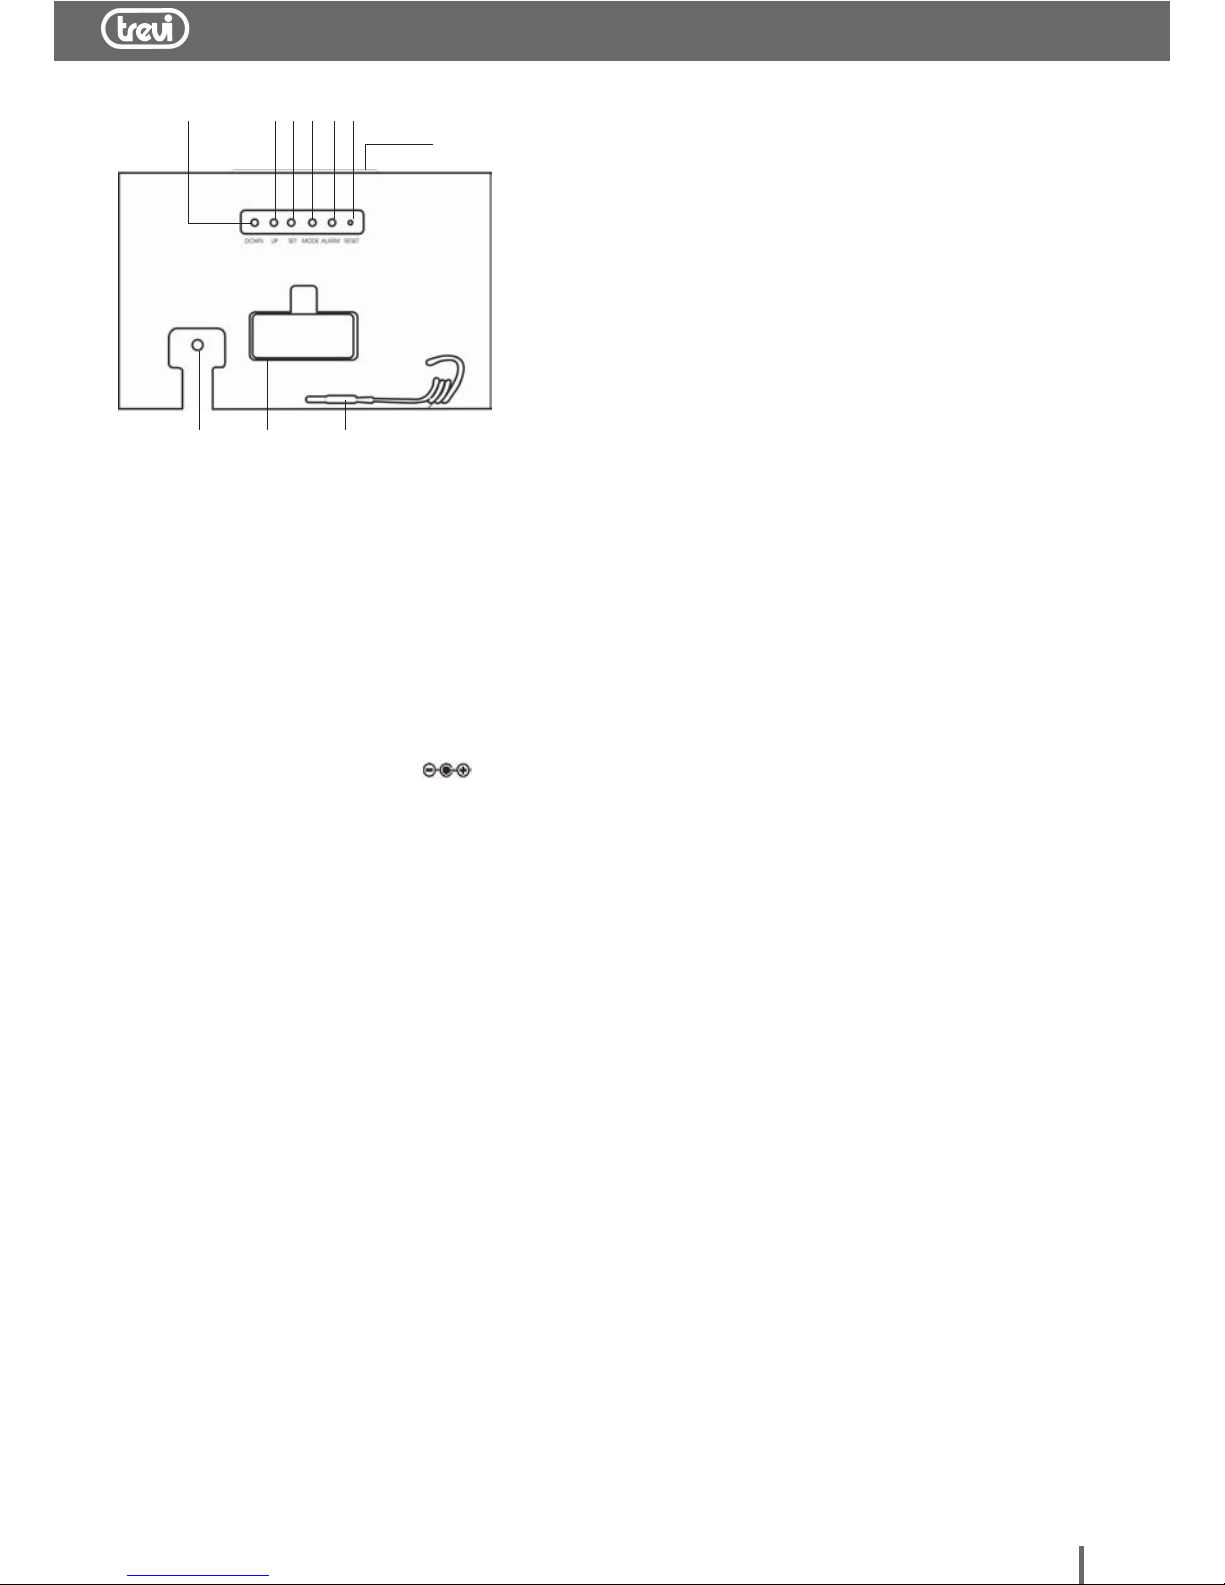
1. Taste DOWN, Einstellung Stunden/Minuten
2. Taste UP, Einstellung Stunden/Minuten, die
Temperatur in °C oder °F gezeigt
3. Taste SET, durch mehrmaliges Drücken
dieser Taste werden die Uhrzeit in 12/24h
Format, die Stunden/Minuten, das Jahr, den
Monat/Tag
4. Taste MODE, Alarmeinstellung
5. Taste ALARM, Aktivierung des Alarms
6. RESET, Standardeinstellungen
7. Gleichstrombuchse DC 3V .
8. Batteriefach 2 x AAA
9. Außensensor
10. Taste SNOOZE, kurzzeitige Abstellung des
Weckers
VERSORGUNG
- Auf der Geräterückwand 2 Batterien des
Typs „AAA“ polaritätsrichtig in das
Batteriefach (8) einlegen.
Sollte das Gerät für einen längeren
Zeitraum nicht betrieben werden, so sind
die Batterien
herauszunehmen.
- Das externe Gleichstrom-Netzgerät DC
6V an die Steckdose (7) anschließen.
UHREINSTELLUNG
1. Die Taste DOWN (1) drücken, um die Uhrzeit
im Format 12 oder 24 Stunden anzuzeigen.
2. Die Taste SET (3) drücken: auf dem Display
beginnt die Stundenanzeige zu blinken.
- Die Stunde über die Tasten UP (2) und
DOWN (1) einstellen.
3. Die Taste SET (3) drücken: auf dem Display
beginnt die Minutenanzeige zu blinken.
- Die Minuten über die Tasten UP (2) und
DOWN (1) einstellen.
4. Die Taste SET (3) drücken: auf dem Display
beginnt die Jahresanzeige zu blinken.
- Das Jahr über die Tasten UP (2) und DOWN
(1) einstellen.
5. Die Taste SET (3) drücken: auf dem Display
beginnt die Monatsanzeige zu blinken.
- Den Monat über die Tasten UP (2) und
DOWN (1) einstellen.
6. Die Taste SET (3) drücken: auf dem Display
beginnt die Tagesanzeige zu blinken.
- Den Tag über die Tasten UP (2) und DOWN
(1) einstellen.
7. Zur Bestätigung wird erneut die SET Taste
(3) gedrückt.
EINSTELLUNG ALARM / SNOOZE
1. Die Taste MODE (4) drücken: auf dem
Display erscheint das Alarmsymbol “AL”.
- Die Stunde über die Tasten UP (2) und
DOWN (1) einstellen.
2. Die Taste SET (3) drücken: auf dem Display
beginnt die Minutenanzeige zu blinken.
- Die Minuten über die Tasten UP (2) und
DOWN (1) einstellen.
3. Die Taste SET (3) drücken: auf dem Display
wird dann das SNOOZE “SN” erscheinen.
- Das SNOOZE-Intervall über die Tasten UP
(2) und DOWN (1) zwischen 1 und 59
Minuten einstellen.
SNOOZE-FUNKTION
Bei aktiviertem Alarm kann der Alarm
vorübergehend unterdrückt werden, indem
Snooze Taste gedrückt wird.
Nach abgelaufener Zeit ertönt der Alarm erneut.
ANWAHL GRADANZEIGE IN CELSIUS ODER
FAHRENHEIT
- Die Taste UP (2) mehrmals drücken, um
die Temperatur in Celsiusgraden °C
(europäische Skala) oder in
Fahrenheitgraden °F (englische oder
amerikanische Skala) anzuzeigen.
Stromversorgung: ... 2 „AAA“ Batterien
DC 6V / 230V 50Hz
Abmessungen: ....... 200 x 132 x 55 mm
Page 6
6
LED 3325
ESPANOL
.1 .2 .3 .4 .5 .6
.8 .9.7
.10
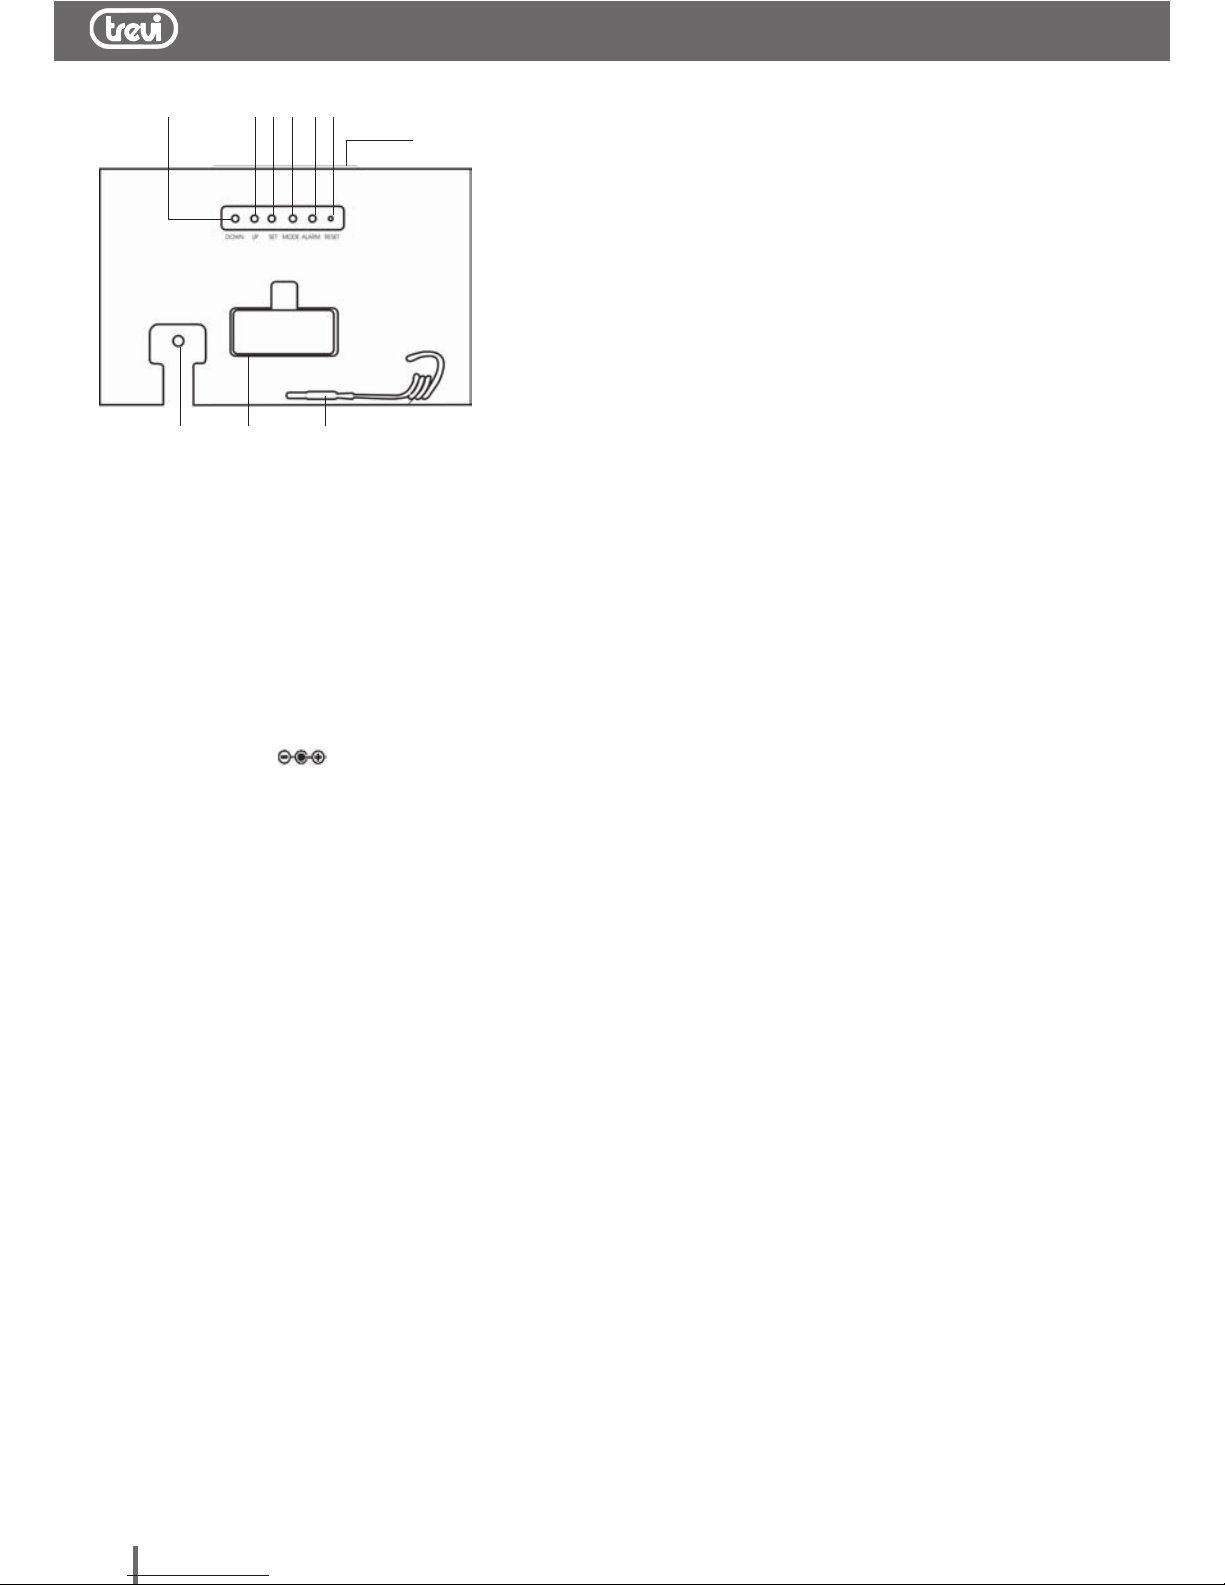
1. Botón DOWN, ajuste hora/minutos
2. Botón UP, ajuste hora/minutos, visualiza los
grados ºC o ºF.
3. Botón SET, si se pulsa en secuencia
visualiza la hora 12/24, las horas/minutos,
el año, el mes/día, Pulsarlo dos veces para
4. Botón MODE, configurar la alarma
5. Botón ALARM, activaciòn de la alarma
6. RESET, restablecer el valor de las
configuraciones
7. Presa DC 6V
8. Compartimiento de baterías 2 x AAA
9. Termòmetro
10. Botón SNOOZE, interrupción temporal de
la alarma
ALIMENTACIÓN
- Introduzca 2 baterías formato “AAA” en el
compartimiento (8) situado en la parte trasera
del aparato, respetando las polaridades
indicadas. Retire las baterías si no utiliza el
aparato durante un largo período de tiempo.
- Conecte el alimentador externo D.C. 6V a la
toma de alimentación (7).
AJUSTE DEL RELOJ
1. Pulse el botón DOWN (1) para visualizar la
hora en el formato 12h/24h.
2. Pulse el botón SET (3), en el display la hora
empieza a parpadear.
- Configure la hora con los botones UP (2) o
DOWN (1).
3. Pulse el botón SET (3), en el display los
minutos empiezan a parpadear.
- Configure los minutos con los botones UP
(2) o DOWN (1).
4. Pulse el botón SET (3), en el display el año
empieza a parpadear.
- Configure el año con los botones UP (2) o
DOWN (1).
5. Pulse el botón SET (3), en el display el día
empieza a parpadear.
- Configure el día con los botones UP (2) o
DOWN (1).
6. Pulse el botón SET (3), en el display el mes
empieza a parpadear.
- Configure el mes con los botones UP (2) o
DOWN (1).
7. Vuelva a pulsar el botón SET (3) para
confirmar.
AJUSTE DE LA ALARMA / SNOOZE
1. Pulse el botón MODE (4), en el display se
visualizará la alarma “AL”.
2. Pulse el botón SET (3) durante unos
segundos, en el display la hora empieza a
parpadear.
- Configure la hora con los botones UP (2) o
DOWN (1).
3. Pulse el botón SET (3), en el display los
minutos empiezan a parpadear.
- Configure los minutos con los botones UP
(1) o DOWN (2).
4. Pulse el botón SET (3), a continuación
aparecerá el SNOOZE “SN” en el display.
- Configure el intervalo de tiempo SNOOZE
con los botones UP (2) o DOWN (1) entre 1
y 59 minutos.
ACTIVACIÓN DE LA ALARMA
1. Pulse una vez el botón ALARM (5) para
activar el icono de la alarma “AL”.
2. Pulse de nuevo el botón ALARM (5) para
desactivar la alarma.
FUNCIÓN SNOOZE
Con la alarma activada, pulsando el botón
SNOOZE (10), puede desactivar temporalmente
la alarma.Cuando el tiempo finalice, la alarma
volverá a sonar.
SELECCIÓN DE LOS GRADOS CELSIUS –
FAHRENHEIT
- Pulse en secuencia el botón UP (2) para
visualizar la temperatura en grados Celsius
°C (escala europea) o en grados Fahrenheit
°F (escala inglesa y americana).
Alimentación: .......... 2 baterías formato “AAA”
DC 6V / 230V 50 Hz
Dimensiones:.......... 200 x 132 x 55 mm
Page 7
7
LED 3325
PORTUGUESE
.1 .2 .3 .4 .5 .6
.8 .9.7
.10
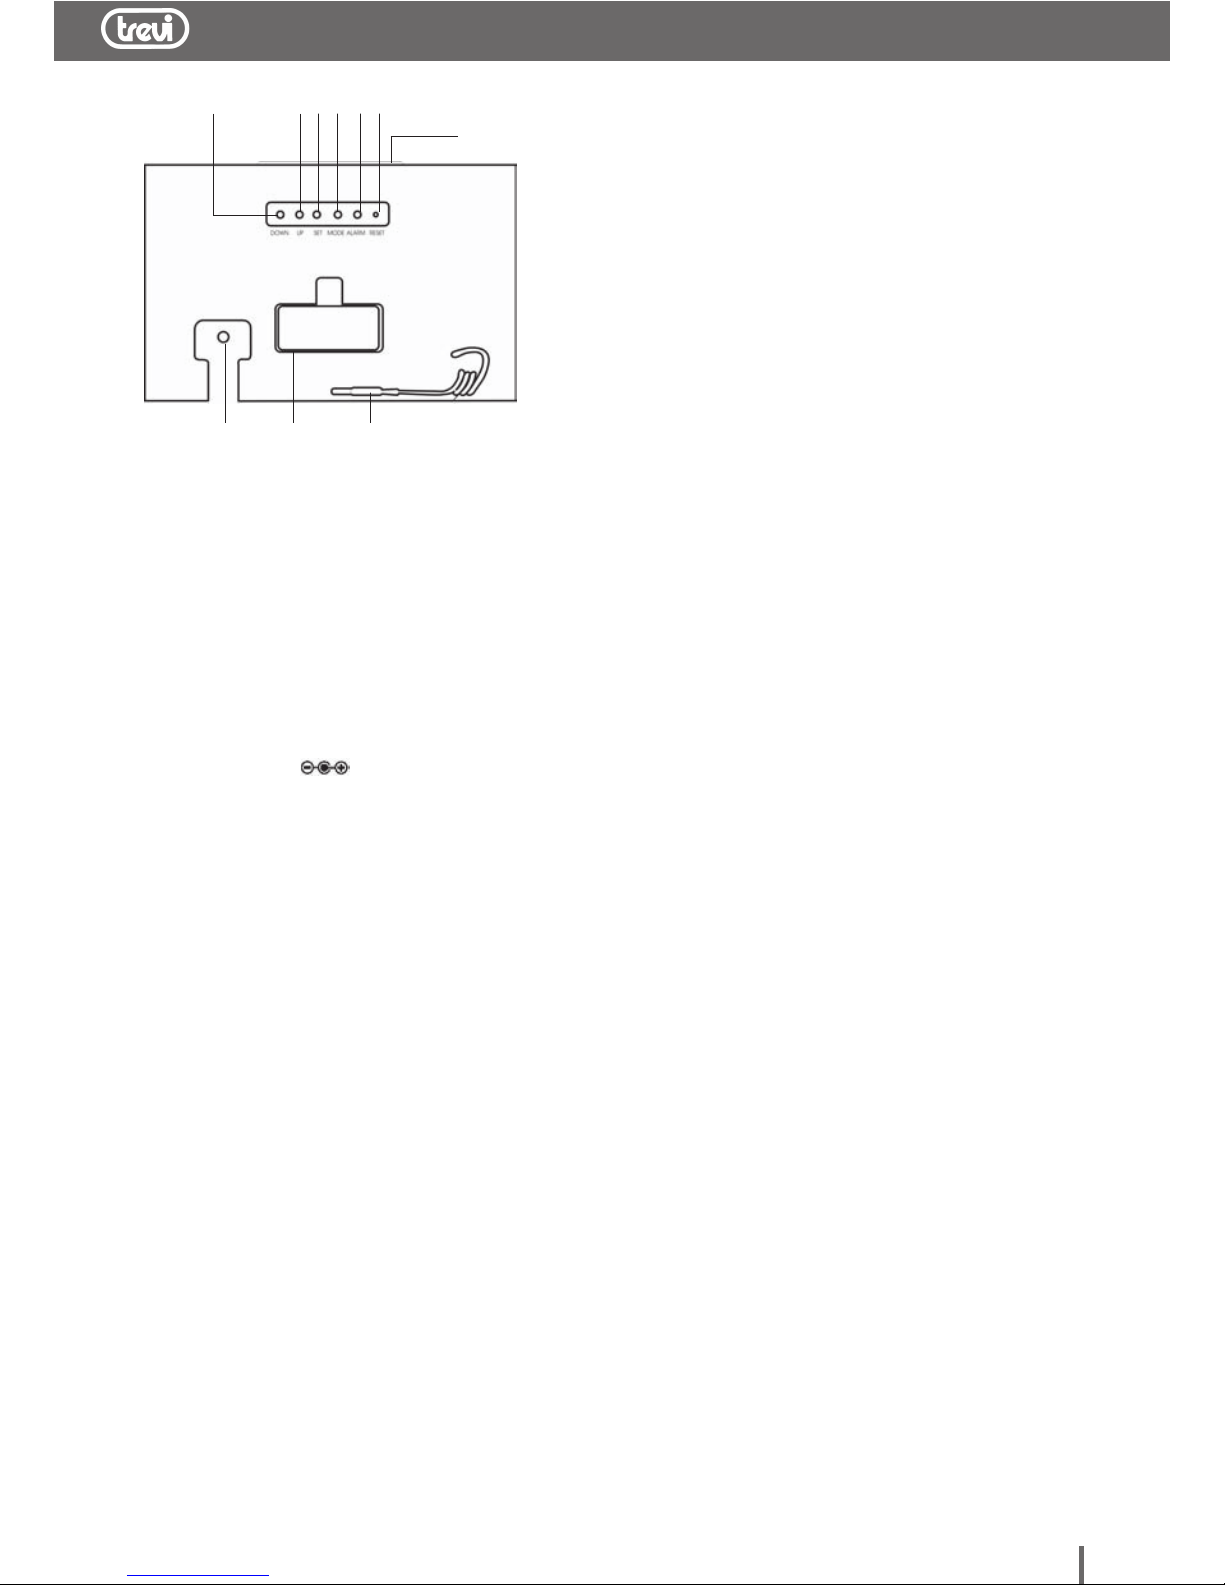
DESCRIÇÃO DOS COMANDOS
1. Tecla DOWN, ajuste hora/minutos
2. Tecla UP, ajuste hora/minutos, visualização
em graus °C ou °F
3. Tecla SET, se pressionada em sequência
visualiza o horário 12/24H, horas/minutos,
ano, mês/ dia
4. Tecla MODE, ajuste da alarma
5. Tecla ALARM, activação do alarme
6. RESET, redefinir o valor padrao
7. Tomada DC 6V .
8. Compartimento das baterias 2xAAA
9. Sensor externo
10.Tecla SNOOZE, interrupção momentânea do
alarme
ALIMENTAÇÃO
- Introduza 2 baterias formato “AAA” no compar
timento (8) posicionado na parte posterior
do aparelho, respeitando as polaridades
indicadas. Remova as baterias se pre
tende não utilizar o aparelho por um
longo período de tempo.
- Ligue o alimentador externo D.C. 6V à
tomada de alimentação (7).
AJUSTE DO RELÓGIO
1. Pressione a tecla DOWN (1), para visualizar
o horário no formato 12h/24h.
2. Pressione a tecla SET (3), no visor a hora
começará a piscar.
- Programe a hora mediante as teclas UP (2)
ou DOWN (1).
3. Pressione a tecla SET (3), no visor os
minutos começarão a piscar.
- Programe os minutos mediante as teclas UP
(2) ou DOWN (1).
4. Pressione a tecla SET (3), no visor o ano
começará a piscar.
- Programe o ano mediante as teclas UP (2)
ou DOWN (1).
5. Pressione a tecla SET (3), no visor o mês
começará a piscar.
- Programe o mês mediante as teclas UP (2)
ou DOWN (1).
6. Pressione a tecla SET (3), no visor o dia
começará a piscar.
- Programe o dia mediante as teclas UP (2)
ou DOWN (1).
7. Pressione novamente a tecla SET (3) para
confirmar.
AJUSTE DO ALARME/SNOOZE/MELODIA
1. Pressione a tecla MODE (4), no visor será
visualizado o ícone do alarme “AL”.
- Programe a hora mediante as teclas UP (2)
ou DOWN (1).
2. Pressione a tecla SET (3), no visor os
minutos começarão a piscar.
- Programe os minutos mediante as teclas UP
(2) ou DOWN (1).
5. Pressione a tecla SET (3), de seguida
aparecerá o ícone SNOOZE “SN” no visor.
- Programe o intervalo de tempo SNOOZE
mediante as teclas UP (2) ou DOWN (1) entre
1 e 59 minutos.
ACTIVAÇÃO DO ALARME
1. Pressione a tecla ALARM (5), no visor será
visualizado o ícone do alarme “AL”.
2. Pressione novamente a tecla ALARM (5)
para desactivar o alarme.
FUNÇÃO SNOOZE
Com o alarme activado e fazendo pressão
sobre la tecla SNOOZE (10) será possível
desactivar momentaneamente o
alarme.Finalizado esse tempo, o alarme tocará
de novo.
SELECÇÃO DOS GRAUS CELSIUS FAHRENHEIT
- Pressione em sequência a tecla UP (2) para
visualizar a temperatura em graus Celsius
°C (escala europeia) ou em graus
Fahrenheit °F (escala inglesa e americana).
Alimentação: ........... 2 baterias formato “AAA”
DC 6V / 230V 50Hz
Dimensões: ............. 200 x 132 x 55 mm
Page 8
8
LED 3325
HELLENIKA
.1 .2 .3 .4 .5 .6
.8 .9.7
.10
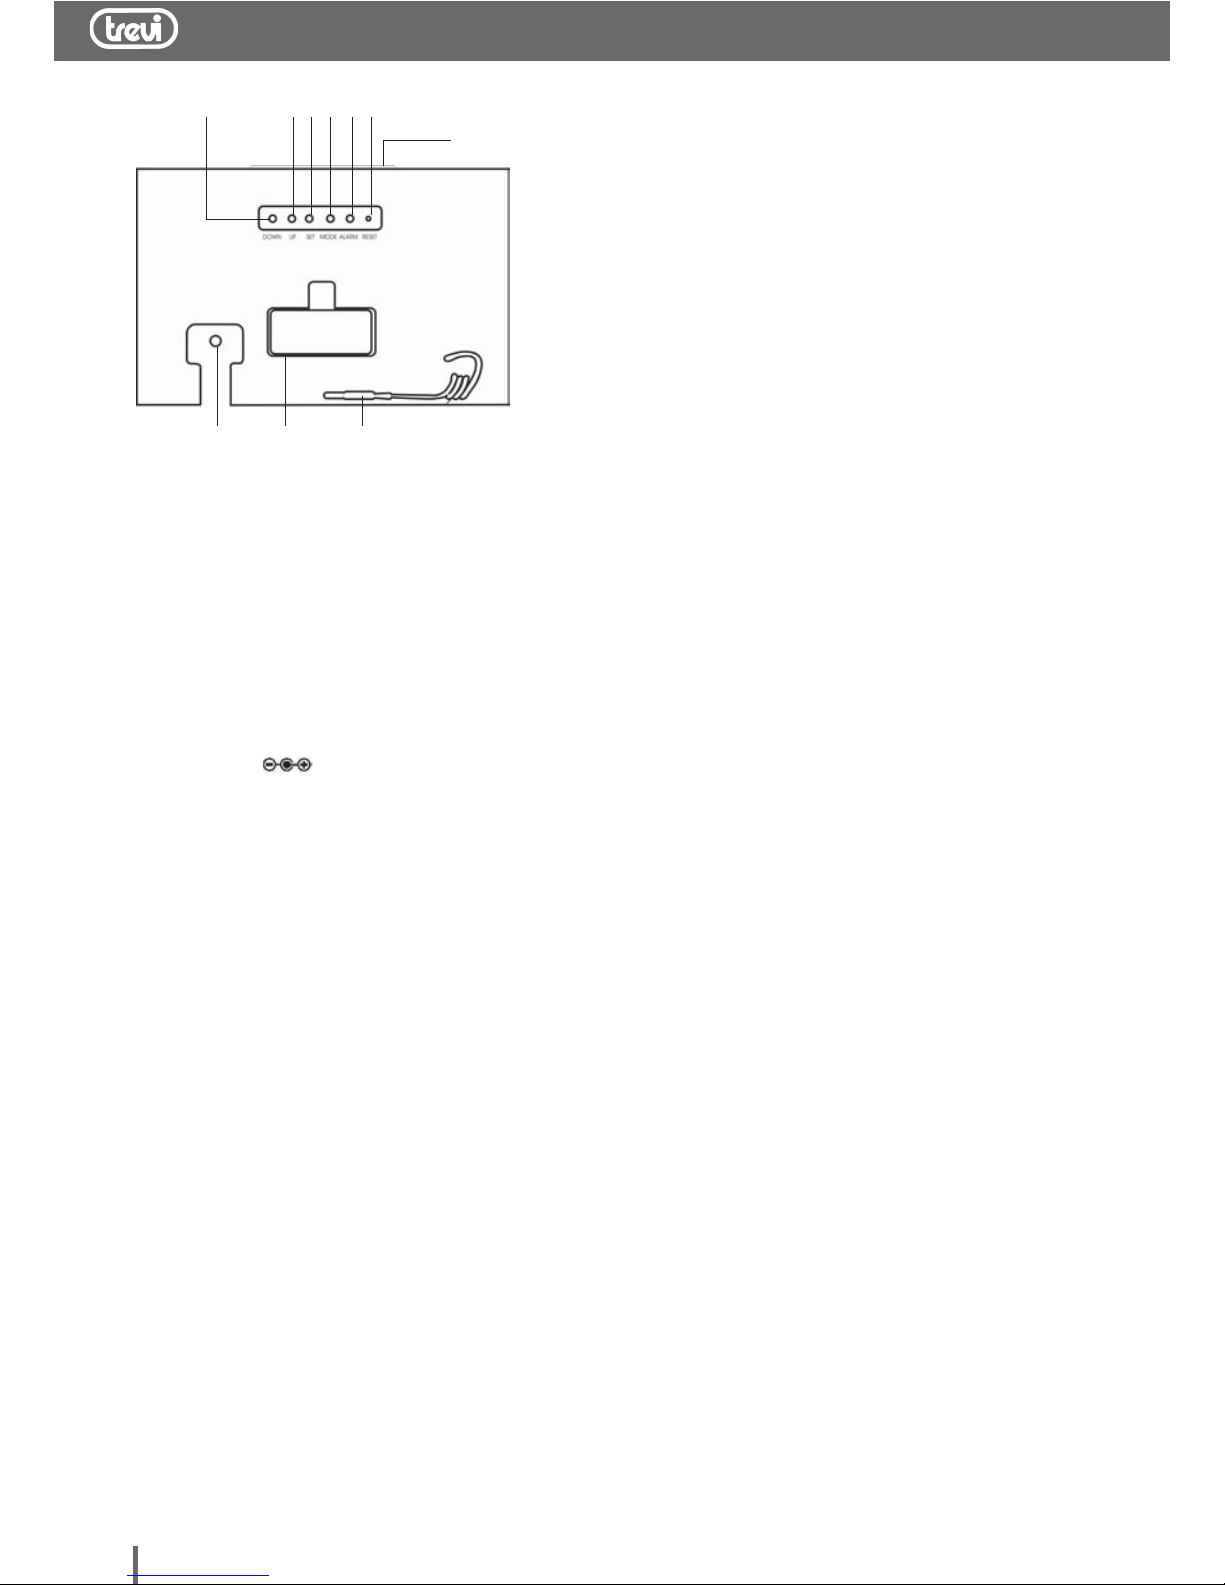
1. РлЮкфсп DOWN, сэимйуз юсбт/лерфюн
2. РлЮкфсп UP, сэимйуз юсбт/лерфюн
3. РлЮкфсп SET, бн рбфйЭфбй дйбдпчйкЬ
емцбнЯжефбй з юсб 12/24 H, з юсб/фб лерфЬ, фп
Эфпт, п мЮнбт/з змЭсб, пй вбимпЯ °C Ю °F.
4. РлЮкфсп MODE, РбфЮуфе фп дэп цпсЭт гйб нб
схимЯуефе фп охрнзфЮсй
5. РлЮкфсп ALARM, енесгпрпЯзуз/
бренесгпрпЯзуз охрнзфзсйпэ
6. RESET
7. ËÞøç DC 6V .
8. ИЮкз фпрпиЭфзузт мрбфбсйюн 2 x AAA
9. еощфесйкпэ бйуизфЮсб
10.РлЮкфсп LIGHT/SNOOZE, рспущсйнЮ
дйбкпрЮ
ФСПЦПДПУЙБ ЙУЧХПУ
ВЬлфе 2 мрбфбсЯет фэрпх “БББ” уфз ихсЯдб (8)
уфп кЬфщ мЭспт фзт ухукехЮт рспуЭчпнфбт фйт
рплюуейт рпх бнбцЭспнфбй. ВгЬлфе фйт
мрбфбсЯет бн ден чсзуймпрпйеЯфе фз ухукехЮ
гйб мегЬлп чспнйкь дйЬуфзмб.
УхндЭуфе фпн еощфесйкь фспцпдьфз D.C. 6 V уфзн
хрпдпчЮ фспцпдпуЯбт (7).
СХИМЙУЗ СПЛПГЙПХ
1. РбфЮуфе фп рлЮкфсп DOWN (1), гйб нб
емцбнйуфеЯ з юсб уфз мпсцЮ 12h/24h.
2. РбфЮуфе фп рлЮкфсп SET (3), уфзн пиьнз з
юсб бсчЯжей нб бнбвпувЮней.
- ИЭуфе фзн юсб мЭущ фщн рлЮкфсщн UP (2) Ю
DOWN (1).
3. РбфЮуфе фп рлЮкфсп SET (3), уфзн пиьнз
бсчЯжпхн нб бнбвпувЮнпхн фб лерфЬ.
- ИЭуфе фб лерфЬ мЭущ фщн рлЮкфсщн UP (2) Ю
DOWN (1).
4. РбфЮуфе фп рлЮкфсп SET (3), уфзн пиьнз фп
Эфпт бсчЯжей нб бнбвпувЮней.
- ИЭуфе фп Эфпт мЭущ фщн рлЮкфсщн UP (2) Ю
DOWN (1).
5. РбфЮуфе фп рлЮкфсп SET (3), уфзн пиьнз
бсчЯжей нб бнбвпувЮней п мЮнбт.
- ИЭуфе фп мЮнб мЭущ фщн рлЮкфсщн UP (2) Ю
DOWN (1).
6. РбфЮуфе фп рлЮкфсп SET (3), уфзн пиьнз
бсчЯжей нб бнбвпувЮней з змЭсб.
- ИЭуфе фзн змЭсб мЭущ фщн рлЮкфсщн UP (2) Ю
DOWN (1).
7. РбфЮуфе обнЬ фп рлЮкфсп SET (3) гйб
ерйвевбЯщуз.
СХИМЙУЗ ЛЕЙФПХСГЙБУ БЦХРНЙУЗУ/
SNOOZE
1. РбфЮуфе фп рлЮкфсп MODE (4), уфзн пиьнз
бсчЯжей нб бнбвпувЮней з ейкьнб фпх
охрнзфзсйпэ “AL”.
- ИЭуфе фзн юсб мЭущ фщн рлЮкфсщн UP (2) Ю
DOWN (1).
2. РбфЮуфе фп рлЮкфсп SET (3), уфзн пиьнз
бсчЯжпхн нб бнбвпувЮнпхн фб лерфЬ.
- ИЭуфе фб лерфЬ мЭущ фщн рлЮкфсщн UP (2) Ю
DOWN (1).
3. РбфЮуфе фп рлЮкфсп SET (3), уфз ухнЭчейб иб
емцбнйуфеЯ з ейкьнб SNOOZE “SN” уфзн пиьнз.
- ИЭуфе фп чспнйкь дйЬуфзмб SNOOZE мЭущ
фщн рлЮкфсщн UP (2) Ю DOWN (1) брь 1 Эщт
59 лерфЬ.
ЛЕЙФПХСГЙБ SNOOZE
Еню фп охрнзфЮсй еЯнбй енесгпрпйзмЭнп,
рбфюнфбт SNOOZE (10) рлЮкфсп мрпсеЯфе нб
бренесгпрпйЮуефе уфйгмйбЯб фп охрнзфЮсй.
МефЬ брь лЯгп фп охрнзфЮсй иб бсчЯуей обнЬ нб
чфхрЬ.
ЕРЙЛПГЗ ВБИМЩН КЕЛУЙПХ - ЦБСЕНБЪФ
- РбфЮуфе фп рлЮкфсп UP (2) гйб фзн брейкьнйуз
фзт иесмпксбуЯбт уе вбимпэт КелуЯпх °C
(ехсщрбъкЮ клЯмбкб) з уе вбимпэт ЦбсенЬйф
°F (бгглйкЮ кбй бмесйкбнйкЮ клЯмбкб).
ФспцпдпуЯб йучэпт: 2 мрбфбсЯет фэрпх “AAA”
DC 6V / 230V 50Hz
ДйбуфЬуейт: .............. 200 x 132 x 55 mm
Page 9
9
LED 3325
Avvertenze per il corretto smaltimento
del prodotto.
Il simbolo riportato sull'apparecchiatura indica
che il rifiuto deve essere oggetto di "raccolta
separata" pertanto il prodotto non deve essere
smaltito insieme ai rifiuti urbani.
L'utente dovrà consegnare il prodotto presso gli
appositi "centri di raccolta differenziata" predisposti dalle amministrazioni comunali, oppure
consegnarlo al rivenditore contro acquisto di un
nuovo prodotto.
La raccolta differenziata del rifiuto e le successive operazioni di trattamento, recupero e
smaltimento favoriscono la produzione di
apparecchiature con materiali riciclati e limitano
gli effetti negativi sull'ambiente e sulla salute
causati da una gestione impropria del rifiuto.
Lo smaltimento abusivo del prodotto comporta
l'applicazione di sanzioni amministrative.
Precautions for correct disposal of the
product.
The symbol shown on the equipment indicates
that waste must be disposed of in "separate
collection" and so the product must not be
disposed of together with urban waste.
The user must take the product to special "separate waste collection centres" provided by local
government, or deliver it to the retailer against the
purchase of a new product.
Separate collection of waste and subsequent
treatment, recycling and disposal operations
promotes the production of equipment with
recycled materials and limits negative effects on
the environment and on health caused by
improper handling of waste.
Illegal disposal of the product leads to the
enforcement of administrative penalties.
Recommandations pour l'élimination
correcte du produit.
Le symbole figurant sur l'appareil indique que le
produit fait l'objet d'une " collecte séparée ". C'est
pourquoi, le produit ne doit pas être éliminé avec
les déchets urbains.
L'utilisateur doit remettre le produit auprès de "
décharges spécialisées de collecte séparée "
prévues par les autorités locales, ou bien le
rendre au revendeur quand il achètera un nouvel
appareil équivalent.
La collecte séparée du produit et les opérations
CORRECT DISPOSAL OF THE PRODUCT
successives de traitement, recyclage et
élimination favorisent la production d'appareils
composés par des matériaux recyclés ainsi que
permettent d'éviter des effets négatifs sur
l'environnement et sur la santé des personnes
suite à une gestion impropre du déchet.
Toute élimination abusive du produit entraîne
l'application de sanctions administratives.
Hinweise zur ordnungsgemäßen
Entsorgung des Produkts.
Das auf dem Gerät angebrachte Symbol weist
darauf hin, dass das Altgerät "getrennt zu
sammeln" ist und das Produkt daher nicht
zusammen mit dem Gemeindeabfall entsorgt
werden darf.
Der Benutzer muss das Produkt zu den
entsprechenden, von der Gemeindeverwaltung
eingerichteten "Wertstoffsammelstellen" bringen
oder dem Händler beim Kauf eines neuen
Produkts übergeben.
Die getrennte Müllsammlung und anschließende
Aufbereitung, Wiederverwertung und
Entsorgung fördern die Herstellung von Geräten
unter Verwendung wiederverwerteter
Materialien und vermindern die negativen
Auswirkungen auf die Umwelt und Gesundheit
in Folge einer falschen Müllverwaltung.
Die widerrechtliche Entsorgung des Produkts
führt zur Auferlegung von Verwaltungsstrafen.
Advertencias para la correcta
eliminación del producto.
El símbolo que aparece en el aparato indica que
el residuo debe ser objeto de "recogida selectiva"
por tanto el producto no se debe eliminar junto
con residuos urbanos.
El usuario deberá entregar el producto a los
"centros de recogida selectiva" creados por las
administraciones municipales o bien al
distribuidor cuando adquiera un nuevo producto.
La recogida selectiva del residuo y las sucesivas
operaciones de tratamiento, recuperación y
eliminación favorecen la fabricación de aparatos
con materiales reciclados y limitan los efectos
negativos en el medio ambiente y la salud
causados por una gestión incorrecta del residuo.
La eliminación abusiva del producto da lugar a
la aplicación de sanciones administrativas.
Page 10
10
LED 3325
Advertências para a correcta demolição
do produto.
O símbolo indicado na aparelhagem indica que
o resíduo deve ser objecto de "recolha separada"
portanto o produto não deve ser desmantelado
junto dos resíduos urbanos.
O utilizador deverá entregar o produto nos
apropriados "centros de recolha diferenciada"
predispostos pelas administrações comunais,
ou entregá-lo ao revendedor em troca de uma
compra de um novo produto.
A recolha diferenciada do resíduo e as
sucessivas operações de tratamento,
recuperação e desmantelamento favorecem a
produção de aparelhagens com materiais
reciclados e limitam os efeitos negativos no
ambiente e na saúde causados por uma gestão
imprópria do resíduo.
O desmantelamento abusivo do produto comporta a aplicação de sanções administrativas.
РспейдпрпйЮуейт гйб фз ущуфЮ
дйЬиеуз фпх рспъьнфпт.
Фп уэмвплп рпх брейкпнЯжефбй ерЬнщ уфз
ухукехЮ хрпдейкнэей ьфй фп брьвлзфп рсЭрей
нб брпфелЭуей бнфйкеЯменп “чщсйуфЮт ухллпгЮт”
щт ек фпэфпх фп рспъьн ден рсЭрей нб
дйбфЯиефбй мбжЯ ме фб буфйкЬ брьвлзфб.
П чсЮуфзт иб рсЭрей нб рбсбдюуей фп рспъьн
уфб ейдйкЬ “кЭнфсб дйбцпспрпйзмЭнзт
ухллпгЮт” рпх Эчпхн дйехиефзиеЯ брь фйт
дзмпфйкЭт дйпйкЮуейт, Ю нб фп рбсбдюуей уфп
кбфЬуфзмб рюлзузт ме фзн бгпсЬ еньт нЭпх
рспъьнфпт.
З дйбцпспрпйзмЭнз ухллпгЮ фпх брпвлЮфпх
кбй пй бкьлпхиет еремвЬуейт ереоесгбуЯбт,
бнЬкфзузт кбй дйЬиеузт впзипэн фзн
рбсбгщгЮ ухукехюн ме бнбкхклщмЭнб хлйкЬ
кбй ресйпсЯжпхн фйт бснзфйкЭт ерйрфюуейт гйб фп
ресйвЬллпн кбй фзн хгеЯб рпх рспкблпэнфбй
брь фзн бкбфЬллзлз дйбчеЯсйуз фпх
брпвлЮфпх.
З бхибЯсефз дйЬиеуз фпх рспъьнфпт
ухнерЬгефбй фзн ецбсмпгЮ дйпйкзфйкюн
кхсюуещн.
CORRECT DISPOSAL OF THE PRODUCT
Page 11
11
LED 3325
WARRANTY
GARANZIA
1. L’apparecchio è garantito per 24 mesi dalla data di
fabbricazione indicata sull’etichetta applicata sul
prodotto.
2. La garanzia si applica solo ad apparecchi, non
manomessi, riparati da centri assistenza TREVI,
essa comprende la riparazione dei componenti per
difetti di fabbricazione con l’esclusione di etichette,
manopole e parti asportabili.
3. TREVI non risponde di danni diretti o indiretti a
cose o/e persone causati dall’uso o sospensione
d’uso dell’apparecchio.
WARRANTY
1. This unit is guaranteed for a period of 24 months
from the date of production printed on the product
itself or on label on product.
2. The warranty is valid only if the unit has not been
tampered with. The warranty is valid only at
authorized TREVI assistance centres, that will
repair manufacturing defects, excluded
replacement of labels and removable parts.
3. TREVI is not liable for damage to people or things
caused by the use of this unit or by the interruption
in the use of this unit.
GARANTIE
1. L’appareil est garanti pendant une période de 24
mois de la date de fabrication indiquée sur l’étiquette
se trouvant sur le produit.
2. La garantie n’est appliquée que sur les appareils
non altérés, ayant été réparés chez un Service
Après-Vente TREVI. Elle comprend la réparation
des composantes à la suite de défauts de
fabrication, à l’exclusion d’étiquettes, boutons de
réglage et parties amovibles.
3. TREVI ne répond pas des dommages directs ou
indirects aux choses et/ou aux personnes
entraînés pendant l’usage ou la suspension
d’usage de l’appareil.
GARANTIEBESTIMMUNGEN
1. Das Gerät hat eine Garantie von 24 Monaten ab
dem Herstellungsdatum. Das Herstellungsdatum
ist auf der am Produkt angebrachten Etikette
angegeben.
2. Die Garantie gilt nur für Geräte, an denen nicht
selbst ausgeführte Reparaturen erfolgt sind,
sondern die von TREVI-Kundendienststellen
durchgeführt wurden. Die Garantie umfaßt die
Reparatur von Bauteilen, wenn diese auf
Herstellungsfehler zurückzuführen sind. Die
Garantie gilt hingegen nicht für Etiketten,
Drucktasten, Knöpfe und entfernbare Teile.
3. TREVI haftet nicht für direkte oder indirekte Sachund/oder Personenschäden, die vom Gebrauch
des Gerätes verursacht worden sind.
GARANTIA
1. El aparato tiene una garantía de 24 meses a partir
de la fecha de fabricación indicada en la tarjeta
sobre el producto.
2. La garantía está aplicada solamente a los
productos no desarreglados y reparados por los
centros de asistencia TREVI. Además, la garantía
incluye la reparación de los componentes a causa
de defectos de fabricación, con la exclusión de
etiquetas, botones y partes removibles.
3. TREVI no es responsable por daños directos o
indirectos a cosas y/o personas causados por el
uso o suspensión del uso del aparato.
GARANTIA
1. O aparelho tem uma garantia de 24 meses a partir
da data de fabricação indicada na etiqueta que
consta no produto.
2. Somente aparelhos não violados, e que foram
reparados pelo Centro de Assistência TREVI
incluem-se nesta garantia. Esta compreende a
reparação dos componentes em caso de defeitos
de fabricação com a exclusão de etiquetas, botões
e partes que podem ser extraídas.
3. A TREVI não considera-se responsável por danos
directos ou indirectos, causados pelo uso ou
suspensão do uso do aparelho, à objectos e/ou
pessoas.
EGGUHSHEGGUHSH
EGGUHSHEGGUHSH
EGGUHSH
1. H suskeuhv evcei egguvhsh diavrkeiaj 24
mhnwvn apov thn hmeromhniva kataskeuhvj pou
anagravfetai sthn kollhmevnh epavnw thj
etikevta.
2. H egguvhsh evcei iscuv movno gia tij
suskeuevj, stij opoivej den evcei epembeiv
kaneivj, tij episkeuasmevnej apov ta kevntra
antiproswpeivaj TREVI kai perilambavnei thn
episkeuhv twn sustatikwvn stoiceivwn pou
eivnai elattwmatikav apov kataskeuhvj
ektovj twn etiketwvn, ceirolabwvn kai
metakinouvmenwn tmhmavtwn.
3. H etairiva TREVI den eivnai upovlogh avmeswn
hv evmmeswn zhmiwvn se pravgmata hv
provswpa apov kakhv crhvsh hv diakophv thj
crhvshj thj suskeuhvj.
Page 12

ENGLISH
MADE IN CHINA
Trevi S.p.A. - Strada Consolare Rimini-San Marino, 62
47924 Rimini (Rn) Italy
Tel. 0541/756420 - Fax 0541/756430
www.trevi.it - E-mail: [email protected]
 Loading...