

Page 1
IP 380 V1
TV MULTIBOX
MANUALE UTENTE ITALIANO
USER MANUAL ENGLISH
MANUEL FRANÇAIS
BEDIENUNGSANLEITUNG DEUTSCH
MANUAL DEL USUARIO ESPAÑOL
Page 2

IP 380 V1
1. PREFAZIONE E AVVERTENZE
Grazie per aver acquistato Trevi IP 380 V1. Con questo apparecchio multifunzione, potrete
collegarvi liberamente ad Internet, grazie alla connessione LAN e Wi-Fi, per accedere a
migliaia di contenuti, scaricare applicazioni utili e divertenti e visualizzare/ascoltare tutti i
vostri le multimediali (Audio, Video, Immagini) compresi i video in 4K/2K.
Prima di utilizzarlo si prega di leggere attentamente il seguente manuale d’uso.
• Non posizionate l’apparecchio su supporti instabili o con for ti vibrazioni.
• Non esporre l’unità alla luce diretta del sole o ad altre sorgenti di calore.
• Non utilizzare liquidi vicino o sopra all’unità.
ITALIANO
• Non versare liquidi all’interno dell’unità.
• Non utilizzare l’apparecchio in ambienti molto umidi.
• Non tenere l’unità vicino ad apparecchi che creano campi magnetici.
• Non inserire oggetti all’interno dell’unità.
• Posizionate l’apparecchio in modo che ai suoi lati ci sia sempre abbastanza spazio per
la libera circolazione di aria (almeno 5 cm).
• Non ostruite le feritoie di ventilazione.
• Non scollegate il dispositivo durante la formattazione o il caricamento di le, si potrebbero
produrre errori nel programma.
• Il sistema operativo Android, essendo un sistema open source è in continuo sviluppo ed
è utilizzato in differenti dispositivi, pertanto le parole Telefono, Cellulare, MID o TABLET,
che potrebbero apparire sul display, equivalgono ad indicare “Apparecchio/Dispositivo”.
La scritta “Telefono” o “cellulare”, che potrebbe comparire, non indica che lo stesso
funga da telefono, ma è da intendersi come sinonimo di Apparecchio/Dispositivo.
• Non tentare di aggiornare il sistema operativo con versioni più recenti o versioni differenti,
potreste causare danneggiamenti non riparabili al dispositivo.
• Le impostazioni descritte in questo manuale sono quelle pre denite dell’apparecchio.
• TREVI non è responsabile dei problemi che software di terze parti potrebbero causare
nella velocità e nelle prestazioni dell’apparecchio.
• TREVI non è responsabile dei problemi di incompatibilità o prestazioni dovuti alla modica
da parte dell’utente delle impostazioni di sistema dell’apparecchio.
• TREVI non è responsabile di eventuali “virus” o “danneggiamenti” del software dovuti
alla navigazione internet dell’utente.
• TREVI declina ogni responsabilità sulla violazione delle leggi sul copyright da parte
dell’utente.
• Accertarsi che il prodotto non sia danneggiato, in tal caso rivolgersi al venditore.
• Controllare che siano presenti tutti gli accessori; utilizzare solamente accessori forniti
nella confezione.
• Non aprire l’apparecchio: all’interno non vi sono ne comandi manipolabili dall’utente ne par ti
di ricambio. Per tutte le operazioni rivolgersi ad un Centro Assistenza Autorizzato Trevi.
2
Page 3
IP 380 V1
3.2 Con nec t TV bo x to TV a nd co nnect network
• Tutti i marchi e diritti d’autore sono proprietà dei rispettivi possessori dei diritti.
• L’apparecchio non deve essere esposto a stillicidio o a spr uzzi d’acqua. Nessun oggetto
pieno di liquido, quali vasi, deve essere posto sull’apparecchio.
• Se dei liquidi penetrano all’interno dell’apparecchio scollegate immediatamente la spina
dalla presa o togliere la batteria e portate l’apparecchio al più vicino centro assistenza
autorizzato TREVI.
• Nessuna sorgente di amma nude, quali candele accese, deve essere posta
sull’apparecchio.
• Conservare il seguente manuale d’uso.
2. CONTENUTO DELLA CONFEZIONE
• Apparecchio
• Telecomando
• Cavo HDMI
• Alimentatore AC/DC
• Manuale Istruzioni
CURA E MANUTENZIONE
Per la pulizia si consiglia l’uso di un panno morbido, leggermente inumidito. Evitate solventi
o sostanze abrasive.
IMPORTANTE
La buona costruzione di questo apparecchio ne garantisce per lungo tempo il perfetto
funzionamento. Se tuttavia dovesse presentarsi qualche inconveniente, sarà opportuno
consultare il più vicino Centro Assistenza Trevi autorizzato.
3. DESCRIZIONE COLLEGAMENTI UNITA’ / TELECOMANDO
ITALIANO
1 2 3 4
8
76
3
5
Page 4
IP 380 V1
Voice Control: Hold it to
aactive and voice input
demands to search for
the information.
Remark: when you use
voice search function in
apps like youtube, please
click the voice knob in
remote to activate first, then
long press to input voice
command
IP 380 V1
2.2 Use your mobile phone to control the Box
N11 Android box and your mobile phone have to connect to the same Wi-Fi
from one router before download.
For IOS: Download“Android TV Remote”from APP STORE
For Android: Download“Android TV Remote”from Google Play store
Download and open the app,choose“IP 380 V1” on your phone and follow the prompts
and enter the code popping up on the screen to pair your phone with the box
and remote.(Some Iphone IOS will not support using touch mode and Voice
commands to search for the content).
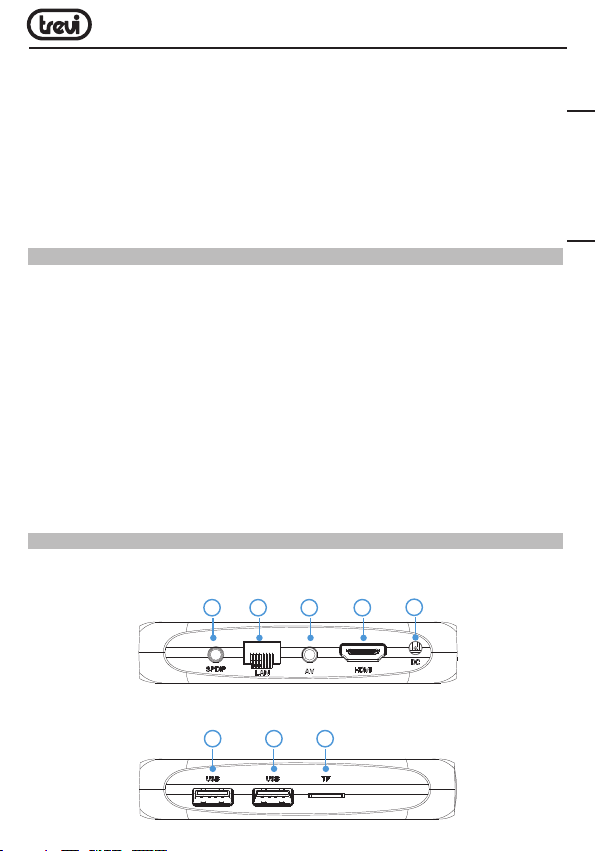
1. Presa uscita OTTICA DIGITALE: Per collegare all’apparecchio il vostro sistema Audio
surround.
2. Ethernet LAN RJ45: 10/100Mbs, interfaccia Ethernet per connessione alla rete locale.
3. Uscita AV: Uscita segnale video composito (CVBS). Cavo non in dotazione.
4. Presa HDMI: Uscita Video per collegamento a HDTV.
5. Presa di alimentazione DC IN 5V: Collegare l’alimentatore in dotazione.
6,7. Prese USB: Per collegare dispositivi esterni USB, come chiavette di memoria, Hard
Disc esterni, Mouse wireless, Tastiere wireless, ecc...
8. Slot per lettura di memorie Micro SD Card.
ITALIANO
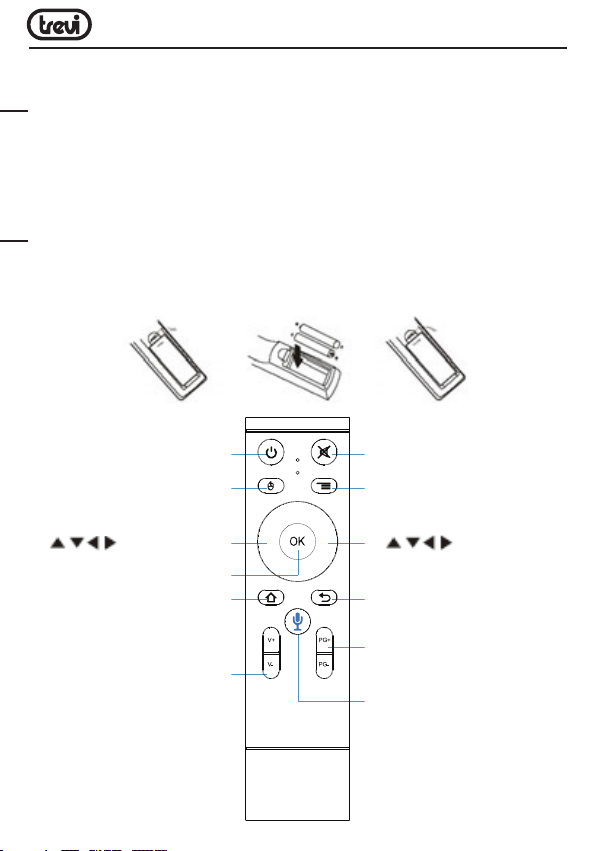
TELECOMANDO
Installazione batterie:
Rimuovere il coperchio nella parte posteriore del Telecomando, inserire 2 batterie formato
“AAA” facendo attenzione alle polarità indicate sul mobile e richiudere il coperchio.
9. TASTO POWER: Comando accensione/
spegnimento.
10. TASTO MOUSE: Abilita il cursore del
mouse (utilizzando i tasti di navigazione).
Premere nuovamente per abilitare
lo spostamento passo-passo.
11. Tasti di navigazione e
spostamento.
12. TASTO OK: Tasto conferma.
13. TASTO HOME: Per tornare rapidamente
alla pagina principale (Home).
14. TASTI V+/V-: Regolazione volume.
4
15. TASTO MUTE: Azzeramento livello audio.
16. TASTO MENU: Per aprire la barra dei menu
in determinate applicazioni/funzioni.
11. Tasti di navigazione e
spostamento.
17. TASTO BACK: Per tornare alla schermata
precedente.
18. TASTI PG+/PG-: Per spostarsi alla pagina
successiva o precedente.
19. TASTO VOICE CONTROL: Tenere premuto
per attivare l’immissione vocale e la
richiesta di informazioni.
Page 5
IP 380 V1
4. OPERAZIONI DI BASE/INSTALLAZIONE
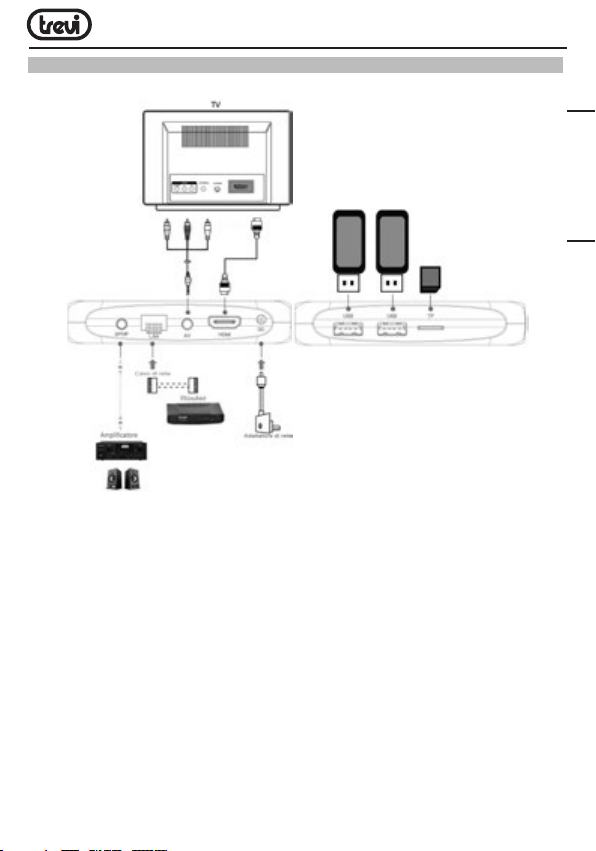
Collegamenti:
Installazione / Accensione / Spegnimento:
• Per accendere il dispositivo, collegare l’alimentatore in dotazione del IP 380 V1 alla
presa di alimentazione (5) e l’altra estremità alla presa di rete elettrica. L’IP 380 V1 si
accenderà automaticamente e il display si accenderà.
• Collegare una estremità del Cavo HDMI alla presa (4) del IP 380 V1; collegare l’altra
estremità alla presa HDMI del vostro TV.
• Accendere il TV e attendere qualche secondo che l’apparecchio carichi il sistema
operativo.
• Premere il tasto Power (9) sul telecomando per portare in modalità sospensione
l’IP 380 V1. In questo modo il segnale video verrà disattivato, ma il sistema rimarrà
attivo. Il display si spegnerà. Premere il tasto Power (9) sul telecomando per riattivare
l’IP 380 V1.
• Tenere premuto il tasto Power (9) sul telecomando per spegnere in modalità stand-by
l’IP 380 V1, selezionare Spegni con i tasti di navigazione (11) e confermare con il tasto
OK (12). In questo modo tutto il sistema verrà spento. Il display si spegnerà. Premere
il tasto Power (9) sul telecomando per riacendere l’IP 380 V1.
5
ITALIANO
Page 6
IP 380 V1
ATTENZIONE: L’apparecchio di fabbrica è settato con uscita Video sulla presa HDMI,
se volete utilizzare l’uscita composita AV (cavo di collegamento non incluso), collegate
prima l’unita ad un TV tramite HDMI e poi dal menu “Impostazioni”/“Impostazioni
avanzate”/“Display”/”Screen resolution”, selezionare la risoluzione Video 480 oppure 576.
Accoppiamento telecomando Bluetooth:
• Al primo utilizzo occorre accoppiare il telecomando Bluetooth in dotazione all’IP 380
V1. Tenere premuti contemporaneamente per 5 secondi i tasti V- (14) e PG- (18).
L’indicatore rosso sul telecomando lampeggerà ad indicare l’avvenuto accoppiamento.
ITALIANO
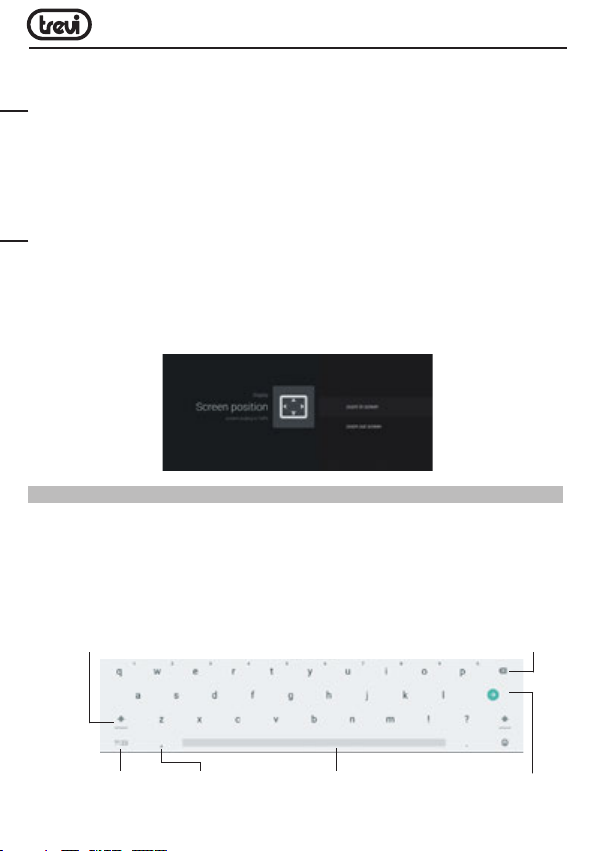
Regolazione quadro:
Regolate l’immagine (quadro) in base al vostro TV; per regolare il quadro selezionare
“Impostazioni”/“Impostazioni avanzate”/“Display”/”Screen position”, per stringere selezionare “Zoom out screen”, mentre per ingrandire selezionare “Zoom in screen”.
5. UTILIZZO DELLA TASTIERA VIRTUALE
Cliccando o selezionando le nestre di testo sullo schermo apparirà una tastiera virtuale,
con questa potrete inserire indirizzi web o scrivere qualsiasi testo.
Per selezionare le lettere potete spostarvi passo-passo utilizzando i tasti di navigazione
(11) e confermando con il tasto OK (12) oppure, premendo il tasto Mouse (10), comparirà una freccia che potrete spostare velocemente utilizzando i tasti di navigazione (11) e
confermando con il tasto OK (12).
Tasto maiuscole
Tasto Cancellazione
Numeri e simboli
Cliccare il comando per
passare alla modalità tastiera numerica
Opzioni inserimento
Barra Spaziatrice Tasto Conferma
6
Page 7
IP 380 V1
6. INSERIMENTO DI UNA MEMORIA ESTERNA MICRO SD
Questo dispositivo è in grado di supportare Memorie esterne Micro SD grazie alla slot (8).
• Inserire la scheda tenendo la supercie con i contatti elettrici rivolta verso il basso,
inserirla delicatamente no in fondo.
• Per una rimozione sicura della scheda di memoria andare in SETTINGS/ MORE
SETTINGS/ MEMORIA e selezionare SMONTA ARCHIVIO CONDIVISO.
• Premere la scheda Micro SD verso l’interno per sganciarla dalla slot ed estrarla dall’unità.
Nota: Non inserire o rimuovere la memoria quando l’apparecchio sta leggendo i le o
trasferendo dei dati. Questo potrebbe causare errori. L’inserimento della memoria deve
avvenire solo con IP 380 V1 spento.
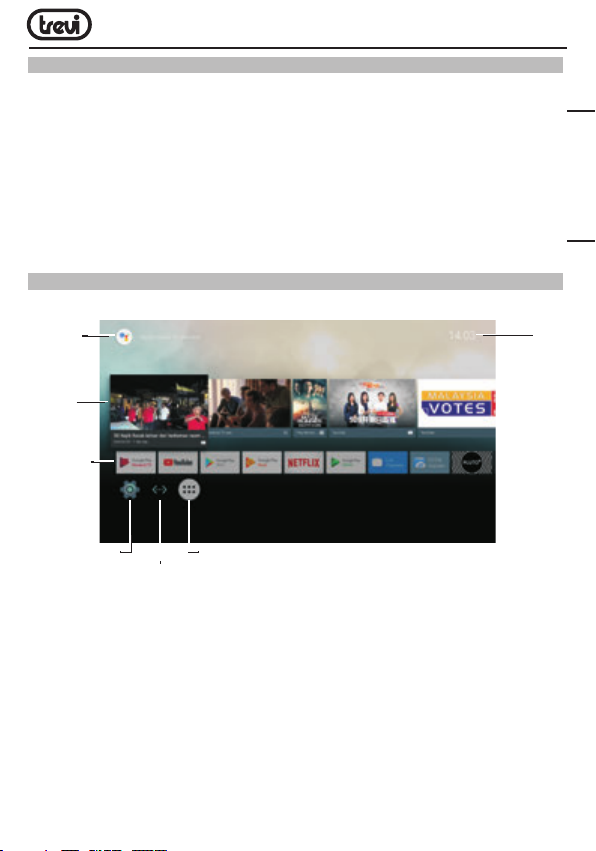
7. DESCRIZIONE DELLA PAGINA PRINCIPALE (schermata Home)
Questa schermata visualizza tutte le funzioni che l’apparecchio è in grado di gestire.
Indicatore
per la ricerca
vocale
Suggerimenti
video da
visualizzare
Collegamento
diretto App
preinstallate
Data e
Orario
ITALIANO
Impostazioni
Stato connessione
Elenco App installate
(App Drawer)
di rete
Note: L’utente può selezionare le applicazioni con i tasti di navigazione (11) e aprirle
con il tasto OK (12), oppure, premendo il tasto Mouse (10), comparirà una freccia che
potrete spostare velocemente utilizzando i tasti di navigazione (11) e confermando con
il tasto OK (12).
7
Page 8

IP 380 V1
8. COLLEGAMENTO ALLE RETI
Per accedere alla rete Internet, prima di tutto, occorre congurare una rete con una connessione Wi-Fi Access Point (AP) o una connessione via Cavo tramite presa LAN.
Collegamento tramite presa LAN:
• Collegare il cavo di rete LAN proveniente dal vostro modem Router, alla presa LAN (2)
sull’unità.
• Nella schermata Home selezionare “Impostazioni” e poi “Rete”.
• Selezionare la voce Ethernet e attendere che compaia la scritta “Connesso”.
ITALIANO
Ricerca e collegamento ad una rete Wi-Fi:
Per effettuare una connessione di questo tipo occorre trovarsi in una zona Wi-Fi.
• Nella schermata Home selezionare “Impostazioni” e poi “Rete”.
Attivazione/disattivazione Wi-Fi:
• Selezionare la voce “Wi-Fi” e attivarla con il tasto OK (12). L’IP 380 V1 attiverà
automaticamente una ricerca delle reti Wi-Fi disponibili e le mostrerà.
• Selezionare la rete preferita e confermare con il tasto OK (12). Se protetta, inserire la
password utilizzando la tastiera virtuale (vedi paragrafo 5 “Utilizzo della tastiera virtuale”).
• Cliccare il tasto di invio sulla tastiera e attendere che compaia il messaggio “Connesso
correttamente”.
• Per disattivare la rete: selezionare la rete di collegamento e poi il comando “Elimina rete”.
9. NAVIGAZIONE INTERNET
Prima di collegarsi in rete, assicurarsi che il collegamento Wi-Fi o tramite presa LAN sia attivo.
• Nella scher mata Home selezionare l’icona “App Drawer” e poi selezionare l’icona “Chrome”.
• Il cursore si posizionerà sulla barra di testo, e comparirà automaticamente la tastiera
virtuale di Android, dove digitare l’indirizzo inter net del sito oppure effettuare una ricerca
tramite il motore di ricerca.
Durante la navigazione premere il tasto (16) sul telecomando per visualizzare i
sotto menu o regolare le impostazioni.
NOTA sulla velocità di navigazione Internet
• La velocità di navigazione in Internet è strettamente legata alle caratteristiche del
prodotto, alle caratteristiche della rete e del sito visitato, per cui è possibile avere
forti rallentamenti o stop parziali durante la navigazione. Questo non è da considerarsi
un difetto dell’unità ma una situazione temporanea che si può risolvere attendendo o
migliorando le condizioni di rete oppure visitando altri siti.
• Consigliamo di navigare cliccando moderatamente per evitare la congestione del usso
dati e il conseguente rallentamento o blocco del dispositivo.
• Per una “navigazione” più veloce, vi consigliamo di utilizzare il collegamento LAN.
:
8
Page 9

IP 380 V1
10. RICERCA VOCALE
• Per attivare l’assistente vocale dell’IP 380 V1 nella schermata Home, occorre tenere
premuto il tasto VOICE CONTROL (19) ed effettuare la richiesta vocale, portando il
telecomando vicino alla bocca. Verranno visualizzati video e contenuti relativi alla
richiesta effettuata.
• Per attivare l’assistente vocale dell’IP 380 V1 in applicazioni come ad esempio Youtube,
Premere una volta il tasto VOICE CONTROL (19) per attivare la ricerca e poi tenere premuto
lo stesso tasto per effettuare la richiesta vocale, portando sempre il telecomando vicino
alla bocca.
11. GESTIONE DELLE APPLICAZIONI
IP 380 V1 viene fornito con alcune applicazioni al suo interno, ma è in grado di supportare
anche applicazioni di terze parti.
Installare un’applicazione da Play Store:
• Avviare il collegamento alla rete.
• Nella barra delle App preinstallate selezionare “Play Store”.
• Crearsi un account di posta elettronica su Gmail (operazione da effettuarsi solo la prima volta).
• Una volta dentro la pagina Play Store, ricercare l’applicazione desiderata.
• L’applicazione scaricata si auto installerà su IP 380 V1 e la sua icona sarà presente
nella pagina delle applicazioni.
Installare un’applicazione di terze parti:
• Scaricare il le .apk da PC e copiarlo su una chiavetta USB o una scheda di memoria
microSD.
• Inserire la chiavetta USB o la scheda di memoria microSD nei rispettivi slot (6/7 o 8).
• Nella barra delle App preinstallate selezionare “ES File Explorer”, ricercare e avviare il le
dell’applicazione presente sulla memoria esterna.
Note: Assicurarsi che il le .apk sia supportato dal sistema operativo Android 7.1 e che
rispetti l’estensione .apk.
Es: “air_attack_hd_1.apk”.
Disinstallare un’applicazione:
• Nella schermata Home selezionare “Impostazioni” - “App”.
• Selezionare l’applicazione che si vuole disinstallare.
• Selezionare il comando “DISINSTALLA” per disinstallare denitivamente l’applicazione.
ITALIANO
9
Page 10
IP 380 V1
12. LETTORE DI FILE MULTIMEDIALI
Musica
• Dopo aver caricato la vostra Musica in una chiavetta USB o una scheda di memoria
microSD, nella schermata Home selezionare l’icona “App Drawer” e poi selezionare
l’icona
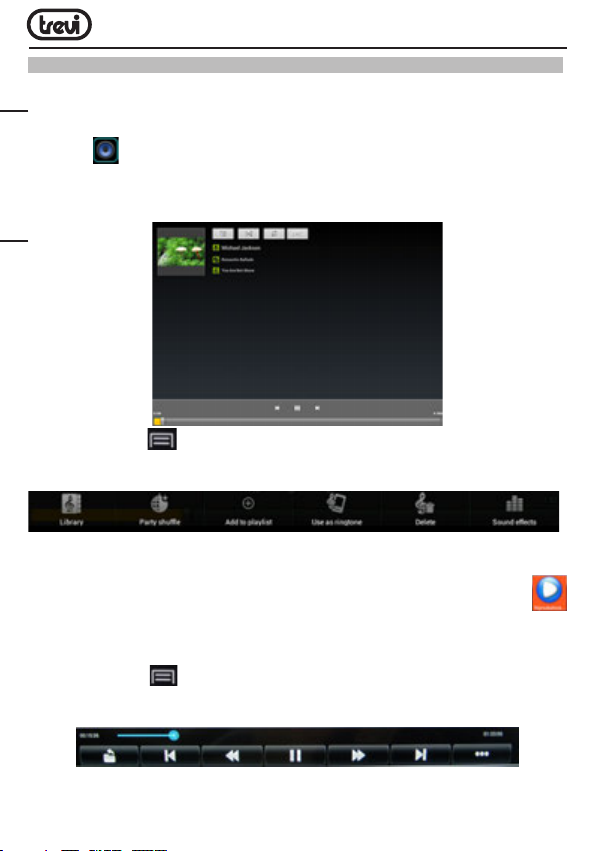
• Selezionare il le da riprodurre e premere il tasto OK (12) per confermare. Dopo la
selezione si aprirà un lettore multimediale dove poter gestire I brani e visualizzare la
copertina dell’album se disponibile nel le.
ITALIANO
• Premere il Tasto Menu (16) sul telecomando per visualizzare in fondo allo schermo
la barra degli strumenti che permette di effettuare le seguenti operazioni:
Video
• Dopo aver caricato i vostri Video in una chiavetta USB o una scheda di memoria microSD,
nella schermata Home selezionare l’icona “App Drawer” e poi selezionare l’icona
“Riproduttore vi...”.
• Selezionare la periferica di archiviazione e il percorso, quindi selezionare e confermare
il le da riprodurre.
• Premere il Tasto Menu (16) sul telecomando per visualizzare in fondo allo schermo
la barra degli strumenti.
“Musica”. Avrete la possibilità di scegliere tra Artista, Album, Brani o Playlist.
10
Page 11

IP 380 V1
Immagini
• Dopo aver caricato le vostre Immagini in una chiavetta USB o una scheda di memoria
microSD, nella schermata Home selezionare l’icona “App Drawer” e poi selezionare
l’icona
• Selezionare l’immagine desiderata tramite i tasti di navigazione (11) e confermare
premendo il tasto OK (12) per vederla a schermo intero.
• Premere i tasti di navigazione (11) a Destra o a Sinistra per visualizzare le altre immagini.
• Premere il tasto BACK (17) per ritornare alla visualizzazione normale.
• Selezionareare l’icona , o premere il tasto Menu (16) sul telecomando, per
modicare, ritagliare, impostare l’immagine come sfondo o condividerla.
“Galleria”.
13. FUNZIONI PARTICOLARI
Questo apparecchio è dotato di funzioni particolari come BLUETOOTH, MIRACAST, AIR-
PLAY e MEDIA CENTER per l’invio e la ricezione di le senza l’uso di cavi di collegamento.
BLUETOOTH:
IP 380 V1 è dotato di sistema Bluetooth per la trasmissione/ricezione di le tra il dispositivo
e altri apparecchi dotati di questa funzione (sistemi Android).
Ricerca dispositivi:
• Nella schermata Home selezionare “Impostazioni” e poi “Aggiungi accessorio”.
L’apparecchio avvierà automaticamente una ricerca dei dispositivi disponibili.
• Al termine della ricerca verrà visualizzata una lista di tutti gli apparecchi disponibili.
Accoppiamento con i dispositivi:
• Dalla lista visualizzata selezionare il dispositivo da accoppiare. Ad accoppiamento
avvenuto il nome del dispositivo comparirà sotto la lista dei dispositivi accoppiati.
• Se viene richiesto un PIN, questo dovrebbe essere indicato nell’apparecchio con cui si
sta cercando di effettuare l’accoppiamento, se così non fosse provare con “0000” o
“1234”.
• Dopo l’accoppiamento è possibile trasmettere/ricevere i le tra IP 380 V1 e il dispositivo
accoppiato.
MIRACAST:
Miracast è un nuovo standard di trasmissione di le multimediali (foto, video e musica)
senza la necessità di cavi sici, che permette all’utente di collegare tramite la tecnologia
Wi-Fi Direct un device Android al televisore di ultima generazione. Con Miracast il vostro
dispositivo sarà strettamente collegato allo schermo della TV e sarà necessario tenere acceso
il display dello smartphone o del tablet per visualizzare il suo schermo direttamente sul TV.
11
ITALIANO
Page 12
IP 380 V1
ATTENZIONE: PER FUNZIONARE CORRETTAMENTE IL DISPOSITIVO IP 380 V1 NECESSITA
CHE LO SMARTPHONE O IL TABLET ABBIA COME REQUISITI DI SISTEMA OS ANDROID 4.2.2
O SUPERIORE CON SUPPORTO WIRELESS DISPLAY O MIRRORING DISPLAY.
Attivazione Miracast:
• Collegate l’IP 380 V1 e il dispositivo esterno (Smartphone o Tablet) alla stesse rete Wi-Fi.
• Sul vostro dispositivo esterno (Smartphone o Tablet), attivate la funzione Miracast o
“Wireless Display” o Mirroring Display” o “Trasmetti schermo” (fate riferimento al manuale
istruzioni del vostro dispositivo per il corretto nome e la procedura di attivazione).
ITALIANO
• Su IP 380 V1, dalla pagina principale selezionare “Apps” e poi selezionare l’icona
“Miracast”. L’apparecchio effettuerà una ricerca dei dispositivi.
• Sul’apparecchio esterno (Smartphone o Tablet) comparirà “Android_xxxx”, selezionatelo.
• Sul TV comparirà una schermata di conferma, selezionate OK e attendete qualche
secondo che il collegamento venga attivato. Ora tutte le immagini presenti sul dispositivo
esterno verranno visualizzate sul TV.
Disattivazione Miracast:
• Sul dispositivo esterno (Smartphone o Tablet) selezionare “Android_xxxx”e poi, sulla
videata successiva, “Disconnetti”.
MEDIA CENTER:
Questa funzione vi permette di visualizzare direttamente sul vostro TV le presenti su altri
dispositivi (come PC o Consolle) collegati tramite rete DLNA o AirPlay (per dispositivi Apple).
Nota: I dispositivi collegati devono essere accesi per poter scegliere e visualizzare i le
utilizzando IP 380 V1.
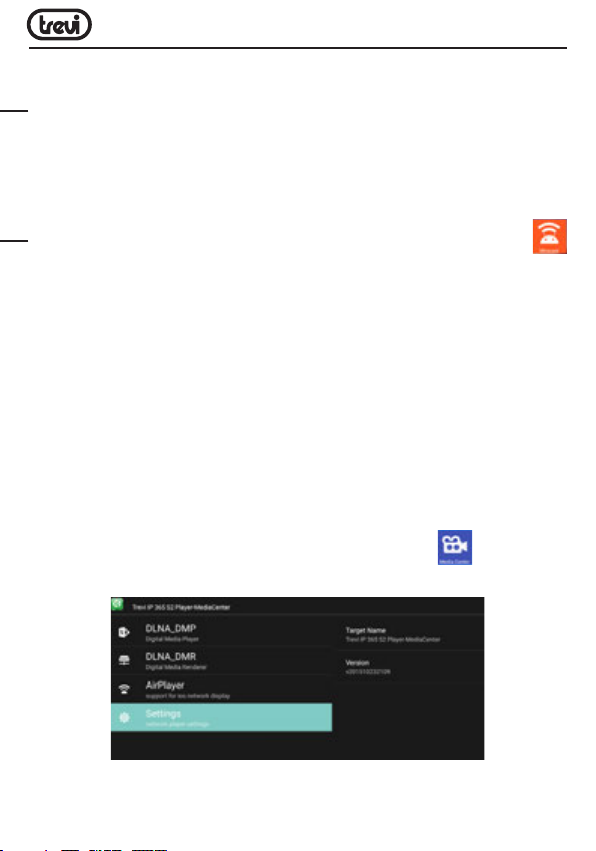
• Dalla pagina principale selezionare “Apps” e poi selezionare l’icona “Media center”,
si aprirà la seguente videata:
• Selezionando DLNA_DMP (Digital Media Player) sfoglia e riproduce i contenuti multimediali
fruibili dal media server. Verrà visualizzato l’elenco dei dispositivi collegati in rete, basterà
selezionare quello desiderato per visualizzare i le che contiene e riprodurli sul TV.
12
Page 13

IP 380 V1
• Selezionando DLNA_DMR (Digital Media Rendered) non può sfogliare i contenuti presenti
nel server, ma li può riprodurre.
• Selezionare AirPlayer se si dispone di apparecchi Apple. AirPlayer è una applicazione
dedicata agli utenti Apple. Grazie all’AirPlayer si riescono a riprodurre immagini/video
dei dispositivi apple direttamente sul TV.
Nota: La funzione AirPlayer può essere preclusa a causa dei continui aggiornamenti
software iOS.
14. IMPOSTAZIONI
Il Menu Impostazioni vi permette di congurare o modicare le impostazioni dell’IP 380 V1.
• Nella schermata Home selezionare “Impostazioni”.
Per ritornare alla pagina precedente o per annullare un comando premere il tasto
BACK (17) sul telecomando.
RETE
Vengono visualizzate le reti LAN o Wi-Fi connesse o disponibili.
SUONO
Attiva o disattiva l’audio di sistema e imposta l’audio surround del dispositivo.
APP
Selezionando questa voce è possibile gestire le varie applicazioni presenti sul dispositivo.
Per eliminare un’ applicazione basta selezionarla e toccare il comando “Disinstalla”.
SCREENSAVER
Vengono visualizzate le modalità d’uso dello screensaver.
MEMORIA E RIPRISTINO
Selezionando questa voce è possibile controllare gli spazi utilizzati e quelli liberi della memoria
Interna del dispositivo, quelli della eventuale scheda microSD installata o chiavetta USB e
effettuare una rimozione sicura o cancellazione della scheda microSD/USB.
NOTA BENE: Le applicazioni pre installate e il sistema operativo Android OS occupano una
considerevole parte della capacità della memoria interna del dispositivo, quindi risulta
normale avere una differenza tra “Spazio di memoria disponibile” e “Spazio totale”.
Selezionando questa voce è possibile ripristinare l’apparecchio con i dati di fabbrica.
INFORMAZIONI
Selezionando questa voce è possibile visualizzare tutte le informazioni che riguardano
l’apparecchio.
ITALIANO
13
Page 14

IP 380 V1
IMPOSTAZIONI AVANZATE
Selezionando questa voce è possibile visualizzare tutte le impostazioni avanzate che
riguardano l’apparecchio, quali:
Display (risoluzione dello schermo, la posizione dello schermo (zoom in/out), funzione
HDR), HDMI CEC, Riproduzione, Suono, funzione tasto Power, aggiornamento telecomando
Bluetooth, accesso ad altre impostazioni.
DATA E ORA
Selezionando questa voce è possibile impostare la data e l’ora del dispositivo, il fuso
ITALIANO
orario e il formato.
LINGUA E TASTIERA
Selezionando questa voce è possibile impostare la lingua desiderata e impostare alcune
funzioni della tastiera virtuale.
RICERCA E VOCE
Selezionando questa voce è possibile impostare alcuni parametri sulla ricerca e l’utilizzo
vocale.
ACCESSIBILITÀ
Selezionando questa voce è possibile impostare alcuni parametri di utilizzo dell’apparacchio
da parte di utenti por tatori di handicap.
BLUETOOTH
Comando per effettuare la ricerca e connessione di dispositivi Bluetooth.
LUOGO
Per acconsentire o meno all’invio dei propri dati di posizione per i risultati di ricerca di
Google e altri servizi Google.
SICUREZZA
Impostazioni per installazione di App di terze parti e verica di App potenzialmente pericolose.
UTILIZZO DATI
Impostazione per il consenso o meno all’invio di dati diagnostici a Google.
ACCOUNT
Visualizza quanti e quali account sono stati registrati sul dispositivo.
14
Page 15

15. INFORMATIVA SULLO SMALTIMENTO DEL PRODOTTO
IP 380 V1
INFORMAZIONI AGLI UTENTI ai sensi del Decreto Legislativo N° 49 del 14 Marzo 2014
“Attuazione della Direttiva 2012/19/UE sui riuti di apparecchiature elettriche ed elettroniche
(RAEE)”
Il simbolo del cassonetto barrato ripor tato sull’apparecchiatura indica che il prodotto alla ne della
propria vita utile deve essere raccolto separatamente dagli altri riuti. L’utente dovrà, pertanto,
conferire l’apparecchiatura integra dei componenti essenziali giunta a ne vita agli idonei centri
di raccolta differenziata dei riuti elettronici ed elettrotecnici, oppure riconsegnarla al rivenditore
al momento dell’acquisto di nuova apparecchiatura di tipo equivalente, in ragione di uno a uno,
oppure 1 a zero per le apparecchiature aventi lato maggiore inferiore a 25 cm. L’adeguata raccolta
differenziata per l’avvio successivo dell’apparecchiatura dimessa al riciclaggio, al trattamento e allo
smaltimento ambientale compatibile contribuisce ad evitare possibili effetti negativi sull’ambiente e
sulla salute e favorisce il riciclo dei materiali di cui è composta l’apparecchiatura. Lo smaltimento
abusivo del prodotto da parte dell’utente compor ta l’applicazione delle sanzioni amministrative
di cui al D.Lgs n. Decreto Legislativo N° 49 del 14 Marzo 2014.
TREVI persegue una politica di continua ricerca e sviluppo, pertanto i prodotti possono presentare
caratteristiche diverse da quelle descritte.
16. SPECIFICHE TECNICHE
CPU ................................................................... AMLOGIC S905W, Quad Core, ARM Cortex A53
FREQUENZA PROCESSORE
RAM
.................................................................. 2GB
MEMORIA INTERNA
SISTEMA OPERATIVO
CLASSE DI POTENZA BLUETOOTH
POTENZA DI TRASMISSIONE BLUETOOTH
POTENZA MAX DI TRASMISSIONE BLUETOOTH
BANDA DI TRASMISSIONE BLUETOOTH
WIFI STANDARD
FREQUENZE
RF OUTPUT POWER (EIRP)
MODULAZIONE
MODALITÀ DI FUNZIONAMENTO
CLASSE PRODOTTO
INTERFACCIA
ALIMENTAZIONE
DIMENSIONI.......................................................104x104x21mm
PESO
....................................................... 2412-2472MHz (802.11b/g/n HT20)
...................................................................... 2422-2462MHz (802.11n HT40)
.................................................. DSSS; OFDM
..................................................... USB(x2), Slot Micro SD Card, RJ45, HDMI, AV, Optical
................................................................. 116g
................................2GHz, 64bit
........................................... 16GB
........................................Android 7.1
..................... 2
......... 1,9mW
. 2,5mW
............. 2,4GHz
................................................ 802.11 b/g/n (2,4GHz)
................................ 11.78 dBm
........................ DUPLEX
.......................................... CLASSE 1
................................................ 5V 2A
ITALIANO
15
Page 16

IP 380 V1
IMPORTANT SAFETY INSTRUCTIONS
• Please read and keep this Instructions.
• To reduce the risk of electric shock, do not remove the cover or back. There are no
user-serviceable parts inside. Refer servicing to qualied personnel.
• To prevent re or electric shock hazard, do not expose the unit to rain or moisture.
• Do not expose to water (dripping or splashing) and no objects lled with liquids, such
as vases, should be placed on the unit.
• Keep the product away from direct sunlight and heat source such as radiators or stoves.
• Do not block the ventilation openings. Slots and openings on the unit are provided for
ventilation. The openings should never be blocked by placing your product on a cushion,
sofa or other similar surface.
• Do not place the product on unstable cart, stand, tripod, bracket or table. The unit may
fall, resulting in possible damage or injury.
• Only use the AC adapter included with product. Using any other adapter will void your
warranty.
ENGLISH
• Unplug the power from the outlet when the unit is not in use.
• Attention should be drawn to the environmental aspects of battery disposal.
• WARNNING: The battery shall not be exposed to excessive heat such as sunshine, re
or the like.
• WARNNING: Only use attachments/accessories specied provided by the manufacturer,
the product is supplied by AC adapter, the AC adapter is used as disconnect device,
the disconnect device shall remain readily operable.
The symbol indicates that dangerous voltages constituting a risk of electric shock are
present within this unit.
The symbol indicates that there are important operating and maintenance instructions in
the literature accompanying this unit.
CAUTION:
When the apparatus was in electrostatic circumstance, it may be malfunction and need
to reset by user.
16
Page 17
IP 380 V1
3.2 Con nec t TV bo x to TV a nd co nnect network
CONNECTIONS AND REMOTE CONTROL / REMOTE CONTROL
1 2 3 4
8
76
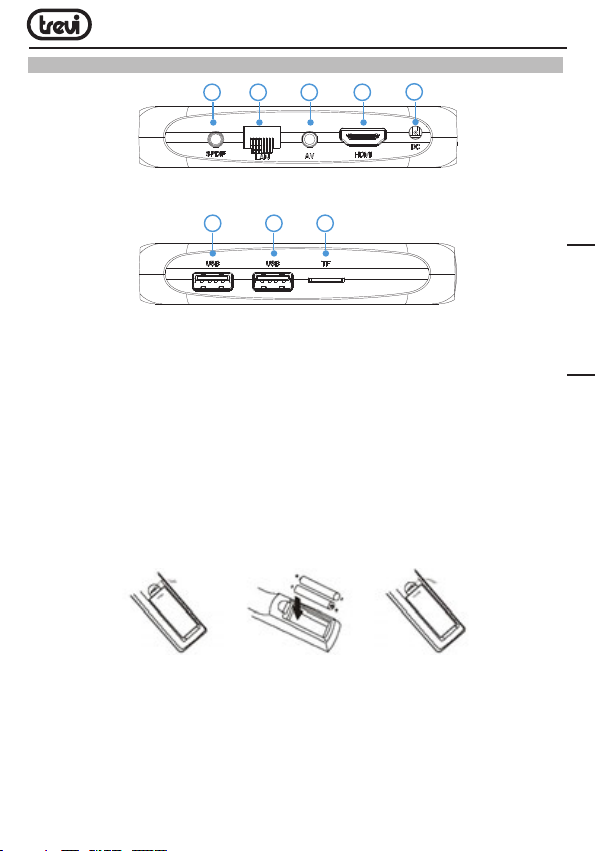
1. DIGITAL OPTICAL output socket: To connect your device Audio System surround.
2. LAN RJ45 Ethernet: 10 / 100Mbps Ethernet interface for connection to the local network.
3. AV Output: Composite video signal output (CVBS). Cable not included.
4. HDMI: Video output for connection to HDTV.
5. Power socket DC IN 5V: Connect the supplied power adapter.
6,7. USB Sockets: To connect external USB devices such as memory sticks, Hard External
disk, wireless mouse, wireless keyboards, etc....
8.
Slot for Micro SD Card.
Installing the Batteries
Remove the battery cover from the Remote Control and put 2xAAA size batteries inside
the compartment. The diagram inside the Battery Compartment shows the correct way
to install the batteries.
5
ENGLISH
17
Page 18
IP 380 V1
Voice Control: Hold it to
aactive and voice input
demands to search for
the information.
Remark: when you use
voice search function in
apps like youtube, please
click the voice knob in
remote to activate first, then
long press to input voice
command
IP 380 V1
2.2 Use your mobile phone to control the Box
N11 Android box and your mobile phone have to connect to the same Wi-Fi
from one router before download.
For IOS: Download“Android TV Remote”from APP STORE
For Android: Download“Android TV Remote”from Google Play store
Download and open the app,choose“IP 380 V1” on your phone and follow the prompts
and enter the code popping up on the screen to pair your phone with the box
and remote.(Some Iphone IOS will not support using touch mode and Voice
commands to search for the content).
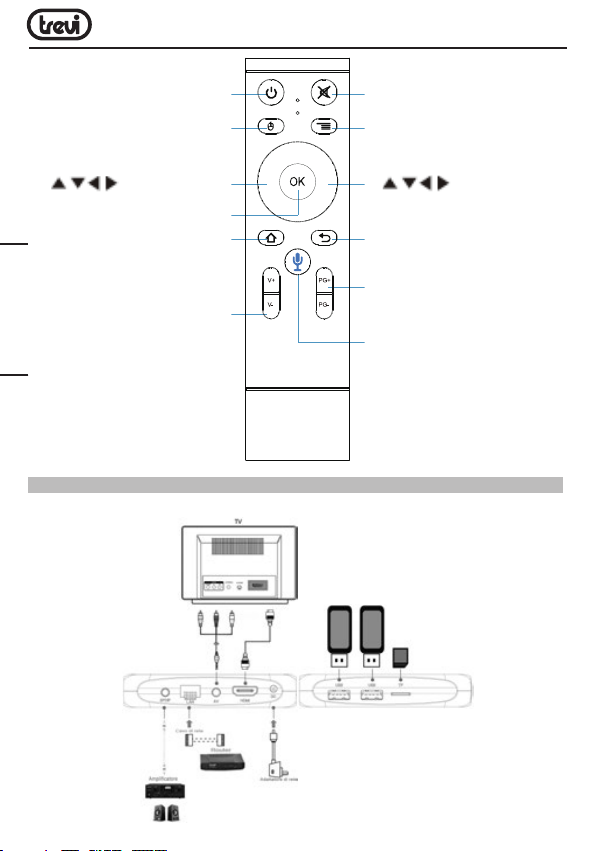
9. POWER BUTTON: Power ON/OFF.
10. MOUSE BUTTON: To enable moving fast
by arrow (using the navigation keys),
press again to enable the displacement
step.
11. Move highlight.
12. OK BUTTON: Conrmation.
13. HOME BUTTON: To return to Main (Home)
page.
14. V+/V- BUTTONS: Increase/decrease
volume.
ENGLISH
CONNECTIONS
Connections:
15. MUTE BUTTON: Muting sound.
16. MENU BUTTON: To open the sub-menu
folder in certain applications / functions.
11. Move highlight.
17. BACK BUTTON: Return to previous step/
Exit.
18. PG+/PG- BUTTONS: To move to
previous/next page.
19. VOICE CONTROL BUTTON: Hold it to
active and voice input demands to search
for the information.
Remark: when you use voice search
function in apps like youtube, please click
the voice knob in remote to activate rst,
then long press to input voice command.
18
Page 19
IP 380 V1
Installation/Power On/Off:
• To turn on the device, connect the power adapter supplied to the power socket DC (5)
of the IP 380 V1 and the other end to the wall outlet. It will turn on automatically and
the display will turn on.
• Connect one end of the HDMI cable to socket (4), connect the other end to the HDMI
socket of your TV.
• Turn on the TV and wait a few seconds for the device loads the operating system.
• Press the Power button (9) on the remote control to bring in sleep mode the device. In this
way the video signal will be turned off, but the system will remain activated. The display
will switch off. Press the Power button (9) on the remote control to wake the device.
• Press and hold the Power button (9) on the remote control to turn off in standby mode
the device, select Shutdown with the navigation keys (11) and conrm by pressing OK
(12). In this way the entire system is turned off. The display will switch off. Press the
Power button (9) on the remote control to the heaters device.
WARNING: The unit is factory set with video output on HDMI, if you want to use the
composite AV output (cable not included), rst connect the unit to a TV via HDMI and then
from the menu “Settings”/“Advanced Settings”/“Display”/“Screen resolution“, select the
video resolution to 480 or 576.
Bluetooth remote control pairing:
For the rst time, you must pair your Bluetooth remote control supplied with the device.
Press and hold for 5 seconds the keys V- (14) and PG- (18). The red light on the remote
ashes to indicate successful pairing.
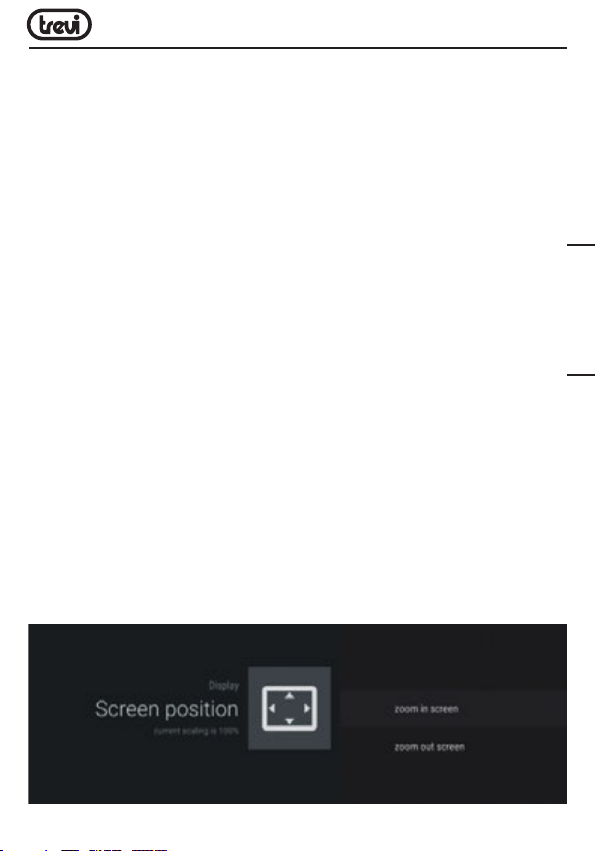
Regulation framework:
At rst power you need to set some parameters such as language, the connection to the
network and regulation of the framework.
Adjust the image according to your TV; to adjust the picture, select “Setting”- “Display”-
“Screenposition”. Select “Zoom out” to tighten, select “Zoom in” to enlarge.
ENGLISH
19
Page 20
HOME SCREEN
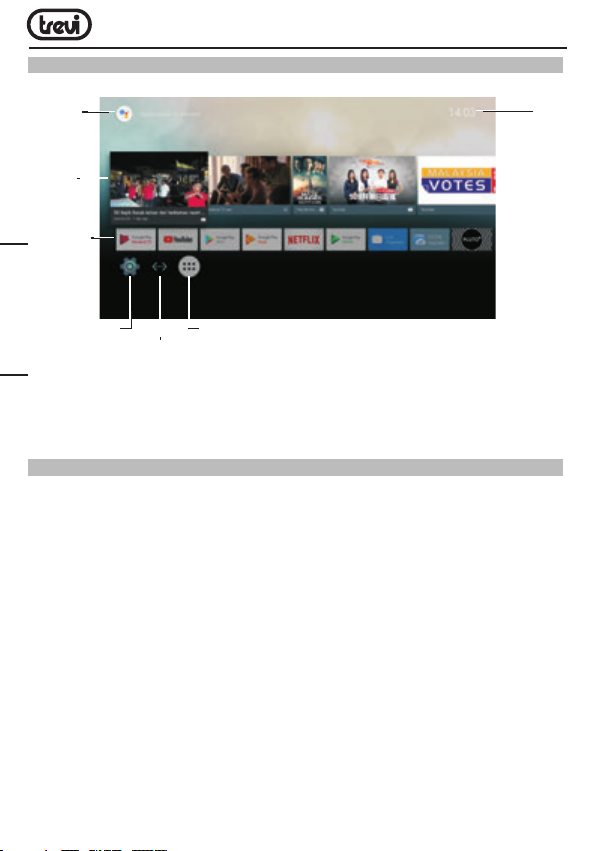
This screen displays all functions that the device can handle.
Voice
search
indicator
Videos
tips to
display
Direct link
installed
apps
IP 380 V1
Date and
time
Settings
ENGLISH
Network
connection status
List installed apps
(App Drawer)
Note: The user can select the applications with the navigation keys (11) and open them
with the OK (12) button, or by pressing the mouse (10), an arrow will appear which you
can move quickly using the navigation keys (11) and conrming with OK (12).
CONNECTION TO NETWORKS
To access the Internet, rst of all, it is necessary to set up a network using a Wi-Fi Access
Point (AP) or cable connection via LAN port.
Connection via LAN socket:
• Connect the LAN cable coming from your modem router, the LAN socket (2) unit.
• Select the “Setting”- “Network”.
• Select Ethernet and wait for the message “Connected” appears under the item “internet
connection”.
Search and connect to a Wi-Fi network:
To make a connection of this type must be in a Wi-Fi zone.
• Select “Setting”- “Wi-Fi”.
Enabling/disabling Wi-Fi:
• Select “Wi-Fi”, the unit will automatically activate a search of available Wi networks
and will show on the TV.
20
Page 21
IP 380 V1
• Select your favorite network and conrm with OK (12), if protected, enter the password
using the virtual keyboard.
• Click the Enter key on your keyboard and wait until you see the message “Connected
successfully.”
• To disable the network: select the network connection and then the command “Delete
network”.
VOICE SEARCH
• To enable the voice assistant of IP 380 V1 on the Home screen, you must hold the
VOICE CONTROL button (19) and make your voice prompt, bringing the remote control
near your mouth. Displays video and content about the request made.
• To enable the voice assistant of IP 380 V1 in applications such as Youtube, press the
button VOICE CONTROL (19) to activate the search and then press and hold the same
button for making your voice prompt, always bringing the remote close the mouth.
SPECIAL FUNCTIONS
This device is equipped with features like BLUETOOTH, MIRACAST, AIRPLAY and MEDIA
CENTER for sending and receiving les without the use of cables.
BLUETOOTH:
IP 380 V1 is equipped with a Bluetooth system for transmitting/receiving les between the
device and other devices with this feature.
Bluetooth Activation:
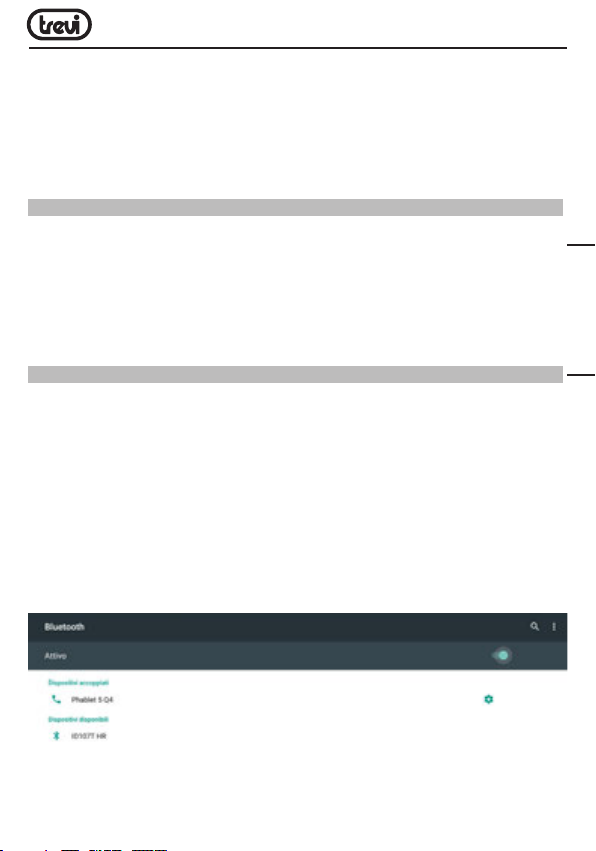
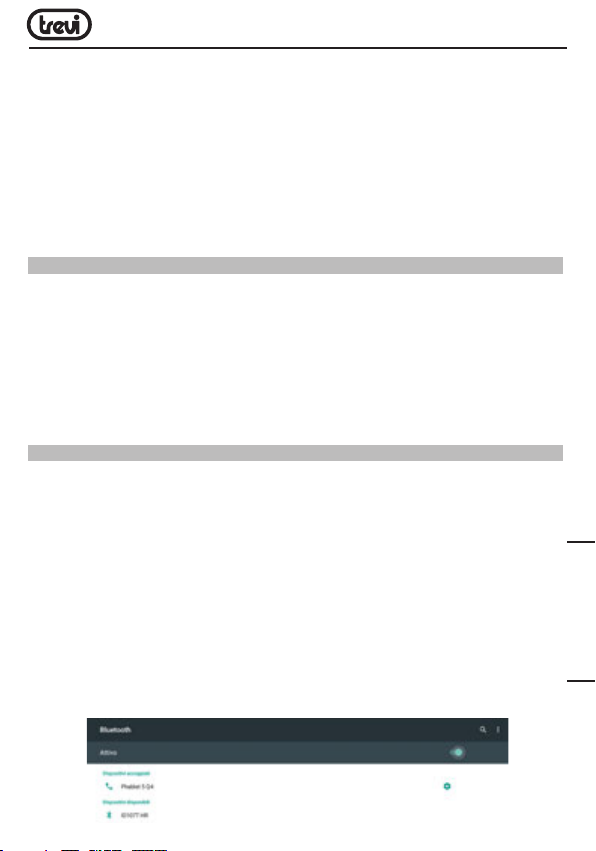
• From the main page click “Settings” - “More settings” and select the “Bluetooth” icon.
Turn Bluetooth bringing ON (turn green) the switch in the upper right.
• To turn off the Bluetooth connection, bring the command to OFF (becomes colored
Grey).
ENGLISH
21
Page 22

IP 380 V1
Search devices:
• Once activated Bluetooth, the device will automatically star t a search of available devices.
If you want to perform a new search, select command “Refresh” after you press the
Menu button (16) on the remote control.
• You will see a list of all devices available.
Pairing with devices:
• From the list displayed select the device to be coupled. Af ter connection under the name
of the device will display “Connected”.
• If a PIN is required, this should be indicated in analyzer which you’re trying to pair, if
not try “0000” or “1234”.
• After mating is possible to transmit/receive les between IP 380 V1 and other devices.
MIRACAST:
Miracast is a new standard for transmission of multimedia les (photos, video and music)
ENGLISH
without cable, which allows the user to connect via Wi-Fi Direct technology an Android
device to the TV last generation. With Miracast your device will be closely connected to
the TV screen and will need to keep the display on the smartphone or tablet to view its
screen directly on TV.
CAUTION: TO OPERATE PROPERLY, SMARTPHONE OR TABLET MUST HAVE AS SYSTEM
REQUIREMENTS OS ANDROID 4.2.2 OR HIGHER WITH WIRELESS DISPLAY SUPPORT.
Miracast Activation:
• Connect the IP 380 V1 and the external device (smartphone or tablet) to the same Wi-Fi
network.
• On your external device (smartphone or tablet), activate the function Miracast or “Wireless
Display” or Mirroring Display“(refer to the instructions manual of your device for the
correct name and the activation procedure).
• On IP 380 V1, from the main page click “Apps” and select the icon Miracast. The
unit will search for devices.
• On external device (Smartphone or Tablet) appear Trevi IP 380 V1, select it.
• The TV will show a conrmation screen, select OK and wait a few second for the
connection. Now all the images on External device will appear on the TV.
Disabling Miracast:
• On the external device (smartphone or tablet) select Trevi IP 380 V1 and select
“Disconnect”.
22
Page 23
IP 380 V1
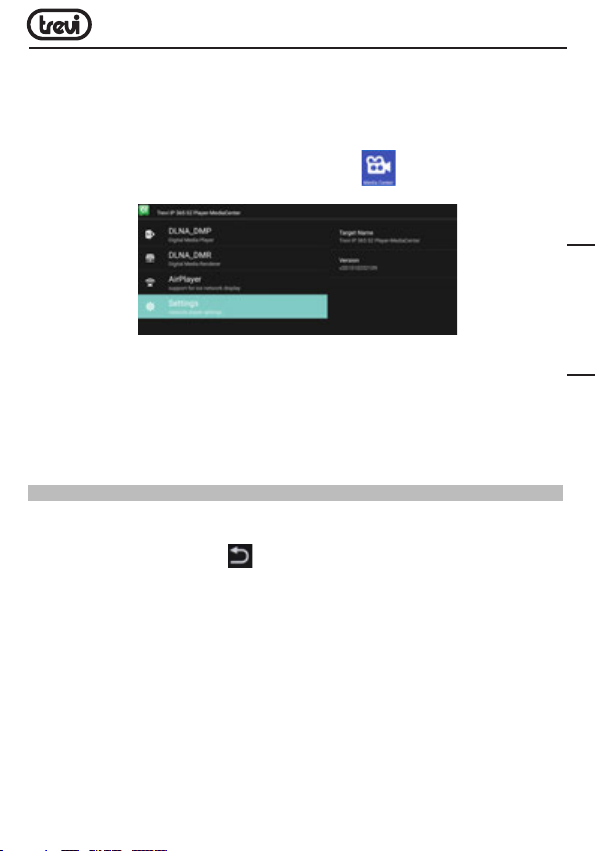
MEDIA CENTER:
This function allows you to view directly on your TV les on other devices (such as PC or
console) connected by DLNA network or AIRPLAY (for Apple devices).
Note: The connected devices must be turned on in order to choose and view les using
IP 380 V1.
• From the main page select “Apps” icon and select Media Center icon, you will
open the following screen:
• Selecting DLNA_DMP (Digital Media Player) will display the list of devices networked,
just select the one you want to display the le that contains and play them on TV.
• Selecting DLNA_DMR (Digital Media Rendered) you can set the DMR.
• Select AirPlayer if you have Apple devices. AirPlayer is an Apple‘s application dedicated users.
With AirPlayer you can play the image and videos of your apple device directly on TV.
Note: The AirPlay function can be precluded due to continuous iOS software updates).
SETTING
The “Settings” menu allows you to congure or change the settings of your Android device.
• From main page select “Setting” - “More settings”. To return to the previous page or
to cancel a command, press BACK (17) on the remote control.
NETWORK
To activate and search Wi-Fi networks. This will display a available Wi-Fi networks list,
choose one and enter the password if required.
SOUND
Enables or disables the audio of the system device’s and sets the audio surround.
APPS
You can manage the various applications on the device. To delete an application just select
it and tap “Uninstall”.
SCREENSAVER
Displays how to use the screensaver.
ENGLISH
23
Page 24

IP 380 V1
STORAGE & USB
You can control the space used and free ones in the internal memory of the device, those
of any Micro SD card installed and perform safe removal or deletion of the Micro SD card.
NOTE: The Pre-installed applications and the operating system Android OS occupy a
considerable part of the capacity of the internal memory of the device, so it is normal to
have a difference between “Free storage space” and “Total space”.
ABOUT PHONE
Selecting this item, you can view all the information you need on the device.
ADVANCED SETTINGS
Selecting this item is possible to display all the advanced settings related to the unit, such as:
Display (screen resolution, screen position (zoom in / out), HDR function), HDMI CEC,
Playback, Sound, Power on/off button function, Bluetooth remote control update, access
to other settings.
DATE & TIME
ENGLISH
you can set the date and time of the device, the time zone and format.
LANGUAGE & INPUT
you can set the desired language, spelling, set some functions of the virtual keyboard and
the pointer speed.
RESEARCH AND VOICE
Selecting this item you can set some parameters on the search and voice usage.
ACCESSIBILITY
Selecting this item you can set some parameters of use of the appliance by people with
disabilities.
BLUETOOTH
To turn on and search Bluetooth devices.
LOCATION
To allow or disallow the sending of your location data for Google search results and other
Google services.
SECURITY
Security. Settings for installing third-party apps and testing of potentially dangerous Apps.
DATA USAGE
Setting to consent or not to send diagnostic data to Google.
ACCOUNT
Show how many and which accounts were registered on the device.
24
Page 25

IP 380 V1
PRECAUTION FOR CORRECT DISPOSAL OF THE PRODUCT
Precautions for correct disposal of the product.
The symbol shown on the equipment indicates that waste must be disposed of in
“separate collection” and so the product must not be disposed of together with urban waste.
The user must take the product to special “separate waste collection centres” provided
by local government, or deliver it to the retailer against the purchase of a new product.
Separate collection of waste and subsequent treatment, recycling and disposal operations
promotes the production of equipment with recycled materials and limits negative effects
on the environment and on health caused by improper handling of waste.
Illegal disposal of the product leads to the enforcement of administrative penalties.
TREVI pursues a policy of continuous research and development, the product may show
different characteristics from those described.
TECHICAL SPECIFICATION
CPU ................................................................... AMLOGIC S905W, Quad Core, ARM Cortex A53
CPU FREQUENCY
RAM
.................................................................. 2GB
MEMORY
OPERATIV SYSTEM
CLASS POWER BLUETOOTH
POWER TRANSMITION BLUETOOTH
MAX POWER TRANSMITION BLUETOOTH
BAND TRANSMITION BLUETOOTH
WIFI STANDARD
FREQUENCY
...................................................................... 2422-2462MHz (802.11n HT40)
RF OUTPUT POWER (EIRP)
MODULATION
FUNCTION’S MODULATION
CLASS
CONNECTIVITY’ WIRELESS MOUSE
SENSOR OPTICAL MOUSE
INTERFACE
POWER
DIMENSIONS
WEIGHT
...............................................2GHz, 64bit
........................................................... 16GB
............................................ Android 7.1
..............................2
.................. 1,9mW
.......... 2,5mW
..................... 2,4GHz
................................................ 802.11 b/g/n (2,4GHz)
...................................................... 2412-2472MHz (802.11b/g/n HT20)
................................ 11.78 dBm
.................................................... DSSS; OFDM
................................ DUPLEX
............................................................... CLASSE 1
................... 2,4GHz
................................. 800 - 1600 DPI
........................................................ USB(x2), Slot Micro SD Card, RJ45, HDMI, Optical
..............................................................5V 2A
..................................................... 104x104x21mm
............................................................. 116g
ENGLISH
25
Page 26
IP 380 V1
3.2 Con nec t TV bo x to TV a nd co nnect network
CONSIGNES DE SECURITE’IMPORTANTES
• Se il vous plaît lire et conserver ces instructions
• Pour réduire le risque de choc électrique, ne pas retirer le couvercle ou le dos. Il y a
pièce réparable par l’utilisateur. Contactez personnel qualié.
• Pour éviter un incendie ou d’électrocution, ne pas exposer l’appareil à la pluie ou à
l’humidité.
• Ne pas exposer à l’eau (gouttes ou des éclaboussures) et au objet rempli de liquides,
tels que des vases, doit être placé sur l’appareil.
• Conserver le produit loin des sources de la lumière du soleil et de chaleur telles que
des radiateurs ou des poêles.
• Ne pas bloquer les ouvertures de ventilation. Les fentes et ouvertures sont prévues
pour l’unité ventilation. Les ouvertures ne doivent jamais être bloquées en plaçant le
produit sur un oreiller, canapé ou toute autre surface similaire.
• Ne pas placer le produit sur instable panier, support, trépied, un support ou une table.
L’unité peut tomber, causant des dommages ou des blessures.
• Utilisez uniquement l’adaptateur secteur fourni avec le produit. Utiliser tout autre
adaptateur peut annuler garantie.
• Couper l’alimentation de la prise lorsque l’appareil ne est pas utilisé.
• Il attire l’attention sur les aspects environnementaux de l’élimination de la batterie.
• AVERTISSEMENT: La batterie (ou les batteries ou de la batterie) ne doivent pas être
exposés à des la chaleur excessive comme le soleil, un feu ou similaire.
• AVERTISSEMENT: utiliser uniquement les pièces/ accessoires spéciés fourni par le
fabricant, le produit est équipé d’un adaptateur secteur.
FRANÇAISE
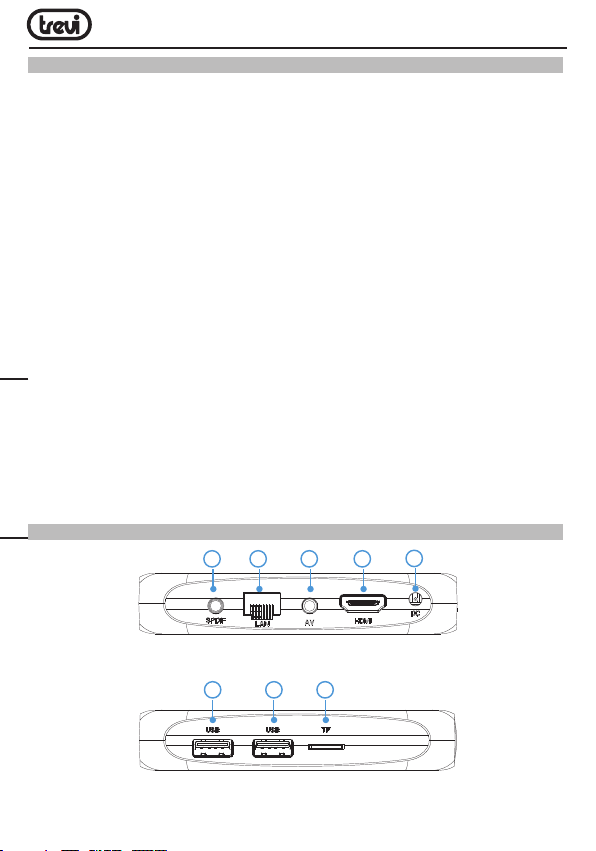
DESCRIPTION COMMANDES DE L’UNITÉ / TÉLÉCOMMANDE
1 2 3 4
5
8
76
1. Prise sortie OPTIQUE NUMÉRIQUE: Pour connecter l’appareil à votre système à
audiofréquences surround.
26
Page 27
IP 380 V1
Voice Control: Hold it to
aactive and voice input
demands to search for
the information.
Remark: when you use
voice search function in
apps like youtube, please
click the voice knob in
remote to activate first, then
long press to input voice
command
IP 380 V1
2.2 Use your mobile phone to control the Box
N11 Android box and your mobile phone have to connect to the same Wi-Fi
from one router before download.
For IOS: Download“Android TV Remote”from APP STORE
For Android: Download“Android TV Remote”from Google Play store
Download and open the app,choose“IP 380 V1” on your phone and follow the prompts
and enter the code popping up on the screen to pair your phone with the box
and remote.(Some Iphone IOS will not support using touch mode and Voice
commands to search for the content).
2. Ethernet LAN RJ45: 10/100Mb, interface Ethernet pour connexion au réseau local.
3. Sortie AV: Sortie signal vidéo composite (CVBS) et signal audio L/R (disponible
uniquement avec résolutions vidéo 480i ou 576i). Câble non fourni.
4.
Prise HDMI: Sortie vidéo pour connexion à HDTV.
5. Prise d’alimentation CC IN 5V: Brancher l’alimentateur fourni.
6,7. Prises USB : Pour connecter des dispositifs USB externes tels que clés mémoire,
disques durs externes, souris sans l, clavier sans l, etc.
8. Emplacement pour la lecture de la mémoire de la carte SD Micro.
Installation des batteries :
Ôter le couvercle au dos de la télécommande, introduire 2 batteries en format « AAA »
ayant soin de respecter la polarité indiquée, et remettre le couvercle.
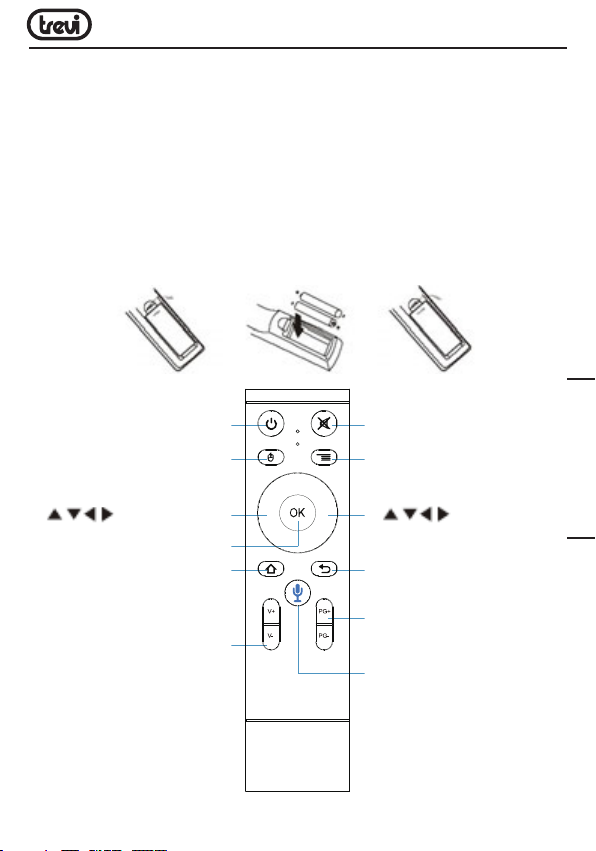
9. BOUTON POWER: Commande Allumage/
Mise.
10. BOUTON MOUSE: Pour activer le
déplacement rapide avec curseur (se
servant des touches de navigation),
presser de nouveau pour activer le
déplacement d’un caractère à la fois.
11. Touches de navigation et
déplacement.
12. BOUTON OK: Touche de conrmation.
13. BOUTON HOME: Pour revenir à la page
principale (Home).
14. BOUTONS V+/V-: Réglage de volume.
15. BOUTON MUTE: Pour désactiver le signal
audio TV, presser de nouveau pour le
réactiver.
16. BOUTON MENU: Pour ouvrir le dossier
sous-menu dans certaines applications/
fonctions.
11. Touches de navigation et
déplacement.
17. BOUTON BACK: Pour revenir à la page
qui précède.
18. BOUTONS PG+/PG-: Pour passer à la
page précédente / suivante.
19. BOUTON VOICE CONTROL: Tenez-le à la
demande d’entrée active et vocale pour
rechercher l’information.
Remarque: lorsque vous utilisez la
fonction de recherche vocale dans des
applications comme YouTube, cliquez sur
le bouton vocal de la télécommande pour
activer d’abord, puis appuyez longuement
pour entrer la commande vocale..
FRANÇAISE
27
Page 28
IP 380 V1
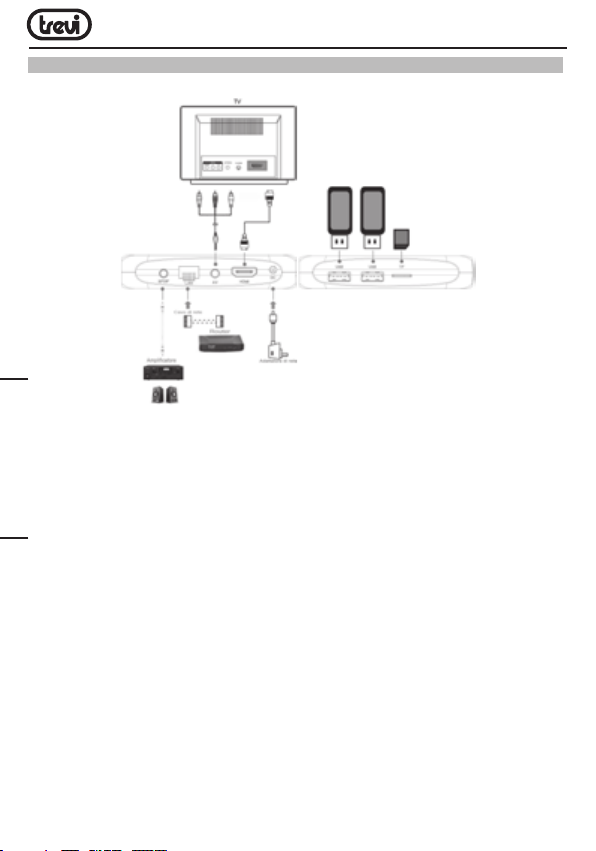
OPÉRATIONS DE BASE/INSTALLATION
Connexions:
Installation/marche/arrêt:
• Pour allumer le dispositif, brancher l’alimentateur fourni avec l’IP 380 V1 à la prise
d’alimentation (5) et l’autre extrémité à la prise du réseau. Il s’allume automatiquement
et l’écran s’allume.
• Brancher une extrémité du câble HDMI à l’IP 380 V1 sur la prise (4), brancher l’autre
extrémité à la prise HDMI de votre TV.
FRANÇAISE
• Allumez la télévision et attendre quelques secondes pour que l’appareil charge le système
d’exploitation.
• Appuyez sur le bouton d’alimentation (9) sur la télécommande pour mettre en mode
“veille” de l’appareil. De cette manière le signal vidéo sera éteint, mais le système
restera activé. L’afchage s’éteint. Appuyez sur le bouton d’alimentation (9) sur la
télécommande pour actionner l’unité.
• Appuyez et maintenez le bouton d’alimentation (9) sur la télécommande pour éteindre
en mode veille, l’appareil, sélectionnez Shutdown avec les touches de navigation (11)
et conrmez en appuyant sur OK (12). De cette façon, tout le système est éteint.
L’afchage s’éteint. Appuyez sur le bouton d’alimentation (9) de la télécommande de
l’appareil de chauffage.
ATTENTION: L’appareil est réglé en usine avec une sortie vidéo sur la prise HDMI; si on
souhaite utiliser la sortie composite AV (le cordon n’est pas compris), connecter d’abord
l’unité à un appareil TV via HDMI, ensuite dans le menu “Settings”/”Display”/”Screen
resolution” sélectionner la résolution Vidéo 480 ou 576.
28
Page 29
IP 380 V1
Jumelage de la télécommande Bluetooth:
Pour la première fois, vous devez apparier votre télécommande Bluetooth fourni avec l’ap-
pareil. Maintenez enfoncé pendant 5 secondes les touches V- (14) et PG- (18). La lumière
rouge sur la télécommande clignote pour indiquer un appariement réussi.
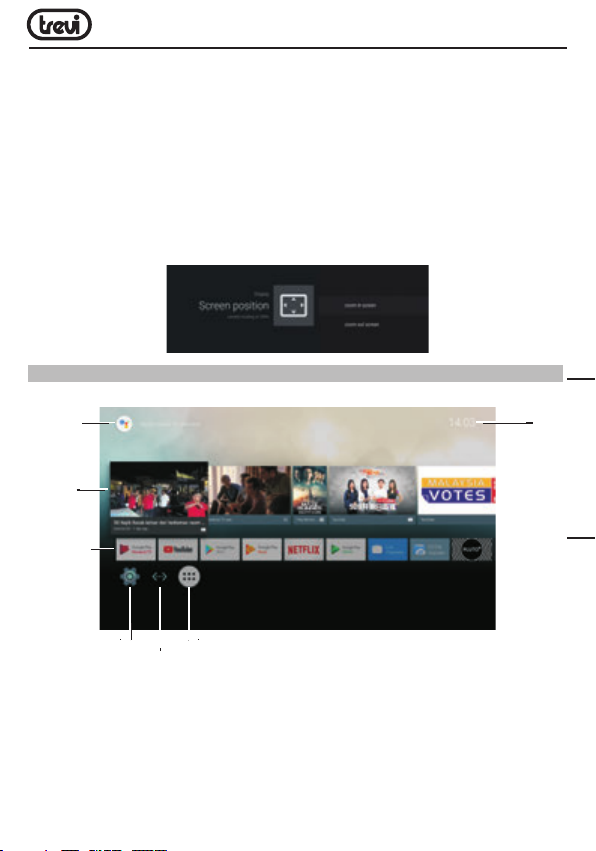
Réglage du cadre:
A première puissance dont vous avez besoin de régler certains paramètres tels que la
langue, la connexion au réseau et à la réglementation du cadre.
Ajustez l’image selon votre téléviseur; pour ajuster l’image, sélectionnez “Paramètres” - “Paramètres avancés” - “Afchage” - “Screenposition”. Sélectionnez “Zoom out” pour serrer,
sélectionnez “Zoom in” pour agrandir.
DESCRIPTION DE LA PAGE PRINCIPALE (écran d’accueil Home)
Cet écran afche toutes les fonctions que l’appareil peut gérer.
Indicateur
de recherche
vocale
Conseils
vidéos à
afcher
Lien direct
des apps
installées
Paramètres
État de la
connexion réseau
Liste installé apps
(App Drawer)
Remarque: L’utilisateur peut sélectionner les applications avec les touches de navigation
(11) et les ouvrir avec le bouton OK (12), ou en appuyant sur la souris (10), une èche
apparaîtra qui vous pouvez vous déplacer rapidement à l’aide des touches de navigation
(11) et en conrmant avec OK (12).
29
Date
et heure
FRANÇAISE
Page 30

IP 380 V1
CONNEXION AUX RÉSEAUX
Pour pouvoir accéder au réseau Internet il faut tout d’abord congurer un réseau qui peut
utiliser un point d’accès Wi-Fi (AP) ou un câble sur une prise LAN. Sélectionner cette option
pour accéder aux réglages Sans l et Ethernet.
Connexion par prise LAN:
• Brancher le câble réseau LAN de votre modem Routeur à la prise LAN (2) de l’unité.
• Sélectionner la fonction “Setting” - “Réseau”.
• Sélectionnez Ethernet et attendez le message “Connecté” apparaît sous la rubrique
“Internet connexion”.
Recherche et connexion à un réseau Wi-Fi:
Pour pouvoir activer une pareille connexion il faut se trouver dans une zone Wi-Fi.
• Sélectionner la fonction “Settings” -”Réseau”.
Activation/désactivation du Wi-Fi:
• Sélectionner l’option “Wi-Fi”. L’unité activera automatiquement une recherche des
réseaux Wi disponibles et montrera sur le téléviseur.
• Sélectionnez votre réseau préféré et validez avec OK (12), si elle est protégée, entrez
le mot de passe en utilisant le clavier virtuel.
• Cliquez sur la touche Entrée de votre clavier et attendre jusqu’à ce que vous voyez le
message «Connecté avec succès.”
• Pour désactiver le réseau: sélectionnez la connexion réseau, puis la commande
“Supprimer réseau.”
FRANÇAISE
VOICE SEARCH
• Pour activer l’assistant de voix de IP 380 V1 sur l’écran d’accueil, vous devez tenir le
bouton VOICE CONTROL (19) et rendre votre message vocal, ce qui porte la télécommande
près de votre bouche. Afche le contenu sur la demande formulée et vidéo.
• Pour activer l’assistant de voix de IP 380 V1 dans les applications telles que Youtube,
appuyez sur la touche VOICE CONTROL (19) pour activer la recherche puis appuyez
et maintenez enfoncé le bouton même pour faire votre message vocal, toujours ce qui
porte la fermeture à distance de la bouche.
30
Page 31
IP 380 V1
FONCTIONS SPÉCIALES
Cet appareil est pourvu de fonctions spéciales telles que BLUETOOTH, MIRACAST, AIRPLAY
et MEDIA CENTER qui permettent d’envoyer et de recevoir des chiers sans utiliser aucun
câble de raccordement.
BLUETOOTH:
IP 380 V1 est pourvu du système Bluetooth pour la transmission/réception de chiers entre
le dispositif et d’autres appareils pourvus, eux aussi, de cette même fonction.
Activation du Bluetooth:
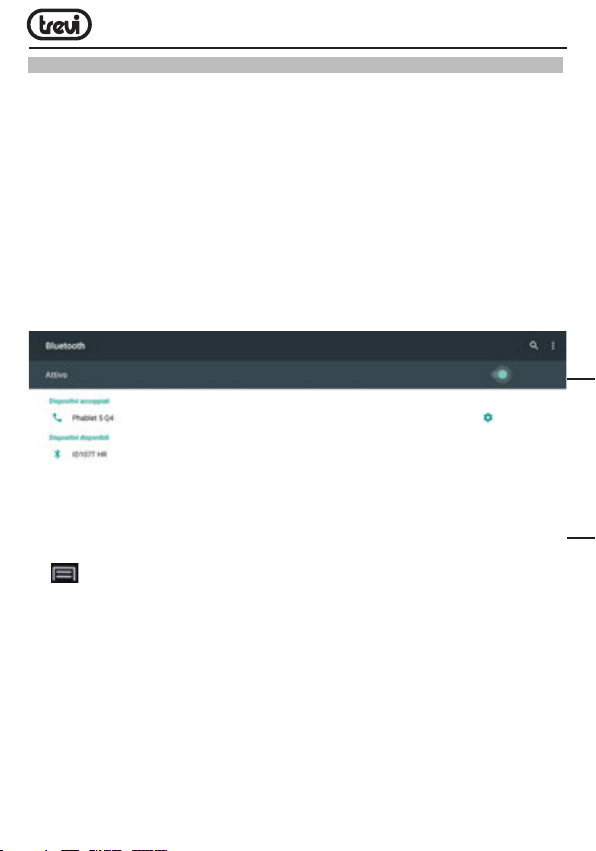
• Dans la page principale, cliquer sur “Settings” - “More settings” et sélectionner l’icône
“Bluetooth”. Pour activer le Bluetooth, passer l’interrupteur en haut à droite sur ON
(Devient vert).
• Pour désactiver la connexion Bluetooth, passer la commande sur OFF (Se colore gris).
Recherche de dispositifs:
• Une fois que la fonction Bluetooth est activée, l’appareil lance automatiquement une
recherche des dispositifs disponibles. Si on souhaite effectuer une nouvelle recherche,
sélectionner la commande “Actualiser ” en haut à droite après avoir appuyé sur le bouton
Menu (16) sur la télécommande.
• Vous verrez une liste de tous les périphériques disponibles.
FRANÇAISE
Accouplement avec les dispositifs:
• Dans la liste afchée, toucher le dispositif à accoupler. En n d’accouplement, le message
“Connexion” apparaît au-dessous du nom du dispositif.
• Si un code PIN est requis, celui-ci devrait être indiqué dans l’appareil avec lequel on
essaye d’effectuer l’accouplement ; si cela n’était pas le cas, essayer avec “0000” ou
“1234”.
• Après l’accouplement, il est possible de transmettre/recevoir les chiers entre l’IP 380
V1 et d’autres dispositifs.
31
Page 32
IP 380 V1
MIRACAST:
Miracast est un nouveau standard de transmission de chiers multimédiaux (photos, vidéo
et musique) qui ne requiert pas de câbles physiques ; grâce à la technologie Wi-Fi Direct,
il permet à l’utilisateur de connecter un dispositif Android à un téléviseur de la dernière
génération. Avec Miracast votre dispositif sera étroitement connecté à l’écran du TV, et il
sera nécessaire de garder l’afcheur du smartphone ou de la tablette allumé pour que son
écran soit visible directement sur le TV.
ATTENTION: POUR QUE LE DISPOSITIF IP 365 FONCTIONNE CORRECTEMENT, LES CONDITIONS DE SYSTÈME DE VOTRE SMARTPHONE OU DE VOTRE TABLETTE DOIVENT ÊTRE
OS ANDROID 4.2.2 OU SUPÉRIEUR AVEC SUPPORT WIRELESS DISPLAY.
Activation de Miracast:
• Connecter l’IP 380 V1 et le dispositif externe (Smartphone ou Tablette) au même réseau Wi-Fi.
• Sur le dispositif externe (Smartphone ou Tablette), activer la fonction Miracast ou
“Wireless Display” ou “Mirroring Display” (se référer aux instructions d’utilisation de
votre dispositif pour connaître le nom et la procédure d’activation corrects).
• Sur l’IP 380 V1, dans la page principale cliquer sur « Apps » et sélectionner l’icône
Miracast. L’appareil va effectuer une recherche des dispositifs.
• Sur le dispositif externe (Smartphone ou Tablette) l’option Trevi IP 380 V1 va apparaître:
la sélectionner.
• Sur le TV une page-écran de conrmation va apparaître; sélectionner OK et attendre
quelques secondes pour que la connexion soit activée. Toutes les images disponibles
FRANÇAISE
dans le dispositif externe sont maintenant afchées sur le TV.
Désactivation de Miracast:
• Sur le dispositif externe (Smartphone ou Tablette), sélectionner Trevi IP 380 V1 et
ensuite “Disconnect”.
MEDIA CENTER:
Cette fonction vous permet d’afcher directement sur votre TV des chiers disponibles
dans d’autres dispositifs (tels que PC ou console) et connectés via le réseau DLNA ou
AIRPLAY (pour les appareils Apple).
Remarque: Les dispositifs connectés doivent être allumés pour qu’il soit possible de
choisir et d’afcher les chiers à l’aide de l’IP 380 V1.
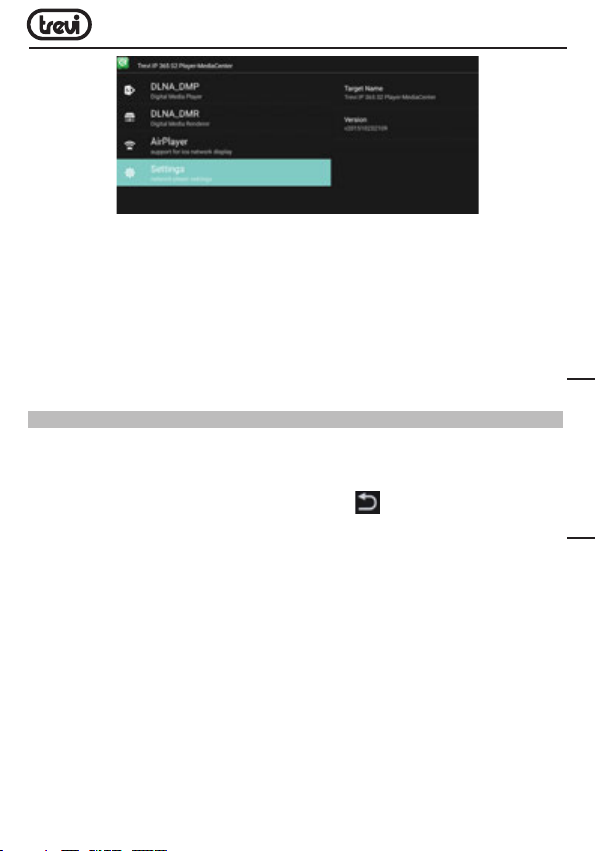
• Dans la page principale cliquer sur « Apps » et sélectionner l’icône Media Center,
la page-écran suivante va s’ouvrir:
32
Page 33
IP 380 V1
• Sélectionner DLNA_DMP (Digital Media Player) pour que la liste des dispositifs connectés
au réseau s’afche; il suft de sélectionner celui que l’on veut pour afcher les chiers
qu’il contient et les lire sur le TV.
• Sélectionner DLNA_DMR (Digital Media Rendered) pour congurer le DMR.
• Sélectionner AirPlayer si on dispose d’appareils Apple. AirPlayer est une application
dédiée aux utilisateurs d’appareils Apple. Grâce à l’AirPlayer on arrive à lire les vidéos
des dispositifs Apple directement sur le TV. Congurer les paramètres.
Remarque: La fonction AirPlay peut être exclue en raison de mises à jour logicielles
en continu iOS).
PARAMETRES
Le menu “More setting” vous permet de congurer ou de modier les paramètres de votre
appareil à partir d’Android.
• Sur la page principale, cliquez sur “Settings” - “More Settings”. Pour revenir à la page
précédente ou d’annuler une commande, appuyez sur BACK (17) sur la télécommande.
RÉSEAU
Afche le LAN ou Wi-Fi connectée ou disponible.
SON
Active ou désactive l’audio de l’appareil système et dénit l’habillage audio.
APPLICATIONS
En sélectionnant cette option, vous pouvez gérer les différentes applications sur l’appareil.
Pour supprimer une «demande suft de le sélectionner et tapez la commande ”Désinstaller“.
ÉCONOMISEUR D’ÉCRAN
Afche l’utilisation de l’économiseur d’écran.
STOCKAGE
En sélectionnant cette option, vous pouvez contrôler l’espace utilisé et celles qui sont libres
dans la mémoire interne de l’appareil, ceux de ne importe quelle carte Micro SD installé et
effectuer la dépose en toute sécurité ou la suppression de la carte Micro SD.
33
FRANÇAISE
Page 34

IP 380 V1
NOTE: Les applications pré-installées et le système d’exploitation OS Android occupent une
partie considérable de la capacité de la mémoire interne de l’appareil, il est donc normal
d’avoir une différence entre «l’espace de stockage libre» et «Espace total”.
À PROPOS DU TELEPHONE
En sélectionnant cette option, vous pouvez afcher toutes les informations dont vous avez
besoin sur le dispositif.
PARAMÈTRES AVANCÉS
En sélectionnant ce point est possible d’afcher tous les paramètres avancés liés à
l’appareil, tels que:
Afchage (résolution de l’écran, position de l’écran (zoom in / out), fonction HDR), lecture,
son, HDMI CEC, interrupteur marche/arrêt fonction de bouton, mise à jour de télécommande
Bluetooth, accès à d’autres environnements.
DATE ET HEURE
En sélectionnant cette option, vous pouvez régler la date et l’heure de l’appareil, le fuseau
horaire et le format.
LANGUE ET SAISIE
En sélectionnant cette option, vous pouvez sélectionner la langue désirée, l’orthographe,
dénir certaines fonctions du clavier virtuel et la vitesse du pointeur.
RECHERCHE ET VOIX
Sélectionnant ce point vous pouvez régler certains paramètres sur l’utilisation de la
recherche et de la voix.
FRANÇAISE
ACCESSIBILITÉ
En sélectionnant ce point, vous pouvez dénir des paramètres d’utilisation de l’appareil
par des personnes handicapées.
BLUETOOTH
Commande pour allumer et recherche les appareils Bluetooth.
LOCALISATION
Pour autoriser ou interdire l’envoi de vos données de localisation pour les résultats de
recherche Google et d’autres services Google.
SÉCURITÉ
Paramètres d’installation d’applications tierces et l’essai des applications potentiellement
dangereuses.
CONSOMMATION DES DONNÉES
Dénition de consentir ou non à envoyer des données de diagnostic à Google.
34
Page 35

IP 380 V1
COMPTES
Montrer combien et quels comptes ont été enregistrées sur l’appareil.
INFORMATIONS SUR L’ÉLIMINATION DES PRODUITS
Avertissements pour l’élimination correcte du produit.
Le symbole sur l’équipement indique que les déchets doivent être soumis à “collecte séparée”
de sorte que le produit ne doit pas être éliminé avec les déchets urbains.
L’utilisateur doit retourner le produit à des “centres de collecte” spéciaux fournis par le
gouvernement local, ou de le livrer au détaillant contre l’achat d’un nouveau produit.
La collecte sélective des déchets et les opérations ultérieures de traitement, la récupération et l’élimination aidera la production d’équipements avec des matériaux recyclés et
de réduire les effets négatifs sur l’environnement et la santé causés par une mauvaise
manipulation des déchets.
L’élimination inappropriée du produit implique l’application de sanctions administratives.
TREVI poursuit une politique de recherche et de développement continu, les produits peuvent
présenter des caractéristiques différentes de celles décrites.
TECHNICAL SPECIFICATIONS
CPU ................................................................... AMLOGIC S905W, Quad Core, ARM Cortex A53
CPU FRÉQUENCE
RAM
.................................................................. 2GB
MÉMOIRE
OPERATIV SYSTEM
CLASSE ÉNERGIE BLUETOOTH
PUISSANCE TRANSMITION BLUETOOTH
PUISSANCE MAX TRANSMITION BLUETOOTH
BAND TRANSMITION BLUETOOTH
WIFI STANDARD
FRÉQUENCE
...................................................................... 2422-2462MHz (802.11n HT40)
SORTIE DE PUISSANCE RF (EIRP)
MODULATION
FUNCTION’S MODULATION
CLASS
INTERFACE
PUISSANCE
DIMENSIONS ..................................................... 104x104x21mm
POIDS
............................................... 2GHz, 64bit
.......................................................... 16GB
............................................ Android 7.1
.......................... 2
........... 1,9mW
....2,5mW
..................... 2,4GHz
................................................ 802.11 b/g/n (2,4GHz)
...................................................... 2412-2472MHz (802.11b/g/n HT20)
.....................11.78 dBm
.................................................... DSSS; OFDM
................................ DUPLEX
............................................................... CLASSE 1
........................................................ USB(x2), Slot Micro SD Card, RJ45, HDMI, Optical
....................................................... 5V 2A
................................................................ 116g
FRANÇAISE
35
Page 36

IP 380 V1
WICHTIGE SICHERHEITSHINWEISE
• Lesen und speichern Sie diese Anweisungen
• Um das Risiko eines Stromschlags zu vermeiden, nicht die Abdeckung oder Rückseite
entfernen. Es gibt zu wartenden Teile. Kontaktieren qualiziertes Personal.
• Um Feuer oder Stromschlag zu vermeiden, darf das Gerät weder Regen noch Feuchtigkeit
ausgesetzt werden.
• Setzen Sie in das Wasser (Tropf- oder Spritzwasser) und keine mit Flüssigkeit gefüllten
Behälter, wie aussetzen wie beispielsweise Vasen, auf dem Gerät abgestellt werden.
• Halten Sie das Gerät vor direkter Sonneneinstrahlung und Wärmequellen wie Heizungen
oder Öfen.
• Die Lüftungsöffnungen dürfen nicht blockiert werden. Für Einheit Schlitze und Öffnungen
dienen Belüftung. Die Öffnungen sollten niemals durch Aufstellen des Gerätes auf einem
Kissen blockiert werden, Sofa oder ähnliche Oberächen.
• Das Produkt auf instabilen Wagen, Stand, Stativ, Halter oder Tisch aufstellen. Das Gerät
kann fallen, was zu Schäden oder Verletzungen führen.
• Verwenden Sie nur das Netzteil im Lieferumfang enthalten. Verwendung eines anderen
Adapters kann ungültig Garantie.
• Schalten Sie den Strom aus der Steckdose, wenn das Gerät nicht benutzt wird.
• Es lenkt die Aufmerksamkeit auf die Umweltaspekte der Batterieentsorgung.
• WARNUNG: Der Akku (Akku oder Batterien oder Akkus) nicht freigelegt werden großer
Hitze wie Sonnenschein, Feuer oder dergleichen.
• WARNUNG: Verwenden Sie nur Zusatzgeräte / Zubehör speziziert durch den Hersteller
zur Verfügung gestellt, Das Produkt wird mit einem AC-Adapter ausgestattet.
FRANÇAISE
36
Page 37
IP 380 V1
3.2 Con nec t TV bo x to TV a nd co nnect network
BESCHREIBUNG DER BEDIENELEMENTE / FERNBEDIENUNG
1 2 3 4
8
76
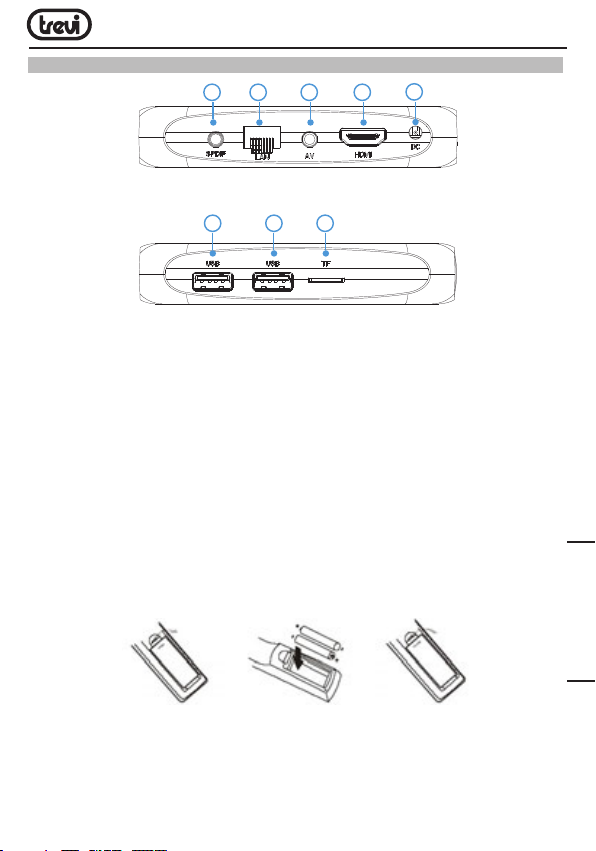
1. Buchse OPTISCHER DIGITAL-Ausgang: Für den Anschluss Ihres Audio-Surround Systems
am Gerät.
2.
RJ45 LAN-Ethernet: 10/100Mbs, Ethernet-Schnittstelle für Anschluss an lokales
Netzwerk.
3. AV-Ausgang: Ausgang Composite-Video-Signal (CVBS) und L/R-Audio-Signal (nur mit
480- oder 576-Videoauösung erhältlich). Kabel nicht mitgeliefert.
4. HDMI-Buchse: Videoausgang für Anschluss an HDTV.
5.
Buchse Versorgungseingang DC-IN 5V: Das mitgelieferte Netzgerät anschließen.
6,7. USB-Anschluss: Für den Anschluss externer USB-Geräte wie Speichersticks, externe
Festplatten, kabellose Mäuse, kabellose Tastaturen usw.
8. Slot für Lesegerät der Micro-SD-Speicherkarte.
Einsetzen der Batterien:
Entfernen Sie die Batterieabdeckung von der Fernbedienung und setzen Sie 2 x AAA-Batterien
in das Fach. Das Diagramm im Inneren des Batteriefachs zeigt den richtigen Weg, um die
Batterien zu installieren.
5
DEUTSCH
37
Page 38
IP 380 V1
Voice Control: Hold it to
aactive and voice input
demands to search for
the information.
Remark: when you use
voice search function in
apps like youtube, please
click the voice knob in
remote to activate first, then
long press to input voice
command
IP 380 V1
2.2 Use your mobile phone to control the Box
N11 Android box and your mobile phone have to connect to the same Wi-Fi
from one router before download.
For IOS: Download“Android TV Remote”from APP STORE
For Android: Download“Android TV Remote”from Google Play store
Download and open the app,choose“IP 380 V1” on your phone and follow the prompts
and enter the code popping up on the screen to pair your phone with the box
and remote.(Some Iphone IOS will not support using touch mode and Voice
commands to search for the content).
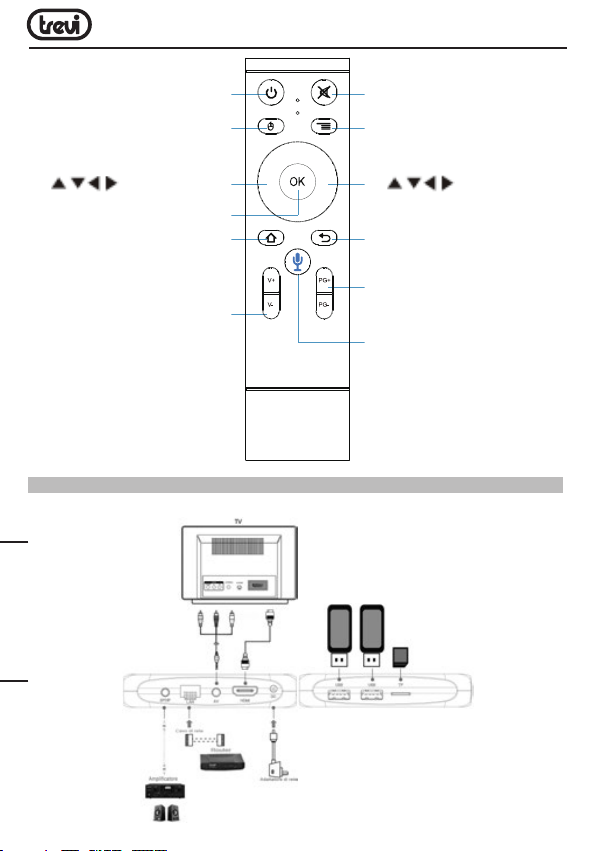
9. POWER-TASTE: Einschalten/Stand-by.
10. MOUSETASTE: Bewegt sich schnell
zu ermöglichen, indem Pfeil (mit
den Navigationstasten ), drücken
Sie erneut auf ermöglichen, den
Verdrängungsschritt.
11. Navigations- und
Bewegungstasten.
12. OK-TASTE: Bestätigungstaste.
13. HOME-TASTE: Zur Rückkehr zur Main
(Home) Seite.
14. V+/V- TASTEN: Lautstärkeregulierung.
WICHTIGSTE BEDIENUNGSVORGÄNGE/INSTALLATION
Anschlüsse:
15. MUTE-TASTE: Zurücksetzen Schallpegel.
16. MENU-TASTE: So öffnen Sie das
Untermenü Ordner bei bestimmten
Anwendungen/Funktionen.
11. Navigations- und
Bewegungstasten.
17. BACK-TASTE: Rückkehr zum vorherigen
Schritt/Exit.
18. PG+/PG- TASTEN: Um zur vorherigen /
nächsten Seite zu gelangen.
19. LAUTSTÄRKEREGLER: Halten Sie es an
aktive und sprachgesteuerte Eingaben,
um nach Informationen zu suchen.
Anmerkung: Wenn Sie die Sprachsuche
in Apps wie youtube verwenden, klicken
Sie zuerst auf den Voice-Knopf in der
Fernbedienung, um zuerst zu aktivieren,
und dann lange, um den Sprachbefehl
einzugeben.
DEUTSCH
38
Page 39

IP 380 V1
Installation/Power On/Off:
• Um das Gerät einschalten, schließen Sie das Netzteil an die Steckdose DC versorgt (5)
der IP 380 V1 und das andere Ende an die Steckdose. Es wird automatisch eingeschaltet
und das Display leuchtet auf.
• Schließen Sie ein Ende des HDMI-Kabels an die Buchse (4), das andere Ende an den
HDMI Buchse Ihres Fernsehers an.
• Schalten Sie den Fernseher ein und warten Sie einige Sekunden für das Gerät das
Betriebssystem lädt.
• Drücken Sie die Power-Taste (9) auf der Fernbedienung drücken, das Gerät im Sleep-
Modus zu bringen. Auf diese Weise wird das video-Signal abgeschaltet werden, aber
das System bleibt aktiviert. Die Anzeige wird ausgeschaltet. Drücken Sie die Power-Taste
(9) auf der Fernbedienung auf das Gerät wecken.
• Drücken Sie und halten Sie die Power-Taste (9) auf der Fernbedienung auf das Gerät
im Standby-Modus deaktivieren, wählen Shutdown mit den Navigationstasten (11) und
bestätigen Sie mit “OK” (12). Auf diese Weise ist das gesamte System deaktiviert. Die
Anzeige wird ausgeschaltet. Drücken Sie die Power-Taste (9) auf der Fernbedienung
das Gerät Heizungen.
ACHTUNG: Das Gerät wurde werksseitig mit Videoausgang an der HDMI-Buchse eingestellt.
Wenn Sie den Composite-AV-Ausgang (Anschlusskabel nicht inbegriffen) verwenden
wollen, schließen Sie die Einheit zuerst über HDMI an einen Fernseher an und wählen Sie
dann aus dem Menü “Settings”/”Display“/”Screen resolution“ aus. Wählen Sie entweder
die Videoauösung 480 oder 576 aus.
Bluetooth-Fernbedienung Paarung:
Zum ersten Mal müssen Sie Ihre Bluetooth-Fernbedienung im Lieferumfang des Geräts
koppeln. Drücken Sie und halten Sie für 5 Sekunden die Tasten V- (14) und PG- (18). Das
rote Licht an der Fernbedienung blinkt um erfolgreiche Paarung anzugeben.
Verordnung Rahmen:
Beim ersten Einschalten müssen Sie einige Parameter einstellen, wie die Sprache, die
Verbindung zum Netzwerk und die Regulierung des Rahmens.
Stellen Sie das Bild nach Ihren Fernseher; um das Bild zu korrigieren, wählen Sie “Settings”
- “Advanced Settings” - “Display” - “Screen position”. Wählen Sie “Zoom out” zu ziehen,
wählen Sie “Zoom in” zu vergrößern.
DEUTSCH
39
Page 40
IP 380 V1
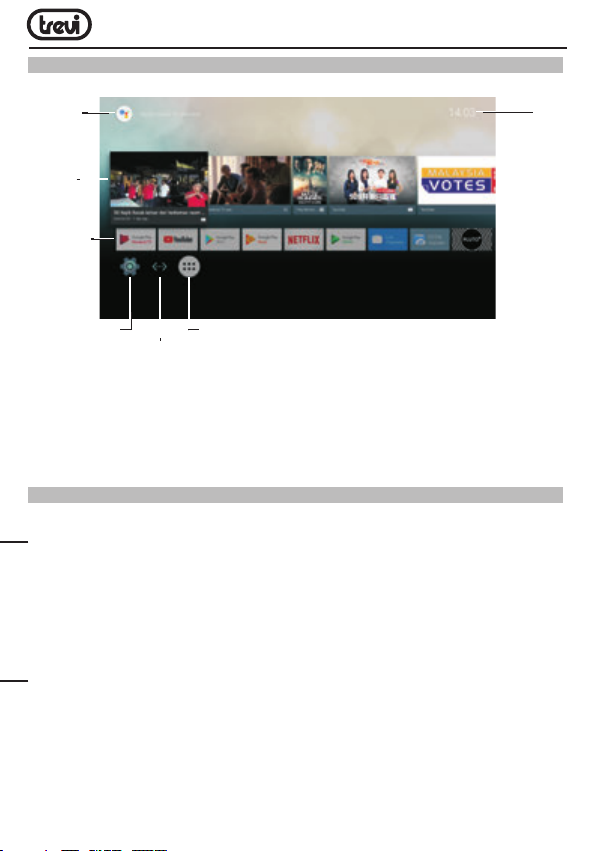
BESCHREIBUNG DER HAUPTSEITE (Bildschirmseite Home)
Dieser Bildschirm zeigt alle Funktionen, die das Gerät verarbeiten kann.
Stimme
Suche
Anzeige
Videos
Tipps
anzeigen
Direkter Link
installierte
Anwendungen
Datum und
Uhrzeit
Einstellungen
Netzwerkverbindungsstatus
Liste installierte apps
(App Drawer)
Hinweis: Der Benutzer kann die Anwendungen mit den Navigationstasten wählen (11), und
öffnen Sie sie mit der OK (12) drücken, oder indem Sie die Maus drücken (10), erscheint
ein Pfeil, die Sie schnell mit den Navigationstasten bewegen kann (11) und bestätigen
Sie mit OK (12).
ANSCHLUSS AN NETWORKS
Zugriff auf das Internet, ist es zunächst notwendig, Einrichten eines Netzwerks mit einem
WLAN-Access Point (AP) oder Kabel-Verbindung per LAN-Anschluss.
Anschluss über LAN-Buchse:
• Das LAN-Netzwerkkabel aus dem Modem-Router an die LAN-Buchse (2) der Einheit
anschließen.
• Wählen Sie die “Einstellung” - “Netzwerk”.
• Wählen Sie Ethernet und warten, bis die Meldung “Verbunden” erscheint unter dem
DEUTSCH
Punkt “Internet Verbindung “.
Suchen und eine Verbindung zu einem WLAN-Netzwerk:
Um eine derar tige Verbindung herzustellen, muss man sich in einem WLAN-Bereich benden.
• Wählen Sie “Einstellungen” - “Wireless-LAN”.
40
Page 41
IP 380 V1
WLAN aktivieren/deaktivieren:
• Wählen Sie “Wi-Fi”, wird das Gerät automatisch aktiviert eine Suche nach verfügbaren
WLAN-Netzwerken und wird auf der TV-Show.
• Wählen Sie Ihre Lieblings-Netzwerk und bestätigen Sie mit OK (12), wenn geschützt,
geben Sie das Passwort über die virtuelle Tastatur.
• Klicken Sie auf die Enter-Taste auf Ihrer Tastatur und warten Sie, bis die Meldung
“erfolgreich verbunden”.
• Um das Netzwerk zu deaktivieren: Wählen Sie die Netzwerkverbindung und dann den
Befehl “Netzwerk löschen”.
SPRACHSUCHE
• Um Sprachassistent IP-380 v1 auf dem Home-Bildschirm zu aktivieren, müssen Sie
halten Sie die VOICE CONTROL-Taste (19) und Ihre Ansage zu machen, bringen die
Fernbedienung in der Nähe Ihrer Mündung. Zeigt video und Inhalt über den Antrag.
• Um die Stimme-Assistent des IP-380 V1 in Anwendungen wie Youtube zu aktivieren,
drücken Sie die VOICE CONTROL-Taste (19), aktivieren Sie die Suche und drücken dann
die gleiche Taste dafür, dass Ihre Ansage immer bringen die Fernbedienung schließen
den Mund zu halten.
SONDERFUNKTIONEN
Dieses Gerät ist mit Sonderfunktionen wie BLUETOOTH, MIRACAST, AIRPLAY und MEDIA
CENTER für das Senden und Empfangen von Dateien ohne Verwendung von Verbindungskabeln ausgestattet.
BLUETOOTH:
IP 380 V1 verfügt über ein Bluetooth-System zum Übertragen/Empfangen von Dateien
zwischen dem Gerät und anderen Geräten, die ebenfalls mit dieser Funktion ausgestattet sind.
Bluetooth-Aktivierung:
• Von der Hauptseite klicken Sie auf “Settings” - “More setting” und wählen Sie das Symbol
“Bluetooth”. Schalten Sie Bluetooth bringen ON (leuchtet grün), um den Schalter in der
oberen rechten Ecke.
• So schalten Sie die Bluetooth-Verbindung aus, bringen den Befehl OFF (wird farbig grau).
41
DEUTSCH
Page 42

IP 380 V1
Geräte suchen:
• Einmal aktiviert Bluetooth, wird das Gerät automatisch eine Suche nach verfügbaren
Geräten zu starten. Wenn Sie eine neue Suche durchführen möchten, wählen Sie Befehl
“Aktualisieren”, nachdem Sie die Taste Menü-Taste (16) auf der Fernbedienung.
• Hier nden Sie eine Liste aller Geräte verfügbar zu sehen.
Pairing mit Geräten:
• Aus der angezeigten Liste wählen Sie das Gerät gekoppelt werden. Nach der Verbindung
unter dem Namen des Geräts erscheint auf dem Display “Connected”.
• Wenn eine PIN erforderlich ist, sollte dies im Gerät angezeigt werden, die Sie für das
Paar sind versuchen, wenn nicht versuchen, “0000” oder “1234”.
• Nach der Paarung möglich ist, zum Senden / Empfangen von Dateien zwischen IP 380
V1 und anderen Geräten.
MIRACAST:
Miracast ist ein neuer Übertragungsstandard für Multimedia-Dateien (Fotos, Videos und
Musik), der keinerlei physischer Kabel bedarf und der dem Nutzer den Anschluss eines
Android-Gerätes mittels Wi-Fi Direct-Technik an das Fernsehgerät der jüngsten Generation
ermöglicht. Mit Miracast ist Ihr Gerät mit den Bildschirm des TV-Gerätes verbunden und
das Display des Smartphones oder des Tablets muss eingeschaltet bleiben, damit sein
Bildschirm direkt auf dem TV-Gerät angezeigt wird.
ACHTUNG: FÜR DIE EINWANDFREIE FUNKTION DES GERÄTES IST ES FÜR IP 365
ERFORDERLICH, DASS DAS SMARTPHONE ODER DAS TABLET DIE FOLGENDEN SYSTEMANFORDERUNGEN ERFÜLLT: OS ANDROID 4.2.2 ODER HÖHER MIT UNTERSTÜTZUNG
FÜR DAS WIRELESS DISPLAY.
Miracast-Aktivierung:
• Verbinden Sie IP 380 V1 und das externe Gerät (Smartphone oder Tablet) mit dem
gleichen WLAN-Netzwerk.
• Aktivieren Sie an Ihrem externen Gerät (Smartphone oder Tablet) entweder die Miracast
Funktion oder „Wireless Display“ oder „Mirroring Display“ (für den korrekten Namen
DEUTSCH
und den Aktivierungsvorgang das Bedienungshandbuch Ihres Gerätes heranziehen).
• Bei IP 380 V1 auf der Hauptseite auf „Apps“ klicken und das Miracast-Symbol
auswählen. Das Gerät führt einen Gerätesuchlauf durch.
• Auf dem externen Gerät (Smartphone oder Tablet) erscheint Trevi IP 380 V1. Wählen
Sie diese Angabe aus.
• Auf dem TV erscheint ein Bestätigungsbildschirm. Wählen Sie OK aus und warten
Sie einige Sekunden lang auf die Aktivierung der Verbindung. Die im externen Gerät
vorhandenen Bilder werden nun auf dem TV-Gerät angezeigt.
42
Page 43
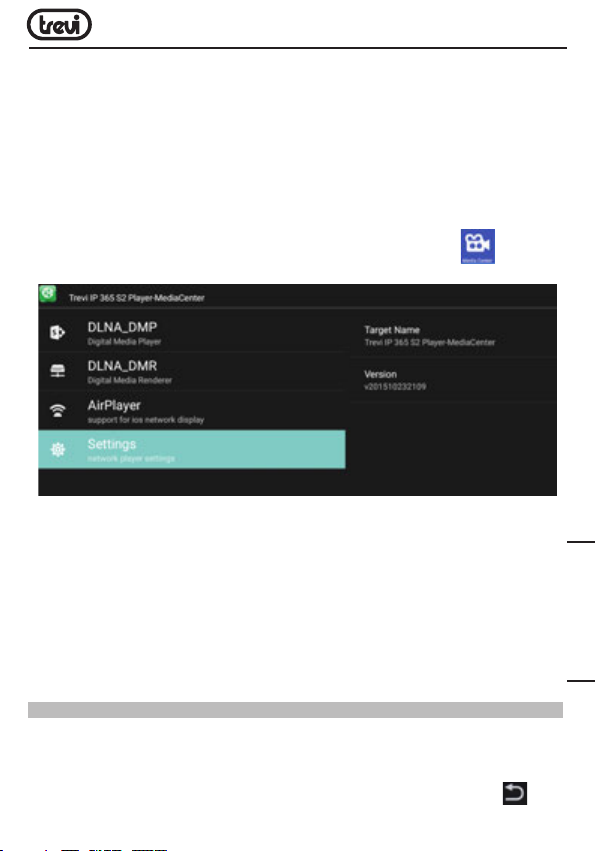
IP 380 V1
Miracast-Deaktivierung:
• Auf dem externen Gerät (Smartphone oder Tablet) wählen Trevi IP 380 V1 und wählen
Sie “Disconnect”.
MEDIA CENTER:
Mit dieser Funktion können Sie direkt auf Ihrem TV-Dateien auf anderen Geräten (wie PC
oder Konsole) verbunden DLNA-Netzwerk oder AIRPLAY (für Apple-Geräte) zu sehen.
Hinweis: Die verbundenen Geräte müssen eingeschaltet werden, damit die Dateien unter
Verwendung von IP 380 V1 ausgewählt und angezeigt werden können.
• Auf der Hauptseite auf “Apps“ klicken und das Media Center-Symbol auswählen.
Es erscheint die folgende Bildschirmansicht:
• Durch Auswahl von DLNA_DMP (Digital Media Player) wird die Liste der vernetzten
Geräte angezeigt. Einfach nur das gewünschte Gerät auswählen, um die darin enthaltenen
Dateien anzeigen und diese auf dem Fernseher wiederzugeben.
• Durch Auswahl von DLNA_DMR (Digital Media Rendered) kann der DMR eingestellt werden.
• AirPlayer auswählen, wenn man über Apple-Geräte verfügt. AirPlayer ist eine den Apple
Anwendern vorbehaltene Applikation. Mit AirPlayer können die Videos der Apple-Geräte
direkt auf dem Fernseher abgespielt werden. Die Einstellungen anpassen.
Hinweis: Die AirPlay-Funktion kann es aufgrund einer kontinuierlichen) iOS SoftwareUpdates ausgeschlossen.
DEUTSCH
EINSTELLUNGEN
Das Menü “Settings” können Sie die Einstellungen von Ihrem Android-Gerät zu kongurieren
oder zu ändern.
• Von der Hauptseite, klicken Sie auf “Settings” - “More settings”. Um zur vorherigen
Seite zurückzukehren oder um einen Befehl, drücken Sie die Eingabetaste BACK
(17) auf der Fernbedienung.
43
Page 44

IP 380 V1
NETZWERK
Zeigt die LAN- oder WLAN-Verbindung oder zur Verfügung.
KLANG
Ermöglicht oder deaktiviert den Ton des Systemgeräts und setzt die audio surround.
APPS
Durch Wahl dieser Option können Sie die verschiedenen Anwendungen auf dem Gerät
verwalten. Um eine “Anwendung zu löschen markieren Sie diese und tippen Sie auf den
Befehl” Deinstallieren “.
SCREENSAVER
Gewusst wie: Verwenden Sie den Bildschirmschoner zeigt.
SPEICHER
Durch Wahl dieser Option können Sie den Raum eingesetzt und kostenlos sind im internen
Speicher des Gerätes, die jedes Micro SD-Karte installiert steuern und sichere Entfernung
oder Löschung der Micro-SD-Karte.
HINWEIS: Die Vorinstallierte Anwendungen und das Betriebssystem Android OS nehmen
einen beträchtlichen Teil der Kapazität des internen Speicher des Gerätes, so ist es normal,
einen Unterschied zwischen “Freier Speicherplatz” und “Gesamtäche” haben.
ÜBER DAS TELEFON
Durch Wahl dieser Option können Sie alle Informationen, die Sie auf dem Gerät anzeigen
zu können benötigen.
ERWEITERTE EINSTELLUNGEN
Auswahl dieses Punktes ist möglich, alle im Zusammenhang mit der Einheit, wie z. B.
Erweiterte Einstellungen anzuzeigen:
Display (Bildschirmauösung, Bildschirmposition (Zoom in / out), HDR-Funktion), HDMI
CEC, Wiedergabe, Sound, Power on/off Tastenfunktion, Bluetooth-Fernbedienung Update
Zugriff auf andere Einstellungen.
DATUM & UHRZEIT
DEUTSCH
Durch Wahl dieser Option können Sie das Datum und die Uhrzeit des Gerätes, die Zeitzone
und das Format festlegen.
SPRACHE & EINGABE
Durch Wahl dieser Option können Sie die gewünschte Sprache, Rechtschreibung, setzen
einige Funktionen der virtuellen Tastatur und Zeigergeschwindigkeit.
FORSCHUNG UND STIMME
Auswahl dieses Punktes können Sie einige Parameter für die Suche und Stimme Nutzung
festlegen.
44
Page 45

IP 380 V1
BEDIENUNGSHILFEN
Auswahl dieses Punktes können Sie einige Parameter der Gebrauch des Gerätes durch
Menschen mit Behinderungen einstellen.
BLUETOOTH
Befehl zum Einschalten und die Suche nach Bluetooth-Geräten.
STANDORT
Zulässig sind oder nicht die Absendung Ihrer Standortdaten für Google-Suchergebnisse
und andere Google-Dienste.
SICHERHEIT
Einstellungen für Drittanbieter-apps installieren und Testen von potenziell gefährliche Apps.
DATENVERBRAUCH
Einstellung zu stimmen oder nicht zu diagnostischen Daten an Google gesendet.
KONTO
Zeigen an, wie viele und welche Konten auf dem Gerät aufgezeichnet wurden.
DEUTSCH
45
Page 46

IP 380 V1
INFORMATIONEN ÜBER DIE ENTSORGUNG VON PRODUKT
Belangrijke informatie voor de juiste afvoer van het product.
Het symbool op het apparaat geeft aan dat de afvalstoffen een “gescheiden inzameling”
moet zijn, zodat het product niet mag worden afgevoerd als huishoudelijk afval.
De gebruiker dient het product retourneren naar speciale “verzamelcentra” die door de
lokale overheid, of overhandigen aan de winkelier tegen de aankoop van een nieuw product.
Gescheiden inzameling van afval en de daaropvolgende verwerking, nuttige toepassing
en verwijdering zal helpen de productie van apparatuur met gerecycleerde materialen
en de negatieve effecten op het milieu en de gezondheid, veroorzaakt door een onjuiste
behandeling van afval te verminderen.
Onjuiste verwijdering van het product gepaard gaat met de toepassing van administratieve
sancties.
TREVI voert een beleid van continue onderzoek en ontwikkeling, kunnen de producten
verschillende kenmerken van die beschreven tonen.
TECHNISCHE GEGEVENS
CPU ................................................................... AMLOGIC S905W, Quad Core, ARM Cortex A53
CPU FREQUENZ
RAM
ERINNERUNG
OPERATIV SYSTEM
CLASS POWER BLUETOOTH
POWER TRANSMITION BLUETOOTH
MAX POWER TRANSMITION BLUETOOTH
BAND TRANSMITION BLUETOOTH
WIFI STANDARD
FREQUENCY
...................................................................... 2422-2462MHz (802.11n HT40)
HF-AUSGANGSLEISTUNG (EIRP)
DEUTSCH
MODULATION
FUNKTION DES MODULATION
CLASS
INTERFACE
POWER
MASSE
WEIGHT
................................................. 2GHz, 64bit
.................................................................. 2GB
.................................................... 16GB
............................................ Android 7.1
..............................2
.................. 1,9mW
.......... 2,5mW
..................... 2,4GHz
................................................ 802.11 b/g/n (2,4GHz)
...................................................... 2412-2472MHz (802.11b/g/n HT20)
........................11.78 dBm
.................................................... DSSS; OFDM
........................... DUPLEX
............................................................... CLASSE 1
........................................................ USB(x2), Slot Micro SD Card, RJ45, HDMI, Optical
..............................................................5V 2A
.............................................................. 104x104x21mm
............................................................. 116g
46
Page 47
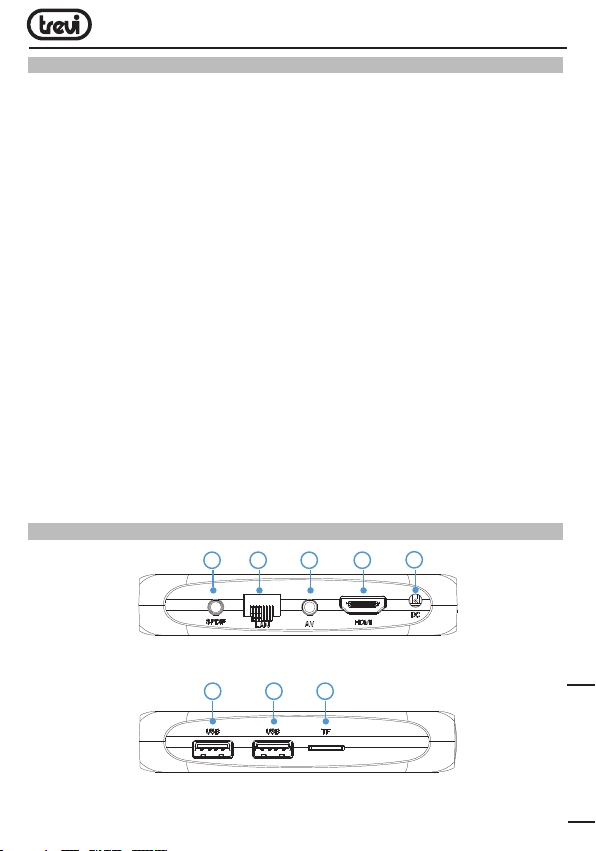
IP 380 V1
3.2 Con nec t TV bo x to TV a nd co nnect network
INSTRUCCIONES DE SEGURIDAD IMPORTANTES
• Lea y guarde estas instrucciones
• Para reducir el riesgo de choque eléctrico, no retire la cubierta o en la espalda. Hay
piezas que el usuario pueda reparar. Póngase en contacto con personal cualicado.
• Para evitar incendios o descargas eléctricas, no exponga la unidad a la lluvia ni a la
humedad.
• No exponga al agua (goteo o salpicadura), y no hay objetos que contengan líquidos,
tales tales como vasijas, deberá ser colocado en la unidad.
• Mantenga el producto lejos de fuentes de luz del sol y el calor directo como radiadores
o estufas.
• No bloquee las aber turas de ventilación. Las ranuras y aberturas de la unidad ventilación.
Las aberturas no deben bloquearse nunca al colocar el producto sobre una almohada,
sofá u otra supercie similar.
• No coloque el producto en inestable carro, soporte, trípode, soporte o mesa. La unidad
puede caerse y causar daños o lesiones.
• Utilice sólo el adaptador de AC incluido con el producto. El uso de cualquier otro
adaptador puede anular garantía.
• Desconecte la alimentación de la toma cuando la unidad no está en uso.
• Llama la atención sobre los aspectos ambientales de la eliminación de baterías.
• Advertencia: La batería (batería o baterías o paquete de baterías) no deben ser expuestas
a calor excesivo, como la luz solar, fuego o similares.
• Advertencia: Use únicamente los dispositivos/accesorios especicados proporcionada
por el fabricante, el producto está equipado con un adaptador de AC.
DESCRIPCIÓN DE LOS MANDOS DE LA UNIDAD
1 2 3 4
8
76
47
5
ESPAÑOL
Page 48
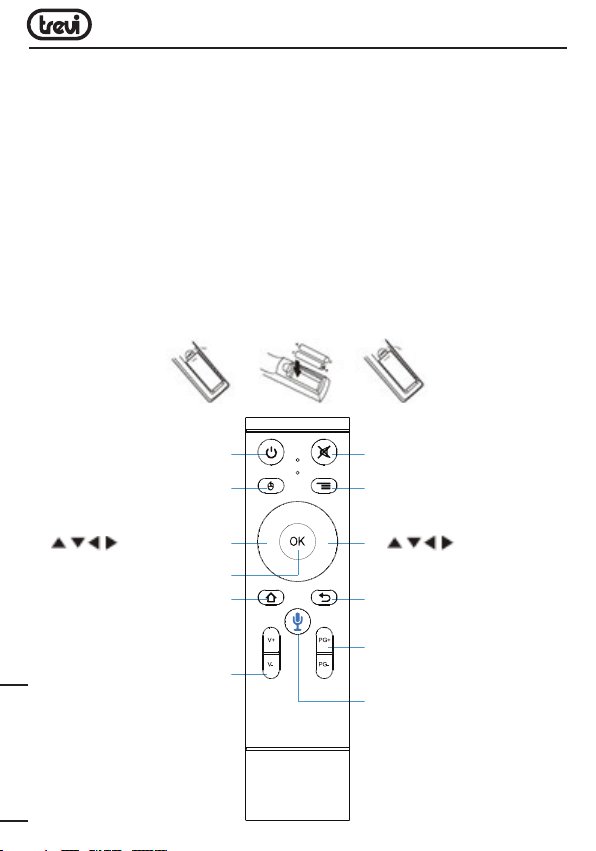
IP 380 V1
Voice Control: Hold it to
aactive and voice input
demands to search for
the information.
Remark: when you use
voice search function in
apps like youtube, please
click the voice knob in
remote to activate first, then
long press to input voice
command
IP 380 V1
2.2 Use your mobile phone to control the Box
N11 Android box and your mobile phone have to connect to the same Wi-Fi
from one router before download.
For IOS: Download“Android TV Remote”from APP STORE
For Android: Download“Android TV Remote”from Google Play store
Download and open the app,choose“IP 380 V1” on your phone and follow the prompts
and enter the code popping up on the screen to pair your phone with the box
and remote.(Some Iphone IOS will not support using touch mode and Voice
commands to search for the content).
1. Toma de la salida ÓPTICA DIGITAL: Para conectar al aparato un sistema de audio surround.
2. Ethernet LAN RJ45: 10/100 Mbs, interfaz Ethernet para conexión a la red local.
3. Salida AV: Salida de la señal de vídeo compuesto (CVBS) y señal de audio L/R (sólo
disponible con resoluciones de imagen de 480 o 576). Cable no incluido.
4. Puerto HDMI: Salida de vídeo para conexión a HDTV.
5.
Toma de alimentación DC IN 5V: Para la conexión del alimentador suministrado.
6,7. Puertos USB: Para conectar dispositivos externos USB, como llaves de memoria,
discos duros externos, ratones inalámbricos, teclados inalámbricos, etc.
8.
Ranura del lector de tarjetas de memoria Micro SD.
MANDO A DISTANCIA
Instalación de las pilas:
Quite la tapa de la parte posterior del mando a distancia, introduzca 2 pilas formato “AAA”
respetando la polaridad indicada y coloque la tapa.
9. BOTÓN POWER: Botón de encendido/
stand-by.
10. BOTÓN MOUSE: Para habilitar el
desplazamiento rápido mediante cursor
(utilizando los botones de navegación);
pulsándolo de nuevo, se habilita el
desplazamiento paso a paso.
11. Botones de navegación y
desplazamiento.
12. BOTÓN OK: Botón de conrmación.
13. BOTÓN HOME: Para regresar rápidamente
a la página Principal (Home).
14. BOTONES V+/V-: Ajuste del volumen.
ESPAÑOL
48
15. BOTÓN MUTE: Restablecimiento de nivel
de sonido.
16. BOTÓN MENU: Para abrir la carpeta
submenú en ciertas aplicaciones/
funciones.
11. Botones de navegación y
desplazamiento.
17. BOTÓN BACK: Para volver a la página
anterior.
18. BOTONES PG+/PG-: Para pasar a la
página anterior / siguiente.
19. BOTÓN VOICE CONTROL: Manténgalo
en las demandas de entrada activa y de
voz para buscar la información.
Observación: cuando utiliza la función de
búsqueda por voz en aplicaciones como
YouTube, haga clic en la perilla de voz
en remoto para activar primero, luego
mantenga presionada para ingresar el
comando de voz.
Page 49
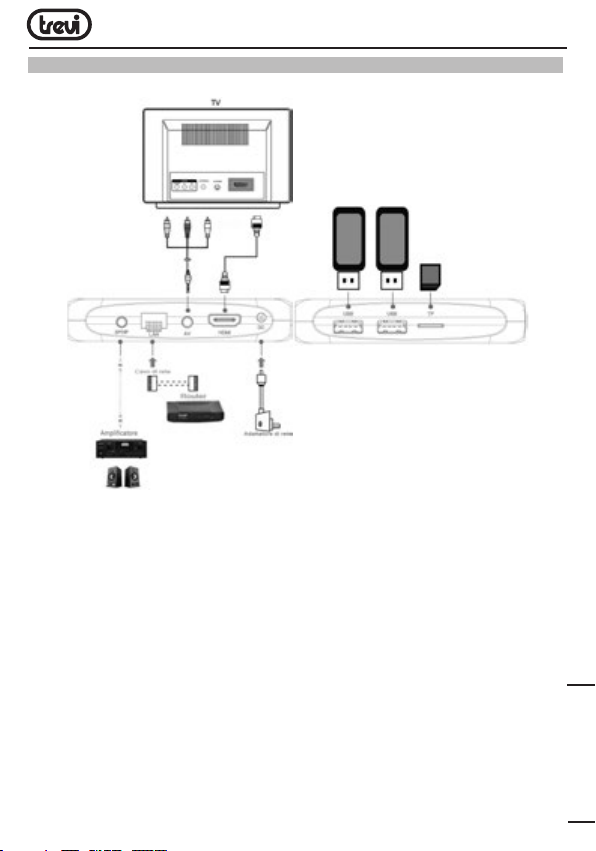
IP 380 V1
OPERACIONES BÁSICAS/INSTALACIÓN
Conexiones:
Instalación/encendido On/Off:
• Para encender el dispositivo, conecte el alimentador suministrado junto con IP 380
V1 a la toma de alimentación (5) y el otro extremo a la toma de red. Se encenderá
automáticamente y la pantalla se encenderá.
• Conecte un extremo del cable HDMI al puerto (4) de IP 380 V1 y el otro extremo al
puerto HDMI de su TV.
• Encienda el televisor y espere unos segundos para que el dispositivo de carga el sistema
operativo.
• Presione el botón de encendido (9) en el control remoto para el dispositivo en modo
de reposo. De esta manera la señal de vídeo se apagará, pero el sistema permanecerá
activado. La pantalla se apagará. Presione el botón de encendido (9) del control remoto
para activar el dispositivo.
• Presione y sostenga el botón de encendido (9) en el control remoto para apagar en
modo de espera del dispositivo, seleccione Shutdown con las teclas de navegación
(11) y conrmar pulsando OK (12). De esta manera todo el sistema está apagado. La
pantalla se apagará. Presione el botón de encendido (9) del control remoto al dispositivo
de los calentadores.
49
ESPAÑOL
Page 50
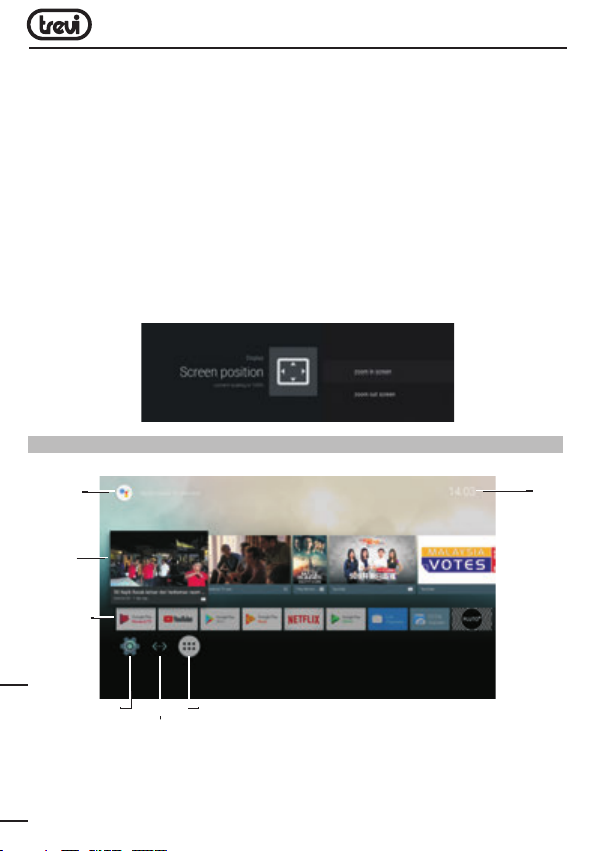
IP 380 V1
ATENCIÓN: El aparato está congurado de fábrica con el puerto HDMI como salida de vídeo;
en caso de que desee utilizar la salida compuesta AV (cable de conexión no incluido), conecte
primero la unidad a un TV mediante HDMI y luego en el menú “Settings”/“Pantalla”/“Screen
resolution” seleccione la resolución de imagen 480 o 576.
Emparejamiento de Bluetooth control remoto:
Por primera vez, debe aparear su Bluetooth mando a distancia suministrado con el dispo-
sitivo. Presione y mantenga presionado durante 5 segundos las teclas V- (14) y PG- (18).
La luz roja en el remoto parpadea para indicar un acoplamiento correcto.
Ajuste del tamaño de la pantalla:
Ajuste la imagen (foto) de acuerdo con el televisor; para ajustar la imagen y selecciona
“Settings” / “Advanced Settings” / “Pantalla” / “Screen position”, para apretar seleccionar
“Zoom out screen”, mientras que para agrandar seleccionar “Zoom in screen”.
DESCRIPCIÓN DE LA PÁGINA PRINCIPAL (pantalla Home)
Esta pantalla muestra todas las funciones que puede manejar el dispositivo.
Indicador
de búsqueda
de voz
Sugerencias
de videos
para mostrar
Enlace
directo app
instaladas
Fecha
y hora
Conguración
Estado de la
conexión de red
Lista instalado aplicaciones
(App Drawer)
Nota: Puede utilizar los botones de navegación (11) para seleccionar las aplicaciones y
el botón OK (12) para abrirlas; otra forma de hacerlo es pulsando el botón Mouse (10),
ESPAÑOL
tras lo cual aparecerá un cursor que se puede desplazar rápidamente con los botones de
navegación (11), y conrmando con el botón OK (12).
50
Page 51

IP 380 V1
CONEXIÓN A LAS REDES
Para acceder a Internet, en primer lugar, debe congurar una red que puede utilizar un punto
de acceso Wi-Fi (AP) o mediante una conexión por cable a través de la conexión LAN.
Conexión a través del puerto LAN:
• Conectar el cable de red que viene de su módem router de LAN, la conexión LAN (2)
unidad.
• Seleccione la función “Setting” y luego “Red”.
• Seleccione la voz Ethernet y esperando hasta que aparezca la palabra “Conectado”
en el marco del elemento “conexión a Internet”.
Búsqueda y conexión a una red Wi-Fi:
Para poder efectuar una conexión de este tipo, es necesario encontrarse en una zona Wi-Fi.
• Seleccione la función “Setting” y luego “Red”.
Activación/desactivación del Wi-Fi:
• Seleccione “Wi-Fi”, la unidad se activará automáticamente una búsqueda de Las
redes Wi-Fi y se mostrará en el televisor.
• Seleccione su red preferida y conrme con OK (12), si está protegido, introduzca la
contraseña utilizando el teclado virtual.
• Haga clic en la tecla Intro en el teclado y espere hasta que aparezca el mensaje
“Conectado con éxito.”
• Para desactivar la red: seleccione la conexión de red y luego el comando “Borrar la
red”.
BÚSQUEDA POR VOZ
• Para activar al asistente de voz IP 380 V1 en la pantalla de inicio, debe mantenga pulsado
el botón VOICE CONTROL (19) y hacer su voz, llevando el control remoto cerca de la
boca. Muestra video y contenido sobre la solicitud.
• Para activar al asistente de voz IP 380 V1 en aplicaciones como Youtube, presione el
botón VOICE CONTROL (19) para activar la búsqueda y luego presione y mantenga
presionado el mismo botón para hacer su voz, siempre que el remoto cierre la boca.
FUNCIONES ESPECIALES
Este aparato está dotado de funciones especiales como BLUETOOTH, MIRACAST, AIRPLAY
y MEDIA CENTER que permiten el envío y la recepción de archivos sin el uso de cables
de conexión.
ESPAÑOL
51
Page 52
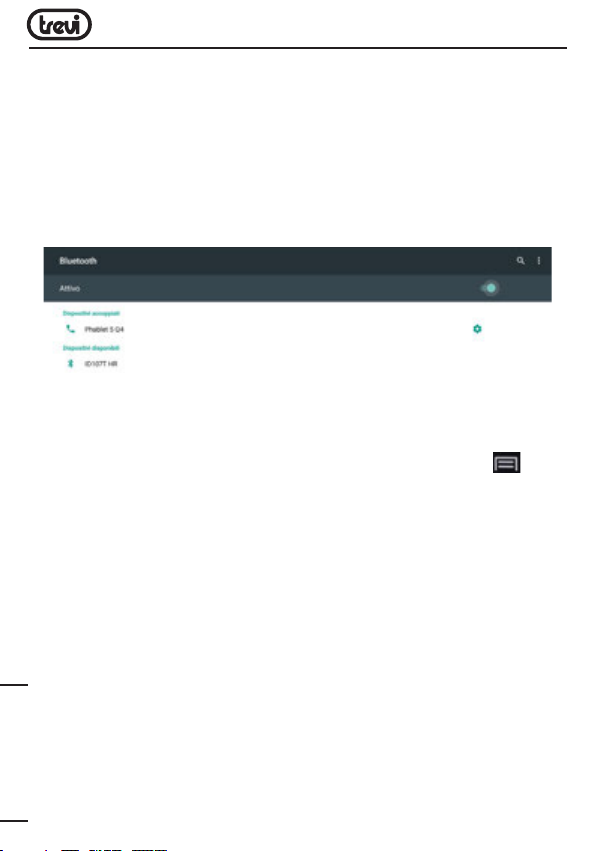
IP 380 V1
BLUETOOTH:
IP 380 V1 está equipado con sistema Bluetooth para el archivo de transmisión/recepción
entre el dispositivo y otros dispositivos que tienen esta característica.
Activación del Bluetooth:
• En la página principal, haga clic en “Settings” - “More settings” y seleccione el icono
“Bluetooth”. Active el Bluetooth poniendo en ON (Cambiará a verde) el interruptor de
arriba a la derecha.
• Para desactivar la conexión Bluetooth, sitúe el interruptor en OFF (Se convertirá en el
color gris).
Búsqueda de dispositivos:
• Una vez activada la función Bluetooth, el dispositivo se iniciará automáticamente
una buscar los dispositivos disponibles. Si desea realizar una nueva búsqueda,
seleccione el comando “Actualizar” después de pulsar el botón de menú
en el control remoto.
• Cuando la búsqueda se mostrará una lista de dispositivos disponibles.
Emparejamiento con los dispositivos:
• En la lista que aparece, seleccione el dispositivo que debe acoplarse. Después de
la conexión el nombre del dispositivo aparecerá en la lista de “Los dispositivos
vinculados”.
• En caso de que se solicite un PIN, el aparato con el que se está intentado realizar el
emparejamiento debería indicarlo; si así no fuese, inténtelo con “0000” o “1234”.
• Tras el emparejamiento, es posible transmitir/recibir archivos entre IP 380 V1 y otros
dispositivos.
(16)
MIRACAST:
Miracast es un nuevo estándar de transmisión de archivos multimedia (foto, vídeo y
música) sin la necesidad de cables físicos, que permite al usuario conectar mediante la
tecnología Wi-Fi Direct un dispositivo Android a un televisor de última generación. Con
ESPAÑOL
Miracast, su dispositivo estará estrechamente vinculado a la pantalla de su TV de manera
52
Page 53

IP 380 V1
que, accediendo al display de su smartphone o tablet, podrá proyectar su pantalla en el TV.
ATENCIÓN: PARA QUE ESTA FUNCIÓN FUNCIONE CORRECTAMENTE, EL DISPOSITIVO
IP 365 REQUIERE QUE EL SMARTPHONE O LA TABLET TENGAN COMO REQUISITOS DE
SISTEMA OS ANDROID 4.2.2 O SUPERIOR CON SOPORTE WIRELESS DISPLAY.
Activación de Miracast:
• Conecte IP 380 V1 y el dispositivo externo (smartphone o tablet) a la misma red
Wi-Fi.
• En su dispositivo externo (smartphone o tablet), active la función Miracast o
“Wireless Display” o ”Mirroring Display” (consulte el manual de instrucciones de
su dispositivo para conocer el nombre exacto de la función y el procedimiento de
activación).
• En la página principal de IP 365, haga clic en “Apps” y seleccione el icono
miracast. El aparato efectuará una búsqueda de dispositivos.
• En el aparato externo (smartphone o tablet) aparecerá Trevi IP 380 V1; selecciónelo.
• En el TV aparecerá una pantalla de conrmación; seleccione OK y espere unos
segundos a que se active la conexión. Ahora todas las imágenes presentes en el
dispositivo externo se visualizarán en el TV.
Desactivación de Miracast:
• En el dispositivo externo (smartphone o tablet), seleccione Trevi IP 380 V1 y luego
“Desconectar” en la pantalla siguiente.
MEDIA CENTER:
Esta característica le permite ver los archivos directamente en su televisor con otros
dispositivos (tales como PC o consola) conectados a través de DLNA o AirPlay de red
(para los dispositivos de Apple).
• En la página principal, haga clic en “Apps” y seleccione el icono Media center;
se abrirá la siguiente pantalla:
53
ESPAÑOL
Page 54
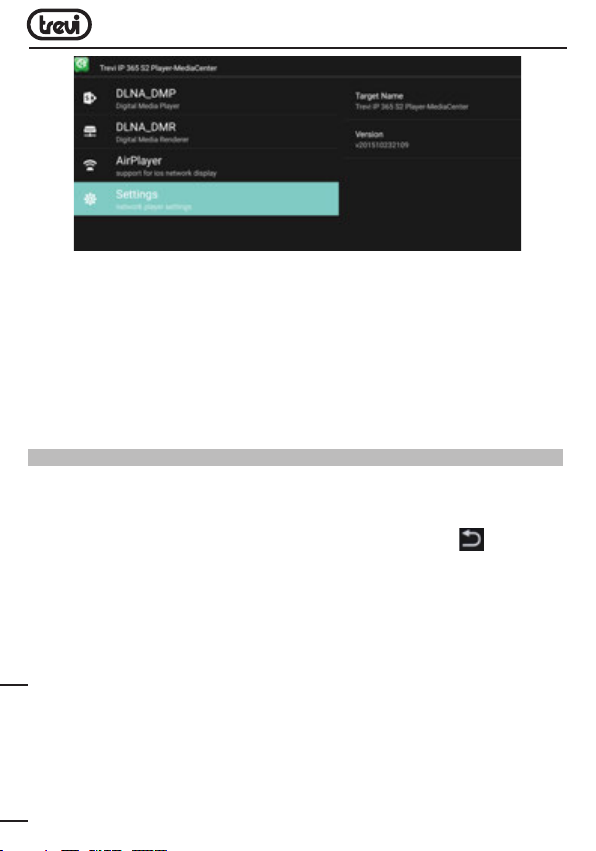
IP 380 V1
• Seleccionando DLNA_DMP (Digital Media Player), se mostrará la lista de
dispositivos conectados a la red; basta con seleccionar el deseado para visualizar
los archivos que contiene y reproducirlos en el TV.
• Seleccionando DLNA_DMR (Digital Media Rendered), es posible congurar el DMR.
• Seleccione AirPlayer si dispone de aparatos Apple. AirPlayer es una aplicación
especíca para usuarios Apple. AirPlayer permite reproducir los vídeos de los
dispositivos Apple directamente en el TV. Ajuste la conguración.
Nota: La función AirPlay puede excluirse debido a iOS continuas actualizaciones de
software).
AJUSTES
El menú de conguración le permite congurar o modicar la conguración de su dispositivo de Android.
• A partir de los principales página Haga clic en “Apps” - “Ajustes” - “More settings”.
Para volver a la página anterior o para cancelar un comando, pulse BACK (17)
en el control remoto.
RED
Muestra la red LAN o Wi-Fi conectado o disponible.
SONIDO
Permite o deshabilita el audio del dispositivo y establece el audio surround.
APLICACIONES
Al seleccionar este elemento se pueden gestionar las diversas aplicaciones en el dispositivo.
Para eliminar una ‘aplicación simplemente selecciónela y pulse el comando “Desinstalar”.
PROTECTOR DE PANTALLA
Muestra cómo utilizar el protector de pantalla.
ESPAÑOL
54
Page 55

IP 380 V1
ALMACENAMIENTO
Al seleccionar este ítem, se puede controlar el espacio utilizado y los libres en la memoria
interna del dispositivo, las de cualquier tarjeta Micro SD instalada y realizar una extracción
segura o la supresión de la tarjeta Micro SD.
NOTA: Las aplicaciones preinstaladas y el sistema operativo OS Android ocupan una parte
considerable de la capacidad de la memoria interna del dispositivo, por lo que es normal
que haya una diferencia entre “espacio de almacenamiento gratuito” y “espacio total”.
INFORMACIÓN DEL TELEFONO
Al seleccionar esta opción, se puede ver toda la información que necesita en el dispositivo.
CONFIGURACIÓN AVANZADA
Seleccione esta opción es posible visualizar todos los ajustes avanzados relacionados
con la unidad, tales como:
Pantalla (resolución de la pantalla, posición en la pantalla (zoom in / out), función HDR)
HDMI CEC, reproducción, sonido, encendido y apagado función de botón, actualización
del control remoto Bluetooth, acceso a otras opciones.
FECHA Y HORA
Al seleccionar este elemento se puede establecer la fecha y hora del dispositivo, la zona
horaria y el formato.
IDIOMA E INTRODUCCIÓN DE TEXTO
Al seleccionar este elemento se puede ajustar el idioma deseado, ortografía, establecer
algunas funciones del teclado virtual y la velocidad del puntero.
INVESTIGACIÓN Y VOZ
Seleccionar este elemento se pueden establecer algunos parámetros en el uso de la voz
y la búsqueda de.
ACCESIBILIDAD
Seleccionar este elemento puede establecer algunos parámetros de uso del aparato por
personas con discapacidad.
BLUETOOTH
Comando para encender y la búsqueda de dispositivos Bluetooth.
UBICACIÓN
Para permitir o no permitir el envío de sus datos de ubicación para los resultados de
búsqueda de Google y otros servicios de Google.
SEGURIDAD
Conguración para instalar aplicaciones de terceros y la prueba de aplicaciones potencialmente peligrosas.
55
ESPAÑOL
Page 56

IP 380 V1
USO DE DATOS
Establecer consentimiento o no enviar datos de diagnóstico a Google.
CUENTAS
Mostrar cuántos y qué cuentas se registraron en el dispositivo.
INFORMACIÓN SOBRE LA ELIMINACIÓN DE PRODUCTOS
Información importante para la eliminación correcta del producto.
El símbolo en el equipo indica que los residuos deben ser objeto de la “recogida selectiva”
por lo que el producto no debe eliminarse como residuo urbano.
El usuario debe devolver el producto a los “centros de recogida” especiales proporcionadas
por el gobierno local, o entregarlo al vendedor en contra de la compra de un nuevo producto.
La recogida selectiva de los residuos y de las operaciones de procesamiento posteriores, la
recuperación y la eliminación ayudará a la producción de equipos con materiales reciclados
y reducir los efectos negativos sobre el medio ambiente y la salud causado por el manejo
inadecuado de los residuos.
La eliminación inadecuada del producto consiste en la aplicación de sanciones administrativas.
TREVI sigue una política de continua investigación y desarrollo, los productos podrán
presentar características diferentes a las descritas.
ESPAÑOL
56
Page 57

IP 380 V1
SPECIFICACIONES
CPU ................................................................... AMLOGIC S905W, Quad Core, ARM Cortex A53
PROCESADOR DE FRECUENCIA
RAM
.................................................................. 2GB
MEMORIA INTERNA
SISTEMA OPERATIVO
CLASE DI POTENZA BLUETOOTH
POTENCIA DE TRANSMISIÓN BLUETOOTH
MAXIMA POTENCIA DE TRANSMISION DE BLUETOOTH
BANDA DE TRANSMISIÓN DE BLUETOOTH
El ESTANDAR WIFI
FRECUENCIA
...................................................................... 2422-2462MHz (802.11n HT40)
POTENCIA DE SALIDA RF (EIRP)
MODULACIÓN
NORMAS DE OPERACIÓN
CLASE DE PRODUCTOS
INTERFACE USB.................................................USB(x2), Slot Micro SD Card, RJ45, HDMI, Optical
POTENCIA..........................................................5V
DIMENSIONES
PESO
................................................................. 116g
........................................... 16GB
............................................. 802.11 b/g/n (2,4GHz)
..................................................... 2412-2472MHz (802.11b/g/n HT20)
....................................................DSSS; OFDM
................................................... 104x104x21mm
......................... 2GHz, 64bit
........................................Android 7.1
....................... 2
.........1,9mW
. 2,5mW
........ 2,4GHz
........................ 11.78 dBm
.................................. DUPLEX
.....................................CLASSE 1
2A
ESPAÑOL
57
Page 58

IP 380 V1
58
Page 59

Dichiarazione di conformità UE semplicata
IP 380 V1
Il fabbricante TREVI S.p.a. dichiara che il tipo di apparecchiatura radio IP 380 V1
é conforme alla direttiva 2014/53/UE.
Il testo completo della dichiarazione di conformità UE è disponibile al seguente indirizzo
internet: www.trevi.it
Simplied EU Declaration Of Conformity
Hereby TREVI S.p.a declares that the radio equipment model IP 380 V1
is in compliance with Directive 2014/53/EU.
The full text of the EU declaration of conformity is available at the following internet
address: www.trevi.it
NOTE
59
Page 60
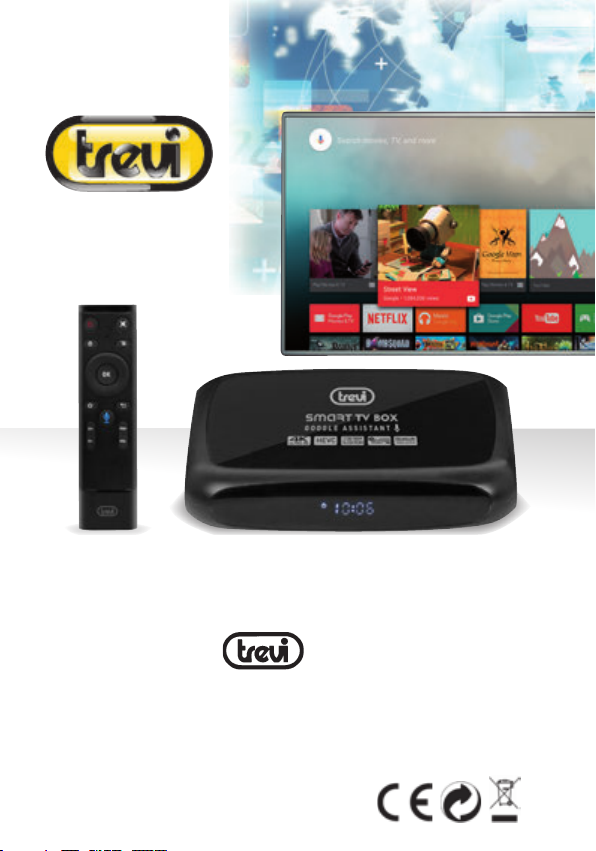
IP 380 V1
TV MULTIBOX
Trevi S.p.A.
Strada Consolare Rimini-San Marino, 62
47924 RIMINI (RN) Italy
Tel. 0541/756420 - Fax 0541/756430
www.trevi.it - E-mail: [email protected]
Made In China
 Loading...