

Page 1
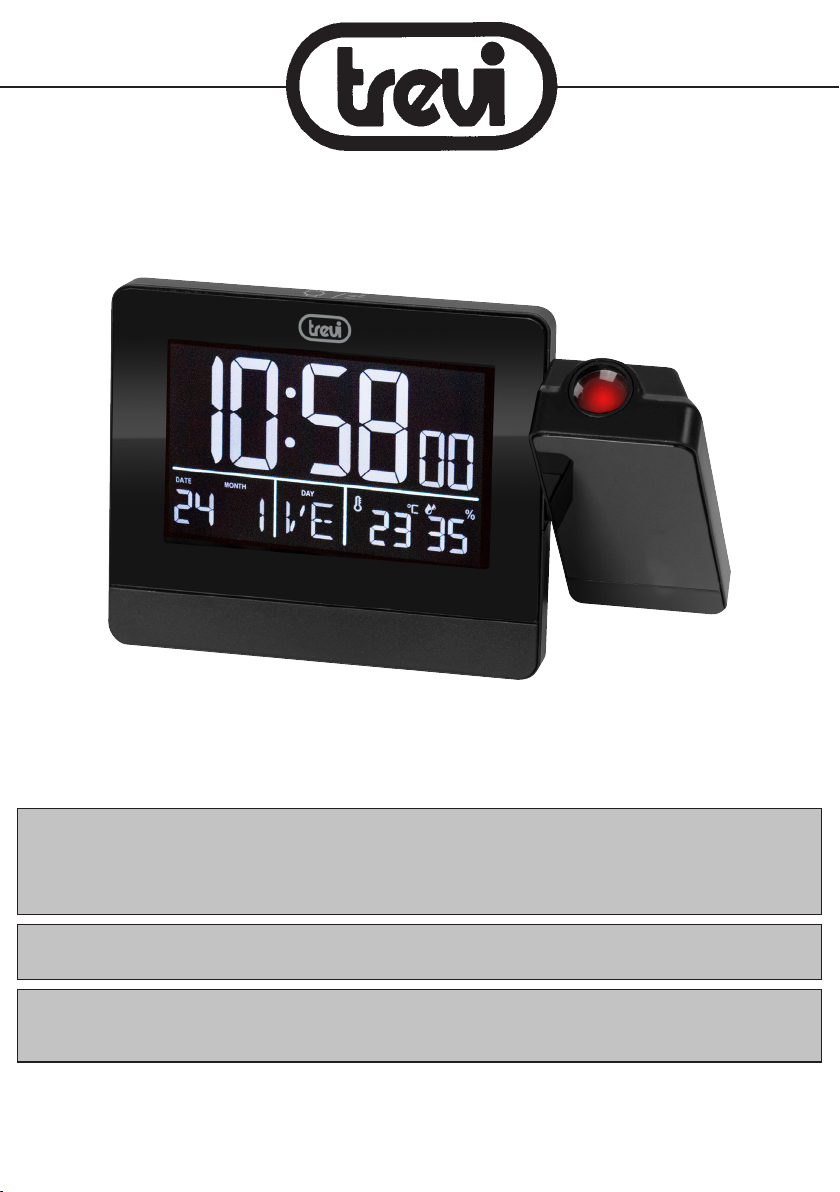
EC 884 PJ
SVEGLIA ELETTRONICA
CON PROIEZIONE
MANUALE D’USO
MULTILANGUAGE USER GUIDE
ITA ENG FRA DEU ESP
* Per informazioni integrative e aggiornamenti di questo prodotto vedi: www.trevi.it
* For additional information and updates of this product see: www.trevi.it
Page 2
EC 884 PJ CLOCK PROJECTION
AVVERTENZE
AVVERTENZE:
- Non tentare di smontare o alterare parti dell’apparecchiatura
non espressamente descritte in questa guida. Lo smontaggio o
l’alterazione può provocare scosse elettriche ad alta tensione.
Ispezioni interne, modifiche e riparazioni devono essere condotte
solo da personale di assistenza qualificato.
- Garantire una distanza minima di 5cm attorno all’apparecchio
per garantire una ventilazione sufficiente. Non posizionare il
prodotto in librerie o scaffali chiusi senza adeguata ventilazione.
Assicurarsi che la ventilazione non sia impedita coprendo le
aperture di ventilazione con oggetti, quali giornali, tovaglie,
tende, ecc...
- Non posizionare fonti di fiamme libere, come candele accese,
su questo dispositivo.
- Non deve essere esposto a gocciolamenti o spruzzi e nessun
oggetto riempito di liquidi, come vasi, deve essere posizionato
sull’apparecchio.
- L’uso di fonti di alimentazione o batterie non espressamente
consigliate per questa apparecchiatura può provocare surriscaldamento, malfunzionamento dell’apparecchiatura, incendi,
scosse elettriche o altri pericoli. Utilizzare solo la fonte di
alimentazione consigliata.
- Non utilizzare o conservare l’apparecchiatura in un’area umida o
polverosa. Si dovrebbe attirare l’attenzione sull’uso di apparecchi
in climi tropicali e/o moderati.
- Pericolo di esplosione se la batteria viene sostituita in modo
errato. Sostituire solo con lo stesso tipo o equivalente. Le
batterie non devono essere esposte a calore eccessivo come
luce solare, fuoco o simili. Non gettare mai le batterie nel fuoco!
Si dovrebbe attirare l’attenzione sugli aspetti ambientali dello
smaltimento delle batterie.
- L’adattatore di corrente deve essere collegato a una presa vicina
al dispositivo e deve essere facilmente accessibile.
- Se si nota un calore eccessivo sul dispositivo o sull’adattatore
di corrente, scollegare immediatamente la spina dalla presa di
corrente principale.
- Non tirare il cavo di alimentazione.
- Non posizionare mai l’orologio del proiettore vicino a motori
elettrici o altre apparecchiature che generano forti campi
elettromagnetici. L’esposizione a forti campi magnetici può
causare malfunzionamenti o corruzione dell’immagine.
- Non posizionare l’orologio del proiettore su luoghi sensibili alle
vibrazioni o ai bordi del tavolo.
- Non guardare direttamente nell’obiettivo del proiettore poiché
ciò potrebbe danneggiare permanentemente la vista.
- Leggere e conservare queste istruzioni per riferimenti futuri.
Gestione e utilizzo della batteria
- Solo gli adulti devono maneggiare la batteria. Non consentire
a un bambino di utilizzare questo apparecchio a meno che il
coperchio della batteria non sia saldamente fissato all’unità.
- Il tipo di batteria utilizzato nell’unità è 2 batterie da 1,5V “AAA”
(non incluse) che sono accessibili e possono essere sostituite.
- Rimuovere il coperchio della batteria situato nella parte inferiore
dell’unità per rimuovere le batterie.
IMPORTANTE
La buona costruzione di questo apparecchio ne garantisce per lungo
tempo il perfetto funzionamento. Se tuttavia dovesse presentarsi
qualche inconveniente, sarà opportuno consultare il più vicino
Centro Assistenza autorizzato TREVI.
TREVI persegue una politica di continua ricerca e sviluppo.
Pertanto i prodotti possono presentare caratteristiche diverse da
quelle descritte.
WARNINGS
- Do not attempt to disassemble or alter any part of the equipment
that is not expressly described in this guide. Disassembly or
alteration may result in high-voltage electrical shock. Internal
inspections, alterations and repairs should be conducted by
qualified service personnel only.
- Ensure minimum distances of 5cm around the apparatus
for sufficient ventilation. Do not place the product in closed
bookcases or racks without proper ventilation. Ensure that the
ventilation is not impeded by covering the ventilation openings
with items, such as newspapers, table-cloths, curtains, etc.
- No naked flame sources, such as lighted candles, should be
placed on the apparatus.
- It shall not be exposed to dripping or splashing and that no
objects filled with liquids, such as vases, shall be placed on
the apparatus.
- Use of power sources, or batteries not expressly recommended
for this equipment may lead to overheating, malfunction of the
equipment, fire, electrical shock or other hazards. Use only the
recommended power source.
- Do not use or store the equipment in humid or dusty area.
Attention should be drawn to the use of apparatus in tropical
and/ or moderate climates.
- Danger of explosion if battery is incorrectly replaced. Replace
only with the same or equivalent type. Batteries shall not be
exposed to excessive heat such as sunshine, fire or the like.
Never throw batteries in fire! Attention should be drawn to the
environmental aspects of battery disposal.
- Power adaptor must be connected to a socket close to the
device and must be easily accessible.
- If you notice eccessive heat on the device or power adaptor,
disconnect the plug from the main power socket immediately.
- Do not pull the power cord.
- Never place the projector clock close to electric motors or other
equipment generating strong electromagnetic fields. Exposure
to strong magnetic fields may cause malfunctions or corrupt
image.
- Do not place projector clock on places sensitive to vibrations
or table edges.
- Do not look directly into the projector lens as doing this may
permanently damage your sight.
- Please read and retain these instructions for future reference.
Battery handling and usage
- Only adults should handle battery. Do not allow a child to use
this apparatus unless the battery cover is securely attached to
the unit.
2
2
Page 3
EC 884 PJ CLOCK PROJECTION
WARNINGS
- The battery type used in the unit is 2 x 1,5V “AAA” size batteries
(not included) which are accessible and can be replaced.
- Remove the battery cover located at the bottom of the unit to
remove the batteries.
IMPORTANT
This appliance has been carefully built to ensure long-lasting perfect
performance. However, should any inconvenience occur, please
contact your local authorised TREVI Service Centre.
TREVI follows a policy of ongoing research and development. Therefore products may have different features from those described.
AVERTISSEMENTS
- N’essayez pas de démonter ou de modifier des éléments de
l’équipement qui ne sont pas décrits expressément dans ce
guide. Le démontage ou la modification peut entraîner un
choc électrique sous haute tension. Les inspections internes,
modifications et réparations doivent être effectuées uniquement
par du personnel qualifié.
- Respectez des distances minimales de 5cm autour de l’appareil
pour une ventilation suffisante. Ne placez pas le produit dans des
bibliothèques ou des casiers fermés sans ventilation adéquate.
Veillez à ne pas gêner la ventilation en recouvrant les orifices
de ventilation d’objets tels que des journaux, des nappes, des
rideaux, etc.
- Aucune source de flamme nue, telle que des bougies allumées,
ne doit être placée sur l’appareil.
- Il ne doit pas être exposé à des gouttes d’eau ni à des éclaboussures et aucun objet rempli de liquide, tel qu’un vase, ne
doit être placé sur l’appareil.
- L’utilisation de sources d’alimentation ou de piles non expressément recommandées pour cet équipement peut entraîner une
surchauffe, un dysfonctionnement de l’équipement, un incendie,
un choc électrique ou tout autre danger. Utilisez uniquement la
source d’alimentation recommandée.
- N’utilisez ni ne stockez l’équipement dans un endroit humide
ou poussiéreux. L’attention devrait être attirée sur l’utilisation
d’appareils sous les climats tropicaux et/ou modérés.
- Danger d’explosion si la batterie est remplacée de manière
incorrecte. Remplacez uniquement par le même type ou un
type équivalent. Les piles ne doivent pas être exposées à une
chaleur excessive, comme le soleil, le feu ou similaires. Ne jetez
jamais les piles au feu! L’attention devrait être attirée sur les
aspects environnementaux de la mise au rebut des batteries.
- L’adaptateur secteur doit être connecté à une prise proche de
l’appareil et doit être facilement accessible.
- Si vous remarquez une chaleur excessive sur l’appareil ou
l’adaptateur secteur, débranchez immédiatement la fiche de la
prise de courant principale.
- Ne tirez pas sur le cordon d’alimentation.
- Ne placez jamais l’horloge du projecteur à proximité de moteurs
électriques ou de tout autre équipement générant des champs
électromagnétiques puissants. L’exposition à des champs
magnétiques puissants peut provoquer des dysfonctionnements
ou une image corrompue.
- Ne placez pas l’horloge du projecteur sur des endroits sensibles
aux vibrations ou aux bords de la table.
- Ne regardez pas directement dans l’objectif du projecteur, car
vous risqueriez de vous blesser à la vue.
- Veuillez lire et conser ver ces instructions pour référence future.
Manipulation et utilisation de la batterie
- Seuls les adultes doivent manipuler la batterie. Ne laissez pas
un enfant utiliser cet appareil à moins que le couvercle de la
batterie ne soit solidement fixé à l’appareil.
- Le type de pile utilisé dans l’appareil est 2 piles de type “AAA”
de 1,5V (non fournies) qui sont accessibles et peuvent être
remplacées.
- Retirez le couvercle du compartiment à piles situé au bas de
l’appareil pour retirer les piles.
IMPORTANT
Cet appareil a été soigneusement construit pour assurer une performance parfaite et durable. Toutefois, en cas de dérangement,
veuillez contacter votre centre de service agréé TREVI.
TREVI suit une politique de recherche et développement en cours.
Par conséquent, les produits peuvent avoir des caractéristiques
différentes de celles décrites.
WARNUNGEN
- Versuchen Sie nicht, Teile des Geräts zu zerlegen oder zu
verändern, die nicht ausdrücklich in dieser Anleitung beschrieben
sind. Eine Demontage oder Veränderung kann zu einem elektrischen Hochspannungsschlag führen. Interne Inspektionen,
Änderungen und Reparaturen dürfen nur von qualifizier tem
Servicepersonal durchgeführt werden.
- Achten Sie auf einen Mindestabstand von 5cm um das
Gerät, um eine ausreichende Belüftung zu gewährleisten.
Stellen Sie das Produkt nicht ohne ausreichende Belüftung
in geschlossene Bücherschränke oder Gestelle. Stellen Sie
sicher, dass die Belüftung nicht beeinträchtigt wird, indem Sie
die Belüftungsöffnungen mit Gegenständen wie Zeitungen,
Tischdecken, Vorhängen usw. abdecken.
- Stellen Sie keine offenen Flammen wie brennende Kerzen auf
das Gerät.
- Es darf keinem Tropfen oder Spritzen ausgesetzt werden und
es dürfen keine mit Flüssigkeiten gefüllten Gegenstände, wie
z. B. Vasen, auf das Gerät gestellt werden.
- Die Verwendung von Stromquellen oder Batterien, die für
dieses Gerät nicht ausdrücklich empfohlen werden, kann zu
Überhitzung, Fehlfunktionen des Geräts, Feuer, elektrischem
Schlag oder anderen Gefahren führen. Verwenden Sie nur die
empfohlene Stromquelle.
- Verwenden oder lagern Sie das Gerät nicht an einem feuchten
oder staubigen Ort. Es sollte auf die Verwendung von Geräten
in tropischen und/oder gemäßigten Klimazonen hingewiesen
werden.
- Explosionsgefahr bei falschem Batteriewechsel. Nur durch
den gleichen oder einen gleichwertigen Typ ersetzen. Batterien
dürfen keiner übermäßigen Hitze wie Sonnenschein, Feuer oder
Ähnlichem ausgesetzt werden. Werfen Sie niemals Batterien ins
Feuer! Beachten Sie die Umweltaspekte bei der Batterieentsorgung.
3
3
Page 4
EC 884 PJ CLOCK PROJECTION
- Das Netzteil muss an eine Steckdose in der Nähe des Geräts
angeschlossen und leicht zugänglich sein.
- Wenn Sie eine anhaltende Hitze am Gerät oder Netzteil bemerken,
ziehen Sie den Stecker sofort aus der Hauptsteckdose.
- Ziehen Sie nicht am Netzkabel.
- Stellen Sie die Projektor uhr niemals in der Nähe von Elektromotoren oder anderen Geräten auf, die starke elektromagnetische
Felder erzeugen. Starke Magnetfelder können zu Fehlfunktionen
oder Bildverfälschungen führen.
- Stellen Sie die Projektoruhr nicht an Orten auf, die empfindlich
gegen Vibrationen oder Tischkanten sind.
- Schauen Sie nicht direkt in das Objektiv des Projektors, da dies
Ihr Sehvermögen dauerhaft schädigen kann.
- Bitte lesen Sie diese Anweisungen und bewahren Sie sie zum
späteren Nachschlagen auf.
Handhabung und Verwendung des Akkus
- Nur Erwachsene sollten mit der Batterie umgehen. Lassen Sie
ein Kind dieses Gerät nicht benutzen, es sei denn, die Batterieabdeckung ist fest mit dem Gerät verbunden.
- Der im Gerät verwendete Batterietyp besteht aus 2x 1,5 V “AAA”Batterien (nicht im Lieferumfang enthalten), die zugänglich sind
und ausgetauscht werden können.
- Entfernen Sie die Batterieabdeckung an der Unterseite des
Geräts, um die Batterien zu entfernen.
WICHTIG
Dieses Gerät wurde sorgfältig gebaut, um eine lang anhaltende
perfekte Leistung zu gewährleisten. Sollte es dennoch zu Unannehmlichkeiten kommen, wenden Sie sich bitte an das TREVI
Service Center.
TREVI verfolgt eine Politik der laufenden Forschung und Entwicklung.
Daher können Produkte von den beschriebenen verschieden sein.
ADVERTENCIAS
- No intente desarmar ni alterar ninguna parte del equipo que no
esté expresamente descrita en esta guía. El desmontaje o la
alteración pueden provocar descargas eléctricas de alto voltaje.
Las inspecciones internas, alteraciones y reparaciones deben
ser realizadas únicamente por personal de servicio calificado.
- Asegure distancias mínimas de 5cm alrededor del aparato
para una ventilación suficiente. No coloque el producto en
estanterías o estanterías cerradas sin la ventilación adecuada.
Asegúrese de que la ventilación no se vea impedida cubriendo
las aberturas de ventilación con ar tículos, como periódicos,
manteles, cortinas, etc.
- No se deben colocar fuentes de llamas descubiertas, como
velas encendidas, sobre el aparato.
- No debe exponerse a goteos ni salpicaduras, y no se deben
colocar objetos llenos de líquidos, como jarrones, sobre el
aparato.
- El uso de fuentes de alimentación o baterías no recomendadas
expresamente para este equipo puede provocar sobrecalentamiento, mal funcionamiento del equipo, incendio, descarga
eléctrica u otros peligros. Utilice solo la fuente de alimentación
recomendada.
- No use ni almacene el equipo en un área húmeda o polvorienta.
Se debe llamar la atención sobre el uso de aparatos en climas
tropicales y / o moderados.
- Peligro de explosión si la batería es reemplazada incorrectamente. Reemplace sólo con el mismo tipo o equivalente. Las
baterías no deben exponerse al calor excesivo como la luz
solar, el fuego o similares. ¡Nunca arroje las baterías al fuego!
Se debe llamar la atención sobre los aspectos ambientales de
la eliminación de la batería.
- El adaptador de corriente debe estar conectado a una toma de
corriente cercana al dispositivo y debe ser fácilmente accesible.
- Si nota calor excesivo en el dispositivo o adaptador de corriente,
desconecte el enchufe de la toma de corriente principal de
inmediato.
- No tire del cable de alimentación.
- Nunca coloque el reloj del proyector cerca de motores eléctricos
u otros equipos que generen fuertes campos electromagnéticos.
La exposición a campos magnéticos fuertes puede causar un
mal funcionamiento o dañar la imagen.
- No coloque el reloj del proyector en lugares sensibles a las
vibraciones o los bordes de la mesa.
- No mire directamente a la lente del proyector, ya que esto puede
dañar su vista de forma permanente.
- Lea y conserve estas instrucciones para referencia futura
Manejo y uso de la batería.
- Solo los adultos deben manejar la batería. No permita que un
niño use este aparato a menos que la tapa de la batería esté
bien sujeta a la unidad.
- El tipo de batería utilizado en la unidad es 2 baterías de tamaño
“AAA” de 1,5V (no incluidas) que son accesibles y pueden
reemplazarse.
- Retire la tapa de la batería ubicada en la parte inferior de la
unidad para extraer las baterías.
IMPORTANTE
Este aparato ha sido cuidadosamente construido para asegurar
un rendimiento perfecto y duradero. Sin embargo, en caso de
cualquier inconveniente, póngase en contacto con su centro de
servicio TREVI autorizado local.
TREVI sigue una política de investigación y desarrollo. Por lo tanto, los
productos pueden tener características diferentes de las descritas.
4
4
Page 5
EC 884 PJ CLOCK PROJECTION
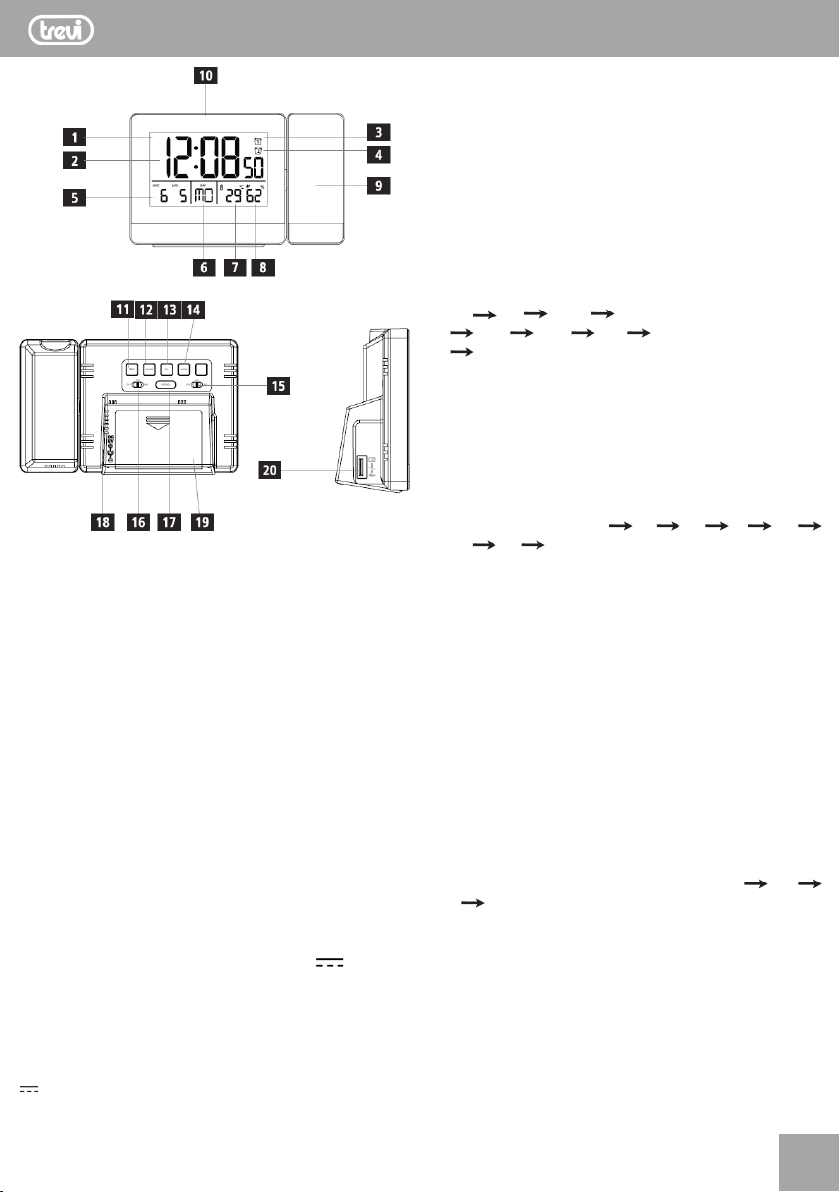
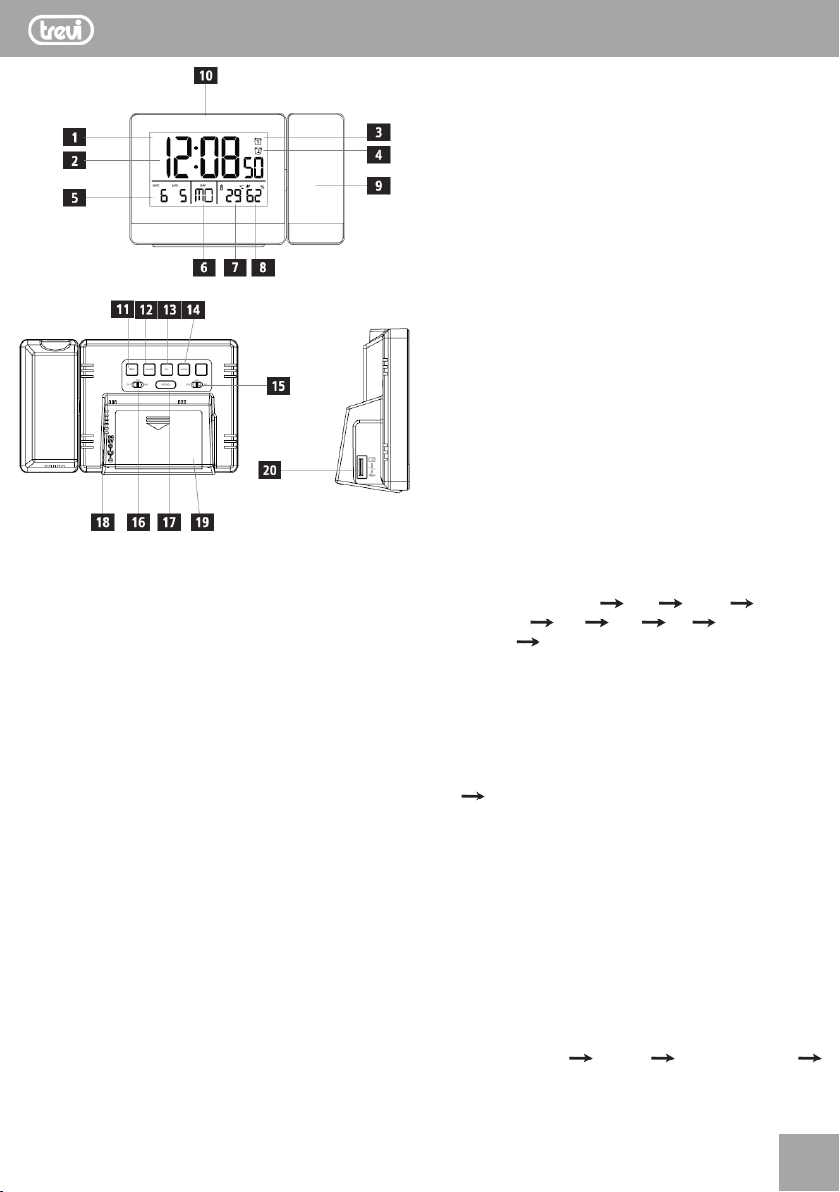
1. Display.
2. Indicazione Ora.
3. Simbolo Allarme 1.
4. Simbolo Allarme 2.
5. Data.
6. Giorno della settimana.
7. Indicazione Temperatura.
8. Indicazione Umidità.
9. Proiettore.
10. Comando DIMMER/SNOOZE/PROIEZIONE, attivazione/regolazione luminosità display, spegnimento temporaneo allarme,
attivazione Proiezione.
11. Tasto TIME, regolazione ora e data.
12. Tasto ALARM, regolazione Allarme.
13. Tasto UP, regolazione crescente.
14. Tasto DOWN, regolazione decrescente.
15. Interruttore ON/OFF Allarme 1.
16. Interruttore ON/OFF Allarme 2.
17. Tasto ROTATE, rotazione della proiezione.
18. Presa di alimentazione.
19. Vano batterie.
20. Presa USB per ricarica dispositivi esterni (5V 1A).
INSTALLAZIONE
L’apparecchio può funzionare con le batterie o collegando l’alimentatore in dotazione.
FUNZIONAMENTO CON BATTERIE
Aprire il vano batterie (19) e inserire 2 batterie formato “AAA” 1,5V
facendo attenzione a rispettare le polarità indicate.
FUNZIONAMENTO CON ALIMENTATORE
Inserire la spina dell’alimentatore in dotazione nella presa (18)
ITALIANO
e collegare l’alimentatore ad una presa di corrente 110-230V~
50/60Hz.
Note:
• Se le batterie sono inserite e si collega l’alimentatore alla
sveglia, questa passerà automaticamente all’alimentazione
esterna.
• La proiezione continua dell’ora è possibile solo con l’utilizzo
dell’alimentatore di rete.
OROLOGIO
1. Tenere premuto il pulsante TIME (11) per circa 3 secondi fino
a quando il display inizia a lampeggiare;
2. Impostare le seguenti informazioni nell’ordine elencato: 12/24
ore Ora Minuti Formato (Data Mese o Mese Data)
Anno Mese Data Lingua giorni della settimana
Esci;
3. Premere il tasto UP (10) per aumentare, tenerlo premuto per
aumentare velocemente;
4. Premere il tasto DOWN (11) per diminuire, tenerlo premuto per
diminuire velocemente;
5. Premere il tasto TIME per confermare e passare alla voce
successiva.
• Dopo aver impostato la data, il giorno della settimana cambierà
conseguentemente.
• L’ordine delle lingue è: GE FR SP IT DU
DA EN GE.
PROIEZIONE DELL’ORA
Questo apparecchio è in grado di proiettare l’indicazione dell’ora
corrente sul muro o sul soffitto della vostra camera. Per vedere la
proiezione è necessario che la stanza sia in penombra o al buio.
La distanza massima di proiezione è di circa 2 metri.
Funzionamento con batterie:
Toccare il comando DIMMER/SNOOZE/PROIEZIONE (10) per
illuminare il display e attivare la proiezione per circa 8 secondi.
Funzionamento con alimentatore:
Utilizzando l’alimentatore in dotazione la proiezione può rimanere
sempre accesa, oppure toccare per 3 secondi il comando DIMMER/
SNOOZE/PROIEZIONE (10) per disattivare la proiezione; toccarlo
nuovamente per 3 secondi per riattivare la proiezione.
Regolazione proiezione
Ruotare il proiettore (9) nella direzione della parete o del soffitto
su cui desiderate vedere l’ora, premere più volte il tasto ROTATE
(17) per ruotare, eventualmente, la proiezione di 0° 90°
180° 360°.
SVEGLIA
Con questo apparecchio si possono impostare indipendentemente
fino a due sveglie. Prima di impostare l’ora della sveglia, assicurarsi
che l’orario sia impostato correttamente.
IMPOSTAZIONE DELL’ORA SVEGLIA 1/2
1. Tenere premuto per 3 secondi il tasto ALARM (12), l’ora
comincerà a lampeggiare;
2. Nell’indicazione di Data e Mese (5) verrà mostrato l’orario della
sveglia 1, mentre nell’indicazione di Temperatura e Unidità (7 e
8) verrà mostrato l’orario della sveglia 2;
3. Impostare l’ora della sveglia premendo ripetutamente il tasto
5
5
Page 6
EC 884 PJ CLOCK PROJECTION
ITALIANO
UP (13) o il tasto DOWN (14);
4. Premere il tasto ALARM (12) per confermare e passare all’impostazione dei minuti;
5. Una volta impostati i minuti premere il tasto ALARM (12) per
confermare e uscire.
ATTIVAZIONE/DISATTIVAZIONE SVEGLIA
- Spostare l’interruttore (15) per la sveglia 1 o l’interruttore (16)
per la sveglia 2 sulla posizione ON per attivare la sveglia;
- Se la sveglia è attivata il display visualizzerà l’icona per la
sveglia 1 e l’icona per la sveglia 2;
- Spostare l’interruttore (15) per la sveglia 1 o l’interruttore (16)
per la sveglia 2 sulla posizione OFF per disattivare la sveglia.
SPEGNIMENTO DELLA SVEGLIA/FUNZIONE SNOOZE
- Quando l’allarme viene attivato, il simbolo (3) o (4)
inizia a lampeggiare e viene emesso un segnale acustico;
- Premere un qualsiasi pulsante (tranne il pulsante DIMMER/
SNOOZE/PROIEZIONE (10)) per interrompere definitivamente
l’allarme. Altrimenti, si arresterà automaticamente dopo 2 minuti;
- Mentre la sveglia suona, premere il pulsante DIMMER/SNOOZE/
PROIEZIONE (10) per attivare la funzione Snooze. Il simbolo di
allarme / inizierà a lampeggiare. Il segnale di allarme
verrà arrestato per 5 minuti, dopodiché suonerà di nuovo.
DIMMER
La funzione DIMMER è attiva solamente quando l’apparecchio è
collegato col suo alimentatore alla presa di rete, questa vi permetterà
di aumentare/diminuire la luminosità del display.
- Premere più volte il tasto DIMMER/SNOOZE/PROIEZIONE (10)
per modificare il livello di luminosità (alto/basso/spento).
RICARICA DISPOSITIVI ESTERNI
1. Collegare il dispositivo esterno da ricaricare alla presa USB (20)
sulla sveglia utilizzando un cavo USB adatto (non incluso);
2. L’avanzamento della ricarica viene visualizzato sul dispositivo
esterno;
3. Scollegare il dispositivo esterno dalla presa di ricarica USB se
si desidera interrompere la carica o se il dispositivo è completamente carico.
Note:
• La funzione di ricarica è possibile solo se la sveglia è collegata
all’alimentazione di rete.
• Prima di collegare un dispositivo, verificare che l’uscita di
alimentazione della sveglia possa fornire energia sufficiente
alla ricarica del dispositivo esterno.
• Consultare sempre il manuale operativo del dispositivo esterno.
VISUALIZZAZIONE TEMPERATURA
Premere il tasto DOWN (14) per la visualizzazione della temperatura
in °C o °F.
SPECIFICHE TECNICHE
Alimentazione: ...................5V 1A
Batteria: ............................. 2x 1,5V formato “AAA” (non incluse)
uscita presa USB: ............. 5V 1A
Gamma temperatura:......... -9°C-+50°C /14°F-+122°F
Gamma Umidità:................ 20%-95%
Dimensioni: ........................ 151x 94x 42mm
INFORMAZIONI AGLI UTENTI ai sensi del Decreto
Legislativo N° 49 del 14 Marzo 2014
“Attuazione della Direttiva 2012/19/UE sui rifiuti di apparecchiature elettriche ed elettroniche (RAEE)”
Il simbolo del cassonetto barrato riportato sull’apparecchiatura
indica che il prodotto alla fine della propria vita utile deve essere
raccolto separatamente dagli altri rifiuti. L’utente dovrà, pertanto,
conferire l’apparecchiatura integra dei componenti essenziali giunta a
fine vita agli idonei centri di raccolta differenziata dei rifiuti elettronici
ed elettrotecnici, oppure riconsegnarla al rivenditore al momento
dell’acquisto di nuova apparecchiatura di tipo equivalente, in ragione
di uno a uno, oppure 1 a zero per le apparecchiature aventi lato
maggiore inferiore a 25cm. L’adeguata raccolta differenziata per
l’avvio successivo dell’apparecchiatura dimessa al riciclaggio, al
trattamento e allo smaltimento ambientale compatibile contribuisce
ad evitare possibili effetti negativi sull’ambiente e sulla salute e
favorisce il riciclo dei materiali di cui è composta l’apparecchiatura.
Lo smaltimento abusivo del prodotto da parte dell’utente compor ta
l’applicazione delle sanzioni amministrative di cui al D.Lgs n. Decreto
Legislativo N° 49 del 14 Marzo 2014.
6
6
Page 7
EC 884 PJ CLOCK PROJECTION
CONTROLS AND DISPLAY
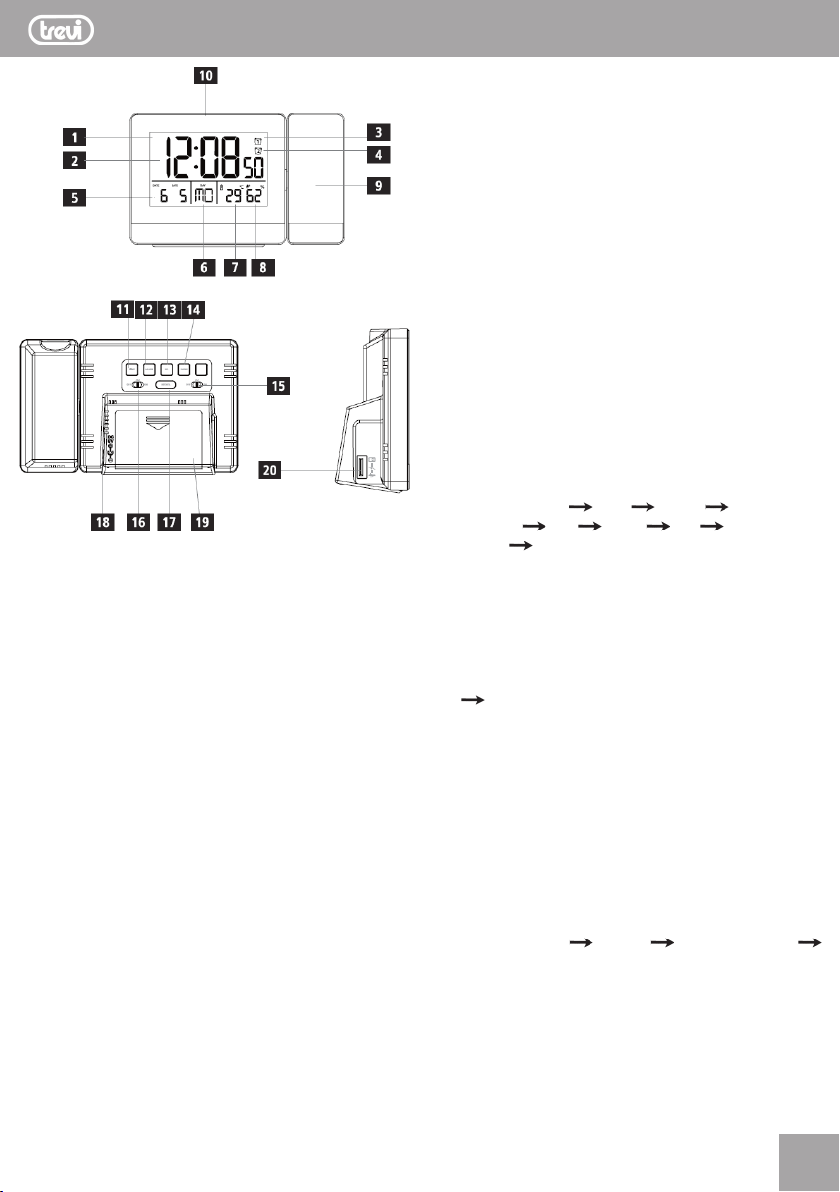
1. Display.
2. Time.
3. Alarm symbol 1.
4. Alarm symbol 2.
5. Date.
6. Day of the week.
7. Indoor temperature.
8. Indoor humidity.
9. Projection arm.
10. LIGHT/SNZ/PROJECTION button, activate the backlight (approx.
8 seconds)/ stop the alarm for 5 minutes.
11. TIME button, set the Time mode.
12. ALARM button, set the Alarm mode.
13. UP button, increase the current set value.
14. DOWN button, decrease the current set value/ switch between
°C and °F.
15. ON/OFF switch for alarm 1.
16. ON/OFF switch for alarm 2.
17. ROTATE button, rotate the projection by 0°, 90°, 180° or 360°.
18. Power supply unit connection socket.
19. Battery compartment.
20. USB charging port.
GETTING STARTED
INSERTING THE BATTERIES/ CONNECTING THE POWER SUPPLY
1. Connect the power supply unit to the power supply unit connection socket (18) on the back of the projection alarm clock;
2. Connect the power cable of the projection alarm clock to a
properly installed socket;
3. The projection alarm clock switches on automatically;
ENGLISH
4. Alternatively, open the battery compartment (19), insert two
AAA batteries with the correct polarity and close the battery
compartment cover.
Note:
• If the batteries are inserted correctly and you connect the power
supply unit to the alarm clock, the projection alarm clock will
automatically switch to the external power supply.
• Sustained projection is only possible on mains power.
REPLACING THE BATTERIES
1. Open the batter y compartment (19) on the back of the product;
2. Remove and dispose of any used batteries. Insert two new
batteries (AAA). Ensure that the polarity of the battery corresponds to the symbols in the battery compartment;
3. Close the battery compartment (19).
OPERATION
SETTING THE DATE/TIME
Once you have inserted the batteries or connected the power supply
unit, the display is switched on, an acoustic signal sounds and the
alarm clock automatically starts.
1. Press and hold the TIME button (11) for approximately 3 seconds
until the display begins to flash;
2. Set the following information in the order listed:
12/24-hour format Hour Minute Date Month or
Month Date Year Month Day Day of the week
language Exit;
3. To select individual values, press the UP button (13) or the
DOWN button (14) and confirm each selection by pressing
the TIME button (11);
4. Press the TIME button (11) immediately to adopt the set value
display and skip ahead;
5. If you do not make an entry for 20 seconds, Settings mode is
exited automatically.
Note Day of the week language:
You can choose from German (GE), French (FR), Spanish (SP),
Italian (IT), Dutch (DU), Danish (DA) and English (EN) for the display
of the day of the week.
TEMPERATURE DISPLAY
Press the DOWN button (14) to choose between °C and °F for the
temperature display.
ALARM CLOCK
SETTING THE ALARM TIME
1. Press and hold the ALARM button (12) for approx. 3 seconds
to go to Alarm mode. The display begins to flash;
2. Set the following information in the order listed:
Alarm 1 (3): hours minutes Alarm 2 (4): hours
minutes;
3. Press the UP button (13) or the DOWN button (14) to select the
hour for the alarm time and confirm your selection by pressing
the ALARM button (12). The minutes display begins to flash;
4. Repeat the process to set the minutes for the alarm time;
5. Press the ALARM button (12) immediately to adopt the set
value display and skip ahead;
6. If you do not make an entry for 20 seconds, Settings mode is
exited automatically.
7
7
Page 8
EC 884 PJ CLOCK PROJECTION
ENGLISH
ACTIVATING/DEACTIVATING THE ALARM
1. Set the ON/OFF switch for alarm 1 (15) or 2 (16) to “ON” to
activate alarm 1 and/or alarm 2 or set to “OFF” to deactivate
alarm 1 and/or alarm 2;
2. If the alarm is activated, alarm 1 will be displayed instead of
the date (5) or alarm 2 instead of the indoor temperature and
humidity (7/8) together with the corresponding symbol
and (3/4);
3. Alarm sound as below:
0-10sec: BI once/second
10-20sec: BI twice/second
20-30sec: BI four times/second
After 30sec, continuous BI sound
STOPPING THE ALARM/SNOOZE FUNCTION
1. When the alarm is triggered, the alarm symbol (3) or
(4) begins to flash and an alarm sounds;
2. Press any button (except the LIGHT/SNZ/PROJECTION button
(10)) to stop the alarm. Otherwise, it will stop automatically
after 2 minutes;
3. While the alarm signal is sounding press the LIGHT/SNZ/
PROJECTION button (10) activate the snooze function. The
alarm symbol / will begin to flash. The alarm signal
will be stopped for 5 minutes, after which it will sound again.
BACKLIGHT
1 Power from batteries:
Press the LIGHT/SNZ/PROJECTION button (10) to light up the
display. The display is illuminated for approx. 8 seconds.
2. Power from power supply unit:
Press the LIGHT/SNZ/PROJECTION button (10) several times
to change the brightness level (high/low/off, Dimmer function).
Note - Permanent backlight mode
Permanent backlight mode is only possible when plugged into
mains power.
PROJECTION
ACTIVATING/DEACTIVATING
Power from batteries:
Press the LIGHT/SNZ/PROJECTION button (10) to project the display
onto the wall or ceiling for 8 seconds.
Power from power supply unit:
1. Press and hold the LIGHT/SNZ/PROJECTION button (10) for
approximately 3 seconds to activate sustained projection.
2. Press and hold the LIGHT/SNZ/PROJECTION button (10) for
approximately 3 seconds to deactivate sustained projection.
PROJECTION SETTING
1. Turn the projection arm (9) forward/back to project the display
onto the desired wall/ceiling;
2. Press the ROTATE button (17) again to rotate the projection by
0°, 90°, 180° or 360°.
CHARGING FUNCTION
1. Connect your terminal device to a USB charging socket (20)
on the alarm clock using a suitable USB cable;
2. The charging progress is displayed on your terminal device;
3. Disconnect the terminal device from the USB charging socket
if you want to interrupt charging or if the terminal device is fully
charged.
Note - Connecting terminal devices
• The charging function is only possible when plugged into mains
power.
• Before connecting a terminal device, check whether the power
output of the charger can supply sufficient power for the device.
• Please refer to the instructions in the operating manual of your
terminal device.
SPECIFICATION
Power Supply: ...........................5V 1A
Battery: .................................... 2x 1,5V (“AAA”size,
Not included)
USB Output: ............................. 5V 1A
Measuring range temperature: ... -9°C-+50°C /14°F-+122°F
Measuring range humidity: ........ 20%-95%
Size: ........................................151x 94x 42mm
Precautions for correct disposal of the product
The symbol shown on the equipment indicates that waste must be
disposed of in “separate collection” and so the product must not
be disposed of together with urban waste.
The user must take the product to special “separate waste collection
centres” provided by local government, or deliver it to the retailer
against the purchase of a new product.
Separate collection of waste and subsequent treatment, recycling
and disposal operations promotes the production of equipment with
recycled materials and limits negative effects on the environment
and on health caused by improper handling of waste.
Illegal disposal of the product leads to the enforcement of administrative penalties.
8
8
Page 9
EC 884 PJ CLOCK PROJECTION
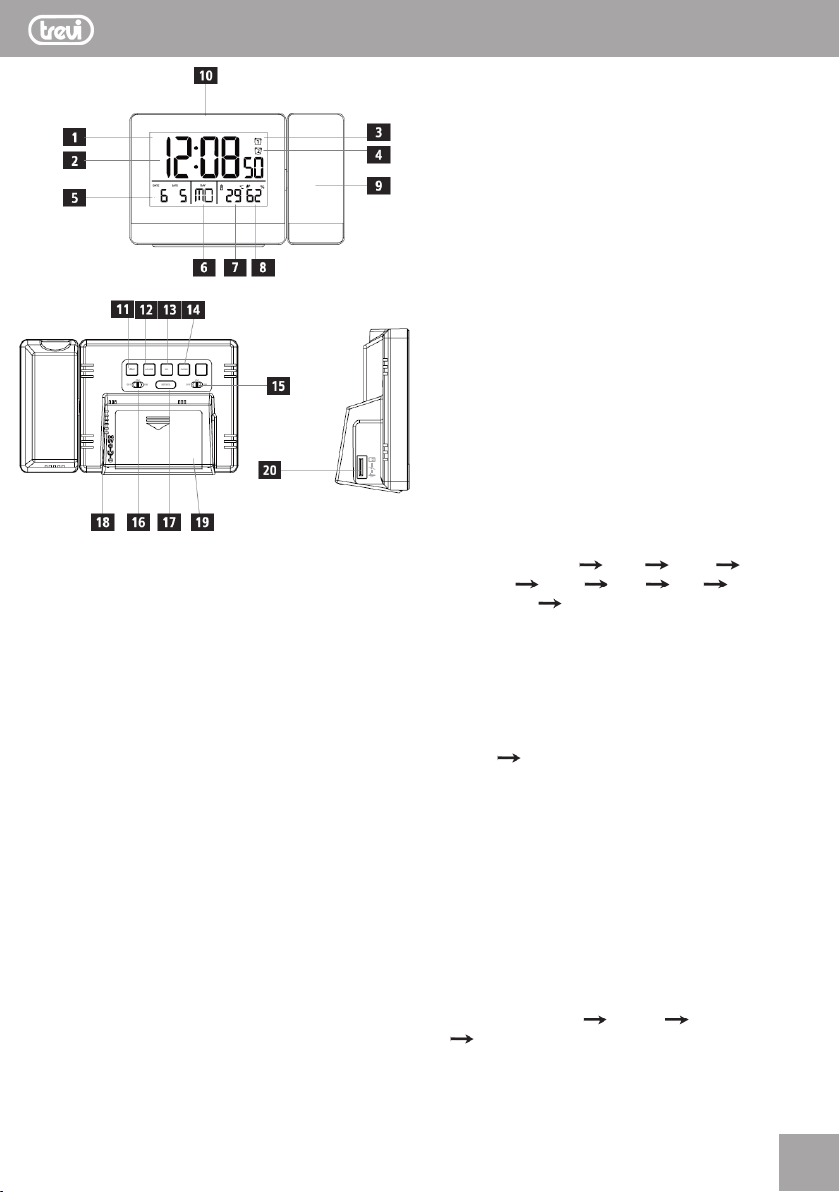
COMMANDES ET AFFICHAGES
1. Affichage.
2. Temps.
3. Symbole d’alarme 1.
4. Symbole d’alarme 2.
5. Date.
6. Jour de la semaine.
7. Température intérieure.
8. Humidité intérieure.
9. Bras de projection.
10. Touche LIGHT/SNZ/PROJECTION; activer le rétroéclairage
(environ 8 secondes)/ arrêter l’alarme pendant 5 minutes.
11. Bouton TIME, régler le mode Time.
12. Bouton ALARM, régler le mode d’alarme.
13. Bouton UP, augmente la valeur de réglage actuelle.
14. Bouton DOWN, diminuer la valeur de consigne actuelle/ basculer
entre °C et °F.
15. Interrupteur ON/OFF pour l’alarme 1.
16. Interrupteur ON/OFF pour l’alarme 2.
17. Bouton ROTATE, faire pivoter la projection de 0°, 90°, 180° ou
360°.
18. Prise de connexion du bloc d’alimentation.
19. Compartiment à piles.
20. Port de chargement USB.
PUOR COMMENCER
INSERTION DES PILES/ CONNEXION DE L’ALIMENTATION
1. Connectez le bloc d’alimentation à la prise de raccordement
du bloc d’alimentation (18) à l’arrière du réveil de projection;
2. Connectez le câble d’alimentation du réveil à projection à une
FRANCAISE
prise correctement installée;
3. Le réveil à projection s’allume automatiquement;
4. Vous pouvez également ouvrir le compartiment des piles (19),
insérer deux piles AAA avec la polarité correcte et fermer le
couvercle du compartiment des piles.
Remarque
• Si les piles sont insérées correctement et que vous connectez
le bloc d’alimentation au réveil, le réveil à projection passera
automatiquement à l’alimentation externe.
• Une projection soutenue n’est possible que sur secteur.
REPLACEMENT DES PILES
1. Ouvrez le compartiment des piles (19) à l’arrière du produit;
2. Retirez et jetez toutes les piles usées. Insérez deux piles neuves
(AAA). Assurez-vous que la polarité de la batterie correspond
aux symboles dans le compartiment de la batterie;
3. Fermez le compartiment à piles (19).
FUNCIONNEMENT
RÉGLAGE DE LA DATE/HEURE
Une fois que vous avez inséré les piles ou connecté le bloc d’alimentation, l’affichage est allumé, un signal acoustique retentit et
le réveil démarre automatiquement.
1. Appuyez sur le bouton TIME (11) et maintenez-le enfoncé pendant
environ 3 secondes jusqu’à ce que l’affichage commence à
clignoter;
2. Définissez les informations suivantes dans l’ordre indiqué:
Format 12/24 heures Heure Minute Date Mois ou
Mois Date Année Mois Jour Langue du jour
de la semaine Quitter;
3. Pour sélectionner des valeurs individuelles, appuyez sur le
bouton UP (13) ou DOWN (14) et confirmez chaque sélection
en appuyant sur le bouton TIME (11);
4. Appuyez immédiatement sur le bouton TIME (11) pour adopter
l’affichage de la valeur de consigne et avancer;
5. Si vous n’effectuez pas de saisie pendant 20 secondes, le mode
Paramètres se ferme automatiquement.
Remarque Langue du jour de la semaine:
Vous pouvez choisir parmi l’allemand (GE), le français (FR), l’espagnol (SP), l’italien (IT), le néerlandais (DU), le danois (DA) et
l’anglais (EN) pour l’affichage du jour de la semaine.
AFFICHAGE DE LA TEMPÉRATURE
Appuyez sur le bouton DOWN (14) pour choisir entre °C et °F pour
l’affichage de la température.
RÉVEIL
RÉGLAGE DE L’HEURE DE L’ALARME
1. Appuyez sur le bouton ALARM (12) et maintenez-le enfoncé
pendant env. 3 secondes pour passer en mode Alarme. L’affichage commence à clignoter;
2. Définissez les informations suivantes dans l’ordre indiqué:
Alarme 1 (3): heures minutes Alarme 2 (4): heures
minutes;
3. Appuyez sur le bouton UP (13) ou le bouton DOWN (14) pour
sélectionner l’heure de l’heure de l’alarme et confirmez votre
sélection en appuyant sur le bouton ALARME (12). L’affichage
des minutes commence à clignoter;
9
9
Page 10
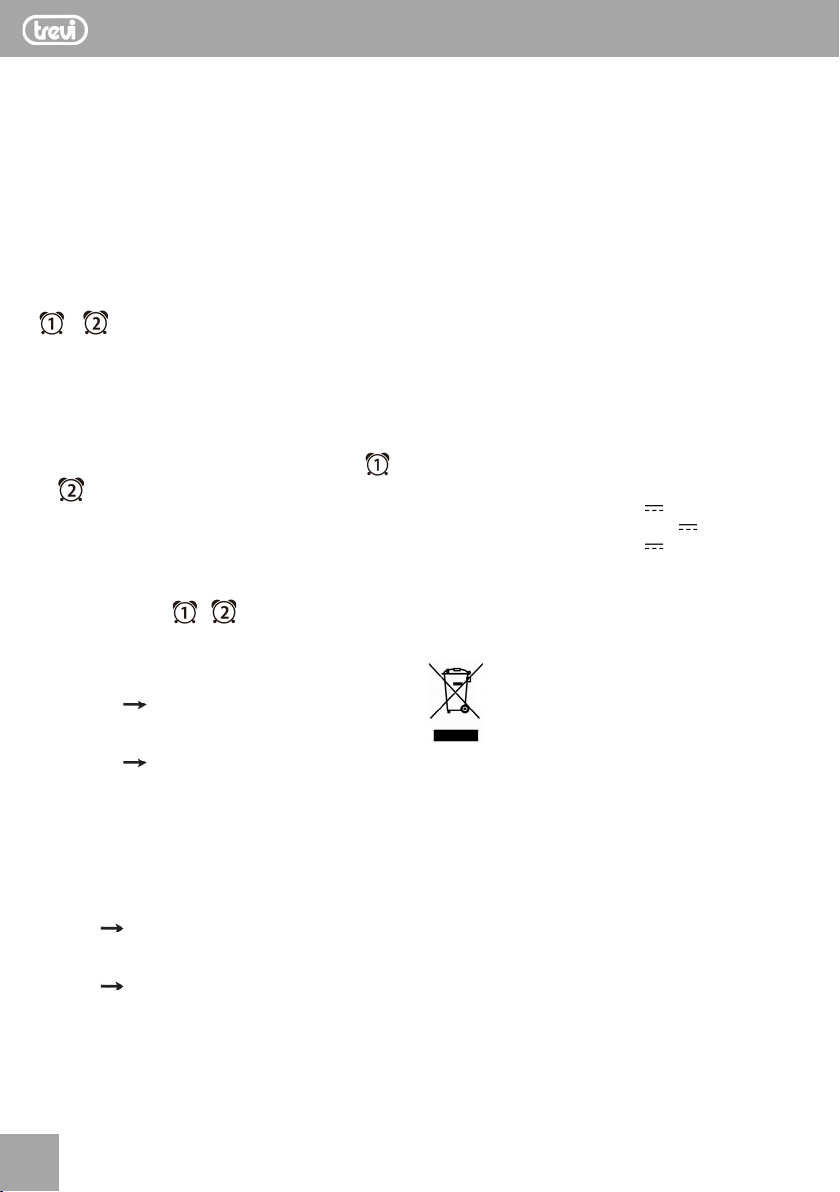
EC 884 PJ CLOCK PROJECTION
FRANCAISE
4. Répétez le processus pour régler les minutes de l’heure de
l’alarme;
5. Appuyez immédiatement sur le bouton ALARME (12) pour
adopter l’affichage de la valeur de consigne et avancer;
6. Si vous n’effectuez pas de saisie pendant 20 secondes, le mode
Paramètres se ferme automatiquement.
ACTIVER/DÉSACTIVER L’ALARME
1. Réglez l’interrupteur ON/OFF pour l’alarme 1 (15) ou 2 (16)
sur “ON” pour activer l’alarme 1 et/ou l’alarme 2 ou sur “OFF”
pour désactiver l’alarme 1 et/ou l’alarme 2;
2. Si l’alarme est activée, l’alarme 1 sera affichée à la place de
la date (5) ou l’alarme 2 à la place de la température et de
l’humidité intérieures (7/8) avec le symbole correspondant
et (3/4);
3. Son d’alarme comme ci-dessous:
0-10s: BI une fois/seconde
10-20s: BI deux fois/seconde
20-30s: BI quatre fois/seconde
Après 30s, son BI continu
ARRÊT DE LA FONCTION ALARME/RÉPÉTITION
1. Lorsque l’alar me est déclenchée, le symbole d’alarme (3)
ou (4) commence à clignoter et une alarme retentit;
2. Appuyez sur n’importe quel bouton (sauf le bouton LIGHT/SNZ/
PROJECTION (10)) pour arrêter l’alarme. Sinon, il s’arrêtera
automatiquement après 2 minutes;
3. Pendant que le signal d’alarme retentit, appuyez sur le bouton
LIGHT/SNZ/PROJECTION (10) pour activer la fonction snooze.
Le symbole d’alarme / commencera à clignoter. Le
signal d’alarme sera arrêté pendant 5 minutes, après quoi il
retentira à nouveau.
RÉTROÉCLAIRAGE
1 Alimentation batterie:
Appuyez sur le bouton LIGHT/SNZ/PROJECTION (10) pour
allumer l’affichage. L’écran est éclairé pendant env. 8 secondes.
2. Alimentation adaptateur secteur:
Appuyez plusieurs fois sur le bouton LIGHT/SNZ/PROJECTION
(10) pour modifier le niveau de luminosité (haut/bas/éteint).
Remarque - Mode rétroéclairage permanent
Le mode de rétroéclairage permanent n’est possible que lorsqu’il
est branché sur le secteur.
PROJECTION
ACTIVATION/DÉSACTIVATION
Alimentation batteries:
Appuyez sur le bouton LIGHT/SNZ/PROJECTION (10) pour projeter
l’affichage sur le mur ou le plafond pendant 8 secondes.
Alimentation adaptateur secteur:
1. Appuyez sur le bouton LIGHT/SNZ/PROJECTION (10) et
maintenez-le enfoncé pendant environ 3 secondes pour activer
la projection prolongée.
2. Appuyez sur le bouton LIGHT/SNZ/PROJECTION (10) et maintenez-le enfoncé pendant environ 3 secondes pour désactiver
la projection prolongée.
PARAMÈTRE DE PROJECTION
1. Tournez le bras de projection (9) vers l’avant/l’arrière pour
projeter l’écran sur le mur/plafond souhaité;
2. Appuyez à nouveau sur le bouton ROTATE (17) pour faire pivoter
la projection de 0°, 90°, 180° ou 360°.
FUNCTION DE CHARGE
1. Connectez votre terminal à une prise de charge USB (20) du
réveil à l’aide d’un câble USB adapté.
2. La progression de la charge s’affiche sur votre terminal.
3. Débranchez le terminal de la prise de chargement USB si vous
souhaitez interrompre la charge ou si le terminal est complètement chargé.
Remarque - Connexion de terminaux
• La fonction de charge n’est possible que lorsqu’elle est branchée
sur le secteur.
• Avant de connecter un appareil terminal, vérifiez si la sortie
d’alimentation du chargeur peut fournir une alimentation
suffisante à l’appareil.
• Veuillez vous référer aux instructions du manuel d’utilisation
de votre terminal.
CARACTÉRISTIQUES
Alimentation: ............................. 5V 1A
Batterie: ............................. ........2x 1,5V “AAA” (non inclus)
Sortie USB: ............................... 5V 1A
Plage de mesure Température:... -9°C-+50°C /14°F-+122°F
Plage de mesure de l’humidité: .. 20%-95%
Taille: ........................................ 151x 94x 42mm
Recommandations pour l’élimination correcte
du produit
Le symbole figurant sur l’appareil indique que le produit fait l’objet
d’une “collecte séparée“. C’est pourquoi, le produit ne doit pas être
éliminé avec les déchets urbains.
L’utilisateur doit remettre le produit auprès de “décharges spécialisées de collecte séparée“ prévues par les autorités locales, ou
bien le rendre au revendeur quand il achètera un nouvel appareil
équivalent.
La collecte séparée du produit et les opérations successives de
traitement, recyclage et élimination favorisent la production d’appareils composés par des matériaux recyclés ainsi que permettent
d’éviter des effets négatifs sur l’environnement et sur la santé des
personnes suite à une gestion impropre du déchet.
Toute élimination abusive du produit entraîne l’application de
sanctions administratives.
10
10
Page 11
EC 884 PJ CLOCK PROJECTION
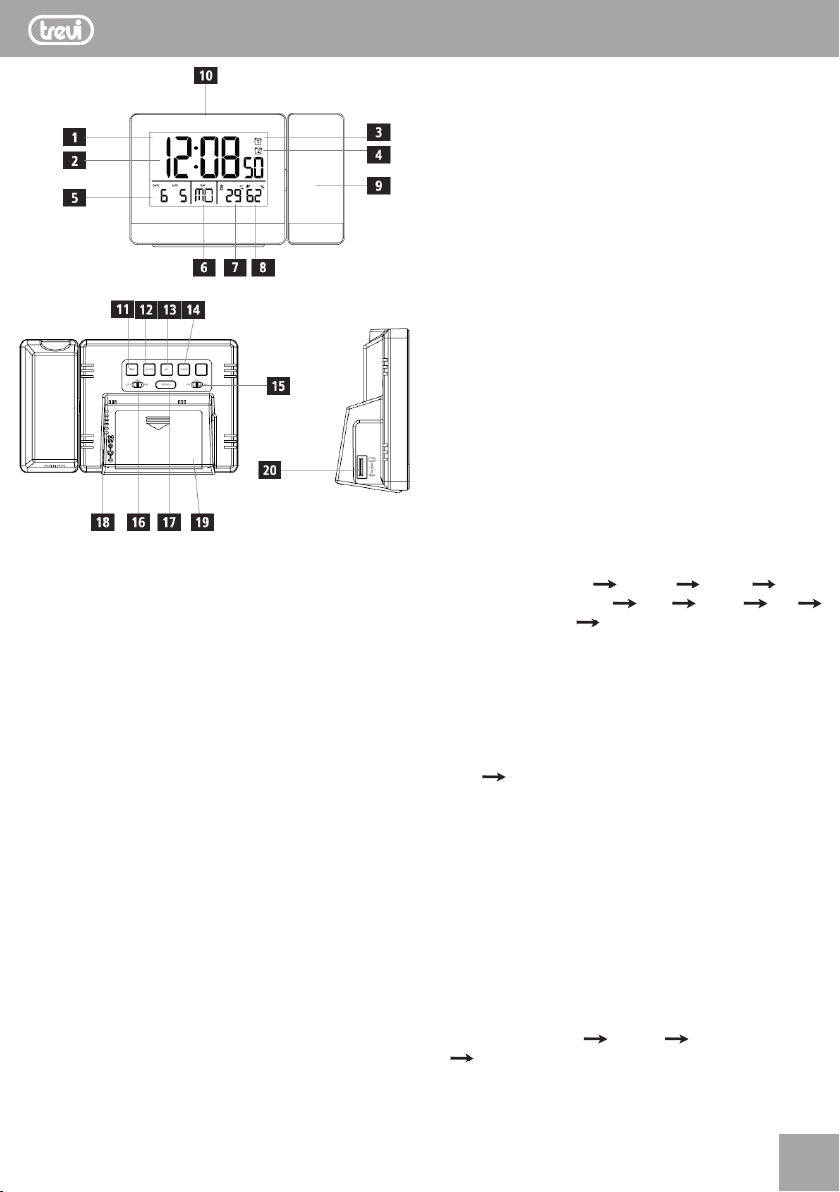
STEUERELEMENTE UND ANZEIGEN
1. Anzeigen.
2. Mal.
3. Alarmsymbol 1.
4. Alarmsymbol 2.
5. Datum.
6. Wochentag.
7. Innentemperatur.
8. Raumfeuchtigkeit.
9. Projektionsarm.
10. Taste LIGHT/SNZ/PROJECTION, Hintergrundbeleuchtung
aktivieren (ca. 8 Sekunden)/ Alarm für 5 Minuten stoppen.
11. TIME-Taste, Zeitmodus einstellen.
12. ALARM-Taste, Alarmmodus einstellen.
13. UP-Taste, erhöhen Sie den aktuell eingestellten Wert.
14. DOWN-Taste, Verringert den aktuell eingestellten Wer t/Schalter
zwischen °C und °F.
15. ON/OFF-Schalter für Alarm 1.
16. ON/OFF-Schalter für Alarm 2.
17. ROTATE-Taste, Drehen Sie die Projektion um 0°, 90°, 180° oder
360°.
18. Anschlussbuchse des Netzteils.
19. Batteriefach.
20. USB-Ladeanschluss.
ANFANGEN
EINLEGEN DER BATTERIEN/ ANSCHLIEßEN DER
STROMVERSORGUNG
1. Schließen Sie das Netzteil an die Anschlussbuchse des Netzteils
(18) auf der Rückseite des Projektionsweckers an;
DEUTSCH
2. Schließen Sie das Netzkabel des Projektionsweckers an eine
ordnungsgemäß installierte Steckdose an;
3. Der Projektionswecker schaltet sich automatisch ein;
4. Öffnen Sie alternativ das Batteriefach (19), legen Sie zwei
AAA-Batterien mit der richtigen Polarität ein und schließen Sie
die Batteriefachabdeckung.
Hinweis:
• Wenn die Batterien richtig eingelegt sind und Sie das Netzteil
an den Wecker anschließen, schaltet der Projektionswecker
automatisch auf das externe Netzteil um.
• Eine nachhaltige Projektion ist nur mit Netzstrom möglich.
ERSETZEN DER BATTERIEN
1. Öffnen Sie das Batteriefach (19) auf der Rückseite des Produkts;
2. Gebrauchte Batterien entfernen und entsorgen. Legen Sie zwei
neue Batterien (AAA) ein. Stellen Sie sicher, dass die Polarität
der Batterie den Symbolen im Batteriefach entspricht;
3. Schließen Sie das Batteriefach (19).
BETRIEB
DATUM/UHRZEIT EINSTELLEN
Sobald Sie die Batterien eingelegt oder das Netzteil angeschlossen
haben, wird das Display eingeschaltet, ein akustisches Signal ertönt
und der Wecker startet automatisch.
1. Halten Sie die TIME-Taste (11) ca. 3 Sekunden lang gedrückt,
bis die Anzeige zu blinken beginnt;
2. Stellen Sie die folgenden Informationen in der angegebenen
Reihenfolge ein:
12/24-Stunden format Stunde Minute Datum
Monat oder Monat Datum Jahr Monat Tag
Wochentag Sprache Beenden;
3. Um einzelne Werte auszuwählen, drücken Sie die UP-Taste (13)
oder die DOWN-Taste (14) und bestätigen Sie jede Auswahl
durch Drücken der TIME-Taste (11);
4. Drücken Sie sofor t die TIME-Taste (11), um die Einstellwertanzeige zu übernehmen und fortzufahren;
5. Wenn Sie 20 Sekunden lang keine Eingabe vornehmen, wird
der Einstellungsmodus automatisch beendet.
Hinweis Wochentagssprache:
Für die Anzeige des Wochentags können Sie zwischen Deutsch (GE),
Französisch (FR), Spanisch (SP), Italienisch (IT), Niederländisch
(DU), Dänisch (DA) und Englisch (EN) wählen.
TEMPERATURANZEIGE
Drücken Sie die DOWN-Taste (14), um zwischen °C und °F für die
Temperaturanzeige zu wählen.
WECKER
EINSTELLEN DER ALARMZEIT
1. alten Sie die ALARM-Taste (12) ca. 3 Sekunden, um in den
Alarmmodus zu wechseln. Die Anzeige beginnt zu blinken;
2. Stellen Sie die folgenden Informationen in der angegebenen
Reihenfolge ein:
Alarm 1 (3): Stunden minuten Alarm 2 (4): Stunden
minuten;
3. Drücken Sie die UP-Taste (13) oder die DOWN-Taste (14), um
die Stunde für die Alarmzeit auszuwählen und Ihre Auswahl
durch Drücken der ALARM-Taste (12) zu bestätigen. Die
11
11
Page 12
EC 884 PJ CLOCK PROJECTION
DEUTSCH
Minutenanzeige beginnt zu blinken;
4. Wieder holen Sie den Vorgang, um die Minuten für die Alarmzeit
einzustellen;
5. Drücken Sie sofort die ALARM-Taste (12), um die Einstellwertanzeige zu übernehmen und fortzufahren;
6. Wenn Sie 20 Sekunden lang keine Eingabe vornehmen, wird
der Einstellungsmodus automatisch beendet.
ALARM AKTIVIEREN/DEAKTIVIEREN
1. Stellen Sie den ON/OFF-Schalter für Alarm 1 (15) oder 2 (16)
auf “ON”, um Alarm 1 und/oder Alarm 2 zu aktivieren, oder auf
“OFF”, um Alarm 1 und/oder Alarm 2 zu deaktivieren;
2. Wenn der Alarm aktivier t ist, wird Alarm 1 anstelle des Datums
(5) oder Alarm 2 anstelle der Innentemperatur und Luftfeuch-
tigkeit (7/8) zusammen mit dem entsprechenden Symbol
und (3/4) angezeigt;
3. Alarmton wie folgt:
0-10sec: BI einmal pro Sekunde
10-20sec: BI zweimal pro Sekunde
20-30sec: BI viermal/Sekunde
After 30sec, kontinuierlicher BI-Sound
STOPPEN DER ALARM/SCHLUMMERFUNKTION
1. Wenn der Alarm ausgelöst wird, beginnt das Alar msymbol
(3) oder (4) zu blinken und ein Alarm ertönt;
2. Drücken Sie eine beliebige Taste (außer der LIGHT/SNZ/
PROJECTION-Taste (10)), um den Alarm zu stoppen. Andernfalls
wird es nach 2 Minuten automatisch gestoppt;
3. Während das Alarmsignal er tönt, drücken Sie die Taste LIGHT/
SNZ/PROJECTION (10), um die Schlummerfunktion zu akti-
vieren. Das Alarmsymbol / beginnt zu blinken. Das
Alarmsignal wird für 5 Minuten gestoppt, danach ertönt es
erneut.
HINTERGRUNDBELEUCHTUNG
1 Strom aus Batterien:
Drücken Sie die Taste LIGHT/SNZ/PROJECTION (10), um das
Display zu beleuchten. Das Display leuchtet ca. 8 Sekunden.
2. Strom aus Netzteil:
Drücken Sie mehr mals die Taste LIGHT/SNZ/PROJECTION (10),
um die Helligkeitsstufe (hoch/niedrig/aus) zu ändern.
Hinweis - Permanenter Hintergrundbeleuchtungsmodus
Der permanente Hintergrundbeleuchtungsmodus ist nur möglich,
wenn er an das Stromnetz angeschlossen ist.
PROJEKTION
AKTIVIEREN/DEAKTIVIEREN
Strom aus Batterien:
Drücken Sie die Taste LIGHT/SNZ/PROJECTION (10), um das
Display 8 Sekunden lang auf die Wand oder Decke zu projizieren.
Strom aus Netzteil:
1. Halten Sie die Taste LIGHT/SNZ/PROJECTION (10) ca. 3
Sekunden lang gedrückt, um die Dauerprojektion zu aktivieren.
2. Halten Sie die Taste LIGHT/SNZ/PROJECTION (10) ca. 3 Sekunden lang gedrückt, um die Dauerprojektion zu deaktivieren.
PROJEKTIONSEINSTELLUNG
1. Drehen Sie den Projektionsarm (9) vorwärts/rückwärts, um
das Display auf die gewünschte Wand/Decke zu projizieren;
2. Drücken Sie die ROTATE-Taste (17) erneut, um die Projektion
um 0°, 90°, 180° oder 360° zu drehen.
LADEFUNKTION
1. Schließen Sie Ihr Endgerät mit einem geeigneten USB-Kabel an
eine USB-Ladebuchse (20) am Wecker an;
2. Der Ladevorgang wird auf Ihrem Endgerät angezeigt;
3. Trennen Sie das Endgerät von der USB-Ladebuchse, wenn
Sie den Ladevorgang unterbrechen möchten oder wenn das
Endgerät vollständig aufgeladen ist.
Hinweis - Anschließen von Endgeräten
• Die Ladefunktion ist nur möglich, wenn sie an das Stromnetz
angeschlossen ist.
• Überprüfen Sie vor dem Anschließen eines Endgeräts, ob die
Ausgangsleistung des Ladegeräts ausreichend Strom für das
Gerät liefern kann.
• Bitte beachten Sie die Anweisungen in der Bedienungsanleitung
Ihres Endgeräts.
TECHNISCHE DATEN
Stromversorgung: ..................... 5V 1A
Batterie: ............................. .......2x 1,5V “AAA” (Nicht enthalten)
USB-Ausgang: .......................... 5V 1A
Messbereichstemperatur: .......... -9°C-+50°C /14°F-+122°F
Messbereich Luftfeuchtigkeit: .... 20%-95%
Größe: ...................................... 151x 94x 42mm
Hinweise zur ordnungsgemäßen Entsorgung des
Produkts
Das auf dem Gerät angebrachte Symbol weist darauf hin, dass
das Altgerät “getrennt zu sammeln” ist und das Produkt daher
nicht zusammen mit dem Gemeindeabfall entsorgt werden darf.
Der Benutzer muss das Produkt zu den entsprechenden, von der
Gemeindeverwaltung eingerichteten “Wer tstoffsammelstellen” bringen oder dem Händler beim Kauf eines neuen Produkts übergeben.
Die getrennte Müllsammlung und anschließende Aufbereitung, Wiederverwer tung und Entsorgung fördern die Herstellung von Geräten
unter Verwendung wiederverwer teter Materialien und vermindern
die negativen Auswirkungen auf die Umwelt und Gesundheit in
Folge einer falschen Müllverwaltung.
Die widerrechtliche Entsorgung des Produkts führt zur Auferlegung
von Verwaltungsstrafen.
12
12
Page 13
EC 884 PJ CLOCK PROJECTION
CONTROLES Y PANTALLAS
1. Pantalla
2. Tiempo.
3. Símbolo de alarma 1.
4. Símbolo de alarma 2.
5. Fecha.
6. Día de la semana.
7. Temperatura interior.
8. Humedad interior.
9. Brazo de proyección.
10. Botón LIGHT/SNZ/PROJECTION, active la luz de fondo (aprox.
8 segundos)/ pare la alarma durante 5 minutos.
11. Botón TIME, establece el modo Time.
12. Botón ALARM, configurar el modo de alarma.
13. Botón UP, aumenta el valor establecido actual.
14. Botón DOWN, disminuye el valor de ajuste actual/cambia entre
°C y °F.
15. Interruptor ON/OFF para alarma 1.
16. Interruptor ON/OFF para alarma 2.
17. Botón ROTATE, gira la proyección 0°, 90°, 180° o 360°.
18. Toma de conexión de la fuente de alimentación.
19. Compartimento de la batería.
20. Puerto de carga USB.
EMPEZANDO
INSERTAR LAS BATTERÍAS/ CONECTAR LA FUENTE DE
ALIMENTACIÓN
1. Conecte la unidad de fuente de alimentación a la toma de
conexión de la unidad de fuente de alimentación (18) en la
parte posterior del reloj de alarma de proyección;
ESPANOL
2. Conecte el cable de alimentación del reloj despertador de
proyección a una toma instalada correctamente;
3. El reloj desper tador de proyección se enciende automáticamente;
4. Alternativamente, abra el compartimiento de la batería (19),
inserte dos baterías AAA con la polaridad correcta y cierre la
tapa del compartimiento de la batería.
Nota:
• Si las baterías están insertadas correctamente y conecta la
unidad de fuente de alimentación a la alarma, la alarma de
proyección cambiará automáticamente a la fuente de alimentación externa.
• Sustained projection is only possible on mains power.
SUSTITUCIÓN DE LAS PILAS
1. Abra el compartimento de la batería (19) en la parte posterior
del producto;
2. Retire y deseche las baterías usadas. Inser te dos baterías nuevas
(AAA). Asegúrese de que la polaridad de la batería corresponde
a los símbolos en el compartimiento de la batería;
3. Cerrar el compartimento de la batería (19).
OPERACIÓN
ESTABLECER LA FECHA/HORA
Una vez que ha insertado las baterías o conectado la fuente de
alimentación, la pantalla se enciende, suena una señal acústica y
la alarma se activa automáticamente.
1. Mantenga presionado el botón TIME (11) durante aproximadamente 3 segundos hasta que la pantalla comience a parpadear;
2. Establezca la siguiente información en el orden indicado:
Formato de 12/24-horas Hora Minuto Fecha Mes
o Mes Fecha Año Mes Día Idioma del día de
la semana Salir;
3. Para seleccionar valores individuales, presione el botón UP (13)
o el botón DOWN (14) y confirme cada selección presionando
el botón TIME (11);
4. Presione el botón TIME (11) inmediatamente para adoptar la
visualización del valor establecido y salte hacia adelante;
5. Si no realiza una entrada durante 20 segundos, el modo Configuración se cierra automáticamente.
Nota language Idioma del día de la semana:
Puede elegir entre alemán (GE), francés (FR), español (SP), italiano
(IT), holandés (DU), danés (DA) e inglés (EN) para la visualización
del día de la semana.
VISUALIZACIÓN DE LA TEMPERATURA
Presione el botón DOWN (14) para elegir entre °C y °F para la
visualización de la temperatura.
DESPERTADOR
CONFIGURAR LA HORA DE LA ALARMA
1. Mantenga presionado el botón ALARM (12) durante aprox. 3
segundos para ir al modo de alarma. La pantalla comienza a
parpadear;
2. Establezca la siguiente información en el orden indicado:
Alarm 1 (3): horas minutos Alarm 2 (4): horas
minutos;
3. Presione el botón UP (13) o el botón DOWN (14) para seleccionar la hora para la hora de la alarma y confirme su selección
13
13
Page 14
EC 884 PJ CLOCK PROJECTION
ESPANOL
presionando el botón ALARM (12). La pantalla de minutos
comienza a parpadear;
4. Repita el proceso para configurar los minutos para la hora de
la alarma;
5. Presione el botón ALARM (12) inmediatamente para adoptar
la visualización del valor establecido y saltar hacia adelante;
6. Si no realiza una entrada durante 20 segundos, el modo Configuración se cierra automáticamente.
ACTIVAR/DESACTIVAR LA ALARMA
1. Ajuste el interruptor de ON/OFF para la alarma 1 (15) o 2 (16)
en “ON” para activar la alarma 1 y/o la alarma 2 o en “OFF”
para desactivar la alarma 1 y/o la alarma 2;
2. Si la alarma está activada, se mostrará la alarma 1 en lugar de
la fecha (5) o la alarma 2 en lugar de la temperatura y humedad
interior (7/8) junto con el símbolo correspondiente y
(3/4);
3. Sonido de alarma de la siguiente manera:
0-10sec: BI una vez/segundo
10-20sec: BI dos veces/segundo
20-30sec: BI cuatro veces/segundo
Después de 30sec, sonido BI continuo.
DETENER LA FUNCIÓN DE ALARMA/REPETICIÓN
1. Cuando se activa la alarma, el símbolo de alarma (3) Y
(4) comienza a parpadear y suena una alarma;
2. Presione cualquier botón (excepto el botón LIGHT/SNZ/
PROJECTION (10)) para detener la alarma. De lo contrario, se
detendrá automáticamente después de 2 minutos;
3. Mientras suena la señal de alarma, presione el botón LIGHT/
SNZ/PROJECTION (10) para activar la función de repetición.
El símbolo de alarma / comenzará a parpadear. La
señal de alarma se detendrá durante 5 minutos, después de
lo cual volverá a sonar.
ILLUMINAR DESDE EL FONDO
1 Potencia de baterías:
Presione el botón LIGHT/SNZ/PROJECTION (10) para iluminar
la pantalla. La pantalla se ilumina durante aprox. 8 segundos.
2. Alimentación desde unidad de fuente de alimentación:
Presione el botón LIGHT/SNZ/PROJECTION (10) varias veces
para cambiar el nivel de brillo (alto/bajo/apagado).
Nota - Modo de luz de fondo permanente
El modo de retroiluminación permanente solo es posible cuando
se conecta a la red eléctrica.
PROJECCIÓN
ACTIVANDO/DESACTIVANDO
Potencia de baterías:
Presione el botón LIGHT/SNZ/PROJECTION (10) para proyectar la
pantalla en la pared o el techo durante 8 segundos.
Alimentación desde unidad de fuente de alimentación:
1. Mantenga presionado el botón LIGHT/SNZ/PROJECTION (10)
durante aproximadamente 3 segundos para activar la proyección
sostenida;
2. Mantenga presionado el botón LIGHT/SNZ/PROJECTION (10)
durante aproximadamente 3 segundos para desactivar la
proyección sostenida.
AJUSTE DE PROYECCIÓN
1. Gire el brazo de proyección (9) hacia adelante/atrás para
proyectar la pantalla en la pared/techo deseado;
2. Presione el botón ROTATE (17) nuevamente para rotar la
proyección en 0°, 90°, 180° o 360°.
FUNCIÓN DE CARGA
1. Conecte su dispositivo terminal a una toma de carga USB (20)
en el reloj de alarma con un cable USB adecuado;
2. El progreso de carga se muestra en su dispositivo terminal;
3. Desconecte el dispositivo terminal de la toma de carga USB
si desea interrumpir la carga o si el dispositivo terminal está
completamente cargado.
Nota - Conexión de dispositivos terminales
• La función de carga solo es posible cuando se conecta a la
red eléctrica.
• Antes de conectar un dispositivo terminal, verifique si la salida
de energía del cargador puede suministrar suficiente energía
para el dispositivo.
• Consulte las instrucciones en el manual de funcionamiento de
su dispositivo terminal.
ESPECIFICACIONES
Alimentação: ............................. 5V 1A
Batería: .............................. .......2x 1,5V Tamaño “AAA”
(no incluidas)
Salida USB: ............................... 5V 1A
Rango de Temperatura: ............. -9°C-+50°C /14°F-+122°F
Rango de humedad: .................. 20%-95%
Dimensões: ............................... 151x 94x 42mm
Advertencias para la correcta eliminación del producto
El símbolo que aparece en el aparato indica que el residuo debe
ser objeto de “recogida selectiva” por tanto el producto no se debe
eliminar junto con residuos urbanos.
El usuario deberá entregar el producto a los “centros de recogida
selectiva” creados por las administraciones municipales o bien al
distribuidor cuando adquiera un nuevo producto.
La recogida selectiva del residuo y las sucesivas operaciones de
tratamiento, recuperación y eliminación favorecen la fabricación
de aparatos con materiales reciclados y limitan los efectos negativos en el medio ambiente y la salud causados por una gestión
incorrecta del residuo.
La eliminación abusiva del producto da lugar a la aplicación de
sanciones administrativas.
14
14
Page 15
EC 884 PJ CLOCK PROJECTION
EN If you will not find your language on the instruction manual, please go on our website www.trevi.it to find it
FR Si vous ne trouverez pas votre langue sur le mode d’emploi, veuillez vous visiter sur notre site Web www.trevi.it de le trouver
DE Wenn Sie Ihre Sprache auf die Bedienungsanleitung nicht finden, gehen Sie bitte auf unsere Webseite www.trevi.it zu finden
ES Si no encuentras tu idioma en el manual de instrucciones, por favor vaya a nuestra página web www.trevi.it se encuentra
PT Se você não vai encontrar sua língua sobre o manual de instruções, por favor, vá em nosso site www.trevi.it para encontrá-lo
15
15
Page 16
DICHIARAZIONE DI CONFORMITÀ UE SEMPLIFICATA
Il fabbricante TREVI dichiara che il tipo di apparecchiatura sveglia
elettronica EC 884 PJ è conforme alla direttiva 2014/53/UE.
Il testo completo della dichiarazione di conformità EU è disponibile al
seguente indirizzo Internet
https://www.trevi.it/dms/zidi/TREVI/DOCEC884PJ.pdf
SIMPLIFIED EU DECLARATION OF CONFORMITY
Hereby TREVI Spa declares that alarm clock EC 884 PJ is in
compliance with directive 2014/53/EU.
The full text of the EU declaration of conformity is available at the
following internet address
https://www.trevi.it/dms/zidi/TREVI/DOCEC884PJ.pdf
Trevi S.p.a.
Strada Consolare Rimini-San Marino, 62
47924 Rimini (Rn) Italia
Tel. 0541/756420 Fax 0541/756430
www.trevi.it E-mail: [email protected]
Made in CHINA
 Loading...