

Page 1
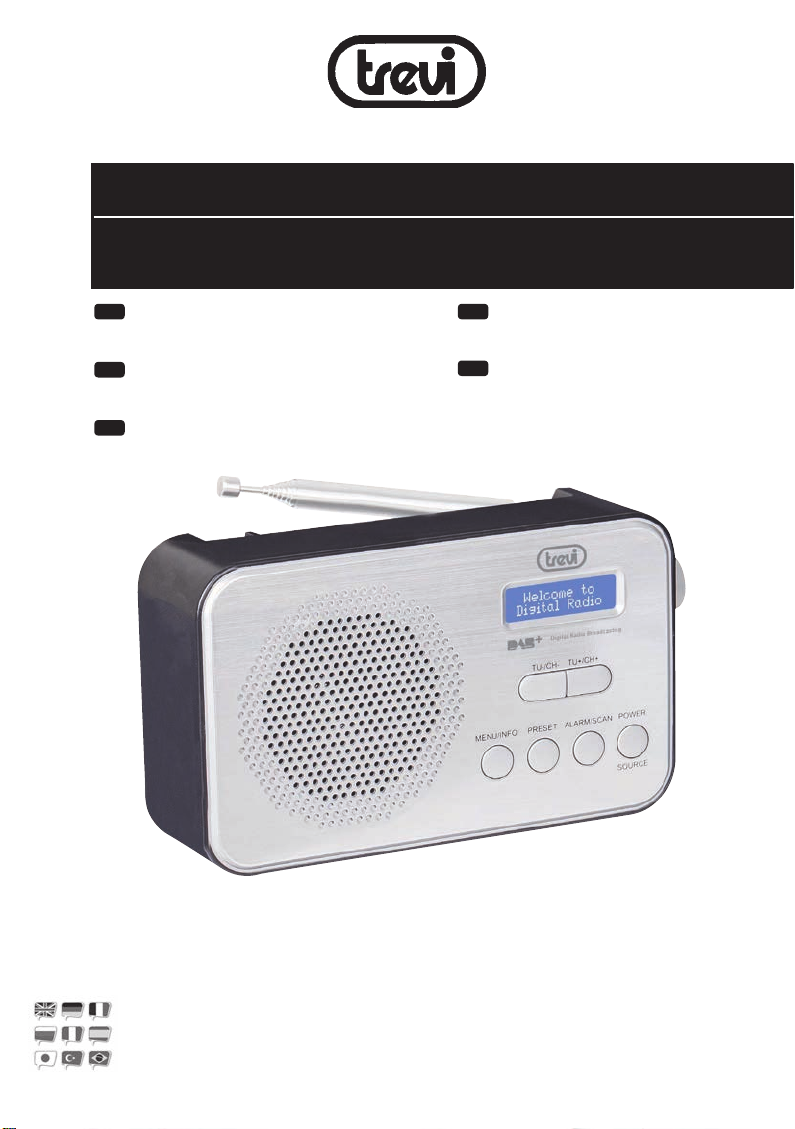
DAB 7F92 R
Guida d’uso
User guide
ita
RADIO CON SISTEMA DAB/DAB+ E FM
Manuale d’uso e collegamento
eng
RADIO WITH DAB/DAB+ AND FM
Instruction Manual
fra
RADIO AVEC DAB/DAB+ ET FM
Mode d’emploi et connexions
deu
RADIO MIT DAB/DAB+ UND FM
Gebrauchs- und Anschlusshandbuch
esp
RADIO DAB/DAB+ Y FM
Manual de uso y conexión
* Per informazioni integrative e aggiornamenti di
questo prodotto vedi: www.trevi.it
* For additional information and updates of this
product see: www.trevi.it
If you will not nd your language on the instruction manual, please go on our website www.trevi.it
to nd it
Page 2

NOTE D’USO
NOTE D'USO
Ascoltare a volume alto per lungo tempo, potrebbe danneggiare il vostro udito.
Questo apparecchio è uno strumento elettronico di alta precisione, evitate quindi di utilizzarlo nei seguenti
casi:
• Vicino a campi magnetici.
• Vicino a fonti di calore come caloriferi e stufe.
• In luoghi molto umidi come stanze da bagno, piscine, ecc...
• In luoghi molto polverosi.
• In luoghi soggetti a forti vibrazioni.
• Non avvicinare l’orecchio all’altoparlante durante le fasi di messa punto e regolazioni del volume, e in particolare di tenere il volume al minimo nella fase di accensione.
• Posizionare l’apparecchio in modo che ai suoi lati ci sia sempre abbastanza spazio per la libera circolazione
di aria (almeno 5 cm).
• Se dei liquidi penetrano all’interno dell’apparecchio scollegare immediatamente la spina dalla presa e
portare l’apparecchio al più vicino centro assistenza autorizato TREVI.
• Controllare sempre prima di ricaricare l’apparecchio, che i cavi di alimentazione e di collegamento siano
installati correttamente.
• Nessuna sorgente di amma nuda, quali candele accese, dovrebbe essere posta sull’apparecchio.
• L’apparecchio non deve essere esposto a stillicidio o a spruzzi d’acqua e nessun oggetto pieno di liquido,
quali vasi, deve essere posto sull’apparecchio.
• Conservare il presente manuale per futuri riferimenti.
CURA E MANUTENZIONE
Per la pulizia si consiglia l’ uso di un panno morbido, leggermente inumidito. Evitate solventi o sostanze abrasive.
IMPORTANTE
Questo dispositivo e' progettato per uso domestico non professionale. La buona costruzione di questo apparecchio ne garantisce per lungo tempo il perfetto funzionamento. Se tuttavia dovesse presentarsi qualche
inconveniente, sarà opportuno consultare il più vicino Centro Assistenza autorizzato TREVI.
TREVI persegue una politica di continua ricerca e sviluppo. Pertanto i prodotti possono presentare caratteristiche diverse da quelle descritte.
DAB 7F92 R
NOTES OF USE
Listen at high volume for long periods of time, may damage your hearing.
• Avoid using it in the following cases:
- Near strong heat sources, such as central heating plants or stoves.
- In very humid places such as bathrooms, swimming pools, etc.
- In very dusty places.
- In places subject to strong vibrations.
- Position the appliance in such a way that there is always enough room for free air circulation (at least 5
cm).
• Do not block the air inlets.
• If any liquid enters the appliance, unplug it immediately from the socket and take it to the nearest TREVI
authorised service centre.
• Before switching on the appliance, always check that the power cable and the connection cable are properly installed.
• No naked ame sources, such as lighted candles, should be placed on this.
• The apparatus shall not be exposed to dripping or splashing water and no object lled with water, such as
vases, should be placed on the unit.
• Keep this manual for future reference.
CARE AND MAINTENANCE
For cleaning we recommend the use of a soft, slightly damp cloth. Avoid solvents or abrasives.
IMPORTANT
The good construction of this machine guarantees the perfect functioning for a long time. However, should
any problem arise, you should consult your nearest authorized service center.
TREVI pursues a policy of continuous research and development. Therefore, the products may have dierent
features from those described.
2
Page 3

NOTE OF USE
DAB 7F92 R
NOTES D’EMPLOI
Cet appareil est un instrument électronique de haute précision; évitez donc de l’employer dans les cas suivants:
• A proximité de fortes sources de chaleur telles que des radiateurs ou tout appareil de chauage.
• Dans des lieux très humides tels que des salles de bains, des piscines, etc.
• Dans des lieux très poussiéreux.
• Dans des lieux sujets à des fortes vibrations.
• Positionner l’appareil de façon à laisser toujours de l’espace pour la libre circulation de l’air à ses côtés (au moins 5 cm).
• N’obstruez pas les fentes d’aération.
• Si des substances liquides pénètrent à l’intérieur de l’appareil, débranchez immédiatement la che et apportez l’appareil au
centre d’assistance agréé TREVI le plus proche.
• Avant de mettre l’appareil en fonction, vériez toujours que les câbles d’alimentation et de connexion soient correctement
installés.
SOIN ET ENTRETIEN
Pour le nettoyage on conseille l’emploi d’un chion doux, légèrement imbibé. Evitez les solvants ou les substances abrasives.
ANWEISUNGEN ZUM GEBRAUCH
Dieses Gerät ist ein elektronisches Instrument höchster Präzision; vermeiden Sie deshalb, das Gerät in folgenden Fällen zu
benutzen:
• In der Nähe von Wärmequellen, wie z.B. Heizkörpern oder Öfen.
• In sehr feuchten Räumen, wie z.B. Badezimmern, Schwimmbädern, usw.
• In sehr staubigen Räumen.
• An Plätzen, die starken Vibrationen ausgesetzt sind.
• Das Gerät muß so aufgestellt werden, daß an den Seiten genügend Raum für den freien Luftumlauf vorhanden ist (mindestens
5 cm.).
• Die Ventilationsönungen nicht abdecken.
• Sollten Flüssigkeiten im Innern des Geräts eindringen, ziehen Sie den Stecker sofort aus der Steckdose und bringen Sie das
Gerät in die nächstgelegene TREVI-autorisierte Kundendienststelle.
• Vor Inbetriebnahme des Gerätes überprüfen Sie stets, daß die Netzkabel und die Verbindungskabel ordnungsgemäß installiert sind.
PFLEGE UND WARTUNG
Zum Reinigen benutzen Sie einen leicht angefeuchteten, weichen Lappen. Verwenden Sie keine Lösungsmittel oder Scheuermittel.
NOTAS DE UTILIZACION
Este aparato es un instrumento electrónico de alta precisión, evite utilizarlo en los siguientes casos:
• En proximidad de fuentes de calor como caloríferos y estufas.
• En lugares donde exista alto grado de humedad como por ejemplo cuartos de baño, piscinas, etc..
• En lugares muy polvorientos.
• En lugares sujetos a fuertes vibraciones.
• Coloque el aparato de modo que por sus lados exista el espacio suciente para que el aire pueda circular siempre libremente (por lo menos 5 cm).
• No obstruya los oricios de ventilación.
• Si entra líquido en el aparato, desconecte inmediatamente el enchufe de la corriente y lleve el aparato al centro de asistencia TREVI más cercano.
• Controle siempre, antes de poner en funcionamiento el aparato, que los cables de alimentación y de conexión estén instalados correctamente.
CUIDADOS Y MANTENIMIENTO
Para la limpieza se aconseja utilizar un paño suave, ligeramente humedecido. Evitar disolventes y sustancias abrasivas.
3
Page 4
ITALIANO
DAB 7F92 R
DISPLAY
7
6
1
4
5
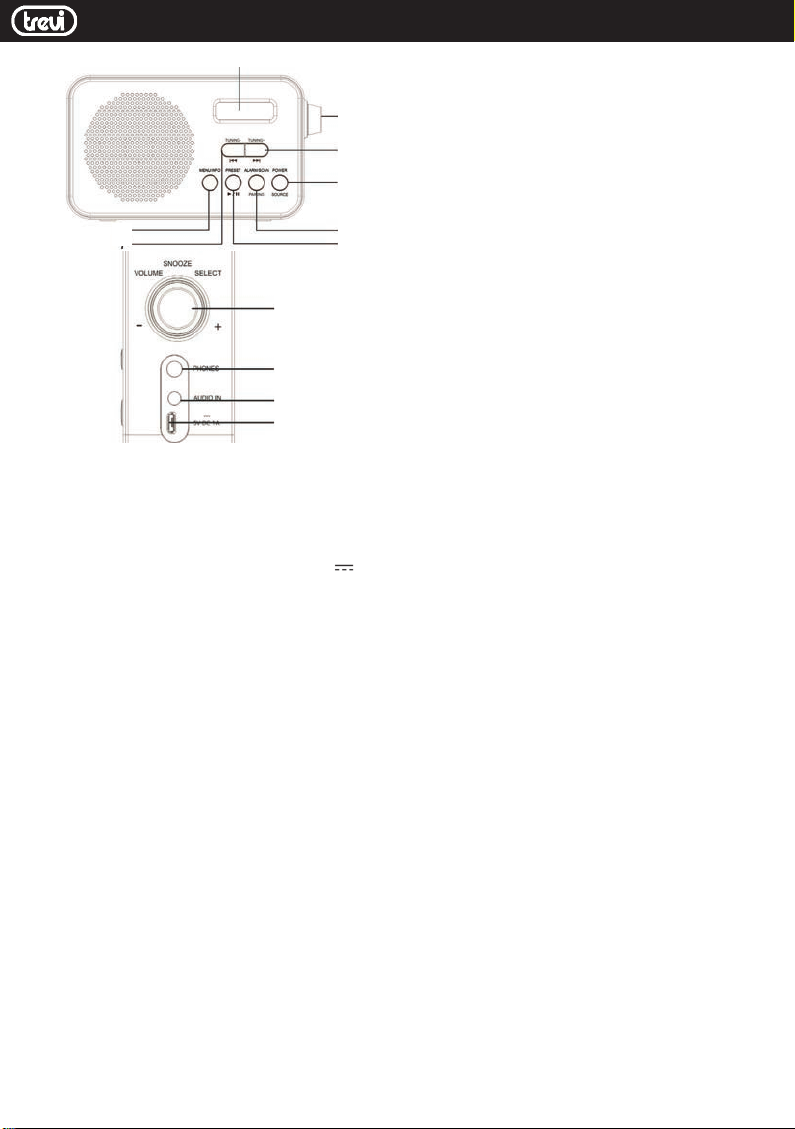
1. Tasto POWER/SOURCE
2. Tasto ALARM/SCAN
3. Tasto PRESET
4. Tasto MENU/INFO
5. Tasto TU-/CH-
6. Tasto TU+/CH+
7
8
10
9
7. Tasto/Manopola VOLUME / SELECT
8. Presa cue
9. Presa alimentazione e
ricarica
10. Ingresso AUX IN
2
3
RICARICA DELLA BATTERIA
1. Ricaricare il dispositivo con un carica batterie 5V
1A (non incluso) con presa microUSB. Inserire la presa
microUsb dell’alimentatore nellapresa di alimentazione e
ricarica (9).
2. Sul display viene mostrata la percentuale di carica della
batteria.
3. Con batteria in fase di esaurimento, viene mostrato un
messaggio si avvertimento sul display e dopo un certo
tempo la radio si spegne automaticamente.
Nota: con batteria in fase di esaurimento, la radio puo’ avere
comportamenti anomali; in questo caso procedere con la
ricarica della batteria.
ACCENSIONE/SPEGNIMENTO- STANDBY
1. Estendere l’antenna telescopica.
2. Premere il tasto POWER(1) per accendere l’apparecchio.
3. L’apparecchio si porterà sul sistema di ricezione DAB.
Alla prima accensione l’apparecchio eettuerà una scan-
sione automatica delle stazioni DAB/DAB+.
4. Solo se alimentato con alimentatore esterno, premere
a lungo il tasto POWER(1) per portare l’apparecchio in
modalità Stand-by. Il display mostrerà l’ora corrente, lo
stato della batteria ed eventuali allarmi impostati.
5. Se alimentata a batteria, premere a lungo il tasto POWER(1) per spegnere l’apparecchio.
SELEZIONE FM/DAB/AUX IN E REGOLAZIONE VOLUME
1. Premere il tasto SOURCE(1) per commutare tra la banda di
ricezione DAB/DAB+, la banda FM e l’ingresso AUX IN.
2. Ruotare la manopola VOLUME (7) per diminuire o aumen-
tare il volume.
MENU IMPOSTAZIONI
1. Premere e tenere premuto per qualche secondo il tasto
MENU(4), sul display apparirà il menu’ impostazioni.
2. Premere i tasti TU-(5) o TU+(6) e selezionare la voce desiderata.
3. Premere il tasto/manopola SELECT(7) per entrare nelle
impostazioni della voce selezionata.
Nel menu’ impostazioni sono disponibili le seguenti voci (al-
cune vengono visualizzate a seconda che sia selezionata
la modalità DAB o FM):
Scan Setting (FM): permette di eettuare la ricerca su stazio-
ni FM con forte segnale oppure su tutte le stazioni trovate.
Full scan (DAB): selezionando questa voce viene eettuata
una scansione e memorizzazione automatica delle stazioni radio ricevute.
Manual tune (DAB): selezionare la frequenza/canale deside-
rato e confermare con SELECT(7). Una barra mostrera’ la
forza del segnale ricevuto.
Audio Setting (FM): permette di selezionare l’ascolto in
Stereo o Mono
Prune (DAB): permette di eliminare dalle lista delle stazioni
memorizzate tutte le radio trovate ma non disponibili
(scarso segnale).
DRC (DAB): permette di abilitare/disabilitare la funzione
DRC per migliorare il suono durante l’ascolto in ambienti
rumorosi. È possibile impostare il livello di DRC in alto
(high), basso (low) o O (spento).
System setting: questa voce permette di accedere ad ulterio-
ri impostazioni.
Sleep: permette di impostare un timer di autospegni-
mento dopo il quale l’apparecchio si portera’ in modo
standby automaticamente. E’ possibile selezionare tra 90,
60, 45, 30, 15 minuti. Con la funzione attivata e’ presente
un’icona a forma di luna con il tempo rimanente prima
dello spegnimento sul display.
Alla voce O la funzione e’ disattivata.
Alarm: permette di attivare ed impostare due allarmi
sveglia. Dopo aver selezionato ALARM, premere il tasto
ALARM(2) per selezionare ALARM 1 o 2 e confermando si
accede ad un sottomenu’ in cui impostare:
On Time: impostare l’ora di attivazione dell’allar
me.
Duration: durata in minuti dell’allarme sveglia.
Source: impostare il tipo di suoneria tra Buzzer
DAB, FM. Selezionando DAB o FM viene poi
richiesto di selezionare una delle stazioni radio
salvate in memoria
Frequency: Daily (ogni giorno), Once (una
volta sola), Weekends (nei giorni di
sabato e domenica), weekdays(dal
lunedi’ al venerdi’).
Volume: volume di riproduzione dell’allarme
sveglia, viene visualizzata una barra.
Alarm: On/O per attivare/disattivare la sveglia.
Equaliser: permette di variare la dinamica dell’audio in
ascolto; e’ possibile selezionare Normal, Classic, Jazz, Pop,
Rock, Speech, My EQ (impostazioni personalizzate).
Time: permette di impostare ora/data correnti.
4
Page 5

ITALIANO
DAB 7F92 R
Set Time/Date: impostare ora e data correnti.
Auto Update: seleziona da quale fonte imposta
re automaticamente l’ora e la data se disponibili.
Set 12/24 Hour: imposta il formato dell’ora
12/24H
Set Date Format: imposta il formato della data.
Backlight: permette di impostare il tempo e il livello di
luminosità del display:
Timeout: imposta il tempo dopo il quale il
display abbassa la luminosità in assenza di
comandi.
On Level: indica il livello di luminosità del display
quando l’apparecchio riceve dei comandi.
Dim Level: indica il livello di luminosità del
display quando l’apparecchio e’ inattivo.
Inactive standby: imposta un tempo dopo il quale la
radio si spegne automaticamente (O=spento).
Language: permette di selezionare la lingua di sistema.
Factory reset: permette di riportare tutte le impostazioni
a quelle di fabbrica. Selezionare Yes per il ripristino.
SW version: versione del software installato.
RADIO DAB/DAB+
1. Selezionare la modalità DAB (Digital radio).
2. Premere i tasti TU-(5) e TU+(6) per visualizzare e scorrere
la lista delle stazioni radio ricevute. Premere il tasto/manopola SELECT(7) per selezionare la stazione desiderata.
3. Premendo il tasto INFO(4) e’ possibile variare la visualizzazione delle informazioni , se disponibili, sul display.
4. Premendo a lungo il tasto PRESET(3) e’ possibile accedere
al menu’ di salavataggio della stazione radio in riproduzione in una delle 20 memorie disponibili.
5. Premendo il tasto PRESET(3) e’ possibile scorrere la lista
delle stazioni radio salvate.
INFORMAZIONI TRASMISSIONE DAB/DAB+
In modalità DAB, sul display verranno visualizzate una serie di
informazioni relative alla stazione e al brano in ascolto.
1. Premere ripetutamente il tasto INFO (4) per cambiare le
informazioni visualizzate.
Nota: non tutte le stazioni DAB forniscono le informazioni
visualizzabili dall’apparecchio.
Se disponibili, sono presenti e seguenti informazioni:
DLS: visualizza informazioni relative al brano musicale trasmesso (artista, titolo brano, ecc...).
Tipo programma: visualizza le informazioni relative al tipo di
programma trasmesso.
Nome trasmittente: visualizza le informazioni relative al
trasmittente del servizio.
Numero/Frequenza trasmittente: visualizza le informazioni
relative a numero e frequenza della stazione DAB/DAB+
trasmessa.
Indice di errore del segnale: visualizza le informazioni relative
al livello di errori del segnale e all’intensità con cui viene
ricevuto.
Bit Rate: visualizza informazioni relative al rapporto di compressione della trasmissione corrente.
Stato della batteria
Data: visualizza informazioni relative alla data.
RADIO FM
1. Selezionare la modalità FM.
2. Premere i tasti TU-(5) e TU+(6) per eettuare la ricerca
3. Premendo il tasto PRESET(3) e’ possibile accedere alla
4. Premendo a lungo il tasto PRESET(3) e’ possibile accedere
5. Premendo ripetutamente il tasto INFO (4) verranno
ALLARMI SVEGLIA
Sono disponibili 2 allarmi sveglia.
Per impostarli ed attivarli fare riferimento al paragrafo “Menu’
impostazioni” alla voce “System Setting” e “Alarm”.
Per rimandare l’allarme premere il tasto SELECT, l’allarme si
attiverà di nuovo dopo 5 minuti, premendolo piu’ volte si puo’
programmare la riattivazione dell’allarme no a 30 minuti.
Per spegnere l’allarme sveglia denitivamente premere il
tasto ALARM(2).
INGRESSO AUX IN
1. Selezionare la modalità Aux Input.
2. Collegare un cavo Jack 3.5mm alla presa AUX IN (10) e
PRESA CUFFIE
1. Inserire le cue nella presa cue (8).
2. Accendere la radio e regolare il volume.
SPECIFICHE TECNICHE
manuale di una stazione radio. Premendo una volta i tasti
TUNE si eettua uno spostamento di 0,05 MHz, premendoli a lungo si eettua una ricerca no al primo segnale
forte incontrato.
lista delle stazioni radio FM memorizzate. Selezionare la
stazione radio desiderata per ascoltarla.
al menu’ di salavataggio della stazione radio corrente in
una delle 20 memorie disponibili.
visualizzate diverse informazioni riguardanti la radio
sintonizzata (se disponibili).
Nota: l’allarme sveglia e’ disponibile solo se la radio viene
alimentata tramite alimentatore esterno.
l’altra estremità all’apparecchio esterno. Avviare la riproduzione dall’apparecchio esterno.
Alimentazione: .................................5V 1A
Batteria ricaricabile: ........................3.7V
Gamma di frequenza DAB: ...........174.928 - 239.200 MHz
Gamma di frequenza FM: .............87.5-108MHz
Dimensioni: ........................................165 x 95 x 46 mm
Peso: ..................................................... 347 gr.
2000mAh
Per evitare possibili danni all’udito,
limitare il tempo di ascolto a volumi
elevati.
5
Page 6
ENGLISH
DAB 7F92 R
DISPLAY
7
6
1
4
5
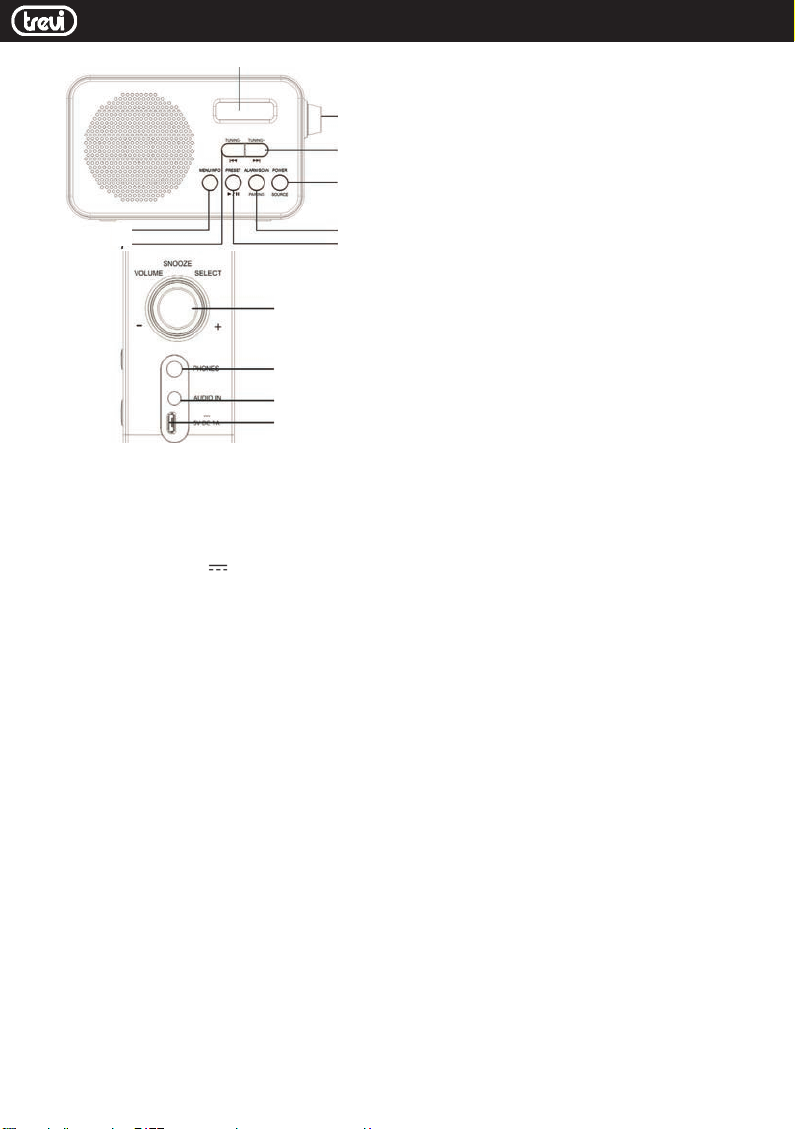
1. POWER / SOURCE button
2. ALARM / SCAN button
3. PRESET button
4. MENU / INFO button
5. TU- / CH- button
6. TU + / CH + button
7
8
10
9
7. VOLUME / SELECT button
/ knob
8. Headphone jack
9. Power supply socket
10. AUX IN input
2
3
BATTERY RECHARGE
1. Charge the device with a 5V 1A battery charger (not
included) with microUSB socket.
2. The display shows the percentage of battery charge.
3. With the battery running out, a warning message is shown
on the display and after a certain time the radio switches
o automatically.
Note: with the battery running out, the radio may behave
abnormally; in this case proceed with charging the battery.
SWITCHING ON / OFF - STANDBY
1. Extend the telescopic antenna.
2. Press the POWER button (1) to switch on the appliance.
3. The device will go to the DAB reception system.
When rst turned on, the device will automatically scan
the DAB / DAB + stations.
4. Only if powered with an external power supply, press the
POWER button (1) for a long time to place the appliance
in Stand-by mode. The display will show the current time,
the battery status and any alarms set.
5. If powered by battery, press and hold the POWER button (1)
to turn o the device.
FM / DAB / AUX IN SELECTION AND VOLUME
ADJUSTMENT
1. Press the SOURCE button (1) to switch between the DAB /
DAB + reception band, the FM band and the AUX IN input.
2. Turn the VOLUME knob (7) to decrease or increase the
volume.
SETTINGS MENU
1. Press and hold the MENU key (4) for a few seconds, the
settings menu will appear on the display.
2. Press the TU- (5) or TU + (6) keys and select the desired
item.
3. Press the SELECT button / knob (7) to enter the settings of
the selected item.
The following items are available in the settings menu (some
are displayed depending on whether DAB or FM mode is
selected):
Scan Setting (FM): allows you to search on FM stations with a
strong signal or on all stations found.
Full scan (DAB): selecting this item automatically scans and
stores received radio stations.
Manual tune (DAB): select the desired frequency / channel
and conrm with SELECT (7). A bar will show the strength
of the received signal.
Audio Setting (FM): allows you to select listening in Stereo
or Mono
Prune (DAB): allows you to delete from the list of stored sta-
tions all the radios found but not available (poor signal).
DRC (DAB): allows you to enable / disable the DRC function to
improve the sound when listening in noisy environments.
You can set the DRC level to high (high), low (low) or o
(o).
System setting: this item allows access to further settings.
Sleep: allows you to set an auto-o timer after which the
appliance will go into standby mode automatically. It is
possible to select between 90, 60, 45, 30, 15 minutes. With
the function activated there is an icon in the shape of a
moon with the time remaining before turning o on the
display.
In the O item the function is deactivated.
Alarm: allows you to activate and set two alarms. After selec-
ting ALARM, press the ALARM key (2) to select ALARM 1 or
2 and conrming you enter a submenu in which to set:
On Time: set the activation time of the alarm.
Duration: duration in minutes of the alarm clock.
Source: set the type of ringtone between Buzzer
DAB, FM. Selecting DAB or FM is then prompted to select one
of the radio stations saved in memory
Frequency: Daily (every day), Once (once only), Weekends
(on Saturdays and Sundays), weekdays (from Monday to
Friday).
Volume: alarm alarm playback volume, a bar is displayed.
Alarm: On / O to activate / deactivate the alarm.
Equalizer: allows you to change the dynamics of the audio
being listened to; it is possible to select Normal, Classic,
Jazz, Pop, Rock, Speech, My EQ (custom settings).
Time: allows you to set the current time / date.
Set Time / Date: set the current time and date.
Auto Update: select from which source you automatically set
the time and date if available.
Set 12/24 Hour: set the 12 / 24H time format
Set Date Format: set the date format.
Backlight: allows you to set the time and brightness level of
the display:
Timeout: set the time after which the
display lowers the brightness without commands.
6
Page 7

ENGLISH
DAB 7F92 R
On Level: indicates the brightness level of the display when
the device receives commands.
Dim Level: indicates the brightness level of the display when
the appliance is inactive.
Inactive standby: set a time after which the radio turns o
automatically (O = o).
Language: allows you to select the system language.
Factory reset: allows you to restore all the settings to the
factory settings. Select Yes for restore.
SW version: software version installed.
DAB / DAB + RADIO
1. Select the DAB (Digital radio) mode.
2. Press the TU- (5) and TU + (6) keys to display and scroll
through the list of received radio stations. Press the
SELECT button / knob (7) to select the desired station.
3. By pressing the INFO button (4) it is possible to change the
display of information, if available, on the display.
4. By long pressing the PRESET key (3) it is possible to access
the menu of the radio station being played in one of the
20 available memories.
5. By pressing the PRESET key (3) it is possible to scroll throu-
gh the list of saved radio stations.
DAB / DAB + TRANSMISSION INFORMATION
In DAB mode, the display will show a series of information
about the station and the track being played.
1. Press the INFO button (4) repeatedly to change the infor-
mation displayed.
Note: not all DAB stations provide the information displayed by
the device.
If available, the following information is available:
DLS: displays information relating to the transmitted music
(artist, song title, etc.).
Program type: displays information relating to the type of
program transmitted.
Transmitter name: displays information relating to the service
transmitter.
Transmitter Number / Frequency: displays information on the
number and frequency of the transmitted DAB / DAB +
station.
Signal error index: displays information relating to the level of
signal errors and the intensity with which it is received.
Bit Rate: displays information relating to the compression
ratio of the current transmission.
Battery status.
Date: displays information relating to the date.
FM RADIO
1. Select the FM mode.
2. Press the TU- (5) and TU + (6) keys to manually search for
a radio station. Pressing the TUNE keys once, you make
a shift of 0.05 MHz, pressing them for a long time you
search until the rst strong signal is encountered.
3. By pressing the PRESET key (3) you can access the list of
stored FM radio stations. Select the desired radio station
to listen to it.
4. By long pressing the PRESET key (3) it is possible to access
the menu for saving the current radio station in one of the
20 available memories.
5. Repeatedly pressing the INFO button (4) will display various
information regarding the tuned radio (if available).
ALARM
2 alarm alarms are available.
To set and activate them, refer to the “Settings menu” section
under “System Setting” and “Alarm”.
To postpone the alarm press the SELECT button, the alarm
will be activated again after 5 minutes, by pressing it several
times you can program the alarm to be reactivated up to 30
minutes.
To turn o the alarm clock alarm permanently press the
ALARM button (2).
Note: the alarm clock is only available if the radio is powered by
an external power supply.
AUX IN INPUT
1. Select the Aux Input mode.
2. Connect a 3.5mm Jack cable to the AUX IN socket (10) and
the other end to the external device. Start playback from
the external device.
HEADPHONE JACKS
1. Insert the headphones into the headphone jack (8).
2. Turn on the radio and adjust the volume.
TECHNICAL SPECIFICATIONS
Power supply: ..................................5V 1A
Rechargeable battery: ..................3.7V
DAB frequency range: ...................174.928 - 239.200 MHz
FM frequency range: .....................87.5-108MHz
Dimensions: ......................................165 x 95 x 46 mm
Weight: ...............................................347 gr.
2000mAh
To avoid possible hearing
damage, limit the time listening
at high volumes
7
Page 8
FRANÇAIS
DAB 7F92 R
DISPLAY
7
6
1
4
5
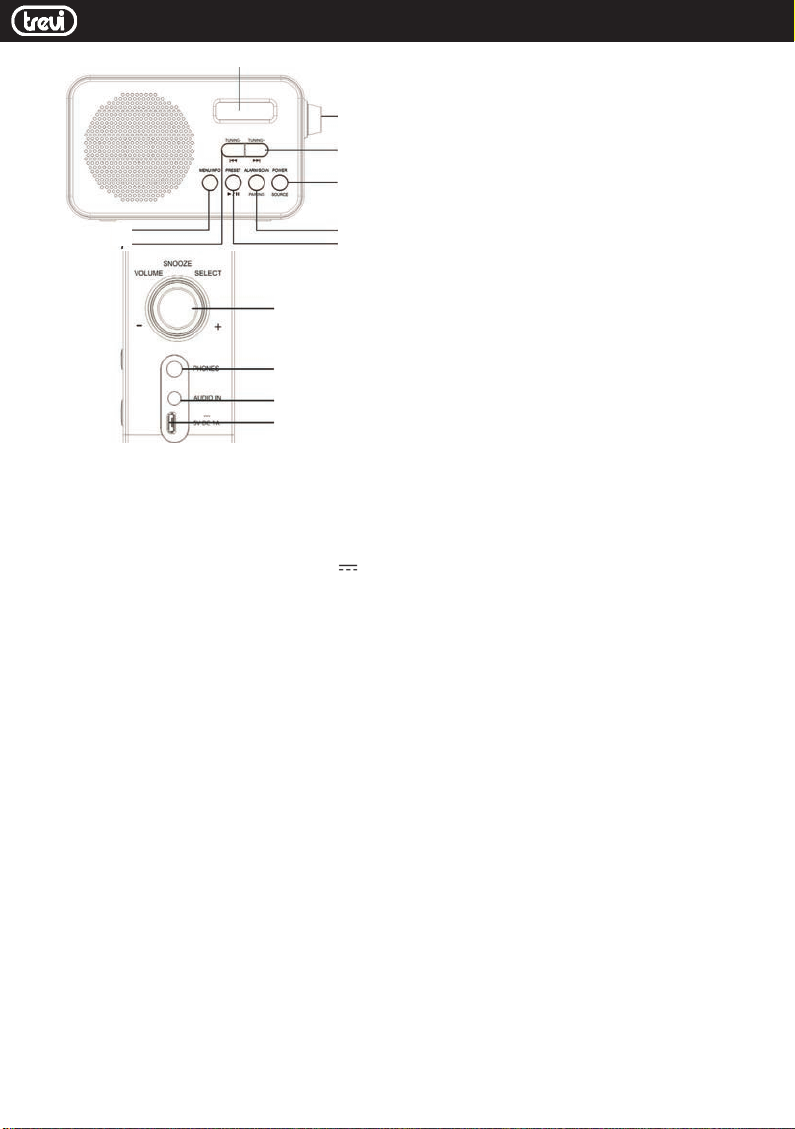
1. Bouton POWER / SOURCE
2. Bouton ALARME / SCAN
3. Bouton PRESET
4. Bouton MENU / INFO
5. Bouton TU / CH-
7
8
10
9
6. Bouton TU + / CH +
7. Bouton VOLUME / SELECT
8. Prise casque
9. Prise d’alimentation
10. Entrée AUX IN
2
3
RECHARGE DE BATTERIE
1. Chargez l’appareil avec un chargeur de batterie 5V 1A
(non fourni) avec prise microUSB.
2. L’écran ache le pourcentage de charge de la batterie.
3. Lorsque la batterie est épuisée, un message d’avertissement s’ache et au bout d’un certain temps, la radio
s’éteint automatiquement.
Remarque: lorsque la batterie est épuisée, la radio peut se comporter de manière anormale. dans ce cas, chargez la batterie.
MISE EN MARCHE / ARRÊT - VEILLE
1. Déployez l’antenne télescopique.
2. Appuyez sur le bouton POWER (1) pour allumer l’appareil.
3. L’appareil ira au système de réception DAB.
Lorsqu’il est allumé pour la première fois, l’appareil
numérise automatiquement les stations DAB / DAB +.
4. Uniquement si vous êtes alimenté par une source d’alimentation externe, appuyez longuement sur le bouton
POWER (1) pour mettre l’appareil en mode veille. L’écran
achera l’heure actuelle, l’état de la batterie et les alarmes éventuellement programmées.
5. Si la batterie est alimentée, maintenez le bouton POWER (1)
enfoncé pour éteindre l’appareil.
SÉLECTION FM / DAB / AUX ET RÉGLAGE DU VOLUME
1. Appuyez sur le bouton SOURCE (1) pour basculer entre la
bande de réception DAB / DAB +, la bande FM et l’entrée
AUX IN.
2. Tournez le bouton VOLUME (7) pour diminuer ou augmenter le volume.
MENU RÉGLAGES
1. Appuyez sur la touche MENU (4) et maintenez-la enfoncée
pendant quelques secondes pour acher le menu des
paramètres.
2. Appuyez sur les touches TU- (5) ou TU + (6) et sélectionnez
l’élément souhaité.
3. Appuyez sur le bouton / bouton de SELECTION (7) pour
entrer les réglages de l’élément sélectionné.
Les éléments suivants sont disponibles dans le menu des
paramètres (certains sont achés selon que le mode DAB ou
FM est sélectionné):
Réglage de balayage (FM): vous permet de rechercher des
stations FM avec un signal puissant ou toutes les stations
trouvées.
Analyse complète (DAB): en sélectionnant cet élément,
l’analyse et la mémorisation automatique des stations
radio reçues.
Réglage manuel (DAB): sélectionnez la fréquence / le canal
souhaité et conrmez avec SELECT (7). Une barre indiquera la force du signal reçu.
Réglage audio (FM): vous permet de sélectionner une écoute
en stéréo ou en mono
Élagage (DAB): permet d’eacer de la liste des stations mémo-
risées toutes les radios trouvées mais non disponibles
(signal de mauvaise qualité).
DRC (DAB): vous permet d’activer / désactiver la fonction DRC
pour améliorer le son lorsque vous écoutez dans des environnements bruyants. Vous pouvez dénir le niveau de
DRC sur Elevé (élevé), Bas (faible) ou désactivé (désactivé).
Conguration système: cet élément permet d’accéder à
d’autres paramètres.
Veille: vous permet de dénir une minuterie d’extinction
automatique au terme de laquelle l’appareil passera automatiquement en mode veille. Il est possible de choisir
entre 90, 60, 45, 30, 15 minutes. Lorsque la fonction est
activée, une icône en forme de lune indique le temps qu’il
reste avant de s’éteindre.
Dans l’élément Désactivé, la fonction est désactivée.
Alarme: vous permet d’activer et de dénir deux alarmes.
Après avoir sélectionné ALARME, appuyez sur la touche
ALARME (2) pour sélectionner ALARME 1 ou 2 et conrmez que vous entrez dans un sous-menu dans lequel
dénir:
Heure d’activation: dénissez l’heure d’activation de l’alarme.
Durée: durée en minutes du réveil.
Source: dénir le type de sonnerie entre Buzzer
DAB, FM. La sélection de DAB ou FM demande ensuite de
sélectionner l’une des stations de radio mémorisées.
Fréquence: quotidienne (tous les jours), une fois (une seule
fois), week-ends (les samedis et dimanches), en semaine
(du lundi au vendredi).
Volume: volume de la lecture de l’alarme, une barre est
achée.
Alarme: On / O pour activer / désactiver l’alarme.
Égaliseur: permet de changer la dynamique de l’audio en
cours d’écoute. il est possible de sélectionner Normal,
Classique, Jazz, Pop, Rock, Discours, Mon EQ (réglages
personnalisés).
Heure: permet de régler l’heure / la date actuelles.
8
Page 9

FRANÇAIS
DAB 7F92 R
Dénir l’heure / la date: dénissez l’heure et la date actuelles.
Mise à jour automatique: sélectionnez la source avec laquelle
vous dénissez automatiquement l’heure et la date, le cas
échéant.
Set 12/24 Hour: dénit le format de l’heure 12 / 24H
Dénir le format de date: dénissez le format de la date.
Rétro-éclairage: vous permet de dénir l’heure et le niveau de
luminosité de l’écran:
Timeout: dénissez le délai après lequel le
l’achage réduit la luminosité sans commandes.
Activé: indique le niveau de luminosité de l’écran lorsque
l’appareil reçoit des commandes.
Dim Level: indique le niveau de luminosité de l’écran lorsque
l’appareil est inactif.
Veille inactive: dénissez un délai après lequel la radio s’éteint
automatiquement (Désactivé = Désactivé).
Langue: permet de sélectionner la langue du système.
Factory reset: permet de restaurer tous les paramètres aux
paramètres d’usine. Sélectionnez Oui pour la restauration.
Version SW: version du logiciel installée.
DAB / DAB + RADIO
1. Sélectionnez le mode DAB (radio numérique).
2. Appuyez sur les touches TU- (5) et TU + (6) pour acher et
faire déler la liste des stations de radio reçues. Appuyez
sur le bouton / bouton de sélection (7) pour sélectionner
la station souhaitée.
3. En appuyant sur le bouton INFO (4), il est possible de chan-
ger l’achage des informations, si elles sont disponibles.
4. En appuyant longuement sur la touche PRESET (3), il est
possible d’accéder au menu de la station de radio en
cours de lecture dans l’une des 20 mémoires disponibles.
5. En appuyant sur la touche PRESET (3), il est possible de faire
déler la liste des stations de radio enregistrées.
INFORMATIONS DE TRANSMISSION DAB / DAB +
En mode DAB, l’écran ache une série d’informations sur la
station et la piste en cours de lecture.
1. Appuyez plusieurs fois sur le bouton INFO (4) pour modier
les informations achées.
Remarque: toutes les stations DAB ne fournissent pas les infor-
mations achées par le périphérique.
Si disponibles, les informations suivantes sont disponibles:
DLS: ache les informations relatives à la musique transmise
(artiste, titre de la chanson, etc.).
Type de programme: ache des informations relatives au
type de programme transmis.
Nom de l’émetteur: ache les informations relatives à l’émet-
teur de service.
Numéro / fréquence de l’émetteur: ache des informations
sur le nombre et la fréquence de la station DAB / DAB +
transmise.
Signal error index: ache des informations relatives au niveau
des erreurs de signal et à l’intensité avec laquelle elles
sont reçues.
Débit: ache les informations relatives au taux de compres-
sion de la transmission en cours.
État de la batterie.
Date: ache les informations relatives à la date.
RADIO FM
1. Sélectionnez le mode FM.
2. Appuyez sur les touches TU- (5) et TU + (6) pour rechercher
manuellement une station de radio. En appuyant une
fois sur les touches TUNE, vous eectuez un décalage de
0,05 MHz. Vous les appuyez pendant une longue période
jusqu’à ce que le premier signal fort soit rencontré.
3. En appuyant sur la touche PRESET (3), vous pouvez accéder
à la liste des stations de radio FM mémorisées. Sélectionnez la station de radio souhaitée pour l’écouter.
4. En appuyant longuement sur la touche PRESET (3), il est
possible d’accéder au menu de sauvegarde de la station
de radio actuelle dans l’une des 20 mémoires disponibles.
5. Appuyez plusieurs fois sur le bouton INFO (4) pour acher
diverses informations sur la radio syntonisée (si disponible).
ALARME
2 alarmes sont disponibles.
Pour les congurer et les activer, reportez-vous à la section
«Menu Paramètres» sous «Paramètres système» et «Alarme».
Pour retarder l’alarme, appuyez sur la touche SELECT. L’alarme
est réactivée au bout de 5 minutes. En appuyant plusieurs fois
sur cette touche, vous pouvez programmer la réactivation de
l’alarme jusqu’à 30 minutes.
Pour désactiver l’alarme du réveil, appuyez sur le bouton
ALARM (2).
Remarque: le réveil n’est disponible que si la radio est alimentée
par une source d’alimentation externe.
ENTREE AUX
1. Sélectionnez le mode Aux Input.
2. Connectez un câble jack 3,5 mm à la prise AUX IN (10) et
l’autre extrémité au périphérique externe. Commencez la
lecture à partir du périphérique externe.
JACKS DE CASQUE
1. Insérez le casque dans la prise casque (8).
2. Allumez la radio et réglez le volume.
SPÉCIFICATIONS TECHNIQUES
Alimentation: ...................................5V 1A
Batterie rechargeable: ...................3.7V
Gamme de fréquences DAB: ......174,928 - 239,200 MHz
Gamme de fréquence FM: ...........87,5-108 MHz
Dimensions: ......................................165 x 95 x 46 mm
Poids: ...................................................347 gr.
2000mAh
Pour éviter d’éventuels dommages auditifs, limiter le temps
d’écoute à volume élevé.
9
Page 10
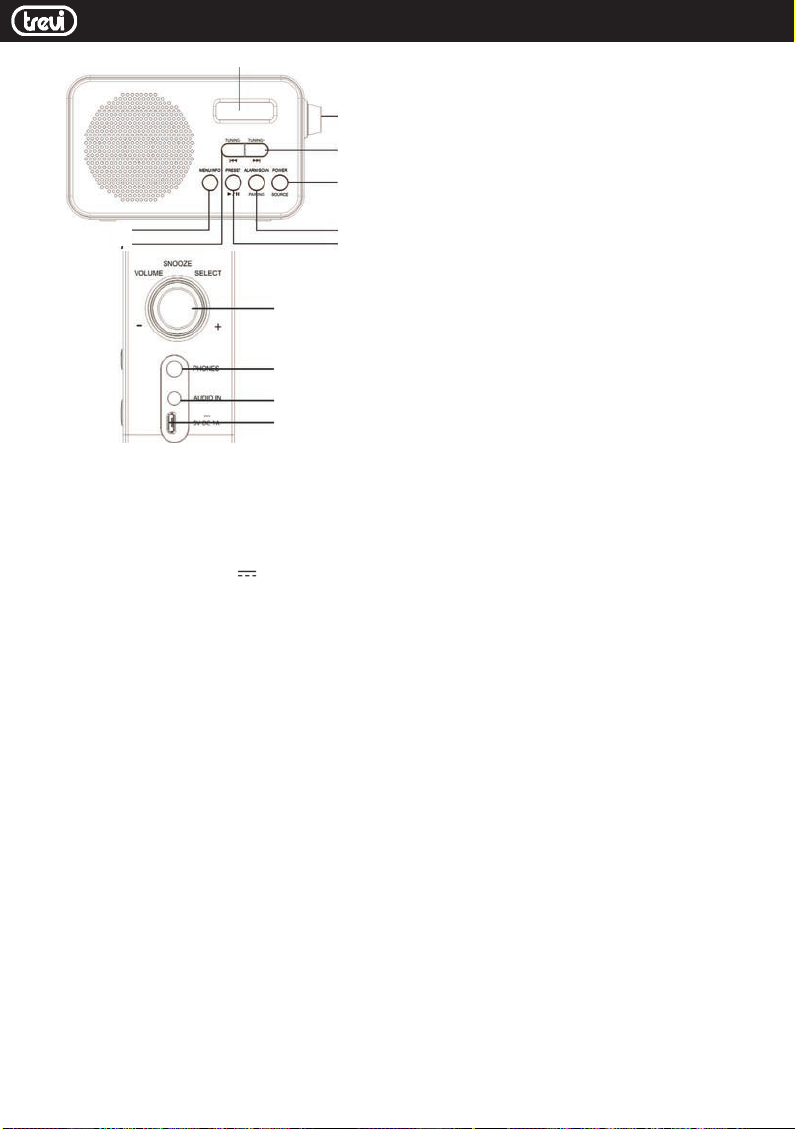
DEUTSCH
DAB 7F92 R
DISPLAY
7
6
1
4
5
1. POWER / SOURCE-Taste
2. ALARM / SCAN-Taste
3. PRESET-Taste
4. MENU / INFO-Taste
5. TU- / CH- Taste
6. TU + / CH + -Taste
7
8
10
9
7. VOLUME / SELECT-Taste /
-Knopf
8. Kopfhöreranschluss
9. Steckdose
10. AUX IN Eingang
2
3
BATTERIE AUFLADEN
1. Laden Sie das Gerät mit einem 5V 1A-Ladegerät (nicht
im Lieferumfang enthalten) mit Micro-USB-Buchse auf.
2. Das Display zeigt den Prozentsatz der Batterieladung an.
3. Wenn der Akku leer ist, wird eine Warnmeldung auf dem
Display angezeigt und das Radio schaltet sich nach einer
bestimmten Zeit automatisch aus.
Hinweis: Wenn der Akku leer ist, verhält sich das Radio mögli-
cherweise ungewöhnlich. Fahren Sie in diesem Fall mit dem
Laden des Akkus fort.
EIN- / AUSSCHALTEN - STANDBY
1. Ziehen Sie die Teleskopantenne heraus.
2. Drücken Sie die POWER-Taste (1), um das Gerät einzuschalten.
3. Das Gerät geht zum DAB-Empfangssystem.
Beim ersten Einschalten durchsucht das Gerät automatisch
die DAB / DAB + -Sender.
4. Drücken Sie die POWER-Taste (1) nur bei externer Stromversorgung lange, um das Gerät in den Standby-Modus
zu versetzen. Das Display zeigt die aktuelle Uhrzeit, den
Batteriestatus und alle eingestellten Alarme an.
5. Halten Sie bei Batteriebetrieb die POWER-Taste (1) gedrückt, um das Gerät auszuschalten.
FM / DAB / AUX IN AUSWAHL UND LAUTSTÄRKEREINSTELLUNG
1. Drücken Sie die SOURCE-Taste (1), um zwischen dem DAB
/ DAB + -Empfangsband, dem FM-Band und dem AUX
IN-Eingang umzuschalten.
2. Drehen Sie den VOLUME-Knopf (7), um die Lautstärke zu
verringern oder zu erhöhen.
10
EINSTELLUNGSMENÜ
1. Halten Sie die MENU-Taste (4) einige Sekunden lang
gedrückt. Das Einstellungsmenü wird auf dem Display
angezeigt.
2. Drücken Sie die Tasten TU- (5) oder TU + (6) und wählen Sie
den gewünschten Eintrag aus.
3. Drücken Sie die SELECT-Taste / den SELECT-Knopf (7), um
die Einstellungen des ausgewählten Elements einzugeben.
Die folgenden Optionen sind im Einstellungsmenü verfügbar
(einige werden angezeigt, je nachdem, ob der DAB- oder der
UKW-Modus ausgewählt ist):
Scan Setting (FM): Ermöglicht die Suche nach UKW-Sendern
mit einem starken Signal oder nach allen gefundenen
Sendern.
Vollständiger Suchlauf (DAB): Bei Auswahl dieser Option wer-
den empfangene Radiosender automatisch durchsucht
und gespeichert.
Manuelle Sendersuche (DAB): Wählen Sie die gewünschte
Frequenz / den gewünschten Kanal und bestätigen Sie
mit SELECT (7). Ein Balken zeigt die Stärke des empfangenen Signals an.
Audioeinstellung (FM): Ermöglicht die Auswahl von Stereo
oder Mono
Prune (DAB): Ermöglicht das Löschen aller gefundenen, aber
nicht verfügbaren Radiosender aus der Liste der gespeicherten Sender (schlechtes Signal).
DRC (DAB): Mit dieser Option können Sie die DRC-Funktion
aktivieren / deaktivieren, um den Klang bei lauten Umgebungen zu verbessern. Sie können den DRC-Pegel auf
hoch (hoch), niedrig (niedrig) oder aus (aus) einstellen.
Systemeinstellung: Dieser Punkt ermöglicht den Zugri auf
weitere Einstellungen.
Ruhezustand: Mit dieser Option können Sie einen Timer für
die automatische Abschaltung einstellen, nach dem
das Gerät automatisch in den Standby-Modus wechselt.
Es kann zwischen 90, 60, 45, 30, 15 Minuten gewählt
werden. Bei aktivierter Funktion bendet sich ein Symbol
in Form eines Mondes mit der verbleibenden Zeit bis zum
Ausschalten auf dem Display.
Im Punkt Aus ist die Funktion deaktiviert.
Alarm: Damit können Sie zwei Alarme aktivieren und einstel-
len. Drücken Sie nach Auswahl von ALARM die ALARM-Taste (2), um ALARM 1 oder 2 auszuwählen, und bestätigen
Sie, dass Sie ein Untermenü aufrufen, in dem Folgendes
eingestellt werden soll:
Einschaltzeit: Legen Sie die Aktivierungszeit für den Alarm
fest.
Dauer: Dauer in Minuten des Weckers.
Quelle: Legen Sie die Art des Klingeltons zwischen Summer
fest
DAB, FM. Wenn Sie DAB oder UKW auswählen, werden Sie
aufgefordert, einen der gespeicherten Radiosender
auszuwählen
Häugkeit: Täglich (jeden Tag), Einmal (nur einmal), Wo-
chenende (samstags und sonntags), Wochentage (von
Montag bis Freitag).
Lautstärke: Alarm Alarm Wiedergabelautstärke, ein Balken
wird angezeigt.
Alarm: Ein / Aus, um den Alarm zu aktivieren / deaktivieren.
Equalizer: Mit dieser Option können Sie die Dynamik des
Page 11

DEUTSCH
DAB 7F92 R
wiedergegebenen Audios ändern. Es ist möglich, Normal,
Klassisch, Jazz, Pop, Rock, Sprache, My EQ (benutzerdenierte Einstellungen) auszuwählen.
Uhrzeit: Damit können Sie die aktuelle Uhrzeit / das aktuelle
Datum einstellen.
Uhrzeit / Datum einstellen: Stellen Sie die aktuelle Uhrzeit
und das Datum ein.
Auto Update: Wählen Sie aus, von welcher Quelle Sie Uhrzeit
und Datum automatisch einstellen, falls verfügbar.
12/24 Stunden einstellen: Stellen Sie das 12 / 24H-Zeitformat
ein
Datumsformat einstellen: Stellen Sie das Datumsformat ein.
Hintergrundbeleuchtung: Damit können Sie die Zeit und
Helligkeit des Displays einstellen:
Timeout: Stellen Sie die Zeit ein, nach der der
Display verringert die Helligkeit ohne Befehle.
On Level: Zeigt die Helligkeitsstufe des Displays an, wenn das
Gerät Befehle empfängt.
Dimmstufe: Zeigt die Helligkeitsstufe des Displays an, wenn
das Gerät inaktiv ist.
Inaktiver Standby: Stellen Sie eine Zeit ein, nach der sich das
Radio automatisch ausschaltet (Aus = Aus).
Sprache: Hier können Sie die Systemsprache auswählen.
Werksreset: Ermöglicht es Ihnen, alle Einstellungen auf die
Werkseinstellungen zurückzusetzen. Wählen Sie Ja für die
Wiederherstellung.
SW-Version: Software-Version installiert.
DAB / DAB + RADIO
1. Wählen Sie den DAB-Modus (Digital Radio).
2. Drücken Sie die Tasten TU- (5) und TU + (6), um die Liste der
empfangenen Radiosender anzuzeigen und zu durchsu-
chen. Drücken Sie die SELECT-Taste / den SELECT-Knopf
(7), um den gewünschten Sender auszuwählen.
3. Durch Drücken der INFO-Taste (4) können Sie die Anzeige
von Informationen, falls verfügbar, auf dem Display
ändern.
4. Durch langes Drücken der PRESET-Taste (3) kann auf das
Menü des Radiosenders zugegrien werden, der in einem
der 20 verfügbaren Speicherplätze abgespielt wird.
5. Durch Drücken der PRESET-Taste (3) kann durch die Liste
der gespeicherten Radiosender geblättert werden.
DAB / DAB + ÜBERTRAGUNGSINFORMATIONEN
Im DAB-Modus zeigt das Display eine Reihe von Informationen über den Sender und den wiedergegebenen Titel.
1. Drücken Sie wiederholt die Taste INFO (4), um die ange-
zeigten Informationen zu ändern.
Hinweis: Nicht alle DAB-Sender liefern die vom Gerät ange-
zeigten Informationen.
Falls verfügbar, sind folgende Informationen verfügbar:
DLS: Zeigt Informationen zur übertragenen Musik an (Kün-
stler, Songtitel usw.).
Programmtyp: Zeigt Informationen zum übertragenen
Programmtyp an.
Sendername: Zeigt Informationen zum Service-Sender an.
Sendernummer / Frequenz: Zeigt Informationen zu Nummer
und Frequenz des gesendeten DAB / DAB + -Senders an.
Signalfehlerindex: Zeigt Informationen zur Stärke der Signal-
fehler und zur Intensität des Empfangs an.
Bitrate: Zeigt Informationen zum Komprimierungsverhältnis
der aktuellen Übertragung an.
Batteriestatus.
Datum: Zeigt Informationen zum Datum an.
FM-RADIO
1. Wählen Sie den FM-Modus.
2. Drücken Sie die Tasten TU- (5) und TU + (6), um manuell
nach einem Radiosender zu suchen. Durch einmaliges
Drücken der TUNE-Tasten wird eine Verschiebung von
0,05 MHz vorgenommen, und Sie suchen so lange, bis das
erste starke Signal auftritt.
3. Durch Drücken der PRESET-Taste (3) können Sie auf die
Liste der gespeicherten UKW-Radiosender zugreifen.
Wählen Sie den gewünschten Radiosender aus, um ihn
anzuhören.
4. Durch langes Drücken der PRESET-Taste (3) kann auf das
Menü zum Speichern des aktuellen Radiosenders in
einem der 20 verfügbaren Speicher zugegrien werden.
5. Durch wiederholtes Drücken der Taste INFO (4) werden
verschiedene Informationen zum eingestellten Radio
angezeigt (falls verfügbar).
ALARM
Es stehen 2 Alarmalarme zur Verfügung.
Informationen zum Einstellen und Aktivieren nden Sie im
Abschnitt “Einstellungen” unter “Systemeinstellungen” und
“Alarm”.
Um den Alarm zu verschieben, drücken Sie die SELECT-Taste.
Der Alarm wird nach 5 Minuten erneut aktiviert. Durch mehrmaliges Drücken können Sie den Alarm so programmieren,
dass er bis zu 30 Minuten wieder aktiviert wird.
Um den Wecker dauerhaft auszuschalten, drücken Sie die
ALARM-Taste (2).
Hinweis: Der Wecker ist nur verfügbar, wenn das Radio über
ein externes Netzteil mit Strom versorgt wird.
AUX IN INPUT
1. Wählen Sie den AUX-Eingangsmodus.
2. Schließen Sie ein 3,5-mm-Klinkenkabel an die AUX INBuchse (10) und das andere Ende an das externe Gerät an.
Starten Sie die Wiedergabe vom externen Gerät.
KOPFHÖRERANSCHLÜSSE
1. Stecken Sie den Kopfhörer in die Kopfhörerbuchse (8).
2. Schalten Sie das Radio ein und stellen Sie die Lautstärke
ein.
TECHNISCHE SPEZIFIKATIONEN
Spannungsversorgung: ................5V 1A
Wiederauadbare batterie: .........3,7 V
DAB-Frequenzbereich: ..................174.928 - 239.200 MHz
UKW-Frequenzbereich: ................87,5-108 MHz
Abmessungen: .................................165 x 95 x 46 mm
Gewicht: .............................................347 gr.
Um Hörschäden zu vermeiden, begrenzen Sie die Zeit
bei hoher Lautstärke zu hören.
2000 mAh
11
Page 12
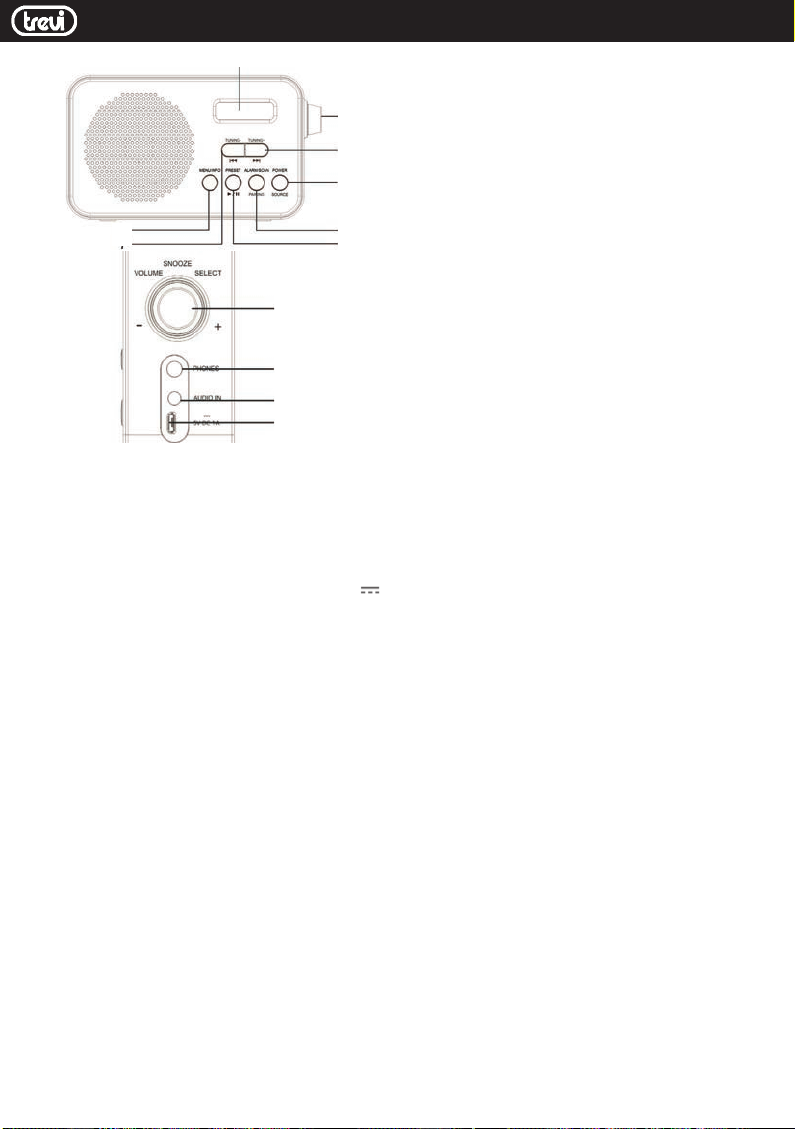
ESPAÑOL
DAB 7F92 R
DISPLAY
7
6
1
4
5
1. Botón POWER / SOURCE
2. Botón ALARM / SCAN
3. Botón PRESET
4. Botón MENÚ / INFO
5. Botón TU- / CH-
6. Botón TU + / CH +
7
8
10
9
7. Botón / perilla VOLUME /
SELECT
8. Toma de auriculares
9. Toma de corriente
10. Entrada AUX IN
2
3
RECARGA DE BATERÍA
1. Cargue el dispositivo con un cargador de batería de 5V
1A (no incluido) con enchufe microUSB.
2. La pantalla muestra el porcentaje de carga de la batería.
3. Con la batería agotada, se muestra un mensaje de advertencia en la pantalla y, después de cierto tiempo, la radio
se apaga automáticamente.
Nota: con la batería agotada, la radio puede comportarse de
manera anormal; En este caso, proceda a cargar la batería.
ENCENDIDO / APAGADO - EN ESPERA
1. Extienda la antena telescópica.
2. Presione el botón POWER (1) para encender el aparato.
3. El dispositivo irá al sistema de recepción DAB.
Cuando se enciende por primera vez, el dispositivo escaneará
automáticamente las estaciones DAB / DAB +.
4. Solo si se alimenta con una fuente de alimentación externa,
presione el botón POWER (1) durante mucho tiempo para
colocar el aparato en modo de espera. La pantalla mostrará la hora actual, el estado de la batería y las alarmas
conguradas.
5. Si funciona con batería, presione y mantenga presionado el
botón POWER (1) para apagar el dispositivo.
FM / DAB / AUX EN SELECCIÓN Y AJUSTE DE VOLUMEN
1. Presione el botón SOURCE (1) para cambiar entre la banda
de recepción DAB / DAB +, la banda FM y la entrada AUX
IN.
2. Gire la perilla VOLUME (7) para disminuir o aumentar el
volumen.
12
MENÚ DE CONFIGURACIÓN
1. Mantenga presionada la tecla MENÚ (4) durante unos
segundos; el menú de conguración aparecerá en la
pantalla.
2. Presione las teclas TU- (5) o TU + (6) y seleccione el elemento deseado.
3. Presione el botón / perilla SELECT (7) para ingresar la conguración del elemento seleccionado.
Los siguientes elementos están disponibles en el menú de
conguración (algunos se muestran dependiendo de si se
seleccionó el modo DAB o FM):
Conguración de escaneo (FM): le permite buscar en estacio-
nes de FM con una señal fuerte o en todas las estaciones
encontradas.
Exploración completa (DAB): la selección de este elemento
explora y almacena automáticamente las estaciones de
radio recibidas.
Sintonización manual (DAB): seleccione la frecuencia / canal
deseado y conrme con SELECT (7). Una barra mostrará la
fuerza de la señal recibida.
Conguración de audio (FM): le permite seleccionar escuchar
en estéreo o mono
Prune (DAB): le permite eliminar de la lista de estaciones
almacenadas todas las radios encontradas pero no disponibles (señal deciente).
DRC (DAB): le permite habilitar / deshabilitar la función DRC
para mejorar el sonido cuando escucha en entornos
ruidosos. Puede establecer el nivel de DRC en alto (alto),
bajo (bajo) o apagado (apagado).
Conguración del sistema: este elemento permite acceder a
otras conguraciones.
Suspender: le permite congurar un temporizador de apaga-
do automático, después del cual el dispositivo pasará automáticamente al modo de espera. Es posible seleccionar
entre 90, 60, 45, 30, 15 minutos. Con la función activada,
hay un icono en forma de luna con el tiempo restante
antes de apagar la pantalla.
En el elemento O, la función está desactivada.
Alarma: le permite activar y congurar dos alarmas. Después
de seleccionar ALARM, presione la tecla ALARM (2) para
seleccionar ALARM 1 o 2 y conrme que ingrese un
submenú en el que congurar:
On Time: establece el tiempo de activación de la alarma.
Duración: duración en minutos del despertador.
Fuente: establece el tipo de tono de llamada entre Buzzer
DAB, FM. Al seleccionar DAB o FM, se le solicita que seleccione
una de las estaciones de radio guardadas en la memoria
Frecuencia: diaria (todos los días), una vez (solo una vez), nes
de semana (sábados y domingos), días laborables (de
lunes a viernes).
Volumen: volumen de reproducción de alarma alarma, se
muestra una barra.
Alarma: On / O para activar / desactivar la alarma.
Ecualizador: le permite cambiar la dinámica del audio que se
está escuchando; Es posible seleccionar Normal, Clásico,
Jazz, Pop, Rock, Voz, Mi EQ (ajustes personalizados).
Hora: le permite establecer la hora / fecha actual.
Establecer hora / fecha: establece la hora y fecha actuales.
Actualización automática: seleccione desde qué fuente
establecerá automáticamente la hora y la fecha, si está
disponible.
Page 13

ESPAÑOL
DAB 7F92 R
Establecer 12/24 horas: congure el formato de hora 12 / 24H
Establecer formato de fecha: establece el formato de fecha.
Luz de fondo: le permite establecer el tiempo y el nivel de
brillo de la pantalla:
Tiempo de espera: establece el tiempo después del cual
La pantalla reduce el brillo sin comandos.
On Level: indica el nivel de brillo de la pantalla cuando el
dispositivo recibe comandos.
Nivel de atenuación: indica el nivel de brillo de la pantalla
cuando el aparato está inactivo.
Inactivo en espera: establezca un tiempo después del cual
la radio se apaga automáticamente (Apagado = apagado).
Idioma: le permite seleccionar el idioma del sistema.
Restablecimiento de fábrica: le permite restaurar todas las
conguraciones a las conguraciones de fábrica. Seleccio-
ne Sí para restaurar.
Versión SW: versión de software instalada.
DAB / DAB + RADIO
1. Seleccione el modo DAB (radio digital).
2. Presione las teclas TU- (5) y TU + (6) para visualizar y
desplazarse por la lista de estaciones de radio recibidas.
Presione el botón / perilla SELECT (7) para seleccionar la
estación deseada.
3. Al presionar el botón INFO (4) es posible cambiar la visualización de información, si está disponible, en la pantalla.
4. Al presionar prolongadamente la tecla PRESET (3) es
posible acceder al menú de la estación de radio que se está
reproduciendo en una de las 20 memorias disponibles.
5. Al presionar la tecla PRESET (3) es posible desplazarse por
la lista de estaciones de radio guardadas.
DAB / DAB + INFORMACIÓN DE TRANSMISIÓN
En modo DAB, la pantalla mostrará una serie de información
sobre la estación y la pista que se está reproduciendo.
1. Presione el botón INFO (4) varias veces para cambiar la
información que se muestra.
Nota: no todas las estaciones DAB proporcionan la información
que muestra el dispositivo.
Si está disponible, la siguiente información está disponible:
DLS: muestra información relacionada con la música transmi-
tida (artista, título de la canción, etc.).
Tipo de programa: muestra información relacionada con el
tipo de programa transmitido.
Nombre del transmisor: muestra información relacionada con
el transmisor de servicio.
Número / frecuencia del transmisor: muestra información
sobre el número y la frecuencia de la estación DAB / DAB
+ transmitida.
Índice de error de señal: muestra información relacionada
con el nivel de errores de señal y la intensidad con la que
se recibe.
Velocidad de bits: muestra información relacionada con la
relación de compresión de la transmisión actual.
Estado de la batería.
Fecha: muestra información relacionada con la fecha.
RADIO FM
1. Seleccione el modo FM.
2. Presione las teclas TU- (5) y TU + (6) para buscar manual-
mente una estación de radio. Presionando las teclas TUNE
una vez, realiza un cambio de 0.05 MHz, presionándolas
durante mucho tiempo, busca hasta encontrar la primera
señal fuerte.
3. Al presionar la tecla PRESET (3) puede acceder a la lista
de estaciones de radio FM almacenadas. Seleccione la
estación de radio deseada para escucharla.
4. Al presionar prolongadamente la tecla PRESET (3) es
posible acceder al menú para guardar la estación de radio
actual en una de las 20 memorias disponibles.
5. Al presionar repetidamente el botón INFO (4) se mostrará
información variada sobre la radio sintonizada (si está
disponible).
ALARMA
2 alarmas de alarma están disponibles.
Para congurarlos y activarlos, consulte la sección “Menú de
conguración” en “Conguración del sistema” y “Alarma”.
Para posponer la alarma, presione el botón SELECT, la alarma
se activará nuevamente después de 5 minutos, al presionarla
varias veces puede programar la alarma para que se reactive
hasta 30 minutos.
Para apagar la alarma del despertador, presione permanentemente el botón ALARM (2).
Nota: la alarma solo está disponible si la radio está alimentada
por una fuente de alimentación externa.
ENTRADA AUXILIAR
1. Seleccione el modo de entrada auxiliar.
2. Conecte un cable Jack de 3,5 mm a la toma AUX IN (10) y el
otro extremo al dispositivo externo. Inicie la reproducción
desde el dispositivo externo.
TOMAS DE AURICULARES
1. Inserte los auriculares en la toma de auriculares (8).
2. Encienda la radio y ajuste el volumen.
ESPECIFICACIONES TÉCNICAS
Fuente de alimentación: ..............5V 1A
Batería recargable: .........................3.7V
Rango de frecuencia DAB: ........... 174.928 - 239.200 MHz
Rango de frecuencia FM: .............87.5-108MHz
Dimensiones: ...................................165 x 95 x 46 mm.
Peso: .................................................... 347 gr.
2000mAh
Para evitar posibles daños a la
audición, limitar el tiempo de
escuchar a un volumen alto.
13
Page 14
SMISTAMENTO - CORRECT DISPOSAL
INFORMAZIONI AGLI UTENTI
ai sensi del Decreto Legislativo N° 49 del 14 Marzo
2014 “Attuazione della Direttiva 2012/19/UE sui
riuti di apparecchiature elettriche ed elettroniche
(RAEE)”
Il simbolo del cassonetto barrato riportato sull’apparecchiatura indica che il prodotto alla ne della propria vita utile
deve essere raccolto separatamente dagli altri riuti. L’utente
dovrà, pertanto, conferire l’apparecchiatura integra dei
componenti essenziali giunta a ne vita agli idonei centri di
raccolta dierenziata dei riuti elettronici ed elettrotecnici,
oppure riconsegnarla al rivenditore al momento dell’acquisto
di nuova apparecchiatura di tipo equivalente, in ragione di
uno a uno, oppure 1 a zero per le apparecchiature aventi lato
maggiore inferiore a 25 cm. L’adeguata raccolta dierenziata per l’avvio successivo dell’apparecchiatura dimessa al
riciclaggio, al trattamento e allo smaltimento ambientale
compatibile contribuisce ad evitare possibili eetti negativi
sull’ambiente e sulla salute e favorisce il riciclo dei materiali di
cui è composta l’apparecchiatura. Lo smaltimento abusivo del
prodotto da parte dell’utente comporta l’applicazione delle
sanzioni amministrative di cui al D.Lgs n. Decreto Legislativo
N° 49 del 14 Marzo 2014.
Precautions for correct disposal of the product
The symbol shown on the equipment indicates that
waste must be disposed of in “separate collection” and so the
product must not be disposed of together with urban waste.
The user must take the product to special “separate waste
collection centres” provided by local government, or deliver it
to the retailer against the purchase of a new product.
Separate collection of waste and subsequent treatment,
recycling and disposal operations promotes the production of
equipment with recycled materials and limits negative eects
on the environment and on health caused by improper
handling of waste.
Illegal disposal of the product leads to the enforcement of
administrative penalties.
DAB 7F92 R
Recommandations pour l’élimination correcte
du produit
Le symbole gurant sur l’appareil indique que le produit fait
l’objet d’une “ collecte séparée “. C’est pourquoi, le produit ne
doit pas être éliminé avec les déchets urbains.
L’utilisateur doit remettre le produit auprès de “ décharges
spécialisées de collecte séparée “ prévues par les autorités
locales, ou bien le rendre au revendeur quand il achètera un
nouvel appareil équivalent.
La collecte séparée du produit et les opérations successives
de traitement, recyclage et élimination favorisent la production d’appareils composés par des matériaux recyclés ainsi
que permettent d’éviter des eets négatifs sur l’environnement et sur la santé des personnes suite à une gestion
impropre du déchet.
Toute élimination abusive du produit entraîne l’application de
sanctions administratives.
Hinweise zur ordnungsgemäßen Entsorgung
des Produkts
Das auf dem Gerät angebrachte Symbol weist darauf hin, dass
das Altgerät “getrennt zu sammeln” ist und das Produkt daher
nicht zusammen mit dem Gemeindeabfall entsorgt werden
darf.
Der Benutzer muss das Produkt zu den entsprechenden, von
der Gemeindeverwaltung eingerichteten “Wertstosammelstellen” bringen oder dem Händler beim Kauf eines neuen
Produkts übergeben.
Die getrennte Müllsammlung und anschließende Aufbereitung, Wiederverwertung und Entsorgung fördern die
Herstellung von Geräten unter Verwendung wiederverwerteter Materialien und vermindern die negativen Auswirkungen
auf die Umwelt und Gesundheit in Folge einer falschen
Müllverwaltung.
Die widerrechtliche Entsorgung des Produkts führt zur Auferlegung von Verwaltungsstrafen.
Advertencias para la correcta eliminación del
producto
El símbolo que aparece en el aparato indica que el residuo
debe ser objeto de “recogida selectiva” por tanto el producto
no se debe eliminar junto con residuos urbanos.
El usuario deberá entregar el producto a los “centros de recogida selectiva” creados por las administraciones municipales o
bien al distribuidor cuando adquiera un nuevo producto.
La recogida selectiva del residuo y las sucesivas operaciones
de tratamiento, recuperación y eliminación favorecen la
fabricación de aparatos con materiales reciclados y limitan los
efectos negativos en el medio ambiente y la salud causados
por una gestión incorrecta del residuo.
La eliminación abusiva del producto da lugar a la aplicación
de sanciones administrativas.
14
Page 15

NOTE
DAB 7F92 R
15
Page 16

DICHIARAZIONE DI CONFORMITÀ UE
SEMPLIFICATA
Il fabbricante TREVI dichiara che il tipo di
apparecchiatura radio DAB 7F92 R è
conforme alla direttiva 2014 / 53 / UE.
SIMPLIFIED EU DECLARATION OF
CONFORMITY
Hereby TREVI Spa declares that the radio
equipment type DAB 7F92 R is in compliance
with directive 2014 / 53 / EU.
Il testo completo della dichiarazione di conformità
EU è disponibile al seguente indirizzo Internet:
https://www.trevi.it/dms/zidi/TREVI/DOCDAB7F92R.pdf
The full text of the EU declaration of conformity is
available at the following internet address:
Made in China
Trevi S.p.A.
Strada Consolare Rimini-San Marino, 62 47924 Rimini (RN) Italy
Tel. 0541/756420 - Fax 0541/756430 - www.trevi.it - e-mail: [email protected]
16
 Loading...