

Trevi CR 410 Notemanager User Manual
1
2
3
4
5
9
11
12
13
6
7
8
10
14
16
15
CR 410
NOTEMANAGER RECORDER

p.2
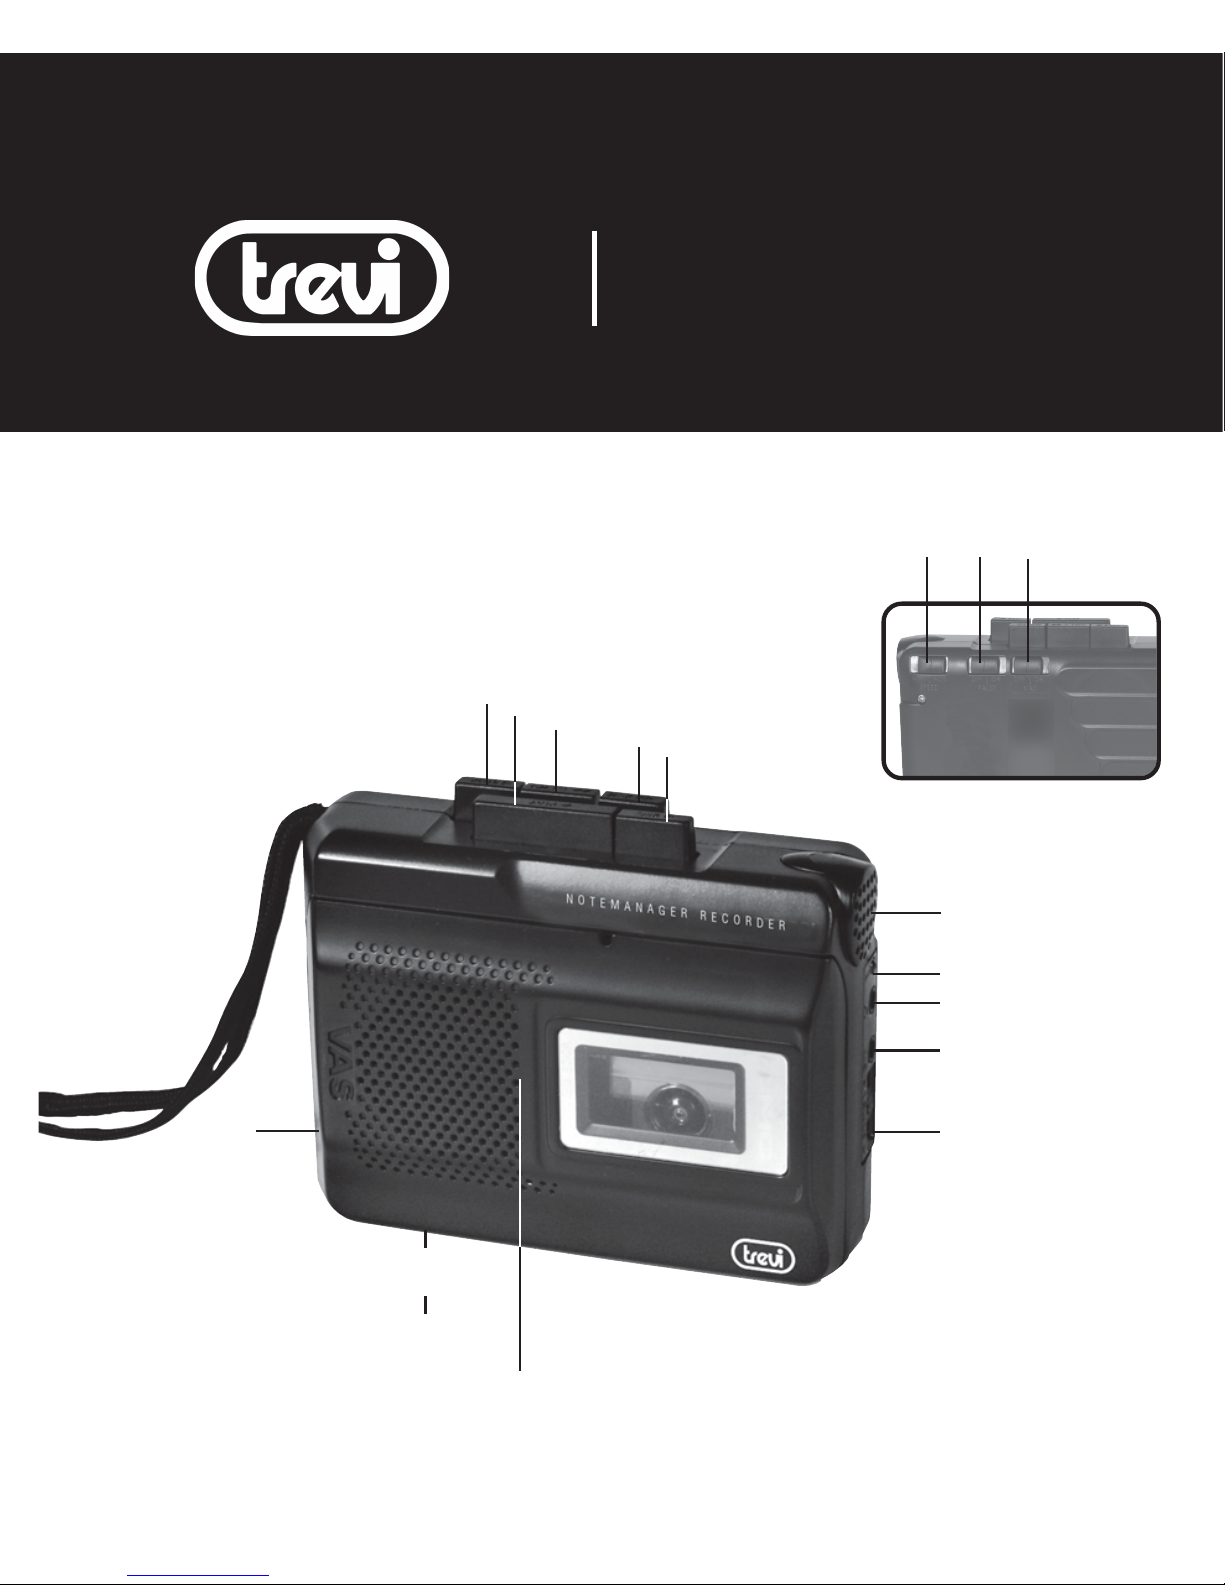
DESCRIZIONE COMANDI
1. Tasto PLAY, riproduzione
2. Tasto STOP, arresto
3. Tasto F.FWD, avanzamento veloce
4. Tasto REW, riavvolgimento veloce
5. Tasto RECORD, registrazione
6. Selettore VAS ON/OFF, sistema di
attivazione vocale
7. Selettore PAUSE ON/OFF, pausa
8. Selettore SPEED LOW/NOR velocità di
riproduzione
9. Microfono incorporato
10.Indicatore di registrazione
11.Presa cuffia
12.Presa per microfono esterno
13. Controllo volume/ sensibilità VAS
14.Vano batterie
15.Presa alimentazione esterna DC + 3V
16.Vano cassette
ALIMENTAZIONE CON BATTERIE
Inserite due batterie formato "AA" nel vano
batterie (14), avendo cura di rispettare le
polarità indicate.
CON ALIMENTAZIONE ESTERNA
Collegate un adattatore C.A. 220V - C.C. + 3V,
opzionale, alla presa (15) rispettando
attentamente le polarità indicate. Inserite la
spina dell'adattatore in una presa di corrente.
APERTURA DEL VANO CASSETTA
Premere il tasto STOP(2) per arrestare la
riproduzione/registrazione. Aprire il vano (16)
per inserire od estrarre una cassetta.
CONTROLLO VOLUME
1. In riproduzione il controllo VOL (13) regola
il volume di ascolto in cuffia o altoparlante.
2. In registrazione (modalità VAS inserita)
regola la sensibilità del microfono.
REGISTRAZIONE CON MICROFONO
INTERNO
1. Portare il selettore (8) di velocità in
posizione NOR (velocità normale) o LOW
(velocità bassa) in base a come si vuole
effettuare la registrazione (vedi
descrizione controllo della velocità).
2. Inserite la cassetta su cui desiderate
registrare nel vano cassette (16).
3. Orientare il microfono incorporato (5)
verso la sorgente da registrare.
4. Premete il tasto REC (7) per iniziare la
registrazione.
5. Portate il selettore PAUSE (6) sulla
posizione ON per fermare momentanea
mente la registrazione.
Riportatelo sulla posizione iniziale per
riprenderla.
6. Premete il tasto STOP (10) per fermare
definitivamente la registrazione.
REGISTRAZIONE CON ATTIVAZIONE
VOCALE (VAS)
Quando la funzione VAS è attiva, la
registrazione partirà automaticamente
appena l’apparecchio rileverà la voce e si
interromperà tutte le volte che non ci
saranno segnali vocali all’interno della stanza.
1. Portate il selettore VAS (4) su ON.
2. Premete il tasto REC (7), non appena
l’apparecchio rileva una voce o un suono
automaticamente la registrazione ha inizio.
3. La registrazione si ferma quando la voce o
altri suoni cessano.
4. Il livello di sensibilità del microfono per
attivare o disattivare la registrazione VAS
viene regolato attraverso il controllo
CR 410 NOTEMANAGER ITALIANO

p.3
volume (13).
CONTROLLO DELLA VELOCITÀ
Questo apparecchio può funzionare a due
diverse velocità: 1,2 e 2,4 cm al secondo. Il
normale funzionamento è a 2,4 cm al sec.
La velocità di 1,2 cm al sec. permette di
raddoppiare la durata delle cassette con un
degrado, però, della qualità di registrazione.
RIPRODUZIONE
1. Inserite la cassetta nel vano (16) con il
lato che si desidera ascoltare rivolto verso
l'esterno.
2. Premete il tasto PLAY (1) per iniziare la
riproduzione.
3. Premete il tasto STOP (2) per fermare la
riproduzione.
4. Potete ascoltare con l'altoparlante
incorporato o con una cuffia mono,
opzionale.
5. Premere il tasto F.FWD per avanzare
rapidamente.
Successivamente premere il tasto STOP
(2)per terminare l’avanzamento.
Nota: se la registrazione viene effettuata in modalità
LOW anche in riproduzione il selettore (8) di velocità
dovrà essere in posizione LOW.
RISPARMIO BATTERIE
Rimuovere le batterie se il recorder non
verrà utilizzato per più di 30 giorni, evitando
un inutile consumo.
CARATTERISTICHE TECNICHE
Risposta in frequenza: ........... 300-4.000Hz
Velocità del nastro: ................. selezionabile fra 2,4 o 1,2cm/sec
Presa microfono: ...................... 0,3mV (600 ohm)
Presa cuffia: ................................ 8ohm
Alimentazione: .......................... 2 batterie formato "AA" (UM3)
Rete DC + 3V
Dimensioni: ................................ 115x95x35mm
CR 410 NOTEMANAGER ITALIANO

p.4
CR 410 NOTEMANAGER ENGLISH
INDEX
1. PLAY button
2. STOP button
3. F.FWD (Fast forward) button
4. REW (Rewind) button
5. RECORD button
6. Voice-activated system (VAS) switch
7. PAUSE button
8. SPEED switch
9. Built-in microphone
10.Record indicator
11.Earphone jack
12.External microphone jack
13.VOLUME control
14.Battery compartment ( on back panel )
15.3V DC power jack
16. Cassette compartment
OPERATION RECORDING
1. Open the cassette compartment.
2. Install a cassette with desired side facing
outward (visible through window).
3. Close the cassette compartment.
4. Set the VAS switch to OFF (for normal
recording) or ON (to activate the voice
activated system).
5. Press the RECORD button. The PLAY
button will automatically engage. The
Record indicator will alight.
6. Place the recorder close to the sound
source.
7. Press the STOP button to stop recording.
NOTE
1. The first few sounds that activate the unit
may not be recorded .For best results, say
a few introductory words before you
begin dictation.
2. Variation in voice level will not
temporarily stop the unit (two-to-six
seconds of silence is required).
3. Built-in record level control automatically
sets the recording input level.
CONTROLS TAPE SPEED
1. Nor (normal) tape speed: Compatible with
most single-speed micro cassettes.
2. Low tape speed: for longer recording,
allows you to record up to three hours on
a 90-minute (C-90) cassette.
NOTE: Do not change the tape speed while
recording.
PAUSE CONTROL
Slide the PAUSE switch up to suspend
function in PLAY, RECORD, FAST FORWARD
or REWIND mode. Slide the switch down to
resume operation.
FAST FORWARD AND REWIND
To rapidly advance or rewind the tape, press
the F.FWD or REW button. To stop the tape at
the desired position or once the tape has
ended press STOP button again.
SET-UP
Install two AA batteries (not included) into
the battery compartment, matching the
polarity as indicated inside the chamber.
VOLUME/VAS SENS CONTROL
When the unit is in playback mode, this
control (13) adjusts the playback volume
level.
When the unit is in record mode, this control
adjust the microphone sensitivity. At
maximum, a soft sound can turn on the
recorder. At minimum, a louder sound is
required.
VOICE ACTIVATED SYSTEM (VAS)
1. Set VAS switch to ON; when dictation
pauses for two to six seconds, recording
will stop temporarily. When dictation
resumes, recording will continue.
2. Set VAS switch to OFF; recording will
continue until the STOP/EJECT button is

p.5
CR 410 NOTEMANAGER ENGLISH
pressed.
3. Adjust the microphone sensitivity with
the VOLUME/VAS SENS control until the
sound source level just activates the unit.
TAPE PLAYBACK
To listen to your recorded cassette, rewind to
the starting point and press STOP. Press play
and adjust the VOLUME control to the
desired listening level.
NOTE: A tape must be played back at the
same speed used to record it.
TAPE ERASE:
To erase a tape, simply record over the
unwanted recording.
EARPHONE JACK:
When you plug your earphones (not
included) into the EARPONE jack, the built-in
speaker is automatically disconnected.
MICROPHONE JACK:
When you plug your own external
microphone (not included) into the MIC jack,
the built-in microphone is automatically
disconnected.
CHANGING BATTERIES:
Slide open the battery compartment on the
back of the unit. Insert 2 AA batteries,
following the polarities indicated inside the
chamber, replace the battery compartment
door.
NOTE: REMOVE THE BATTERIES IF
THE UNIT WILL NOT BE USED
FOR MORE THAN 30 DAYS. USE
ALKALINE BATTERIES FOR
LONGER LIFE.
 Loading...