

Page 1
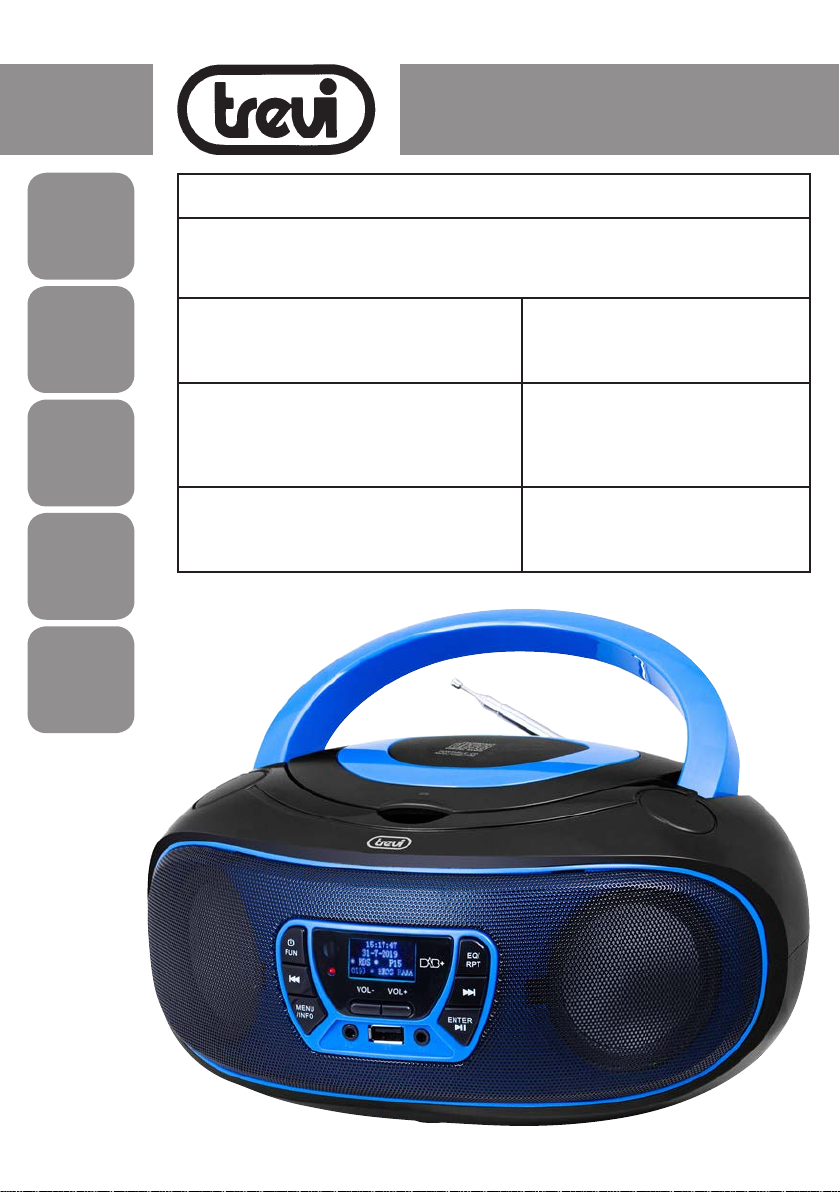
DAB+
RADIO
CMP 583 DAB
Guida d’uso / User guide
FM
RADIO
CD
PLAYER
USB
INPUT
AUX
INPUT
DAB RADIO STEREO
CON CD/MP3/USB/AUX
Manuale d'uso e installazione
DAB RADIO STÉRÉO
AVEC LECTEUR CD/MP3/USB/AUX
Mode d’emploi et installation
DAB RADIO ESTÉREO
CON LECTORA DE CD/MP3/USB/AUX
Manual de uso e instalación
DAB RADIO STEREO
WITH CD/MP3/USB/AUX
Instruction manual
DAB RADIO STEREO
MIT CD/MP3/USB/AUX
Gebrauchs- und Installationshandbuch
Page 2
WARNING!
CMP 583 DAB
ATTENZIONE
RISCHIO DI SCOSSE
ELETTRICHE!
NON ESPORRE A
PIOGGIA E UMIDITÀ
ATTENZIONE: NON APRITE L'APPARECCHIO. ALL'INTERNO NON
VI SONO COMANDI MANIPOLABILI DALL'UTENTE NE PARTI DI
RICAMBIO. PER TUTTE LE OPERAZIONI DI SERVIZIO RIVOLGERSI
AD UN CENTRO DI ASSISTENZA AUTORIZZATO TREVI
ATTENTION
RISQUE DE DECHARGES
ELECTRIQUES
NE PAS EXPOSER A LA PLUIE
ET A L’HUMIDITE
ATTENTION: NE PAS OUVRIR L’APPAREIL, A L’INTERIEUR IL N’Y
A PAS DE COMMANDES A MANIPULER PAR L’UTILISATEUR OU
DE PIECES DE RECHANGE. POUR TOUTES LES OPERATIONS DE
SERVICE IL FAUT S’ADRESSER A UN SERVICE D’ASSISTANCE
AUTORISE TREVI.
ATENCION
PELIGRO DE CHOQUES
ELECTRICOS
NO EXPONER A LLUVIA
Y HUMEDAD
ATENCION: NO ABRIR EL APARATO, EN SU INTERIOR NO HAY MANDOS QUE PUEDAN SER MANIPULADOS POR EL USUARIO NI PARTES
DE REPUESTO. PARA TODAS LAS OPERACIONES DE SERVICIO
DIRIGIRSE A UN CENTRO DE ASISTENCIA AUTORIZADO TREVI.
WARNING!
DANGER OF ELECTRIC SHOCK!
DO NOT EXPOSE TO
RAIN OR HUMIDITY
WARNING: DO NOT OPEN THE SET. NEITHER CONTROLS OR SPARE
PARTS TO BE USED BY THE USER ARE TO BE FOUND INSIDE IT. APPLY TO AUTHORISED TREVI CENTERS FOR SERVICE OPERATIONS.
ACHTUNG
GEFAHR ELEKTRISCHER
NICHT DER FEUCHTIGKEIT UND
ACHTUNG: DAS GERÄT NICHT ÖFFNEN. IM INNERN BEFINDEN
SICH KEINE VOM BENUTZER SELBST INSTANDSETZBAREN TEILE
UND AUCH KEINE ERSATZTEILE. FÜR JEGLICHE SERVICEARBEITEN, WENDEN SIE SICH BITTE AN EINE TREVI AUTORISIERTEN
KUNDENDIENSTSTELLE.
WIRES CONNECTIONS TO A UK THREE-PIN PLUG
The wires in this mains lead are coloured in accordance with the following wiring codes:
Blue: ............................................................Neutral
Brown: .........................................................Live
The wires in this mains lead must be connected to the terminals in the plug as follows:
Blue wire:.....................................................N or Black
Brown wire: .................................................L or Red
Neither wire is to be connected to the earth (E or W) terminal of three-pin plug.
Should the fuse fail in the plug remove the plug form the wall socket and replace the fuse
with a 3 Amp. ASTA approved BS 1362 fuse.
SCHLÄGE
DEM REGEN AUSSETZEN
UK PLUG ONLY
2
Page 3
CMP 583 DAB
ITALIANO
VOL T AGGIO PERICOLOSO
Questo simbolo riportato sul retro
dell'apparecchio ed in questo manuale
segnala la presenza all'interno di questo
apparecchio di componenti operanti ad
alta tensione, non apritelo per evitare il
rischio di scosse elettriche.
ATTENZIONE
Questo simbolo riportato sul retro
dell'apparecchio ed in questo
manuale indicano la presenza
sugli stessi di importanti istruzioni
per la sicurezza d'uso. Leggetele
attentamente prima di utilizzare
l'apparecchio.
AVVERTENZE SUL LASER
Questo apparecchio è dotato di un
sistema di lettura con raggio laser.
Benché il laser sia di bassa potenza
e con dispositivo di sicurezza che ne
impedisce il funzionamento a sportello
aperto attenetevi scrupolosamente alle
seguenti avvertenze:
Non avvicinate l'occhio alla lente del
laser con l'apparecchio aperto, pericolo
di lesione della retina.
Non tentate di smontare o manomettere
l'unità laser, pericolo di assorbimento
di radiazioni.
NOTE D'USO
Ascoltare a volume alto per lungo tempo, potrebbe danneggiare il vostro udito.
Questo apparecchio è uno strumento elettronico di alta precisione, evitate quindi di utilizzarlo nei seguenti casi:
• Vicino a campi magnetici.
• Vicino a fonti di calore come caloriferi e stufe.
• In luoghi molto umidi come stanze da bagno, piscine, ecc...
• In luoghi molto polverosi.
• In luoghi soggetti a forti vibrazioni.
• Non avvicinare l’orecchio all’altoparlante durante le fasi di messa punto e regolazioni del volume, e in particolare
di tenere il volume al minimo nella fase di accensione.
• Posizionare l’apparecchio in modo che ai suoi lati ci sia sempre abbastanza spazio per la libera circolazione di
aria (almeno 5cm).
• Se dei liquidi penetrano all’interno dell’apparecchio scollegare immediatamente la spina dalla presa e portare
l’apparecchio al più vicino centro assistenza autorizato TREVI.
• Controllare sempre che il cavo di alimentazione sia installato correttamente.
• Utilizzare solamente accessori forniti nella confezione.
• Nessuna sorgente di fiamma nuda, quali candele accese, dovrebbe essere posta sull’apparecchio.
• L’apparecchio non deve essere esposto a stillicidio o a spruzzi d’acqua e nessun oggetto pieno di liquido, quali
vasi, deve essere posto sull’apparecchio.
• Conservare il presente manuale per futuri riferimenti.
CURA E MANUTENZIONE
Per la pulizia si consiglia l’ uso di un panno morbido, leggermente inumidito. Evitate solventi o sostanze abrasive.
IMPORTANTE
Questo dispositivo e' progettato per uso domestico non professionale. La buona costruzione di questo apparecchio
ne garantisce per lungo tempo il perfetto funzionamento. Se tuttavia dovesse presentarsi qualche inconveniente, sarà
opportuno consultare il più vicino Centro Assistenza autorizzato TREVI.
TREVI persegue una politica di continua ricerca e sviluppo. Pertanto i prodotti possono presentare caratteristiche
diverse da quelle descritte.
Per evitare possibili danni all’udito, limitare il tempo di ascolto a volumi elevati.
3
Page 4
ITALIANO
CMP 583 DAB
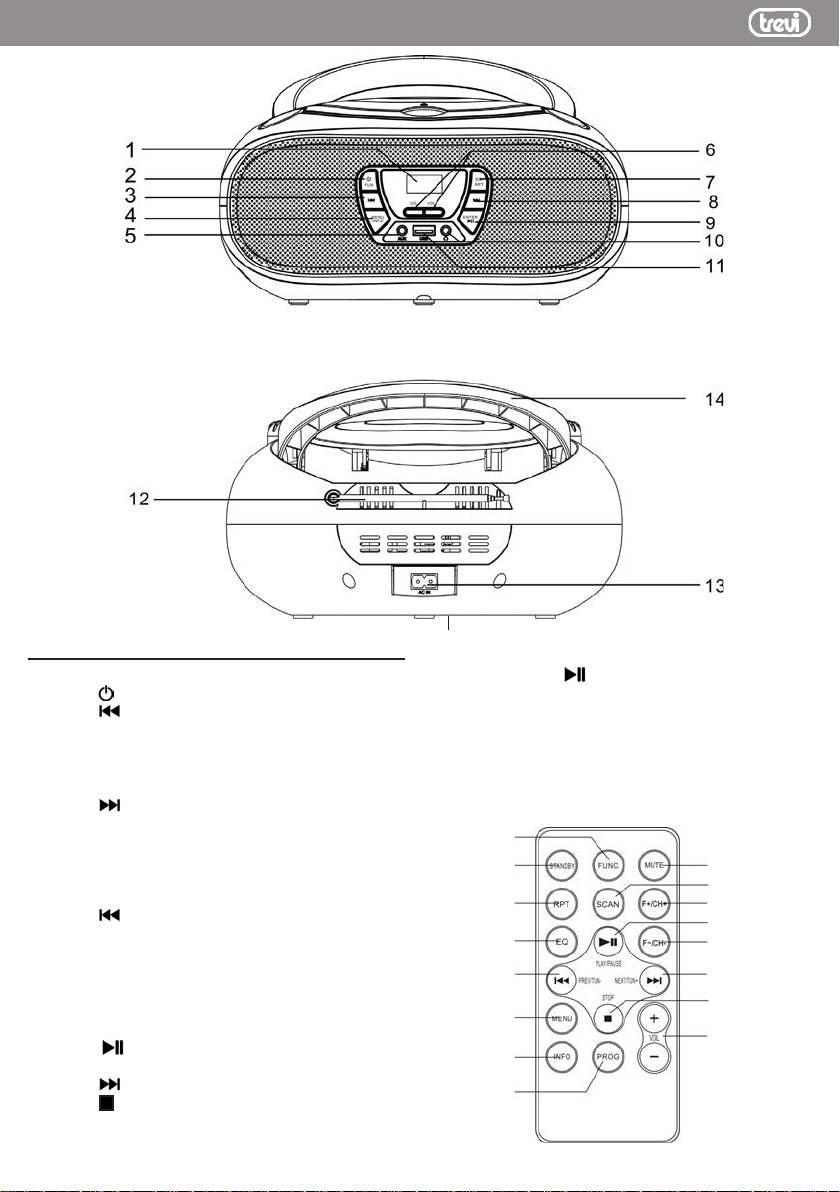
DESCRIZIONE COMANDI
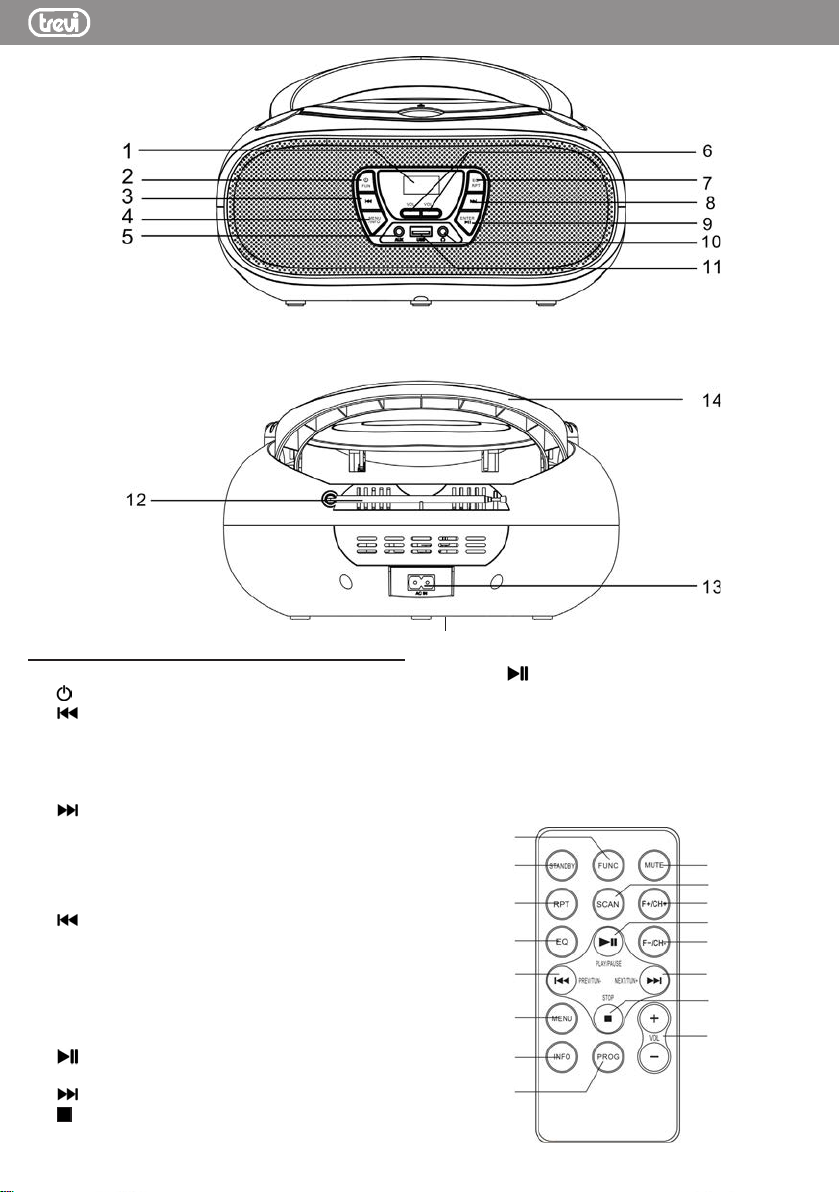
1. Display LCD
2. Tasto
3. Tasto
4. Tasto MENU/INFO, Menu/informazioni
5. Ingresso AUX IN
6. Tasti regolazione VOLUME
7. Tasto EQ/RPT, pre equalizzazioni/ripetizione
8. Tasto
16. Tasto FUNC, selezione funzione
17. Tasto STANDBY
18. Tasto RPT, ripetizione
19. Tasto EQ, pre equalizzazioni
20. Tasto
21. Tasto MENU
22. Tasto INFO
23. Tasto PROG, programmazione
24. Tasto MUTE
25. Tasto SCAN, scansione
26. Tasto F+/CH+, stazione successiva
27. Tasto
28. Tasto F-/CH-, stazione precedente
29. Tasto
30. Tasto
31. Tasti Volume
4
/FUN, Stand-by/Funzione
, brano/stazione precedente
, brano/stazione successiva
, brano precedente
, Play/Pausa
, brano successivo
, Stop
15
9. Tasto ENTER/
10. Presa uscita cuffie
11. Ingresso USB
12. Antenna
13. Presa AC, alimentazione di rete
14. Maniglia
15. Vano batterie
16
17
18
19
20
21
22
23
, Conferma/Play/Pausa
24
25
26
27
28
29
30
31
Page 5
CMP 583 DAB
ITALIANO
ALIMENTAZIONE
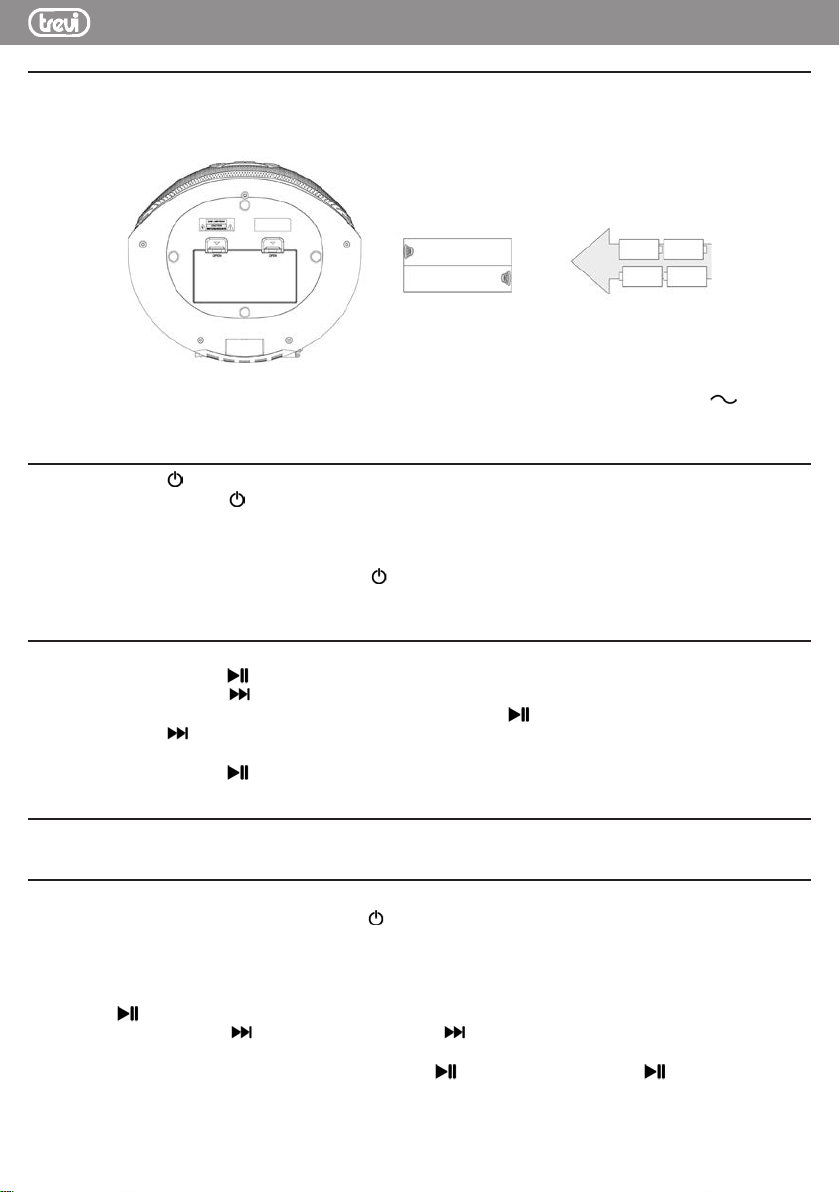
BATTERIE
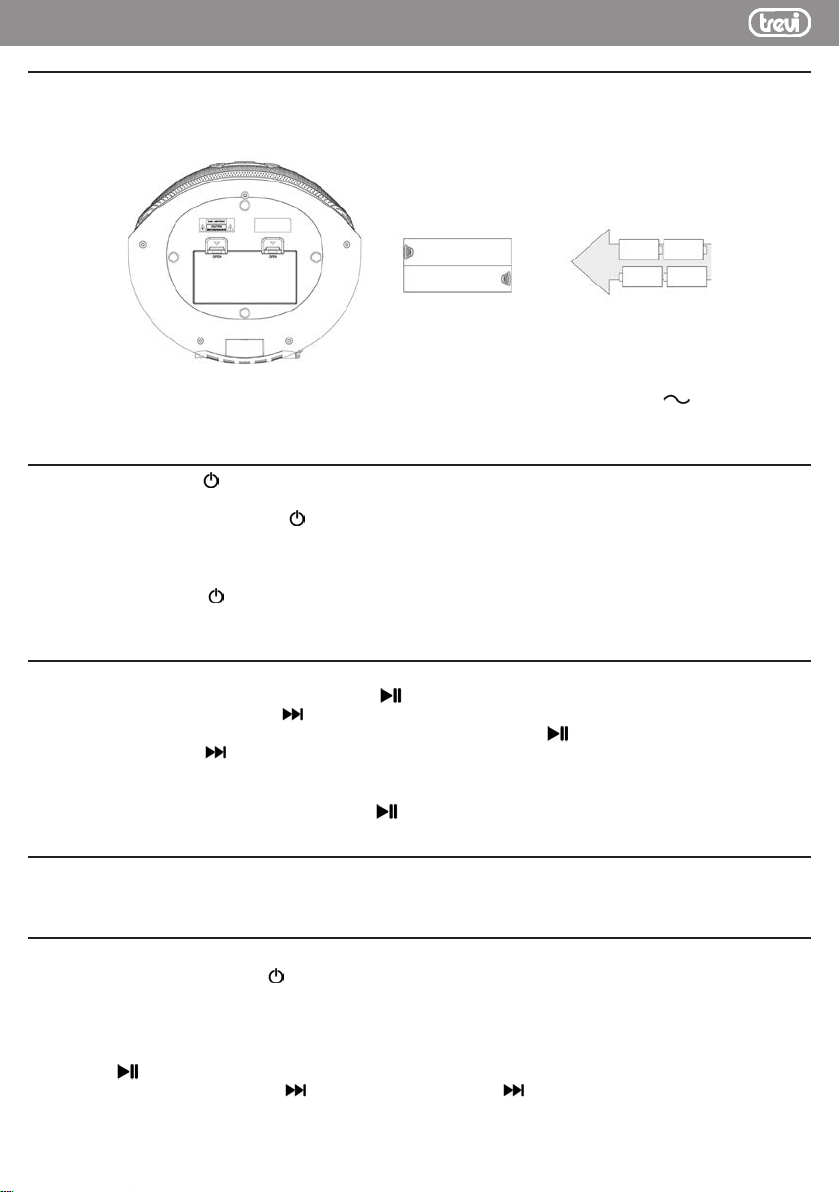
Aprire il vano batterie (15) ed inserire 4 batterie formato "C" (UM-2) avendo cura di rispettare attentamente le polarità
indicate. Sostituire immediatamente le batterie scariche e toglierle se prevedete di non utilizzare l'apparecchio per
lungo tempo.
RETE
Collegare il cavo di alimentazione alla presa (13). Inserire la spina in una presa di corrente 100-240V 50/60Hz.
Non collegare l'apparecchio a prese con tensione diversa da quella indicata.
ACCENSIONE/SPEGNIMENTO APPARECCHIO
1. Premere il tasto /FUN (2) sull'unità oppure il tasto STANDBY (17) sul telecomando per accendere l'unità;
2. Premere più volte il tasto
le sorgenti radio DAB+, radio FM, lettore CD, ingresso USB e ingresso AUX;
NOTA: In sorgente CD, USB o AUX, se entro 15 minuti non viene effettuata alcuna operazione, l'unità entrerà
automaticamente in modalità STANDBY.
3. Tenere premuto per qualche secondo il tasto /FUN (2) sull'unità oppure premere il tasto STANDBY (17) sul
telecomando per spegnere l'unità.
/FUN (2) sull'unità oppure il tasto FUN (16) sul telecomando per selezionare una tra
ACCENSIONE/SPEGNIMENTO LUCI LED
1. In modalità Stand-by, tenere premuto per qualche secondo il tasto MENU/INFO (4) sull'unità;
2. Premere il tasto ENTER/
3. Premere più volte il tasto
4. Selezionare la voce "SPK-Light" e confermare con il tasto ENTER/
5. Premere il tasto
Selezionare ON per accendere i Led sugli speaker, selezionare OFF per tenere spenti i Led;
6. Premere il tasto ENTER/
(9) per confermare;
(8) per visualizzare le varie voci;
(9);
(8) per visualizzare le varie opzioni disponibili. L'opzione con il simbolo ✳ è quella impostata.
(9) per confermare.
CONTROLLO V OLUME
Agire sui tasti VOLUME (6) sull'unità, oppure sui tasti (31) del telecomando per aumentare o diminuire il volume.
FUNZIONAMENTO RADIO DAB/DAB+
SCANSIONE STAZIONI RADIO DAB/DAB+
1. Selezionare la sorgente DAB agendo sul tasto /FUN (2) dell'unità oppure sul tasto FUNC (16) del telecomando.
Comparirà la scritta DAB.
Alla prima accensione la radio effettuerà una scansione e memorizzazione automatica di tutte le stazioni DAB
disponibili;
2. Se si desidera ripetere l'operazione di scansione automatica delle stazioni DAB disponibili premere a lungo il tasto
ENTER/
3. Premere più volte il tasto
DAB sintonizzate;
4. Sulla stazione DAB desiderata, premere il tasto ENTER/
per avviare la riproduzione;
5. Premere piu' volte il tasto MENU/INFO (4) sull'unità oppure il tasto INFO (22) del telecomando per visualizzare
tutte le informazioni sulla stazione ricevuta.
(9) sull'unità oppure il tasto SCAN (25) sul telecomando;
(8) sull'unità oppure il tasto (29) del telecomando per scorrere le varie stazioni
(9) sull'unità oppure il tasto (27) del telecomando
5
Page 6
ITALIANO
MEMORIZZAZIONE STAZIONI RADIO DAB
Per memorizzare una stazione radio, effettuare le seguenti operazioni:
1. Sintonizzarsi sulla stazione radio desiderata;
2. Tenere premuto per qualche secondo il tasto MENU/INFO (4) sull'unità oppure il tasto MENU (21) del telecomando
per accedere al menu DAB;
3. Utilizzare i tasti
per confermare;
4. Utilizzare i tasti
(9) sull'unità per confermare e salvare la stazione radio.
Ripetere questa operazione per ogni stazione radio che si desidera salvare. Sono disponibili 30 locazioni di memoria.
MENU RADIO DAB/DAB
1. Tenere premuto per qualche secondo il tasto MENU/INFO (4) sull'unità oppure il tasto MENU (21) del telecomando
per accedere al menu DAB;
2. Premere il tasto
DAB;
3. Premere il tasto ENTER/
menu visualizzata.
Full scan (Ricerca completa): permette di scansionare l’intera banda DAB/DAB+ e memorizzare automaticamente
le stazioni trovate.
Preset Recall (Visualizza preselez.): permette di richiamare una stazione radio memorizzata in una delle 30 memorie
disponibili.
Preset Store (Memorizza preselez.): permette di salvare una stazione radio in una delle 30 memorie disponibili.
Manual tune (Sintonizzazione manuale): permette di scansionare manualmente una singola frequenza DAB/
DAB+. Premere il tasto
scansionare e successivamente premere il tasto ENTER/ (9) sull'unità per avviare la scansione. Le stazioni
trovate verranno automaticamente memorizzate. Al termine premere a lungo il tasto MENU/INFO (4) sull'unità
per tornare al menu DAB.
DRC: permette di abilitare/disabilitare la funzione DRC per migliorare il suono durante l’ascolto in ambienti rumorosi.
L'opzione con il simbolo ✳ è quella impostata. È possibile impostare il livello di DRC in alto (high), basso (low) o
OFF (spento).
Prune (Elimina): permette di eliminare dalle lista delle stazioni memorizzate tutte le radio trovate ma non disponibili
(scarso segnale). Spostarsi con il tasto
ENTER/ (9) sull'unità.
TA: permette di attivare o meno il traffic allert (notiziari sul traffico), ovvero di sintonizzarsi automaticamente su emittenti
radio che trasmettono informazioni sul traffico. Spostarsi con il tasto
confermare con il tasto ENTER/ (9) sull'unità.
System (Sistema): permette di accedere al sottomenù di sistema dell'apparecchio:
Alarm: Selezionare se impostare "Alarm 1" o "Alarm 2", utilizzare il tasto
con il tasto ENTER/ (9) sull'unità.
Wake up time: impostare l’ora di attivazione della sveglia.
Duration: durata in minuti dell’allarme sveglia.
Source: impostare il tipo di suoneria tra Buzzer, Digital radio (DAB), FM (radio FM), DC, USB.
Frequency: Daily (ogni giorno), Once (una volta sola), Weekends (nei giorni di sabato e domenica),
weekdays(dal lunedi’ al venerdi’).
Volume: volume di riproduzione dell’allarme sveglia.
Preset: imposta quale stazione radio riprodurre all’attivazione della sveglia( Last listened=l’ultima
sintonizzata oppure una radio tra quelle salvate nelle memorie disponibili).
Alarm ON/OFF: per attivare o disattivare l'allarme.
Time: permette di impostare ora/data correnti.
Set Time/Date: impostare ora e data correnti.
Auto Update: seleziona da quale fonte impostare automaticamente l’ora e la data se disponibili.
Set 12/24 Hour: imposta il formato dell’ora 12/24H
Set Date Format: imposta il formato della data.
Backlight: permette di impostare il tempo e il livello di luminosità del display:
Timeout: imposta il tempo dopo il quale il display abbassa la luminosità in assenza di comandi.
On Level: indica il livello di luminosità del display quando l’apparecchio riceve dei comandi.
(3) o (8) sull'unità e selezionare "Preset Store", premere il tasto ENTER/ (9) sull'unità
(3) o (8) sull'unità e selezionare una locazione di memoria, premere il tasto ENTER/
+
(8) sull'unità oppure il tasto (29) del telecomando per visualizzare le varie voci del menu
(9) sull'unità oppure il tasto (27) sul telecomando per selezionare la voce del
(3) o (8) sull'unità per selezionare il numero del canale relativo alla frequenza da
(3) o (8) sull'unità su "Yes" e confermare l’eliminazione con il tasto
CMP 583 DAB
(3) o (8) sull'unità su "Yes" o "No" e
(3) o (8) sull'unità e confermare
6
Page 7
CMP 583 DAB
Dim Level: indica il livello di luminosità del display quando l’apparecchio e’ inattivo.
SPK-Light: permette di attivare o meno le luci Led frontali. L'opzione con il simbolo ✳ è quella impostata.
Language: permette di selezionare la lingua di sistema.
Factory reset (Ripristino valori di fabbrica): permette di riportare tutte le impostazioni a quelle di fabbrica.
Selezionare "Yes" per il ripristino.
Software upgrade (Aggiornamento del software): permette di effettuare una scansione per verificare eventuali
aggiornamenti disponibili per l'apparecchio.
SW version (Versione del software): versione del software installato.
INFORMAZIONI TRASMISSIONE DAB/D AB+
In modalità DAB, sul display verranno visualizzate una serie di informazioni relative alla stazione e al brano in ascolto.
- Premere ripetutamente il tasto MENU/INFO (4) sull'unità, oppure il tasto INFO (22) del telecomando per cambiare
le informazioni visualizzate.
Nota: non tutte le stazioni DAB forniscono le informazioni visualizzabili dall’apparecchio.
Se disponibili, sono presenti le seguenti informazioni:
DLS: visualizza informazioni relative al brano musicale trasmesso (artista, titolo brano, ecc...).
Tipo programma: visualizza le informazioni relative al tipo di programma trasmesso.
Nome trasmittente: visualizza le informazioni relative al trasmittente del servizio.
Numero/Frequenza trasmittente: visualizza le informazioni relative a numero e frequenza della stazione DAB/DAB+
trasmessa.
Indice di errore del segnale: visualizza le informazioni relative al livello di errori del segnale e all’intensità con cui
viene ricevuto.
Bit Rate: visualizza informazioni relative al rapporto di compressione della trasmissione corrente.
Ora: visualizza l'ora.
Data: visualizza informazioni relative alla data.
ITALIANO
FUNZIONAMENTO RADIO FM
SCANSIONE STAZIONI RADIO FM
1. Estendere completamente l'antenna (12) e selezionare la sorgente FM; sul display comparirà la frequenza;
2. Premere più volte il tasto
aumentare o diminuire la frequenza ed effettuare una ricerca passo-passo;
3. Tenere premuto per qualche secondo il tasto
sul telecomando per sintonizzarsi sulla stazione radio successiva o precedente con il miglior segnale ricevuto;
4. Premere a lungo il tasto ENTER/
scansione e memorizzazione automatica delle stazioni FM. Verranno automaticamente memorizzate le prime 30
stazioni ricevute;
5. Premere il tasto F-/CH- (28) o F+/CH+ (26) del telecomando per scorrere le varie stazioni FM memorizzate;
6. Premere piu' volte il tasto MENU/INFO (4) sull'unità oppure il tasto INFO (22) del telecomando per visualizzare
tutte le informazioni sulla stazione ricevuta.
NOTE:
Se la ricezione non è buona provate a regolare diversamente la lunghezza e l’orientamento dell’antenna (12),
comunque la qualità della ricezione in FM dipende molto dal luogo dove è posto l’apparecchio.
La vicinanza di apparecchi TV, lampade al neon o altri elettrodomestici può provocare disturbi nella ricezione di
programmi radio, in questo caso allontanate il radioregistratore dall’apparecchio che disturba.
MEMORIZZAZIONE STAZIONI RADIO
Per memorizzare una stazione radio, effettuare le seguenti operazioni:
1. Sintonizzarsi sulla stazione radio desiderata;
2. Tenere premuto per qualche secondo il tasto MENU/INFO (4) sull'unità oppure il tasto MENU (21) del telecomando
per accedere al menu FM;
3. Utilizzare i tasti
per confermare;
4. Utilizzare i tasti
(9) sull'unità per confermare e salvare la stazione radio;
Ripetere questa operazione per ogni stazione radio che si desidera salvare. Sono disponibili 30 locazioni di memoria.
MENU RADIO FM
1. Tenere premuto per qualche secondo il tasto MENU/INFO (4) sull'unità oppure il tasto MENU (21) del telecomando
per accedere al menu FM;
(3) o (8) sull'unità e selezionare "Preset Store", premere il tasto ENTER/ (9) sull'unità
(3) o (8) sull'unità e selezionare una locazione di memoria, premere il tasto ENTER/
(3) o il tasto (8) sull'unità oppure i tasti (20) o (29) sul telecomando per
(3) o il tasto (8) sull'unità oppure i tasti (20) o (29)
(9) sull'unità oppure il tasto SCAN (25) sul telecomando per avviare la
7
Page 8
ITALIANO
2. Premere il tasto (8) sull'unità oppure il tasto (29) del telecomando per visualizzare le varie voci del menu
FM;
3. Premere il tasto ENTER/
menu visualizzata.
Preset Recall (Visualizza preselez.): permette di richiamare una stazione radio memorizzata in una delle 30 memorie
disponibili.
Preset Store (Memorizza preselez.): permette di salvare una stazione radio in una delle 30 memorie disponibili.
Scan setting: permette di impostare la ricerca delle stazioni radio su tutte le stazioni trovate (All stations)
o solo su quelle con forte segnale (Strong station).
Audio setting (Impostazioni audio): permette di impostare l'audio in stereo (Stereo allowed) o mono (Forced mono).
System (Sistema): permette di accedere al sottomenù di sistema dell'apparecchio (vedi MENU RADIO DAB/DAB+).
(9) sull'unità oppure il tasto (27) sul telecomando per selezionare la voce del
CMP 583 DAB
FUNZIONAMENTO LETTORE CD-MP3
RIPRODUZIONE
1. Selezionare la sorgente CD. Comparirà la scritta "CD";
2. Aprire il vano CD ed inserire il disco con il lato scritto rivolto verso l'alto. Richiudere lo sportello con cura;
3. Dopo qualche secondo il display mostrerà il numero delle tracce presenti sul disco. La riproduzione partirà automaticamente;
4. Premere il tasto ENTER/
trascorso della traccia comincerà a lampeggiare. Ripremerlo per disinserire la pausa e avviare la normale riproduzione;
5. Premere il tasto
SALTO TRACCIA E AVANTI/INDIETRO VELOCE
1. Premere il tasto (3) o il tasto (8) sull'unità oppure i tasti (20) o (29) sul telecomando per passare
alla traccia precedente o successiva;
2. Tenere premuto il tasto
l'ascolto per mandare indietro o avanti veloce la traccia. Rilasciare il tasto per tornare alla normale riproduzione.
RIPRODUZIONE ININTERROTTA DI UNA SINGOLA TRACCIA
1. Per riprodurre ininterrottamente una singola traccia, premere il tasto EQ/RPT (7) sull'unità oppure il tasto RPT
(18) sul telecomando durante la riproduzione, fino alla comparsa sul display della scritta "REP-1". Il lettore CD
riprodurrà ininterrottamente la traccia visualizzata sul display;
2. Per cancellare la riproduzione ininterrotta della singola traccia, premere il tasto EQ/RPT (7) sull'unità oppure il
tasto RPT (18) sul telecomando piu' volte fino alla comparsa della scritta "DISC".
RIPETIZIONE ININTERROTTA DELL’INTERO DISCO
1. Per riprodurre ininterrottamente tutte le tracce del disco, premere il tasto EQ/RPT (7) sull'unità oppure il tasto RPT
(18) sul telecomando durante la riproduzione, fino alla comparsa sul display della scritta "REP-ALL". Il lettore CD
riprodurrà ininterrottamente tutte le tracce del disco;
2. Per cancellare la riproduzione ininterrotta di tutte le tracce del disco, premere il tasto EQ/RPT (7) sull'unità oppure
il tasto RPT (18) sul telecomando piu' volte fino alla comparsa della scritta simbolo "DISC".
RIPRODUZIONE ININTERROTTA DELL'INTERA CARTELLA
NOTA: funzione valida solo per CD MP3/USB MP3.
1. Per riprodurre ininterrottamente tutte le tracce di una cartella, premere il tasto EQ/RPT (7) sull'unità oppure il tasto
RPT (18) sul telecomando durante la riproduzione, fino alla comparsa sul display della scritta "REP-DIR". Il lettore
CD riprodurrà ininterrottamente tutte le tracce della cartella;
2. Per cancellare la riproduzione ininterrotta di tutte le tracce della cartella, premere il tasto EQ/RPT (7) sull'unità
oppure il tasto RPT (18) sul telecomando piu' volte fino alla comparsa della scritta simbolo "DISC".
RIPRODUZIONE CASUALE DELLE TRACCE (RANDOM)
1. Per riprodurre casualmente tutte le tracce del disco, premere il tasto EQ/RPT (7) sull'unità oppure il tasto RPT
(18) sul telecomando durante la riproduzione, fino alla comparsa sul display della scritta "RANDOM". Il lettore CD
riprodurrà casualmente tutte le tracce del disco;
2. Per cancellare la riproduzione casuale di tutte le tracce del disco, premere il tasto EQ/RPT (7) sull'unità oppure il
tasto RPT (18) sul telecomando piu' olte fino alla comparsa della scritta simbolo "DISC".
PROGRAMMAZIONE
È possibile selezionare l'ordine con cui vengono riprodotte le tracce.
1. Premere il tasto
8
(30) sul telecomando per arrestare definitivamente la riproduzione.
(30) sul telecomando per arrestare la riproduzione;
(9) sull'unità oppure il tasto (27) sul telecomando per attivare la pausa; il tempo
(3) o il tasto (8) sull'unità oppure i tasti (20) o (29) sul telecomando durante
Page 9
CMP 583 DAB
2. Premere il tasto PROG (23) sul telecomando, sul display appare la scritta P01;
3. Selezionare la traccia che si desidera riprodurre per prima con i tasti
tasti (20) o (29) del telecomando;
4. Premere il tasto PROG (23) sul telecomando per confermare;
5. Ripetere i punti 3 e 4 per memorizzare e riprodurre i brani che desiderate; per i CD audio si possono memorizzare
un massimo di 20 brani, mentre per i CD MP3 si possono memorizzare un massimo di 99 brani;
6. Premere il tasto ENTER/
7. Premere due volte il tasto
(9) sull'unità oppure il tasto (27) sul telecomando per iniziare la riproduzione;
(30) sul telecomando per annullare la programmazione.
(3) o il tasto (8) sull'unità oppure i
ITALIANO
FUNZIONAMENTO INGRESSO USB
RIPRODUZIONE
1. Collegare un dispositivo USB nell'ingresso USB (11);
2. Selezionare la sorgente USB. Comparirà la scritta "USB";
3. Dopo qualche secondo il display LCD mostrerà il numero delle tracce presenti oppure la cartella. La riproduzione
partirà automaticamente.
NOTA: Fare riferimento al paragrafo FUNZIONAMENTO LETTORE CD-MP3 per il resto delle funzioni.
FUNZIONAMENTO INGRESSO AUX
RIPRODUZIONE
1. Collegare un dispositivo esterno all'ingresso AUX IN (5);
2. Selezionare la sorgente AUX. Sul display comparirà la scritta "ENTER AUX";
3. Avviare la riproduzione dal dispositivo esterno. Per tutte le funzioni di riproduzione fare riferimento al manuale del
dispositivo esterno.
PRESA CUFFIE
1. Inserire le cuffie nella presa cuffie (10);
2. Avviare la riproduzione desiderata e regolare il volume.
CARA TTERISTICHE TECNICHE
GENERALI
Alimentazione e consumo: ................................................................100-240V 50/60 (8W), Stand-by 0,3W
Batterie 4x "C" (UM2) non incluse
Ricezione banda in FM: ....................................................................87,5 - 108 MHz
Ricezione banda DAB/DAB+: ............................................................174.928 - 239.200 MHz
Potenza Audio: ..................................................................................2x 2W
Dimensioni: ........................................................................................274x 232x 134mm
INFORMAZIONI AGLI UTENTI
ai sensi del Decreto Legislativo N° 49 del 14 Marzo 2014
“Attuazione della Direttiva 2012/19/UE sui rifiuti di apparecchiature elettriche ed elettroniche (RAEE)”
Il simbolo del cassonetto barrato riportato sull’apparecchiatura indica che il prodotto alla fine della propria vita
utile deve essere raccolto separatamente dagli altri rifiuti. L’utente dovrà, pertanto, conferire l’apparecchiatura
integra dei componenti essenziali giunta a fine vita agli idonei centri di raccolta differenziata dei rifiuti elettronici
ed elettrotecnici, oppure riconsegnarla al rivenditore al momento dell’acquisto di nuova apparecchiatura di tipo
equivalente, in ragione di uno a uno, oppure 1 a zero per le apparecchiature aventi lato maggiore inferiore a 25
cm. L’adeguata raccolta differenziata per l’avvio successivo dell’apparecchiatura dimessa al riciclaggio, al trattamento e allo smaltimento ambientale compatibile contribuisce ad evitare possibili effetti negativi sull’ambiente
e sulla salute e favorisce il riciclo dei materiali di cui è composta l’apparecchiatura. Lo smaltimento abusivo del
prodotto da parte dell’utente comporta l’applicazione delle sanzioni amministrative di cui al D.Lgs n. Decreto
Legislativo N° 49 del 14 Marzo 2014.
9
Page 10
ENGLISH
CMP 583 DAB
CAUTION
This symbol on the back of the unit and
in this manual indicate the presence
on them of important instructions for
safe use. Please read them carefully
before using the appliance.
DANGEROUS VOL T A GE
This symbol on the back of the unit
and in this manual indicates the
presence in this equipment components operating at high voltage,
do not open it to avoid the risk of
electric shock.
WARNINGS ON THE LASER
This device is equipped with a laser
beam reading system. Although the laser
is of low power and with a safety device
that prevents open door operation, scrupulously observe the following warnings:
Do not bring the eye to the laser lens
with the device open, risk of retinal injury.
Do not attempt to disassemble or tamper with the laser unit, risk of radiation
absorption.
NOTES OF USE
Listen at high volume for long periods of time, may damage your hearing.
• Avoid using it in the following cases:
- Near strong heat sources, such as central heating plants or stoves.
- In very humid places such as bathrooms, swimming pools, etc...
- In very dusty places.
- In places subject to strong vibrations.
- Position the appliance in such a way that there is always enough room for free air circulation (at least 5cm).
• Do not block the air inlets.
• If any liquid enters the appliance, unplug it immediately from the socket and take it to the nearest TREVI authorised
service centre.
• Before switching on the appliance, always check that the power cable and the connection cable are properly
installed.
• No naked flame sources, such as lighted candles, should be placed on this.
• The apparatus shall not be exposed to dripping or splashing water and no object filled with water, such as vases,
should be placed on the unit.
• Keep this manual for future reference.
CARE AND MAINTENANCE
For cleaning we recommend the use of a soft, slightly damp cloth. Avoid solvents or abrasives.
IMPORTANT
The good construction of this machine guarantees the perfect functioning for a long time. However, should any problem
arise, you should consult your nearest authorized service center.
TREVI pursues a policy of continuous research and development. Therefore, the products may have different features
from those described.
To avoid possible hearing damage, limit the time listening at high volumes
10
Page 11
CMP 583 DAB
ENGLISH
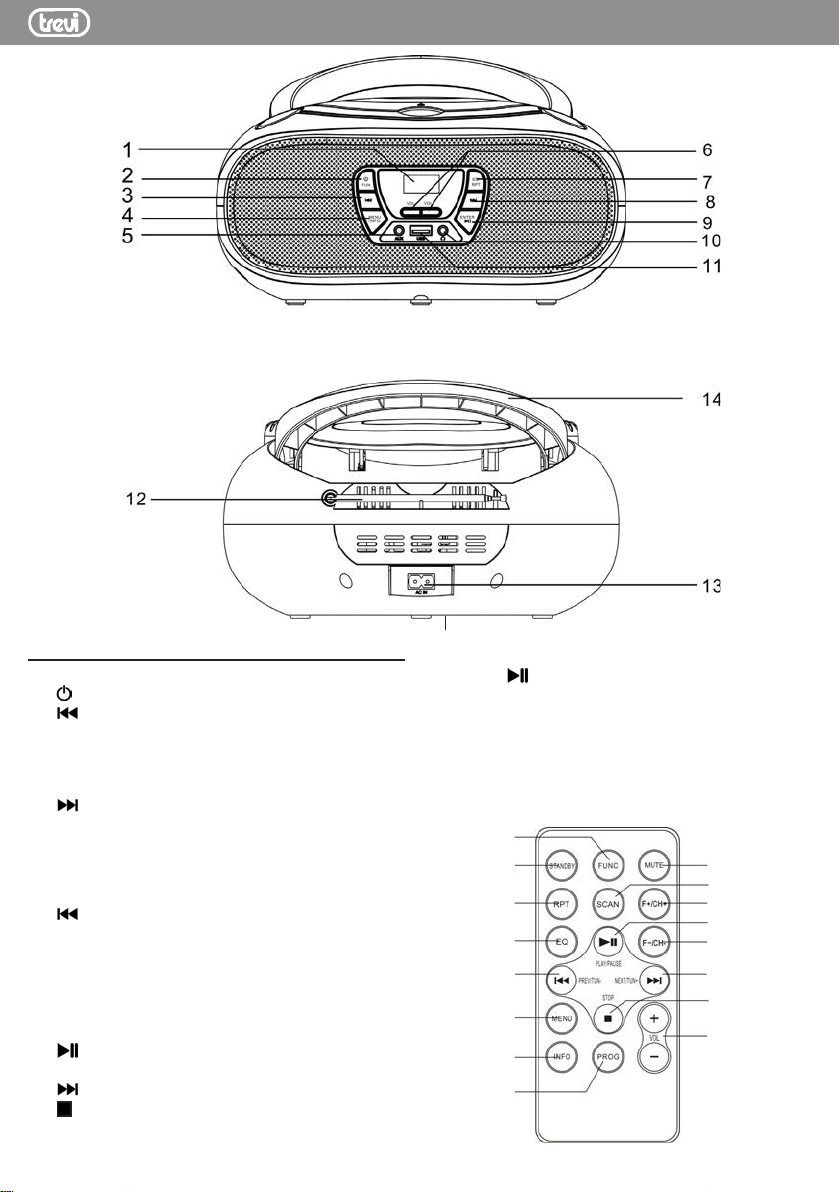
DESCRIPTION OF COMMANDS
1. LCD display
2.
/FUN button
3.
button, Previous file/Station
4. MENU/INFO button
5. AUX IN input
6. VOLUME buttons
7. EQ/RPT button
8.
button, Next file/Station
16. FUNC button, function
17. STANDBY button
18. RPT button, repeat
19. EQ button
20.
button, Previous
21. MENU button
22. INFO button
23. PROG button, program
24. MUTE button
25. SCAN button
26. F+/CH+ button
27.
button, Play/Pause
28. F-/CH- button
29.
button, Next
30.
button, Stop
31. Volume button
15
9. Enter/
10. Headphone output socket
11. USB input
12. Antenna
13. AC outlet, mains power supply
14. Handle
15. Battery compartment
button
16
17
18
19
20
21
22
23
24
25
26
27
28
29
30
31
11
Page 12
ENGLISH
CMP 583 DAB
POWER SOURCE
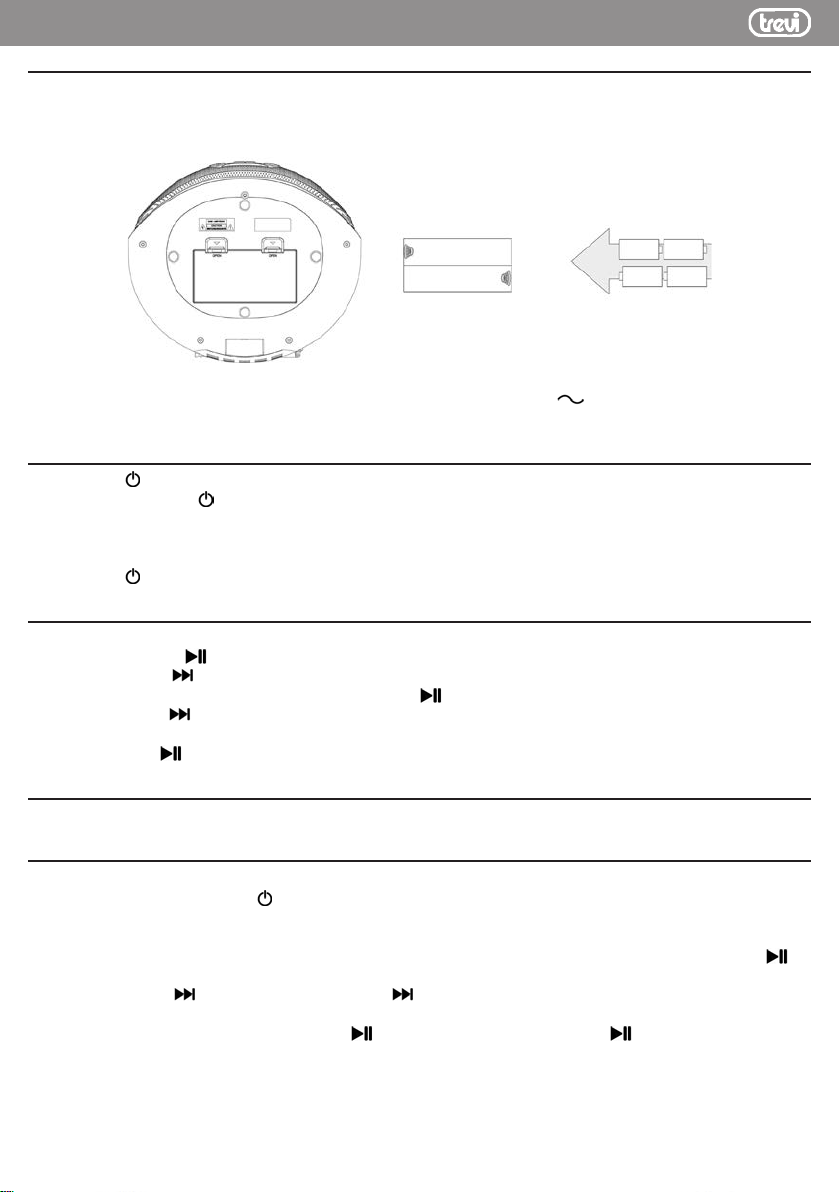
BATTERY
Open the battery compartment (15) and insert 4 "C" size batteries (UM-2) taking care to respect the indicated polarities
carefully. Replace the exhausted batteries immediately and remove them if you do not plan to use the appliance for
a long time.
AC OPERATION
Connect the power cord to the AC socket (13). Insert the plug into a 100-240V 50/60 mains socket.
Do not connect the appliance to electrical outlets other than those indicated.
ON/OFF
1. Press the /FUN (2) button on unit or STANDBY button (17) on remote control to turn ON the unit;
2. Press repeatedly the
radio, FM radio, CD player, USB input and AUX input;
NOTE: In CD, USB or AUX source, if no operation is performed within 15 minutes, the unit will automatically enter STANDBY
mode.
3. Press the /FUN (2) button on unit or STANDBY button (17) on remote control to turn OFF the unit.
/FUN (2) button on the unit or the FUNC button (16) on the remote control to select: DAB+
LED LIGHTING ON/OFF
1. In Stand-by mode, hold down the MENU/INFO button (4) on the unit for a few seconds;
2. Press the ENTER/
3. Press the button
4. Select the "SPK-Light" item and confirm with ENTER/
5. Press the button
ON to turn on the LEDs on the speakers, select OFF to keep the LEDs off;
6. Press ENTER/
(9) button to confirm;
(8) several times to display the various item;
(9) button;
(8) to display the various options available. The option with the ✳ symbol is the set one. Select
(9) button to confirm.
VOLUME CONTROL
Use the VOLUME buttons (6) on unit or VOLUME buttons (31) on remote control to increase or decrease the volume.
DAB/DAB+ RADIO
SCAN DAB/DAB+ RADIO STATIONS
1. Select the DAB source using /FUN (2) on the unit or FUNC (16) button on remote control. The word DAB will
appear.
When the radio is turned on for the first time, it will automatically scan and store all available DAB stations;
2. If you want to repeat the automatic scanning operation of the available DAB stations, long press ENTER/
key on the unit or SCAN (25) button on remote control;
3. Press the button
various tuned DAB stations;
4. On the desired DAB station, press ENTER/
to start playback;
5. Repeatedly press MENU/INFO (4) button on the unit or the button INFO (22) on the remote control to display all
information on the received station.
12
(8) on the unit or the button (29) on the remote control repeatedly to scroll through the
(9) button on the unit or the button (27) on the remote control
(9)
Page 13
CMP 583 DAB
STORING RADIO STATIONS
To store a radio station, perform the following steps:
1. Tune to the desired radio station;
2. Long press the MENU/INFO (4) button on the unit or MENU (21) button on the remote control to access the DAB
menu;
3. To use the keys
confirm;
4. To use the keys
unit to confirm and save the radio station;
Repeat this operation for each radio station you want to save. There are 30 memory locations available.
DAB RADIO MENU
1. Press for a few seconds MENU/INFO (4) button on unit or MENU (21) button on the remote control to access the
DAB menu;
2. Press the key
menu;
3. Press ENTER/
Full scan: allows you to scan the entire DAB/DAB + band and automatically store the stations found.
Preset Recall: allows you to recall a radio station stored in one of the 30 available memories.
Preset Store: allows you to save a radio station in one of the 30 available memories.
Manual tune: allows you to manually scan a single DAB/DAB+ frequency. Press button
to select the channel number for the frequency to be scanned and then press ENTER/ (9) button on the unit
to start scanning. The stations found will be automatically memorized. At the end press and hold the MENU/INFO
(4) button on the unit to return to the DAB menu.
DRC: allows you to enable/disable the DRC function to improve the sound when listening in noisy environments. The
option with the ✳ symbol is the one set. You can set the DRC level high, low or OFF.
Prune: allows you to delete all the radio stations found but not available (poor signal) from the list of stored stations. Move
with the button
TA: allows you to activate or not the traffic alert (traffic announcements), or to automatically tune in to radio stations
that broadcast traffic information. Move with the button
with ENTER/ (9) button on the unit.
System: allows access to the system's submenu:
Alarm: Select whether to set "Alarm 1" or "Alarm 2", use the key
ENTER/
Wake up time: set the alarm activation time.
Duration: duration in minutes of the alarm clock.
Source: set the type of ringtone between Buzzer, Digital radio (DAB), FM (FM radio), DC, USB.
Frequency: Daily (every day), Once (once only), Weekends (on Saturdays and Sundays), weekdays (from
Monday to Friday).
Volume: playback volume of the alarm clock.
Preset: set which radio station to play when the alarm is activated (Last listened = the last one tuned or a
radio among those saved in the available memories).
Alarm ON/OFF: to activate or deactivate the alarm.
Time: allows you to set the current time/date.
Set Time/Date: set the current time and date.
Auto Update: select from which source to automatically set the time and date if available.
Set 12/24 Hour: set the 12/24H time format
Set Date Format: set the date format.
Backlight: allows you to set the time and brightness level of the display:
Timeout: set the time after which the display lowers the brightness without commands.
On Level: indicates the brightness level of the display when the device receives commands.
Dim Level: indicates the brightness level of the display when the appliance is inactive.
SPK-Light: allows you to activate or deactivate the front LED lights. The option with the ✳ symbol is the one set.
Language: allows you to select the system language.
Factory reset: allows you to restore all the settings to the factory settings. Select "Yes" for the restore.
Software upgrade: allows you to perform a scan to check for any updates available for the device.
(3) and (8) on unit and select "Preset Store", press ENTER/ (9) button on the unit to
(3) and (8) son the unit and select a memory location, press ENTER/ (9) button on the
(8) on the unit or the key (29) on the remote control to display the various items of the DAB
(9) button on the unit or (27) button on the remote control to select the displayed menu item:
(3) or (8) on the unit
(3) or (8) on the unit to "Yes" and confirm the deletion with ENTER/ (9) button on the unit.
(3) or (8) on the unit to "Yes" or "No" and confirm
(3) or (8) on the unit and confirm with
(9) key on the unit.
ENGLISH
13
Page 14
ENGLISH
SW version: software version installed.
DAB/DAB+ TRANSMISSION INFORMATION
In DAB mode, the display will show a series of information about the station and the track being played.
- Repeatedly press MENU/INFO (4) button on the unit or INFO (22) button on the remote control to change the
information displayed.
Note: not all DAB stations provide the information displayed by the device.
If available, the following information is available:
DLS: displays information relating to the transmitted music (artist, song title, etc...).
Program type: displays information relating to the type of program transmitted.
Transmitter name: displays information relating to the service transmitter.
Transmitter Number/Frequency: displays information on the number and frequency of the transmitted DAB/DAB+ station.
Signal error index: displays information relating to the level of signal errors and the intensity with which it is received.
Bit Rate: displays information relating to the compression ratio of the current transmission.
Time: displays the time.
Date: displays information relating to the date.
CMP 583 DAB
FM RADIO
SCAN FUNCTION
1. Fully extend the antenna (12) and select the FM source; the display will show the frequency;
2. Press the button
to increase or decrease the frequency and perform a step-by-step search;
3. Press for a few seconds the key
control to tune in to the next or previous radio station with the best signal received;
4. Long press the ENTER/
and automatic storage of FM stations. The first 30 stations received will be automatically stored;
5. Press F-/CH- (28) or F+/CH+ (26) buttons on the remote control to scroll through the various stored FM stations;
6. Repeatedly press the MENU/INFO (4) button on the unit or the INFO (22) button on the remote control to display
all information on the station received.
NOTE:
To obtain the best FM reception, extend and orient the antenna (12). If reception is not good try to adjust the length
and orientation of the antenna differently, however the quality of FM reception depends very much on the place where
the device is placed.
The proximity of TV sets, neon lamps or other domestic appliances may cause disturbances in the reception of radio
programs, in this case move the radio recorder away from the disturbing device.
STORING RADIO STATIONS
To store a radio station, do the following:
1. Tune to the desired radio station;
2. Press for a few seconds the MENU/INFO button (4) on unit or the MENU button (21) on the remote control to
access the FM menu;
3. Use the keys
4. Use the keys
unit to confirm and save the radio station;
Repeat this for each radio station you want to save. 30 memory locations are available.
MENU
1. Long press the MENU/INFO (4) button on the unit or MENU (21) button on remote control to enter the FM menu;
2. Press the key
3. Press the ENTER/
menu item.
Preset Recall: allows you to recall a radio station stored in one of the 30 available memories.
Preset Store: allows you to save a radio station in one of the 30 available memories.
Scan setting: allows you to set the search for radio stations on all stations found (All stations) or only on
those with strong signal (Strong station).
Audio setting: allows you to set audio in stereo (Stereo allowed) or mono (Forced mono).
System: allows access to the system menu (see RADIO DAB/DAB+ MENU).
(3) or the button (8) on the unit or the buttons (20) or (29) n the remote control
(3) or the key (8) on the unit or the keys (20) or (29) on the remote
(9) button on the unit or the SCAN (25) button on the remote control to start scanning
(3) or (8) on the unit and select "Preset Store", press ENTER/ (9) sull'unità per confermare;
(3) or (8) on the unit and select a memory location, press the ENTER/ (9) button on the
(8) on the unit or the key (29) on the remote control to display the various FM menu items;
(9) button on the unit or the button (27) on the remote control to select the displayed
14
Page 15
CMP 583 DAB
ENGLISH
CD-MP3 PLAYER
PLAYING A DISC
1. Select the CD source. The "CD" will appear;
2. Open the CD compartment and insert the disc with the written side facing up. Close the door carefully;
3. After a few seconds the LCD display (1) will show the number of tracks on the disc. Playback will start automatically;
4. Press ENTER/
time of the track will begin to flash. Press it again to turn off the pause;
5. Press
JUMP TRACE AND FORWARD/FAST BACK
1. Press (3) or (8) button on the unit or the button (20), (29) on the remote control to move to the
2. Press
REPEAT OF SINGLE TRACE
1. To play a single track continuously, press EQ/RPT (7) on the unit or RPT (18) button on remote control during
2. To cancel uninterrupted playback of the single track, press EQ/RPT (7) on the unit or RPT (18) button on remote
DISK REPETITION
1. To continuously play all the tracks on the disc, press EQ/RPT (7) on the unit or RPT (18) button on remote control
2. To cancel the uninterrupted playback of all tracks on the disc, press EQ/RPT (7) on the unit or RPT (18) button on
FOLDER REPEAT
NOTE: function valid only for MP3 CDs.
1. To play all tracks in a folder continuously, press EQ/RPT (7) on the unit or RPT (18) button on remote control during
2. To cancel the uninterrupted playback of all the tracks in the folder, pressEQ/RPT (7) on the unit or RPT (18) button
RANDOM FUNCTION
1. To randomly play all the tracks on the disc, press EQ/RPT (7) on the unit or RPT (18) button on remote control
2. To cancel random playback of all tracks on the disc, press EQ/RPT (7) on the unit or RPT (18) button on remote
PROGRAM
You can select the order in which the tracks are played.
1. Press
2. Press PROG (23) button on the remote control, the message P01 will appears on the display;
3. Select the tracks with button
4. Press PROG button (23) on the remote control;
5. Repeat steps 3 and 4 to store and play the tracks you want; for audio CDs a maximum of 20 tracks can be stored,
6. Press ENTER/
7. Press
(30) button on the remote control to stop playback permanently.
previous or next track;
send the track back or forward quickly. Release the button to return to normal playback.
playback until "REP-1" appears on the display. The CD player will continuously play the track shown on the display;
control several times until the "DISC" symbol appears.
during playback until "REP-ALL" appears on the display. The CD player will continuously play all the tracks on the
disc;
remote control repeatedly until the "DISC" symbol appears.
playback until "REP-DIR" appears on the display. The CD player will continuously play all the tracks in the folder;
on remote control several times until the "DISC" symbol appears.
during playback until "RANDOM" appears on the display. The CD player will randomly play all the tracks on the
disc;
control several times until the "DISC" symbol appears.
(30) button on remote control to stop playback;
while for MP3 CDs a maximum of 99 tracks can be stored;
(30) button on the remote control twice to cancel the programming.
(9) button on the unit or (27) button on the remote control to activate the pause; the elapsed
(3) or (8) button on the unit or the button (20), (29) on the remote control while listening to
(3) or (8) button on unit or button (20) or (29) on the remote control;
(9) button on the unit or press (27) button on the remote control to start playback;
USB INPUT
PLAYBACK
1. Connect a USB device to the USB input (11);
2. Select the USB source. The "USB" will appear on the display;
3. After a few seconds the LCD display (1) will show the number of tracks on the disc. Playback will start automatically.
NOTE: Refer to the CD-MP3 PLAYER OPERATION paragraph for the rest of the functions.
15
Page 16
ENGLISH
CMP 583 DAB
AUX INPUT
REPRODUCTION
1. Connect an external device to the AUX IN input (5);
2. Select the AUX source. The "ENTER AUX" will appear on the display;
3. Start playback of the external device. For all playback functions refer to the manual of the external device.
HEADPHONE
1. Insert the headphones into the headphone jack (10);
2. Start the desired playback and adjust the volume.
TECHNICAL FEATURES
GENERAL
Power and consumption: ..................................................................100-240V 50/60 (8W, Stand-by 0.3W)
.............................................................................................4 x "C" batteries (UM2) not included
FM band reception: ...........................................................................87.5 - 108 MHz
DAB / DAB + band reception: ...........................................................174.928 - 239.200 MHz
Power Audio: .....................................................................................2x 2W
Dimensions: ......................................................................................274 x 232 x 134mm
PRECAUTIONS FOR CORRECT DISPOSAL OF THE PRODUCT.
The symbol shown on the equipment indicates that waste must be disposed of in “separate collection” and so the
product must not be disposed of together with urban waste.
The user must take the product to special “separate waste collection centres” provided by local government, or deliver
it to the retailer against the purchase of a new product.
Separate collection of waste and subsequent treatment, recycling and disposal operations promotes the production of
equipment with recycled materials and limits negative effects on the environment and on health caused by improper
handling of waste.
Illegal disposal of the product leads to the enforcement of administrative penalties.
16
Page 17
CMP 583 DAB
FRANÇAIS
VOL T A GE DANGEREUX
Ce symbole apposé sur le dos
de l’appareil et reproduit dans
ce manuel indique la présence
d’éléments fonctionnant à haute
tension à l’intérieur de cet appareil;
ne l’ouvrez pas, afin d’éviter le
risque de décharges électriques.
ATTENTION
Ce symbole apposé sur le
dos de l’appareil et reproduit
dans ce manuel indique
la présence d’instructions
importantes pour la sécurité
d’emploi. Lisez-les avec
attention avant d’utiliser
l’appareil.
AVERTISSEMENT SUR LE LASER
Cet appareil est pourvu d’un système de lecture
à rayon laser. Bien que le laser soit de faible
puissance et muni d’un dispositif de sécurité
empêchant son fonctionnement lorsque le volet
est ouvert, suivez scrupuleusement les précautions
suivantes:n’approchez pas les yeux de la lentille du
laser lorsque l’appareil est ouvert; danger de lesion
de la retine.n’essayez pas de demonter ou d’alterer
l’unite laser; danger d’absorption de radiations.
AVERTISSEMENT
NOTES D’EMPLOI
Cet appareil est un instrument électronique de haute précision; évitez donc de l’employer dans les cas suivants:
• A proximité de fortes sources de chaleur telles que des radiateurs ou tout appareil de chauffage.
• Dans des lieux très humides tels que des salles de bains, des piscines, etc...
• Dans des lieux très poussiéreux.
• Dans des lieux sujets à des fortes vibrations.
• Positionner l’appareil de façon à laisser toujours de l’espace pour la libre circulation de l’air à ses côtés (au moins
5cm).
• N’obstruez pas les fentes d’aération.
• Si des substances liquides pénètrent à l’intérieur de l’appareil, débranchez immédiatement la fiche et apportez
l’appareil au centre d’assistance agréé TREVI le plus proche.
• Avant de mettre l’appareil en fonction, vérifiez toujours que les câbles d’alimentation et de connexion soient correctement installés.
SOIN ET ENTRETIEN
SOIN ET ENTRETIEN
Pour le nettoyage on conseille l’emploi d’un chiffon doux, légèrement imbibé. Evitez les solvants ou les substances
abrasives.
IMPORTANT
La bonne construction de cet appareil garantit pour longtemps son parfait fonctionnement. Si toutefois des inconvénients
devaient se présenter, contactez le Centre d’Assistance agréé le plus proche.
TREVI poursuit une politique de recherche et de développement continus. Par conséquent, les produits peuvent
présenter des caractéristiques différentes par rapport aux données mentionnées.
Pour éviter d’éventuels dommages auditifs, limiter le temps d’écoute à volume élevé.
17
Page 18
FRANÇAIS
CMP 583 DAB
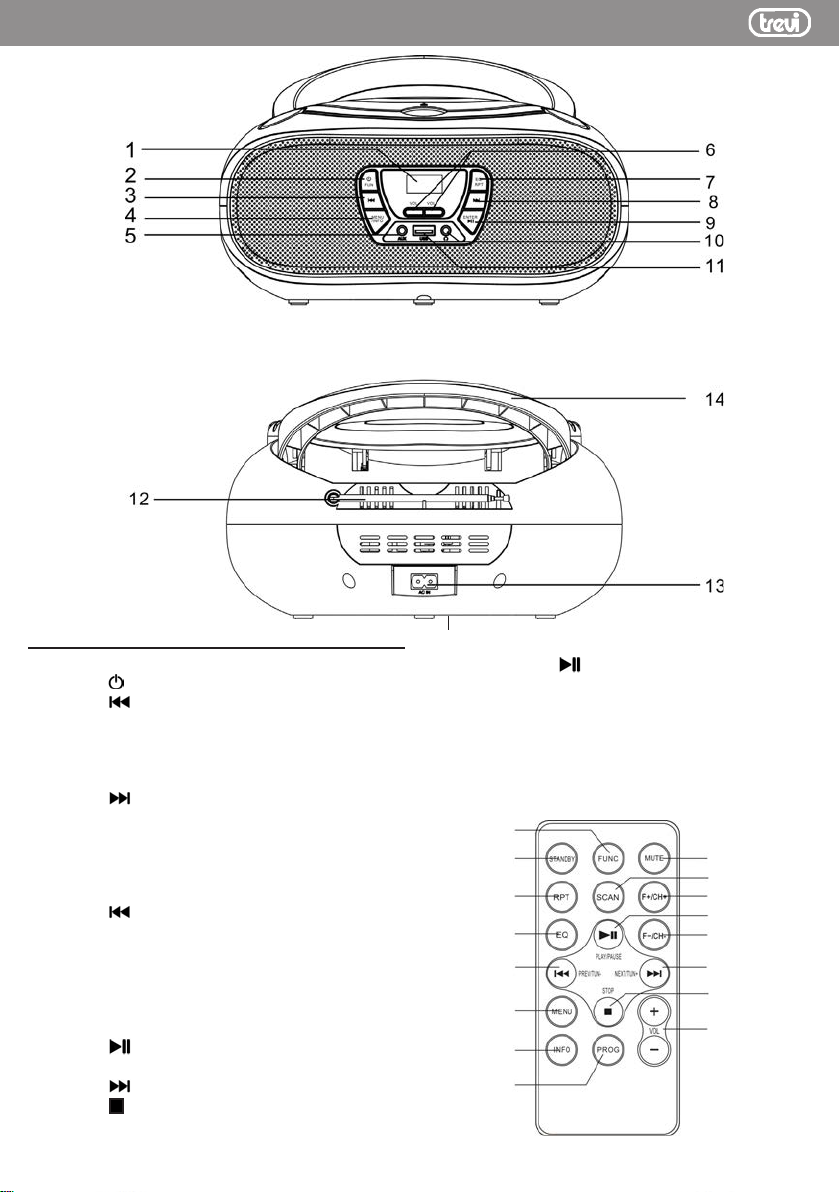
DESCRIPTION DES COMMANDES
1. Ecran LCD
2. Bouton
3. Bouton
4. Bouton MENU/INFO
5. Entrée AUX IN
6. Bouton VOLUME
7. Bouton EQ/RPT
8. Bouton
16. Bouton FUNC, une fonction
17. Bouton STANDBY
18. Bouton RPT, répéter
19. Bouton EQ
20. Bouton
21. Bouton MENU
22. Bouton INFO
23. Bouton PROG, programme
24. Bouton MUTE
25. Bouton SCAN
26. Bouton F+/CH+
27. Bouton
28. Bouton F-/CH-
29. Bouton
30. Bouton
31. Bouton Volume
18
/FUN
, Fichier/station précédent
, Fichier/station suivant
, Précédente
, Prochaine
, Arrêtez
15
9. Bouton Enter/
10. Prise de sortie casque
11. Entrée USB
12. Antenne FM
13. Prise de courant
14. Poignée
15. Compartiment à piles
16
17
18
19
20
21
22
23
24
25
26
27
28
29
30
31
Page 19
CMP 583 DAB
FRANÇAIS
SOURCE D'ÉNERGIE
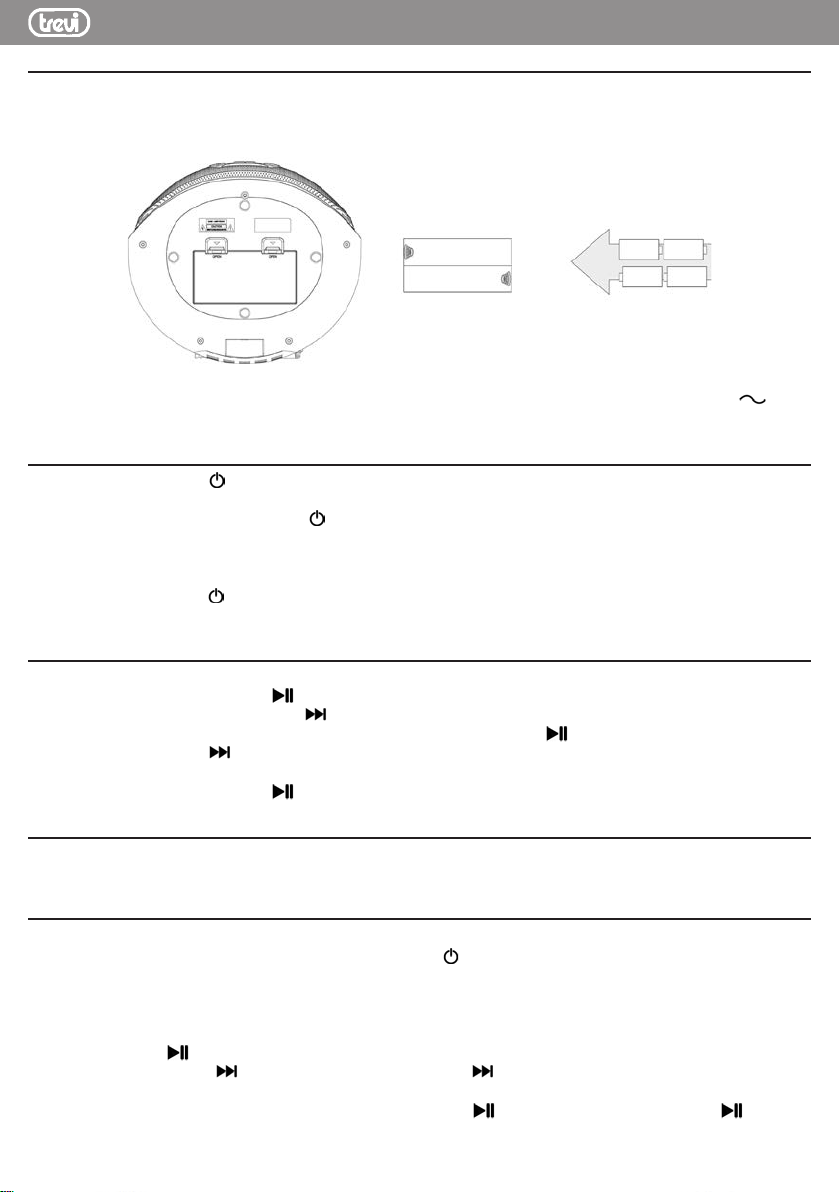
BATTERIE
Ouvrez le compartiment à piles (15) et insérez 4 piles "C" (UM-2) en prenant soin de respecter scrupuleusement les
polarités indiquées. Remplacez immédiatement les piles épuisées et retirez-les si vous prévoyez de ne pas utiliser
l'appareil pendant une longue période.
OPERATION AC
Branchez le cordon d’alimentation sur la prise secteur (13). Insérez la fiche dans une prise secteur 100-240V 50/60.
Ne branchez pas l’appareil à des prises électriques autres que celles indiquées.
ALLUMÉ ÉTEINT
1. Appuyez sur le bouton /FUN (2) de l’appareil ou sur le bouton STANDBY (17) de la télécommande pour allumer
l’appareil;
2. Appuyez plusieurs fois sur le bouton
pour sélectionner: radio DAB+, radio FM, lecteur CD, entrée USB et entrée AUX;
REMARQUE: En source CD, USB ou AUX, si aucune opération n’est effectuée dans les 15 minutes, l’appareil entrera
automatiquement en mode STANDBY.
3. Appuyez sur le bouton /FUN (2) de l’appareil ou sur le bouton STANDBY (17) de la télécommande pour éteindre
l’appareil.
/FUN (2) de l'appareil ou sur le bouton FUNC (16) de la télécommande
ÉCLAIRAGE LED ON/OFF
1. En mode veille, maintenez le bouton MENU/INFO (4) de l'appareil enfoncée pendant quelques secondes;
2. Appuyez sur le bouton ENTER/
3. Appuyez plusieurs fois sur le bouton
4. Sélectionnez l'élément "SPK-Light" et confirmez avec le bouton ENTER/
5. Appuyez sur le bouton
qui est définie. Sélectionnez ON pour allumer les voyants des haut-parleurs, sélectionnez OFF pour les éteindre;
6. Appuyez sur le bouton ENTER/
(8) pour afficher les différentes options disponibles. L'option avec le symbole ✳ est celle
(9) pour confirmer;
(8) pour afficher les différents éléments;
(9);
(9) pour confirmer.
CONTRÔLE DU VOLUME
Utilisez les boutons VOLUME (6) de l’appareil ou les boutons VOLUME (31) de la télécommande pour augmenter ou
diminuer le volume.
DAB/DAB+ RADIO
BALAYAGE LES STATIONS RADIO DAB/DAB+
1. Sélectionnez la source DAB en appuyant sur le bouton /FUN (2) sur l'appareil ou touche FUNC (16) sur la
télécommande. Le mot DAB apparaîtra.
Lorsque vous l'allumez pour la première fois, la radio balaie et enregistre automatiquement toutes les stations DAB
disponibles.
2. Si vous souhaitez répéter le balayage automatique des stations DAB disponibles, appuyez longuement sur le
bouton ENTER/
3. Appuyez sur le bouton
différentes stations DAB accordées;
4. Sur la station DAB souhaitée, appuyez sur le bouton ENTER/
télécommande pour lancer la lecture;
(9) de l'appareil ou sur le bouton SCAN (25) de la télécommande;
(8) de l'appareil ou sur le bouton (29) de la télécommande pour faire défiler les
(9) de l'appareil ou sur le bouton (27) de la
19
Page 20
FRANÇAIS
5. Appuyez plusieurs fois sur le bouton MENU/INFO (4) de l'appareil ou sur le bouton INFO (22) de la télécommande
pour afficher toutes les informations sur la station reçue.
STOCKAGE DE STATIONS RADIO
Pour mémoriser une station de radio, procédez comme suit:
1. Syntonisez la station de radio souhaitée;
2. Appuyez longuement sur le bouton MENU/INFO (4) de l'appareil ou sur le bouton MENU (21) de la télécommande
pour accéder au menu DAB;
3. Utiliser les boutons
(9) de l'appareil pour confirmer;
4. Utiliser les boutons
bouton ENTER/
Répétez cette opération pour chaque station de radio que vous souhaitez enregistrer. Il y a 30 emplacements de
mémoire disponibles.
DAB MENU
1. Appuyez pendant quelques secondes sur le bouton MENU/INFO (4) button de l'appareil ou sur le bouton MENU
(21) de la télécommande pour accéder au menu DAB;
2. Appuyez sur le bouton
éléments du menu DAB;
3. Appuyez sur le bouton ENTER/
l'élément de menu affiché:
Full scan: vous permet de balayer toute la bande DAB/DAB+ et de stocker automatiquement les stations trouvées.
Preset Recall: permet de rappeler une station de radio enregistrée dans l’une des 30 mémoires disponibles.
Preset Store: vous permet de sauvegarder une station de radio dans l’une des 30 mémoires disponibles.
Manual tune: vous permet de balayer manuellement une seule fréquence DAB/DAB+. Appuyez sur le bouton
DRC: vous permet d'activer/désactiver la fonction DRC pour améliorer le son lorsque vous écoutez dans des envi-
Prune: permet de supprimer toutes les stations de radio trouvées mais non disponibles (signal faible) de la liste des
TA: ous permet d'activer ou non l'alerte de trafic (annonces de trafic), ou de syntoniser automatiquement les stations
System: permet d'accéder au sous-menu du système:
Alarm: choisissez de régler "Alarm 1" ou "Alarm 2", utilisez le bouton
Wake up time: définissez l'heure d'activation de l'alarme.
Duration: durée en minutes du réveil.
Source: définissez le type de sonnerie entre Buzzer, Radio numérique (DAB), FM (radio FM), CD, USB.
Frequency: quotidienne (tous les jours), une fois (une seule fois), week-ends (les samedis et dimanches),
Volume: volume de lecture du réveil.
Preset: définissez la station de radio à jouer lorsque l’alarme est activée (Dernière écoute = la dernière
Alarm ON/OFF: pour activer ou désactiver l'alarme.
Time: permet de régler l'heure/la date actuelles.
Set Time/Date: définissez l'heure et la date actuelles.
Auto Update: sélectionnez la source pour régler automatiquement l'heure et la date, le cas échéant.
Set 12/24 Hour: définit le format de l'heure 12/24H.
Set Date Format: définissez le format de la date.
Backlight: vous permet de définir l'heure et le niveau de luminosité de l'écran:
Timeout: définissez le délai après lequel l'écran réduit la luminosité sans commande.
On Level: indique le niveau de luminosité de l'écran lorsque l'appareil reçoit des commandes.
20
(8) de l’appareil pour sélectionner le numéro de canal de la fréquence à balayer, puis appuyez sur le bouton
ou
ENTER/ (9) de l’appareil pour lancer le balayage. Les stations trouvées seront automatiquement mémorisées.
À la fin, maintenez le bouton MENU/INFO (4) de l’appareil enfoncée pour revenir au menu DAB.
ronnements bruyants. L'option avec le symbole ✳ est celle qui est définie. Vous pouvez définir le niveau de DRC
élevé, faible ou désactivé.
stations mémorisées. Déplacez le bouton
l’aide de le bouton ENTER/
de radio qui diffusent des informations sur le trafic. Déplacez-vous avec les boutons
sur "Yes" ou "No" et confirmez avec le bouton ENTER/
avec le bouton ENTER/
en semaine (du Lundi à vendredi).
syntonisée ou un radio parmi celles sauvegardées dans les mémoires disponibles).
(3) et (8) de l'appareil et sélectionner "Preset Store", appuyez sur le bouton ENTER/
(3) et (8) de l'appareil et sélectionner un emplacement de mémoire, appuyez sur le
(9) de l'appareil pour confirmer et enregistrer la station de radio;
(8) de l'appareil ou sur le bouton (29) e la télécommande pour afficher les différents
(9) de l'appareil ou sur le bouton (27) de la télécommande pour sélectionner
(3) ou (8) de l’appareil sur "Yes" et confirmez la suppression à
(9) de l’appareil.
(9) de l'appareil.
(9) de l'appareil.
CMP 583 DAB
(3)
(3) ou (8) de l'appareil
(3) ou (8) de l'appareil et confirmez
Page 21
CMP 583 DAB
Dim Level: indique le niveau de luminosité de l'écran lorsque l'appareil est inactif.
SPK-Light: vous permet d'activer ou de désactiver les voyants avant. L'option avec le symbole ✳ est celle qui est
définie.
Language: permet de sélectionner la langue du système.
Factory reset: permet de restaurer tous les paramètres aux paramètres d'usine. Sélectionnez "Yes" pour la
restauration.
Software upgrade: permet d'effectuer une analyse pour rechercher les mises à jour disponibles pour le
périphérique.
SW version: version du logiciel installée.
INFORMATIONS DE TRANSMISSION DAB/DAB+
En mode DAB, l'écran affiche une série d'informations sur la station et la piste en cours de lecture.
- Appuyez plusieurs fois sur le bouton MENU/INFO (4) de l’appareil ou sur le bouton INFO (22) de la télécommande
pour modifier les informations affichées.
Remarque: toutes les stations DAB ne fournissent pas les informations affichées par le périphérique.
Si disponibles, les informations suivantes sont disponibles:
DLS: affiche les informations relatives à la musique transmise (artiste, titre de la chanson, etc...).
Program type: affiche des informations relatives au type de programme transmis.
Transmitter name: affiche les informations relatives à l'émetteur de service.
Transmitter Number/Frequency: affiche des informations sur le nombre et la fréquence de la station DAB/DAB+
transmise.
Signal error index: affiche des informations relatives au niveau des erreurs de signal et à l'intensité avec laquelle
elles sont reçues.
Bit Rate: affiche les informations relatives au taux de compression de la transmission en cours.
Time: affiche l'heure.
Date: affiche les informations relatives à la date.
FRANÇAIS
RADIO FM
FONCTION DE BALAYAGE
1. Déployez complètement l'antenne (12) et sélectionnez la source FM. l'écran affichera la fréquence;
2. Appuyez sur le bouton
télécommande pour augmenter ou diminuer la fréquence et effectuer une recherche pas à pas;
3. Appuyez pendant quelques secondes sur le bouton
4. Appuyez longuement sur le bouton ENTER/
5. Appuyez sur les boutons F-/CH- (28) ou F+/CH+ (26) de la télécommande pour faire défiler les différentes stations
6. Appuyez plusieurs fois sur le bouton MENU/INFO (4) de l'appareil ou sur le bouton INFO (22) de la télécommande
REMARQUE
STOCKAGE DE STATIONS RADIO
Pour stocker une station de radio, procédez comme suit:
1. Syntonisez la station de radio souhaitée;
2. Appuyez pendant quelques secondes sur le bouton MENU/INFO (4) de l'appareil ou sur le bouton MENU (21) de
3. Utilisez les boutons
4. Utilisez les boutons
(20) ou (29) de la télécommande pour syntoniser la station de radio suivante ou précédente avec le
tons
meilleur signal reçu;
pour lancer la recherche et l'enregistrement automatique des stations FM. Les 30 premières stations reçues seront
automatiquement enregistrées;
FM enregistrées;
pour afficher toutes les informations sur la station reçue.
Pour obtenir la meilleure réception FM, déployez et orientez l’antenne (12). Si la réception n’est pas bonne, essayez de
régler différemment la longueur et l’orientation de l’antenne. Toutefois, la qualité de la réception FM dépend beaucoup
de l’endroit où est placé l’appareil.
La proximité de téléviseurs, de lampes au néon ou d’autres appareils domestiques peut perturber la réception des
programmes radio. Dans ce cas, éloignez l’enregistreur radio du dispositif perturbateur.
la télécommande pour accéder au menu FM;
ENTER/ (9) de l'appareil pour confirmer;
(3) ou sur le bouton (8) de l'appareil ou sur les boutons (20) ou (29) de la
(3) ou sur le bouton (8) de l'appareil ou sur les bou-
(9) de l'appareil ou sur le bouton SCAN (25) de la télécommande
(3) ou (8) de l'appareil et sélectionnez "Preset Store", puis appuyez su le bouton
(3) ou (8) de l'appareil pour sélectionner un emplacement de mémoire, appuyez sur l
21
Page 22
FRANÇAIS
e bouton ENTER/ (9) de l'appareil pour confirmer et enregistrer la station de radio.
Répétez cette opération pour chaque station de radio que vous souhaitez enregistrer. Il y a 30 emplacements de
mémoire disponi
MENU
1. Appuyez longuement sur le bouton MENU/INFO (4) de l'appareil ou sur le bouton MENU (21) de la télécommande
pour accéder au menu FM;
2. Appuyez sur le bouton
éléments du menu FM;
3. Appuyez sur le bouton ENTER/
l'élément de menu affiché.
Preset Recall: permet de rappeler une station de radio enregistrée dans l’une des 30 mémoires disponibles.
Preset Store: vous permet de sauvegarder une station de radio dans l’une des 30 mémoires disponibles.
Scan setting: vous permet de définir la recherche de stations de radio sur toutes les stations trouvées (Toutes les
stations) ou uniquement sur celles qui ont un signal puissant (Station forte).
Audio setting: permet de régler l'audio en stéréo (stéréo autorisé) ou en mono (mono forcé).
System: permet d'accéder au menu système (voir RADIO DAB/DAB+ MENU).
bles.
(8) de l'appareil ou sur le bouton (29) de la télécommande pour afficher les différents
(9) de l'appareil ou sur le bouton (27) de la télécommande pour sélectionner
CMP 583 DAB
LECTEUR CD-MP3
LECTURE D'UN DISQUE
1. Sélectionnez la source du CD. Le "CD" apparaîtra;
2. Ouvrez le compartiment à CD et insérez le disque avec le côté écrit vers le haut. Fermez la porte avec précaution;
3. Après quelques secondes, l’écran LCD (1) indique le nombre de plages du disque. La lecture commencera automatiquement;
4. Appuyez sur le bouton ENTER/
pause; le temps écoulé de la piste commencera à clignoter. Appuyez à nouveau pour désactiver la pause;
5. Appuyez sur le bouton
SAUT DE TRACE ET AVANT / RETOUR RAPIDE
1. Appuyez sur le bouton (3) ou (8) de l'appareil ou sur les boutons (20), (29) de la télécommande
pour passer à la piste précédente ou suivante;
2. Appuyez sur le bouton
tout en écoutant pour renvoyer la piste rapidement ou rapidement. Relâchez le bouton pour revenir à la lecture
normale.
RÉPÉTITION D'UNE SIMPLE TRACE
1. Pour lire une seule piste en continu, appuyez sur le bouton EQ/RPT (7) sur l'appareil ou sur le bouton RPT (18)
de la télécommande pendant la lecture jusqu'à ce que "REP-1" apparaisse à l'écran. Le lecteur CD lira en continu
la piste affichée à l'écran;
2. Pour annuler la lecture ininterrompue d'une piste, appuyez plusieurs fois sur le bouton EQ/RPT (7) de l'appareil
ou sur le bouton RPT (18) de la télécommande jusqu'à ce que le symbole "DISC" apparaisse.
RÉPÉTITION SUR DISQUE
1. Pour lire en continu toutes les plages du disque, appuyez sur le bouton EQ/RPT (7) sur l'appareil ou sur le bouton
RPT (18) de la télécommande pendant la lecture jusqu'à ce que "REP-ALL" apparaisse à l'écran. Le lecteur CD
lira en continu toutes les plages du disque;
2. Pour annuler la lecture ininterrompue de toutes les plages du disque, appuyez plusieurs fois sur le bouton EQ/RPT
(7) de l'appareil ou sur le bouton RPT (18) de la télécommande jusqu'à ce que le symbole "DISC" apparaisse.
RÉPÉTITION DU DOSSIER
REMARQUE: fonction valide uniquement pour les CD MP3.
1. Pour lire toutes les pistes d’un dossier en continu, appuyez sur le bouton EQ/RPT (7) sur l’appareil ou sur le bouton
RPT (18) de la télécommande pendant la lecture jusqu’à ce que "REP-DIR" apparaisse à l’écran. Le lecteur CD
lit en permanence toutes les pistes du dossier;
2. Pour annuler la lecture ininterrompue de toutes les pistes du dossier, appuyez plusieurs fois sur le bouton EQ/RPT
(7) de l'appareil ou sur le bouton RPT (18) de la télécommande jusqu'à ce que le symbole "DISC" apparaisse.
FONCTION ALÉATOIRE
1. Pour lire toutes les plages du disque de manière aléatoire, appuyez sur le bouton EQ/RPT (7) de l'appareil ou sur
le bouton RPT (18) de la télécommande pendant la lecture jusqu'à ce que "RANDOM" apparaisse à l'écran. Le
lecteur CD lira de manière aléatoire toutes les pistes du disque;
(30) de la télécommande pour arrêter la lecture de façon permanente.
(3) ou (8) de l'appareil ou sur les boutons (20), (29) de la télécommande
(9) de l'appareil ou sur le bouton (27) de la télécommande pour activer la
22
Page 23
CMP 583 DAB
2. Pour annuler la lecture aléatoire de toutes les plages du disque, appuyez plusieurs fois sur le bouton EQ/RPT (7)
de l'appareil ou sur le bouton RPT (18) de la télécommande jusqu'à ce que le symbole "DISC" apparaisse.
PROGRAMME
Vous pouvez sélectionner l'ordre dans lequel les pistes sont lues.
1. Appuyez sur le bouton
2. Appuyez sur le bouton PROG (23) de la télécommande, le message P01 apparaît à l'écran;
3. Sélectionnez les pistes avec les bouton
télécommande;
4. Appuyez sur le bouton PROG (23) de la télécommande;
5. Répétez les étapes 3 et 4 pour stocker et lire les pistes souhaitées. pour les CD audio, un maximum de 20 pistes
peut être stocké, tandis que pour les CD MP3, un maximum de 99 pistes peut être stocké;
6. Appuyez sur le bouton ENTER/
lancer la lecture;
7. Appuyez deux fois sur le bouton
(30) de la télécommande pour arrêter la lecture;
(3) ou (8) de l'appareil ou les bouton (20) ou (29) sur la
(9) de l'appareil ou appuyez sur le bouton (27) de la télécommande pour
(30) de la télécommande pour annuler la programmation.
FRANÇAIS
ENTRÉE USB
LA REPRODUCTION
1. Connectez un périphérique USB à l’entrée USB (11);
2. Sélectionnez la source USB. Le "USB" apparaîtra sur l'écran;
3. Après quelques secondes, l’écran LCD (1) indique le nombre de plages du disque. La lecture commencera automatiquement.
REMARQUE: Reportez-vous au paragraphe FONCTIONNEMENT DU LECTEUR CD-MP3 pour le reste des fonctions.
AUX INPUT
LA REPRODUCTION
1. Connectez un appareil externe à l’entrée AUX IN (5);
2. Sélectionnez la source AUX. L'écriture "ENTER AUX" apparaîtra à l'écran;
3. Commencez la lecture du périphérique externe. Pour toutes les fonctions de lecture, reportez-vous au manuel du
périphérique externe.
CASQUE DE MUSIQUE
1. Insérez le casque dans la prise casque (10);
2. Lancez la lecture souhaitée et ajustez le volume.
CARACTÉRISTIQUES TECHNIQUES
GÉNÉRAL
Puissance et consommation: ............................................................100-240V 50/60 (8W, en veille 0.3W)
.............................................................................................4 piles "C" (UM2) non fournies
Réception de la bande FM: ..............................................................87,5 - 108 MHz
Réception de bande DAB / DAB +: ..................................................174,928 - 239,200 MHz
Puissance audio: ...............................................................................2x 2W
Dimensions: ......................................................................................274x 232 x 134mm
RECOMMANDATIONS POUR L'ÉLIMINATION CORRECTE DU PRODUIT.
Le symbole figurant sur l’appareil indique que le produit fait l’objet d’une “collecte séparée“. C’est pourquoi, le produit
ne doit pas être éliminé avec les déchets urbains.
L’utilisateur doit remettre le produit auprès de “décharges spécialisées de collecte séparée“ prévues par les autorités
locales, ou bien le rendre au revendeur quand il achètera un nouvel appareil équivalent.
La collecte séparée du produit et les opérations successives de traitement, recyclage et élimination favorisent la
production d’appareils composés par des matériaux recyclés ainsi que permettent d’éviter des effets négatifs sur
l’environnement et sur la santé des personnes suite à une gestion impropre du déchet.
Toute élimination abusive du produit entraîne l’application de sanctions administratives.
23
Page 24
DEUTSCH
CMP 583 DAB
GEFÄHRLICHE
SPANNUNGEN
Dieses Symbol, das auf der Rückseite des Gerätes und auf diesem
Handbuch abgebildet ist, weist den
Benutzer auf das Vorhandensein
von mit Hochspannung betriebenen
Bauteilen im Innern des Gerätes hin.
Um elektrische Schläge zu vermeiden,
muß das Gerät nicht geöffnet werden.
ACHTUNG
Dieses Symbol, das auf der Rückseite des Gerätes und auf diesem
Handbuch abgebildet ist, weist den
Benutzer auf wichtige Anweisungen
zum sicheren Gebrauch hin. Bevor
das Gerät in Betrieb genommen wird,
müssen diese Anweisungen aufmerksam gelesen werden.
HINWEISE IN BEZUG
AUF DEN LASER
Dieses Gerät ist mit einem LaserLesesystem versehen. Der Laser
verfügt über eine niedrige Leistung
und ist mit einer Sicherheitsvorrichtung versehen, die den Betrieb
bei geöffneter Klappe verhindert.
Halten Sie sich trotzdem sorgfältig
an folgende Hinweise:bei geöffnetem
gerät, das auge nicht an die linse des
lasers nähern. es besteht die gefahr,
dass die netzhaut dabei verletzt wird.
versuchen sie nicht, die lasereinheit
abzumontieren oder unsachgemäss
zu behandeln. es besteht die gefahr,
daß strahlen dabei absorbiert werden.
HINWEISE
ANWEISUNGEN ZUM GEBRAUCH
Dieses Gerät ist ein elektronisches Instrument höchster Präzision; vermeiden Sie deshalb, das Gerät in folgenden
Fällen zu benutzen:
• In der Nähe von Wärmequellen, wie z.B. Heizkörpern oder Öfen.
• In sehr feuchten Räumen, wie z.B. Badezimmern, Schwimmbädern, usw.
• In sehr staubigen Räumen.
• An Plätzen, die starken Vibrationen ausgesetzt sind.
• Das Gerät muß so aufgestellt werden, daß an den Seiten genügend Raum für den freien Luftumlauf vorhanden ist
(mindestens 5cm.).
• Die Ventilationsöffnungen nicht abdecken.
• Sollten Flüssigkeiten im Innern des Geräts eindringen, ziehen Sie den Stecker sofort aus der Steckdose und
bringen Sie das Gerät in die nächstgelegene TREVI-autorisierte Kundendienststelle.
• Vor Inbetriebnahme des Gerätes überprüfen Sie stets, daß die Netzkabel und die Verbindungskabel ordnungsgemäß
installiert sind.
PFLEGE UND W ARTUNG
Zum Reinigen benutzen Sie einen leicht angefeuchteten, weichen Lappen. Verwenden Sie keine Lösungsmittel oder
Scheuermittel.
WICHTIG
WICHTIG
Die gute Bauweise des Geräts gewährleistet den einwandfreien Betrieb auf längere Zeit hin. Sollten trotzdem irgendwelche Störungen auftreten, wenden Sie sich an die nächstgelegene TREVI-autorisierte Kundendienststelle.
Die Firma TREVI ist für die ständige Forschung und Entwicklung seiner Produkte engagiert. Auf Grund dieser Tatsache
können die Produkte andere Merkmale als die beschriebenen aufweisen.
Um Hörschäden zu vermeiden, begrenzen Sie die Zeit bei hoher Lautstärke zu hören.
24
Page 25
CMP 583 DAB
DEUTSCH
BESCHREIBUNG DER BEFEHLE
1. LCD-Anzeige
2.
/FUN Taste
3.
Taste, Vorherige Datei/Station
4. MENU/INFO Taste
5. AUX IN-Eingang
6. VOLUMEN Taste
7. EQ/RPT Taste
8.
Taste, Nächste Datei/Station
16. FUNC Taste, funktion
17. STANDBY Taste
18. RPT Taste, wiederholen
19. EQ Taste
20.
Taste, Bisherige
21. MENU Taste
22. INFO Taste
23. PROG Taste, Programm
24. MUTE Taste
25. SCAN Taste
26. F+/CH+ Taste
27.
Taste
28. F-/CH- Taste
29.
Taste, Nächster
30.
Taste, Stop
31. Volumen Taste
15
9. Enter/
10. Kopfhörerausgang
11. USB-Eingang
12. Antenne
13. Steckdose, Netzteil
14. Griff
15. Batteriefach
Taste
16
17
18
19
20
21
22
23
24
25
26
27
28
29
30
31
25
Page 26
DEUTSCH
CMP 583 DAB
ENERGIEQUELLE
BATTERIE
Öffnen Sie das Batteriefach (15) und legen Sie 4 Batterien der Größe "C" (UM-2) ein. Achten Sie dabei auf die angegebenen Polaritäten. Wechseln Sie die leeren Batterien sofort aus und entfernen Sie sie, wenn Sie das Gerät längere
Zeit nicht benutzen.
AC-Betrieb
Schließen Sie das Netzkabel an die Steckdose (13) an. Stecken Sie den Stecker in eine 100-240V 50/60-Steckdose.
Schließen Sie das Gerät nicht an andere als die angegebenen Steckdosen an.
EIN/AUS
1. Drücken Sie die taste /FUN (2) am Gerät oder die Taste STANDBY (17) auf der Fernbedienung, um das Gerät
einzuschalten;
2. Drücken Sie wiederholt die Taste
Folgendes auszuwählen: DAB+ -Radio, UKW-Radio, CD-Player, USB-Eingang und AUX-Eingang;
HINWEIS: Bei einer CD-, USB- oder AUX-Quelle wechselt das Gerät automatisch in den STANDBY-Modus, wenn innerhalb von 15
Minuten keine Aktion ausgeführt wird.
3. Drücken Sie die Taste /FUN (2) am Gerät oder die Taste STANDBY (17) auf der Fernbedienung, um das Gerät
auszuschalten.
/FUN (2) am Gerät oder die Taste FUNC (16) auf der Fernbedienung, um
LED-BELEUCHTUNG EIN/AUS
1. Halten Sie im Standby-Modus die MENU/INFO-Taste (4) am Gerät einige Sekunden lang gedrückt;
2. Drücken Sie zur Bestätigung die Taste ENTER/
3. Drücken Sie mehrmals die Taste
4. Wählen Sie den Punkt "SPK-Light" und bestätigen Sie mit taste ENTER/
5. Drücken Sie die Taste
✳ ist die festgelegte. Wählen Sie EIN, um die LEDs an den Lautsprechern einzuschalten, und AUS, um die LEDs
auszuschalten;
6. Drücken Sie zur Bestätigung die TasteENTER/
(8) um die verschiedenen verfügbaren Optionen anzuzeigen. Die Option mit dem Symbol
(8) um die verschiedenen Optionen anzuzeigen;
(9);
(9);
(9).
LAUTSTÄRKEREGELUNG
Verwenden Sie die VOLUME-Tasten (6) am Gerät oder die VOLUME-Tasten (31) auf der Fernbedienung, um die
Lautstärke zu erhöhen oder zu verringern.
DAB/DAB+ RADIO
SCAN DAB/DAB+ RADIO-STATIONEN
1. Wählen Sie die DAB-Quelle mit /FUN (2) am Gerät oder der Taste FUNC (16) auf der Fernbedienung. Das Wort
DAB wird angezeigt;
Wenn Sie das Radio zum ersten Mal einschalten, werden automatisch alle verfügbaren DAB-Sender gesucht und
gespeichert;
2. Wenn Sie den automatischen Suchlauf für die verfügbaren DAB-Sender wiederholen möchten, halten Sie die Taste
ENTER/
3. Drücken Sie wiederholt die Taste
verschiedenen eingestellten DAB-Sender zu blättern;
26
(9) am Gerät oder die Taste SCAN (25) auf der Fernbedienung gedrückt;
(8) am Gerät oder die Taste (29) auf der Fernbedienung, um durch die
Page 27
CMP 583 DAB
4. Drücken Sie auf dem gewünschten DAB-Sender die Taste ENTER/ (9) am Gerät oder die Taste (27) auf
der Fernbedienung, um die Wiedergabe zu starten;
5. Drücken Sie wiederholt die Taste MENU/INFO (4) am Gerät oder die Taste INFO (22) auf der Fernbedienung, um
alle Informationen zum empfangenen Sender anzuzeigen.
RADIOSENDER SPEICHERN
Führen Sie die folgenden Schritte aus, um einen Radiosender zu speichern:
1. Stellen Sie den gewünschten Radiosender ein;
2. Halten Sie die Taste MENU/INFO (4) am Gerät oder die Taste MENU (21) auf der Fernbedienung gedrückt, um
auf das DAB-Menü zuzugreifen;
3. Um die Tasten
Bestätigung die Taste ENTER/ (9) am Gerät;
4. Um die Tasten
Taste ENTER/ (9) am Gerät, um den Radiosender zu bestätigen und zu speichern;
Wiederholen Sie diesen Vorgang für jeden Radiosender, den Sie speichern möchten. Es stehen 30 Speicherplätze
zur Verfügung.
DAB RADIO MENÜ
1. Drücken Sie einige Sekunden lang die Taste MENU/INFO (4) am Gerät oder die Taste MENU (21) auf der Fernbedienung, um auf das DAB-Menü zuzugreifen;
2. Drücken Sie die Taste
Elemente des DAB-Menüs anzuzeigen;
3. Drücken Sie die Taste ENTER/
zeigten Menüpunkt auszuwählen:
Full scan: Damit können Sie das gesamte DAB/DAB+ -Band durchsuchen und die gefundenen Sender automatisch
speichern.
Preset Recall: Damit können Sie einen Radiosender aufrufen, der in einem der 30 verfügbaren Speicherplätze ge-
speichert ist.
Preset Store: Damit können Sie einen Radiosender in einem der 30 verfügbaren Speicherplätze speichern.
Manual tune: Damit können Sie manuell eine einzelne DAB/DAB+ -Frequenz suchen. Drücken Sie die Taste
order (8) am Gerät, um die Kanalnummer für die zu scannende Frequenz auszuwählen, und drücken Sie dann
die Taste ENTER/
gespeichert. Halten Sie am Ende die MENU/INFO-taste (4) am Gerät gedrückt, um zum DAB-Menü zurückzukehren.
DRC: Mit dieser Option können Sie die DRC-Funktion aktivieren/deaktivieren, um den Klang in lauten Umgebungen
zu verbessern. Die Option mit dem Symbol ✳ ist die eingestellte. Sie können den DRC-Pegel hoch, niedrig oder
AUS einstellen.
Prune: Ermöglicht das Löschen aller gefundenen, aber nicht verfügbaren Radiosender (schlechtes Signal) aus der
Liste der gespeicherten Sender. Stellen Sie mit der Taste
Sie den Löschvorgang mit der Taste ENTER/ (9) am Gerät.
TA: Ermöglicht das Aktivieren oder Deaktivieren des Verkehrsalarms (Verkehrsmeldungen) oder das automatische
Einstellen von Radiosendern, die Verkehrsinformationen senden. Stellen Sie mit der Taste
am Gerät "Ja" oder "Nein" ein und bestätigen Sie mit der Taste ENTER/ (9) am Gerät.
System: Ermöglicht den Zugriff auf das Untermenü des Systems:
Alarm: Wählen Sie aus, ob "Alarm 1" oder "Alarm 2" eingestellt werden soll, drücken Sie die Taste (3) order
(8) am Gerät und bestätigen Sie mit ENTER/ (9)-Taste am Gerät.
Wake up time: Stellen Sie die Alarmaktivierungszeit ein.
Duration: Dauer in Minuten des Weckers.
Source: Stellen Sie die Art des Klingeltons zwischen Summer, Digitalradio (DAB), FM (FM-Radio), DC, USB
ein.
Frequency: Täglich (jeden Tag), Einmal (nur einmal), Wochenende (samstags und sonntags), Wochentage
(ab Montag bis Freitag).
Volume: Wiedergabelautstärke des Weckers.
Preset: Legen Sie fest, welcher Radiosender abgespielt werden soll, wenn der Alarm aktiviert wird (zuletzt
gehört = zuletzt eingestellt oder a Radio unter denen, die in den verfügbaren Speichern
gespeichert sind).
Alarm ON/OFF: Zum Aktivieren oder Deaktivieren des Alarms.
Time: Damit können Sie die aktuelle Uhrzeit/das aktuelle Datum einstellen.
(3) und (8) am Gerät zu verwenden und "Preset Store" auszuwählen, drücken Sie zur
(3) und (8) des Geräts zu verwenden und einen Speicherort auszuwählen, drücken Sie die
(8) am Gerät oder die Taste (29) auf der Fernbedienung, um die verschiedenen
(9) am Gerät oder die Taste (27) auf der Fernbedienung, um den ange-
(9) am Gerät, um den Scanvorgang zu starten. Die gefundenen Sender werden automatisch
(3) order (8) oam Gerät "Ja" ein und bestätigen
DEUTSCH
(3)
(3) order (8)
27
Page 28
DEUTSCH
Set Time/Date: Stellen Sie die aktuelle Uhrzeit und das Datum ein.
Auto Update: Wählen Sie aus, von welcher Quelle Uhrzeit und Datum automatisch eingestellt werden
sollen, falls verfügbar.
Set 12/24 Hour: Stellen Sie das 12/24H-Zeitformat ein.
Set Date Format: Stellen Sie das Datumsformat ein.
Backlight: Damit können Sie die Zeit und Helligkeit des Displays einstellen:
Timeout: Stellen Sie die Zeit ein, nach der das Display die Helligkeit ohne Befehle verringert.
On Level: Zeigt die Helligkeitsstufe des Displays an, wenn das Gerät Befehle empfängt.
Dim Level: Zeigt die Helligkeitsstufe des Displays an, wenn das Gerät inaktiv ist.
SPK-Light: Ermöglicht das Aktivieren oder Deaktivieren der vorderen LED-Lichter. Die Option mit dem Symbol ✳
ist die eingestellte.
Language: Hier können Sie die Systemsprache auswählen.
Factory reset: Ermöglicht Ihnen, alle Einstellungen auf die Werkseinstellungen zurückzusetzen. Wählen Sie "Ja"
für die Wiederherstellung.
Software upgrade: Mit dieser Option können Sie einen Scan durchführen, um nach verfügbaren Updates für das
Gerät zu suchen.
SW version: Software-Version installiert.
DAB/DAB+ ÜBERTRAGUNGSINFORMATIONEN
Im DAB-Modus zeigt das Display eine Reihe von Informationen über den Sender und den wiedergegebenen Titel.
- Drücken Sie wiederholt die Taste MENU/INFO (4) am Gerät oder die Taste INFO (22) auf der Fernbedienung, um
die angezeigten Informationen zu ändern.
Hinweis: Nicht alle DAB-Sender liefern die vom Gerät angezeigten Informationen.
Falls verfügbar, sind folgende Informationen verfügbar:
DLS: Zeigt Informationen zur übertragenen Musik an (Künstler, Songtitel usw.).
Program type: Zeigt Informationen zum übertragenen Programmtyp an.
Transmitter name: Zeigt Informationen zum Service-Sender an.
Transmitter Number/Frequency: Zeigt Informationen zu Nummer und Frequenz des gesendeten DAB/DAB+ -Senders an.
Signal error index: Zeigt Informationen zur Stärke der Signalfehler und zur Intensität des Empfangs an.
Bit Rate: Zeigt Informationen zum Komprimierungsverhältnis der aktuellen Übertragung an.
Time: Zeigt die Uhrzeit an.
Date: Zeigt Informationen zum Datum an.
CMP 583 DAB
FM-RADIO
SCAN-FUNKTION
1. Ziehen Sie die Antenne (12) vollständig heraus und wählen Sie die FM-Quelle aus. Das Display zeigt die Frequenz
an;
2. Drücken Sie die Taste
Fernbedienung, um die Frequenz zu erhöhen oder zu verringern und eine schrittweise Suche durchzuführen;
3. Drücken Sie einige Sekunden lang die Taste
(29) auf der Fernbedienung, um den nächsten oder vorherigen Radiosender mit dem besten empfangenen
Signal einzustellen;
4. Halten Sie die Taste ENTER/
den Suchlauf und das automatische Speichern von UKW-Sendern zu starten. Die ersten 30 empfangenen Sender
werden automatisch gespeichert;
5. Drücken Sie die Tasten F-/CH- (28) order F+/CH+ (26) auf der Fernbedienung, um durch die verschiedenen
gespeicherten UKW-Sender zu blättern;
6. Drücken Sie wiederholt die Taste MENU/INFO (4) am Gerät oder die Taste INFO (22) auf der Fernbedienung, um
alle Informationen zum empfangenen Sender anzuzeigen.
HINWEIS:
Um den besten UKW-Empfang zu erzielen, ziehen Sie die Antenne heraus und richten Sie sie aus (12). Wenn der
Empfang nicht gut ist, versuchen Sie, die Länge und Ausrichtung der Antenne unterschiedlich einzustellen. Die
Qualität des UKW-Empfangs hängt jedoch stark vom Aufstellungsort des Geräts ab.
Die Nähe von Fernsehgeräten, Neonröhren oder anderen Haushaltsgeräten kann den Empfang von Radioprogrammen
stören. In diesem Fall entfernen Sie den Radiorecorder vom störenden Gerät.
(3) oder die Taste (8) am Gerät oder die Tasten (20) order (29) auf der
(3) oder die Taste (8) am Gerät oder die Tasten (20) order
(9) am Gerät oder die Taste SCAN (25) auf der Fernbedienung gedrückt, um
28
Page 29
CMP 583 DAB
RADIOSENDER SPEICHERN
Gehen Sie wie folgt vor, um einen Radiosender zu speichern:
1. Stellen Sie den gewünschten Radiosender ein;
2. Drücken Sie einige Sekunden lang die MENU/INFO-Taste (4) am Gerät oder die MENU-Taste (21) auf der Fernbe-
dienung, um auf das FM-Menü zuzugreifen;
3. Verwenden Sie die Tasten
gung ENTER/
4. Verwenden Sie die Tasten
ENTER/ (9) am Gerät, um den Radiosender zu bestätigen und zu speichern;
Wiederholen Sie diesen Vorgang für jeden Radiosender, den Sie speichern möchten. Es stehen 30 Speicherplätze
zur Verfügung.
MENU
1. Drücken Sie lange die Taste MENU/INFO (4) am Gerät oder die Taste MENU (21) auf der Fernbedienung, um
das FM-Menü aufzurufen;
2. Drücken Sie die Taste
FM-Menüoptionen anzuzeigen;
3. Drücken Sie die Tastee ENTER/
zeigten Menüpunkt auszuwählen.
Preset Recall: Damit können Sie einen Radiosender aufrufen, der in einem der 30 verfügbaren Speicherplätze ge-
speichert ist.
Preset Store: Damit können Sie einen Radiosender in einem der 30 verfügbaren Speicherplätze speichern.
Scan setting: Mit dieser Option können Sie die Suche nach Radiosendern für alle gefundenen Sender einstellen (Alle
Sender) oder nur für diejenigen mit starkem Signal (Starker Sender).
Audio setting: Mit dieser Option können Sie Audio in Stereo (Stereo zulässig) oder Mono (Forced Mono) einstellen.
System: Ermöglicht den Zugriff auf das Systemmenü (siehe RADIO DAB/DAB+ MENU).
(9) am Gerät;
(3) order (8) am Gerät und wählen Sie "Preset Store", Drücken Sie zur Bestäti-
(3) order (8) am Gerät und wählen Sie einen Speicherort. Drücken Sie die Taste
(8) am Gerät oder die Taste (29) auf der Fernbedienung, um die verschiedenen
(9) am Gerät oder die Taste (27) auf der Fernbedienung, um den ange-
DEUTSCH
CD-MP3-PLAYER
WIEDERGABE EINER DISC
1. Wählen Sie die CD-Quelle. Die "CD" erscheint;
2. Öffnen Sie das CD-Fach und legen Sie die CD mit der beschrifteten Seite nach oben ein. Die Tür vorsichtig
schließen;
3. Nach einigen Sekunden zeigt das LCD-Display (1) die Anzahl der Titel auf der Disc an. Die Wiedergabe startet
automatisch;
4. Drücken Sie die Taste ENTER/
zu aktivieren. Die verstrichene Zeit des Titels beginnt zu blinken. Drücken Sie die Taste erneut, um die Pause
auszuschalten;
5. Drücken Sie die Taste
SPRUNGVERFOLGUNG UND VORWÄRTS/SCHNELLER RÜCKGANG
1. Drücken Sie die Taste (3) order (8) am Gerät oder die Tasten (20), (29) auf der Fernbedienung,
um zum vorherigen oder nächsten Titel zu wechseln;
2. Drücken Sie die Taste
während Sie den Titel hören, um ihn schnell vorwärts oder rückwärts zu senden. Lassen Sie die Taste los, um zur
normalen Wiedergabe zurückzukehren.
WIEDERHOLEN EINER SPUR
1. Um einen einzelnen Titel fortlaufend abzuspielen, drücken Sie während der Wiedergabe die Taste EQ/RPT (7)
am Gerät oder die Taste RPT (18) auf der Fernbedienung, bis "REP-1" im Display angezeigt wird. Der CD-Player
spielt den auf dem Display angezeigten Titel fortlaufend ab;
2. Um die ununterbrochene Wiedergabe eines einzelnen Titels abzubrechen, drücken Sie mehrmals die Taste EQ/
RPT (7) am Gerät oder die Taste RPT (18) auf der Fernbedienung, bis das Symbol "DISC" angezeigt wird.
DISK REPETITION
1. Um alle Titel der Disc fortlaufend abzuspielen, drücken Sie während der Wiedergabe die Taste EQ/RPT (7) am
Gerät oder die Taste RPT (18) auf der Fernbedienung, bis "REP-ALL" im Display angezeigt wird. Der CD-Player
spielt kontinuierlich alle Titel auf der CD ab;
2. Um die ununterbrochene Wiedergabe aller Titel auf der Disc abzubrechen, drücken Sie wiederholt EQ/RPT (7)
am Gerät oder RPT (18) auf der Fernbedienung, bis das Symbol "DISC" angezeigt wird.
(30) auf der Fernbedienung, um die Wiedergabe dauerhaft zu stoppen.
(3) order (8) am Gerät oder die Taste (20), (29) auf der Fernbedienung,
(9) am Gerät oder die Taste (27) auf der Fernbedienung, um die Pause
29
Page 30
DEUTSCH
ORDNER WIEDERHOLEN
HINWEIS: Funktion nur für MP3-CDs gültig.
1. Um alle Titel in einem Ordner fortlaufend abzuspielen, drücken Sie während der Wiedergabe die Taste EQ/RPT
(7) am Gerät oder die Taste RPT (18) auf der Fernbedienung, bis "REP-DIR" im Display angezeigt wird. Der CD-
Player spielt fortlaufend alle Titel im Ordner ab;
2. Um die ununterbrochene Wiedergabe aller Titel im Ordner abzubrechen, drücken Sie mehrmals EQ/RPT (7) am
Gerät oder RPT (18) auf der Fernbedienung, bis das Symbo "DISC" angezeigt wird.
ZUFÄLLIGE FUNKTION
1. Um alle Titel der Disc in zufälliger Reihenfolge abzuspielen, drücken Sie während der Wiedergabe die Taste EQ/
RPT (7) am Gerät oder die Taste RPT (18) auf der Fernbedienung, bis "RANDOM" im Display angezeigt wird. Der
CD-Player spielt alle Titel der CD nach dem Zufallsprinzip ab;
2. Um die Zufallswiedergabe aller Titel auf der Disc abzubrechen, drücken Sie mehrmals die Taste EQ/RPT (7) am
Gerät oder die Taste RPT (18) auf der Fernbedienung, bis das Symbol "DISC" angezeigt wird.
PROGRAMM
Sie können die Reihenfolge auswählen, in der die Titel abgespielt werden.
1. Drücken Sie die Taste
2. Drücken Sie die Taste PROG (23) auf der Fernbedienung. Die Meldung P01 erscheint im Display;
3. Wählen Sie die Titel mit den Tasten
auf der Fernbedienung aus;
4. Drücken Sie die Taste PROG button (23) auf der Fernbedienung;
5. Wiederholen Sie die Schritte 3 und 4, um die gewünschten Titel zu speichern und abzuspielen. Bei Audio-CDs
können maximal 20 Titel und bei MP3-CDs maximal 99 Titel gespeichert werden;
6. Drücken Sie die Taste ENTER/
zu starten;
7. Drücken Sie zweimal die Taste
(30) auf der Fernbedienung, um die Wiedergabe zu stoppen;
(3) order (8) am Gerät oder mit den Tasten (20) order (29)
(9) am Gerät oder die Taste (27) auf der Fernbedienung, um die Wiedergabe
(30) auf der Fernbedienung, um die Programmierung abzubrechen.
CMP 583 DAB
USB-EINGANG
WIEDERGABE
1. Schließen Sie ein USB-Gerät an den USB-Eingang (11) an;
2. Wählen Sie die USB-Quelle. Auf dem Display erscheint "USB";
3. Nach einigen Sekunden zeigt das LCD-Display (1) die Anzahl der Titel auf der Disc an. Die Wiedergabe startet
automatisch.
HINWEIS: Weitere Informationen zu den Funktionen finden Sie im Abschnitt betrieb des CD-MP3-PLAYERS.
AUX-EINGANG
REPRODUKTION
1. Schließen Sie ein externes Gerät an den AUX IN-Eingang (5) an;
2. Wählen Sie die AUX-Quelle. Auf dem Display erscheint "ENTER AUX";
3. Starten Sie die Wiedergabe des externen Geräts. Informationen zu allen Wiedergabefunktionen finden Sie im
Handbuch des externen Geräts.
KOPFHÖRER
1. Stecken Sie den Kopfhörer in die Kopfhörerbuchse (10);
2. Starten Sie die gewünschte Wiedergabe und stellen Sie die Lautstärke ein.
TECHNISCHE EIGENSCHAFTEN
ALLGEMEINES
Leistung und Verbrauch: ...................................................................100-240V 50/60 (8W, Standby 0,3W)
.............................................................................................4 x "C" -Batterien (UM2) nicht enthalten
UKW-Bandempfang: .........................................................................87,5 - 108 MHz
DAB / DAB + -Bandempfang: ...........................................................174.928 - 239.200 MHz
Audioleistung: ....................................................................................2x 2W
Abmessungen: ..................................................................................274 x 232 x 134mm
30
Page 31
CMP 583 DAB
HINWEISE ZUR ORDNUNGSGEMÄßEN ENTSORGUNG DES PRODUKTS
Das auf dem Gerät angebrachte Symbol weist darauf hin, dass das Altgerät “getrennt zu sammeln” ist und das Produkt
daher nicht zusammen mit dem Gemeindeabfall entsorgt werden darf.
Der Benutzer muss das Produkt zu den entsprechenden, von der Gemeindeverwaltung eingerichteten “Wertstoffsammelstellen” bringen oder dem Händler beim Kauf eines neuen Produkts übergeben.
Die getrennte Müllsammlung und anschließende Aufbereitung, Wiederverwertung und Entsorgung fördern die Herstellung von Geräten unter Verwendung wiederverwerteter Materialien und vermindern die negativen Auswirkungen
auf die Umwelt und Gesundheit in Folge einer falschen Müllverwaltung.
Die widerrechtliche Entsorgung des Produkts führt zur Auferlegung von Verwaltungsstrafen.
DEUTSCH
31
Page 32
ESPAÑOL
CMP 583 DAB
VOL T AJE PELIGROSO
Este símbolo se halla en la parte
trasera del aparato y en el presente manual, su función es la de
señalar la presencia, en el interior
del aparato, de componentes que
funcionan con alta tensión, no
lo abra: evitará de este modo el
riesgo de descargas eléctricas.
ATENCION
Este símbolo se halla en la
parte trasera del aparato y
en este manual, su función
es la de indicar la presencia
de instrucciones importantes
para utilizar dichos aparatos
con seguridad. Léalas atentamente antes de utilizar el
aparato.
ADVERTENCIAS RELATIV AS AL LASER
Este aparato consta de un sistema de lectura con
rayo láser. Aunque el láser sea de baja potencia
y conste de dispositivo de seguridad que impide
el funcionamiento con la tapa abierta, aténgase
a las siguientes advertencias:
no acerque el ojo a la lente del laser con el
aparato abierto, peligro de lesiones en la retina.
no intente desmontar ni modificar la unidad laser,
peligro de absorcion de radiaciones.
ADVERTENCIAS
NOTAS DE UTILIZACION
Este aparato es un instrumento electrónico de alta precisión, evite utilizarlo en los siguientes casos:
• En proximidad de fuentes de calor como caloríferos y estufas.
• En lugares donde exista alto grado de humedad como por ejemplo cuartos de baño, piscinas, etc..
• En lugares muy polvorientos.
• En lugares sujetos a fuertes vibraciones.
• Coloque el aparato de modo que por sus lados exista el espacio suficiente para que el aire pueda circular siempre
libremente (por lo menos 5cm).
• No obstruya los orificios de ventilación.
• Si entra líquido en el aparato, desconecte inmediatamente el enchufe de la corriente y lleve el aparato al centro
de asistencia TREVI más cercano.
• Controle siempre, antes de poner en funcionamiento el aparato, que los cables de alimentación y de conexión
estén instalados correctamente.
CUIDADOS Y MANTENIMIENTO
Para la limpieza se aconseja utilizar un paño suave, ligeramente humedecido. Evitar disolventes y sustancias abrasivas.
IMPORTANTE
IMPORTANTE
La buena fabricación de este aparato garantiza durante largo tiempo su perfecto funcionamiento. Si aún así se presenta
algún inconveniente, resultará oportuno consultar el Centro Asistencia autorizado.
TREVI sigue una política de continua investigación y desarrollo. Por lo tanto los productos pueden presentar características distintas a las descritas.
Para evitar posibles daños a la audición, limitar el tiempo de escuchar a un volumen alto.
32
Page 33
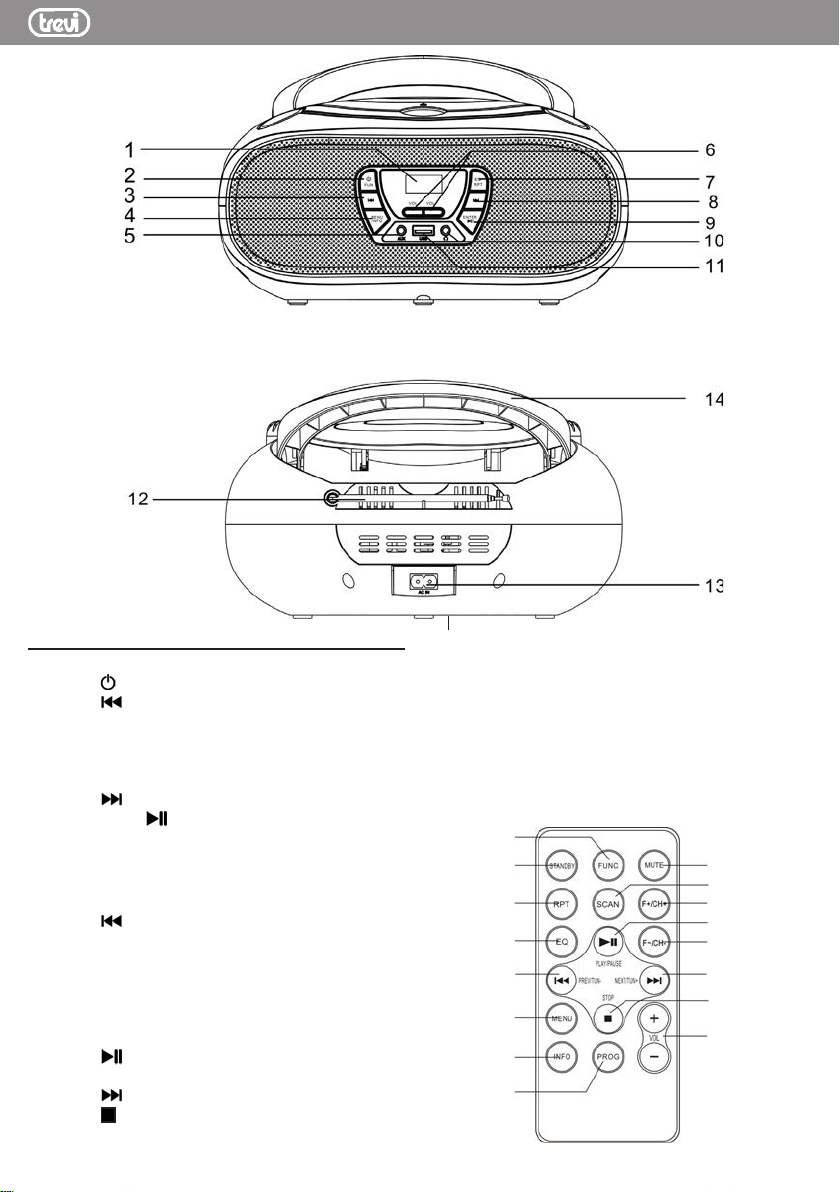
CMP 583 DAB
ESPAÑOL
DESCRIPCION DE LOS COMANDOS
1. Pantalla LCD
2. Botón
3. Botón
4. Botón MENU/INFO
5. Entrada AUX IN
6. Botón Volumen
7. Botón EQ/RPT
8. Botón
9. Botón Enter/
16. Botón FUNC, función
17. Botón STANDBY
18. Botón RPT, repetir
19. Botón EQ
20. Botón
21. Botón MENU
22. Botón INFO
23. Botón PROG, programa
24. Botón MUTE
25. Botón SCAN
26. Botón F+/CH+
27. Botón
28. Botón F-/CH-
29. Botón
30. Botón
31. Botón Volume
/FUN
, archivo anterior/estación
, Siguiente archivo/estación
, Anterior
, Play/Pause
, Próxima
, Detener
15
10. Conector de salida de auriculares
11. Entrada USB
12. Antena FM
13. Toma de corriente, alimentación de red.
14. Manejar
15. Compartimiento de la batería
16
17
18
19
20
21
22
23
24
25
26
27
28
29
30
31
33
Page 34
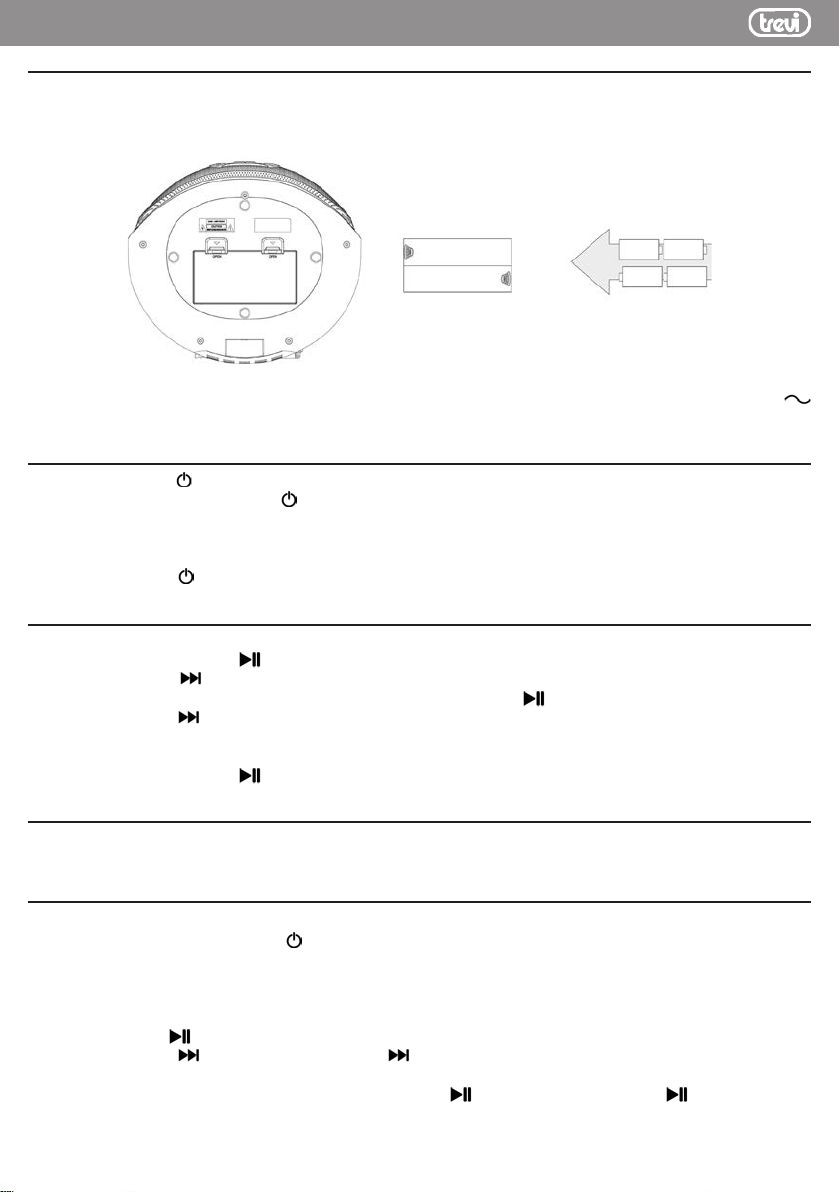
ESPAÑOL
CMP 583 DAB
FUENTE DE ALIMENTACIÓN
BATERÍA
Abra el compartimiento de la batería (15) e inserte 4 baterías de tamaño "C" (UM-2) teniendo cuidado de respetar las
polaridades indicadas cuidadosamente. Reemplace las baterías agotadas inmediatamente y sáquelas si no planea
usar el aparato durante mucho tiempo.
OPERACION AC
Conecte el cable de alimentación a la toma de CA (13). Inserte el enchufe en una toma de corriente de 100-240V
50/60. No conecte el aparato a tomas de corriente que no sean las indicadas.
ENCENDIDO/APAGADO
1. Presione el botón /FUN (2) en la unidad o el botón STANDBY (17) en el control remoto para encender la unidad;
2. Presione repetidamente el botón
cionar: radio DAB+, radio FM, reproductor de CD, entrada USB y entrada AUX;
NOTA: En una fuente de CD, USB o AUX, si no se realiza ninguna operación en 15 minutos, la unidad ingresará automáticamente
al modo de ESPERA.
3. Presione el botón
/FUN (2) en la unidad o el botón STANDBY (17) en el control remoto para apagar la unidad.
/FUN (2) en la unidad o el botón FUNC (16) en el control remoto para selec-
ILUMINACIÓN LED ACTIVADA/DESACTIVADA
1. En el modo de espera, mantenga presionado el botón MENU/INFO en la unidad durante unos segundos;
2. Presione el botón ENTER/
3. Presione el botón
4. Seleccione el elemento "SPK-Light" y confirme con el botón ENTER/
5. Presione el botón
blecida. Seleccione ENCENDIDO para encender los LED en los altavoces, seleccione APAGADO para mantener
los LED apagados;
6. Presione el botón ENTER/
(8) para mostrar las diferentes opciones disponibles. La opción con el símbolo ✳ es la esta-
(9) para confirmar;
(8) varias veces para mostrar los diversos elementos;
(9);
(9) para confirmar.
CONTROL DEL VOLUMEN
Use los botones VOLUME (6) en la unidad o los botones VOLUME (31) en el control remoto para aumentar o disminuir
el volumen.
DAB/DAB+ RADIO
ESCANEAR DAB/DAB+ ESTACIONES DE RADIO
1. Seleccione la fuente DAB usando /FUN (2) en la unidad o el botón FUNC (16) en el control remoto. Aparecerá
la palabra DAB.
Cuando la radio se enciende por primera vez, buscará y almacenará automáticamente todas las estaciones DAB
disponibles;
2. Si desea repetir la operación de escaneo automático de las estaciones DAB disponibles, mantenga presionada
la tecla ENTER/
3. Presione el botón
las distintas estaciones de DAB sintonizadas;
4. En la estación DAB deseada, presione el botón ENTER/
remoto para iniciar la reproducción;
34
(9) en la unidad o el botón SCAN (25) en el control remoto;
(8) on the unit or the button (29) en el control remoto varias veces para desplazarse por
(9) en la unidad o el botón (27) en el control
Page 35
CMP 583 DAB
5. Presione repetidamente el botón MENU/INFO (4) en la unidad o el botón INFO (22) en el control remoto para
mostrar toda la información en la estación recibida.
ALMACENAMIENTO DE ESTACIONES DE RADIO
Para almacenar una estación de radio, realice los siguientes pasos:
1. Sintonice la estación de radio deseada;
2. Mantenga presionado el botón MENU/INFO (4) en la unidad o el botón MENU (21) en el control remoto para
acceder al menú DAB;
3. Para usar las teclas
en la unidad para confirmar;
4. Para usar las teclas
ENTER/
Repita esta operación para cada estación de radio que desee guardar. Hay 30 ubicaciones de memoria disponibles.
MENÚ RADIO DAB
1. Presione durante unos segundos el botón MENU/INFO (4) en la unidad o el botón MENU (21) en el control remoto
para acceder al menú DAB;
2. Presione la tecla
del menú DAB;
3. Presione el botón ENTER/
del menú que se muestra:
Full scan: le permite explorar toda la banda DAB/DAB+ y almacenar automáticamente las estaciones encontradas.
Preset Recall: le permite recuperar una estación de radio almacenada en una de las 30 memorias disponibles.
Preset Store: le permite guardar una estación de radio en una de las 30 memorias disponibles.
Manual tune: le permite escanear manualmente una sola frecuencia DAB/DAB+. Presione el botón
en la unidad para seleccionar el número de canal para la frecuencia a escanear y luego presione el botón ENTER/
(9) en la unidad para comenzar a escanear. Las estaciones encontradas se memorizarán automáticamente.
Al final, presione y mantenga presionado el botón MENU/INFO (4) en la unidad para volver al menú DAB.
DRC: le permite habilitar/deshabilitar la función DRC para mejorar el sonido cuando escucha en entornos ruidosos. La
opción con el símbolo ✳ es el único conjunto. Puede establecer el nivel de DRC alto, bajo o apagado.
Prune: le permite eliminar todas las estaciones de radio encontradas pero no disponibles (señal deficiente) de la lista
de estaciones almacenadas. Mueva con el botón
con el botón ENTER/ (9) en la unidad.
TA: ale permite activar o no la alerta de tráfico (anuncios de tráfico) o sintonizar automáticamente las estaciones de
radio que transmiten información de tráfico. Mueva con el botón
confirme con el botón ENTER/ (9) en la unidad.
System: permite el acceso al submenú del sistema:
Alarm: Seleccione si desea configurar "Alarm 1" o "Alarm 2", use la tecla (3) u (8) en la unidad y confirme
con Tecla ENTER/ (9) en la unidad.
Wake up time: establezca la hora de activación de la alarma.
Duration: duración en minutos del despertado.
Source: establece el tipo de tono de llamada entre Buzzer, Radio digital (DAB), FM (radio FM), CD, USB.
Frequency: diaria (todos los días), una vez (solo una vez), fines de semana (los sábados y domingos),
días laborables (desde de lunes a viernes).
Volume: volumen de reproducción del despertado.
Preset: establece qué estación de radio se reproducirá cuando se active la alarma (Última escuchada = la
última sintonizada o un radio entre los guardados en los recuerdos disponibles).
Alarm ON/OFF: para activar o desactivar la alarma.
Time: le permite establecer la hora/fecha actual.
Set Time/Date: establece la hora y fecha actuales.
Auto Update: seleccione de qué fuente establecer automáticamente la hora y la fecha, si están disponibles.
Set 12/24 Hour: configure el formato de hora 12/24H.
Set Date Format: establece el formato de fecha.
Backlight: le permite establecer el tiempo y el nivel de brillo de la pantalla:
Timeout: establece el tiempo después del cual la pantalla reduce el brillo sin comandos.
On Level: indica el nivel de brillo de la pantalla cuando el dispositivo recibe comandos.
Dim Level: indica el nivel de brillo de la pantalla cuando el aparato está inactivo.
(9) en la unidad para confirmar y guardar la estación de radio;
(3) y (8) en la unidad y seleccionar "Preset Store", presione el botón ENTER/ (9)
(3) y (8) en la unidad y seleccionar una ubicación de memoria, presione el botón
(8) en la unidad o la tecla (29) en el control remoto para mostrar los diversos elementos
(9) en la unidad o el botón (27) en el control remoto para seleccionar el elemento
(3) u (8) en la unidad a "Yes" y confirme la eliminación
(3) u (8) en la unidad a "Yes" o "No" y
ESPAÑOL
(3) u (8)
35
Page 36
ESPAÑOL
SPK-Light: le permite activar o desactivar las luces LED delanteras. La opción con el símbolo ✳ es el único
conjunto.
Language: le permite seleccionar el idioma del sistema.
Factory reset: le permite restaurar todas las configuraciones a las configuraciones de fábrica. Seleccione "Yes"
para la restauración.
Software upgrade: le permite realizar un escaneo para verificar si hay actualizaciones disponibles para el
dispositivo.
SW version: versión de software instalada.
DAB/DAB+ INFORMACIÓN DE TRANSMISIÓN
En modo DAB, la pantalla mostrará una serie de información sobre la estación y la pista que se está reproduciendo.
- Presione repetidamente el botón MENU/INFO (4) en la unidad o el botón INFO (22) en el control remoto para
cambiar la información que se muestra.
Nota: no todas las estaciones DAB proporcionan la información que muestra el dispositivo.
Si está disponible, la siguiente información está disponible:
DLS: muestra información relacionada con la música transmitida (artista, título de la canción, etc...).
Program type: muestra información relacionada con el tipo de programa transmitido.
Transmitter name: muestra información relacionada con el transmisor de servicio.
Transmitter Number/Frequency: muestra información sobre el número y la frecuencia de la estación DAB/DAB+
transmitida.
Signal error index: muestra información relacionada con el nivel de errores de señal y la intensidad con la que se recibe.
Bit Rate: muestra información relacionada con la relación de compresión de la transmisión actual.
Time: muestra la hora.
Date: muestra información relacionada con la fecha.
CMP 583 DAB
RADIO FM
FUNCION DE ESCANEO
1. Extienda completamente la antena (12) y seleccione la fuente FM; la pantalla mostrará la frecuencia;
2. Presione el botón
para aumentar o disminuir la frecuencia y realizar una búsqueda paso a paso;
3. Presione durante unos segundos la tecla
el control remoto para sintonizar la estación de radio siguiente o anterior con la mejor señal recibida;
4. Mantenga presionado el botón ENTER/
el escaneo y el almacenamiento automático de las estaciones de FM. Las primeras 30 estaciones recibidas se
almacenarán automáticamente;
5. Presione los botones F-/CH- (28) o F+/CH+ (26) en el control remoto para desplazarse por las diferentes estaciones
FM almacenadas;
6. Presione repetidamente el botón MENU/INFO (4) en la unidad o el botón INFO (22) en el control remoto para
mostrar toda la información sobre la estación recibida.
NOTA:
Para obtener la mejor recepción de FM, extienda y oriente la antena (12). Si la recepción no es buena, intente ajustar
la longitud y la orientación de la antena de manera diferente, sin embargo, la calidad de la recepción de FM depende
mucho del lugar donde se coloca el dispositivo.
La proximidad de televisores, lámparas de neón u otros electrodomésticos puede causar molestias en la recepción
de programas de radio, en este caso aleje la grabadora de radio del dispositivo perturbador.
ALMACENAMIENTO DE ESTACIONES DE RADIO
Para almacenar una estación de radio, haga lo siguiente:
1. Sintonice la estación de radio deseada;
2. Presione durante unos segundos el botón MENU/INFO (4) en la unidad o el botón MENU (21) en el control remoto
para acceder al menú FM;
3. Use las teclas
para confirmar;
4. Use las teclas
(9) en la unidad para confirmar y guardar la estación de radio;
Repita esto para cada estación de radio que desee guardar. Hay 30 ubicaciones de memoria disponibles.
(3) o el botón (8) en la unidad o los botones (20) o (29) en el control remoto
(3) o la tecla (8) en la unidad o las teclas (20) o (29) en
(9) en la unidad o el botón SCAN (25) en el control remoto para iniciar
(3) u (8) en la unidad y seleccione "Preset Store", presione ENTER/ (9) en la unidad
(3) u (8) en la unidad y seleccione una ubicación de memoria, presione la tecla ENTER/
36
Page 37
CMP 583 DAB
MENÚ
1. Mantenga presionado el botón MENU/INFO (4) en la unidad o el botón MENU (21) en el control remoto para
ingresar al menú FM;
2. Presione la tecla
del menú FM;
3. Presione el botón ENTER/
del menú que se muestra.
Preset Recall: le permite recuperar una estación de radio almacenada en una de las 30 memorias disponibles.
Preset Store: le permite guardar una estación de radio en una de las 30 memorias disponibles.
Scan setting: le permite configurar la búsqueda de estaciones de radio en todas las estaciones encontradas (Todas
las estaciones) o solo en aquellos con señal fuerte (estación fuerte).
Audio setting: le permite configurar el audio en estéreo (estéreo permitido) o mono (mono forzado).
System: permite acceder al menú del sistema (consulte RADIO DAB/DAB+ MENÚ).
(8) en la unidad o la tecla (29) en el control remoto para mostrar los diversos elementos
(9) en la unidad o el botón (27) en el control remoto para seleccionar el elemento
ESPAÑOL
REPRODUCTOR DE CD-MP3
REPRODUCIENDO UN DISCO
1. Seleccione la fuente del CD. Aparecerá el "CD";
2. Abra el compartimento del CD e inserte el disco con el lado escrito hacia arriba. Cierra la puerta con cuidado;
3. Después de unos segundos, la pantalla LCD (1) mostrará el número de pistas en el disco. La reproducción co-
menzará automáticamente;
4. Presione el botón ENTER/
tiempo transcurrido de la pista comenzará a parpadear. Presiónelo nuevamente para apagar la pausa;
5. Presione el botón
SALTE TRACE Y HACIA ADELANTE/RETROCESO
1. Presione el botón (3) u (8) en la unidad o el botón (20), (29) en el control remoto para pasar a la
pista anterior o siguiente;
2. Presione el botón
para enviar la pista hacia atrás o hacia adelante rápidamente. Suelte el botón para volver a la reproducción normal.
REPETICIÓN DE UN SOLO RASTREO
1. Para reproducir una sola pista continuamente, presione EQ/RPT (7) en la unidad o el botón RPT (18) en el control
remoto durante la reproducción hasta que aparezca "REP-1" en la pantalla. El reproductor de CD reproducirá
continuamente la pista que se muestra en la pantalla;
2. Para cancelar la reproducción ininterrumpida de la pista individual, presione EQ/RPT (7) en la unidad o el botón
RPT (18) en el control remoto varias veces hasta que aparezca el símbolo "DISC".
REPETIR DE DISCO
1. Para reproducir continuamente todas las pistas del disco, presione EQ/RPT (7) en la unidad o el botón RPT (18)
en el control remoto durante la reproducción hasta que aparezca "REP-ALL" en la pantalla. El reproductor de CD
reproducirá continuamente todas las pistas del disco;
2. Para cancelar la reproducción ininterrumpida de todas las pistas del disco, presione EQ/RPT (7) en la unidad o
el botón RPT (18) en el control remoto varias veces hasta que aparezca el símbolo "DISC".
REPETIR DE CARPETA
NOTA: función válida solo para CD MP3.
1. Para reproducir continuamente todas las pistas en una carpeta, presione EQ/RPT (7) en la unidad o el botón RPT
(18) en el control remoto durante la reproducción hasta que aparezca "REP-DIR" en la pantalla. El reproductor de
CD reproducirá continuamente todas las pistas de la carpeta;
2. Para cancelar la reproducción ininterrumpida de todas las pistas en la carpeta, presione EQ/RPT (7) en la unidad
o el botón RPT (18) en el control remoto varias veces hasta que aparezca el símbolo "DISC".
FUNCION ALEATORIA
1. Para reproducir aleatoriamente todas las pistas del disco, presione EQ/RPT (7) en la unidad o el botón RPT (18)
en el control remoto durante la reproducción hasta que aparezca "RANDOM" en la pantalla. El reproductor de CD
reproducirá aleatoriamente todas las pistas del disco;
2. Para cancelar la reproducción aleatoria de todas las pistas en el disco, presione EQ/RPT (7) en la unidad o el
botón RPT (18) en el control remoto varias veces hasta que aparezca el símbolo "DISC".
(30) en el control remoto para detener la reproducción permanentemente.
(3) u (8) en la unidad o el botón (20), (29) en el control remoto mientras escucha
(9) en la unidad o el botón (27) en el control remoto para activar la pausa; el
37
Page 38
ESPAÑOL39DICHIARAZIONE DI CONFORMITA'/DECLARATION OF CONFORMITY
PROGRAMA
Puede seleccionar el orden en que se reproducen las pistas.
1. Presione el botó
2. Presione el botón PROG (23) en el control remoto, el mensaje P01 aparecerá en la pantalla;
3. Seleccione las pistas con el botón
4. Presione el botón PROG (23) en el control remoto;
5. Repita los pasos 3 y 4 para almacenar y reproducir las pistas que desee; para CD de audio se puede almacenar
un máximo de 20 pistas, mientras que para CD de MP3 se puede almacenar un máximo de 99 pistas;
6. Presione el botón ENTER/
reproducción;
7. Presione el botón
(30) en el control remoto para detener la reproducción;
(3) u (8) en la unidad o el botón (20) o (29) en el control remoto;
(9) en la unidad o presione el botón (27) en el control remoto para iniciar la
(30) en el control remoto dos veces para cancelar la programación.
CMP 583 DAB
ENTRADA USB
REPRODUCCIÓN
1. Conecte un dispositivo USB a la entrada USB (11);
2. Seleccione la fuente USB. El "USB" aparecerá en la pantalla;
3. Después de unos segundos, la pantalla LCD (1) mostrará el número de pistas en el disco. La reproducción co-
menzará automáticamente;
NOTA: Consulte el párrafo OPERACIÓN DEL REPRODUCTOR DE CD-MP3 para el resto de las funciones.
ENTRADA AUXILIAR
REPRODUCCIÓN
1. Conecte un dispositivo externo a la entrada AUX IN (5);
2. Seleccione la fuente AUX. Aparecerá "ENTER AUX" en la pantalla;
3. Inicie la reproducción del dispositivo externo. Para todas las funciones de reproducción, consulte el manual del
dispositivo externo.
AURICULAR
1. Inserte los auriculares en la toma de auriculares (10);
2. Inicie la reproducción deseada y ajuste el volumen.
CARACTERÍSTICAS TÉCNICAS
GENERAL
Potencia y consumo: ........................................................................100-240V 50/60 (8W, Stand-by 0.3W)
.............................................................................................4 x baterías "C" (UM2) no incluidas
Recepción de banda FM: .................................................................87.5 - 108 MHz
Recepción de banda DAB / DAB +: ..................................................174.928 - 239.200 MHz
Potencia de audio:: ............................................................................2x 2W
Dimensiones: ....................................................................................274 x 232 x 134mm.
ADVERTENCIAS PARA LA CORRECTA ELIMINACIÓN DEL PRODUCTO.
El símbolo que aparece en el aparato indica que el residuo debe ser objeto de “recogida selectiva” por tanto el producto
no se debe eliminar junto con residuos urbanos.
El usuario deberá entregar el producto a los “centros de recogida selectiva” creados por las administraciones municipales o bien al distribuidor cuando adquiera un nuevo producto.
La recogida selectiva del residuo y las sucesivas operaciones de tratamiento, recuperación y eliminación favorecen
la fabricación de aparatos con materiales reciclados y limitan los efectos negativos en el medio ambiente y la salud
causados por una gestión incorrecta del residuo.
La eliminación abusiva del producto da lugar a la aplicación de sanciones administrativas.
38
Page 39
DICHIARAZIONE DI CONFORMITÀ UE SEMPLIFICATA
Il fabbricante TREVI dichiara che il tipo di apparecchiatura radio CMP 583 DAB
è conforme alla direttiva 2014/53/UE.
Il testo completo della dichiarazione di conformità EU è disponibile al seguente indirizzo Internet:
https://www.trevi.it/dms/zidi/TREVI/DOCCMP583DAB.pdf
SIMPLIFIED EU DECLARATION OF CONFORMITY
Hereby TREVI Spa declares that the radio equipment type CMP 583 DAB
The full text of the EU declaration of conformity is available at the following internet address:
is in compliance with directive 2014/53/EU.
https://www.trevi.it/dms/zidi/TREVI/DOCCMP583DAB.pdf
EN: If you will not find your language on the instruction manual, please go on our website www.trevi.it to find it
FR: Si vous ne trouverez pas votre langue sur le mode d’emploi, veuillez vous visiter sur notre site web www.trevi.it
de le trouver
DE: Wenn Sie Ihre Sprache auf die Bedienungsanleitung nicht finden, gehen Sie bitte auf unsere webseite
www.trevi.it zu finden
ES: Si no encuentras tu idioma en el manual de instrucciones, por favor vaya a nuestra página web
www.trevi.it se encuentra
PT: Se você não vai encontrar sua língua sobre o manual de instruções, por favor, vá em nosso site
www.trevi.it para encontrá-lo
Page 40

Trevi S.p.A.
Strada Consolare Rimini-San Marino, 62
47924 Rimini (RN) Italy
Tel. 0541/756420 - Fax 0541/756430
- www.trevi.it - e-mail: [email protected]
40
Made in China
 Loading...