

Page 1

Start Here to Activate
and Learn to Use Your
Treo™ 600 Smartphone
www.sprintpcs.com
Copyright © 2003 Sprint Spectrum L.P. All rights reserved. No reproduction in whole or in part without prior written approval. Sprint and the
diamond logo design are trademarks of Sprint Communications Company L.P. All other trademarks are the property of their respective owners.
Portions copyright © 2003 Handspring, Inc. All rights reserved. Treo and the Treo logo are trademarks of Handspring, Inc., and may be
registered in some jurisdictions. Handspring, Blazer Web Browser, and the Handspring logo are trademarks of Handspring, Inc., are registered
trademarks in the U.S.A., and may be registered in other jurisdictions. Palm OS and HotSync are registered trademarks, and Palm and the Palm
Powered logo are trademarks, of PalmSource, Inc., and are used by Handspring under license. This product contains ACCESS Co., Ltd.’s NetFront
3.0 Internet browser software. © 1996-2003 ACCESS Co., Ltd. and ACCESS Systems America, Inc. NetFront is the trademark or registered
trademark of ACCESS Co., Ltd. in Japan and in other countries except the United States of America. NetFront is a registered trademark of
NetFront Communications, Inc. in the United States of America and is used under a license.
Printed in the U.S.A.
50-1118-00
Table of Contents
How to Use This Guide . . . . . . . . . . . . . . . . . . . . . . . . . . . . . . . . . . . . . . . . . . . . . . . . . . . . . . . . . . . . . . . . i
Where to Learn More. . . . . . . . . . . . . . . . . . . . . . . . . . . . . . . . . . . . . . . . . . . . . . . . . . . . . . . . . . . . . . . . . . ii
Setting Up . . . . . . . . . . . . . . . . . . . . . . . . . . . . . . . . . . . . . . . . . . . . . . . . . . . . . . . . . . . . . . . . . . . . . . . . . . . 1
Getting Started . . . . . . . . . . . . . . . . . . . . . . . . . . . . . . . . . . . . . . . . . . . . . . . . . . . . . . . . . . . . . . . . . . . . . . . 7
Connecting . . . . . . . . . . . . . . . . . . . . . . . . . . . . . . . . . . . . . . . . . . . . . . . . . . . . . . . . . . . . . . . . . . . . . . . . . 17
Basics of Your PCS Phone . . . . . . . . . . . . . . . . . . . . . . . . . . . . . . . . . . . . . . . . . . . . . . . . . . . . . . . . . . . . 23
Your New PCS Phone . . . . . . . . . . . . . . . . . . . . . . . . . . . . . . . . . . . . . . . . . . . . . . . . . . . . . . . . . . . . . . 24
Your Phone’s Features: Top View . . . . . . . . . . . . . . . . . . . . . . . . . . . . . . . . . . . . . . . . . . . . . . . 24
Your Phone’s Features: Front View . . . . . . . . . . . . . . . . . . . . . . . . . . . . . . . . . . . . . . . . . . . . . . 25
Your Phone’s Features: Back View . . . . . . . . . . . . . . . . . . . . . . . . . . . . . . . . . . . . . . . . . . . . . . 26
Turning Your Phone On and Off . . . . . . . . . . . . . . . . . . . . . . . . . . . . . . . . . . . . . . . . . . . . . . . . . . . . . 27
Turning Wireless Mode ON . . . . . . . . . . . . . . . . . . . . . . . . . . . . . . . . . . . . . . . . . . . . . . . . . . . . 27
Turning Wireless Mode OFF . . . . . . . . . . . . . . . . . . . . . . . . . . . . . . . . . . . . . . . . . . . . . . . . . . . . 27
Turning the Screen On and Off . . . . . . . . . . . . . . . . . . . . . . . . . . . . . . . . . . . . . . . . . . . . . . . . . 27
Launching Applications . . . . . . . . . . . . . . . . . . . . . . . . . . . . . . . . . . . . . . . . . . . . . . . . . . . . . . . . . . . . 28
Moving Around the Treo Screen . . . . . . . . . . . . . . . . . . . . . . . . . . . . . . . . . . . . . . . . . . . . . . . . . . . . 30
Scrolling Through Screens . . . . . . . . . . . . . . . . . . . . . . . . . . . . . . . . . . . . . . . . . . . . . . . . . . . . . 30
Highlighting Items . . . . . . . . . . . . . . . . . . . . . . . . . . . . . . . . . . . . . . . . . . . . . . . . . . . . . . . . . . . 31
Accessing Command Buttons . . . . . . . . . . . . . . . . . . . . . . . . . . . . . . . . . . . . . . . . . . . . . . . . . . . 32
Choosing or Activating Items . . . . . . . . . . . . . . . . . . . . . . . . . . . . . . . . . . . . . . . . . . . . . . . . . . . 32
Selecting Menu Items . . . . . . . . . . . . . . . . . . . . . . . . . . . . . . . . . . . . . . . . . . . . . . . . . . . . . . . . . 32
Choosing Options in a Pick List . . . . . . . . . . . . . . . . . . . . . . . . . . . . . . . . . . . . . . . . . . . . . . . . . 33
Using the Keyboard . . . . . . . . . . . . . . . . . . . . . . . . . . . . . . . . . . . . . . . . . . . . . . . . . . . . . . . . . . . . . . . . 34
Using the Keyboard Backlight . . . . . . . . . . . . . . . . . . . . . . . . . . . . . . . . . . . . . . . . . . . . . . . . . . 34
Entering Lowercase and Uppercase Letters . . . . . . . . . . . . . . . . . . . . . . . . . . . . . . . . . . . . . . . 34
Entering Numbers, Punctuation, and Symbols that Appear Above
the Letters on the Keys . . . . . . . . . . . . . . . . . . . . . . . . . . . . . . . . . . . . . . . . . . . . . . . . . . . . . . . . 35
Entering Other Symbols and Accented Characters . . . . . . . . . . . . . . . . . . . . . . . . . . . . . . . . . . 35
Using Your Treo Phone, Web, and Messaging Features . . . . . . . . . . . . . . . . . . . . . . . . . . . . . . . . . 37
Making Calls . . . . . . . . . . . . . . . . . . . . . . . . . . . . . . . . . . . . . . . . . . . . . . . . . . . . . . . . . . . . . . . . . . . . . 38
Dialing With the Keyboard . . . . . . . . . . . . . . . . . . . . . . . . . . . . . . . . . . . . . . . . . . . . . . . . . . . . . 38
Dialing by Contact Name . . . . . . . . . . . . . . . . . . . . . . . . . . . . . . . . . . . . . . . . . . . . . . . . . . . . . . 38
Page 2

Dialing With a Favorites Button . . . . . . . . . . . . . . . . . . . . . . . . . . . . . . . . . . . . . . . . . . . . . . . . . 40
Dialing Using the Onscreen Dial Pad . . . . . . . . . . . . . . . . . . . . . . . . . . . . . . . . . . . . . . . . . . . . . 40
Dialing From a Web Page . . . . . . . . . . . . . . . . . . . . . . . . . . . . . . . . . . . . . . . . . . . . . . . . . . . . . . 41
Dialing From SMS Messages . . . . . . . . . . . . . . . . . . . . . . . . . . . . . . . . . . . . . . . . . . . . . . . . . . . . 42
Redialing the Last Number You Called . . . . . . . . . . . . . . . . . . . . . . . . . . . . . . . . . . . . . . . . . . . 42
Receiving Calls . . . . . . . . . . . . . . . . . . . . . . . . . . . . . . . . . . . . . . . . . . . . . . . . . . . . . . . . . . . . . . . . . . . 43
Answering Calls . . . . . . . . . . . . . . . . . . . . . . . . . . . . . . . . . . . . . . . . . . . . . . . . . . . . . . . . . . . . . 43
Sending Calls to Voicemail . . . . . . . . . . . . . . . . . . . . . . . . . . . . . . . . . . . . . . . . . . . . . . . . . . . . . 43
Silencing the Ring of an Incoming Call . . . . . . . . . . . . . . . . . . . . . . . . . . . . . . . . . . . . . . . . . . . 43
Signal Strength and Phone Status . . . . . . . . . . . . . . . . . . . . . . . . . . . . . . . . . . . . . . . . . . . . . . . . . . . 44
What’s My Number? . . . . . . . . . . . . . . . . . . . . . . . . . . . . . . . . . . . . . . . . . . . . . . . . . . . . . . . . . . 45
Managing Active Calls . . . . . . . . . . . . . . . . . . . . . . . . . . . . . . . . . . . . . . . . . . . . . . . . . . . . . . . . . . . . . 46
Ending a Call . . . . . . . . . . . . . . . . . . . . . . . . . . . . . . . . . . . . . . . . . . . . . . . . . . . . . . . . . . . . . . . . 47
Returning to an Active Call From Another Application . . . . . . . . . . . . . . . . . . . . . . . . . . . . . . . 47
Making a Second Call . . . . . . . . . . . . . . . . . . . . . . . . . . . . . . . . . . . . . . . . . . . . . . . . . . . . . . . . . 47
Controlling Your Roaming Experience . . . . . . . . . . . . . . . . . . . . . . . . . . . . . . . . . . . . . . . . . . . . . . . 48
Setting Your Phone’s Roam Mode . . . . . . . . . . . . . . . . . . . . . . . . . . . . . . . . . . . . . . . . . . . . . . . 48
Feature Availability . . . . . . . . . . . . . . . . . . . . . . . . . . . . . . . . . . . . . . . . . . . . . . . . . . . . . . . . . . . 48
Internal Phone Book . . . . . . . . . . . . . . . . . . . . . . . . . . . . . . . . . . . . . . . . . . . . . . . . . . . . . . . . . . . . . . . 49
Adding a Contact . . . . . . . . . . . . . . . . . . . . . . . . . . . . . . . . . . . . . . . . . . . . . . . . . . . . . . . . . . . . 49
Viewing or Changing Contact Information . . . . . . . . . . . . . . . . . . . . . . . . . . . . . . . . . . . . . . . . 50
Deleting a Contact . . . . . . . . . . . . . . . . . . . . . . . . . . . . . . . . . . . . . . . . . . . . . . . . . . . . . . . . . . . 50
Saving Phone Numbers . . . . . . . . . . . . . . . . . . . . . . . . . . . . . . . . . . . . . . . . . . . . . . . . . . . . . . . 50
Defining Your Business Card . . . . . . . . . . . . . . . . . . . . . . . . . . . . . . . . . . . . . . . . . . . . . . . . . . . 50
Defining Favorites Buttons . . . . . . . . . . . . . . . . . . . . . . . . . . . . . . . . . . . . . . . . . . . . . . . . . . . . . . . . . 51
Creating a Speed Dial Favorites Button . . . . . . . . . . . . . . . . . . . . . . . . . . . . . . . . . . . . . . . . . . . 51
Creating an Application, Message, or Web Link Favorites Button . . . . . . . . . . . . . . . . . . . . . . 53
Editing or Deleting an Existing Favorites Button . . . . . . . . . . . . . . . . . . . . . . . . . . . . . . . . . . . . 53
Using a Phone Headset . . . . . . . . . . . . . . . . . . . . . . . . . . . . . . . . . . . . . . . . . . . . . . . . . . . . . . . . . . . . 54
Headset Specifications . . . . . . . . . . . . . . . . . . . . . . . . . . . . . . . . . . . . . . . . . . . . . . . . . . . . . . . . 54
Sending and Receiving Messages . . . . . . . . . . . . . . . . . . . . . . . . . . . . . . . . . . . . . . . . . . . . . . . . . . 55
Setting Up Your Voicemail . . . . . . . . . . . . . . . . . . . . . . . . . . . . . . . . . . . . . . . . . . . . . . . . . . . . . 55
Retrieving Your Voicemail Messages . . . . . . . . . . . . . . . . . . . . . . . . . . . . . . . . . . . . . . . . . . . . . 55
Accessing Your Voicemail From Another Phone . . . . . . . . . . . . . . . . . . . . . . . . . . . . . . . . . . . 55
Displaying Numeric Pages . . . . . . . . . . . . . . . . . . . . . . . . . . . . . . . . . . . . . . . . . . . . . . . . . . . . . 55
PCS Service Features . . . . . . . . . . . . . . . . . . . . . . . . . . . . . . . . . . . . . . . . . . . . . . . . . . . . . . . . . . . . . . 56
Call Waiting . . . . . . . . . . . . . . . . . . . . . . . . . . . . . . . . . . . . . . . . . . . . . . . . . . . . . . . . . . . . . . . . . 56
Call Forwarding . . . . . . . . . . . . . . . . . . . . . . . . . . . . . . . . . . . . . . . . . . . . . . . . . . . . . . . . . . . . . 56
Three-Way Calling . . . . . . . . . . . . . . . . . . . . . . . . . . . . . . . . . . . . . . . . . . . . . . . . . . . . . . . . . . . 57
PCS Voice Command
TTY Use With PCS Service From Sprint . . . . . . . . . . . . . . . . . . . . . . . . . . . . . . . . . . . . . . . . . . . 58
SM
. . . . . . . . . . . . . . . . . . . . . . . . . . . . . . . . . . . . . . . . . . . . . . . . . . . . . . . . 58
PCS VisionSM . . . . . . . . . . . . . . . . . . . . . . . . . . . . . . . . . . . . . . . . . . . . . . . . . . . . . . . . . . . . . . . . . . . . . . 60
Getting Started With PCS Vision . . . . . . . . . . . . . . . . . . . . . . . . . . . . . . . . . . . . . . . . . . . . . . . . 60
PCS Vision Features . . . . . . . . . . . . . . . . . . . . . . . . . . . . . . . . . . . . . . . . . . . . . . . . . . . . . . . . . . 61
Accessing PCS Vision Features . . . . . . . . . . . . . . . . . . . . . . . . . . . . . . . . . . . . . . . . . . . . . . . . . . 62
PCS Vision Symbols on Your Screen . . . . . . . . . . . . . . . . . . . . . . . . . . . . . . . . . . . . . . . . . . . . . 62
PCS Vision Billing Information . . . . . . . . . . . . . . . . . . . . . . . . . . . . . . . . . . . . . . . . . . . . . . . . . . 62
Using the Camera and Picture Mail . . . . . . . . . . . . . . . . . . . . . . . . . . . . . . . . . . . . . . . . . . . . . . . . . 63
Taking a Picture . . . . . . . . . . . . . . . . . . . . . . . . . . . . . . . . . . . . . . . . . . . . . . . . . . . . . . . . . . . . . 63
Viewing a Picture . . . . . . . . . . . . . . . . . . . . . . . . . . . . . . . . . . . . . . . . . . . . . . . . . . . . . . . . . . . . 64
Sharing a Picture . . . . . . . . . . . . . . . . . . . . . . . . . . . . . . . . . . . . . . . . . . . . . . . . . . . . . . . . . . . . . 64
Receiving Picture Mail . . . . . . . . . . . . . . . . . . . . . . . . . . . . . . . . . . . . . . . . . . . . . . . . . . . . . . . . 65
Moving Pictures . . . . . . . . . . . . . . . . . . . . . . . . . . . . . . . . . . . . . . . . . . . . . . . . . . . . . . . . . . . . . 66
Deleting a Picture From Your Phone . . . . . . . . . . . . . . . . . . . . . . . . . . . . . . . . . . . . . . . . . . . . . 66
Setting a Picture as Wallpaper . . . . . . . . . . . . . . . . . . . . . . . . . . . . . . . . . . . . . . . . . . . . . . . . . . 66
Uploading Pictures to Your Online Inbox . . . . . . . . . . . . . . . . . . . . . . . . . . . . . . . . . . . . . . . . . 67
Accessing Your Online Picture Mail Inbox . . . . . . . . . . . . . . . . . . . . . . . . . . . . . . . . . . . . . . . . 67
Working With Your Albums on the Picture Mail Web Site
Customizing Your Picture Mail settings . . . . . . . . . . . . . . . . . . . . . . . . . . . . . . . . . . . . . . . . . . . 68
Viewing Pictures on Your Computer . . . . . . . . . . . . . . . . . . . . . . . . . . . . . . . . . . . . . . . . . . . . . 68
. . . . . . . . . . . . . . . . . . . . . . . . . . . . . . . . . . . . 67
SMS . . . . . . . . . . . . . . . . . . . . . . . . . . . . . . . . . . . . . . . . . . . . . . . . . . . . . . . . . . . . . . . . . . . . . . . . . . . . . 69
Creating and Sending a Message . . . . . . . . . . . . . . . . . . . . . . . . . . . . . . . . . . . . . . . . . . . . . . . . 69
SMS Tips . . . . . . . . . . . . . . . . . . . . . . . . . . . . . . . . . . . . . . . . . . . . . . . . . . . . . . . . . . . . . . . . . . . 70
Receiving SMS Messages . . . . . . . . . . . . . . . . . . . . . . . . . . . . . . . . . . . . . . . . . . . . . . . . . . . . . . . 70
Using Links in Messages . . . . . . . . . . . . . . . . . . . . . . . . . . . . . . . . . . . . . . . . . . . . . . . . . . . . . . . 71
Chatting with SMS . . . . . . . . . . . . . . . . . . . . . . . . . . . . . . . . . . . . . . . . . . . . . . . . . . . . . . . . . . . 71
Managing Your Messages . . . . . . . . . . . . . . . . . . . . . . . . . . . . . . . . . . . . . . . . . . . . . . . . . . . . . . 72
Customizing Your SMS Settings . . . . . . . . . . . . . . . . . . . . . . . . . . . . . . . . . . . . . . . . . . . . . . . . . 73
Page 3

Browsing the Web . . . . . . . . . . . . . . . . . . . . . . . . . . . . . . . . . . . . . . . . . . . . . . . . . . . . . . . . . . . . . . . . 75
Viewing a Web Page . . . . . . . . . . . . . . . . . . . . . . . . . . . . . . . . . . . . . . . . . . . . . . . . . . . . . . . . . . 75
Navigating in Optimized Mode . . . . . . . . . . . . . . . . . . . . . . . . . . . . . . . . . . . . . . . . . . . . . . . . . 76
Navigating in Wide Page Mode . . . . . . . . . . . . . . . . . . . . . . . . . . . . . . . . . . . . . . . . . . . . . . . . . 76
Creating a Bookmark . . . . . . . . . . . . . . . . . . . . . . . . . . . . . . . . . . . . . . . . . . . . . . . . . . . . . . . . . 76
Saving a Page . . . . . . . . . . . . . . . . . . . . . . . . . . . . . . . . . . . . . . . . . . . . . . . . . . . . . . . . . . . . . . . . 77
Viewing Bookmarks or Saved Pages . . . . . . . . . . . . . . . . . . . . . . . . . . . . . . . . . . . . . . . . . . . . . . 78
Editing or Deleting a Bookmark or Saved Page . . . . . . . . . . . . . . . . . . . . . . . . . . . . . . . . . . . . . 78
Arranging Bookmarks and Saved Pages . . . . . . . . . . . . . . . . . . . . . . . . . . . . . . . . . . . . . . . . . . . 78
Downloading Files From a Web Page . . . . . . . . . . . . . . . . . . . . . . . . . . . . . . . . . . . . . . . . . . . . 79
Navigating Web Sites With Split Pages (Frames) . . . . . . . . . . . . . . . . . . . . . . . . . . . . . . . . . . . . 80
Copying Text From a Web Page . . . . . . . . . . . . . . . . . . . . . . . . . . . . . . . . . . . . . . . . . . . . . . . . 80
Dialing a Phone Number on a Web Page . . . . . . . . . . . . . . . . . . . . . . . . . . . . . . . . . . . . . . . . . . 80
Creating Email From a Web Page . . . . . . . . . . . . . . . . . . . . . . . . . . . . . . . . . . . . . . . . . . . . . . . . 81
Using the History List . . . . . . . . . . . . . . . . . . . . . . . . . . . . . . . . . . . . . . . . . . . . . . . . . . . . . . . . . 81
Finding Text on a Web Page . . . . . . . . . . . . . . . . . . . . . . . . . . . . . . . . . . . . . . . . . . . . . . . . . . . 81
Customizing Your Blazer Web Browser Settings . . . . . . . . . . . . . . . . . . . . . . . . . . . . . . . . . . . . 82
PCS Business ConnectionSM Personal Edition . . . . . . . . . . . . . . . . . . . . . . . . . . . . . . . . . . . . . . . . 84
Using Your Treo Organizer Features . . . . . . . . . . . . . . . . . . . . . . . . . . . . . . . . . . . . . . . . . . . . . . . . . . . 85
Calendar . . . . . . . . . . . . . . . . . . . . . . . . . . . . . . . . . . . . . . . . . . . . . . . . . . . . . . . . . . . . . . . . . . . . . . . . . 86
Displaying Your Calendar . . . . . . . . . . . . . . . . . . . . . . . . . . . . . . . . . . . . . . . . . . . . . . . . . . . . . . 86
Creating an Event . . . . . . . . . . . . . . . . . . . . . . . . . . . . . . . . . . . . . . . . . . . . . . . . . . . . . . . . . . . . 86
Adding an Alarm to an Event . . . . . . . . . . . . . . . . . . . . . . . . . . . . . . . . . . . . . . . . . . . . . . . . . . . 87
Creating an Untimed Event . . . . . . . . . . . . . . . . . . . . . . . . . . . . . . . . . . . . . . . . . . . . . . . . . . . . 88
Scheduling a Repeating Event . . . . . . . . . . . . . . . . . . . . . . . . . . . . . . . . . . . . . . . . . . . . . . . . . . 88
Editing or Deleting an Event . . . . . . . . . . . . . . . . . . . . . . . . . . . . . . . . . . . . . . . . . . . . . . . . . . . . 89
Customizing General Preferences for Your Calendar . . . . . . . . . . . . . . . . . . . . . . . . . . . . . . . . 90
Customizing To Do List Preferences for Your Calendar . . . . . . . . . . . . . . . . . . . . . . . . . . . . . . 91
To Do List . . . . . . . . . . . . . . . . . . . . . . . . . . . . . . . . . . . . . . . . . . . . . . . . . . . . . . . . . . . . . . . . . . . . . . . . . 93
Adding a To Do Item . . . . . . . . . . . . . . . . . . . . . . . . . . . . . . . . . . . . . . . . . . . . . . . . . . . . . . . . . 93
Setting Item Priority, Due Date, and Other Details . . . . . . . . . . . . . . . . . . . . . . . . . . . . . . . . . . 93
Checking Off a To Do Item . . . . . . . . . . . . . . . . . . . . . . . . . . . . . . . . . . . . . . . . . . . . . . . . . . . . 95
Deleting a To Do Item . . . . . . . . . . . . . . . . . . . . . . . . . . . . . . . . . . . . . . . . . . . . . . . . . . . . . . . . 95
Purging To Do Items . . . . . . . . . . . . . . . . . . . . . . . . . . . . . . . . . . . . . . . . . . . . . . . . . . . . . . . . . 95
Customizing To Do List . . . . . . . . . . . . . . . . . . . . . . . . . . . . . . . . . . . . . . . . . . . . . . . . . . . . . . . 96
Memo Pad . . . . . . . . . . . . . . . . . . . . . . . . . . . . . . . . . . . . . . . . . . . . . . . . . . . . . . . . . . . . . . . . . . . . . . . . 97
Creating a Memo . . . . . . . . . . . . . . . . . . . . . . . . . . . . . . . . . . . . . . . . . . . . . . . . . . . . . . . . . . . . 97
Deleting a Memo . . . . . . . . . . . . . . . . . . . . . . . . . . . . . . . . . . . . . . . . . . . . . . . . . . . . . . . . . . . . 97
CityTime . . . . . . . . . . . . . . . . . . . . . . . . . . . . . . . . . . . . . . . . . . . . . . . . . . . . . . . . . . . . . . . . . . . . . . . . . . 98
Setting Your Home City . . . . . . . . . . . . . . . . . . . . . . . . . . . . . . . . . . . . . . . . . . . . . . . . . . . . . . . 98
Selecting Remote Cities . . . . . . . . . . . . . . . . . . . . . . . . . . . . . . . . . . . . . . . . . . . . . . . . . . . . . . . 99
Adding Cities . . . . . . . . . . . . . . . . . . . . . . . . . . . . . . . . . . . . . . . . . . . . . . . . . . . . . . . . . . . . . . . . 99
Changing Locations . . . . . . . . . . . . . . . . . . . . . . . . . . . . . . . . . . . . . . . . . . . . . . . . . . . . . . . . . . 99
CityTime Tips . . . . . . . . . . . . . . . . . . . . . . . . . . . . . . . . . . . . . . . . . . . . . . . . . . . . . . . . . . . . . . . 99
Calculator . . . . . . . . . . . . . . . . . . . . . . . . . . . . . . . . . . . . . . . . . . . . . . . . . . . . . . . . . . . . . . . . . . . . . . . 100
Switching Between Basic and Advanced Calculator Modes . . . . . . . . . . . . . . . . . . . . . . . . . . 100
Selecting Functions in Advanced Calculator Mode . . . . . . . . . . . . . . . . . . . . . . . . . . . . . . . . . 100
Storing and Recalling Numbers in Advanced Mode . . . . . . . . . . . . . . . . . . . . . . . . . . . . . . . . 101
Looking Up Contacts and Other Information . . . . . . . . . . . . . . . . . . . . . . . . . . . . . . . . . . . . . . . . . 102
Name Lookup . . . . . . . . . . . . . . . . . . . . . . . . . . . . . . . . . . . . . . . . . . . . . . . . . . . . . . . . . . . . . . 102
Using Find . . . . . . . . . . . . . . . . . . . . . . . . . . . . . . . . . . . . . . . . . . . . . . . . . . . . . . . . . . . . . . . . . 103
Beaming Information . . . . . . . . . . . . . . . . . . . . . . . . . . . . . . . . . . . . . . . . . . . . . . . . . . . . . . . . . . . . . 104
Beaming a Record . . . . . . . . . . . . . . . . . . . . . . . . . . . . . . . . . . . . . . . . . . . . . . . . . . . . . . . . . . . 104
Beaming an Application . . . . . . . . . . . . . . . . . . . . . . . . . . . . . . . . . . . . . . . . . . . . . . . . . . . . . . 105
Receiving Beamed Information . . . . . . . . . . . . . . . . . . . . . . . . . . . . . . . . . . . . . . . . . . . . . . . . 106
Managing Applications on Your Treo . . . . . . . . . . . . . . . . . . . . . . . . . . . . . . . . . . . . . . . . . . . . . . . . . 107
Synchronizing Contacts and Other Personal Data . . . . . . . . . . . . . . . . . . . . . . . . . . . . . . . . . . . 108
Installing Applications . . . . . . . . . . . . . . . . . . . . . . . . . . . . . . . . . . . . . . . . . . . . . . . . . . . . . . . . . . . . 109
Installing Applications From the Internet . . . . . . . . . . . . . . . . . . . . . . . . . . . . . . . . . . . . . . . . 109
Installing Applications From a Windows Computer . . . . . . . . . . . . . . . . . . . . . . . . . . . . . . . . 110
Installing Applications From a Macintosh Computer . . . . . . . . . . . . . . . . . . . . . . . . . . . . . . . 111
Getting Help With Third-Party Applications . . . . . . . . . . . . . . . . . . . . . . . . . . . . . . . . . . . . . . 111
Removing Applications . . . . . . . . . . . . . . . . . . . . . . . . . . . . . . . . . . . . . . . . . . . . . . . . . . . . . . . . . . . 112
Manually Deleting Applications From Your Computer . . . . . . . . . . . . . . . . . . . . . . . . . . . . . . 113
Using Application Info . . . . . . . . . . . . . . . . . . . . . . . . . . . . . . . . . . . . . . . . . . . . . . . . . . . . . . . . . . . . 114
Using Expansion Cards . . . . . . . . . . . . . . . . . . . . . . . . . . . . . . . . . . . . . . . . . . . . . . . . . . . . . . . . . . . 115
Inserting and Removing Expansion Cards . . . . . . . . . . . . . . . . . . . . . . . . . . . . . . . . . . . . . . . . 115
Launching Applications on an Expansion Card . . . . . . . . . . . . . . . . . . . . . . . . . . . . . . . . . . . . 117
Copying Applications to an Expansion Card . . . . . . . . . . . . . . . . . . . . . . . . . . . . . . . . . . . . . . 117
Page 4

Viewing Expansion Card Information . . . . . . . . . . . . . . . . . . . . . . . . . . . . . . . . . . . . . . . . . . . 119
Renaming an Expansion Card . . . . . . . . . . . . . . . . . . . . . . . . . . . . . . . . . . . . . . . . . . . . . . . . . 119
Formatting an Expansion Card . . . . . . . . . . . . . . . . . . . . . . . . . . . . . . . . . . . . . . . . . . . . . . . . . 120
Customizing Your Treo . . . . . . . . . . . . . . . . . . . . . . . . . . . . . . . . . . . . . . . . . . . . . . . . . . . . . . . . . . . . . . 121
Phone Settings . . . . . . . . . . . . . . . . . . . . . . . . . . . . . . . . . . . . . . . . . . . . . . . . . . . . . . . . . . . . . . . . . . . 122
Selecting Ring Tones and SMS Alert Tones . . . . . . . . . . . . . . . . . . . . . . . . . . . . . . . . . . . . . . . 122
Adjusting Volume Settings . . . . . . . . . . . . . . . . . . . . . . . . . . . . . . . . . . . . . . . . . . . . . . . . . . . . 125
Assigning a Caller ID Picture . . . . . . . . . . . . . . . . . . . . . . . . . . . . . . . . . . . . . . . . . . . . . . . . . . 125
Choosing Wallpaper for the Phone screen . . . . . . . . . . . . . . . . . . . . . . . . . . . . . . . . . . . . . . . 126
System Sound Settings . . . . . . . . . . . . . . . . . . . . . . . . . . . . . . . . . . . . . . . . . . . . . . . . . . . . . . . . . . . 127
Display and Appearance . . . . . . . . . . . . . . . . . . . . . . . . . . . . . . . . . . . . . . . . . . . . . . . . . . . . . . . . . . 128
Turning the Keyboard Backlight On and Off . . . . . . . . . . . . . . . . . . . . . . . . . . . . . . . . . . . . . . 128
Adjusting the Contrast and Brightness . . . . . . . . . . . . . . . . . . . . . . . . . . . . . . . . . . . . . . . . . . . 128
Changing the Screen Font . . . . . . . . . . . . . . . . . . . . . . . . . . . . . . . . . . . . . . . . . . . . . . . . . . . . 128
Aligning the Touchscreen . . . . . . . . . . . . . . . . . . . . . . . . . . . . . . . . . . . . . . . . . . . . . . . . . . . . 129
Changing the System Color Scheme . . . . . . . . . . . . . . . . . . . . . . . . . . . . . . . . . . . . . . . . . . . . 129
Applications Launcher Settings . . . . . . . . . . . . . . . . . . . . . . . . . . . . . . . . . . . . . . . . . . . . . . . . . . . 130
Arranging Applications by Category . . . . . . . . . . . . . . . . . . . . . . . . . . . . . . . . . . . . . . . . . . . . 130
Displaying Applications by Category . . . . . . . . . . . . . . . . . . . . . . . . . . . . . . . . . . . . . . . . . . . . 131
Choosing the Applications Launcher Display . . . . . . . . . . . . . . . . . . . . . . . . . . . . . . . . . . . . . 131
Button Settings . . . . . . . . . . . . . . . . . . . . . . . . . . . . . . . . . . . . . . . . . . . . . . . . . . . . . . . . . . . . . . . . . . 132
Buttons Preferences . . . . . . . . . . . . . . . . . . . . . . . . . . . . . . . . . . . . . . . . . . . . . . . . . . . . . . . . . 132
Setting Default Applications . . . . . . . . . . . . . . . . . . . . . . . . . . . . . . . . . . . . . . . . . . . . . . . . . . . 133
Date and Time Settings . . . . . . . . . . . . . . . . . . . . . . . . . . . . . . . . . . . . . . . . . . . . . . . . . . . . . . . . . . . 134
Setting the Date and Time . . . . . . . . . . . . . . . . . . . . . . . . . . . . . . . . . . . . . . . . . . . . . . . . . . . . 134
Setting Date and Time Formats . . . . . . . . . . . . . . . . . . . . . . . . . . . . . . . . . . . . . . . . . . . . . . . . 135
General Preferences . . . . . . . . . . . . . . . . . . . . . . . . . . . . . . . . . . . . . . . . . . . . . . . . . . . . . . . . . . . . . 136
Locking Your Phone and Data . . . . . . . . . . . . . . . . . . . . . . . . . . . . . . . . . . . . . . . . . . . . . . . . . . . . . 137
Keyguard . . . . . . . . . . . . . . . . . . . . . . . . . . . . . . . . . . . . . . . . . . . . . . . . . . . . . . . . . . . . . . . . . . 137
Auto-Keyguard and Touchscreen Lockout . . . . . . . . . . . . . . . . . . . . . . . . . . . . . . . . . . . . . . . 137
Phone Lock . . . . . . . . . . . . . . . . . . . . . . . . . . . . . . . . . . . . . . . . . . . . . . . . . . . . . . . . . . . . . . . . 138
System Password Lock . . . . . . . . . . . . . . . . . . . . . . . . . . . . . . . . . . . . . . . . . . . . . . . . . . . . . . . 139
Setting Owner Preferences . . . . . . . . . . . . . . . . . . . . . . . . . . . . . . . . . . . . . . . . . . . . . . . . . . . . 140
Private Records . . . . . . . . . . . . . . . . . . . . . . . . . . . . . . . . . . . . . . . . . . . . . . . . . . . . . . . . . . . . . 141
Hiding or Masking All Private Records . . . . . . . . . . . . . . . . . . . . . . . . . . . . . . . . . . . . . . . . . . . 142
Viewing All Private Records . . . . . . . . . . . . . . . . . . . . . . . . . . . . . . . . . . . . . . . . . . . . . . . . . . . 142
Viewing Private Entries in a Specific Application . . . . . . . . . . . . . . . . . . . . . . . . . . . . . . . . . . 142
Security and Palm Desktop (Windows) . . . . . . . . . . . . . . . . . . . . . . . . . . . . . . . . . . . . . . . . . . 143
Additional Features . . . . . . . . . . . . . . . . . . . . . . . . . . . . . . . . . . . . . . . . . . . . . . . . . . . . . . . . . . . . . . 144
Accessories for Your Phone . . . . . . . . . . . . . . . . . . . . . . . . . . . . . . . . . . . . . . . . . . . . . . . . . . . . . . . 145
PCS Accessories . . . . . . . . . . . . . . . . . . . . . . . . . . . . . . . . . . . . . . . . . . . . . . . . . . . . . . . . . . . . 145
Handspring Accessories . . . . . . . . . . . . . . . . . . . . . . . . . . . . . . . . . . . . . . . . . . . . . . . . . . . . . . 145
Help . . . . . . . . . . . . . . . . . . . . . . . . . . . . . . . . . . . . . . . . . . . . . . . . . . . . . . . . . . . . . . . . . . . . . . . . . . . . . . . 147
Getting Help . . . . . . . . . . . . . . . . . . . . . . . . . . . . . . . . . . . . . . . . . . . . . . . . . . . . . . . . . . . . . . . . . . . . . 148
Launching the Tutorial . . . . . . . . . . . . . . . . . . . . . . . . . . . . . . . . . . . . . . . . . . . . . . . . . . . . . . . 148
Upgrading From Another Palm Powered Device . . . . . . . . . . . . . . . . . . . . . . . . . . . . . . . . . . . . . 149
Trouble Installing Palm Desktop? . . . . . . . . . . . . . . . . . . . . . . . . . . . . . . . . . . . . . . . . . . . . . . . . . . 151
Resetting Your Treo . . . . . . . . . . . . . . . . . . . . . . . . . . . . . . . . . . . . . . . . . . . . . . . . . . . . . . . . . . . . . . 152
Soft Reset . . . . . . . . . . . . . . . . . . . . . . . . . . . . . . . . . . . . . . . . . . . . . . . . . . . . . . . . . . . . . . . . . 152
System Reset . . . . . . . . . . . . . . . . . . . . . . . . . . . . . . . . . . . . . . . . . . . . . . . . . . . . . . . . . . . . . . . 152
Hard Reset . . . . . . . . . . . . . . . . . . . . . . . . . . . . . . . . . . . . . . . . . . . . . . . . . . . . . . . . . . . . . . . . . 153
Screen . . . . . . . . . . . . . . . . . . . . . . . . . . . . . . . . . . . . . . . . . . . . . . . . . . . . . . . . . . . . . . . . . . . . . . . . . . 154
The Screen Appears Blank . . . . . . . . . . . . . . . . . . . . . . . . . . . . . . . . . . . . . . . . . . . . . . . . . . . . 154
The Screen Doesn’t Respond Accurately to Taps or Activates Wrong Features . . . . . . . . . . . 154
There's a Blinking Symbol at the Top of the Screen . . . . . . . . . . . . . . . . . . . . . . . . . . . . . . . . 154
Network Connection . . . . . . . . . . . . . . . . . . . . . . . . . . . . . . . . . . . . . . . . . . . . . . . . . . . . . . . . . . . . . 155
Signal Strength Is Weak . . . . . . . . . . . . . . . . . . . . . . . . . . . . . . . . . . . . . . . . . . . . . . . . . . . . . . 155
The Treo Won’t Connect to the Mobile Network . . . . . . . . . . . . . . . . . . . . . . . . . . . . . . . . . . 155
The Treo Hangs Up When I Hold It to My Ear . . . . . . . . . . . . . . . . . . . . . . . . . . . . . . . . . . . . . 155
The Treo Makes or Answers Calls When It’s in a Briefcase or Pocket . . . . . . . . . . . . . . . . . . 155
Wireless Mode Seems to Turn Off by Itself . . . . . . . . . . . . . . . . . . . . . . . . . . . . . . . . . . . . . . . 155
The Treo Won’t Connect to the Internet . . . . . . . . . . . . . . . . . . . . . . . . . . . . . . . . . . . . . . . . . 156
I Can’t Send or Receive Picture Mail or SMS Messages . . . . . . . . . . . . . . . . . . . . . . . . . . . . . . 156
Synchronization (HotSync) . . . . . . . . . . . . . . . . . . . . . . . . . . . . . . . . . . . . . . . . . . . . . . . . . . . . . . . . 157
Desktop Does Not Respond to HotSync Attempt . . . . . . . . . . . . . . . . . . . . . . . . . . . . . . . . . . 157
HotSync Operation Starts But Stops Without Finishing . . . . . . . . . . . . . . . . . . . . . . . . . . . . . 158
HotSync Operation Finishes But Data Does Not Appear Where It Should . . . . . . . . . . . . . . . 159
Page 5

Web . . . . . . . . . . . . . . . . . . . . . . . . . . . . . . . . . . . . . . . . . . . . . . . . . . . . . . . . . . . . . . . . . . . . . . . . . . . . 160
1
2
I Can’t Access a Page . . . . . . . . . . . . . . . . . . . . . . . . . . . . . . . . . . . . . . . . . . . . . . . . . . . . . . . . 160
An Image or Map Displays Too Small on the Treo Screen . . . . . . . . . . . . . . . . . . . . . . . . . . . 160
A Secure Site Refuses to Permit a Transaction . . . . . . . . . . . . . . . . . . . . . . . . . . . . . . . . . . . . . 160
I Can’t Select an Email Address From a Web Page . . . . . . . . . . . . . . . . . . . . . . . . . . . . . . . . . . 160
Picture Mail . . . . . . . . . . . . . . . . . . . . . . . . . . . . . . . . . . . . . . . . . . . . . . . . . . . . . . . . . . . . . . . . . . . . . 161
Third-Party Applications . . . . . . . . . . . . . . . . . . . . . . . . . . . . . . . . . . . . . . . . . . . . . . . . . . . . . . . . . . 162
Getting More Help . . . . . . . . . . . . . . . . . . . . . . . . . . . . . . . . . . . . . . . . . . . . . . . . . . . . . . . . . . 162
Errors . . . . . . . . . . . . . . . . . . . . . . . . . . . . . . . . . . . . . . . . . . . . . . . . . . . . . . . . . . . . . . . . . . . . . . . . . . . 163
Making Room On Your Treo . . . . . . . . . . . . . . . . . . . . . . . . . . . . . . . . . . . . . . . . . . . . . . . . . . . . . . . 164
Glossary . . . . . . . . . . . . . . . . . . . . . . . . . . . . . . . . . . . . . . . . . . . . . . . . . . . . . . . . . . . . . . . . . . . . . . . . . . . 165
Safety and Warranty Information . . . . . . . . . . . . . . . . . . . . . . . . . . . . . . . . . . . . . . . . . . . . . . . . . . . . . 169
Performance and Safety . . . . . . . . . . . . . . . . . . . . . . . . . . . . . . . . . . . . . . . . . . . . . . . . . . . . . . . . . . 170
Important Information About Your Phone and Service . . . . . . . . . . . . . . . . . . . . . . . . . . . . . 170
Maintaining Safe Use of and Access to Your Phone . . . . . . . . . . . . . . . . . . . . . . . . . . . . . . . . 171
Caring for Your Phone Battery . . . . . . . . . . . . . . . . . . . . . . . . . . . . . . . . . . . . . . . . . . . . . . . . . 172
Acknowledging Special Precautions and the FCC Notice . . . . . . . . . . . . . . . . . . . . . . . . . . . . 173
Terms and Conditions & Warranty Information . . . . . . . . . . . . . . . . . . . . . . . . . . . . . . . . . . . . . . 175
Terms and Conditions of Services . . . . . . . . . . . . . . . . . . . . . . . . . . . . . . . . . . . . . . . . . . . . . . 175
Terms of PCS Picture Mail Service . . . . . . . . . . . . . . . . . . . . . . . . . . . . . . . . . . . . . . . . . . . . . . 188
Handspring Product Warranty . . . . . . . . . . . . . . . . . . . . . . . . . . . . . . . . . . . . . . . . . . . . . . . . . 196
Specifications . . . . . . . . . . . . . . . . . . . . . . . . . . . . . . . . . . . . . . . . . . . . . . . . . . . . . . . . . . . . . . . . . . . 198
Index . . . . . . . . . . . . . . . . . . . . . . . . . . . . . . . . . . . . . . . . . . . . . . . . . . . . . . . . . . . . . . . . . . . . . . . . . . . . . . 199
How to Use This Guide
Welcome — you’ve made the right choice
The advantages of Sprint are as clear as each wireless call you make. With PCS Service,
we give you what you really want from a wireless service provider – clear calls, easy-tounderstand service plans, and self-servicing options for managing your account. All this
is designed to make your life easier and worry free.
We know you’re eager to start using your phone right away, and the sections of this
guide are designed to help you do just that.
Setting Up. This section guides you through the steps required to set up your new
PCS Phone Handspring Treo 600 and the desktop synchronization software.
Getting Started. This section guides you through the steps to set up your
PCS Service. Blank spaces are provided so you can write down important
information that you’ll want to remember. Things like your new PCS Phone
Number, information about your service plan, and your first invoice.
Basics of Your PCS Phone. This section guides you through the basics of your
phone and service with quick, easy-to-follow instructions.
3
Using Your Treo Phone, Web and Messaging Features. This section guides you through
the wireless features on your Treo, including phone, Picture Mail, Web
4
browsing, SMS, and email.
Using Your Treo Organizer Features. This section guides you through using the builtin, full-featured, Palm Powered organizer that gives you instant access to your
5
Calendar, To Do List, Memo Pad, CityTime, Calculator, and more.
Managing Applications on Your Treo. This section guides you through how to add or
delete extra applications, and use an expansion card with your Treo.
6
Customizing your Treo. This section guides you through advanced features of your
phone. Once you’ve learned the basics, you’ll want to explore additional
7
features on your Treo and customize its settings.
Help. This section answers frequently asked questions and shows you what to
do if something goes wrong or you can’t figure out how to use a feature.
8
i
Page 6

Where to Learn More
A quick introduction to your new Treo:
Tutorial. The Tutorial teaches you how to use many features of your Treo. It is
already installed on your Treo and you can launch it any time (see page 148).
Additional Tips and Shortcuts for Keyboard Navigation. This booklet provides a list of
time-saving shortcuts, tips, and tricks. It is included in the box with your Treo.
While using your Treo:
Tips. Many of the built-in applications include helpful tips for getting the most
out of your Treo. To view these tips, launch an application, press Menu ,
then from the Options menu, choose Ti ps.
Information. Many dialog screens have an Information icon in the upper-right
corner. Tap the Information icon with your stylus to learn about the tasks you
can perform in that dialog.
If you need more information:
Books. Many books on Palm Powered devices are available in local or online
book retailers (look in the computers section).
Online forums. Consult online Treo user discussion groups to swap information
and learn about areas you may find nowhere else.
PCS Customer Solutions. For questions about your mobile account or PCS Service,
contact Sprint for the latest information and help. Visit
instant access to new Sprint PCS features and information.
www.sprintpcs.com
for
Setting Up
Setting Up Your
PCS Phone Treo
™
600
ii
1
Page 7
Setting Up
1
What You Need
You should have received all of the following components in the Treo box:
Hardware
• Treo handset
• AC charger
• USB HotSync
• headset
• slip case
Documentation
• Start Here to Activate (this book)
• Additional Tips & Shortcuts for Keyboard Navigation
Software
• Palm Desktop and synchronization software (on the CD in the Treo box)
Other
As you work through the instructions in this section, you’ll also need the
following items:
• An electrical outlet
• The computer with which you will synchronize your personal data
®
cable
2
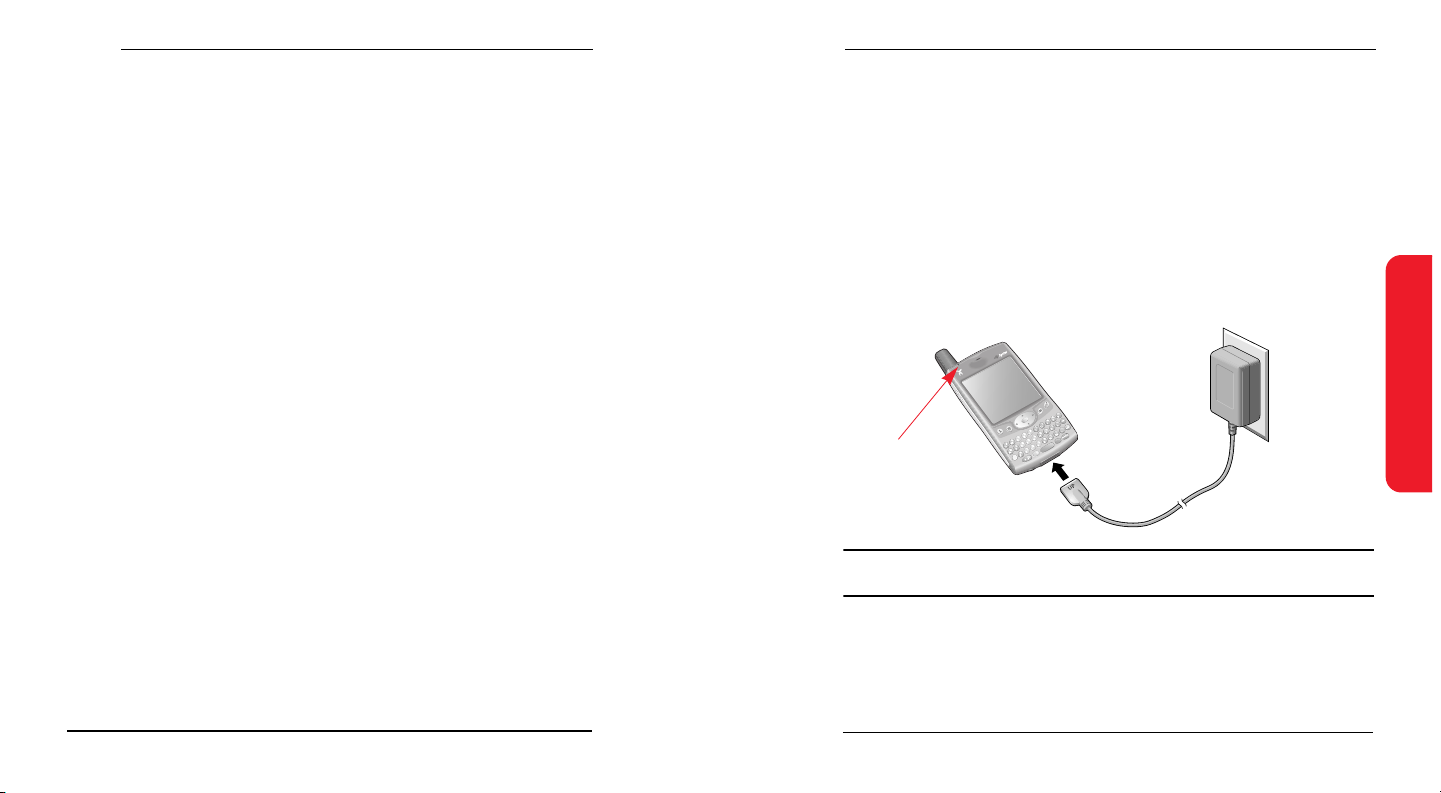
Charging the Battery
You must charge your Treo fully before using it. It may not turn on at all when you
first remove it from the box.
1. Plug the AC charger into a wall outlet.
2. Connect the charger cable to the bottom of the Treo with the word UP facing
the same way as your Treo screen.
3. Wait for the LED to turn solid green. This may take up to 3 hours.
LED
Important Note:
unauthorized accessories could damage your phone and invalidate your warranty.
It is vital that you use only Sprint-approved AC adapter chargers. Use of
Setting Up
2
3
Page 8

Setting Up
4. Confirm your Treo is charging by checking the LED. If the battery is fully
drained, it may take a few moments for the LED to turn on while charging.
Red LED: battery is charging.
Green LED: battery is fully charged.
LED off: battery is not charging. Check the cable connection and the outlet to
which it is connected.
After you set up your Treo, the onscreen battery gauge displays power status:
Full battery icon : battery is charged.
Partial battery icon : battery has some power but is not fully charged.
Empty battery icon : battery needs charging immediately.
Red lightning bolt : battery is charging.
Green lightning bolt : battery is fully charged.
Battery life
Battery life depends on individual use. Consumption factors include signal
strength, backlight and speakerphone use, and whether calls are data or voice
calls.
When Wireless Mode is on, the Treo battery provides approximately 4 hours of
talk time or approximately 10 days of standby time on the PCS, 1900 MHz band.
Talk time is slightly lower when roaming on the cellular 800Mhz band. When
Wireless Mode is off, the battery provides about 4 weeks of normal use.
If the battery drains to the point where your Treo doesn’t turn on, the Treo stores
your data safely for about 3 days. We recommend that you charge and synchronize
your Treo every day, especially if you use your phone often.
Maximizing battery life
You can increase the life of your Treo battery by following a few easy guidelines.
Remember that battery life depends on how you use your Treo.
• Charge your Treo whenever you’re at your desk. The Lithium Ion (Li-Ion)
battery has a much longer useful life when it is topped off frequently, versus
charging it after it is fully drained.
• The wireless features of your Treo (phone, email, messaging, and Web)
consume more power than its organizer features. However, if you spend a lot
of time using the camera, games, media players, eBooks, or other Palm OS
applications, keep an eye on the battery level and charge when necessary.
• If you don’t plan to use the wireless features on your Treo for a while, you may
want to turn off Wireless Mode (see page 27). You can forward calls to a
different number or let all calls be picked up by voicemail (see page 56).
• As with any mobile phone, if you are in an area with no wireless coverage,
your Treo searches for a signal, which consumes power. If you cannot move to
an area of better coverage, you may wish to temporarily turn off Wireless
Mode.
• Use the keyboard backlight (see page 34) only when you need it. Turn down
the screen brightness (see page 128).
• Decrease the Auto-off setting in General Preferences (see page 136). This turns
off your screen automatically after a shorter period of inactivity.
Setting Up
4
5
Page 9

Setting Up
Getting Started
Activating and Using PCS Service
6
7
Page 10

Getting Started
1
Have these things ready before you call to activate
• Your PCS Phone (Make sure it’s fully charged)
• Your Social Security number
• Your driver’s license number
• Your Electronic Serial Number (also known as ESN;
refer to step 5 to locate the number)
• The city and state where your phone will primarily be used
• A pen
2
Setting up your service — You choose the way
• Visit us online at activate.sprintpcs.com.
– or –
• From your PCS Phone, enter , then press Center to dial.
– or –
• Use a phone other than your PCS Phone – dial 1-888-715-4588.
2
*
3
PCS Service Areas
Are you interested in where you can use your new phone? Check out the most upto-date coverage maps at
www.sprintpcs.com.
4
Your PCS Account Password
My Account Password is: _____________________________________________
You’ll use this password when managing your account on www.sprintpcs.com and
with PCS Customer Solutions. Your default password is the last four digits of your
Social Security number.
Getting Started
8
9
Page 11
Getting Started
5
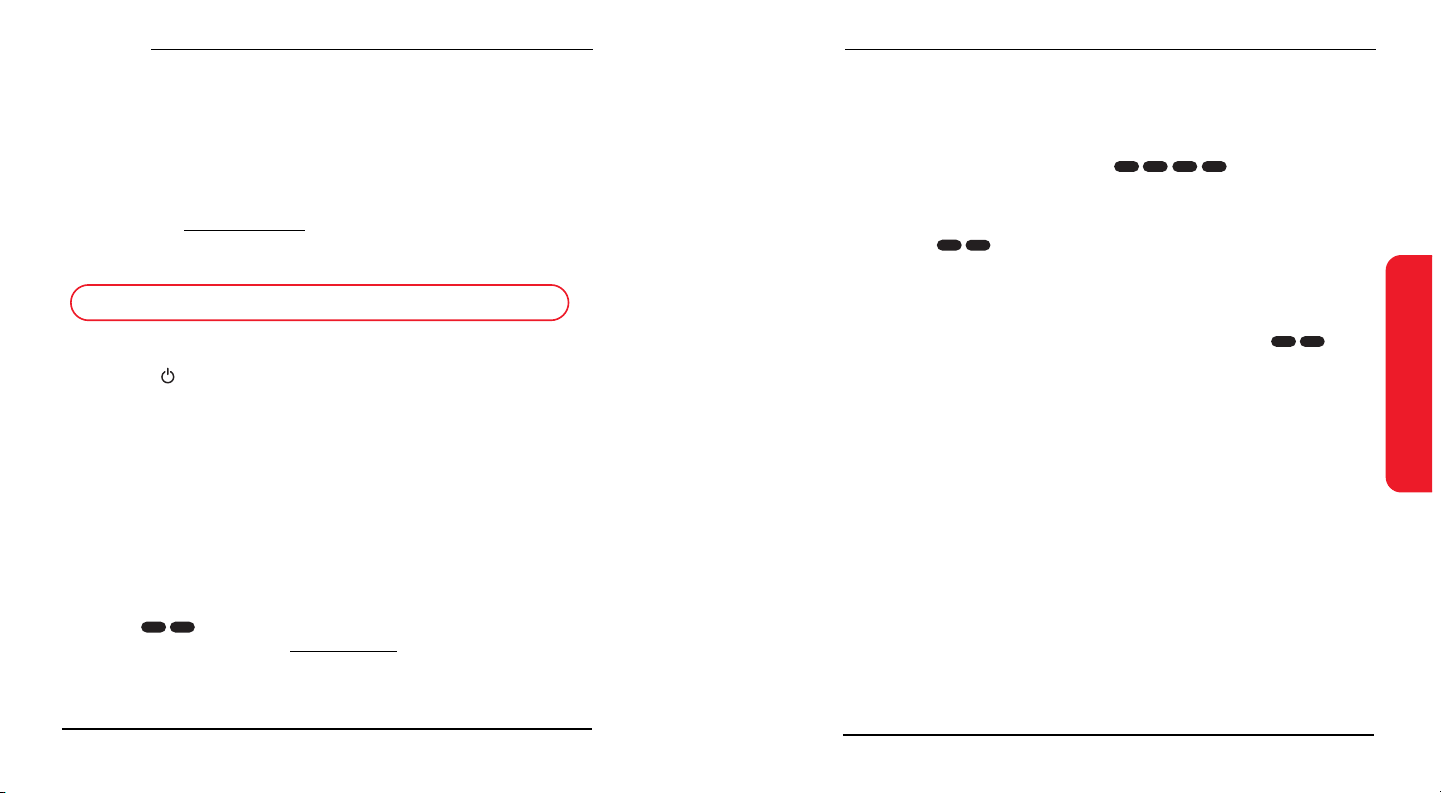
Finding Your Phone’s ESN
If you set up service using your PCS Phone, the network automatically
communicates the ESN to us. You’ll only need this number when you’re setting up
service online at
new PCS Phone. The ESN DEC, or Electronic Serial Number (Decimal), is an
11-digit number written on the barcode sticker on the back of your phone.
activate.sprintpcs.com or calling us from a phone other than your
• Make payments
If you have exceeded the minutes in your plan or you have a past due balance,
you should make a payment to keep your service turned on. There are two
easy payment options:
Make a payment at any Western Union
To find the nearest location, enter , then press Center to
dial from your PCS Phone. (Transaction fee applies; payment is credited to
your account within 12 hours.)
– or –
Enter , then press Center to dial from your PCS Phone (posting time
is 12 hours).
3
*
®
location using the Swiftpay® form.
8
9
*
6
ESN DEC: ________________________________________________________
After writing down the ESN, turn on your phone by holding down the Wireless
Mode button on the top of your phone for a few seconds.
6
PCS Clear PaySM Program
Check this box if you are on the PCS Clear PaySM Program. If you are not on the
PCS Clear Pay Program, skip ahead to step 7 on page 12.
Follow these easy steps to continue enjoying your new PCS Service:
• Keep track of your minutes
Enter , then press Center to dial from your PCS Phone (normal airtime
usage will apply) or sign on to
you have currently used within your service plan.
10
4
*
www.sprintpcs.com to find out how many minutes
How we will help you keep your service turned on:
• In the event that your service has been turned off, you will receive an SMS
message stating: “Your PCS Service has been turned off. Press to
make a payment and turn service on.”
• The first time your service has been turned off you will be connected to a live
PCS Clear Pay Program Specialist who will explain why your service has been
turned off. You will be asked to pay your balance to get your service turned
back on (payment will be credited and service turned back on within 12
hours).
• For any additional times that your service has been turned off, you will be
connected to our automated payment process. You will have to pay your
balance to have your service turned back on (payment will be credited and
service turned back on within 12 hours).
3
*
Getting Started
11
Page 12

Getting Started
7
Understanding Your PCS Service Plan
Use the following forms to record your PCS Service Plan and to familiarize yourself
with its features and options.
PCS Free & Clear Plans With Vision
Monthly Service Charge . . . . . . . . . . . . . . . . . . . . . $__________
Anytime Minutes. . . . . . . . . . . . . . . . . . . . . . . __________
Unlimited Night & Weekend Minutes
(Mon.-Thur. 9pm-7am, Fri. 9pm-Mon. 7am) . . . . . . . . . . . . . . . . . Yes No
Each additional voice minute (overage). . . . . . . . . . . _________¢
Nationwide Long Distance Included . . . . . . . . . . . . Yes No
Unlimited PCS Vision
Options (monthly charges)
Unlimited Night & Weekend Minutes
(if not included with plan) . . . . . . . . . . . . . . . . . $__________
Unlimited PCS-to-PCS Calling
PCS Voice Command
PCS Business Connection
PCS Add-a-Phone
Off-Network Minutes . . . . . . . . . . . . . . . . . . . . $__________
PCS Equipment Replacement. . . . . . . . . . . . . . . . $__________
Roadside Rescue . . . . . . . . . . . . . . . . . . . . . . $__________
Other . . . . . . . . . . . . . . . . . . . . . . . . . . . . $__________
SM
. . . . . . . . . . . . . . . . . . . Yes No
SM
SM
SM
. . . . . . . . . . . . . . . . . . . . . $__________
. . . . . . . . . . . . . . . $__________
. . . . . . . . . . . . . . . . . . . $__________
SM
. . . . . . . . . . . . . . . . . $__________
PCS Free & Clear Plans
Monthly Service Charge . . . . . . . . . . . . . . . . . . . . . . $__________
Anytime Minutes . . . . . . . . . . . . . . . . . . . . . . . __________
Unlimited Night & Weekend Minutes
(Mon.-Thur. 9pm-7am, Fri. 9pm-Mon. 7am) . . . . . . . . . . . . . . . . . Yes No
Each additional voice minute (overage) . . . . . . . . . . . _________¢
Nationwide Long Distance Included . . . . . . . . . . . . . Yes No
Options (monthly charges)
Unlimited Night & Weekend Minutes
(if not included with plan). . . . . . . . . . . . . . . . . . $__________
Unlimited PCS-to-PCS Calling
PCS Voice Command
PCS Business Connection
PCS Add-a-Phone
Off-Network Minutes . . . . . . . . . . . . . . . . . . . . $__________
PCS Equipment Replacement . . . . . . . . . . . . . . . . $__________
Roadside Rescue . . . . . . . . . . . . . . . . . . . . . . . $__________
Other. . . . . . . . . . . . . . . . . . . . . . . . . . . . . $__________
SM
. . . . . . . . . . . . . . . . . . . . . . $__________
PCS Advantage Agreement
I have agreed to a PCS Advantage Agreement.
___ 1 Year ___ 2 Year
I have opted not to sign a PCS Advantage Agreement.
$______ Monthly fee
Note: Your agreement for wireless service with Sprint is made up of the Service Plan you
choose and the Terms and Conditions of Service which can be found on page 175 of this guide.
SM
SM
. . . . . . . . . . . . . . . $__________
. . . . . . . . . . . . . . . . . . . . $__________
SM
. . . . . . . . . . . . . . . . . $__________
SM
:
Getting Started
12
13
Page 13

Getting Started
8
Your New PCS Phone Number and User Name
PCS Phone Number
PCS User Name
Your user name is automatically assigned to you. Your user name, which
resembles an email address (for example,
PCS Mail and SMS services.
Note: You can use nearly any email address with the PCS Business Connection email
application (see page page 84). Your PCS user name is simply an additional email address that
identifies your PCS Account.
14
[email protected]), is used with
9
Understanding Your PCS Invoice
Your first invoice will arrive within a few days and will reflect these charges:
• Your first full month of service, which is your monthly service charge of
$_____
• Additional charges such as taxes, roaming, or overages
• Charges for additional options you opt to subscribe to: $______
• Your one-time non-refundable activation fee of $______
The approximate total of your first invoice will be $______
10
Quick, Easy Options to Manage Your Account
With PCS Customer Solutions, there are two convenient options for managing
your account.
• Manage it online – visit www
Once you sign on, you can:
View the details of your PCS Service Plan
Find out how many minutes you have used and how many minutes are
remaining in your plan
View your current and previous 3 months invoices, including the call detail
Make a payment
Find out about PCS Products and Services
Learn how to set up your voicemail and more
.sprintpcs.com
Getting Started
15
Page 14

Getting Started
• Use your PCS Phone – enter , then press Center to dial.
Once connected, you can:
Access a summary of your rate plan
Find out the number of minutes remaining in your plan for the current
invoice cycle
Access information about your most recent invoice
Find out when your last payment was received
Make a payment
Note: Normal airtime charges will apply when calling .
4
*
Welcome and thank you for choosing Sprint.
Connecting
Connecting Your Computer
4
*
16
17
Page 15

Connecting
1
Preparing Your Computer
Synchronization allows you to enter information on your computer in an
application called Palm Desktop or in Microsoft
transfer that information to your Treo. At the same time, changes you make on the
Treo are transferred to Palm Desktop software or to Microsoft Outlook. Even if
you manage all your contacts on your Treo, synchronization is a great way to back
up your data.
Before you can synchronize, you need to install the Palm Desktop synchronization
software on your computer. Even if you already own a Palm Powered device and
have installed a previous version of the Palm Desktop software, install the
software that comes on the CD with your Treo.
We strongly recommend that you install the Palm Desktop synchronization
software soon after you start using your Treo and that you synchronize your Treo
and computer frequently to keep your information up-to-date (and backed up) in
both locations.
®
Outlook® and then efficiently
System requirements
Your computer should meet one of the following minimum system profiles:
• Windows 98SE, Me, 2000, or XP (later versions may also be supported)
32 MB of memory
30 MB of free hard disk space
CD-ROM drive
available USB port
USB cable (included with your Treo)
• Windows NT 4
32 MB of memory
30 MB of free hard disk space
CD-ROM drive
available serial port
serial synchronization cable (sold separately, visit www.handspring.com
for details)
• Macintosh OS X 10.1-10.2.x (later versions may also be supported)
32 MB of memory
25 MB of free hard disk space
CD-ROM drive
available USB port
USB cable (included with your Treo)
Connecting
18
19
Page 16
Connecting
2
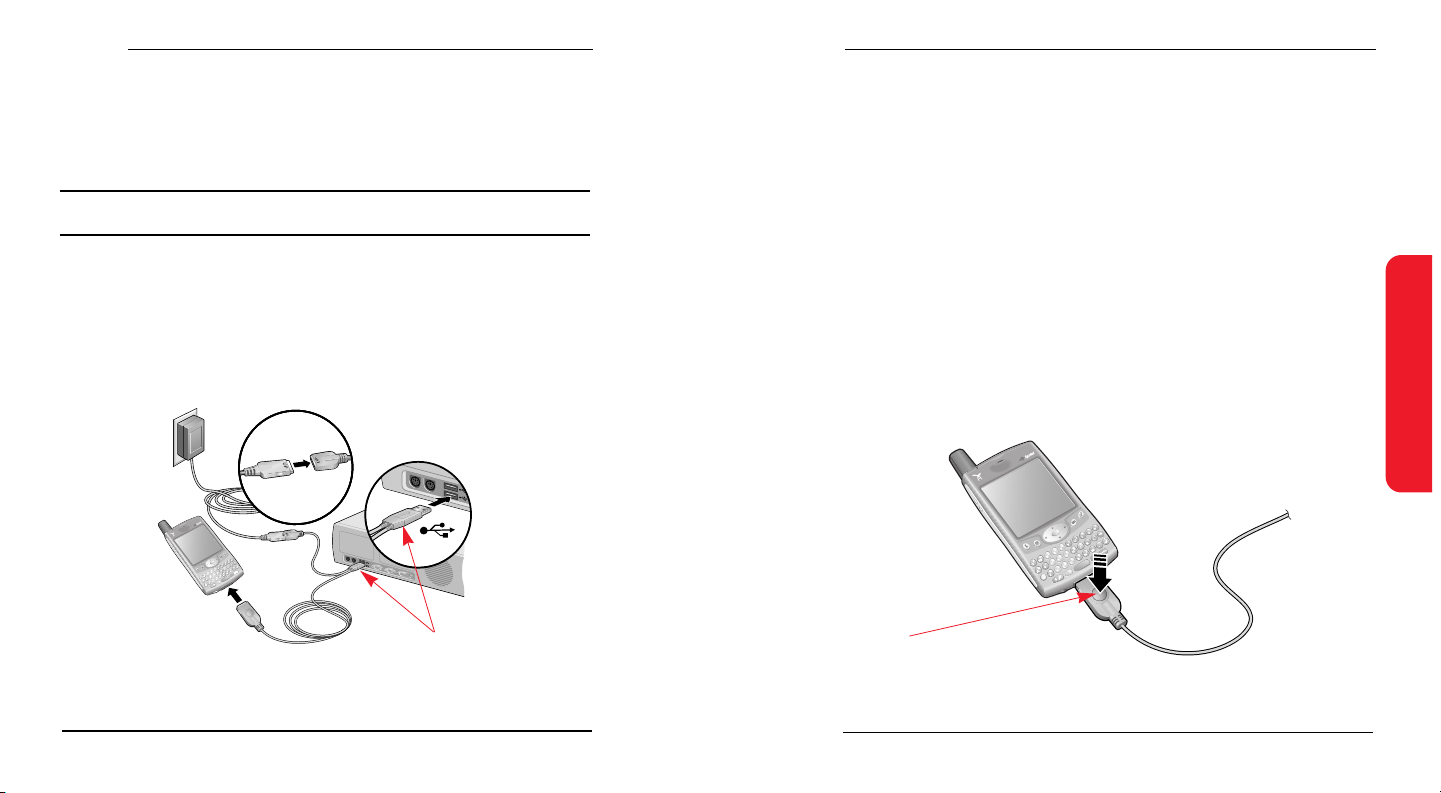
Connecting Treo to Your Computer
IMPORTANT: If you’re upgrading from another Palm Powered device, follow the upgrade steps
on page page 149 before you set up your computer for your new Treo.
1. Plug the AC charger into a wall outlet. If necessary, connect an adapter.
2. Connect the charger to the short end of the HotSync cable. Be sure to match
the sides of the connectors labeled UP.
3. Plug the USB HotSync cable into an available USB port or a powered USB hub
on your computer.
4. Connect the long end of the HotSync cable to the bottom of your Treo with
the button facing up. Do not press the HotSync button until you are instructed
to do so in the next step.
USB Cable
3
Installing Palm Desktop Software on Your Computer
Your computer needs to have all its resources available to install the software.
Follow these guidelines for a successful installation:
1 If you are installing on a computer at work, make sure your company allows
you to install new software. Contact your company’s IT department for help.
2. Exit any applications that are currently running on your computer, including
those running in the background.
3. Insert the CD that came with your Treo into the CD-ROM drive on your
computer. If you are installing on a Macintosh, double-click the CD icon on the
desktop, then double-click the Installer icon.
4. Follow the onscreen instructions of the installation program. Click Install
Synchronization Software to install the Palm Desktop software. During the
installation process, you will be prompted to synchronize for the first time.
HotSync
Button
Connecting
20
21
Page 17

Connecting
Basics of Your PCS Phone
22
23
Page 18
Basics
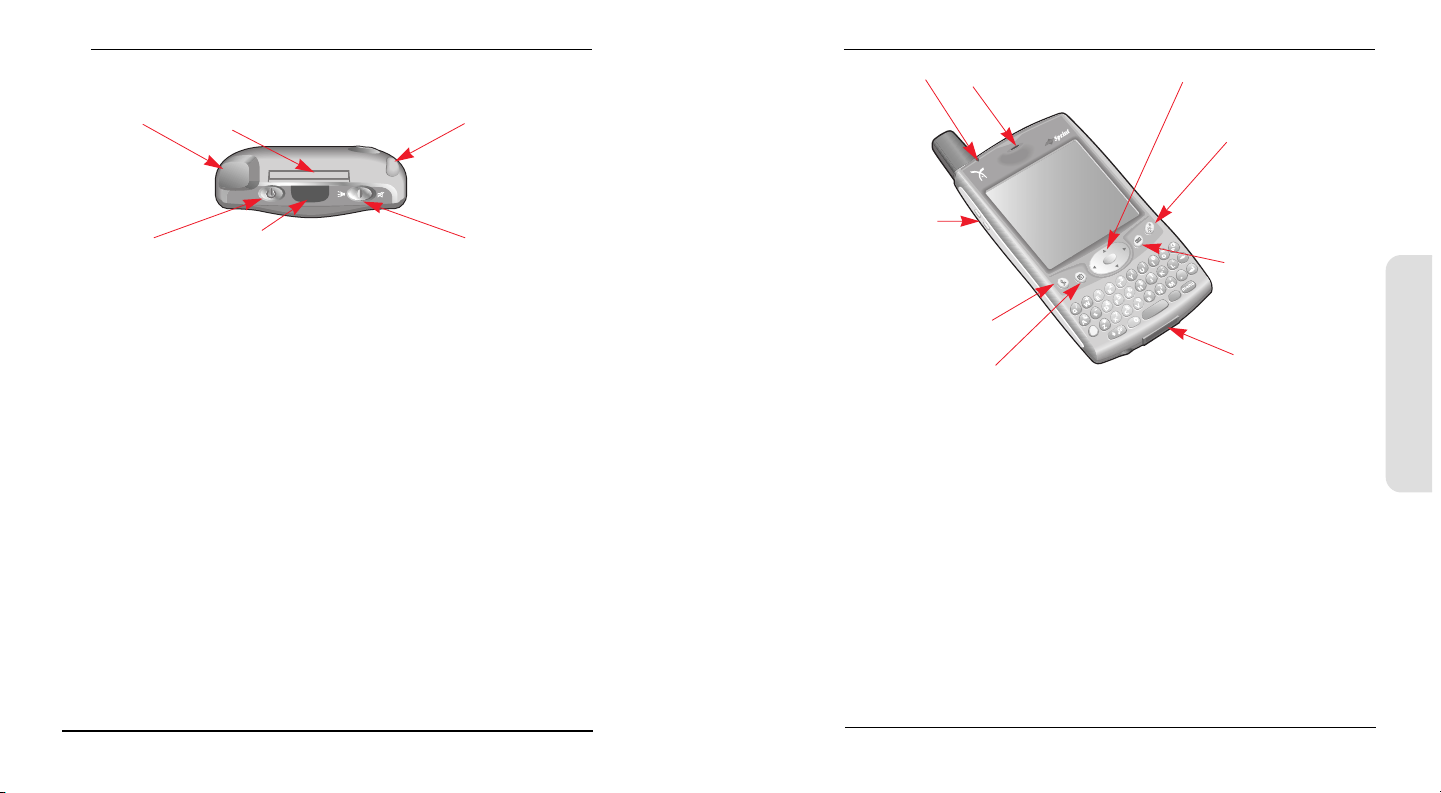
Your New PCS Phone
7. LED
8. Speaker
9. 5-way Navigation Control
1. Antenna 3. Stylus2. SD/MMC Expansion Card Slot
6. Wireless
Mode Button
5. Infrared (IR) Port
4. Ringer Switch
Your Phone’s Features: Top View
1. Antenna receives and sends wireless communication signals. The antenna does
not telescope out of your phone.
2. SD/MMC Expansion Card Slot allows you to expand the capabilities of your phone
using a Secure Digital (SD) cards or MultiMedia Cards (MMC). See page 115 for
details on using expansion cards.
3. Stylus serves as the instrument used to tap options on your phone screen. To
use the stylus, slide the stylus out of the slot and hold it as you would a pen or
pencil.
4. Ringer Switch controls the ringer setting. See page page 127 for details on
changing the settings. Silencing the ringer turns off all system sounds,
including alarms.
5. Infrared (IR) Port uses infrared technology to transmit data to and receive data
from other Palm Powered devices.
6. Wireless Mode Button turns Wireless Mode on and off.
24
10. Screen Button
15. Volume
Buttons
11. Messaging Button
14. Phone Button
12. HotSync and
13. Calendar Button
Power Connector
Your Phone’s Features: Front View
7. LED provides status information for your Treo based on the color of the light
and the blink state.
8. Speaker functions as the earpiece on your Treo.
9. 5-way Navigation Control lets you move around the Treo screen and choose
options.
10. Screen Button turns the phone screen on and off.
11. Messaging Button launches the SMS application.If you downloaded and installed
Business Connection, this button launches Business Connection.
12. HotSync and Power Connector enables you to attach the HotSync cable and power
adapter to your phone.
13. Calendar Button launches the Calendar application.
14. Phone Button launches the Phone application.
15. Volume Buttons adjusts the speaker volume level.
Basics
25
Page 19

Basics
16. Camera
Lens
21. Vibrating
Alarm
20. Microphone
17. ESN
18. Reset Button
19. Headset Jack
Your Phone’s Features: Back View
16. Camera Lens enables you to take pictures using the built-in camera.
17. ESN (Electronic Serial Number) identifies your phone on the PCS Network.
18. Reset Button restarts your Treo if an error occurs.
19. Headset Jack enables you to connect a hands-free headset. Use only headsets
that are compatible with your phone.
20. Microphone serves as the mouthpiece on your phone.
21. Vibrating Alarm notifies you when an alarm goes off and the ringer is set to silent.
Note: The Treo speaker includes a large magnet, so be sure not to store your Treo near credit
cards or other items that could become demagnetized.
Turning Your Phone On and Off
You can use the Palm OS features of your Treo independently of the wireless
features and applications. Therefore, the screen and Wireless Mode are designed to
be turned off and on separately.
Turning Wireless Mode ON
Wireless Mode connects your Treo to the PCS Network so that you can make and
receive phone calls and use other wireless services.
Press and hold the Wireless Mode button to turn on Wireless Mode. (You will
hear a series of ascending tones and the phone displays “Welcome” and then
“Searching for Service” until it locates a signal.) At this point, Wireless Mode is
on and you’re ready to begin making and receiving calls and using the Internet
features (if supported by the local network).
Turning Wireless Mode OFF
When Wireless Mode is off, your Treo is not connected to the PCS Network. You
can still use its other Palm OS features. This is ideal for airplane flights and for
maximizing battery life.
Press and hold the Wireless Mode button again to turn off Wireless Mode.
You will hear a series of descending tones and a “Goodbye.” message appears
on the screen.
Turning the Screen On and Off
1. Press the Screen button to turn on the screen.
2. Press the Screen button again to turn off the screen.
Basics
26
27
Page 20
Basics
Launching Applications
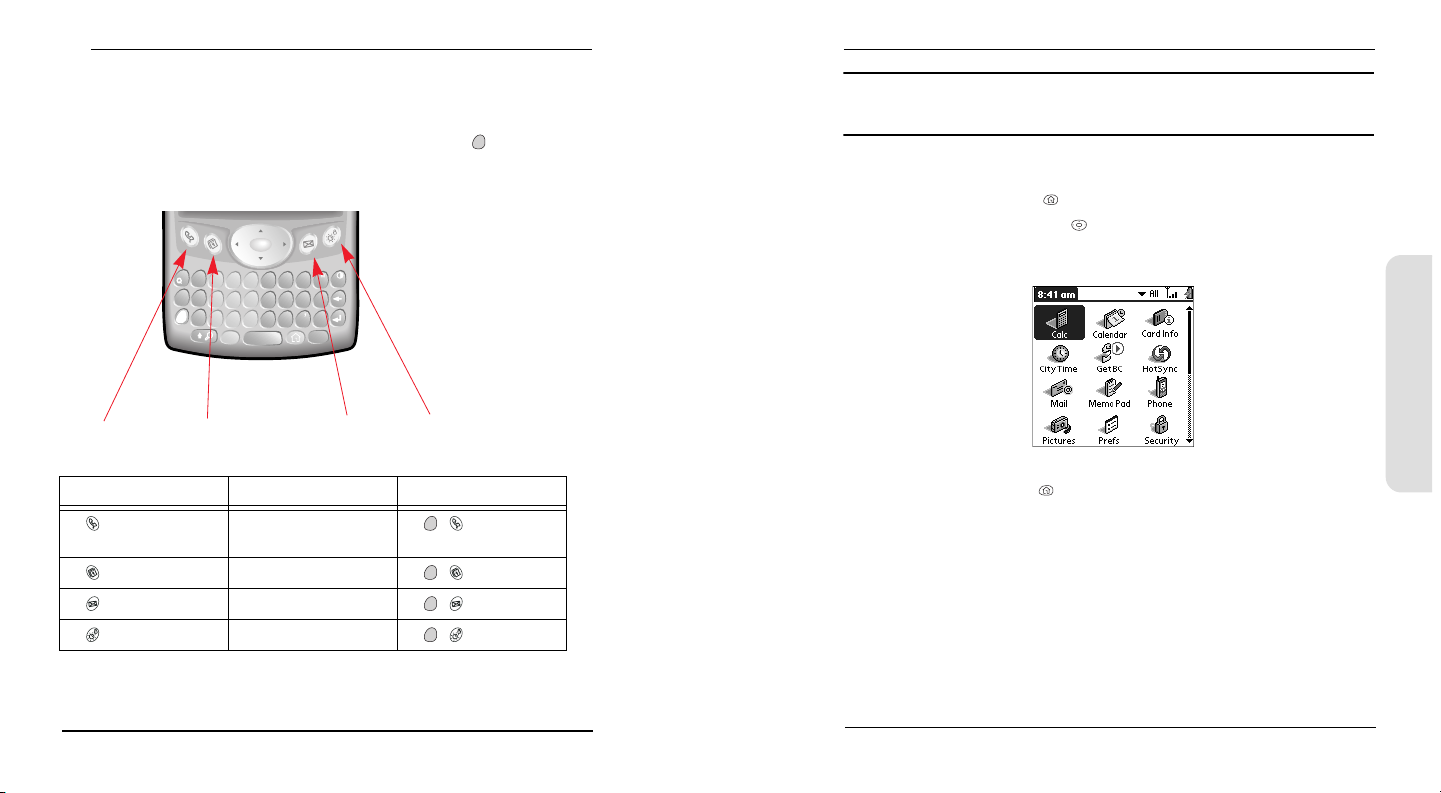
Each of the three application buttons on the front of the Treo can be used to
launch two applications. To access a button’s primary application, simply press the
button. To access a button’s secondary application, press Option , then press the
application button. The fourth button turns the screen on and off and controls the
keyguard.
/
+
1R2
W
E
&
-
4
5
A
S
D
F
7
8
*
Z
X
C
Alt0
Phone Calendar Messaging Screen
Button Primary Application Secondary Application
@
)
(
3
T
Y
$
6
G
H
#
9
V
B
P
O
U
I
:
!
'
L
K
J
?
.
M
N
menu
Phone + Blazer
Browser
Calendar + CityTime
Messaging + SMS
Screen + Keyguard
®
Web
Note: The Messaging button launches PCS Business Connection if you downloaded and
installed PCS Business Connection on your phone. You can also customize the buttons yourself.
See page 132 for details.
In Palm OS, you access all available applications through a screen called the
Applications Launcher:
1. Press Applications Launcher .
2. Use the 5-way navigation control to highlight the application you want to use.
3. Press Center to launch the selected application.
Basics
In the Applications Launcher, you can also do any of the following:
Press Applications Launcher repeatedly to cycle through different categories of
applications.
Type the first few letters of the application’s name to highlight it. For example,
if you type c it highlights Calendar, then if you type i it highlights CityTime. If
you pause and then type i, it highlights the first application that starts with i.
28
29
Page 21
Basics
Moving Around the Treo Screen
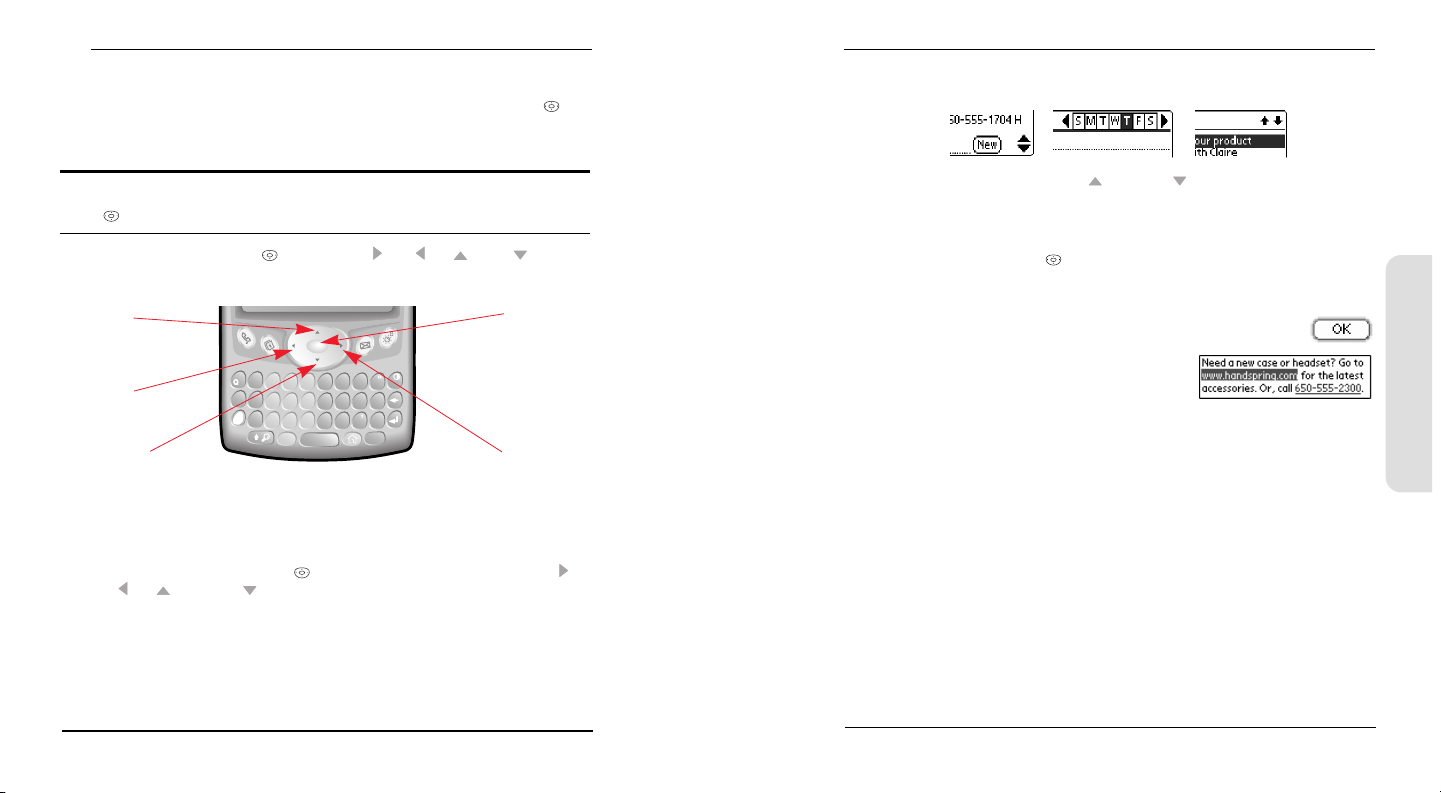
To move around the Treo screen, you can use the 5-way navigation control or
tap items on the screen with the stylus. With use, you will find your own favorite
way to scroll, highlight, and select menu commands.
Tap an onscreen scroll arrow:
Note: Some third-party applications may not work with 5-way navigation and you must use the
stylus instead. In this guide, we use arrow icons to indicate directions on the 5-way navigation
control . These arrows are different from any onscreen scroll arrows or pick list arrows.
The 5-way navigation control includes Right , Left , Up , Down , and
Center buttons.
.
Up
Left
Down
/
+
1R2
W
E
&
-
4
5
A
S
D
F
7
8
*
Z
X
C
Alt0
@
)
(
3
T
Y
$
6
G
H
#
9
V
B
P
O
U
I
:
!
'
L
K
J
?
.
M
N
menu
Center
Right
Scrolling Through Screens
As on a computer, you scroll on the Treo to move from field to field, or page to
page, or in some cases to highlight an item or option in a list. There are several
methods of scrolling:
Press the 5-way navigation control on the front of the Treo. Pressing Right ,
Left , Up , and Down moves to the next field, button, or action in that
direction.
30
When inside a text field, press Up and Down to scroll through the text.
Drag the slider of an onscreen scroll bar:
Highlighting Items
The 5-way navigation control lets you highlight items before launching or
selecting them. Experiment with using the navigation control to highlight different
screen elements.
When an onscreen button (OK, Cancel, etc.) or pick list is
highlighted, the button acquires a blue glow around its border.
When a phone number, email address or
Web link is highlighted on a Web page or in
a message, the text appears in reverse type
(light text on a dark background).
When an entire text entry field is highlighted, you can press Center to edit the
text. After you edit the text, press Center again to highlight the entire field.
You can also use the stylus to highlight text on the screen. When text is
highlighted it appears in reverse type.
Drag the stylus across the text you want to highlight.
Double-tap a word to highlight it.
Triple-tap a line of text to highlight it.
Basics
31
Page 22
Basics
Accessing Command Buttons
Command buttons, such as New, OK, and Details appear at the bottom of the screen.
In many cases you can jump directly to these buttons instead of scrolling to them.
From a list screen, such as the Contacts list, press Right to jump to the first
button.
From a screen where you create or edit entries, such as Edit Contacts or Day
View in Calendar, press Center to jump to the first button.
From a dialog box, such as the Edit Categories, press Option then Return
for OK, or Option then Backspace for Cancel.
Choosing or Activating Items
After highlighting an item with the 5-way navigation control , you can choose or
activate it by pressing Center. You can also choose an item by tapping it with the
stylus.
Selecting Menu Items
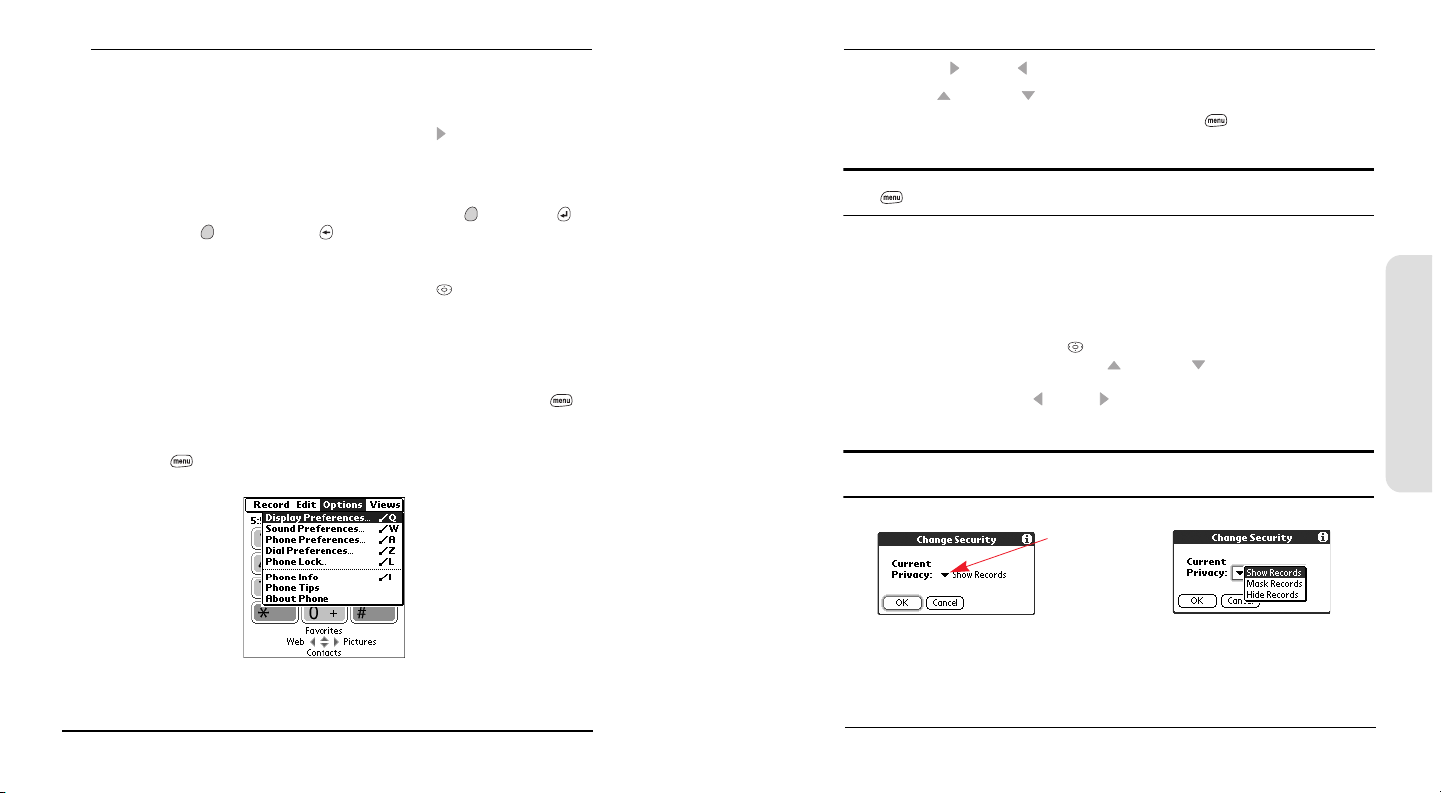
Many applications have menus to provide access to additional features. These
menus are usually hidden from view, but they appear when you press Menu .
To get the most out of your Treo, it’s a good idea to familiarize yourself with the
additional features available through the various application menus.
1. Press Menu to display an application’s menus.
2. Press Right and Left to switch between menus.
3. Press Up and Down to highlight a menu item.
4. Press Center to choose the menu item or press Menu to close the menu and
cancel your selection.
Tip: Most menu commands have keyboard shortcuts listed in the menu. To use a shortcut, press
Menu plus the shortcut letter. You don’t have to see the menu item to use the shortcut.
Choosing Options in a Pick List
A range of options is often presented in a type of menu called a pick list, which
can be identified by a downward-pointing arrow to the left of the currently
selected choice. You can select an option from a pick list by doing one of the
following:
Use the 5-way navigation control to highlight the pick list, then press Center to
display the items in the list. Press Up and Down to highlight the item you
want, then press Center to accept your selection. To exit the pick list and cancel
your selection, press Left or Right .
Use your stylus to tap the pick list, then tap the item you want from the list.
Tip: You can jump to an item in a pick list by using the keyboard to type the first letter of the item
you want to select.
Pick list
Basics
32
33
Page 23
Basics
Using the Keyboard
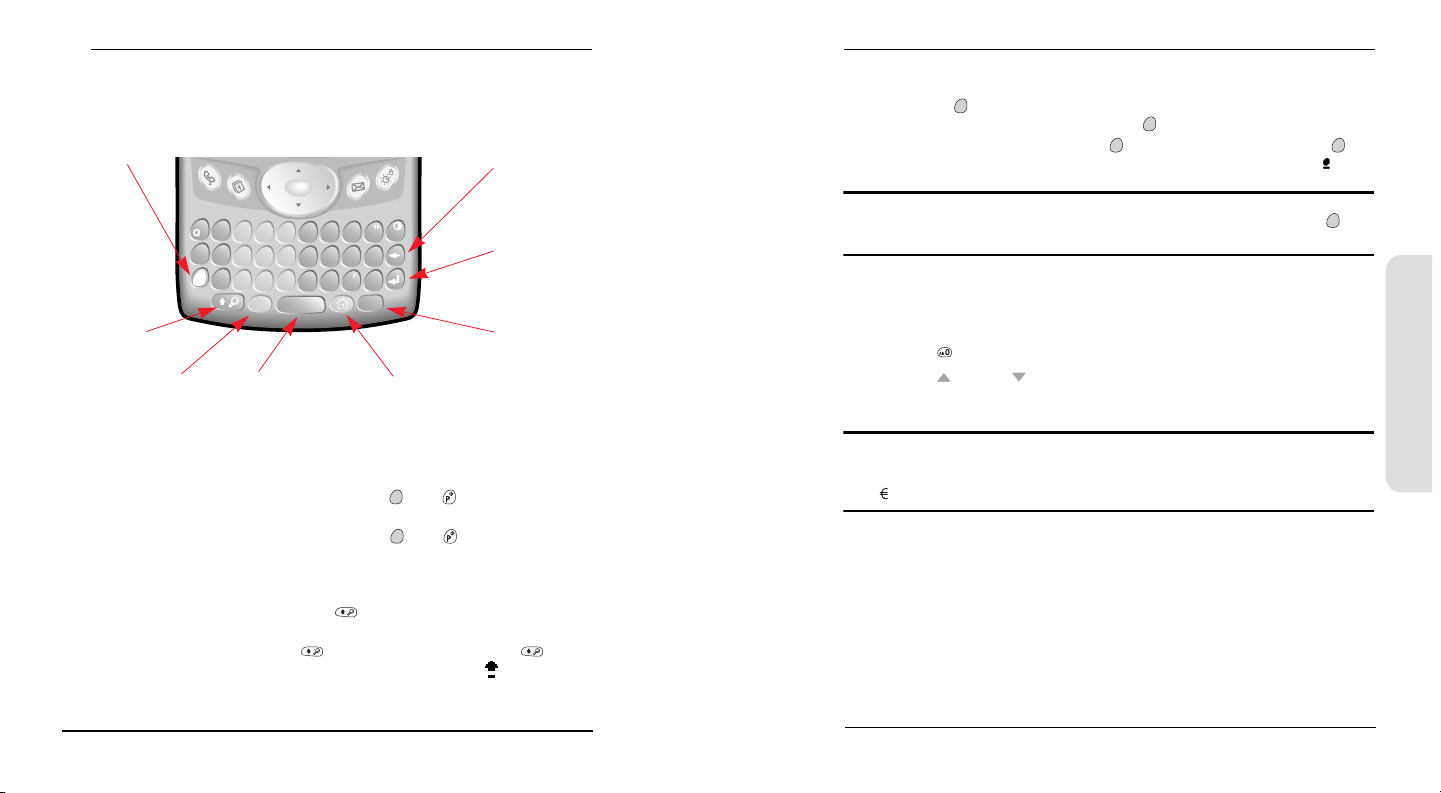
When using the keyboard, most people find it easiest to hold the Treo with two
hands and use the tips of both thumbs to press the keys.
Option
/
+
1R2
W
&
-
A
S
*
Z
3
E
T
4
6
5
D
G
F
7
9
8
X
V
C
Alt 0
Shift/Find
Alt Space
Using the Keyboard Backlight
Treo includes a keyboard backlight for nighttime use. The keyboard backlight
activates automatically when the screen turns on, but shuts off if the keyboard is
not in use.
To manually turn on the backlight, press Option then . The backlight may
not be visible in bright sunlight.
To manually turn off the backlight, press Option then again.
Entering Lowercase and Uppercase Letters
To type lowercase letters, press the desired keys.
To type an uppercase letter, press Shift , then type a letter. You don’t need to
hold down Shift while typing.
To turn Caps Lock on, press Shift twice. To turn it off, press Shift again.
When Caps Lock is on, this symbol appears in the lower right:
@
)
(
U
Y
$
J
H
#
N
B
P
O
I
:
!
'
L
K
?
.
M
menu
Applications Launcher
Backspace
Return
Menu
Entering Numbers, Punctuation, and Symbols that Appear Above
the Letters on the Keys
Press Option , then press the key with the desired character shown above the
letter. You don’t need to hold down Option while pressing the second key.
To turn Option Lock on, press Option twice. To turn it off, press Option
again. When Option Lock is on, this symbol appears in the lower right:
Tip: Some application views automatically default to Option Lock, such as the Dial Pad of the
Phone application, or the Calculator. In this case, you do not have to hold down
Option to
enter numbers.
Entering Other Symbols and Accented Characters
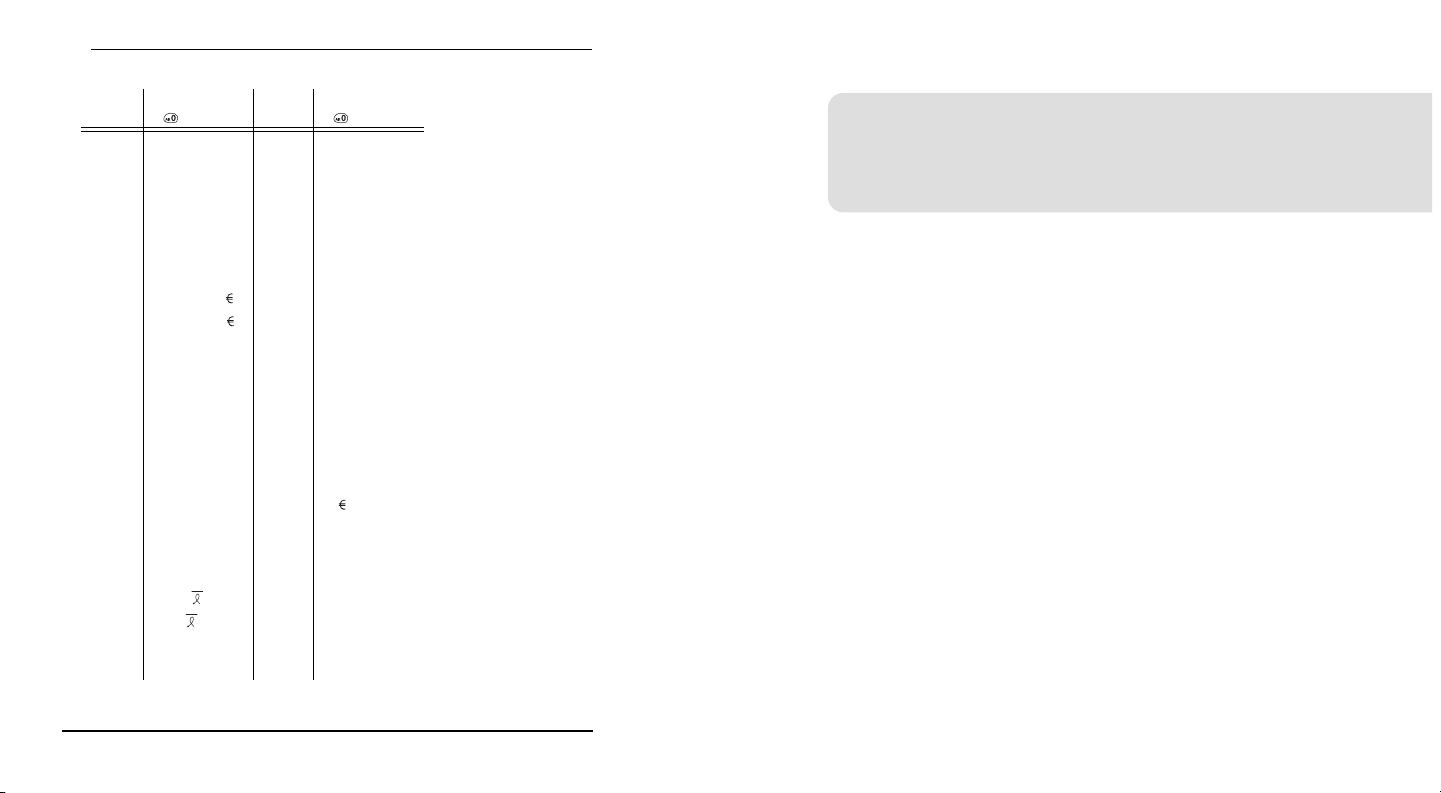
1. Type the character that corresponds to the symbol or accented character you
want. See the table on the next page.
2. Press Alt .
3. Press Up or Down to highlight the desired character.
4. Press Center to insert the character, or just continue typing the next character.
Tip: In many applications you can view a list of all the alternate characters. From the Edit menu,
choose
Keyboard Help (/G). The alternate characters are grouped according to their similarity to
the corresponding key. For example, the alternate characters available for the e key are é, è, ë,
ê and .
Basics
34
35
Page 24
Basics
Type ……then press
a
A
b or B
c
C
d
D
e
E
f or F
i
I
l or L
m or M
n
N
o
O
p or P
r or R
s
S
t or T
u
to choose…
à á ä â ã å æ
À Á Ä Â Ã Å Æ
ß
ç ¢ © ^ ˆ
Ç ¢ © ^ ˆ
† ‡
† ‡ √
è é ë ê
È É Ë Ê
ƒ
ì í ï î
Ì Í Ï Î
£
µ
ñ
Ñ
ò ó ö ô õ ø
Ò Ó Ö Ô Õ Ø
¶
®
ß §
ß ≥ §
~ ™ † ‡
ù ú ü û
Type ……then press
U
x or X
y
Y
0
1
2
3
.
,
!
?
:
.
'
"
$
+
/
%
#
(
)
to choose…
Ù Ú Ü Û
∞
∆ ÿ ¥
∆ Ÿ ¥
‰ º
∂ π ∫
∑
∏
? ! …
‚‚‚
¡
¿
; :-) :-( ;-) :-D
? ! …
‘ ’ ‹ › ~ `
“ ” « »
£ ¥
&
_ ~ • – —
\ ÷ ≠
‰
=
<[{‹
>]}›
Using Your Treo Phone, Web,
and Messaging Features
36
37
Page 25
Phone, Web, & Messaging
Making Calls
Your Treo offers several options for making phone calls. As you get familiar with
your Treo, you’ll discover which method you prefer.
IMPORTANT: Before making a call, make sure Wireless Mode is on (see steps on page 27). If
No Service appears in the upper-left, you are out of a wireless coverage area. If you believe you
are in a wireless coverage area and this problem persists, contact Sprint for assistance.
Dialing With the Keyboard
1. Press Phone .
2. Using the numbered keys on the keyboard, start dialing a phone number. You
do not need to press Option to access the numbers on the keyboard.
3. Press Center to dial.
Tip: If you make a mistake while dialing, press Backspace to erase one digit at a time or
choose Cancel to start over.
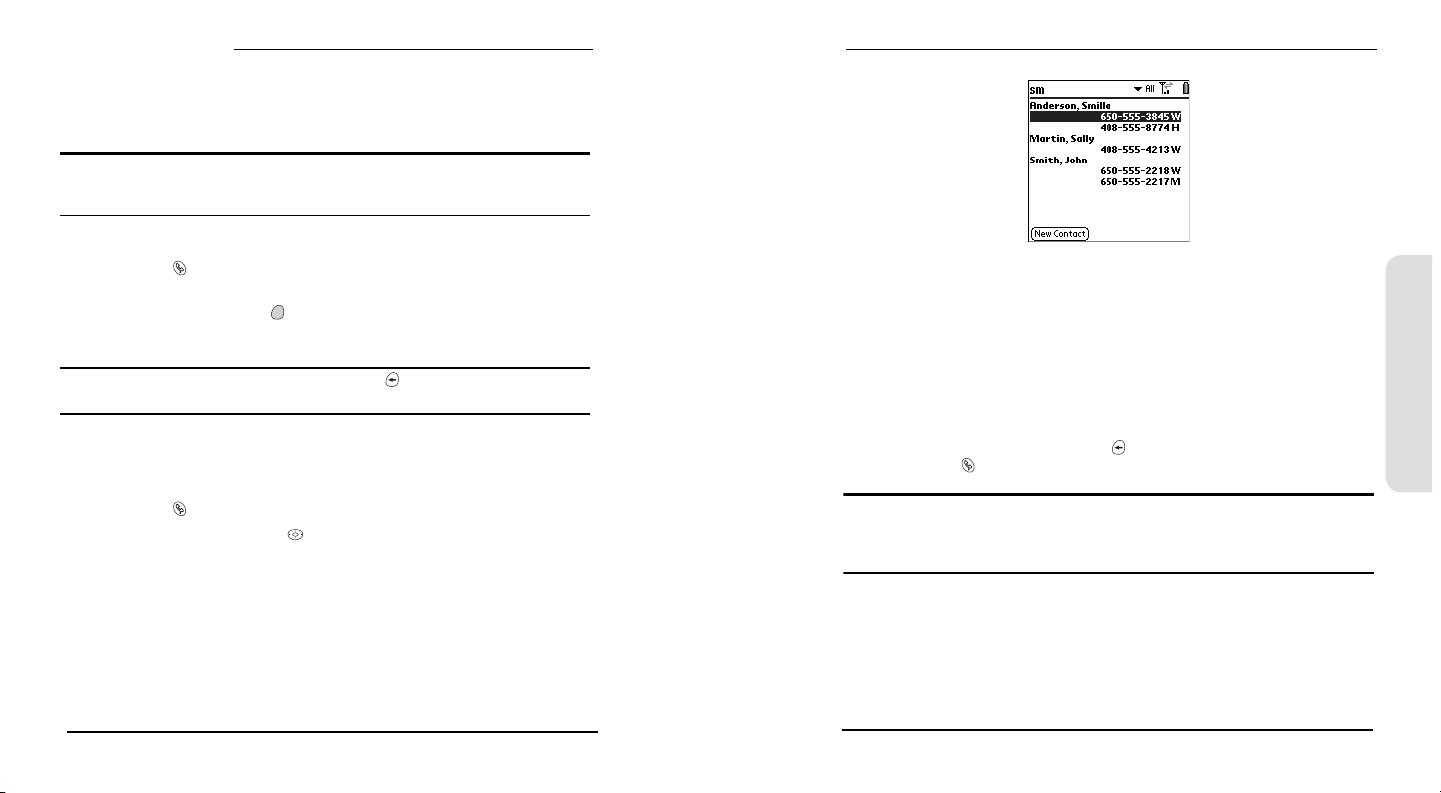
Dialing by Contact Name
Before you can dial a call by contact name, you must create some contacts (see
page 49), or import them with a HotSync operation (see page 108).
1. Press Phone .
2. Use the 5-way navigation control to access the Contacts list.
38
3. Using the keyboard, begin typing one of the following for the contact you want
to call:
First initial and last name
First name
Last name
4. Choose the number you want to dial, or to see more information about a
contact, highlight the name and press Center to view the address, company, and
other details.
5. With the number highlighted, press Center to dial.
To start another search, press Backspace to delete letters you’ve entered. Or,
just press Phone to start all over.
Tip: You can also begin a Name Lookup immediately from the Main view in the Phone
application. From the
Options menu, select Display Preferences (/Q), then choose Typing Starts
Contacts Search. Note that when you select this option, you cannot use Quick Keys to launch
your Favorites buttons from the Main view.
Phone, Web, & Messaging
39
Page 26
Phone, Web, & Messaging
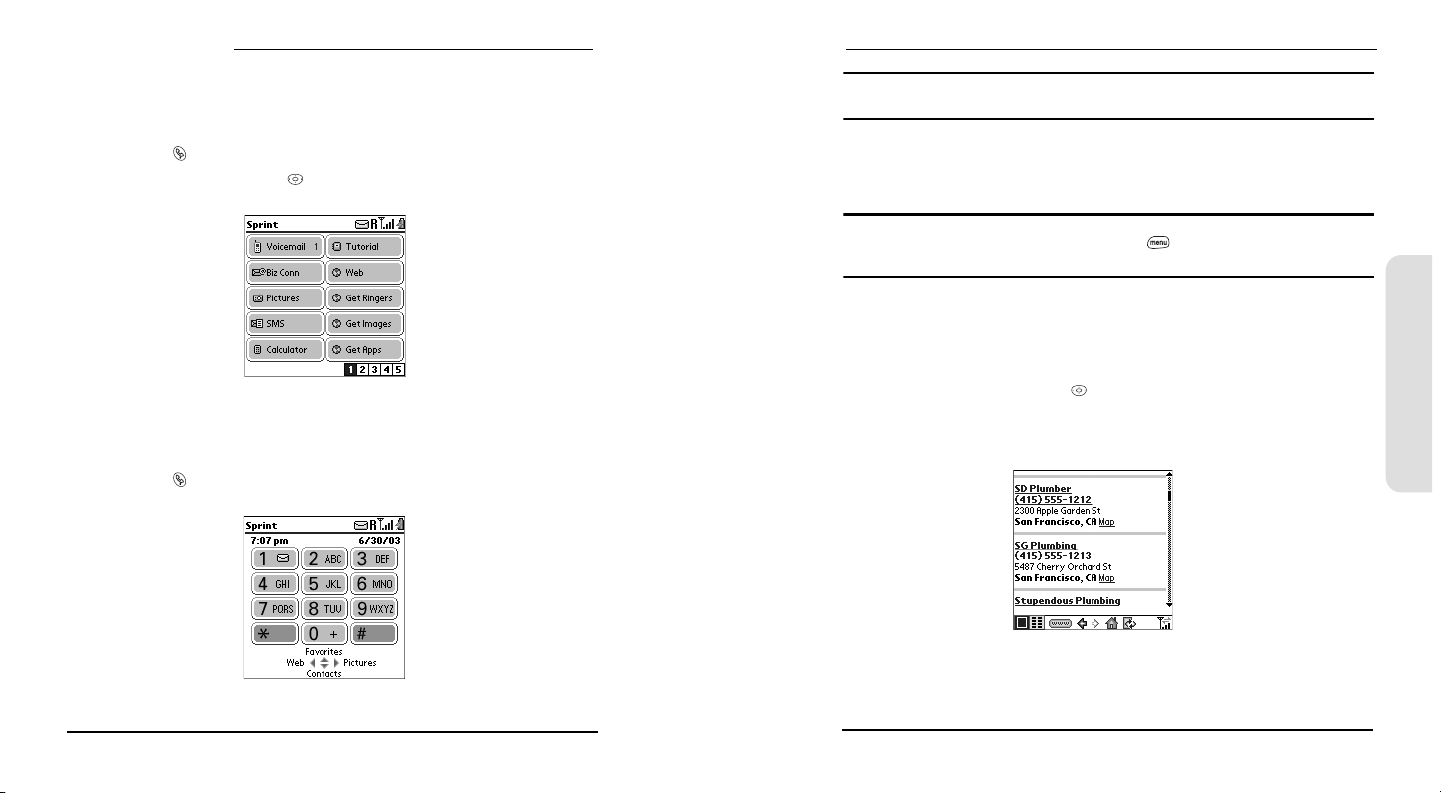
Dialing With a Favorites Button
Favorites buttons can be used as shortcuts for dialing phone numbers and
performing other common tasks. You can use the built-in Favorites buttons or see
page 51 to create some of your own.
1. Press Phone .
2. Use the 5-way navigation control to access your Favorites buttons.
3. Highlight the desired Favorites button.
4. Press Center to dial the selected Favorites button.
Dialing Using the Onscreen Dial Pad
1. Press Phone .
Note: If you changed the wallpaper in the Main view of the Phone application (see page 66), you
can access the Dial Pad by pressing Center, then choosing Dial Pad.
2. Type the desired phone number using the keyboard or tap the numbers on the
onscreen Dial Pad.
3. Press Center to dial.
Tip: You can also paste numbers directly into the Dial Pad view. Copy a number from another
application, then switch to Dial Pad view. Press
Paste (/P). Press Center to dial.
Menu , then from the Edit menu, choose
Dialing From a Web Page
Treo recognizes most phone numbers that appear in Web pages. If you can’t
highlight and dial a phone number on a Web page using the 5-way navigation
control or stylus, it means that Treo does not recognize it as a phone number.
1. Use the 5-way navigation control to highlight the phone number you want to
dial in the Web page or SMS message.
2. Press Center to dial.
Phone, Web, & Messaging
40
41
Page 27
Phone, Web, & Messaging
Dialing From SMS Messages
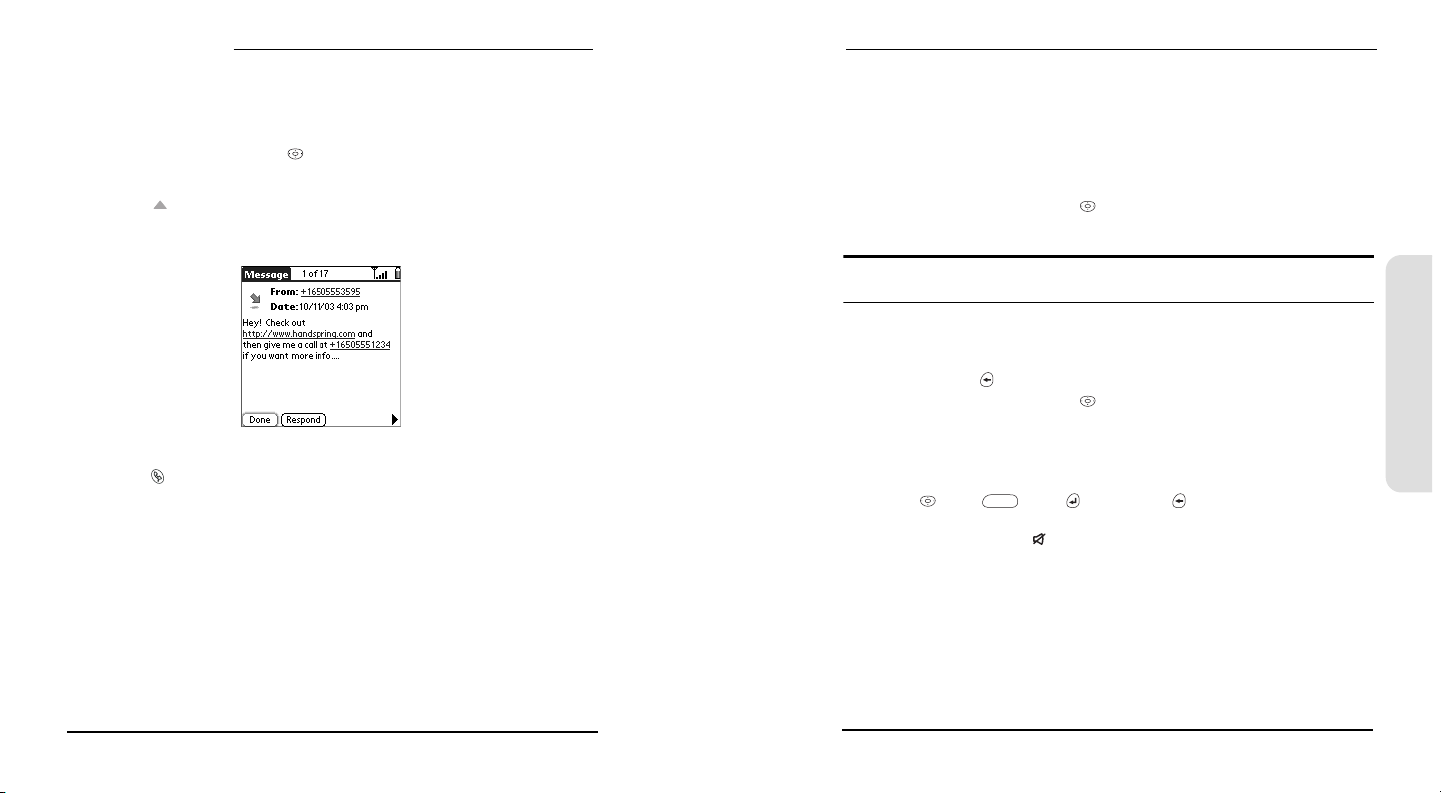
Treo recognizes most phone numbers that appear in SMS messages. If you can’t
use the 5-way navigation control or stylus to highlight and dial a phone number
from an SMS message, it means that Treo does not recognize it as a phone number.
1. Use the 5-way navigation control to scroll to the text box.
2. Press Center to choose the text box.
3. Press Up to highlight the phone number in the SMS message.
4. Press Center to dial.
Receiving Calls
To receive calls, Wireless Mode must be on. This is different from having just the
screen turned on (see page 27).
Answering Calls
To answer a call, do one of the following:
Using the 5-way navigation control , choose the onscreen Answer button.
If the headset is attached, press the headset button.
Redialing the Last Number You Called
Press Phone , then press Center to display a list of your most recently dialed
numbers. To view all your recent incoming and outgoing calls in chronological
order, choose Call Log from the list.
42
Tip: To prevent calls from accidentally being answered while the phone is in a pocket or
briefcase, you can disable the touchscreen when an incoming call arrives (see page 137).
Sending Calls to Voicemail
To ignore a call and send it to voicemail, do one of the following:
Press Backspace .
Using the 5-way navigation control , choose the onscreen Ignore button.
Silencing the Ring of an Incoming Call
To silence the ringer while your phone is ringing:
Press the volume buttons or any key on your Treo except the 5-way navigation
control , Space , Return , or Backspace .
To immediately silence all system sounds including the ringer, slide the ringer
switch to Sound Mode Off (see page 127).
When you silence the ringer, you can either answer the call or let it ring through to
voicemail.
Some third-party applications let you play MP3 music on your Treo 600. If music is
playing through the internal speaker or headset, and a call arrives, you can still
hear the phone ringing softly. The music continues playing but you won’t hear it
during your call. Go to your third-party application to stop the music.
Phone, Web, & Messaging
43
Page 28
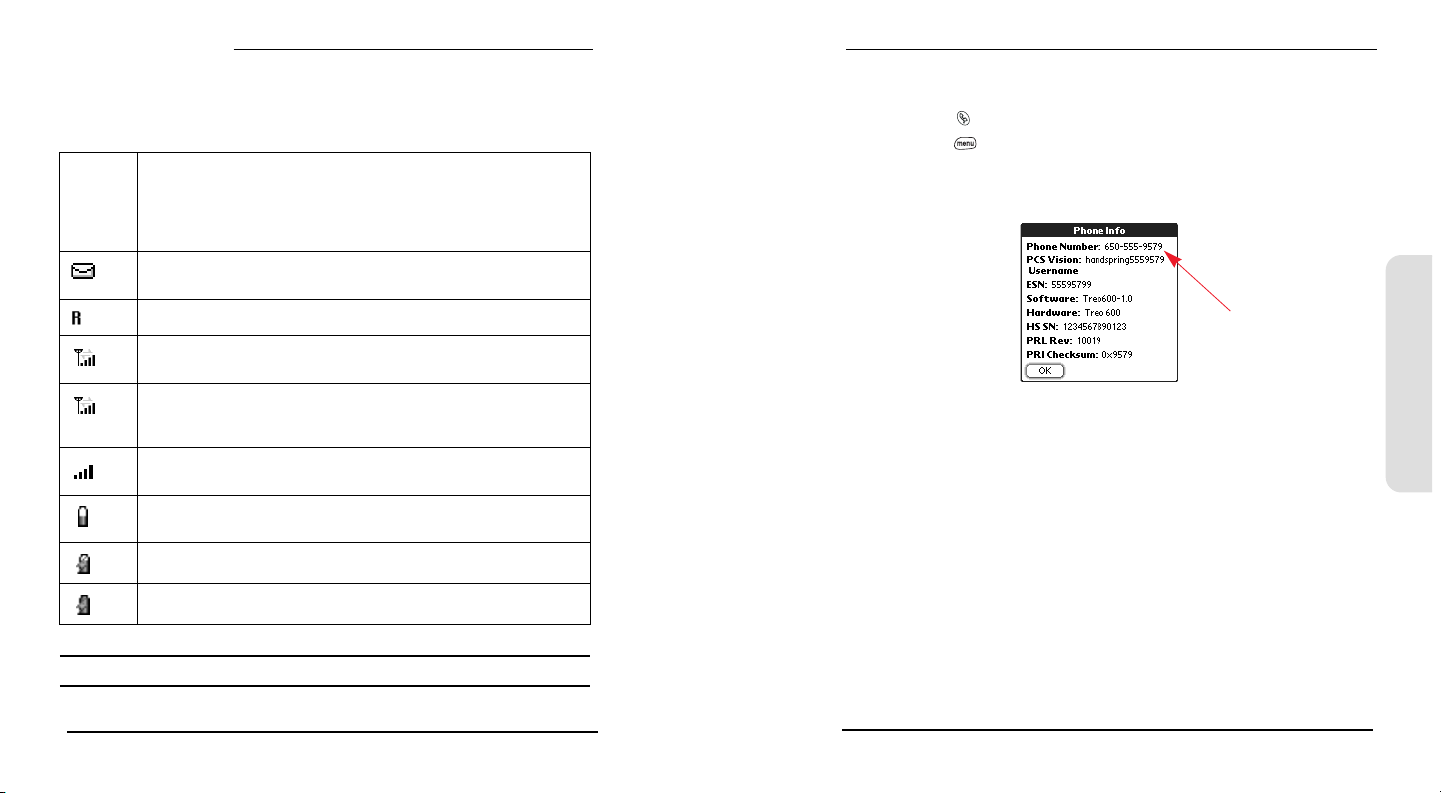
Phone, Web, & Messaging
Signal Strength and Phone Status
You can monitor the status of your phone’s signal strength and several other items,
using icons at the top of the Phone screen:
Network
name
Displays Sprint when Wireless Mode is on and you’re in your Home
network. If you roam outside the PCS Network, the network name indicates
you are roaming outside your network neighborhood. If you’re outside a
coverage area,
Mode, it displays
Appears when you have new voicemail messages. You can tap this icon to
retrieve your messages.
Appears when roaming is active.
Appears with gray arrows when Wireless Mode is on and you’re connected
to the PCS Vision network. You can still receive calls.
Appears with green arrows when you are connected to the PCS Vision
network and a data session is active (for example, when you are browsing
the Web). You cannot receive calls.
Displays the signal strength. The stronger the signal, the more bars appear.
If you are outside a coverage area, no bars appear.
Displays the battery charge status. As the battery drains, the icon changes
from black to clear, and then to red when it’s time to recharge.
Appears when your Treo battery is charging.
Appears when your Treo battery is fully charged.
No service appears instead. When you turn off Wireless
Wireless Mode is Off.
What’s My Number?
1. Make sure Wireless Mode is on (see page 27).
2. Press Phone .
3. Press Menu .
4. From the Options menu, choose Phone Info (/I). If your phone number isn’t listed,
consult Sprint to confirm your phone is activated.
Look here for your
phone number
Phone, Web, & Messaging
Tip: To display details about your battery power, tap the battery icon at the top of the screen.
44
45
Page 29
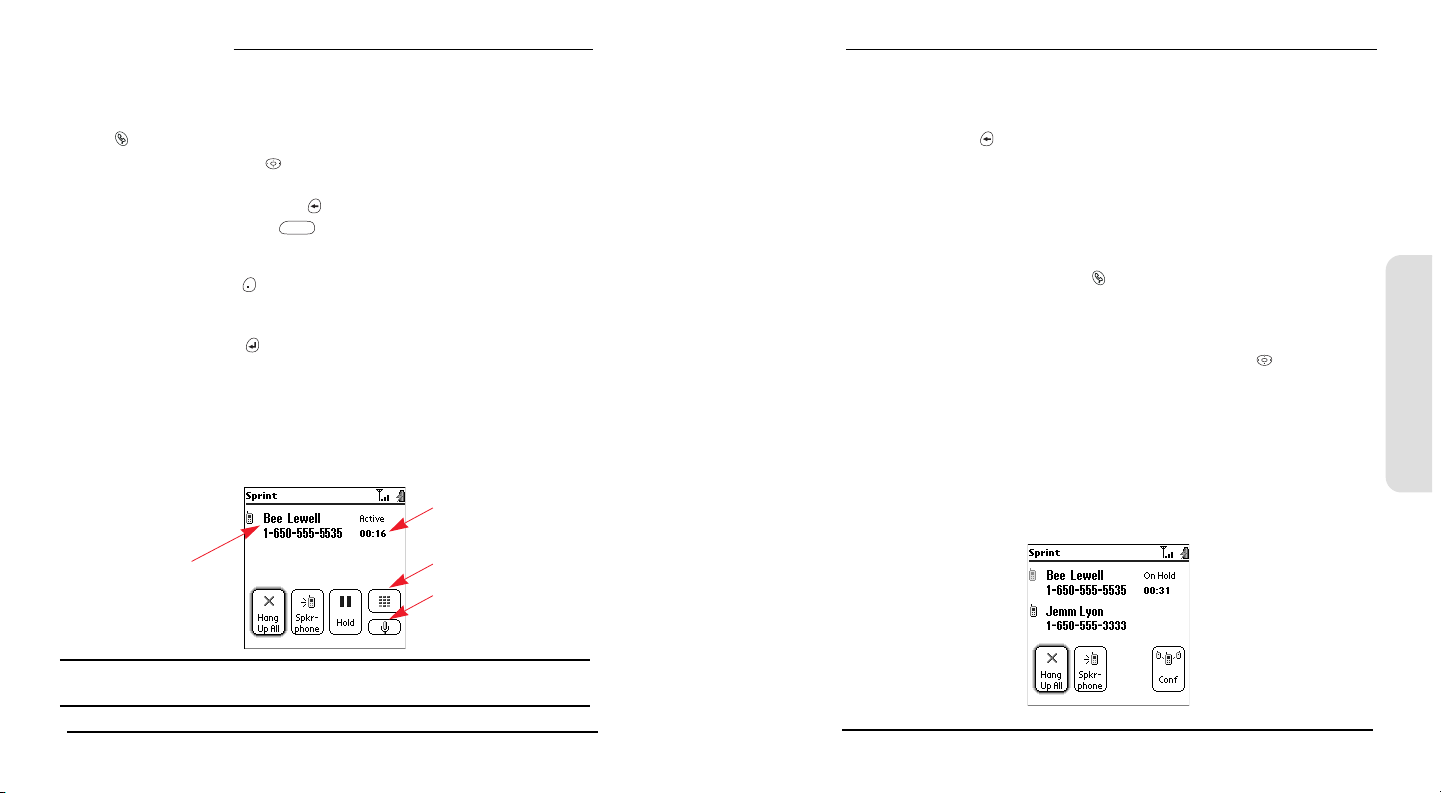
Phone, Web, & Messaging
Managing Active Calls
When you make or receive a call, the Active Call view appears. To toggle between
the Active Call view and the Main view of the Phone application, repeatedly press
Phone .
Use the 5-way navigation control to access the onscreen buttons in this view and
manage an active call:
Hang Up All (or pressing Backspace ) ends the call immediately.
Spkr-phone (or pressing Space ) switches to the personal speakerphone.
The personal speakerphone lets you use other features, such as checking your
calendar, during a call.
Hold (or pressing Period ) places the current call on hold.
Dial Pad opens the Dial Pad so that you can enter extra digits or manually dial an
additional number.
Mute (or pressing Return ) mutes the Treo speaker so you cannot be heard.
Add Call lets you place another call while keeping the first call active. First
choose Hold, then choose Add Call.
Extra Digits dials any extra digits (such as a password or extension) that you
assigned to a Favorites button. This button appears only during outbound calls
to numbers that include pre-defined extra digits. See page 51, for more on
creating a speed dial Favorites button.
Current duration of call
Ending a Call
Do one of the following:
Choose Hang Up All.
Press Backspace .
Press the headset button (if the headset is attached).
Returning to an Active Call From Another Application
You can use many other applications on your Treo while holding a phone
conversation, including the organizer and SMS features. You cannot browse the
Web or send and receive email while on an active call.
From any application, press Phone to return to the Active Call view.
Making a Second Call
You can make a second call while your first call is still active.
1. After dialing the first number, use the 5-way navigation control to choose Hold.
2. Use the navigation control to choose Add Call.
3. Dial the second number using Favorites, Contacts, Dial Pad, Call Log, or Redial
list (see page 38).
The Active Call view now includes two status lines, each representing one of the
calls. You can join the two calls in a conference call, but you cannot switch
between the two calls.
4. Use the navigation control to choose Hang Up All to end both calls.
Phone, Web, & Messaging
Caller’s name
and number
Dial Pad
Mute
Tip: To avoid accidentally pressing onscreen buttons while you’re holding the phone up to your
ear to speak, you can disable the touchscreen during active calls (see page 137).
46
47
Page 30
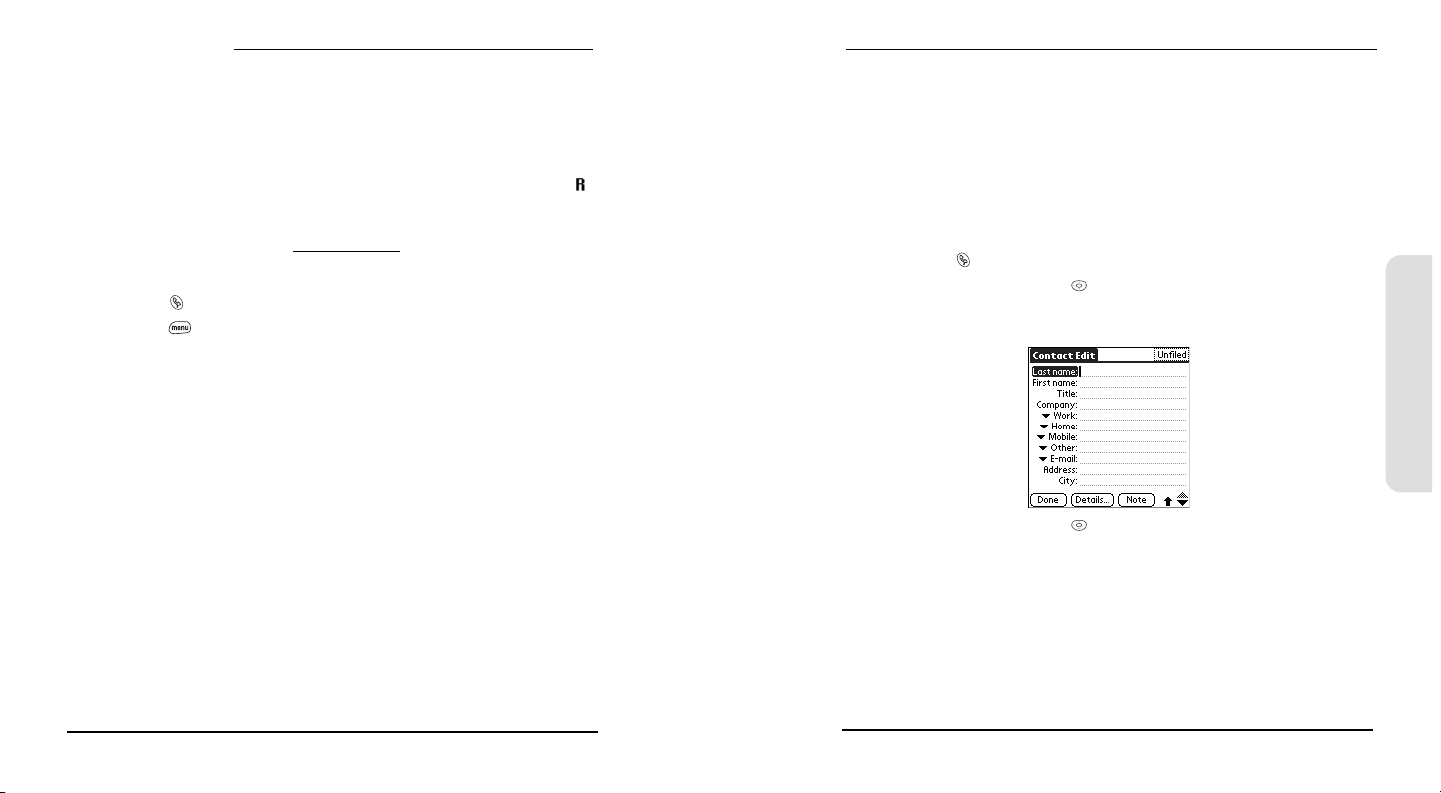
Phone, Web, & Messaging
Controlling Your Roaming Experience
Your phone is dual band, which means you can make and receive calls while
on the enhanced Sprint Nationwide PCS Network and you can also roam on
other digital networks where we’ve implemented roaming agreements with
other carriers.
When you roam outside the Sprint Nationwide PCS Network, the Roaming icon
appears at the top of the screen. Additional charges may apply if you use your Treo
while roaming.
To learn more about roaming, visit
Setting Your Phone’s Roam Mode
1. Press Phone .
2. Press Menu .
3. From the Options menu, choose Phone Preferences (/A).
4. Check the Enable Digital Roaming box.
5. Choose OK.
Feature Availability
You can make and receive calls while roaming.
You will have access to voicemail while roaming.
Other features which are standard on the enhanced Sprint Nationwide
PCS Network, such as Call Waiting, PCS Voice Command, and PCS Vision are
unavailable while roaming.
www.sprintpcs.com.
Internal Phone Book
The internal phone book is located in the Contacts view in Phone. If you are
familiar with Palm Powered devices, you may recognize that the Contacts view is
similar to the Address Book on previous devices.
If you have several contacts to enter, it’s more efficient to use the Palm Desktop
software or Microsoft
between the Treo and your computer. For more information, see page 108.
Adding a Contact
1. Press Phone .
2. Use the 5-way navigation control to access the Contacts list.
3. Choose New Contact.
4. Use the 5-way navigation control to move between fields as you enter
information. Be sure to correctly label your contact’s mobile number(s). The
SMS application (see page 69) only looks up Mobile numbers and email
addresses.
5. To place the entry in a category or mark it private, choose Details.
6. To add a note to an entry, choose Note.
7. After you enter all the information, choose Done.
®
Outlook® on your computer and then synchronize data
Phone, Web, & Messaging
48
49
Page 31
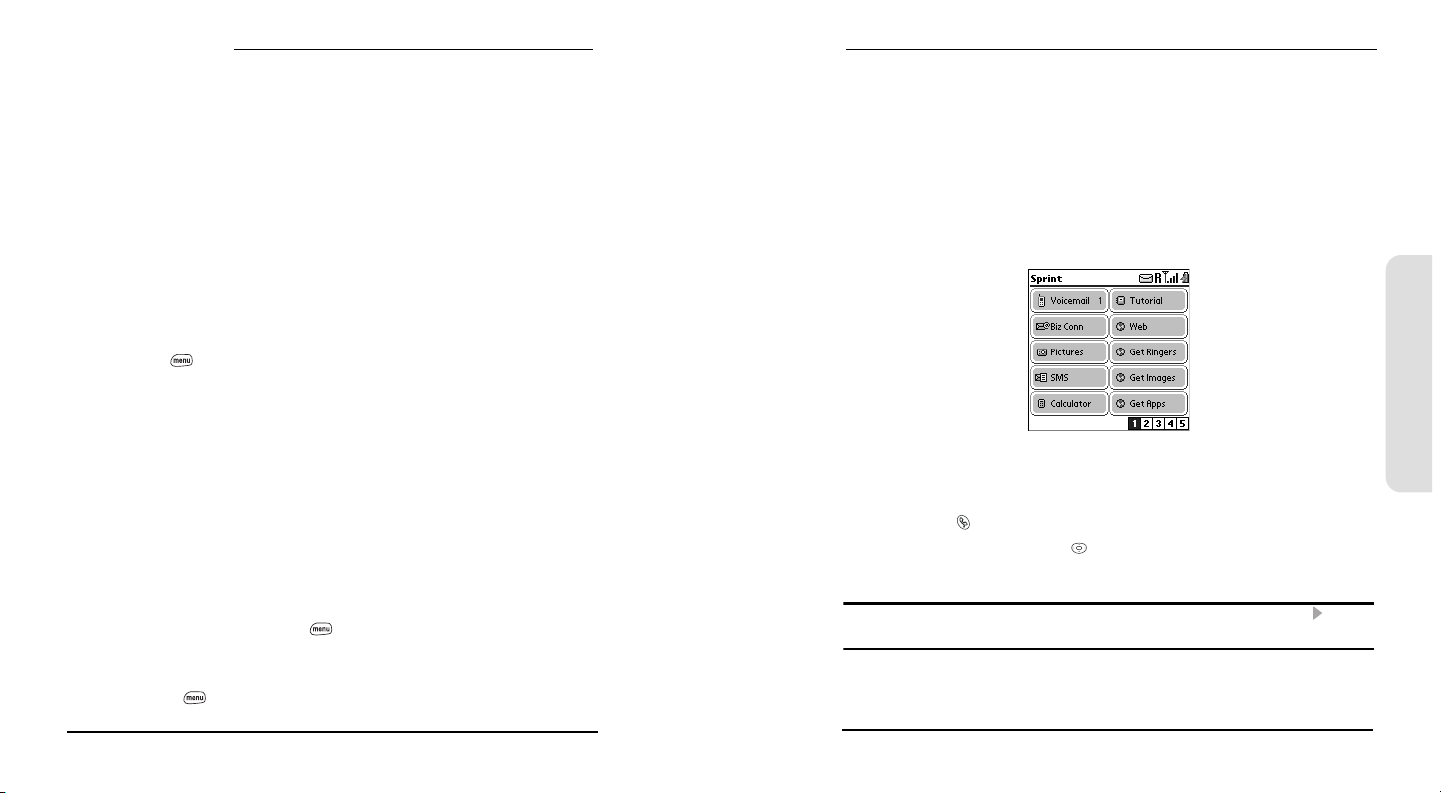
Phone, Web, & Messaging
Viewing or Changing Contact Information
1. In the Contacts list, begin typing one of the following for the contact you want
to view or edit:
First initial and last name
First name
Last name
2. Choose the name of the entry you want to open.
3. Choose Edit.
4. Make changes to the entry as necessary.
5. Choose Done.
Deleting a Contact
1. Open the contact you want to delete.
2. Press Menu .
3. From the Record menu, choose Delete Contact (/D).
4. Choose OK.
Defining Favorites Buttons
Treo provides approximately 50 programmable Favorites buttons for quick access
to the following common tasks:
Dialing a phone number (speed dial).
Launching an application.
Accessing a Web page.
Addressing an SMS message.
Accessing voicemail (preset on Treo).
Phone, Web, & Messaging
Saving Phone Numbers
1. In the Call Log (see page 42), highlight the number you want to save.
2. Select Add Contact.
3. Enter the information for the entry.
4. Choose Done.
Defining Your Business Card
1. Create a new contact using the information on your business card.
2. From Contact Edit view, press Menu .
3. From the Record menu, choose Select Business Card.
Now you can beam your business card to other Palm OS devices. In any Phone
view, press Menu . From the Record menu, choose Beam Business Card (/M).
50
For each Favorite, you can also set up a Quick Key that gives you instant access to
the phone number or application.
Creating a Speed Dial Favorites Button
1. Press Phone .
2. Use the 5-way navigation control to access your Favorites buttons.
3. Choose a blank button.
Tip: If there are no blank Favorites buttons on the current Favorites page, press Right to scroll
through the other pages.
4. Choose the Types pick list, then select Speed Dial.
5. Enter a label for the Favorite:
51
Page 32
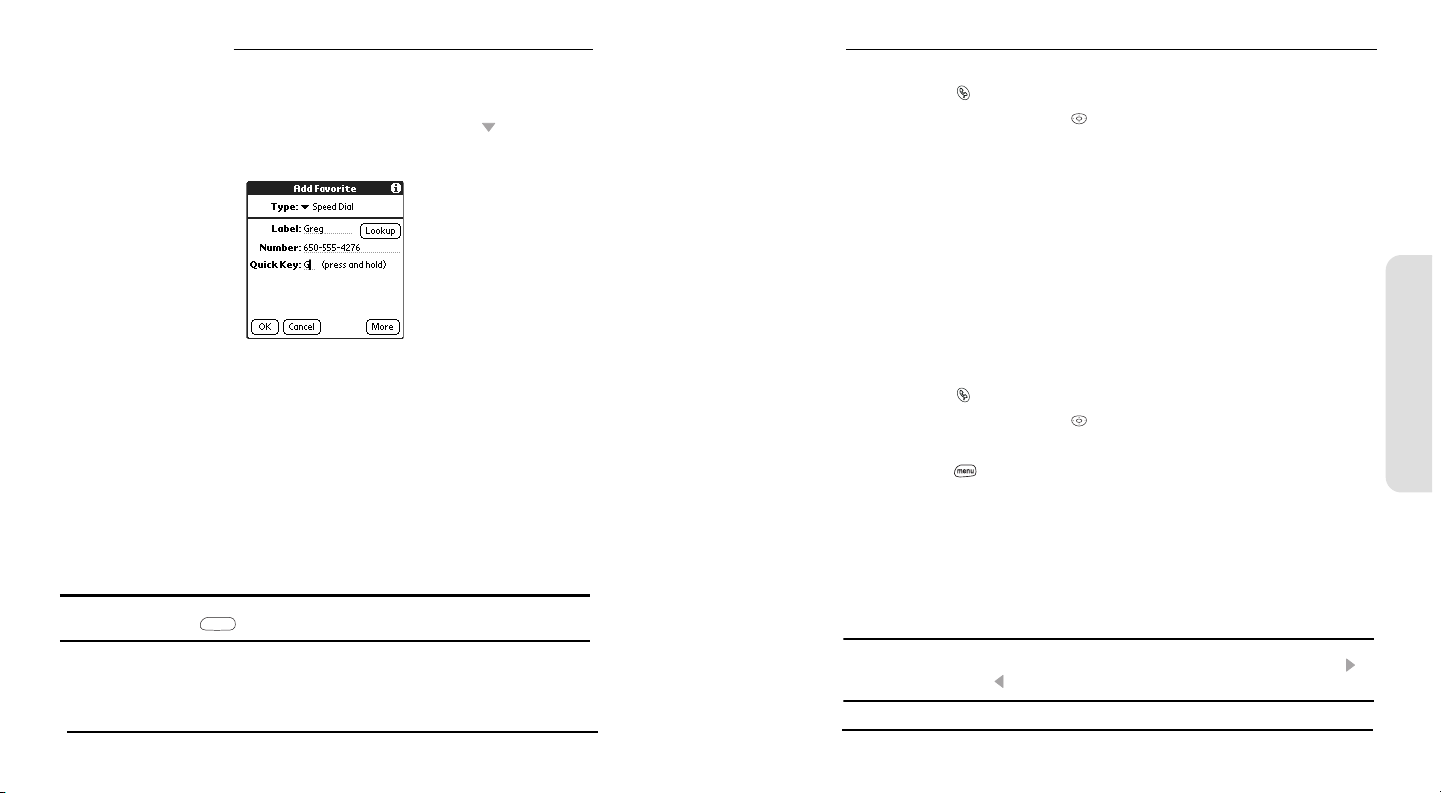
Phone, Web, & Messaging
If the entry is for an existing contact, choose Lookup. Start typing the
contact’s last name, then select the contact when it appears in the
Lookup list.
If the entry is for a new contact, type the Label, press Down and type the
Number.
6. (optional) Enter a Quick Key. When you are in the Main, Dial Pad, or Favorites
view of the Phone application, press and hold the Quick Key to instantly
launch the Favorite.
7. (optional) Choose More, and select advanced options:
Extra Digits lets you define additional digits to dial, such as a password or
extension.
Dial Extra Digits Automatically dials pre-defined Extra Digits immediately after
dialing the phone number, when checked.
Ringtone assigns a special ringtone for incoming calls from that contact.
Image assigns a Caller ID picture that displays when that person calls.
8. Choose OK.
Tip: To view all the contact numbers for the selected person or business, highlight the Favorites
button then press Space .
Creating an Application, Message, or Web Link Favorites Button
1. Press Phone .
2. Use the 5-way navigation control to access your Favorites buttons.
3. Choose a blank button.
4. Choose the Types pick list, then select Application, SMS or Web Link.
5. Enter a label and any other necessary information on the Favorite screen.
6. (optional) Enter a Quick Key. When you are in the Main, Dial Pad, or Favorites
view of the Phone application, press and hold the Quick Key to instantly
launch the Favorite.
7. Choose OK.
Editing or Deleting an Existing Favorites Button
You can edit or delete most Favorites buttons. Note that you cannot edit or delete
the preset voicemail button, but you can add Extra Digits or move the voicemail
button to a different position.
1. Press Phone .
2. Use the 5-way navigation control to access your Favorites buttons.
3. Highlight the Favorites button you want to edit or delete.
4. Press Menu .
5. From the Edit menu, choose Edit Favorites Button (/E).
6. Make the desired changes. For example, add a Quick Key shortcut to any
Favorite. When you are in the Main, Dial Pad, or Favorites view of the Phone
application, press and hold the Quick Key to instantly launch the Favorite.
7. To delete the entry, choose Delete.
8. Choose OK.
Tip: You can also organize your Favorites buttons on different pages. From the Edit menu,
choose
Edit Favorites Pages. To scroll through your Favorites pages, repeatedly press Right to
see the next page and Left to see the previous page.
Phone, Web, & Messaging
52
53
Page 33
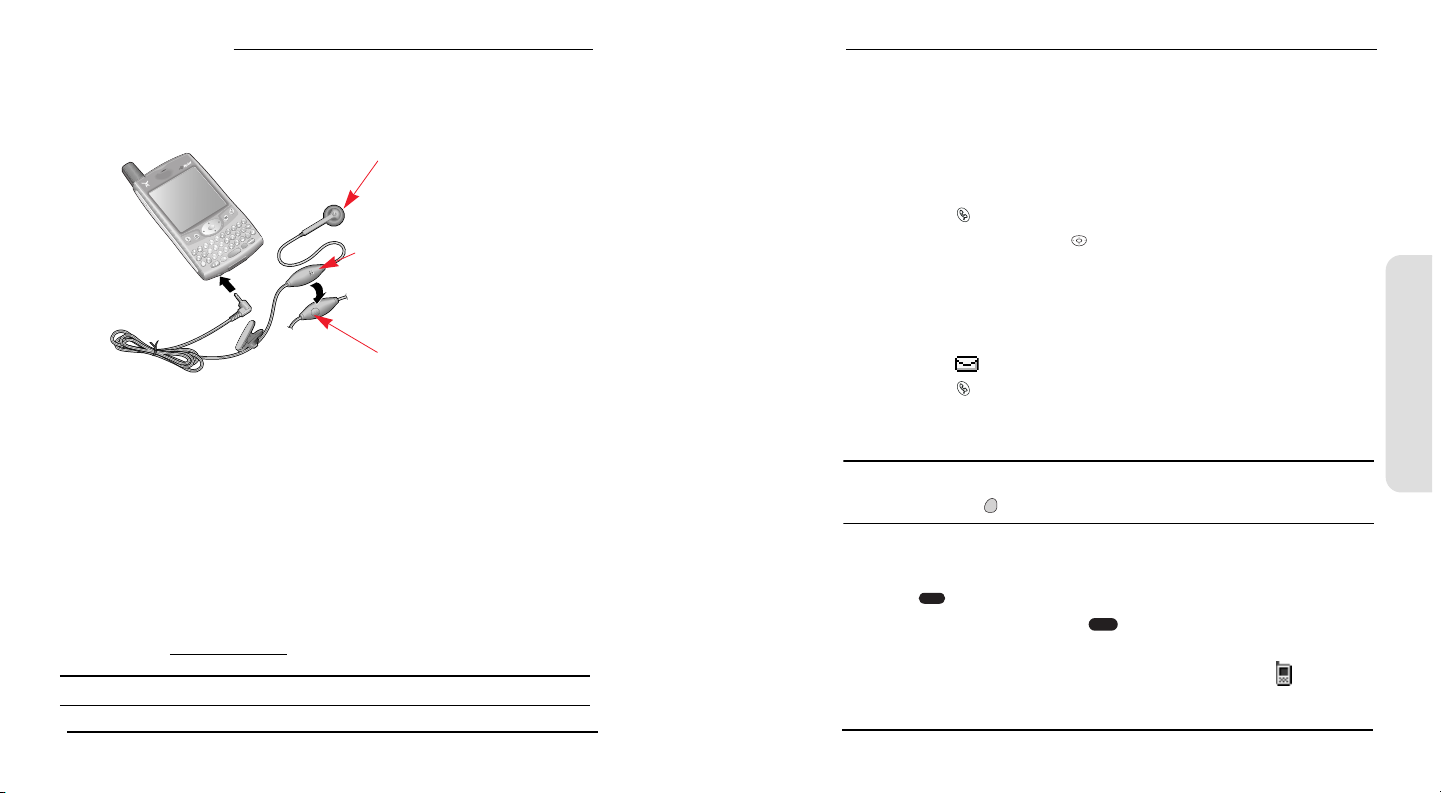
Phone, Web, & Messaging
Using a Phone Headset
You can connect a phone headset for hands-free operation. If you need to use your
phone while driving and this is permitted in your area, we recommend using a
phone headset.
You can press the headset button to perform any of the following tasks:
Answer an incoming call
Answer a call-waiting call
Switch between two active calls or join the calls in a 3-way conference
Hang up a single call
Headset Specifications
Your Treo uses a 2.5 mm, 3-pin headset connector. In addition to the headset that
came with your Treo, you can use other third-party headsets that are designed for
this type of connector. When in doubt, ask the third-party headset manufacturer if
their product is compatible with Treo phones. If you hear a headset buzz or poor
microphone performance, your headset may be incompatible with Treo.
To hear in stereo through the jack (such as music), use a stereo adapter or other
accessory. Visit
Note: The headset designed for previous models of Treo is not compatible with the Treo 600.
54
www.handspring.com for more information.
Speaker
Microphone
Headset
Button
Sending and Receiving Messages
Setting Up Your Voicemail
Your voicemail number is preset when you activate your phone. The first time you
call voicemail, you are prompted to enter your voicemail pass code. If necessary,
please contact Sprint for your pass code and enter it as prompted.
1. Turn on Wireless Mode, as described on page 27.
2. Press Phone .
3. Use the 5-way navigation control to access Favorites.
4. Choose the Voicemail Favorites button.
5. Follow the system prompts to create your pass code and record your greeting.
Retrieving Your Voicemail Messages
When you have a new voicemail message, you are notified with an alert and a
voicemail icon that appears near the top of your screen.
1. Press Phone .
2. From the Phone application Main view, Dial Pad, or Favorites, press and hold 1.
3. Follow the system prompts.
Tip: Enter your voicemail pass code using the Treo keyboard, or choose Extra Digits if you
defined this option. See page 53 for information on editing Favorites buttons. Remember, you do
not need to press Option to type numbers, *, or # while on an active call.
Accessing Your Voicemail From Another Phone
1. Dial your PCS Phone Number.
2. Press when your voicemail answers.
3. Enter your pass code, then press .
Displaying Numeric Pages
1. From the New Message alert, highlight an item with a phone icon .
2. Choose Go To to view the page in the SMS application.
*
#
Phone, Web, & Messaging
55
Page 34
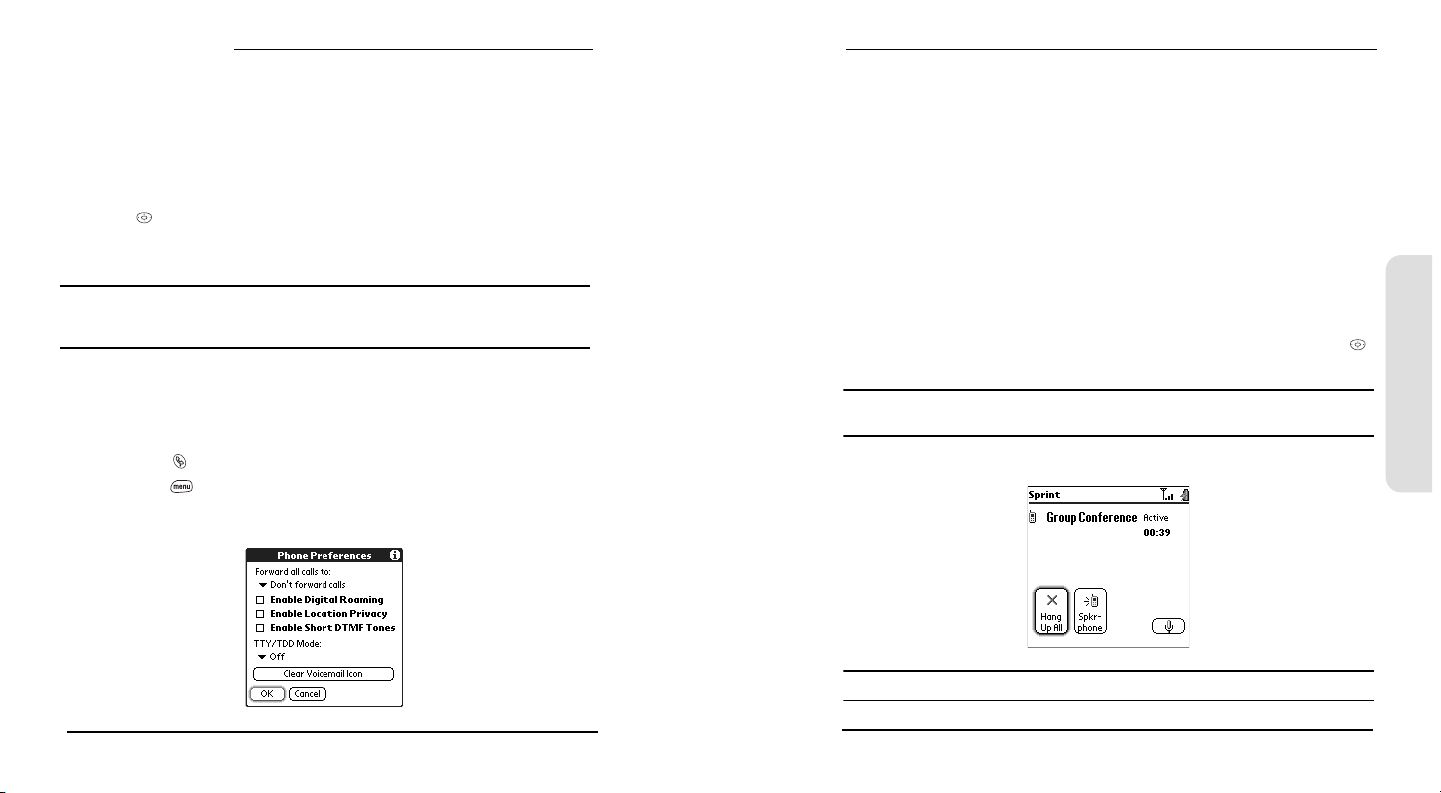
Phone, Web, & Messaging
PCS Service Features
Call Waiting
When you are on an active call, you can receive a second call. When the second
call comes in, the Call Waiting dialog appears, giving you the following options for
handling the second call:
To put your first call on hold and answer the second call, use the 5-way navigation
control to choose Answer. (To switch between calls, choose Swap.)
To continue your first call and send the second call to voicemail, use the
navigation control to choose Ignore.
Note: When you have more than one active call, and you choose the Hang Up All button, it ends
both calls. If the call that was on hold was an incoming call, your phone automatically redials
that number so that you can continue the conversation.
Call Forwarding
Call Forwarding lets you forward your calls to another number. You can still make
calls from your phone while this is activated. There is a per-call charge for this
service.
1. Press Phone .
2. Press Menu .
3. From the Options menu, choose Phone Preferences (/A).
4. Choose the Forward all calls pick list.
If the forwarding number appears in the pick list, select the number.
If the forwarding number does not appear in the pick list, select Edit Numbers,
then choose New. Enter a 10-digit forwarding number without spaces.
Choose OK to finish.
5. Choose OK.
Three-Way Calling
Talking with two different people at the same time is made easy with Three-Way
Calling.
1. Enter a number you wish to call and press Center to dial.
2. After you establish the connection, place a second call (see page 47). You cannot
initiate a three-way call if the second call is an incoming call.
3. When you’re connected to the second party, use the 5-way navigation control
to choose Conf. to begin your three-way call.
Note: If one of the people you called hangs up, you and the remaining caller stay connected. If
you initiated the call and are the first to hang up, all three callers are disconnected.
4. To end the three-way call, use the navigation control to choose Hang Up All and
end all the calls.
Phone, Web, & Messaging
56
Note: When using Three-Way Calling, normal airtime rates apply for each of the two calls.
57
Page 35
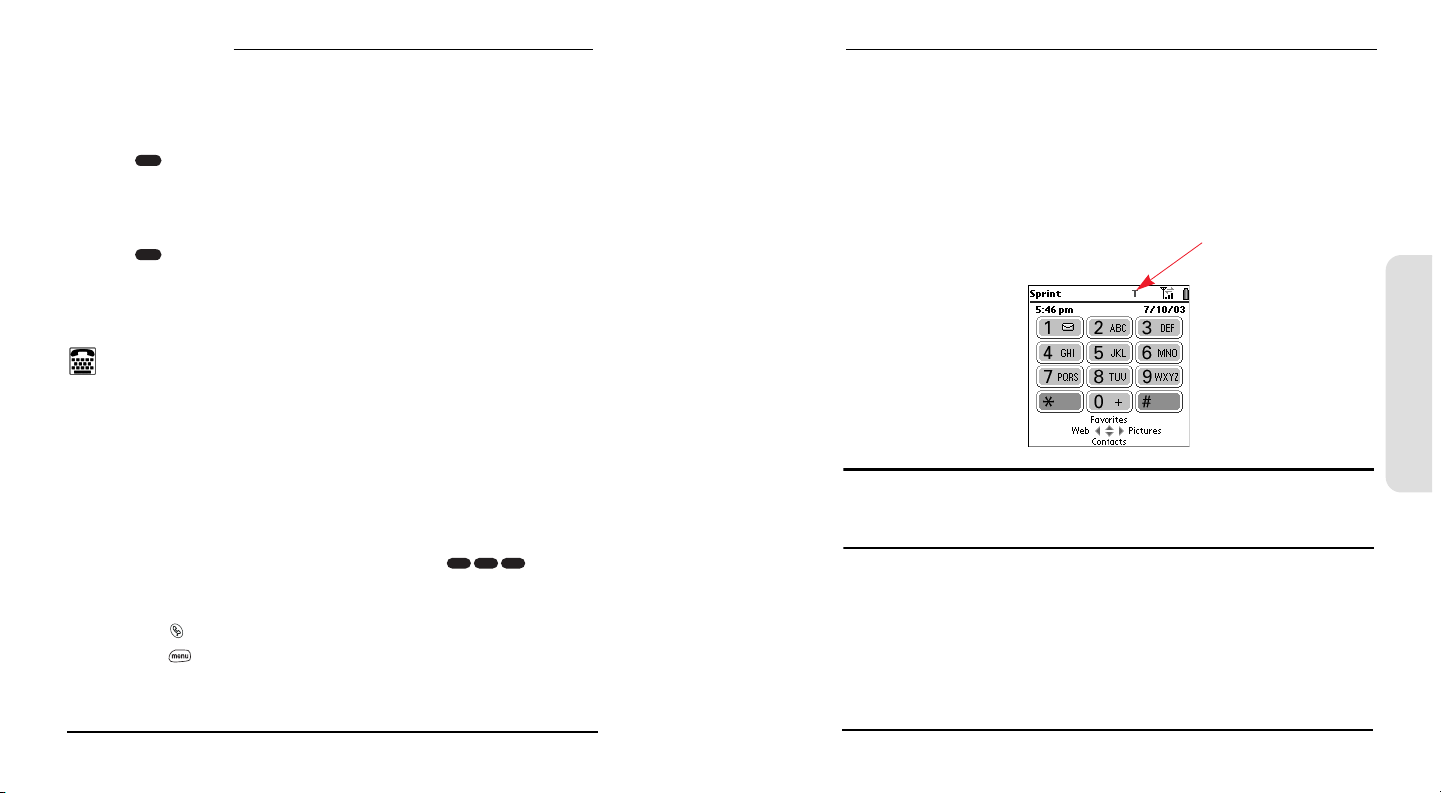
Phone, Web, & Messaging
PCS Voice Command
If you subscribe to the PCS Voice Command service, you can call a number just by
saying a name. There is a monthly charge for PCS Voice Command service.
Get started by setting up your Personal Address Book
1. Press , then Center. Follow the system prompts. (You’ll hear a tone
followed by the prompt “Ready.”)
2. Say “Add Name” to begin setting up your Personal Address Book.
Making a call with PCS Voice Command
1. Press , then Center. (You’ll hear a tone followed by the prompt “Ready.”)
2. After the prompt, say “Call” and the name of the person or the number you
want to call. (Your request will be repeated and you will be asked to verify.)
3. Say “Yes” to call the number or person. Say “No” to cancel.
SM
*
*
TTY Use With PCS Service From Sprint
A TTY (also known as a TDD or Text Telephone), is a telecommunications device
that allows people who are deaf or hard of hearing, or who have speech or
language disabilities, to communicate by telephone.
Your phone is compatible with select TTY devices. You can connect a TTY/TDD
machine to your phone through the headset jack, but you cannot use your headset
jack with a headset or handsfree kit, while this mode is enabled. Please check with
the manufacturer of your TTY device for connectivity information and to ensure
that the TTY device supports digital wireless transmission.
When establishing your PCS Service, please call PCS Customer Solutions
state Telecommunications Relay Service (TRS) by first dialing , then
pressing Center. Then provide the state TRS with this number: 866-727-4889.
To turn TTY mode on or off:
1. Press Phone .
2. Press Menu .
3. From the Options menu, choose Phone Preferences (/A).
7
1 1
SM
via the
4. Choose the TTY Mode pick list, then select one of the following modes:
Default Mode sends and receives text.
VCO Mode sends voice and receives text.
HCO Mode sends text and receives voice.
Off disables TTY mode and sends and receives voice.
5. Choose OK. A red T appears at the top of the Phone screen whenever TTY is
enabled.
TTY Enabled
Phone, Web, & Messaging
IMPORTANT NOTICE: Sprint recommends that TTY users make emergency calls by other
means, including Telecommunications Relay Services (TRS), analog cellular, and landline
communications. Wireless TTY calls to 911 may be corrupted when received by public safety
answering points (PSAPs), rendering some communications unintelligible.
58
59
Page 36
Phone, Web, & Messaging
PCS Vision
SM
Getting Started With PCS Vision
To sign up for PCS Vision services or to access complete instructions, visit
www.sprintpcs.com/manage. For information on charges associated with features that
use a PCS Vision connection, refer to your PCS Service Plan.
Launching PCS Vision
1. Make sure Wireless Mode is turned on, as described on page 27.
2. Press Phone .
3. Use the 5-way navigation control to choose Web.
4. When the Connect to the Internet dialog appears, choose Ye s to launch a
PCS Vision connection.
If you have not already done so, select Now when the Preparing Vision Services
dialog appears. This initiates a one-time process to configure your PCS Vision
services. At the end of this two-minute process, your phone connects to the
PCS Vision Home page.
If you want to cancel the connection, select No.
Tip: To bypass the selection screen in the future, check the Don’t ask me again box.
5. Use the 5-way navigation control to scroll around and select from a variety of
online services.
6. Exit the browser to end your session.
PCS Vision Features
With PCS Vision services, you have access to additional features, better performance,
faster Web connections, and a wider variety of online services. Features such as Web
access, graphically-enriched games, and sending/receiving digital images are
available on your Treo through the enhanced Sprint Nationwide PCS Network.
Picture Mail
Take digital pictures with the built-in camera and send them to email
addresses or other PCS Vision phones.
SMS
Send and receive email and text messages, or chat.
Games
Play exciting games with full-color graphics, sound, and vibration.
Ringers
Personalize your PCS Phone by downloading ring tones. You can use Sound
preferences to assign these tones to different applications and speed dial
Favorites buttons.
Screen Savers
Download unique images to Picture Mail. Use these images as wallpaper, or
make it easy to tell who’s calling by assigning specific images to numbers in
your speed dial Favorites buttons.
Web
Experience full-color graphic versions of popular Web sites.
PCS Business Connection
Secure, real-time access to your Microsoft
company email, calendar, business directory, and personal contacts.
SM
SM
®
Outlook® or Lotus Notes®
Phone, Web, & Messaging
60
61
Page 37
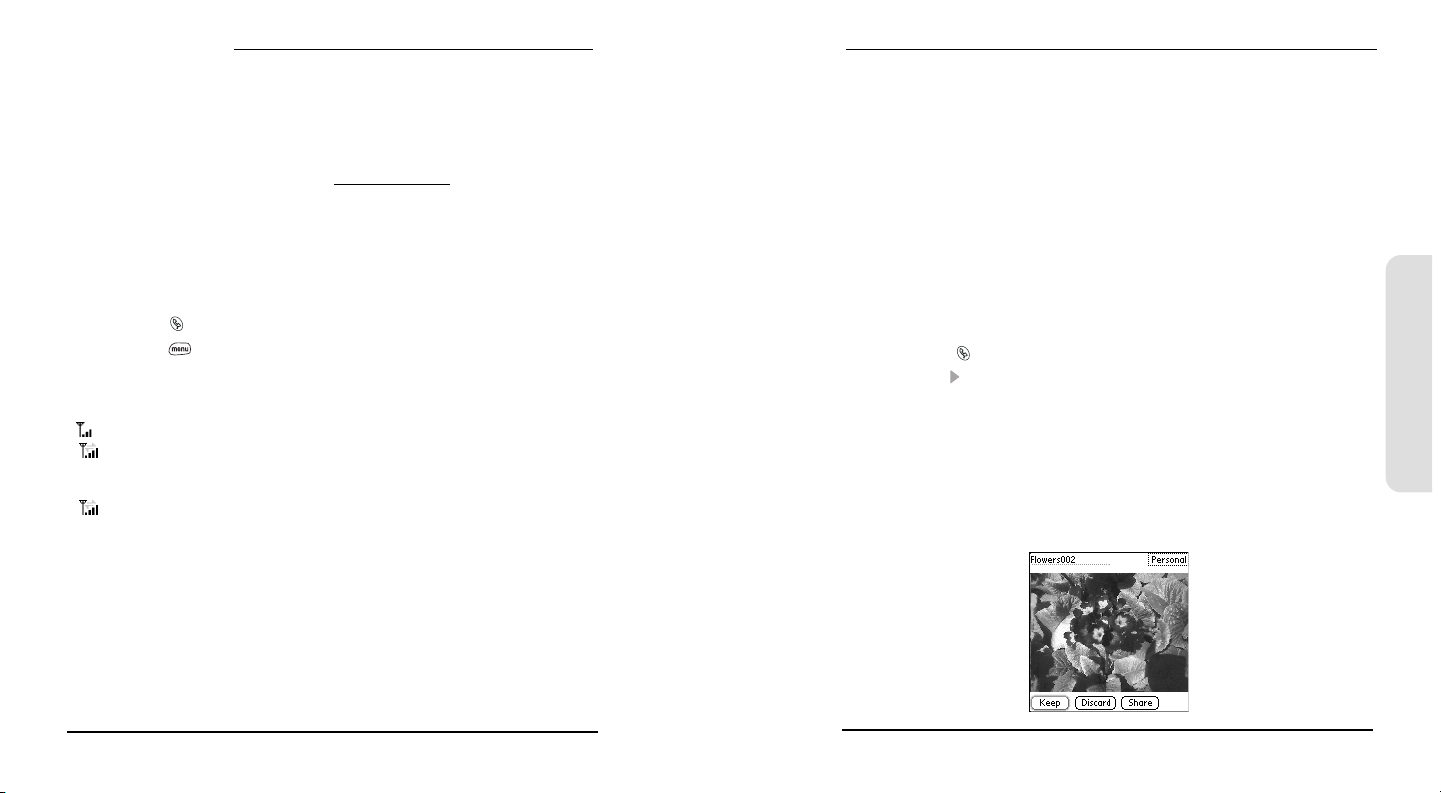
Phone, Web, & Messaging
Accessing PCS Vision Features
Once your phone is activated, you are signed in and ready to connect to
PCS Vision services at any time.
PCS User Name
Your PCS User name is automatically assigned to you. Your user name, which
resembles an email address (for example,
PCS Mail and SMS services. Remember, with PCS Business Connection, you can
use virtually any email address (see page 84). Your PCS User name is simply an
additional address that identifies your PCS Account.
When your phone is Vision-enabled, your user name automatically appears on the
Phone Info screen.
To find your user name:
1. Press Phone .
2. Press Menu .
3. From the Options menu, choose Phone Info (/I).
[email protected]), is used with
PCS Vision Symbols on Your Screen
Phone is not currently able to access PCS Vision service features.
Connection is active (data is being transferred) when the arrows are green.
Outgoing calls can be made, but incoming calls go directly to your
voicemail.
Connected, and voice calls can be sent and received when the arrows are gray.
PCS Vision Billing Information
See your service plan for details on PCS Vision billing.
Using the Camera and Picture Mail
Your phone comes with an easy-to-use built-in camera, which allows you to
instantly take, view, and share pictures with your friends and family. To add a
personal touch to your phone, use your pictures as wallpaper on the Main Phone
screen and as caller ID images.
You can store your pictures on your phone, upload them to albums on the Picture
Mail Web site, move them to an expansion card, and copy them to your computer
by performing a HotSync operation.
Additional fees may apply for Picture Mail service. Contact Sprint for additional
information.
Taking a Picture
The camera takes 12-bit color pictures that are at a maximum resolution of
640x480 pixels (0.3 megapixels).
1. Press Phone .
2. Press Right to launch Pictures.
3. Using your phone screen as a viewfinder, aim the lens on the back of your Treo
at the subject you want to photograph.
4. Press Center to take the picture.
5. If desired, edit the picture name and category at the top of the screen.
6. Choose Keep to save the picture on your phone, choose Discard to cancel the
picture, or choose Share to share the picture. For details on sharing pictures,
see the instructions on page 64.
Phone, Web, & Messaging
62
63
Page 38
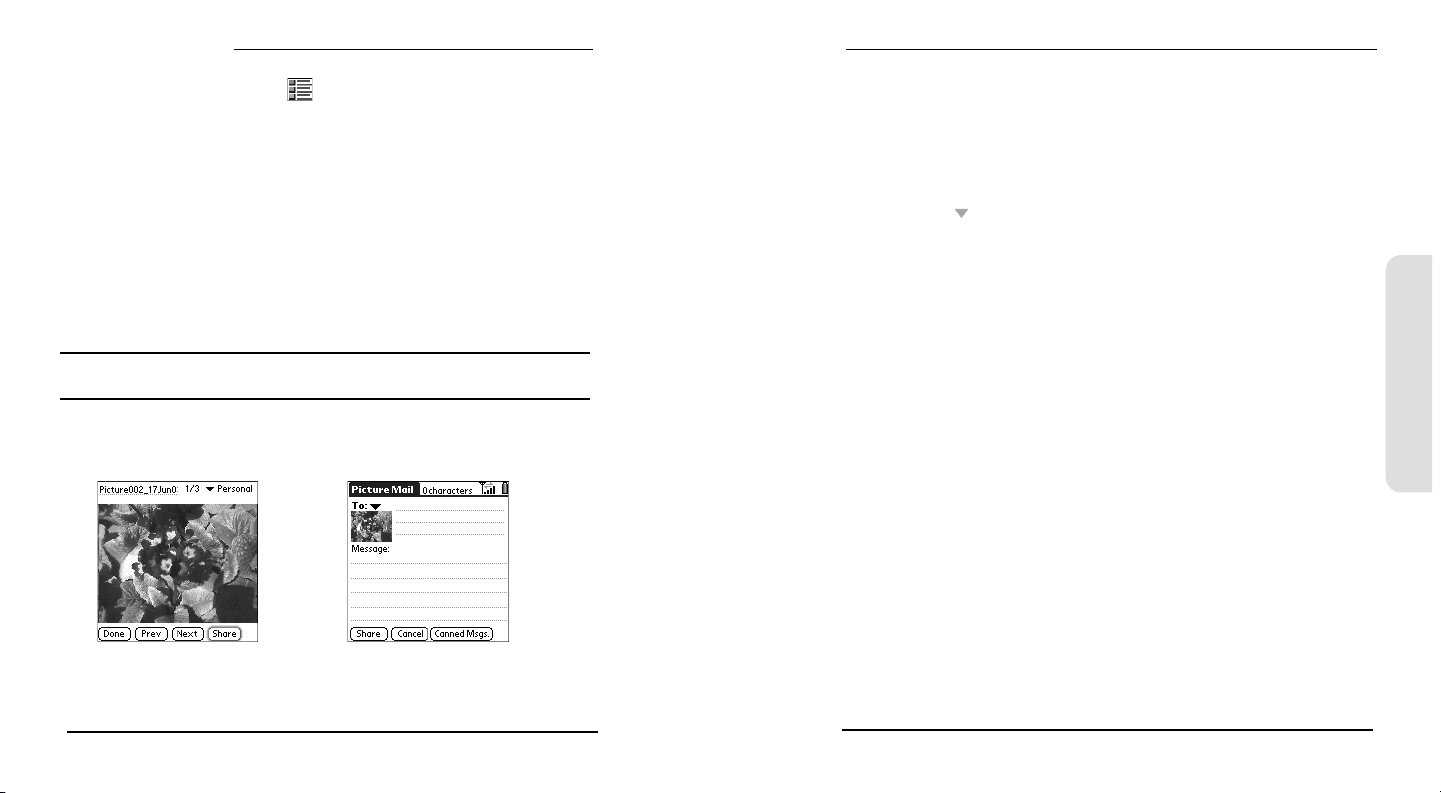
Phone, Web, & Messaging
Viewing a Picture
1. Choose the Pictures view icon .
2. Choose the picture you want to view.
3. Choose Next or Prev to move between pictures.
4. Choose Done.
Sharing a Picture
You can share a picture with someone who uses a PCS Vision Phone or with
someone who has an email address.
The first time you share a picture, you are prompted to establish a Picture Mail
Web site account and password. Enter a four- to eight-digit, alpha-numeric
password and press Center. Once you receive confirmation, you may continue to
upload and share pictures.
Tip: You can reduce the size of an image before sending it. From the Picture menu, choose
Downsize. Indicate whether you want to resize the original or save a reduced copy.
1. From the Pictures view, choose the picture you want to share.
2. Choose Share.
3. Choose the To pick list to address the message:
If the recipient’s name appears in the To pick list, select it from the list.
If the recipient is in your Contacts list, choose Lookup in Contacts List, then
start typing the first few letters of the recipient’s first or last name. Highlight
the recipient’s phone number or email address, then choose Add.
If the recipient’s name is not in the pick list or your Contacts list, type the
full phone number or email address.
4. Press Down .
5. Type your message or choose Canned msgs to insert predefined phrases.
6. Choose Share.
Your phone uploads the picture to the Picture Mail Web site, creates a private
Guest Book for the recipient on the Picture Mail Web site, and sends your message
to the recipient. The recipient can then use a Web browser to access this private
Guest Book to view this picture and to enter comments. You can view the
comments later from the Picture Mail Web site.
Receiving Picture Mail
You can automatically download new messages or have Treo notify you that a
message is ready to download. In either case, an alert appears when you have a
new message.
From the alert:
To view your message(s), choose Go To.
To dismiss the alert and view the message(s) later, choose OK.
To be reminded again in 5 minutes, choose Snooze.
Phone, Web, & Messaging
64
65
Page 39
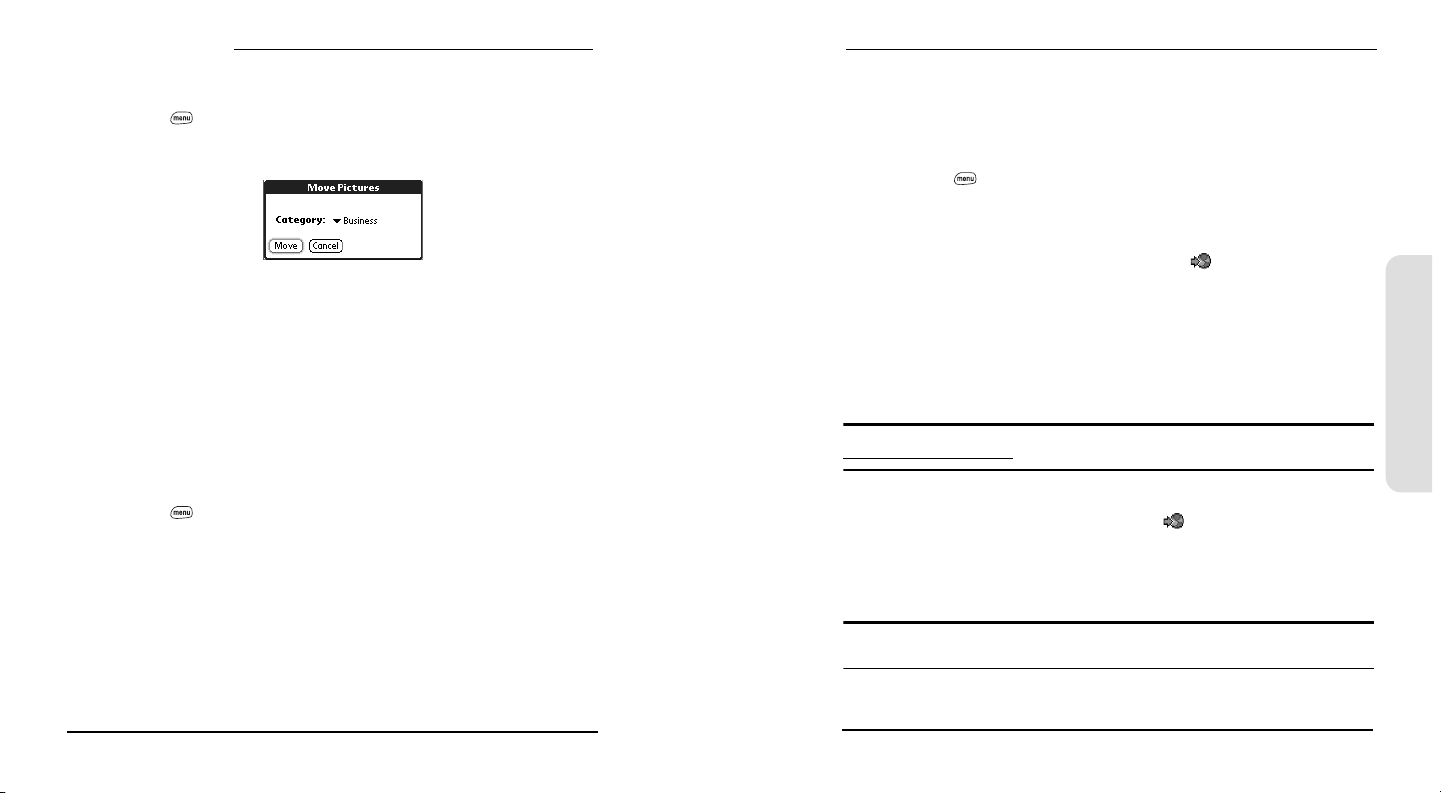
Phone, Web, & Messaging
Moving Pictures
1. From the Pictures view, choose the picture(s) you want to move.
2. Press Menu .
3. From the Picture menu, choose Move (/M).
4. Choose the category or expansion card where you want to move the
picture(s).
5. Choose Move to finish.
Deleting a Picture From Your Phone
1. From the Pictures view, choose the picture you want to delete.
2. Choose Delete (/D).
3. If prompted, choose OK to confirm deletion.
Setting a Picture as Wallpaper
1. From the Pictures view, choose the picture you want to use as wallpaper.
2. Press Menu .
3. From the Picture menu, choose Set Wallpaper.
4. When the confirmation message appears, confirm by selecting Ye s , or decline
by selecting No.
Uploading Pictures to Your Online Inbox
Your Picture Mail account includes an Inbox on the Picture Mail Web site. You can
use your Inbox to store and view pictures from your phone or from a computer
with Internet access.
1. From the Pictures view, choose the picture(s) you want to move.
2. Press Menu .
3. From the Picture menu, choose Upload (/U).
Accessing Your Online Picture Mail Inbox
1. From any Picture Mail view, choose the Web icon to access your Inbox.
2. Choose any of the following:
Share Inbox enables you to share all the pictures in your Inbox.
Save Inbox As copies the pictures in your Inbox into a new album.
Move All Pictures To transfers the pictures in your Inbox to an existing album.
Back returns to the Camera application on your phone.
Album List displays a list of all the albums in your Picture Mail account.
Tip: You can also view and manage your pictures on your computer at
www.picturemail.sprintpcs.com.
Working With Your Albums on the Picture Mail Web Site
1. From any Camera view, choose the Web icon to access your Inbox.
2. Choose Album List.
3. Choose an album, then choose View, Share, Options, or Edit to perform the
corresponding action.
Phone, Web, & Messaging
66
Tip: To download a picture from the Picture Mail Web site to your phone, tap and hold the stylus
on the picture until you are prompted to confirm the download request.
67
Page 40
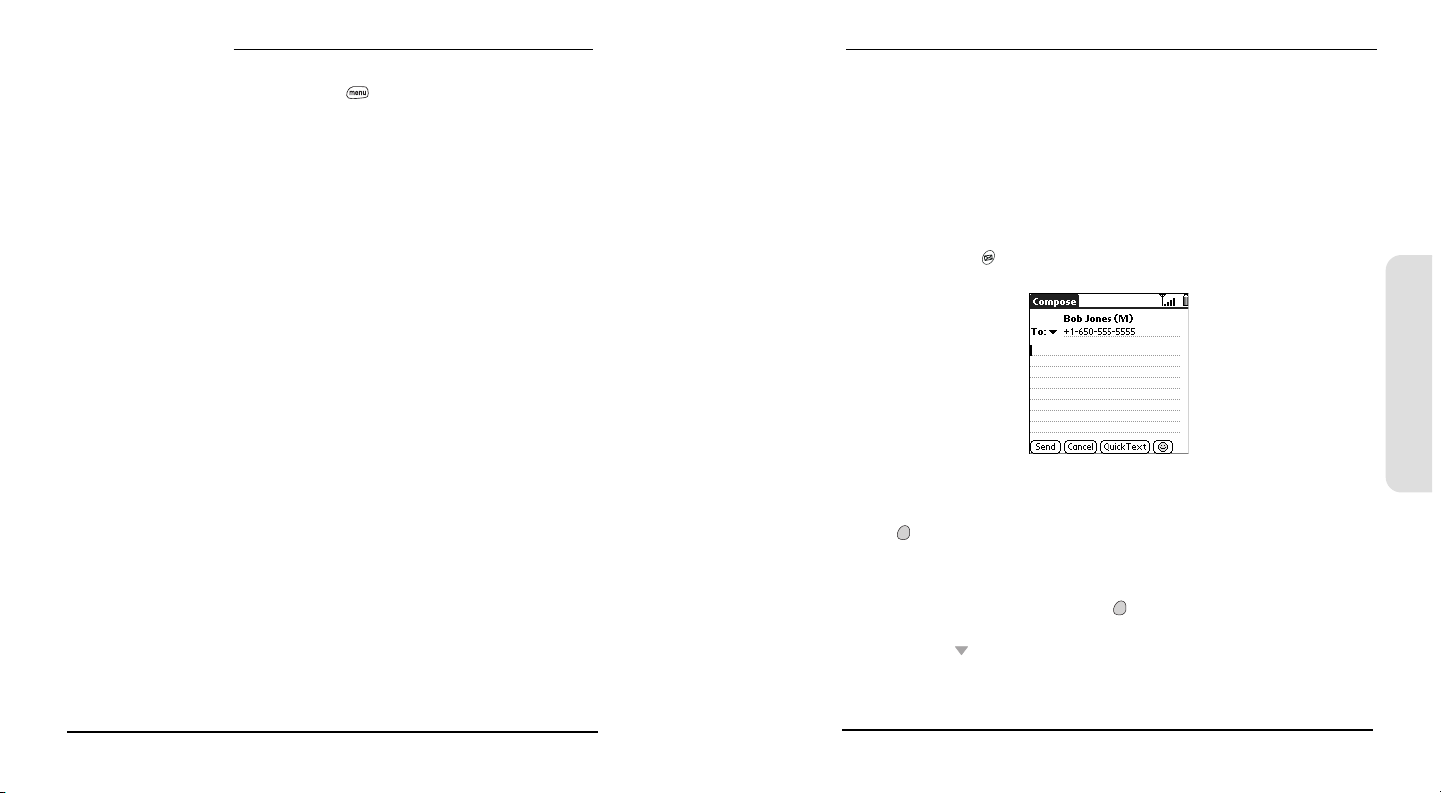
Phone, Web, & Messaging
Customizing Your Picture Mail settings
1. From any Picture Mail view, press Menu .
2. From the Options menu, choose Preferences.
3. Set any of the following preferences:
Default name assigns a name to a series of pictures to be captured, such as
Seattle001, Seattle002, etc.
Category sets the default category for newly captured pictures.
Picture size sets the default size for newly captured pictures. Large is 640 x
480 pixels, small is 160 x 120 pixels.
Play capture sound plays a sound to confirm picture capture.
Confirm before deleting instructs Picture Mail to ask if you’re sure you want to
delete a picture before erasing it.
Confirm before saving instructs Picture Mail to ask if you’re sure you want to
save a picture before storing it on your Treo.
Backup settings backs up the Treo image database on your computer.
4. Choose OK.
Viewing Pictures on Your Computer
If you customized the Picture Mail settings to backup pictures onto your Windows
computer (see above), you can view these pictures in JPEG format or email them
to friends with your desktop email application.
1. Locate your Pictures folder. When you installed the desktop software from the
Treo CD, a shortcut to the Treo Pictures folder was created on your desktop.
You can also look in C:\Program Files\Handspring\Treo Pictures\(user name), or if you
upgraded from another Palm powered device, in C:\Program Files\Palm\Treo
Pictures\(user name).
2. Double-click any file to launch it with the default picture viewing software on
your Windows computer.
68
SMS
SMS messages are brief text messages that you exchange with other wireless
phones that have text messaging capability, or with email addresses. You can
exchange messages of up to 160 characters (including the destination email
address or mobile number). Before you use your Treo to send or receive SMS
messages, you need to verify pricing and availability with Sprint.
Creating and Sending a Message
1. Make sure Wireless Mode is turned on, as described on page 27.
2. Press Messaging .
3. Choose New.
4. Choose the To pick list to address the message:
If the recipient’s name appears in the To pick list, select it from the list.
If the recipient is in your Contacts list, choose Lookup in Contacts, press Option
to turn off Option Lock, then start typing the first few letters of the
recipient’s first or last name. Highlight the recipient’s phone number or
email address, then choose Add.
If the recipient’s name is not in the pick list or your Contacts list, type the
full phone number, or press Option to turn off Option Lock and then type
the email address.
5. Press Down to jump to the body of the message.
6. Type your message.
7. Choose Send.
Phone, Web, & Messaging
69
Page 41
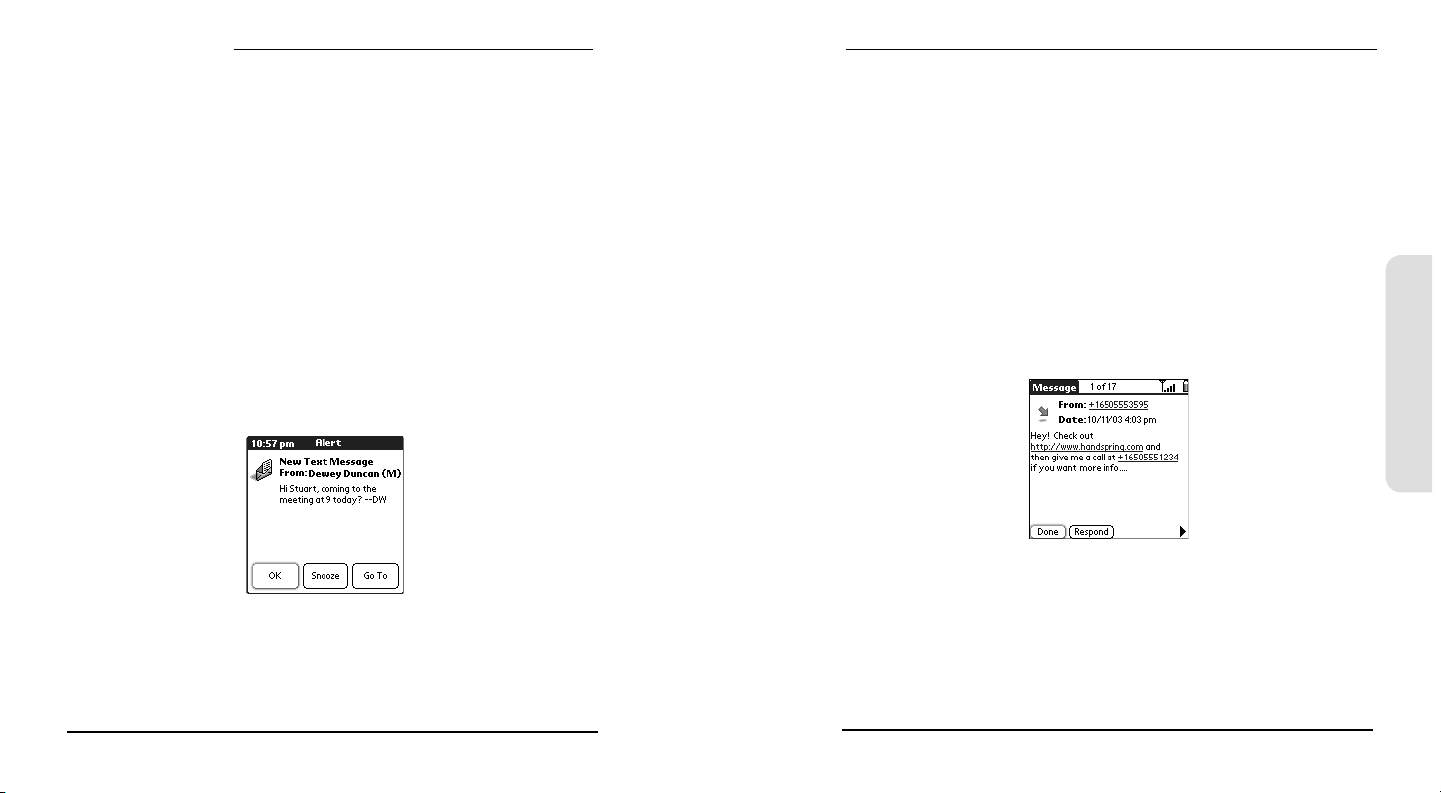
Phone, Web, & Messaging
If you are out of a coverage area or if Wireless Mode is off, outgoing messages go
into the Outbox folder. When you return to a coverage area, messages are sent
automatically.
SMS Tips
You can address SMS messages to multiple recipients by separating the
addresses with a comma.
When entering a message, you can insert emotive symbols by choosing
Emoticons or predefined QuickText phrases by choosing QuickText and then
selecting a phrase. To add a new phrase, select Edit QuickText from the list.
You cannot use all symbols available on your phone in SMS messages. The SMS
application automatically replaces invalid characters before it sends messages.
You can send and receive SMS messages even while you are on a phone call.
This is easiest when using the hands-free headset or speakerphone.
Receiving SMS Messages
When your phone is on and in a wireless coverage area, you automatically receive
SMS messages sent to you. You can configure your Treo to automatically notify you
when new SMS messages arrive, using a ringtone or simply an onscreen alert.
From the New Message alert:
To view your message(s), choose Go To.
To dismiss the alert, choose OK. The message will go straight to the Inbox.
To be reminded of the new message again in 5 minutes, choose Snooze.
Using Links in Messages
The SMS software is designed to recognize links within a message and give you
one-tap access to them. When you receive an SMS message that contains a
recognizable telephone number, email address, or URL, you can dial the number,
send an email message, or go to the Web page directly from the SMS message.
1. Choose a message from the list.
2. Choose the phone number, email address, or URL (the link appears as
underlined blue text).
3. Your Treo automatically launches the appropriate application from the link.
Chatting with SMS
When you exchange more than one SMS message with a single contact, your
messages will automatically be grouped into a chat session. The upper part of the
Chat view displays all messages you’ve exchanged with this address, and the lower
part provides a text entry area where you can continue the conversation. You can
carry on multiple chats at the same time and easily switch between them, using
the pick list at the top of the screen.
Phone, Web, & Messaging
70
71
Page 42
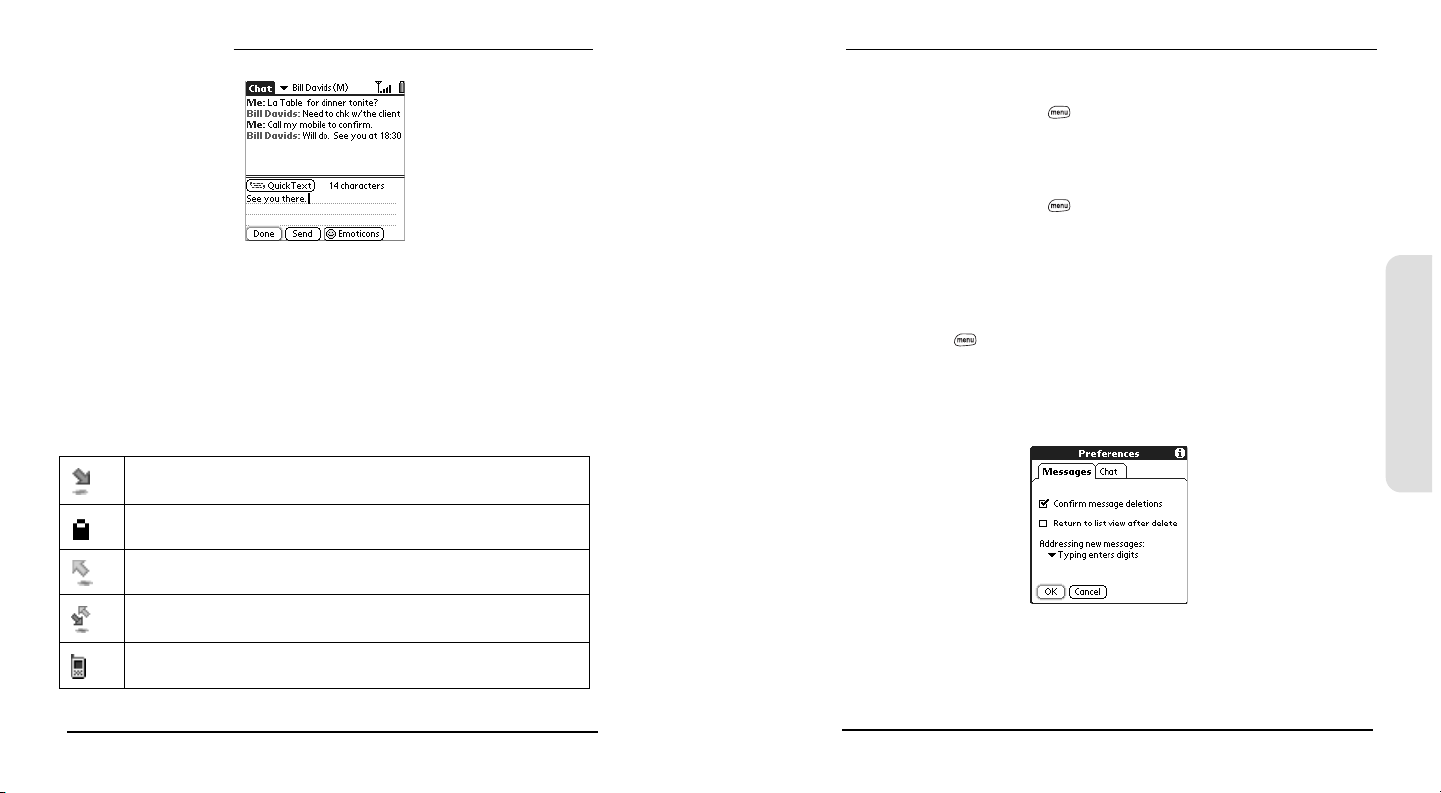
Phone, Web, & Messaging
1. From the Inbox, choose a chat.
2. Type your message.
3. Choose Send.
To find the conversations you had with someone, open your SMS Inbox and select a
chat session.
Managing Your Messages
The status icons that appear next to each message in the Inbox, Outbox, and Sent
folders indicate the following:
An incoming message. Unread messages appear in bold; messages you’ve read
appear in plain text.
An item that is locked and cannot be deleted or purged until you unlock it.
An outbound message.
You can rearrange the messages in any folder using the Sort command. This makes
it easier to find and view messages.
1. From list view, press Menu .
2. From the View menu, choose Sort by Name or Sort by Date.
You can also delete several messages at once from any folder using the Purge
command.
1. From list view, press Menu .
2. From the Message menu, choose Purge (/K).
3. Choose the Purge pick list, then select an option.
4. Choose OK.
Customizing Your SMS Settings
1. Press Menu .
2. From the Options menu, choose Preferences.
3. Set any of the following Messages preferences for your individual SMS
messages:
Phone, Web, & Messaging
72
A chat session. Chats containing unread incoming messages appear in bold text.
A voicemail page. An unopened voicemail page appears in bold.
Confirm message deletions indicates whether you want deletion confirmation
messages to appear.
Return to list view after delete indicates whether you want to view the next
message or chat, or to return to the list view after deleting a message.
73
Page 43
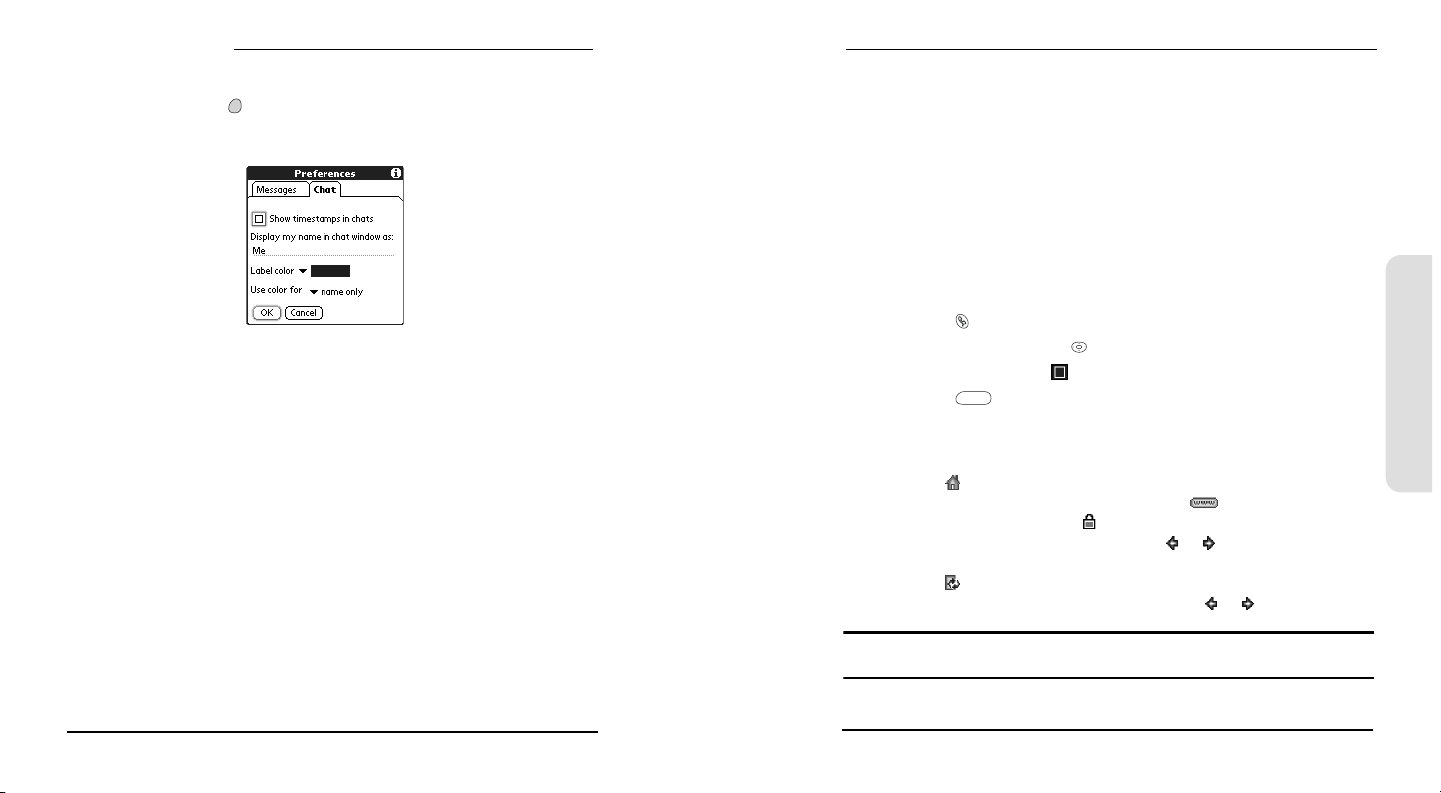
Phone, Web, & Messaging
Addressing new messages determines whether typing in the To field enters
numbers or letters by default. You can still switch between digits and letters
by pressing Option .
4. Set any of the following Chat preferences for your chat sessions:
Show timestamps in chats displays the local date and time the message was sent
next to each message.
Display my name in chat window as sets the text label for your messages in Chat
view.
Label color selects the label color for your messages in the Chat view.
Use color for indicates whether you want to view both the chat partner’s name
and message in a different color, or only the name.
5. Choose OK.
Browsing the Web
The Blazer Web Browser on your Treo is designed to provide quick and easy access
to Web pages.You can view the regular Web sites you use today, including sites
with advanced features such as JavaScript, frames, and cookies, and secure sites
such as online shopping, banking, and email sites. However, Blazer does not
support plug-ins (Flash, Shockwave, etc.) or Java applets. Some secure sites require
specific browsers and may not work with Blazer.
To use your Treo to browse the Web, you must first activate PCS Vision data
services from Sprint.
Viewing a Web Page
1. Make sure Wireless Mode is turned on, as described on page 27.
2. Press Phone .
3. Use the 5-way navigation control to choose Web.
4. Choose the Page View icon .
5. Press Space to jump between the Web page contents and the icons at
the bottom of the screen.
6.
Navigate to the Web page you want:
To view a portal of mobile content designed specifically for your Treo,
choose .
To go to any Web page on the Internet, choose . If you browse to a
secure Web page, a Lock icon appears.
To view the previous or next page, choose or .
To refresh the page with the latest content available from the Internet,
choose .
To view a list of sites you’ve visited, tap and hold or .
Phone, Web, & Messaging
74
Tip: If graphics are slowing you down, you can browse the Web faster by turning off images.
From the Options menu, choose Preferences, and then check the Don’t Show Images box.
75
Page 44
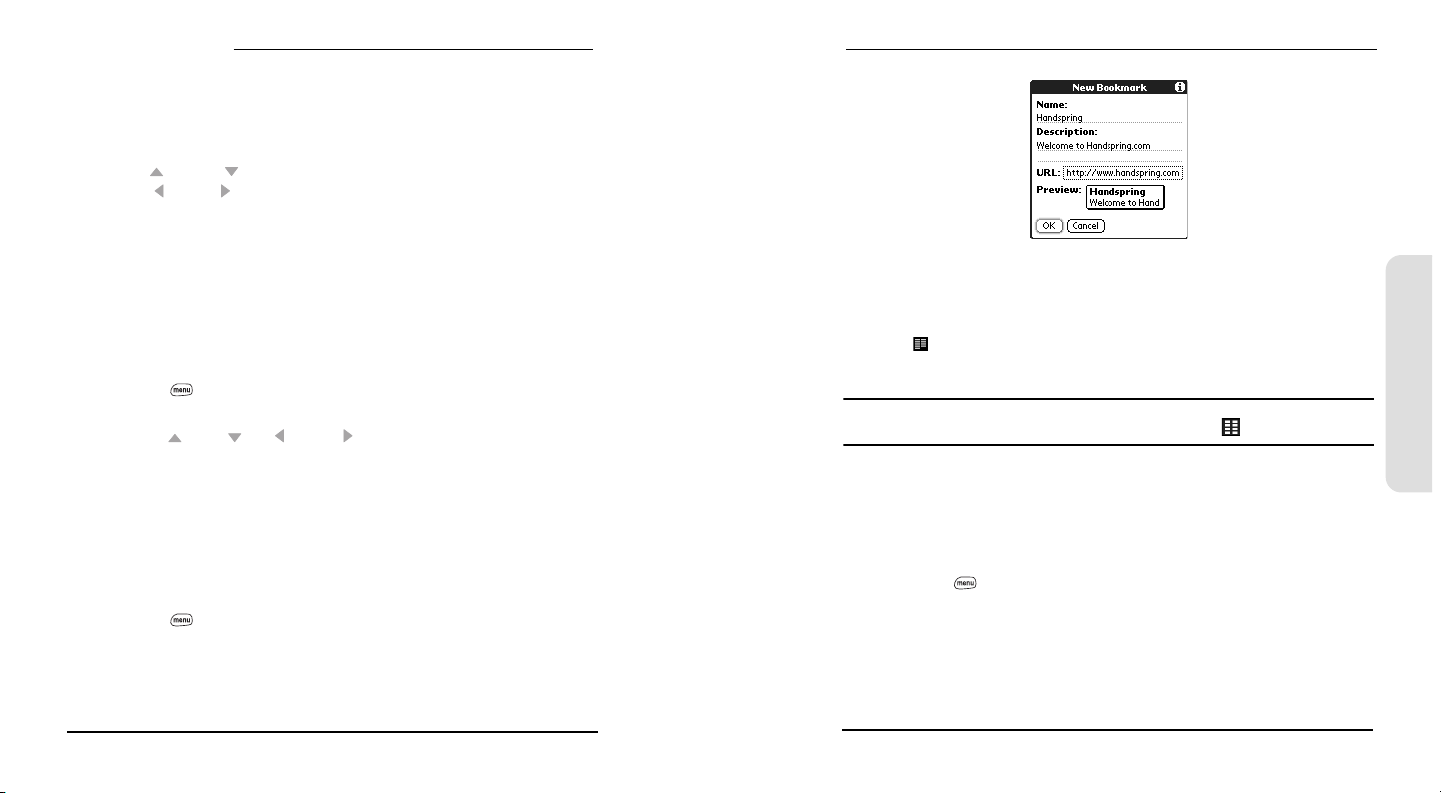
Phone, Web, & Messaging
Navigating in Optimized Mode
The Blazer Web Browser uses a patent-pending technology to optimize normal
Web pages for your Treo. By default, Blazer Web Browser reformats Web pages to
fit into one long column on your Treo screen. This way, you can see everything
easily without needing to scroll left or right.
Press Up or Down to move through a Web page.
Press Left or Right to move between links on the page. To follow a link to
another Web page, highlight the link and then press Center. You can also tap on
the link on the screen with your stylus.
Navigating in Wide Page Mode
Some Web pages, such as maps, are easier to view without the optimization done
in Optimized Mode. You may want to view these pages in Wide Page Mode. This
mode presents the Web page as you would expect to see it on your computer’s
Web browser.
1. Go to the page you want to view.
2. Press Menu .
3. From the Page menu, choose Wide Page Mode (/W).
Press Up , Down , Left , or Right to scroll through the wide page.
To follow a link to another Web page, tap the link with your stylus.
Creating a Bookmark
Bookmarks let you instantly access a Web page, without needing to type the
address every time. Blazer Web Browser can store up to 100 bookmarks or saved
pages, allowing you to open your favorite Web pages quickly. Remember, a Blazer
Web Browser bookmark is different from a Favorite (see page 51).
1. Go to the page you want to bookmark.
2. Press Menu .
3. From the Page menu, choose Add Bookmark (/A).
76
4. If desired, change the Name and Description.
5. Choose OK
6. Use the stylus to drag and drop the new bookmark into a slot on the current
page. To move the bookmark to a different page, drag and drop it on the page
icon (see page 78 for more information about arranging bookmarks).
7. Choose OK.
Tip: You can make Bookmark view the default view when you launch the browser. From the
Options menu, choose Preferences, then select the Bookmarks icon as your Initial View.
Saving a Page
Blazer Web Browser lets you save single pages for offline viewing. This feature
saves the page’s text and images onto your Treo, so you don’t need an Internet
connection to view the page’s content later.
1. Go to the page you want to save.
2. Press Menu .
3. From the View menu, choose Save Page.
4. Choose OK.
5. Use the stylus to drag and drop the saved page into a slot on the current page.
To move it to a different page, drag and drop it on the page icon.
6. Choose OK.
Phone, Web, & Messaging
77
Page 45
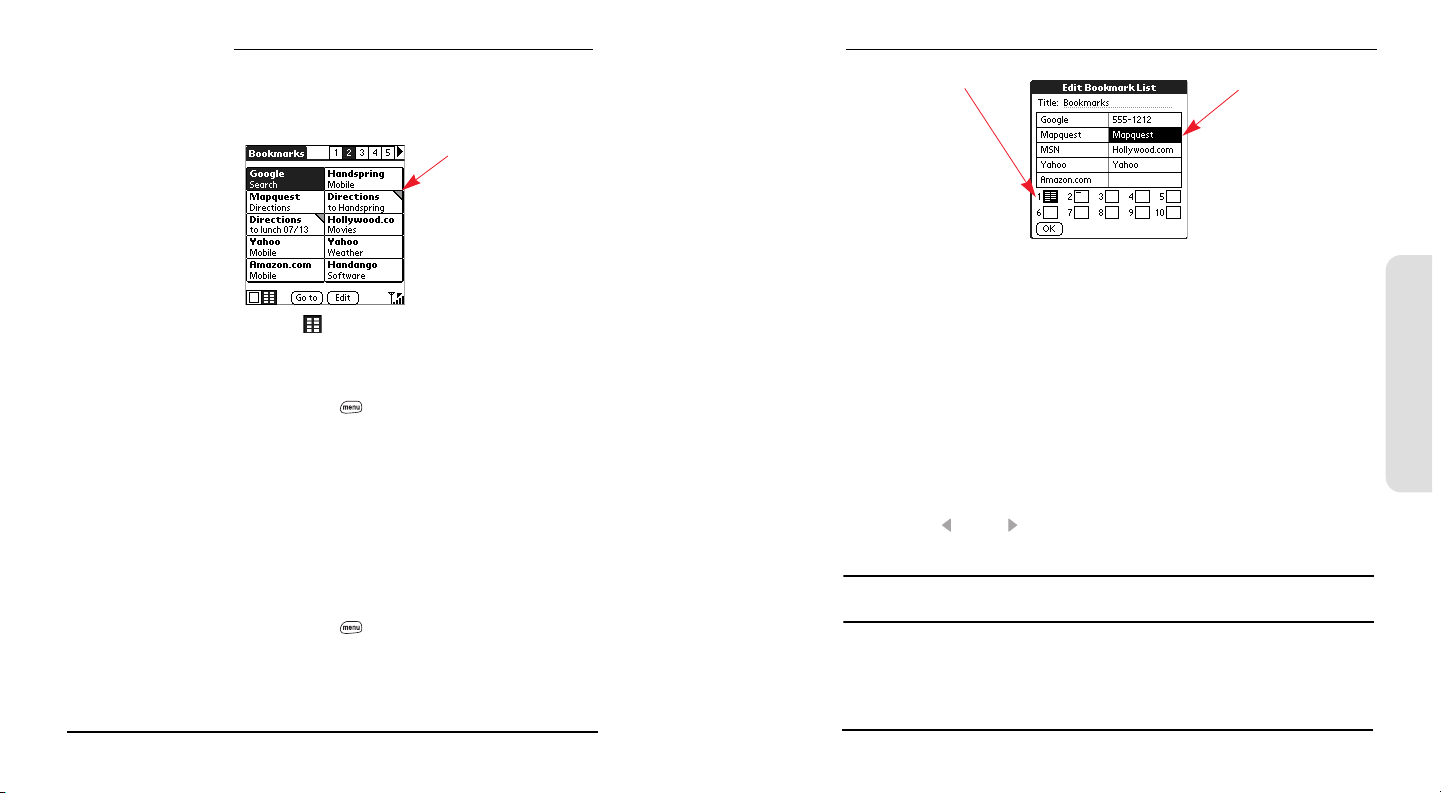
Phone, Web, & Messaging
Viewing Bookmarks or Saved Pages
Bookmarks and saved pages both appear in Bookmark view. Saved pages are
indicated by a small triangle in the upper-right corner of the bookmark.
Saved page indicator
Page icons
Bookmark slots
1. Choose the Bookmarks view icon .
2. Choose the bookmark or saved page you want to view.
Editing or Deleting a Bookmark or Saved Page
1. From the Bookmarks view, press Menu .
2. From the Bookmarks menu, choose Edit Bookmarks.
3. Choose the bookmark you want to edit or delete.
4. Enter the desired changes.
5. Choose OK.
Arranging Bookmarks and Saved Pages
Blazer Web Browser includes 10 pages so that you can arrange bookmarks and
saved pages in a logical fashion. For example, you can store travel links on one
page, stock links on another, and business links on third page.
1. From the Bookmarks view, press Menu .
2. From the Bookmarks menu, choose Edit Bookmarks.
78
3. Type a new title for this page.
4. Use the stylus to drag and drop bookmarks into different slots on the current
page. To move a bookmark to a different page, drag and drop it on the page
icon.
5. Choose OK.
Downloading Files From a Web Page
Blazer Web Browser lets you download files that are usable on your Treo, such as
ring tones, new applications, or pictures that are tagged specifically for download.
When you download a file, it is automatically sent to the application that can use
the file. For example, if you download a JPEG image, it is stored in Picture Mail for
later viewing.
1. Go to the page that contains the link to the file you want to download.
2. Press Left or Right to highlight the link to the file, then press Center to
initiate the download process.
Note: You can only download files that you can open on your Treo. If you try to download a file
that does not have a corresponding application on your Treo, an error appears.
Phone, Web, & Messaging
79
Page 46
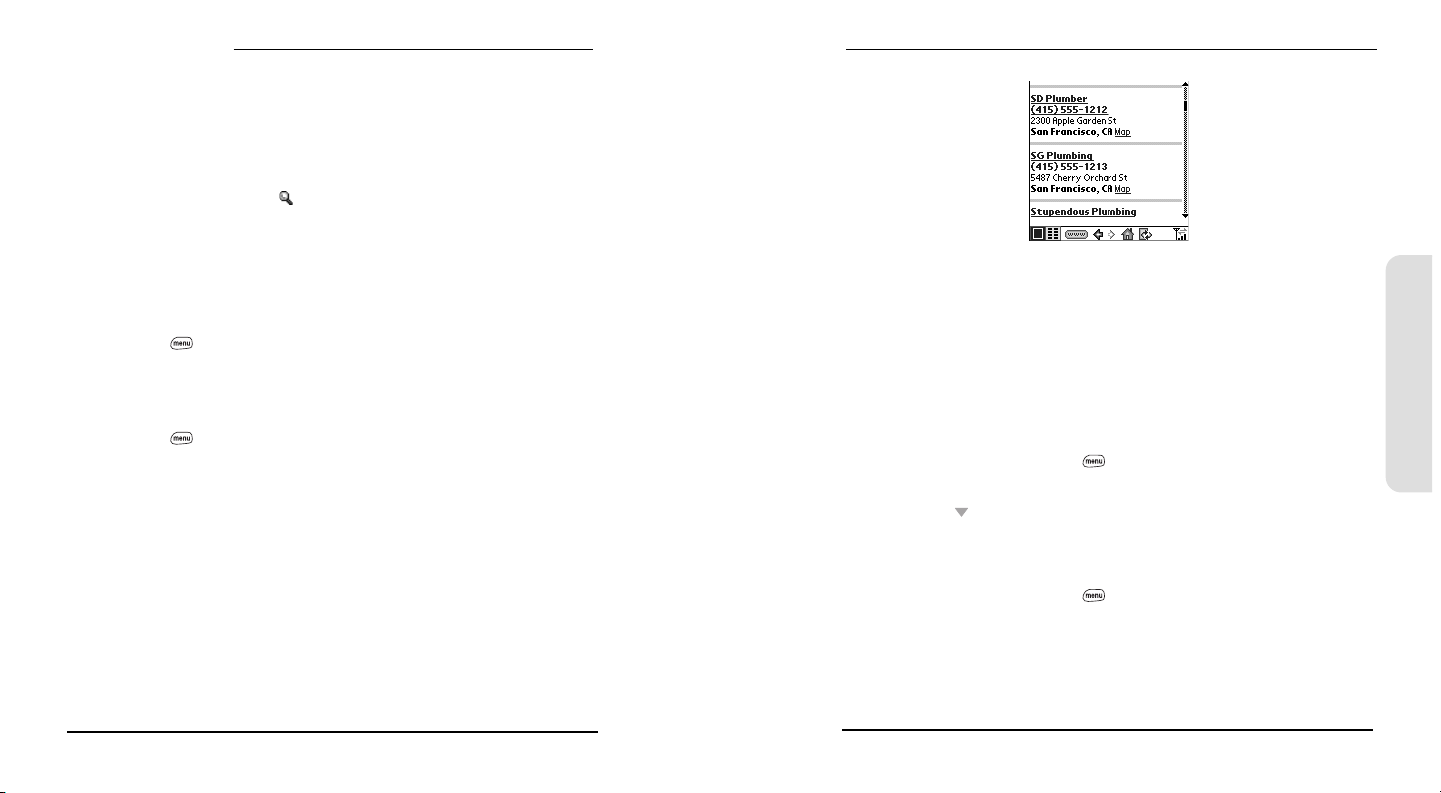
Phone, Web, & Messaging
Navigating Web Sites With Split Pages (Frames)
Some Web sites split their pages into separate areas, each with their own scroll
bars. The easiest way to navigate these sites is to zoom in on one of the separate
areas.
1. Tap the area of the split page you want to enlarge. Make sure you tap an area
that is not a link, otherwise you will navigate to the selected link.
2. Tap the Magnifying Glass icon at the bottom of the screen to expand the
selected area to fill the entire screen. The Magnifying Glass icon appears only
when a page is split into separate areas.
Copying Text From a Web Page
You can copy text from a Web page and paste it in other applications.
1. Use the stylus to highlight the text you want to copy.
2. Press Menu .
3. From the Edit menu, choose Copy (/C).
4. Go to the application in which you want to paste, then position the cursor
where you want to paste the text.
5. Press Menu .
6. From the Edit menu, choose Paste (/P).
Dialing a Phone Number on a Web Page
Blazer Web Browser can dial most phone numbers that appear on Web pages (see
page 41). If Blazer Web Browser does not recognize a phone number as dialable,
you can copy the phone number (as text) and paste it into the Phone Dial Pad (see
page 40).
Creating Email From a Web Page
Email addresses often appear as links on Web pages. After you configure an email
application on your Treo, you can select an email address link to create a message
to the selected address.
Using the History List
The History list stores the addresses of the most recent pages you visited in Blazer
Web Browser. If you want to go back to a page you remember visiting, but did not
bookmark the page, you can use the History list to jump directly to that page.
Items in the History list are sorted chronologically.
1. From the Page view, press Menu .
2. From the Page menu, choose History (/H).
3. Press Down to navigate through the list.
4. Choose the Web page you want to load.
Finding Text on a Web Page
1. From the Page view, press Menu .
2. From the Page menu, choose Find Text on Page.
3. Type the text you want to find.
Phone, Web, & Messaging
80
81
Page 47
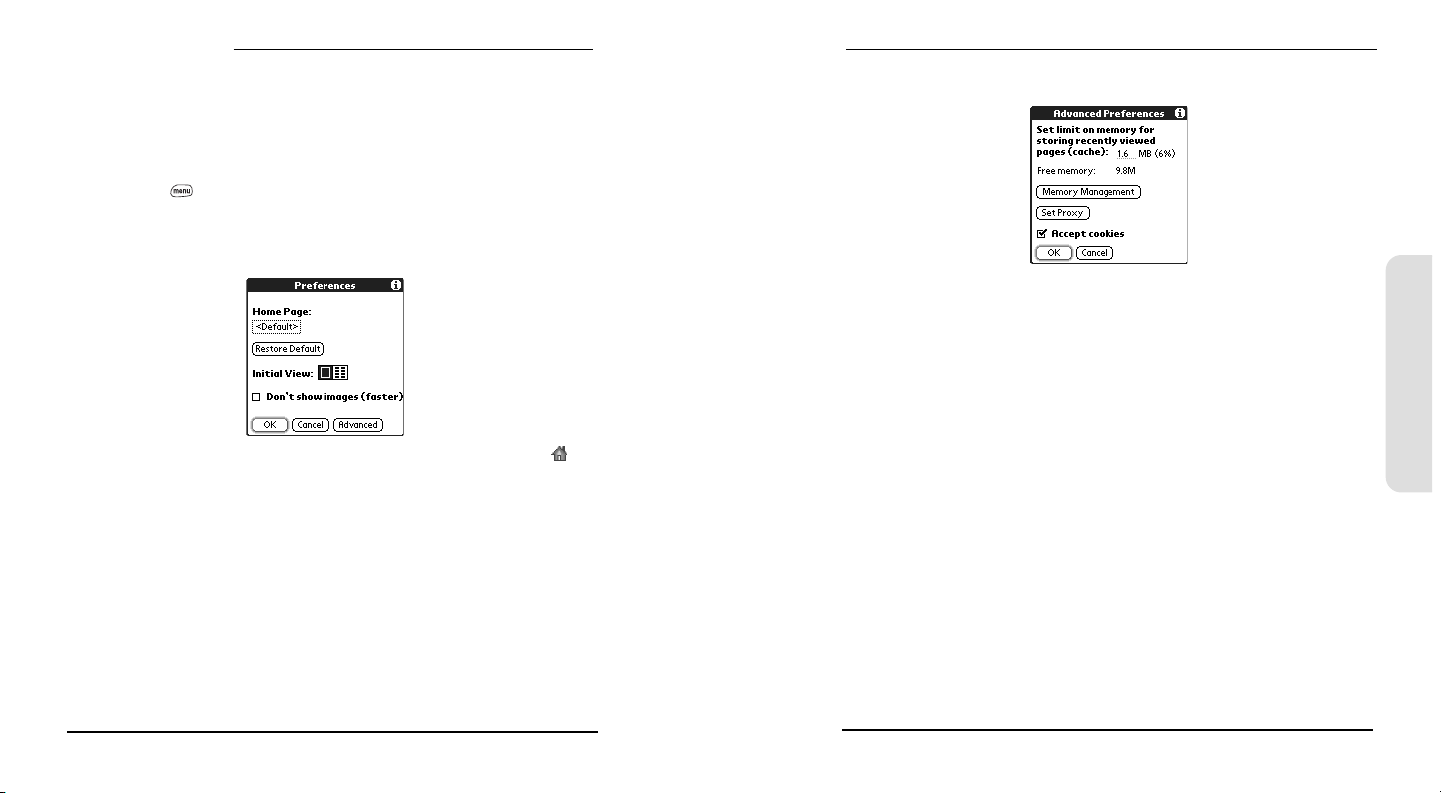
Phone, Web, & Messaging
4. Check or uncheck the Wrap Search box to indicate whether you want the
search to wrap from the end of the page to the beginning when the end is
reached.
5. Choose Find to start the search.
Customizing Your Blazer Web Browser Settings
1. Press Menu .
2. From the Options menu, choose Preferences.
3. Set any of the following preferences:
Home Page sets the Web page that appears when you choose the Home
icon. Choosing Restore Default selects the original PCS Vision Home page if
you changed it.
Initial View determines which view displays every time you launch Blazer
Web Browser.
Don’t show images selects whether you want images to appear when you load
a Web page. If you don’t view images, Web pages will load faster. If you
choose not to view images, you can still see any image by choosing the
placeholder box on the Web page.
4. Choose Advanced and set any of the following preferences:
Phone, Web, & Messaging
Set limit on memory for storing recently viewed pages (cache) sets the amount of
memory used for your cache. Pages are cached so they load faster the next
time you view them.
Memory Management enables you to free up memory on your device by
clearing the memory for recent pages, history and cookies.
Set Proxy sets up a proxy server to access the Internet. If your connection
requires a proxy server, please contact your Internet service provider or IT
administrator for this information.
Accept cookies allows some Web sites to store personalized information on
your Treo. Some sites do not work properly unless you select this option.
5. Choose OK.
82
83
Page 48

Phone, Web, & Messaging
PCS Business ConnectionSM Personal Edition
You can install the optional PCS Business Connection application for secure, realtime access to your Microsoft
business directory, and personal contacts. For more information and to sign up,
visit
www.sprintpcs.com.
1. Press Applications Launcher .
2. Choose the pick list in the upper-right corner, then select All.
3. Choose the Get BC icon .
4. Follow the onscreen instructions to download and install the software.
After you install the PCS Business Connection application on your phone, you can
access it by pressing Messaging .
®
Outlook® or Lotus Notes® company email, calendar,
Using Your Treo
Organizer Features
84
85
Page 49
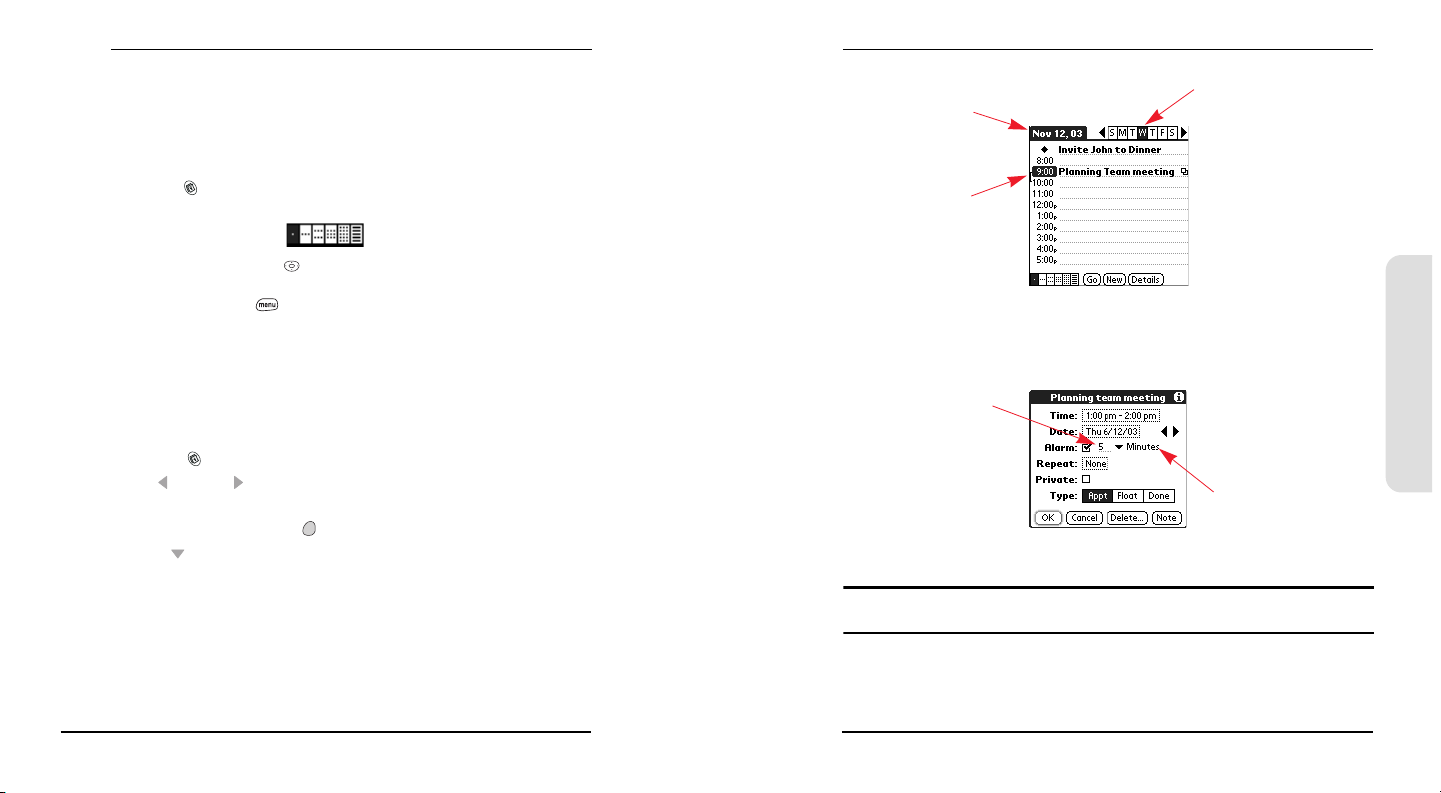
Organizer
Calendar
Calendar is a powerful organizer application that helps you manage your schedule.
Displaying Your Calendar
Do any of the following:
Press Calendar repeatedly to cycle through the various active views.
Use the 5-way navigation control to move to another day, week, or month
(depending on the current view).
Choose Go, or press Menu , then from the Options menu, choose Go to Day (/O).
Then choose a date from the calendar.
Creating an Event
You can enter events on your phone. However, if you have several appointments
to enter, it’s more efficient to use the Palm Desktop software or Microsoft
®
Outlook
on your computer and then synchronize data between the Treo and
your computer. For more information, see page 108.
1. Press Calendar until you are in Day view.
2. Press Left and Right to select the desired day.
3. Using the keyboard, type a starting time for the event. For example, type 53 for
5:30. (Remember to press Option before typing numbers.)
4. Press Down and type the ending time for the event.
5. Choose OK.
6. Type a description for the event.
Selected day
Selected date
Start and
end times
Adding an Alarm to an Event
1. In Calendar, select the event.
2. Choose Details.
®
Number of time units
Type of time units
3. Check the Alarm box and choose the number of minutes, hours, or days before
the event you would like to receive the alarm.
Note: The alarm for untimed events (see page 88) is defined by minutes, days, or hours before
midnight of the date of the event.
Organizer
86
4. Choose OK.
When an alert occurs, the Alert screen displays all your pending alerts. Tap an
item’s description to jump to that item, or check the box to clear that item.
87
Page 50
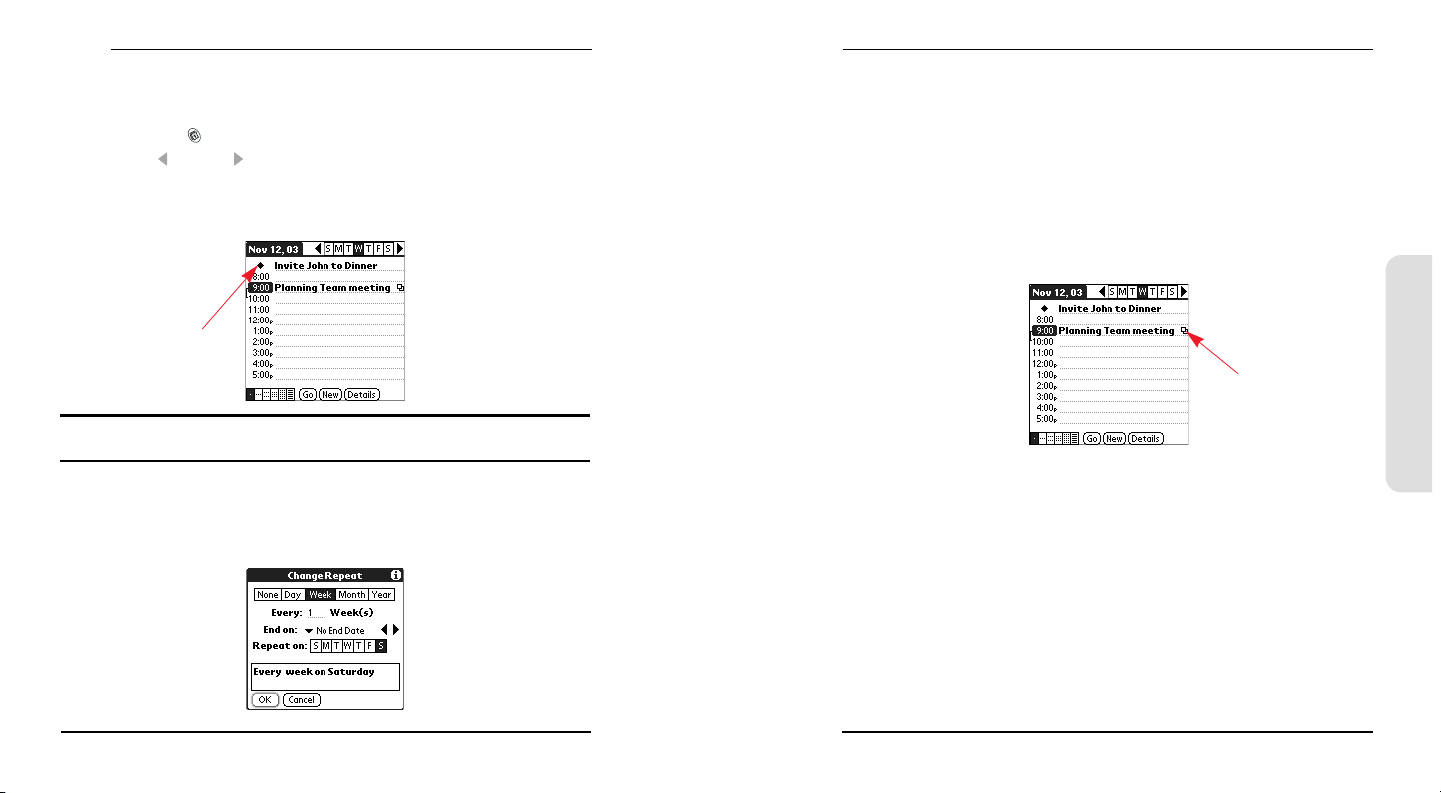
Organizer
Creating an Untimed Event
An untimed event, such as a birthday or anniversar y, does not occur at a
particular time.
1. Press Calendar until you are in Day view.
2. Press Left and Right to go to the date of the event.
3. Make sure nothing is highlighted.
4. Type a description for the event.
Diamond
indicates an
untimed event
Tip: To enter a birthday or anniversary, create an untimed event. Then, from the Details screen,
choose Year as the repeat interval.
Scheduling a Repeating Event
1. Create an event, then highlight it.
2. Choose Details.
3. Choose the Repeat box, then choose a repeat interval:
For a birthday or anniversary, choose Year.
For weekly events, choose the day(s) the event repeats.
For monthly events, choose Day or Date to indicate the repeating method.
4. If the event has an ending date, choose the End on pick list, then select Choose
Date, and select the ending date.
5. Choose OK.
This icon indicates a
repeating event
Editing or Deleting an Event
1. Highlight the event you want to reschedule.
2. Choose Details.
3. Change the date and time as needed, or choose Delete.
4. Choose OK.
Organizer
88
89
Page 51
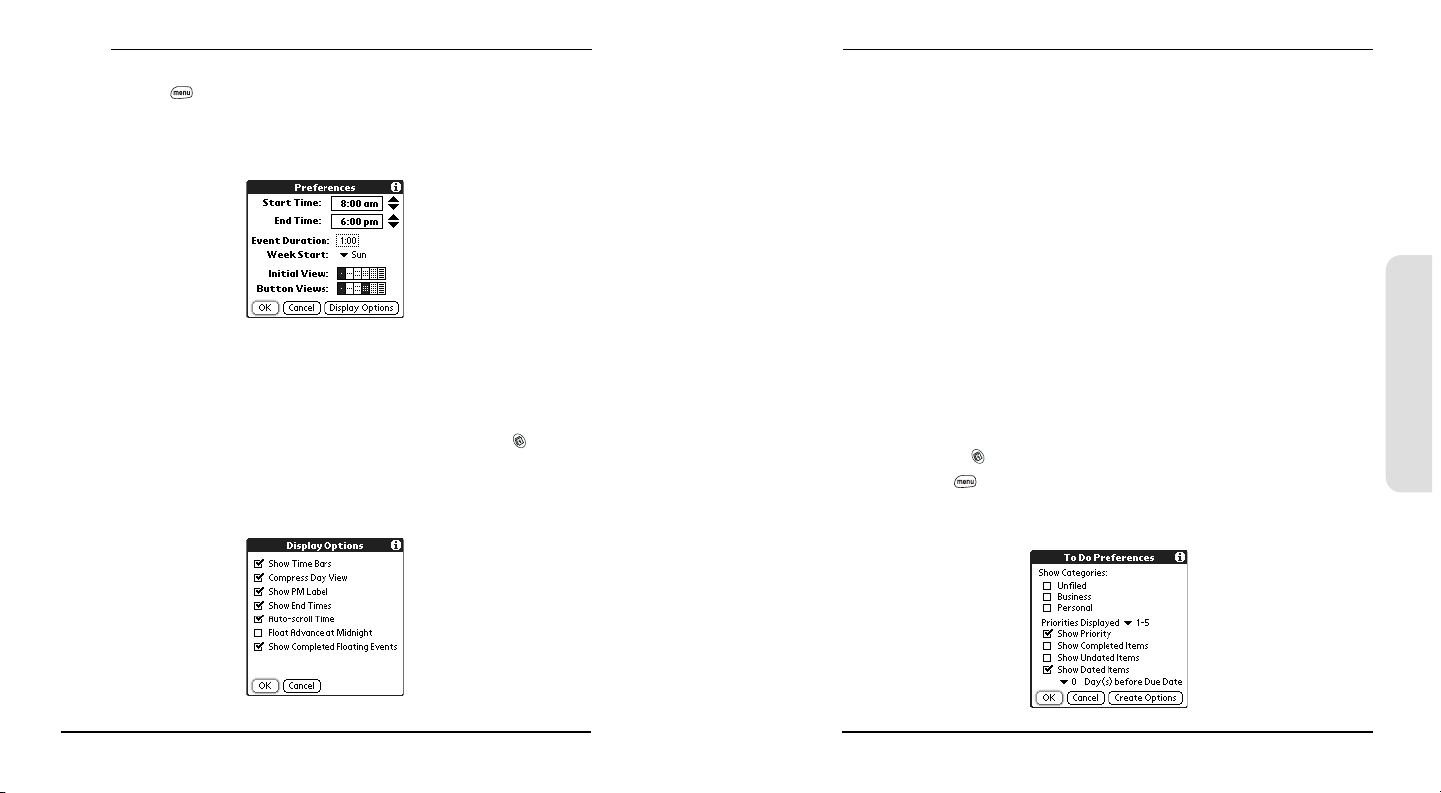
Organizer
Customizing General Preferences for Your Calendar
1. Press Menu .
2. From the Options menu, choose Preferences (/R).
3. Set any of the following preferences:
Start Time and End Time set the beginning and end of the day shown on the
Calendar screens.
Event Duration sets the default duration of a new event.
Week Start sets the day on which the calendar week starts.
Initial View sets the view that appears when you launch Calendar.
Button Views sets the views that appear when you press Calendar
repeatedly. By default, you see Day and Month Views, but you can also
choose to see Week, Week with Text, Year, and List Views.
4. Choose Display Options to set any of the following:
Show Time Bars activates the time bars that appear in the Day view. The time
bars show the duration of an event and illustrate event conflicts
Compress Day View controls how times appear in the Day view. When
Compress Day View is off, all time slots display. When it is on, start and end
times display for each event, but blank time slots toward the bottom of the
screen disappear to minimize scrolling.
Show PM Label displays a p after PM times.
Show End Times displays all time bars and time slots for end times of an event.
Auto-scroll Time displays events based on the time of day when the Day view
contains more than one screen of information. The up and down arrows at
the bottom-right corner indicate more information.
Float Advance at Midnight advances floating events to the next day at midnight
of the current day.
Show Completed Floating Events displays completed floating events.
5. Choose OK to close the Display options dialog.
6. Choose OK.
Customizing To Do List Preferences for Your Calendar
You can display To Do List items in your calendar to keep on top of your tasks.
1. Press Calendar until you are in Day view.
2. Press Menu .
3. From the Options menu, choose To Do Preferences.
4. Set any of the following preferences:
Organizer
90
91
Page 52
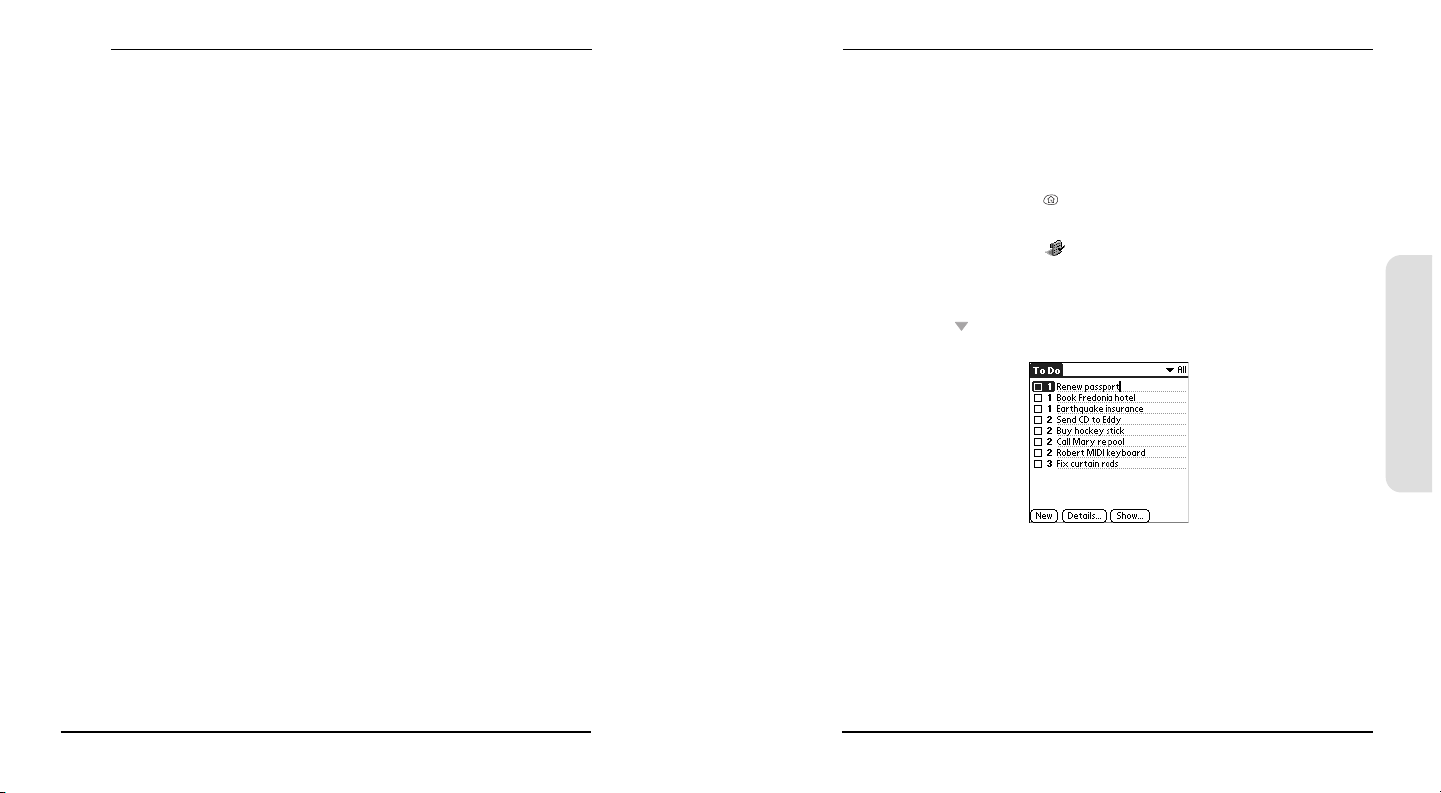
Organizer
Show Categories determines which To Do List categories display in Calendar
Day view.
Priorities Displayed limits the display of To Do List items to those with a certain
priority.
Show Priority displays the priority assigned to an item.
Show Completed Items displays checked-off items, as well as unchecked items.
Show Undated Items displays To Do List items that do not have a Due Date
assigned.
Show Dated Items displays To Do List items that have a Due Date assigned.
Choose the pick list, then select how far in advance of the Due Date you
wish the item to appear in your calendar.
5. Choose OK.
To Do List
You can use To Do List as a reminder of tasks you need to complete and to keep a
record of complete tasks. You can also display To Do List items in your calendar.
See page 91 for details.
Adding a To Do Item
1. Press Applications Launcher .
2. Choose the pick list in the upper-right corner, then select All.
3. Choose the To Do List icon .
4. Choose New to create a new To Do item
5. Type the text of the To Do item. The text can be longer than one line.
6. Press Down to deselect the To Do item.
Setting Item Priority, Due Date, and Other Details
The Details dialog enables you to assign a priority level, due date, category, privacy
flag, and note to each item.
1. Highlight the item to which you want assign details.
2. Choose Details.
Organizer
92
93
Page 53
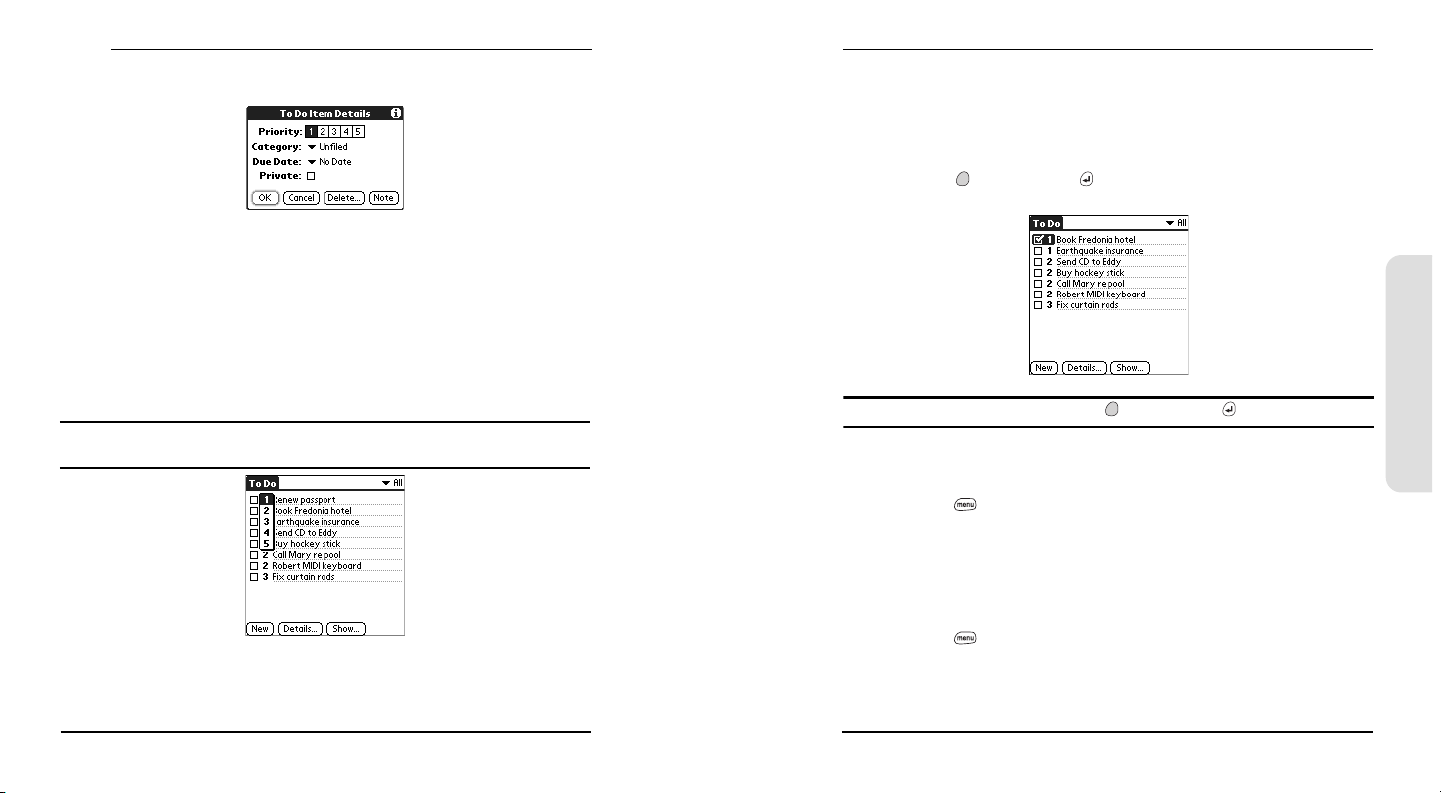
Organizer
3. Set any of the following:
Priority sets the Priority number for this item (1 is most important). Later you
can arrange your To Do List based on the importance of each item.
Category assigns the item to a specific category.
Due Date sets the due date for the item. Choose the Due Date pick list, then
select a due date.
Private indicates whether the item is private. Check this box to mark this
item private.
Note stores additional text you want to associate with the item.
4. Choose OK.
Tip: You can also set the priority by choosing the Priority number next to an item and selecting a
priority level from the list.
Checking Off a To Do Item
You can set To Do List to record the date that you completed the To Do item, and
you can choose to show or hide completed items. Completed items remain in the
memory of your phone until you purge them.
1. Choose the item you want to check off.
2. Hold Option and press Return .
Organizer
Tip: To uncheck the selected item, hold Option and press Return .
Deleting a To Do Item
1. Highlight the item you want to delete.
2. Press Menu .
3. From the Record menu, choose Delete Item (/D).
4. Choose OK.
Purging To Do Items
To save memory, you can purge all completed To Do List items.
1. Press Menu .
2. From the Record menu, choose Purge.
3. Choose OK.
94
95
Page 54
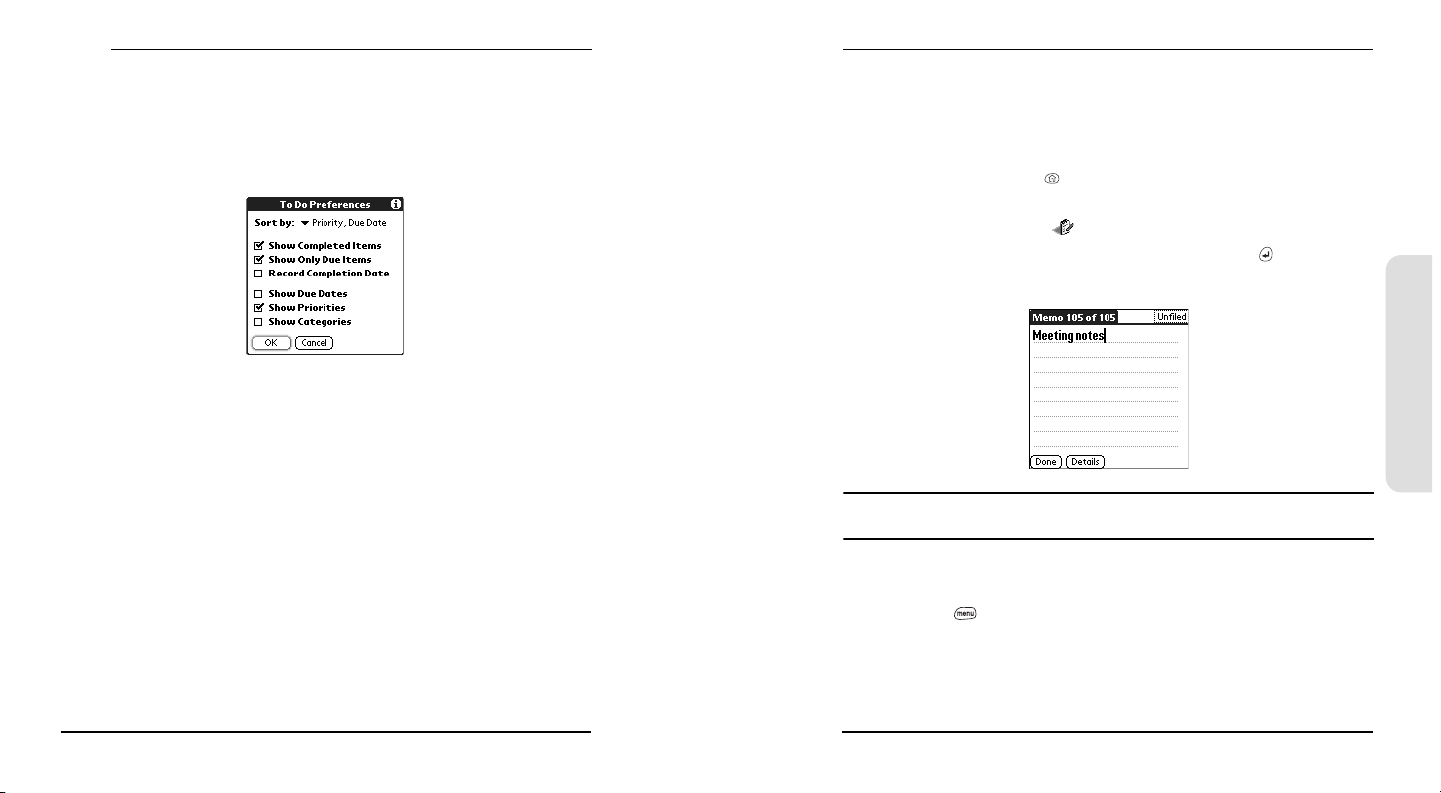
Organizer
Customizing To Do List
The Show Options dialog enables you to control the appearance of the To Do list
screen.
1. In the To Do list screen, choose Show.
2. Set any of the following preferences:
Sort by indicates the order in which your To Do items appear in the list.
Show Completed Items displays items checked off.
Show Only Due Items hides items that are not yet due.
Record Completion Date replaces due date with the completion date when you
complete (check) the item.
Show Due Dates displays item due dates and inserts an exclamation mark next
to overdue items. Turning on this option also enables you to tap directly on
the due date in the To Do List to choose a new date.
Show Priorities displays the priority setting for each item.
Show Categories displays the category for each item.
3. Choose OK.
Memo Pad
Memos are a great way to store notes on your Treo. Each memo can include 4,096
characters of text.
Creating a Memo
1. Press Applications Launcher .
2. Choose the pick list in the upper-right corner, then select All.
3. Choose the Memo Pad icon .
4. Enter the text you want to appear in the memo. Press Return to move down
to new lines in the memo.
5. Choose Done.
Organizer
Tip: You can assign categories to your memos. Open the memo you want to change, choose the
pick list in the upper-right corner, then select a category.
Deleting a Memo
1. Choose the memo you want to delete.
2. Press Menu .
3. From the Record menu, choose Delete Item (/D).
4. Choose OK.
96
97
Page 55
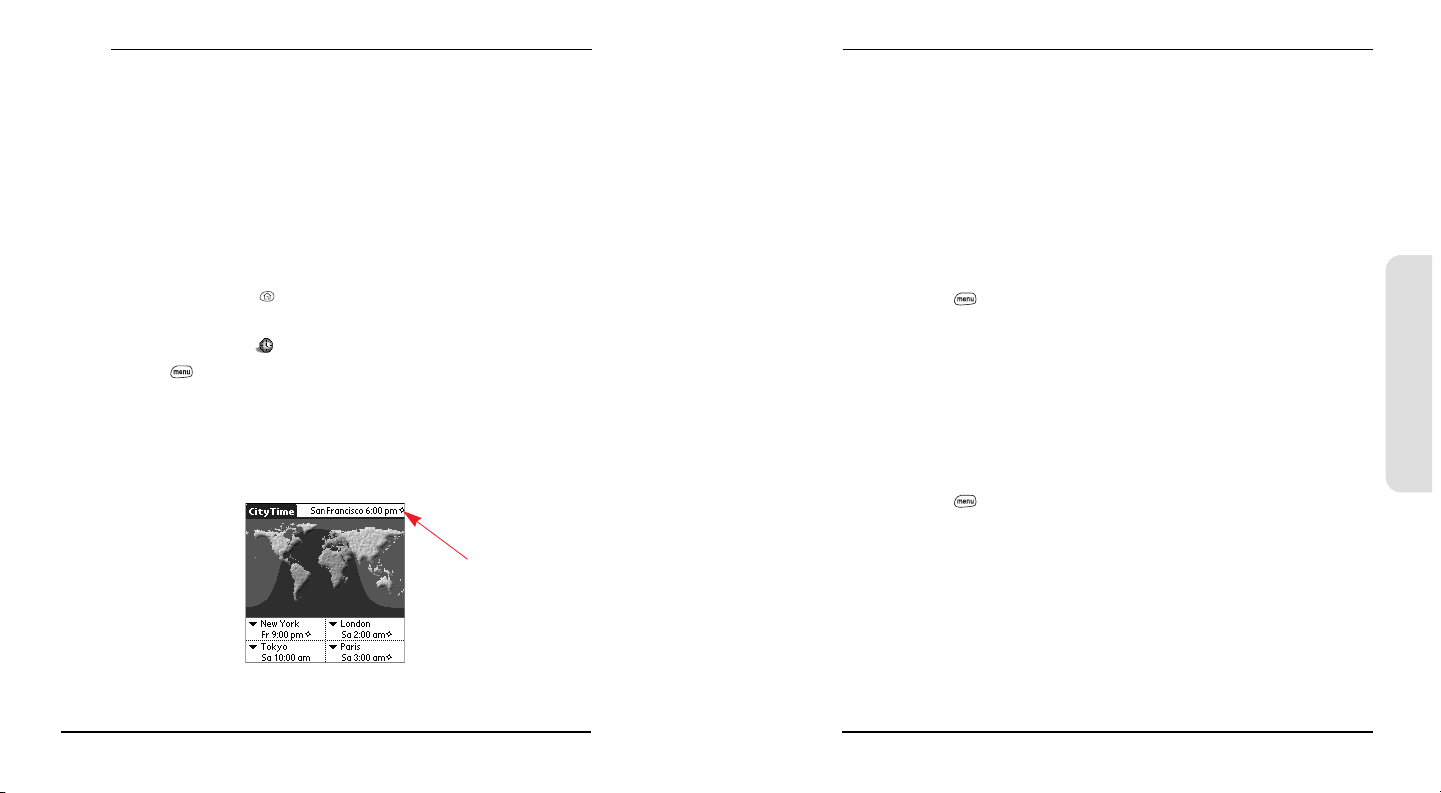
Organizer
CityTime
The CityTime world clock displays the day and time in your home city and in four
other cities around the globe. Whether you’re travelling or at home, it’s easy to
keep track of the best time to reach your business associates, friends, and family in
far away places.
Setting Your Home City
The Home City serves as a point of reference for your other city selections. The
Home City time reflects the current system time (unless you have changed
locations; see page 99). The information displayed for all the other cities is based
on the day and time in your Home City.
1. Press Applications Launcher .
2. Choose the pick list in the upper-right corner, then select All.
3. Choose the CityTime icon .
4. Press Menu .
5. From the Options menu, choose Select Home City (/H).
6. Choose the Home City pick list, then select the city closest to your location (in
the same time zone).
7. Choose OK.
Home city
Selecting Remote Cities
In addition to your home city, you can display the day and time for four other cities
anywhere around the globe. These other cities are called remote cities.
1. Use the stylus to tap a pick list in the lower part of the CityTime screen, then
select the city closest to the city you want to display.
2. Choose the remaining pick lists, then select the other three cities you want to
display.
Adding Cities
If the city you want to display is not in the predefined list, you can use the Edit
Cities command to add it.
1. Press Menu .
2. From the Options menu, choose Edit Cities (/E).
3. Choose New.
4. Enter the city name and other information.
5. Choose OK.
Changing Locations
If you travel, you can easily coordinate the system time on your Treo with the
local time.
1. Press Menu .
2. From the Utilities menu, choose Change Location (/L).
3. Choose the To pick list, then select your new location.
4. Choose OK.
CityTime Tips
CityTime does not automatically update the system time for Daylight Savings
Time (DST).
Run your stylus over the map to see the time in other cities.
The shadow over the map represents nighttime moving across the globe.
Organizer
98
99
Page 56
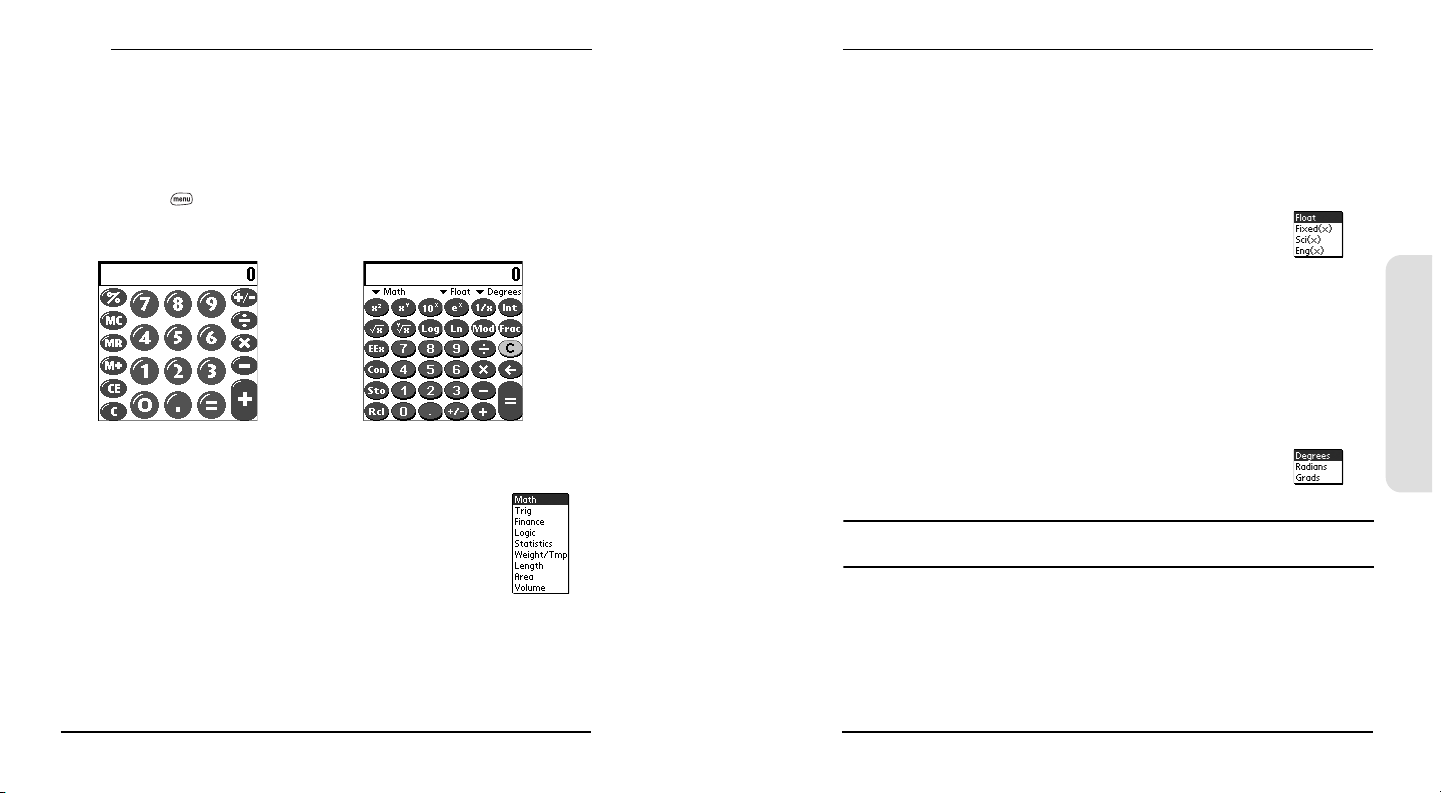
Organizer
Calculator
Calculator includes a basic calculator, plus an advanced calculator with scientific,
financial and conversion functions. You can tap the screen or use the keyboard to
input numbers.
Switching Between Basic and Advanced Calculator Modes
1. Press Menu .
2. From the Options menu, choose Toggle Mode (/M).
Selecting Functions in Advanced Calculator Mode
1. Switch to Advanced Calculator mode (see above).
2. Choose the pick list near the upper-left part of the screen,
then select the Advanced Calculator function you would like
to use:
Math provides advanced mathematical functions such as
exponents, roots, and logarithms.
Trig provides trigonometric functions such as sine, cosine,
tangent, and variants.
Finance provides financial calculator functions such as APR and amortization.
Logic displays hexadecimal characters in the keypad, plus logic functions
such as and, not, or and xor. In place of Float/Degrees (see below), this view
includes options for class (bin, oct, SDec, UDec, hex) and bits (8, 16, 32).
Statistics provides statistical functions such as sum, factorial, and random
number generator.
Weight/Temp provides weight and temperature conversions for metric and
English values.
Length provides length conversions for metric and English values.
Area provides area conversions for metric, traditional, and English values.
Volume provides volume conversions for metric and English values.
3. Choose the pick list near the upper-middle of the screen,
then select how to display decimal values:
Float (Floating point). Position of decimal point varies
according to calculation results.
Fixed (x) (Fixed point). Enter an integer for the number of decimal places to
display, then select Fixed (x) to round calculations to that decimal place.
Sci (x) (Scientific notation). Enter an integer for the number of decimal places to
display, then select Sci (x) to round calculations to that decimal place using
scientific notation.
Eng (x) (Engineering notation). Enter an integer for the number of decimal places
to display, then select Eng (x) to round calculations to that decimal place
using engineering notation.
4. Choose the pick list near the upper-right of the screen, then
select whether you want to display numbers in degrees,
radians, or grads.
Tip: To access a list of mathematical constants such as Avogadro’s number or the speed of light,
choose Con.
Storing and Recalling Numbers in Advanced Mode
To store a number in one of ten memory slots, choose Sto.
To recall a stored number, choose Rcl.
Organizer
100
101
Page 57
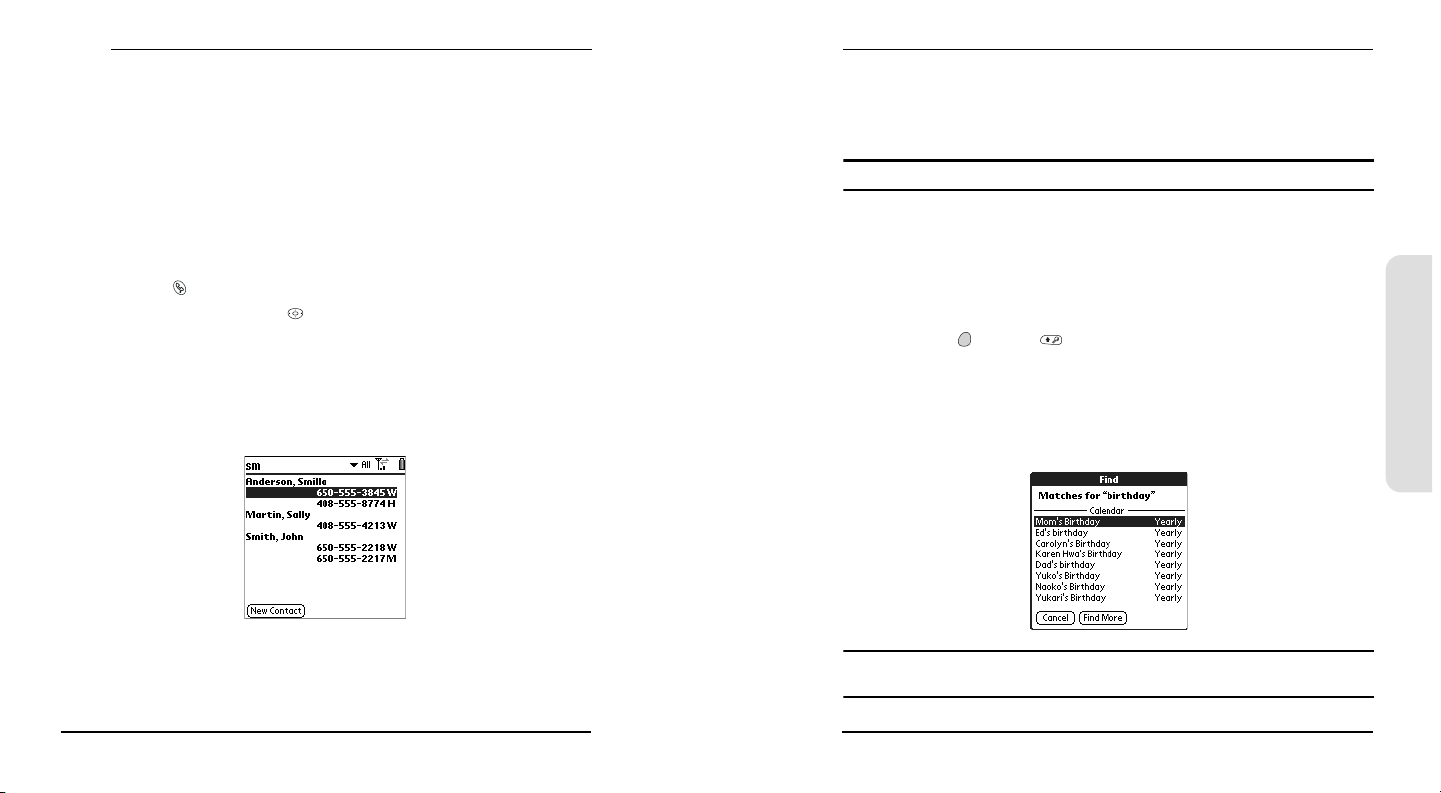
Organizer
Looking Up Contacts and Other Information
With the built-in search features on your Treo, you can find information quickly:
Name Lookup enables you to dial your Contacts by name. It locates people’s
phone numbers when you’re in the Contacts list.
Find searches through the text in all the applications on your Treo, always
starting with the current application.
Name Lookup
You can access Name Lookup directly from the Contacts list. This feature helps
you locate Contacts quickly by entering just a few letters of a Contact’s name.
1. Press Phone .
2. Use the 5-way navigation control to access the Contacts list.
3. From the Contacts list, enter the first few letters of the contact you want to
find. You can enter:
First name (JOH for John) or
Last name (SMI for Smith) or
First name initial and last name (JSM for John Smith)
4. Do one of the following:
Highlight the contact name, then press Center to view the contents of the
record.
Highlight any phone number, then press Center to dial.
Tip: To access Name Lookup in other applications, choose the Lookup button if it appears.
Using Find
The Find feature locates any text in the built-in applications and databases, and in
some third-party applications. The Find feature performs an exact search on a
character string, including characters that are parts of words. Find is not casesensitive and it locates any word that begins with the text you enter. For example,
entering “plan” finds “planet,” but not “airplane.”
1. Press Option then Shift to open the Find dialog.
2. Enter the text you want to find.
3. Choose OK to start the search.
4. In the search results, choose the text you want to review, or choose Find More
to search additional applications.
Organizer
For example, entering SM displays Smilla Anderson, John Smith, and Sally Martin as
shown above. Entering JSM finds only John Smith.
102
Tip: To search by company for a person’s name you can’t remember, open Find, and type the
name of the company.
103
Page 58
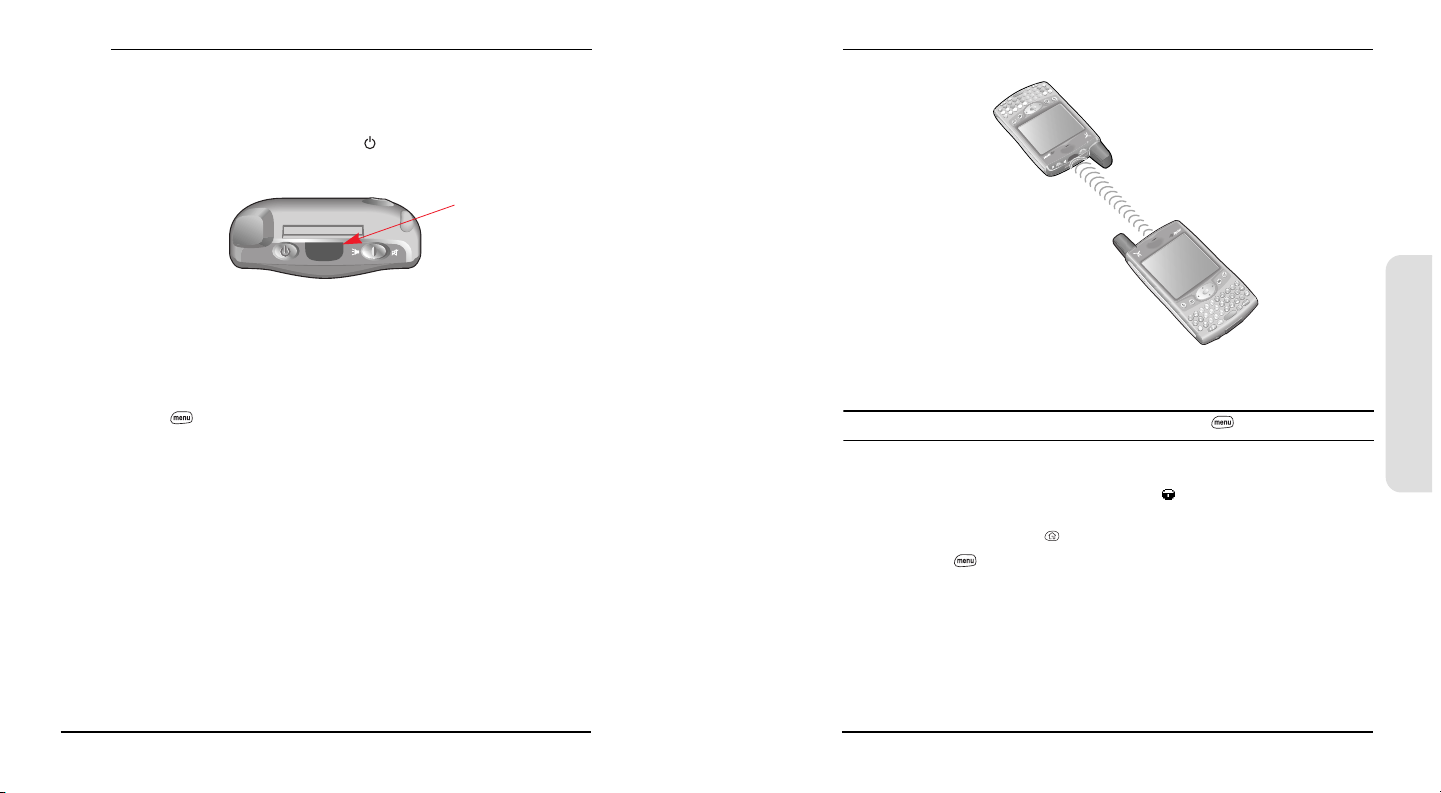
Organizer
Beaming Information
Your Treo is equipped with an IR (infrared) port that lets you beam information to
another Palm Powered device with an IR port. The IR port is located on the top of
your Treo, between the Wireless Mode button and the ringer switch, behind
the small dark shield.
IR port
For best results, the path between the two devices must be clear of obstacles, and
both devices kept stationary. If you have difficulty beaming, shorten the distance
and avoid bright sunlight.
Beaming a Record
1. Choose the record or category you want to beam.
2. Press Menu .
3. From the Record menu, choose one of the following:
Beam (/B) sends an individual record.
Beam Category (/Y) sends all records in the current category.
4. When the Beam Status dialog appears, point the IR port on your Treo directly
at the IR port of the receiving device.
Z
A
*
A
X
l
&
t
S
0
7
Q
C
–
D
8
W
4
V
F
+
E
9
5
1
B
G
R
6
#
2
N
H
T
?
3
$
M
J
Y
!
,
(
K
U
:
)
I
L
'
@
O
"
P
5. Wait for the Beam Status dialog to indicate that the transfer is complete before
you continue using your Treo.
Tip: Beam your business card. From any Phone view, press Menu , then press M.
Beaming an Application
Not all applications can be beamed. A lock icon appears on the Beam screen
next to applications that cannot be beamed.
1. Press Applications Launcher .
2. Press Menu .
3. From the App menu, choose Beam (/B).
4. Choose the Beam From pick list, then select whether the application you want
to beam is located on your Treo or an expansion card.
5. Choose the application you want to transfer.
6. Choose Beam.
Organizer
104
105
Page 59

Organizer
7. When the Beam Status dialog appears, point the IR port on your Treo directly
at the IR port of the receiving device.
8. Wait for the Beam Status dialog to indicate that the transfer is complete before
you continue using your Treo.
Managing Applications
Receiving Beamed Information
You can store a beamed entries and applications on your phone, or send them to
an expansion card inserted in the expansion slot.
1. Turn on your screen.
2. Point the IR port on your Treo directly at the IR port of the transmitting device
to open the Beam Status dialog.
3. When the Beam dialog appears, choose a category or expansion card. If you
don’t choose a category, the item goes in the Unfiled category.
4. Press Up to receive the beam or press Down to refuse it.
106
on Your Treo
107
Page 60
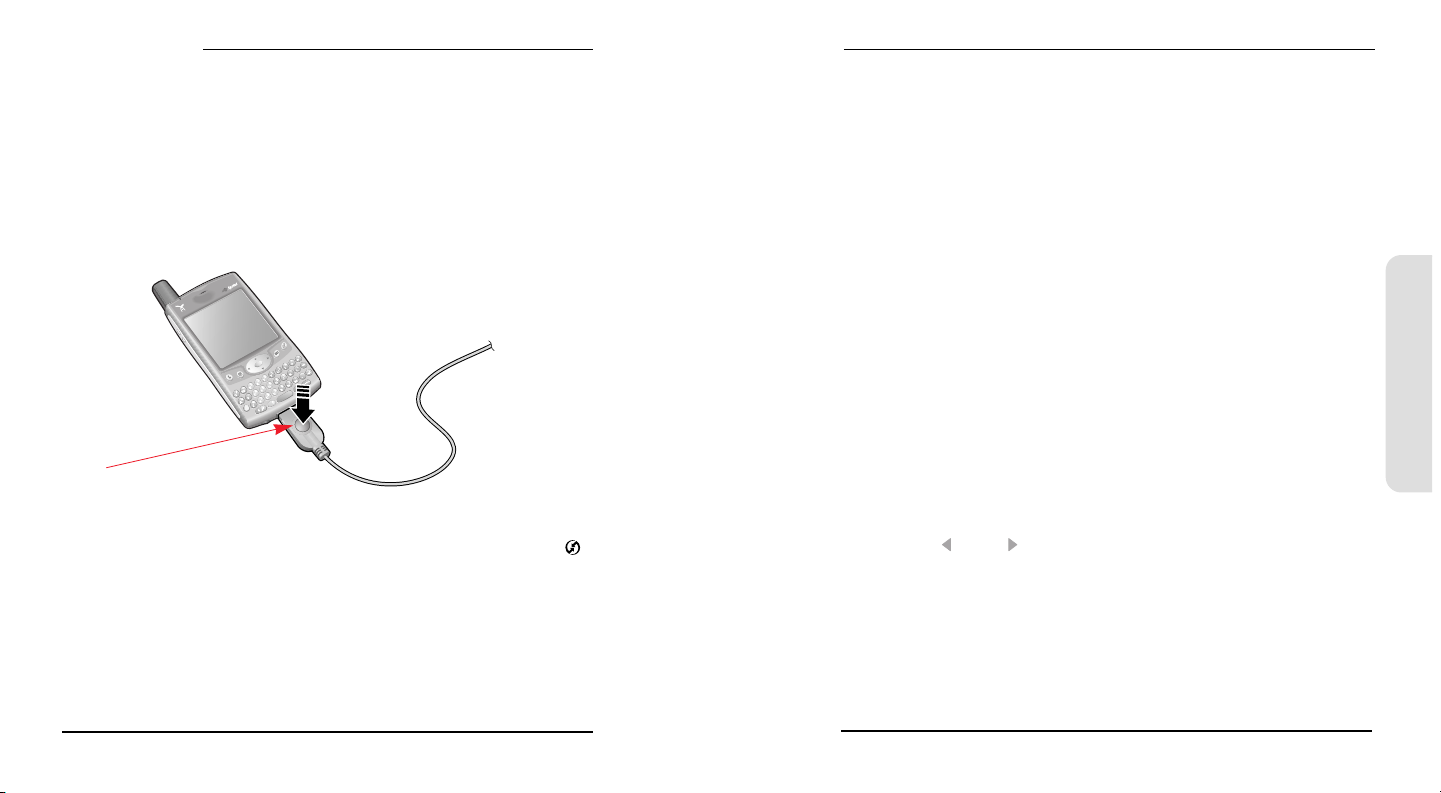
Managing Applications
Synchronizing Contacts and Other Personal Data
We strongly recommend that you synchronize your Treo and computer frequently
to keep your information up-to-date (and backed up) in both locations.
Before you can synchronize your contacts and other personal data, you must install
the Palm Desktop software from the CD that came with your Treo. See page 21 for
instructions.
1. Connect your Treo to your computer as described on page 20.
2. Press the HotSync button on the cable.
HotSync
Button
3. Wait for your Treo to display a message indicating that the process is complete.
If nothing happens, make sure that you installed the Palm Desktop software
and that the HotSync Manager application is running on your computer .
If you want to synchronize data with applications other than Palm Desktop
or Microsoft
software.
If you have any problems performing a HotSync operation, see pages
157-159 for troubleshooting suggestions.
®
Outlook®, you need to purchase additional third-party conduit
Installing Applications
Your Treo comes with several applications built-in and ready to use. You can also
install any of the more than 16,000 third-party Palm OS applications for use on
your Treo, such as business software, games, and other applications.
When you download an application to your computer, it is probably in a
compressed format such as a .zip or .sit file. If the file is compressed, you need to
use a decompression utility on your computer before you install applications on
your Treo.
These instructions tell you how to install basic .prc (Palm OS application) and .pdb
(Palm OS database) files onto your Treo. Some Palm OS software uses an automatic
installer or wizard to guide you through the process. Consult the documentation
that came with the software for details about how to install a particular piece of
software. Treo is not compatible with .pqa files.
Before you can install an application on your Treo, you need to have the Palm
Desktop synchronization software installed on your computer (see page 21).
Installing Applications From the Internet
You can install Palm OS applications directly from the Internet, using the Blazer
Web Browser. When you download an application, it automatically installs on your
Treo. Remember: Palm OS applications have .prc or .pdb at the end of their
filenames.
1. Launch the Blazer Web Browser (see page 75).
2. Go to the page that contains the link to the application you want to download.
3. Press Left or Right to highlight the link to the file, then press Center to
initiate the download process.
Managing Applications
108
109
Page 61
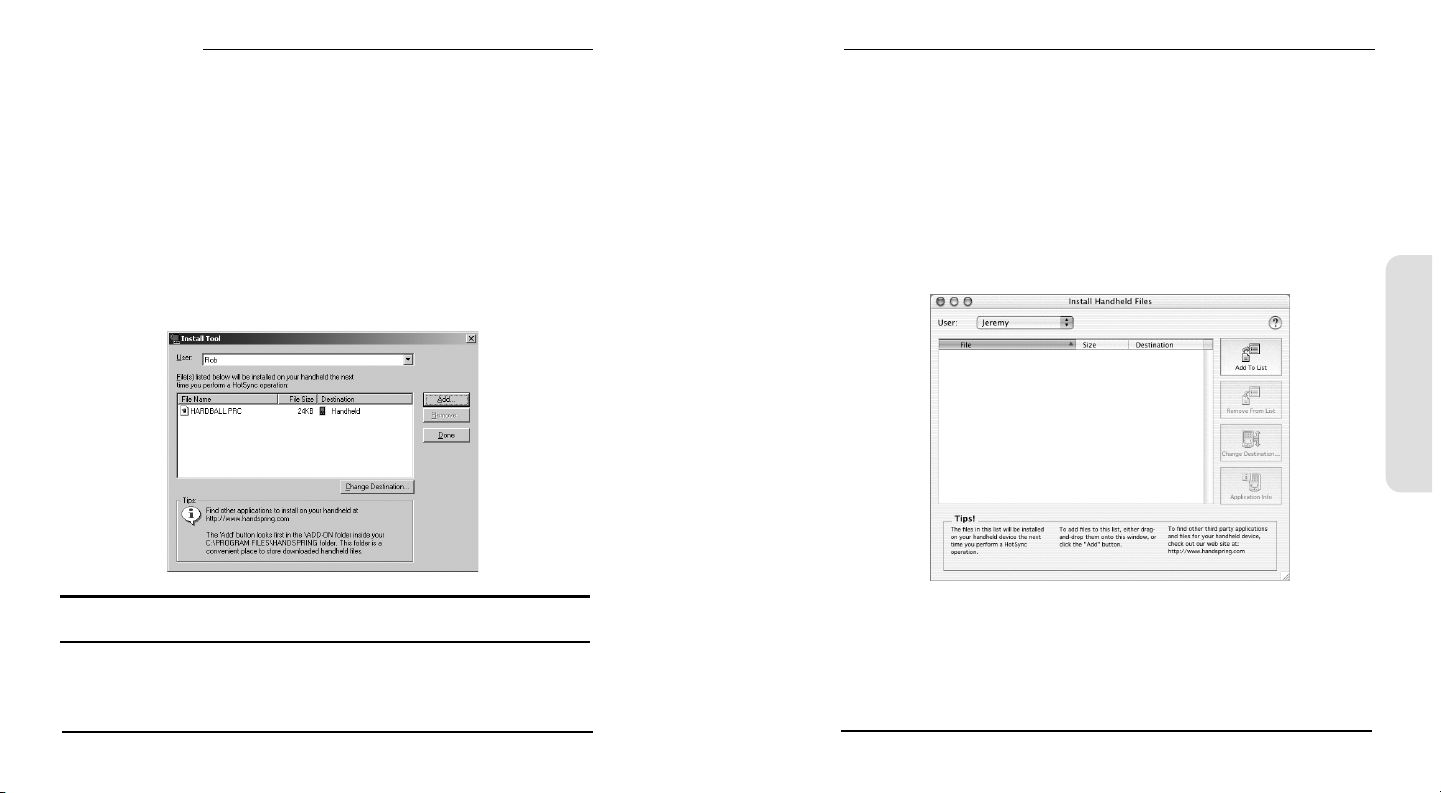
Managing Applications
Installing Applications From a Windows Computer
1. Double-click the .prc or .pdb file you want to install on your Treo.
2. A dialog may appear with a User drop-down list. Select your User Name from
the list.
3. The Install Tool window appears. If you would like to install additional files,
simply drag and drop them into the space in this window.
4. If you want to install an application to an expansion card, click Change
Destination. Click the arrows to move the application to the expansion card
pane, then click OK.
5. Click Done.
6. Perform a HotSync operation to install the application(s) on your Treo.
Installing Applications From a Macintosh Computer
1. On your Macintosh, launch Palm Desktop.
2. From the HotSync menu, choose Install Handheld Files.
3. Select the User Name that corresponds to your Treo phone from the User drop-
down menu.
4. Click Add To List.
5. Locate the .prc or .pdb file you want to install on your Treo. Highlight it and click
Add File.
6. Perform a HotSync operation to install the application(s) on your Treo.
Managing Applications
Tip: On a Windows computer, you can also access the Install Tool dialog by selecting Install Tool
under Handspring on the Start menu or from the Programs folder.
110
Getting Help With Third-Party Applications
If a you encounter a problem with a third-party application (such as an error
message), contact the application’s author or vendor. For general troubleshooting
of third-party applications, see page 162.
111
Page 62
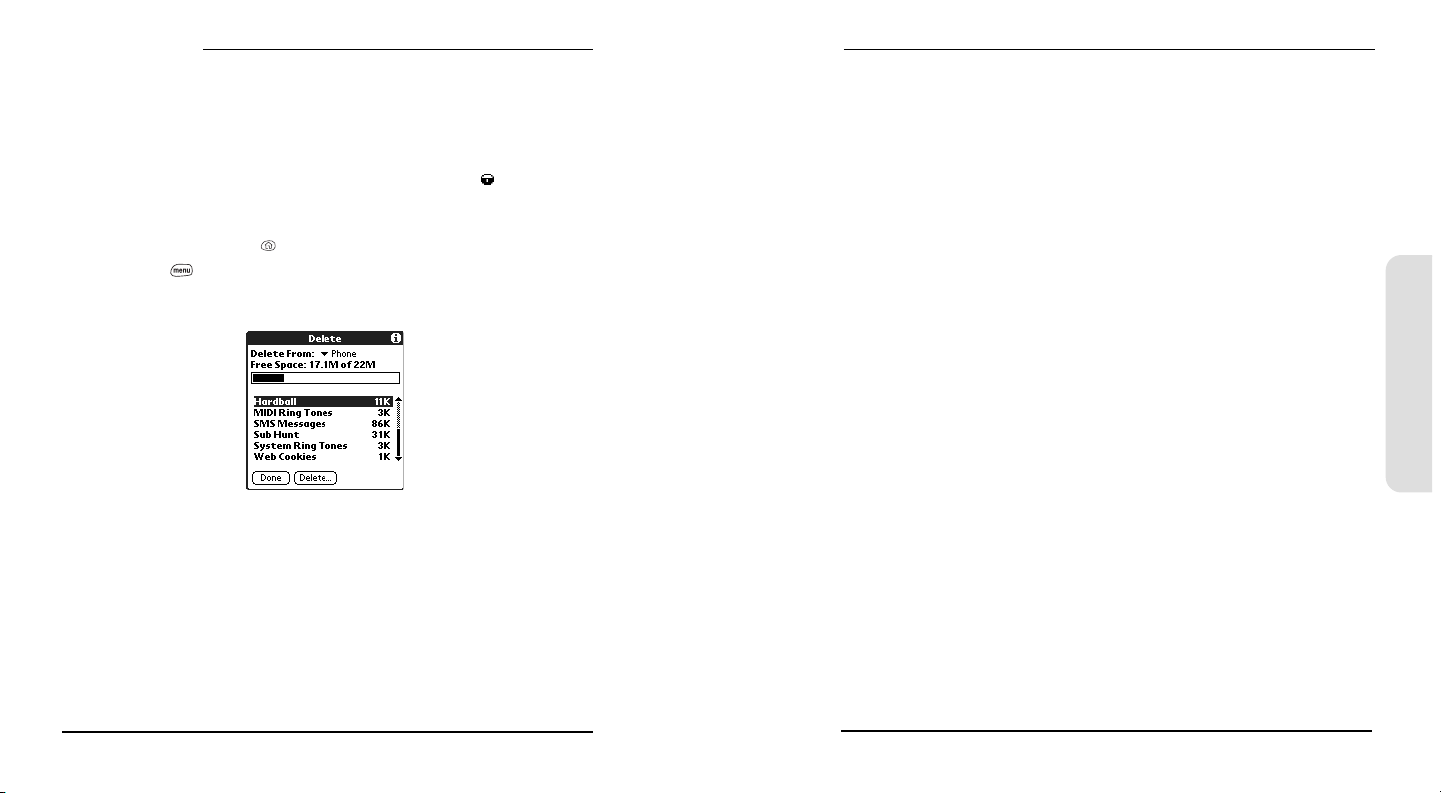
Managing Applications
Removing Applications
If you decide that you no longer need an application or you want to free up
memory on your Treo, you can remove applications from your Treo or an
expansion card. You can remove only applications, patches, and extensions that
you install; you cannot remove the built-in applications that reside in the ROM
portion of your Treo. These applications appear with a lock icon next to them.
Applications deleted from your phone are kept on your computer in the Archive
folder of your user folder.
1. Press Applications Launcher .
2. Press Menu .
3. From the Options menu, choose Delete (/D).
4. If you want to remove an application from an expansion card, insert the card
into your Treo.
5. Choose the Delete From pick list, then select the location of the application you
want to remove.
6. Choose the application that you want to remove.
7. Choose Delete to finish.
8. Perform a HotSync operation to remove the application from the Backup folder
on your computer.
Manually Deleting Applications From Your Computer
If an application you delete re-appears on your device, you may need to manually
delete it from your computer.
1. Locate your Backup folder on your computer.
Windows: C:\Program Files\Handspring\user name.
Macintosh: Mac HD\Applications\Palm\Users\user name.
If you upgraded from a previous version of Palm Desktop software, your
backup folder may be located in the Palm folder.
2. If you find a .prc or .pdb file for the application you just removed, delete the
file from the Backup folder.
3. Delete the file from your Treo again.
Managing Applications
112
113
Page 63
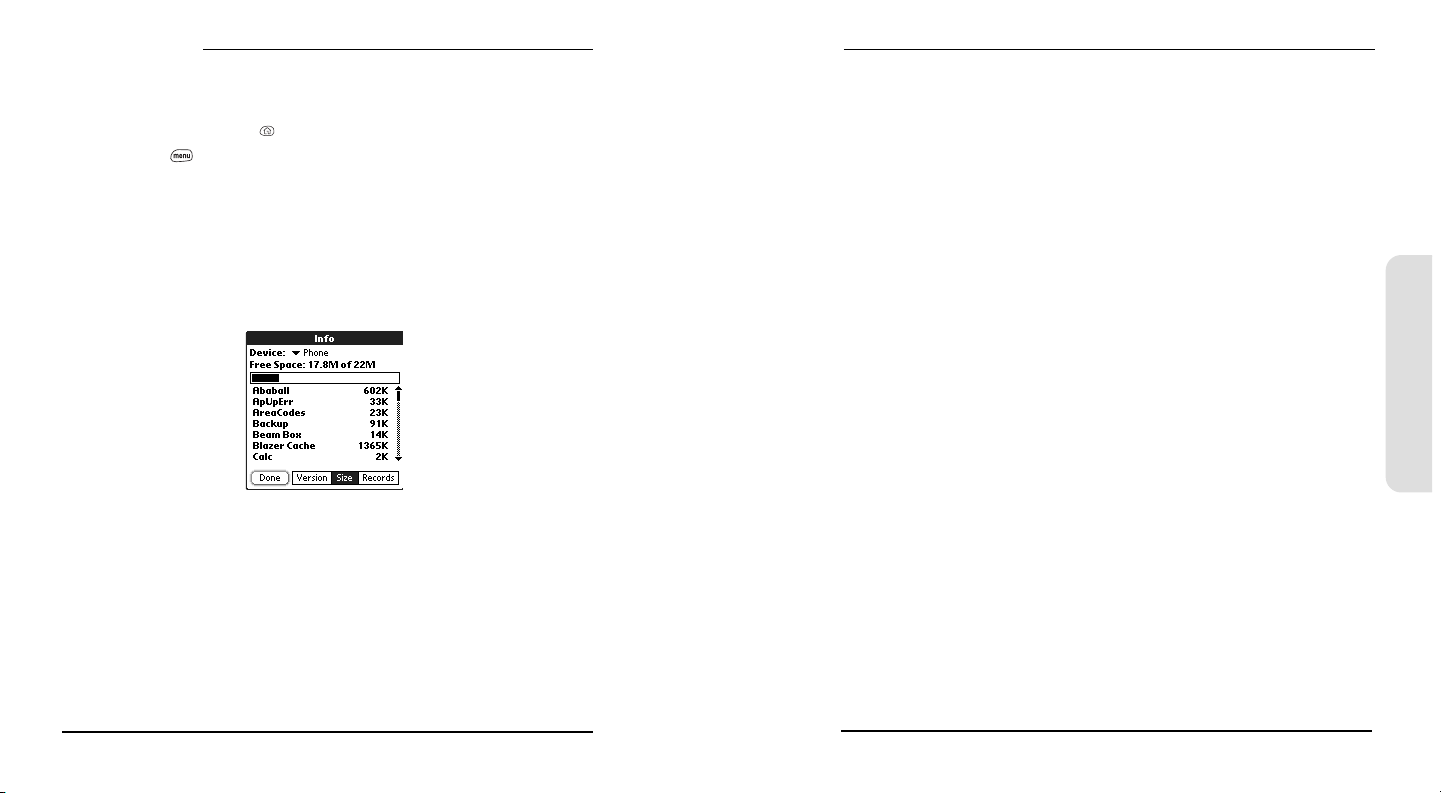
Managing Applications
Using Application Info
The Info screens display basic statistics about the applications on your Treo.
1. Press Applications Launcher .
2. Press Menu .
3. From the App menu, choose Info.
4. At the bottom of the screen, choose the type of information you want to view:
Version displays the version numbers of applications on your Treo.
Size displays the size (in kilobytes) of applications and data on your Treo.
Records displays the number of entries in different applications on your Treo.
5. Choose Done.
Using Expansion Cards
The expansion slot on your Treo enables you to add Secure Digital (SD) cards and
MultiMedia Cards (MMC) to extend the storage capacity of your Treo. Although SD
cards are faster than MMC cards for reading and writing data, you can use either
type of expansion card to store:
Pictures
MP3 audio files
Games
eBooks
Applications
Databases
... and more.
Although expansion cards are sold separately, your Treo includes a mock,
non-functional card inside the expansion slot. When you do not have a functioning
card inside the expansion slot, reinsert the mock card to protect the slot opening.
Inserting and Removing Expansion Cards
When you insert an expansion card, the card name appears as a category with a
card icon next to the name. To switch between the applications on the expansion
card and your phone, choose the category pick list in the upper-right corner, then
select another category.
1. Press down and release the mock card.
2. After you feel the expansion slot eject the mock card, remove the card from the
expansion slot.
Managing Applications
114
115
Page 64
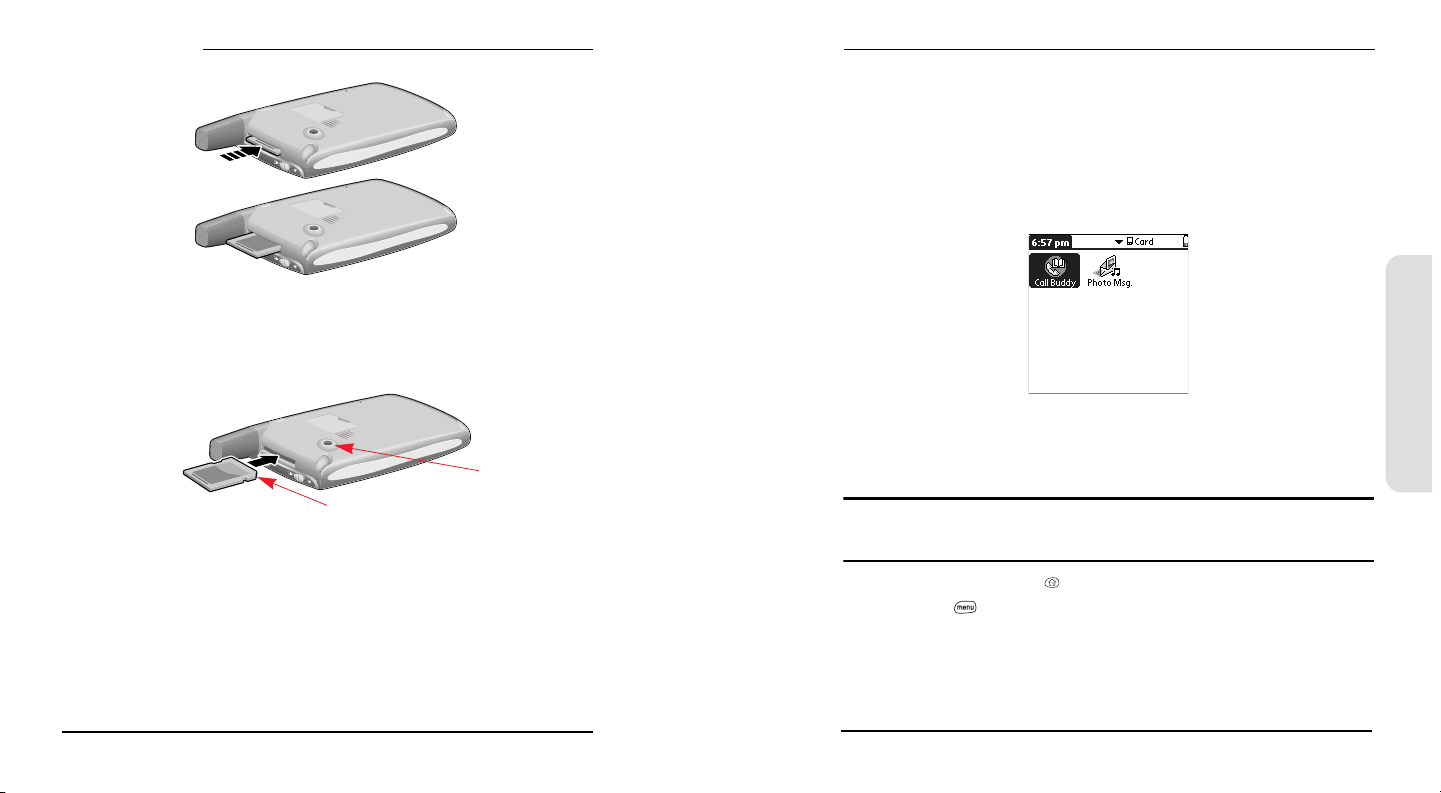
Managing Applications
Launching Applications on an Expansion Card
After you insert an expansion card in the expansion slot, you can launch any of the
applications stored on the expansion card, provided you have enough free space
in the internal memory of your Treo to accommodate the program.
1. Insert the expansion card into the expansion slot. The Applications Launcher
automatically appears.
2. Choose the icon for the application you want to launch.
3. Hold your Treo with the screen facing you and the card with the notch in the
lower-right corner next to the camera lens.
4. Insert the card into the expansion slot until you feel the card lock into place
and hear the confirmation tone.
Notch
5. When you’re done using the expansion card, repeat steps 1 and 2 to remove
the expansion card.
6. Reinsert the mock card to keep the expansion slot clean.
116
Camera lens
Managing Applications
3. Press Center to launch the application.
Copying Applications to an Expansion Card
You can copy applications between your Treo and your expansion card.
Note: Before you copy an application to an expansion card, make sure that it is compatible with
Palm OS version 5.2 or higher. Some applications do not work with expansion cards and do not
allow you to store data files in a location that is separate from the application.
1. Press Applications Launcher .
2. Press Menu .
3. From the App menu, choose Copy (/C).
117
Page 65
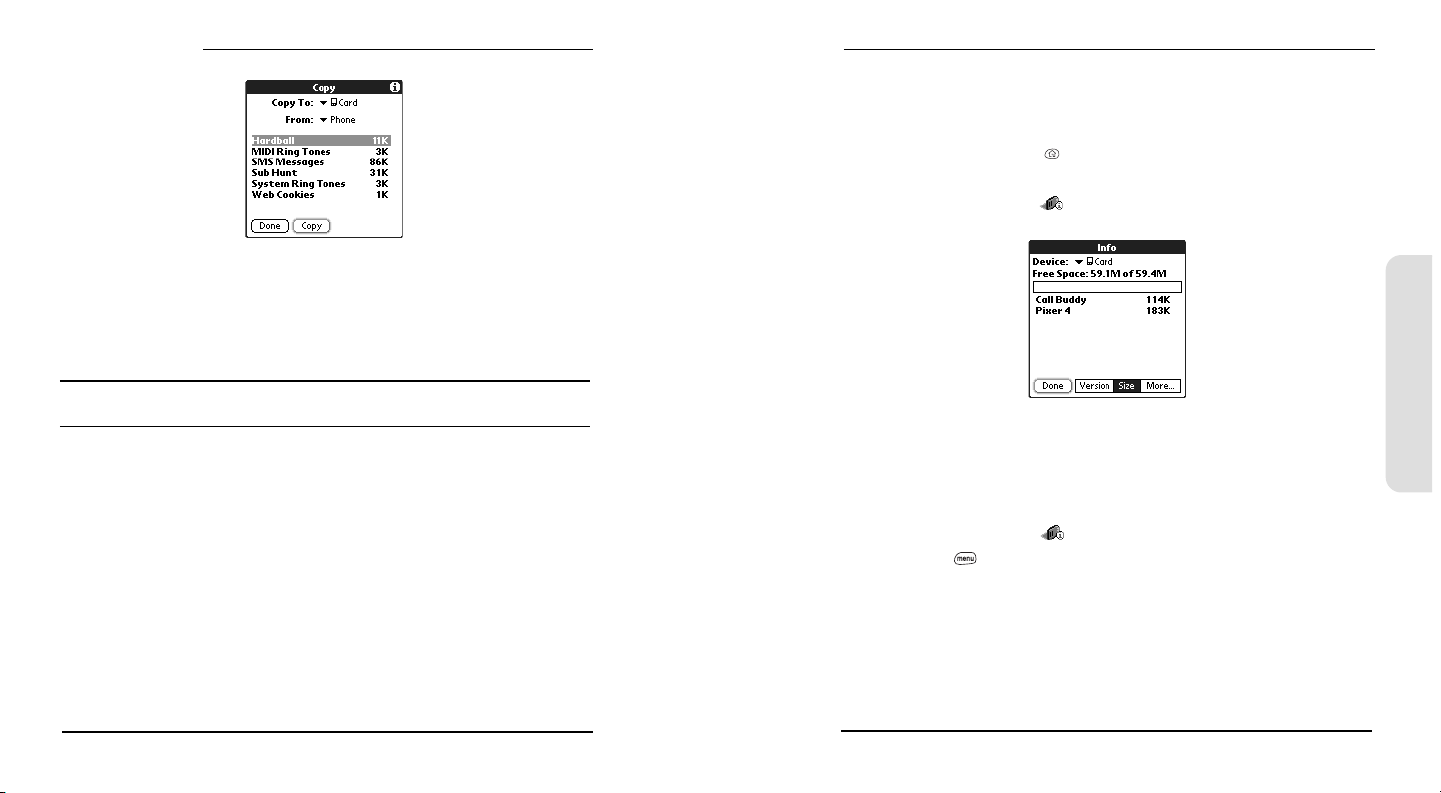
Managing Applications
Viewing Expansion Card Information
The Card Info application displays general information about the expansion card
that is currently in the expansion slot and it enables you to rename and format
a card.
1. Press Applications Launcher .
2. Choose the pick list in the upper-right corner, then select All.
3. Choose the Card Info icon .
4. Choose the Copy To pick list, then select the destination: card name or Phone.
5. Choose the From pick list, then select the location of the application you want
to copy: card name or Phone.
6. Highlight the application you want to copy.
7. Choose Copy to finish.
Tip: You can install an application directly to an expansion card instead of copying it from Treo’s
main memory. See page 109 for details.
118
Managing Applications
Renaming an Expansion Card
If you change the contents of an expansion card, you may at some point want to
rename the card to better match its contents.
1. Insert the expansion card into the expansion slot. The Applications Launcher
automatically appears.
2. Choose the Card Info icon .
3. Press Menu .
4. From the Card menu, choose Rename Card (/R).
5. Type a new name for the card.
6. Choose OK.
119
Page 66

Managing Applications
Formatting an Expansion Card
Formatting an expansion card is similar to formatting a diskette on a computer.
When you format an expansion card, you erase all the data stored on the card and
return it to a blank state.
1. Insert the expansion card into the expansion slot. The Applications Launcher
automatically appears.
2. Choose the pick list in the upper-right corner, then select All.
3. Choose the Card Info icon .
4. Press Menu .
5. From the Card menu, choose Format Card (/F).
6. Type a new name for the card.
7. Choose OK.
Customizing Your Treo
120
121
Page 67
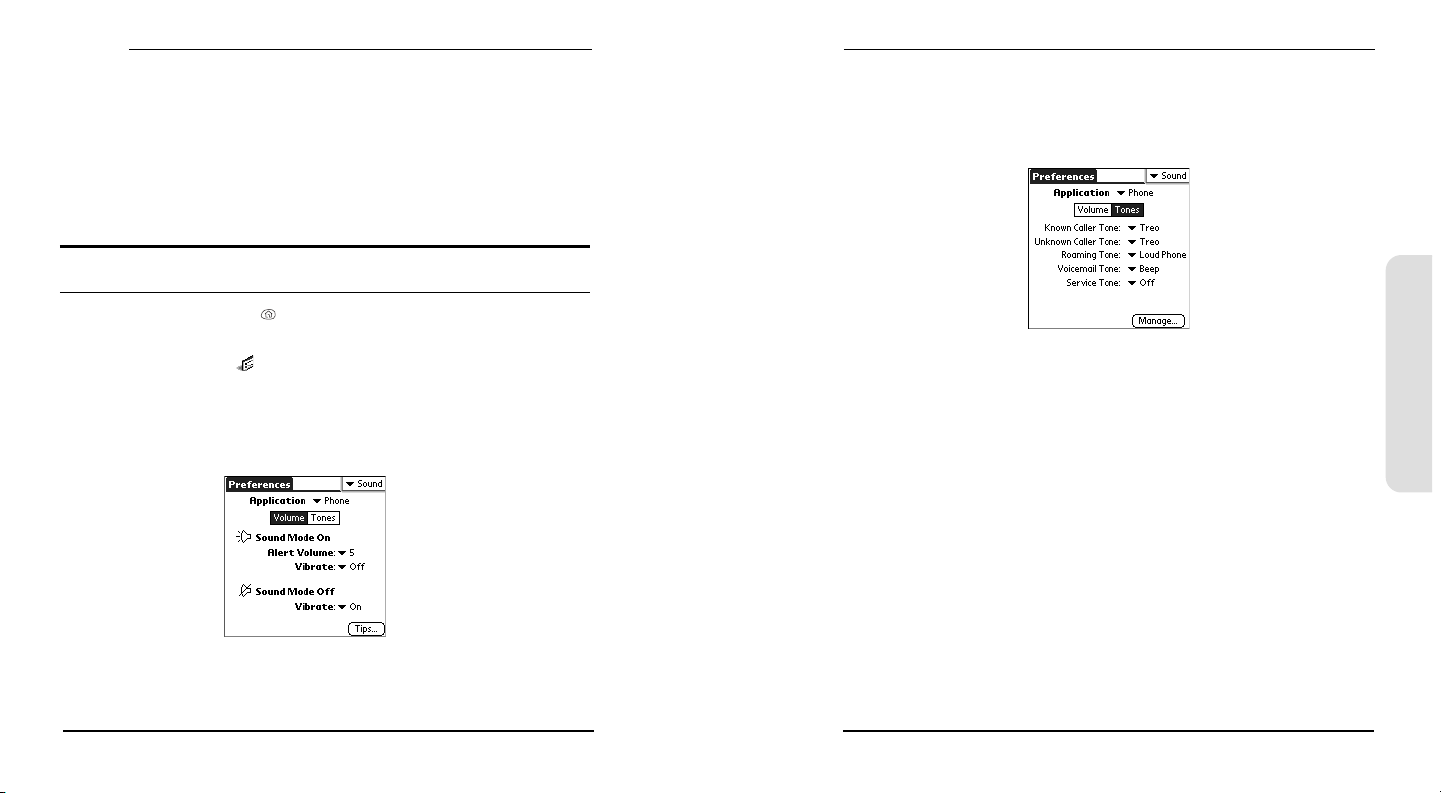
Customizing
Phone Settings
Customize your Treo with Phone settings that match the way you make calls. You
can select ring and alert tones, adjust call volume, assign a Caller ID picture to a
contact, and even choose wallpaper for the Phone application screen, and more.
Selecting Ring Tones and SMS Alert Tones
You can set different tones and volumes for incoming phone calls, Calendar
alarms, and SMS alerts.
Tip: Want more ring tones? Download any MIDI file from the web, then e-mail it to your Treo.
The MIDI files you download appear in the list of tones when you follow the steps below.
8. Choose the Tones box.
9. Depending on the application, select alert tones from the pick lists that appear:
Phone
1. Press Applications Launcher .
2. Choose the pick list in the upper-right corner, then select All.
3. Choose the Prefs icon .
4. Choose the pick list in the upper-right corner, then select Sound.
5. Choose the Application pick list, then select Phone, Calendar, or SMS.
6. Choose the Vo lume box.
7. Choose each pick list, then select an alert volume.
122
Customizing
Known Caller Tone for an incoming call from someone in your Contacts or
Favorites.
Unknown Caller Tone for an incoming call from someone identified by Caller ID
who is not in your Contacts or Favorites.
Roaming Tone for incoming calls when you’re outside your home mobile
network.
Voicemail Tone to alert you of a new voicemail.
Service Tone to warn you of a service change, such as moving into and out of
a mobile network coverage area.
123
Page 68
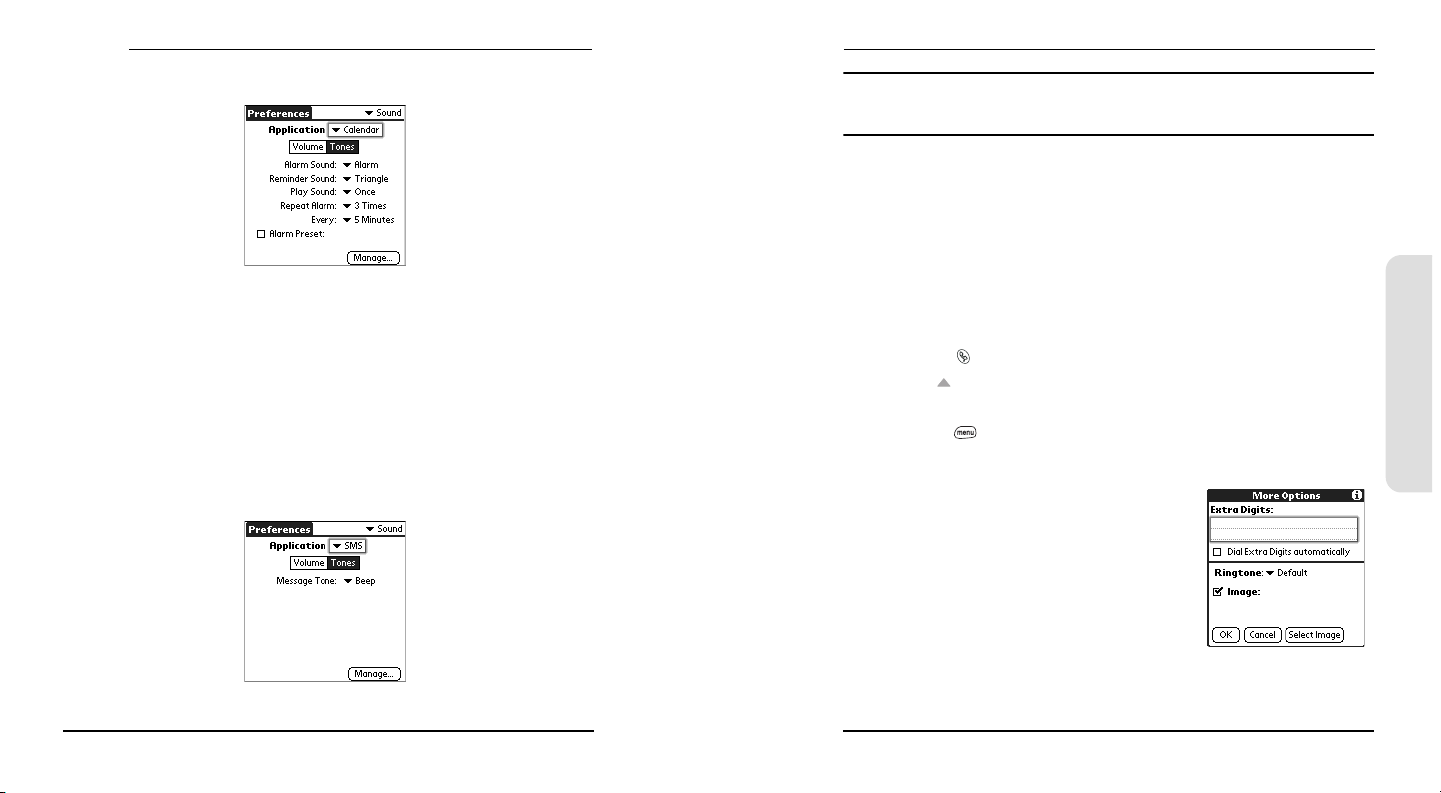
Customizing
Calendar
Alarm Sound sets the tone played the first time your alarm goes off.
Reminder Sound sets the tone played if an alarm is not acknowledged and the
alarm repeats itself.
Play Sound sets the number of times an alert tone plays during the alarm
sequence.
Repeat Alarm sets the number of times the alarm repeats if it is not
acknowledged.
Every sets the interval between alarm repeats if it is not acknowledged.
Alarm Preset sets the default number of minutes, hours, or days before the
event that the alarm goes off.
SMS
Tip: You can also preview, send, and delete sounds, such as ring tones, on your phone. From
Sound Preferences, choose the Tones box. Choose Manage, then choose Play, Send, or Edit to
perform the corresponding action.
Adjusting Volume Settings
While a call is in progress, or while using the personal speakerphone, press the
volume buttons on the side of your Treo to adjust call volume.
When a call is not in progress, press the volume buttons on the side of your
Treo to adjust the ringer volume.
Slide the ringer switch to Sound Mode Off mode at any time to silence the
ringer immediately.
Assigning a Caller ID Picture
1. Press Phone .
2. Press Up to access your Favorites buttons.
3. Highlight the Favorites button you want to give a caller ID picture.
4. Press Menu .
5. From the Edit menu, choose Edit Favorites Button (/E).
6. Choose More.
7. Check the box for Image.
8. Choose Select Image.
9. Choose the picture you want to assign to the
selected Favorites button.
10. Choose Select.
11. Choose OK.
Customizing
124
Message Tone notifies you when a new SMS message arrives.
125
Page 69
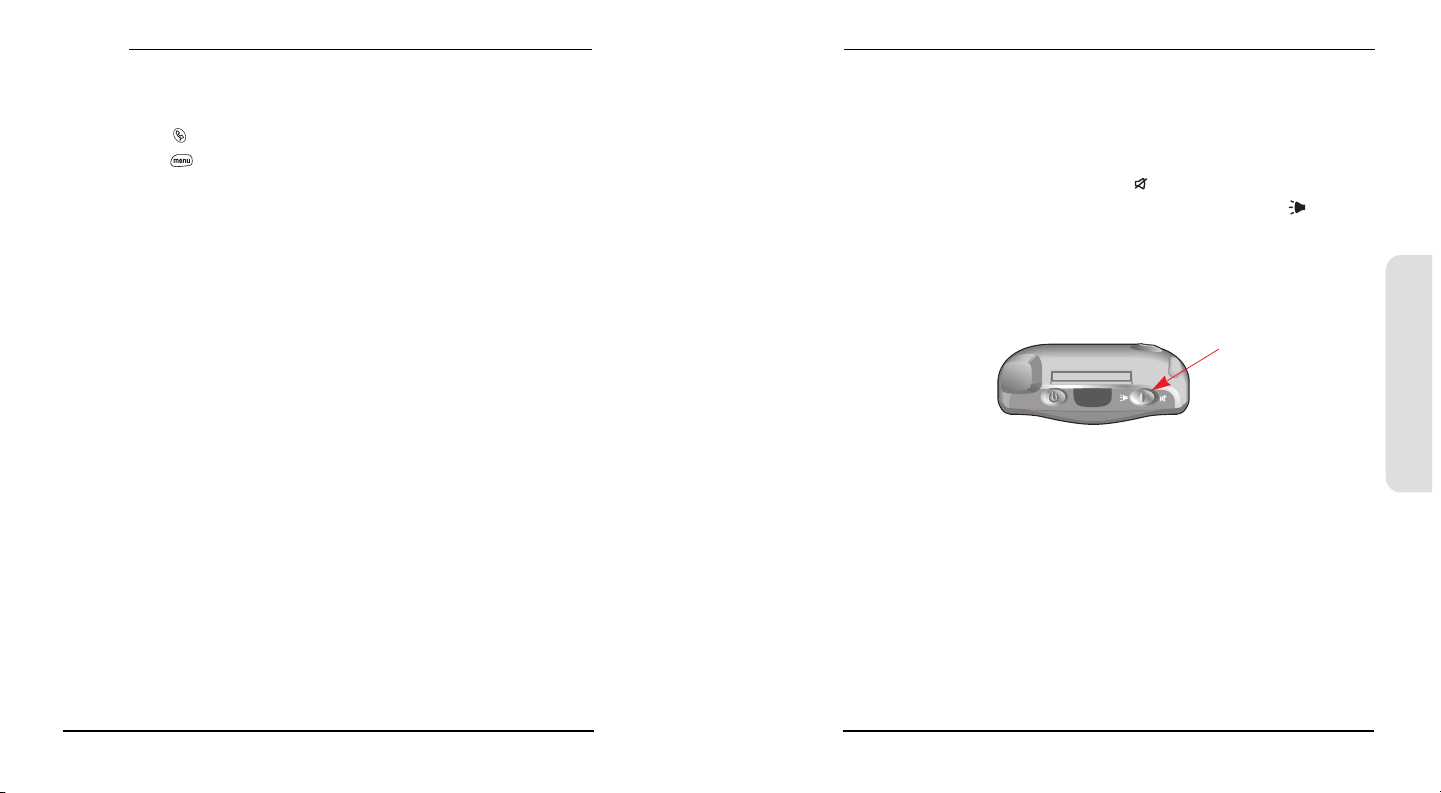
Customizing
Choosing Wallpaper for the Phone screen
If you have images stored on your Treo (see page 63), you can select different
wallpaper for the Phone screen.
1. Press Phone .
2. Press Menu .
3. From the Options menu, choose Display Preferences (/Q).
4. Choose the pick list at the top of the screen, then select Show Wallpaper.
5. Choose a Wallpaper image for your Phone screen.
6. Choose OK.
System Sound Settings
You can immediately silence all sounds on your Treo, including phone ring tones,
Calendar alerts, and system sounds. If the ringer switch is set to no sound, the
ringer setting overrides the sound settings and all sounds are turned off. This does
not, however, mute the speaker on your Treo during a phone call.
1. Slide the ringer switch to Sound Mode Off .
2. To hear all sounds again, slide the ringer switch to Sound Mode On .
When you slide the ringer switch, it does not affect the software settings for the
sounds on your Treo. For example, if the Phone ring volume is set to 7, sliding the
ringer switch to Sound Mode Off does not change this setting, but you will not
hear the phone ring because of the ringer switch position. Your Treo includes a
silent alarm that vibrates when the ringer switch is set to Sound Mode Off.
Ringer switch
Customizing
126
127
Page 70
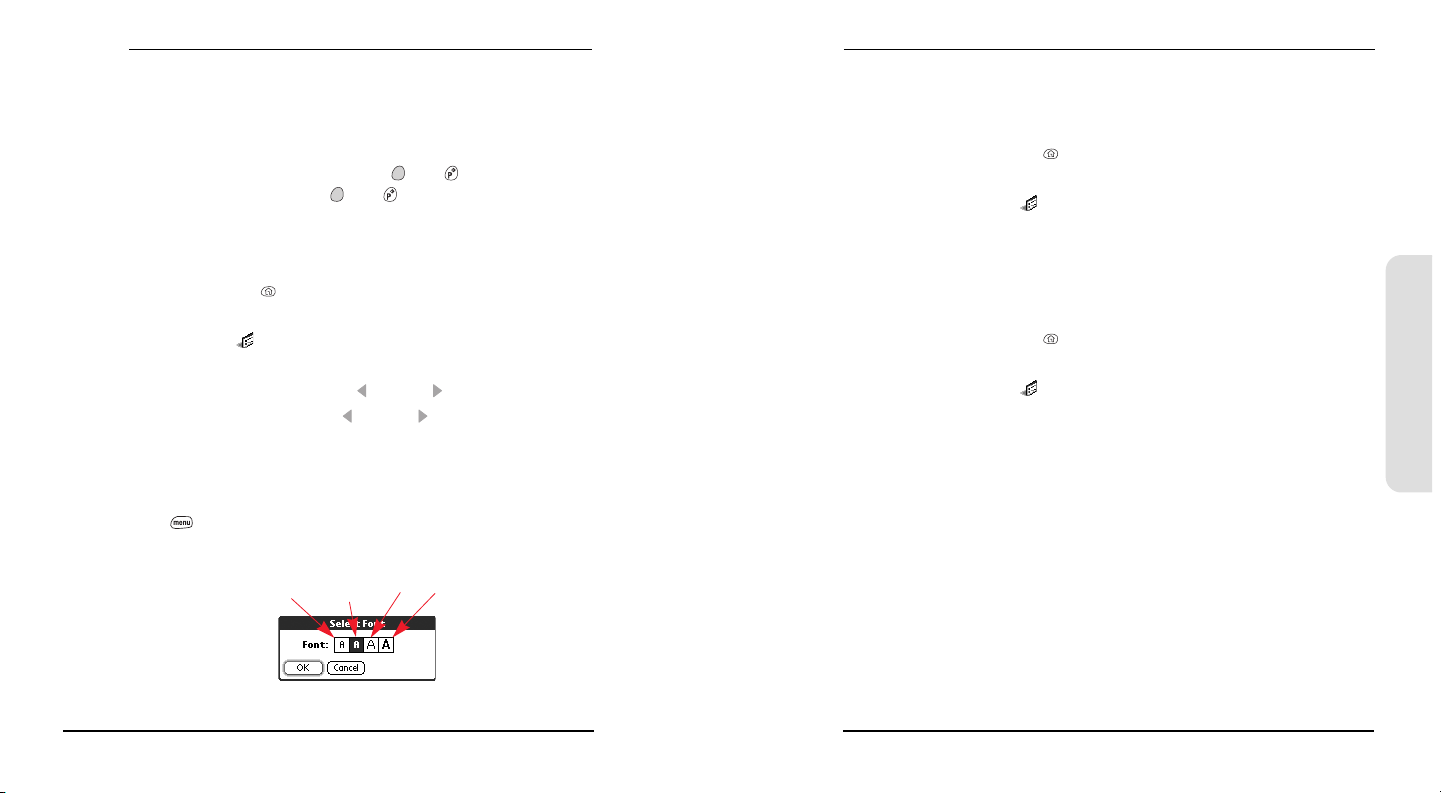
Customizing
Display and Appearance
Turning the Keyboard Backlight On and Off
When you turn on night mode, the keyboard backlight illuminates the keys and
the screen dims slightly.
To turn on the keyboard backlight, press Option then
To turn off the backlight, press Option then again.
Adjusting the Contrast and Brightness
Depending on the lighting conditions in which you’re using your Treo, you may
need to adjust the screen contrast and brightness.
1. Press Applications Launcher .
2. Choose the pick list in the upper-right corner, then select All.
3. Choose the Prefs icon .
4. Choose the pick list in the upper-right corner, then select Display.
5. Choose the brightness slider, and use Left and Right to adjust brightness.
6. Choose the contrast slider, and use Left and Right to adjust contrast.
Changing the Screen Font
You can change the screen font in Calendar, Contacts, Memo Pad, SMS, and To Do.
1. Launch the application in which you want to change the font.
2. Press Menu .
3. From the Options menu, choose Font (/F).
4. Choose a font style:
Small Large Large
Small
bold
bold
Aligning the Touchscreen
Occasionally, your Treo touchscreen may need to be readjusted. If it is out of
alignment, you may see the wrong feature being activated when you tap the
screen. To fix the problem, you can realign the touchscreen any time.
1. Press Applications Launcher .
2. Choose the pick list in the upper-right corner, then select All.
3. Choose the Prefs icon .
4. Choose the pick list in the upper-right corner, then select Display.
5. Choose Touchscreen.
6. Follow the onscreen instructions.
Changing the System Color Scheme
1. Press Applications Launcher .
2. Choose the pick list in the upper-right corner, then select All.
3. Choose the Prefs icon .
4. Choose the pick list in the upper-right corner, then select General.
5. Choose the Colors pick list, then select a color scheme.
Customizing
128
5. Choose OK.
129
Page 71
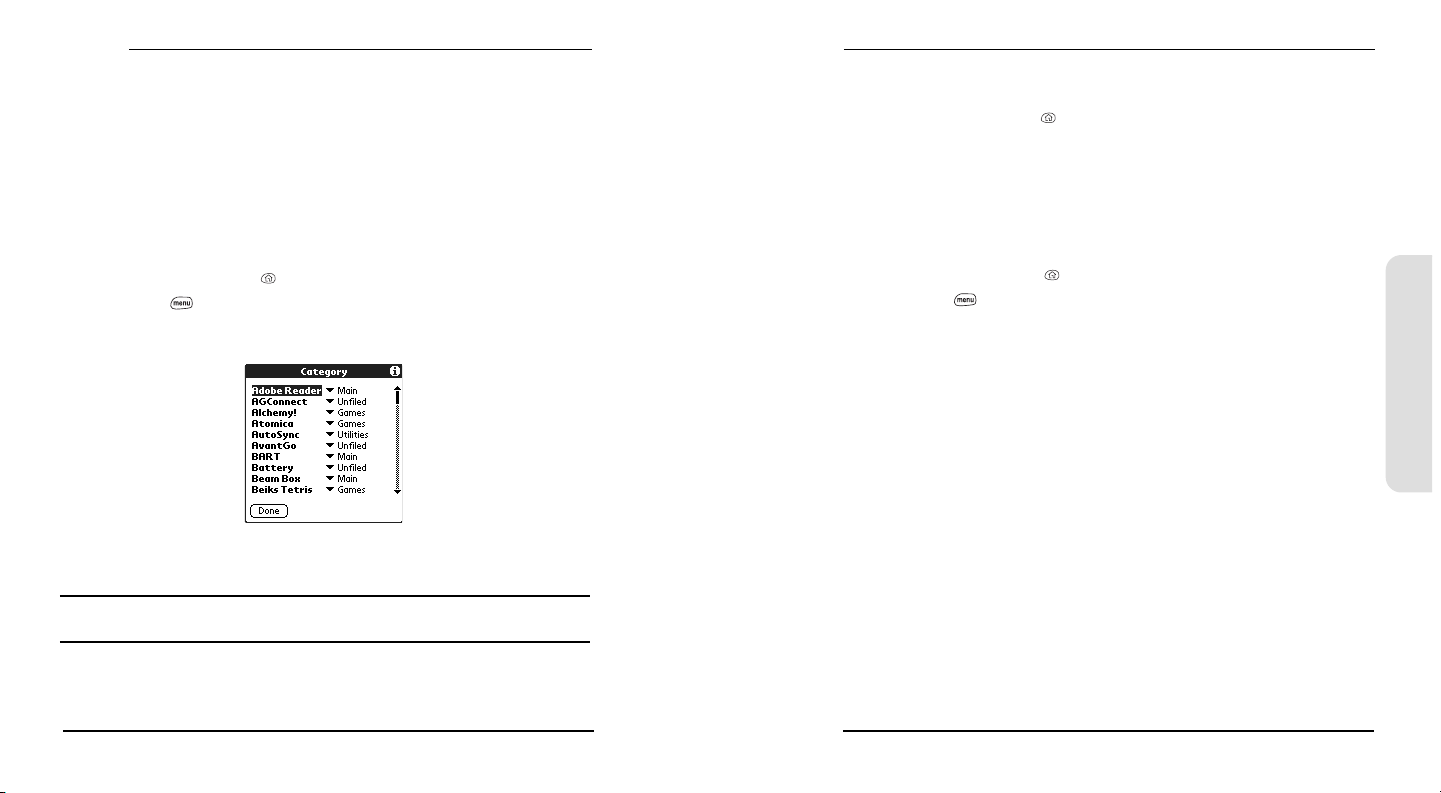
Customizing
Applications Launcher Settings
You can change the Applications Launcher settings on your Treo so that you can
easily access the applications you use most often. You can arrange and display your
applications by category, reassign the buttons on your Treo, and choose default
applications for specific tasks.
Arranging Applications by Category
The category feature enables you to manage the groups of application icons that
appear in the Applications Launcher. You can assign an application to a category
and then display just a specific category or all of your applications.
1. Press Applications Launcher .
2. Press Menu .
3. From the App menu, choose Category (/Y).
4. Choose the pick list next to each application, then select a category.
5. Choose Done.
Tip: To create a new category, choose the category pick list, then select Edit Categories. Choose
New, then enter the category name. Choose OK to close the dialog, then choose OK.
Displaying Applications by Category
Do one of the following:
Press Applications Launcher repeatedly to cycle through all your categories.
Choose the pick list in the upper-right corner, then select the category you
want to display.
Choosing the Applications Launcher Display
By default, the Applications Launcher displays each application as an icon. As an
alternative, you can view a list of applications. The list view is particularly useful
when you have several applications in a category.
1. Press Applications Launcher .
2. Press Menu .
3. From the Options menu, choose Preferences (/R).
4. Choose the View By pick list, then select List.
5. Choose OK.
Customizing
130
131
Page 72
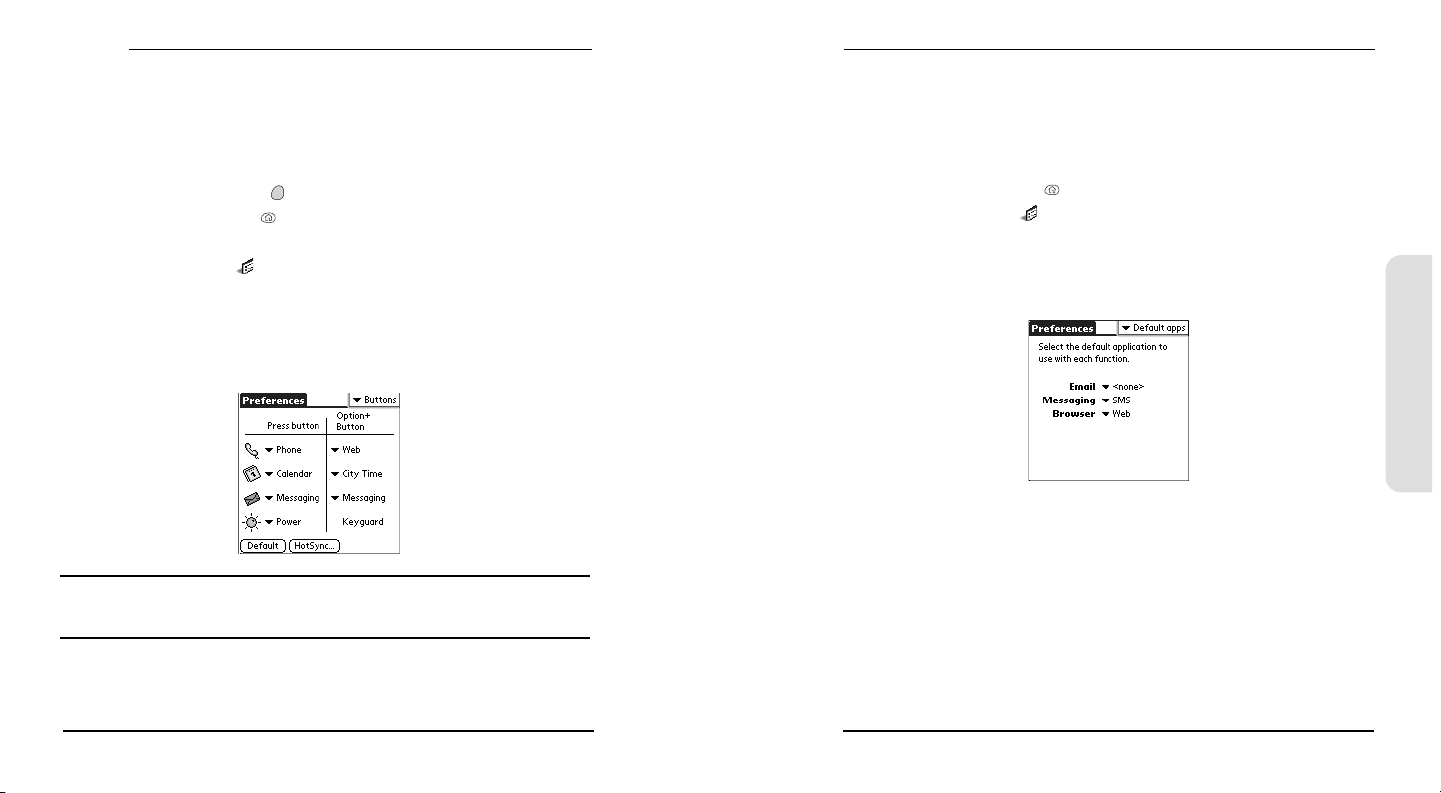
Customizing
Button Settings
Buttons Preferences
Buttons Preferences enable you to choose which applications are associated with
the buttons on the front of your Treo and the HotSync button on the cable. You
can also change the applications associated with these buttons when they are used
in combination with the Option key.
1. Press Applications Launcher .
2. Choose the pick list in the upper-right corner, then select All.
3. Choose the Prefs icon .
4. Choose the pick list in the upper-right corner, then select Buttons.
5. Choose the pick list next to the button or key combination you want to re-
assign, then select the application you want to assign to that button or key
combination.
Tips: You can also choose HotSync to pick an application to launch from the HotSync button on
the cable. To restore all of the buttons and key combinations to their factory settings, choose
Default.
Setting Default Applications
Sometimes, one application looks for another application to handle some data (for
example, a mail application might launch a browser when you choose a link in an
email message). Default Apps Preferences enable you to designate a specific
application as the default handler for a particular type of data. For example, you
can choose Blazer Web Browser as the default Web browser.
1. Press Applications Launcher .
2. Choose the Prefs icon .
3. Choose the pick list in the upper-right corner, then select Default Apps.
4. Choose each pick list, then select the application you want to associate with
that function.
Customizing
132
133
Page 73
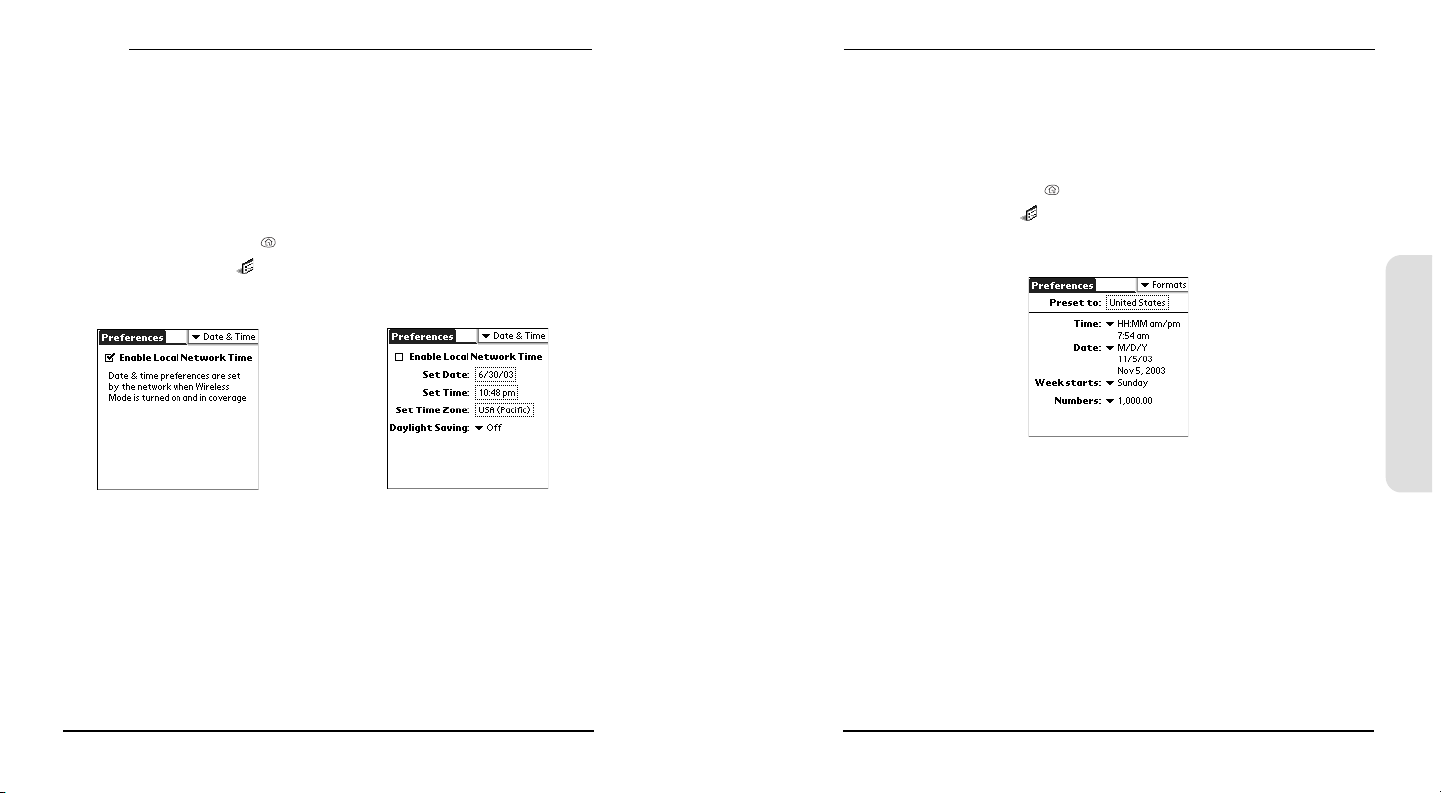
Customizing
Date and Time Settings
Setting the Date and Time
Date & Time Preferences enable you to set the time, date, time zone, and daylight
savings setting for your Treo. By default, your phone synchronizes the date and
time with the PCS Network when Wireless Mode is on and you are inside a
coverage area.
To manually set the date and time, follow these steps:
1. Press Applications Launcher .
2. Choose the Prefs icon .
3. Choose the pick list in the upper-right corner, then select Date & Time.
4. Uncheck the Enable Local Network Time
5. Choose the Set Date box. Highlight the current year, month, and date, then
press Center to set the date.
6. Choose the Set Time box. Using the stylus, tap the up and down arrows to select
the current time, then choose OK to set the time.
7. Choose the Set Time Zone box. Choose the time zone for your location, then
choose OK to set the time zone.
8. Choose the Daylight Saving pick list, then select On or Off.
box.
Setting Date and Time Formats
Formats Preferences enable you to choose number conventions based on
geographic regions. For example, in the United Kingdom, time often is expressed
using a 24-hour clock. In the United States, time is expressed using a 12-hour clock
with an AM or PM suffix. All the built-in applications on your Treo use the Format
Preferences settings.
1. Press Applications Launcher .
2. Choose the Prefs icon .
3. Choose the pick list in the upper-right corner, then select Formats.
Customizing
4. Set any of the following preferences:
Preset to sets the standard number conventions for your country. When you
select a country, the other Formats Preferences are automatically set to that
country’s conventions. You can also edit each option individually.
Tim e sets the time format. Select HH:MM to display a 24-hour clock.
Date sets the date format.
Week starts sets the first day of the week (usually Sunday or Monday) for all
applications that include a calendar.
Numbers sets the format for numbers with decimal points and commas.
134
135
Page 74
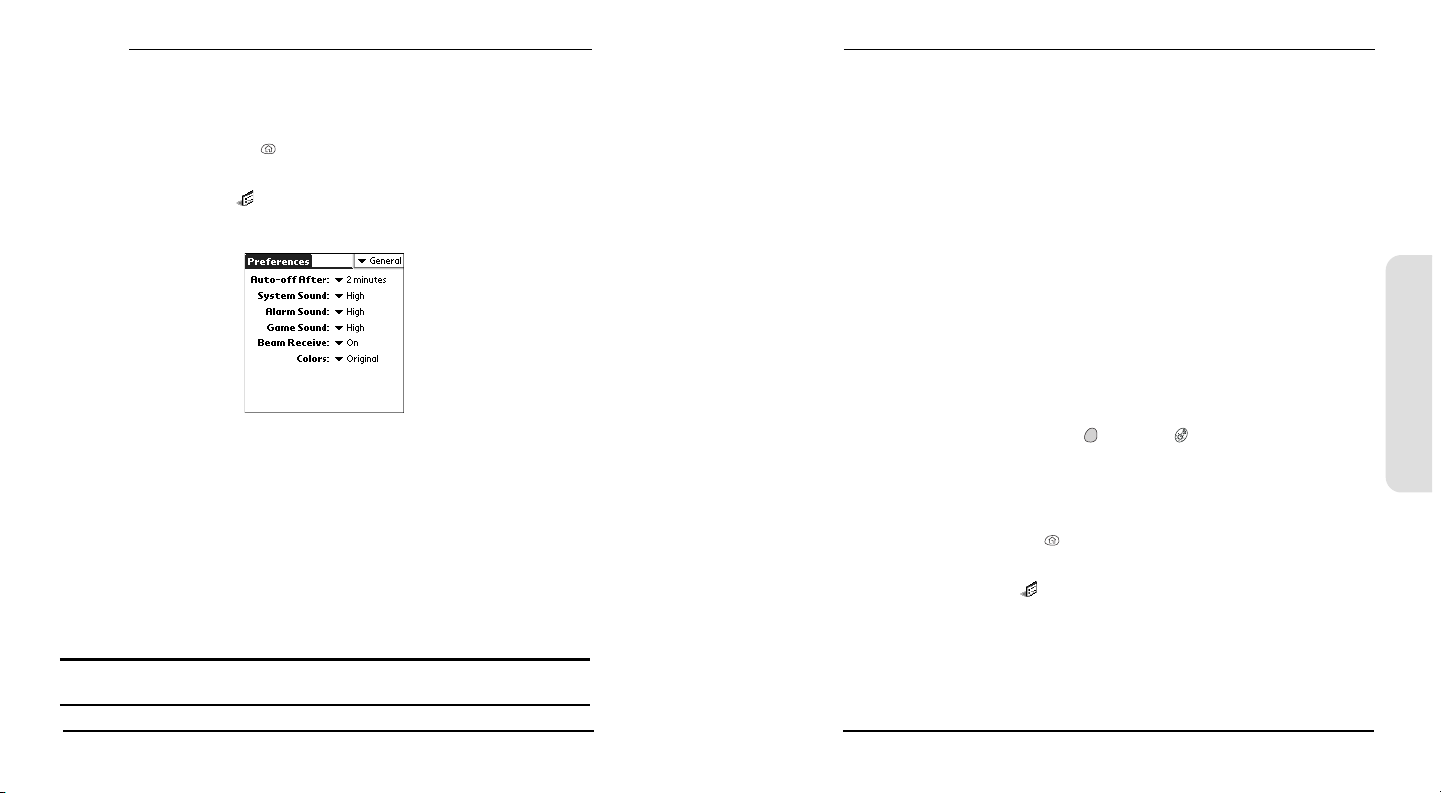
Customizing
General Preferences
General Preferences enable you to set the auto shutoff interval, the beam receive
feature, sounds, and screen colors for your Treo.
1. Press Applications Launcher .
2. Choose the pick list in the upper-right corner, then select All.
3. Choose the Prefs icon .
4. Choose the pick list in the upper-right corner, then select General.
5. Set any of the following preferences:
Auto-off After conserves battery power by automatically turning off your
phone’s screen after the specified time period elapses. It does not turn off
Wireless Mode, so you can still receive calls, email, and SMS messages after
the automatic shutoff period.
System Sound sets the volume for system beeps and alerts.
Alarm Sound sets the volume for Calendar and To Do List alarms and alerts.
Game Sound sets the volume for game sounds.
Beam Receive sets whether your Treo is enabled to receive beamed
information.
Colors chooses the set of predefined colors for the system display.
Note: The System Sound and Game Sound volume settings apply only when the ringer switch is
set to the on position.
136
Locking Your Phone and Data
Your Treo includes several features that help you protect your phone from
inadvertent use and keep your data private. The built-in security software enables
you to use your Treo for emergency calls even if the handset is locked.
Keyguard manually disables all buttons and the touchscreen to prevent
accidental presses in your briefcase or pocket.
Auto-Keyguard and Touchscreen Lockout automatically enables Keyguard after a
period of inactivity, and lets you disable the touchscreen during an active call or
call alert.
Phone Lock prevents phone calls without a password.
System Password Lock prevents anyone from seeing any data on your Treo
without a password.
Private Records masks or hides items marked as private and requires a password
to view them.
Keyguard
Your Treo includes a feature that locks the keyboard, so that you don’t accidentally
press buttons or activate screen items while the phone is in a pocket or bag.
1. With the screen on, press Option and Screen to enable Keyguard.
2. To disable Keyguard, press Center.
Auto-Keyguard and Touchscreen Lockout
Auto-Keyguard lets you automatically lock the keyboard after a period of inactivity.
1. Press Applications Launcher .
2. Choose the pick list in the upper-right corner, then select All.
3. Choose the Prefs icon .
4. Choose the pick list in the upper-right corner, then select Keyguard.
5. Set any of the following preferences:
Auto-Keyguard sets the period of inactivity that passes before the keyboard
automatically locks.
Disable touchscreen when sets the conditions that disable the touchscreen.
Customizing
137
Page 75
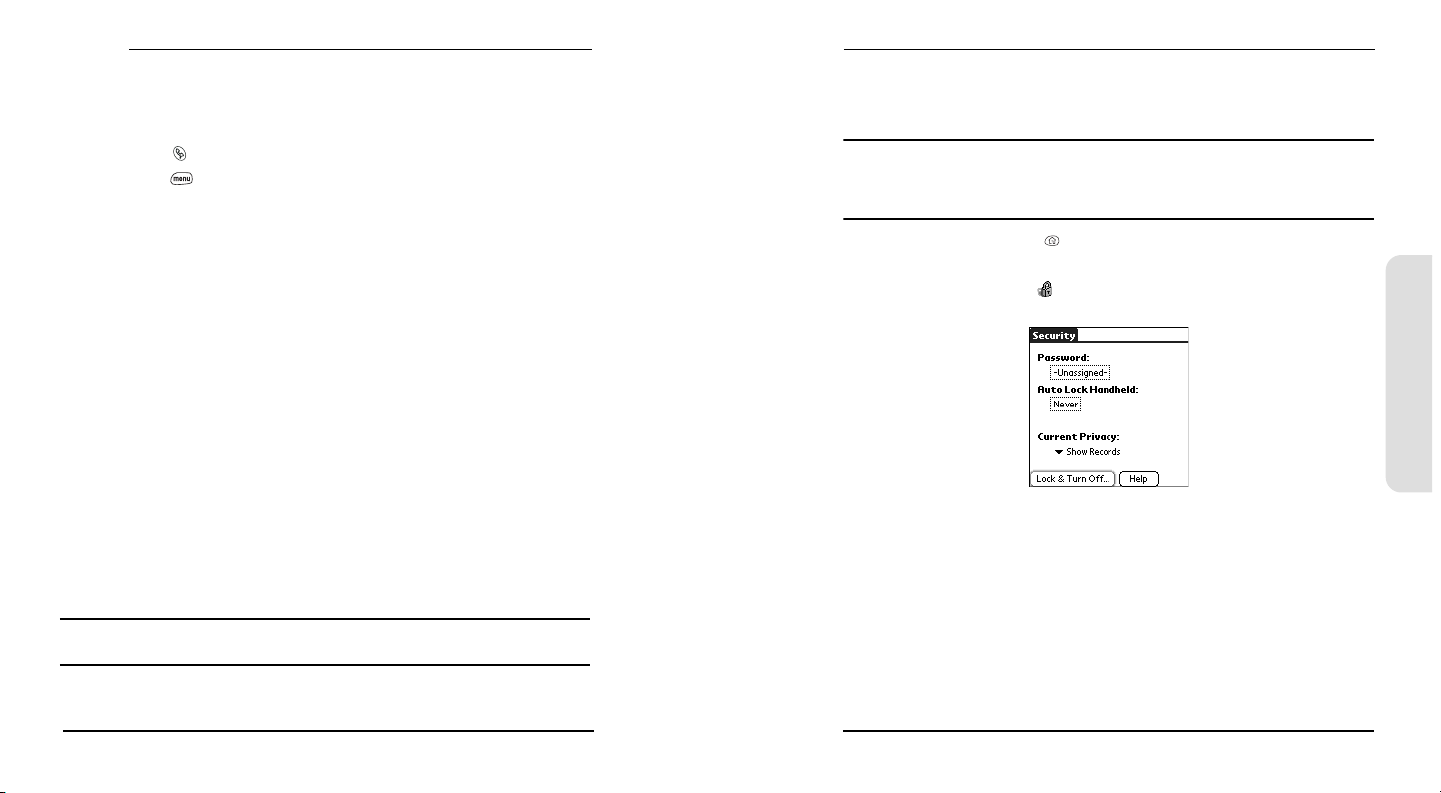
Customizing
Phone Lock
You can lock your phone to prevent unauthorized voice and data calls. When your
phone is locked, you must enter the correct code to unlock it. You can, however,
still place emergency calls when your phone is locked.
1. Press Phone .
2. Press Menu .
3. From the Options menu, choose Phone Lock (/L).
4. (Optional.) Choose Advanced, enter up to three numbers (in addition to 911)
that you can dial when your phone is locked, and then choose OK.
5. Choose one of the following Lock Wireless Mode options:
On Wireless Mode power off locks your phone each time you turn off Wireless
Mode. When this setting is active, you must enter your lock code each time
you turn Wireless Mode on again.
Immediately locks your phone when you choose OK. The next time you turn
Wireless Mode on again you must enter your lock code. After that, you can
turn Wireless Mode on again without entering your lock code.
6. When prompted, enter the lock code and choose OK. Unless you changed your
lock code, the lock code is the last four digits of your phone number.
7. If you want to change the lock code, choose Change Lock Code, enter a new lock
code, then choose OK to accept it. Repeat this step to verify the new lock code.
8. Based on the option you selected in step 5, do one of the following to lock
your phone:
For On Wireless Mode power off, turn off Wireless Mode.
For Immediately, choose OK.
9. To unlock Wireless Mode, dial a number, enter your lock code, then choose OK.
System Password Lock
To protect your personal information, you can lock the system so that you need to
enter your password to access any of your data or use other features of your Treo.
Important: If you lock your system, you must enter the exact password to unlock it. If you forget
the password, you need to perform a hard reset to resume using your phone. Performing a hard
reset deletes all the records in your phone. However, you can restore all previously
synchronized data at the next HotSync operation (see page 157).
1. Press Applications Launcher .
2. Choose the pick list in the upper-right corner, then select All.
3. Choose the Security icon .
Customizing
4. Choose the Password box.
5. Assign a password and a password hint to your Treo.
6. Choose the Auto Lock Handheld box.
7. When prompted, enter your password.
Note: To permanently unlock your phone, choose Phone Lock (/L) from the Options menu and
uncheck the On Wireless Mode power off box. Your lock code is required to change this setting.
138
139
Page 76
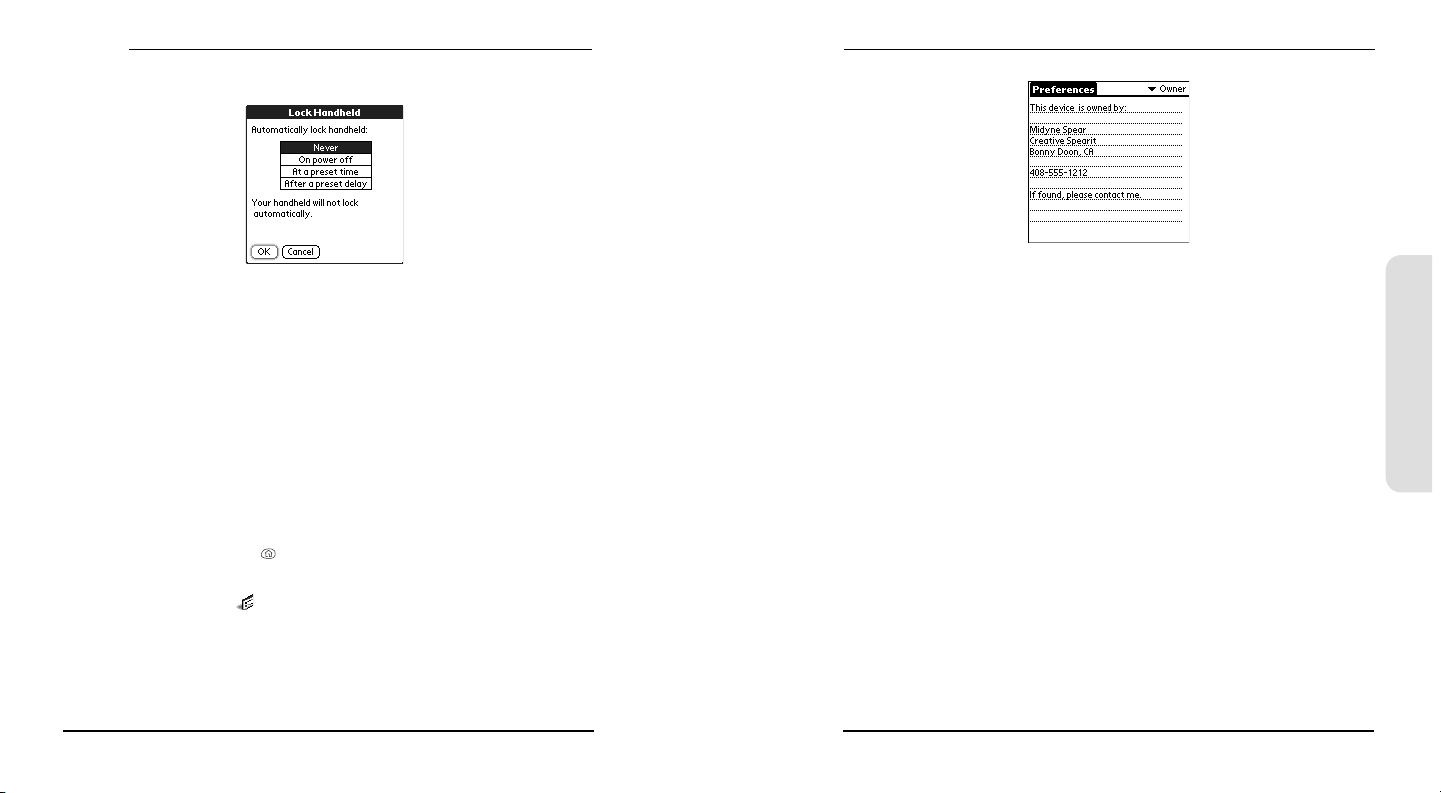
Customizing
8. Choose one of the following options:
Never prevents your Treo from locking automatically. You can still lock your
system manually by choosing Lock & Turn Off and then choosing Off & Lock.
On power off locks your Treo when you turn off the screen, or when it shuts
off with the auto-off feature.
At a preset time locks your Treo at a specific time of day.
After a preset delay locks your Treo after a period of inactivity.
Setting Owner Preferences
You can use Owner Preferences to record information that you want to associate
with your Treo, such as your name, company name, and phone number. If you
system lock your phone, the Owner Preferences information appears on the
screen that requests your password to unlock it.
1. Press Applications Launcher .
2. Choose the pick list in the upper-right corner, then select All.
3. Choose the Prefs icon .
4. Choose the pick list in the upper-right corner, then select Owner.
5. If you assigned a password with the Security application, choose Unlock, enter
your password, then choose OK to continue.
6. Type the text that you want to appear in the Owner Preferences screen.
Private Records
In most applications you can mark individual entries as private. All private entries
remain visible and accessible until you select the Security setting to hide or mask
them. When you hide entries, they do not appear anywhere in the application.
When you mask entries, a visual placeholder appears where the entry would
normally appear. However, as a security measure, masked Contacts records are
temporarily hidden when you perform a search. So you will not see a placeholder
for masked entries when viewing the results of a Lookup or Find request.
If you define a password, you must enter it to display private entries. If you do not
define a password, you (or anyone else) can reveal private entries without a
password.
1. Display the entry that you want to mark private.
2. Choose Details.
3. Check the Private box.
4. Choose OK.
Customizing
140
141
Page 77

Customizing
Hiding or Masking All Private Records
1. Make sure the records you want to hide or mask are marked private.
2. Press Applications Launcher .
3. Choose the pick list in the upper-right corner, then select All.
4. Choose the Security icon .
5. Choose the Current Privacy pick list, then select either Hide Records or
Mask Records.
Viewing All Private Records
1. Press Applications Launcher .
2. Choose the pick list in the upper-right corner, then select All.
3. Choose the Security icon .
4. Choose the Current Privacy pick list, then select Show Records.
5. If the Show Private Records dialog appears, enter your password, then
choose OK.
Viewing Private Entries in a Specific Application
1. Launch the application that contains the private entries you want to display.
2. Press Menu .
3. From the Options menu, choose Security (/H).
4. Choose the Current Privacy pick list, then select Show Records.
5. Choose OK.
Security and Palm Desktop (Windows)
Palm Desktop for Windows observes the security password for your Treo. If you
forget your Treo password, you cannot view your data in Palm Desktop. You can
change your password, but all records marked as Private will be deleted. You can
restore these records at the next HotSync operation.
1. Press Applications Launcher .
2. Choose the pick list in the upper-right corner, then select All.
3. Choose the Security icon .
4. Choose the Password box.
5. Choose the Lost Password box.
6. Choose Ye s .
If you want additional security for Palm Desktop files, you may wish to purchase a
third-party solution.
Customizing
142
143
Page 78
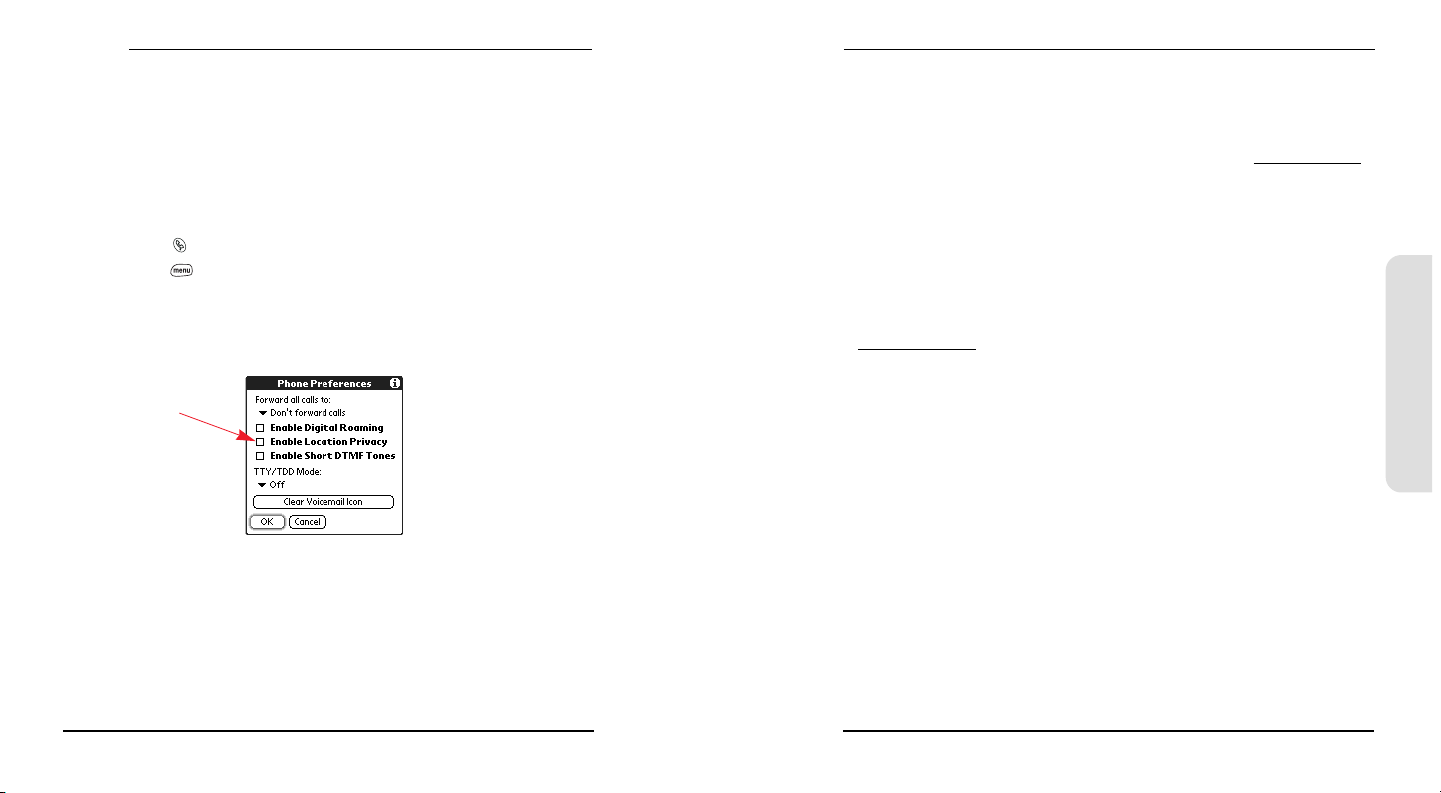
Customizing
Additional Features
Location
Your PCS Phone is equipped with a Location feature for use in connection with
location-based services which may be available in the future. Currently the
location information is used to help identify your longitude and latitude position
during an emergency call.
You can prevent your location information from being provided during all calls
except when you contact 911 in an emergency.
1. Press Phone .
2. Press Menu .
3. From the Options menu, select Phone Preferences.
4. Check the box for Enable Location Privacy. Your location information will not be
shared except when you call 911 in an emergency.
Check this box
144
Accessories for Your Phone
PCS Accessories
These and other accessories are available for purchase at your local Sprint Store. You
can also call the PCS Accessory Hotline (1-800-974-2221) or visit
Next day delivery is offered in select areas.
Extended Battery
Provides up to 3 hours of continuous talk time or up to 1 week of continuous standby time.
Stylus
Provides a replacement or spare stylus for your phone.
Handspring Accessories
These and other accessories are available for purchase from Handspring at
www.handspring.com.
Next day delivery is offered in select areas.
Vehicle Power Charger
Charges your phone in your vehicle using the car lighter socket.
Serial HotSync Cable
Enables you to synchronize via a serial port on your computer. This is required for
computers running Windows NT.
USB HotSync Cable
Provides an extra cable for quick USB synchronization of data between your Treo
and PC or Macintosh computer using a USB port.
USB Docking Cradle
Provides a convenient and elegant desktop solution for synchronizing data and
charging your phone with any USB-enabled PC or Macintosh computer.
Extra AC Charger
Provides an extra 100 - 240 volt AC charger for your phone.
International Travel Adapters
Provides snap-on adapters for continental Europe, the United Kingdom, and Australia. For
use with the Extra AC Charger only.
www.sprintpcs.com.
Customizing
145
Page 79

Customizing
Leather Side Case With Belt Clip
Clips to your belt or bag and provides both quick access and protection for your phone.
Stereo Headphone Adapter
Converts a mini-stereo phone connector to a 2.5mm connector so that it is
compatible with the headphone jack on your phone. This enables you to listen to
MP3 files on your Treo with your own stereo headphones.
Help
146
147
Page 80

Help
Getting Help
This section presents answers to the questions and issues you are most likely to
have while using your Treo phone.
Launching the Tutorial
Your Treo includes a built-in tutorial to teach you the basics. Launch it any time,
anywhere.
1. Press Applications Launcher .
2. Choose the pick list in the upper-right corner, then select All.
3. Choose the Tutorial icon .
4. Follow the instructions and learn all about your Treo. The Tutorial will walk
you through the basics.
Upgrading From Another Palm Powered Device
Note for Macintosh Users: A special README file on the Treo 600 CD contains instructions to
make sure you don’t encounter compatibility issues when you upgrade to Treo 600. Follow the
instructions in this README file for a smooth transition.
To transfer all compatible applications and data from your previous device to your
new Treo:
1. Perform a HotSync operation with your old device and your old desktop
software to back up your data one last time.
2. Install the Palm Desktop synchronization software from the CD that came with
your Treo (see page 21). During the installation process, perform a HotSync
operation with your new Treo. When prompted to choose a user name for your
new Treo, be sure to select the existing user name for your old device.
3. Some third-party applications may be quarantined by the HotSync Manager
because they are not compatible with the Palm OS 5.2.1 on your Treo. Do not
manually install any quarantined files.
4. If you plan to continue using your old device, perform a hard reset (see page
153) to remove its associated user name. Each device you synchronize with
your computer must have a unique name. The next time you synchronize with
your old device, be sure to assign it a new user name.
After upgrading, there are a few things you need to know about your new Treo:
Address Book is now called Contacts. To launch Contacts, press Phone ,
then use the 5-way navigation control to choose Contacts.
Date Book+ is now called Calendar. Press Calendar to launch.
Applications Launcher. Some previous Palm Powered devices called this the
Home screen. To access this screen, press Applications Launcher .
Find. Some previous Palm Powered devices launched this global search
engine by tapping the magnifying glass icon in the Graffiti area. Now you
can access it by pressing Option and Shift together.
Help
148
149
Page 81

Help
Menu commands. Users familiar with Graffiti’s Menu launch command can
now access system menus by pressing Menu . To access a menu shortcut,
press Menu , then the letter for the shortcut (see page 32).
Backlight. Treo includes a keyboard backlight that also dims the screen
slightly for low light conditions. While your Treo screen is on, press Option
then to turn on the keyboard backlight.
Center button. If you used a previous Treo phone, you might be accustomed to
pressing Spacebar to activate commands or dial numbers. With this Treo
phone, we recommend pressing Center instead.
Screen button. The fourth button on the right is used to control the screen and
is not an application button. However, you can remap this button to your
favorite application if you wish (see page 132). To turn on the screen, tap the
Wireless Mode button briefly (don’t press and hold).
Internet connection. This Treo was designed to work on the PCS Vision
Network. When you sign up for a PCS Vision account, these settings are
automatically transferred to your Treo; you don't need to do any extra setup.
If you have trouble connecting to the Internet, you may need to contact
Sprint and ask them to re-provision your Treo 600 for PCS Vision.
5-way navigation compatibility. Some Palm OS 5 applications are optimized for
5-way navigation on devices other than Treo. Therefore, you may notice
inconsistencies with software that is not designed with Treo in mind.
Contact the application’s author or vendor to learn if a version that is
optimized for Treo is available.
Trouble Installing Palm Desktop?
The software included with your Treo installs the drivers that let you synchronize
with Palm Desktop software or Microsoft
1. Restart your computer.
2. Quit any active applications, including virus scanners and Internet security
applications.
3. Make sure you’re installing the version of Palm Desktop that came on the CD
with your Treo. Other versions of Palm Desktop may not work with this Treo.
4. Make sure your computer profile includes administrator rights to install
software. In large organizations, these are usually granted by the system
administrator.
Note: If you want to synchronize with a Personal Information Management (PIM) application
other than Palm Desktop or Outlook, you must install a third-party solution. Contact the PIM’s
author or vendor to learn if software is available for the PIM.
®
Outlook® for Windows.
Help
150
151
Page 82
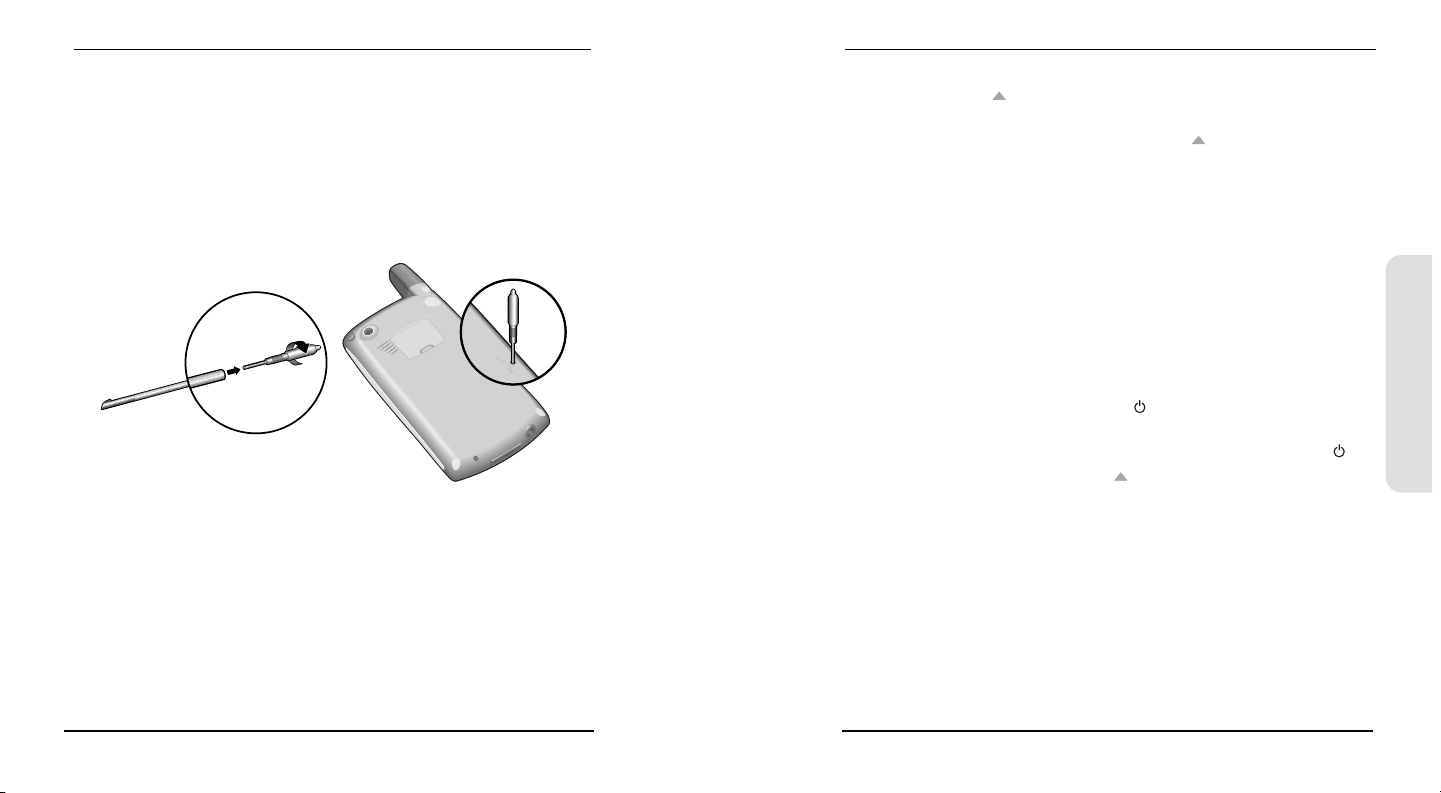
Help
Resetting Your Treo
Soft Reset
A soft reset is similar to restarting a computer. If your Treo is not responding or
you have trouble synchronizing with your computer, a soft reset may help. Unless
your battery is extremely low, a soft reset should not affect your data.
1. Unscrew the stylus tip to access the reset tool.
2. Use the reset tool to gently press the reset button on the back of your Treo.
System Reset
A system reset, also called a safe or warm reset, tells your Treo to stop what it’s
doing and start over again without loading any system extras. If your Treo loops or
freezes during a soft reset, a system reset may help. Performing a system reset
allows you to get out of an endless loop in order to uninstall a third-party
application causing the looping. Unless your battery is extremely low, a system
reset should not affect your data.
If you need to perform a system reset and disable conflicting applications, always
end the process with a soft reset. This returns your Treo to normal operation.
1. Unscrew the stylus tip to access the reset tool.
2. While holding Up , use the reset tool to gently press the reset button on the
back of your Treo.
3. When the Palm Powered logo appears, release Up .
4. Perform a soft reset. Some features, such as Wireless Mode, are not available
until you complete this step.
Hard Reset
A hard reset erases all data and third-party software on your Treo. Never perform a
hard reset without first trying a soft and system reset. You can restore previously
synchronized data with the next HotSync operation.
A hard reset can tell you whether a problem stems from your Treo or an
application installed on it. If you do not experience the problem after you perform
a hard reset, the problem may be related to software you installed. See page 162
for suggestions on diagnosing third-party software issues.
1. Unscrew the stylus tip to access the reset tool.
2. While holding the Wireless Mode button , use the reset tool to gently press
the reset button on the back of your Treo.
3. When the Palm Powered logo appears, release the Wireless Mode button .
4. When the warning appears, press Up to confirm the hard reset.
Help
152
153
Page 83

Help
Screen
Network Connection
The Screen Appears Blank
1. Look closely at the screen. If you can see a dim image, try adjusting the screen
contrast and brightness (see page 128).
2. If that doesn’t work, perform a soft reset (see page 152).
3. If that doesn’t work, connect the Treo to the AC charger (see page 3) and
perform a soft reset again.
4. If that doesn’t work, perform a hard reset (see page 153).
The Screen Doesn’t Respond Accurately to Taps or Activates Wrong Features
1. Press Applications Launcher .
2. Choose the pick list in the upper-right corner, then select All.
3. Choose the Prefs icon .
4. Choose the pick list in the upper-right corner, then select Display.
5. Choose Touchscreen.
6. Follow the onscreen instructions to recalibrate the touchscreen.
There's a Blinking Symbol at the Top of the Screen
The blinking asterisk at the top of the screen is the Alert Manager symbol. It
appears when you have alarms or messages that you haven't acknowledged.
1. Tap the Alert Manager symbol.
2. A list of pending alarms or messages appears.
Choose the text of an alarm or message to view the item and keep it in the
list.
Check the box next to the alarm or message to clear it from the list, and then
choose Done.
Choose Snooze to receive another alert in 5 minutes. The next alert will list
all items that haven't been checked off.
Signal Strength Is Weak
Become familiar with low coverage areas where you live, commute, work, and
play. Then, you will know when to expect signal strength issues.
If standing, move about 10 feet in any direction.
In a building, move near a window. Open any metal blinds.
In a building, move outdoors or to a more open area.
Outdoors, move away from large buildings, trees, or electrical wires.
In a vehicle, move your Treo level with a window.
The Treo Won’t Connect to the Mobile Network
Try our suggestions above for weak signals.
Turn off Wireless Mode and turn it on again (see page 27).
Perform a soft reset (see page 152).
The Treo Hangs Up When I Hold It to My Ear
You may be accidentally pressing the onscreen Hang Up All button with your
cheek. Try holding the phone so your face doesn’t press against the screen. If this
is not convenient, you may want to set the Disable touchscreen when option on the
Keyguard Preferences screen to turn on during active calls (see page 137).
The Treo Makes or Answers Calls When It’s in a Briefcase or Pocket
Items in your briefcase or pocket may be pressing the onscreen Answer button, or
otherwise activating screen items. If this happens, set the Disable touchscreen when
option on the Keyguard Preferences screen to activate during incoming calls (see
page 137).
Wireless Mode Seems to Turn Off by Itself
If a system error and reset occurs, Treo automatically turns on Wireless Mode if it
was on before the reset. However, if the Treo can’t determine whether Wireless
Mode was on before the reset, it does not turn on automatically (see page 27).
Help
154
155
Page 84
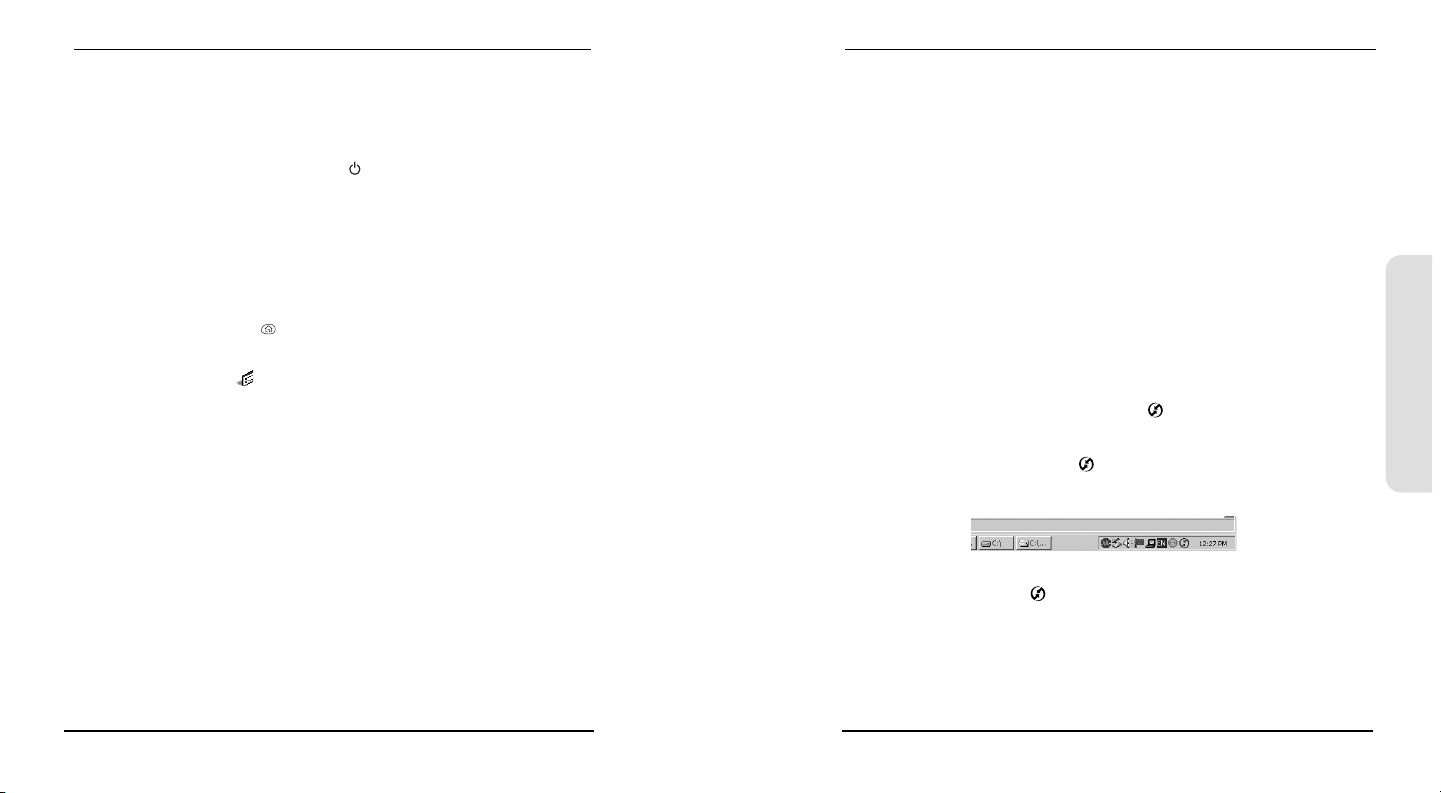
Help
The Treo Won’t Connect to the Internet
Your Treo supports PCS Vision, a way to connect to the Internet that is persistent,
faster, and more reliable than a regular dial-up connection. All Sprint customers
can connect to the Internet, but to avoid high per-minute charges, we recommend
that you subscribe to a PCS Vision plan.
Press and hold the Wireless Mode button to turn off Wireless Mode. Then,
turn Wireless Mode back on again.
Perform a soft reset (see page 152).
Contact Sprint to verify that your subscription plan includes PCS Vision
services, that these services have been correctly activated, and to confirm your
user name and password. Sprint should also be able to tell you if there are any
outages in your area.
Confirm that high-speed data services are correctly configured on your Treo:
1. Press Applications Launcher .
2. Choose the pick list in the upper-right corner, then select All.
3. Choose the Prefs icon .
4. Choose the pick list in the upper-right corner, then select Network.
5. If the Service field says Untitled, choose the Service pick list, then select
PCS Vision. If PCS Vision does not appear in the list, call Sprint for assistance.
I Can’t Send or Receive Picture Mail or SMS Messages
Make sure Wireless Mode is turned on (see page 27).
Contact Sprint to verify that your service plan includes the appropriate
messaging services, that these services are correctly activated, and that
messaging services are currently available at your location. (Sprint should be
able to tell you if messaging services are experiencing transmission delays.)
If possible, contact the recipient or sender of the message and make sure the
receiving device can handle the type of file that is being sent.
Synchronization (HotSync)
Synchronization lets you back up your Treo data onto your computer. If you ever
need to perform a hard reset or otherwise erase all your data on your Treo, you can
perform a HotSync operation to restore the data from your computer. To make
sure you always have an up-to-date backup of your data, synchronize frequently.
Before you attempt a HotSync operation, make sure you have installed the Palm
Desktop and HotSync Manager software from the CD that came with your Treo.
Every device needs a unique name. Never synchronize more than one device to
the same user name on your computer.
Desktop Does Not Respond to HotSync Attempt
As you complete the following steps, perform a HotSync operation after each step.
If the synchronization is successful, you do not need to complete the remaining
steps. If the synchronization is not successful, continue to the next step.
1. Verify that the HotSync cable is securely connected at all points (see page 20).
2. Make sure that the HotSync Manager is running:
Windows. Click the HotSync Manager icon in the lower-right corner of your
computer screen and make sure Local USB is checked, or if you’re using an
optional serial HotSync cable, make sure Local Serial is checked. If you don’t
see the HotSync Manager icon , click Start, select Programs, select Handspring,
and then select HotSync Manager.
Macintosh. Find the Palm folder on your Mac hard drive. Double-click the
HotSync Manager icon in the Palm folder. In the Connection Settings panel,
set Local Setup Port to Handspring USB.
3. Verify with your computer hardware vendor that your operating system
supports your internal USB Controller.
4. Perform a soft reset (see page 152).
Help
156
157
Page 85

Help
5. If problems persist and you’re synchronizing through a USB hub, try
connecting the HotSync cable to a different USB port, or directly to your
computer’s built-in USB port.
6. Uninstall Palm Desktop.
7. Reboot your computer.
8. Reinstall Palm Desktop.
HotSync Operation Starts But Stops Without Finishing
As you complete the following steps, perform a HotSync operation after each step.
If the synchronization is successful, you do not need to complete the remaining
steps. If the synchronization is not successful, continue to the next step.
1. If you upgraded from a previous Palm Powered device, there may be conflicts
with some of the files from your previous device.
Locate your Backup folder (Windows: C:\Program Files\Handspring\user
name; Macintosh: Mac HD\Applications\Palm\Users\user name).
Move the Backup folder to another location.
Perform a HotSync operation.
Manually reinstall any third-party applications you want on your new phone,
from the items in the old Backup folder you moved.
2. (Windows only) If the Windows New Hardware Wizard appears, the HotSync
process may be timing out before the wizard completes its job. Follow all
instructions in the New Hardware Wizard, and attempt another HotSync
operation.
3. Uninstall Palm Desktop.
4. Reboot your computer.
5. Reinstall Palm Desktop.
Tip: The HotSync Log can tell you when and why synchronization stopped. Right-click the
HotSync Manager icon in your Windows System Tray and select View Log.
HotSync Operation Finishes But Data Does Not Appear Where It Should
1. Make sure you’re synchronizing with the intended desktop Personal
Information Manager (PIM). The CD that came with your Treo includes
software to synchronize with Palm Desktop or Microsoft Outlook for Windows.
The software that lets you synchronize with Microsoft Outlook is called
PocketMirror, from Chapura, Inc. When you install the Treo software from the
CD, PocketMirror will be activated if you choose the option to synchronize
with Outlook. If you use a different PIM, you will need to install third-party
software to synchronize it with your Treo. Consult the company that makes the
PIM for more information.
2. If there are multiple Palm Powered devices synchronizing with your computer,
make sure you are synchronizing with the correct user name. If data is not
appearing in Palm Desktop, make sure the correct user name is selected in the
toolbar of Palm Desktop.
3. Launch the HotSync Manager application on your computer, and make sure
the necessary conduits are set to Synchronize the files.
4. Uninstall Palm Desktop.
5. Reboot your computer.
6. Reinstall Palm Desktop.
7. If you’re using Microsoft Outlook, consider the following:
With the included software, your Treo can synchronize with the root folders
of Contacts, Calendar, Tasks, and Notes. If you want to synchronize the
addresses from a global Exchange Address Book, you must copy the
addresses to your local Contacts list in Outlook (right-click the addresses,
and select Add to Personal Address Book).
Outlook subfolders and public folders are not accessible with the included
software. You may wish to use a third-party solution instead.
If you’re trying to synchronize offline, be sure to set your Outlook Calendar,
Contacts, Notes, and Tasks to be available offline.
Help
158
159
Page 86

Help
Web
I Can’t Access a Page
First, make sure you have Internet access: launch the Blazer Web Browser to see if
you can view a Web page you’ve successfully viewed before. To ensure that you’re
viewing the page directly from the Internet, press Menu , then from the Page
menu, choose Refresh.
After confirming your Internet connection, try to view the page in question again.
If it comes up blank, press Menu , then from the Page menu, choose Refresh.
If you still cannot access the page, it may be because the page contains only
elements that are not supported by Blazer Web Browser. Unsupported elements
include Flash, Shockwave, Java applets, VBScript, WML script, and media plug-ins.
Some Web sites automatically redirect you to their true home page (for example,
http://www.handspring.com/support may resolve to http://support.handspring.com/esupport/
html/start.jsp). If the Blazer Web Browser fails to observe the redirect, you can use a
desktop browser to see the true home page’s address, and enter that address in
Blazer.
An Image or Map Displays Too Small on the Treo Screen
The Blazer Web Browser has two modes: Optimized and Wide Page. Optimized
Mode re-sizes all images and page elements to make them fit on a single vertical
column on the Treo screen. Switch to Wide Page mode to see the image in its
original, full-size form (see page 76).
A Secure Site Refuses to Permit a Transaction
Some secure sites are very specific about which browsers they allow to conduct
secure transactions. If you are having trouble using a secure site, please contact
the site’s Web master to make sure the site allows transactions using Blazer Web
Browser.
Picture Mail
The Picture Mail application takes pictures at Small picture size (160x120 pixels)
and Large picture size (640x480 pixels, or 0.3 megapixel). Here are some tips for
taking good pictures with the built-in camera:
Clean the camera’s lens with a soft, lint-free cloth.
Take pictures in brighter lighting conditions. Low-light images may be grainy,
due to the sensitivity of the camera.
Hold the camera as still as possible. You may want to support your picture-
taking arm up against your body or a stationary object (such as a wall).
Keep the subject of the pictures still. Exposure time is longer with lower light
levels, so you may see a blur.
For best results, verify that you have the brightest light source coming from
behind you, lighting the subject’s face. Don’t take indoor pictures with the
subject in front of a window or light.
Make sure the subject is at least 16 inches away from the camera to ensure good
focus.
Remember, when you synchronize, your Picture Mail images are stored in the Treo
Pictures folder on your hard drive (see page 68).
Help
I Can’t Select an Email Address From a Web Page
If nothing happens when you choose an email address on a Web page, you
probably do not have an email application that supports this feature. Try
downloading and installing Handspring’s Mail application from
160
www.handspring.com.
161
Page 87

Help
Third-Party Applications
On rare occasions, third-party applications can cause conflicts that interfere with
the smooth operation of your Treo. Third-party applications that modify the
wireless features of your Treo may require extra troubleshooting.
If you recently installed an application and your Treo seems to be stuck, try the
following:
1. Perform a soft reset (see page 152).
2. If the problem persists, perform a system reset (see page 152).
3. Delete the most recently installed application from your Treo (see page 112).
4. If the problem persists, perform another system reset.
5. Delete other third-party applications one at a time until you eliminate the
problem.
6. If none of the steps above are possible, you may wish to perform a hard reset
(see page 153). Then, locate your Backup folder on your computer (Windows:
C:\Program Files\Handspring\user name; Macintosh: Mac
HD\Applications\Palm\Users\user name). If you find a .prc or .pdb file for any
applications you just removed, delete the file(s) from the Backup folder. Then,
perform a HotSync operation to restore your data and applications.
Remember, not all third-party applications were written with the Treo keyboard
and 5-way navigation in mind. You may encounter strange behavior or errors in
these applications if you use the keyboard and navigation control.
Getting More Help
Contact the author or vendor of any third-party software if you require further
assistance. Sprint does not provide technical support for applications that are not
built into your Treo.
Errors
Your Treo is designed to minimize interruptions when a system error occurs. If
Treo encounters a system error, it automatically resets itself and resumes
functioning as normal. If possible, it even turns Wireless Mode back on if it was on
before the error occurred.
Note: Treo may not re-establish a PCS Vision session after a hard reset. To manually establish a
new PCS Vision session, launch the Blazer Web Browser.
Sometimes you might want to know more about an error. Treo uses a special
interface to show error messages in greater detail.
1. Press Phone .
2. Press Center, then choose Dial Pad.
3. Type ##377, then press Center.
4. Review the screen with details about the conditions that led up to the most
recent automatic reset.
5. Choose OK.
Please note that third-party developers create their own error messages. If you do
not understand an error message, please contact the developer of the application
for help.
Help
162
163
Page 88

Help
Making Room On Your Treo
If you store a large number of records, or install many third-party applications, the
internal memory on your Treo may fill up. Here are some common ways to clear
space on your Treo:
Picture Mail. Pictures can consume excessive memory. Move your pictures to an
expansion card or upload them to your account on the Picture Mail Web site,
and then delete large files from your Treo (see page 66).
Internet. If you have set a large Blazer Web Browser cache, you may wish to clear
the cache, (see page 82).
Third-party applications. You can delete infrequently used applications or move
them to an expansion card, (see page 112).
Email. If you installed a third-party email application, you may have large
attachments that can quickly consume memory on your Treo. Delete emails
with large attachments. If you have hundreds of messages with or without
attachments, you may wish to delete older messages to make room.
Also, remember that your Treo includes an expansion slot, and that you can store
applications and data on expansion cards. However, you still need some free
memory on the Treo itself to run applications from an expansion card.
Glossary
164
165
Page 89

Glossary
1XRTT: The next generation of mobile Internet connectivity that allows for
persistent data connections as long as you are actively using your data connection.
The average data transmission rate is around 70kb/s although theoretical limits are
153.6kb/s. With PCS Vision plans, you pay a monthly rate for unlimited data
transfer and you don't pay for connection time.
Lithium Ion (Li-Ion): The rechargeable battery technology used in Treo phones.
Option key : The keyboard button that lets you access the alternative feature that
appears above the letter on each key.
Alt (alternative) : A keyboard key. Type a letter on the keyboard, then press Alt
to access variations such as international characters and symbols.
Applications Launcher: The view on your Treo from which you can launch all
applications.
Auto-off interval: The time of inactivity that passes before the screen on your Treo
turns off. Wireless Mode is unaffected by this setting.
Beam: The process of sending or receiving a data record or application using the
infrared port on your Treo.
HotSync: The PalmSource technology that synchronizes your Treo and your
computer with the simple press of a button.
HotSync Manager: The computer application that manages the synchronization with
your Treo.
Infrared (IR): A way of transmitting data using light waves. The IR port on your Treo
lets you transfer data between other IR devices within a short radius.
Install tool: The component of Palm Desktop software that enables you to install
Palm OS applications and data on your Treo.
166
Palm Desktop: A PIM application for computers that helps you manage your personal
information and keep your personal data synchronized with your Treo.
Palm OS: The operating system of your Treo phone. A trademark of PalmSource,
Palm OS is known for its simplicity of use and for the large number of applications
that can be added to your Treo.
PCS Business Connection
SM
: A service offered by Sprint that lets you access your
existing corporate or personal email on your Treo. For more information, visit
www.sprintpcs.com.
PCS Vision: The next generation of mobile Internet access that lets you check your
email, browse the Web, and share photos with Picture Mail.
Phone: The application on your Treo that provides quick access to the most
commonly used applications on your Treo.
Picture Mail: An enhanced PCS Vision messaging service that lets you instantly share
pictures with friends and family. You can also manage your pictures online.
PIM (Personal Information Management): A genre of software that includes applications
such as Palm Desktop software, Microsoft
®
Outlook®, Lotus Notes®, and ACT!.
PIMs generally store contacts, schedules, to do items, and memos.
Glossary
167
Page 90

Glossary
PocketMirror: Software included on the Treo CD that lets you synchronize with
Microsoft Outlook (English language and Windows only). PocketMirror is made by
a third-party company called Chapura, Inc.
SMS (Short Messaging Service): The service that exchanges short text messages
almost instantly between mobile phones. These messages can usually include up
to 160 characters.
User name: The name associated with your Treo that distinguishes it from other
Palm Powered devices. When you first synchronize your Treo, you are asked to
give it a user name.
Wireless Mode: The feature inside your Treo that controls the radio which enables
you connect to the mobile network for wireless communications.
Safety and Warranty
Information
168
169
Page 91

Safety & Warranty
Performance and Safety
Important Information About Your Phone and Service
Keeping Tabs on Signal Strength
The quality of each call you make or receive depends on the signal strength in your area. Your
phone informs you of the current signal strength by displaying a number of bars next to the
signal strength icon. The more bars displayed, the stronger the signal. If you’re inside a building,
being near a window may give you better reception.
Understanding the Power Save Feature
If your phone is unable to find a signal after 15 minutes of searching, a Power Save feature is
automatically activated. If your phone is active, it periodically rechecks service availability or
you can check it yourself by pressing any key. Anytime the Power Save feature is activated, a
message displays on the screen. When a signal is found, your phone returns to standby mode.
Understanding How Your Phone Operates
Your phone is basically a radio transmitter and receiver. When it's turned on, it receives and
transmits radio frequency (RF) signals. When you use your phone, the system handling your call
controls the power level. This power can range from 0.006 watts to 0.2 watts in digital mode.
Maintaining Your Phone’s Peak Performance
There are several simple guidelines to operating your phone properly and maintaining safe,
satisfactory service.
Hold the phone with the antenna over your shoulder.
Try not to hold, bend or twist the phone’s antenna.
Don’t use the phone if the antenna is damaged.
Speak directly into the mouthpiece.
Avoid exposing your phone and accessories to rain or liquid spills. If your phone does get wet,
immediately turn the power off. If it’s inoperable, return it to a Sprint Store or call
PCS Customer Solutions for service.
Note: For the best care of your phone, only Sprint Authorized Personnel should service your phone and
accessories. Faulty service may void the warranty.
Maintaining Safe Use of and Access to Your Phone
FAILURE TO FOLLOW THE INSTRUCTIONS OUTLINED MAY LEAD TO SERIOUS PERSONAL INJURY
AND POSSIBLE PROPERTY DAMAGE.
Using Your Phone While Driving
Talking on your phone while driving (or operating the phone without a hands-free device) is
prohibited in some jurisdictions. Laws vary as to specific restrictions. Remember that safety always
comes first.
When using your phone in the car:
Get to know your phone and its features, such as speed dial and redial.
When available, use a hands-free device.
Position your phone within easy reach.
Let the person you are speaking to know you are driving; if necessary, suspend the call in heavy
traffic or hazardous weather conditions.
Do not take notes or look up phone numbers while driving.
Dial sensibly and assess the traffic; if possible, place calls when stationary or before pulling into
traffic.
Do not engage in stressful or emotional conversations that may divert your attention from the road.
Dial 911 to report serious emergencies. It’s free from your wireless phone.
Use your phone to help others in emergencies.
Call roadside assistance or a special non-emergency wireless number when necessary.
Tip: Purchase an optional Hands-Free Car Kit.
Following Safety Guidelines
To operate your phone safely and efficiently, always follow any special regulations in a given area.
Turn your phone off in areas where use is forbidden or when it may cause interference or danger.
Using Your Phone Near Other Electronic Devices
Most modern electronic equipment is shielded from radiofrequency (RF) signals. However, RF
signals from wireless phones may affect inadequately shielded electronic equipment.
RF signals may affect improperly installed or inadequately shielded electronic operating systems
and/or entertainment systems in motor vehicles. Check with the manufacturer or their
representative to determine if these systems are adequately shielded from external RF signals. Also
check with the manufacturer regarding any equipment that has been added to your vehicle.
Consult the manufacturer of any personal medical devices, such as pacemakers and hearing aids, to
determine if they are adequately shielded from external RF signals.
Safety & Warranty
170
171
Page 92

Safety & Warranty
Note: Always turn off the phone in health care facilities and request permission before using the phone near
medical equipment.
Turning Off Your Phone Before Flying
Turn off your phone before boarding any aircraft. To prevent possible interference with aircraft
systems, the U.S. Federal Aviation Administration (FAA) regulations require you to have
permission from a crew member to use your phone while the plane is on the ground. To prevent
any risk of interference, FCC regulations prohibit using your phone while the plane is in the air.
Turning Off Your Phone in Dangerous Areas
To avoid interfering with blasting operations, turn your phone off when in a blasting area or in
other areas with signs indicating two-way radios should be turned off. Construction crews often
use remote-control RF devices to set off explosives.
Turn your phone off when you're in any area that has a potentially explosive atmosphere.
Although it's rare, your phone and accessories could generate sparks. Sparks can cause an
explosion or fire, resulting in bodily injury or even death. These areas are often, but not always,
clearly marked. They include:
Fueling areas such as gas stations.
Below deck on boats.
Fuel or chemical transfer or storage facilities.
Areas where the air contains chemicals or particles such as grain, dust or metal powders.
Any other area where you would normally be advised to turn off your vehicle’s engine.
Note: Never transport or store flammable gas, liquid or explosives in the compartment of your vehicle that
contains your phone or accessories.
Restricting Children’s Access to Your Phone
Your phone is not a toy. Do not allow children to play with it as they could hurt themselves and
others, damage the phone or make calls that increase your phone bill.
Caring for Your Phone Battery
Protecting Your Battery
The guidelines listed below help you get the most out of your battery’s performance.
Use only Sprint-approved chargers. These chargers are designed to maximize battery life. Using
other chargers voids your warranty and may cause damage.
In order to avoid damage, charge the battery only in temperatures that range from
32º F to113º F. (0º C to 45º C).
Don’t use the battery charger in direct sunlight or in high humidity areas, such as the bathroom.
172
Never dispose of the phone by incineration.
Keep the metal contacts on the bottom of your phone clean.
Don’t attempt to disassemble or short-circuit the battery.
The battery may need recharging if it has not been used for a long period of time.
Don’t store the phone in extreme temperature areas for long periods of time. Store the phone in
environments that range from 32º F to 113º F (0º C to 45º C).
Disposal of Phone
For safe disposal options of your phone, contact your nearest Sprint authorized service center.
Special Note: Be sure to dispose of your phone properly. In some areas disposal in household or
business trash may be prohibited.
Note: For safety, do not handle a damaged or leaking battery.
Acknowledging Special Precautions and the FCC Notice
FCC Statement
This device complies with part 15 of the FCC rules. Operation is subject to the following two
conditions: (1) This device may not cause harmful interference, and (2) this device must accept any
interference received, including interference that may cause undesired operation.
This device has been tested and found to comply with the limits for a Class B digital device,
pursuant to part 15 of the FCC Rules. These limits are designed to provide reasonable protection
against harmful interference in a residential installation. This equipment generates, uses, and can
radiate radio frequency energy and, if not installed and used in accordance with the instructions,
may cause harmful interference to radio communications. However, there is no guarantee that
interference will not occur in a particular installation. If this equipment does cause harmful
interference to radio or television reception, which can be determined by turning the equipment
off and on, the user is encouraged to try to correct the interference by one or more of the following
measures:
Reorient or relocate the receiving antenna
Increase the separation between the equipment and receiver
Connect the equipment into an outlet or circuit different from that to which the receiver is
connected
Consult the dealer or an experienced radio/TV technician for help and for additional suggestions.
Safety & Warranty
173
Page 93

Safety & Warranty
RF Safety Exposure To Radio Frequency Energy (SAR)
Radio transmitting devices radiate Radio Frequency (RF) energy during its operation. RF energy
can be absorbed into the human body and potentially can cause adverse health effects if
excessive levels are absorbed. The unit of measurement for human exposure to RF energy is
“Specific Absorption Rate” (SAR).
The Federal Communications Commission (FCC), Industrie Canada (IC), and other agencies
around the world have established limits that incorporate a substantial safety margin designed to
assure the safety of all persons using this equipment.
In order to certify this unit for sale in the US, Canada and Europe this unit has been tested for RF
exposure compliance at a qualified test laboratory and found to comply with the regulations
regarding exposure to RF Energy.
SAR was measured with the unit transmitting at its maximum certified RF power. Often,
however, during normal operation the unit will transmit much less than maximum power.
Transmit power is controlled automatically and, in general is reduced as you get closer to a
cellular base station. This reduction in transmit power will result in a lower RF energy exposure
and resulting SAR value.
FCC RF Safety Statement
In order to comply with FCC RF exposure safety guidelines, users MUST use one of the
following types of body-worn accessories.
1. A Handspring brand body-worn accessory that has been tested for SAR compliance and is
intended for use with this product.
2. An accessory that contains NO metal (snaps, clips, etc.) and provides AT LEAST 1 cm of
separation between the users body and the unit.
Do NOT use the device in a manner such that it is in direct contact with the body (i.e. on the lap
or in a breast pocket). Such use will likely exceed FCC RF safety exposure limits See
www.fcc.gov/oet/rfsafety/ for more information on RF exposure safety.
Antenna Care/Unauthorized Modifications
Use only the supplied integral antenna. Unauthorized antenna modifications or attachments
could damage the unit and may violate FCC regulations. Any changes or modifications not
expressly approved by the party responsible for compliance could void the user's authority to
operate the equipment.
174
Terms and Conditions & Warranty Information
Terms and Conditions of Services
(Effective as of June 1, 2003 until replaced)
Thanks for choosing Sprint. These terms and conditions are part of your agreement with Sprint for
PCS Services.
The terms and conditions included with your PCS Phone may not be the most current version. For
the most current version of the terms and conditions, please visit our Web site at www
or call PCS Customer Solutions at 1-888-211-4PCS. If you activated PCS Services before the effective
date of these terms and conditions, these terms and conditions replace and supersede any previous
terms and conditions.
If you have questions about your PCS Services, please visit our Web site at www
PCS Customer Solutions at 1-888-211-4PCS (4727).
Para solicitar esta literatura en español, por favor contactar a 1-888-211-4PCS(4727).
Agreement. Your agreement (“Agreement”) with Sprint Spectrum L.P. and any of its affiliates doing
business as Sprint providing PCS Services (“Services”) to you is made up of these Terms and
Conditions of Service (“Terms”) and the Service Plan that we agree to provide you. Your “Service
Plan” is described in our marketing materials, and includes the terms, rates and features we set for
that Service Plan. In the agreement, we use the words “we,” “us,” “our” or “Sprint” to refer to Sprint
Spectrum L.P. and its affiliates doing business as Sprint. You accept the agreement when you
activate PCS Services or make any attempt to use our PCS Services (for example, attempting to
place any call while on or roaming off the Sprint Nationwide PCS Network, using data services,
etc.). We may change the Agreement at any time by giving you prior notice. Any changes to the
Agreement are effective when we publish them. If you use our Services or make any payment to us
on or after the effective date of the changes, you accept the changes. If we change a material term
of the Agreement and that change has a material adverse effect on you, you may terminate the
Agreement without an early termination fee by calling 1-888-211-4727 within 30 days after the
invoice date of the first invoice your receive after the changes go into effect. You understand and
agree that taxes, Universal Ser vice fees and other charges imposed by the government or based on
government calculations may increase or decrease on a monthly basis, and that this paragraph does
not apply to any increases in such taxes, Universal Service fees and other charges.
Provision of Service. Your purchase of a PCS Phone or other equipment does not mean that we
must provide Services to you. We may decide not to provide Services to you for any lawful reason.
We may request that you provide us with any information we reasonably require to determine
whether you qualify for Services. Ser vices in some areas are managed and provided under contract
with Sprint by independent affiliates with access to the Sprint Nationwide PCS Network. Some
Services may not be available or may operate differently in certain affiliate markets or other areas.
.sprintpcs.com
.sprintpcs.com or call
Safety & Warranty
175
Page 94

Safety & Warranty
Credit Verification. You must have and maintain satisfactory credit to receive and continue to
receive Services. We will verify your credit before agreeing to provide Services to you and we
may verify your credit at any time while we provide Services to you. Credit verification may
include a review of credit reports that we receive from credit bureaus. If at any time we
determine, in our sole discretion, that payment for Services may not be made when due, we may
suspend Services and require that you provide payment on account or a guarantee of payment
before we resume Services.
Service Plan. You may be eligible for a fixed length PCS Service Plan (“Term Service Plan”) or for
a month-to-month Service Plan (“Non-Term Service Plan”). We determine the Service Plan for
which you qualify. Except as permitted by the Agreement, you must maintain service with us on
your Term Service Plan for the minimum term associated with that Term Ser vice Plan. We may
offer non-identical Service Plans to different individuals or entities. Ser vices and coverage under
some Service Plans may be more limited than available under other Service Plans. Your Service
Plan sets out the charges for Services and is your Service Plan until that Service Plan is changed,
you switch to a different Service Plan, or your Services terminate. Based on your credit rating or
other factors, we may require that you make a deposit, prepayment, or a series of deposits or
prepayments, or be subject to an account spending limit, before Services are activated or
maintained.
Changing Service Plans. If you are on a Non-Term Service Plan, you may change to a different
Service Plan for which you qualify. Any change is effective at the start of your next full invoicing
cycle unless otherwise specified by us at the time that you place your change order. If you
change or add a different Service Plan or service feature and the change is effective prior to the
start of your next full invoicing cycle, you will be invoiced a prorated amount. We may require a
service charge for implementing any change directed by you in addition to the charges
associated with the Service Plan or optional service features you select. If you are on a Term
Service Plan and you want to change your service plan, you may be required to accept a new
Term Service Plan and we may require you to pay the early termination fee set out in your
Service Plan or other fee.
Termination. Non-Term Service Plan. If you are on a Non-Term Service Plan, you may terminate
Services at any time by giving us notice. Subject to the terms of this Agreement, we may
terminate Services at any time, with or without notice. If your Service has been suspended due
to non-payment, you may be charged a reactivation fee. We may deactivate any Number before
you receive notice of termination without liability to you. Ter mination by either of us may be
with or without cause.
Termination. Term Service Plan. EXCEPT AS PERMITTED BY THE AGREEMENT, IF YOU
TERMINATE YOUR TERM SERVICE PLAN BEFORE THE END OF THE TERM, OR IF WE TERMINATE
SERVICES FOR CAUSE BEFORE THE END OF THE TERM, YOU WILL BE REQUIRED TO PAY THE
EARLY TERMINATION FEE ASSOCIATED WITH YOUR TERM SERVICE PLAN. No early termination
fee is charged if you terminate a Term Service Plan in accordance with the return policy associated
with your Term Service Plan. After the expiration of the term, the Terms relating to Non-Term
Service Plans apply.
Termination. General. Regardless of whether you have a Non-Term or a Term Service Plan, we may
terminate or suspend Services to you without liability if: (1) you breach any provision of this
Agreement (including if you fail to pay any charges for Services); or (2) you fail to pay any charges
due us for equipment or otherwise. If Services are terminated before the end of your current
invoicing cycle, we will not prorate the monthly recurring charge to the date of termination, and
you will not receive a credit or refund for any unused minutes in your Service Plan.
Use of Services and Equipment; Availability. You must be at least 18 years old to subscribe to our
Services. We may require you to provide proof of your age and identity. If you are under 18 years
old you may be eligible for certain Services that have Account Spending Limits if a person 18 years
or older is also named as a subscriber on the Account. Your PCS Phone will not accept the services
of any wireless provider other than Sprint (but see Roaming). Services and equipment may not be
used for any unlawful, fraudulent or abusive purpose. By requesting Services, you agree that you
will not use Services and equipment in any unlawful, fraudulent or abusive manner. You may not
resell or lease Services or equipment to anyone.
Coverage. Most services are only available within the operating range of the Sprint Nationwide
PCS Network (also see Roaming). Coverage is not available everywhere. Coverage and quality of
Services may be affected by conditions within or beyond our control, including network problems,
signal strength, your equipment, and atmospheric, geographic, or topographic conditions. We do
not guarantee service availability or that there will be no interruptions or delays in Services (e.g.,
dropped calls, blocked calls, etc.).
Number. We assign a phone number (“Number”) to the phone or other equipment used by you on
the Sprint Nationwide PCS Network. We may change the Number without compensation by giving
you prior notice. You do not own the Number. You may not modify the Number we program into
any phone or other equipment, transfer or duplicate the Number to any phone or other equipment
other than that authorized by us, or transfer the Number to any other individual or entity.
Phone Activation Fee. You may be required to pay a non-refundable phone activation fee when you
activate a new Number, have us switch a Number to a different phone, have your current Number
changed, we activate a different phone on your existing account or your Service Plan says so.
Safety & Warranty
176
177
Page 95

Safety & Warranty
Charges. For most forms of wireless Service, your usage will be charged from the time you first
initiate contact between your phone or other wireless device and the network until the network
connection is broken, whether or not you are successful in connecting with the service with
which you seek to connect, even if the connection is later broken or dropped. An exception is
that you are not charged for voice calls that are not completed. You are charged for completed
calls to your Number from the time shortly before the phone starts ringing until the call is
terminated. You will be charged peak rates for the entire duration of calls initiated during the
peak time periods applicable to your Service. You will be charged off-peak rates for the entire
duration of calls initiated during the off-peak time periods applicable to your Service. In addition
to these usage charges, you may be charged for recurring monthly service charges, applicable
local and long-distance toll charges, other usage charges, (including voicemail access, call
waiting, call forwarding, etc.), connection fees, roaming charges, directory assistance, call
completion charges, account review and management charges, optional features you select at an
extra cost, surcharges related to government programs, and taxes. Charges for most Services are
incurred in one-minute increments, with partial minutes of use rounded up to the next highest
minute. You must pay, by each invoice due date, all charges for Services provided to the Number
for each phone or other equipment that our records show you activated, no matter who actually
uses or has possession of the phone or other equipment at the time Services are provided.
PCS Vision (Third Generation) Wireless Charges. For PCS Vision wireless services, you will be
charged, on a per kilobyte basis, for data used, whether sent or received by your PCS Phone or
other wireless device, rather than for airtime used, even for certain third generation voice
services. As long as your PCS Phone or other wireless device is connected to the enhanced Third
Generation Sprint Nationwide PCS Network (“PCS Vision network”), you will be incurring data
usage charges. You cannot receive incoming calls while using third generation services. Data
usage will be measured in kilobytes and will be rounded up to the next whole kilobyte. Kilobyte
usage will be rounded up to the next full cent. Rounding up will occur at the end of each
separate session or each clock hour (at the top of each hour), if the session spans more than 1
clock hour. When traveling on our PCS Vision network, a session may be ended and new session
initiated, although no interruption to the actual data session will occur. The amount of data used
and charged to you will vary widely, depending upon the specific PCS Vision wireless
application or other service you use, the amount of data used in the specific application or
service, and network congestion. You will be charged for data exchanges initiated by other
Internet users as well as those you initiate. Estimates of data usage, for example, the size of
downloadable files, will var y from what you actually use. You will be charged for additional data
used in transporting and routing on the network. If you use a Premium Service (including
services provided by third parties but for which you are billed on your PCS Invoice), you will be
charged for data used in transport and routing in addition to the charge for the Premium Service.
You will be charged for partial and interrupted data downloads or other use, including re-sent
data, and for unsuccessful attempts to reach Web sites and use other applications and services,
178
including those resulting from dropped network connections. Your invoice will not separately
identify the number of kilobytes attributable to your use of specific sites, sessions or services used.
PCS Vision Premium Services. Your PCS Vision wireless services may allow you to access or
download premium content for an additional charge. Certain PCS Vision services (e.g., games,
ringers and screen savers) primarily contain premium services content. Access to and downloading
of premium content is not included with PCS Vision services. The additional charges for this
premium content will be billed to you on your PCS Invoice. You will be charged for this content (at
rates and charges specified at the time of access or download) that will be in addition to data usage
charges you will incur while connected to the enhanced PCS Vision network. We provide no
warranties and make no representations or claims with regard to third-party Premium Services.
In certain instances, subject to the terms of the content purchased, we may delete premium and
non-premium items downloaded to available storage areas (e.g., your vault), including any pictures,
games and other content. We may limit the amount of Premium Services you may purchase in a
specific timeframe (month, week, day, or other time period). We may suspend your use of Premium
Services without prior consent or notice if we have reason to suspect fraudulent or unauthorized
use of your Premium Services account, but we make no assurances that we will suspend your
account.
Other Terms Applicable to PCS Vision Wireless Usage. Use of PCS Vision wireless services
requires the purchase of a separate third generation wireless compatible phone or other device and
is subject to any software, memory, storage or other limitation in the phone or other equipment.
Not all applications and services work, or work the same, on all third generation wireless phones
and devices. Check the materials accompanying your phone or device to determine which
applications and services it will support. PCS Vision wireless services are not available while off the
PCS Vision network.
Sprint is not responsible for any opinions, advice, statements, services applications or other
information provided by third parties and accessible through PCS Vision wireless services. Neither
Sprint nor its vendors or licensors guarantees the accuracy, completeness or usefulness of
information that is obtained through the PCS Vision wireless services. You are responsible for
evaluating such content. Use of certain PCS Vision wireless services, including some messaging
services, may result in the disclosure to others of your email address and other information about
you in connection with your internet usage. Your accessing of, or use of, third party sites or
services accessible PCS Vision wireless services may require the disclosure of information about
you, subject to the policies of those sites and services. You consent to receiving advertising,
warnings, alerts and other messages, including broadcast messages. Your access to PCS Vision
wireless services is controlled by a password.
Safety & Warranty
179
Page 96

Safety & Warranty
Voice Command. PCS Voice Command is an optional service that allows you to place calls by
using speech recognition technology. Calls to 911 or similar emergency numbers cannot be
placed through the Voice Command feature. Airtime and applicable long distance charges for a
call completed from your Number using the Voice Command feature begin when you press or
activate the TALK or similar key(s) and end when your call is terminated by hitting the END key
or by returning to the Voice Command platform. If you initiate and complete another call
without leaving the Voice Command platform, a separate charge for that call will begin from the
time the previous call was terminated. Airtime and applicable long distance charges will be
applied to the entire length of a completed call initiated from Voice Command. Using Directory
Assistance to input names into your Voice Command address book will incur additional charges.
Invoicing. Invoicing cycles are approximately 30 days in length. Invoicing cycles and dates may
change from time to time. Except as otherwise provided in your Service Plan, monthly recurring
charges (MRCs) are invoiced one invoicing cycle in advance. Charges for Services are usually
invoiced as soon as possible after the charges accrue. We may, however, invoice you for usage
and charges occurring before the invoicing cycle being invoiced, if they were not previously
invoiced. If you are invoiced for usage incurred during a prior invoicing cycle, those minutes
will be applied to your Service Plan minutes for the current invoicing cycle. However, if you
change your PCS Service Plan between the time the usage was incurred and the beginning of the
current invoicing cycle, those minutes from the prior invoicing cycle will be charged at the rate
per minute for usage over included minutes provided in the Service Plan in effect at the time the
usage was incurred.
Payment. If you have authorized payment for Services or equipment by credit card or by
debiting a bank account, no additional notice or consent is required before we invoice the credit
card or debit the bank account for all amounts due to us or billed by us on behalf of a third party.
You must promptly notify us of any change in your invoicing address or of the credit card or
bank account used for payment. We reser ve the right to require payment by money order,
cashier's check or other secured form of payment. If we take action to receive payment beyond
invoicing you for charges for Ser vices or equipment, you must pay our costs and expenses of
collection, including attorneys' fees and expenses, the fees of any collection agency and court
costs. If we act as an invoicing agent for a third-party service provider, payments received are
first applied to amounts due and owing to us and any remaining amounts are applied to sums
due and owing to the third-party service provider. We may immediately charge an additional fee
for any check or other negotiable instrument endorsed by you and returned unpaid by a
financial institution for any reason. You may be charged fees for certain methods of payment.
Late Payment Charges. Payment is past due if we do not receive it by the due date shown on your
invoice. Any payment for Services and equipment not made when due accrues late charges until
paid at the rate of 5% per month or at the highest rate allowed by law. Acceptance of late or partial
payments (even if marked “paid in full”) does not waive our right to collect all amounts that you
owe us. If your Service has been suspended due to non-payment, you may be charged a reactivation
fee.
Disputed Charges. You must raise any dispute that you have about any charges invoiced to you
within 15 days of the date of the invoice or you have accepted the invoice. You may notify us of any
dispute by notifying PCS Customer Solutions. Calls to our sales or general business offices are not
notice of a dispute. If disputed invoice procedures are described on the invoice, you must follow
them.
Account Spending Limit. If we agree to provide Services to you on an Account Spending Limit
basis, we will tell you your Account Spending Limit before we start Services to your Number, or as
reasonably practicable after the limit is imposed. If we require a deposit for you to establish or keep
Services on an Account Spending Limit basis, we will hold the deposit as partial guarantee of
payment for Services (see Deposits). Charges for Services accrue against your Account Spending
Limit as they are incurred. We may charge an initial ASL start up fee. We may charge a monthly ASL
service fee, in addition to your recurring monthly service charge. We may suspend Services to your
Number without prior notice to you when your account balance reaches your Account Spending
Limit. Services are restored when you have paid any past due balance and pay a specified minimum
amount to reduce your account balance below your Account Spending Limit. We may change this
minimum amount at any time upon notice to you. You may pay any past due balance and the
minimum amount by any method authorized by Sprint. Contact PCS Customer Solutions for
information about authorized methods of making these payments. We may charge you a fee for
calls that involve our live customer care services. If we provide Services to you on an Account
Spending Limit basis, Ser vices and coverage may be limited in certain ways. You must pay all
charges for Services even if they exceed the amount of your Account Spending Limit.
Clear Pay. If we agree to provide Services to you as a Clear Pay customer, we may suspend Services
to your Number without prior notice to you immediately when your bill becomes past due. Even if
your bill is not past due, we may suspend services if your unpaid usage exceeds $125 or another
amount to be determined by your past credit or usage history. If we require a deposit for you to
establish or keep Services as a Clear Pay customer, we will hold the deposit as partial guarantee of
payment for Services (see Deposits, below). Contact PCS Customer Solutions for information about
authorized methods of making these payments. We may charge you a fee for calls that involve our
live customer care services. If we provide Services to you on as a Clear Pay basis, Services and
coverage may be limited in certain ways. You must pay all charges for Services whether or not your
Services are suspended or terminated.
Safety & Warranty
180
181
Page 97

Safety & Warranty
Deposits. If we require a deposit for you to establish or keep Services, we will hold the deposit
as partial guarantee of payment for Services. We may change the deposit amount at any time to
reflect revised estimated monthly charges based upon your usage. A deposit may not be used to
pay any invoice (unless it is used to pay a final invoice) or delay payment. The deposit amount,
the length of time we hold the deposit and changes to the deposit amount are determined based
on your credit and payment history. The rate of interest, if any, on the deposit is subject to
change. We may mix deposits with our other funds. If Services are terminated for any reason, we
may, without notice to you, apply your deposit toward payment of outstanding charges and
return any excess to you at your last known address within 75 days after termination of Services.
If the U.S. Postal Service cannot deliver the money to you and returns it to us, we will hold it for
you for one year from the date of return and, during that period, we may charge a servicing fee
against the deposit balance. Any money held during this one-year period will not accrue interest
for your benefit. You forfeit any portion of the money left after the one-year period.
Wireless Web and Voice Portal Services. Wireless Web Services are part of the Ser vices that
can be obtained through Sprint. Wireless Web Services are not available in all markets or while
roaming off the Sprint Nationwide PCS Network. Use of Wireless Web Services requires an
Internet-ready PCS Phone or certain other equipment (or both) and is subject to any memory,
storage or other limitation in the phone or other equipment. Wireless Web Services are not
available on PCS Vision phones or devices. The Caller ID blocking feature is not available when
using Wireless Web Services. Any use of Wireless Web Services deducts from your Service Plan
minutes. For data calls (including Wireless Web and Voice Portal calls) that are attempted, but
not completed, you are charged for the time during which the network attempts to connect the
call. You are charged for time spent connected to the Wireless Web or Voice Portal, including
time spent browsing on the Internet or Voice Portal and reviewing or scrolling through Internet
information on-line while still connected to the Sprint Nationwide PCS Network. Not all Internet
sites can be accessed and you may receive an error message if you attempt to access a site that
cannot be accessed through Wireless Web Services. You are also charged for Wireless Web
connections to review your PCS account information. Wireless Web Services are not available
with all Service Plans. Sprint is not responsible for any opinions, advice, statements, services or
other information provided by third-parties and accessible through Wireless Web Ser vices or
Voice Portal Services. Neither Sprint nor its vendors or licensors guarantees the accuracy,
completeness or usefulness of information that is obtained through the Wireless Web Services or
Voice Portal Services. You are responsible for evaluating such content.
Taxes and Surcharges. We invoice you for taxes, fees and other charges levied by or remitted
directly to federal, state or local authorities, or foreign government on Services including,
without limitation, sales, gross receipts, use, and excise taxes. If you claim any tax exemption,
you must provide us with a valid tax-exempt document. Any tax exemption applies only from
the date we receive a valid tax-exempt document.
We also invoice you for fees that we collect and remit to the government such as Universal Service,
and for surcharges that we collect and keep to pay for the costs of complying with government
mandates such as number pooling and portability, and Enhanced 911 service. These charges are
neither taxes nor government imposed assessments.
Roaming. Calls made while off the Sprint Nationwide PCS Network are “roaming” calls. Your
PCS Phone is specifically designed and engineered to work only on the Sprint Nationwide
PCS Network. It works on another CDMA PCS provider's system only when a roaming agreement is
in place between Sprint and the other providers. If your PCS Phone is a dual-mode phone, it works
on both a CDMA PCS provider's system (in addition to the Sprint Nationwide PCS Network) and a
wireless analog telecommunications provider's system only when roaming agreements are in place
between Sprint and the other providers. If we do not have a roaming agreement in place, you may
be able to place roaming calls “manually” by using a valid credit card. If there is a gap or other
interruption of coverage within a PCS coverage area that prevents connection with the Sprint
Nationwide PCS Network and your dual-band phone is set to roam automatically when outside PCS
coverage, you may incur roaming fees within a PCS coverage area. Certain features and services
may not be available when roaming (including PCS Vision, voicemail, call waiting, call forwarding,
etc.).
Phones and Other Equipment. Phones and other equipment may be purchased and returned as
provided in the purchase documents. We are not the manufacturer of the phones or other
equipment. The only warranties on the phones or other equipment are any limited warranties
extended by the manufacturers. We have no liability in connection with the phones and other
equipment or for the manufacturers' acts or omissions.
Lost or Stolen Equipment. If your phone or other equipment is lost or stolen, you must notify us by
calling PCS Customer Solutions. You are responsible for all charges for Services provided to the
Number for the lost or stolen equipment before you notify us of the loss or theft. We will deactivate
Services to the Number upon notification to us of any loss or theft. You may be required to provide
evidence of the loss or theft (for example, a police report or sworn statement). If the equipment is
later found, we may require that you exchange it for another phone or other equipment before we
reactivate Services (if we do reactivate Services), as well as require you to pay a reactivation fee. We
will deactivate Services to any Number without prior notice to you if we suspect any unlawful or
fraudulent use of the Number. You agree to cooperate reasonably with us in investigating suspected
unlawful or fraudulent use.
Messages. You will incur airtime usage charges when accessing your voicemail from your PCS
Phone. You may also incur charges in accessing text messages from your PCS Phone. You may
access your voicemail without incurring airtime usage charges by checking your voicemail from a
wireline phone. We may impose limits on the number of voicemail or text message that can be
retained through your PCS account. Audible or visual indicators of text or voicemail messages,
including mailbox icons on your PCS Phone, may not always provide an up to date indication of
Safety & Warranty
182
183
Page 98

Safety & Warranty
new messages. In certain instances, you may be required to manually reset or clear your mailbox
indicator.
Caller ID. If you do not want people you call to receive the Number assigned to your phone, you
must call PCS Customer Solutions for information about automatic Caller ID blocking. The
Number assigned to your phone can be blocked on a per-call basis by dialing *67 + Destination
Number + TALK (or similar key), but Caller ID deliver y resumes on the next call you make.
Caller ID display on incoming calls to your Number depends on receiving the information from
the calling party.
TTY Access. A TTY (also known as TDD or Text Telephone) is a telecommunications device that
allows people who are deaf or hard of hearing, or who have speech or language disabilities, to
communicate by telephone. TTY doesn't work with all PCS Phones. If you have a PCS TTYcapable phone, it may not function effectively, or at all, when attempting 911 calls due to the
equipment or software of the answering agency. Therefore, a TTY device should not be relied
on for 911 calls.
Pay-Per-Call Service. We will not complete calls from your Number to 900, 976 and similar
numbers for pay-per-call services.
International Calling. You may be limited in the international destinations that you can call with
Services. You should contact PCS Customer Solutions for information about international
destinations that you cannot call.
Limitation of Liability. Except as otherwise provided in this section, our sole liability to you for
any loss or damage arising out of providing or failing to provide Services (including mistakes,
omissions, interruptions, delays, errors, or defects) does not exceed (1) in cases related to a
specific piece of equipment, the prorated MRC for Services to the piece of equipment during
the affected period, or (2) in cases not related to a specific piece of equipment, the prorated
MRCs for Services to you during the affected period. Neither we nor our vendors, suppliers or
licensors are liable for any damage arising out of or in connection with:
a) any act or omission of any telecommunications service or other service provider other than
us;
b) any directory listing;
c) any dropped calls or inability to place or receive calls;
d) any interruption of Services, including interruptions caused by equipment or facilities failure
or shortages, transmission limitations or system capacity limitations;
e) traffic or other accidents, or any health-related claims allegedly arising from the use of
Services, phones, equipment or accessories used in connection with the Services;
184
f) the use of Wireless Web Services and PCS Vision applications and services, including the
accuracy or reliability of any information obtained from the Internet using Wireless Web Services or
from Voice Portal Services, PCS Vision wireless services or Internet services, content or
applications not supported by Sprint PCS;
g) any late or failed message delivery;
h) any interruption or failure of 911 or E911 emergency services or identification of the Number,
address or name associated with any person accessing or attempting to access emergency services
from your phone;
i) the installation or repair of any products or equipment by parties who are not our authorized
employees or agents;
j) events due to factors beyond our control, including acts of God (including, without limitation,
weather-related phenomena, fire or earthquake), war, riot, strike, or orders of governmental
authority;
k) any act or omission of any third party or independent contractor that offers products or services
in conjunction with or through the Services; or
l) your negligent or intentional act or omission.
NO CONSEQUENTIAL OR OTHER DAMAGES. UNDER NO CIRCUMSTANCES ARE WE LIABLE FOR
ANY INCIDENTAL, CONSEQUENTIAL, PUNITIVE OR SPECIAL DAMAGES OF ANY NATURE
WHATSOEVER ARISING OUT OF OR IN CONNECTION WITH PROVIDING OR FAILING TO
PROVIDE SERVICES, PHONES OR OTHER EQUIPMENT USED IN CONNECTION WITH THE
SERVICES, INCLUDING, WITHOUT LIMITATION, LOST PROFITS, LOSS OF BUSINESS, OR COST OF
REPLACEMENT PRODUCTS AND SERVICES. THIS SECTION SURVIVES TERMINATION OF THIS
AGREEMENT.
Indemnification. You indemnify and defend us, our partners, directors, officers, employees and
agents from and against any claim, action, damage, liability and expense arising out of or in
connection with: (1) your acts or omissions that occur in connection with your use of the Services
or equipment used in connection with the Services, and (2) any communications you make or
receive using the Services. This indemnification extends to and includes any attorney's fees and
costs incurred by us arising from any actions or claims to which this indemnification applies, or
from the contesting of the applicability of this provision. This section survives termination of this
Agreement.
MANDATORY ARBITRATION OF DISPUTES. ANY CLAIM, CONTROVERSY OR DISPUTE OF ANY
KIND BETWEEN THE CUSTOMER AND THE COMPANY AND/OR ANY OF ITS EMPLOYEES,
AGENTS, AFFILIATES OR OTHER REPRESENTATIVES, WHETHER SOUNDING IN CONTRACT,
STATUTE, OR TORT, INCLUDING FRAUD, MISREPRESENTATION, FRAUDULENT INDUCEMENT,
OR ANY OTHER LEGAL OR EQUITABLE THEORY AND REGARDLESS OF THE DATE OF ACCRUAL
OF SUCH CLAIM, CONTROVERSY OR DISPUTE SHALL BE RESOLVED BY FINAL AND BINDING
ARBITRATION AS PRESCRIBED IN THIS SECTION. THE FEDERAL ARBITRATION ACT, NOT STATE
Safety & Warranty
185
Page 99

Safety & Warranty
LAW, GOVERNS THE QUESTION OF WHETHER A CLAIM IS SUBJECT TO ARBITRATION.
HOWEVER, NOTHING CONTAINED IN THIS ARBITRATION PROVISION SHALL PRECLUDE THE
CUSTOMER FROM RESOLVING ANY CLAIM, CONTROVERSY OR DISPUTE IN SMALL CLAIMS
COURT HE OR SHE OTHERWISE WOULD HAVE THE RIGHT TO PURSUE.
A single arbitrator engaged in the practice of law will conduct the arbitration. The arbitrator will
be selected according to the rules of CPR or, alternatively, may be selected by agreement of the
parties, who shall cooperate in good faith to select the arbitrator. The arbitration will be
conducted by, and under the then-applicable rules of the CPR Institute for Dispute Resolution.
All expedited procedures prescribed by the applicable rules will apply. Any required hearing
fees and costs shall be paid by the parties as required by the applicable rules or as required by
applicable law, but the arbitrator shall have the power to apportion such costs as the arbitrator
deems appropriate.
The arbitrator's decision and award will be final and binding (subject to the appeal clause
below), and judgment on the award rendered by the arbitrator may be entered in any court with
jurisdiction.
An appeal may be taken under the CPR Arbitration Appeal Procedure from any final award of any
arbitral panel in any arbitration arising out of or related to this agreement that is conducted in
accordance with the requirements of such Appeal Procedure. Unless otherwise agreed by the
parties and the appeal tribunal, the appeal shall be conducted at the place of the original
arbitration.
If any party files a judicial or administrative action asserting a claim that is subject to arbitration
and another party successfully stays such action or compels arbitration, the party filing that
action must pay the other party's costs and expenses incurred in seeking such stay or
compelling arbitration, including attorney's fees.
Notices. You may get our current address for written notice by calling PCS Customer Solutions.
Written notice to you is sent to your last known address in our invoicing records. Written notice
is effective three days after deposit in the U.S. mail, postage prepaid, and properly addressed.
Unless required by this Agreement or Applicable Laws, (1) you may notify us by calling PCS
Customer Solutions, and (2) we may notify you by leaving a message for you on your PCS Phone,
answering machine or with your answering service. Notice addresses may be changed by giving
notice as provided in this section.
Choice of Law; Jurisdiction. This Agreement is governed by and must be construed under
federal law and the laws of the State of Kansas, without regard to choice of law principles.
General. If either of us does not enforce any right or remedy available under this Agreement, that
failure is not a waiver of the right or remedy for any other breach or failure by the other party. Our
waiver of any requirement in any one instance is not a general waiver of that requirement and does
not amend this Agreement. This Agreement is subject to any applicable federal and state law
(collectively, “Applicable Laws”). If any part of this Agreement is held invalid or unenforceable, that
part is interpreted consistent with Applicable Laws as nearly as possible to reflect the original
intentions of the parties and the rest of this Agreement remains in full force and effect. Section
headings are for descriptive purposes only and are not used to interpret this Agreement. You may
not assign this Agreement to any other person or entity without our prior written approval. This
Agreement (including any referenced documents and attachments) makes up the entire agreement
between you and us and replaces all prior written or spoken agreements, representations, promises
or understandings between you and us. The provisions of this Agreement that are contemplated to
be enforceable after the termination of this Agreement survive termination of this Agreement. If
there is a conflict, the Ser vice Plan (including any Term Service Plan) controls over the Terms.
The following provisions are not generally applicable and apply only to customers whose
Service Plans include these terms:
Traveling.
If you are making or receiving calls outside your Home Service Area but on the Sprint
Nationwide PCS Network, you may be charged for Services at a “travel” rate for both outgoing and
incoming traveling calls. Long distance charges may not be included in the travel rate. Traveling
charges do not apply if you subscribe to a Home Rate USA plan or to both Toll-Free USA and Home
Rate USA. (See Home Rate USA and Toll-Free USA for more information.) You do not have to
register your Number when traveling outside your Home Service Area.
Home Rate USA. This service lets you make or receive calls from anywhere on the Sprint
Nationwide PCS Network at your Home Service Area airtime rates.
Toll-Free USA. This service lets you call from anywhere on the Sprint Nationwide PCS Network to
anywhere in the United States, Puerto Rico and the U.S. Virgin Islands and be charged at your
Home Service Area airtime rates, with no additional long distance charges. If you have Home Rate
USA but do not have Toll-Free USA, and if you make a long distance call outside of your defined
local calling area, you are invoiced for the long distance charges.
Safety & Warranty
186
187
Page 100

Safety & Warranty
Terms of PCS Picture Mail Service
The Pictures or Picture Mail service (“Service”) – including access to and use of the services at
www
.picturemail.sprintpcs.com – is provided to you by Sprint under the following terms and
conditions and incorporate the Terms and Conditions set forth at www
include the Terms and Conditions of Service provided with your PCS Phone User Guide, terms
regarding copyright and trademark matters, and other terms relating to the use of our services.
Your use of the Service indicates your acceptance of all of these terms (collectively “Terms”).
Sprint may change these Terms from time to time at our discretion with or without notice to
you. Any changes will be posted on the Service.
1. Eligibility
The Service is provided to individuals who are at least 18 years old and to minors who have
parental permission. We encourage parents and guardians to take an active role in protecting the
privacy and security of their children. If you as a parent have any concerns regarding this issue,
please feel free to contact us at [email protected]
.
2. Membership Fees
PCS Picture Mail is available at an additional monthly charge (in addition to any charges you may
pay for PCS Vision services) through Sprint and provides you basic services, such as the ability to
store and share pictures taken on select Vision-enabled PCS Phones or devices. Additional
features or services (beyond basic services) may also be available from time to time for an
additional charge. If you have previously not signed up for the Service with activation of your
PCS Service Plan, you may add this Service to your account for an additional monthly charge
through select Vision-capable PCS Phones.
3. Picture Mail Password
We will have access to your Picture Mail password and User Name. We may remind you of your
password, at your request, by sending an email to the address you used when creating your
account. We will not disclose your Picture Mail password to third parties, but we may access
your account if necessary to maintain the Service, to comply with lawful requests from
governmental authorities, or in response to court orders, subpoenas, complaints.
4. Photo Loss
Sprint does not warrant that pictures or albums stored will not be deleted, modified or damaged.
If pictures or images are particularly valuable, have sentimental or other intangible value or are
otherwise unique or irreplaceable, reliable storage alternatives should be used, including hard
copy duplication and electronic back up and storage.
5. Use of Related Software
Any software that is provided for download and installation on your personal computer or
electronic device in connection with the Service is licensed under the terms and conditions of a
separate software license agreement. These license agreements are available for your review
upon download, installation and/or use of that software.
188
.sprintpcs.com which
6. Use of Pictures
Solely for the purposes of displaying your pictures to selected persons and fulfilling your print
orders, you grant us permission to use, download, upload, copy, print, display, reproduce, modify,
publish, post, transmit and distribute any material included in your albums.
7. Member Conduct
(a) In consideration for use of the Service, you agree to provide true, accurate, current and
complete information about you as prompted during the registration process, and to maintain and
update this information to keep it true, accurate, current and complete.
(b) You are responsible for maintaining the confidentiality of your Picture Mail password and
account, and you agree to be fully responsible for all activities which occur through anyone's use of
your Picture Mail password or account, whether or not authorized by you. You agree to notify
Sprint immediately of any unauthorized use of your password or account or any other breach of
security.
(c) You must provide at your own expense all equipment and software required to use the Service,
including computer and photography equipment, application software, modems, and access to the
Internet. We are not responsible for delays resulting from incompatibility of such equipment and
software, or from improper configuration or maintenance of such equipment and software.
(d) While we do not control the content of any member submissions to the Service and do not have
any obligation to monitor such content, if we have any reason to believe that any language,
content, graphics or other materials contained within your content is inappropriate, we may, in our
sole discretion, refuse to process any print orders, remove your pictures from our servers, suspend
your account, restrict access to it, remove content from it, or terminate it.
(e) You agree (1) not to use the Service for illegal purposes; (2) not to interfere with or disrupt the
Service or servers or networks or software or data connected to the Service; (3) to comply with all
requirements, procedures, policies and regulations of networks connected to the Service; and
(4) to comply with all applicable laws regarding the transmission of technical data exported from
the United States. You agree to abide by all applicable local, state, national, and international laws
and regulations in your use of the Service and in your use of any software downloaded from the
Service, including, without limitation, copyright, trademark, obscenity and defamation laws.
(f) You agree not to interfere with the use and enjoyment of the Service by other users of the
Service. You agree not to attempt to gain unauthorized access to other computer systems or
networks connected to the Service.
(g) You agree not to transmit through the Service, or upload to it (1) any pictures or other content
in violation of the copyrights, privacy rights or other rights of any other person; (2) any unlawful,
harassing, libelous, privacy invading, abusive, hateful, threatening, harmful, vulgar, defamatory,
obscene or otherwise objectionable material of any kind; (3) any material that violates the rights of
another, including, but not limited to, the intellectual property rights of another; (4) any material
that harms minors; (5) any material that violates any applicable local, state, national, or
Safety & Warranty
189
 Loading...