

Page 1
USB Server User Manual
1
Page 2

USB Server User Manual
Copyright Notice
Copyright Incorporated 2009. All rights reserved.
Disclaimer
Incorporated shall not be liable for technical or editorial errors or
omissions contained herein; nor for incidental or consequential damages
resulting from furnishing this material, or the performance or use of this
product.
Incorporated reserves the righ t to change product specifications without
notice. Information in this document may change without notice.
Trademarks
Microsoft, Windows 7, VISTA and XP are registered trademarks of the
Microsoft Corporation. All other brand and product names mentioned
herein may be registered trademarks of their respective owners.
Customers should ensure that their use of this product does not infringe
upon any patent rights. Trademarks mentioned in this publication are
sued for identification purposes only and are properties of their
respective companies.
2
Page 3

USB Server User Manual
TABLE OF CONTENT
Introduction ..................................................................................................................................... 4
Features ....................................................................................................................................... 4
Unpacking ................................................................................................................................... 4
Software Installation ....................................................................................................................... 5
Utility .......................................................................................................................................... 6
Menu bar ................................................................................................................................. 6
Using the utility for USB Servers ............................................................................................... 7
General Configuration ............................................................................................................ 8
Maintenance ............................................................................................................................ 9
Using utility for USB Devices .................................................................................................... 9
Configuration with Web-based UI ............................................................................................ 11
Network Information/Setting ................................................................................................ 12
Restart ................................................................................................................................... 12
Factory Default ..................................................................................................................... 13
Update Firmware .................................................................................................................. 13
Change Password .................................................................................................................. 14
Specifications ................................................................................................................................ 15
Limited Warranty .......................................................................................................................... 16
3
Page 4

USB Server User Manual
Introduction
The 4-Port Network USB Hub (model TU2-NU4) provides access to
most USB devices over a Local Area Network.
Connect USB hard drives, flash drives, printers, digital cameras, iPods™
and other USB peripherals to this compact hub for fast network-wide file
sharing.
Install the included utility on each computer to provide access to the 4Port Network USB Hub*. Power up the device and connect it to an
available Ethernet port on a wired router, wireless router, or networked
switch. Plug in USB devices and start sharing content across your digital
network.
Features
• Access USB devices across your Local Area Network
• Connect USB hard drives, flash drives, printers, digital cameras,
iPods and more
• High Speed USB 2.0 data transfers
• One 10/100Mbps Auto-MDIX Fast Ethernet Port
• Compliant with USB 2.0 high speed data communication
• Supports USB storage devices such as hard drives, flash driver and
memory card readers
• Turns most USB peripheral devices into a shared network resource
• Supports most USB printers and all-in-one multi-functional
printers
• Compliant with Windows 7/Vista/XP
• 3-year limited warranty
Unpacking
Open the box of the Network USB Hub and carefully unpack it. The box
should contain the following items:
TU2-NU4 4-Port Network USB Hub
CD-Rom (Utility & User’s Guide)
Multi-Language Quick Installation Guide
Power Adapter (5V DC, 3A)
If any item is found missing or damaged, please contact your local
reseller for replacement.
4
Page 5
USB Server User Manual
Software Installation
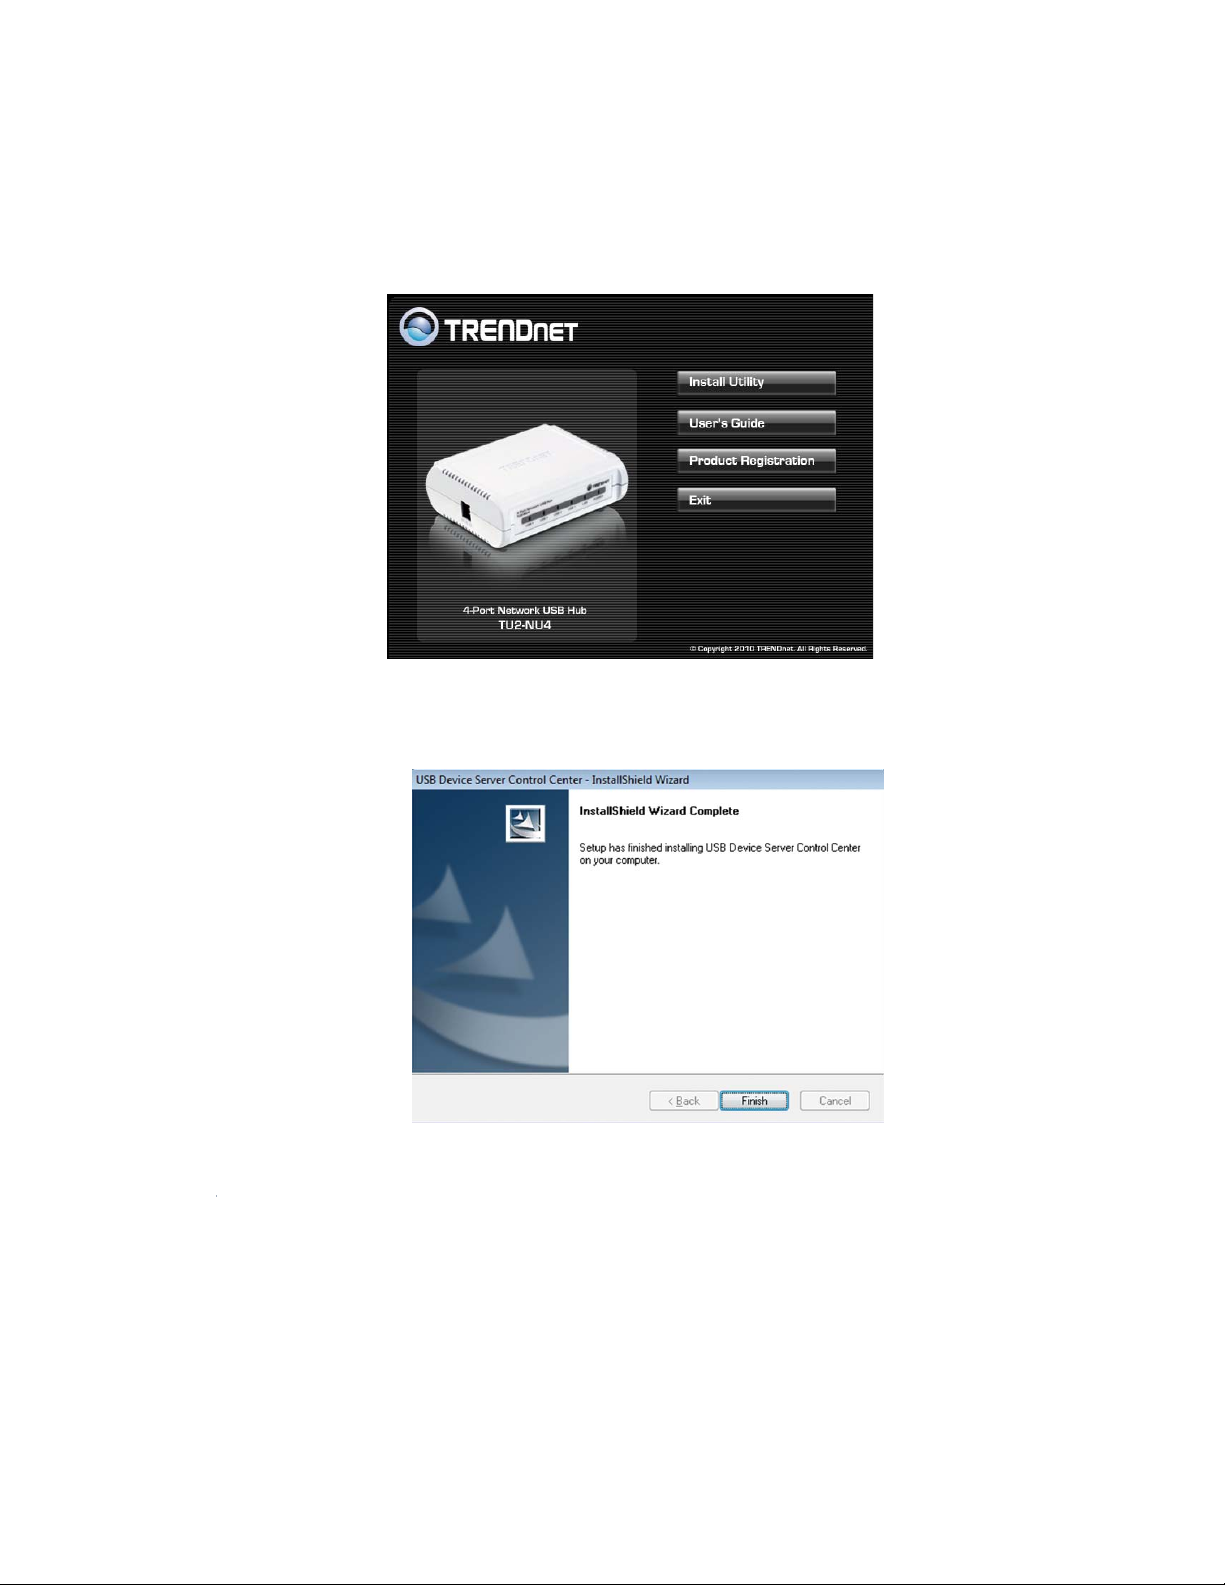
1) Insert the Utility CD-ROM into your computer’s CD_ROM Drive
and click Install Utility.
2) Follow the InstallShield Wizard Instructions
3) Click Finish to restart the computer.
5
Page 6
USB Server User Manual
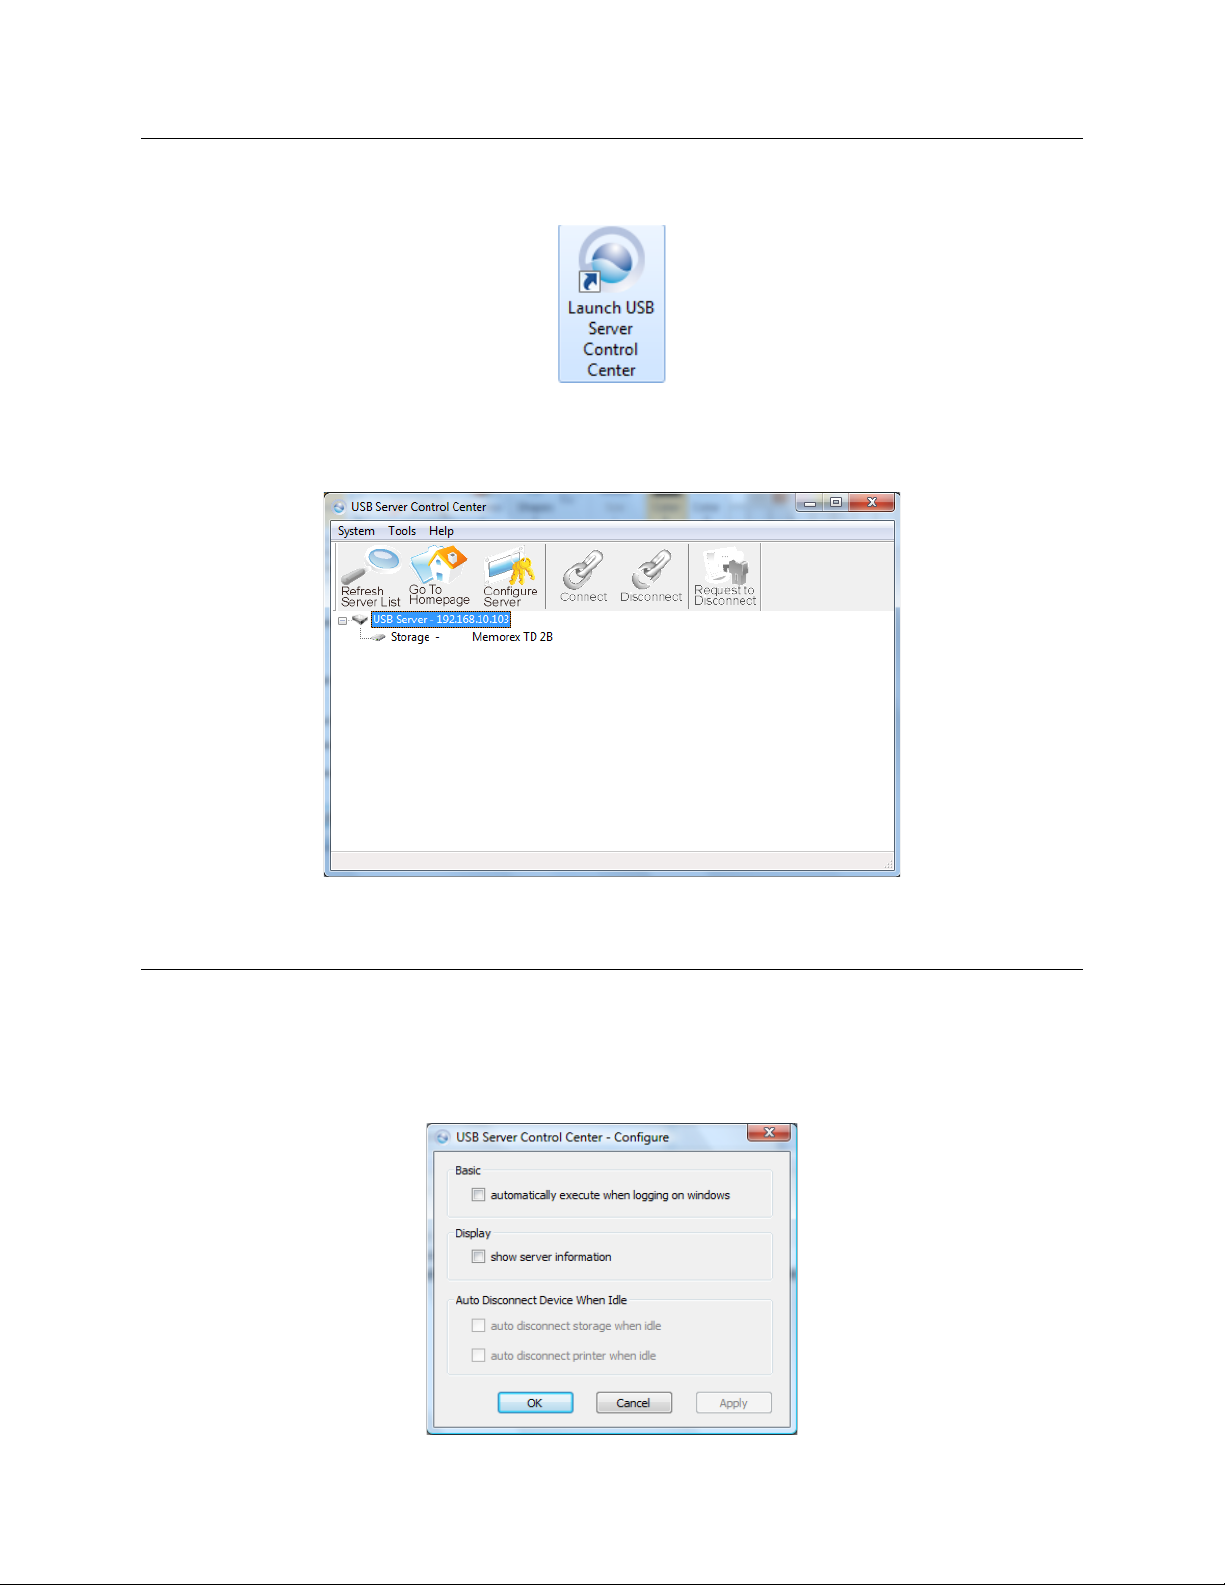
Utility
To start the USB Server program, please double click the shortcut icon
of the USB Server on the Desktop.
This brings up the main dialog. The main dialog box of USB Server is
shown below.
Menu bar
System: Provides option to exit and close utility
Tools
6
Page 7

USB Server User Manual
Basic: Check option to have utility automatically run during PC start up
Display: Check this option to display selected server information
Auto Disconnect: Enable this option on the type of devices (USB
storage or USB printers) after idle period. Idle period is set to 3 minutes.
Help
About: Display utility information.
Using the utility for USB Servers
The utility allows you to apply settings changes to the USB server (TU2NU4).
Refresh Server List: Click this option for the utility to refresh all
connected servers and all connected USB devices.
7
Page 8

USB Server User Manual
Go to Homepage: Click this option to open the TU2-NU4’s user
interface.
Configure Server: Click this option to configure the TU2-NU4 through
the utility
General Configuration
Server Name: Assign the name of the selected USB server and click
OK. This is useful when your network has multiple servers
connected.
DHCP: Enable this option to allow the USB server to obtain DHCP
from a DHCP server. When option is disable, enter the IP
Address and Subnet schemes similar to your networks.
Restart Server: Click this option to reboot the USB server
OK: Click to confirm settings
Apply: Click to apply settings
Cancel: Click to close window
8
Page 9

Maintenance
USB Server User Manual
Server Password
New Password: Enter a new password for the TU2-NU4
Confirm Password: Re-enter the new password for the TU2-NU4
Submit: Click Submit when new password information has been entered
System Firmware:
Update File: Click this option to update the firmware on the TU-NU4
Cancel: Click to close window
Using utility for USB Devices
The utility tells you the status of all the USB Servers and devices that
are accessible to you. A USB Servers is either accessible or inaccessible.
An inaccessible server is either disconnected from the network, powered
off or suffers other technical difficulties that prevent it from being
accessed by your PC. Inaccessible server will not show up on the tree
view.
However, the devices have several kinds of status:
9
Page 10

USB Server User Manual
Connect: Select the USB device listed on the utility and click to
establish connection.
Disconnect: Select the connected USB device and click to properly
disconnect the USB device.
Request to Disconnect: Click when another user is connected to the
USB device. The other user will receive notification of your request.
Yes: Click Yes if you would like to properly disconnect to the USB
device and allow other user’s to establish connection
No: Click to deny connection request.
10
Page 11

USB Server User Manual
Configuration with Web-based UI
Your default web browser will pop up and take you into the web-based
configuration UI of the server.
This is the main page of the configuration UI. You can see the important
information about the USB Server and the device(s) connected to it. The
6 links at the left-hand side each represent s a function. Clicking on
“Device Status” brings you back to this page, and the 5 other links take
you to pages with different functions.
11
Page 12

Network Information/Setting
USB Server User Manual
This page displays the current network setting of the server and provides
links to the pages where you can perform special actions. You can
change the network setting according to your need. However, please
note that if you would like to give this server a static IP, please disable
the DHCP option. Once you are done, please click on the “Submit”
button and reboot the server.
NOTE: A Server with busy device(s) connected is prohibited to be
configured to prevent interruption of any on-going tasks.
Restart
Clicking on this link takes you the page show below:
12
Page 13

USB Server User Manual
With the “Reset Server” button you can reboot the server. However, if
there is a password, you must enter it for this function to work. Password
is by default blank. So, unless a password is explicitly set, you do not
have to enter anything for the reset function to work.
Factory Default
Clicking on this link takes you the page where you can restore the
server’s settings back to default:
Again, the password is not necessary, if no password is set just leave the
field empty and click on the “Factory Default” button to restore the
factory default settings.
Update Firmware
This link takes to the page where you will be able to upload the lat
firmware for the server:
13
Page 14

USB Server User Manual
Please first click on the “Browse” button to browse to the firmware you
would like to upload and then click on the “Save” button to update the
firmware. You do not need to provide a password for this operation if
there is not password set. Please just leave it blank.
Change Password
This page allows you to link to the password update page below: To
change the password, you must enter current password, input new
password and re-input new password for confirmation and then click on
“Save”. If you are setting the password for the first time, you don’t have
to provide current password.
14
Page 15

Specifications
Hardware
Standards
LANPort
USBPorts
LEDIndicators
TCP/IPProtocol
Supported
SupportedOS
Buttons Resetbutton–restoresfactorydefaultsettings
PowerSupply Poweradapter5VDC,3A
PowerConsumption
Dimensions
(LxWxH)
Weight
Temperature
Humidity
Certifications
IEEE802.3(10Base‐T),IEEE802.3u(100Base‐TX),USB1.1/2.0
1x10/100MbpsAuto‐MDIXEthernetport
4xUSB2.0
Power,LAN,USBPort1‐4
DHCP
Windows2000/XP(32/64bit)/2003Server/Vista(32/64bit)
1.1w(max)
100x78x31mm(3.93x3.07x1.22in.)
128g(4.5oz)
Operating:0~55°C(32‐131°F)
Storage:‐10~70°C(14‐158°F)
Operating:10%~90%(non‐condensing)
Storage:5%~90%(non‐condensing)
CE,FCC
USB Server User Manual
15
Page 16

USB Server User Manual
Limited Warranty
TRENDnet warrants its products against defects in material and
workmanship, under normal use and service, for the following lengths of
time from the date of purchase.
TU2-NU4– 2 Years Warranty
AC/DC Power Adapter, Cooling Fan, and Power Supply carry 1 year
warranty.
If a product does not operate as warranted during the applicable
warranty period, TRENDnet shall reserve the right, at its expense, to
repair or replace the defective product or part and deliver an equivalent
product or part to the customer. The repair/replacement unit’s warranty
continues from the original date of purchase. All products that are
replaced become the property of TRENDnet. Replacement products may
be new or reconditioned. TRENDnet does not issue refunds or credit.
Please contact the point-of-purchase for their return policies.
TRENDnet shall not be responsible for any software, firmware,
information, or memory data of customer contained in, stored on, or
integrated with any products returned to TRENDnet pursuant to any
warranty.
There are no user serviceable parts inside the product. Do not remove or
attempt to service the product by any unauthorized service center. This
warranty is voided if (i) the product has been modified or repaired by
any unauthorized service center, (ii) the product was subject to accident,
abuse, or improper use (iii) the product was subject to conditions more
severe than those specified in the manual.
Warranty service may be obtained by contacting TRENDnet within the
applicable warranty period and providing a copy of the dated proof of
the purchase. Upon proper submission of required documentation a
Return Material Authorization (RMA) number will be issued. An RMA
number is required in order to initiate warranty service support for all
16
Page 17

USB Server User Manual
TRENDnet products. Products that are sent to TRENDnet for RMA
service must have the RMA number marked on the outside of return
packages and sent to TRENDnet prepaid, insured and packaged
appropriately for safe shipment. Customers shipping from outside of the
USA and Canada are responsible for return shipping fees. Customers
shipping from outside of the USA are responsible for custom charges,
including but not limited to, duty, tax, and other fees.
WARRANTIES EXCLUSIVE: IF THE TRENDNET PRODUCT
DOES NOT OPERATE AS WARRANTED ABOVE, THE
CUSTOMER’S SOLE REMEDY SHALL BE, AT TRENDNET’S
OPTION, REPAIR OR REPLACE. THE FOREGOING
WARRANTIES AND REMEDIES ARE EXCLUSIVE AND ARE IN
LIEU OF ALL OTHER WARRANTIES, EXPRESSED OR IMPLIED,
EITHER IN FACT OR BY OPERATION OF LAW, STATUTORY OR
OTHERWISE, INCLUDING WARRANTIES OF
MERCHANTABILITY AND FITNESS FOR A PARTICULAR
PURPOSE. TRENDNET NEITHER ASSUMES NOR AUTHORIZES
ANY OTHER PERSON TO ASSUME FOR IT ANY OTHER
LIABILITY IN CONNECTION WITH THE SALE, INSTALLATION
MAINTENANCE OR USE OF TRENDNET’S PRODUCTS.
TRENDNET SHALL NOT BE LIABLE UNDER THIS WARRANTY
IF ITS TESTING AND EXAMINATION DISCLOSE THAT THE
ALLEGED DEFECT IN THE PRODUCT DOES NOT EXIST OR
WAS CAUSED BY CUSTOMER’S OR ANY THIRD PERSON’S
MISUSE, NEGLECT, IMPROPER INSTALLATION OR TESTING,
UNAUTHORIZED ATTEMPTS TO REPAIR OR MODIFY, OR ANY
OTHER CAUSE BEYOND THE RANGE OF THE INTENDED USE,
OR BY ACCIDENT, FIRE, LIGHTNING, OR OTHER HAZARD.
LIMITATION OF LIABILITY: TO THE FULL EXTENT ALLOWED
BY LAW TRENDNET ALSO EXCLUDES FOR ITSELF AND ITS
SUPPLIERS ANY LIABILITY, WHETHER BASED IN CONTRACT
OR TORT (INCLUDING NEGLIGENCE), FOR INCIDENTAL,
CONSEQUENTIAL, INDIRECT, SPECIAL, OR PUNITIVE
DAMAGES OF ANY KIND, OR FOR LOSS OF REVENUE OR
17
Page 18

USB Server User Manual
PROFITS, LOSS OF BUSINESS, LOSS OF INFORMATION OR
DATE, OR OTHER FINANCIAL LOSS ARISING OUT OF OR IN
CONNECTION WITH THE SALE, INSTALLATION,
MAINTENANCE, USE, PERFORMANCE, FAILURE, OR
INTERRUPTION OF THE POSSIBILITY OF SUCH DAMAGES,
AND LIMITS ITS LIABILITY TO REPAIR, REPLACEMENT, OR
REFUND OF THE PURCHASE PRICE PAID, AT TRENDNET’S
OPTION. THIS DISCLAIMER OF LIABILITY FOR DAMAGES
WILL NOT BE AFFECTED IF ANY REMEDY PROVIDED HEREIN
SHALL FAIL OF ITS ESSENTIAL PURPOSE.
Governing Law: This Limited Warranty shall be governed by the laws
of the state of California.
18
Page 19

USB Server User Manual
19
 Loading...