

Page 1
Quick Installation Guide
TEW-WLC100 (V1)
Page 2

Table of Content
1 English
1. Before You Start
2. Hardware Installation and Configuration
3. Connect your wireless access points
Page 3

1. Before You Start
Package Contents
ENGLISHFRANÇAISDEUTSCH
Ÿ TEW-WLC100
Ÿ Quick Installation Guide
Ÿ CD-ROM (User's Guide)
Ÿ Power adapter (12V DC, 1A)
Ÿ Rack mount kit
Minimum Requirements
Ÿ Computer with an Ethernet port and web browser
Ÿ Network cable for computer connection to controller
Ÿ Compatible wireless access point(s) (TRENDnet TEW-755AP, TEW-821DAP, or TEW-825DAP)
Optional Equipment
Ÿ EIA standard 19” rack
Ÿ Power drill/drill bits and Phillips bit or screwdriver for mounting
ESPAÑOLРORTUGUÊS
Important Note:
Make sure your existing network is using a DHCP server to distribute IP addresses to the access
points. By default, TRENDnet access points listed below will obtain an IP address automatically
through DHCP or otherwise default back to 192.168.10.100 / 255.255.255.0 if a DHCP server is
not available on your network. Each access point must be assigned a unique IP address on the
same network. The wireless controller and access points must be connected to the same IP
subnet on your network (e.g. 192.168.10.x / 255.255.255.0).
1
Page 4

Access Point Model Description
Controller Compatible
Firmware Version
TEW-755AP N300 PoE Access Point 1.03 or above
TEW-821DAP
AC1200 Dual Band PoE Access Point
1.05 or above
TEW-825DAP
AC1750 Dual Band PoE Access Point
1.01 or above
Access Point Compatibility
Before you proceed, please ensure you are using one of the access point models in the list and
the firmware version of your access point has been upgraded accordingly to the versions
indicated in the list below. You can download the access point firmware from
http://www.trendnet.com/support which include instructions on how to upgrade the firmware.
Before any access points are added to the wireless controller, make sure to reset the access
points to factory default.
2
Page 5
2. Initial Controller Setup
Note: Before connecting the wireless controller to the network and connecting other devices
such as PoE injectors or access points, follow the steps to set up your controller IP address
ENGLISHFRANÇAISDEUTSCH
settings and administrator password first.
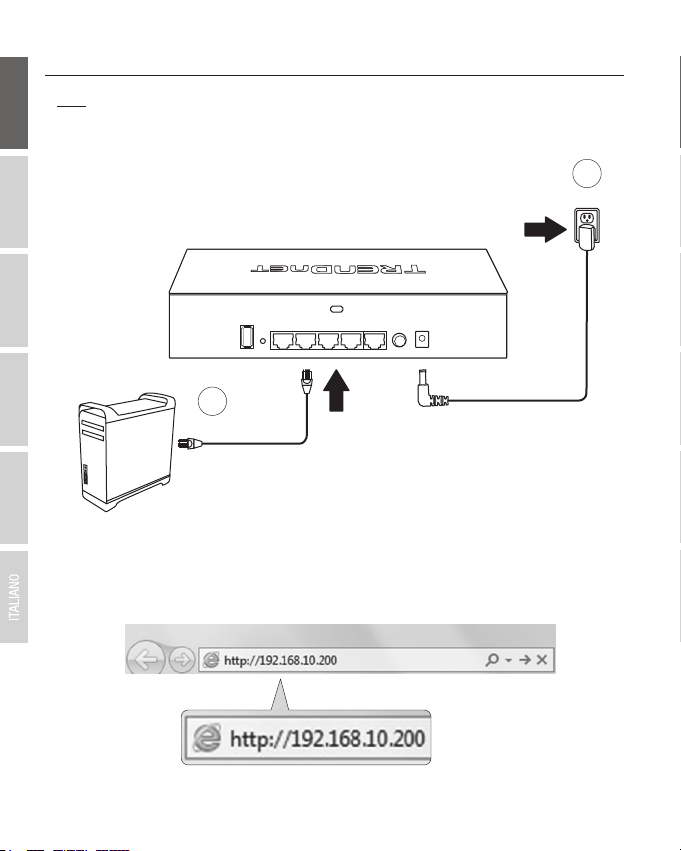
1
Power
ESPAÑOLРORTUGUÊS
3. Assign a Static IP address to your computer's network adapter in the subnet of 192.168.10.x
(e.g. 192.168.10.25) and a subnet mask of 255.255.255.0.
4. Open your web browser, type the default IP address of the wireless controller in the address
bar, and then press Enter. The default IP address is 192.168.10.200.
2
3
Page 6
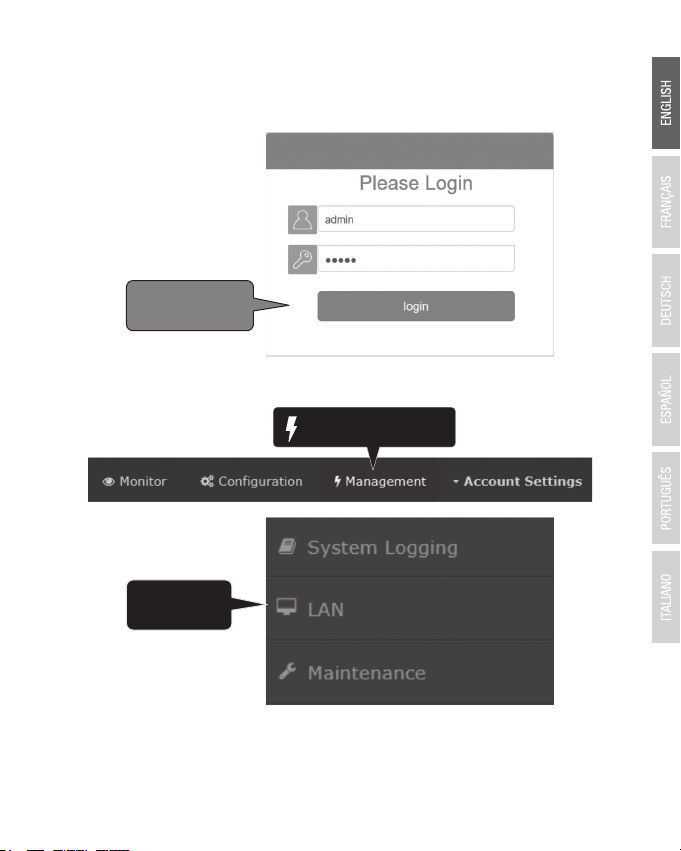
5. Enter the User name and Password, and then click Login. By default:
LAN
Management
Login
User Name: admin
Password: admin
6. Click Management and click on LAN.
4
Page 7

Edit
Account Settings
7. Configure the wireless controller IP address settings to match the requirements of your
network and click Apply.
ENGLISHFRANÇAISDEUTSCH
IP Address
Netmask
Gateway
DNS1
DNS2
8. To change the controller administrator password, click Account Settings and click Edit.
ESPAÑOLРORTUGUÊS
192.168.10.200
255.255.255.0
192.168.10.1
192.168.10.1
5
Page 8

9. In the New Password and Confirm Password fields, enter the new administrator password
OK
Confirm Password
New Password
and click OK to save the new password settings. You will be prompted immediately
afterwards to login to the controller management page with the new password.
10. Using an Ethernet cable, connect one of the five Gigabit Ethernet ports located on the back of
the wireless controller to your network (e.g. router, switch, etc.)
TEW-WLC100
Network
6
Page 9
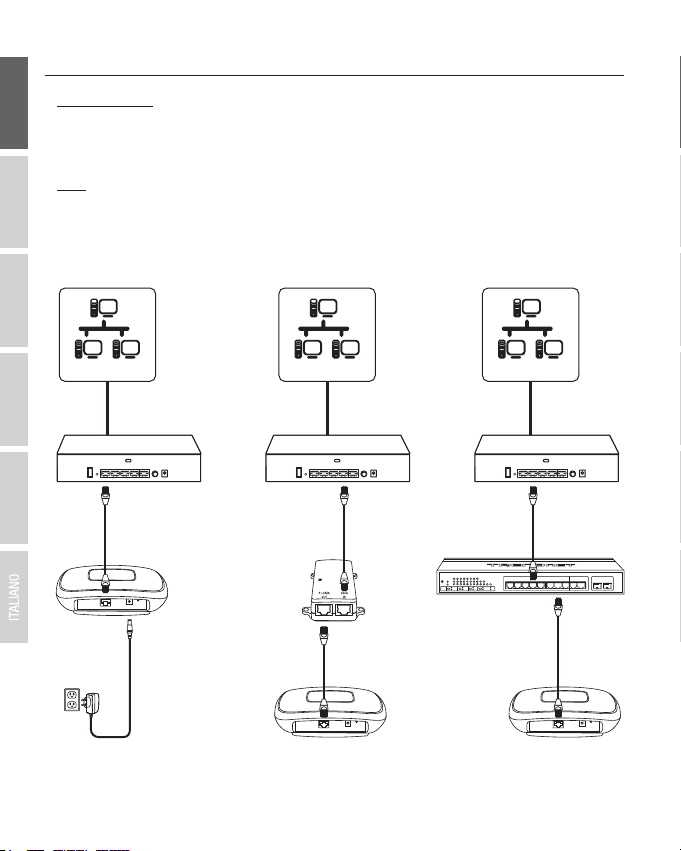
3. Connect your wireless access points
Important Note: Please make sure your access points have met the requirements in Section 1.
ENGLISHFRANÇAISDEUTSCH
1. Using an Ethernet cable, connect each wireless access point to the wireless controller or your
network.
Note: If powering the access points using their power adapters, you can connect the access
points directly to your network or the wireless controller. If powering the access point using
power over Ethernet (PoE), you can connect your access points to your network or to the
wireless controller using a separate PoE injector (not included) or PoE/PoE+ switch (not
included).
ESPAÑOLРORTUGUÊS
Power
Network
Access Point
Network
OR OR
PoE Injector
Access Point
7
Network
PoE Switch
Access Point
Page 10

4. Initial Wireless Setup
Login
Devices
Monitor
1. Using your computer and web browser, access the wireless controller management page
using the newly assigned IP address settings (configured in Section 2) and login.
Note: If the IP address settings were not changed in Section 2, the IP address settings for the
controller are 192.168.10.200 / 255.255.255.0.
2. Click Monitor and click Devices.
3. The access points will be discovered automatically and appear in the Device List.
Note: If the access points do not appear, make sure the access points are powered by checking
the physical LEDs and physical cable connections and refresh the page.
8
Page 11

4. After the access points are discovered and appear in the Device List, under the Action
Device Name Mac Address Address
Wifi Group Status Client DOWN
UP History
Channel
Type Action
D8:EB:97:31:5A:31
00:18:E7:95:92:45
192.168.10.21
192.168.10.22
NEW
NEW
Accept
Accept
Device Name Mac Address Address
Wireless Group Status Client DOWN
UP History
Channel
Type Action
192.168.10.26
192.168.10.25
RUN
RUN
Edt
TEW-821DAP
TEW-821DAP
00:18:E7:95:92:45
D8:EB:97:31:5A:31
1(2.4G)/1(5G)
1(2.4G)/1(5G)
000B0B0B
0B
AP
AP
Edt
Accept
Configuration
Wireless Groups/Profiles
column, click on each access point to add them to the wireless controller.
ENGLISHFRANÇAISDEUTSCH
5. Once the access points have been added to the wireless controller, the Status will change
from NEW to RUN.
6. Click Configuration and click Wireless Groups/Profiles.
ESPAÑOLРORTUGUÊS
9
Page 12

7. In the list below, click Create to create a new wireless profile.
8. In the Edit Wireless Group window, enter the wireless network name/SSID for the wireless
network. (e.g. TRENDnet-WiFi)
Note: The SSID is the wireless network name used to broadcast and be discovered by your
wireless client devices to connect to your wireless network.
9. For Roaming options, select 802.11k and OKC wireless roaming protocols to ensure
fast transition wireless connectivity for client devices when roaming between multiple access
points.
10. For Authentication method, select WPA/WPA2-PSK. For the WPA Cipher, select AES and
enter the Pre-Shared Key required to connect to your wireless network. Click OK.
Note: The pre-shared key is the key/password (8-63 alphanumeric characters) client devices
will be required to enter in order to connect to your wireless network.
11. The initial wireless settings are complete.
Note: The access points must be connected to the same IP subnet as your wireless controller.
(e.g. 192.168.10.x / 255.255.255.0)
For detailed information regarding advanced settings, please refer to the User's Guide found on
the included CD.
10
Page 13

Manufacturer’s Name and Address
TRENDnet, Inc.
20675 Manhattan Place
Torrance, CA 90501 USA
Zwolsestraat 156 2587 WB
The Hague The Netherlands
Product Information
Model Number:
Product Name:
Trade Name:
TRENDnet hereby declare that the product is in compliance with the essential requirements and
other relevant provisions under our sole responsibility.
Safety
EMC
TEW-WLC100
Wireless LAN Controller
TRENDnet
EN 60950-1: 2006 + A11: 2010 + A12: 2011 + A2: 2013
EN 55022: 2010 + AC: 2011
EN 55024: 2010 + A1: 2015
EN 55032: 2015
Energy Efficiency
Regulation (EC) No. 1275/2008, No. 801/2013
This product is herewith confirmed to comply with the Directives.
Directives:
Low Voltage Directive 2014/35/EC
EMC Directive 2014/30/EC
RoHS Directive 2011/65/EU
WEEE Directive 2012/19/EU
REACH Regulation (EC) No. 1907/2006
R&TTE Directive 1999/5/EC
Ecodesign Directive 2009/125/EC
Person responsible for this declaration.
Date: March 8, 2017
Name: Sonny Su
Title: Director of Technology
Signature:
Page 14

Certifications
This device complies with Part 15 of the FCC Rules.
Operation is subject to the following two conditions:
(1) This device may not cause harmful interference.
(2) This device must accept any interference received.
Including interference that may cause undesired operation.
Waste electrical an electronic products must not
be disposed of with household waste. Please
recycle where facilities exist. Check with your
Local Authority or Retailer for recycling advice.
Applies to PoE Products Only: This product is to be connected
only to PoE networks without routing to the outside plant.
Note
The Manufacturer is not responsible for any radio or TV
interference caused by unauthorized modifications to this
equipment. Such modifications could void the user’s authority
to operate the equipment.
Advertencia
En todos nuestros equipos se mencionan claramente las
caracteristicas del adaptador de alimentacón necesario para
su funcionamiento. El uso de un adaptador di stinto al
mencionado puede producir daños fisicos y/o daños al equipo
conectado. El adaptador de alimentación debe operar con
voltaje y frecuencia de la energia electrica domiciliaria exitente
en el pais o zona de instalación.
Technical Support
If you have any questions regarding the product
installation, please contact our Technical Support.
Toll free US/Canada: 1-855-373-4741
Regional phone numbers available
at www.trendnet.com/support
TRENDnet
20675 Manhattan Place
Torrance, CA 90501
USA
Copyright © 2017. All Rights Reserved. TRENDnet.
Product Warranty Registration
Please take a moment to register your
product online. Go to TRENDnet’s website at:
www.trendnet.com/register
TEW-WLC100 (V1) /03.09.2017
 Loading...