

Quick Installation Guide
TEW-P21G

Table of Contents
Table of Contents
Deutsch .....................................................................................................
1. Bevor Sie anfangen ...........................................................................
2. Herstellung der Verbindung ...............................................................
3. Nutzung des Druckservers .................................................................
Troubleshooting ........................................................................................
1
1
2
3
7
Version 12.13.05
1. Bevor Sie anfangen
Packungsinhalt
TEW-P21G
Kurzanleitung zur Installation
Treiber-CD
Netzteil (5 V, 2,5 A)
Systemanforderungen
1. Pentium 100 MHz oder schneller
2. 8 MB RAM oder mehr
3. Windows, Linux, Mac OS X oder andere Betriebssysteme
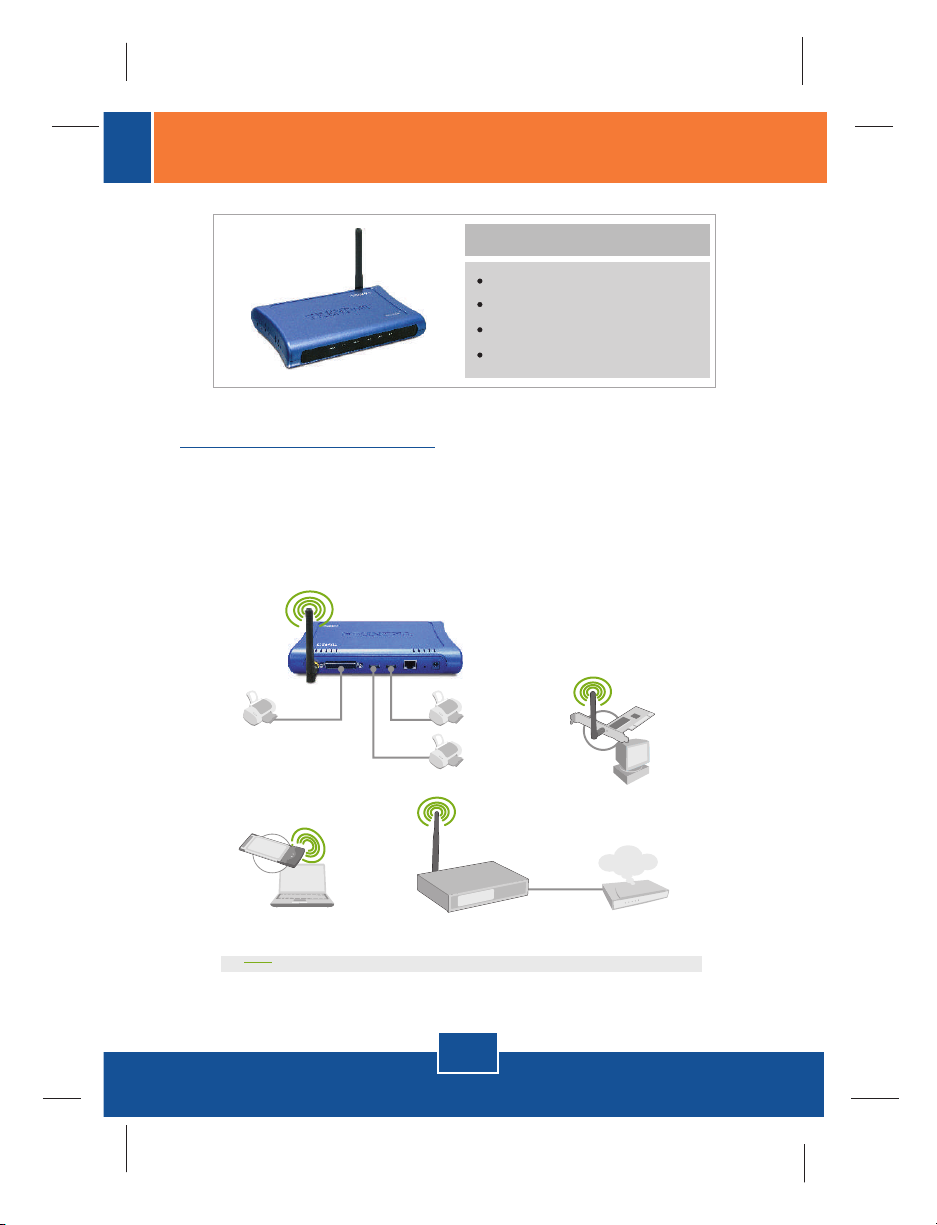
54Mbps 802.11g Wireless
Multi-Port Print Server
(TEW-P21G)
Parallel Printer
Notebook with
Wireless PC Card
(TEW-421PC)
54Mbps Wireless
USB 2.0 Printers
Cable/DSL 802.11g
54Mbps Wireless Router
(TEW-431BRP)
1
Deutsch
Workstation with
Wireless PCI Adapter
(TEW-423PI)
Internet
Cable/DSL Modem
2. Herstellung der Verbindung
Hinweis: Schalten Sie bitte alle Drucker aus, bevor Sie sie mit dem
Druckserver verbinden. Sobald die Hardware korrekt angeschlossen ist,
können Sie die Drucker wieder einschalten.
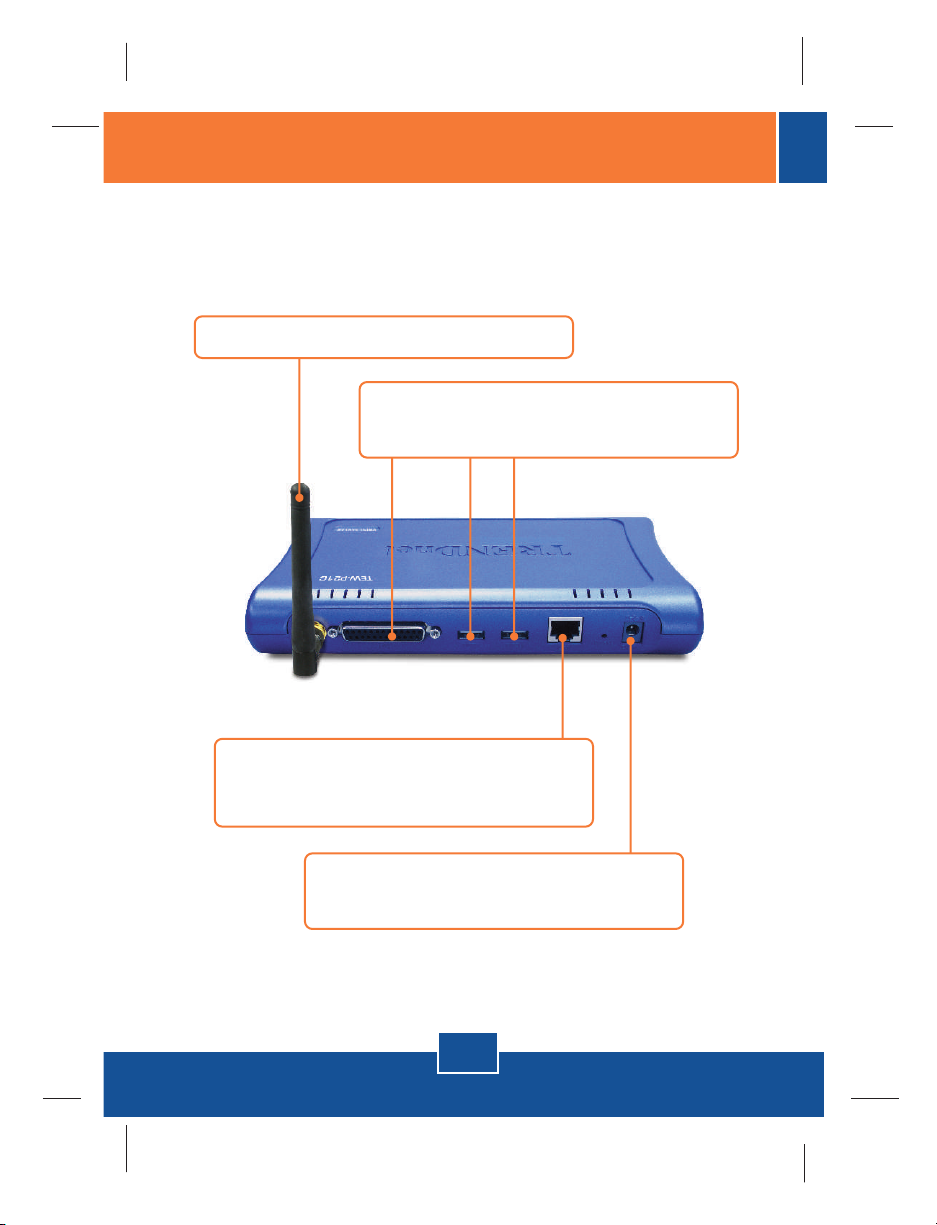
1. Antenne Anschliessen.
2. Verbinden Sie die Parallel - oder USB-Drucker
mit den Druckeranschlüssen.
3. Verbinden Sie den LAN-Port über das RJ-
45-Kabel mit dem Hub oder Switch Ihres
Netzwerks.
4. Verbinden Sie das Netzteil mit dem
Druckserver.
2
Deutsch

3. Nutzung des Druckservers
Hinweis: Benutzer von MACs ändern bitte die IP-Adresse des Computers auf
192.168.0.X (X ist eine beliebige Nummer von 1 bis 253) und geben in den
Webbrowser 192.168.0.1 ein, um auf das Internetprogramm des Druckservers
zugreifen zu können.
Für Benutzer von Windows
1. Legen Sie die Installations-CD ein
und klicken Sie auf Install Utility
(Programm installieren).
2. Folgen Sie den
Installationsschritten und klicken
Sie abschließend auf Finish
(Fertigstellen).
3. Doppelklicken Sie auf das Symbol
für das Druckserverprogramm.
3
Deutsch
PS-Utility
V3.00

4. Klicken Sie dann auf Change IP
Address (IP-Adresse ändern).
5. Markieren Sie Manually Assign
(Manuell zuweisen) und geben Sie
eine IP-Adresse ein, die Ihrem
gegenwärtigen Netzwerksegment
entspricht. Klicken Sie auf OK. Die
Änderung wird in einem neuen
Popup-Fenster angezeigt. Klicken
Sie auf OK.
6. Klicken Sie im
Druckserverprogramm auf Show
Web Setup (Web-Setup anzeigen).
Notieren Sie sich die Server- und
Druckernamen.
4
Deutsch

Hinweis: Wenn Sie Windows 95/98(SE)/ME verwenden, muss NETBEUI
installiert sein, bevor Sie die untenstehenden Anweisungen ausführen können.
Bei Windows 2000/XP können Sie Ihren Drucker einfach entsprechend den
folgenden Schritten hinzufügen. Detaillierte Hinweise zum TCP/IP-Druck
entnehmen Sie bitte der Bedienungsanleitung auf der CD.
7. Gehen Sie zu Control Panel
(Systemsteuerung) und
doppelklicken Sie dort auf
Printers and Faxes (Drucker und
Faxgeräte). Klicken Sie auf Add
Printer (Drucker hinzufügen).
8. Wählen Sie im Add Printer
Wizard (Druckerinstallations-
Assistent) die Option Network
Printer (Netzwerkdrucker) aus und
klicken Sie auf Next (Weiter).
5
Deutsch

9. Markieren Sie Connect to this
printer (Verbindung mit folgendem
Drucker herstellen) und geben Sie
die Namen von Server und Drucker
im folgenden Format ein:
\\Servername\Druckername
klicken Sie auf Next (Weiter).
10. Klicken Sie auf OK.
11. Wählen Sie den geeigneten
Treiber für Ihren Drucker aus und
klicken Sie auf Next (Weiter).
12. Markieren Sie Yes (Ja) und
klicken Sie auf Next (Weiter).
Klicken Sie auf Finish
(Fertigstellen), um die Installation
abzuschließen.
Ihre Installation ist beendet!
Hinweis: Zusätzliche Informationen zu den erweiterten Funktionen finden Sie in
der Bedienungsanleitung.
6
Deutsch

Troubleshooting
I cannot add a network printer after I typed the server name and printer name.
Q1.
Please double check your hardware connections. Make sure that your printer
A1.
is connected properly to the print server and your power adapter is connected
properly to a power outlet.
I have double checked my hardware connections and have verified that
Q2.
everything is connected properly, but I still cannot connect to my printer after I
typed in the server name and printer name.
Make sure that you are typing the correct printer name. If your USB printer is
A2.
connected to the USB2 slot, then use the Printer Name that is by the USB2
heading in the web configuration utility.
I verified that the hardware installation is correct and typed the correct printer
Q3.
name, but I still cannot find the network printer.
Make sure that the server name and printer name is entered correctly. There
A3.
should be no spaces, and the back slashes that separate the server name
and printer name should be this “\\”, instead of this ”//”.
I typed in the server name and printer name correctly and successfully
Q4.
installed the network printer. But I can't print a test page.
Make sure that the printer is online by turning the printer on. Make sure the
A4.
power adapter of your printer is properly connected to a power outlet.
I successfully added a network printer to my computer, and my printer is
Q5.
receiving power. I can also print a test page, but I cannot print anything from
Microsoft Word or other applications.
Make sure to set the newly installed network printer to your default printer.
A5.
I configured my print server to automatically receive an IP Address from a
Q6.
DHCP server, and now I cannot go into the print server's web utility.
Open PS-Utility to locate your Print Server's IP address. For MAC users,
A6.
press the Reset button at the back of the TEW-P21G, hold the button for 15
seconds, release the button, and enter http://192.168.0.1 in a web browser to
access the web utility feature.
7

I pressed the reset button and held it for 15 seconds. I also typed in
Q7.
http://192.168.0.1 in a web browser, but I still cannot access my print server.
Make sure to change your IP Address to 192.168.0.xxx where xxx is an
A7.
available number between 2 to 254.
I configured my Wireless Print Server to have the same SSID as my Access
Q8.
Point, but I still cannot print from my Wireless Print Server.
Your Access Point or Wireless Router may have enabled its wireless security.
A8.
You can either disable wireless security or configure the Print Server's
wireless security feature. Make sure that the encryption method and
password for your Wireless Printer is the SAME as your Access Point or
Wireless Router. Also make sure that the format (HEX or ASCII) and the bit
encryption (64-bit, 128bit, etc.) is the same.
If you have any questions regarding the TEW-P21G, please contact TRENDnet
Technical Support Department.
Certifications
This equipment has been tested and found to comply with FCC and CE Rules.
Operation is subject to the following two conditions:
(1) This device may not cause harmful interference.
(2) This device must accept any interference received.
Including interference that may cause undesired operation.
Waste electrical and electronic products
must not be disposed of with household
waste. Please recycle where facilities
exist. Check with you Local Authority or
Retailer for recycling advice.
NOTE: THE MANUFACTURER IS NOT RESPONSIBLE FOR ANY RADIO OR TV
INTERFERENCE CAUSED BY UNAUTHORIZED MODIFICATIONS TO THIS
EQUIPMENT. SUCH MODIFICATIONS COULD VOID THE USER’S AUTHORITY TO
OPERATE THE EQUIPMENT.
8

TRENDnet Technical Support
US/Canada Support Center European Support Center
Contact
Telephone: 1(866) 845-3673
Email: support@trendnet.com
Tech Support Hours
24/7 Toll Free Tech Support
Contact
Telephone:
Deutsch : +49 (0) 6331 / 268-460
Français : +49 (0) 6331 / 268-461
Español : +49 (0) 6331 / 268-462
English : +49 (0) 6331 / 268-463
Italiano : +49 (0) 6331 / 268-464
Dutch : +49 (0) 6331 / 268-465
Fax: +49 (0) 6331 / 268-466
0800-90-71-61 (numéro vert)
Tech Support Hours
8:00am - 6:00pm
Middle European Time
Monday - Friday
Product Warranty Registration
Please take a moment to register your product online.
Go to TRENDnet’s website at http://www.trendnet.com
3135 Kashiwa Street
Torrance, CA 90505
USA
Copyright ©2005. All Rights Reserved. TRENDnet.
 Loading...