

Page 1
Quick Installation Guide
TEW-P1UG
Page 2

Table of Contents
Table of Contents
English ......................................................................................................
1. Before You Start
2. How to Install .....................................................................................
3. Configure the Print Server .................................................................
4. Add the Network Printer to your PC ...................................................
Troubleshooting ........................................................................................
.................................................................................
1
1
2
3
6
8
Version 05.22.06
Page 3
1. Что нужно сделать в самом начале
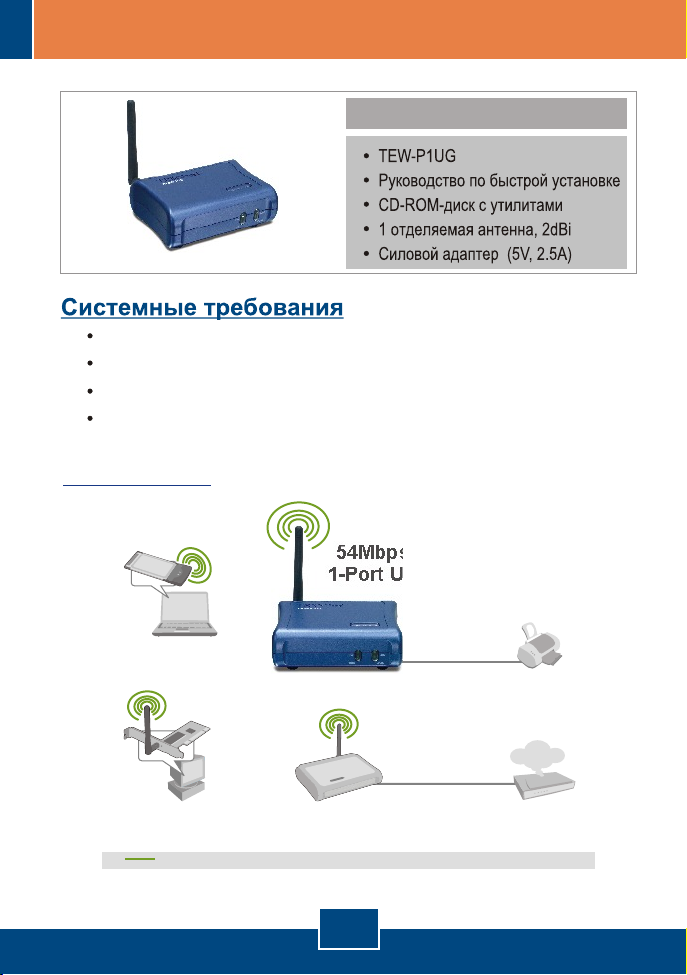
Содержимое упаковки
CD-ROM-привод
ЦП: Intel Pentium 100 МГц или более
Память: МБ или более
Windows 2003/XP/2000/ME/98SE, Unixware, Linux, Mac OS X
Применение
8
54Mbps 802.11g Wireless
1-Port USB 2.0 Print Server
(TEW-P1UG)
Notebook with
Wireless PC Card
(TEW-421PC)
Workstation with
Wireless PCI Adapter
(TEW-423PI)
54Mbps Wireless
54Mbps 802.11g
Wireless Firewall Router
(TEW-432BRP)
1
Русский
USB Printer
Internet
Cable/DSL Modem
Page 4
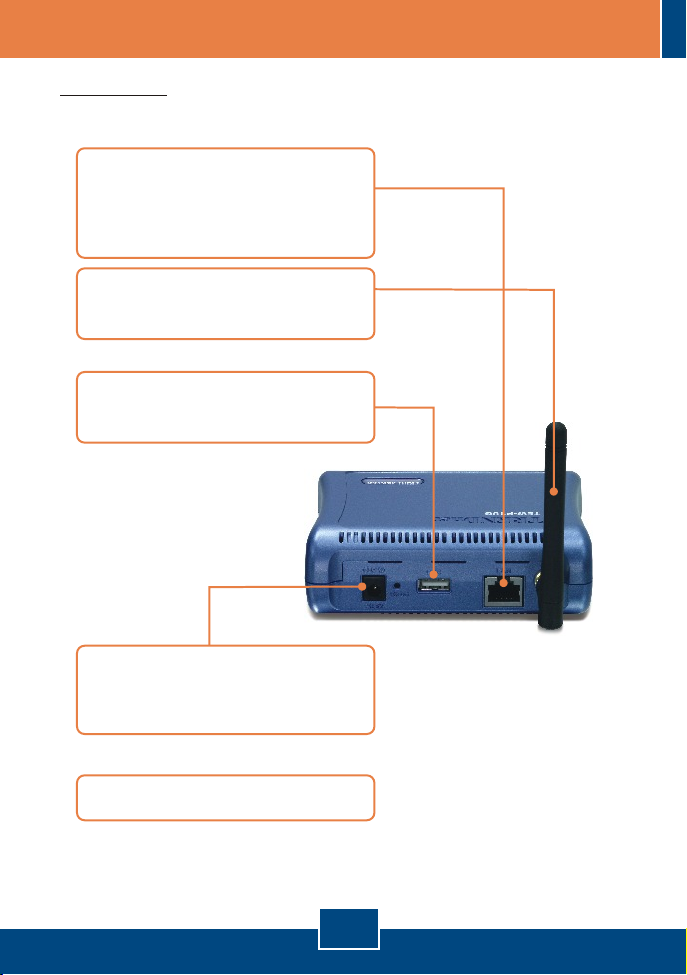
2. Порядок установки
Примечание: Отключите питание всех принтеров перед их подключением
к серверу печати.
1.
Присоедините сетевой кабель
RJ-45 от коммутатора/
маршрутизатора к порту LAN
сервера печати.
2. Присоедините отделяемую
антенну.
3. Присоедините USB-принтер к
USB-порту сервера печати.
4. Подключите адаптер питания ê
серверу печати и затем к сетевой
розетке.
5. Включите питание компьютера.
2
Русский
Page 5

3. Настройте конфигурацию сервера печати
Примечание: Сервер печати управляется служебной программой сервера
печати или с помощью веб-браузера. Пользователи MAC должны
изменить IP-адрес своих компьютеров на 192.168.0.X (где X – имеющееся
число от 2 до 254). Поскольку у принт-сервера IP-адрес по умолчанию -
192.168.0.1, нужно убедиться в том, что он не присвоен другим сетевым
устройствам. Затем введите в веб-браузере http://192.168.0.1, чтобы
получить доступ к служебной программе сервера печати через Интернет.
Пользователям Windows
1. Установите CD-ROM-диск ñî
служебной программой â
дисковод CD-ROM компьютера и
выберите Install Utility.
2. Следуйте указаниям Мастера
InstallShield.
3. Выберите Пуск Все программы
PS-Utility, затем щелкните по PS-
Utility.
3
Русский
Page 6

Щелкните по серверу печати и
4.
затем по кнопке изменения IPадреса (Change IP Address).
Вручную задайте IP-адрес
сервера печати и щелкните по
кнопке ÎÊ.
Примечание: IP-адрес должен
совпадать с тем же сегментом
сети, что и у вашего компьютера.
5. Щелкните по кнопке OK.
6. Щелчком выберите Show Web
Setup.
7. Найдите и запишите для себя
имена: Server Name è Printer
Name.
4
Русский
Page 7

8. Выберите Configuration, затем
Wireless. Выберите нужный
идентификатор SSID и щелкните
по кнопке Save.
Настройка конфигурации сервера печати завершена.
5
Русский
Page 8
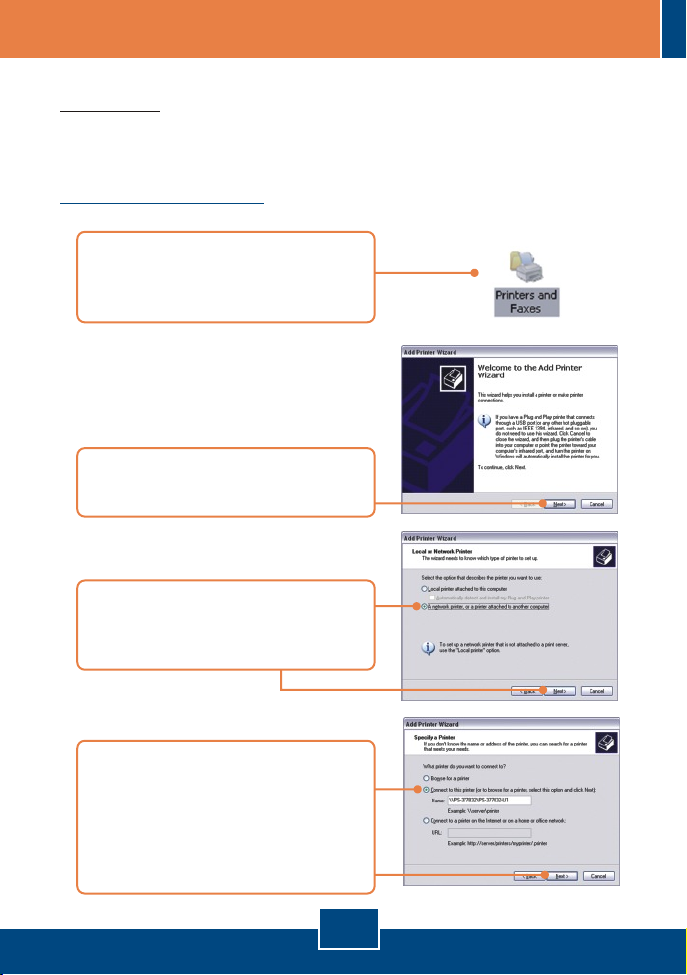
4. Добавление в компьютер сетевого принтера
Примечание: Для получения указаний по TCP/IP-печати воспользуйтесь
руководством пользователя на CD-ROM-диске со служебной программой
из комплекта.
Windows 2000/XP
1.
Перейдите к Панели
управления и двойным щелчком
выберите Принтеры и факсы.
2. Выберите Добавить принтер è
щелкните по кнопке Далее.
3. Выберите Network Printer и
щелкните по кнопке Далее
(Next).
4. Выберите Подключиться к
этому принтеру и введите имя
сервера и имя принтера в
следующем формате:
\\server_name\printer_name
Щелкните по кнопке Далее.
6
Русский
Page 9

5. Щелкните по кнопке OK.
Выберите соответствующий
6.
драйвер для принтера и
щелкните по кнопке OK.
7. Выберите Äà и щелкните по
кнопке Далее.
8. Щелкните по кнопке Завершить
(Finish).
9.
Повторяйте этапы с 1 по 8 для
добавления принтера на других
ПК.
Процедура добавления сетевого принтера завершена.
Подробнее о конфигурации устройства TEW-P1UG и дополнительных
настройках можно узнать в руководстве пользователя на диске CD-ROM
со служебными программами из комплекта или на сайте компании
TRENDnet по адресу www.trendnet.com
7
Русский
Page 10
Troubleshooting
I correctly typed in the print server name and printer name, but I still cannot add a network
Q1.
printer. What should I do?
Q2.
name are correct, but I still cannot find the network printer. What should I do?
Q3.
print anything from Microsoft Word or other applications.
Q4.
now I cannot go into the print server's web utility.
Q5.
not print through the Print Server.
If you still encounter problems or have any questions regarding the TEW-P1UG, please refer to the User’s
Guide included on the Utility CD-ROM or contact TRENDnet’s Technical Support Department.
Double check your hardware connections; make sure that the print server and printer are
A1.
powered ON and are properly connected. Also verify that the spelling of the server name and
printer name are correct.
I verified that the hardware installation is correct and that the print server name and printer
Make sure that the print server name and printer name are entered correctly. There should be
A2.
no spaces, and the back slashes that separate the print server name and printer name should be
this, \\, instead of this, //.
I successfully added a network printer to my computer and I can print a test page, but I cannot
Make sure to set the newly installed network printer as your default printer. Click Start and
A3.
then click Printers & Faxes, verify that your printer icon has a check on it.
I configured my print server to automatically receive an IP Address from a DHCP server, and
Open PS-Utility v3.00 (See 3. Configure the Print Server) to locate your print server's IP
A4.
Address. For Mac users, press the Reset button at the back of the TEW-P1UG, hold the button for
15 seconds, release the button, and enter in a web browser to access the web
utility features.
After I successfully configured the TEW-P1UG to match my wireless network settings, I can
First, verify that the wireless settings match your wireless network settings. Second, verify that
A5.
the antenna is attached to the Print Server and the WLAN LED on the Print Server is lit.
Certifications
This equipment has been tested and found to comply with FCC and CE Rules. Operation is subject to the
following two conditions:
(1) This device may not cause harmful interference.
(2) This device must accept any interference received.
Including interference that may cause undesired operation.
http://192.168.0.1
Waste electrical and electronic products
must not be disposed of with household
waste. Please recycle where facilities
exist. Check with you Local Authority or
Retailer for recycling advice.
NOTE: THE MANUFACTURER IS NOT RESPONSIBLE FOR ANY RADIO OR TV
INTERFERENCE CAUSED BY UNAUTHORIZED MODIFICATIONS TO THIS
EQUIPMENT. SUCH MODIFICATIONS COULD VOID THE USER’S AUTHORITY TO
OPERATE THE EQUIPMENT.
8
Page 11

TRENDnet Technical Support
.
US Canada
Toll Free Telephone: 1(866) 845-3673
24/7 Tech Support
Europe (Germany France Italy Spain Switzerland UK)
Toll Free Telephone: +00800 60 76 76 67
English/Espanol - 24/7
Francais/Deutsch - 11am-8pm, Monday - Friday MET
. . . . .
Worldwide
Telephone: +(31) (0) 20 504 05 35
English/Espanol - 24/7
Francais/Deutsch - 11am-8pm, Monday - Friday MET
Product Warranty Registration
Please take a moment to register your product online.
Go to TRENDnet’s website at http://www.trendnet.com
3135 Kashiwa Street
Torrance, CA 90505
USA
Copyright ©2006. All Rights Reserved. TRENDnet.
 Loading...