

Page 1
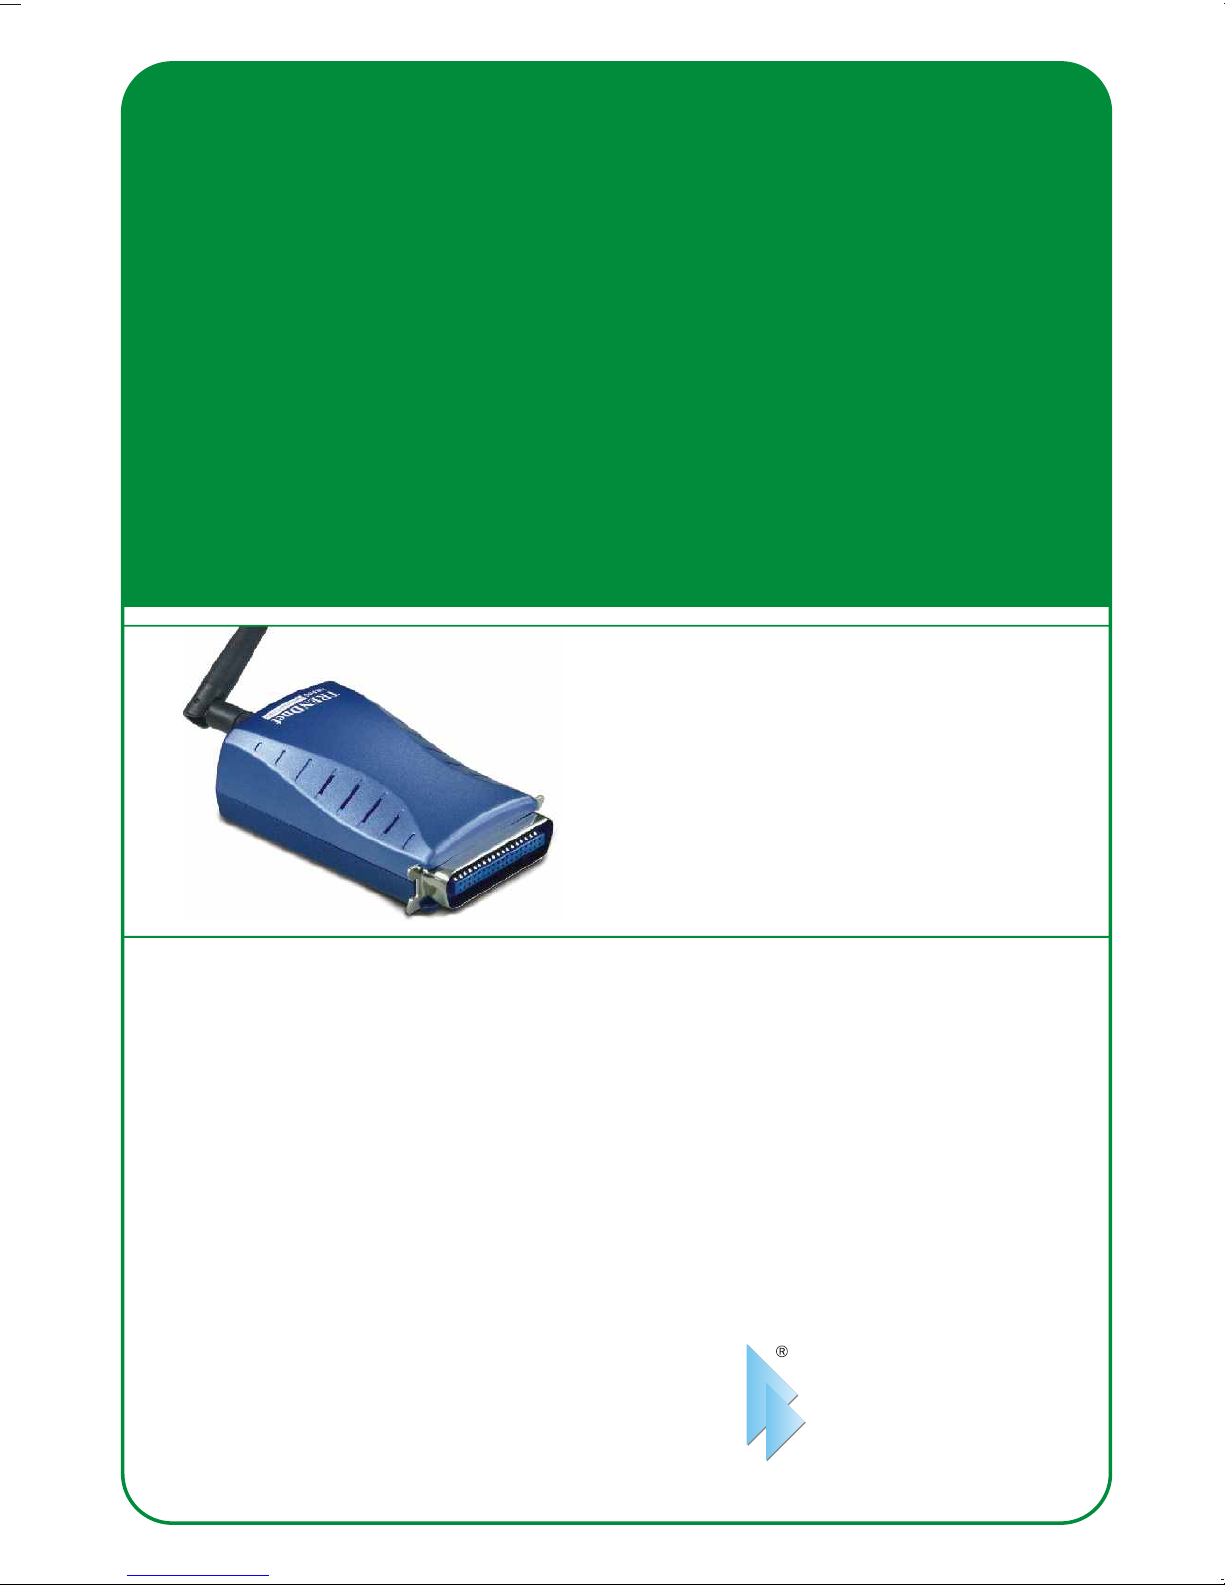
TEW-P1PG
1 port Parallel Wireless G Print Server
Quick Installation Guide
Guide d'installation rapide du
serveur d'impression G sans fil à 1 port parallèle
Wireless-G-Druckserver mit 1 Parallelport
Kurzanleitung zur Installation
Guía de instalación rápida del
servidor de impresora inalámbrico G con un puerto paralelo
Version 12.14.04
Copyright ©2004. All Rights Reserved. TRENDware International, Inc.
TRENDnet
TRENDware, USA
What's Next in Networking
Page 2

Table of Contents
English ......................................................................................................
1. Prepare for Installation ......................................................................
2. Product Detail .....................................................................................
3. Hardware Installation ........................................................................
4. Configure the Print Server ................................................................
5. Add the Network Printer to your PC ..................................................
6. Configure the Print Server’s Wireless ...............................................
Troubleshooting ........................................................................................
1
1
2
3
4
8
11
12
Page 3
English QIG
1. Prepare for Installation
Thank you for purchasing TRENDnet's TEW-P1PG 1 port Parallel Wireless G
Print Server.
This guide will help you set up your Wireless G Print Server. Following the
installations should be quick and easy. If you run into problems, please refer to
the Troubleshooting section. If you need further technical support, please visit
www.TRENDNET.com or call technical support by phone.
Verify Package Contents
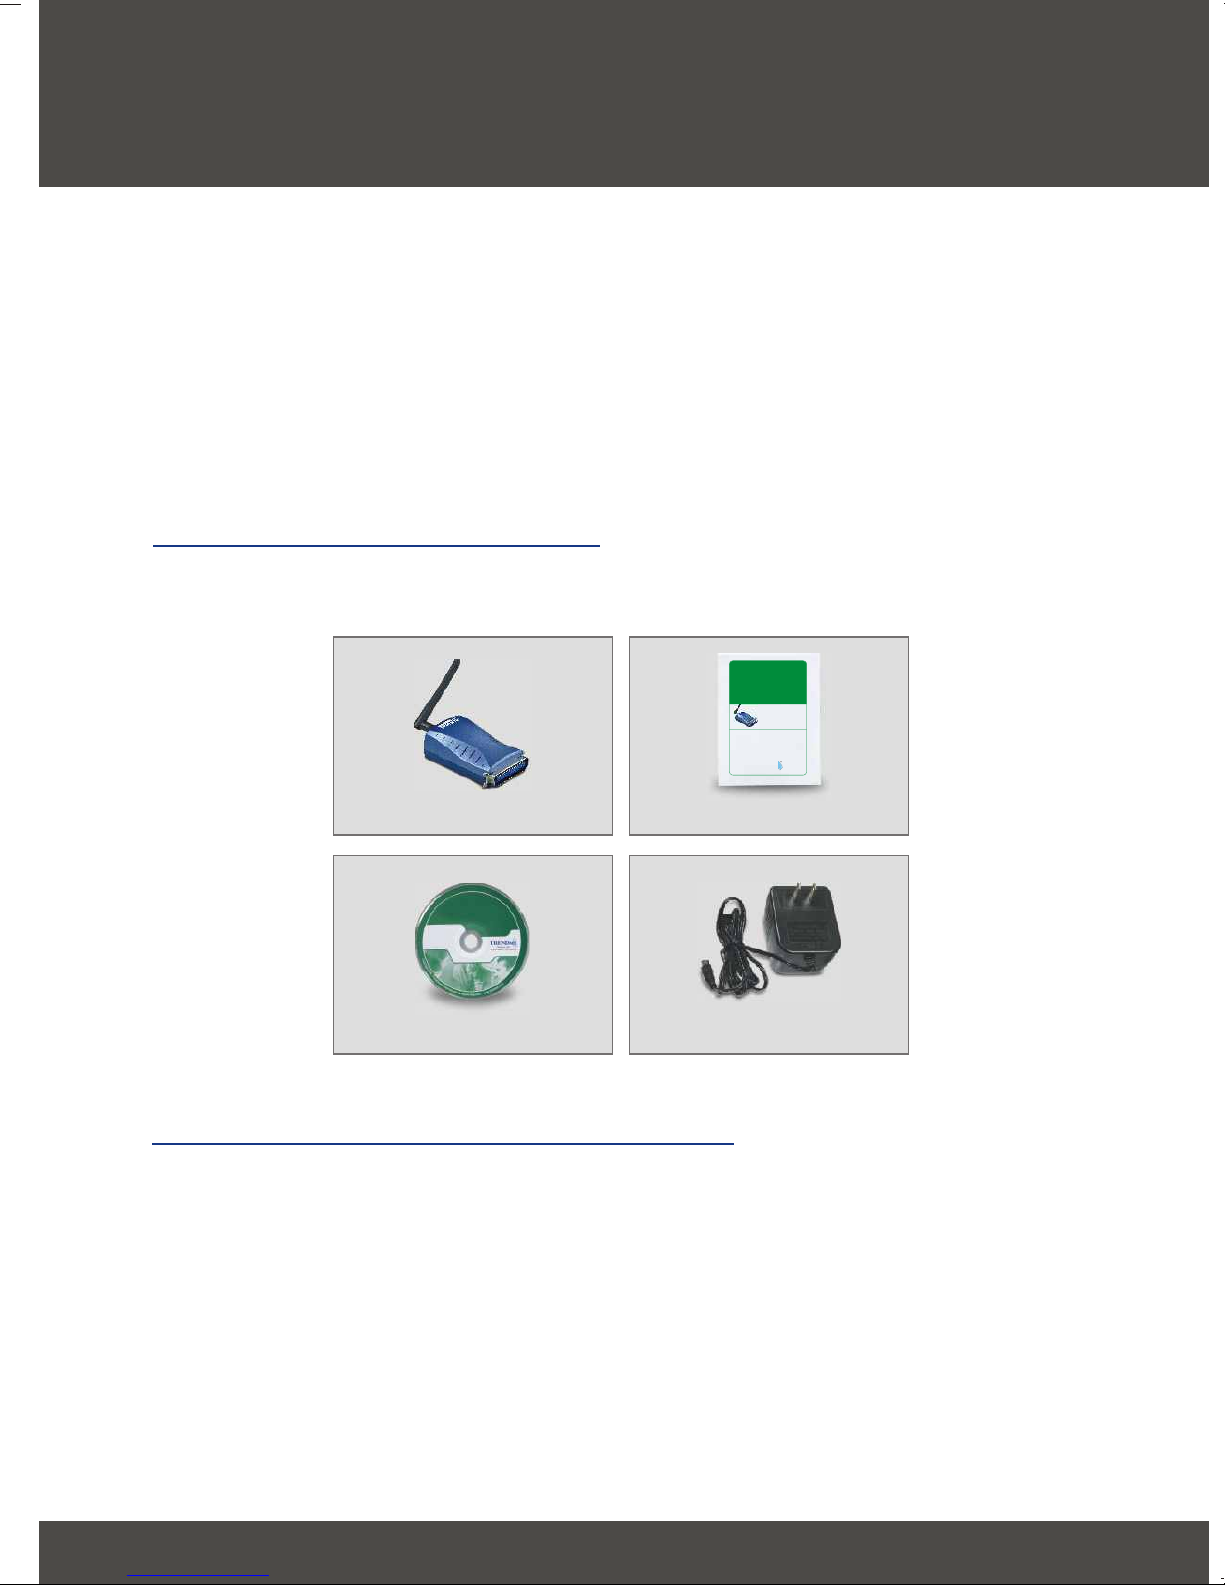
Please make sure you have everything in the box:
TEW-P1PG
Driver CD-ROM
Quick Installation Guide
Power Adapter (5 V, 2.5A)
Minimum System Requirements
1. Pentium 100Mhz or faster processor
2. 8MB RAM or more
TEW-P1PG
1 port Parallel Wireless G Print Server
Quick Installation Guide
Guide d'installation rapide du
serveur d'impression G sans fil à 1 port parallèle
Wireless-G-Druckserver mit 1 Parallelport
Kurzanleitung zur Installation
Guía de instalación rápida del
servidor de impresora inalámbrico G con un puerto paralelo
Version 12.14.04
TRENDnet
TRENDware, USA
What's Next in Networking
Copyright ©2004. All Rights Reserved. TRENDware International, Inc.
3. Windows 95/98/NT/ME/2000/XP/2003, HP-UX, Sun O.S, Solaris, SCO Unix,
AIX, Unixware, Linux, Mac O.S.
1
English
Page 4
2. Product Detail
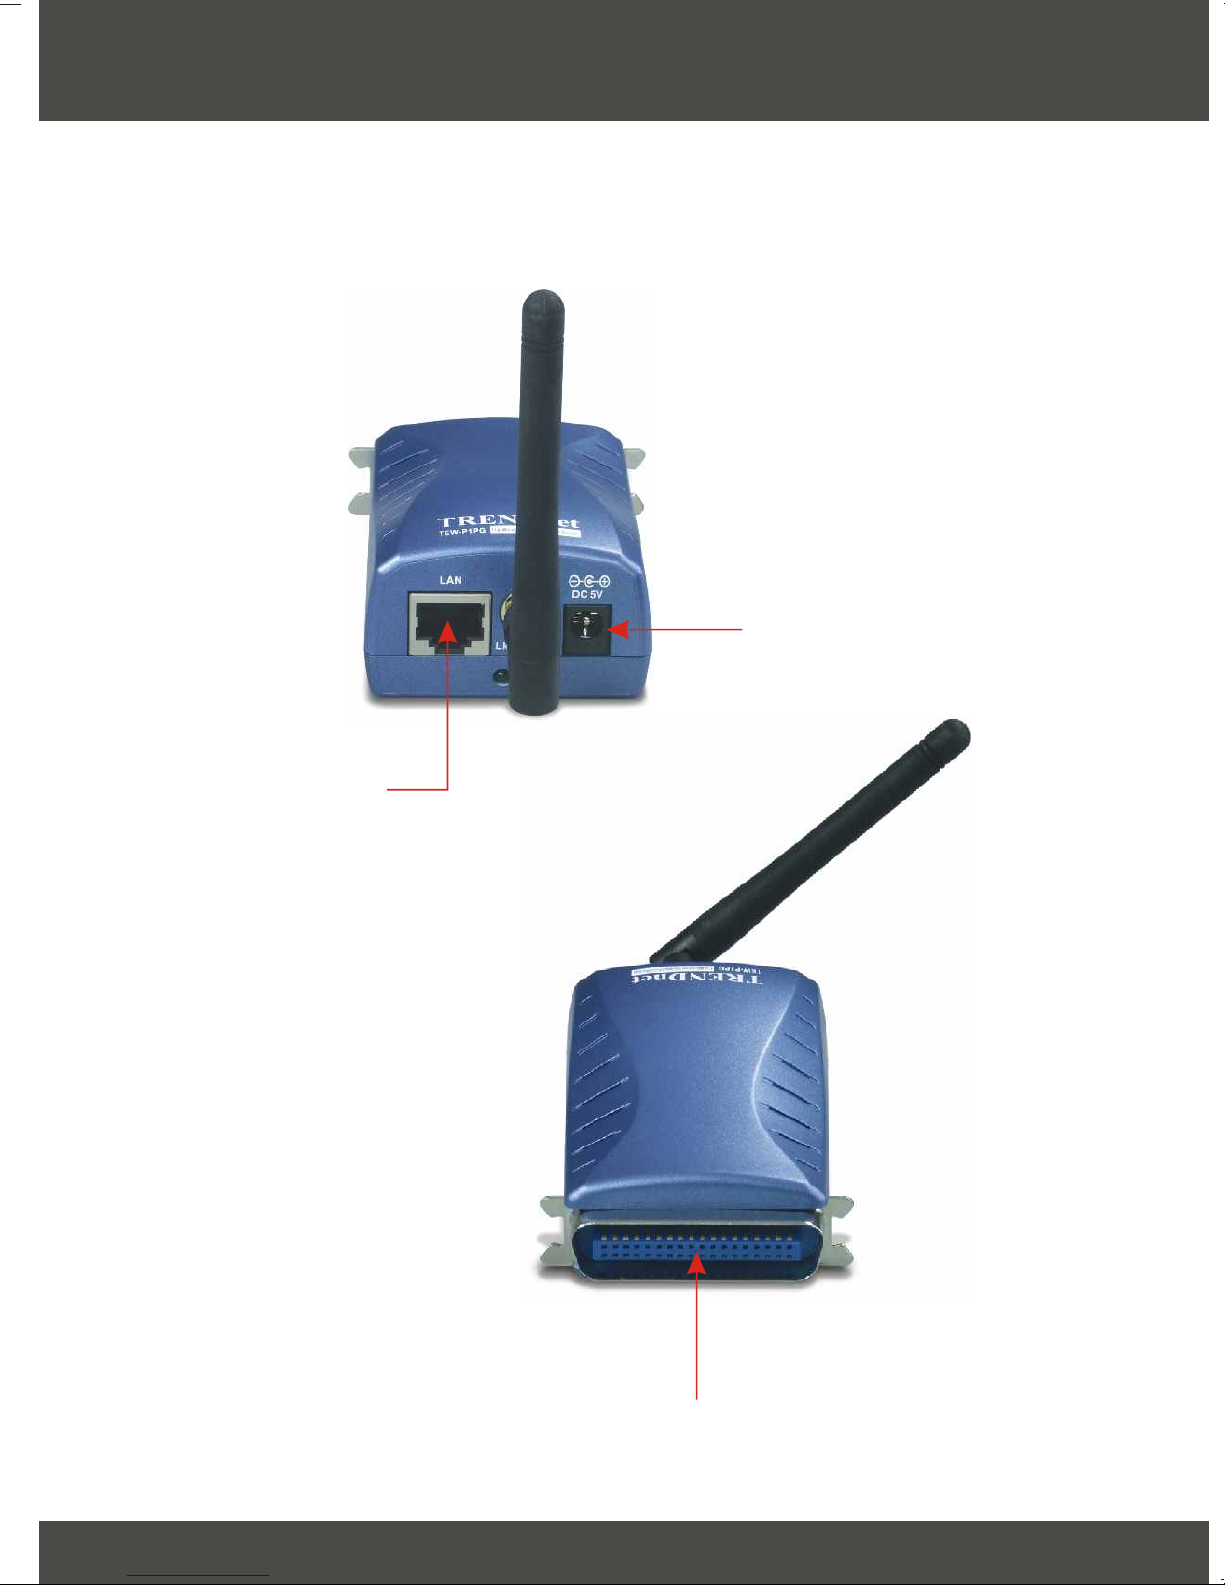
The Wireless G Print Server has a RJ-45 connector, and one parallel port. It
also has three LEDS that indicate power, network activity, and printer activity.
Power Adapter Connector
RJ-45 Connector
Parallel Port
2
English
Page 5
3. Hardware Installation
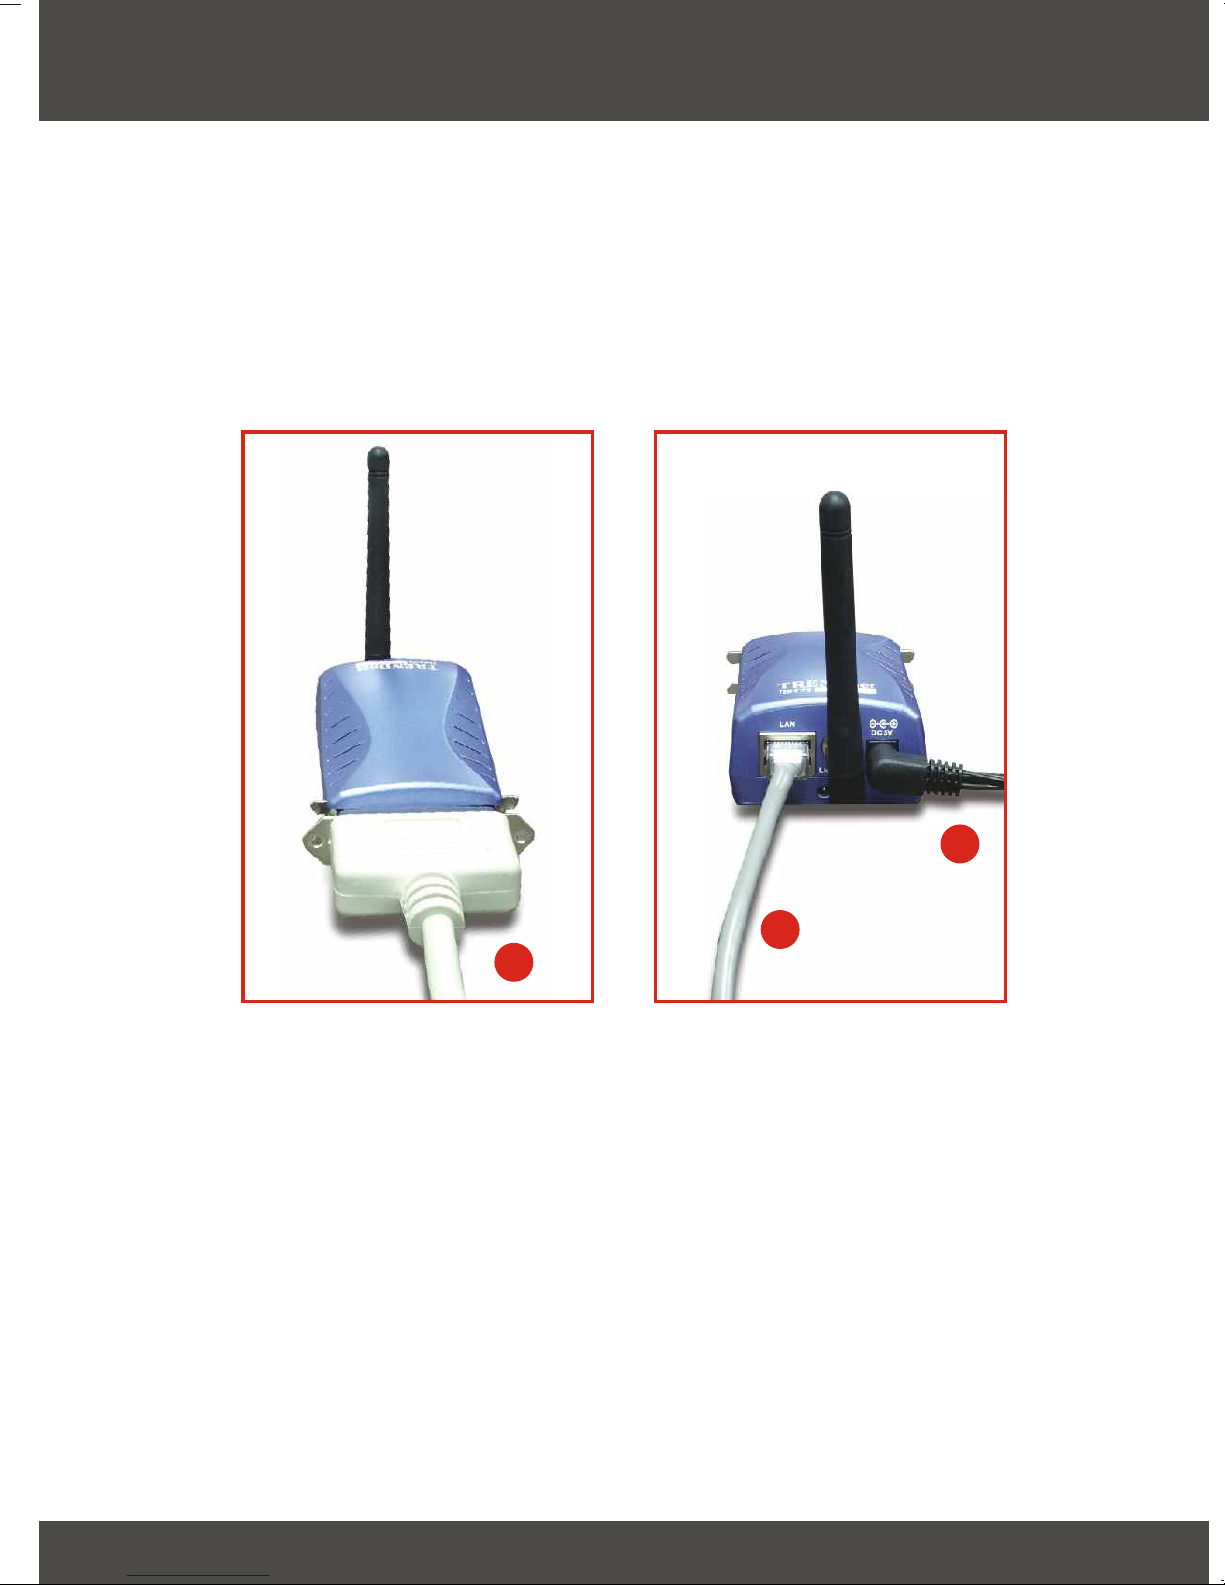
1. Power off the Print Server and Printers.
2. Connect the Print Server's printer port to the printers.
3. Connect the RJ45 cable to the LAN port and to your network hub or switch.
4. Plug the AC power adapter into the power connector on the back of the Print
Server.
5. Power on the printer.
2
Your installation is now complete.
4
3
3
English
Page 6
4. Configure the Print Server
Note: For MAC Users, change your computers IP address to
192.168.0.X (where X is an available number from 1-253), and enter
192.168.0.1 in your web browser to access the Print Server's Web
Utility.
For Windows Users
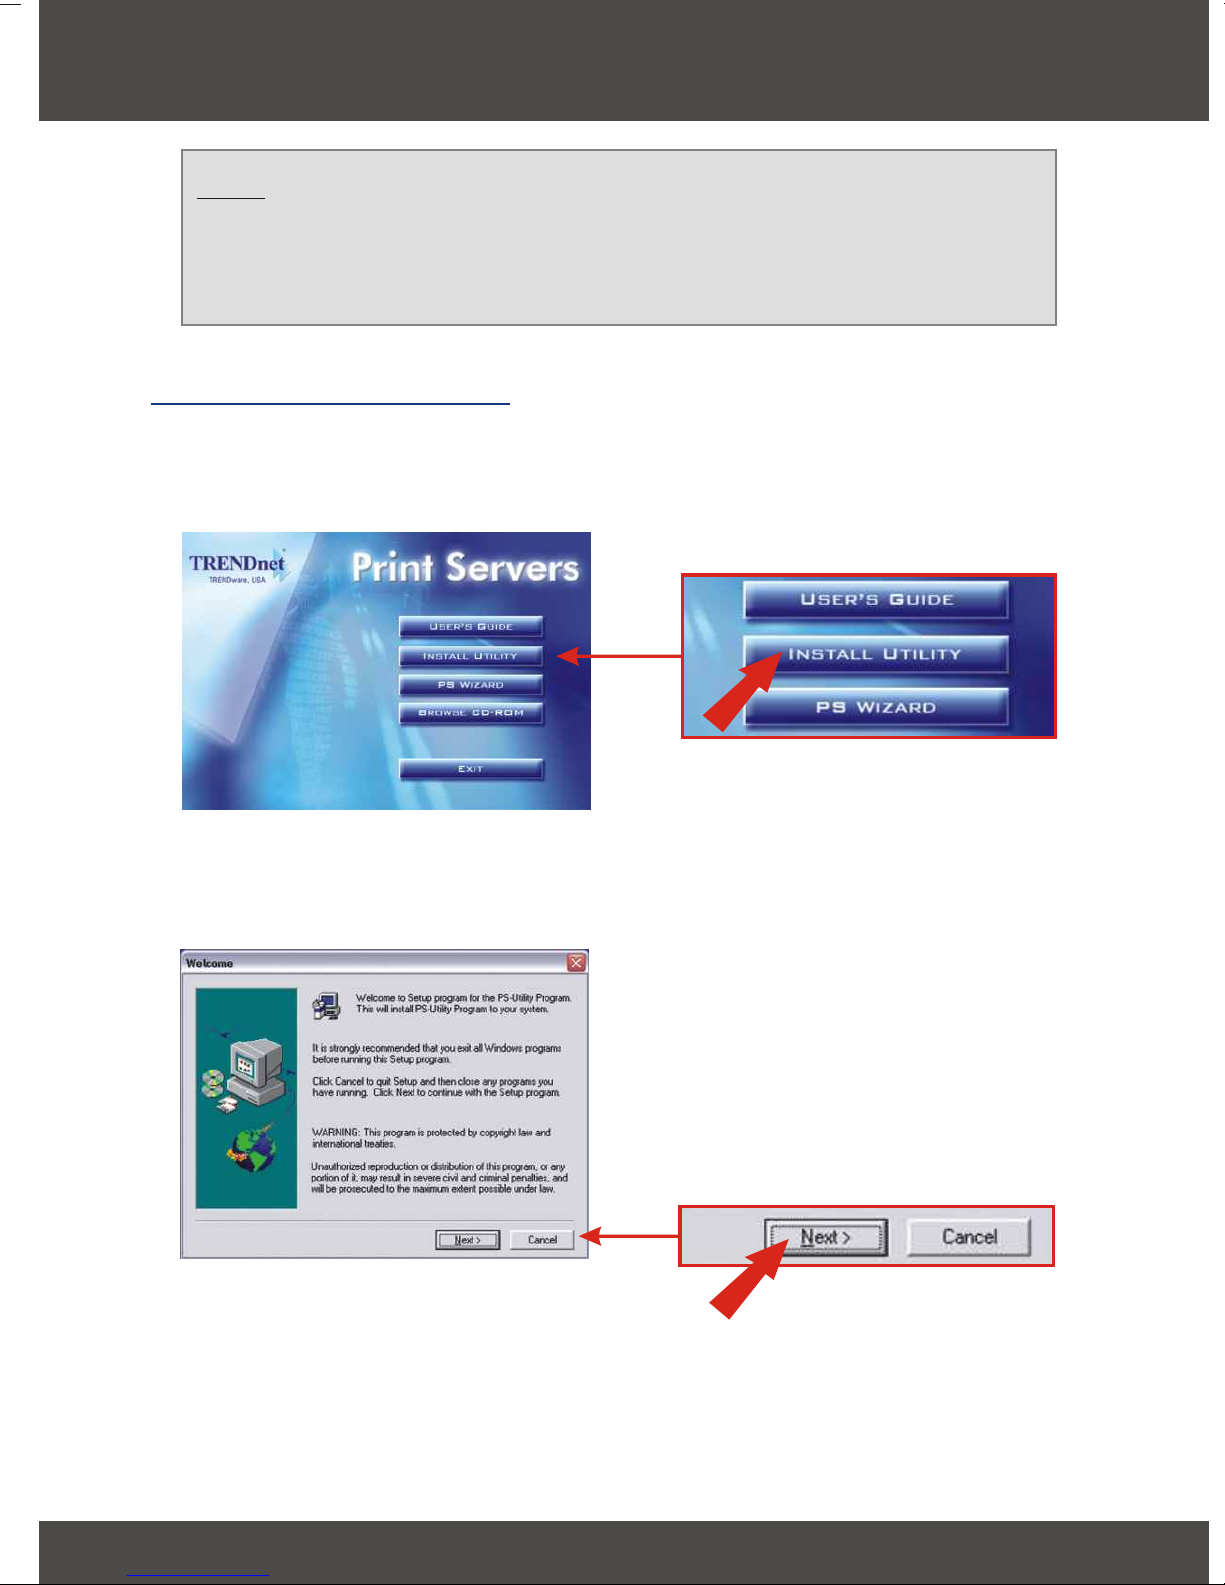
1. Insert the TEW-P21G CD-ROM into your computer's CD-ROM drive.
2. Click Install Utility.
3. Click Next.
4
English
Page 7
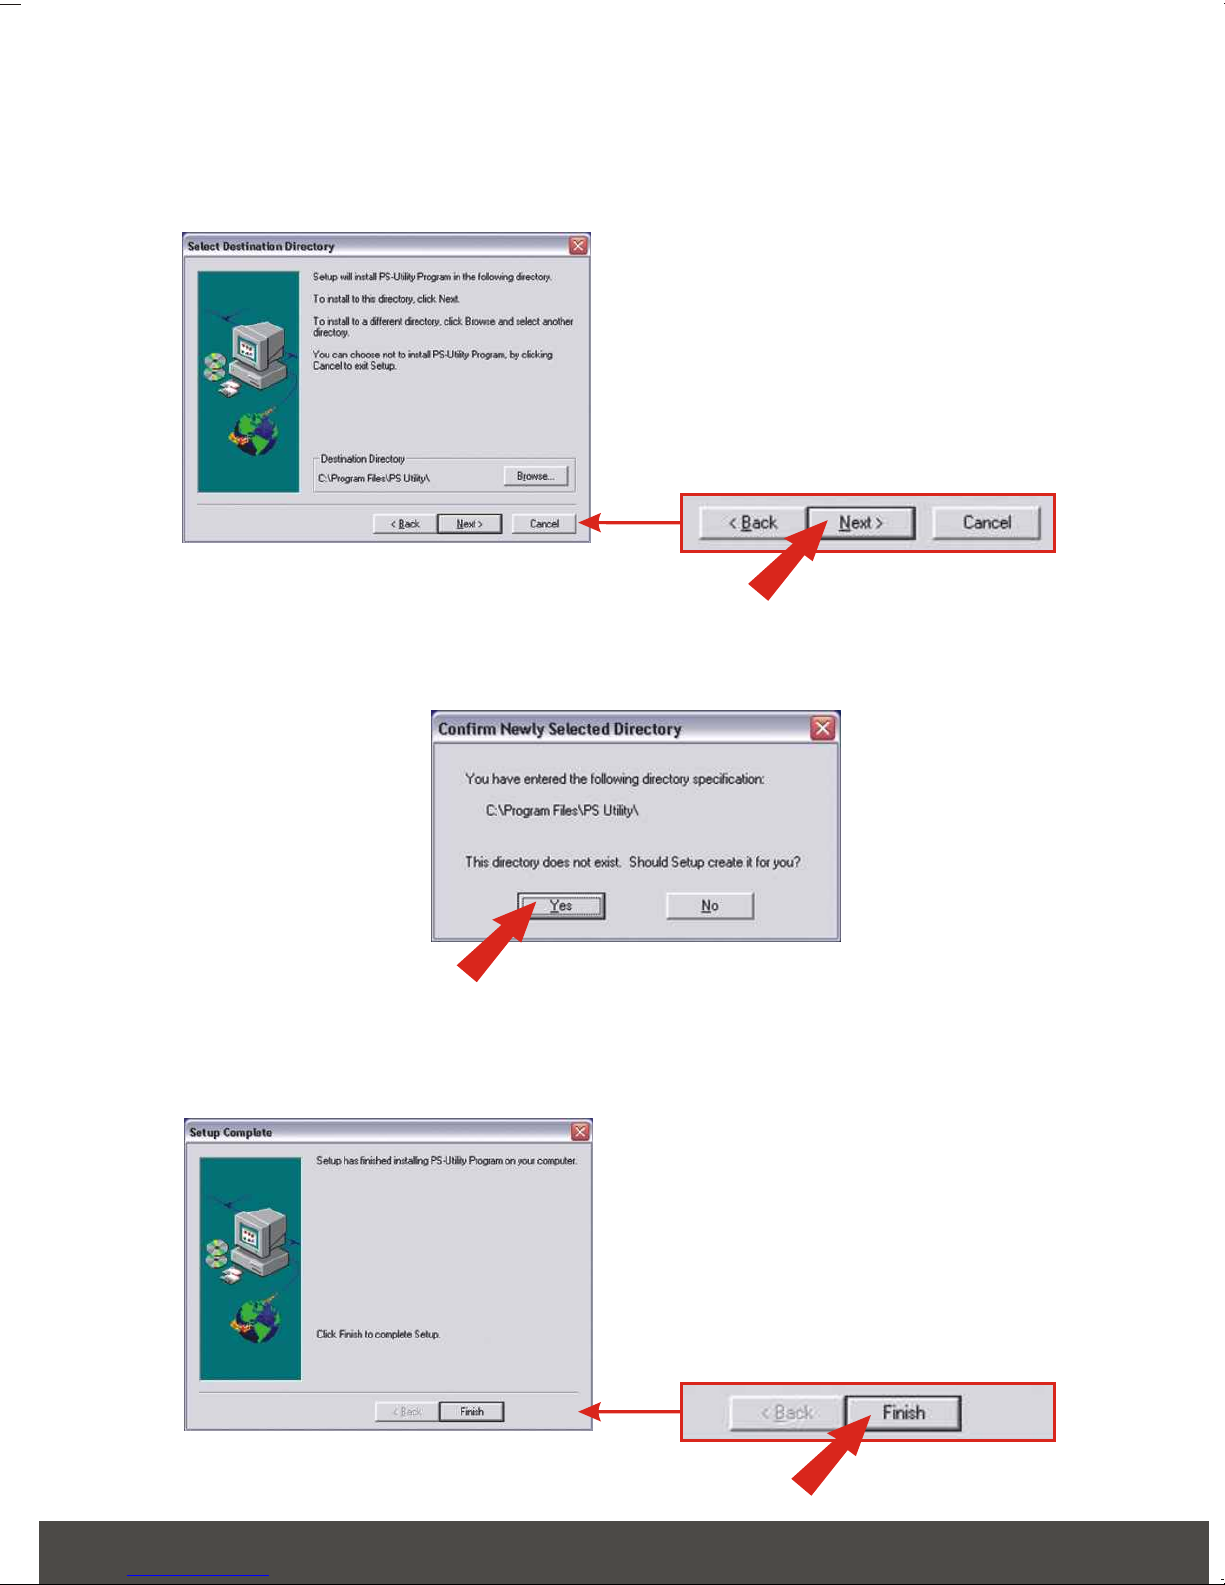
4. Click Next.
5. Click Yes.
6. Click Finish.
5
English
Page 8
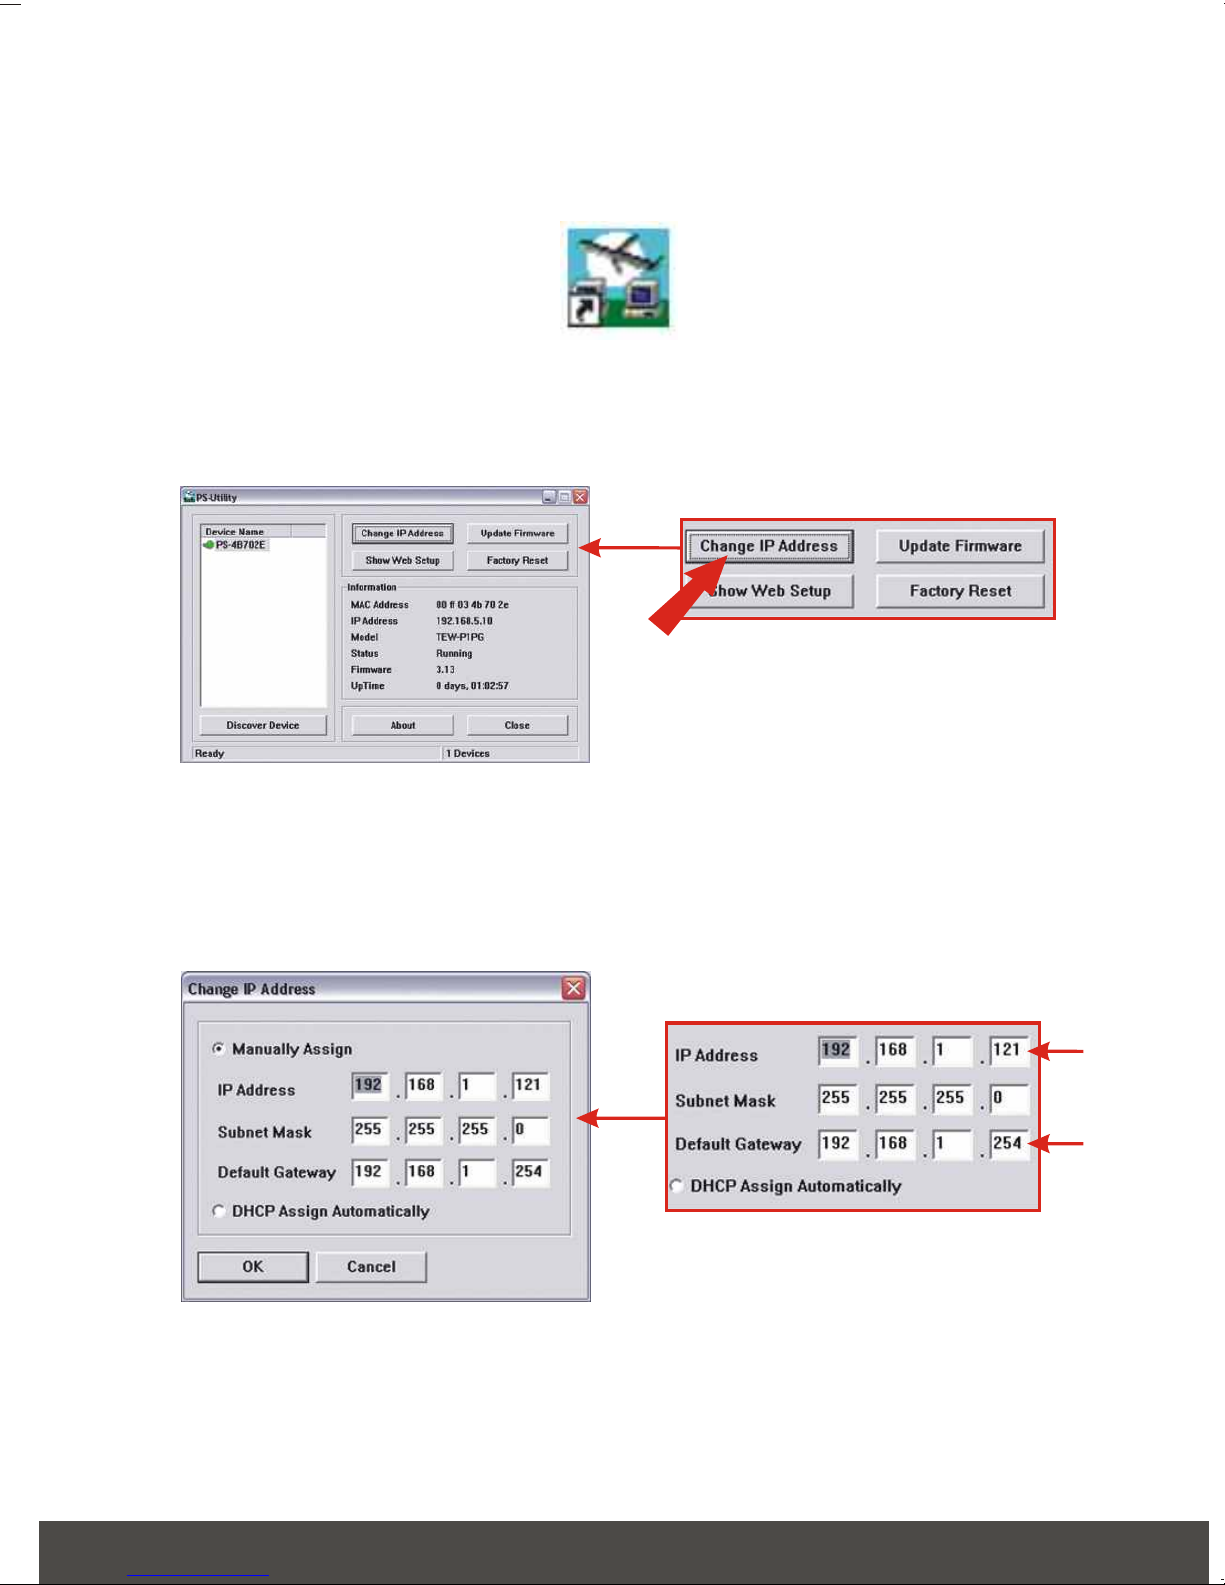
7. Double-click PS-Utility icon.
8. Click Change IP Address.
9. Type in the IP address that applies to your LAN. Type in the Default
Gateway (i.e. your router's local IP address).
6
English
Page 9
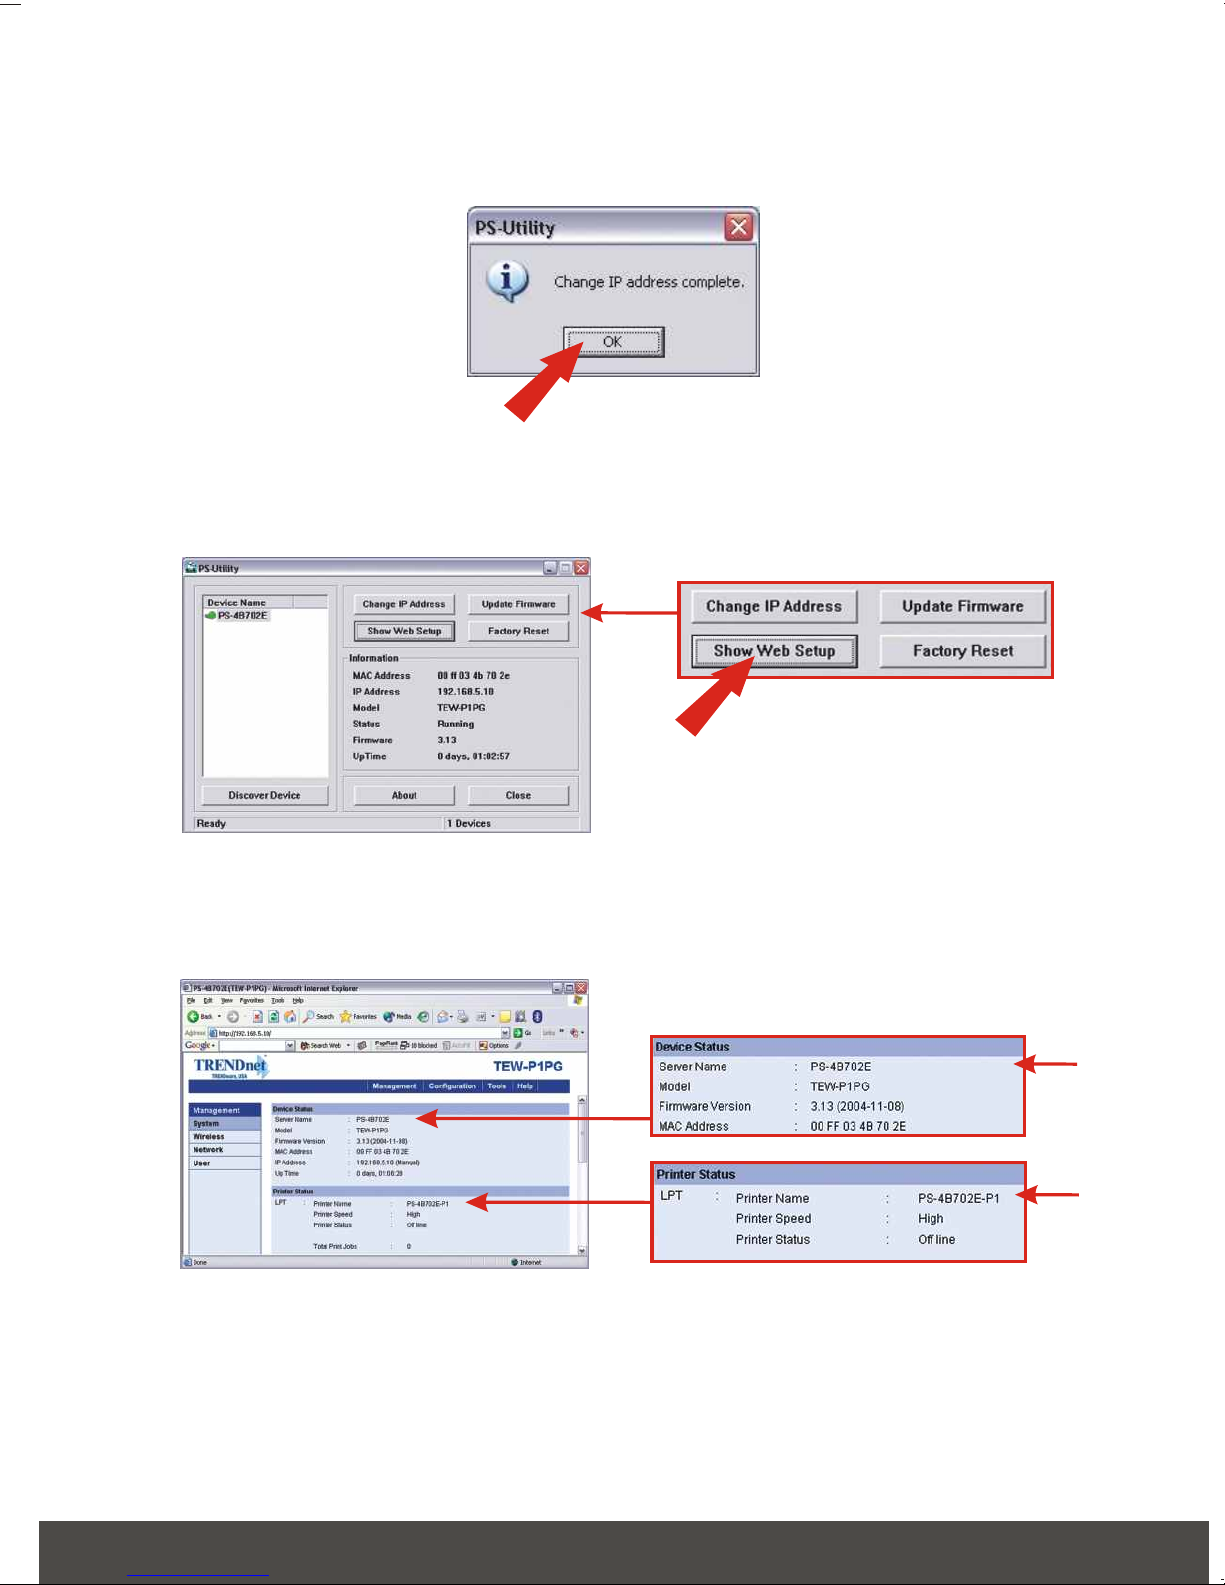
10. Click OK.
11. Click Show Web Setup.
12. Please take note and write down the Server Name and the Printer Name.
Wireless Print Server's configuration is now complete. For detail information,
please check the User's Guide that's included on the CD-ROM.
7
English
Page 10
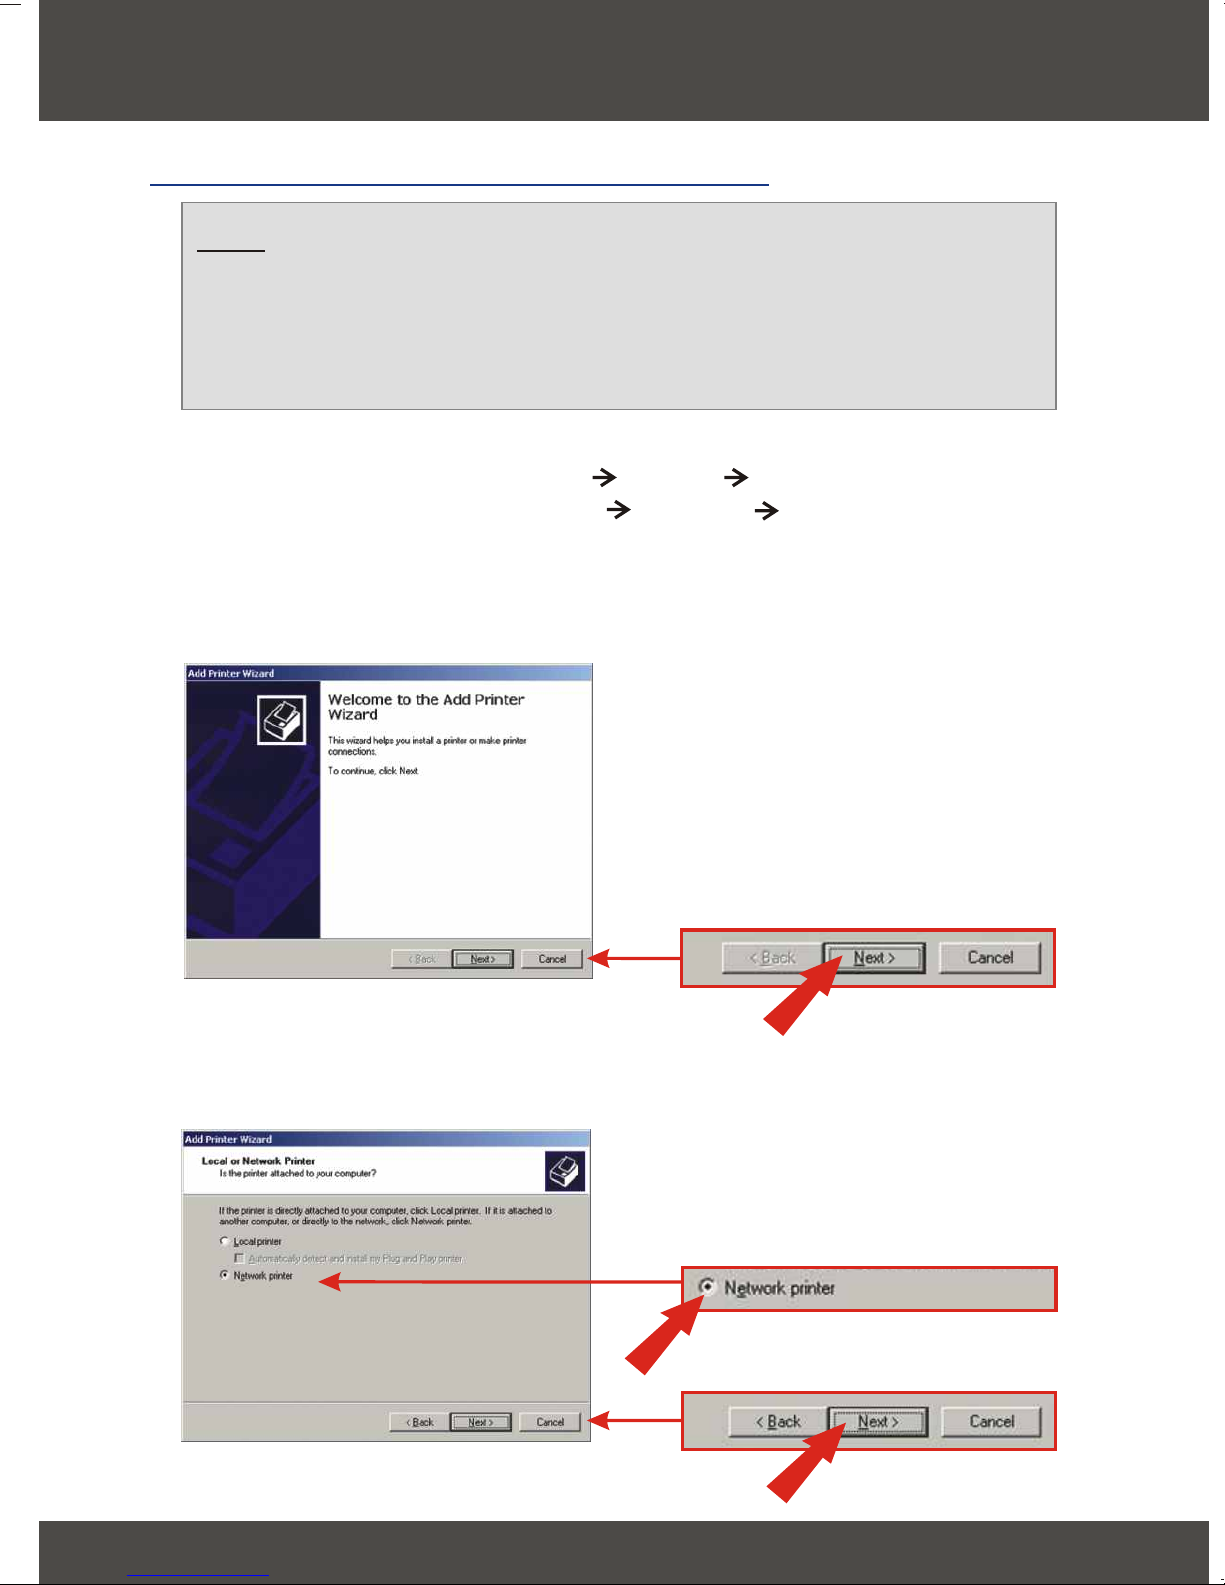
5. Add the Network Printer to your PC
For Windows 95/98/ME/2000/XP
Note: If you are using Windows 95/98/ME, then make sure that
NETBEUI is installed before you follow the instructions below. If you are
using Windows 2000/XP, then you can simply add your printer using the
instructions below. For TCP/IP Printing instructions, please consult the
User’s Guide on the CD-ROM for details.
1. For Windows 2000/XP, Click Start Control Panel.
For Windows 95/98/ME, Click Start Settings Control Panel.
2. Double-Click the Printers and Faxes Icon.
3. Click or Double-Click Add Printer.
4. Click Next.
5. Select Network Printer option and click Next.
8
English
Page 11
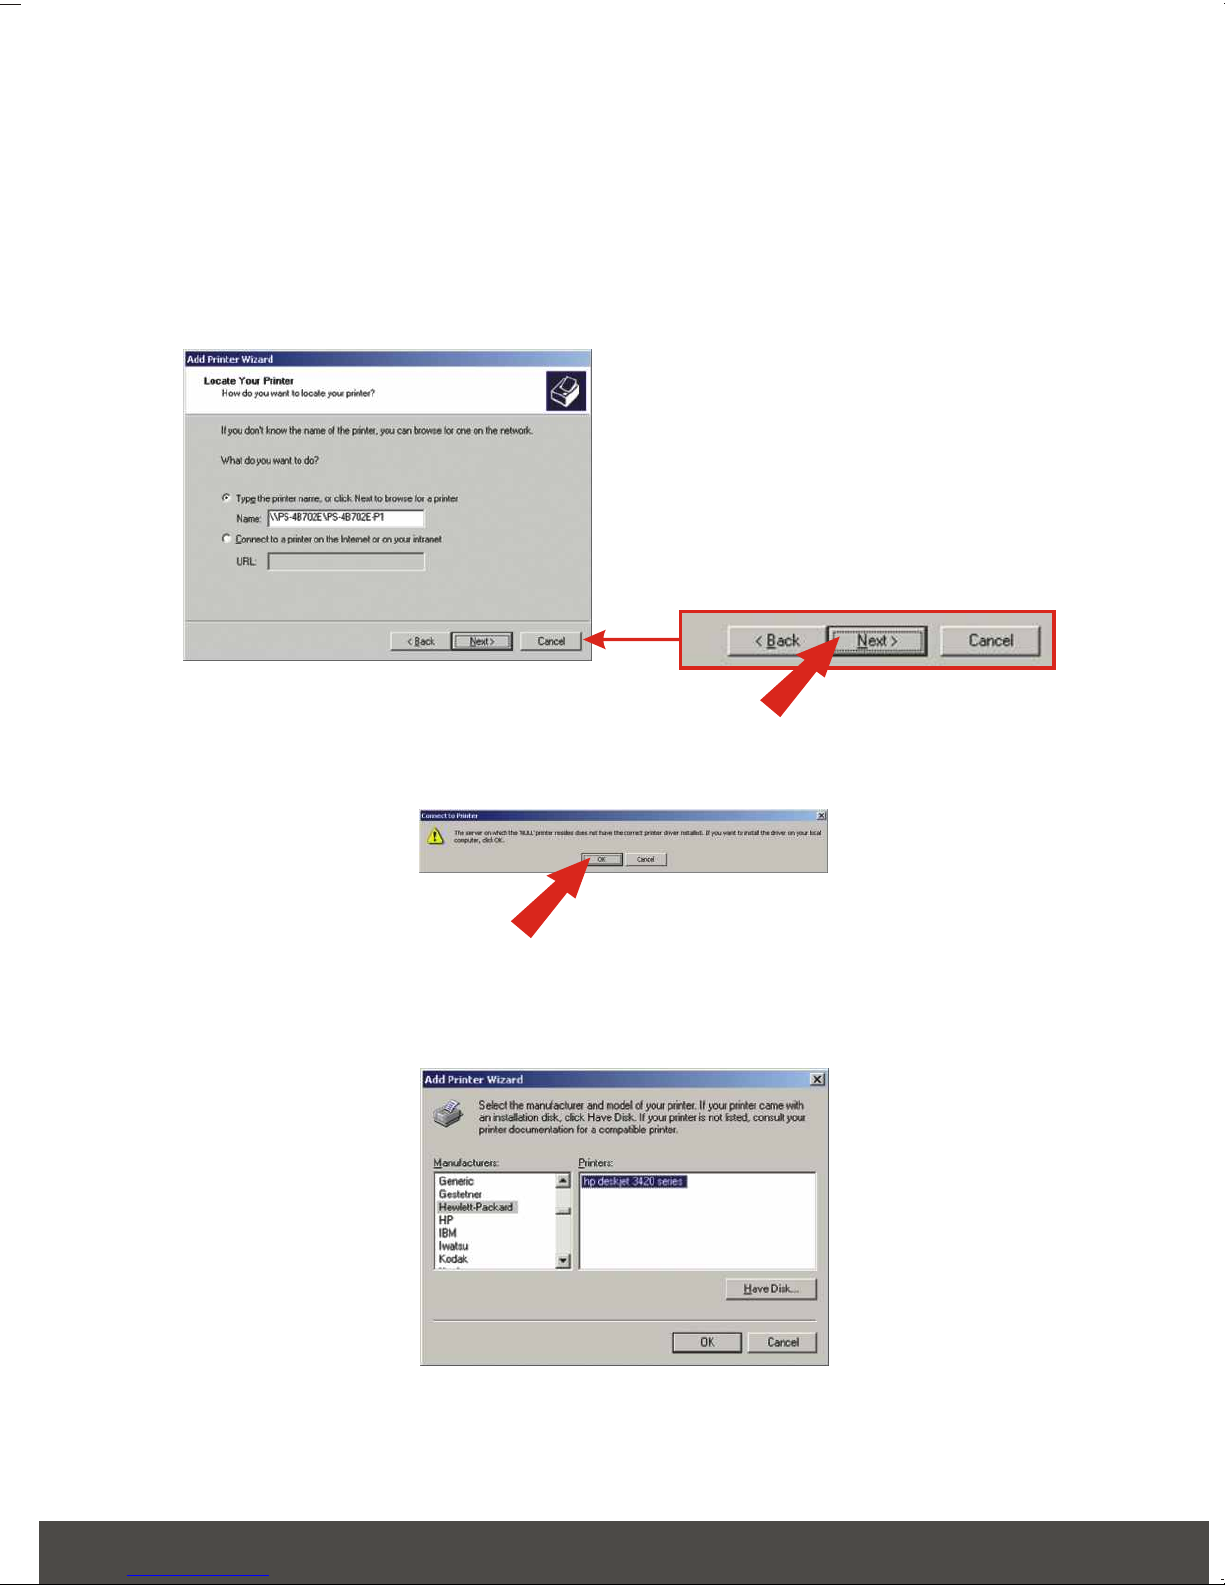
6. Click the option that allows you to type the printer’s name. Type the server
name and the printer name in the following format: . For example, if you
connected a USB printer to the USB1 slot, then you would type \\PS-
4B702E\PS-4B702E-P1 with NO SPACES in between them. Click Next.
7. Click OK.
8. Select the appropriate driver for your printer.
9
English
Page 12
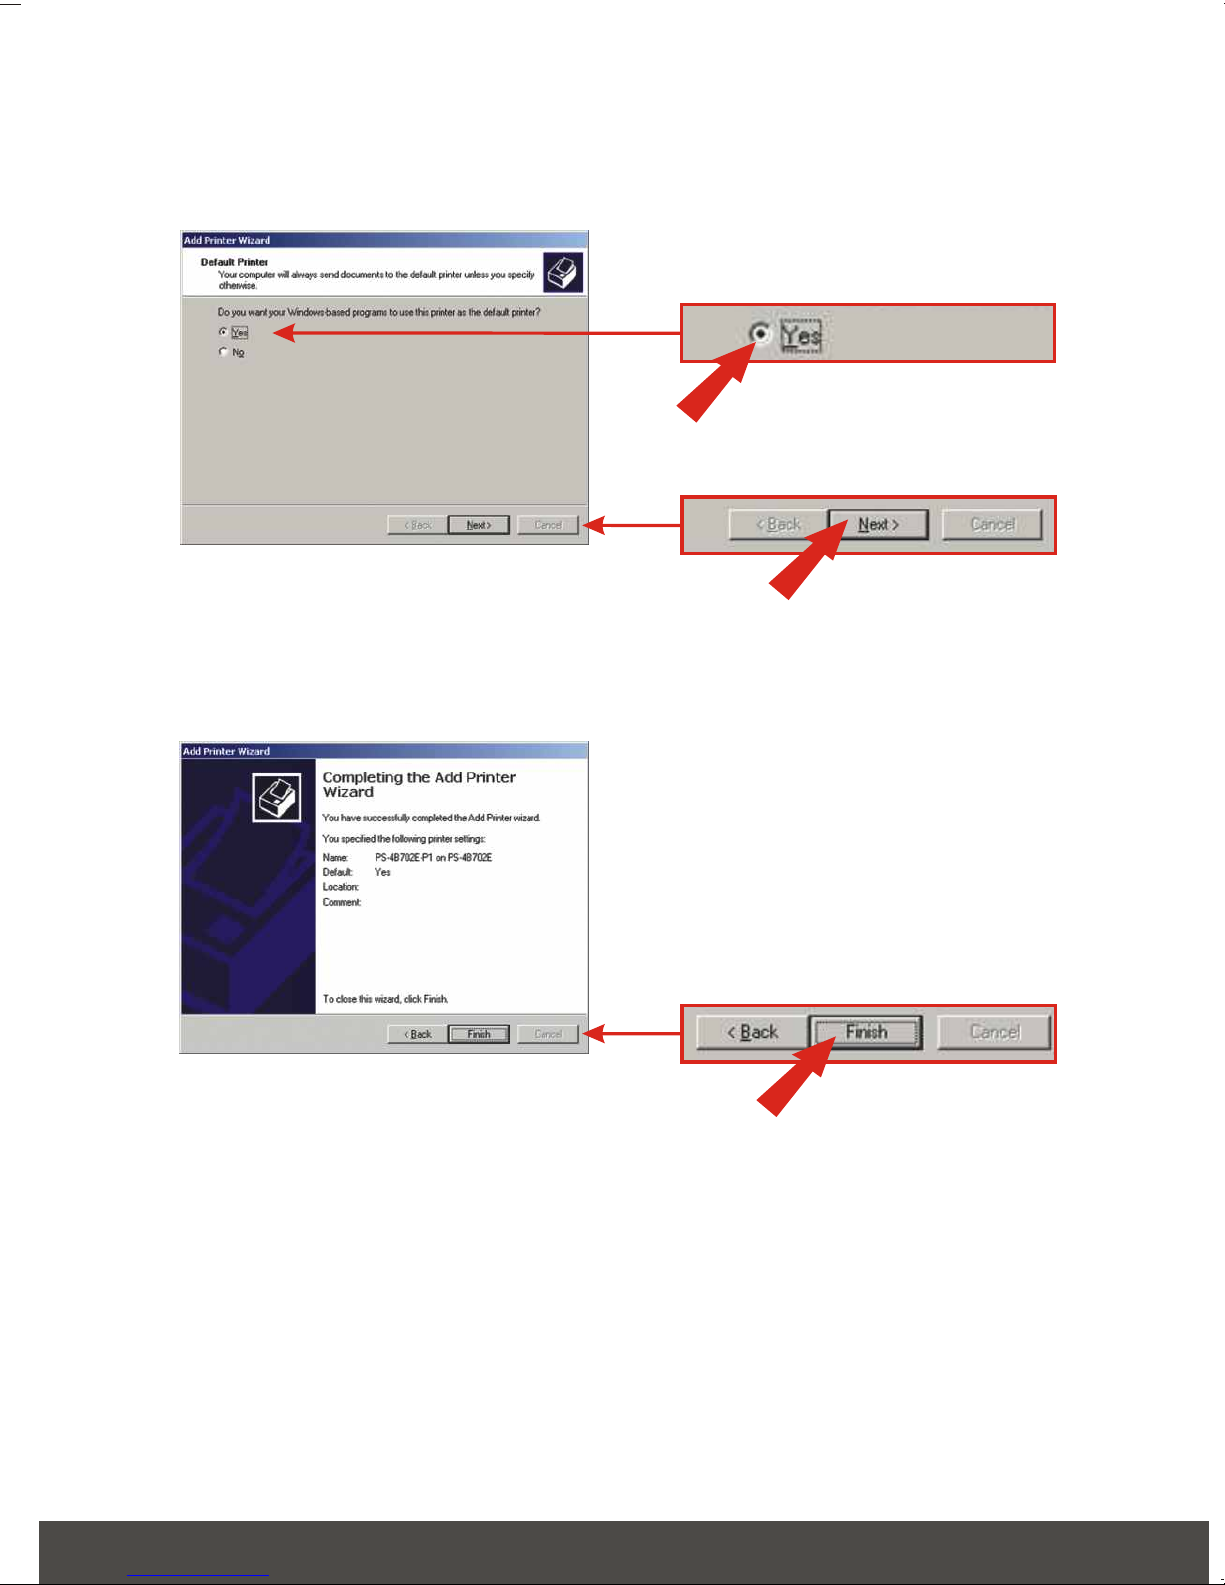
9. Click Yes. Click Next.
10. Click Finish.
You have completed adding the printer to your PC.
10
English
Page 13
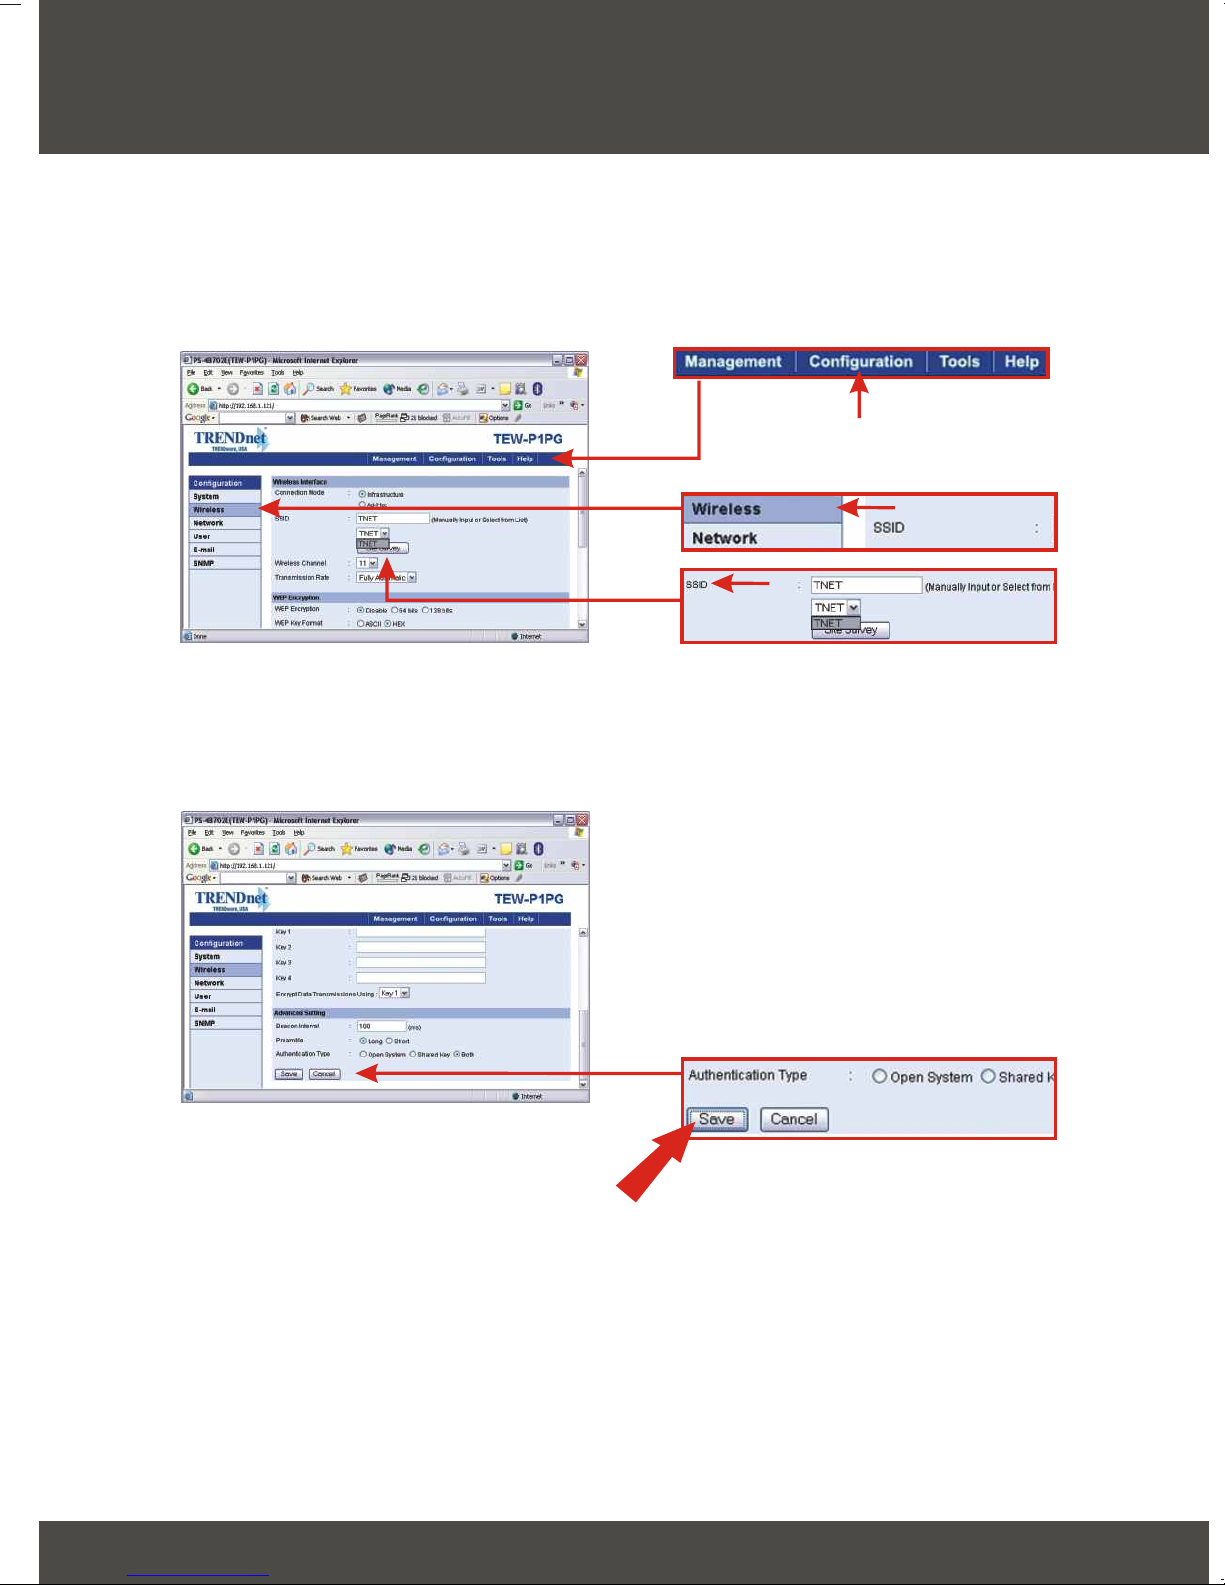
6. Configure the Print Server’s Wireless
Connection
1. Open the web utility and click Configuration. Click Wireless, and use the
pull down menu to select the SSID of an Access Point or Wireless Router
that is connected to your network.
2. Scroll down the utility. Click Save.
Your wireless configuration is complete.
11
English
Page 14

Troubleshooting
I cannot add a network printer after I typed the server name and printer name.
Q1:
Please double check your hardware connections. Make sure that your printer is connected properly to the
A1:
print server and your power adapter is connected properly to a power outlet. (See 3. Hardware Installation)
I verified that the hardware installation is correct and typed the correct printer name, but I still cannot find
Q2:
the network printer.
Make sure that the server name and printer name is entered correctly. There should be no spaces, and the
A2:
back slashes that separate the server name and printer name should be this, \\, instead of this, //. (See 5. Add
Network Printer).
I typed in the server name and printer name correctly and successfully installed the network printer. But I
Q3:
can't print a test page.
Make sure that the printer is online by turning the printer on. Make sure the power adapter of your printer is
A3:
properly connected to a power outlet.
I successfully added a network printer to my computer, and my printer is receiving power. I can also print a
Q4:
test page, but I cannot print anything from Microsoft Word or other applications.
Make sure to set the newly installed network printer to your default printer.
A4:
I configured my print server to automatically receive an IP Address from a DHCP server, and now I cannot go
Q5:
into the print server's web utility.
Open PS-Utility v2.00 (See 4. Configure the Print Server) to locate your Print Server's IP address. For
A5:
MAC users, press the Reset button at the back of the TEW-P1PG, hold the button for 15 seconds, release the
button, and enter http://192.168.0.1 in a web browser to access the web utility feature.
I pressed the reset button and held it for 15 seconds. I also typed in http://192.168.0.1 in a web browser, but I
Q6:
still cannot access my print server.
Make sure to change your IP Address to 192.168.0.xxx where xxx is an available number between 2 to 253.
A6:
(See 4. Configure TCP/IP Settings)
I configured my Wireless Print Server to have the same SSID as my Access Point, but I still cannot print from
Q7:
my Wireless Print Server.
Your Access Point or Wireless Router may have enabled its wireless security. You can either disable the
A7:
wireless security or configure the Print Server's wireless security feature. Make sure that the encryption method
and password for your Wireless Printer is the SAME as your Access Point or Wireless Router. Also make sure
that the format (HEX or ASCII) and the bit encryption (64-bit, 128bit, etc.) is the same.
If you have any questions regarding the TEW-P1PG 1 port Parallel Wireless Print Server, please contact Trendware
Technical Support Department.
Certifications
This equipment has been tested and found to comply with FCC and CE Rules. Operation is subject to the following two
conditions:
(1) This device may not cause harmful interference.
(2) This device must accept any interference received including interference that may cause undesired operation.
12
Page 15
@
TRENDnet
TRENDware, USA
What's Next in Networking
Product Warranty Registration
Please take a moment to register your product online.
Go to TRENDware’s website at http://www.TRENDNET.com
TRENDnet Technical Support
US/Canada Support Center European Support Center
Contact
Telephone:
Fax:
Email:
Tech Support Hours
7:30am - 6:00pm Pacific Standard Time
Monday - Friday
1(310) 626-6252
1(310) 626-6267
TRENDware International, Inc.
3135 Kashiwa Street. Torrance, CA 90505
Contact
Telephone
Deutsch : +49 (0) 6331 / 268-460
Français : +49 (0) 6331 / 268-461
Español : +49 (0) 6331 / 268-462
English : +49 (0) 6331 / 268-463
Italiano : +49 (0) 6331 / 268-464
Dutch : +49 (0) 6331 / 268-465
+49 (0) 6331 / 268-466
Fax:
Tech Support Hours
8:00am - 6:00pm Middle European Time
Monday - Friday
http://www.TRENDNET.com
Copyright ©2004. All Rights Reserved. TRENDware International, Inc.
 Loading...