


11M WLAN Access Point
FreePort Station
User’ s Manual
Rev 1.0

FreePort Station User's Manual
2
Using this Manual
This section explains the symbols used in this manual.
n Symbols
Caution : Items to which you must pay attention when handling the product. Failure to follow this mark
may result in personal injury and/or damage to the equipment.
Note : Supplementary information that you should know when handling the product.
Reference : Refers to the page of related subject.
Next : Advises to which page you should continue next.
Column : Explanatory text with this mark explains convenient facts for you to know.
n Glossary and Diacritical Marks Within the Text
Ÿ Text in bold indicates the names of menu options, buttons, text boxes, check boxes, software, and dialog
boxes, etc., that you can select to perform operations.
Ÿ The AP is referred as Access Point through this manual.
Ÿ The personal computer to be used with the wireless LAN card is called the wireless LAN personal computer.
Ÿ The personal computer to be used with the Access Point settings is referred as the Settings Personal
Computer.

FreePort Station User's Manual
3
Communication between a wireless LAN and a wired
LAN
This section describes how to use an AP when communicating between a wireless LAN and a wired LAN.
Network Configuration Illustration
Current Network Environment : Wired LAN Network
Desired Network : Network comprising wireless and wired LAN PCs.

FreePort Station User's Manual
4
Table of Contents
1. Communications Between Ethernet LAN and Wireless LAN 5
Installation 5
2. Preparing the FreePort Station Settings 6
TCP/IP Protocol Setting 6
On Windows 98 / 95 6
Adding TCP/IP Protocols (Windows 98/95) 7
On Windows 2000 9
Adding TCP/IP Protocols (Windows 2000) 11
On Windows NT4.0 12
3. Installing FreePort Station Manager 13
Displaying FreePort Station Setting Screen 14
Enabling and Disabling Roaming Function 15
Limiting Connections from Wireless LAN PCs 16
Ensuring Security by the WEP (Encryption) Function 18
Grouping Multiple FreePort Stations 19
Configuring the Transmission Mode 20
Reset FreePort Station Settings to the Factory Defaults 20
4. Self-Diagnostic 21
5. Setting Screen Tables 22
6. Glossary 25
7. Product Specifications 28
Specifications 28
LAN Port Connector Specifications 29
FreePort Station User's Manual
5
1. Communications Between Ethernet LAN and
Wireless LAN
This section explains the procedure for enabling communication between personal computers on an Ethernet
LAN and personal computers on a wireless LAN using AP.
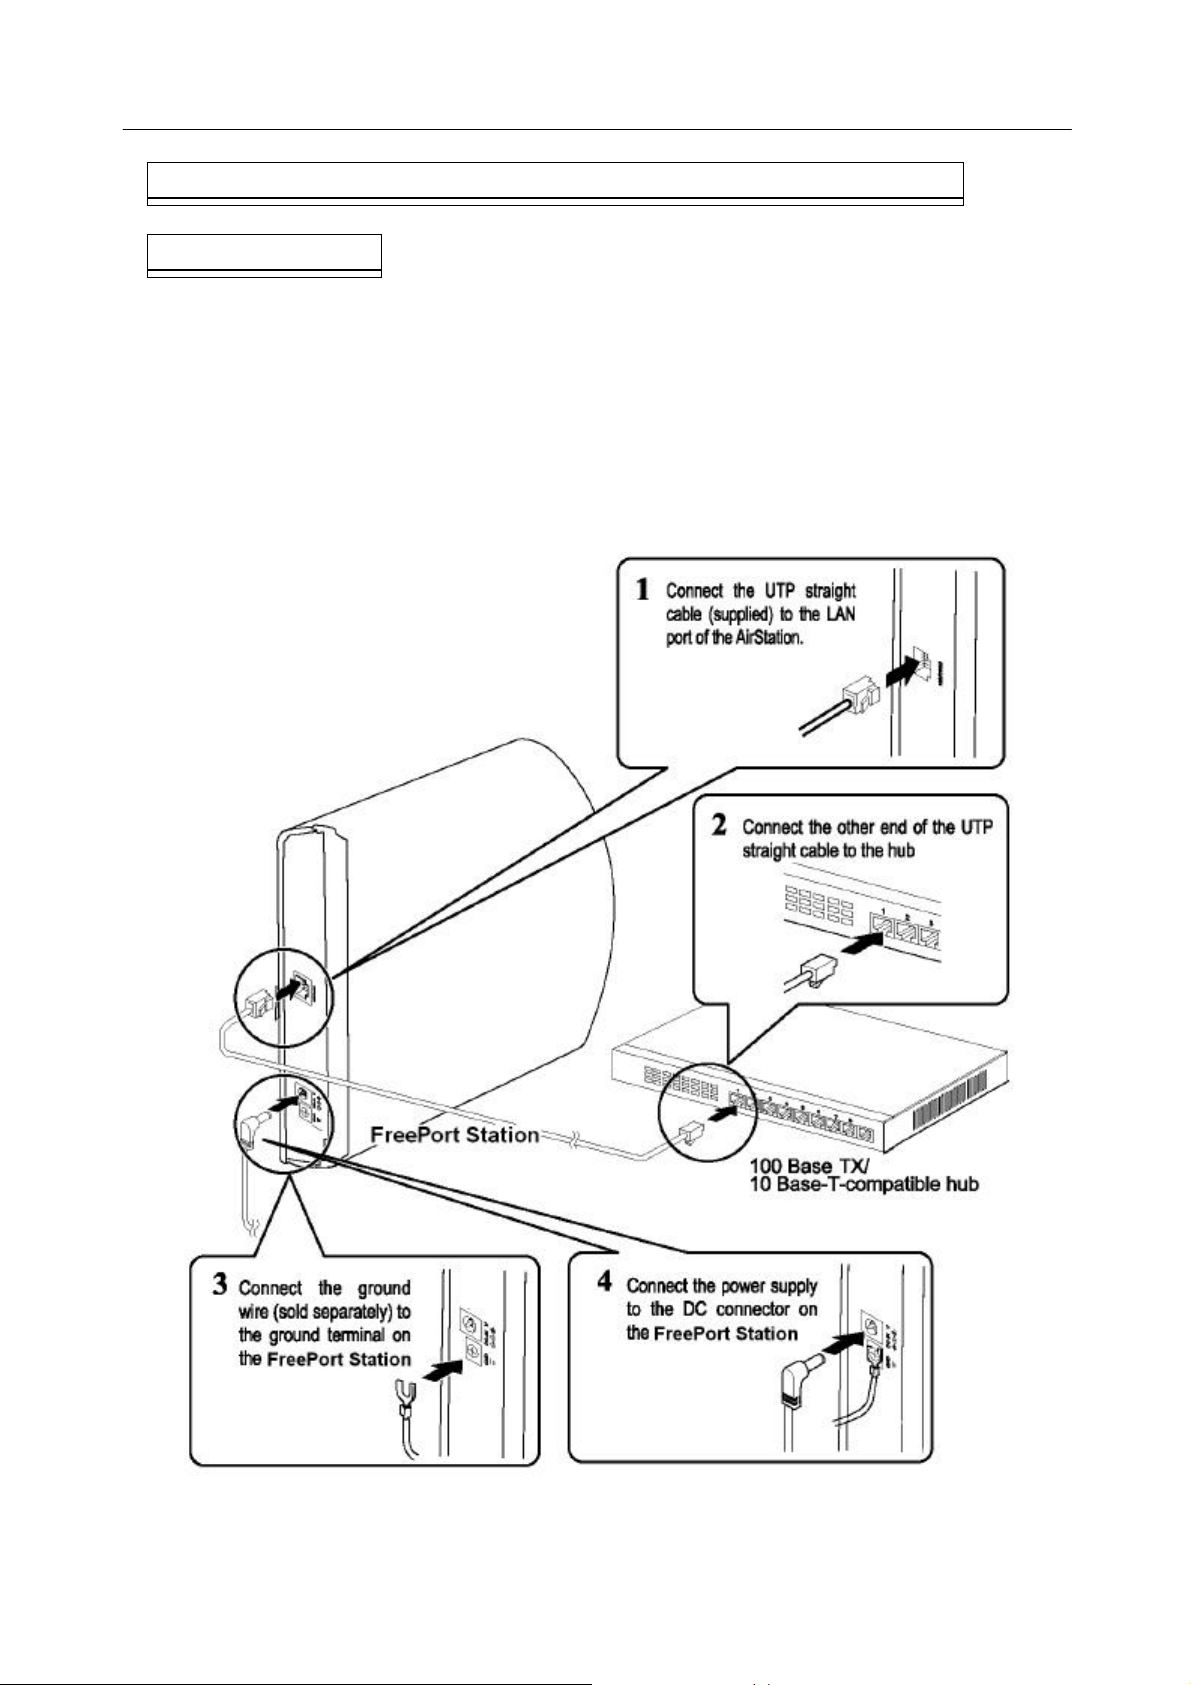
Installation
Connection to the AP, hub, ground wire, and Power supply is shown below.
Be sure to use the supplied AC adapter power supply.
FreePort Station User's Manual
6
2. Preparing the FreePort Station Settings
(on the Personal Computer)
The AP settings are preformed using a personal computer on the Ethernet LAN. For the proper AP setting, make
sure that the following software are installed in the personal computer (hereafter called the settings personal
computer) on the Ethernet LAN.
TCP/IP protocol …………………….. Refer to the “TCP/IP Protocol Setting” section below.
FreePort Station Manager ………… Refer to “Installing the FreePort Station Manager”.
Web browser (Microsoft Internet Explorer version 4.0 or later, or Netscape Navigator 3.0 or later):
…………………………………….. Refer to the relevant Web browser manual. Microsoft Internet Explorer is
installed as standard on Windows 98 and Windows 2000.
TCP/IP Protocol Setting
The procedure for setting the proper TCP/IP protocol is depending on the OS used in the PC. Please refer to the
following for the proper settings.
Before the setting, check the LAN port drivers are properly installed in the personal computer and it is
connected to the network.
Windows 98/95: Refer to “On Windows 98/95” below.
Windows 2000: Refer to “On Windows 2000”.
Windows NT 4.0: Refer to “On Windows NT 4.0”.
On Windows 98/95
The TCP/IP protocol is set as follows.
1.
Start your personal computer.
2.
Click the Start button, and then select Settings, and then Control Panel.
3.
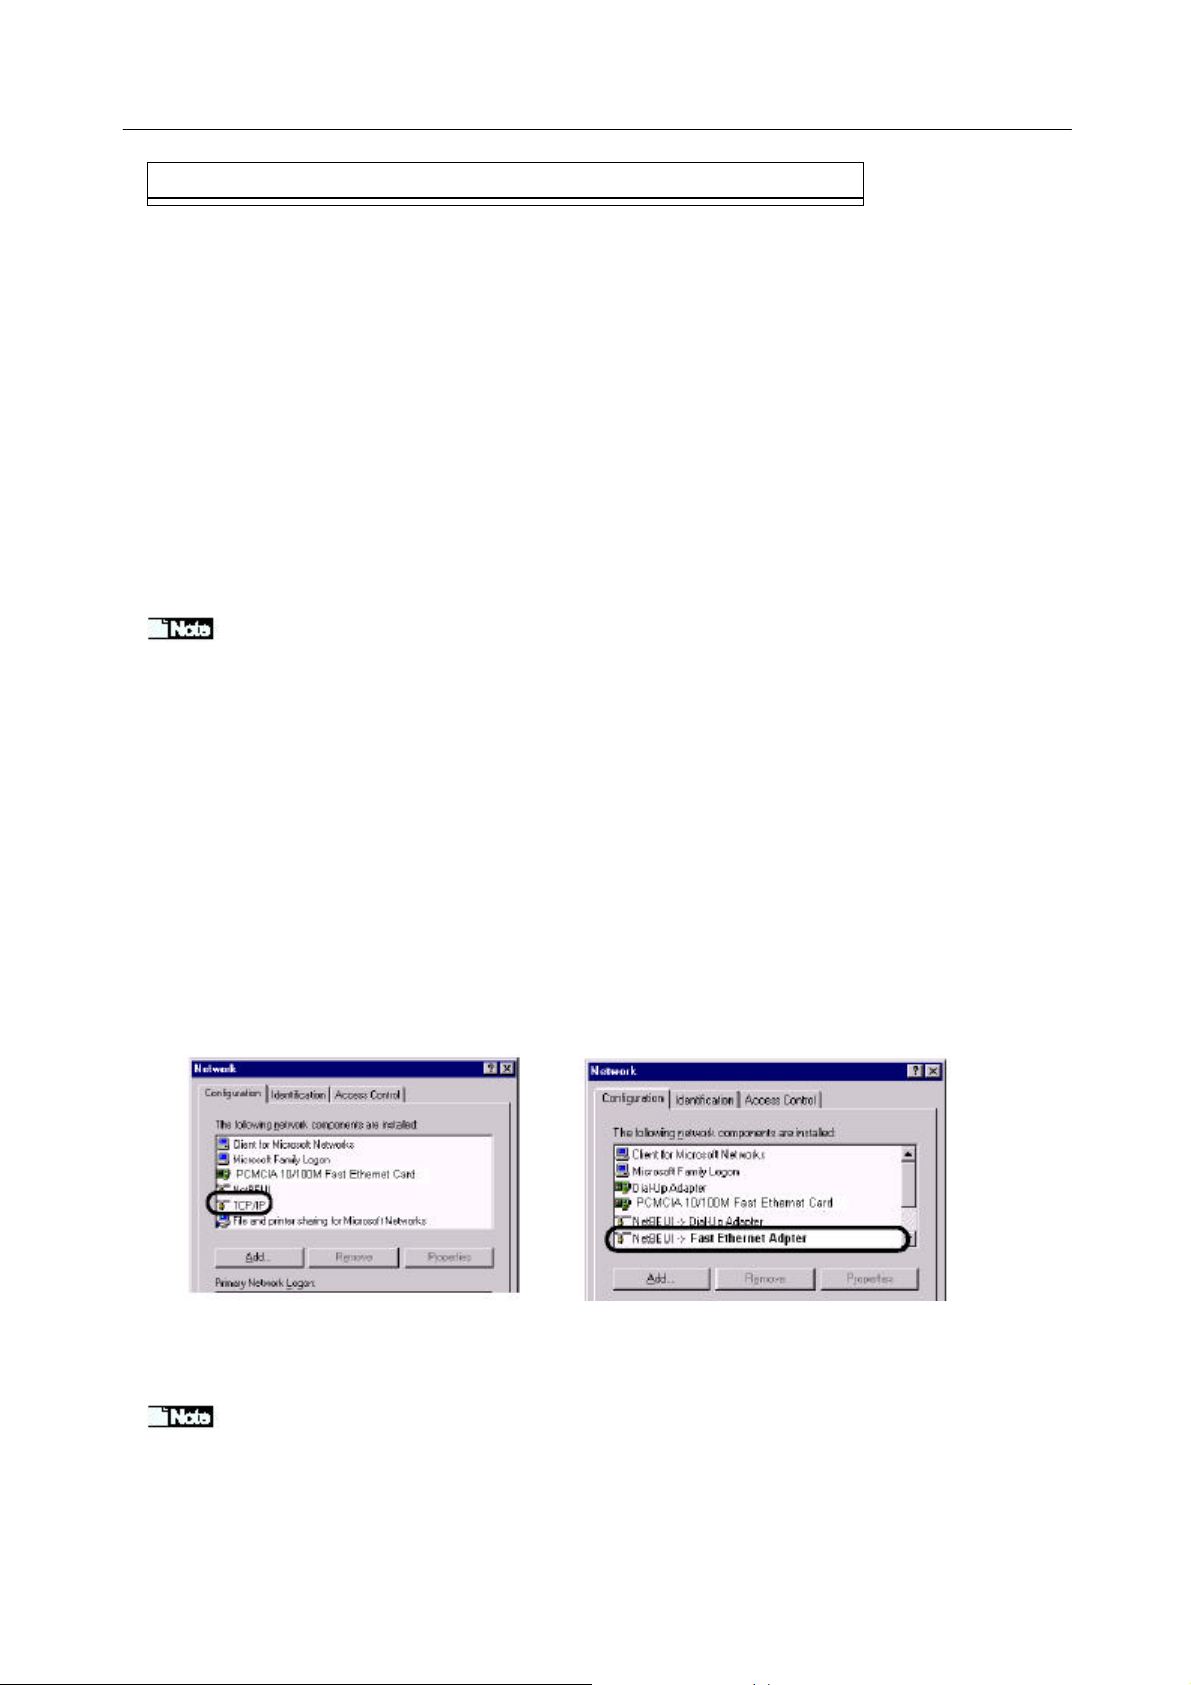
Double-click the Network icon.
4.
In the Network dialog box, check that TCP/IP is displayed in the following network components are installed:
Only 1 LAN board installed The dial-up adapter and the LAN boards are installed.
TCP/IP (LAN board driver name) is normally displayed in the
following network components are installed:
[TCP/IP-> "LAN board driver name"]
If no TCP/IP is displayed. Refer to “Adding TCP/IP Protocos (Windows 98/95)” section.
FreePort Station User's Manual
7
5
6
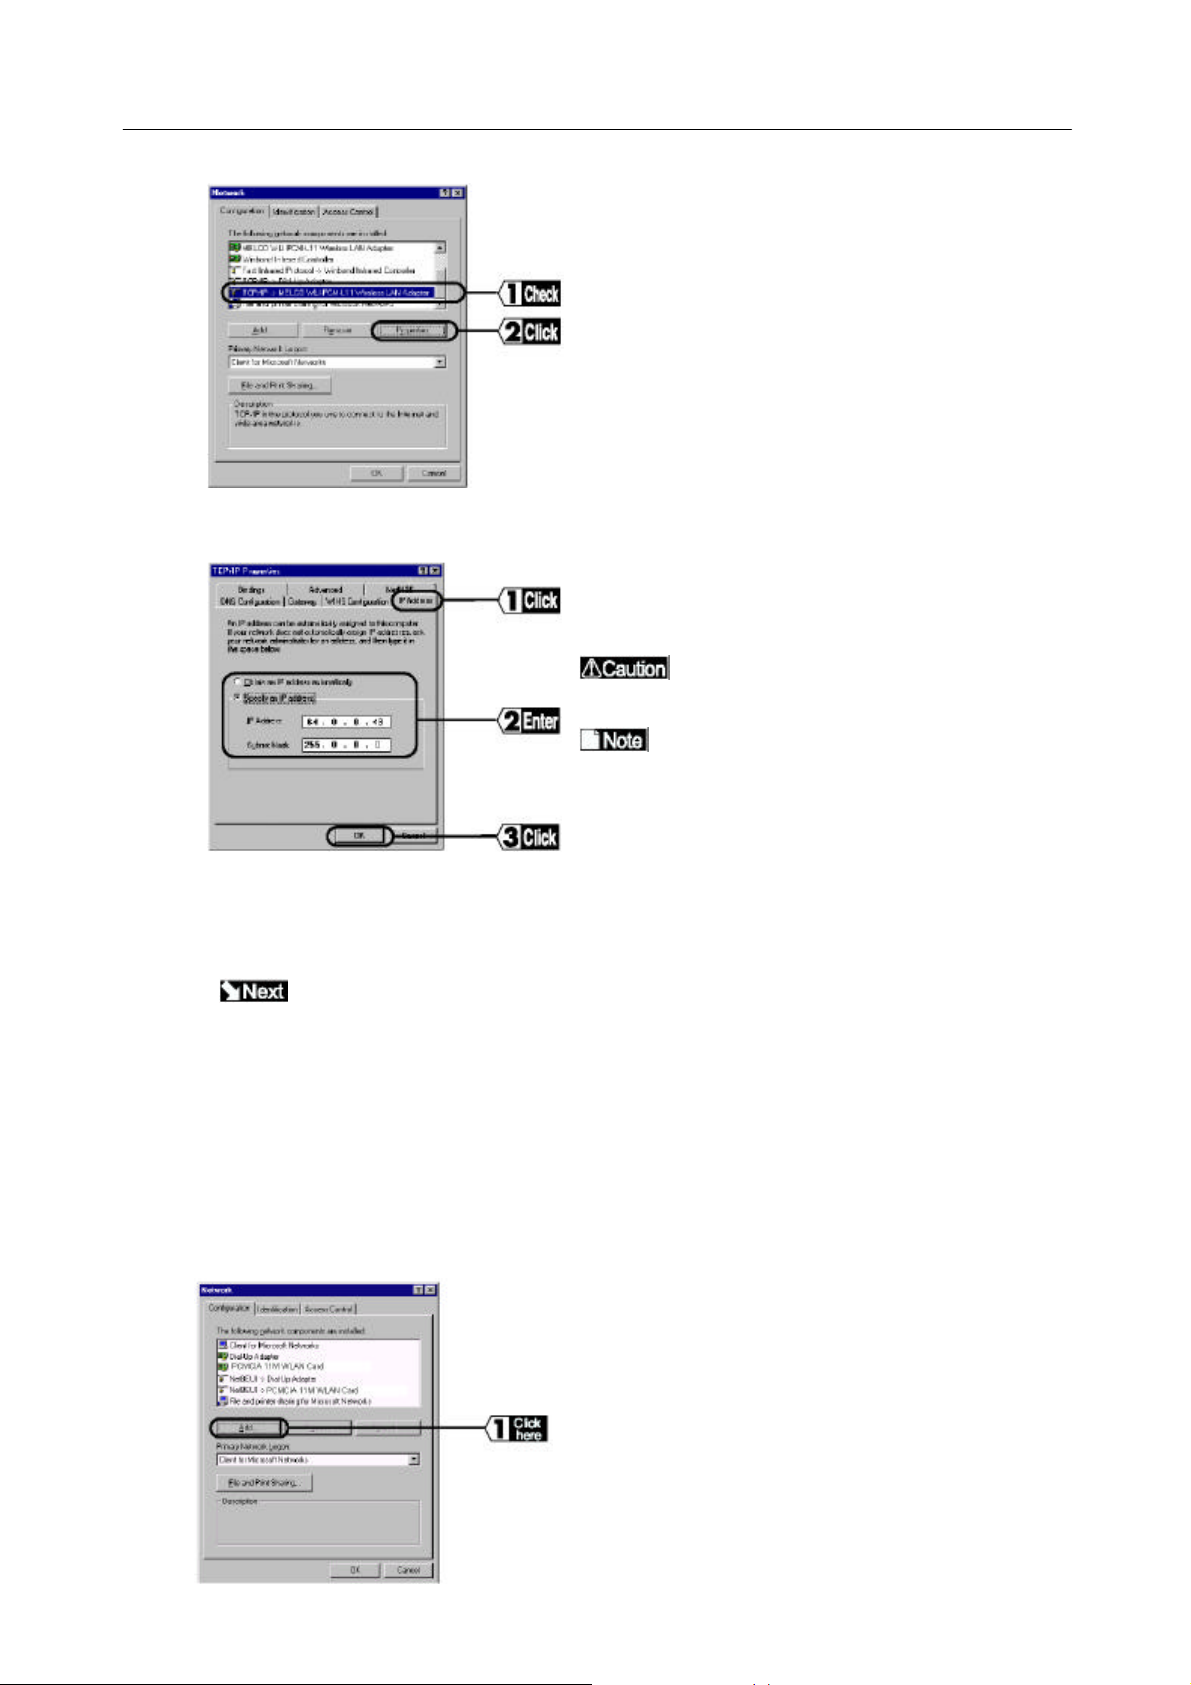
Select "TCP/IP" and click the Properties button.
Click the IP Address tab, set the IP Address and click OK
Consult your network administrator for IP
address settings for the configuration PC.
If there is a DHCP server in your network, select
"Automatic IP address assignment".
7 Restart Windows 98/95.
This completes the configuration of the TCP/IP protocol for the configuration PC.
Go to "Installing FreePort Station Manager" section.
Adding TCP/IP Protocols (Windows 98/95)
If the TCP/IP Protocol is not in added to the settings personal computer, add the protocol using the following
procedure.
1 Click the Start button, and select Settings, Control Panel, and then Network.
2
Click the Add button.
FreePort Station User's Manual
8
3
4
5
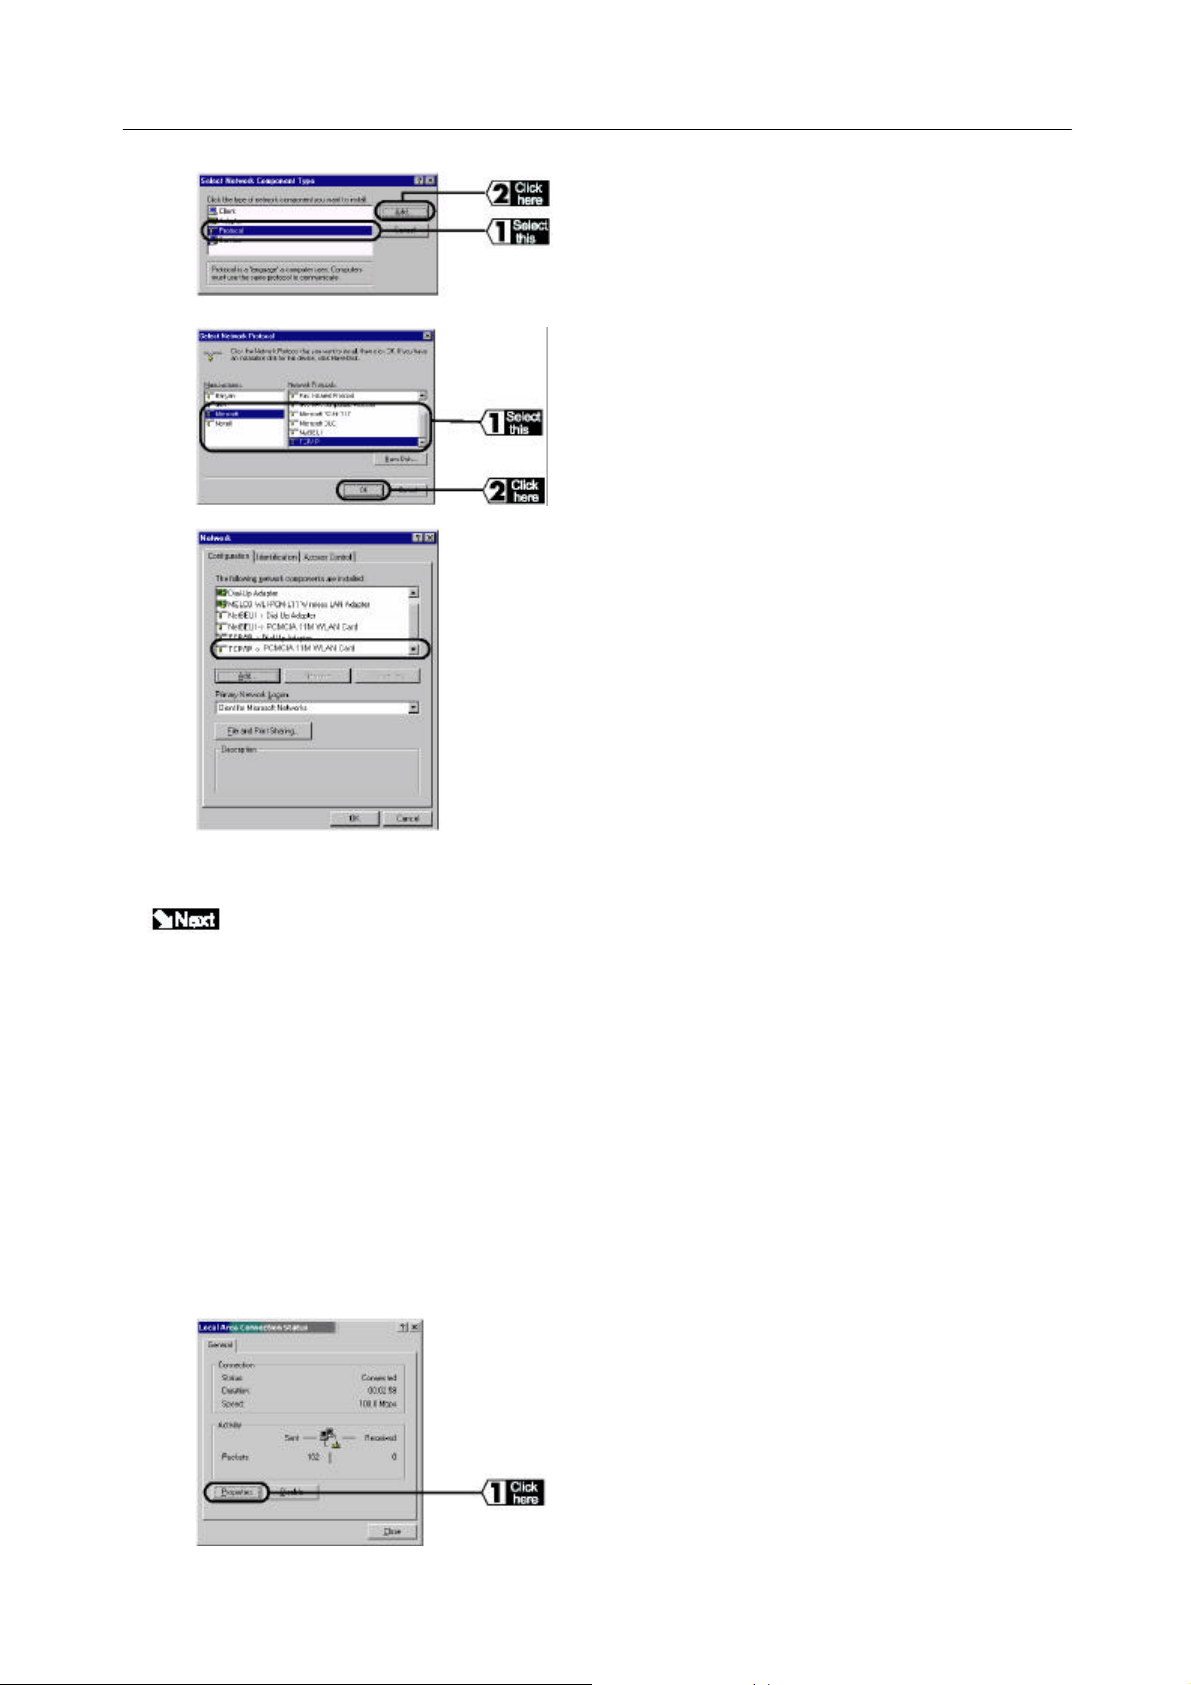
Select Protocol, and click the Add button.
In the Manufacturers field, select Microsoft,
and in the Network Protocols field, select
TCP/IP and click the OK button.
The TCP/IP protocol is added.
This completes the TCP/IP protocol installation.
Continue to the “TCP/IP Protocol Settings” (On Windows 98/95) section procedure.
On Windows 2000
The TCP/IP protocol is set on the settings personal computer using the following procedure.
1 Start Windows 2000, and log on using your logon name (e.g., Administrator with administrator access).
2 Click the Start button. Then select Settings and Network and Dial-up Connections.
3 Double-click the Local Area Connection icon.
4
Click the Properties button.
FreePort Station User's Manual
9
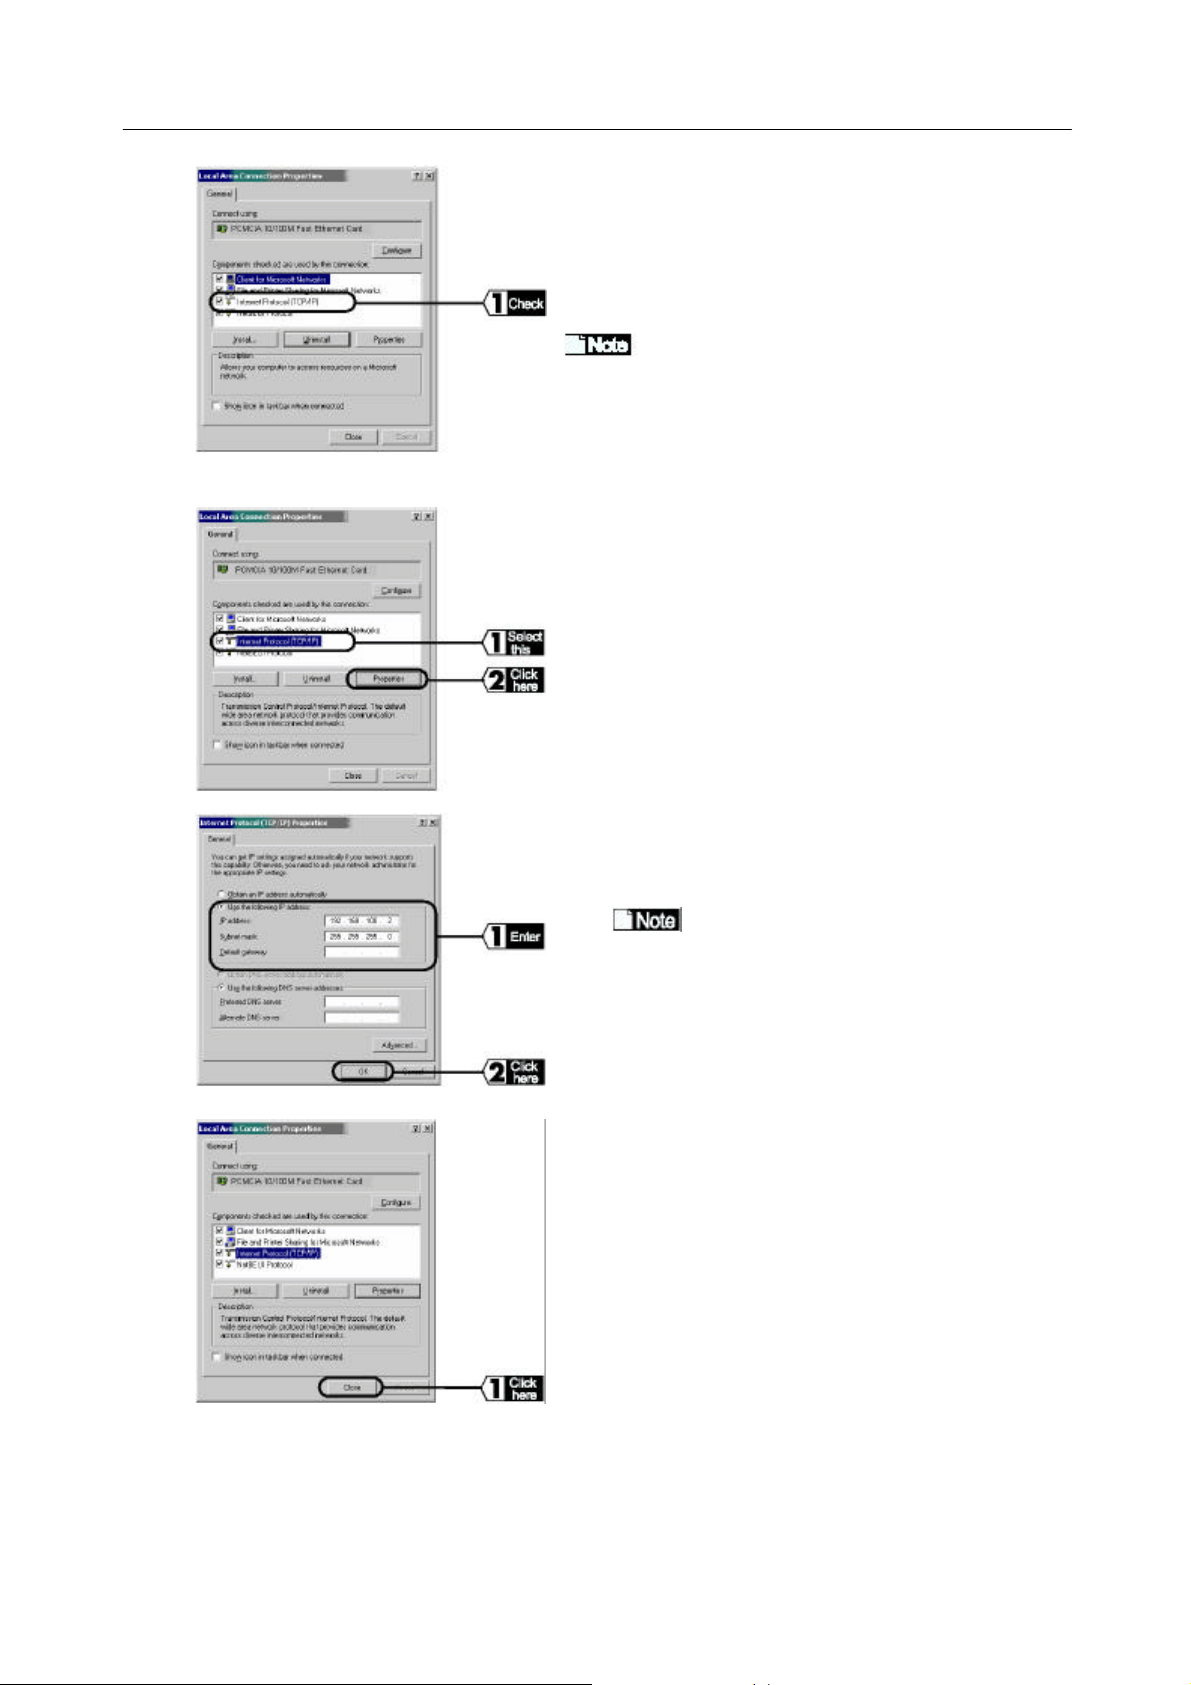
5
6
Con
Check it Internet Protocol (TCP/IP) is displayed.
If Internet Protocol (TCP/IP) is not
displayed, refer to "Adding the TCP/IP Protocols
(Windows 2000)" section.
Select Internet Protocol (TCP/IP), and click
the Properties button.
7
8
Set the IP address, and click the OK button.
If there is a DHCP server on the network,
select "Obtain an IP address automatically".
Click the Close button.

FreePort Station User's Manual
10
9
Click the Close button.
Go to “Installing FreePort Station Manager” section.
Adding the TCP/IP Protocols (Windows 2000)
If the TCP/IP Protocol is not in added to the settings personal computer, add the protocol using the following
procedure.
1 Click the Start button, and then select Settings and Network and Dial-up Connections.
2 Double-click the Local Area Connection icon.
3
Click the Properties button.
4
Click the Install button.

FreePort Station User's Manual
11
5
6
7
Select Protocol, and click the Add button.
Select Internet Protocol (TCP/IP), and click the OK button.
Check if the Internet Protocol (TCP/IP) is
added.Continue to next page
This completes the TCP/IP protocol installation.
Continue to the “TCP/IP Protocol Settings” (On Windows 2000) section procedures.
On Windows NT4.0
Follow the steps below to set the TCP/IP protocol for the configuration PC.
1 Start the PC.
2 Click Start and select Settings and then Control Panel.
3 Double-click the Network icon.

FreePort Station User's Manual
12
4
5
Click the Protocol tab and check that
"TCP/IP Protocol" is listed in the
Network Protocol field.
Select "TCP/IP Protocol" and click
Properties.
6
Type in the IP addresses and click OK.
Consult your network administrator for the IP
address settings for the configuration PC.
When there is a DHCP server in your network,
select "Automatic IP address assignment".
7 Restart Windows NT4.0.
This completes the configuration of the TCP/IP protocol for the configuration PC.
Go to "Installing FreePort Station Manager" section.

FreePort Station User's Manual
13
3. Installing FreePort Station Manager
Install the FreePort Station Manager in the settings personal computer using the following procedure.
1 Insert the Driver CD in the CD-ROM drive.
2 Click the Start button, and select Run...
3
Enter D:\AP\SETUP.EXE (where D is the CD-ROM drive),
and click the OK button.
4
5
6
7
Click the Next button.
Select the directory in which you want to install FreePort
Station Manager, and click the Next button.
To change the default installation directory, select
a new directory, and then click the Next button.
Check the installation directory displayed, and then click the
Start button. Windows will copy the file to the directory.
Click the OK button.
Installation of the FreePort Station Manager is completed.
To remove FreePort Station Manager, click the Start button, and select Programs, FreePort Station,
and Uninstall FreePort Manager, and then follow the instruction on screen.

FreePort Station User's Manual
14
Display FreePort Setting Screen
Follow the steps below to display the FreePort Station setting screen.
1 Refer to " Installing FreePort Station Manager" to install the FreePort Station Manager.
2 Click Start and select Programs, FreePort Station and then FreePort Station Manager
3
Click Edit and select Search FreePort Station.
4
The computer starts searching for the FreePort Station.
5
The FreePort Station appears in the list.
6 Select the FreePort Station, click Admin and select
Configure AS.
7
The Web browser starts to display the FreePort Station
settings screen.

FreePort Station User's Manual
15
Enabling / Disabling the Roaming Function
With the roaming function, an appropriate FreePort Station is automatically chosen according to the location of
your PC. There is no need to change the FreePort Station’ s settings when you move your PC to another room.
Follow the steps below to set the roaming function.
1 Refer to " Installing FreePort Station Manager" to install the FreePort Station Manager.
2
Click Custom Setting.
3
Fill in the following fields.
Group Name: All FreePort Stations that are set up for
roaming must have the same Group Name.
Roaming option: "Use"
After filling in the fields, click Set.
Follow the screen prompt.

FreePort Station User's Manual
16
Limiting connection from Wireless LAN PCs
Follow the steps below to limit the connection capability from wireless LAN PCs to the FreePort Station. The
steps below will change settings so that no wireless LAN PCs other than those registered with the settings can
connect to the wired LAN PCs.
Setting procedure
1 Refer to " Installing FreePort Station Manager" to install the FreePort Station Manager.
2
Click Custom Setting.
3
4
5
Click "Wireless LAN Computer Limitation".
Select "Set Limit" for Wireless LAN Computer Limitation
Setting and click Set.
When the message "Settings Complete" appears, click
"Return".

FreePort Station User's Manual
17
6 Type in a MAC address for the wireless LAN PC to be
connected to the wired LAN PCs in the "Wireless LAN
Computer MAC Address" field and click Add.
• Refer to the manual supplied with the wireless
LAN PC for information about the MAC address.
• The MAC address should be separated every two digits
by colons ( : ).
When the "Unavailable wireless LAN computer(s)" list includes a wireless LAN card which you want
allow to connect to the Wired LAN PCs, tick the "Enable" check box for the relevant MAC address and click
Change.
7
When the message "MAC addresses
added" appears, click Return.
8 The added MAC address will appear in the "Available Wireless
LAN Computer(s)" field.
Up to 256 MAC addresses can be registered.
No wireless LAN PCs other than those registered in the "Available Wireless LAN Computers" field can
communicate with any wired LAN PCs. Communication between wireless LAN PCs via the FreePort Station is
available.
To disable a registered wireless PC, tick the "Disable" check box for the relevant MAC address in the
"Available Wireless LAN Computers" field and click Change.

FreePort Station User's Manual
18
Ensuring Security by the WEP (Encryption) Function
Follow the steps below to encrypt wireless packets so that they cannot be intercepted by a third party.
If the WEP function is set, communication between a Macintosh computer is not available.
Setting procedure
1 Refer to " Installing FreePort Station Manager" to install the FreePort Station Manager.
2
Click Custom Setting.
3 Enter a 5-digit encryption key in the "WEP (encryption
code)" box. Enter the same encryption key again in the
"Confirm Encryption Code" box for confirmation and click
Settings.
The five characters can include alphanumeric
characters and an under bar "_" .
4 When the message "Setting Complete" appears, close the browser.

FreePort Station User's Manual
19
Grouping Multiple FreePort Stations
If there are many FreePort Stations in the same area each having wireless LAN PCs connected, the overall data
transmission speed may slowdown considerably. This could be the result of all the FreePort Stations using the
same frequency radio wave. Assigning a different frequency (wireless channel) to each wireless LAN will improve
the transmission speed. Follow the steps below to change wireless channel and differentiate the LANs.
Setting procedure
1 Refer to " Installing FreePort Station Manager" to install the FreePort Station Manager.
2
Click Custom Setting.
3
Choose a wireless channel in the "Wireless Channel" box
to assign it to the FreePort Station and click Set.
4 When the message "Setting Complete" appears, close the browser.
• Using close frequencies (channels) may cause interference. When using two or more channels, each channel
should be spaced by two or three channels. (Changing the wireless channel may cause interference with other
radio wave equipment.)

FreePort Station User's Manual
20
Configuring the Transmission Mode
Follow the steps below to configure the transmission mode.
1 Refer to " Installing FreePort Station Manager" to install the FreePort Station Manager.
2
Click Custom Setting.
3
In the "Communication Mode" field, select either
Full Duplex or Half Duplex and click OK.
When the FreePort Station is set at Full Duplex, make sure that the hub is also set at Full Duplex. When
the FreePort Station is set at Full Duplex Mode and the hub is set at Half Duplex or at Auto Detection, they cannot
communicate with each other.
Resetting FreePort Station Settings to Factory Defaults
1 Power on the FreePort Station.
2 Hold down the "RESET" button located at the rear of the FreePort Station for 3 seconds or longer to reset the
FreePort Station to the factory default settings.

FreePort Station User's Manual
21
4. Self-Diagnostic
The FreePort Station performs self-diagnosis every time it is turned on or restarted.
When an error occurs, the "DIAG" lamp flashes a specific number of times identifying the error. The lamp flashing
pattern is repeated until the FreePort Station is restarted or turned off.
DIAG lamp Error Descriptions
Number of
flashes
1 RAM check error Cannot read/write the internal memory.
2 ROM check error Cannot read/write the flash ROM.
3 Wired LAN error Wired LAN controller malfunction.
4 Wireless LAN error Wireless LAN controller malfunction.
5 Clock error The clock is not set correctly, or the clock battery may be depleted.
9 Other errors
Error Explanation
3
If one of the above errors is displayed, try removing the AC adapter from the socket to restart.

FreePort Station User's Manual
22
5. Setting Screens Tables
This section explains details of the setting screen tables.
Setting Screen Configuration

FreePort Station User's Manual
23
Setting Screens Explanation
Items marked with an asterisk (*) can be set using the Standard Setup screen.
Detailed Settings (Bridge Mode)
Note 1: Enter a maximum of 32 alphanumeric characters (case sensitive), and the underbar "_".
Note 2: Enter a maximum of 16 alphanumeric characters (case sensitive), and the underbar "_".
Note 3: Enter a maximum of 5 alphanumeric characters (case sensitive), and the underbar "_".

FreePort Station User's Manual
24
Machine Diagnostics

FreePort Station User's Manual
25
6. Glossary
This section explains the glossary of terms used in this manual that are required to configure the network.
Wireless Channel
If there is more than one Wireless LAN network with different ESS-ID on the same floor, and they are
communicating with each other, the baud rate may be slowed, due to the same radio frequency being used. If this
happens, you can still communicate regardless of other LAN networks by using to use different frequencies
(wireless channels).
Note: If they are communications using the wireless LAN, be sure to set all the Units the same wireless channel.
DHCP Server
When configuring the network TCP/IP, be sure to set the IP address in each personal computer and other
devices. When there is a DHCP server on the network, you can assign IP addresses
automatically to the personal computers and the FreePort Station on the network. If there is Windows 2000,
Windows NT, dial-up router, or other device with built-in DHCP server function on the network, the DHCP server
function may start to operate. For the Windows NT server and dial-up router, or other DHCP server function, refer
to the Windows 2000, Windows NT, or dial-up router manual, or consult the manufacturer. There should be no
DHCP server problems for Windows 98/95 personal computers only on the network.
ESS-ID
This ID is used to prevent cross-communication during communication between the FreePort Station and
personal computers within the wireless LAN. The Wireless LAN personal computers that have the same ESS-ID
as the FreePort Station can communicate with the FreePort Station. (ESS-ID is disabled when wireless LAN
personal computers are communicating each other.) Set the FreePort Station ESS-ID as follows: Last six digits of
MAC address
+ Group name. The ESS-ID is case sensitive. You can enter a maximum of 32 alphanumeric characters, and the
underbar "_".
LAN (Local Area Network)
Read as one word. A LAN is a network in a comparatively small area, such as campus or within a single building.
The LAN baud rate varies from 10 Mbps to 100 Mbps.
MAC Address (Media Access Control Address)
The MAC address is a physical address specific to each network card. The MAC address is configured from a
total of six bytes as follows: A vendor code comprising the lead three bytes and a 3-byte user code. The vendor
code is managed and assigned by IEEE. The user code is managed using a unique (unduplicated) number from
the network card manufacturer. That is, the MAC address is assigned as a physical address unique throughout

FreePort Station User's Manual
26
the world. In an Ethernet LAN, the MAC address is used as a base to create a frame for sending and receiving.
TCP/IP (Transmission Control Protocol/Internet Protocol)
TCP/IP is a protocol equivalent to the network and transport levels of the OSI reference model, and it is defined
using RFC. Consequently, different terminals can communicate with each other using TCP/IP.
• Normally, TCP/IP includes the application protocols TELNET and FTP.
• TCP/IP is the standard internet protocol.
WEP (Encryption)
By setting an encryption key in the FreePort Station, you can prevent wireless packets from being decrypted
externally.
When connecting to the FreePort Station with the encryption key you must enter the encryption key from the
FreePort manager.
Windows 98/95 Identification Screen
Displayed Screen
Double-click the Network icon and click the "Identification" tab. The following screen will be displayed.
Explanation of Screen Fields
The boxes within the screen are as follows:
Computer name: The name used to identify the computer on the network. Set a unique name for each
personal computer.
Workgroup: The name used to identify the computer workgroup on the network. If there is no
particular need to identify separate workgroups, set the same workgroup name for all the
personal computers on the network.
Computer Description: Use this box to enter additional explanation of the computer name. You can also leave
this box blank.
Firmware
Firmware is the name given to the software (programs) built into hardware such as the router, modem, and

FreePort Station User's Manual
27
terminal adapter. This software is built into the hardware, so it can be said to be in-between hardware and
software.
Protocol
Protocols are the procedures and regulations for sending and receiving data between the network terminals. For
example, if two computers are communicating, you can send the correct information according to the regulations
by formatting all required information. The protocol such as which terminal sends first, what type of message,
what type of message the receiving terminal should send in reply, the data format, and responses to
communications errors are same of examples.
Roaming Function
If using the roaming function and moving from one room to another room, you can switch the FreePort Station
automatically. With the roaming function, you can easily move from the office to the conference room while
maintaining access to the network.
Ethernet LAN and Wireless LAN
The following terms are used in this manual to clarify the distinction between the wired 10/100 base LAN, and the
wireless LAN.
Ethernet LAN: LAN connected using cables
Wireless LAN: LAN that uses wireless communications
The above terms are used for explanatory in this manual and they are not used generally.

FreePort Station User's Manual
28
7. Product Specifications
This chapter describes the specifications of the product and the LAN port connector.

FreePort Station User's Manual
29
LAN Port Connector Specifications
The RJ-45 8-pole connector, specified ISO / IEC8877:1992.
MDI Signal Assignment

FreePort Station User's Manual
30
NOTICE
The information in this manual is subject to change without notice.
Federal Communications Commission Notice
This equipment has been tested an found to comply with the limits for a Class B digital device, pursuant to Part
15 of the FCC Rules. These limits are designed to provide reasonable protection against harmful interference in a
residental instration. This equipment generates, uses, and can radiate radio frequency energy and, if not installed
and used in accordance with the instructions, may cause harmful interference to radio communications. However,
there is no guarantee that interference will not occur in a particular installation. If this equipment does cause
harmful interference to radio or television, which can be determined by turning the equipment off and on, the user
is encouraged to try to correct the interference by one or more of the following measures:
Ÿ Reorient or relocate the receiving antenna.
Ÿ Increase the separation between the equipment and the receiver.
Ÿ Connect the equipment into an outlet on a circuit different from that to which the receiver is connected.
Ÿ Consult the dealer or an experienced radio/TV technician for help.
 Loading...