

Quick Installation Guide
TEW-634GRU
1.01

Table of Contents
Deutsch ......................................................................................................
1. Bevor Sie anfangen ...........................................................................
2. Installation der Hardware ..................................................................
3. .......................................Konfiguration des
4. Verwendung des USB-Ports ..............................................................
Troubleshooting ..........................................................................................
drahtlosen Routers .........
1
1
3
5
9
15
Version 06.19.2009
1. Bevor Sie anfangen
Packungsinhalt
?
TEW-634GRU
?CD mit Bedienungsanleitung
?
Mehrsprachige
Installationsanleitung
?
Kat.5 Ethernet Kabel (1.5m/5ft)
AC Netzteil (12V, 2A)
?
Systemanforderungen
Computer mit korrekt installiertem verdrahtetem oder drahtlosem
?
Netzwerkadapter
Webbrowser: Internet Explorer (5.0 oder höher)
?
Breitband-Internet
?
Installiertes Kabel- oder DSL-Modem
?
Hinweis:
1. Warten Sie mit der Installation des USB-Kontrollzentrums und der
Verbindung von Drucker und Computer mit dem TEW-634GRU, bis Sie dazu
aufgefordert werden.
2. Das USB-Kontrollzentrum muss erst auf jedem Computer installiert sein,
bevor Sie Ihren Multifunktionsdrucker oder das USB-Speichergerät benutzen
können.
1
Deutsch
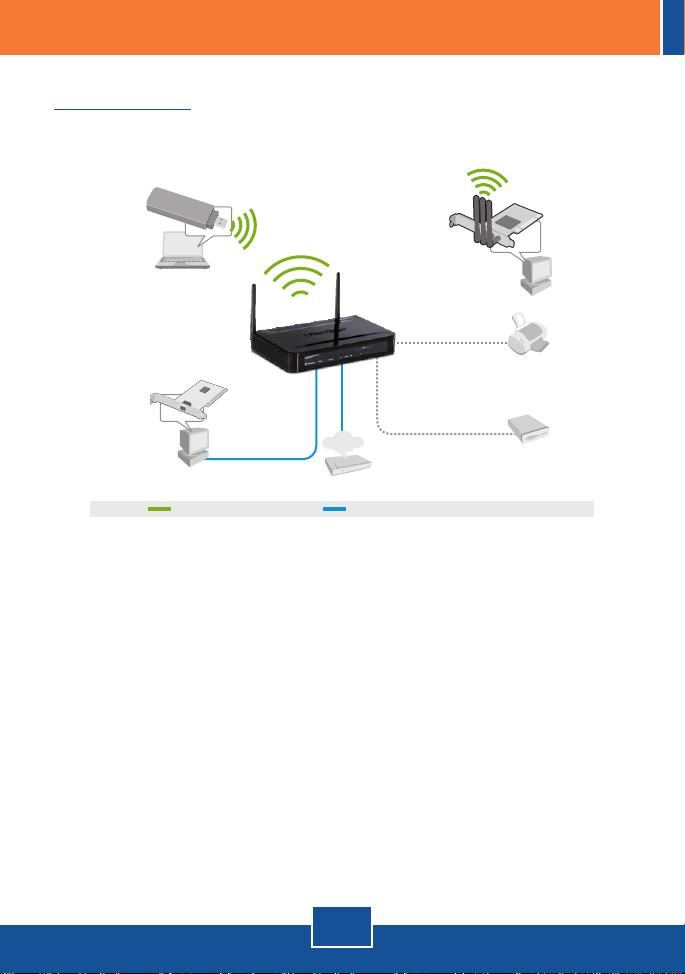
Anwendung
300Mbps Wireless N
Gigabit Router with USB Port
(TEW-634GRU)
Notebook with 300Mbps
Wireless N USB Adapter
(TEW-624UB)
Workstation with Gigabit PCI Adapter
(TEG-PCITXR)
300Mbps wireless multimedia sharing
Internet
Cable/DSL
Modem
Gigabit
Workstation with 300Mbps
Wireless N PCI Adapter
(TEW-623PI)
OR
USB Hard Drive
USB Printer
2
Deutsch
2. Installation der Hardware
Hinweis: Notieren Sie sich zuerst alle erforderlichen Angaben über Ihre
Internetverbindung. Wenden Sie sich bei Bedarf an Ihren Internet Service
Provider (ISP).
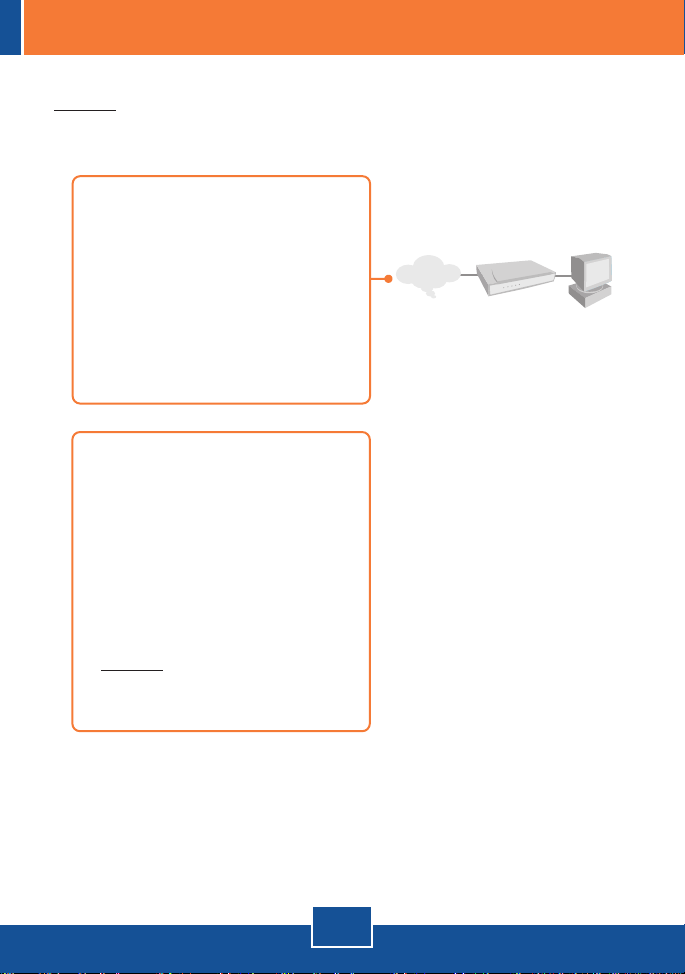
1.
Prüfen Sie, dass eine
Internetverbindung besteht, sobald
Sie Ihren Computer direkt mit dem
Kabel- oder DSL-Modem
verbinden. Öffnen Sie Ihr web
browser, (z.B. Internet Explorer)
und tippen Sie ein URL ein (z.B.
http://www.trendnet.com) im
Adressenstab.
2. Installieren Sie die Druckertreiber
auf Ihrem Computer, wenn Sie
einen Multifunktionsdrucker an den
USB-Port des TEW-634GRU
anschließen möchten. Schalten Sie
den Drucker anschließend aus und
trennen Sie das Verbindungskabel
vom Computer.
Internet
Cable/DSL Modem
Hinweis: Informationen zur
Installation des Druckers finden Sie
in der Bedienungsanleitung.
3
Deutsch

3. Verbinden Sie ein Ende eines
RJ-45-Kabels mit dem WAN-Port
des TEW-634GRU und das andere
Ende mit Ihrem Modem.
4. Verbinden Sie ein Ende des gelben
RJ-45-Kabels mit einem LAN-Port
des TEW-634GRU. Verbinden Sie
das andere Ende des Kabels mit
dem Ethernet-Port des Computers.
5. Verbinden Sie dieabnehmbare
2dBi-Antenne a mit dem
TEW-634GRU.
6. Verbinden Sie das Netzteil mit dem
des drahtlosen Routers und
stecken Sie es in eine Steckdose.
7. Prüfen Sie, dass die folgenden
Anzeigen leuchten:
POWER, LAN, WAN, WLAN und
USB.
Deutsch
4
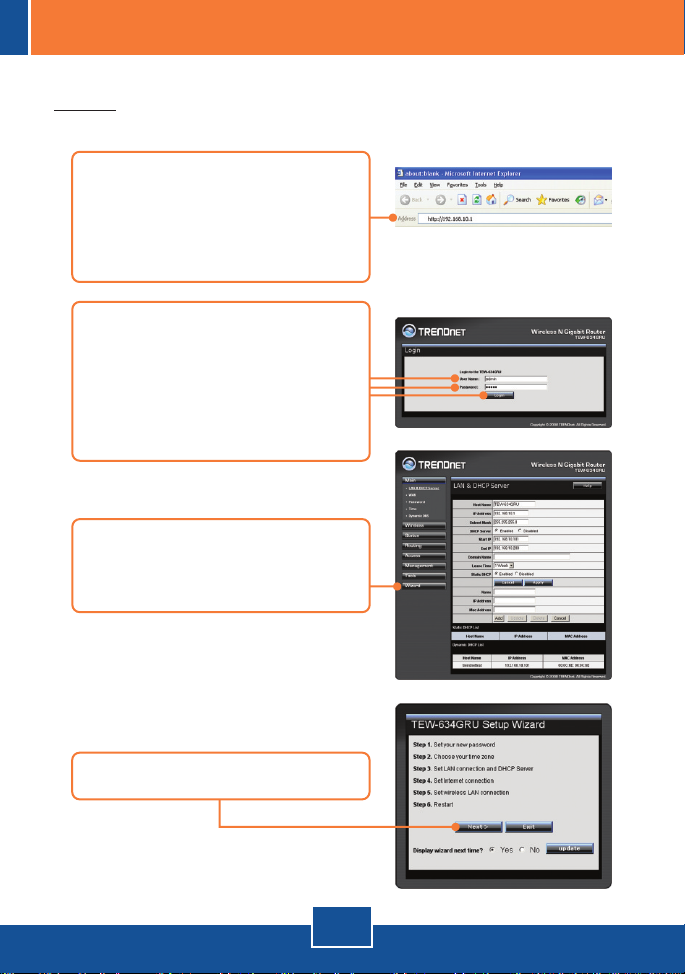
3. Konfiguration des drahtlosen Routers
Hinweis: Es ist zu empfehlen, den drahtlosen Router von einem verdrahteten
Computer aus zu konfigurieren.
1. Öffnen Sie einen Webbrowser und
geben Sie in die Adressleiste
http://192.168.10.1 ein. Drücken
Sie dann auf die Eingabetaste
(Enter).
2. Geben Sie User name
(Benutzername) und Password
(Kennwort) ein und klicken Sie auf
Log In (LOGON).
: admin
Benutzername
: admin.
Kennwort
3. Der Assistent wird automatisch
angezeigt. Klicken Sie andernfalls
auf Wizard (Assistent).
4. Klicken Sie auf Next (Weiter).
5
Deutsch

5. Geben Sie (Kennwort) Password ,
Geben Sie das Passwort ein, und
klicken Sie anschließend auf
"Weiter". Standardmäßig lautet das
Passwort “admin”.
6. Wählen Sie Ihre Zeitzone aus und
klicken Sie auf Next (Weiter).
7. Klicken Sie auf Next (Weiter).
Hinweis: Ändern Sie die
Standardeinstellungen nur dann,
wenn es einen Konflikt mit Ihrer
vorhandenen Hardware gibt.
8. Konfigurieren Sie die Einstellungen
entsprechend den Angaben Ihres
ISP. Führen Sie die Konfiguration
entsprechend den
Bildschirmanweisungen durch.
Hinweis: Für jede Art der
Internetverbindung stehen andere
Optionen zu Verfügung.
Deutsch
6

9. Geben Sie die gewünschte SSID
ein und klicken Sie auf Next
(Weiter). Standardmäßig lautet die
SSID TRENDnet634.
Hinweis: Grundsätzlich is es anzuraten den Drahtlosen Router zu
verschlüsseln. Bitte beachten Sie die Gebrauchsanweisung auf der CD-ROM
für weitere Informationen über die Konfiguration der Verschlüsselung des
kabellosen Routers.
10. Klicken Sie auf Restart
(Neu starten).
11. Klicken Sie auf Close (Schließen).
7
Deutsch

12. Öffnen Sie Ihren Webbrowser und
geben Sie eine URL ein (z.B.
www.trendnet.com), um zu
prüfen, ob eine
Internetverbindung besteht.
Ihre Konfiguration ist beendet!
Weitere Informationen zu den Konfigurations- und erweiterten Einstellungen
des finden Sie im Abschnitt „Problembehandlung“ der
TEW-634GRU
Bedienungsanleitung auf der beiliegenden CD-ROM oder auf der Website von
TRENDnet unter http://www.trendnet.com.
Nehmen Sie sich bitte einen Moment Zeit und registrieren Sie Ihr Produkt online, so
dass Sie unsere umfassenden Support- und Kundendienstleistungen in Anspruch
nehmen können: www.trendnet.com/register
Vielen Dank für den Kauf eines TRENDnet-Produkts
8
Deutsch
Registrieren Sie Ihr Produkt

4. Verwendung des USB-Ports
Installation des Dienstprogramms
Hinweis: Vor der Installation des Dienstprogramms müssen Sie zunächst die
Druckertreiber in Ihrem Computer installieren. Schalten Sie den Drucker aus
und trennen Sie das Verbindungskabel vom Computer. Informationen zur
Installation des Druckers finden Sie in der Bedienungsanleitung.
1. Legen Sie die DienstprogrammCD in das CD-ROM-Laufwerk Ihres
Computers.
2. Klicken Sie auf Run Autorun.exe
(setup.exe ausführen)
(nur Windows Vista).
3. Klicken Sie dann auf Install Utility
(Programm installieren).
4. Klicken Sie auf Next (Neustart).
Deutsch
9

5. Folgen Sie den Anweisungen des
Installationsassistenten. Klicken
Sie auf Finish (Fertigstellen).
6. Verbinden Sie den USB-Drucker
bzw. das USB-Speichergerät mit
dem USB-Port des TEW-634GRU.
Druck
Hinweis: Zu einem Zeitpunkt kann immer nur ein Benutzer im automatischen
Verbindungsmodus drucken. Sobald der Druckvorgang abgeschlossen ist,
erhält der nächste Benutzer Zugriff.
1. Doppelklicken Sie auf das Symbol
für das USB-Kontrollzentrum von
TRENDnet.
2. Wählen Sie den Drucker aus.
Klicken Sie auf Auto Connect
Printer (Automatische
Druckerverbindung) und auf Set
Auto Connect Printer
(automatisch verbundenen Drucker
einrichten).
10
Deutsch

3. Wählen Sie den gewünschten
Drucker und klicken Sie auf Apply
(Übernehmen).
4. Klicken Sie auf OK.
5. Das USB-Kontrollzentrum zeigt
den Drucker als automatisch
verbundenen Drucker an.
6. Sie können jetzt mit dem Drucken
beginnen.
7. Wählen Sie den Drucker aus.
Klicken Sie dann auf Disconnect
(Trennen) (optional)
Hinweis: Beim Drucken im automatischen Verbindungsmodus brauchen die
anderen Anwender nicht zu warten, bis der jeweilige Nutzer auf „Trennen“
klickt. Folgen Sie Schritt 1, um Zugriff zum Druckserver zu erhalten.
11
Deutsch

Scan-Funktion
Hinweis: Zu einem Zeitpunkt kann immer nur ein Benutzer im automatischen
Verbindungsmodus scannen. Sobald der Scanvorgang abgeschlossen ist,
erhält der nächste Benutzer Zugriff.
1. Wählen Sie den Drucker aus.
Klicken Sie auf Network Scanner
(Netzwerkscanner).
2. Wählen Sie das TWAIN- oder WIA-
Format und klicken Sie dann auf
OK.
3. Legen Sie das Dokument auf die
Scanplatte des
Multifunktionsdruckers.
4. Geben Sie einen Namen ein,
wählen Sie den Bildtyp aus und
geben Sie den gewünschten
Speicherstandort an. Klicken Sie
dann auf Scan (Scannen).
12
Deutsch

5. Jetzt wird die Benutzeroberfläche
der Scannersoftware des
Multifunktionsdruckers angezeigt.
Folgen Sie den
Softwareanweisungen.
6. Wiederholen Sie die Schritte 3, 4
und 5, wenn Sie weitere
Dokumente scannen wollen.
Klicken Sie andernfalls auf Close
(Schließen).
Speicherung
Hinweis: Zu einem konkreten Zeitpunkt kann immer nur ein Benutzer auf das
USB-Speichergerät zugreifen.
1. Doppelklicken Sie auf das Symbol
für das USB-Kontrollzentrum von
TRENDnet.
13
Deutsch

2. Klicken Sie auf Connect
(Verbindung herstellen).
3. Markieren Sie Open folder to
view files (Ordner öffnen, um
Dateien anzuzeigen) und klicken
Sie auf OK.
4. Klicken Sie auf Disconnect
(Trennen), um den Zugriff auf das
Speichergerät zu beenden.
14
Deutsch

Troubleshooting
Q1:
I typed http://192.168.10.1 in my Internet Browser's Address Bar, but an error
message says “The page cannot be displayed.” How can I get into the TEW634GRU's web configuration page?
First, check your hardware settings again by following the instructions in
A1:
Section 2. Second, make sure the LAN and WLAN lights are lit. Third, make sure
your TCP/IP settings are set to Obtain an IP address automatically (see the
steps below).
Windows Vista
1. Go into the Control Panel, click Network and
Internet, click Network and Sharing Center,
click Manage Network Connections and then
right-click the Local Area Connection icon and
then click Properties.
2. Click Internet Protocol Version
4(TCP/IPv4) and then click Properties.
Then click on Obtain an IP address
automatically.
1. Go into the Control Panel, double-click the
Network Connections icon and then right-click
the Local Area Connection icon and then click
Properties.
2. Click Internet Protocol (TCP/IP) and
then click Properties. Then click on
Obtain an IP address automatically.
15

Fourth, press on the factory reset button for 15 seconds.
Q2:
I am not sure what type of Internet Account Type I have for my Cable/DSL
connection. How do I find out?
A2:
Contact your Internet Service Provider's (ISP) support service for the correct
information.
Q3:
The Wizard does not appear. What should I do?
A3:
First, click on Wizard on the left hand side. Second, near the top of the
browser, “Pop-up blocked” message appear. Right click on the message and
select Always Allow Pop-ups from This Site. The next time to login to the TEW-
634GRU, this window will appear. Third, disable your browser's pop up blocker.
Q4:
I went through the Wizard, but I can not get onto the Internet. What should I
do?
A4:
First, verify that you can get onto the Internet with a direct connection into your
modem. Second, contact your ISP and verify all the information that you have in
regards to your Internet connection settings is correct. Third, power cycle your
modem and router. Unplug the power to the modem and router. Wait 30
seconds, and then reconnect the power to the modem. Wait for the modem to fully
boot up, and then reconnect the power to the router.
Q5:
I can not make a wireless connection to the Router. What should I do?
A5:
First, make sure that the antennas are connected to the TEW-634GRU.
Second, double check that the WLAN light on the Router is lit. Third, login to your
router. Enter http://192.168.10.1 into the address bar of your router. The default
user name and password is admin. Click Wireless and then click Basic. Make
sure Enabled is selected for Wireless and then click Apply. Fourth, power cycle
the TEW-634GRU. Unplug the power to the TEW-634GRU. Wait 15 seconds,
then plug the power back in to the TEW-634GRU. Fivth, contact the manufacturer
of your wireless network adapter and make sure the wireless network adapter is
configured with the proper SSID. The preset SSID is TRENDnet634.
16

The TRENDnet USB Control Center does not detect the TEW-634GRU. What
Q6:
should I do?
First, double check your hardware connections; make sure that the TEW-
A6:
634GRU is powered ON and is properly connected. Second, disable any
software firewall programs such as ZoneAlarm or Norton Internet Security. If your
computer is running Windows XP or Vista, disable the built-in firewall. Third, go
to System -> Exit in the USB Control Center to close the program. Then double
click on the TRENDnet USB Control Center icon to open up the program. Fifth,
power cycle the TEW-634GRU. Unplug the power to the TEW-634GRU, wait 15
seconds, then plug the TEW-634GRU back in.
No window appears after I connect my computer to my storage device. What
Q7:
should I do?
On Windows 2000/XP, double click on My Computer. A list of drives appears.
A7:
Double click on the drive for your storage device. On Windows Vista, click the
windows icon on the bottom right hand corner and click Computer. A list of drives
appears. Double click on the drive for your storage device.
A connect device failed error message appears when I try to connect to my
Q8:
USB storage device. What should I do?
This message appears when another computer current has access to the
A8:
USB storage device. Press Request to Connect in the USB Control Center utility
and wait for the other user to accept your request. You may also get access to the
USB storage device by unplugging the power to the router and plugging the power
to the router back in. In the USB Control Center utility, click Connect. The error
message will no longer appear.
I cannot set my printer as an auto-connect printer. What should I
Q9:
do?
Verify that no other computer is using the printer. In the utility, if there is a
A9:
computer name next to the printer name, another computer is using the printer.
Once the user has finished printing or scanning, you will be able to print or scan.
If you still encounter problems or have any questions regarding the TEW-634GRU,
please contact TRENDnet's Technical Support Department.
17

GPL/LGPL General Information
This TRENDnet product includes free software written by third party developers. These codes are subject to the GNU
General Public License ("GPL") or GNU Lesser General Public License ("LGPL"). These codes are distributed WITHOUT
WARRANTY and are subject to the copyrights of the developers. TRENDnet does not provide technical support for these
codes. The details of the GNU GPL and LGPL are included in the product CD-ROM.
Please also go to (http://www.gnu.org/licenses/gpl.txt) or (http://www.gnu.org/licenses/lgpl.txt) for specific terms of each
license.
The source codes are available for download from TRENDnet's web site (http://trendnet.com/downloads/list_gpl.asp) for at
least three years from the product shipping date.
You could also request the source codes by contacting TRENDnet.
20675 Manhattan Place, Torrance, CA 90501, USA. Tel: +1-310-961-5500 Fax: +1-310-961-5511
Informations générales GPL/LGPL
Ce produit TRENDnet comprend un logiciel libre écrit par des programmeurs tiers. Ces codes sont sujet à la GNU General
Public License ("GPL" Licence publique générale GNU) ou à la GNU Lesser General Public License ("LGPL" Licence
publique générale limitée GNU). Ces codes sont distribués SANS GARANTIE et sont sujets aux droits d'auteurs des
programmeurs. TRENDnet ne fournit pas d'assistance technique pour ces codes. Les détails concernant les GPL et LGPL
GNU sont repris sur le CD-ROM du produit.
Veuillez également vous rendre en (http://www.gnu.org/licenses/gpl.txt) ou en (http://www.gnu.org/licenses/lgpl.txt) pour les
conditions spécifiques de chaque licence.
Les codes source sont disponibles au téléchargement sur le site Internet de TRENDnet web site
(http://trendnet.com/downloads/list_gpl.asp) durant au moins 3 ans à partir de la date d'expédition du produit.
Vous pouvez également demander les codes source en contactant TRENDnet.
20675 Manhattan Place, Torrance, CA 90501, USA. Tel: +1-310-961-5500 Fax: +1-310-961-5511
Allgemeine Informationen zu GPL/LGPL
Dieses Produkt enthält die freie Software "netfilter/iptables" (© 2000-2004 netfilter project http://www.netfilter.org) und die
freie Software „Linux „mtd“ (Memory Technology Devices) Implementation (© 2000 David Woodhouse), erstmals integriert in
Linux Version 2.4.0-test 3 v. 10.07.2000 (http://www.kernel.org/pub/linux/kernel/v2.4/old-test-kernels/linux-2.4.0-test3.tar.bz2),
sowie weitere freie Software. Sie haben durch den Erwerb dieses Produktes keinerlei Gewährleistungsansprüche gegen die
Berechtigten an der oben genannten Software erworben; weil diese die Software kostenfrei lizenzieren gewähren sie keine
Haftung gemäß unten abgedruckten Lizenzbedingungen. Die Software darf von jedermann im Quell-und Objektcode unter
Beachtung der Lizenzbedingungen der GNU General Public License Version 2, und GNU Lesser General Public License
(LGPL) vervielfältigt, verbreitet und verarbeitet werden. Die Lizenz ist unten im englischsprachigen Originalwortlaut
wiedergegeben. Eine nichtoffizielle Übersetzung in die deutsche Sprache finden Sie im Internet unter
(http://www.gnu.de/documents/gpl-2.0.de.html). Eine allgemeine öffentliche GNU Lizenz befindet sich auch auf der
mitgelieferten CD-ROM.
Sie können Quell-und Objektcode der Software für mindestens drei Jahre auf unserer Homepage www.trendnet.com im
Downloadbereich (http://trendnet.com/langen/downloads/list_gpl.asp) downloadend. Sofern Sie nicht über die Möglichkeit
des Downloads verfügen können Sie bei TRENDnet.
20675 Manhattan Place, Torrance, CA 90501 -U.S.A -, Tel.: +1-310-961-5500, Fax: +1-310-961-5511 die Software anfordern.
Información general sobre la GPL/LGPL
Este producto de TRENDnet incluye un programa gratuito desarrollado por terceros. Estos códigos están sujetos a la
Licencia pública general de GNU (“GPL”) o la Licencia pública general limitada de GNU (“LGPL”). Estos códigos son
distribuidos SIN GARANTÍA y están sujetos a las leyes de propiedad intelectual de sus desarrolladores. TRENDnet no ofrece
servicio técnico para estos códigos. Los detalles sobre las licencias GPL y LGPL de GNU se incluyen en el CD-ROM del
producto.
Consulte también el (http://www.gnu.org/licenses/gpl.txt) ó el (http://www.gnu.org/licenses/lgpl.txt) para ver las cláusulas
específicas de cada licencia.
Los códigos fuentes están disponibles para ser descargados del sitio Web de TRENDnet
(http://trendnet.com/downloads/list_gpl.asp) durante por lo menos tres años a partir de la fecha de envío del producto.
También puede solicitar el código fuente llamando a TRENDnet.
20675 Manhattan Place, Torrance, CA 90501, USA. Tel: +1-310-961-5500 Fax: +1-310-961-5511
Общая информация о лицензиях GPL/LGPL
В состав данного продукта TRENDnet входит бесплатное программное обеспечение, написанное сторонними
разработчиками. Это ПО распространяется на условиях лицензий GNU General Public License ("GPL") или GNU
Lesser General Public License ("LGPL"). Программы распространяются БЕЗ ГАРАНТИИ и охраняются авторскими
правами разработчиков. TRENDnet не оказывает техническую поддержку этого программного обеспечения.
Подробное описание лицензий GNU GPL и LGPL можно найти на компакт-диске, прилагаемом к продукту.
В пунктах (http://www.gnu.org/licenses/gpl.txt) и (http://www.gnu.org/licenses/lgpl.txt) изложены конкретные условия
каждой из лицензий.
Исходный код программ доступен для загрузки с веб-сайта TRENDnet (http://trendnet.com/downloads/list_gpl.asp) в
течение, как минимум, трех лет со дня поставки продукта.
Кроме того, исходный код можно запросить по адресу TRENDnet.
20675 Manhattan Place, Torrance, CA 90501, USA. Tel: +1-310-961-5500 Fax: +1-310-961-5511

GPL/LGPL informações Gerais
Este produto TRENDnet inclui software gratuito desenvolvido por terceiros. Estes códigos estão sujeitos ao GPL (GNU
General Public License) ou ao LGPL (GNU Lesser General Public License). Estes códigos são distribuídos SEM GARANTIA
e estão sujeitos aos direitos autorais dos desenvolvedores. TRENDnet não presta suporte técnico a estes códigos. Os
detalhes do GNU GPL e do LGPL estão no CD-ROM do produto.
Favor acessar http://www.gnu.org/licenses/gpl.txt ou http://www.gnu.org/licenses/lgpl.txt para os termos específicos de cada
licença.
Os códigos fonte estão disponíveis para download no site da TRENDnet (http://trendnet.com/langen/downloads/list_gpl.asp)
por pelo menos três anos da data de embarque do produto.
Você também pode solicitar os códigos fonte contactando TRENDnet, 20675 Manhattan Place, Torrance, CA 90501,
USA.Tel: +1-310-961-5500, Fax: +1-310-961-5511.
GPL/LGPL üldinformatsioon
See TRENDneti toode sisaldab vaba tarkvara, mis on kirjutatud kolmanda osapoole poolt. Koodid on allutatud GNU (General
Public License) Üldise Avaliku Litsentsi (GPL) või GNU (Lesser General Public License) ("LGPL") Vähem Üldine Avalik
Litsentsiga. Koode vahendatakse ILMA GARANTIITA ja need on allutatud arendajate poolt. TRENDnet ei anna koodidele
tehnilist tuge. Detailsemat infot GNU GPL ja LGPL kohta leiate toote CD-ROMil. Infot mõlema litsentsi spetsiifiliste terminite
kohta leiate (http://www.gnu.org/licenses/gpl.txt) või (http://www.gnu.org/licenses/lgpl.txt).
Infot mõlema litsentsi spetsiifiliste terminite kohta leiate (http://www.gnu.org/licenses/gpl.txt) või
(http://www.gnu.org/licenses/lgpl.txt). Lähtekoodi on võimalik alla laadida TRENDneti kodulehelt
(http://trendnet.com/langen/downloads/list_gpl.asp) kolme aasta jooksul alates toote kättesaamise kuupäevast.
Samuti võite lähtekoodi paluda TRENDneti'lt, 20675 Manhattan Place, Torrance, CA 90501, USA. Tel: +1-310-961-5500,
Fax: +1-310-961-5511.
Certifications
This equipment has been tested and found to comply with FCC and CE Rules.
Operation is subject to the following two conditions:
(1) This device may not cause harmful interference.
(2) This device must accept any interference received. Including interference that may
cause undesired operation.
Waste electrical and electronic products must not
be disposed of with household waste. Please
recycle where facilities exist. Check with you Local
Authority or Retailer for recycling advice.
NOTE: THE MANUFACTURER IS NOT RESPONSIBLE FOR ANY RADIO OR TV
INTERFERENCE CAUSED BY UNAUTHORIZED MODIFICATIONS TO THIS
EQUIPMENT. SUCH MODIFICATIONS COULD VOID THE USER’S AUTHORITY TO
OPERATE THE EQUIPMENT.
ADVERTENCIA
En todos nuestros equipos se mencionan claramente las caracteristicas del adaptador de alimentacón
necesario para su funcionamiento. El uso de un adaptador distinto al mencionado puede producir
daños fisicos y/o daños al equipo conectado. El adaptador de alimentación debe operar con voltaje y
frecuencia de la energia electrica domiciliaria existente en el pais o zona de instalación.

Product Warranty Registration
Please take a moment to register your product online.
Go to TRENDnet’s website at http://www.trendnet.com/register
20675 Manhattan Place
Torrance, CA 90501
USA
Copyright ©2009. All Rights Reserved. TRENDnet.
 Loading...