

Page 1
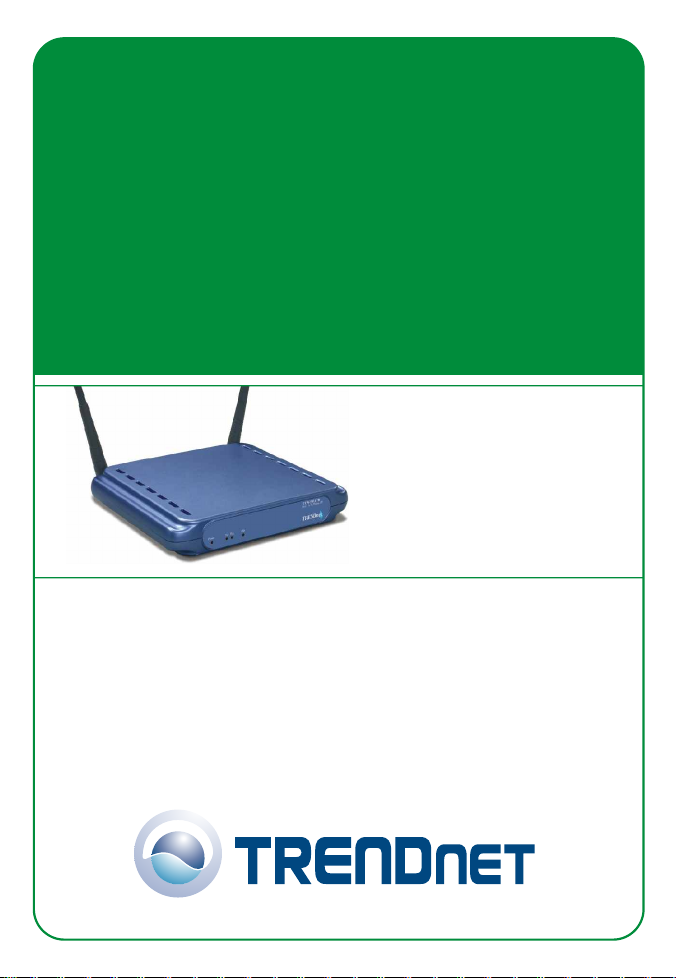
TEW-510APB
Lühike paigaldusjuhend
Versioon 10.12.05
Copyright ©2005. All Rights Reserved. TRENDnet.
Page 2

Sisukord
Eesti .........................................................................................................
1. Paigalduseks valmistumine ..............................................................
2. Riistvara paigaldamine ......................................................................
3. TCP/IP parameetrite seadistamine ....................................................
4. Accesspoindi seadistamine ...............................................................
Troubleshooting...........................................................................................
1
1
2
3
5
8
Page 3
Eesti
1. Paigalduseks valmistumine
Täname sind TRENDnet TEW-510APB Super A+G accesspoindi ostmise eest.
See juhend aitab sul seadistada accespointi kiiresti ja lihtsalt. Järgi ainult
juhiseid ja naudi juhtmevaba interneti eeliseid. Kui sul tekib probleeme, loe
“Probleemide lahendamise” peatükki. Kui vajad täiendavat tehnilist tuge,
külasta veebisaiti www.trendnet.com või võta ühendust tehnilise toega telefoni
teel.
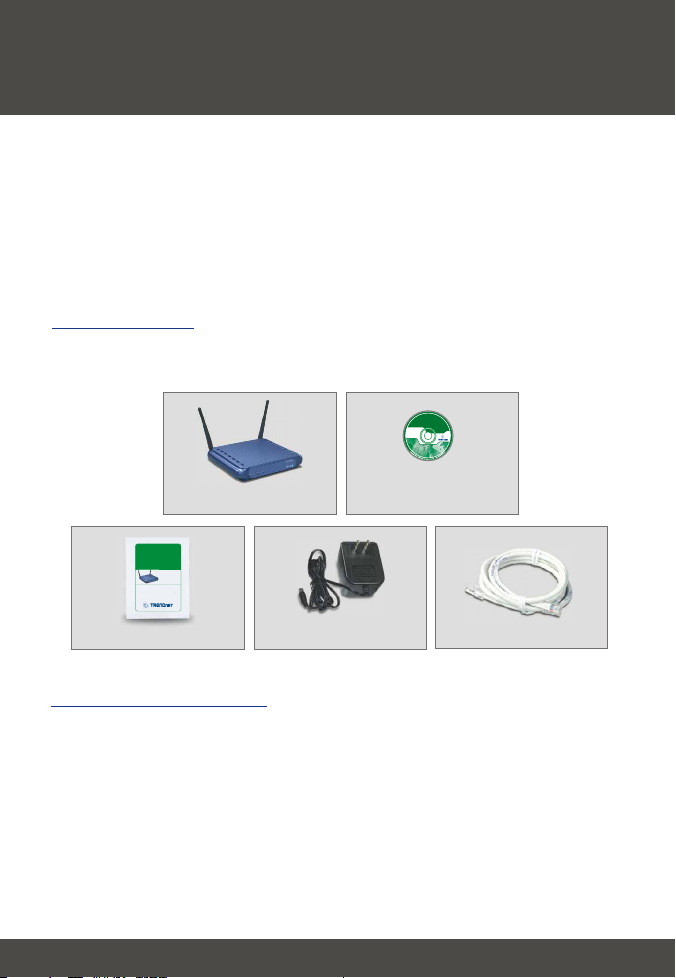
Pakendi sisu
Palun veendu, et karbis on kõik osad:
CD-plaat
(Kasutaja käsiraamat)
1,5m RJ-45 kaabel
TEW-510APB
Lühike paigaldusjuhend
Versioon 10.12.05
Copyright ©2005. All Rights Reserved. TRENDnet.
Lühike paigaldusjuhend
TEW-510APB
Väline toiteadapter
Kontrolli seadmeid
Enne accesspoindi paigaldamist peaks sul olema:
1. Arvuti kaablipõhise (RJ-45) või WiFi võrgukaardiga
2. Arvutisse paigaldatud TCP/IP protokoll
3. Veebibrauser nagu Internet Explorer (5.0 või uuem) või Netscape Navigator
(4.7 või uuem)
4. Hub või switch, millega on ühendatud olemasolev kaablivõrk
5. RJ-45 võrgukaabel accesspoindi ühendamiseks switchiga
1
Eesti
Page 4
2. Riistvara paigaldamine
1. Leia accesspoindile sobiv koht. Parim koht accesspoindi jaoks on tavaliselt
sinu traadita võrgu leviala keskel.
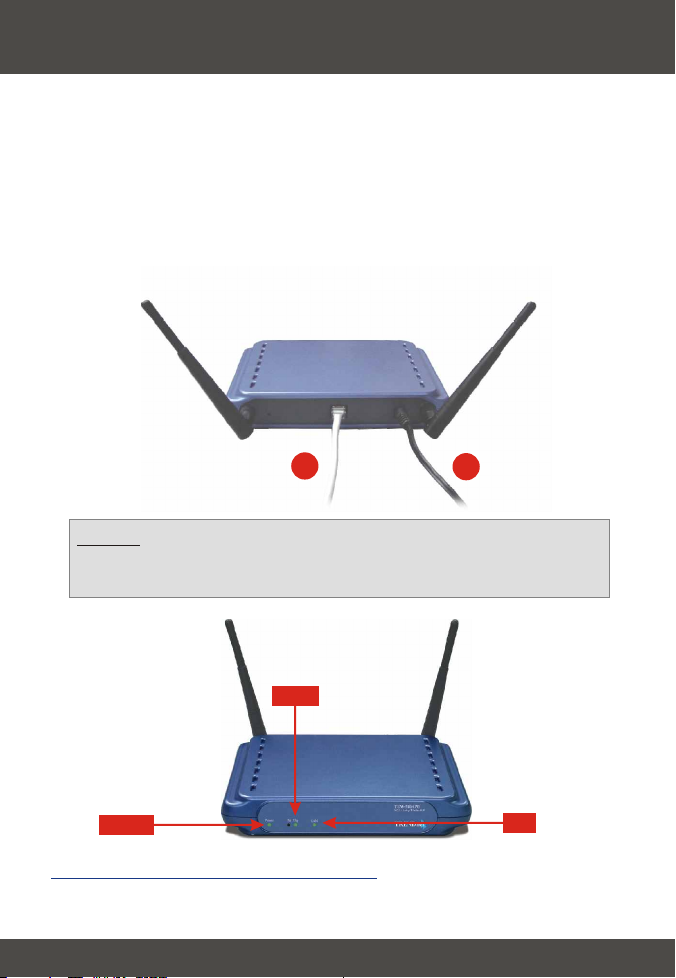
2. Ühenda RJ-45 võrgukaabel accesspoindiga, seejärel ühenda võrgukaabli
teine ots switchi või hubiga. Accesspoint on nüüd ühendatud sinu 10/100
Mbps kohtvõrguga.
3. Ühenda toiteadapter accesspoindiga. Kasuta accesspoindiga komplektis
olevat adapterit. Teiste adapterite kasutamine võib seadet kahjustada.
TEW-510APB
2
Märkus: kui sa kasutad accesspoindi seadistamiseks
kaabliühendusega arvutit, ühenda see arvuti sama switchi või hubi
külge, kuhu on ühendatud TEW-510APB.
WLAN
POWER
3
LAN
Kontrolli riistvara paigaldust
Veendu, et põlevad järgmised esipaneeli tuled: Power, LAN, WLAN.
2
Eesti
Page 5

3. TCP/IP parameetrite seadistamine
Enne, kui accesspoindile juurde pääseb ja seda seadistada saab, tuleb muuta
arvuti TCP/IP parameetreid (sealhulgas WiFi kaardi IP-aadress).
Windows 2000/XP
1. Leia töölaualt Start nupp.
2. Kliki Start ja kliki Control Panel. Windows 2000 puhul kliki Start, märgi
Settings ja kliki Control Panel.
3. Topeltkliki Network Connection ikooni.
4. Paremkliki Local Area Connection ikooni ja seejärel kliki Properties.
Avaneb Local Area Connection Properties aken.
3
Eesti
Page 6

5. Leia ja kliki General sakil Internet Protocol TCP/IP, seejärel kliki
Properties. Avaneb Internet Protocol (TCP/IP) Properties aken.
6. Vali Use the following IP address. Sisesta IP-aadressiks 192.168.1.50,
subnetiks 255.255.255.0 ja kliki OK.
7. Kliki OK.
8. Sinu arvuti on nüüd accesspoindiga ühenduse loomiseks ja selle
seadistamiseks seadistamiseks valmis.
4
Eesti
Page 7

4. Accesspoindi seadistamine
Kui sa seadistad TEW-510APB accesspointi kaabliühendusega arvutist, järgi
punkte 1-3. Kui sa seadistad accesspointi WiFi ühendusega arvutist, järgi
punkte 4-7.
Kaabliühendusega arvutist
1. Ava veebibrauser (Internet Explorer või Netscape) ja sisesta aadressiväljale
http://192.168.1.250, seejärel vajuta Enter klahvi. Jäta username väli
tühjaks ja sisesta parooliks admin.
2. Kliki Wireless. Sisesta accesspoindile vabalt valitud AP nimi (AP Name).
Loo SSID, mida WiFi võrk kasutama hakkab (näiteks “WiFi AP”, “Kodu AP”
või “Kontori AP”) ja vali kanal. Keri lehekülje lõppu ja kliki Apply.
5
Eesti
Page 8

3. Kliki Setup. Kui sinu praegune võrk ei ole samast segmendist (st
192.168.0.1-254), sisesta palun IP-aadress, subnet mask ja gateway (st
ruuteri IP-aadress). Kliki Apply. Kui TEW-510APB praegused seadistused
sind rahuldavad, jätka järgmisest punktist.
WiFi ühendusega arvutist
(Näites kasutatakse TRENDneti TEW-510PC WiFi adapterit)
Accesspoindi tehaseseadistused on:
SSID wlan-a
Kanal - 6
4. va WiFi adapteriga arvutis WiFi seadistusprogramm.
5. Kliki AP List, vali wlan-a ja kliki Connect.
6
Eesti
Page 9

6. Kliki Link Information ja veendu, et arvuti saab ühenduse TEW-510APB
ruuteriga.
7. Mine peatüki 4 (Accesspoindi seadistamine) algusse ja järgi samme 1-3.
7
Eesti
Page 10

Troubleshooting
I specified the IP address http://192.168.1.100 in my internet browser's
Q1:
address bar, but error message says "The page cannot be displayed". How can I
get into the TEW-510APB's web configuration page?
Please check your hardware and TCP/IP settings again by following the
A1:
instructions sections 1~3, make sure the Power, WAN, WLAN on the Access
Point's front panel are on and the TCP/IP configurations are correct. Then try
accessing http://192.168.1.100 again.
If my network's IP is different than the Access Point's range, what should I
Q2:
do?
You should still configure the access point first. After all the settings are applied,
A2:
go to the Access Point's configuration page, click on TCP/IP settings and change an
IP address for the Access Point to match your network's IP.
After I successfully configured the Access Point to meet my network settings,
Q3.
I cannot connecting to my network using wireless computers.
If you have a DHCP server in your network, you need to go into TCP/IP settings
A3:
again and re-select "Obtain an IP automatically" for Windows 98/ME and "Obtain
an IP Address automatically" for Windows 2000/XP to allow the PC to regain an IP
address from your DHCP server.
All the settings are set correct, but I still can't use the Access Point, what
Q4.
should I do?
You can find additional information in the User's Guide. If you still have
A4:
Problems, contact our Technical Support by email or phone.
Certifications
This equipment has been tested and found to comply with FCC and CE Rules. Operation is
subject to the following two conditions:
(1) This device may not cause harmful interference.
(2) This device must accept any interference received.
Including interference that may cause undesired operation.
NOTE: THE MANUFACTURER IS NOT RESPONSIBLE FOR ANY RADIO OR TV
INTERFERENCE CAUSED BY UNAUTHORIZED MODIFICATIONS TO THIS
EQUIPMENT. SUCH MODIFICATIONS COULD VOID THE USER’S AUTHORITY TO
OPERATE THE EQUIPMENT.
8
Page 11

Federal Communication Commission Interference Statement
This equipment has been tested and found to comply with the limits for a Class B digital
device, pursuant to Part 15 of the FCC Rules. These limits are designed to provide
reasonable protection against harmful interference in a residential installation. This
equipment generates, uses and can radiate radio frequency energy and, if not installed
and used in accordance with the instructions, may cause harmful interference to radio
communications. However, there is no guarantee that interference will not occur in a
particular installation. If this equipment does cause harmful interference to radio or
television reception, which can be determined by turning the equipment off and on, the
user is encouraged to try to correct the interference by one of the following measures:
– Reorient or relocate the receiving antenna.
– Increase the separation between the equipment and receiver.
– Connect the equipment into an outlet on a circuit different from that
to which the receiver is connected.
– Consult the dealer or an experienced radio/TV technician for help.
This device complies with Part 15 of the FCC Rules. Operation is subject to the
following two conditions: (1) This device may not cause harmful interference, and (2)
this device must accept any interference received, including interference that may cause
undesired operation.
FCC Caution: Any changes or modifications not expressly approved by the party
responsible for compliance could void the user's authority to operate this equipment.
IMPORTANT NOTE:
FCC Radiation Exposure Statement:
This equipment complies with FCC radiation exposure limits set forth for an uncontrolled
environment. This equipment should be installed and operated with minimum distance
20cm between the radiator & your body.
If this device is going to be operated in 5.15 ~ 5.25GHz frequency range, then it is
restricted in indoor environment only.
This transmitter must not be co-located or operating in conjunction with any other
antenna or transmitter.
TRENDware declares that TEW-510APB ( FCC ID: RYK-WL7800A ) is limited in
CH1~CH11 for 2.4 GHz by specified firmware controlled in U.S.A.
51
Page 12

@
Product Warranty Registration
Please take a moment to register your product online.
Go to TRENDnet’s website at http://www.TRENDNET.com
TRENDnet Technical Support
US/Canada Support Center European Support Center
Contact Contact
Telephone:
Fax:
Email:
Tech Support Hours
7:30am - 6:00pm Pacific Standard Time
Monday - Friday
1(888) 777-1550
1(310) 626-6267
support@trendnet.com
TRENDnet
3135 Kashiwa Street. Torrance, CA 90505
Telephone
Deutsch : +49 (0) 6331 / 268-460
Français : +49 (0) 6331 / 268-461
Español : +49 (0) 6331 / 268-462
English : +49 (0) 6331 / 268-463
Italiano : +49 (0) 6331 / 268-464
Dutch : +49 (0) 6331 / 268-465
Eesti : +372-6593613 (9.00AM to 5:00PM)
+49 (0) 6331 / 268-466
Fax:
Tech Support Hours
8:00am - 6:00pm Middle European Time
Monday - Friday
http://www.TRENDNET.com
Copyright ©2005. All Rights Reserved. TRENDnet.
0800-907-161 (numéro vert)
 Loading...