

Page 1
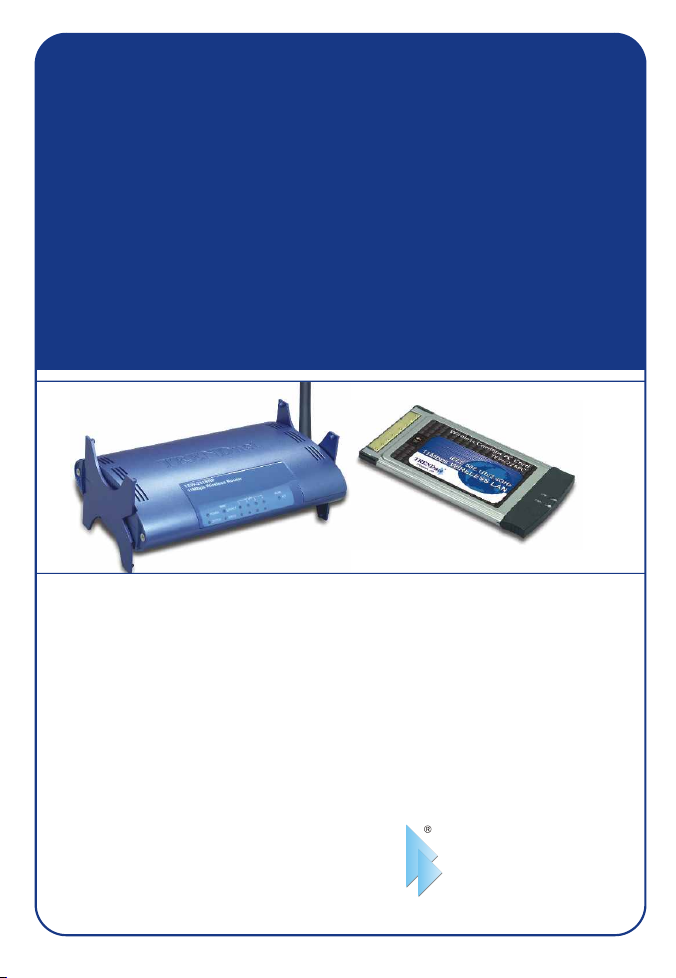
TEW-2K1
11 Mbps 802.11b Wireless Router
Quick Installation Guide
Guide d'installation rapide pour le
Routeur Sans Fil 11Mbps 802.11b
Schnell Anleitung
802.11b Wireless Router
Guía de Instalación Rápida del
Enrutador Inalámbrico 802.11b de 11Mbps
Version 05.20.04
TRENDnet
TRENDware, USA
What's Next in Networking
Copyright ©2004. All Rights Reserved. TRENDware International, Inc.
Page 2

Table of Contents
English ......................................................................................................
1. Prepare for Installation ......................................................................
2. Install Hardware ................................................................................
3. Install Wireless Configuration Utility ..................................................
4. Install Drivers ....................................................................................
5. Configure the Router .........................................................................
Troubleshooting...........................................................................................
1
1
3
4
7
18
26
Page 3
English QIG
1. Prepare for Installation
Thank you for purchasing the TEW-2K1. This 11Mbps 802.11b Wireless
Router / PC Card Kit will enable you to connect to and share your Cable or
DSL broadband Internet connection with 802.11b wireless and wired
computers.
This guide will help you set up and configure your wireless PC card and router.
Following the installations should be quick and easy. If you run into problems,
please refer to the Troubleshooting section or the more detailed installation
procedures on the User's Guide CD-ROM. If you need further technical
support, please visit www.TRENDNET.com or call by phone.
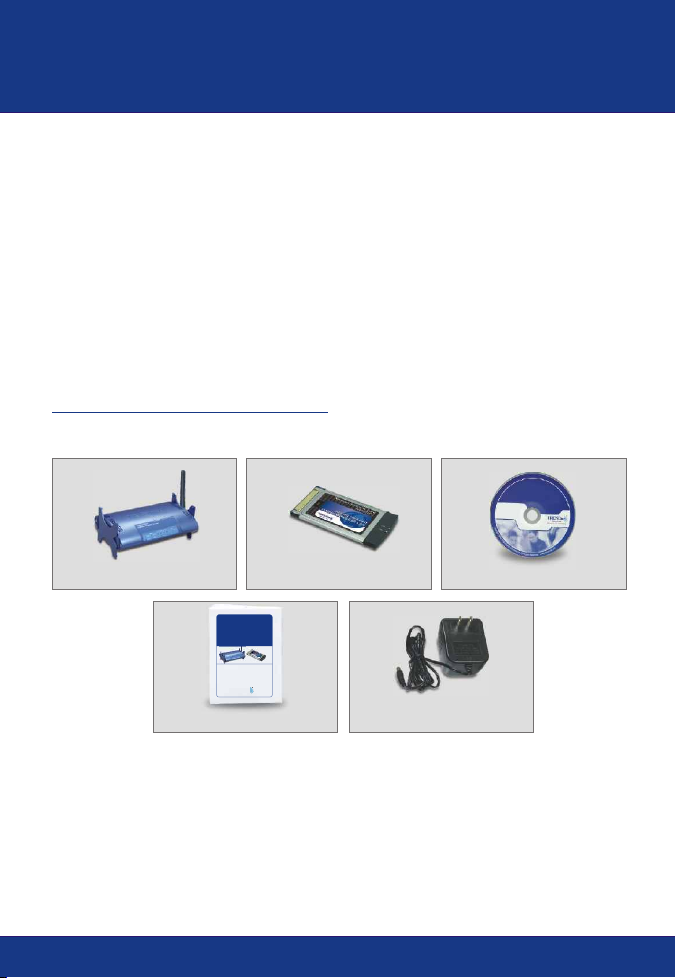
Verify Package Contents
Please make sure you have everything in the box:
TEW-231BRP
Quick Installation Guide
TEW-2K1
11 Mbps 802.11b Wireless Router
Quick Installation Guide
Guide d'installation rapide pour le
Routeur Sans Fil 11Mbps 802.11b
Schnell Anleitung
802.11b Wireless Router
Guía de Instalación Rápida del
Enrutador Inalámbrico 802.11b de 11Mbps
Version 05.20.04
TRENDnet
TRENDware, USA
What's Next in Networking
TEW-226PC User’s Guide CD-ROM
AC Power Adapter
1
English
Page 4

Collect Internet Service Provider (ISP) Information
During the installation of your Wireless Router, the Quick Setup application will
ask you to specify your ISP connection type. Therefore, please verify your
Cable or DSL Internet broadband connection type with your ISP and ensure
you have all the information for one of the following connection types:
A. Dynamic IP Cable Connection
Nothing required. IP address will automatically be assigned by the ISP.
B. Static or Fixed IP Cable Connection
Internet IP Address:____.____.____.____
Subnet Mask: ____. ____. ____. _____
Gateway IP Address:____.____.____._____
Primary DNS:____.____._____.______
Secondary DNS:_____._____._____.____
C. PPPoE DSL Connection
Login Name:______________
Password:________________
D. PPTP DSL Connection
Login Name:_______________
Password:_________________
(eg. 215.24.24.129)
2
English
Page 5
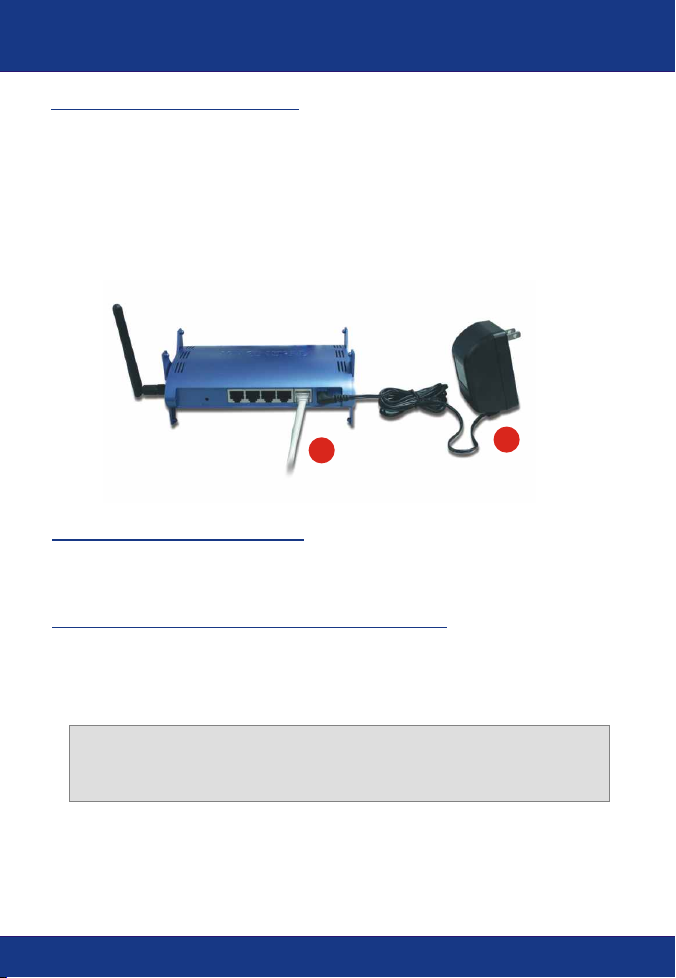
2. Install Hardware
Router (TEW-231BRP)
1. Turn off your Cable/DSL Modem and Computer.
2. Attach the antenna to the connector on the side of your AP/Router.
3. Connect the RJ-45 Ethernet cable from your Cable or DSL modem's
Ethernet port to the WAN port on the TEW-231BRP.
4. Turn on your Cable/DSL Modem. Once the Cable/DSL Modem is on, connect
the included power adapter to your AP/Router and to a power outlet.
5. Turn on your Computer.
POWER
2
3
PC Card (TEW-226PC)
The TEW-226PC Wireless PC Card is designed to operate in Windows 98,
Windows ME, Windows 2000, and Windows XP.
Minimum Hardware Requirements
1. Laptop with an available 32-bit CardBus
2. 300 MHz processor and 32 MB of memory (Recommended)
3. Properly installed CardBus Controller
<Important> DO NOT install the adapter in the computer. Please follow
the instructions below to install the utility and driver before installing the
adapter in the computer.
3
English
Page 6
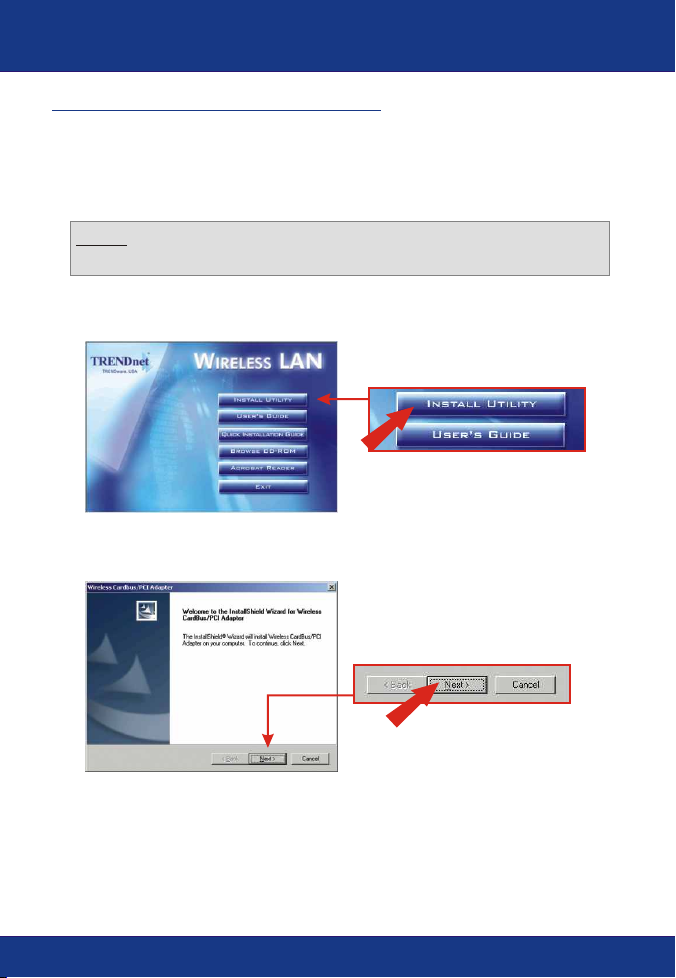
3. Install Wireless Configuration Utility
Windows 98SE/ME/2000/XP
1. Insert the TEW-226PC/TEW228PI CD-ROM into your computer's CD-ROM
drive; the installation menu window will appear automatically. If the window
does not appear automatically, click Start, click Run, and type
E:\Autorun.exe in the text-field. Click OK.
NOTE: Replace “E” in “E:\Autorun.exe” with whichever letter is assigned
to your CD-ROM drive.
2. On the Installation Menu, click Install Utility.
3. Click Next.
4
English
Page 7
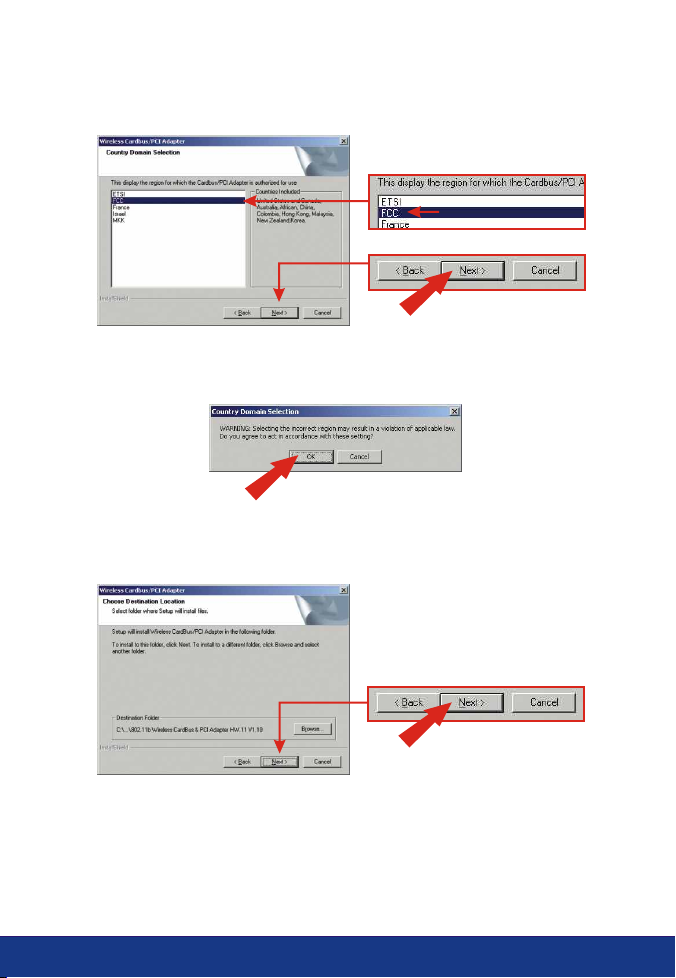
4. Select the region and click Next.
5. Click OK.
6. Click Next to start installing.
5
English
Page 8
8. Click Finish.
NOTE: For Windows 98SE/ME, select “No, I will restart my computer
later,” and click Finish.
9. Click Exit on the Installation menu screen.
Install Hardware
1. Shut down your computer.
2. Insert the PC Card firmly into your notebook PC's open PC Card slot. Only
the plastic end-piece should protrude from the slot.
3. Reboot your computer.
6
English
Page 9
4. Install Drivers
Windows XP
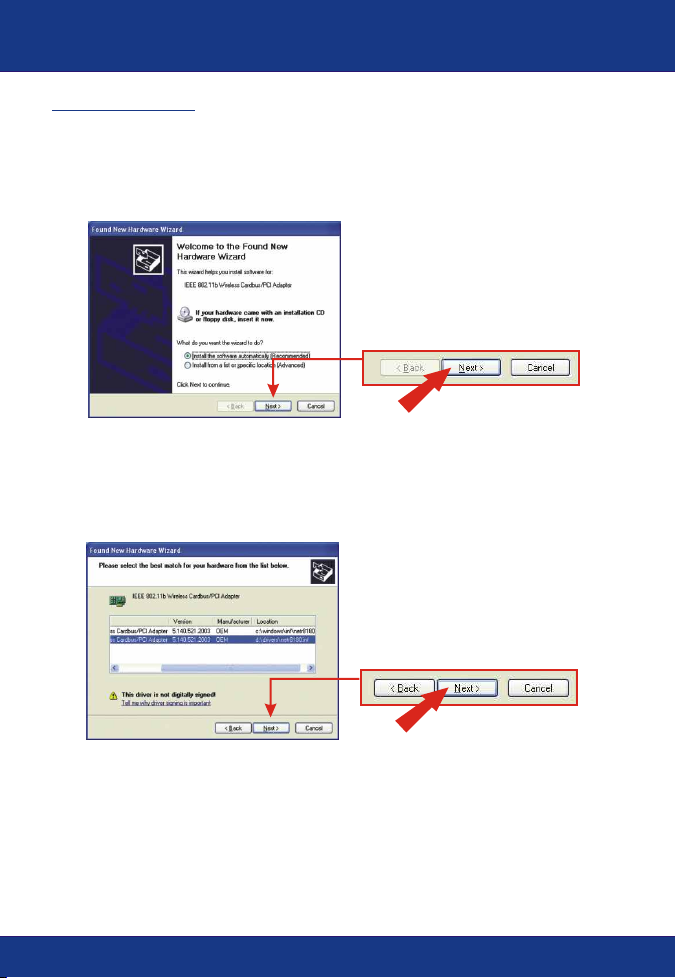
1. After your computer reboots, the “Found New Hardware Wizard” will appear.
Verify that Install the software automatically is selected and that the
TEW-226PC/228PI CD-ROM is in your CD-ROM drive. Then, click Next.
2. When you are prompted to choose a driver from a list of compatible drivers,
choose the one that is located in the TEW-421PC/423PI CD-ROM's
Windows XP folder, and click Next.
7
English
Page 10

3. A warning message will tell you that the device you're installing has not yet
been certified for Windows XP compatibility. Click Continue Anyway.
NOTE: TRENDnet's Wireless Adapter drivers have been fully tested in
all supported Windows Operating Systems and have been found to
provide assured compatibility.
4. The “Found New Hardware Wizard” will tell you that it has finished installing
the software for your IEEE 802.11b Wireless Cardbus/PCI Adapter. Click
Finish.
8
English
Page 11

5. Double-click the wireless computer icon in your system tray (next to the clock
in the bottom right corner of your screen).
6. On the Wireless Configuration Utility window, click the Network tab.
7. Select the wireless network SSID to “default”, then, click Connect.
8. Go to Verify Connection.
Windows 2000
1. After your computer reboots, the “Found New Hardware Wizard” will appear.
Click Next.
2. Ensure that Search for a suitable driver for my device is selected and that
the TEW-226PC/228PI CD-ROM is in your CD-ROM drive. Then, click Next.
9
English
Page 12

3. On the next screen, select Specify a location, and click Next.
4. Click the Browse button on the window that pops up.
5. Double-click your CD-ROM drive, double-click Drivers, and select
“NETR8180.INF”, and click Open.
10
English
Page 13

6. Click OK.
7. Click Next.
8. A message will tell you that the driver you're about to install “does not
contain a digital signature” and will ask you if you want to continue the
installation. Click Yes.
NOTE: TRENDnet's Wireless Adapter drivers have been fully tested in
all supported Windows Operating Systems and have been found to
provide assured compatibility.
11
English
Page 14

9. The “Found New Hardware Wizard” will tell you that it has finished installing
the software for your new device. Click Finish.
10. Double-click the wireless computer icon in your system tray (next to the
clock in the bottom right corner of your screen).
11. On the Wireless Configuration Utility window, click the Network tab.
12. Select the wireless network SSID to “default”, then, click Connect.
13. Go to Verify Connection.
Windows 98SE/ME
1. After your computer reboots, the “Add New Hardware Wizard” will appear.
Click Next.
12
English
Page 15

2. Select Search for the best driver for your device and click Next.
3. Select Specify a location, and click Browse.
4. If the TEW-226PC/228PI CD-ROM is not in your CD-ROM drive, put it into
your CD-ROM drive now. From the “Browse for Folder” window that has
appeared, double-click the icon for the CD-ROM drive containing the TEW226PC/228PI CD-ROM.
13
English
Page 16

5. Double-click the TEW-226PC/228PI CD-ROM's Driver folder; then click OK.
6. Click Next.
NOTE: For Windows ME, select the E:\Driver\Windows ME folder.
7. Click Next.
14
English
Page 17

8. You may be asked to insert your Windows 98/ME CD-ROM. If this is the
case, insert your Windows 98/ ME CD-ROM, and click OK.
9. The “Add New Hardware Wizard” will tell you that it has finished installing the
software for your IEEE 802.11b Wireless Cardbus/PCI Adapter. Click Finish.
10. Click Finish.
11. Windows will ask you if you want to restart your computer. Click Yes.
NOTE: If this prompt does not appear, you must manually restart your
computer.
15
English
Page 18

12. After the computer restarts, double-click the wireless computer icon in your
system tray (next to the clock in the bottom right corner of your screen).
13. On the Wireless Configuration Utility window, click the Network tab.
14. Select the wireless network SSID to “default”, then, click Connect.
Verify Connection
Note: The wireless router TEW-231BRP has the following factory default
settings:
SSID: default
WEP: Disable
Channel: 6
If you cannot see the “default” SSID, make sure your AP/Router is connected
and is turned on; then, click Rescan.
16
English
Page 19

The wireless connection has been established, click the Status tab of the
Wireless Configuration Utility. If the Status page displays “Signal Strength” and
“Link Quality” information, your card’s wireless configuration is complete.
Congratulations! You have finished installing the Wireless PC Card. Continue to
Section 5 of this Quick Installation Guide to configure your wireless router.
17
English
Page 20

5. Configure the Router
1. Open your web browser and type http://192.168.1.1 into the Address box
and press the Enter key.
2. The login screen will appear; click LOGIN to access the Quick Setup.
NOTE: By default, no password has been set on the wireless router. To
reset the password on the wireless router, please refer to the User’s
Guide CD-ROM.
3. Click on Quick Setup to configure your Wireless Router for Broadband
Internet access.
18
English
Page 21

4. Click on the dropdown menu to select the appropriate time zone. If your
region runs on Daylight Savings Time, you should enable the “Set Daylight
Saving” option and input the dates and times when Daylight Savings Time
goes into and out-of effect. Then click Next.
5. Click on the dropdown menu to select your country. (Note: “USA” by default).
NOTE: After selecting your country, a WARNING pop-up will appear to
inform you that choosing an incorrect country may be in violation of
applicable laws. Click OK.
6. Your wireless configuration is complete. Click Next.
NOTE: If you wish to enable the WEP security feature, refer to the
User's Guide on the included CD-ROM.
19
English
Page 22

7. Select the appropriate WAN connection type by clicking on Dynamic IP,
Static IP, PPPoE, or PPTP.
Dynamic IP
1. Specify the Host Name (if any) and Clone the MAC Address (if required by
your ISP). Click Next.
20
English
Page 23

2. Specify Primary and Secondary DNS addresses if you wish to use DNS
addresses other than your ISP-provided DNS addresses. Click Finish.
3. To verify your Internet connection, type http://www.TRENDNET.com in your
browser's address bar, and hit Enter. If the website appears, your router is
configured properly.
21
English
Page 24

Static or Fixed IP Cable Connection
1. Enter the IP Address, Subnet Mask, and ISP Gateway Address provided by
your ISP. Click Next.
2. Specify Primary and Secondary DNS addresses if you wish to use DNS
addresses other than your ISP-provided DNS addresses. Click Finish.
3. To verify your Internet connection, type http://www.TRENDNET.com in your
browser's address bar, and hit Enter. If the website appears, your router is
configured properly.
22
English
Page 25

PPPoE
1. Enter your PPPoE User Name and Password, and retype your password.
Then, click Next.
2. Specify Primary and Secondary DNS addresses if you wish to use DNS
addresses other than your ISP-provided DNS addresses. Click Finish.
23
English
Page 26

3. To verify your Internet connection, type http://www.TRENDNET.com in your
browser's address bar, and hit Enter. If the website appears, your router is
configured properly.
PPTP
1. Enter your PPTP User Name and Password, and retype your password.
Then, click Next.
24
English
Page 27

2. Specify Primary and Secondary DNS addresses if you wish to use DNS
addresses other than your ISP-provided DNS addresses. Click Finish.
3. To verify your Internet connection, type http://www.TRENDNET.com in your
browser's address bar, and hit Enter. If the website appears, your router is
configured properly.
NOTE: Open a web browser and try to access internet. If you still have
problems, retry the steps or contact our technical support.
25
English
Page 28

Troubleshooting
I completed all the steps in the quick installation guide, but my card isn't connecting to
Q1.
my wireless router. What should I do?
Q2.
Q3.
Q4.
"The page cannot be displayed". How can I get into the TEW-231BRP web configuration
page?
Q5.
How do I find out?
Q6.
Internet. Why?
You should first verify that the Network SSID matches your wireless router SSID. If
A1.
they already match, you should check your TCP/IP properties to ensure that Obtain an
IP address automatically is selected. Refer to your Windows User's Manual if you are
unable to locate your TCP/IP properties.
Windows is unable to recognize my hardware. What should I do?
Make sure your computer meets the minimum requirements as specified in Section
A2.
1 of this quick installation guide. Also, you must install the wireless configuration utility
(as described in Section 2) BEFORE you physically install your network card. Lastly,
you may consider moving the card to a different PCI/PC Card Slot.
I cannot open the wireless configuration utility. What should I do?
Go to your device manager (control panel >>> system) to make sure the adapter is
A3.
installed properly. If you see a networking device with a yellow question mark or
exclamation point, you will need to reinstall the device and/or the drivers.
I specified the IP address, 192.168.1.1 in my internet browser, but an error message says
Please check your hardware and TCP/IP settings again by following the
A4.
instructions in section 1-3, make sure the Power, WAN, and on the LAN lights on the
Router's front panel are on, and verify that the TCP/IP configuration is correct. Then try
accessing 192.168.1.1 again using your web browser.
I am not sure what type of Internet Account Type I have for my Cable/DSL connection,
You can simply contact your Internet Service Provider's (ISP) Customer Service or
A5.
Technical Support Department for the correct information.
I set up my internet connection type and saved it, but I still cannot connect to the
Option 1: Go to the Status section of the configuration page, and click on the
A6.
Connection Detail button. Click on the Release/Renew button to allow the router to
refresh the connection with your ISP. Then try browsing a website such as
http://www.trendnet.com again with your Internet browser.
Option 2: Please power down all the equipment including Cable/DSL modem, Router
and your PC. Power on the Cable/DSL modem and wait 60 seconds, then power on
the router followed by your PC. This simple power cycle normally helps the router to
find your Internet connection. Then try browsing a website such as
http://www.trendnet.com with your web browser.
If you still encounter problems, please refer to the User's Guide CD-ROM or contact technical
support.
Contact Technical Support
Telephone: +1-310-891-1100
Fax: +1-310-891-1111
Technical Support Hours
7:00AM ~ 6:00PM, Monday through Friday
Pacific Standard Time (except holidays)
Website: www.TRENDNET.com
E-mail: support@trendware.com
26
Page 29

TRENDnet
TRENDware, USA
What's Next in Networking
Product Warranty Registration
Please take a moment to register your product online.
Go to TRENDware’s website at http://www.TRENDNET.com
@
TRENDware International, Inc.
3135 Kashiwa Street
Torrance, CA 90505
http://www.TRENDNET.com
Copyright ©2004. All Rights Reserved. TRENDware International, Inc.
 Loading...