

Page 1

Compact Flash Size
10/100 Fast Ethernet
LAN Card
For Both Notebook PC and
Windows CE-based PDA / Palm PC
Users Guide
Doc. No.:101802-01
Page 2

FCC REGULATORY STATEMENTS
Part15, Class B
This device complies with Part 15 of FCC rules.
Operation is subject to the following two conditions:
1. This device may not cause harmful interface, and
2. This device must accept any interface received,
including interface that may cause undesired
operation. This equipment has been tested and
found to comply with the limits for a Class B
digital device, pursuant to Part 15 of the FCC
Rules. These limits are designed to provide
reasonable protection against harmful
interference in a residential installation. This
equipment generates, uses and can radiate radio
frequency energy, and if not installed and used in
accordance with the instructions, may cause
harmful interference to radio communications.
However, there is no guarantee that interference
will not occur in a particular installation. If this
equipment does cause harmful interference to
radio or television reception, which can be
determined by turning off and on, the user is
encouraged to try to correct the interference by
one or more of the following measures:
• Reorient or relocate the receiving antenna.
• Increase the distance between the equipment and
receiver.
• Connect the equipment into an outlet on a circuit
different from that to which the receiver is
connected.
Changes or modifications not expressly
approved by party responsible for compliance
could void the user the user authority to
operate the equipment.
Page 3

Table of Contents
Introduction ......................................................1
SYSTEM REQUIREMENTS........................ 1
OPERATING ENVIRONMENTS ................ 2
Parts Names................................................... 3
HARDWARE INSTALLATION ....................4
Connecting to a PDA/Palm PC...................... 4
Installing into a Notebook PC ....................... 4
Connecting to the Network............................ 5
SOFTWARE INSTALLATION For
PDA/Palm PC with Windows CE 2.0..............6
SOFTWARE INSTALLATION For
Notebook PC ..................................................... 8
Installation for Windows 95 .......................... 8
Installation for Windows 98 .......................... 8
Installation for Window ME........................ 11
Installation for Windows 2000 .................... 12
Installation for Windows XP ....................... 15
Installation for Windows NT 4.0................. 17
Novell Netware 3.x/4.x................................ 19
MS LAN Manager....................................... 23
Packet Driver ............................................... 25
Windows for Workgroups 3.11 ................... 26
Page 4

Installation for IBM OS/2 Warp.................. 31
INTERNET ACCESS ....................................33
Setup Pocket PC 2002 PDA ........................ 33
Appendix A. SPECIFICATIONS ............39
Network Interface Specifications ................ 39
Host Interface and Physical Specifications.. 39
Operating Systems....................................... 40
Power Requirements.................................... 40
General Specification .................................. 40
Page 5

INTRODUCTION
This CompactFlash Size 10/100 Fast Ethernet
LAN Card is designed for Windows CE-based
palm-sized PCs, handheld PCs and any computer
with a CompactFlash slot.
Plus, with connecting to a PCMCIA Adapter
(not included), this CompactFlash Fast Ethernet
LAN Card turns into a PC card that plugs into
any computer with a PCMCIA slot.
The CompactFlash Fast Ethernet LAN Card is
simple to use, providing automatic installation,
and no external power is required.
SYSTEM REQUIREMENTS
For Notebook PC:
• An IBM compatible notebook computer with
386SX or faster processor
• At least one Type II PC Card socket
• Drivers and utilities provided with this
product
• PCMCIA release 2.1 compliant
Card Services and Socket Services.
For Windows CE-based PDA/Palm PC:
• One Type I CompactFlash Slot supporting IO
functionality.
• Windows CE 2.0 or newer version
• Windows CE Service Disk
• CF+ and CompactFlash Spec. Reversion 1.4
- 1 -
Page 6

compliant Card Services and Socket Services
OPERATING ENVIRONMENTS
For Notebook PC:
Novell Netware 3.x/4.x
Microsoft LAN Manager
Packet Driver Applications
Microsoft Windows for Workgroups 3.11
Microsoft Windows 3.1
Microsoft Windows NT 4.0
Windows 98
Windows 2000
Windows ME
Windows XP
Lantastic 6.0
IBM OS/2 Warp Version 3
For Windows CE-based PDA/Palm PC:
Software Compatibility
Windows CE 2.0 or newer version
Hardware Compatibility for Processor
Families:
Supports PDA/Palm PC using MIPS4000 series,
and Hitachi Sh3 series processors.
- 2 -
Page 7
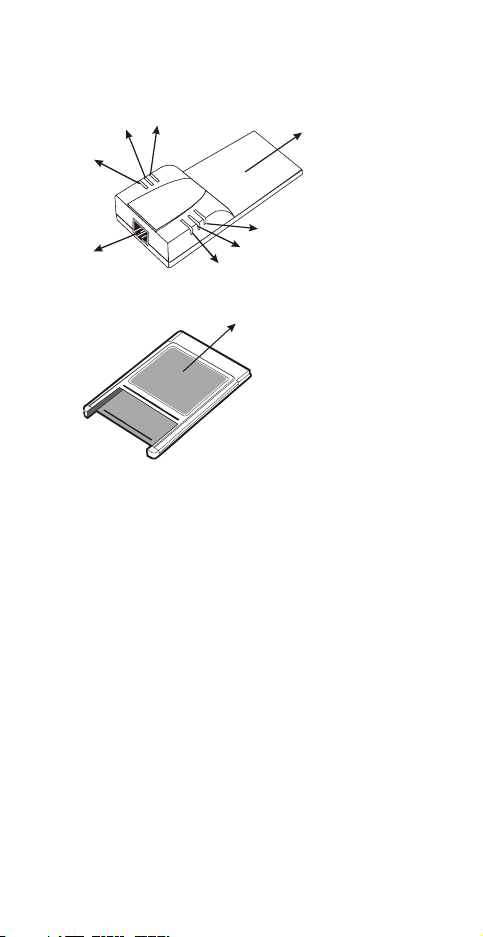
Parts Names
TX LED
COL LED
RX LED
RJ-45 port
CompactFlash-sized 10/100
Fast Ethernet LAN card with
Direct Port
Full/Half
100/10 LED
Link
CompactFlash PC Card adapter
- 3 -
Page 8
HARDWARE INSTALLATION
It’s referred to as the Compact Card for the
separate CompactFlash Size 10/100 Fast
Ethernet LAN Card; and referred to as the PC
Card for the CompactFlash Fast Ethernet LAN
Card together with our CompactFlash PC Card
Adapter in this manual.
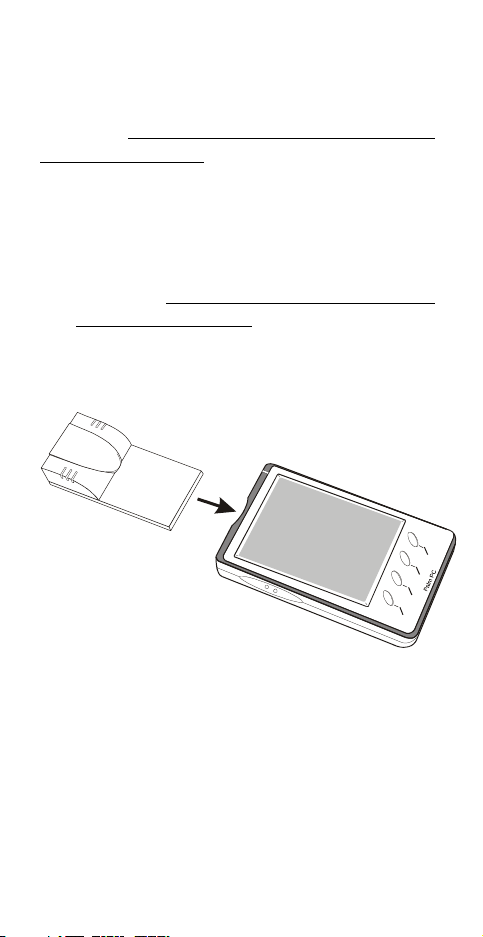
Connecting to a PDA/Palm PC
1. Insert the CompactFlash Size 10/100 Fast
Ethernet LAN Card into Windows CEbased PDA/Palm PC by aligning the
Compact Card with wide connector toward
the CompactFlash slot.
Installing into a Notebook PC
1. Plug the CompactFlash-Size 10/100 Fast
Ethernet LAN Card into the PCMCIA
Adapter. The CompactFlash Fast Ethernet
LAN Card is then turning into a
conventional PCMCIA type II PC Card.
- 4 -
Page 9

2. Align the PC Card toward the PC Card slot
with brand label facing upward, as shown
below.
Notebook
Connecting to the Network
1. Connect unshielded twisted pair (UTP)
cable to the RJ-45 connector before loading
any network driver.
For operation in the 10Mbps (10Base-T)
Ethernet network, Category 3, 4 or 5
unshielded twisted pair (UTP) cable could be
used to connect between the media coupler
and a 10Mbps hub or switch.
- 5 -
Page 10

SOFTWARE INSTALLATION FOR
PDA/PALM PC WITH WINDOWS CE
2.0
1. Establish a connection between the
PDA/Palm PC with the Host PC, typically
your Host PC running
Windows98/2000/ME/XP/NT4.0.
2. Install “ActiveSync” connection from the
WinCE Services CD to your desktop PC. For
more information, please refer to Online help.
3. Connect the PDA/Palm PC to the Host PC
COM1 or COM2 port with serial cable.
4. Once the connectiopn between Host PC and
PDA/Palm PC is established, an “Mobile
device” icon will appear inside “My
Computer” folder of the Host PC.
5. Insert Disk “ CompactFlash Ethernet LAN
Card for WinCE”. Use “Windows Explorer”
to open files directories in A:, then double
click on the directory A: disk and look for
setup file “setup.exe”. Please Execute the
setup file.
6. Insert the Compact Card and reset the
PDA/Palm PC thereafter. Then Configure
your Compact LAN Card as follows.
7. Doble click on “Network”, select “property
and choose “Obtain an IP address through
DHCP sever”. At this time, you should see
“CompactFlash Size 10/100 Fast Ethernet
LAN Card” installed and shown in the
WinCE screen.
- 6 -
Page 11

8. If your local LAN does not have the DHCP,
you may have to manully configure the IP
address under “Specific an IP address”
option.
9. After you have followed the procedure
described above and setup the Compact Card
correctly, you may use the pocket Internet
Explore to browse the internet.
Note: Host PC's running Windows 95 OSR2
cannot active sync after entering suspend mode.
If the machine goes into suspend, it will need to
be reset in order to active sync with the
handheld device.
- 7 -
Page 12

SOFTWARE INSTALLATION FOR NOTEBOOK PC
Installation for Windows 95
The installation procedures for the network
driver may vary slightly depending on the
version of Windows 95 you are using and also
your current system configuration.
1. Once the PCMCIA Fast Ethernet PC
Card is connected to your computer,
Windows 95 will automatically detect the
new hardware device as shown below.
Insert the program diskette #1 into your
floppy drive.
2. Click Next. When the PCMCIA Fast
Ethernet PC Card message appears, click
Finish. The Installation program will
continue to copy the necessary files into
your computer.
3. Follow the on-screen instruction to proceed.
If Windows asks you to supply your original
Windows 95 installation or setup files, insert
the CD-ROM or disks as requested, and
direct Windows 95 to the proper location.
4. When asked if you want to restart your
computer, click Yes.
Installation for Windows 98
1. Once the PC Card is connected to your
computer, Windows 98 will automatically
detect the new hardware device as shown
below. Click Next.
- 8 -
Page 13
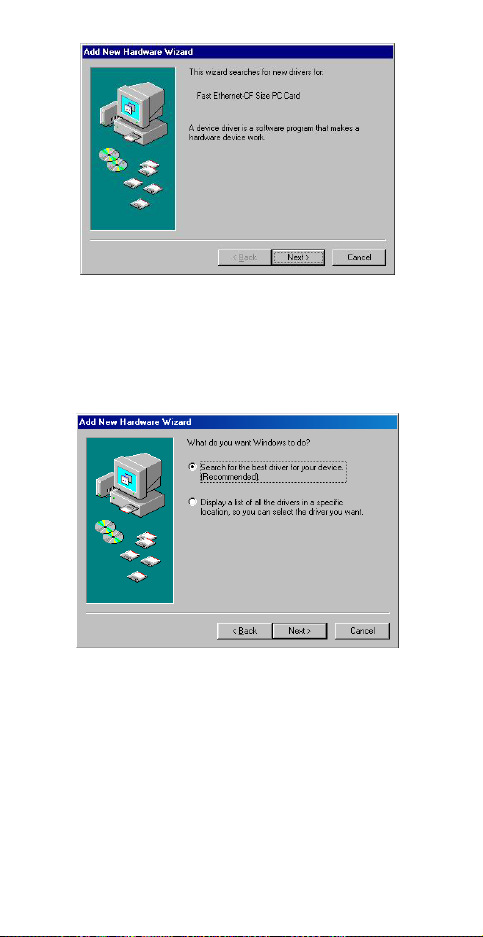
2. Insert the device driver diskette into your
floppy drive. When Windows prompts you
What do you want Windows to do? Select
Search for the best driver for your device.
(Recommended).
Click Next.
3. Follow the on-screen instruction to proceed.
- 9 -
Page 14
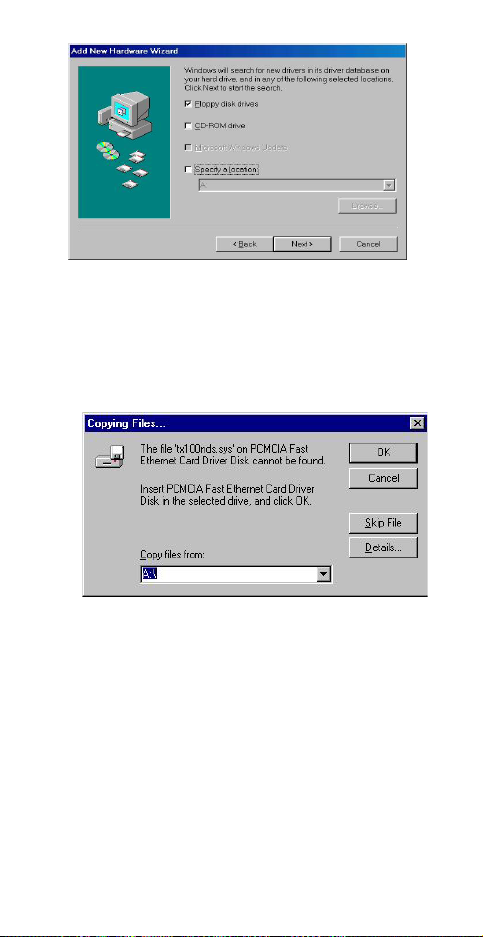
4. The installation program will proceed
automatically.
5. In the following dialog box, direct your
system to copy the requested files from the
floppy root directory, i.e. A:\. Press OK.
6. If you are asked to insert Windows 98 CDROM in the selective drive, please do so to
have Windows copy all the necessary files
to your system. . When the following
window appears, click Finish.
- 10 -
Page 15

7. Click Yes to restart your computer.
Installation for Window ME
1. Once the PC Card is well connected to your
computer, Windows ME will automatically
detect the new device. Select Specify the
Location of the driver… and click Next.
- 11 -
Page 16

2. Insert the device driver disk into the floppy
disk drive on your system.
3. Windows will copy the appropriate driver
to your system. If Windows ME asks you
to supply your original Windows ME
installation CD-ROM, load it on the CDROM drive. Click Finish to complete the
software installation.
4. Reboot your computer to activate the new
device.
Installation for Windows 2000
1. Insert the PC Card into the slot. When the
FOUND NEW HARDWARE WIZARD
dialog box appears, press Next.
- 12 -
Page 17

2. When Windows prompt you a FOUND
NEW HARDWARE WIZARD dialog box,
select Search for the … and press Next.
3. Windows will prompt an FOUND
HARDWARE WIZARD dialog box. In this
NEW
time, select Floppy disk drives and insert
the driver diskette. Press Next. When asked
- 13 -
Page 18

for the original Windows 2000 CD/disks
please follow the on-screen instruction.
4. Wait for a while until Windows has found
the appropriate driver.
5. Click Yes to continue.
6. Click Finish. The PC Card driver
installation is successfully completed.
- 14 -
Page 19

7. For the first time installation, click Network
icon in Control Panel to add Protocols,
Client and Service if needed.
8. Reboot your computer to activate the new
device.
Installation for Windows XP
1. Once the device is well connected,
Windows will detect the new device and
prompt you to insert the network device
driver. Insert the device Driver Disk into
the floppy disk drive of your system.
Click Install the software automatically
(Recommended) and click Next.
- 15 -
Page 20

2. Windows will start searching for the
appropriate driver for this hardware.
Select any drivers named as PCMCIA
Fast Ethernet Card, and click Next.
3. Windows will start searching for the
appropriate driver for the installation.
When the screen appears as below, click
Continue Anyway to proceed.
- 16 -
Page 21

4. Wait while Windows copies the
appropriate driver to your system.
5. Click Finish. The software installation for
this network device is now completed.
Installation for Windows NT 4.0
This section describes the installation for
Windows NT under the condition that Windows
- 17 -
Page 22

NT is already installed in your computer. If your
computer is not yet networking installed, refer to
the Windows documentation for details. Also
remember to have your original Windows NT
CD-ROM handy before you begin the
installation. For Windows NT may ask for it
during the installation.
1. Before you turn on your computer, make
sure the PCMCIA Fast Ethernet PC Card
has been properly inserted into the free
PCMCIA slot of your computer.
2. Start Windows NT.
3. Click StartSettingsControl Panel.
Double-click on the Network icon.
4. When the Network window appears, click
on the Adapters tab. Click on the Add
button, followed by Have Disk. Put the
driver disk into drive A.
5. When asked to supply the path to the disk,
type a:\ and click OK.
6. Windows NT will ask you to supply the I/O
Base, Interrupt, and Memory values for the
card. Good values to start with are 300 (for
the I/O Base) and 5 (for the IRQ).
7. When you're finished, click OK. Windows
NT will copy necessary files to your
computer.
8. When the Network window reappears, click
on the Bindings tab. Choose your bindings.
Click on the Protocols tab and select your
settings. Do the same for the Services tab.
- 18 -
Page 23

9. After your bindings, settings, and services
are set, click on the Close button. Choose to
restart your computer. After Windows NT
restarts, be sure to log in.
Insert the driver diskette into the floppy drive
and set the current drive to the floppy drive.
Then run INSTALL to install the real mode
drivers such as ODI or NDIS 2.x or Packet
Drivers into the target disk.
Novell Netware 3.x/4.x
Installation for ODI DRIVER
Automatic (Menu) Installation
1. Run INSTALL.EXE from the root directory
of driver diskette.
2. Select Netware 3.x and 4.x Workstation
item from menu.
3. If current settings are good, select Start
Installation and the program will continue
automatically, skip to step 5. Otherwise,
- 19 -
Page 24

select Modify Parameters to make settings
changed.
4. Move the cursor to select the setting you
want to make change and press <Enter> to
select a fit value. When the configurations
are set completely, press <Enter> on the
OK field to exit the screen and go back to
step 3.
5. Installation program starts copying related
files from diskette to the destination
directory and modifies AUTOEXEC.BAT and
NET.CFG under user’s agreement
6. When completed. Remember to reboot the
computer to make your Netware connection.
Manual Installation
1. Copy the files LE100ODI.COM and
NET.CFG from the path \NETWARE and
the file LANEN.EXE from the path
\ENABLER in the driver diskette into the
Netware client directory containing Novell's
LSL.COM, IPXODI.COM and NETx.COM
files.
2. Use a text editor to edit the NET.CFG for
setting the default frame type. In the
Netware server the frame type is set to
802.3 for NW3.11 and 802.2 for NW3.12
and NW4.x . The frame type must be set as
same as the server, otherwise the client
won’t be able to login to the server.
3. Follow Novell's instructions on using ODI
programs. You can substitute the
LE100ODI. COM whenever a reference is
made to the Hardware Specific Module.
- 20 -
Page 25

4. A typical ODI workstation startup batch file
includes:
>LANEN /IRQ=dd /IOP=xxx Card Enabler
>LSL ; Link Support Layer Module provided
by Novell
>LE100ODI ; Hardware Specific Module
>IPXODI ; IPX Protocol Stack Module provided
by Novell
>NETx ; Shell Support Module provided by
Novell
>LOGIN
Novell Client Installation
1. Run the NetWare Client Install V1.21:
Get the 4 Client disks from the network
administrator, or
Run the \NWCLIENT\INSTALL.EXE in a
previous Installation
2. A message appears on the screen asking
you if you want the program to perform
modifications on your AUTOEXEC. BAT and
CONFIG.SYS files. Answer "Yes". The
program then modifies your AUTOEXEC.BAT
and CONFIG.SYS files accordingly and
creates backup copies.
3. When the following message appears
“Install support for MS Windows? (Y/N)”,
answer accordingly and provide a path if
necessary.
4. When the program displays the following as
“Configure your workstation for
backup by a NetWare server running
software such as BACKUP?
- 21 -
Page 26

(Y/N):”,answer accordingly and provide a
path if necessary.
5. Select a driver for your network board.
6. From the driver list, select Other Drivers.
7. Go to the Insert the Driver Disk dialog box
and specify the path where the ODI driver
and INS files reside. For example:
C:\ODI.DOS.
8. Press Enter and select the target ODI driver.
9. Specify the driver's optional settings.
10. Press F10 to save to new configuration.
11. Highlight "Install press here" and press
<Enter> to install.
The program copies the necessary files for
NetWare Client. Continue the installation
procedure to completion. Upon completion, a
new NET.CFG file will be created in your DOS
directory. Typically, this file contains the
following lines:
Link Driver LE100ODI
#FRAME Ethernet_802.3
FRAME Ethernet_802.2
:
12. Copy the file LANEN.EXE from the
directory \ENABLER in the driver diskette
to Netware Client directory.
13. Edit the STARTNET.BAT by a text editor.
Add an running LANDEN command at the
- 22 -
Page 27

beginning of the file. An STARTNET.BAT
for the ODI workstation performs as the
following
LANEN /IOP=nnn /IRQ=n
--Card Enabler
SET NWLANGUAGE=ENGLISH
--Set NetWare 4.X to English language
LSL --Link Support Layer Module
provided by Novell
LE100ODI --Hardware Specific Module
IPXODI --IPX Protocol Stack Module
provided by Novell
VLM --DOS Support Module provided by
Novell
F: --Change to connected device
LOGIN xxx --Login to file server as
user xxx
14. Run STARTNET to access the Novell
network.
MS LAN Manager
1. View the README.TXT on the installation
diskette in the \NDIS2 directory. Before
installing the drivers, make sure that the
Microsoft LAN Manager has been installed
in the target path. The installation program
will check and modify the PROTOCOL.INI
file for LAN Manager.
- 23 -
Page 28

2. Run INSTALL.EXE from root directory of
driver diskette.
3. Select Microsoft LAN Manager item on the
menu screen.
4. If current settings are acceptable, select
Start Installation and go to step 6.
Otherwise, select Modify Parameters to
make setting changed.
5. Move cursor to the fields you want to make
change and press <Enter> to select a fit
value. When the configuration are set
completely, press <Enter> on the OK button
to exit the screen and go back to step 4.
6. Installation program starts to copy related
files from driver diskette to the destination
directory and modifies CONFIG.SYS and
PROTOCOL.INI under user’s agreement.
7. Reboot the computer to load driver and start
LAN Manager in batch.
Example of PROTOCOL.INI: used by LAN
Manager
- 24 -
Page 29

[PROTMAN]
DRIVERNAME = PROTMAN$
DYNAMIC = YES
PRIORITY = NETBEUI
[NETBEUI_XIF]
Drivername = netbeui$
SESSIONS = 6
NCBS = 12
BINDINGS = "LE100NDS_NIF"
LANABASE = 0
[LE100NDS_NIF]
; protocol.ini session for LAN
driver.
IOADDRESS = 0x320
INTERRUPT = 11
DRIVERNAME = LE100NDS$
Packet Driver
1. Run INSTALL.EXE from the root directory of
the driver diskette.
2. Select Packet Driver item on the menu
screen.
- 25 -
Page 30

3. If current settings are acceptable, select
Start Installation and go to step 5.
Otherwise, select Modify Parameters to
change the settings.
4. Move cursor to the field(s) you want to
make changes and press <Enter> to select a
fit value. When the configuration are set
completely, press <Enter> on the OK button
to exit the screen and go back to step 3.
5. Installation program starts to copy related
files from diskette to the destination
directory and modifies AUTOEXEC.BAT under
user’s agreement.
6. Reboot your computer to load the driver.
Windows for Workgroups 3.11
NDIS3 Driver for Workgroups
1. Run Windows for Workgroups and click
Network Setup in Network group.
2. In Network Settings dialog box, click
“Networks...” to select the network
operating system.
3. In the Networks dialog box, select the radio
button before Install Microsoft Windows
Network and No Additional Network. Press
OK to go back to the Network Settings
screen.
4. Click Drivers... button to select network
driver.
5. In Network Drivers dialog box, press Add
Adapter... button to enter the Add Network
- 26 -
Page 31

Adapter dialog box. Select Unlisted or
Updated Network Adapter and press OK.
6. Windows will prompt a Install Driver
dialog box. At this, insert the driver diskette
into your floppy drive and press OK.
7. Select the Enhanced mode NDIS3 for...
string and press OK.
8. Follow the on-screen instructions to
complete the installation and exit Windows
9. Run INSTALL.EXE from root directory of
driver diskette.
10. Select Windows for Workgroup in the
Network Operating System screen.
11. If current settings are acceptable, select
Start Installation and go to step 13.
Otherwise, select Modify Parameters to
make settings changed.
12. Move cursor to the setting(s) you want to
make change(s) and press <Enter> to select
a fit value. When the configuration is
accepted, press <Enter> on the OK field to
exit the screen and go back to step 11.
13. Select NDIS Server (LAN Manager,...) as
the network server you will attach to and
press <Enter>.
14. Installation program starts to copy related
files to the destination directory and
modifies AUTOEXEC.BAT and under user’s
agreement.
15. When finished, remember to reboot your
computer to activate the new device.
- 27 -
Page 32

NDIS2 Driver for Workgroups
1. Run Windows for Workgroups and click
Network Setup icon in Network group.
2. In Network Settings dialog box, click
Networks... button to select the network
operating system.
3. In Networks dialog box, check the radio
button before Install Microsoft Windows
Network and No Additional Network. Press
OK to go back to the Network Settings
screen.
4. Click Drivers... to select network driver.
5. In the Network Drivers dialog box, press
Add Adapter... button to enter Add
Network Adapter dialog box. Select
Unlisted or Updated Network Adapter and
press OK.
6. Windows will prompt a Install Driver dialog
box. In this time, put the driver diskette into
floppy drive and press OK.
7. Select the Real mode NDIS2 for.... string
and press OK.
8. Follow Windows instructions to complete
the installation and exit Windows.
9. Run INSTALL.EXE from root directory of
driver diskette.
10. Select Windows for Workgroups in
Network Operating System screen.
11. If current settings are acceptable, select
Start Installation and go to step 13.
- 28 -
Page 33

Otherwise, select Modify Parameters to
make settings changed.
12. Move cursor to focus on the setting you
want to make a change and press <Enter> to
select a fit value. When the configuration is
set completely, press <Enter> on the OK
field to exit the screen and go back to step
11.
13. Select NDIS Server (LAN Manager,...) as
the network server you will attach to and
press <Enter> key.
14. Installation program starts to copy related
files to the destination directory and
modifies AUTOEXEC.BAT under user’s
agreement.
15. Please reboot the computer to have the
driver take effect.
ODI Driver for Workgroups
1. Run Windows for Workgroups and click
Network Setup icon in Network group.
2. In Network Setup dialog box, click
Networks... button to select the network
operating system.
3. In Networks dialog box, check Install
Microsoft Windows Network and Others,
thereafer select Novell NetWare
(Workstation Shell, 3.X) or Novell NetWare
(Workstation 4.0 and above) and press OK
to enter the screen of IPXODI.COM and
LSL.COM .
- 29 -
Page 34

4. Press OK to go back the Network Setup
screen.
5. Click on Drivers... button to select network
driver.
6. In Network Drivers dialog box, press Add
Adapter... button to enter Add Network
Adapter dialog box. Select Unlisted or
Updated Network Adapter and press OK.
7. Windows will prompt a Install Driver
dialog box. In this time, put the driver
diskette into floppy drive and press OK.
8. Select the Netware ODI Driver .... string
and press OK.
9. Follow Windows instructions to complete
the installation and exit Windows.
10. Run INSTALL.EXE from root directory of
driver diskette.
11. Select Windows for Workgroups in
Network Operating System screen.
12. If current settings are acceptable, select
Start Installation and go to step 13.
Otherwise, select Modify Parameters to
make settings changed.
13. Move cursor to focus on the setting you
want to make a change and press <Enter> to
select a fit value. When the configuration is
set completely, press <Enter> on the OK
field to exit the screen and go back to step
11.
- 30 -
Page 35

14. Select Novell Netware Server as the
network server you will attach to and press
<Enter> key.
15. Installation program starts to copy related
files to the destination directory and
modifies AUTOEXEC.BAT and NET.CFG
under user’s agreement.
16. Please reboot the computer to have the
driver take effect.
Installation for IBM OS/2 Warp
Before the driver installation, ensure that the
PCMCIA Service was installed and worked
properly. If the PCMCIA Service of OS/2 Warp
has been enabled already, jump to portion B for
driver installation; otherwise follow the
instructions in the following to install the
PCMCIA Service.
Enabling PCMCIA Service of OS/2 Warp
1. In the OS/2 Desktop group, double-click on
the OS/2 System icon.
2. Double-click on the System Setup icon.
3. Double-click on the Selective Install icon.
4. Select the PCMCIA Support button.
5. Select PCMCIA system. For example :
select IBM ThinkPad 750
6. Click OK”.
7. Click Install
8. Select the source drive and directory. For
Example D:\OS2IMAGE
- 31 -
Page 36

9. Click Install
10. Click OK
Installing NDIS2 driver for IBM LAN Server 4.0
1. In the OS/2 Desktop group, double-click on
the MPTS icon.
2. Click on the Configure button.
3. Select the LAN adapters and protocols
option.
4. Click on the Configure button.
5. Select the Other adapters ... option.
6. Insert the driver diskette and type the driver
path: A:\OS2\NDIS2. Click OK
7. Select PCMCIA Ethernet Adapter, and then
click on the Add button.
8. Select IBM OS/2 NETBIOS, and then click
on the Add button.
9. Click OK.
10. Click Close.
11. Click Exit.
12. Shutdown and restart your system.
- 32 -
Page 37

INTERNET ACCESS
Setup Pocket PC 2002 PDA
1. Install the driver and network adapter
according to the installation guide.
2. Power on PDA.
3. Go to “Start” “Settings”.
4. Tap “Connections”.
5. Tap “Network Adapters”.
6. Tap “CompactFlash Size 10/100 Fast
Ethernet” to highlight it.
7. Tap “Properties”.
- 33 -
Page 38

8. If you have a DHCP Server on the network,
tap the radio button “Use server-assigned IP
address”.
If you need to input fixed IP for the adapter,
tap on the radio button “Use specific IP
address”, key in the IP address, subnet mask,
default gateway, tap on “Name Servers”,
input the DNS, Alternative DNS, WINS, and
- 34 -
Page 39

Alternative WINS.
Note: DNS addresses are normally provided by
ISP. If you are not using WINS, please leave the
filed blank.
9. Tap “Ok”.
10. Tap “Ok” on the pop-up warning screen.
- 35 -
Page 40

11. Remove the card and reinsert it to the PDA.
12. Go to “Start” “Settings”.
13. Tap on “Connections”.
14. Tap in “Connections”.
- 36 -
Page 41

15. At the first entry “When needed,
automatically connect to the Internet using
these settings:”, click on the dropdown menu
and select “My connection”, and tap on
“Modify” below it.
16. Tap on “Proxy settings”, tab on “This
network connects to Internet’.
- 37 -
Page 42

17. Tap “ok”.
18. Back to the “Connections” screen, on the
last entry, tap on the dropdown menu and
select “The Internet”.
19. Tap “Ok”.
20. Open the browser and see if you can open
web pages.
- 38 -
Page 43

APPENDIX A. SPECIFICATIONS
Network Interface Specifications
IEEE 802.3 for 10BaseT
IEEE 802.3u for 100BaseTX
Data Rate
1
10/100 Mbps
Host Interface and Physical Specifications
For Notebook PC: (accessory adapter)
PCMCIA 2.0/2.1 and PC Card Standard
compliant.
Type II PC Card
5.39” x 2.128” x 0.197” (137mm x 54mm x
5.0mm)
55gw in weight with Compact Card
For PDA/Palm PC: (Compact Card Only)
CF+ and CompactFlash Spec. Rev. 1.4
compliant.
Type I CompactFlash I/O Card
3.46” x 1.685” x 0.130” (88mm x 42.8mm x
3.3mm)
28gw in weight
1
CAT5 cable is required for 100M data transfer rate
- 39 -
Page 44

Operating Systems
Novell Netware 3.x, 4.x
Microsoft LAN Manager
Packet Driver Applications
Microsoft Windows for Workgroups 3.11
Windows 3.1
Microsoft Windows NT 4.0
Windows 98
Windows 2000
Windows ME
Windows XP
Windows CE 2.0 or newer
Lantastic 6.0
IBM OS/2 Warp Version 3
Power Requirements
Normal Operation: +3.3V DC, 155mA max
+5V DC, 175mA max
General Specification
LEDs: Link Integrity (Orange), Activity (Green)
Environments Ranges
Operating: 32°F to 149°F (0°C to 65°C)
Storage: -4°F to 158°F (0°C to 70°C)
Humidity: 10% - 90%, noncondensing
Certifications
FCC, Part 15, Class B, VCCI-B
CE Mark (EN55022, ClassB, EN50082-1)
- 40 -
 Loading...