

Quick Installation Guide
TE100-PCIFC
1.01

Table of Contents
Table of Contents
Deutsch .....................................................................................................
1. Bevor Sie anfangen ...........................................................................
2. ...................................................................................Installation ......
Troubleshooting .........................................................................................
1
1
2
5
Version 06.11.2009
1. Bevor Sie anfangen
Packungsinhalt
TE100-PCIFC
?
?Treiber CD-ROM
Mehrsprachige
?
Installationsanleitung
Systemanforderungen
32-Bit PCI-2.2-Steckplatz
?
?CD-ROM - Laufwerk
?Prozessor: 300 MHz oder schneller/ 800 MHz oder schneller
(Windows Vista)
?Speicher: 256MB RAM oder mehr/ 512MB RAM oder mehr
(Windows Vista)
?Windows 98SE/ME/2000/2003 Server(32/64-bit) / XP(32/64-bit) /
Vista (32/64-bit)
?62,5/125 µm Multimodus-Glasfaserkabel
?Empfohlener Glasfaserkonverter: TFC-110MSC oder TFC-210MSC
?Empfohlener Gigabit-Switch: TEG-424WS
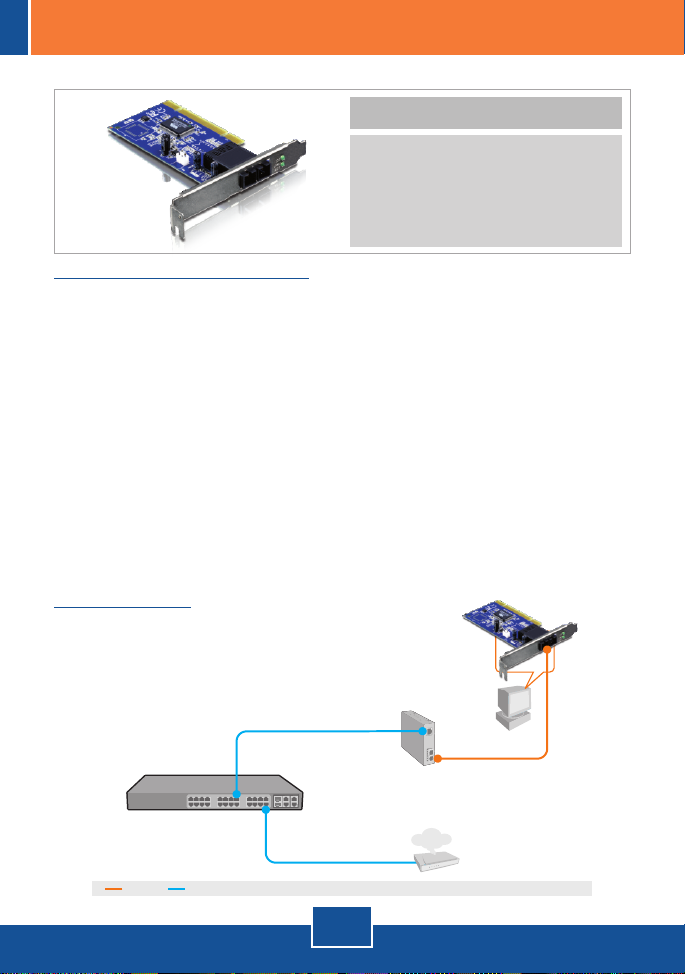
Anwendung
24-Port 10/100Mbps Web Smart Switch
with 4 Gigabit Ports and 2 Mini-GBIC Slots
(TEG-424WS)
EthernetFiber
100Base Multi-Mode SC
Fiber-to-PCI Adapter
(TE100-PCIFC)
100Base-TX to 100Base-FX
Multi Mode SC Fiber Converter
(TFC-110MSC)
Internet
1
Deutsch
Cable/DSL
Modem

2. Installation
Hinweis:
1. Informationen zur Installation der Treiber für Windows 98SE und ME finden
Sie in der Bedienungsanleitung auf der Treiber-CD.
2. Verbinden Sie den TE100-PCIFC erst dann mit Ihrem Computer, wenn Sie
dazu aufgefordert werden.
1. Legen Sie die Treiber-CD in Ihr
CD-ROM-Laufwerk ein.
2. Klicken Sie auf Run Autorun.exe
(setup.exe ausführen)
(nur Bediener Windows Vista).
3. Klicken Sie auf Install Driver
(Treiber installieren) und dann auf
den Namen Ihres Betriebssystems.
2
Deutsch

4. Klicken Sie auf OK.
5. Fahren Sie Ihren Computer
herunter und öffnen Sie das
Gehäuse.
6. Stecken Sie die PCIe-Karte fest in
einen freien PCIe-Karten
-Steckplatz. Schalten Sie Ihren
Computer wieder ein und warten
Sie, bis der Windows-Desktop
erscheint.
7. Die Treiber werden automatisch
installiert.
3
Deutsch

Verbindung des mit Ihrem NetzwerkTE100-PCIFC
1. Verbinden Sie den TE100-PCIFC
über ein SC-Multimodus-Kabel mit
einem 10/100 MBit/sGlasfaserkonverter
(z.B. TFC-110MSC).
Hinweis: Beachten Sie bitte, dass
die TX- und RX-Kabel am anderen
Ende entgegengesetzt
angeschlossen werden müssen.
2. Verbinden Sie den
Glasfaserkonverter über ein
Ethernetkabel mit einem GigabitEthernet-Port Ihres Switches
(z.B. TEG-424WS).
Ihre Installation ist beendet!
Weitere Informationen zu den Konfigurations- und erweiterten Einstellungen
des TE100-PCIFC finden Sie in der Bedienungsanleitung auf der beiliegenden
Programm-CD.
Registrieren Sie Ihr Produkt
Nehmen Sie sich bitte einen Moment Zeit und registrieren Sie Ihr Produkt online, so
dass Sie unsere umfassenden Support- und Kundendienstleistungen in Anspruch
nehmen können: www.trendnet.com/register
Vielen Dank für den Kauf eines TRENDnet-Produkts
4
Deutsch

Troubleshooting
I inserted the Driver CD-ROM into my computer's CD-ROM drive and the installation
Q1:
menu does not appear automatically. What should I do?
For Windows 2000/XP/2003 Server, if the installation menu does not appear
A1:
automatically, click Start, click Run, and type D:\autorun where "D" in "D:\autorun.exe" is the
letter assigned to your CD-ROM Drive, and then press the ENTER key on your keyboard. For
Windows Vista, if the installation menu does not appear automatically, click Start, click the
Start Search box, and type D:\autorun.exe where "D" in "D:\autorun.exe" is the letter assigned
to your CD-ROM Drive, and then press the ENTER key on your keyboard.
Windows doesn't recognize my new hardware. What should I do?
Q2:
First, verify that your computer meets the system requirements as specified in Section 1.
A2:
Second, access your device manager to make sure the adapter is installed properly. If you see
a networking device with a yellow question mark or exclamation point, you will need to reinstall
the device and/or the drivers. To access the device manager on Windows 2000/XP, right-click
My Computer, click Properties, click the Hardware tab, and then click Device Manager. To
access the device manager on Windows Vista, right-click Computer, click Properties and then
click Device Manager. Third, if the device manager fails to recognize the presence of a new
networking adapter, verify that the network adapter is firmly seated in the PCI slot. Fourth, plug
the adapter into another PCI slot on your computer.
Windows recognizes my new hardware, but I'm unable to connect to my network. What
Q3:
should I do?
First, verify that the cable is securely connected from your switch or router to your network
A3:
adapter. Second, verify that the LEDs on your network card are lit. Third, verify that the TCP/IP
settings are set to Obtain an IP address automatically (see the steps below).
Windows Vista
1. Go into the Control Panel, click Network
and Internet, click Network and Sharing
Center, click Manage Network
connections and then right-click the Local
Area Connection icon and then click
Properties.
2. Click Internet Protocol Version 4(TCP/IPv4)
and then click Properties. Then click on
Obtain an IP address automatically.
5

Windows XP/2000
1. Go into the Control Panel, double-click the
Network Connections icon and then right-
click the Local Area Connection icon and
then click Properties.
2. Click Internet Protocol (TCP/IP) and
then click Properties. Then click on
Obtain an IP address automatically.
Q4:
I am not getting a network connection when I connect the TE100-PCIFC to my network.
What should I do?
A4:
cable. Second, make sure the TX and RX cables are reversed on the opposing connection.
Q5:
If you still encounter problems or have any questions regarding the TE100-PCIFC, please refer to
the User's Guide included on the Driver CD-ROM or contact TRENDnet's Technical Support
Department.
First, check the fiber cable. Make sure you are using 62.5/125µm multi-mode fiber
What is the maximum distance that is supported by the adapter?
A5:
2 kilometers.
6

Certifications
This equipment has been tested and found to comply with FCC and CE Rules.
Operation is subject to the following two conditions:
(1) This device may not cause harmful interference.
(2) This device must accept any interference received. Including interference that may
cause undesired operation.
Waste electrical and electronic products must not
be disposed of with household waste. Please
recycle where facilities exist. Check with you Local
Authority or Retailer for recycling advice.
NOTE: THE MANUFACTURER IS NOT RESPONSIBLE FOR ANY RADIO OR TV
INTERFERENCE CAUSED BY UNAUTHORIZED MODIFICATIONS TO THIS
EQUIPMENT. SUCH MODIFICATIONS COULD VOID THE USER’S AUTHORITY TO
OPERATE THE EQUIPMENT.
ADVERTENCIA
En todos nuestros equipos se mencionan claramente las caracteristicas del adaptador de alimentacón
necesario para su funcionamiento. El uso de un adaptador distinto al mencionado puede producir
daños fisicos y/o daños al equipo conectado. El adaptador de alimentación debe operar con voltaje y
frecuencia de la energia electrica domiciliaria existente en el pais o zona de instalación.

Product Warranty Registration
Please take a moment to register your product online.
Go to TRENDnet’s website at http://www.trendnet.com/register
20675 Manhattan Place
Torrance, CA 90501
USA
Copyright ©2009. All Rights Reserved. TRENDnet.
 Loading...