

Mich

TABLE OF CONTENTS
ABOUT THIS GUIDE ..................................................................................... 4
INTRODUCTION .......................................................................................... 5
PACKAGE CONTENTS ...................................................................................... 6
SYSTEM REQUIREMENTS .................................................................................. 6
GENERAL FEATURES ....................................................................................... 7
PRODUCT VIEW ............................................................................................ 8
HARDWARE INSTALLATION ...................................................................... 10
NETWORKING APPLICATION ........................................................................... 10
INSTALLING THE PRINT SERVER ........................................................................ 11
USING THE UTILITIES ................................................................................. 12
AUTO-RUN INSTALLATION ............................................................................. 12
PS-UTILITY ................................................................................................ 14
Installing PS-Utility .............................................................................. 14
Using PS-Utility ................................................................................... 16
PS WIZARD ............................................................................................... 19
PS MONITOR UTILITY ................................................................................... 26
WEB CONFIGURATION .............................................................................. 30
WEB CONFIGURATION UTILITY ........................................................................ 30
MANAGEMENT ........................................................................................... 31
Management System ...................................................................... 32
Management Network .................................................................... 33
Management User .......................................................................... 37
CONFIGURATION ......................................................................................... 38
Configuration System ...................................................................... 38
Configuration Network ................................................................... 41
Configuration User .......................................................................... 44
Configuration E-mail ....................................................................... 45
Configuration SNMP ....................................................................... 47
TOOLS ...................................................................................................... 48
Tool Print Test ................................................................................. 48
Tool E-mail...................................................................................... 49
- 2 -

Tool Reset ....................................................................................... 50
Tool Factory Reset........................................................................... 50
Tool Firmware Upgrade .................................................................. 51
Tool Backup .................................................................................... 52
HELP ........................................................................................................ 53
PRINTING IN WINDOWS 98SE/ME ......................................................... 54
INSTALLING THE LPR FOR TCP/IP PRINTING CLIENT ............................................. 55
ADDING LPR PRINTER PORTS ......................................................................... 57
PRINTING FROM WINDOWS 98SE/ME ............................................................. 59
SETTING TCP/IP PRINTING SETTINGS ............................................................... 62
PRINTING IN WINDOWS 7/VISTA/2003/XP/2000 ..................................... 64
SETTING UP WINDOWS 7/VISTA TCP/IP PRINTING ............................................. 64
SETTING UP WINDOWS XP TCP/IP PRINTING .................................................... 70
SETTING UP WINDOWS 2000 TCP/IP PRINTING ................................................. 78
PRINTING IN MAC OS................................................................................ 86
MAC 10.6 SNOW LEOPARD USER ............................................................. 86
MAC 10.5 LEOPARD USER ....................................................................... 95
MAC OS 10.4 TIGER USER ...................................................................... 104
MAC OS 10.3 PANTHER USER ................................................................ 114
MAC OS 10.2 & MAC 9 USER .................................................................. 120
SETTING UP APPLE TALK/LPR PRINTING ......................................................... 123
For MAC OS 10.2 User ....................................................................... 123
For MAC OS 9 User ............................................................................ 126
PRODUCT SPECIFICATIONS ...................................................................... 129
Printer Connection ............................................................................ 129
Network Connection .......................................................................... 129
Network Protocol Support ................................................................. 129
Hardware .......................................................................................... 129
Operating System Support................................................................. 130
Management .................................................................................... 130
LEDs .................................................................................................. 130
Environmental and Physical .............................................................. 131
EMI Compliance ................................................................................ 131
LIMITED WARRANTY ............................................................................... 132
- 3 -

ABOUT THIS GUIDE
This manual provides instructions and illustrations on how to use
your Print Server, including:
Chapter 1, Introduction, provides the general information on
the product.
Chapter 2, Hardware Installation, describes the hardware
installation procedure for the product.
Chapter 3, Using the Utilities, helps you to install and use the
software.
Chapter 4, Web Configuration, completes the configuration
using the web browser.
Chapter 5, Printing in Windows 98SE/ME, completes the
printing TCP/IP setting in Windows 98SE/ME environment.
Chapter 6, Printing in Windows 7/Vista/2003 Server/XP/ 2000,
completes the printing TCP/IP Setting in Windows 7/Vista/2003
Server/XP/2000 environment.
Chapter 7, Printing in MAC OS, lets you complete printing task
through your print server in MAC OS environment.
Chapter 8, Product Specification.
Please note that the illustrations or setting values in this manual are
FOR YOUR REFERENCE ONLY. The actual settings and values
depend on your system and network. If you are not sure about the
respective information, please ask your network administrator or MIS
staff for help.
- 4 -

1
INTRODUCTION
Congratulations on purchasing your TE100-P21 3-Port Print Server,
the easiest and fastest way to deploy printers on your network.
This print server can connect your network through an Access Point
under the infrastructure mode, or can be used in ad-hoc mode for
direct communication between PC/Notebook and print server
anywhere you wish to locate wireless printer services. It manages
the flow of print files from your workstation or file server to its
connected printers, delivering print jobs to high-performance printers
much faster than a file server or a PC acting as a print server can.
The Print Server features a Web-based Configuration Utility, which
allows you to set up the print server through the web browser easily
and quickly. It also includes a powerful software utility PS-Utility
and PS Monitor Setup, the user-friendly program that allows you to
complete further settings for the print server.
- 5 -

Package Contents
Unpack the package and check all the items carefully, and be certain
that you have:
TE100-P21
Quick Installation Guide
CD-ROM (Utility & User’s Guide)
Power Adapter (5V DC, 2.5A)
If any item contained is damaged or missing, please contact your
local dealer immediately. Also, keep the box and packing materials
in case you need to ship the unit in the future.
System Requirements
Operating System:
Microsoft Windows 7/Vista/2003 Server/XP/2000/ME/98SE
Apple Mac OS 10.1 ~ 10.6 (with Apple Talk support).
For Web Configuration:
Java-enabled web browser, such as Microsoft® Internet Explorer
5.0 and Netscape Navigator 6.0.
- 6 -

General Features
Equipped with 1 parallel port and 2 USB ports allows user to share
three printers on LAN simultaneously.
Compliant with USB 2.0 High-speed printing.
Equipped one 10/100 auto-MDIX Fast Ethernet LAN port.
Multi protocol support is ideal for shared printing in mixed-LAN
environments.
Windows-based administrative program makes it possible to set
up in a few steps.
Latest MIB-II (RFC 1213) for SNMP standard management.
Offer LPR program for Windows 98SE/ME TCP/IP printing.
IP assignment support for DHCP, BOOTP and RARP.
Support Web configuration.
Provide Flash memory for easy firmware upgrade.
Printing Access control and display.
E-mail notification for printer error messages.
Support E-Mail printing and FTP printing.
Ability to save print server configuration into hard drive for easy
access and backup without the hassle to reconfigure if setting
is altered.
Support IPP printing for Windows Windows7/Vista/2003 Server/
XP/2000.
Support Microsoft Graphical Device Interface (GDI) Printer (HP
printer only)
Support second http port for remote web configuration and IPP
printing.
Support UPnP (Universal Plug and Play) for Windows 7/Vista/XP.
Support Mac OS 10.1 ~ 10.6
- 7 -
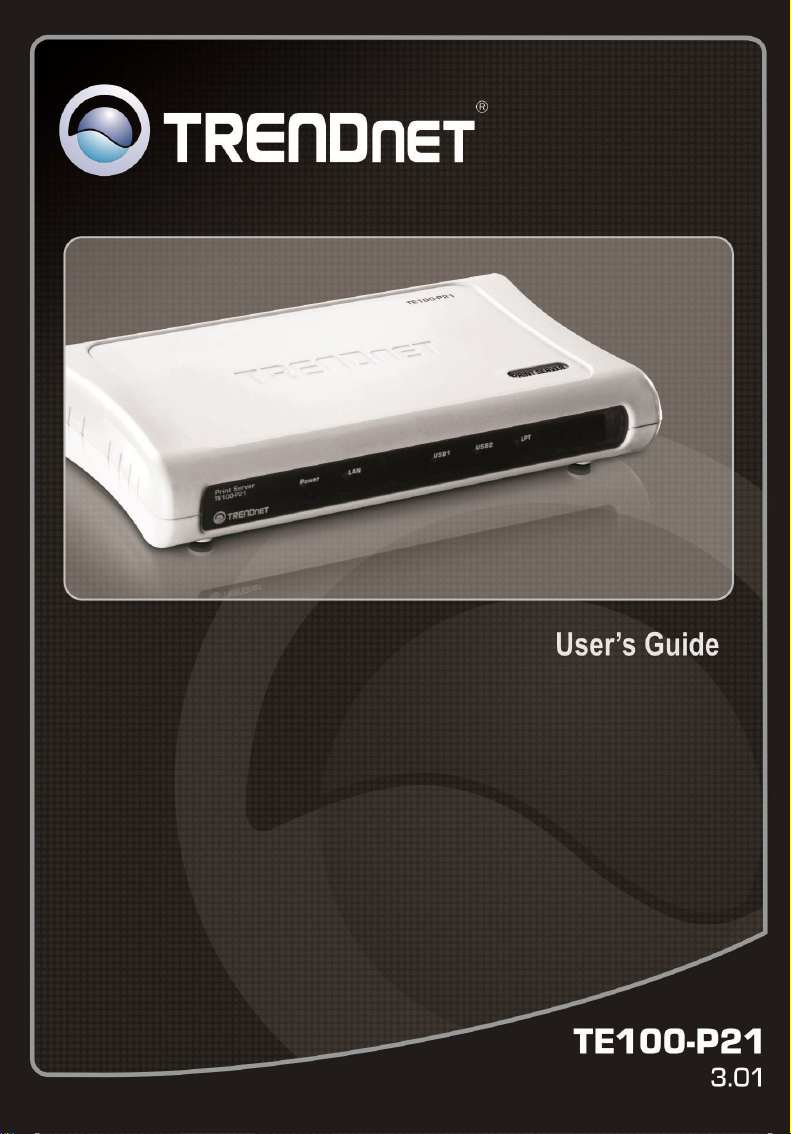
Product View
LEDs*
print server to a USB printer
.
This section describes the externally visible features of the print
server.
Front View
Rear View
LPT Port –
print server to a LPT printer.
connect the
LAN Connector –
plug your LAN cable
to this connector.
DC Power Input –
plug the AC Power
Adapter to this jack.
USB Ports – connect the
- 8 -
Reset Button**

* There are five green LED indicators on the front panel:
LEDs Description
Power Steady light means power on.
USB1 When it is blinking, the connected printer is
printing.
USB2 When it is blinking, the connected printer is
printing.
LPT When blinking, the connected printer is printing.
LAN Steady light means the print server has been
connected to the network.
When blinking (briefly dark), the print server is
receiving/ transmitting data from/to the network.
**Reset Unit
Press and release reset button to reset the print server
Restore to Factory Default
Press and hold this button for three seconds (the USB LED on
the front panel will light up) and then release it, the print
server will restore to factory default settings.
- 9 -
2
HARDWARE INSTALLATION
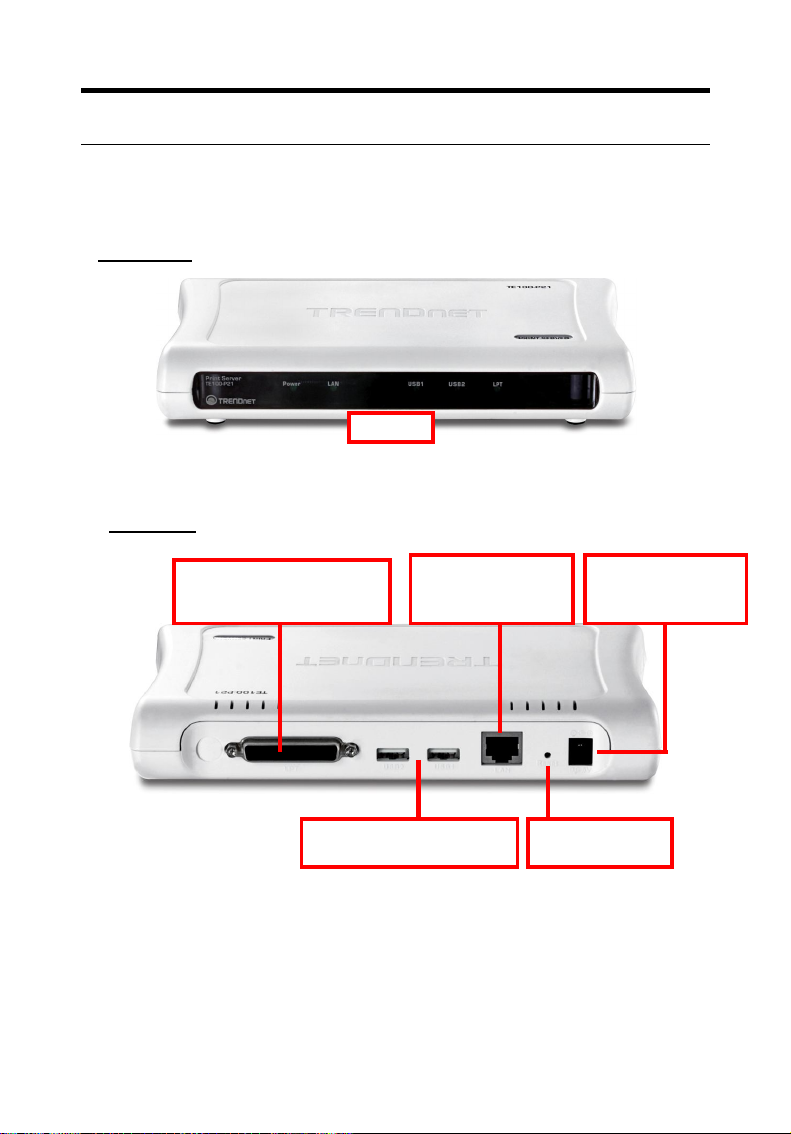
Networking Application
The following diagram explains the application of your print server.
- 10 -

Installing the Print Server
Follow these steps for a trouble-free start of print server operations
with your Print Server.
1. Confirm that your network is operating normally.
2. Connect the print server to the network (through the RJ-45
connector of the print server).
5. While the printer is powered off, connect the print server to the
printer’s USB or Parallel port.
6. Turn on the printer’s power.
7. Connect the DC end of the AC Power adapter to the DC power
input socket of the print server and the AC end to the wall outlet.
This will supply power to the print server immediately.
NOTE: This print server is built-in with a default IP Address (e.g.
192.168.0.1). To prevent from any conflict in your network, it is
recommended to use the PS-Utility program to change the IP setting
when there is some other device’s IP Address is the same as the print
server’s default IP Address.
- 11 -
3
USING THE UTILITIES
This chapter describes the software utilities for the print server,
including how to set up your print server with these utility. The PS-
Utility and PS Wizard are designed with a user-friendly interface that
allows you to set up and administer the print server easily.
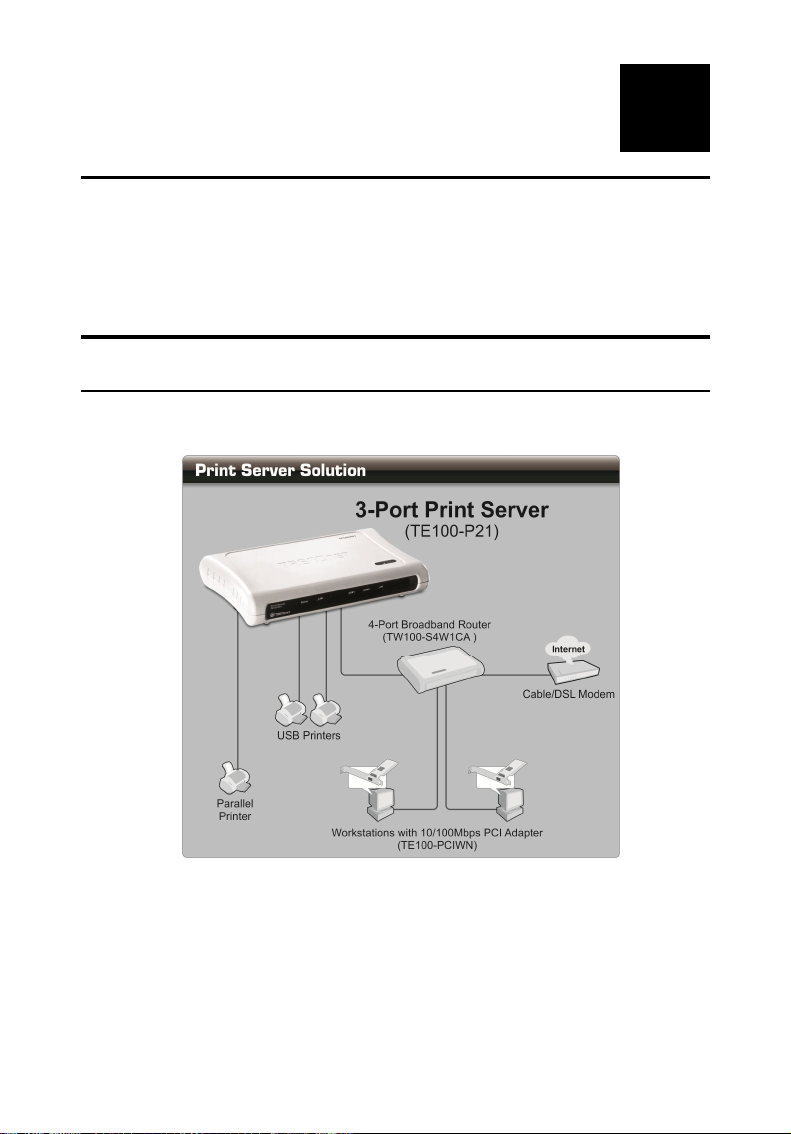
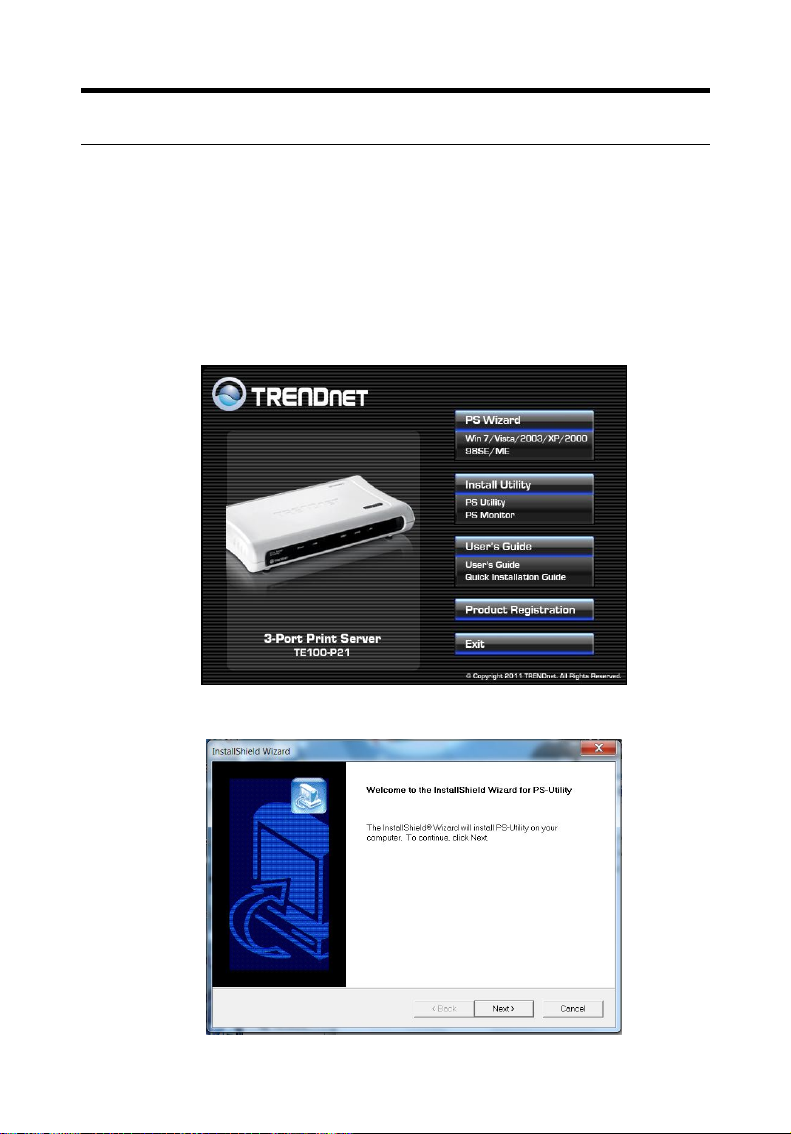
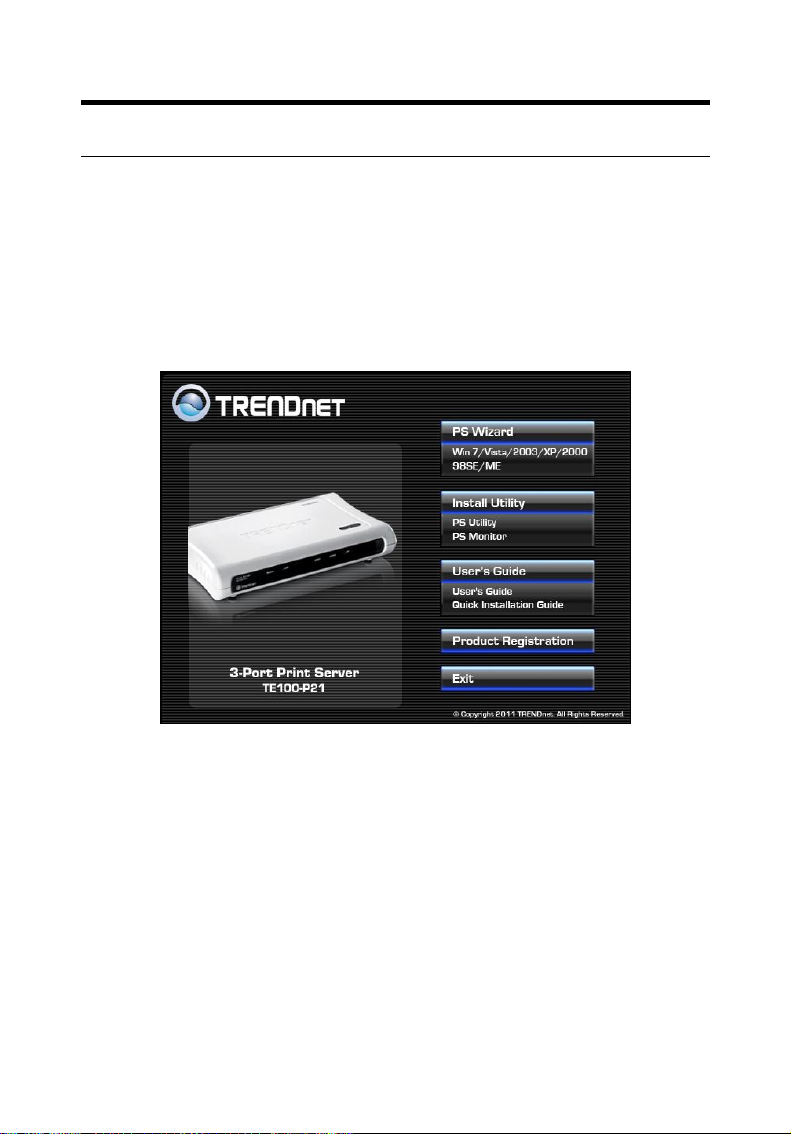
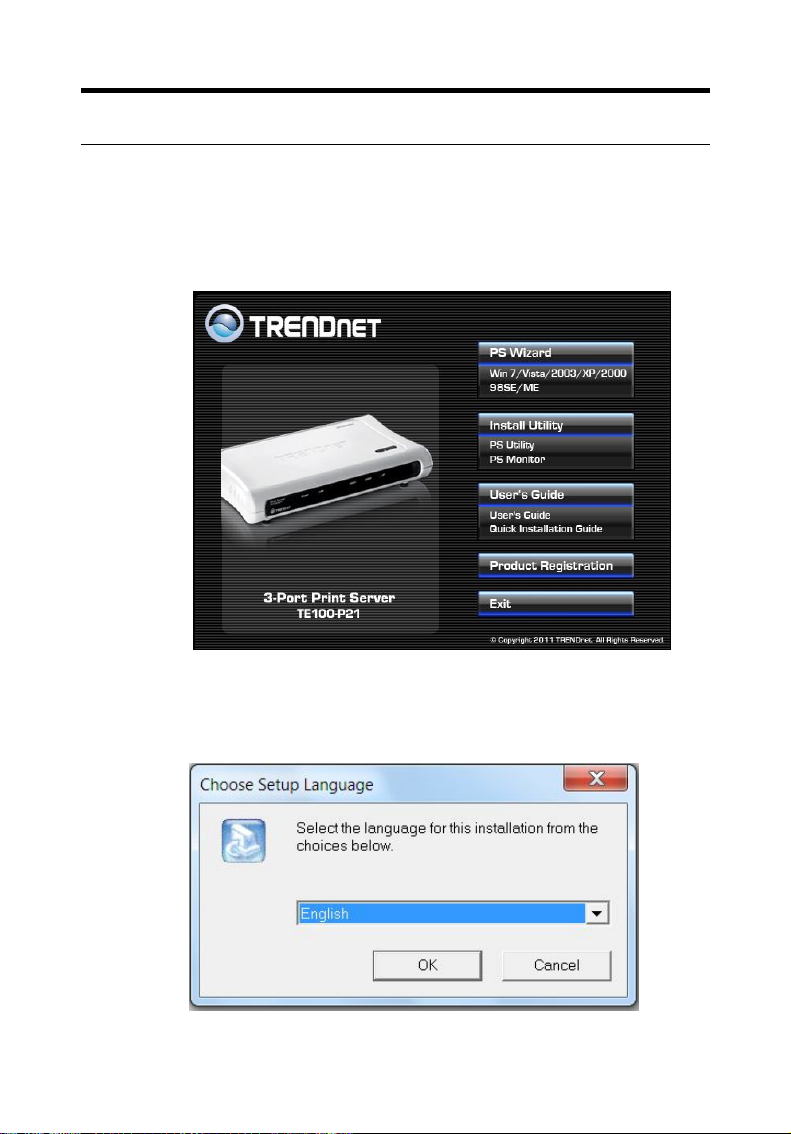
Auto-Run Installation
Insert the Installation CD-ROM into your computer’s CD-ROM drive to
initiate the Auto-Run program, and the menu screen will appear as
below.
- 12 -

PS Wizard – click to setup printer port connectivity
Utility – click to install PS-Utility & PS Monitor. Please refer to
the next section for detailed information on installing the utility.
User's Guide – click to preview the User's Guide in PDF format
for detailed information of the Print Server.
Product Registration– click to register your product on-line
Exit – click to close the Auto-Run program.
- 13 -
PS-Utility
To avoid the conflict in your network, you can use PS-Utility to change
the related settings of your print server (such as the IP address) after
finishing the installation.
Installing PS-Utility
1. Click Install Utility PS Utility from the Auto-Run menu screen.
2. Click Next > in the welcome screen of InstallShield Wizard.
- 14 -
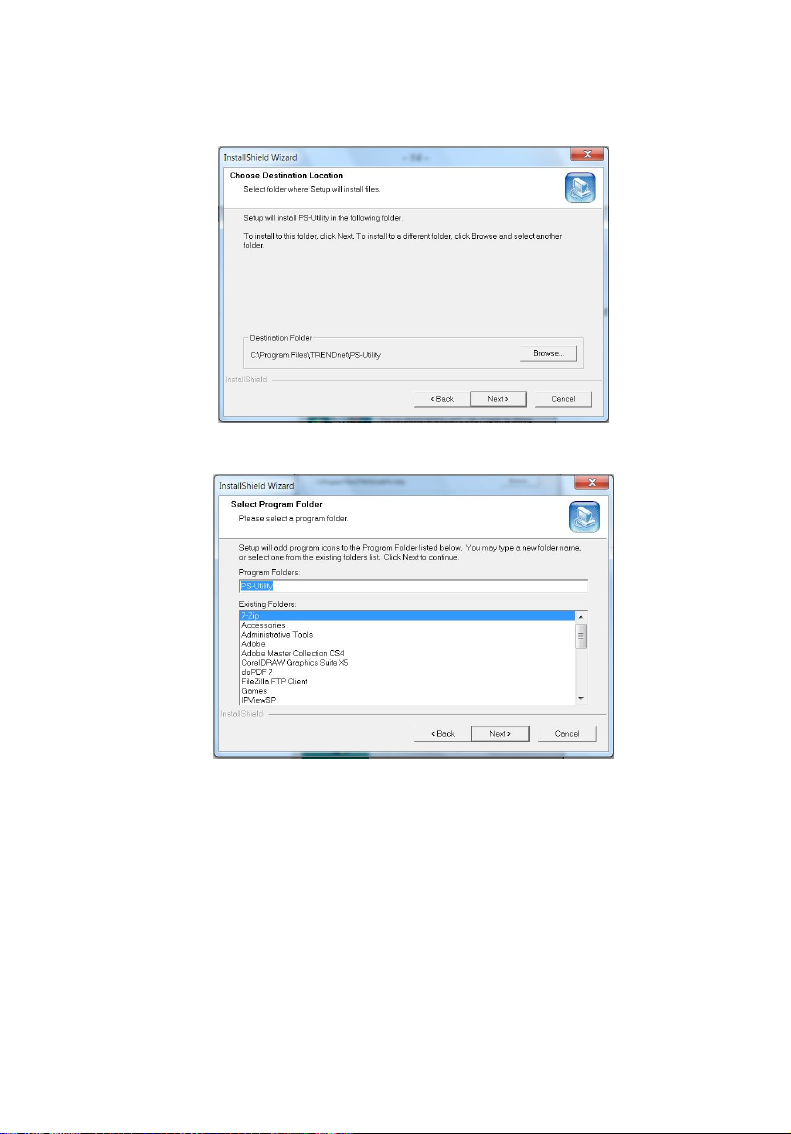
3. Choose the destination location. If no specific requirement,
leave the default setting and click Next >.
4. Click Next > to select Program folder
5. The InstallShield Wizard starts to install the software, and the
Progress bar indicates the installation is proceeding.
- 15 -
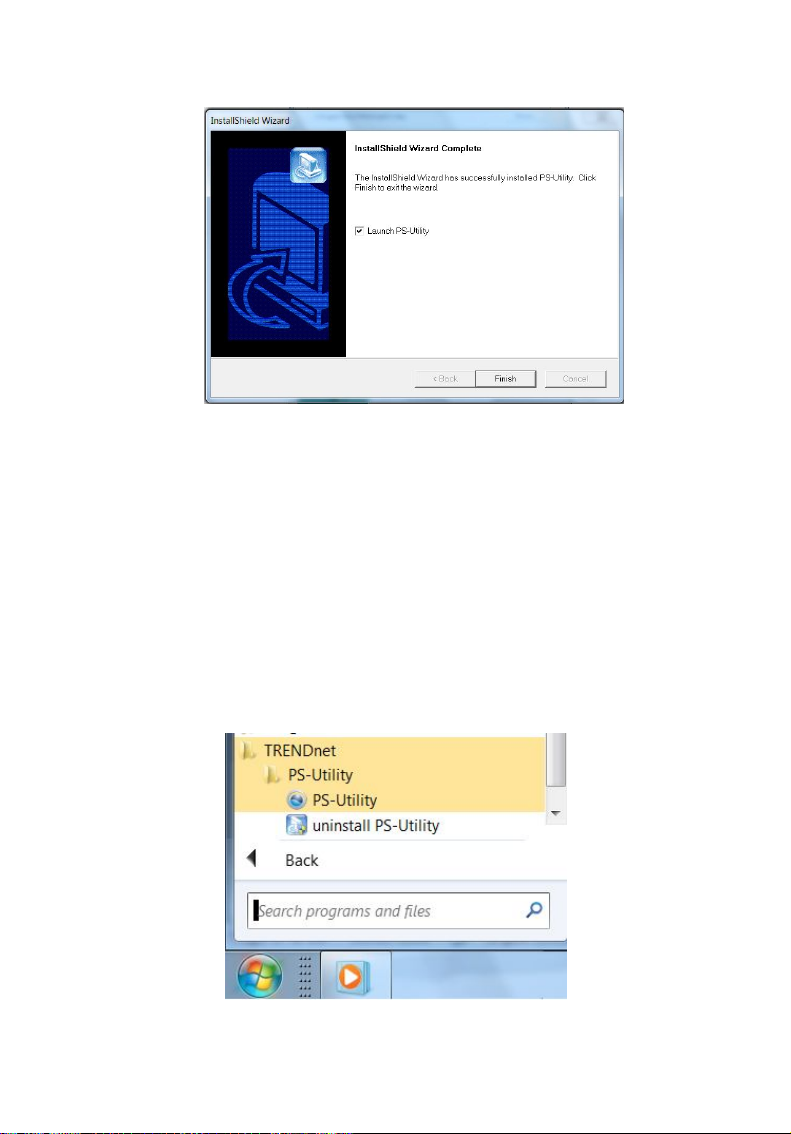
6. When completed, click Finish.
After installing the utility, the application program for the print server
is automatically installed to your computer, and creates a folder in
Start\Programs\TRENDnet\PS-Utility.
Using PS-Utility
This section describes the operation of PS-Utility. To launch PSUtility:
1. Click Start -> Programs -> TRENDnet -> PS-Utility
- 16 -
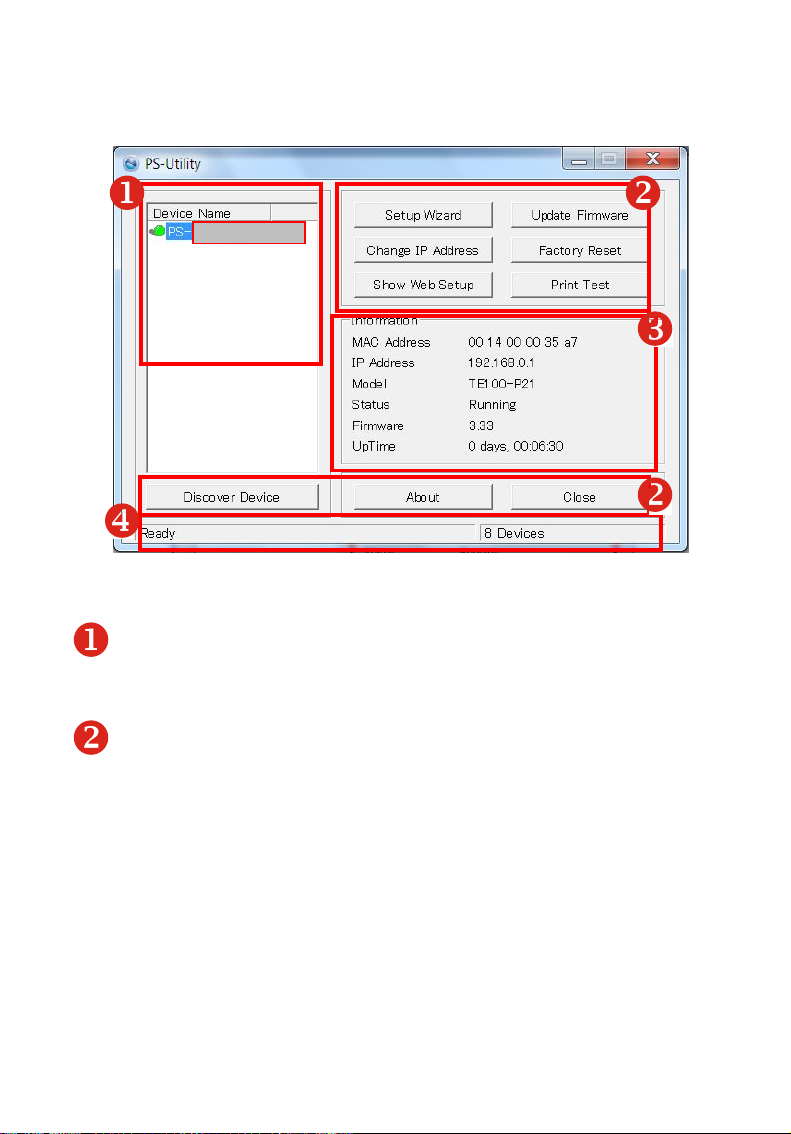
2. The main screen will appear as below, and it starts to search the
connected print server within the network.
Your print server
Component Features:
1. Device List: Display the connected print server within the
network.
2. Control Buttons
- Setup Wizard: Click the button to set up the print server’s
system setting, IP Address, Workgroup of Microsoft Network
and apple talk setting.
- Update Firmware: Click this button to update the firmware of
the selected print server.
- 17 -
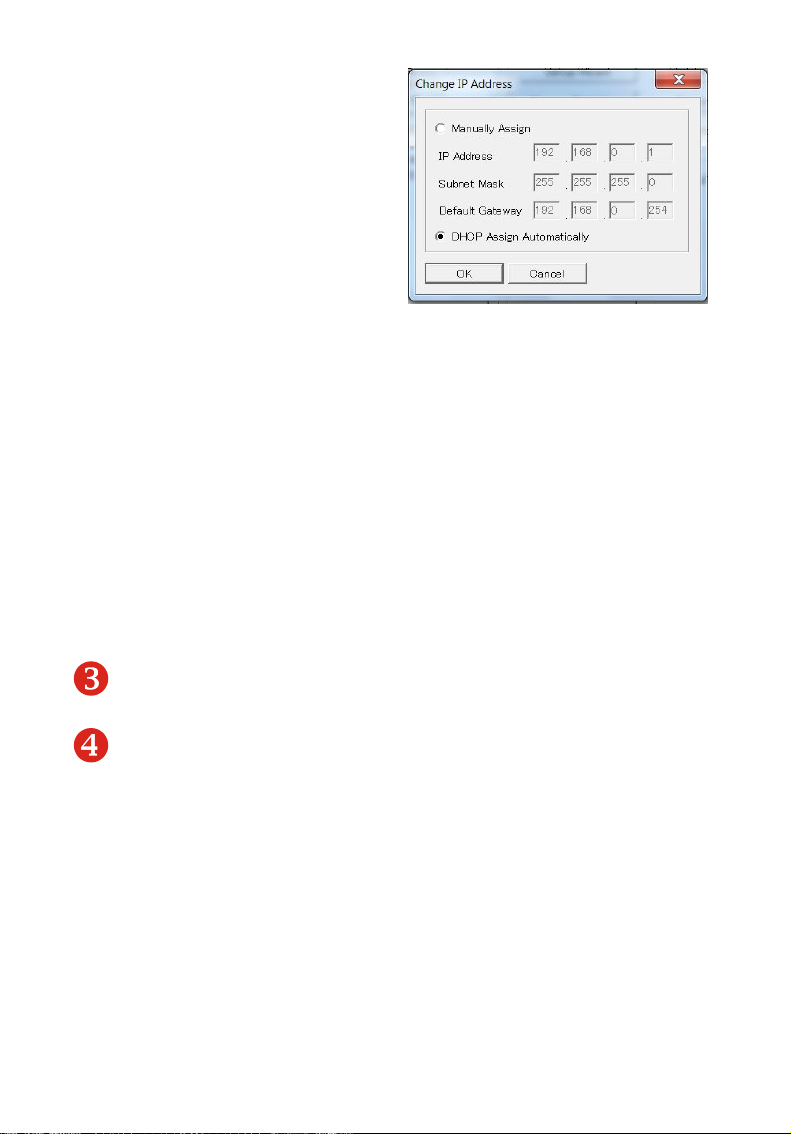
- Change IP Address: Click
this button to bring up
the following dialog box,
allowing you to change
the IP Address. In this
dialog box, you can select
either Manually Assign
or DHCP Assign
Automatically. When
completed, click OK.
- Factory Reset: Click this button to reload the factory settings
of the print server.
- Show Web Setup: Click this button to open your web
browser and launch the Configuration Utility. Alternately,
you can double-click the print server in the Device List to
launch the Configuration Utility.
- Discover Device: Click this button to search the connected
print server again.
- About: Click this button to bring up a window containing the
basic information of PS-Utility.
- Close: Click this button to exit PS-Utility.
3. Information Field: Display the basic information of the selected
print server in the Device List.
4. Status Bar: Display the system status.
- 18 -
PS Wizard
PS Wizard is a convenient utility that allows you to set up the print
server’s port connection.
Windows 7/Vista/XP/2003 Server/XP/2000
Insert the Installation CD-ROM into your computer’s CD-ROM drive.
Click PS Wizard and then click Win 7/Vista/2003/XP/2000 from the
Auto-Run menu screen.
- 19 -
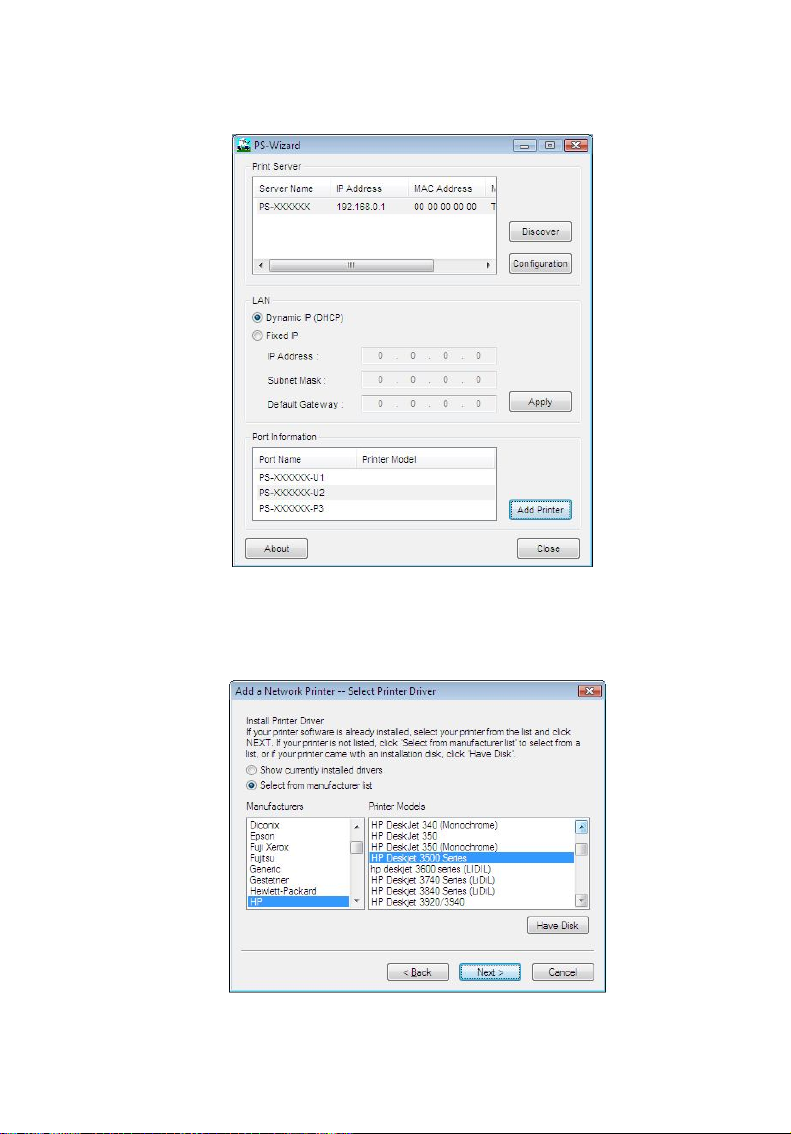
1) Select the print server, select the desired port and then click
Add Printer.
2) Click Select from manufacturer list. Select the appropriate
driver for your printer and then click Next.
- 20 -
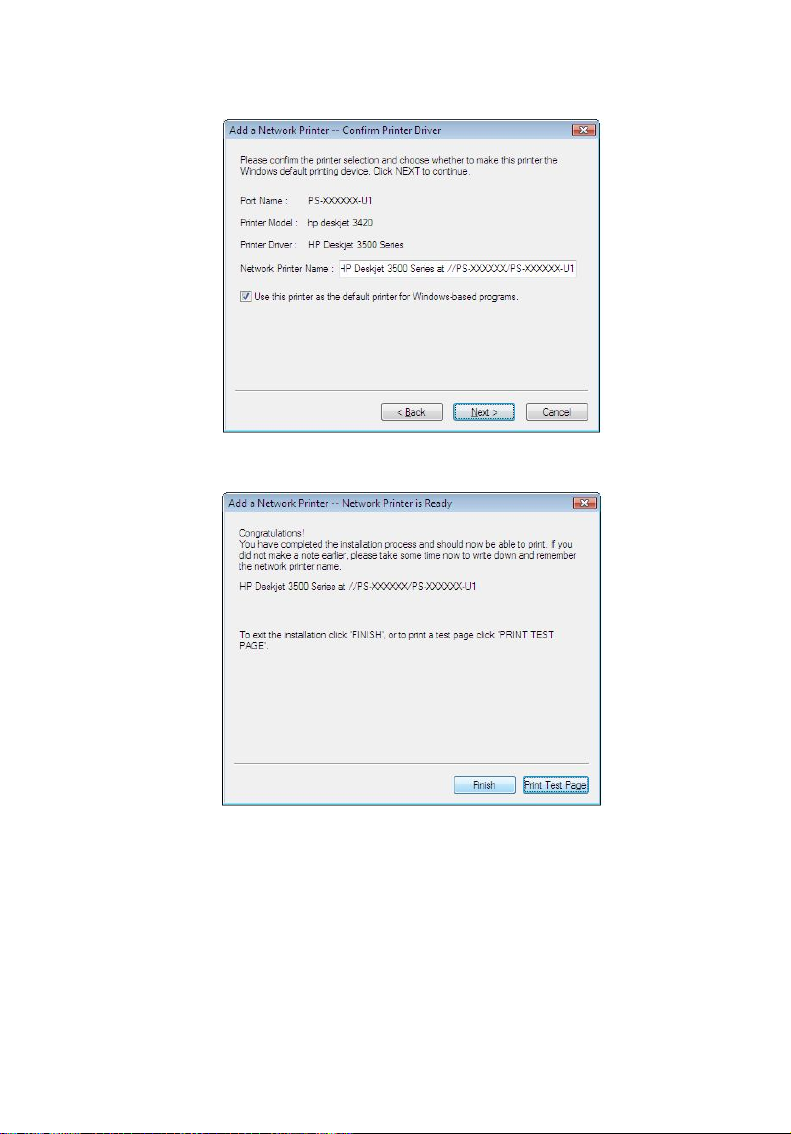
3) Click Next.
4) Click Print Test Page.
- 21 -
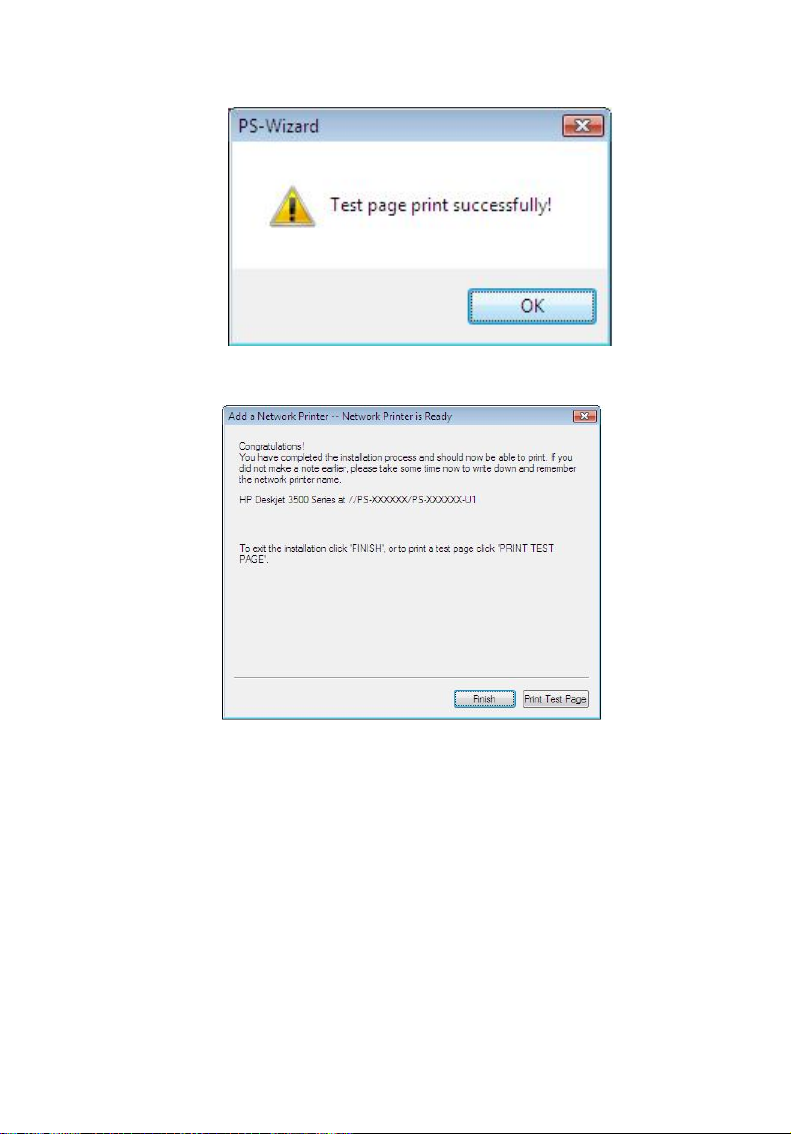
5) Click OK.
6) Click Finish.
7) Repeat steps 1 to 7 to add the printer to other computers on
the network and to add another printer.
- 22 -
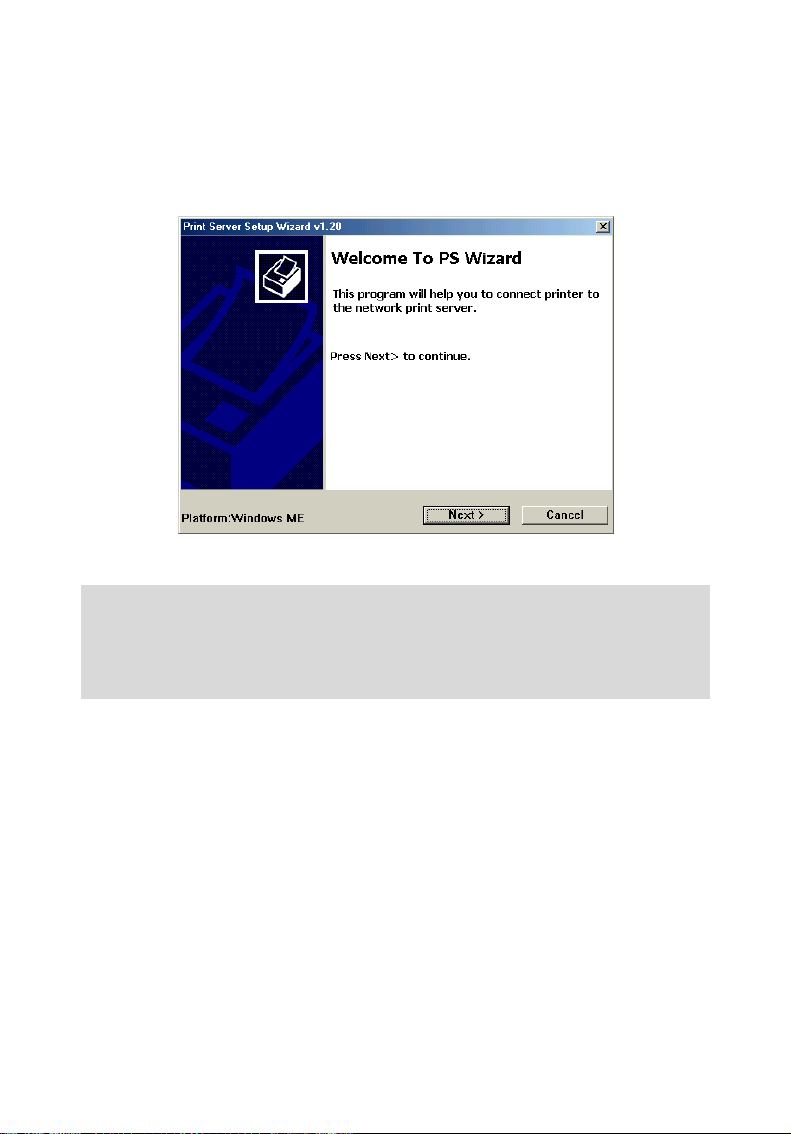
Windows 98SE/ME
1. Insert the Installation CD-ROM into your computer’s CD-ROM
drive, and click PS Wizard from the Auto-Run menu screen. The
welcome screen appears as below. Click Next >.
NOTE: For some specific printers, you may need to connect the printer to
the computer and install the driver. In this case, connect it to the
computer and install the driver first, and then connect it to the print
server.
- 23 -
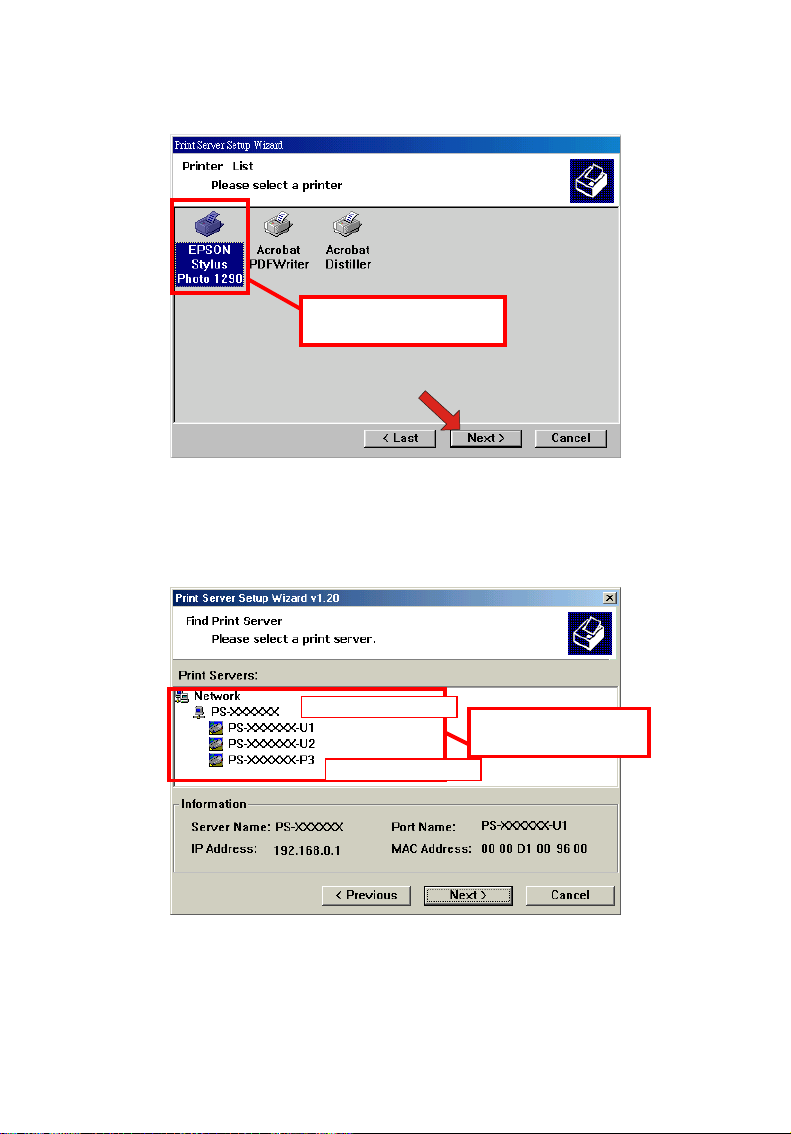
2. In the following window, select one printer in the Printer List to
set up port connection, and then click Next >.
Choose one connected
printer within the network.
3. Select the desire printer port in the Print Server List, and click
Next >.
Your print server name
Your printer port name
- 24 -
Choose one connected
printer port.
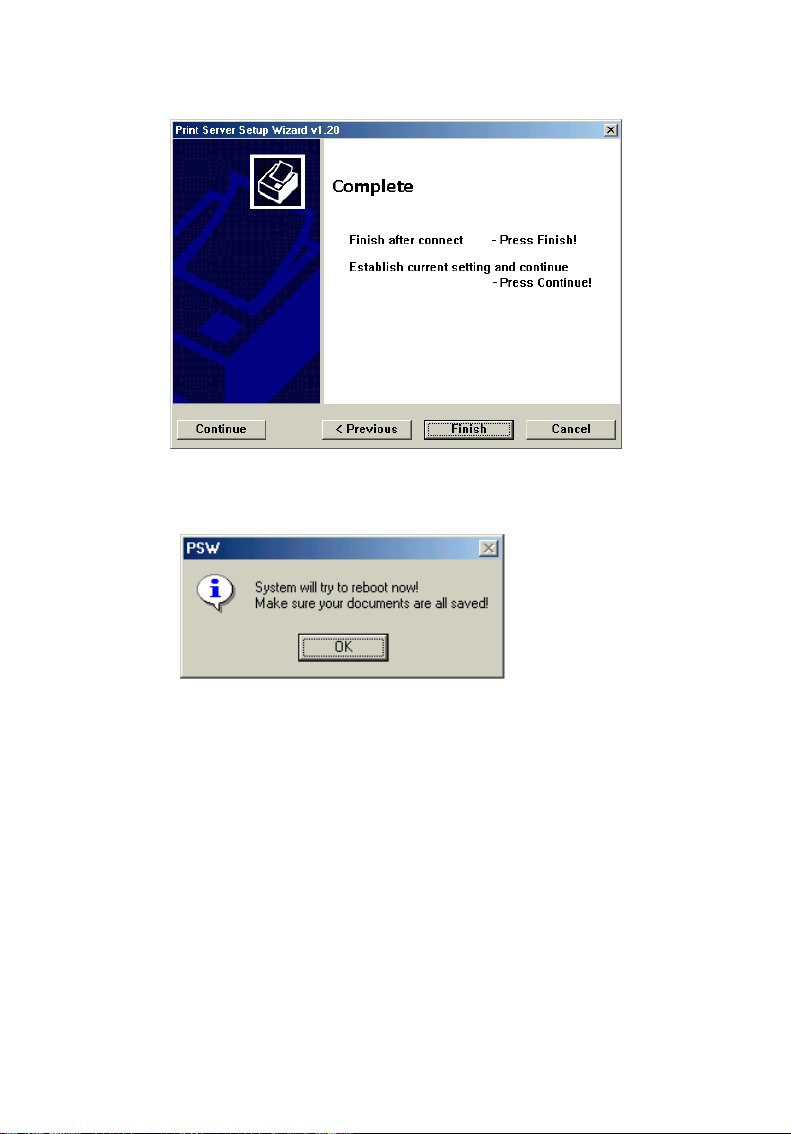
4. The configuration is completed, click Finish.
5. Click OK to reboot the computer.
After rebooting, PS Wizard will help you to complete the port
connection automatically. You can start your printing task
without any complex configuration.
- 25 -
PS Monitor Utility
PS Monitor will allow the print server to support HP GDI Printers.
1. Click the Utility PM Monitor from the Autorun. This program
will lead you to finish the installation process of the PS Monitor
step by step.
2. Choose the Language of your Windows system and click the “OK”
button to the next step.
- 26 -
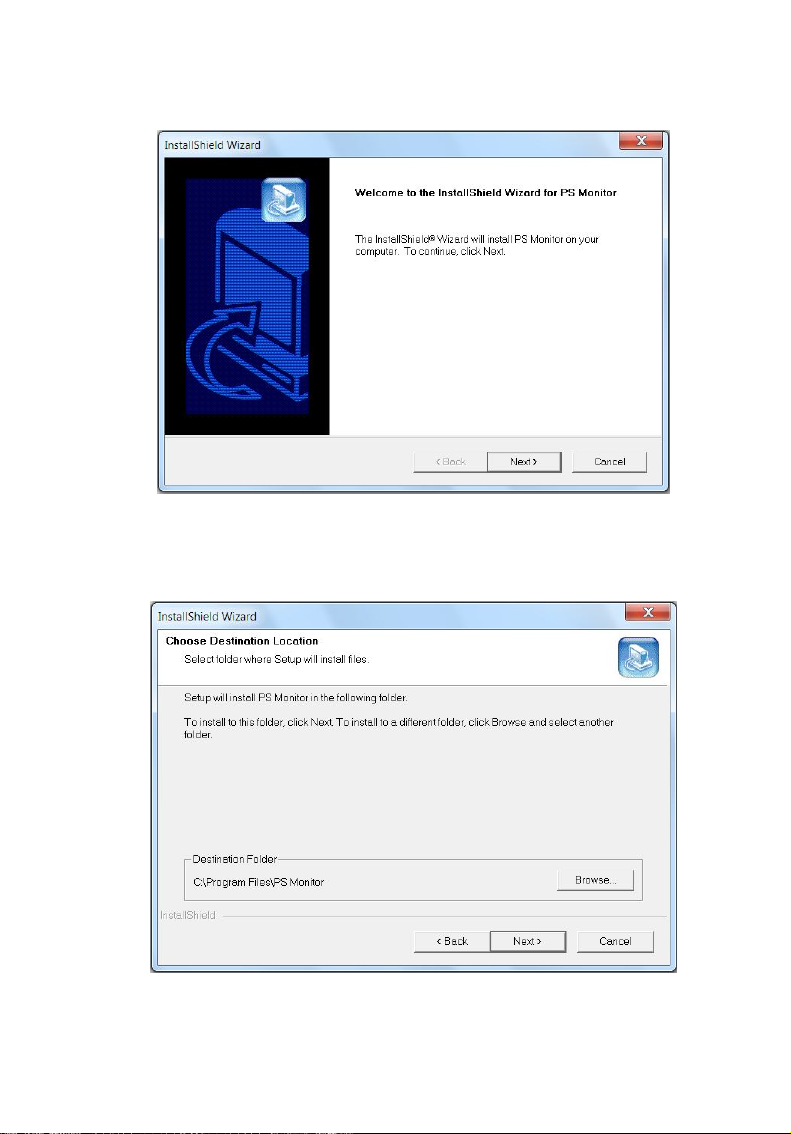
3. Click the “Next” button and start to install the PS Monitor.
4. Specified the directory for of the PS Monitor to be installed inside
and then click the “Next” button.
- 27 -
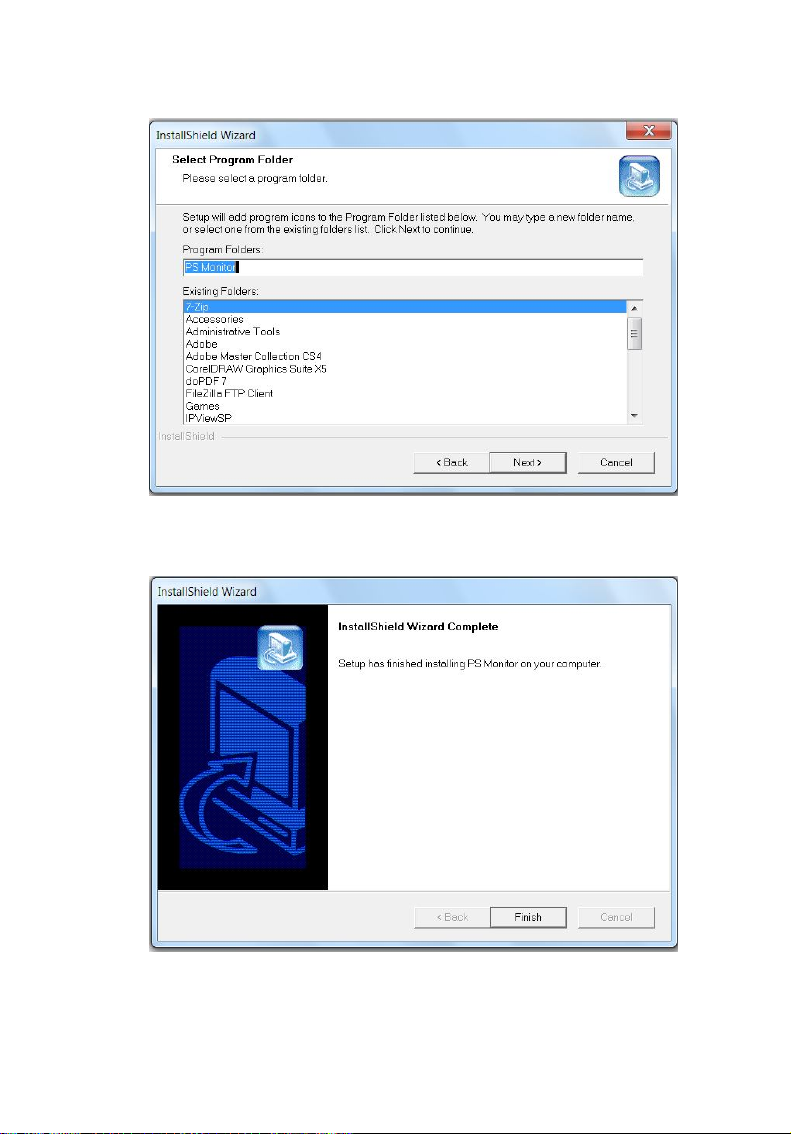
5. Click “Next” on Select Program Folder.
6. Click the “Finish” button to complete the installation.
- 28 -
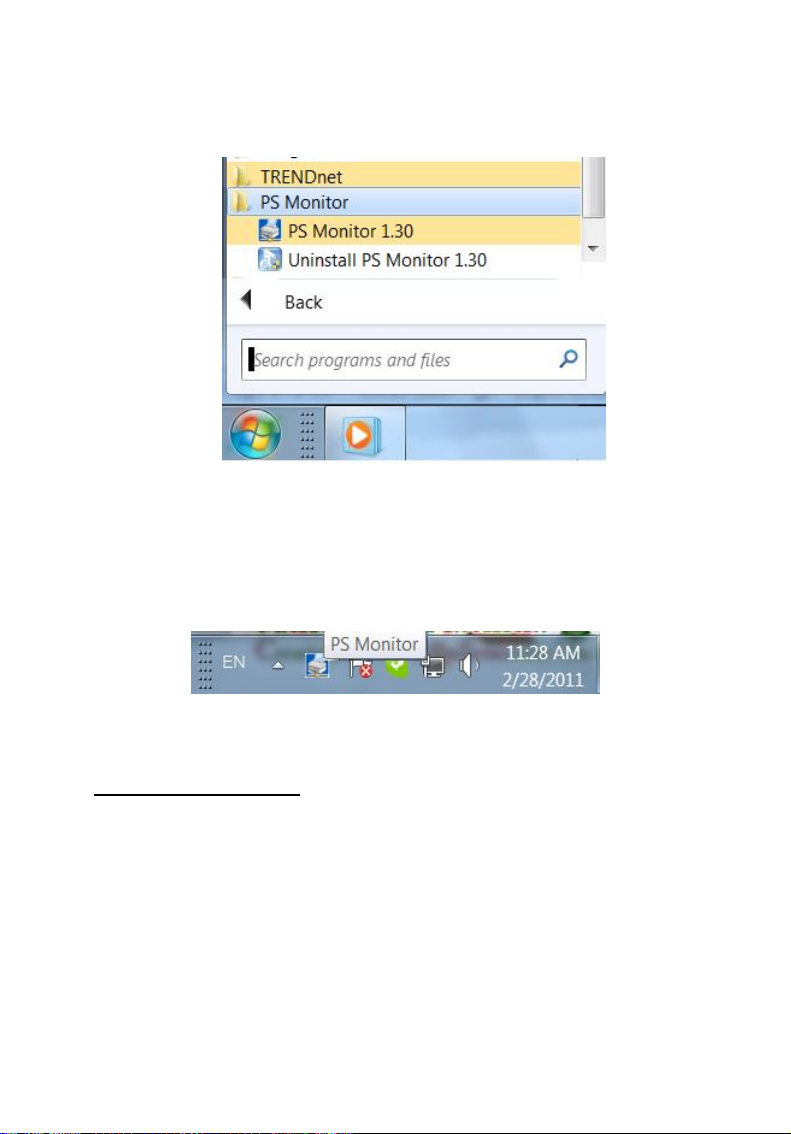
7. The installation is completed. Click the “Start”->”Program”->
TRENDnet”->”PS Monitor 1.30” to launch the PS Monitor.
8. To verify if the PS Monitor is executed successfully, please check
that the icon of PS Monitor is shown in the taskbar under your
Windows system.
To add HP GDI printers onto your network, please proceed to
“Printing in Windows” section and follow the proper operating
system installation instructions.
- 29 -

4
IP address in the same segment for the two devices to communicate.
WEB CONFIGURATION
You can access and manage the Print Server through: 1) the enclosed
software PS-Utility, and 2) a web browser. This chapter describes
the second method – the Web Configuration Utility, and explains how
to set up your print server with the web browser.
Web Configuration Utility
First, launch your web browser (such as the Internet Explorer 6.0
used in this manual). Then, type http://192.168.0.1 (the default IP
address) in the Address bar and press [Enter] to enter the
Management screen of the Configuration Utility.
TIP: The computer’s IP address must correspond with the print server’s
Extensive knowledge of LAN will be helpful in configuring the print
server.
- 30 -

Management
The Management screen displays the basic information of the print
server, including the following four categories:
- 31 -
System
Network
User
Management System
As shown above, the System displays the status of your print server,
printer, and network. Clicking Refresh will update the information.
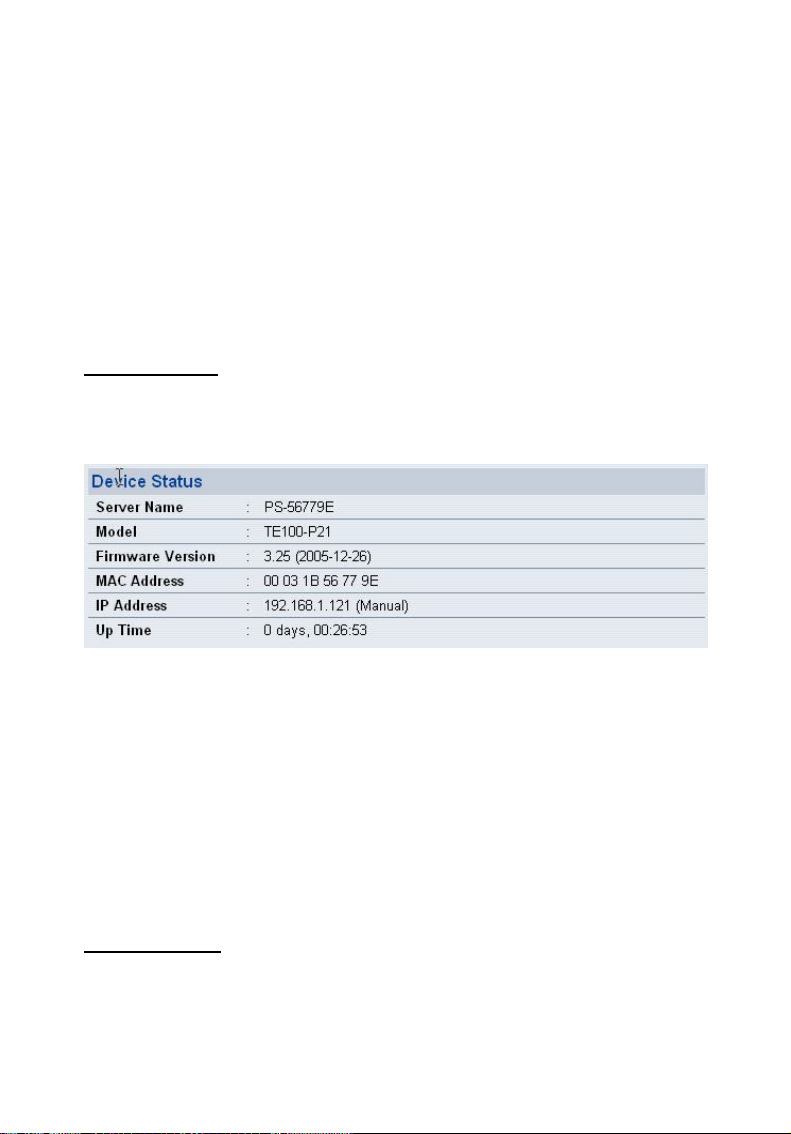
Device Status
The information about the print server, including the firmware
version, MAC/IP address, and up time, can be found in this field.
Printer Status
The items in this field display the information of the printer, such as
the given name for the printer, speed, printer status, and status of
your printing tasks, etc.
- 32 -

Ethernet Status
You can monitor the networking status in this field, including the
network connection, speed, and the packets status.
Management Network
Click the Network item to display the information of the LAN. Clicking
Refresh will update the information.
- 33 -

Auto IP
This field contains the current settings of TCP/IP, including
DHCP/BOOTP, UPnP, and MAC Rendezvous. The items in this field
are configured in Configuration > Network > TCP/IP.
- 34 -

TCP/IP Printing
In this field, you can monitor the status of your printing tasks through
TCP/IP.
Microsoft Network Printing
In this field, you can monitor the status of your printing tasks through
Microsoft Network.
- 35 -

MAC AppleTalk Printing
In this field, you can monitor the status of your printing tasks through
MAC AppleTalk.
- 36 -

Management User
Click the User item in the left column to display the user(s)
information.
Users Printing Log
The items in this field display the user(s) information, which include
the user(s) MAC address, IP address, name, and status of printing
tasks.
- 37 -

Configuration
Configuration System
- 38 -

System Device
In this field, you can configure the basic information of your print
server.
- Server Name: Assign a name to the print server.
- Location (optional): Assign a location for the print server
- Admin Contact (optional): Assign the Admin Contact’s name for
the print server.
- Password: Enter the Administrator password (3-8 characters).
To set up the password, please enter the password in the New
Password box, and then enter the same one again in the Confirm
Again box.
- 39 -
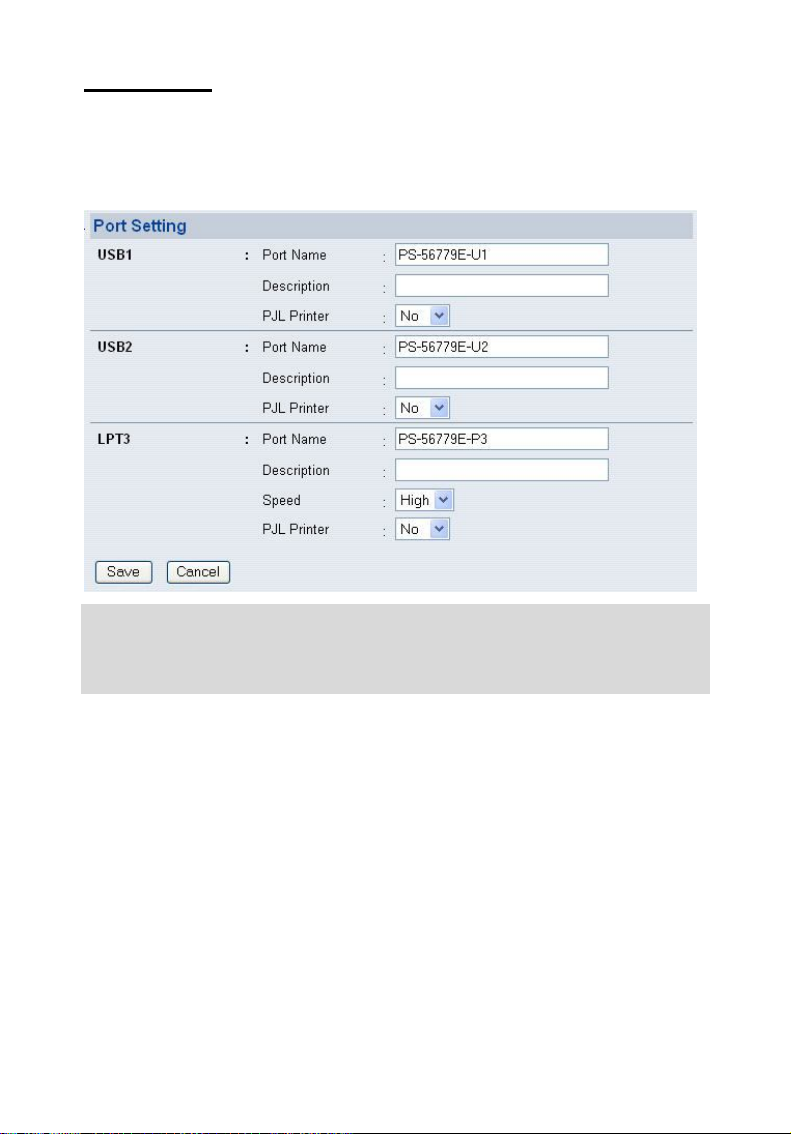
Port Settings
In this field, you can assign the Port Name for the print server, and
the description for the USB port. It also allows you to select the PJL
Printer setting (Yes or No).
NOTE: PJL (Print Job Language) has certain job requirements that must
be met to work correctly. For more information, please refer to your
printer’s manual.
- 40 -

Configuration Network
- 41 -
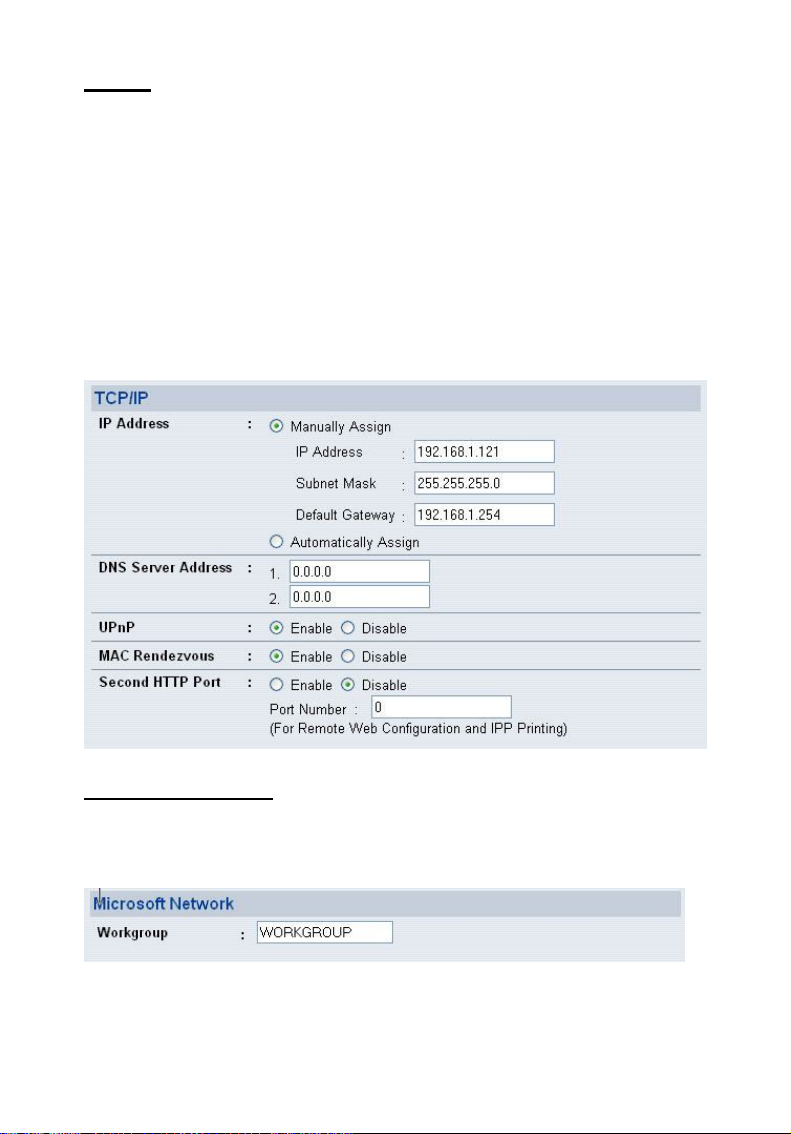
TCP/IP
This field contains three options that allow you to configure the
TCP/IP setting: IP Address, UPnP, and MAC Rendezvous.
- IP Address: This option allows you to set the IP address manually
or automatically. When you choose Manually Assign, you
should enter the related information in the following boxes,
including IP Address, Subnet Mask, and Default Gateway.
- UPnP: This option allows you to enable or disable UPnP mode.
- MAC Rendezvous: This option allows you to enable or disable
MAC Rendezvous mode.
Microsoft Network
Enter the name of the Workgroup that you want the print server
associated with in this field.
- 42 -

ApplyTalk
Enter the AppleTalk Zone name in the box. In the following options,
enter the related configuration, such as the printer type.
- USB1, USB2, LPT3
Chooser Name: Display the print server’s Port name.
Printer Type: Enter the printer’s type in this box.
PostScript Level: Select from the pull-down menu (Level 1 or
Level 2).
Font Group: Select from the pull-down menu.
TIP: Once you have changed the settings in each option, click Save to
store the settings, or Cancel to abandon.
- 43 -

Configuration User
Printing Control
By configuring the Enable User Printing Control option (Yes or No),
the user in the User List is permitted to access the print server or not.
For the user(s) who is not in the User List, you can also limit the
access right by setting the Allow Undefined Users Printing option to
Yes or No.
Define Users
You can add/delete the user(s) to/from the User List. The User List
at the bottom of the screen displays the current defined user and
related information for the print server.
TIP: Once you have changed the settings in each option, click Save to
store the settings, or Cancel to abandon.
- 44 -

Configuration E-mail
E-mail Account
You can assign an E-mail address to the print server, so that your mail
of the account can be printed out directly through the printer (ASCII
text only). To enable this function, enter the E-mail account in the
Print Server E-mail Address box.
- Incoming E-mail (POP3) Server Address: Enter the server address
that is used to receive your E-mail in this box.
- Outgoing E-mail (SMTP) Server Address: Enter the server address
that is used to send your E-mail in this box.
If your mail server needs to verify the user when sending E-mail, you
have to input the Account Name and Password.
- 45 -

E-mail Notification
You can set the print server to send an alter message when the
printer status changes through E-mail. To enable this function, set
the Enable e-mail notification for printer status changing option to
Yes. Then, input the administrator’s E-mail address in the Admin E-
mail Address box.
E-mail Printing
- E-mail Printing (ASCII Text Only): Select Enable to enable the E-
mail printing function.
- Receive E-mail Interval: Enter the number in this box to set up
the time (in minute) to check/receive E-mail regularly.
TIP: Once you have changed the settings in each option, click Save to
store the settings, or Cancel to abandon.
- 46 -
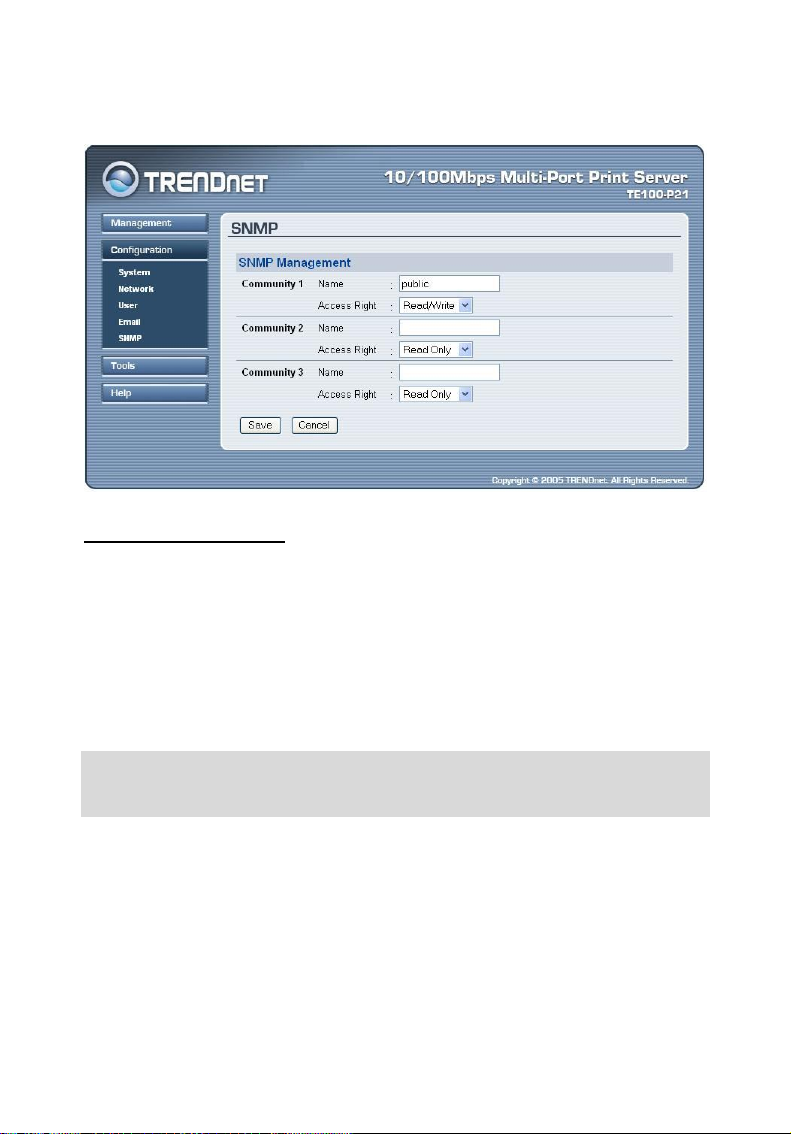
Configuration SNMP
SNMP Management
SNMP (Simple Network Management Protocol) is a set of protocols
for managing complex networks
- Community 1/2/3: Enter a name in the Name box, and configure
the Access Right by selecting Read Only or Read/Write from the
pull-down menu.
TIP: Once you have changed the settings in each option, click Save to
store the settings, or Cancel to abandon.
- 47 -

Tools
Tool Print Test
Print Test
Choose one of the print ports and click Test to print a test page.
- 48 -

Tool E-mail
Test E-mail Account
Click Test to send a test E-mail to the given administrator’s E-mail
address.
Receive E-mail
Click Yes to immediately check and receive E-mail, and then print out
the mail when available.
- 49 -
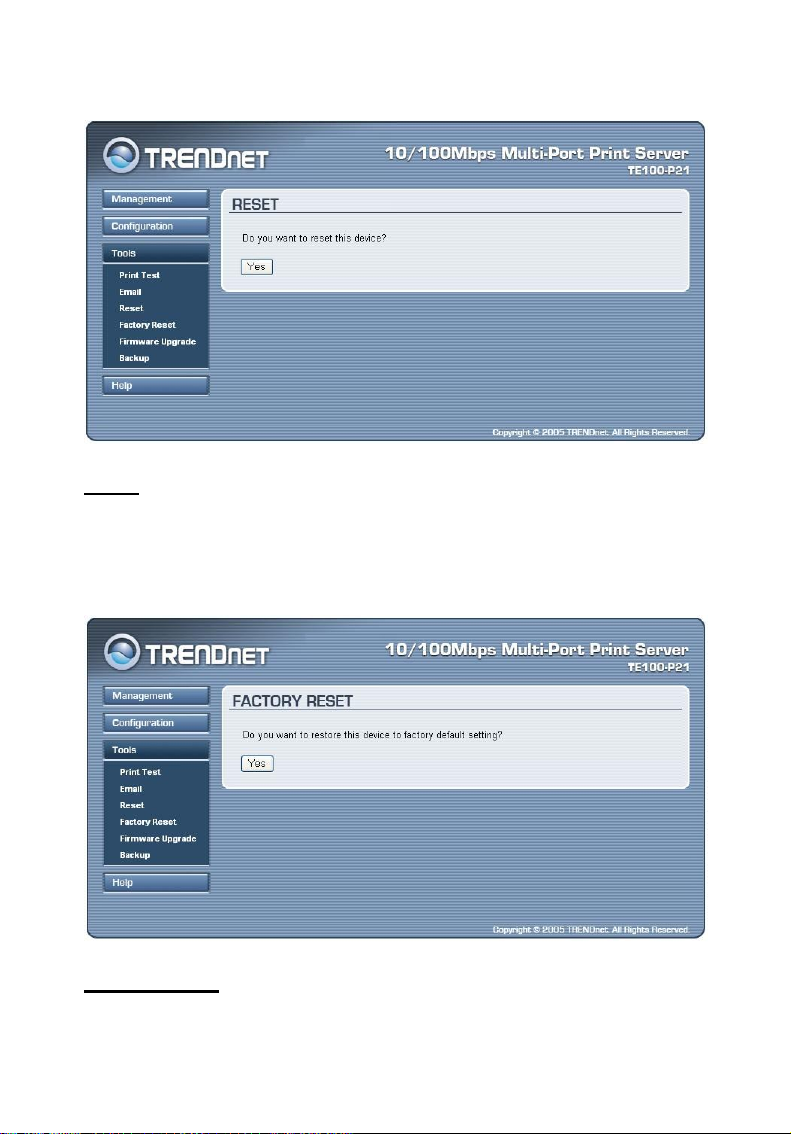
Tool Reset
Reset
Click Yes to immediately reset the print server.
Tool Factory Reset
Factory Reset
Click Yes to reload the factory settings of the print server.
- 50 -

Tool Firmware Upgrade
Firmware Upgrade
When a new version of firmware is available (e.g. downloading from
the manufacturer’s website), you can upgrade the firmware of your
print server. Click Browse to point to the firmware file, and then
click Upgrade.
- 51 -
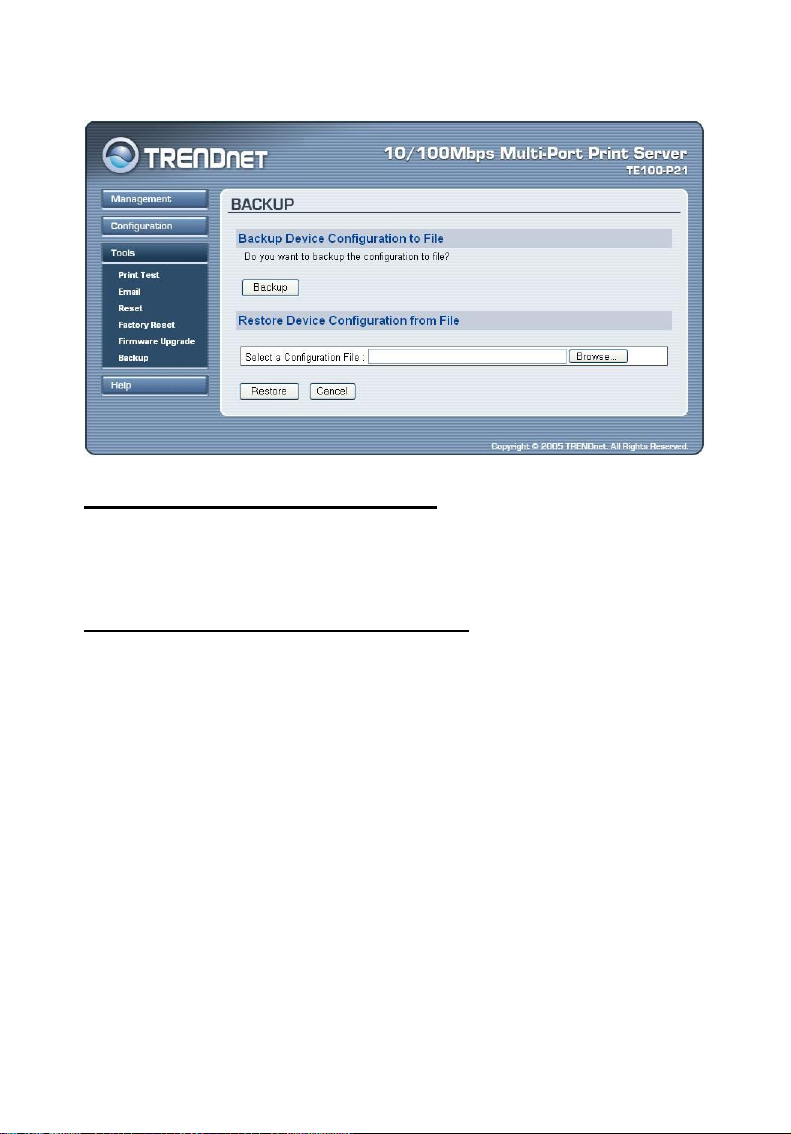
Tool Backup
Backup Device Configuration to File
Click Backup to backup your current configuration of the print server
to file and then save in the computer.
Restore Device Configuration from File
You can reload a configuration that you saved before. Click Browse
to point to the backup file, and then click Restore.
- 52 -

Help
This screen displays the information of the print server.
- 53 -

5
PRINTING IN WINDOWS
98SE/ME
The Print Server can provide print services to TCP/IP networks using
the LPR/LPD network printing protocol. Most UNIX systems are
capable of supporting LPD, as is Windows NT/2000.
This LPR for TCP/IP Printing client gives Windows 98SE/ME
workstations the ability to print using the LPR/LPD printing protocol.
Though it is possible to print to Print Servers from Windows 98SE/ME,
this capability is useful if primarily administer your network from
UNIX systems, or if you want to print from workstations that are only
accessible through IP routing.
- 54 -

Installing the LPR for TCP/IP Printing
Client
Before your Windows 98SE/ME workstation can print using the LPR
protocol, you will need to install the client program, as follows:
1. Make sure that you have installed the TCP/IP protocol, and
have properly configured the Windows 98SE/ME TCP/IP
settings. You can install the protocol from the Network
control panel if necessary.
2. From the Start menu, choose the Settings submenu, then the
Control Panel item within it. Windows will display the
Control Panel folder.
3. Double-click on the Network icon in the Control Panel folder.
4. Click on the Add... button on the Configuration tab.
5. Windows will ask for the type of component to add. Select
Client and click Add... to continue.
6. When Windows asks you to select a network client, click the
Have Disk... button.
7. Insert the Print Server installation CD in your computer’s CD-
ROM, enter the proper pathname (for example , D:\ lpr), and
click OK.
- 55 -

8. Select the LPR for TCP/IP Printing client and click OK.
9. Windows will copy the necessary files, and return to the
Network dialog. Click OK to let Windows restart.
- 56 -

Adding LPR Printer Ports
Once you have installed the client, and have enabled TCP/IP printing
for the Print Servers, then you need to add a printer port for each
printer you will be printing to using the lpr/lpd protocol. To add a
printer port,
1. From the Start menu, choose the Settings submenu, then the
Control Panel item within it. Windows will display the
Control Panel folder.
2. Double-click on the Network icon in the Control Panel folder.
3. Choose the LPR for TCP/IP Printing client and click the
Properties button.
4. Click the Add Port... button to add a new lpd-accessible printer
port.
- 57 -

5. Enter the IP address of the Print Server and the name of the
printer port that you will be printing to, then press OK.
Hint: You can get the Port name (same as print name) from the print
server’s system information through web browser. Please refer
Configuration > System for port information. Please make sure the
port name is correspondence to the port you connected.
6. Click OK to leave the LPR for TCP/IP Printing Properties
window.
- 58 -

Printing from Windows 98SE/ME
After you have added the necessary printer ports, you can add a
printer device for printing to the port. To enable printing to an lpraccessible printer port from Windows 98SE/ME:
1. From the Start menu, choose the Settings submenu, then the
Printers item within it. Windows will display the Printers
folder.
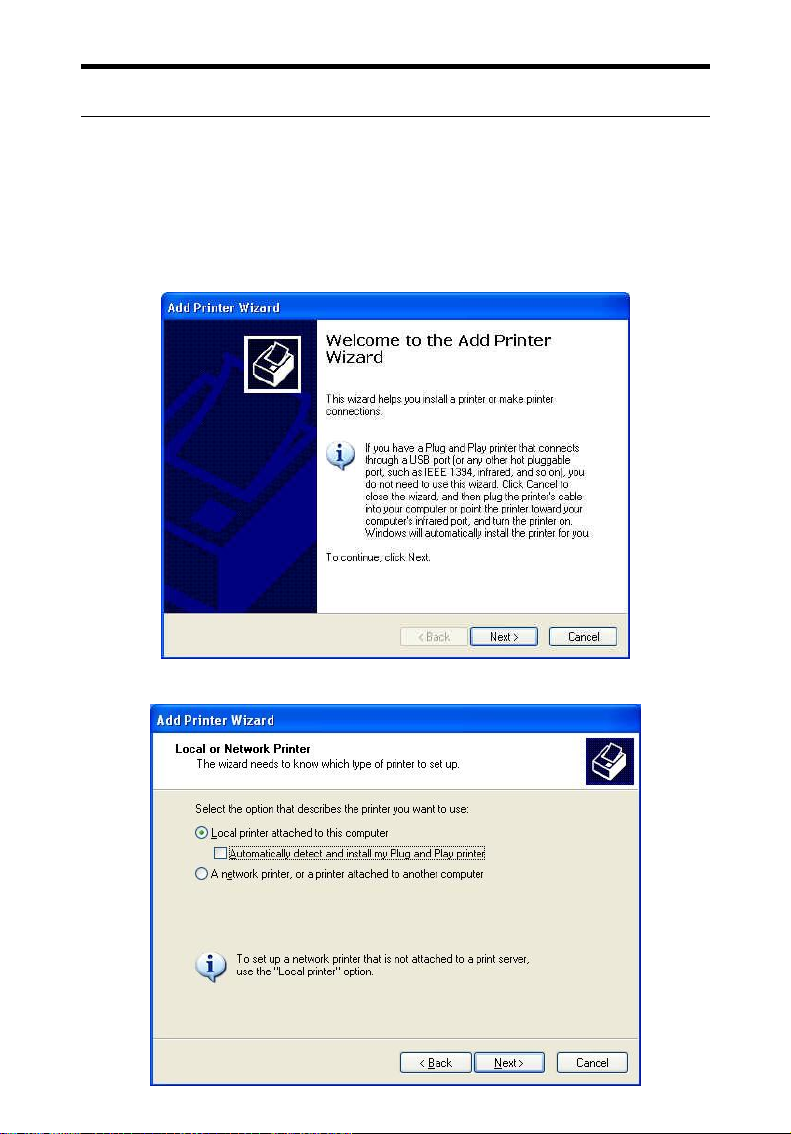
2. Double-click on the Add Printer icon in the Printers folder.
Windows will start the Add Printer Wizard.
Click the Next > button to continue to the next screen.
- 59 -
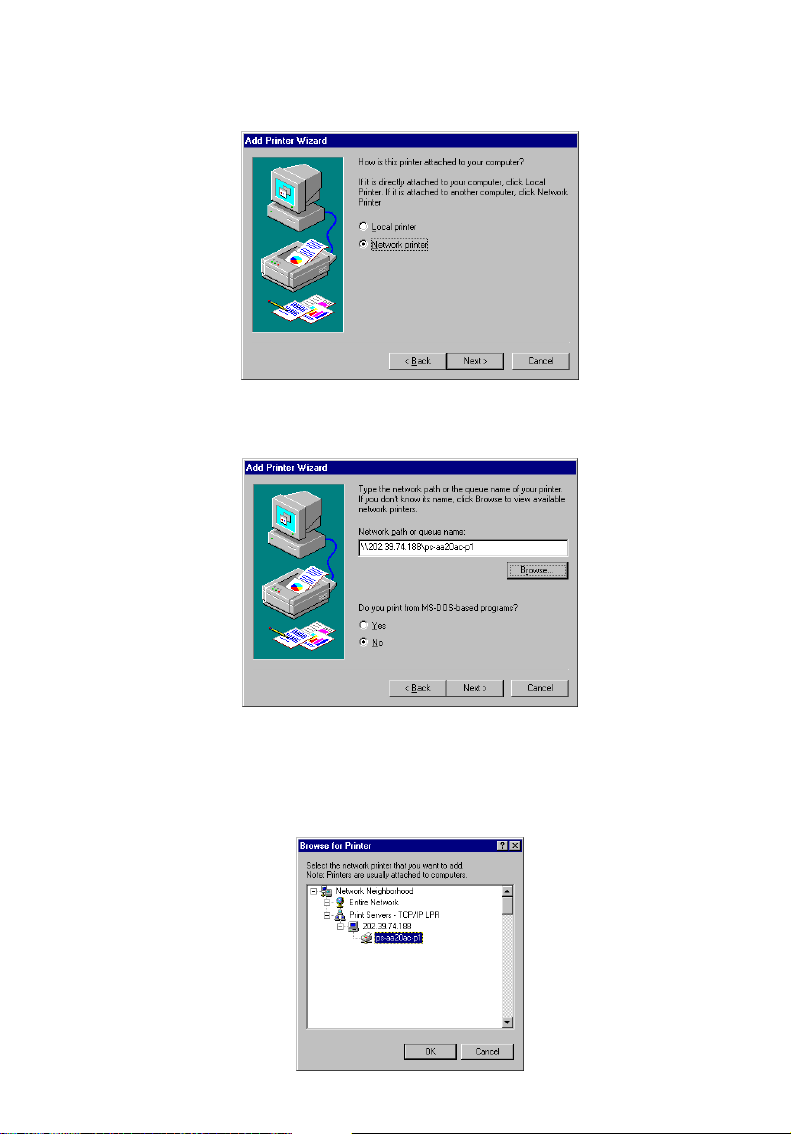
3. Choose the Network Printer selection and click the Next >
button to continue.
4. Enter the name of the port, as displayed in the LPR for TCP/IP
Printing Port List.
Alternatively, you can click Browse... and locate the printer port.
TCP/IP printing ports are located under the Entire Network icon,
within the Print Servers - TCP/IP LPR icon.
- 60 -
Press OK when you have located the proper printer port.
Click Next > to continue to the next step.
5. At this point Windows will ask you to choose the correct
printer driver for the printer. Choose you printer’s make and
model from the list, or use the driver disk included with the
printer. When you have chosen the correct printer, click Next
> to continue.
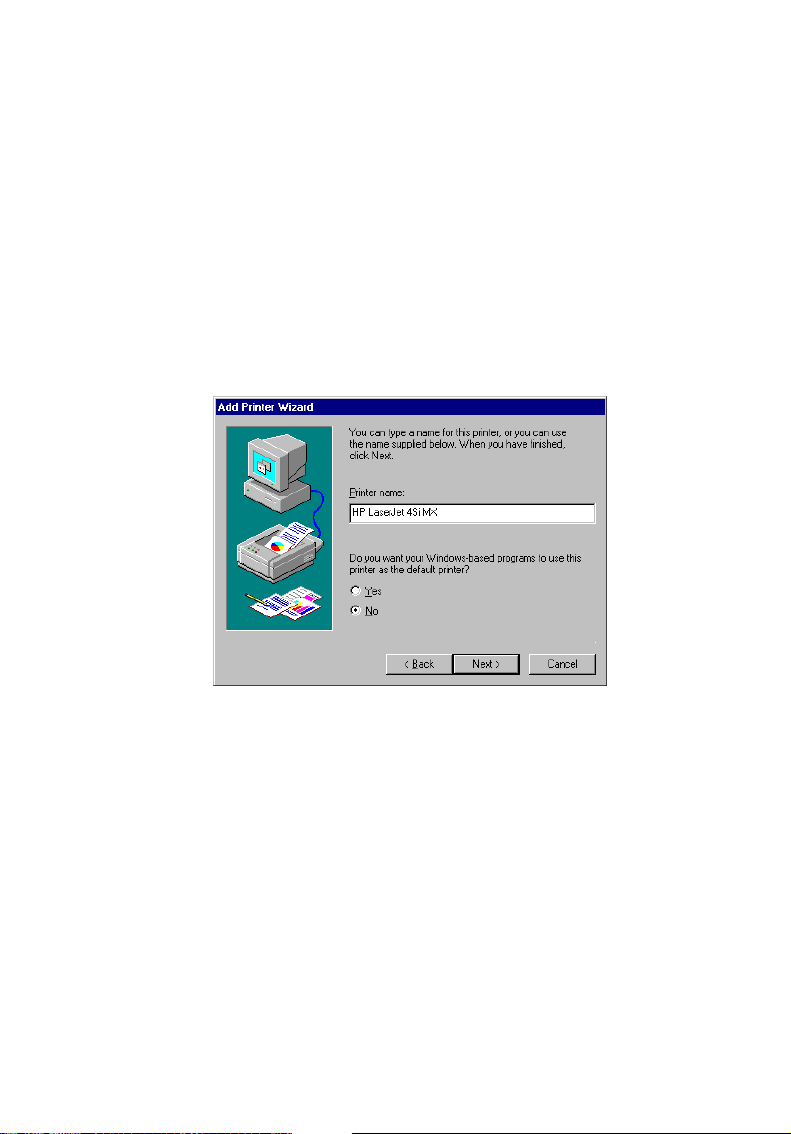
6. Windows will then ask for a name for the new printer, and ask
whether or not you want to set the printer as the Windows
default printer. Click Finish (or Next >) to continue.
7. Windows may ask you whether or not you wish to print a test
page to make sure that the printer will work correctly. When
the test page is done printing, you will be asked whether or not
the test page printed.
- 61 -

Setting TCP/IP Printing Settings
The lpr client’s Properties dialog allows you to change several of the
client’s settings. To change these settings,
1. From the Start menu, choose the Settings submenu, then the
Control Panel item within it. Windows will display the
Control Panel folder.
2. Double-click on the Network icon in the Control Panel folder.
3. Choose the LPR for TCP/IP Printing client and click the
Properties button.
- 62 -
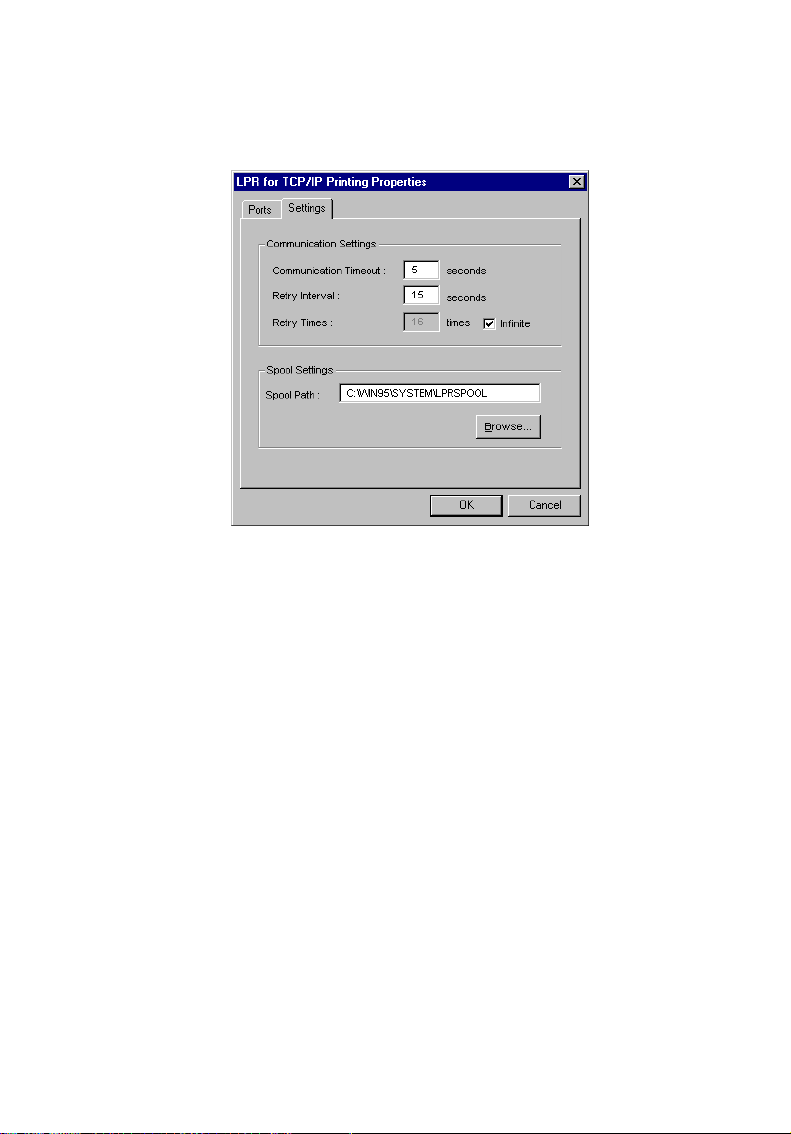
4. Click on the Settings tab to access the lpr client settings.
Change the settings as necessary, and press OK to let the
changes take effect.
The parameters are as follows:
Communication Timeout Determines how long, in seconds,
the system will wait before determining that it has lost
connection with lpr/lpd print servers.
Retry Interval Determines how long, in seconds, the system
will wait before retrying a lost connection.
Retry Times Determines how many times the system will
retry a lost connection with an lpr/lpd print server. If Infinite
is checked, it will retry indefinitely.
Spool Path Gives the directory path where the system will
temporarily store lpr/lpd print server job files.
- 63 -

6
PRINTING IN WINDOWS 7/
VISTA/2003/XP/2000
Setting Up Windows 7/Vista TCP/IP Printing
Following is the correct procedure for setting up TCP/IP LPR printing
under Windows Vista.
Click Start > Printer and Faxes
Double Click “Add a Printer”
Click “Next”
- 64 -

Select Create a new port, select Standard TCP/IP Port and then
click Next.
Input the IP Address of the Print Server, and the Port name of the
Port that will be printed to, then click “Next”.
Hint: You can get the Port name from the print server’s system
information through web browser. Please refer page 38.
Select “Custom”, and click “Settings”.
- 65 -
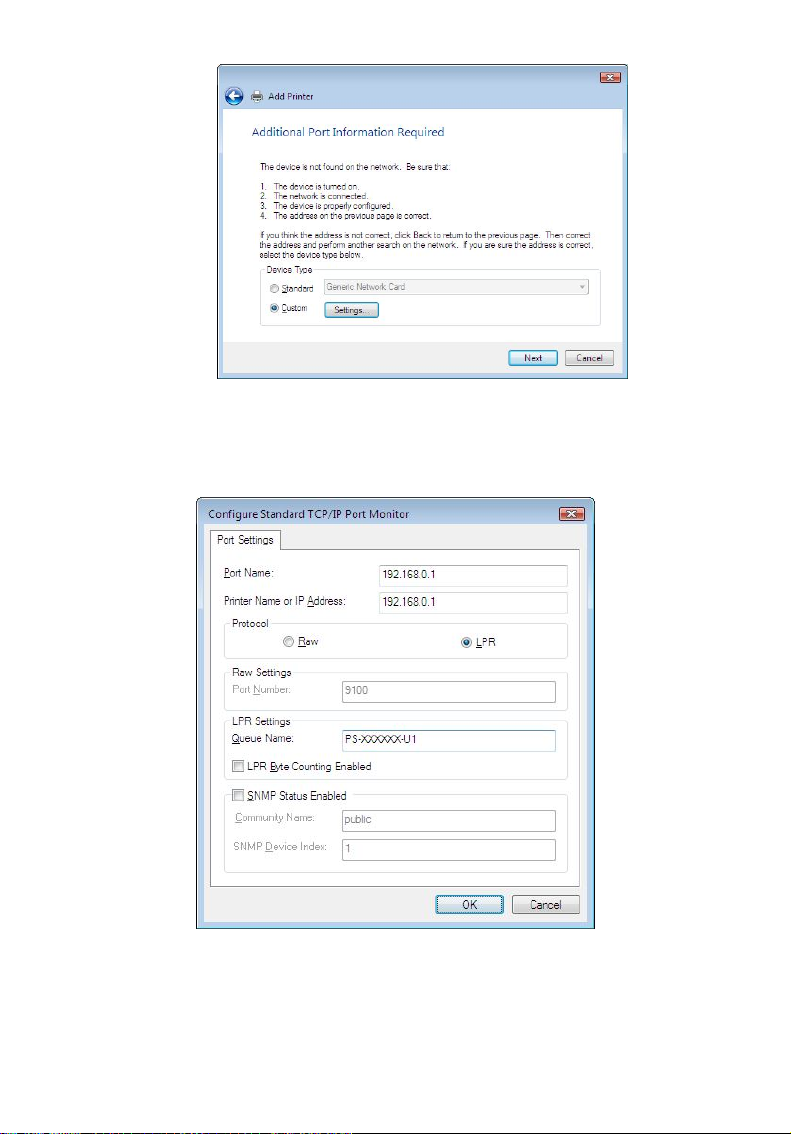
Select “LPR”, and put the Port name in the field labeled “Queue
Name”. Then Click “OK”.
Click “Next”.
- 66 -

The Printer Install Wizard will now prompt for drivers. Select the
correct Make and Model, or click “Have Disk”, to provide the
Manufacturer’s Driver Disk. Click “Next”.
Enter a “Printer Name”.
- 67 -

A Test Page can be printed to confirm proper configuration.
Once a test page has been sent to your printer, click Close.
- 68 -
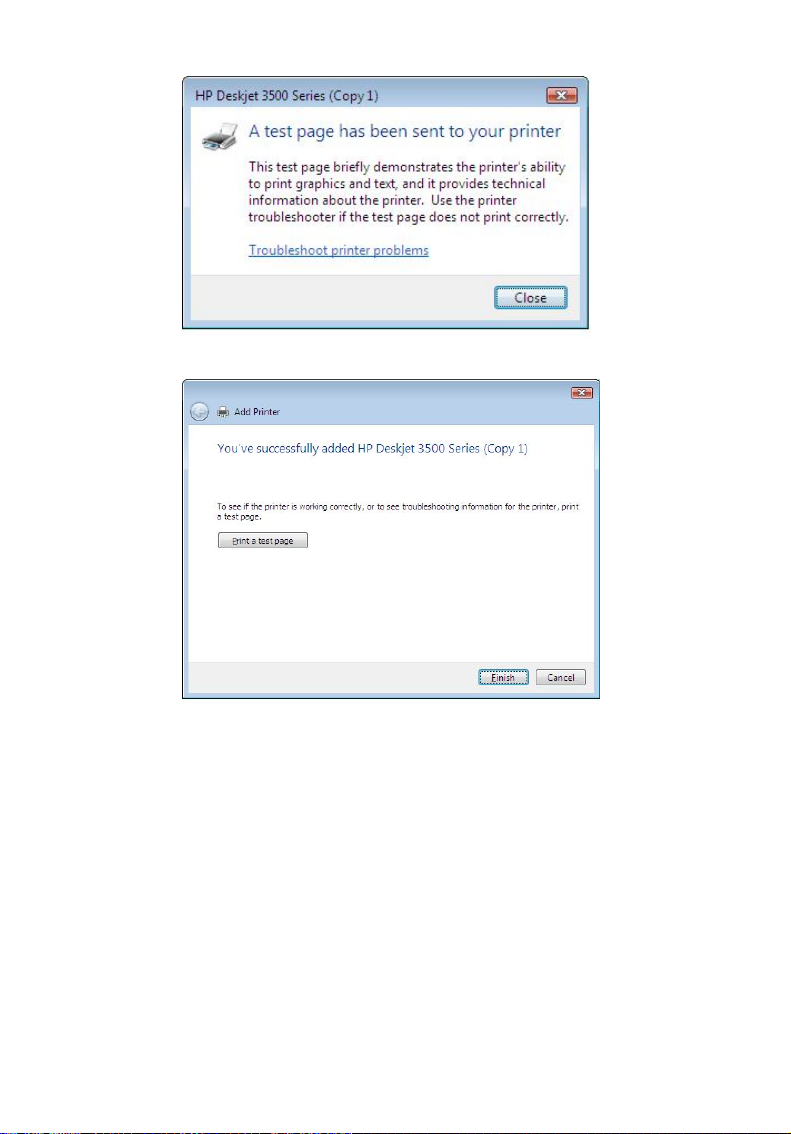
Click Finish.
- 69 -
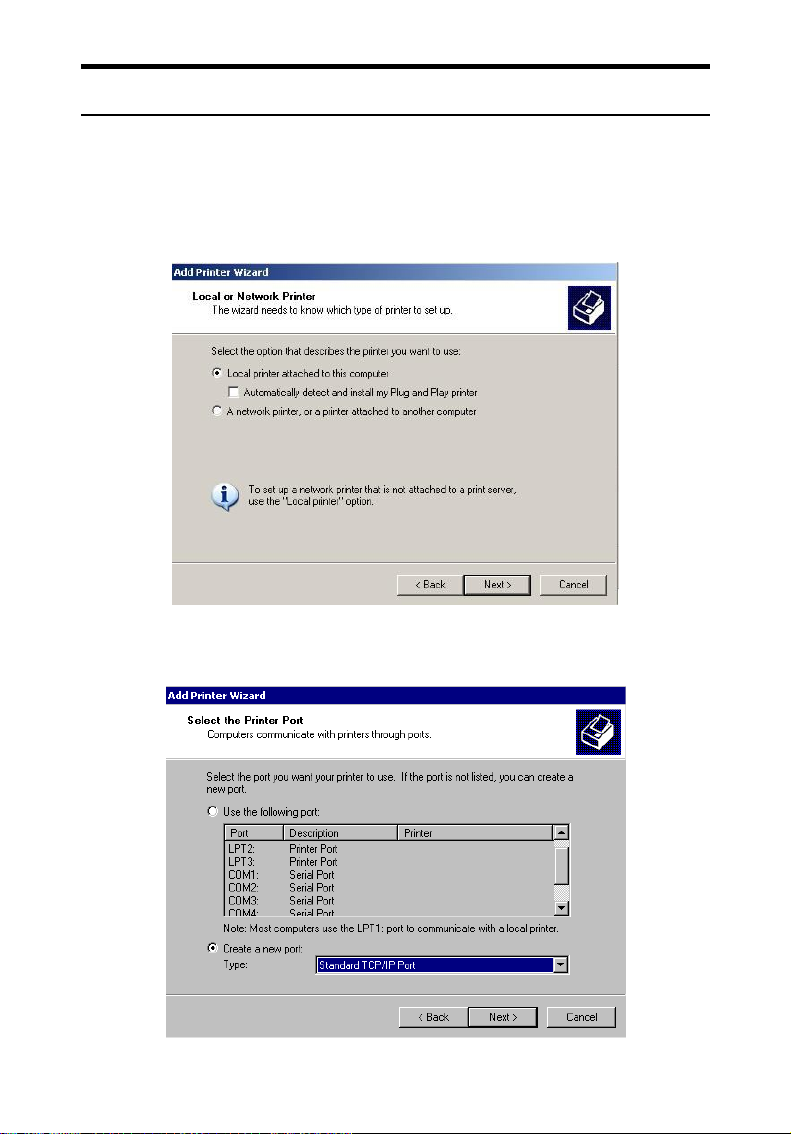
Setting Up Windows XP TCP/IP Printing
Following is the correct procedure for setting up TCP/IP LPR printing
under Windows XP.
Click Start > Printer and Faxes, Double Click “Add a Printer”
Click “Next”
Select “Local Printer”
- 70 -

Create a new “Standard TCP/IP Port”
Click “Next”
- 71 -

Input the IP Address of the Print Server, and the Port name of the
Port that will be printed to, then click “Next”.
Hint: You can get the Port name (same as printer name) from the
print server’s system information through web browser. Please refer
Configure > System for port name information.. Please make sure the
port name is correspondence to the port you connected (etc.USB1,
USB2, LPT3)
- 72 -

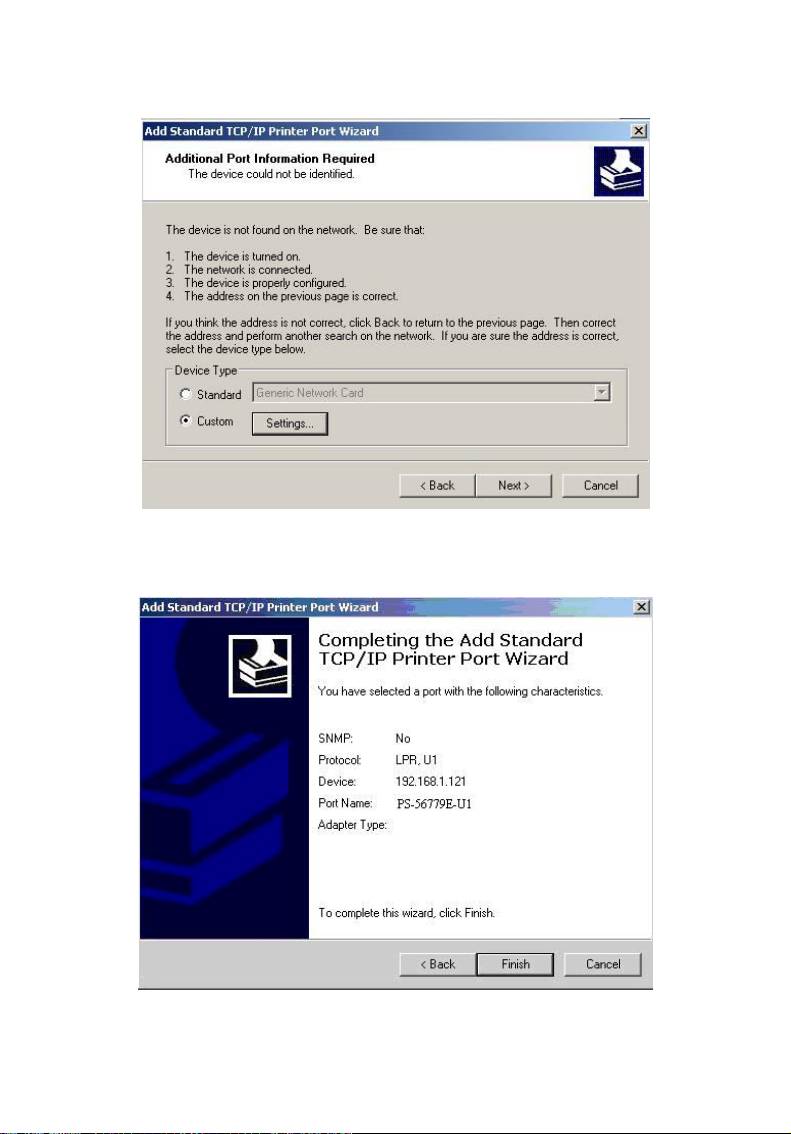
Select “Custom”, and click “Settings”.
- 73 -

Select “LPR”, and put the Port name in the field labeled “Queue
Name”. Then Click “OK”.
Click “Next”.
- 74 -

Click “Finish”
- 75 -

The Printer Install Wizard will now prompt for drivers. Select the
correct Make and Model, or click “Have Disk”, to provide the
Manufacturer’s Driver Disk.
Click “Next”.
Select a “Printer Name”.
- 76 -

A Test Page can be printed to confirm proper configuration.
When the test page has been printed, click “Finish” to complete the
installation.
- 77 -
Setting Up Windows 2000 TCP/IP Printing
Following is the correct procedure for setting up TCP/IP LPR printing
under Windows 2000.
Click Start > Settings > Printers. Double Click “Add Printer”
Select “Local Printer”
Create a new “Standard TCP/IP Port”
- 78 -

Click “Next”
- 79 -

Input the IP Address of the Print Server, and the Port name (Printer
Name) of the Port that will be printed to, then click “Next”.
Hint: You can get the port Name (Same as Printer Name) from the
print server’s system information through web browser. Please refer
page 44-46. Please refer page 44-46. Please make sure the port name
is correspondence to the port you connected (etc.USB1, USB2, LPT3)
- 80 -

Select “Custom”, and click “Settings”.
Select “LPR”, and put the Port name in the field labeled “Queue
Name”. Then Click “OK”.
- 81 -
Click “Next”.
Click “Finish”
- 82 -

The Printer Install Wizard will now prompt for drivers. Select the
correct Make and Model, or click “Have Disk”, to provide the
Manufacturer’s Driver Disk.
Click “Next”.
Select a “Printer Name”.
- 83 -

Sharing can be enabled here.
- 84 -

Also, a Test Page can be printed to confirm proper configuration.
When the Test Page has been printed, click “Finish” to complete the
installation.
- 85 -

7
PRINTING IN MAC OS
NOTE: Mac OS printing is supported by Postscript printers only!
Below instruction is for your reference only. The actually screenshots and
port names will differ depending on the print server. Below is the port
name for each print server:
TE100-P1P/TEW-P1PG => PS-XXXXXX-P1
TE100-P1U/TEW-P1UG => U1
TE100-P21/TEW-P21G => PS-XXXXXX-U1 USB1
=> PS-XXXXXX-U2 USB2
=> PS-XXXXXX-P3 Parallel1
MAC 10.6 SNOW LEOPARD USER
With Mac OS X Snow Leopard (10.6), you can use Bonjour, Internet Printing
Protocol (IPP), Line Printer Daemon (LPD), and HP Jetdirect - Socket
printing through Print Server.
- 86 -

Click this icon in your Dock to open your System Preferences, then
click Network icon
Select Ethernet Connection on the left menu bar, it will display your
computer status.
- 87 -

Adding a Printer
Click this icon in your Dock to open your System Preferences window
as below.
Click the Print & Fax icon in System Preferences menu to view the menu
below.
Click the add button “+” to add a new printer.
Mac OS X Snow Leopard (10.6) supports five printing protocols:
1. Bonjour
2. Internet Printing Protocol (IPP)
3. Line Printer Daemon (LPD)
4. HP Jetdirect – Socket
- 88 -

To add an Internet Printing Protocol enabled, Line Printer Daemon enabled
or HP Jet Direct – Socket enabled printer, click the button and follow
the instructions to add an IP Printer beginning on “Adding an IP printer”
session.
Bonjour-enabled Printers
To add a Bonjour-enabled printer, click the button in the window
below.
Select the printer model from Printer Name list and Kind type. The printer
name selected should be the same as that appearing listed in the Printer
Server’s web manager. In the example here, the printer name is PS-116688P3. By default the Printer Using will use Auto Select to determine what
printer configuration to use. This may also be manually selected in the
Print Using drop-down menu by brand and model.
- 89 -

Click the Add button to exit the window and implement the new setting.
The printer that has just been added will show up in the Printer List menu,
it might take a few seconds depending on network conditions. When the
printer appears listed it is ready for use. Quite the Printer Setup Utility
then start printing.
- 90 -

Adding an IP Printer
To add an Internet Printing Protocol enabled, Line Printer Daemon enabled
or HP Jet Direct – Socket enabled printer, click the button. Select the
desired printing protocol from the Protocol drop-down menu.
Type the IP Address of the printer, the name will appear in the Name field
when the printer is found. This window will indicate that it is verifying the
address. If the printer is found, this window will state “Valid and complete
address” under the Address field.
The printer utility is able to detect the printer and may automatically select
the correct printer driver in the Print Using field. Or manually select the
printer-maker from the Print Using drop-down menu, and then select the
printer model from the scroll-down list, or select Generic PostScrip Printer
option from the Print Using drop-down menu if the model is not listed. To
implement the setting, click Add button.
The setup procedures for these three printing protocols (Internet Printing
Protocol (IPP), Line Printer Daemon (LPD), and HP Jetdirect – Socket) are
basically the same. Please find the example below.
- 91 -

For set up LPD Printing:
1. Enter the IP address of the print server to which the printer is
attached in Address field.
2. Type the port name in Queue field.
Click Add button after done the section of printer model in the Print Using
drop-down menu.
- 92 -
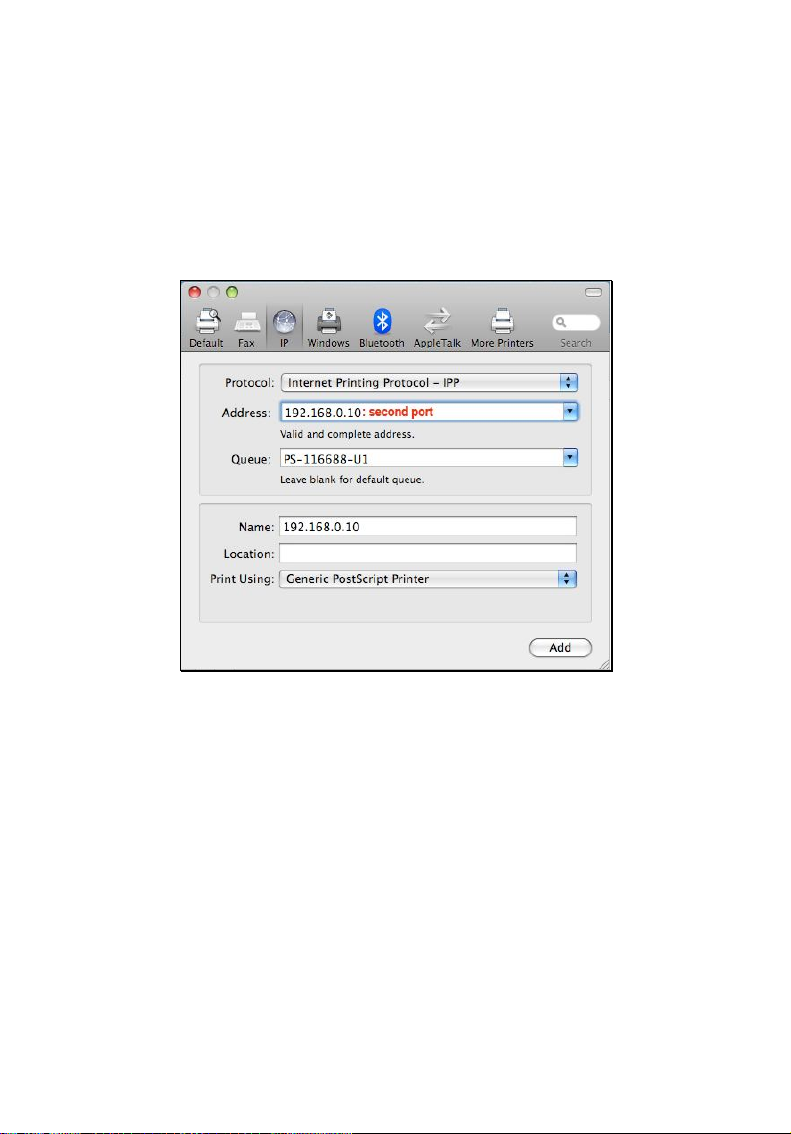
For set up IPP Printing:
1. Enter the IP address of the print server in Address field. After that,
enable print server’s second port, and type
“: second port”.
NOTE: It is highly recommended to configure second port as 631, or
any port from 1024 to 65535.
2. Type the port name in Queue field.
Click Add button after done the section of printer model in the Print Using
drop-down menu.
- 93 -

For set up Socket Printing:
1. Enter the IP address of the print server to which the printer is attached
in Address field. After that, type “: 9100” for port 1, “: 9101” for port 2
or “: 9102” for port 3.
2. Keep the blank in queue field.
Click Add button after done the section of printer model in the Print Using
drop-down menu.
The printer that has just been added will show up in the Printer List menu,
it might take a few seconds depending on network conditions. When the
printer appears listed it is ready for use. Quite the Printer Setup Utility
then start printing.
- 94 -

MAC 10.5 LEOPARD USER
NOTE: Mac OS printing is supported by Postscript printers only!
With Mac OS X Leopard (10.5), you can use Apple Talk, Bonjour, Internet
Printing Protocol (IPP), Line Printer Daemon (LPD), and HP
Jetdirect - Socket printing through Print Server.
Click this icon in your Dock to open your System Preferences, then
click Network icon
Select Ethernet Connection on the left menu bar to review your computer
information.
- 95 -

Click the Advanced button and then the AppleTalk tab as show below.
Select the Make AppleTalk Active option, then click OK and the Apply
button. AppleTalk is now active on the system. Now a printer can be added.
- 96 -

Adding a Printer
Click this icon in your Dock to open your System Preferences, click
Print & Fax icon.
The following screen will appear.
Click the add button “+” to add a new printer.
Mac OS X Leopard (10.5) supports five printing protocols:
1. AppleTalk
2. Bonjour
3. Internet Printing Protocol (IPP)
4. Line Printer Daemon (LPD)
5. HP Jetdirect – Socket
- 97 -

To add an Internet Printing Protocol enabled, Line Printer Daemon enabled
or HP Jet Direct – Socket enabled printer, click the button and follow
the instructions to add an IP Printer beginning on “Adding an IP printer”
session.
AppleTalk-enabled or Bonjour-enabled Printers
To add an AppleTalk-enabled or Bonjour-enabled printer, click the
button below.
Select the printer model from Printer Name/ Kind. The printer name
selected should be the same as that appearing listed in the Printer Server’s
web manager. In the example here, the printer name is PS-116688-P3. By
default the Printer Using will use Auto Select to determine what printer
configuration to use. This may also be manually selected in the Print Using
drop-down menu by brand and model.
- 98 -

Click the Add button to exit the window and implement the new setting.
The printer that has just been added will show up in the Printer List menu,
it might take a few seconds depending on network conditions. When the
printer appears listed it is ready for use. Quite the Printer Setup Utility and
start printing.
- 99 -

Adding an IP Printer
To add an Internet Printing Protocol enabled, Line Printer Daemon enabled
or HP Jet Direct – Socket enabled printer, click the button.
Select the desired printing protocol from the Protocol drop-down menu.
Type the IP Address of the printer, the name will appear in the Name field
when the printer is found. This window will indicate that it is verifying the
address. If the printer is found, this window will state “Valid and complete
address” under the Address field.
The printer utility is able to detect the printer and may automatically select
the correct printer driver in the Print Using field. Or manually select the
printer-maker from the Print Using drop-down menu, and then select the
printer model from the scroll-down list, or select Generic PostScrip Printer
option from the Print Using drop-down menu if the model is not listed. To
implement the setting, click Add button.
The setup procedures for these three printing protocols (Internet Printing
Protocol (IPP), Line Printer Daemon (LPD), and HP Jetdirect – Socket) are
basically the same. Illustrated examples are include below for the sake of
reference.
- 100 -
 Loading...