

Page 1
Guide d'installation rapide
TE100-P1U
V2
Page 2

Table of Contents
Français 1
1. Avant de commencer 1
2. Procéder à l'installation 2
3. Configuration du serveur d'impression 3
Ajout de l'imprimante sur votre PC 5
4.
Troubleshooting 7
Version 08.02.2010
Page 3

1. Avant de commencer
Contenu de l'emballage
TE100-P1U
?
CD-ROM (guide de l´utilisateur et utilitaire)
?
?Guide d'installation rapide en plusieurs
langues
? (5V DC, 2.5A)
Adaptateur secteur
Configuration du système
D'un lecteur de CD-ROM
?
Routeur
?
Un serveur DHCP disponible (les routeurs disposent normalement d'un serveur
?
DHCP intégré)
SE supportés
Windows 7 (32/64-bit)
Windows Vista (32/64-bit)
Windows
2003 Server /ME /
XP (32/64-bit) /2000 / 98SE
Mac OS X (10.6)
Mac OS X (10.5)
Mac OS X (10.4)
Mac OS X (10.1-10.3)
Microprocesseur
1GHz ou supérieur
800MHz ou supérieur
300MHz ou supérieur
Microprocesseur Intel
867MHz ou supérieur
333MHz ou supérieur
300MHz ou supérieur
Mémoire
1GB RAM ou supérieur
512MB RAM ou supérieur
256MB RAM ou supérieur
1GB RAM ou supérieur
512MB RAM ou supérieur
256MB RAM ou supérieur
256MB RAM ou supérieur
Utilitaire PS exigé / Wizard PS exigé
Windows 7 (32/64-bit), Vista (32/64-bit), XP (32/64-bit), 2003 Server, 2000, ME,
?
98SE
1
Page 4
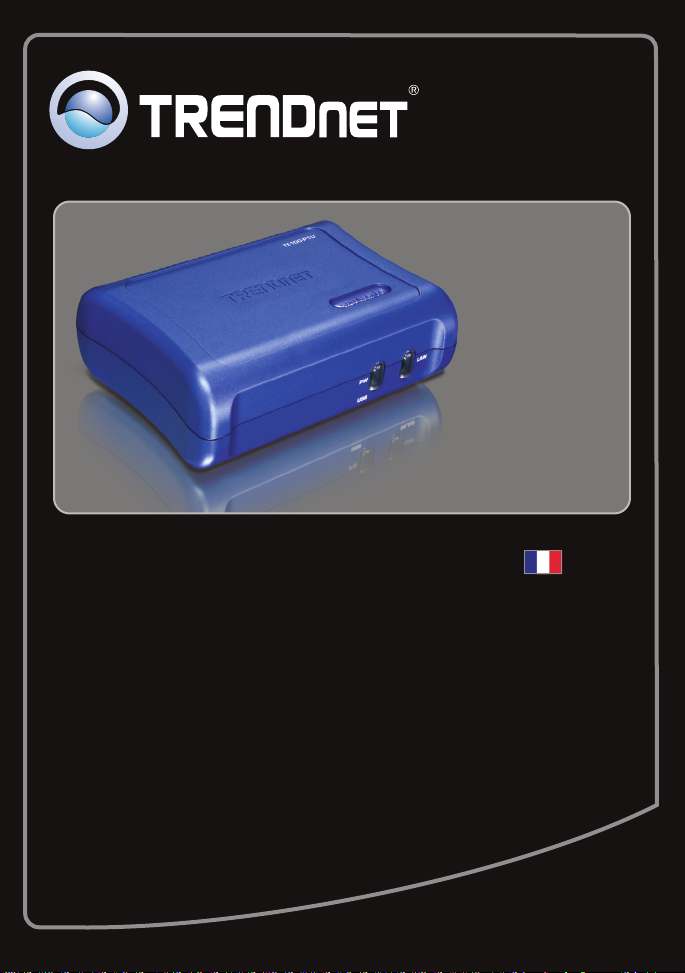
2. Procéder à l'installation
Remarque: Veuillez mettre toutes les imprimantes hors tension avant de la brancher au
serveur d'impression. Après avoir connecté votre matériel, allumez toutes les
imprimantes.
1. Branchez un câble réseau RJ-45 entre le
Switch/Routeur et le port LAN du serveur
d'impression.
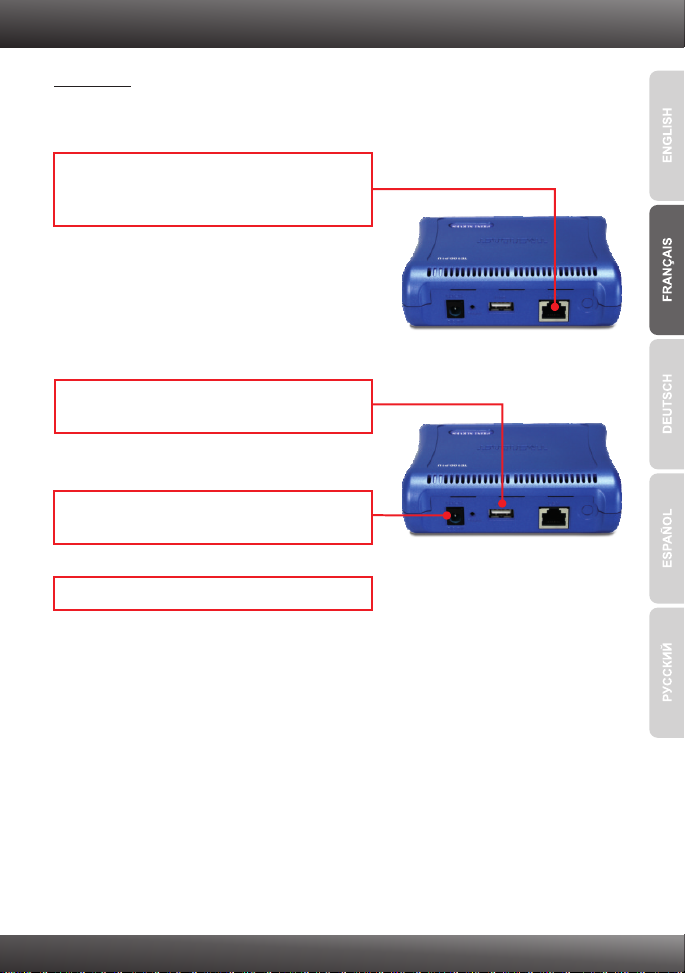
2. Connectez l'imprimante USB au port USB du
serveur d'impression.
3. Branchez l'adaptateur secteur au serveur
d'impression et à une prise de courant.
4. Allumez l'imprimante.
2
Page 5

3. Configuration du serveur d'impression
Remarque : Le serveur d'impression peut être géré à l'aide de l'utilitaire PS ou via un
navigateur Internet. Les utilisateurs MAC doivent modifier l'adresse IP de leurs
ordinateurs et introduire 192.168.0.X (X étant un chiffre disponible entre 2 et 254).
L'adresse IP par défaut du serveur d'impression étant 192.168.0.1, assurez qu'aucun
autre périphérique réseau n'a reçu la même adresse IP. Saisissez ensuite
http://192.168.0.1 dans votre navigateur Internet pour accéder à l'utilitaire sur Internet
du serveur d'impression.
Utilisateurs Windows
1. Insérez le CD-ROM avec l'utilitaire et le pilote
dans le lecteur de CD-ROM de votre ordinateur.
2. Cliquez sur Run autorun.exe
(Windows 7/Vista uniquement).
3. Cliquez sur Install Utility (Installer l'utilitaire) ?
PS Utility (PS Utilité).
3
Page 6

4. Suivez les instructions de l'assistant
d'installation. Cliquez sur Finish (Terminer).
5. Sélectionnez le serveur d'impression et cliquez
sur Change IP Address (Changer d'adresse
IP). Attribuez manuellement l'adresse IP du
serveur d'impression et cliquez sur OK.
Remarque : L'adresse IP doit correspondre au
segment de réseau de votre réseau.
6. Cliquez sur OK.
7. Cliquez sur Show Web Setup (Montrer les
paramètres Internet).
La configuration du serveur d'impression est à présent terminée.
4
Page 7

4. Ajout de l'imprimante sur votre PC
Remarque: En ce qui concerne les instructions d’impression pour Windows ME, 98SE
et Mac OS X, veuillez consulter le Guide de l’utilisateur fourni sur le CD-ROM avec
l’utilitaire.
Windows 7/Vista/2003 Server/XP/2000
1. Cliquez sur PS Wizard (Assistant PS) et sur
Windows 7/Vista/XP/2000.
2. Sélectionnez le serveur d'impression et le port
désiré et cliquez ensuite sur Add Printer.
(Ajouter imprimante)
3. Cliquez sur Select from manufacturer list
(Sélectionner dans la liste du fabricant).
Sélectionnez le pilote correct pour votre
imprimante et cliquez sur Next (Suivant).
5
Page 8

4. Cliquez sur Next (Suivant).
5. Cliquez sur Print Test Page (Imprimer une
page test).
6. Cliquez sur OK.
7. Cliquez sur Finish (Terminer).
8. Répétez les étapes de 1 à 7 pour ajouter
l'imprimante à d'autres ordinateurs du réseau.
L'ajout de l'imprimante est à présent terminée
Si vous désirez des informations détaillées sur la configuration et les paramètres avancés du
TE100-P1U, veuillez consulter le Guide de l'utilisateur fourni sur le CD-ROM avec l'utilitaire
ou le site Internet de TRENDnet sur www.trendnet.com.
Enregistrez votre produit
Afin d’être sûr de recevoir le meilleur niveau de service clientèle et le meilleur support
possibles, veuillez prendre le temps d’enregistrer votre produit en ligne sur:
www.trendnet.com/register
Nous vous remercions d’avoir choisi net.
TREND
6
Page 9

Troubleshooting
1. I inserted the Utility CD-ROM into my computer's CD-ROM Drive but the installation menu does
not appear automatically. What should I do?
1. For Windows 7, if the installation menu does not appear automatically, click on the Windows
Icon on the bottom left hand corner of the screen, click the “Search programs and files” box,
type D:\autorun.exe, where “D” in “D:\autorun.exe” is the letter assigned to your CD-ROM
Driver, and then press the ENTER key on your keyboard
2. For Windows Vista, if the installation menu does not appear automatically, click Start, click the
Start Search box, type D:\autorun.exe where "D" in "D:\autorun.exe" is the letter
assigned to your CD-ROM Drive, and then press the ENTER key on your keyboard.
3. For 98SE/XP/2000, if the window does not appear automatically, click Start, click Run and
type D:\autorun.exe where “D” in “D:\autorun.exe” is the letter assigned to your CD-ROM Drive,
and then press the ENTER key on your keyboard.
2. The PS Wizard / PS Utility is unable to see my print server. What should I do?
1. Double check your hardware connections; make sure that the print server and printer are
powered ON and are properly connected.
2. Click Discover.
3. Disable any software firewall programs (e.g. ZoneAlarm). If your computer is running
Windows 7, XP, or Vista, disable the built in firewall program.
3. My printer does not print the entire document. What should I do?
Windows 7
1. Click on the Windows icon on the bottom left-hand corner of the screen.
2. Click Devices and Printers.
3. Right click on the printer and select Printer Properties.
4. Click the Advanced tab.
5. Uncheck Enable advanced printing features.
6. Click Apply.
7. Click OK.
Windows Vista
1. Click on the Windows icon on the bottom left-hand corner of the screen.
2. Click Control Panel.
3. Click Classic View.
4. Click Printers.
5. Right click on the printer and select Properties.
6. Click the Advanced tab.
7. Uncheck Enable advanced printing features.
8. Click Apply.
9. Click OK.
7
Page 10

4. I successfully added a printer to my computer and I can print a test page, but I cannot print
anything from Microsoft Word or other applications.
Make sure the printer is set as your default printer.
1. On Windows 7, click the Windows icon ? Devices and Printers and verify that your printer icon
has a check on it.
2. On Windows Vista, click the Start Icon ? Control Panel ? Classic View ? Printers and verify
that your printer icon has a check on it.
3. On Windows XP/2000/2003/98SE Server, click Start and then click Printers & Faxes, verify that
your printer icon has a check on it.
5. I configured my print server to automatically receive an IP Address from a DHCP server, and
now I cannot go into the Print Server's web utility.
1. Open PS Wizard (See 4. Add the Printer to your PC) to locate your print server's IP Address.
2. For MAC users, press the Reset button at the back of the TE100-P1U, hold the button for 15
seconds, release the button, and enter in a web browser to access the web
utility feature.
6. How do I setup the TE100-P1U on a Mac?
Type in http://192.168.0.1 in you browser to logon to the built-in web configuration
If you still encounter problems or have any questions regarding the TE100-P1U, please contact
TRENDnet's Technical Support Department.
http://192.168.0.1
8
Page 11

Page 12

Copyright ©2010. All Rights Reserved. TRENDnet.
 Loading...