


Quick Installation Guide
TDM-E400
TDM-C400

Table of Contents
Table of Contents
Deutsch .....................................................................................................
1. Bevor Sie anfangen ...........................................................................
Installation der Software (nur TDM-C400) .
2. ........................................
Konfiguration des Modems
3. ................................................................
Konfiguration des ADSL-Modems über die Ethernet- oder USB-
4.
Verbindung .........................................................................................
Troubleshooting ........................................................................................
1
1
3
4
8
11
Version 09.07.2006

1. Bevor Sie anfangen
TDM-E400/TDM-C400
Kurzanleitung zur Installation
CD mit Bedienungsanleitung
1 x Kat. 5 RJ-45-Kabel
1 x USB-Kabel (nur für TDM-C400)
1 RJ-11-Telefonkabel
Netzteil (15V DC 1A)
Voraussetzungen für die Installation
Telefonleitung mit ADSL/ADSL2/ADSL2+-Service
Einen oder mehrere Computer mit Ethernet 10Base-T/100Base-T
Netzwerkkarten und/oder einen Computer mit einem USB-Anschluss
Einen Ethernet-Hub oder -Switch, wenn Sie das Gerät in einem
Ethernet-Netzwerk mit mehreren Computern verbinden wollen
Webbrowser: Internet Explorer 5.0 (oder später) oder Netscape 6.1
(oder später)
Anwendung
ADSL/ADSL2+ Ethernet Modem Router (TDM-E400)
ADSL/ADSL2+ Ethernet/USB Combo Modem Router (TDM-C400)
Packungsinhalt
Internet
ADSL Enabled Phone Jack
Stand-Alone PC
Workstations with10/100Mbps
Fast Ethernet PCI Adapter
(TE100-PCIWN)
(TDM-C400 only)
Deutsch
5-port 10/100Mbps
Fast Ethernet Switch
(TE100-S5P)
1
Workstation with 10/100Mbps
Fast Ethernet PCI Adapter
(TE100-PCIWN)

Holen Sie von Ihrem ADSL2+-Service-Provider
bitte die folgenden Informationen ein
VPI-Wert: ______
VCI-Wert: ______
Art der Kapselung: ? LLC/SNAP oder ? VC/MUX
Und außerdem:
Für PPPoA (RFC2364) oder PPPoE (RFC2516)
Benutzername: _______________________
Kennwort: ________________________
Authentifizierungsmethode: □PAP oder □CHAP
Host- oder IP-Adresse: _________________
Für statische oder feste IP-Verbindung (RFC1483 oder RFC1577)
Host: ______________________
Domäne:
Gateway: __________________
IP-Adresse: _______________________
Subnetz-Maske: _____________________
IP-Adresse des DHCP-Servers: __________________
IP-Adresse des primären DNS-Servers: ____________________
IP-Adresse des sekundären DNS-Servers: ____________________
2
Deutsch
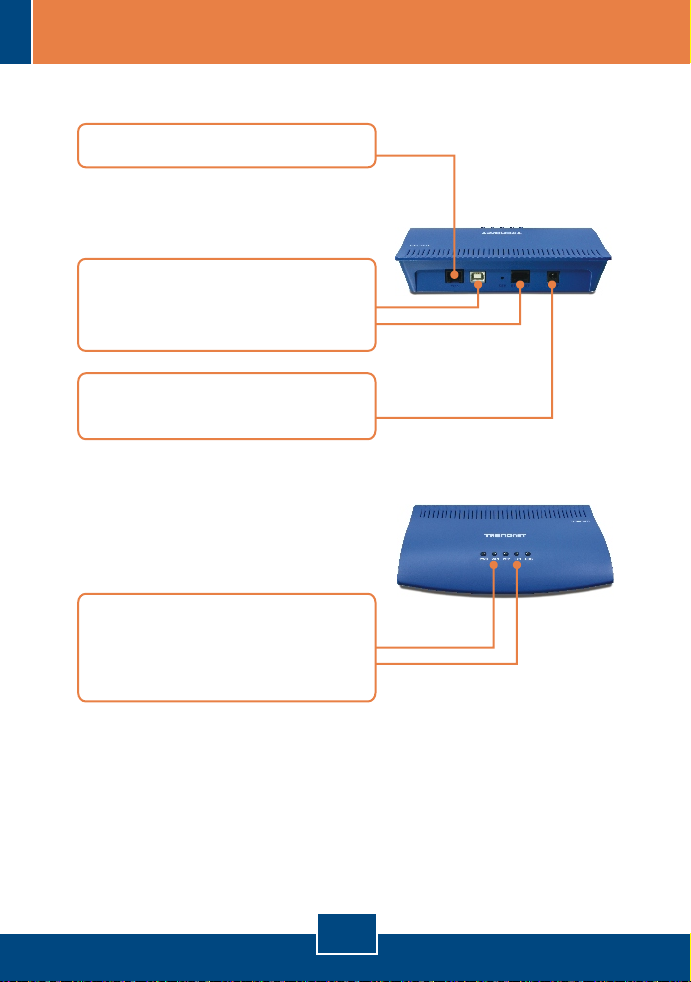
2. Installation der Hardware
1. Schließen Sie das RJ-11 Kabel an.
2. Verbinden Sie das RJ-45-Kabel
(und/oder schließen Sie das USBKabel am TDM-C400 an).
3. Verbinden Sie das Netzteil mit dem
ADSL2+ Ethernet-Router.
4. Warten Sie 60 Sekunden, damit
das Gerät hochfahren kann.
Überprüfen Sie, dass die LEDs
WAN und LAN leuchten.
3
Deutsch

3. Installation der Software (nur TDM-C400)
Hinweis: Wenn Sie Windows 98/98SE verwenden, benötigen Sie für die
Installation eventuell die Windows-98/98SE-CD.
Schließen Sie alle offenen Windows-Anwendungen, bevor Sie mit der
Installation der Software beginnen.
1. Sobald Sie das USB-Kabel mit
Ihrem PC verbinden, erkennt das
System die neue
Hardwarekomponente automatisch.
Klicken Sie auf Cancel
(Abbrechen).
(Windows 98/98SE)
(Windows 2000)
(Windows ME)
(Windows XP)
4
Deutsch

2. Legen Sie die Installations-CD in
Ihr CD-ROM-Laufwerk ein und
klicken Sie im Untermenü „USB
Utility“ (USB-Dienstprogramm) auf
„TDM-C400”. Der
Installationsvorgang sollte jetzt
beginnen.
3. Das Begrüßungsfenster erscheint.
Schließen Sie alle WindowsAnwendungen. Klicken Sie dann
auf Next (Weiter).
4. Lesen Sie den Lizenzvertrag und
klicken Sie dann auf Accept
(Akzeptieren).
5
Deutsch

5. Der Setup-Assistent des USBModems beginnt jetzt mit der
Installation der Software und zeigt
den Installationsstatus an.
6. Der Installationsassistent fordert
Sie auf, das ADSL-Modem an den
USB-Port anzuschließen, falls dies
noch nicht geschehen ist.
7. Sie werden jetzt aufgefordert, das
System neu zu starten. Markieren
Sie „Yes, reboot the computer now“
(Ja, ich möchte den Computer jetzt
neu starten) und klicken Sie dann
auf Close (Schließen).
6
Deutsch

8. Nach dem Neustart ist das Gerät
installiert. Klicken Sie auf Finish
(Fertigstellen).
9. Klicken Sie auf Programs
(Programme), TRENDnet DSL
Modem und dann auf DSL Status.
10. Im Fenster „TRENDnet DSL
Modem“ können Sie in der
Registerkarte „Physical Link“
(Physikalische Verbindung) den
aktuellen Verbindungsstatus des
DSL-Modems von TRENDnet
überprüfen. Im Statusfeld
erscheint die Anzeige, dass der
TDM-C400 „Connected“
(verbunden) ist.
7
Deutsch

4. Konfiguration des ADSL-Modems über die
Ethernet- oder USB-Verbindung
Hinweis: Der DHCP-Server des ADSL2+ Modem-Routers ist standardmäßig
aktiviert. Konfigurieren Sie Ihren Computer bitte so, dass er vom DHCP-Server
des ADSL2+ Modem-Routers automatisch eine IP-Adresse bezieht.
1. Öffnen Sie einen Webbrowser und
geben Sie in die Adressleiste
http://192.168.1.254 ein. Drücken
Sie dann auf die Eingabetaste
(Enter).
2. Geben Sie User name
(Benutzername) und Password
(Kennwort) ein und klicken Sie auf
OK.
User name: admin
Password: admin
3. Wenn Sie sich in der
Webkonfiguration anmelden,
erscheint die Seite System View
(Systemübersicht). Klicken Sie auf
Quick Configuration
(Schnellkonfiguration).
8
Deutsch

4. Daraufhin wird die
Konfigurationstabelle angezeigt, in
der Sie die Informationen Ihres
Service Providers in die
entsprechenden Felder eingeben
können.
5. Klicken Sie dann auf Submit
(Senden).
6. Klicken Sie im Fenster der Web-
Konfiguration auf die Registerkarte
Admin.
7. Klicken Sie dann auf
Commit & Reboot (Übertragen &
Neu starten).
8. Klicken Sie dann auf Schaltfläche
Commit (Übertragen).
9
Deutsch

9. Daraufhin erscheint die Anzeige,
dass Ihre Änderungen erfolgreich
übertragen wurden.
10. Der Reboot Mode
(Neustartmodus) steht
standardmäßig auf Reboot (Neu
starten).
11. Klicken Sie auf die Schaltfläche
Reboot (Neu starten).
12. Schalten Sie die
Stromversorgung während des
Neustarts des ADSL2+ Modem Routers bitte nicht aus.
Ihre Installation ist beendet!
Weitere Informationen zu den Konfigurations- und erweiterten Einstellungen
des TDM-E400/TDM-C400 finden Sie im Abschnitt „Problembehandlung“ der
Bedienungsanleitung auf der beiliegenden CD-ROM oder auf der Website von
TRENDnet unter http://www.trendnet.com.
10
Deutsch

Troubleshooting
POWER LED does not illuminate after the product is turned on. What should I do?
Q1:
Q2:
connection. How do I find out?
Q3:
says, "The page cannot be displayed. How can I get into the TDM-E400 / TDM-C400 web
configuration page?
Q4:
Verify that you are using the power cable provided with the device and that it is securely
A1:
connected to the ADSL2+ modem and a wall socket/power strip.
I am not sure what type of Internet broadband connection I have for my DSL
You can contact your Internet Service Provider's (ISP) Customer Service or Technical
A2:
Support Department for the correct information.
I specified the IP address 192.168.1.254 in my Web browser, but an error messages
A3:
Please check your hardware and TCP/IP settings again by following the instructions in
the QIG. Make sure the Power, WAN and the LAN LEDs are on. Then try to access the
configuration page using your Web Browser again.
INTERNET LED does not illuminate after phone cable is attached.
A4:
Verify that a standard telephone cable (called an RJ‑11 cable) like the one provided is
securely connected to the ADSL port and your wall phone jack. Allow about 30 seconds for
the device to negotiate a connection with your ISP.
Verify that you are using a straight-through type Ethernet cable to the uplink port on a hub or
a cross-over type cable to a stand-alone PC. If you connected the device to an ordinary hub
port (not Uplink), you must use a straight-through cable. (To check: hold the connectors at
each end of the cable side-by-side with the plastic spring facing down. Looking at the wires
from left to right, if the first, second, third, and sixth wires are the same color on the two
connectors, then it is a straight-through type. On a cross-over type, wire 1 on one connector
should be the same color as wire 3 on the other. The same is true of wires 2 and 6.)
Q5:
Ethernet LED does not illuminate after Ethernet cable is attached.
A5:
Verify that the Ethernet cable is securely connected to your LAN hub or PC and to the
ADSL2+ mdoem. Make sure the PC and/or hub is turned on.
Verify that your cable is sufficient for your network requirements. A 100 Mbps network
(10BaseTx) should use cables labeled CAT 5. A 10Mbps network may tolerate lower quality
cables.
Q6.
My LAN PCs cannot display web pages on the Internet.
A6:
Verify that the DNS server IP address specified on the PCs is correct for your ISP, as
discussed in the item above. If you specified that the DNS server be assigned dynamically
from a server, then verify with your ISP that the address configured on the ADSL2+ modem is
correct, then you can use the ping utility, described on page 174 of the user guide,
to test connectivity with your ISP's DNS server.
11

My PC cannot access the Internet.
Q7.
Use the ping utility, described on page 174 of the UG, check whether your PC can
A7:
communicate with the ADSL2+ Modem Router 's LAN IP address (by default 192.168.1.254).
If it cannot, check the Ethernet cabling.
If you statically assigned a private IP address to the computer, (not a registered public
address), verify the following:
1. Check that the gateway IP address on the computer is your public IP address. If it is not,
correct the address or configure the PC to receive IP information automatically.
2. Verify with your ISP that the DNS server specified for the PC is valid. Correct the address
or configure the PC to receive this information automatically.
3. Verify that a Network Address Translation rule has been defined on the ADSL2+ Ethernet
Router to translate the private address to your public IP address. The assigned IP address
must be within the range specified in the NAT rules (see User Guide, Chapter 4). Or,
configure the PC to accept an address assigned by another device (see “Quick Start Part 2
Configuring Your Computers”). The default configuration includes a NAT rule for all
dynamically assigned addresses within a predefined pool (see the instructions in Chapter 8
to view the address pool).
I forgot/lost my Web Configuration user ID or password.
Q8:
If you have not changed the password from the default, try using “admin” as both the
A8:
user ID and password. Otherwise, you can reset the device to the default configuration by
pressing the Reset button on the back panel of the device three times (using a pointed object
such as a pen tip). Then, type the default User ID and password shown above. WARNING:
Resetting the device removes any custom settings and returns all settings to their default
values.
My changes to Web Configuration are not being retained.
Q9.
Be sure to use the Commit function after any changes. This function is described on
A9.
page 47 of the User Guide.
12

Certifications
This equipment has been tested and found to comply with FCC and CE Rules.
Operation is subject to the following two conditions:
(1) This device may not cause harmful interference.
(2) This device must accept any interference received. Including interference that may
cause undesired operation.
Waste electrical and electronic products must not
be disposed of with household waste. Please
recycle where facilities exist. Check with you Local
Authority or Retailer for recycling advice.
NOTE: THE MANUFACTURER IS NOT RESPONSIBLE FOR ANY RADIO OR TV
INTERFERENCE CAUSED BY UNAUTHORIZED MODIFICATIONS TO THIS
EQUIPMENT. SUCH MODIFICATIONS COULD VOID THE USER’S AUTHORITY TO
OPERATE THE EQUIPMENT.
ADVERTENCIA
En todos nuestros equipos se mencionan claramente las caracteristicas del adaptador de
alimentacón necesario para su funcionamiento. El uso de un adaptador distinto al
mencionado puede producir daños fisicos y/o daños al equipo conectado. El adaptador
de alimentación debe operar con voltaje y frecuencia de la energia electrica domiciliaria
existente en el pais o zona de instalación.

TRENDnet Technical Support
.
US Canada
Toll Free Telephone: 1(866) 845-3673
24/7 Tech Support
Europe (Germany France Italy Spain Switzerland UK)
Toll Free Telephone: +00800 60 76 76 67
English/Espanol - 24/7
Francais/Deutsch - 11am-8pm, Monday - Friday MET
. . . . .
Worldwide
Telephone: +(31) (0) 20 504 05 35
English/Espanol - 24/7
Francais/Deutsch - 11am-8pm, Monday - Friday MET
Product Warranty Registration
Please take a moment to register your product online.
Go to TRENDnet’s website at http://www.trendnet.com
20675 Manhattan Place
Torrance, CA 90501
USA
Copyright ©2006. All Rights Reserved. TRENDnet.
 Loading...