

Page 1

Guía de instalación rápida
TDM-C500
TDM-C504
1.01
Page 2

Table of Contents
Español 1
1. Antes de iniciar 1
2. Instalación del Hardware 3
3. Configuración del Módem 4
Troubleshooting 7
Version 10.22.2010
Page 3
1. Antes de iniciar
Contenidos del paquete
?
TDM-C500 / TDM-C504
?Guía de usuario y CD-ROM del controlador
?Guía de instalación rápida multilingüe
?Cable Ethernet Cat. 5 (1.5mts/5pies)
?Cable de teléfono RJ-11 (1.8mts/6pies)
?Adaptador de alimentación
Requisitos del sistema
Una conexión a Internet DSL que funciona
?
?Un PC con adaptador de red alámbrico instalado de manera correcta
?Navegador Web: Internet Explorer (6.0 ó superior)
?Cable USB tipo A al tipo B (opcional)
Nota: El controlador es opcional para el TDM-C500 puerto USB
1
Page 4
Buscar información sobre el proveedor de servicios de Internet (ISP)
Durante la instalación del Enrutador Modem ADSL , el asistente de instalación (Setup
Wizard) detectará automáticamente el tipo de conexión de su ISP. Si el enrutador no
puede detectar el tipo de conexión de su ISP, usted puede especificar el tipo de
conexión manualmente.
1. Encapsulación
PPPoA VC-Mux
PPPoA LLC
1483 Bridged IP LLC
1483 Routed IP LLC
1483 Bridged IP VC-Mux
1483 Routed IP VC-Mux
PPPoE VC-Mux
PPPoE LLC
1483 MER LLC
1483 MER VC-Mux
2. VPI/VCI
VPI: _____ (0~255)
VCI: _____ (32~65535)
3. PPP
Nombre de Usuario: _________
Contraseña: ________________
4. WAN IP
Tipo :Conexión IP fija o DHCP
Dirección IP local (fija): _____. _____._____._____
(p. ej. 215.24.24.129) (Opcional)
Máscara de subred (fija): _____. _____._____._____ (Opcional)
Remote IP Address ((fija): _____. _____._____._____
(p. ej. 215.24.24.129) (Opcional)
DNS (fija): _____. _____._____._____ (Opcional)
2
Page 5
2. Instalación del Hardware
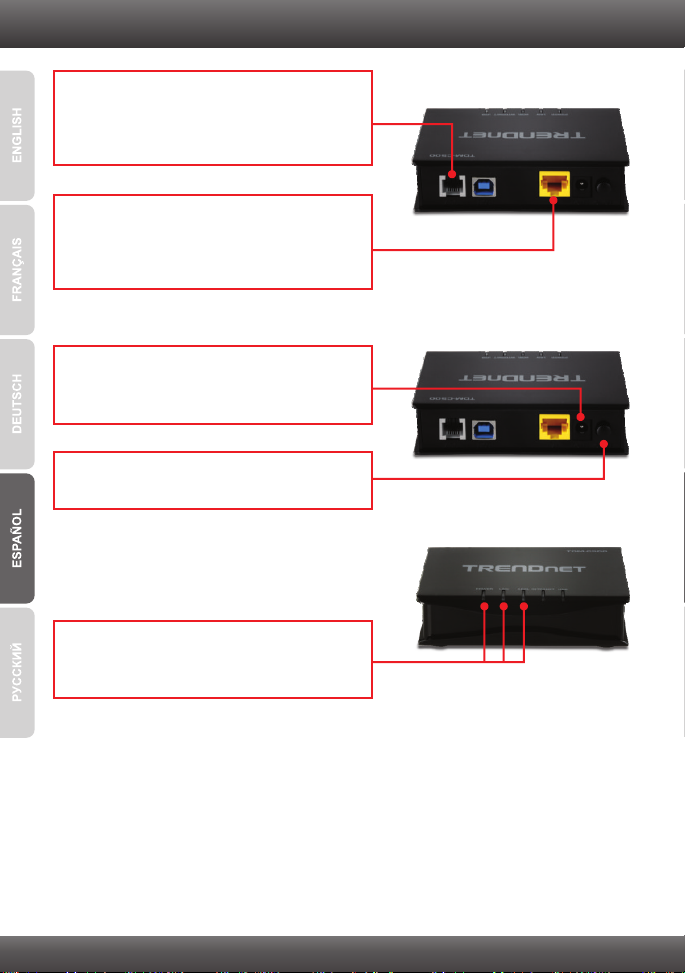
1. Conecte un extremo del cable telefónico RJ-11
suministrado a uno de los puertos ADSL de
TDM-C500 / TDM-C504. Conecte la otra punta
del cable al jack telefónico.
2. Conecte un extremo del cable de red RJ-45 a
uno de los puertos LAN de TDM-C500 /
TDM-C504. Conecte la otra punta del cable al
puerto Etnernet del PC.
3. Conecte el adaptador de alimentación AC al
TDM-C500 / TDM-C504 y luego a una toma de
corriente.
4. Presione el botón de encendido para llevarlo a
la posición de encendido “On”.
5. Compruebe que las siguientes luces del panel
están encendidas: Power (Encendido)(verde),
LAN (verde) y ADSL ( verde).
3
Page 6

3. Configuración del Módem
Nota:
Para configurar el módem a través del puerto USB, consulte la Guía del usuario en el CD-ROM
proporcionado. No conecte los cables al puerto de red y al puerto USB al mismo tiempo.
1. Abra el navegador Web, introduzca
http://192.168.10.1 en la barra de direcciones,
luego pulse la tecla Enter (Intro).
2. Introduzca el User name (Nombre de Usuario)
y Password (contraseña), y después pulse OK.
Configuración predeterminada
User name: admin
Password: admin
Nota: La contraseña por defecto es caso
sensible.
3. Haga clic en Setup Wizard
(Asistente de instalación).
4
Page 7
Nota:
1. Si su ISP no aparece en el menú desplegable, haga clic en Config (Configurar) en la parte
inferior de la pantalla e introduzca la información suministrada por su ISP.
2. En el ejemplo, la conexión DSL es PPPoE.
3. Si su conexión ADSL requiere que introduzca la dirección MAC de su PC, consulte la sección
de resolución de problemas.
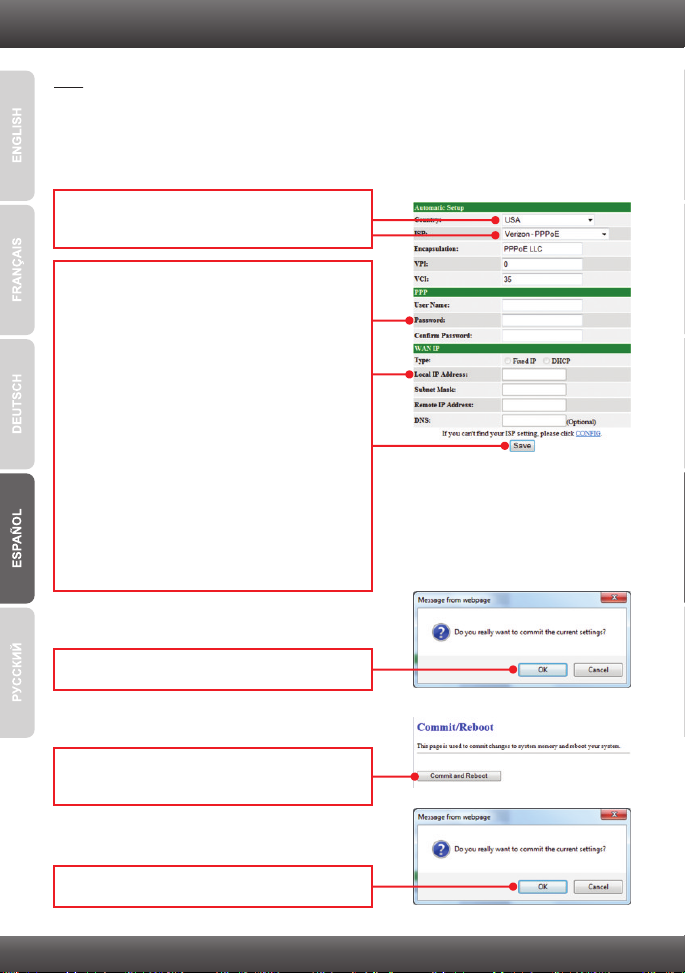
4. Seleccione su país y su proveedor de Internet
de la lista desplegable.
5. Establezca las opciones de configuración
tomando como base la información
suministrada por su ISP. Luego, haga clic en
Save (Guardar). Para el método de conexión
PPPoE, necesita configurar lo siguiente:
Nombre de Usuario
Contraseña
Tipo (DHCP b Conexión IP fija )
Si selecciona la IP fija necesitará configurar lo
siguiente:
Dirección IP (Si es de tipo IP estática )
Máscara de subred
Dirección IP remota
DNS
6. Haga clic en OK (Aceptar).
7. Haga clic en Commit and Reboot
(Ejecutar y reiniciar).
8. Haga clic en OK (Aceptar).
5
Page 8

9. Espere mientras se reinicia el TDM-C500 /
TDM-C504.
10. Tan pronto se complete el proceso de reinicio,
compruebe que puede tener acceso a Internet.
Abra su navegador y escriba un URL
(Ej. www.trendnet.com) para comprobar que
tiene conexión a Internet.
La configuración inalámbrica ha finalizado
Para obtener información más detallada sobre la configuración y las opciones de
configuración avanzadas de la , por favor consulte la sección de
resolución de problemas en el CD-ROM de la Guía del Usuario, o el sitio Web de net
en http://www.trendnet.com.
TDM-C500 / TDM-C504
TREND
Registre su producto
Para asegurar los más altos niveles de servicio y apoyo al cliente, registre su producto
en línea en: www.trendnet.com/register Gracias por elegir TRENDnet.
6
Page 9

Troubleshooting
1. I typed http://192.168.10.1 in my Internet Browser's Address Bar, but an error message
says “The page cannot be displayed.” How can I get into the TDM-C500 / TDM-C504's web
configuration page?
1. Check your hardware settings again by following the instructions in Section 2.
2. Make sure the Power and LAN lights are lit.
3. Make sure your TCP/IP settings are set to Obtain an IP address automatically (see
the steps below).
Windows 7
1. Go into the Control Panel, click Network and Internet,
click Network and Sharing Center, click Change
Adapter Settings and then right-click the Local Area
Connection icon and then click Properties.
2. Click Internet Protocol Version 4(TCP/IPv4) and then
click Properties. Then click on Obtain an IP address
automatically.
Windows Vista
1. Go into the Control Panel, click Network and Internet,
click Network and Sharing Center, click Manage
Network Connections and then right-click the Local
Area Connection icon and then click Properties.
2. Click Internet Protocol Version 4(TCP/IPv4) and then
click Properties. Then click on Obtain an IP address
automatically.
Windows XP / 2000
1. Go into the Control Panel, click Network and Internet,
click Network and Sharing Center, click Change
Adapter Settings and then right-click the Local Area
Connection icon and then click Properties.
2. Click Internet Protocol (TCP/IP) and then click
Properties. Then click on Obtain an IP address
automatically.
7
Page 10

4. Reset the TDM-C500 / TDM-C504. To reset the TDM-C500 / TDM-C504, take a pin or
paperclip and press the reset button on the back of the modem for 15 seconds.
Then let go.
2. I have followed all the steps and still cannot connect to the Internet. What should I do?
1. Verify that your DSL account is valid and activated.
2. Make sure all the cables are properly connected (see Section 2).
3. In Section 3, click Config in the Setup Wizard and configure the modem based on
information provided by your ISP.
3.I forgot my login password. What should I do?
Follow the instructions below:
1.Take a pin or paperclip and press the reset button on the side of the modem for 15
seconds.
2.Wait 15 seconds then let go. This will return all settings to factory default. The default IP
address of the modem is 192.168.10.1. The default user name is “admin”. The default
password is “admin”.
4. My ISP requires me to clone the modem's MAC address. What should I do?
MAC address is the network device's hardware ID and consist of 12 hexadecimal
characters (e.g. 00:12:34:ab:cd:ef). Some ISPs registers the subscriber's computer
network adapter or the DSL modem's MAC address. If this is the case, your options are:
1. Report the TRENDnet modem's MAC address (found on the product label at the bottom
of the modem) to the ISP, or 2. Clone the network adapter or the old DSL modem's MAC
address to the TRENDnet modem. The later is probably the easiest to do and you can
follow the instructions below.
1. With the computer connected to the modem's network port, open the web browser and
go to the modem's setup page http://192.168.10.1.
2. Login with user name and password (default is admin for both).
3. Click on WAN.
4. Click Channel Config.
5. Select Enable from the dropdown list in the MAC Address Clone section.
6. For copying the computer's MAC address to the modem, click on “Clone MAC
address”. For copying the old modem's MAC address, find the modem's MAC address
and then manually enter it in the MAC address box.
7. Click “Apply Changes.”
8. Click on “Commit and Reboot”.
5. Can I connect a computer to the USB port and another computer to the Ethernet port at
the same time?
No, you cannot use the USB and Ethernet port simultaneously.
If you still encounter problems or have any questions regarding the TDM-C500 / TDM-C504, please
contact TRENDnet's Technical Support Department.
8
Page 11

Page 12

Page 13

Page 14
Copyright ©2010. All Rights Reserved. TRENDnet.
 Loading...