

Page 1

InterScanTMGateway Security Appliance M-Series
Page 2

Page 3

Trend Micro Incorporated reserves the right to make changes to this document and to the
products described herein without notice. Before installing and using the software, please
review the readme files, release notes (if any), and the latest version of the Deployment Guide,
which are available from Trend Micro's Web site at:
http://www.trendmicro.com/download/documentation/
Trend Micro, the Trend Micro t-ball logo, IntelliTrap, InterScan, ScanMail, MacroTrap, and
TrendLabs are trademarks, registered trademarks, or servicemarks of Trend Micro,
Incorporated. All other product or company names may be trademarks or registered
trademarks of their owners.
Copyright© 2006-2007 Trend Micro Incorporated. All rights reserved.
Document Part No. SAEM13165/70423
Release Date: May 2007
Protected by U.S. Patent No. 5,623,600 and pending patents.
Page 4

The Trend Micro InterScan Gateway Security Appliance M-Series Administrator’s Guide is
intended to provide detailed information about how to use and configure the features of the
hardware device. Read it before using the software.
Additional information about how to use specific features within the software is available in
the online help file and the online Knowledge Base at the Trend Micro Web site.
Trend Micro is always seeking to improve its documentation. If you have questions,
comments, or suggestions about this or any other Trend Micro documents, please contact us at
docs@trendmicro.com. Your feedback is always welcome. Please evaluate this documentation
on the following site:
http://www.trendmicro.com/download/documentation/rating.asp
Page 5

Contents
iii
Contents
About This Manual
About This Administrator’s Guide .................................................... xvi
Document Conventions .................................................................... xviii
Chapter 1: Introducing Trend Micro InterScan Gateway Security
Appliance
What Is InterScan Gateway Security Appliance? .............................. 1-2
Important Features and Benefits ........................................................1-3
How InterScan Gateway Security Appliance Works ......................... 1-5
Antivirus ........................................................................................ 1-6
Anti-Spyware ................................................................................. 1-6
Anti-Spam ......................................................................................1-7
Anti-Phishing ................................................................................. 1-7
Anti-Pharming ...............................................................................1-7
Content and URL Filtering ............................................................1-8
Outbreak Defense ............................................. .............................1-8
Web Reputation ............................................................................. 1-9
The Appliance Hardware .................................................................1-10
The Front Panel ............................................................................1-10
LCD Module ................................................................................1-11
LED Indicators ........................................................... ..................1-12
The Back Panel ............................................................................1-12
Port Indicators .......................................................................... .... 1-14
Preconfiguring and Deploying the Appliance ..................................1-15
Connecting to the Network ..............................................................1-16
Testing the Appliance Connectivity .................................................1-17
Activating the Appliance ................................................................. 1-17
Chapter 2: Deployment Options
Overview ............................................................................................2-2
Deployment Topologies ..................................................................... 2-4
Deploying in a Single Network Segment ......................................2-4
Deploying in a Network with Multiple Segments .........................2-5
Page 6

Trend Micro™ InterScan™ Gateway Security Appliance M-Series Administrator’s Guide
iv
Basic Deployment ..............................................................................2-8
Advanced Deployment Scenarios .......................................................2-9
Operation Modes ............................................................................2-9
Deployment in a DMZ Environment ...........................................2-12
Failover Deployment ....................................................................2-14
Deployment Recommendations ........................................................2-17
Deployment Issues ............................................................................2-18
Preconfiguring the Appliance ...........................................................2-18
Assigning an IP Address ..............................................................2-19
Connecting to the Network ..........................................................2-19
Testing the Appliance Connectivity .......................... ...................2-20
Activating the Appliance ..............................................................2-20
Chapter 3: How InterScan Gateway Security Appliance Works
The Range and Types of Internet Threats .......................................... 3-2
How InterScan Gateway Security Appliance Protects You ...............3-3
The Primary Functional Components ............................................3-4
Chapter 4: Getting Started with InterScan Gateway Security
Appliance
Preliminary Tasks ...............................................................................4-2
Accessing the Web Console ............................... ................................4-3
The Summary Screen ......................................................................... 4-4
Information Above the Panels ........................................................4-4
Outbreak Prevention Service ..........................................................4-5
Damage Cleanup Service ...............................................................4-5
Component Version .......................................................................4-5
Antivirus ......................................................................................... 4-8
Anti-Spyware .................................................................................4-8
IntelliTrap ....................................................................................... 4-9
Anti-Spam: Content Scanning ........................................................4-9
Anti-Spam: Email Reputation Services .......................................4-10
Web Reputation: SMTP/POP3 .....................................................4-10
Web Reputation: HTTP ................................................................4-10
Others ...........................................................................................4-11
Additional Screen Actions ...........................................................4-11
Navigating the Web Console ............................................................4-12
Page 7

Contents
v
The Online Help System ..................................................................4-14
Chapter 5: SMTP Services
SMTP Services ...................................................................................5-2
Enabling Scanning of SMTP Traffic .............................................5-3
Selecting an Alternative Service Port ............................................5-3
Configuring SMTP Virus Scanning ..................................................5-4
SMTP Scanning - Target ...............................................................5-5
SMTP Scanning - Action ............................................................... 5-7
SMTP Scanning - Notification ......................................................5-9
Configuring SMTP Anti-Spyware ..................................................5-11
SMTP Anti-Spyware - Action ..................................................... 5-14
SMTP Anti-Spyware - Notification .............................................5-15
Configuring SMTP IntelliTrap .........................................................5-16
SMTP IntelliTrap - Target ........................................................... 5-16
SMTP IntelliTrap - Action ...........................................................5-17
SMTP IntelliTrap - Notification ..................................................5-18
Configuring SMTP Web Reputation ................................................5-19
SMTP Web Reputation - Target ..................................................5-19
SMTP Web Reputation - Action ..................................................5-20
SMTP Web Reputation - Notification ......................................... 5-21
Configuring SMTP Anti-Spam: Email Reputation ..........................5-22
SMTP Anti-Spam: Email Reputation - Target ............................ 5-23
SMTP Anti-Spam: Email Reputation - Action ............................5-25
Configuring SMTP Anti-Spam: Content Scanning .........................5-26
SMTP Anti-Spam: Content Scanning - Target ............................ 5-27
SMTP Anti-Spam: Content Scanning - Action ...........................5-29
Configuring SMTP Anti-Phishing ................................................... 5-30
SMTP Anti-Phishing - Target ...................................................... 5-31
SMTP Anti-Phishing - Action .....................................................5-32
SMTP Anti-Phishing - Notification .............................................5-33
Configuring SMTP Content Filtering .............................................. 5-34
SMTP Content Filtering - Target ................................................. 5-35
SMTP Content Filtering - Action ................................................ 5-37
SMTP Content Filtering - Notification ........................................5-38
Page 8

Trend Micro™ InterScan™ Gateway Security Appliance M-Series Administrator’s Guide
vi
Chapter 6: HTTP Services
HTTP Services ....................................................................................6-1
Enabling Scanning of HTTP Traffic ..............................................6-2
Selecting an Alternative Service Port ............................................6-2
Configuring the Global Access Lists .............................................6-3
Configuring HTTP Virus Scanning ....................................................6-5
HTTP Scanning - Target ................................................................6-6
HTTP Scanning - Action .............................................................. 6-12
HTTP Scanning - Notification .....................................................6-13
Configuring HTTP Anti-Spyware ....................................................6-14
HTTP Anti-Spyware - Target .......................................................6-15
HTTP Anti-Spyware - Action ......................................................6-17
HTTP Anti-Spyware - Notification ..............................................6-18
Configuring IntelliTrap for HTTP ....................................................6-19
HTTP IntelliTrap - Target ............................................................6-19
HTTP IntelliTrap - Action ...........................................................6-20
HTTP IntelliTrap - Notification ...................................................6-21
Configuring HTTP Anti-Pharming ...................................................6-22
HTTP Anti-Pharming - Target .....................................................6-22
HTTP Anti-Pharming - Action .....................................................6-23
HTTP Anti-Pharming - Notification ............................................6-24
Configuring HTTP Anti-Phishing ....................................................6-25
HTTP Anti-Phishing - Target .......................................................6-25
HTTP Anti-Phishing - Action ......................................................6-26
HTTP Anti-Phishing - Notification ..............................................6-27
Configuring HTTP URL Filtering ....................................................6-28
HTTP URL Filtering - Rules ........................................................6-28
HTTP URL Filtering - Approved Clients List .............................6-29
HTTP URL Filtering - Settings ....................................................6-31
HTTP URL Filtering - Notification .............................................6-33
Configuring HTTP File Blocking .....................................................6-34
HTTP File Blocking - Target .......................................................6-35
HTTP File Blocking - Notification ..............................................6-36
Configuring HTTP Web Reputation ................................................6-36
HTTP Web Reputation - Target ...................................................6-37
HTTP Web Reputation - Notification .......................................... 6-38
Page 9

Contents
vii
Chapter 7: FTP Services
FTP Services ......................................................................................7-2
Enabling Scanning of FTP Traffic .................................................7-2
Selecting an Alternative Service Port ............................................7-3
Configuring FTP Virus Scanning ......................................................7-4
FTP Scanning - Target .............................. .....................................7-4
FTP Scanning - Action ..................................................................7-6
FTP Scanning - Notification ..........................................................7-7
Configuring FTP Anti-Spyware .........................................................7-8
FTP Anti-Spyware - Target ...........................................................7-9
FTP Anti-Spyware - Action ......................................................... 7-11
FTP Anti-Spyware - Notification ................................................7-12
Configuring FTP File Blocking .......................................................7-13
FTP File Blocking - Target .......................................................... 7-13
FTP File Blocking - Notification .................................................7-14
Chapter 8: POP3 Services
POP3 Services ........................ ............................ ............................ .... 8-2
Enabling Scanning of POP3 Traffic .............................................. 8-2
Selecting an Alternative Service Port ............................................8-3
Configuring POP3 Virus Scanning .......................... ..........................8-4
POP3 Scanning - Target ................................................................8-4
POP3 Scanning - Action ................................................................ 8-6
POP3 Scanning - Notification ....................................................... 8-8
Configuring POP3 Anti-Spyware ....................................................8-10
POP3 Anti-Spyware - Target ............................ ...........................8-10
POP3 Anti-Spyware - Action ........................ ..............................8-12
POP3 Anti-Spyware - Notification ..............................................8-13
Configuring POP3 IntelliTrap ..........................................................8-15
POP3 IntelliTrap - Target .............................. ..............................8-15
POP3 IntelliTrap - Action .................................................. ..........8-16
POP3 IntelliTrap - Notification ...................................................8-17
Configuring POP3 Web Reputation .................................................8-18
POP3 Web Reputation - Target ...................................................8-18
POP3 Web Reputation - Action ................................................. ..8-19
POP3 Web Reputation - Notification ..........................................8-20
Configuring POP3 Anti-Spam .........................................................8-21
Page 10

Trend Micro™ InterScan™ Gateway Security Appliance M-Series Administrator’s Guide
viii
POP3 Anti-Spam - Target ............................................................8-22
POP3 Anti-Spam - Action ............................................... .............8-23
Configuring POP3 Anti-Phishing .....................................................8-24
POP3 Anti-Phishing - Target .......................................................8-24
POP3 Anti-Phishing - Action .......................................................8-25
POP3 Anti-Phishing - Notification ..............................................8-26
Configuring POP3 Content Filtering ................................................8-27
POP3 Content Filtering - Target ..................................................8-28
POP3 Content Filtering - Action ..................................................8-30
POP3 Content Filtering - Notification .........................................8-31
Chapter 9: Outbreak Defense
The Outbreak Defense Services .........................................................9-2
Current Status ..................................................... ............................ ... .9-3
Configuring Internal Outbreak ...........................................................9-5
Configuring Damage Cleanup ............................................................9-6
Potential Threat ..............................................................................9-7
Configuring Settings ...........................................................................9-7
Outbreak Defense - Settings ...........................................................9-8
Outbreak Defense - Notification ....................................................9-9
Chapter 10: Quarantines
Quarantines Screen .................................. ... ......................................10-2
Resending a Quarantined Email Message ...................................... ..10-3
Adding an Inline Notification to Re-Sent Messages ........................10-3
Querying the Quarantine Folder .......................................................10-5
Performing Query Maintenance .......................................................10-9
Manual ........................................................................................10-10
Automatic ...................................................................................10-11
Chapter 11: Updating InterScan Gateway Security Appliance
Components
Update ...............................................................................................11-2
Updating Manually ...........................................................................11-3
Configuring Scheduled Updates .......................................................11-4
Configuring an Update Source .........................................................11-6
Page 11

Contents
ix
Chapter 12: Analyzing Your Protection
Using Logs
Logs ..................................................................................................12-2
Querying Logs ..................................................................................12-3
Configuring Log Settings ................................................................. 12-5
Configuring Log Maintenance ......................................................... 12-6
Manual ......................................................................................... 12-7
Automatic .................................................................................... 12-8
Chapter 13: Administrative Functions
Administration .................................................................................13-2
Access Control ..................................... ............................................13-3
Configuration Backup ......................................................................13-4
Control Manager Settings ................................................................13-6
Registering InterScan Gateway Security Appliance to Control
Manager ................................................................................ 13-7
Disk SMART Test ...........................................................................13-9
Firmware Update ........................................ ....................................13-10
IP Address Settings ........................................................................13-11
Managing IP Address Settings ...................................................13-12
Static Routes ..............................................................................13-13
Notification Settings ......................................................................13-17
Settings ......................................................................................13-18
Events ........................................................................................13-19
Operation Mode ............................................................................. 13-20
Password ........................................................................................ 13-21
Product License ..............................................................................13-22
Proxy Settings ..................................................................... ...........13-26
SNMP Settings ...............................................................................13-27
System Time ..................................................................................13-28
Reboot from Web Console .............................................................13-31
World Virus Tracking ....................................................................13-33
Page 12

Trend Micro™ InterScan™ Gateway Security Appliance M-Series Administrator’s Guide
x
Chapter 14: Technical Support, Troubleshooting, and FAQs
Contacting Technical Support ..........................................................14-2
Readme.txt ........................................................................................ 14-3
Troubleshooting ................................................................................14-4
Frequently Asked Questions (FAQ) .................................................14-7
Recovering a Password .....................................................................14-8
Virus Pattern File ..............................................................................14-9
Spam Engine and Pattern File ........................................................14-10
Hot Fixes, Patches, and Service Packs ...........................................14-10
Licenses ..........................................................................................14-11
Renewing Maintenance ..................................................................14-12
EICAR Test Virus .................. ........................................................14-13
Best Practices ..................................................................................14-14
Handling Compressed Files ......................................................14-14
Handling Large Files ..................................................................14-16
Sending Trend Micro Suspected Internet Threats ......................14-18
Chapter 15: Updating the InterScan Gateway Security Appliance
Firmware
Identifying the Procedures to Follow ...............................................15-2
Updating the Device Image Through the Web Console ...................15-3
Updating the Device Image Using the AFFU ..................................15-4
Preparing InterScan Gateway Security Appliance for the Device
Image Update ........................................................................15-4
Uploading the New Device Image .............................................15-14
Completing the Process After the Device Image Is Uploaded ...15-29
Reverting to the Previous Version of the Program File .............15-30
BMC and BIOS Firmware Updates Using the Appliance Firmware Flash
Utility ......................................................................................15-32
Updating the Appliance BMC Firmware ...................................15-32
Updating the InterScan Gateway Security Appliance BIOS Firmware
15-40
Appendix A: Terminology
BOT ...................................................................................................A-2
Grayware ...........................................................................................A-2
Macro Viruses .................................................... ............................ ...A-2
Page 13

Contents
xi
Mass-Mailing Attacks ....................................................................... A-3
Network Viruses ............................................................ ...................A-3
Pharming ........................................................................................... A-3
Phishing ............................................................................................. A-4
Spam .................................................................................................. A-4
Spyware ............................................................................................. A-4
Trojans .............................................................................................. A-4
Viruses .............................................................................................. A-5
Worms ............................................................................................... A-5
Appendix B: Introducing Trend Micro Control Manager™
Control Manager Basic Features ........................................................B-2
Understanding Trend Micro Management Communication Protocol B-3
Reduced Network Loading and Package Size ...............................B-3
NAT and Firewall Traversal Support ............................................B-4
HTTPS Support .............................................................................B-5
One-Way and Two-Way Communication Support .......................B-5
Single Sign-on (SSO) Support .......................................................B-6
Cluster Node Support ....................................................................B-6
Control Manager Agent Heartbeat .....................................................B-7
Using the Schedule Bar .................................................................B-8
Determining the Right Heartbeat Setting ......................................B-8
Registering InterScan Gateway Security Appliance M-Series to Control
Manager ......................................................................................B-9
Managing InterScan Gateway Security Appliances From Control
Manager ....................................................................................B-11
Understanding Produ c t Directory ................................................B-11
Accessing a InterScan Gateway Security Appliance M-Series Default
Folder ....................................................................................B-12
Configure InterScan Gateway Security Appliances and Managed
Products ................................................................................B-15
Issue Tasks to InterScan Gateway Security Appliances and Managed
Products ................................................................................B-16
Query and View InterScan Gateway Security Appliance M-Series and
Managed Product Logs ..................................................... ....B-17
Understanding Director y Manag e r ...................................................B-20
Using the Directory Manager Options .........................................B-21
Page 14

Trend Micro™ InterScan™ Gateway Security Appliance M-Series Administrator’s Guide
xii
Create Folders .............................................................................B-22
Understanding Temp .......................................................................B-24
Using Temp ................................... ............................ ..................B-24
Download and Deploy New Components From Control Manager . B-28
Understanding Update Manager .................................................B-28
Understanding Manual Downloads .............................................B-29
Configure Scheduled Download Exceptions ..............................B-37
Understanding Scheduled Downloads .................... ....................B-37
Using Reports ................................................................................. .B-45
Understanding Report Templates ................................................B-46
Understanding Report Profiles ....................................................B-47
Generate On-demand Scheduled Reports ...................................B-54
Appendix C: Technology Reference
Deferred Scan ........................................................ ............................C-2
Diskless Mode ...................................................................................C-2
False Positives ...................................................................................C-3
LAN Bypass ......................................................................................C-3
Link State Failover ............................................. ...............................C-4
Enabling or Disabling LAN Bypass and Link State Failover ...........C-5
Scan Engine Technology ................................................................. C-10
IntelliScan ...................................................................................C-10
IntelliTrap ....................................................................................C-10
MacroTrap ...................................................................................C-11
WormTrap ................................................................................... C-11
Supported DCS Clients ....................................................................C-11
Feature Execution Order ..................................................................C-12
SMTP Feature Execution Order ..................................................C-12
POP3 Feature Execution Order ...................................................C-12
HTTP Feature Execution Order ..................................................C-12
FTP Feature Execution Order .....................................................C-12
Page 15

Contents
xiii
Appendix D: Removing the Hard Disk
Appendix E: System Checklist
Appendix F: File Formats Supported
Compression Types ............................................................................F-2
Blockable File Formats ......................................................................F-4
Malware Naming Formats .................................................................F-6
Appendix G: Specifications and Environment
Hardware Specifications ................................................ ................... G-2
Dimensions and Weight ....................... ............................................. G-2
Power Requirements and Environment ............................................. G-3
Index
Page 16

Trend Micro™ InterScan™ Gateway Security Appliance M-Series Administrator’s Guide
xiv
Page 17

xv
Introduction
About This Manual
Welcome to the Trend Micro™ InterScan™ Gateway Security Appliance M-Series
Administrator’s Guide. This book contains information about the tasks involved in
configuring, administering, and maintaining the Trend Micro InterScan Gateway
Security Appliance. Use it in conjunction with the Trend Micro™ InterScan™
Gateway Security Appliance M-Series Deployment Guide, which provides up-front
details about initial planning, preconfiguring, and deploying the appliance.
Page 18

Trend Micro™ InterScan™ Gateway Security Appliance M-Series Administrator’s Guide
xvi
Audience
This book is intended for network administrators who want to configure, administer,
and maintain InterScan Gateway Security Appliance. The manual assumes a working
knowledge of security systems and devices, as well as network administration.
About This Administrator’s Guide
The InterScan™ Gateway Security Appliance M-Series Administrator’s Guide
discusses the following topics:
Chapters
Chapter 1, Introducing Trend Micro InterScan Gateway Security Appliance
Chapter 2, Deployment Options
Chapter 3, How InterScan Gateway Security Appliance Works
Chapter 4, Getting Started with InterScan Gateway Security Appliance
Chapter 5, SMTP Services
Chapter 6, HTTP Services
Chapter 7, FTP Services
Chapter 8, POP3 Services
Chapter 9, Outbreak Defense
Chapter 10, Quarantines
Chapter 11, Updating InterScan Gateway Security Appliance Components
Chapter 12, Analyzing Your Protection Using Logs
Chapter 13, Administrative Functions
Chapter 14, Technical Support, Troubleshooting, and FAQs
Chapter 15, Updating the InterScan Gateway Security Appliance Firmware
Page 19

xvii
Appendixes
Appendix A, Terminology
Appendix B, Introducing Trend Micro Contro l Manager™
Appendix C, Technology Reference
Appendix D, Removing the Hard Disk
Appendix E, System Checklist
Appendix F, File Formats Supported
Appendix G, Specifications and Environment
Index
Page 20
Trend Micro™ InterScan™ Gateway Security Appliance M-Series Administrator’s Guide
xviii
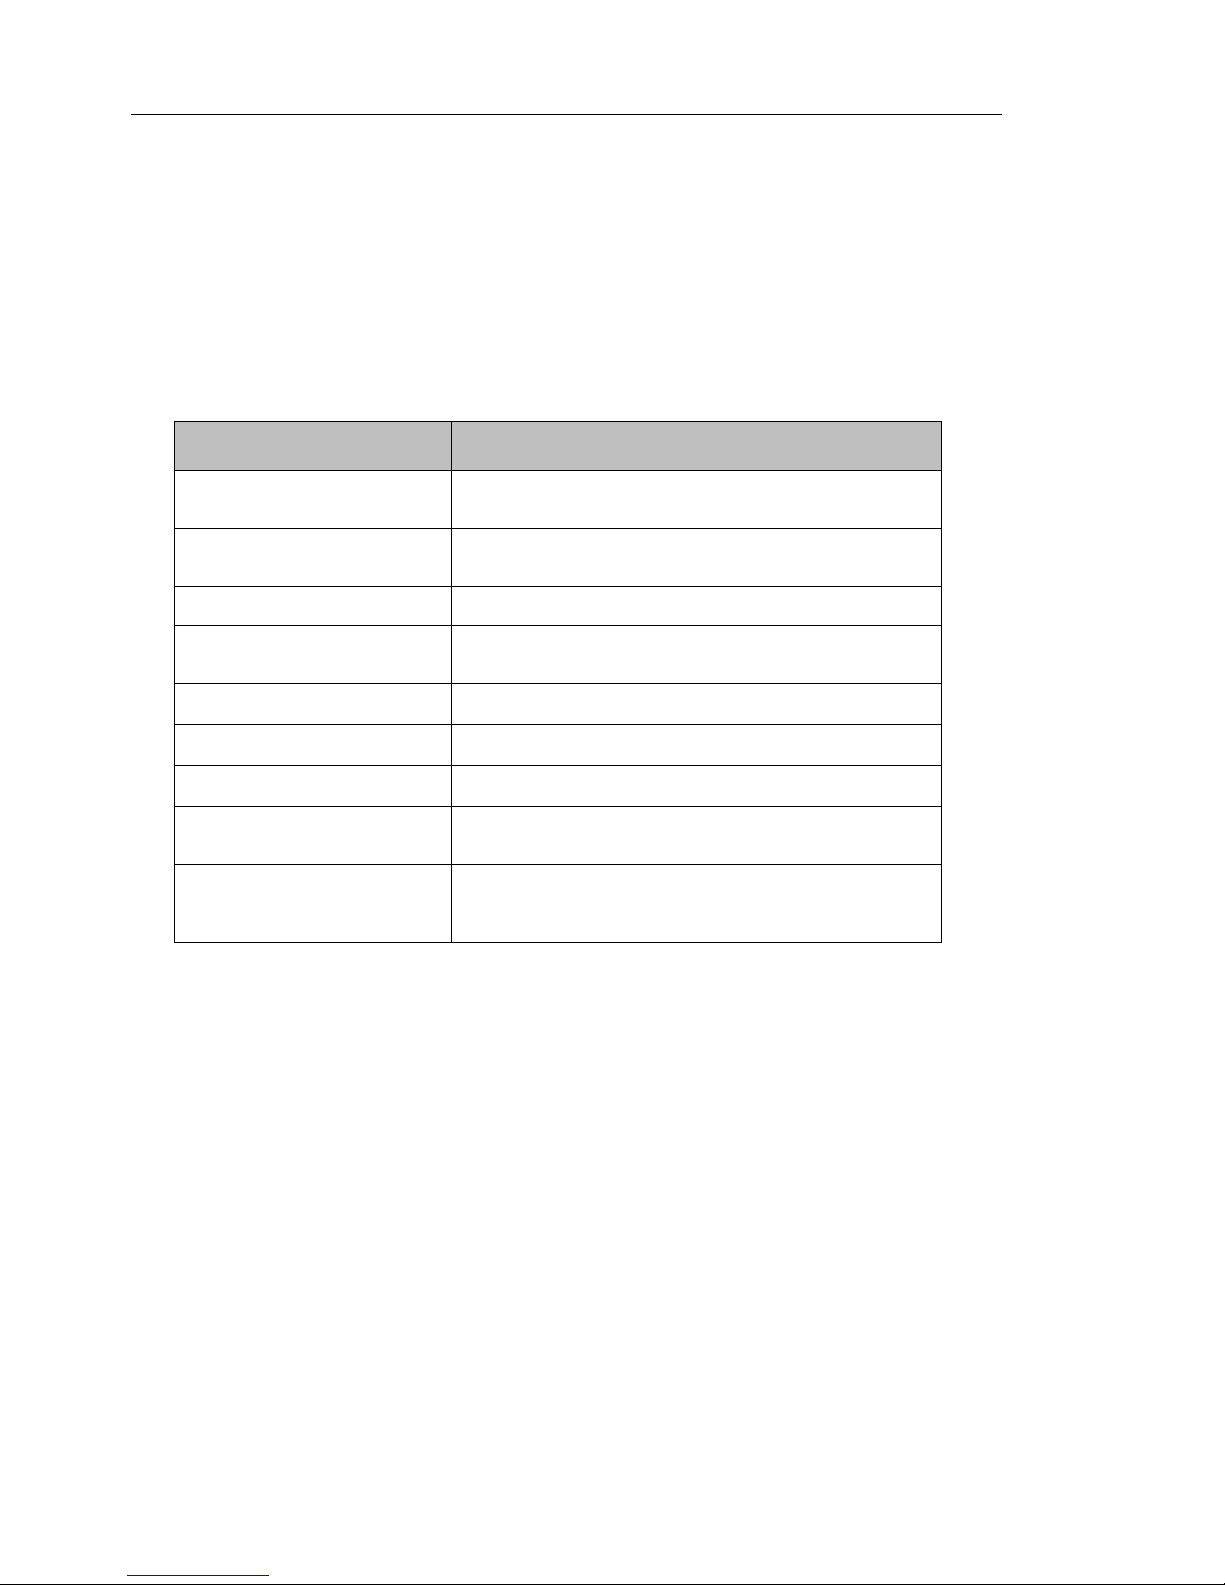
Document Conventions
To help you locate and interpret information easily, the InterScan Gateway Security
Appliance M-Series Administrator’s Guide uses the following conventions:
TABLE 1. Conventions used in the Trend Micro InterScan Gateway Security
Appliance M-Series documentation
CONVENTION DESCRIPTION
Abbreviations, and names of certain commands and
keys on the keyboard
Bold
Menus and menu commands, command buttons,
tabs, options, and ScanMail tasks
Italics References to other documentation
Monospace Examples, sample command lines, program code,
Web URL, file name, and program output
Note:
Configuration notes
Tip:
Recommendations
WARNING!
Reminders about actions or configurations to avoid
INT
InterScan Gateway Security Appliance interface con-
nected to the protected network
EXT
InterScan Gateway Security Appliance interface con-
nected to the external or public network (usually the
Internet)
Page 21

1-1
Chapter 1
Introducing Trend Micro InterScan
Gateway Security Appliance
This chapter introduces InterScan Gateway Security Appliance and provides an
overview of its technology, capabilities, and hardware connections.
This chapter includes the following topics:
• What Is InterScan Gateway Security Appliance? on page 1-2
• Important Features and Benefits on page 1-3
• How InterScan Gateway Security Appliance Works on page 1-5
• The Appliance Hardware on page 1-10
• Preconfiguring and Deploying the Appliance on page 1-15
• Connecting to the Network on page 1-16
• Testing the Appliance Connectivity on page 1-17
• Activating the Appliance on page 1-17
Page 22

Trend Micro™ InterScan™ Gateway Security Appliance M-Series Administrator’s Guide
1-2
What Is InterScan Gateway Security
Appliance?
Trend Micro™ InterScan™ Gateway Security Appliance is an all-in-one security
appliance that blocks threats automatically, right at the Internet gateway. The
appliance provides a critical layer of security against such threats as viruses, spyware,
spam, phishing, pharming, botnet attacks, harmful URLs, and inappropriate content,
while complementing desktop solutions. Because it sits between your firewall and
network, the appliance augments existing firewall and VPN solutions to stop
outbreaks early. Moreover, because the security features of the appliance are
configured to work right out of the box, the appliance starts protectin g your network
from the moment the appliance is connected.
The appliance comes preconfigured with software, making it easy to deploy.
Administrators can manage the appliance quickly an d easily from a single Web-based
console. The appliance also saves time and money by:
• Providing the tools to assist you to more effectively achieve regulatory
compliance
• Preserving network resource availability and reducing spam so your employees
can be more productive
• Integrating multiple products into one solution
• Using Damage Cleanup Services to dramatically reduce administrative effort,
cost, and downtime caused by spyware and viruses
• Using IntelliTrap heuristic detection and Outbreak Prevention Services to
provide increased defense against emerging threats
Page 23

Introducing Trend Micro InterScan Gateway Security Appliance
1-3
Important Features and Benefits
TABLE 1-1. Important Features and Benefits
Features Description
All-in-one defense
• Antivirus, anti-spam, anti-spyware/grayware, anti-phish-
ing, anti-pharming, IntelliTrap™ (Bot threats), content filtering, Outbreak Prevention Services (OPS), URL
blocking, and URL filtering
• IntelliTrap detects malicious code such as bots in com-
pressed files. Virus writers often attempt to circumvent
virus filtering by using different file compression
schemes. IntelliTrap is a real-time, rule-based pattern-recognition scan-engine technology that detects and
removes known viruses in files compressed up to 20 layers deep using any of 16 popular compression types.
Automatic threat protection
Outbreak Defense — An integral part of Trend Micro's Enterprise Protection Strategy (EPS), which enables Trend Micro
devices to proactively defend against threats in their insurgency before traditional pattern files are available.
Gateway protection Protection from malware right at the Internet gateway
Flexible configuration
• Specify files to scan.
• Specify the action to take on infected files/messages.
• Specify file types to block in HTTP and FTP traffic.
• Specify messages and files to filter in SMTP and POP3
traffic based on message size, text in message header
and body, attachment name, and true file type.
• Specify the types of notifications to send or display and
who to send notifications to when InterScan Gateway
Security Appliance detects a threat.
Centralized management
• A Web-based console, accessible from a local or remote
computer, that enforces companywide Internet security
policies
• Web browser support for Microsoft Internet Explorer 6.x
and Mozilla Firefox 1.x
Automated maintenance You can automate maintenance tasks, such as updating
InterScan Gateway Security Appliance components and
maintaining log files, to save time.
Page 24

Trend Micro™ InterScan™ Gateway Security Appliance M-Series Administrator’s Guide
1-4
SMTP, POP3, FTP and
HTTP scanning capabilities
• SMTP and POP3 scanning support: antivirus, IntelliTrap,
spyware/grayware detection, anti-spam (including Email
Reputation Services and Content Scanning for SMTP),
anti-phishing, content filtering, and blocking of messages
that contain malicious URLs (Web Reputation). SMTP
and POP3 scanning also provides notification messages
to the administrator and users upon detection of phishing
any other malicious messages.
• FTP scanning support: antivirus and spyware/grayware
detection, and file blocking
• HTTP scanning support: antivirus, IntelliTrap, spy-
ware/grayware detection, file blocking, blocking of
pharming and phishing URLs, and blocking of URLs that
are identified as a Web threat (Web Reputation).
Anti-Spam - Content
Scanning
Allows the administrator to do the following:
• Set the spam threshold to high, medium, or low.
• Specify approved and blocked senders.
• Define certain categories of mail as spam.
Anti-Spam - Email Reputation Services (ERS)
ERS blocks spam by validating the source IP addresses of
incoming mail against databases of known spam sources —
the Standard Reputation database (previously called
Real-Time Blackhole List or RBL+) and the Dynamic Reputation database (previously called Quick IP List or QIL).
URL filtering for HTTP
• Allows the administrator to define and configure URL fil-
tering policies for work time and leisure time
• Allows the administrator to define global lists of blocked
and approved URLs
• Local cache support to reduce network traffic
• Notifies users if URL filtering disallows the URL that they
want to access
File blocking for HTTP
and FTP
• Allows the administrator to block selected file types
• Provides a notification to users when a file type is
blocked
TABLE 1-1. Important Features and Benefits (Continued)
Page 25

Introducing Trend Micro InterScan Gateway Security Appliance
1-5
How InterScan Gateway Security Appliance
Works
InterScan Gateway Security Appliance sits between your firewall and your network,
acting as a multiprotocol security gateway between the Internet and your busi ness.
With security features for SMTP, POP3, HTTP, and FTP, InterScan Gateway Security
Appliance acts as a one-stop solution for all your security needs.
FIGURE 1-1. How InterScan Gateway Security Appliance Works
InterScan Gateway Security Appliance blocks viruses, spyware, spam, phishing,
botnet attacks, harmful URLs, and inappropriate content before they enter your
network.
InterScan Gateway Security Appliance stops threats at the gateway, using a variety of
innovative technologies, including:
Blocks multiple Internet threats
Complements existing firewall and VPN
Decreases spam, email storage, and the cost of regulatory compliance
Cleans up viruses and spyware at the desktop
Controls users’ Web access with scheduling and policies, and blocks access to
URLs that are a Web threat or likely to be a Web threat.
Internet
threats
Firewall
InterScan Gateway
Security Appliance
Mail
server
File
servers
Administrator
PC
PCs and
servers
Desktop
PC
Firewall
Page 26

Trend Micro™ InterScan™ Gateway Security Appliance M-Series Administrator’s Guide
1-6
Antivirus
The antivirus security in InterScan Gateway Security Appliance guards every
network entry point—from the Internet gateway and network perimeter to email and
file servers, desktops, and mobile devices.
• Delivers proven virus protection. Uses patterns, heuristics, and other innovative
technologies to block viruses, worms, and Trojans.
• Stops file-based viruses, malware, worms, and botnets. Runs inline network
scans to detect and block worms and botnets.
• Contains outbreaks. Isolates infected network segments—before threats can
spread.
• Blocks malicious mobile code. Screens Web pages for malware hidden in
applets, ActiveX controls, JavaScript, and VBscript.
• Automates damage cleanup. Removes malware and spyware from memory of
clients and servers including guest devices.
• Detects zero-day threats in real time. IntelliTrap heuristic detection and Outbreak
Prevention Services increase defenses against emerging threats.
Anti-Spyware
The anti-spyware feature in InterScan Gateway Security Appliance blocks incoming
spyware and stops spyware from sending out user data that it has collected.
Innovative technology also prevents users from browsing Web sites that install
tracking software. If such a site has already installed spyware, end users can
automatically clean the infected system by clicking a URL.
• Stops spyware at multiple layers. Delivers end-to-end spyware protection— from
the Web gatewa y to client/server networks.
• Automates cleanup. Removes spyware, unwanted grayware, and remnants from
both the server and desktop active memory.
• Prevents “drive by” downloads (downloads of malware through exploitation of a
Web browser, e-mail client or operating system bug, without any user
intervention whatsoever). Screens Web pages for malicious mobile code and
blocks “drive by” spyware installations.
• Blocks URLs known for spyware. Prevents users from browsing Web sites
known to harbor malicious spyware.
Page 27

Introducing Trend Micro InterScan Gateway Security Appliance
1-7
Anti-Spam
InterScan Gateway Security Appliance stops spam from consuming network
resources and wasting employees’ valuable time. The key to its effective protection is
the use of adaptable technology that evolves as spamming techniques change and
become more sophisticated.
• Blocks spam at the outermost network layer. Stops spam at the IP-connection
layer before it can enter your network and burden IT resources.
• Detects known spam sources. Validates IP addresses against the largest
reputation database of known spammers.
• Stops spam in real time. Uses dynamic reputation analysis to detect spam,
zombies, and botnets in real time.
• Filters messaging traffic. Blocks spam at the Internet gateway before it can get to
your mail servers and impact performance.
• Improves spam detection. Combines machine learning, pattern recognition,
heuristics, blocked sender lists and approved sender lists for better detection.
• Enables customizing. Gives the flexibility to customize policy and spam
tolerance levels.
Anti-Phishing
The anti-phishing security function in InterScan Gateway Security Appliance offers a
comprehensive approach to stop identity theft and protect confidential corporate
information.
• Filters messaging traffic. Stops fraudulent, phishing-related email at the
messaging gateway and mail servers.
• Prevents theft. Protects credit card and bank account numbers, user names, and
passwords, and so on.
Anti-Pharming
The anti-pharming security function in InterScan Gateway Security Appliance works
within the HTTP protocol to block access to known pharming Web sites.
• When enabled, this feature places a warning message in the user’s browser upon
attempted access of a known pharming site.
Page 28

Trend Micro™ InterScan™ Gateway Security Appliance M-Series Administrator’s Guide
1-8
• Optionally, you can send customized email notification to the administrator when
such an event occurs.
Content and URL Filtering
The URL filtering security function in InterScan Gateway Security Appliance enables
companies to manage employee Internet use and block offensive or non-work-related
Web sites. By rest rict ing content, employers can improve network performance,
reduce legal liability, and increase employee productivity.
• Manages employee Internet use. Enables IT to set Web-use policies for the
company, groups, or individuals.
• Offers flexible filtering options. Filters by category, time, day, bandwidth, key
words, file name, true file type, and so on.
• Filters Web content. Blocks inappropria te con tent from entering your network
and prevents sensitive data from going out.
• Categorizes Web sites in real time. Employs dynamic rating technology to
categorize Web sites while users browse.
Outbreak Defense
In the event of an Internet outbreak of viruses or malware, the Outbreak Defense
function in InterScan Gateway Security Appliance works to protect networks before
the outbreak has reached them—but also repairs malware damage to clients’
computers if the outbreak has already affected them.
• Provides defense against outbreaks. When an outbreak occurs anywhere in the
world, TrendLabs rapidly responds by developing an Outbreak Prevention Policy
(OPP).
• Provides automated policy delivery. Trend Micro ActiveUpdate servers
automatically deploy the OPP to InterScan Gateway Security Appliance.
• Provides strategic protective advice. The OPP contains a list of actions for
InterScan Gateway Security Appliance administrators to take to reduce the threat
to clients.
• Provides damage management. Damage Cleanup Services and Damage Cleanup
Tools clean any client computers that malware has attacked.
Page 29

Introducing Trend Micro InterScan Gateway Security Appliance
1-9
• Moves from prevention to cure. The OPP remains in effect until TrendLabs
develops a more complete solution to the threat.
Web Reputation
Web Reputation is a new feature in InterScan Gateway Security appliance that
enhances protection against malicious Web sites. Web Reputation leverages Trend
Micro’s extensive Web security database to check the reputation of URLs that users
are attempting to access or that are embedded in mail messages. In InterScan
Gateway Security Appliance, Web Reputation is applied to three primary network
services – HTTP, SMTP, and POP3.
• HTTP W eb Reputation evaluates the potential security risk of any requested URL
by querying the Trend Micro Web security database at the time of each HTTP
request. Depending on the security level that has been set, it can block access to
Web sites that are known or suspected to be a Web threat on the reputation
database. HTTP Web Reputation provides both email notification to the
administrator and inline notification to the user for Web Reputation detections.
• SMTP Web Reputation evaluates the potential security risk of any URL
embedded in messages by querying the Trend Micro Web security database.
Depending on the action that has been set, it can insert a notification stamp to the
message containing the URL and deliver the message, or delete the message
immediately. SMTP Web Reputation provides email notifications to both the
administrator and message recipient, as well as an inline notification stamp in the
message that contains the URL.
• POP3 Web Reputati on is similar to SMTP Web Reputation, but it only provi des
the Delete action for messages that contain known or suspected malicious URLs.
Reputation Score
A URL's "reputation score" determines whether it is a Web threat or not. Trend Micro
calculates the score using proprietary metrics.
• Trend Micro considers a URL "a Web threat", "very likely to be a Web threat", or
"likely to be a Web threat" if its score falls within the range set for one of these
categories.
• Trend Micro considers a URL safe to access if its score exceeds a defined
threshold.
Page 30

Trend Micro™ InterScan™ Gateway Security Appliance M-Series Administrator’s Guide
1-10
Security Levels
There are three security levels that determine whether InterScan Gateway Security
Appliance will allow or block access to a URL.
• High: Block more malicious Web sites, but risk more false positives.
• Medium: (default) The standard setting.
• Low: Block fewer malicious Web sites, but risk fewer false positives.
The Appliance Hardware
The Front Panel
The front panel of the InterScan Gateway Security Appliance contains two (2) thumb
screws and a removable bezel for holding it in a fixed position in a rack cabinet. Use
these screws only in conjunction with the rail mounting kit. (See Trend Micro
InterScan Gateway Security Appliance M-Series Deployment Guide for details on
mounting the device.) These screws alone will not support the weight of the device.
At the center of the bezel is the Liquid Crystal Display (LCD) Module.
FIGURE 1-2. Front Panel
Thumb screw
LCD module
Thumb screw
Removable
bezel
Page 31

Introducing Trend Micro InterScan Gateway Security Appliance
1-11
The following table describes each front panel element.
LCD Module
The LCD and control panel elements together comprise the LCD Module.
FIGURE 1-3. LCD Module
TABLE 1-2. Front panel elements
Front Panel Elements Description
LCD Module The LCD Module comprise the following items:
Liquid Crystal Display (LCD)
Control panel
Reset button
UID button
LED indicators
The rest of the table contains the descriptions for each item
Liquid Crystal Display
(LCD)
A 2.6in x 0.6in (65mm x 16mm) dot display LCD that is capable of
displaying messages in two rows of 16 characters each. Displays
device status and preconfiguration instructions
Control panel One five-button control panel that provides LCD navigation. Used
for inputting data during preconfiguration
Reset button Restarts the device
LED Indicators 1 to 5 Indicates the Power, UID, System, Hard Disk, and Outbreak sta-
tus
Power and UID have one color each; System, Hard Disk, and
Outbreak have two colors each
UID button Unique ID button that illuminates a blue LED on the front and rear
of the device, which helps administrators locate the device for
trouble-shooting or maintenance
Bezel Detachable casing that covers and protects the front panel
Thumb screws Used for fixed mounting in any standard 19-inch rack
LCD Reset button
UID button
Control panel
LED indicators
Page 32

Trend Micro™ InterScan™ Gateway Security Appliance M-Series Administrator’s Guide
1-12
LED Indicators
The LCD Module has five light-emitting diodes (LEDs) that indicate the POWER, UID,
SYSTEM, HARD DISK, and OUTBREAK status, as shown in the figure below.
The Back Panel
The back panel of InterScan Gateway Security Appliance contains a power
receptacle, power switch, USB ports, serial connection, fan vent, and LAN ports.
TABLE 1-3. Possible behavior for each LED indicator
LED
Name
Icon State Description
P
OWER Yellow, steady The appliance is operating normally
Off (no color) The appliance is off
UID Blue, steady The UID LED lights up when the UID
button is pressed
Off (no color) The UID LED is not illuminated (default
is off)
System Red, flashing The appliance is booting
Red, steady Power-On Self-Test (POST) error
Yellow, flashing The appliance OS and applications are
booting
Yellow, steady The appliance program file (firmware)
encountered a critical error
Green, steady The appliance program file (firmware) is
ready
Hard Disk Green, steady The appliance hard disk is operating
normally
Red, steady Hard disk has failed and the appliance
is operating in diskless mode
Outbreak Green, steady Outbreak Prevention Services (OPS) is
disabled
Red, flashing OPS is enabled
Page 33

Introducing Trend Micro InterScan Gateway Security Appliance
1-13
FIGURE 1-4. Back panel
The following table describes each back panel element.
TABLE 1-4. Back panel elements
Element Description
AC power receptacle
Connects to a power outlet and InterScan Gateway Security Appliance using the power cord (included in the package)
Power switch Turns the device on and off. Press the power switch for at least five
seconds to turn off the device.
DB9 Serial Connection
Connects to a computer’s serial port with a DB9 type connection to
perform preconfiguration
Ports MGT, EXT,
INT
Copper Gigabit LAN port designated as the MANAGEMENT
EXTERNAL or INTERNAL port depending on the Operation Mode
Fan Vent Cooling vent for three (3) system fans
UID LED and
UID Button
LED at the back panel of InterScan Gateway Security Appliance.
When a user presses the UID button, the UID LED illuminates. The
illuminated UID LED allows administrators to easily located InterScan Gateway Security Appliance for troubleshooting or maintenance
USB Ports USB ports, reserved for future releases
AC Power Receptacle
MGT Port
Fan vent
Serial Connection
USB PortsPower Switch EXT Port INT Port
UID Indicator
Page 34

Trend Micro™ InterScan™ Gateway Security Appliance M-Series Administrator’s Guide
1-14
Port Indicators
InterScan Gateway Security Appliance has three (3) user-configurable copper-based
Ethernet ports. Each Ethernet port has two (2) indicator lights that allow you to
determine the port’s current state and duplex speed.
FIGURE 1-5. Port indicators
The following table describes the status of the port indicators when the device is
operating normally.
TABLE 1-5. Port indicator status
Indicator
Number
Purpose State Description
LED 1 Port activity Light off The applianceis not
receiving data
Green, flashing Receiving data
LED 2 Duplex speed Light off 10mbps LED
Green, steady 100mbps LED
Yellow, steady 1000mbps LED
LED 2
LED 1
EXT Port
INT Port
Management
port
Page 35

Introducing Trend Micro InterScan Gateway Security Appliance
1-15
To understand how the port indicators work when InterScan Gateway Security
Appliance is operating in LAN bypass mode, see “LAN Bypass” in the InterScan
Gateway Security Appliance Online Help.
Note: Loss of power to the InterScan Gateway Security Appliance automatically resets
the appliance to bypass mode, so that all data passes through.
Preconfiguring and Deploying the Appliance
Your InterScan Gateway Security Appliance must have an IP address to operate in
your network.
WARNING! Strictly speaking, this appliance is a gateway device. Therefore:
1. Do not place InterScan Gateway Security Appliance in front of
your network gateway
(your network firewall, for example).
2. Do not reconfigure the network firewall to use the IP address of
InterScan Gateway Security Appliance as its default gateway
address.
Deployment in either of the above ways prevents the appliance from working.
Assign an IP address in any of three ways:
• A DHCP server automatically assigns a dynamic IP address to the appliance
during deployment. This is the preferred method. Normally, there is one DHCP
server per subnet; however, administrators can use a DHCP relay agent to
support multiple subnets.
• Use a terminal communications program, such as HyperTerminal (for Windows)
or Minicom (for Linux) to access the appliance Preconfiguration console and
manually assign a dynamic or static IP address to the appliance during
preconfiguration.If you choose to use a static IP address, you will need to set the
netmask address, default gateway address, and primary DNS address.
• Using the LCD module, manually assign a dynamic or static IP address to the
appliance after you have mounted it on your network. If you choose to use a
Page 36

Trend Micro™ InterScan™ Gateway Security Appliance M-Series Administrator’s Guide
1-16
static IP address, you will need to use the buttons on the LCD module to set the
netmask address, default gateway address, and primary DNS address. Y ou can
also designate a host name in this way.
Note: You may also be required to provide a secondary DNS server address.
See Chapter 2, Deployment Options for full deployment instructions.
Connecting to the Network
With a DHCP server , you can connect InterScan Gateway Security Appliance to your
network right out of the box without having to undergo a preconfiguration process.
Once connected, InterScan Gateway Security Appliance can handle various interface
speeds and duplex mode network traffic.
To connect the InterScan Gateway Security Appliance to your network:
1. Connect one end of the Ethernet cable to the INT port (right side) and the other
end to the segment of the network that InterScan Gateway Security Appliance
will protect (the Protected Network).
2. Connect one end of another Ethernet cable to the EXT port (left side) and the
other end to the part of the network that leads to the public network.
3. Using the power switch in the back of the appliance, power on the device.
Note: To prevent accidental shutdown of the appliance, the appliance power switch has
been modified from the standard On/Off convention. To power on InterScan
Gateway Security Appliance, simply press the Power Switch upward from the 0 to
1 position. To power off InterScan Gateway Security Appliance, press the power
switch upward from 0 to 1 and hold it in that position for a minimum of five
seconds, until the appliance powers off.
Page 37

Introducing Trend Micro InterScan Gateway Security Appliance
1-17
Testing the Appliance Connectivity
Perform either of the following tasks to test whether you have successfully configured
the InterScan Gateway Security Appliance.
To test if the device is configured properly, do one of the following:
1. Ping the device to verify connectivity; you can obtain the IP address by looking
at the LCD panel on the front of the device.
2. Browse the InterScan Gateway Security Appliance Web interface by going to a
PC on the protected network and opening an Internet Explorer browser to
https://{The appliance IP Address}
Activating the Appliance
The Trend Micro sales team or sales representative provides the Registration Key.
Use the Registration Key to obtain a full version Activation Code.
To obtain the Activation Code:
1. Visit the Trend Micro Online Registration Web site.
(
https://olr.trendmicro.com/registration). The Online Registration
page of the Trend Micro Web site opens.
2. Perform one of the following:
• If you are an existing Trend Micro customer , log on using your logon ID and
password in the Returning, registered users section of the page.
• If you are a new customer, select your Region from the drop-down menu in
the Not Registered section of the page and click Continue.
3. On the Enter Registration Key page, type or copy the InterScan Gateway
Security Appliance Registration Key, and then click Continue.
4. On the Confirm License Terms page, read the license agreement and then click
I accept the terms of the license agreement.
5. On the Confirm Product Information page, click Continue Registration.
6. Fill out the online registration form, and then click Submit. Trend Micro will
send you a confirmation message that you need to acknowledge by clicking OK.
7. Click OK twice.
Page 38

Trend Micro™ InterScan™ Gateway Security Appliance M-Series Administrator’s Guide
1-18
After the registration is complete, Trend Micro emails you an Activation Code,
which you can then use to activate InterScan Gateway Security Appliance.
A Registration Key has 22 characters (including the hyphens) and looks like this:
xx-xxxx-xxxx-xxxx-xxxx
An Activation Code has 37 characters (including the hyphens) and looks like this:
xx-xxxx-xxxxx-xxxxx-xxxxx-xxxxx-xxxxx
Page 39

2-1
Chapter 2
Deployment Options
This chapter addresses basic and advanced deployment options. For instructions on
mounting the physical device, see the Trend Micro InterScan Gateway Security
Appliance M-Series Deployment Guide.
This chapter includes the following topics:
• Deployment Topologies on page 2-4
• Basic Deployment on page 2-8
• Advanced Deployment Scenarios on page 2-9
• Deployment Recommendations on page 2-17
• Deployment Issues on page 2-18
• Preconfiguring the Appliance on page 2-18
Page 40

Trend Micro™ InterScan™ Gateway Security Appliance M-Series Administrator’s Guide
2-2
Overview
This chapter provides guidance on deploying the InterScan Gateway Security Appliance in the most common network topology as well as in more advanced topologies.
Note: InterScan Gateway Security Appliance is not a firewall or a router. Always deploy
the appliance behind a firewall or security device that provides adequate NAT and
firewall-type protection.
A typical network topology, with no gateway protection is shown in figure 2-1.
FIGURE 2-1. Typical network topology before deploying InterScan
Gateway Security Appliance
Internet
Network switch or router
Firewall
NO GATEWA Y
PROTECTION
Mail server
HTTP server
FTP server
Client computers in your network
Page 41

Deployment Options
2-3
In a basic deployment of the appliance in the most common network topology, the
appliance sits between the network servers and the firewall, as shown in figure 2-2:
FIGURE 2-2. The most common deployment of InterScan Gateway
Security Appliance
Internet
Network switch or router
Firewall
Mail server
HTTP server
FTP server
Client computers in your network
InterScan Gateway
Security Appliance
LAN switch, router, or hub
Page 42

Trend Micro™ InterScan™ Gateway Security Appliance M-Series Administrator’s Guide
2-4
Deployment Topologies
This section discusses the following types of deployment topologies:
• Single network segment
• Multiple network segments
Deploying in a Single Network Segment
In figure 2-3 on page 2-4, the network devices all belong in one network segment. All
devices, including clients have Class A IP addresses. The core switch is the default
gateway of the clients. The router is the default gateway of the core switch and the
appliance.
Note: If the appliance is not deployed between the router and the core switch, the
connection will go through the core switch and then to its default gateway, which
is the router. In return, the router redirects traffic to the intended server, thus
bypassing the appliance altogether.
FIGURE 2-3. InterScan Gateway Security Appliance and clients deployed
in the same network segment
Server
Internet
Router
1
Client
1
Default gateway of core switch and of the appliance
2
Default gateway of clients
InterScan Gateway
Security Appliance
219.219.2.19
10.2.2.1
10.2.2.23
10.2.2.25
10.2.211.136
Core
switch
2
Page 43

Deployment Options
2-5
If the appliance is deployed between a router and core switch within the sam e
network segment, the appliance can directly connect to the router or clients. If a
client issues a request to a server, the appliance receives the client’s outgoing
connection through TCP handshake. Because all devices are in the same segment,
there are no problems relaying packets between network devices. The appliance
passes the request to the router, which forwards it to the intended server.
Deploying in a Network with Multiple Segments
This section discusses deployment in a multiple-segment environment in which the
default gateway of the appliance is a device handling the Internet connection (for
example, a router or firewall).
In figure 2-5 on page 2-7, the appliance and clients belong in different network segments. The core switch and the appliance belong in one segment using a Class C IP
address. The core switch is the default gateway of the clients. The router is the default
gateway of the core switch and the appliance.
If the clients and the appliance are on different network segments, the router passes
traffic to the Internet, but the appliance is unable to connect directly to the client. The
packet passes to the default gateway of the appliance, which is the router.
Note: When changing the IP address or the static route settings of the appliance, Trend
Micro recommends using a computer that is on the same network segment as
IGSA. This will help ensure that you do not lose the connection with the appliance.
For example, if the gateway IP address has changed but the static route has not yet
been updated on IGSA, you may not be able to access the Web interface if you are
using a computer that is on a different network segment.
In this topology, the appliance passes the packet to the router. The routing decision
depends on the router. The SYN packet will be returned to the client through the
router and the core switch. (See figure 2-4 on page 2-6 for an illustration of this problem.)
Page 44

Trend Micro™ InterScan™ Gateway Security Appliance M-Series Administrator’s Guide
2-6
FIGURE 2-4. Problem: The appliance and clients deployed in different
network segments, with router as default gateway of the
appliance and no static routes set
A routing problem occurs whenever the router performs the following:
• Sending SYN/ACK packet back to clients
• Forwarding data to clients
These transactions lead to a decrease in the network throughput.
Server
Internet
219.219.2.19
192.168.1.254
192.168.1.100
192.168.1.1
10.2.211.136
1
Core switch/default gateway of
2
Default gateway of clients
Client
the appliance
InterScan Appliance
Legend
= Traffic between the appliance and the clients
= Traffic between the appliance and the Internet
Core
switch
2
Problem: Without knowing the
static IP routes, the appliance does
not know where to forward traffic.
Therefore, the appliance forwards
traffic to its default gateway, which
is the router.
Router
1
Page 45

Deployment Options
2-7
FIGURE 2-5. Solution: Static route settings tell the appliance where to
forward traffic from clients deployed, even though they are in
a different network segment
As a workaround, add static routing rules in the appliance. See figure 2-5 on page 2-7
for an illustration of the solution to this problem and see figure 2-6 on page 2-8 for
instructions on how to add static routes.
Server
Internet
Client
219.219.2.19
192.168.1.254
192.168.1.100
192.168.1.1
10.2.211.136
Core
switch
2
1
Core switch/default gateway of
2
Default gateway of clients
Client
the appliance
InterScan Appliance
Router
1
Legend
= Traffic between the appliance and the clients
= Traffic between the appliance and the Internet
Page 46

Trend Micro™ InterScan™ Gateway Security Appliance M-Series Administrator’s Guide
2-8
FIGURE 2-6. You can set static routes from the Web console
(Administration > IP Address Settings, Static Routes tab)
Refer to Deployment Recommendations on page 2-17 for tips to help minimize issues
in a multi-segment environment.
Basic Deployment
As shown in figure 2-2, The most common deployment of InterScan Gateway Security
Appliance, on page 2-3, it is necessary to include a LAN switch, router, or hub after
the appliance in the basic deployment scenario. Including a router or switch after the
appliance is necessary because the appliance itself is not designed to work as a router
or switch.
Page 47

Deployment Options
2-9
Advanced Deployment Scenarios
In addition to the basic deployment scenario, administrators can deploy InterScan
Gateway Security Appliance:
• In two transparent proxy modes:
• Tra nsparent proxy mode
• Fully transparent proxy mode
• In a DMZ environment
• In conjunction with a load-balancing device
• In a single-segment environment
• In a multi segment environment
Note: InterScan Gateway Security Appliance cannot be deployed in a tagged VLAN
topology, because the appliance does not support VLAN tags.
Operation Modes
InterScan Gateway Security Appliance implements transparent proxy with bridging.
Note: The appliance can be deployed as an inline (pass-through) device only. It cannot be
used as a router or proxy server.
All Ethernet packets are transferred between INT (eth0) and EXT (eth1) ports. In
transparent proxy with bridging, the appliance is transparent to other computers (that
is, clients, servers, network devices). Other network devices cannot address the appliance directly. However, they can address it at the network layer if an IP address is
assigned to the virtual bridge interface (br0).
Bridging is a technique for creating a virtual, wide-area Ethernet LAN, running on a
single subnet. A network that uses Ethernet bridging combines an Ethernet interface
with one or more virtual tap interfaces and brides them together under the umbrella of
a single bridge interface. Ethernet bridges represent the software analog to a physical
Ethernet switch. An Ethernet bridge is a kind of software switch that network administrators can use to connect multiple Ethernet interfaces (either physical or virtual) on
a single computer while sharing a single IP subnet.
Page 48

Trend Micro™ InterScan™ Gateway Security Appliance M-Series Administrator’s Guide
2-10
The appliance supports two transparent proxy modes (“operation modes”):
• Transparent proxy mode
• Fully transparent proxy mode
The major difference between transparent and fully transparent proxy modes is the
“actual transparency” of the appliance with the destination server. The appliance
creates an independent connection to the destination server. In transparent proxy
mode, the destination server is aware of the IP address of the appliance.
In neither mode can the appliance keep the client’s MAC address when delivering the
request to the server.
Transparent Proxy Mode
InterScan Gateway Security Appliance enforces transparency through the following
behavior:
• Clients do not see the presence of additional filters/scanners unless a violation is
detected.
• Administrators do not need any additional configuration on the client side.
• The destination servers still see the appliance IP address as the requestor.
For an illustration of how the appliance processes HTTP, FTP, SMTP, or POP3 traffic
in transparent proxy mode, see the figure below.
FIGURE 2-7. In transparent proxy mode, the client's IP address becomes
that of the appliance
Server
Internet
Router
(Default gateway
of InterScan
appliance)
Operation mode:
Transparent proxy
Switch
Client
EXT
port
INT
port
proxy handlers
10.2.211.136
Source IP:
10.2.211.136
10.2.2.23
Source IP:
10.2.2.23
Source IP:
10.2.2.23
Page 49

Deployment Options
2-11
When a client initiates a request, the request passes through the switch that is the
default gateway for clients in this segment. The appliance accepts the request thr ough
the INT port, which redirects traffic to the corresponding proxy handler. After the
proxy handler processes the request, the appliance delivers the packet to the
destination server through the router (the default gateway of the appliance).
WARNING! The connection may be lost if the default gateway IP address of InterScan
Gateway Security Appliance is deployed behind the appliance.
In this mode, the source IP address is that of the InterScan Gateway Security
Appliance and the destination IP address is that of the destination server. The
appliance works in Layer 3 and has no knowledge of Layer 2 behavior.
Fully Transparent Proxy Mode
The appliance enforces full transparency through the following behaviors:
• Clients/destination servers do not see the presence of additional filters/scanners
unless a violation is detected.
• Administrators do not need any additional configuration on the client side.
Page 50

Trend Micro™ InterScan™ Gateway Security Appliance M-Series Administrator’s Guide
2-12
Figure 2-8 below illustrates how the appliance processes traffic in fully transparent
proxy mode.
FIGURE 2-8. In fully transparent proxy mode, the IP address of the client is
unchanged
When a client initiates a request, the request passes through the switch that is the
default gateway for clients in this segment. The appliance accepts the request thr ough
the INT port, which redirects traffic to the corresponding proxy handler. After the
proxy handler processes the request, the appliance delivers the packet to the
destination server by way of the router (the default gateway of the appliance).
In this mode, the source IP address is the client’s address and the destination IP
address is that of the server . Br idge netfilt er ip tables is used to det ermine the rou te of
the destination server.
Deployment in a DMZ Environment
To protect bo th a corporate network and a DMZ (demilitarized zone or perimeter network), you can deploy two appliances:
• One deployed to protect the corporate network
• One deployed to protect the DMZ
Server
Internet
Router
(Default gateway
of InterScan
appliance)
Operation mode:
Fully transparent proxy
Switch
Client
EXT
port
INT
port
proxy handlers
10.2.211.136
Source IP:
10.2.211.136
10.2.2.23
Source IP:
10.2.211.136
Source IP:
10.2.211.136
Page 51

Deployment Options
2-13
Because a DMZ is a network area (a subnetwork) that sits between an organization's
internal network and an external network, two appliances are necessary to protect
both areas.
See figure 2-9 for an illustration of a deployment with two appliances deployed as
mentioned above.In the illustration, the company LAN is the area with a gray border
and the DMZ is the area with a red border.
FIGURE 2-9. Deployment in a DMZ environment (requires two appliances)
Internet
Network switch or router
Firewall
Mail server
HTTP server
FTP server
Client computers in the company network
LAN switch or router
Perimeter network
(DMZ)
Primary network
InterScan
appliance
A
SMTP
server
(for
example)
InterScan
B
appliance
Page 52

Trend Micro™ InterScan™ Gateway Security Appliance M-Series Administrator’s Guide
2-14
Failover Deployment
If deploying two InterScan appliances, you can deploy them in such a way that if the
connection to one appliance is broken, the second appliance takes over the load of the
first appliance.
The basic steps for setting up a failover deployment are:
1. Deploy two appliances in your network (see Failover Deployment Scenario on
page 2-15
2. Ensure that LAN bypass, an option in the Preconfiguration console, is disabled
(disabled by default)
3. Enable Link state failover, another option in the Preconfiguration console
(disabled by default)
For instructions on how to set these options, see Appendix C. Technology
Reference, Enabling or Disabling LAN Bypass and Link State Failover on page
C-5.
Page 53

Deployment Options
2-15
Failover Deployment Scenario
To achieve such a function, deploy two InterScan appliances between two load-balancing devices, as shown in figure 2-10.
FIGURE 2-10. Two InterScan appliances arranged in a link state failover
deployment
Internet
Layer 4 network switch
Firewall
Mail server
HTTP server
FTP server
Client computers in your network
LAN switch, router, or hub
Network switch or router
(load balancer) #1
Layer 4 network switch
(load balancer) #2
InterScan
appliance
A
InterScan
appliance
B
Page 54

Trend Micro™ InterScan™ Gateway Security Appliance M-Series Administrator’s Guide
2-16
WARNING! In order for this kind of “failover” to work, LAN bypass must be disabled
(enabled by default) and Link state failover must be enabled (disabled b y
default).
LAN Bypass and Link State Failover Settings
In the Preconfiguration console, LAN bypass must be disabled and Link state
failover must be enabled in order for a load-balancing “failover” deploym ent to
work.
LAN Bypass
LAN bypass is a feature by which, if the appliance encounters an error that causes
scanning to stop, network traffic will still flow through the appliance unscanned, so
that network traffic is not interrupted (enabled by default).
Link State Failover
Link state failover is a feature by which, if either the INT or the EXT port stops functioning, both ports are automatically shut down (disabled by default).
Setting LAN Bypass and Link State Failover Options
If you have previously enabled LAN bypass, you can disable it through the InterScan
Gateway Security Appliance Preconfiguration console. Likewise, you can enable link
state failover on the same screen of the Preconfiguration console. See Appendix C.
Technology Reference, Enabling or Disabling LAN Bypass and Link State Failover on
page C-5 for details.
Page 55

Deployment Options
2-17
Deployment Recommendations
Figure 2-11 below shows the recommended deployment setup for the appliance.
FIGURE 2-11. Recommended position of InterScan Gateway Security
Appliance and other network devices in single- or
multi-segment environments
To minimize issues and speedily complete deployment, deploy the appliance:
• Between a firewall that leads to the public network and a router, switch, or hub
that leads to the protected segment of the local area network.
Connect a router, switch, or hub to the
INT port, thereby creating a protected
network. Connect the
EXT port to a device that leads to the public network or
Internet.
• Before a proxy server leading to the public network.
If deploying in a multi-segment environment, take note of the following
recommendations:
• Connect the default gateway to the EXT port.
• Use the same default gateway setting for both the appliance and the router that
connects the appliance to the segments.
• Using the Web console, add the static routes for each segment to the appliance.
• Disable the proxy settings from the HTTP URL Filtering screen if traffic is not
passing through the appliance.
Refer to Deployment Issues on page 2-18 to learn about the known deployment issues
in this release. For details about single and multi-segment deploymen t topologies, see
Deploying in a Single Network Segment on page 2-4 and Deploying in a Network with
Multiple Segments on page 2-5.
Client
Switch
Proxy server
Router
Internet
Page 56

Trend Micro™ InterScan™ Gateway Security Appliance M-Series Administrator’s Guide
2-18
Deployment Issues
This release has the following limitations:
• VLAN is not supported in either transparent or fully transparent proxy mode.
Some network devices use VLAN to separate network layers. This use causes
modified VLAN tags. The appliance cannot recognize VLAN tags. If deployed in
a VLAN environment, the appliance is unable to scan any of the four protocols,
and the Web console is inaccessible.
WARNING! If the appliance is deployed in a VLAN environment, the LCM LEDs are
unable to provide any indication that scanning is not working.
• MAC address transparency is not supported in any operation mode.
• Original bridge forwarding processing may be disturbed in both operation
modes. See Deployment Issues on page 2-18.
• If the link is broken on the external (Internet-facing) side of the appliance, the
appliance cannot alert network devices on the external side. Likewise, if the
broken link is on the internal side, the appliance cannot alert devices on that side.
Preconfiguring the Appliance
Your InterScan Gateway Security Appliance must have an IP address to operate in
your network.
WARNING! This appliance is a pass-through device. Therefore:
1. Do not place InterScan Gateway Security Appliance in front of
the network gateway
(the network firewall, for example).
2. Do not reconfigure the network firewall to use the IP address of
InterScan Gateway Security Appliance as its default gateway
address.
Deployment in either of the above ways prevents the appliance from working.
Page 57

Deployment Options
2-19
Assigning an IP Address
Assign an IP address in any of three ways:
• [Recommended] A DHCP server automatically assigns a dynamic IP address to
the appliance during deployment. This is the preferred method. Normally, there is
one DHCP server per subnet; however, you can use a DHCP relay agent to
support multiple subnets.
• Use a terminal communications program, such as HyperTerminal (for Windows)
or Minicom (for Linux) to access the appliance Preconfiguration console and
manually assign a dynamic or static IP address to the appliance during
preconfiguration.If you choose to use a static IP address, you will need to set the
netmask address, default gateway address, and primary DNS address.
• Using the LCD module, manually assign a dynamic or static IP address to the
appliance after you have mounted it on your network. If you choose to use a
static IP address, you will need to use the buttons on the LCD module to set the
netmask address, default gateway address, and primary DNS address. Y ou can
also designate a host name in this way.
Note: You may also be required to provide a secondary DNS server address. See
InterScan Gateway Security Appliance M-Series Deployment Guide for full
preconfiguration instructions.
Connecting to the Network
With a DHCP server , you can connect InterScan Gateway Security Appliance to your
network right out of the box without having to undergo a preconfiguration process.
Once connected, InterScan Gateway Security Appliance can handle various interface
speeds and duplex mode network traffic.
To connect the InterScan Gateway Security Appliance to your network:
1. Connect one end of the Ethernet cable to the INT port (right side) and the other
end to the segment of the network that InterScan Gateway Security Appliance
will protect (the Protected Network).
2. Connect one end of another Ethernet cable to the EXT port (left side) and the
other end to the part of the network that leads to the public network.
3. Using the power switch in the back of the appliance, power on the device.
Page 58

Trend Micro™ InterScan™ Gateway Security Appliance M-Series Administrator’s Guide
2-20
Note: To prevent accidental shutdown of the appliance, the appliance power switch has
been modified from the standard On/Off convention. To power on InterScan
Gateway Security Appliance, simply press the Power Switch upward from the 0 to
1 position. To power off InterScan Gateway Security Appliance, press the power
switch upward from 0 to 1 and hold it in that position for a minimum of five
seconds, until the appliance powers off.
Testing the Appliance Connectivity
Perform either of the following tasks to test whether you have successfully configured
the InterScan Gateway Security Appliance.
To test if the device is configured properly, do one of the following:
1. Ping the device to verify connectivity; you can obtain the IP address by looking
at the LCD panel on the front of the device.
2. Browse the InterScan Gateway Security Appliance Web interface by going to a
PC on the protected network and opening an Internet Explorer browser to
https://{The appliance IP Address}
Activating the Appliance
The Trend Micro sales team or sales representative provides the Registration Key.
Use the Registration Key to obtain a full version Activation Code.
To obtain the Activation Code:
1. Visit the Trend Micro Online Registration Web site.
(
https://olr.trendmicro.com/registration). The Online Registration
page of the Trend Micro Web site opens.
2. Perform one of the following:
• If you are an existing Trend Micro customer , log on using your logon ID and
password in the Returning, registered users section of the page.
• If you are a new customer, select your Region from the drop-down menu in
the Not Registered section of the page and click Continue.
3. On the Enter Registration Key page, type or copy the InterScan Gateway
Security Appliance Registration Key, and then click Continue.
Page 59

Deployment Options
2-21
4. On the Confirm License Terms page, read the license agreement and then click
I accept the terms of the license agreement.
5. On the Confirm Product Information page, click Continue Registration.
6. Fill out the online registration form, and then click Submit. Trend Micro will
send you a confirmation message that you need to acknowledge by clicking OK.
7. Click OK twice.
After the registration is complete, Trend Micro emails you an Activation Code,
which you can then use to activate InterScan Gateway Security Appliance.
A Registration Key has 22 characters (including the hyphens) and looks like this:
xx-xxxx-xxxx-xxxx-xxxx
An Activation Code has 37 characters (including the hyphens) and looks like this:
xx-xxxx-xxxxx-xxxxx-xxxxx-xxxxx-xxxxx
Page 60

Trend Micro™ InterScan™ Gateway Security Appliance M-Series Administrator’s Guide
2-22
Page 61

3-1
Chapter 3
How InterScan Gateway Security
Appliance Works
The chapter provides an overview of how the app liance protects your network from a
range of Internet-borne security risks.
The topics discussed in this chapter include:
• The Range and Typ e s of Internet Threats on page 3-2
• How InterScan Gateway Security Appliance Protects You on page 3-3
• The Primary Functional Components on page 3-4
Page 62

Trend Micro™ InterScan™ Gateway Security Appliance M-Series Administrator’s Guide
3-2
The Range and Types of Internet Threats
Over the years, as the Internet has developed, so too has the creation of a wide range
of Internet threats, collectively known as “malware.” There are thousands of known
viruses, and virus writers are creating more each day. In addition to viruses, new
threats designed to exploit vulnerabilities in corporate email systems and Web sites
continue to emerge. Typical types of malware include the following:
TABLE 3-1. Types of Internet threats
Threat Type Characteristics
Bot Bots are compressed executable files that are often designed to
harm computer systems and networks. Bots, once executed, can
replicate, compress, and distribute copies of themselves. Typical
uses of malicious bots are Denial-of-Service attacks, which can
overwhelm a Web site and make it unusable.
Pharming Similar in nature to email phishing, pharming seeks to obtain per-
sonal or private information (usually financially related) through
domain spoofing.
Phishing Phishing is the use of unsolicited email to request user verifica-
tion of private information, such as credit card or bank account
numbers, with the intent to commit fraud.
Spam Unsolicited, undesired bulk email messages that frequently use
various tricks to bypass email filtering.
Spyware Technology that aids in gathering information about a person or
organization.
Trojan Malware that performs unexpected or unauthorized—often mali-
cious—actions. Trojans cause damage and unexpected system
behavior and compromise system security, but unlike viruses,
they do not replicate.
Virus A program that carries a destructive payload and that replicates,
spreading quickly to infect other systems. Viruses remain one of
the most prevalent threats to computing.
Worm A self-contained program or set of programs that is able to
spread functional copies of itself or its segments to other computer systems, typically via network connections or email attachments.
Page 63

How InterScan Gateway Security Appliance Works
3-3
How InterScan Gateway Security Appliance
Protects You
InterScan Gateway Security Appliance is designed to protect you against these and
other Internet threats, utilizing software technologies that work in conjuncti on with
the appliance hardware to automate security , while allowing custom management and
targeted administration of device settings. The primary functional components in
InterScan Gateway Security Appliance include:
• Ethernet network interfaces
• Real-time scan of SMTP, POP3, HTTP, and FTP protocols
• Web console for management and administrat ion
• Security Services: Content Filtering, Anti-Spam, Antivirus, IntelliTrap,
Anti-Spyware, Anti-Phishing, Anti-Pharming, URL Filtering, File Blocking,
Outbreak Defense Services
• Virus Scan Module: True Type File ID, IntelliScan
• Support Functions: Mail Notification, Log, Quarantine, and Del ete
Page 64

Trend Micro™ InterScan™ Gateway Security Appliance M-Series Administrator’s Guide
3-4
The Primary Functional Components
FIGURE 3-1. InterScan Gateway Security Appliance Primary Functional
Components
Following is an explanation of each of the primary functional components of the
appliance along with the underlying processes that each component executes.
Ethernet Network Interfaces
InterScan Gateway Security Appliance is an inline device that provides bi-directional
support for 10MB, 100MB, and 1GB Ethernet networks through its multi-speed
Ethernet Network Interfaces. When InterScan Gateway Security Appliance is
attached to your local area network (LAN), its auto-sensing featu re au to mat ically
adjusts to the speed of your network.
Ethernet network
interfaces
Web console
Outbreak Defense
services
Mail
notification
Log
module
Delete
SMTP
POP3
HTTP
FTP
Content
Anti-spam
Antivirus*
* One per protocol
IntelliTrap
Anti-spyware
Anti-phishing
Anti-pharming
URL filtering
File blocking
filtering
Virus
scan
module**
** True Type file ID and IntelliScan
Web Reputation
Page 65

How InterScan Gateway Security Appliance Works
3-5
Real-Time Scan of SMTP, POP3, HTTP, and FTP Protocols
Three of the primary types of software tools in use on the Internet are email programs,
Web browsers, and file transfer programs, del ivered over SMTP/POP3, HTTP, and
FTP protocols respectively . Si nce these programs and protocols are the primary ways
that malware can get onto your networ k and computers, any security solution that
wishes to be comprehensive must address each protocol in turn. InterScan Gateway
Security Appliance meets this requirement and does so strategically—right at the
Internet gateway.
InterScan Gateway Security Appliance performs real-time scans of SMTP, POP3,
HTTP, and FTP protocols, providing protocol-specific protection whether you are
sending and receiving email, browsing the Web, or transferring files to and from FTP
sites. By conducting real-time scans of SMTP, POP3, HTTP, and FTP traffic right at
the gateway, InterScan Gateway Security Appliance halts malicious payloads before
they can enter your network.
The Web Console
Trend Micro provides easy administration and management of InterScan Gateway
Security Appliance through a Web console, accessible from any machine outfitted
with a compatible Web browser. Compatible browsers are:
• Microsoft Internet Explorer 6.x
• Mozilla Firefox 1.x
Using the Web console, you have easy access to all InterScan Gateway Security
Appliances on the network. The InterScan Gateway Security Appliance Web console
lets you configure the appliance, customize settings, and generally manage all your
security processes from one convenient interface, accessible anywhere on your local
area network (LAN)—or even remotely, from over the Internet, while providing
security from unauthorized users. See Accessing the Web Console on page 4-3 and
Navigating the Web Console on page 4-12 for more details.
Content Filtering
Objectionable content in email is a problem for both inbound and outbound mail.
Therefore, the content filter in InterScan Gateway Security Appliance provides a
means for the administrator to evalua te and control the delivery of email based on the
Page 66

Trend Micro™ InterScan™ Gateway Security Appliance M-Series Administrator’s Guide
3-6
message text itself. The content filter helps to monitor inbound and outbound messages to check for the existence of harassing, offensive, or otherwise objectionable
message content. Examples of what the content filter can identify include:
• Sexually harassing language
• Racist language
• Spam embedded in the body of an email message
The content filtering function in InterScan Gateway Security Appliance evaluates
inbound and outbound messages based on user-defined rules. Each rule contains a list
of keywords and phrases. Content filtering evaluates the message size, header and
body content, and attachment name. When c ontent filtering finds a word that matches
a keyword in one of the keyword lists it takes the action specified by the
administrator in the content filtering action screen. InterScan Gateway Security
Appliance can send notifications whenever it takes action in response to undesirable
content.
InterScan Gateway Security Appliance applies the content filtering rules to email in
the same order as displayed in the Content Filtering screen of the Web console. The
InterScan Gateway Security Appliance scans each email message. If a message
triggers one or more filtering violation s, InterScan Gateway Security Appliance takes
the action that the administrator has defined in the action section of the Content
Filtering screen.
Anti-Spam
Spam email is a mounting problem for businesses, consuming network, computer and
human resources by its sheer volume. To address this problem, the anti-spam function
in InterScan Gateway Security Appliance helps reduce the occurrence of spam email.
Trend Micro anti-spam, using a spam engine, Approved and Blocked Senders lists,
spam pattern file, and Email Reputation Services works in conjunction with the InterScan Gateway Security Appliance to scan for and filter spam.
If spam logging is enabled, InterScan Gateway Security Appliance writes spam
detections to the Anti-Spam: Content Scanning log or the Anti-Spam: Email
Reputation Services log. You can export the contents of the Anti-Spam logs for
inclusion in reports.
Page 67

How InterScan Gateway Security Appliance Works
3-7
InterScan Gateway Security Appliance uses the foll owing component s to filter email
messages for spam:
• Trend Micro Anti-Spam Engine
• Approved and Blocked senders lists
• Keyword Exceptions list
• The Email Reputation Services databases
InterScan Gateway Security Appliance applies the Anti-Spam filtering rules to email
messages in the following order: Approved Senders > Blocked Senders > Exception
Keywords.
Note: InterScan Gateway Security Appliance can quarantine messages in the user's spam
mail folder if the Exchange server has the End User Quarantine tool. When spam
messages arrive, the system quarantines them in this folder. End users can access
the spam folder to open, read, or delete suspect spam messages.
The Trend Micro Anti-Spam Engine
The anti-spam engine in InterScan Gateway Security Appliance uses spam patterns
and heuristic rules to filter email messages. It scans email messages and assigns a
spam score to each message based on how closely it matches the rules and patterns
from the pattern file. The Anti-Spam engine compares the spam score to the
user-defined spam detection level. When the spam score exceeds the detection level,
the Anti-Spam engine takes action against the message. The spam detection levels are
as follows:
• Low—this is most lenient level of spam detection. InterScan Gateway Security
Appliance will filter only the most obvious and common spam messages, but
there is a very low chance that it will filter false positives.
• Medium—this is the default setting. InterScan Gateway Security Appliance
monitors at a high level of spam detection with a moderate chance of filtering
false positives.
• High—this is the most rigorous level of spam detection. InterScan Gateway
Security Appliance monitors all email messages for suspicious files or text, but
there is greater chance of false positives.
Page 68

Trend Micro™ InterScan™ Gateway Security Appliance M-Series Administrator’s Guide
3-8
An administrator cannot modify the method that the anti-spam engine uses to assign
spam scores but can adjust the detection levels that the anti-spam engine uses to
decide which messages to treat as spam.
For example, spammers sometimes use numerous exclamation marks (!!!!) in their
email messages. When th e ant i-s pam e ngi ne de tect s a mes sa ge that uses exc la mat ion
marks this way, it increases the spam score for that email message.
Tip: In addition to using Anti-Spam to screen spam, you can configure content filterin g
to scan message headers, subject, body, and attachment information for spam and
other undesirable content.
Approved and Blocked Senders Lists
An Approved Senders list is a list of trusted email addresses. InterScan Gateway
Security Appliance will not classify messages arriving from these addresses as spam.
A Blocked Senders list is a list of suspect email addresses. InterScan Gateway
Security Appliance always categorizes email messages from blocked senders as
spam and takes the appropriate action.
The InterScan Gateway Security Appliance administrat or uses the Anti-Spam screen
to manage these lists. The administrator’s Approved Senders list and Blocked
Senders list control how InterScan Gateway Security Appliance handles email
messages bound for the end users.
Use the Web console to set up lists of Approv ed or Blocked Senders to control how
the appliance filters email messages.
InterScan Gateway Security Appliance does not classify addresses from the
Approved Senders list as spam unless it detects a phishing incident. If InterScan
Gateway Security Appliance detects a phishing incident in a message from an
Approved sender, it will classify the message as phishing and will take the action for
phishing.
InterScan Gateway Security Appliance filters addresses from Blocked Senders lists
and always classifies them as spam and takes the action set by the administrator.
Page 69

How InterScan Gateway Security Appliance Works
3-9
Note: Administrators set up Approved Senders and Blocked Sender s lists in InterScan
Gateway Security Appliance. End users can also set up Approved Senders lists
using End User Quarantine. If an end user approves a sender, but the sender is on
the administrator's Blocked Senders list, InterScan Gateway Security Appliance
will block messages from that sender and classify them as spam.
Wildcard Matching
InterScan Gateway Security Appliance supports wildcard matching for App ro ved
Senders and Blocked Senders lists. It uses the asterisk (*) as the wildcard character.
For more information, refer to the table below:
TABLE 3-2. Wildcard matching
Pattern Matched Samples Unmatched Samples
john@trend.com john@trend.com
john@trend.com
Any address different from
the pattern.
@trend.com
*@trend.com
john@trend.com
mary@trend.com
john@ms1.trend.com
john@trend.com.tw
trend.com john@ms1.trend.com
mary@ms1.rd.trend.com
mary@trend.com
john@trend.com.tw
mary@mytrend.com
*.trend.com john@ms1.trend.com
mary@ms1.rd.trend.com
joe@ms1.trend.com
john@trend.com
john@trend.com.tw
trend.com.* john@trend.com.tw
john@ms1.trend.com.tw
john@ms1.rd.trend.com.tw
mary@trend.com.tw
john@trend.com
john@ms1.trend.com
john@mytrend.com.tw
*.trend.com.* john@ms1.trend.com.tw
john@ms1.rd.trend.com.tw
mary@ms1.trend.com.tw
john@trend.com
john@ms1.trend.com
john@trend.com.tw
john@ms1.trend.com
*.*.*.trend.com
*****.trend.com
The same as “*.trend.com”
*trend.com
trend.com*
trend.*.com
@*.trend.com
All invalid.
Page 70

Trend Micro™ InterScan™ Gateway Security Appliance M-Series Administrator’s Guide
3-10
InterScan Gateway Security Appliance does not support wildcard matching on the
username part. However, if you type a pattern such as “*@trend.com”, InterScan
Gateway Security Appliance still treats it as “@trend.com”. This feature applies to
the user-defined Approved Senders and Blocked Senders.
Using the Keyword Exception List
Use the Keyword Exception list as a way to reduce the chances that the spam engine
and pattern file might classify legitimate email as spam.
Use the Web console to set up a list of keywords to control how InterScan Gateway
Security Appliance filters email messages.
InterScan Gateway Security Appliance scans the email message body. If the message
body contains a word from the Keyword Exception list, InterScan Gateway Security
Appliance classifies the message as legitimate email.
Using Email Reputation Services
Anti-Spam Email Reputation Services (ERS) is part of the InterScan Gateway Security Appliance anti-spam solution. If enabled, ERS can effectively block up to 80% of
spam at its source. ERS uses the Standard Reputation database (previously called the
Real-Time Blackhole List or RBL) and the Dynamic Reputation database (previously
called Quick IP List or QIL) to identify spam sources. ERS blocks spam at its source
by validating the IP address of the SMTP server sending the inbound mail to a list of
IP addresses in the Standard Reputation and Dynamic Reputation databases.
TABLE 3-3. Standard Reputation and Dynamic Reputation databases
ERS database Description
Standard Reputation
Standard Reputation is a database that contains the IP
addresses of SMTP servers that originate spam or that ERS
considers spam open-relay hosts. InterScan Gateway Security Appliance categorizes the IP addresses listed in the St andard Reputation database as permanent sources of spam.
Dynamic Reputation Dynamic Reputation is a database that contains the IP
addresses of SMTP servers that either originate spam or that
ERS considers spam open-relay hosts. InterScan Gateway
Security Appliance categorizes the IP addresses listed in the
Dynamic Reputation database as impermanent sources of
spam. The IP addresses in this list change frequently.
Page 71

How InterScan Gateway Security Appliance Works
3-11
Logging in to the Email Reputation Services Site
You can fine-tune ERS settings by logging in to the ERS site and making your
changes there.
To fine-tune Email Reputation Services:
1. Visit the following URL:
https://nrs.nssg.trendmicro.com
2. Log in to Email Reputation Services with your InterScan Gateway Security
Appliance Activation Code.
3. Follow the instructions in the ERS user interface to modify settings.
How Email Reputation Services Works
ERS blocks spam by comparing the IP address of an SMTP server to lists containing
the IP addresses of known spam distributors.
For example, Sam, in Seattle, sends an email message to John in Los Angeles. John's
SMTP server is behind an InterScan Gateway Security Appliance and ERS is enabled
with the Standard setting selected. When InterScan Gateway Security Appliance
receives the email message sent from Sam's SMTP server to John's SMTP server, it
first checks Server A's IP address against the Standard Reputation database. If Sam's
SMTP server IP address is not on the list, InterScan Gateway Security Appliance
sends the email to John's SMTP server. Ho wever , if Sam's SMTP server IP address is
on the list, InterScan Gateway Security Appliance takes the defined action.
If the administrator chose Advanced setting in the Email Reputati on Serv ices screen,
InterScan Gateway Security Appliance first checks the IP address of Sam's SMTP
server against the Standard Reputation database. If the SMTP server IP address is not
in the Standard Reputation database, InterScan Gateway Security Appliance then
queries the Dynamic Reputation database. If the SMTP server IP address is not in the
Dynamic Reputation database, InterScan Gateway Security Appliance forwards the
email to John's SMTP server. If the Dynamic Reputation database does have Sam's
SMTP IP address listed, InterScan Gateway Security Appliance takes the defined
action.
Page 72

Trend Micro™ InterScan™ Gateway Security Appliance M-Series Administrator’s Guide
3-12
FIGURE 3-2. How the Standard Reputation and Dynamic Reputation
databases work
Antivirus
Since viruses are still among the most numerous and serious threats on the Internet,
virus scanning is a critical and integral part of the set of security services in InterScan
Gateway Security Appliance. During a scan, the Trend Micro scan engine works
together with the virus pattern file to perform the first level of detection, using a process called pattern matching. Since each virus contains a unique “pattern” or string of
telltale characters that distinguish it from any other code, the virus experts at
TrendLabs capture inert snippets of this code in the pattern file. The engine then compares certain parts of each scanned file to the pattern in the virus pattern file, looking
for a match. When the scan engine detects a file containing a virus or other malware,
it executes an action such as clean, delete, or replace with text/file. You can customize
these actions when you set up your scanning tasks.
InterScan Gateway Security Appliance protects you from a wide range of viruses,
including:
• HTML viruses
• Macro viruses
• ActiveX malicious code
• COM and EXE file infectors
Sam’s
SMTP server
The appliance
John’s
SMTP server
Standard
Reputation
Database
Dynamic
Reputation
Database
Standard: The appliance
queries the Standard
Reputation database
only.
Advanced: The
appliance first queries
the Standard Reputation
database and then, if no
problem is detected,
queries the Dynamic
Reputation database.
Page 73

How InterScan Gateway Security Appliance Works
3-13
InterScan Gateway Security Appliance supports virus scanning for SMTP, POP3,
HTTP, and FTP protocols, as well as the following features:
• The ability to enable or disable scanning of certain protocols
• The ability to configure scanning for different file types
• Compressed file handling
• Scanning of incoming and outgoing traffic
• The ability to set actions to take when viruses or malware are detected
• The ability to send notifications
• Virus logging
IntelliTrap
Virus writers often attempt to circumvent virus filtering by using different file compression schemes. T o deal with this issue, InterScan Gateway Security Appliance us es
IntelliTrap, which detects malicious code such as bots in compressed files. IntelliTrap
provides heuristic evaluation of compressed files to help reduce the risk that a bot or
other malware compressed using these methods will enter the network through HTTP
downloads/uploads or email.
IntelliTrap uses the virus scan engine, IntelliTrap pattern, and exception pattern to
scan compressed files downloaded or uploaded via HTTP and incoming email
messages and attachments to identify bots and other malware applications.
When InterScan Gateway Security Appliance detects a bot or other malware
application, it takes action according to the action chosen by the administrator under
the Action tab. InterScan Gateway Security Appliance will then send a notification
email to all persons specified under the Notification tab.
Note: IntelliTrap uses the same scan engine as virus scanning. As a result, the file
handling and scanning rules for IntelliTrap will be the same as the ones the
administrator defines for virus scanning.
The InterScan Gateway Security Appliance writes bot and other malware detections
to the IntelliT rap log. You can export the contents of the IntelliTrap log for inclusion
in reports.
Page 74

Trend Micro™ InterScan™ Gateway Security Appliance M-Series Administrator’s Guide
3-14
IntelliTrap uses the following components when checking for bots and other
malicious programs:
• Trend Micro virus scan engine and pattern file
• IntelliTrap pattern and exception pattern
Anti-Spyware
Spyware/grayware often gets into a corporate network when users download legitimate software that has grayware applications included in the installation package.
Most software programs include an End User License Agreement (EULA), which the
user has to accept before downloading. Often the EULA does include information
about the application and its intended use to collect personal data; however, users
often overlook this information or do not understand the legal jargon.
The existence of spyware and other types of grayware on your network have the
potential to introduce the following:
• Reduced computer performance
• Increased Web browser-related crashes
• Reduced user efficiency
• Degradation of network bandwidth
• Loss of personal and corporate information
• Higher risk of legal liability
T o address these problems, the Anti-Spyware functio n in InterScan Gateway Security
Appliance helps protect LAN users from inadvertently downloading spyware and
grayware, which can collect personal and corporate information, reduce computer
performance, degrade network bandwidth, and more seriously, compromise the
security of the network.
Using the spyware scan engine, pattern file, and cleanup template, the Anti-Spyware
function in InterScan Gateway Security Appliance monitors inbound and outbound
SMTP, POP3, HTTP, and FTP traffic for spyware and grayware.
Page 75

How InterScan Gateway Security Appliance Works
3-15
When InterScan Gateway Security Appliance detects spyware or grayware in a
specific protocol, it will take the action that the administrator has defined for that
protocol. InterScan Gateway Security Appliance will then send a notification email
to all persons specified in the Notification section for the specific protocol.
InterScan Gateway Security Appliance writes spyware and grayware detections to
the anti-spyware/grayware log . You can export the contents of the spyware/ gra yware
log for inclusion in reports.
InterScan Gateway Security Appliance uses the following components when
scanning for spyware:
• Trend Micro Spyware scan engine and pattern file
• Spyware/Grayware Exclusion List
Anti-Phishing
Because the Internet fraud known as phishing has become an increasing problem on
the Internet, Trend Micro designed the anti-phishing function in InterScan Gateway
Security Appliance to protect LAN users from inadvertently giving away sensitive
information as part of a phishing attack. Anti-phishing monitors:
• Outbound client URL requests
• Email messages that contain links to phishing sites.
InterScan Gateway Security Appliance writes phishing events to the phishing log.
You can export the log for inclusion in reports.
InterScan Gateway Security Appliance uses the following components to check for
phishing:
• Trend Micro Anti-Spam Engine
• URL rating database
Because the incidence of phishing fraud is growing rapidly and the format continues
to evolve, it is especially important to keep the spam pattern file up to date. Trend
Micro recommends that you schedule frequent updates and set email notifications to
let you know the status of scheduled updates. Check the version of the spam pattern
file you are running and time of last update on the Summary screen.
Page 76

Trend Micro™ InterScan™ Gateway Security Appliance M-Series Administrator’s Guide
3-16
From the main InterScan Gateway Security Appliance menu, click Update >
Schedule and then choose an update frequency. Trend Micro recommends having
InterScan Gateway Security Appliance check for updates at least once a day.
Anti-Pharming
As noted in the introduction to this chapter , the fraud known as pharming has become
an increasingly treacherous way to commit identity theft on the Internet. Therefore,
Trend Micro has designed the anti-pharming feature to protect LAN users from inadvertently giving away sensitive information as part of a pharming event.
The anti-pharming function in InterScan Gateway Security Appliance monitors
outbound client URL requests and compares them to a list of known pharming sites.
If the URL of the requested site matches any of the URLs on the list, InterScan
Gateway Security Appliance takes the action defined in the Action section of the
HTTP Anti-Pharming screen. If enabled, InterScan Gateway Security Appliance
sends a notification email to the administrator. A notification message also appears
on the user's browser explaining that InterScan Gateway Security Appliance has
blocked access to the site for security reasons.
InterScan Gateway Security Appliance writes pharming even ts to the Anti -Pharming
log. You can export the contents of the log for inclusion in reports.
InterScan Gateway Security Appliance uses a URL rating database to check for
pharming.
URL Filtering
Many companies have corporate policies that prohibit access to certain kinds of Web
sites that the company considers offensive or in violation of company ethics. Trend
Micro has designed the URL filtering function to prevent users from accessing such
sites. URL filtering filters access to Web sites based on administrator -defined settings.
When a user requests access to a URL, InterScan Gateway Security Appliance
checks the URL against the Trend Micro URL rating database. After the URL
database returns a rating, InterScan Gateway Security Appliance checks the URL
against the administrator-defined allowable categories. If the rating returned by the
URL rating database matches one of the predefined categories set by the
administrator, InterScan Gateway Security Appliance denies access to the Web site.
Page 77

How InterScan Gateway Security Appliance Works
3-17
When InterScan Gateway Security Appliance denies acc ess to a Web site, it sends a
notification message to the user's browser informing them that it h as denied access to
the site based on company policy. InterScan Gateway Security Appliance also sends
a notification to the administrator, if he or she has enabled that feature, whenever a
user requests access to a prohibited site.
Note: If the rating server does not return a rating result in time, the default action is to
allow access to the URL.
Unless the administrator has disabled this feature in the Log Settings screen,
InterScan Gateway Security Appliance logs requests to access prohibited sites to the
URL filtering log. You can export the contents of the log for inclusion in reports.
The URL filtering function in InterScan Gateway Security Appliance uses the
following components when checking a URL:
• Trend Micro URL rating database
• Category filter list
• Blocked and Approved URL lists
InterScan Gateway Security Appliance applies the URL filtering rules according to
the order shown in the URL Filtering > Target screen.
File Blocking
One of the ways that malware can arrive on your desktop or net wo rk is through files
that an HTTP server has sent by streaming or downloading them when a client computer accesses a Web site or an FTP site (FTP over HTTP). It is important to protect
your network from this security risk. InterScan Gateway Security Appliance can scan
for and block certain file types that originate from HTTP and FTP servers, thereby
protecting your network and computers. The appliance can block both predefined and
administrator-specified file types.
File Blocking checks the file type (true file type and file extensions) of both inbound
and outbound HTTP and FTP files. The File Blocking feature blocks files according
to the settings defined by the administrator in the File Blocking screen of the Web
console.
Page 78

Trend Micro™ InterScan™ Gateway Security Appliance M-Series Administrator’s Guide
3-18
The predefined list of file types that the appliance can block includes:
• Audio/Video
• Compressed
• Executable
•Java
• Microsoft documents
Note: See “Appendix C: File Blocking - File Formats” for a complete listing of files that
can be blocked by InterScan Gateway Security Appliance.
When InterScan Gateway Security Appliance blocks a file, a notification message
will appear on the user's browser informing them that InterScan Gateway Security
Appliance has blocked the file. InterScan Gateway Security Appliance will send a
notification to the administrator, if enabled, whenever it blocks a file.
When InterScan Gateway Security Appliance blocks a file, it will write the incident
to the File blocking log. You can export the File blocking log for inclusion in reports.
True File Type and IntelliScan
V irus originators can easily rename a file to disg uise its actual type. Pr ograms such as
Microsoft Word are “extension independent”; that is, they recognize and open “their”
documents regardless of the fi le name. This security hole poses a danger , for example,
if a Word document containing a macro virus has a name such as
benefits_form.pdf. Word opens the file, but InterScan Gateway Security
Appliance may not have scanned it if the appliance is not checking the true file type.
Rather than relying on the file name alone to decide if it sho uld scan a file, Int erScan
Gateway Security Appliance uses IntelliScan to identify a file's true type.
True file-type detection—IntelliScan first examines the header of the file using true
file-type identification and checks if the file is an executable, compressed, or other
type of file that may be a threat. IntelliScan examines all files to be sure that the file
has not been renamed—the extension must conform to the file's internally registered
data type.
Page 79

How InterScan Gateway Security Appliance Works
3-19
File extension checking—IntelliScan also uses extension checking, that is, the file
name itself. The list of extension names to scan for is updated with each new pattern
file. For example, when there is a new vulnerability discovered with regard to ".jpg"
files, the ".jpg" extension is immediately added to the extension-checking list for the
next pattern update.
Only files of the type that are capable of being infected are scanned. For example,
.gif files make up a large volume of all Web traffic, but they are not currently able to
carry viruses and therefore do not need to be scanned. Similarly, .jpg files are not
currently utilized to carry viruses, though there is some concern this may change in
the future—which means, IntelliScan would be changed to also scan for this threat.
As of the date of publication of this gu ide, howev er, with true file type selected, once
the true type has been determined, these inert file types are not scanned.
Outbreak Defense Services
A virus outbreak can occur on the Internet and spread rapidly. Outbreak Defense is a
combination of services designed to protect networks in the event of an outbreak and
to repair clients' computers that have been exposed to viruses or malware.
Outbreak Defense uses the following components to protect networks from outbreaks
and clean clients exposed to viruses or malware:
• Outbreak Prevention Services and Outbreak Prevention Policy
• Damage Cleanup Services and Damage Cleanup Tool
Outbreak Prevention Services and Outbreak Prevention Policy
Outbreak Prevention Services protects networks by deploying an Outbreak Prevention Policy.
When TrendLabs receives information that a new outbreak is developing anywhere
in the world, it quickly develops a response to it called an Outbreak Prevention
Policy. Trend Micro ActiveUpdate servers then deploy the Outbreak Prevention
Policy to InterScan Gateway Security Appliance. The Outbreak Prevention Policy
remains in effect for the administrator-specified amount of time or until TrendLabs
develops a complete solution to the threat.
Page 80

Trend Micro™ InterScan™ Gateway Security Appliance M-Series Administrator’s Guide
3-20
The Outbreak Prevention Policy contains a list of actions for the appliance to take to
reduce the likelihood that the network that it is protecting will become infected. For
example, if the threat’s main method of delivery is by email or FTP, the appliance
blocks all incoming mail or blocks ports typically used by FTP.
During an outbreak, InterScan Gateway Security Appliance enacts the instructions
contained in the Outbreak Prevention Policy. The Trend Micro Outbreak Prevention
Policy is a set of recommended default security configurations and sett ings designed
by TrendLabs to give optimal protection to your computers and network during
outbreak conditions. InterScan Gateway Security Appliance downloads the Outbreak
Prevention Policy from a Trend Micro ActiveUpdate server.
Damage Cleanup Services and Damage Cleanup Tool
Trend Micro Damage Cleanup Services (DCS) is a comprehensive service that helps
assess and cleanup system damage without the need to install software on client computers. DCS helps restore your Windows system after a virus outbreak. Damage
Cleanup Services can do the following:
• Removes unwanted registry ent ries created by worms or Trojans
• Removes memory-resident worms or Trojans
• Removes active spyware/grayware
• Removes garbage and viral files dropped by viruses
• Assesses a system to decide whether it is infected or not
• Returns the system to an active and clean state
Two versions of DCS are available at no charge, one for Trend Micro customers, and
one for the general public.
You can download Damage Cleanup Services from the following Web site:
http://www.trendmicro.com/download/product.asp?productid=48
Damage Cleanup Services uses the following components to clean clients that have
been exposed to viruses, malware, and spyware:
• Damage cleanup engine and template
• Spyware scan engine
• Manual Damage Cleanup tool
Page 81

How InterScan Gateway Security Appliance Works
3-21
Email Notification
Users and administrators need feedback when InterScan Gateway Security Appliance
intervenes to stop viruses, spyware, phishing attempts, access to blocked URLs, and
so on. To that end, InterScan Gateway Security Appliance can send email notifications about any action that it takes on SMTP, POP3, HTTP, and FTP traffic. The
appliance can insert inline notification stamps into all scanned message before sending them, and senders, recipients, and administrators can receive standard or customized messages when the appliance performs a particular action. The appliance can
also notify TrendLabs of potential threats—for example, a phishing URL—thereby
enabling Trend Micro to verify the accuracy of the potential threat, classify it within
the TrendLabs databases, and if need be, take systematic action against the threat.
Logs
Administrators need a way to monitor scanning and detection activity of the appliance
over time. Monitoring these activities provides a historical view and enables you to
analyze those settings that you may need to modify to optimize security. InterScan
Gateway Security Appliance assists the administrator in these tasks by tracking all
scanning and detection activity that it performs and writing this information to various logs. A log query feature allows you to create reports that show detection activity
for the different protocols for the various types of scanning tasks that InterScan Gateway Security Appliance performs. A log maintenance feature allows you to perform
log maintenance either manually or according to a schedule. You can also view the
event log.
Quarantine
Sometimes the best strategy for dealing with malware that arrives through
email—messages that contain viruses, spyware, or bots—is to quarantine the message
and its enclosures for further examination. The InterScan Gateway Security Appliance allows you to quarantine messages, files, or enclosed objects suspected of being
malicious in a quarantine folder. The appliance can also quarantine email that has
triggered the content filtering rules.
InterScan Gateway Security Appliance allows you to query the quarantine folder by
time, sender, recipient, and subject. You can also perform basic maintenance on the
quarantine folder such as manually deleting email messages or setting a schedule to
delete email messages; and you can export a query of a set of quarantined files.
Page 82

Trend Micro™ InterScan™ Gateway Security Appliance M-Series Administrator’s Guide
3-22
Page 83

4-1
Chapter 4
Getting Started with InterScan
Gateway Security Appliance
This chapter describes how to access InterScan Gateway Security Appliances from
the Web console, view system information, deploy system components, and modify
device settings.
The topics discussed in this chapter include:
• Preliminary Tasks on page 4-2
• Accessing the Web Console on page 4-3
• The Summary Screen on page 4-4
• Navigating the Web Console on page 4-12
• The Online Help System on page 4-14
Page 84

Trend Micro™ InterScan™ Gateway Security Appliance M-Series Administrator’s Guide
4-2
Preliminary Tasks
The InterScan Gateway Security Appliance is designed to provide good default protection from the moment you install it on your network. After installation, however,
you should perform a number of tasks to ensure that everything is set up and working
optimally and that you are making full use of its many features. Following is a list of
preliminary tasks that you can perform using the appliance Web console and the chapters in which you can find descriptions of those functions and settings:
TABLE 4-1. Preliminary tasks
Preliminary Task See Chapter
Change the default admin password to ensure appliance security Ch. 13
Schedule default email notifications Ch. 13
Set up SMTP notifications Ch. 5
Update the virus pattern, URL Filtering, and scan engine file Ch. 11
Schedule automatic pattern and engine updates Ch. 11
Configure HTTP scanning policies Ch. 6
Set up Access Control (for remote access) Ch. 13
Create URL Filtering policies and test Ch. 6
Configure anti-phishing settings and any specific URL sites to block Ch. 5, Ch. 6, Ch. 8
URL Blocking (local list) Ch. 6
URL Blocking (anti-phishing) Ch. 6
Create FTP scanning policies for inbound and outbound traffic Ch. 7
Obtain EICAR test file to confirm your installation is working properly Ch. 14
Page 85

Getting Started with InterScan Gateway Security Appliance
4-3
Accessing the Web Console
Trend Micro has provided easy access to InterScan Gateway Security Appliance
through a W eb console, which is access ible from any machine with a compatible Web
browser.
To access InterScan Gateway Security Appliances:
1. Open a compatible Web browser.
2. In the address field, type the URL (https://URL or IP Address) of the target
InterScan Gateway Security Appliance Web console. For example, type
https://192.168.1.34
. The Web console Log On screen displays.
FIGURE 4-1. Web Console Log On Screen
3. Type the default password admin in the Password field and click Log On. The
Summary screen displays.
Page 86

Trend Micro™ InterScan™ Gateway Security Appliance M-Series Administrator’s Guide
4-4
Note: Once you access the Web console, you have continual access to the InterScan
Gateway Security Appliance as long as you are making changes. If there is no
activity, the appliance automatically logs you out after 20 minutes to maintain
security. To re-access the Web console, simply log on again. To manually log out,
click the Logout link to the left of the Help menu.
The Summary Screen
The Summary screen is designed to provide all the information you need at-a-glance
to easily monitor the status of your InterScan Gateway Security Appliance (the appliance). The Summary screen automatically displa ys information about the appliance
even before you activate the product.
Tip: Action Summaries in the Summary screen panels provide statistics for Today, the
Last 7 days, and the Last 30 days, along with totals for all items scanned.
Information Above the Panels
Below the screen title, the first piece of information shown is the license status. If the
InterScan Gateway Security Appliance license is current, a green arrow displays,
along with the words, "The InterScan Gateway Security Appliance is valid." If the
appliance license is not current, a red arrow displays, along with information about
how to register (or renew) the license.
Above the first panel, at the top right is a time/date stamp (Last update) showing
when the Summary screen was last updated. This time is taken directly from the
InterScan Gateway Security Appliance itself when the Web page loads. The
administrator can use this time to tell if the appliance is correctly synchronized with
an NTP (Network Time Protocol) server and is using the correct time zone setting.
The administrator can adjust the time on the appliance from the Web console. (See
System Time on page 13-28 for more information.)
Scroll down the Summary screen to view the list of panels.
Page 87

Getting Started with InterScan Gateway Security Appliance
4-5
Outbreak Prevention Service
FIGURE 4-2. Summary Screen – Top Part
Outbreak Prevention Service displays information about the status of Outbreak
Prevention Services (OPS) on your network and about the current threat that OPS is
protecting against. Displayed are Status, Risk, Threat, and Description:
To get more information about the status of Outbreak Prevention Service, click
Outbreak Defense > Current Status in the Main Navigation Menu.
Damage Cleanup Service
Damage Cleanup Service displays a total of all infected components and a summary
of infected and cleaned computers.
Component Version
View component version information or manually update component s from this section.
Page 88

Trend Micro™ InterScan™ Gateway Security Appliance M-Series Administrator’s Guide
4-6
To perform a manual update:
1. Select all of the components to update and then click the Manual Update link.
The Manual Update > Update in Progress indicator appears.
FIGURE 4-3. Update in Progress
When the Update in Progress indicator has finished, the Manual Update >
Select Components to Update screen appears, with its update recommendations
pre-selected.
Page 89

Getting Started with InterScan Gateway Security Appliance
4-7
FIGURE 4-4. Manual Update > Select Components to Update
2. Click Update to update the appliance. The Update in Progress indicator
reappears while the appliance updates.
3. [Optional] Click Rollback to roll back the appliance to the last update.
Note: Rollback allows an administrator to roll InterScan Gateway Security Appliance
back to the last Update. Multiple rollbacks are not supported.
Page 90

Trend Micro™ InterScan™ Gateway Security Appliance M-Series Administrator’s Guide
4-8
Antivirus
FIGURE 4-5. Summary Screen – Second Three Panels
Antivirus provides virus/malware detection (including IntelliTrap) statistics from
SMTP/POP3/HTTP/FTP tra ffic, in cl uding:
• Infected files cleaned
• Infected files quarantined
• Infected files deleted or blocked
• Infected files removed
• Infected files passed
• Total files scanned
Anti-Spyware
Anti-Spyware provides spyware/grayware detection statistics from
SMTP/POP3/HTTP/FTP traffic, including:
• Spyware/grayware deleted or blocked
• Spyware/grayware quarantined
Page 91

Getting Started with InterScan Gateway Security Appliance
4-9
• Spyware/grayware removed
• Spyware/grayware passed
• Total files scanned
IntelliTrap
IntelliTrap detects malicious code such as bots in compressed files. IntelliTrap provides detection statistics from SMTP/POP3 traffic, including:
• Infected files deleted or blocked
• Infected files quarantined
• Infected files removed
• Infected files passed
• Total files scanned
Anti-Spam: Content Scanning
FIGURE 4-6. Summary Screen – Last Four Panels
Page 92

Trend Micro™ InterScan™ Gateway Security Appliance M-Series Administrator’s Guide
4-10
Anti-Spam: Content Scanning provides spam detection statistics from SMTP/POP3
traffic, including:
• Spam messages deleted
• Spam messages quarantined
• Spam messages tagged
• Total messages received
Anti-Spam: Email Reputation Services
Anti-Spam: Email Reputation Services provides statistics for HTTP traffic, including:
• IP addresses filtered
• Total IP addresses scanned
Web Reputation: SMTP/POP3
Web Reputation for SMTP/POP3 evaluates the potential security risk of URLs
embedded in email messages. Web Reputation for SMTP/POP3 provides statistics for
malicious URLs that the appliance detected in email messages, including:
• Malicious messages deleted
• Malicious messages tagged
• Total number of messages received
Web Reputation: HTTP
Web Reputation for HTTP evaluates the potential security risk of any requested URL
by querying the Trend Micro Web security database. Web Reputation for HTTP provides statistics for URLs that have been filtered, including:
• URLs filtered by URL filtering
• URLs filtered by Web Reputation
• URLs filtered by global blocked URL list
• Total number of URLs filtered
Page 93

Getting Started with InterScan Gateway Security Appliance
4-11
Others
The Others section provides statistics for detected phishing mail, pharming URLs,
content filtering, and file blocking, including:
• Pharming incidents detected
• Phishing incidents detected
• Number of times that the appliance filtered content and detected information that
met the SMTP and POP3 content filtering criteria
• Number of files blocked based on the HTTP and FTP file blocking criteria
Additional Screen Actions
• Click the up and down arrows to expand or collapse different sections of
summary information.
•Click Back or the Summary link at the top of the screen to return to the Summary
screen.
•Click Reset All Counters in the upper left corner of the six scanning panels to
reset their counters
Page 94

Trend Micro™ InterScan™ Gateway Security Appliance M-Series Administrator’s Guide
4-12
Navigating the Web Console
Click SMTP > Scanning > Incoming in the navigation menu to display the sample
screen below. The Target tab appears.
FIGURE 4-7. SMTP > Scanning (Incoming) > Target – Sample Screen
Active menu item
Tabs
Logout link Online Help
Navigation menu
Working area
Page 95

Getting Started with InterScan Gateway Security Appliance
4-13
The Web console is designed for easy navigation, providing
• A navigation menu on the left with menu and submenu items that provide access
to Settings screens. T o access a menu item in the navigation menu, click the name
of that item. When you position your cursor over a clickable item, the item turns
red.
• A working area on the right with settings screens, often with Target, Action, and
Notification tabs that you can click to access additional screens. Separate panels
in the screens organize the settings according to functions.
• An online Help system with a drop-down menu, which provides online help
organized according to topic. You can also get context-sensitive help at any time
by clicking for that menu item or settings screen.
• A Logout link, which you can click to manually log out of the InterScan Gateway
Security Appliance Web console.
Note: Informational pop-ups in Web console screens, indicated by the icon, provide
context-sensitive information about key features of InterScan Gateway Security
Appliance.
Page 96

Trend Micro™ InterScan™ Gateway Security Appliance M-Series Administrator’s Guide
4-14
The Online Help System
The InterScan Gateway Security Appliance online help system consists three major
kinds of help, listed here from the specific to the general:
• Field-specific “embedded help”
• Screen-level, context-sensitive help
• Broader , console-based help, organized in a table of contents
Embedded Help
Embedded help appears in several forms. One form is the “Tooltip,” a yellow icon
that displays relevant explanatory material when you mouse-over it, as shown in figure 4-8, below.
FIGURE 4-8. Sample ToolTip mouseover embedded help
Other embedded help appears under, above, or inside text entry fields, in pop-up
windows linked from the user interface, and in explanatory text at the beginning of
many sections of the user interface.
Screen-Level Context-Sensitive Help
Context-sensitive help for most screens is available by clicking the blue Help icon at
the top right of the screen ( ).
Page 97

Getting Started with InterScan Gateway Security Appliance
4-15
Console-Based Help
Console-based help includes both screen-level help entries and other, more conceptual information organized in a left-side table of contents. Access this Help system
from the Help drop-down menu on the right side of the Web console the title bar, as
illustrated in figure 4-9, below.
FIGURE 4-9. Online Help Menu – Contents and Index
To use the online Help system:
1. Select Contents and Index from the Help drop-down menu (figure 4-9). The
InterScan Gateway Security Appliance Online Help system displays.
FIGURE 4-10. Online Help System
2. Click items in the Help system menu on the left for information about using the
appliance Web console to configure settings in the appliance.
Page 98

Trend Micro™ InterScan™ Gateway Security Appliance M-Series Administrator’s Guide
4-16
FIGURE 4-11. Online Help – Configuration Screen
3. Click MORE>> to display additional text on any page for more details about that
item.
Page 99

Getting Started with InterScan Gateway Security Appliance
4-17
FIGURE 4-12. Online Help – MORE> Screen
4. Back in the Web console, click in any Web console screen to open online
context-sensitive Help for that screen. The appliance online Help system displays
a Help page for that context.
5. Select other menu items in the online Help drop-down menu to obtain
information from the Trend Micro Knowledge Base, to obtain Security
Information (for example, current Security Advisories), to contact Sales and
Support, or to obtain version, build, and copyright information.
Page 100

Trend Micro™ InterScan™ Gateway Security Appliance M-Series Administrator’s Guide
4-18
 Loading...