

Page 1

Home Network
Security Services
Version 1.1
Page 2

Trend Micro Incorporated reserves the right to make changes to this document and to the
products described herein without notice. The Trend Micro
™ Home Network Security Services
User’s Guide introduces the main features of the software and provides installation
instructions. Trend Micro recommends reading this guide in its entirety prior to installing or
using the software.
NOTE: A license to Trend Micro Software usually includes the right to product updates,
pattern file updates, and basic technical support for one (1) year from the date of purchase
only. After the first year, Maintenance must be renewed on an annual basis at Trend Micro’s
then-current Maintenance fees.
Trend Micro, the Trend Micro t-ball logo, and TrendLabs are trademarks or registered
trademarks of Trend Micro, Incorporated. All other product or company names may be
trademarks or registered trademarks of their owners.
Copyright© 2005 Trend Micro Incorporated. All rights reserved. No part of this publication
may be reproduced, photocopied, stored in a retrieval system, or transmitted without the
express prior written consent of Trend Micro Incorporated.
Document Part No.: THEM12189/50121
Release Date: July 2005
Protected by U.S. Patent No. 5,951,698
Page 3

Chapter 7
Contents
Chapter 1: Trend Micro Home Network Security Services: Overview
Trend Micro dashboard ...................................................................... 1-1
Trend Micro Internet Security ............................................................ 1-1
Router-based Parental Controls ......................................................... 1-2
System Requirements ......................................................................... 1-2
Chapter 2: Installing Home Network Security
Installing the Trend Micro Dashboard ............................................... 2-1
Installing the dashboard: troubleshooting ............................................ 2-2
Activating Your Free Services ........................................................... 2-4
Registering a Trend Micro customer account ....................................... 2-4
Installing Trend Micro Internet Security .............................................. 2-8
Registering Trend Micro Internet Security ......................................... 2-10
Configuring Router-Based Parental Controls .................................. 2-12
Chapter 3: Renewing Your Services
Chapter 4: Using the Trend Micro Dashboard
Starting the Dashboard ....................................................................... 4-1
Using the Service Summary Screen ................................................... 4-1
Renew your services ......................................................................... 4-2
Download Trend Micro Internet Security ............................................ 4-2
Log in to the router setup screen ......................................................... 4-2
Access your Trend Micro customer account ........................................ 4-3
Scan your computer for viruses .......................................................... 4-3
Get technical support ......................................................................... 4-3
Get antivirus and computer security information .................................. 4-3
Change your user account ................................................................... 4-4
Using Security Scan and Anti-Spyware ............................................. 4-5
Generating a Security Scan report and removing spyware ..................... 4-5
Generating a network-wide security report .......................................... 4-7
Vulnerabilities and corrective actions................................................... 4-8
Risk assessment criteria ................................................................... 4-10
Using the Parental Controls screen ................................................... 4-11
Page 4

Chapter 5: Using Parental Controls
Parental Controls: General Mode .......................................................5-2
Parental Controls: Per-User Mode ......................................................5-2
Content Blocking Categories ..............................................................5-3
Chapter 6: Getting Support
Help with Home Network Security Services ......................................6-1
Help with Trend Micro Internet Security ...........................................6-2
Page 5

1-1
Chapter 1
Trend Micro™ Home Network Security
Services: Overview
Trend Micro, in cooperation with leading router manufacturers, has designed the first
complete security solution for home networks. Trend Micro Home Network Security has three
components: the Trend Micro dashboard, Trend Micro Internet Security, and router-based
Parental Controls.
Trend Micro dashboard
After you activate your services, the dashboard is free for unlimited use. From the dashboard,
you can:
• Scan your computer and entire network for security vulnerabilities
• View individual computer and network-wide security reports
• Detect and remove spyware
• View attempts to access Web content restricted by Parental Controls
• Purchase subscriptions for Parental Controls and Trend Micro Internet Security
Trend Micro Internet Security
You can install Trend Micro Internet Security on up to ten computers and try it free for 60
days. This award-winning program has powerful features including:
• Real-time and scheduled scanning to detect and remove viruses, spyware, Trojans, and
other Internet threats
• Personal firewall
• Network intruder detection
•Anti-spam
Page 6

Trend Micro™ Home Network Security Services: Overview
1-2
Router-based Parental Controls
Parental Controls help prevent home network users from accessing inappropriate Web content.
This service is free for 60 days. When you register your free trial of Trend Micro Internet
Security, your Parental Controls 60-day trial is extended to one year.
System Requirements
Following are the minimum hardware and software requirements for running Trend Micro
Home Network Security Services:
•Intel
TM
PentiumTM 233MHz or equivalent processor
• 64MB of RAM
• 256MB of available hard disk space
• A broadband Internet connection
• A router from a Trend Micro certified partner
• Microsoft
TM
WindowsTM 98
• Microsoft Internet Explorer version 5.5
Note: The Trend Micro dashboard requires Microsoft Internet Explorer version 5.5 or later. If you
are using a non-Microsoft browser or an earlier version of Internet Explorer, please install
Internet Explorer 5.5 or later before continuing.
Page 7

2-1
Chapter 2
Installing Home Network Security
This chapter has the following sections:
• Installing the Trend Micro Dashboard on page 2-1
• Activating Your Free Services on page 2-4
• Configuring Router-Based Parental Controls on page 2-12
Note: Before installing Home Network Security, remove any existing antivirus and Internet security
programs. Running multiple antivirus and security programs will slow your system down.
Installing the Trend Micro Dashboard
To install the dashboard:
1. Make sure your computer is connected to the router and your Internet connection is
working. Open an Internet Explorer browser window. In the address bar, type:
http://tmss.trendmicro.com/dashboard
2. A screen picturing your router appears. Click Continue. The ActiveX
TM
download screen
appears.
3. If a security warning message box opens, click Install or Ye s to continue. In Windows XP,
a yellow information bar may appear at the top of the screen. To continue, click the yellow
bar and then click Install ActiveX control.
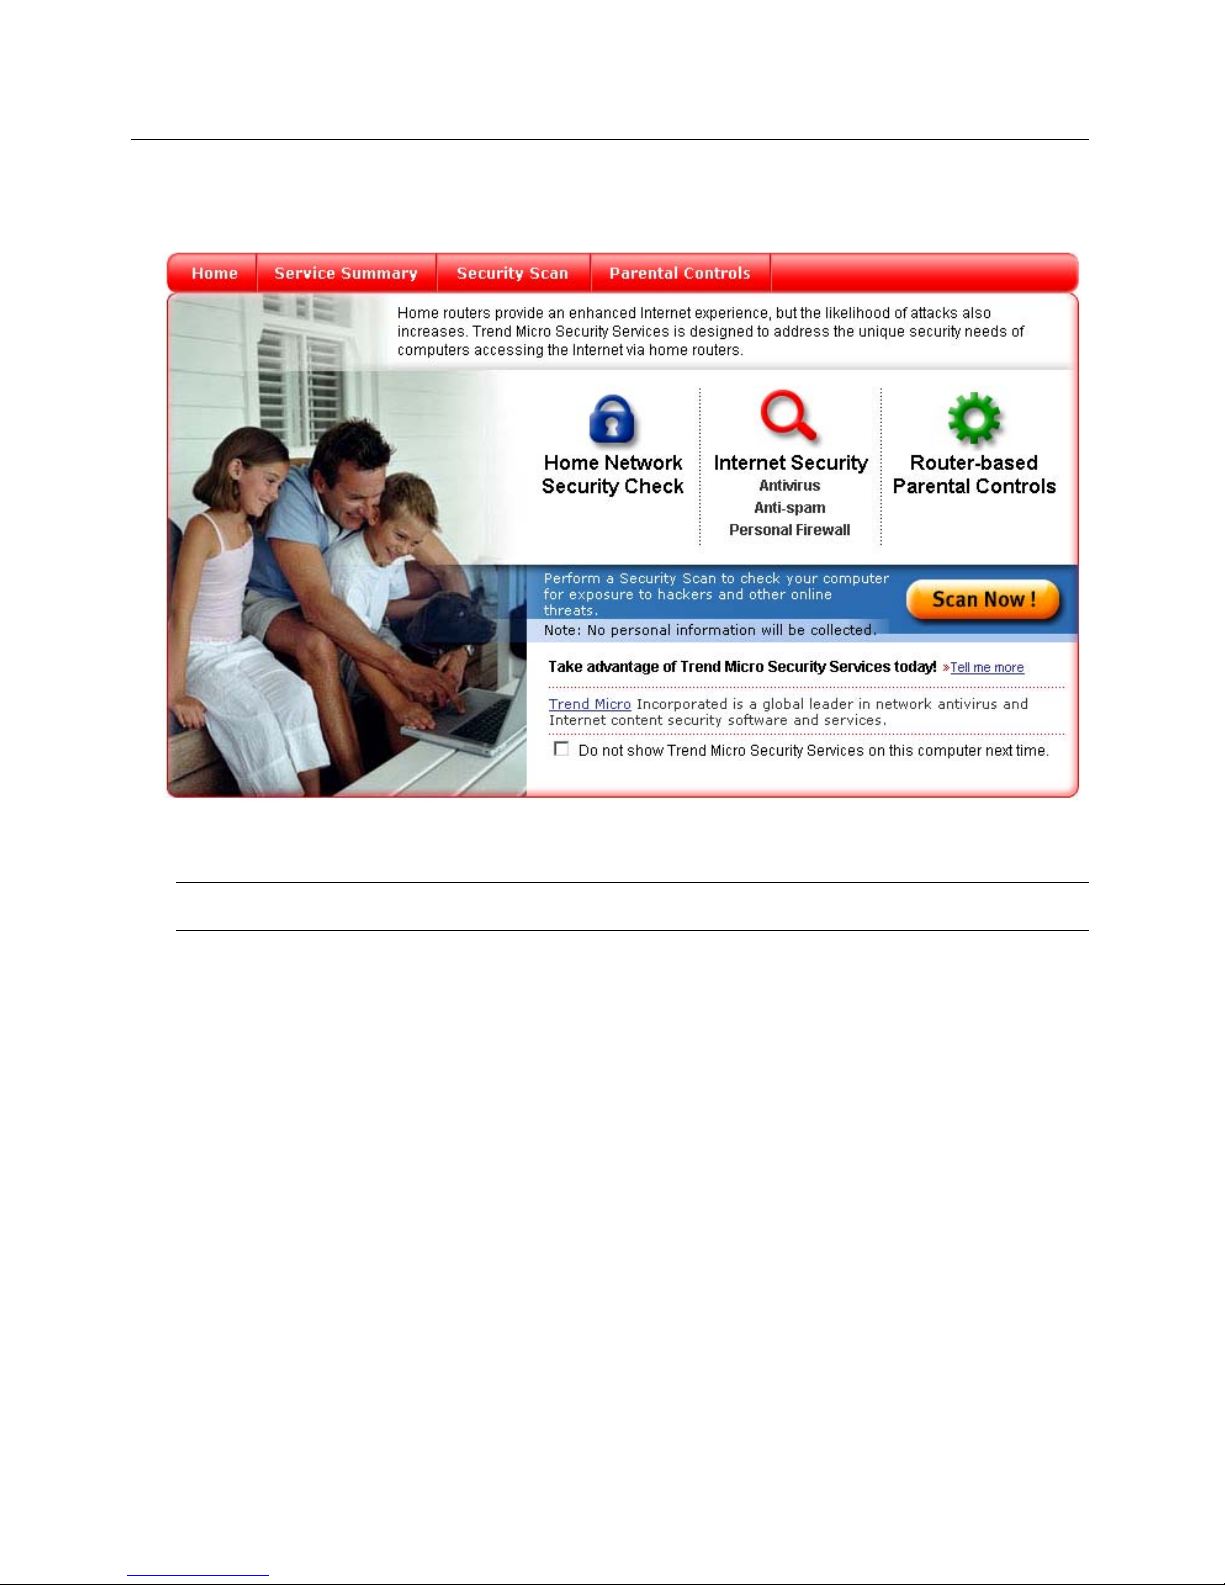
After a few seconds, the Trend Micro dashboard appears. Figure 2-1 shows the dashboard’s
Home screen.
Page 8
Installing Home Network Security
2-2
FIGURE 2-1. The Trend Micro dashboard Home screen
Note: To protect your entire network, install the dashboard on all of your computers.
Installing the dashboard: troubleshooting
Installing the dashboard requires downloading the Trend Micro ActiveX control. If you are
unable to download the ActiveX control, please check your Internet Explorer security settings.
The Trend Micro ActiveX control is a "signed" ActiveX control, meaning it has a digital
signature authenticating Trend Micro as the author. Your Internet Explorer default security
settings permit the downloading of signed ActiveX downloads.
To restore your Internet Explorer default security settings:
1. On the Internet Explorer Tools menu, click Internet Options. The Internet Options box
opens.
2. Click the Security tab, and then click Custom Level. The Security Settings box opens.
Page 9

Installing Home Network Security
2-3
3. Choose the following settings:
4. Click OK to close the Security Settings box. Click OK again to close the Internet Options
box.
To install the dashboard after restoring your default security settings, type the following URL
in the browser’s address bar:
http://tmss.trendmicro.com/dashboard
A screen picturing your router appears. Click Continue. The ActiveX download screen
appears.
If a security warning message box opens, click Install or Ye s to continue. In Windows XP, a
yellow information bar may appear at the top of the screen. Click the yellow bar, and then
click Install ActiveX control.
After a few seconds, the Trend Micro dashboard will appear.
Setting Choose
Download signed ActiveX controls Prompt
Script ActiveX control marked safe for scripting Enable
Run ActiveX controls and plug-ins Enable
Java permissions High safety
Active scripting Enable
Scripting of Java applets Enable
Page 10

Installing Home Network Security
2-4
Activating Your Free Services
Before you activate your services:
• the dashboard's Security Scan and Anti-Spyware services are free for 60 days
• Trend Micro Internet Security and Parental Controls are not available
After you activate your services:
• the dashboard's Security Scan and Anti-Spyware services are free for unlimited use
• Trend Micro Internet Security is free for 60 days
• the Parental Controls service is free for 60 days, extended to one year when you register
your free trial of Trend Micro Internet Security
Activation requires three simple steps:
1. Registering a Trend Micro customer account on page 2-4
2. Installing Trend Micro Internet Security on page 2-8
3. Registering Trend Micro Internet Security on page 2-10
Note: To receive the Parental Controls service free for one year, download Trend Micro Internet
Security and register your Internet Security trial subscription.
Registering a Trend Micro customer account
To register a Trend Micro account:
1. Start the dashboard by clicking Trend Micro Security Services in the Start menu or
the icon in your browser’s toolbar.
2. Click the Service Summary tab. The Service Summary screen appears (Figure 2-2).
Page 11

Installing Home Network Security
2-5
FIGURE 2-2. The dashboard’s Service Summary screen
3. On the Service Summary screen, click Activate My Services. The Three Easy Steps
screen appears. Click Next. The account registration screen appears (Figure 2-3).
Page 12

Installing Home Network Security
2-6
FIGURE 2-3. The account registration screen
4. On the account registration screen, type your name, email address, and other required
information, and then click Next. The Check Information screen appears.
Note: If you already have a Trend Micro customer account, type your user ID and password,
click Log in Now, and then click Next.
Page 13

Installing Home Network Security
2-7
5. If the information on the screen is correct, click Submit. The Registration Sent screen
appears.
6. To return to the dashboard, click Continue. Close the dashboard window.
Trend Micro sends a verification message to the email address you entered as your user ID. To
activate your account, click the link in this message.
Note: Trend Micro does not activate your account until you click the link in the verification
message.
When you click the link in the verification message, the Account Activated screen appears
(Figure 2-4).
FIGURE 2-4. The Account Activated screen
The Account Activated screen shows your Trend Micro Internet Security serial number.
Please write it down, as you will need it to install the program. Click Download Now. The
Download Now screen appears (Figure 2-5).
Please proceed to the next section, Installing Trend Micro Internet Security.
Page 14

Installing Home Network Security
2-8
Installing Trend Micro Internet Security
From the Download Now screen (Figure 2-5), you can download Trend Micro Internet
Security to all of the computers on your network.
FIGURE 2-5. The Download Now screen
Note: To access the Download Now screen at any time, click the Trend Micro Internet Security
download link on the dashboard’s Service Summary screen.
To install Trend Micro Internet Security:
1. On the Download Now screen, click Start Download & Install. A file download message
box opens.
2. Click Run or Open, and then wait while Setup downloads the installation files. If a
second message box opens asking "Do you want to run this software?", click Run. After
downloading the files, the Location to Save Files screen appears.
3. To save the installation files in the default location, click Next. To change the location,
click Change, specify a new location, and then click Next. The license agreement screen
appears.
4. Read the license agreement. If you accept the terms, click I accept the terms in the
license agreement, and then click Next. Setup scans the system memory, boot sector, and
critical files. After scanning, the Registration Information screen appears (Figure 2-6).
Note: When you activated your account, Trend Micro sent you a second email message. This
message contains your Trend Micro Internet Security serial number.
Page 15

Installing Home Network Security
2-9
FIGURE 2-6. The Registration Information screen
5. Type the required information, and then click Next. The Installation Location screen
appears.
6. To install Trend Micro Internet Security in the default location, click Next. To change the
location, click Change, specify a new location, and then click Next. The Installation Type
screen appears.
7. For best results, select Full and click Next. The Configuration Type screen appears. Select
Recommended and click Next. The Ready to Install screen appears.
8. Click Install. When installation completes, click Ye s to restart your computer.
After restarting your computer, please proceed to the next section: Registering Trend Micro
Internet Security.
Page 16

Installing Home Network Security
2-10
Registering Trend Micro Internet Security
After installing Internet Security, register your software to get free updates to scanning
components during the trial period, and free use of Parental Controls for one year. Registration
is done only once, and covers up to ten computers.
To register Trend Micro Internet Security:
1. Click Trend Micro PC-cillin Internet Security in the Start menu or the icon at the
bottom-right corner of your desktop. The main Internet Security screen appears.
2. Click Updates and Registration, and then click Registration. The Registration screen
appears (Figure 2-7).
FIGURE 2-7. The Registration screen
3. Click Register Now. The Account Confirmed screen appears (Figure 2-8).
Page 17

Installing Home Network Security
2-11
FIGURE 2-8. The Account Confirmed screen
The Account Confirmed screen shows your Trend Micro Internet Security serial number and
the expiration date of your trial subscription. To purchase an annual subscription now, click
Upgrade Now.
To protect your entire network, install Trend Micro Internet Security on all of your computers.
To install Trend Micro Internet Security on additional computers:
1. Install the Trend Micro dashboard. (See Installing the Trend Micro Dashboard on page
2-1.)
2. Start the dashboard, click the Service Summary tab, and then click the Trend Micro
Internet Security download link on the Service Summary screen. The Download Now
screen appears.
3. Click Start Download & Install, and then follow the on-screen instructions to install the
program.
Note: Use the same serial number each time you install Trend Micro Internet Security. You can
install the program on up to ten computers using this serial number.
Page 18

Installing Home Network Security
2-12
Configuring Router-Based Parental Controls
Parental Controls are configured on your router's setup screen. To access this screen, click the
dashboard's Service Summary tab, click Log in to the router setup screen, and then type
your router's user name and password. On the setup screen, locate the Parental Controls
configuration area.
Note: After making changes on the router setup screen, click Apply to save changes.
There are four main steps to configure Parental Controls:
1. Choose General or Per-User mode. In General mode, all users have the same access
profile. Per-User mode allows you to choose a different access profile for each user on the
network. In Per-User mode, all users must log in before accessing the Internet.
2. Choose an access profile. The access profile determines the type of content that Parental
Controls will block. You can choose one of the predefined profiles or create a custom
profile. In General mode, the profile you choose applies to all users. In Per-User mode,
you can choose a different profile for each user. To give a specified user unrestricted
Internet access, choose the "No Restrictions" profile.
3. Set a Parental Controls bypassing password (General mode only). This password allows
users to view blocked Web pages. You can also use this password on the dashboard's
Parental Controls screen to override Parental Controls for a specified period.
4. Choose whether to enable Parental Controls all the time, or according to a specified
schedule.
For detailed information on configuring Parental Controls, refer to the instructions on your
router's setup screen.
Page 19

3-1
Chapter 3
Renewing Your Services
After you activate your services, Anti-Spyware and Security Scan are free for unlimited use,
and Trend Micro Internet Security and Parental Controls are free for a trial period. Before the
trial period ends, renew your Internet Security and Parental Controls services by purchasing
annual subscriptions online at the Trend Micro Customer Care Center.
To renew your services at the Customer Care Center:
1. On the dashboard's Service Summary screen, click Buy/Renew. A window appears,
asking "Do you have a prepaid or promotional subscription code?"
2. If you have purchased a prepaid subscription, or if a prepaid subscription was included
with your router, click Ye s . Follow the on-screen instructions to redeem your prepaid
subscription. If you do not have a prepaid subscription, click No. The Customer Care
Center login screen appears (Figure 3-1).
FIGURE 3-1. The Trend Micro Customer Care Center login screen
Page 20

Renewing Your Services
3-2
3. In the User ID box, type the email address you used to register your customer account. In
the Password box, type the password you chose when you registered your account. Click
Login. The My Products screen appears.
4. In the Group column, select "TMSS". In the Renew/Upgrade column, select the services
you want to renew (Internet Security, Parental Controls).
5. Click Renew/Upgrade Now. The Product Information screen appears.
6. Select a subscription quantity according to the number of computers on your network. For
example, if there are three computers on your home network, select 3-4.
7. Click Buy Now. The Checkout screen appears. Follow the on-screen instructions to
complete your order.
Page 21

4-1
Chapter 4
Using the Trend Micro Dashboard
This chapter has the following sections:
• Starting the Dashboard on page 4-1
• Using the Service Summary Screen on page 4-1
• Using Security Scan and Anti-Spyware on page 4-5
• Using the Parental Controls screen on page 4-11
Starting the Dashboard
To start the dashboard, click Trend Micro Security Services in the Start menu or the icon
in your browser’s toolbar.
For online help while using the dashboard, click the icon in the top-right corner of the
screen.
Using the Service Summary Screen
On the Service Summary screen, you can:
• Renew your services
• Download Trend Micro Internet Security
• Log in to the router setup screen
• Access your Trend Micro customer account
• Scan your computer for viruses
• Get technical support
• Get antivirus and computer security information
• Change your user account
To access the Service Summary screen (Figure 4-1), start the dashboard and then click the
Service Summary tab.
Page 22

Using the Trend Micro Dashboard
4-2
FIGURE 4-1. The Service Summary screen
Renew your services
To renew your Trend Micro Internet Security and Parental Controls services, click
Buy/Renew and then follow the instructions in Renewing Your Services on page 3-1.
Download Trend Micro Internet Security
To download Trend Micro Internet Security, click the download link in the My Services area
of the Service Summary screen. The Download Now screen appears. To begin, click Start
Download & Install. For detailed downloading and installation instructions, refer to
Installing Trend Micro Internet Security on page 2-8.
Log in to the router setup screen
Parental Controls are configured on your router's setup screen. To access router setup, click
Log in to the router setup screen and then type your router's user name and password. On
the setup screen, locate the Parental Controls configuration area.
Page 23

Using the Trend Micro Dashboard
4-3
Access your Trend Micro customer account
To access the Trend Micro Customer Care Center, click Log in to your Trend Micro
customer account. The Trend Micro Customer Care Center login screen appears. In the User
ID box, type the email address you used to register your customer account. In the Password
box, type the password you chose when you registered your account.
At the Customer Care Center you can buy and renew services, manage your customer account,
and access product information.
Scan your computer for viruses
To scan your computer for viruses from the dashboard, click HouseCall and then follow the
on-screen instructions.
If you think your computer is infected with a virus, click I think my computer is infected,
what should I do? and then follow the on-screen instructions for assistance.
Get technical support
To search the Trend Micro Knowledge Base:
1. On the dashboard’s Service Summary screen, click Search our Knowledge Base. The
Knowledge Base page appears.
2. Select "Search by Product". In the product list, click Home Network Security.
3. For information about Trend Micro Internet Security, return to the product list and click
PC-cillin Internet Security.
To view frequently asked questions:
1. On the dashboard’s Service Summary screen, click FAQ . The Trend Micro product FAQ
page appears.
2. On the FAQ page, click Home Network Security. For information about Trend Micro
Internet Security, click PC-cillin Internet Security.
To view the latest version of this User's Guide, click Download User's Guide.
Get antivirus and computer security information
The Service Summary screen provides links to the following general information:
• Antivirus and security tips
• Free newsletters on computer security
Page 24

Using the Trend Micro Dashboard
4-4
• The Trend Micro Virus Encyclopedia
• Details of recent virus outbreaks and other Internet security threats. To view this
information, click the name of a threat under "Top Threats Worldwide" or click View all.
Change your user account
To change the Trend Micro user ID that is assigned to your router, click the "If you are not..."
link in the Online Support area of the Service Summary screen (Figure 4-2).
FIGURE 4-2. Change user link
Page 25

Using the Trend Micro Dashboard
4-5
Using Security Scan and Anti-Spyware
On the Security Scan screen, you can:
• View individual computer and network-wide security reports
• Detect and remove spyware
• Get an overall risk assessment, details of what Security Scan checked, and tips for fixing
any problems found
To access the Security Scan screen (Figure 4-3), start the dashboard and then click the
Security Scan tab.
FIGURE 4-3. The Security Scan screen
Generating a Security Scan report and removing spyware
To generate a Security Scan report and remove spyware, click Scan Now. Security Scan
generates a security report (Figure 4-4). If spyware is found, you can remove it using
Anti-Spyware.
Page 26

Using the Trend Micro Dashboard
4-6
FIGURE 4-4. Sample Security Scan report
For information on vulnerabilities found and suggested solutions, click Show.
If Security Scan reports spyware on your computer, click Show. Select the spyware programs
you want to remove (see the example in Figure 4-5), and then click Clean. To remove all
spyware programs, click Select All and then click Clean.
Page 27

Using the Trend Micro Dashboard
4-7
FIGURE 4-5. Spyware detection example
Generating a network-wide security report
To generate a security report for your entire network, first do a Security Scan on all of your
computers. After scanning all of the computers on your network, click Generate Report.
Security Scan generates a network-wide security report (Figure 4-6).
On the network security report screen, click Show to view information on vulnerabilities
found and suggested solutions.
Note: For a complete network security report, you must first do a Security Scan on all computers.
Unscanned computers are not included in the report. If a computer has not been scanned for
more than three weeks, the network security report shows its risk rating as High.
Page 28

Using the Trend Micro Dashboard
4-8
FIGURE 4-6. Network report example
Vulnerabilities and corrective actions
Security Scan checks your system for the following vulnerabilities:
• Microsoft security vulnerabilities. These are security weaknesses that Microsoft has
publicly identified. Microsoft periodically releases software updates that help prevent
hackers, viruses, and other Internet threats from exploiting these weaknesses and
damaging computers running Microsoft software.
• Trojan horse programs. Trojans are installed secretly and perform unauthorized, often
malicious, actions such as displaying or sending messages, erasing files, and formatting
disks.
• Spyware. Spyware is installed either secretly or disguised as a legitimate program.
Spyware may track your Internet use and send your personal data to an illicit database.
The information tracked can include your location, the Web sites you visit, your online
purchases, and other private information.
• Folder and file sharing. A convenient feature of Microsoft Windows operating systems is
the ability to share folders or files with other users on a network. But shared folders allow
attackers easy access to the data they contain.
• Security software. Your system is vulnerable if you do not have well-known virus
protection software installed. Even with virus protection software installed, your system
remains vulnerable if the software has not been updated recently.
Page 29

Using the Trend Micro Dashboard
4-9
Table 4-1 lists suggested corrective actions when vulnerabilities are found.
TABLE 4-1. Vulnerabilities checked by Security Scan
What Security Scan Does Corrective Action
Microsoft vulnerabilities Checks if known Microsoft
vulnerabilities exist on your
system
Visit the Microsoft Windows
TM
update site to download
updates.
Trojan horse programs Scans and detects Trojans To remove Trojans, install
Trend Micro Internet Security.
Spyware Detects spyware and gives you
the option to remove it
Use Anti-Spyware to remove
spyware found by Security
Scan. For real-time and
scheduled spyware scanning,
install Trend Micro Internet
Security.
File sharing Detects shared folders on your
computer
Remove or restrict sharing
permissions. To disable folder
sharing, right-click the folder
in Windows Explorer, click
Properties, and then click
Sharing. In Windows 2000
and XP, click Do not share
this folder. In Windows 98
and ME, click Not Shared.
Security software Checks if you have installed
well-known virus protection
software, and how recently it
has been updated
If you do not have virus
protection software, or if your
software is out of date, install
Trend Micro Internet Security.
Page 30

Using the Trend Micro Dashboard
4-10
Risk assessment criteria
The Security Scan and network security reports give you an overall risk assessment. To
calculate overall risk, Trend Micro uses the criteria shown in Table 4-2.
TABLE 4-2. Security Scan risk assessment criteria
Risk level: High Risk level: Medium Risk level: Low Risk-free
Single
computer
Scan finds one
high or two
medium risks
Scan finds one
medium or two
low risks
Scan finds one
low risk
n/a
Entire
network
Any computer
has one high or
two medium risks
Any computer
has one medium
or two low risks
Any computer
has one low risk
n/a
Microsoft
vulnerability
Scan finds one
highly critical or
critical risk
Scan finds at
least one medium
risk
Scan finds at
least one low risk
No issues
found
Trojan
horse
programs
Trojans found
n/a n/a
No Trojans
found
Spyware
n/a
Spyware found
n/a
No spyware
found
Shared
folders
A shared network
resource has
unlimited
read/write access
privileges
A shared network
resource has
unlimited read
access privileges
n/a
All shared
network
resources
password
protected
Security
software
No antivirus
software
detected, or the
software has not
been updated in
the past month
Antivirus software
detected, but it
has not been
updated in the
past two weeks
Trend Micro
antivirus software
detected, but it
has not been
updated in the
past three days
n/a
Page 31

Using the Trend Micro Dashboard
4-11
Using the Parental Controls screen
On the Parental Controls screen, you can:
• View attempts to access blocked content by all computers on your network, and actual
accesses
• Temporarily override Parental Controls for a specified period
• Log in to the router’s setup screen to configure Parental Controls
To access the Parental Controls screen (Figure 4-7), start the dashboard and then click the
Parental Controls tab.
FIGURE 4-7. The Parental Controls screen (Per-User mode)
The dashboard's Parental Controls screen shows the number of times computers on your
network have accessed or attempted to access blocked content. In General mode, the report
shows activity by all users. In Per-User mode, choose a user name from the list to view that
user's activity.
To configure Parental Controls:
1. Click Log in to the router setup screen and then type your router’s user name and
password.
Page 32

Using the Trend Micro Dashboard
4-12
2. On the router setup screen, locate the Parental Controls configuration area.
3. For configuration instructions, refer to the information on the router setup screen or
consult the documentation that came with your router.
Note: After making changes on the router setup screen, click Apply to save changes.
To override Parental Controls for a specified period:
1. Choose an override time from the list.
2. In General mode, enter the bypassing password you set on the router setup screen. In
Per-User mode, select "Parents" from the Name list, and then enter the login password
you gave to the "Parents" user.
3. Click Override. Parental Controls will be overridden for the selected time.
4. To restore Parental Controls before the override period ends, click Cancel Override.
For detailed information on the content you can block using Parental Controls, please refer to
Content Blocking Categories on page 5-3.
Page 33

5-1
Chapter 5
Using Parental Controls
This chapter has the following sections:
• Parental Controls: General Mode on page 5-2
• Parental Controls: Per-User Mode on page 5-2
• Content Blocking Categories on page 5-3
Parental Controls are configured on your router's setup screen. To access this screen, click the
dashboard's Service Summary tab, click Log in to the router setup screen, and then type
your router's user name and password. On the setup screen, locate the Parental Controls
configuration area.
Note: For specific information on configuring Parental Controls, refer to the instructions on your
router’s setup screen. After making changes on this screen, click Apply to save changes.
There are four main steps to configure Parental Controls:
1. Choose General or Per-User mode. In General mode, all users share the same access
profile. Per-User mode allows you to choose a different access profile for each user on the
network. In Per-User mode, all users must log in before accessing the Internet.
2. Choose an access profile. The access profile determines the type of content that Parental
Controls will block. You can choose one of the predefined profiles or create a custom
profile. In General mode, the profile you choose applies to all users. In Per-User mode,
you can choose a different profile for each user. To give a specified user unrestricted
Internet access, choose the "No Restrictions" profile.
3. Set a Parental Controls bypassing password (General mode only). This password allows
users to view blocked Web pages. You can also use this password on the dashboard's
Parental Controls screen to override Parental Controls for a specified period.
4. Choose whether to enable Parental Controls all the time, or according to a specified
schedule.
Page 34

Using Parental Controls
5-2
Parental Controls: General Mode
General mode is the simplest way to use Parental Controls. In General mode, the same access
profile applies to all network users, but you can set a password that allows mature users to
view blocked Web pages. This password can also be used on the dashboard's Parental Controls
screen to override Parental Controls for a specified period.
When you enable Parental Controls, the default profile blocks all content under the twelve
potentially offensive content blocking categories. You can select another predefined profile, or
create a custom profile.
Follow the instructions on your router's setup screen to enable Parental Controls, select
General mode, set a bypassing password, and select the desired access profile.
To enter the setup screen, click the dashboard's Parental Controls tab, click Log in to the
router setup screen, and then type your router's user name and password. On the setup
screen, locate the Parental Controls configuration area.
Note: After making changes on the router setup screen, click Apply to save changes.
Parental Controls: Per-User Mode
Per-User mode allows you to give each network user a different access profile. Each user has
an individual user name and password, and must log in before accessing the Internet.
In Per-User mode, there is initially only one user: "Parents". This user, by default, has
unrestricted Internet access. For new users that you add, the default access profile is "General
blocking". This predefined profile blocks all content under the twelve potentially offensive
content categories. You can give a new user another predefined profile, or create a custom
profile. To allow a user unrestricted Internet access, select the "No Restrictions" access
profile.
To configure Per-User mode, follow the instructions on your router's setup screen. On the
router setup screen you can:
• Add a new user. Select a user name and password, an access profile for the new user, and
the new user's status (Active or Inactive). A user with Inactive status cannot log in and
cannot access any Internet sites.
• Edit an existing user. You can change the user name, password, access profile, and status.
• Delete a user.
Page 35

Using Parental Controls
5-3
To enter the router setup screen, click the dashboard's Parental Controls tab, click Log in to
the router setup screen, and then type your router's user name and password. On the setup
screen, locate the Parental Controls configuration area.
Note: After making changes on the router setup screen, click Apply to save changes.
Content Blocking Categories
When Parental Controls are enabled in General mode, and when a new user is added in
Per-User mode, the default access profile is "General blocking". This predefined access
profile blocks content in all of the potentially offensive categories listed in Table 5-1. You can
choose another predefined profile, or create a custom profile. When you create a custom
profile, you can select which of the potentially offensive categories to block, and which
categories to allow.
Category Description
Adult/Mature Content Sites that contain material of an adult nature but without excessive
violence, sexual content, or nudity. These sites may include profane or
vulgar content and other content inappropriate for children.
Alcohol/Tobacco Sites that promote or sell alcohol or tobacco products, or that provide the
means to create them. Also includes sites that glamorize or otherwise
encourage alcohol or tobacco consumption. Does not include sites that
sell alcohol or tobacco as a subset of another business.
Gambling Sites at which users can place bets or participate in betting pools
(including lotteries) online. Also includes sites that provide information,
assistance, recommendations, or training on placing bets or participating
in games of chance. Does not include sites that sell gambling related
products or machines. Also does not include off-line casino and hotel
sites, unless they meet one of the foregoing criteria.
Hacking/Proxy
Avoidance
Sites providing information on illegal or questionable access to, or use of,
communications equipment and software, or that provide information on
how to bypass proxy server features or gain access to URLs in a way that
bypasses the proxy server.
Illegal Drugs Sites that promote, offer, sell, supply, encourage or otherwise advocate
the illegal use, cultivation, manufacture or distribution of drugs,
pharmaceuticals, intoxicating plants and chemicals, and related
paraphernalia.
Page 36

Using Parental Controls
5-4
TABLE 5-1. Potentially offensive content categories
Illegal/Questionable Sites that advocate or give advice on performing illegal acts such as
service theft, evading law enforcement, fraud, burglary techniques, and
plagiarism. Also includes sites that provide or sell questionable
educational materials such as term papers.
Intimate Apparel/
Swimsuit
Sites that sell or contain images of swimsuits, intimate apparel, or other
suggestive clothing. Does not include sites selling undergarments as a
subset of another business.
Nudity Sites that contain nude or seminude depictions of the human body. These
depictions need not be sexual in intent or effect. May include sites
containing nude paintings or photo galleries of an artistic nature. This
category also includes nudist or naturist sites containing pictures of nude
individuals.
Pornography Sites that contain sexually explicit material for the purpose of arousing a
sexual interest.
Sex Education Sites that provide graphic information on reproduction, sexual
development, safe sex practices, sexuality, birth control, and sexual
development. Also includes sites that offer tips for better sex as well as
products used for sexual enhancement.
Violence/Hate/Racism Sites that depict extreme physical harm to people or property, or which
advocate or provide instructions on how to cause such harm. Also
includes sites that advocate or depict hostility or aggression toward, or the
denigration of, an individual or group on the basis of race, religion, gender,
nationality, ethnic origin, and so forth.
Weapons Sites that sell, review, or describe weapons such as guns, knives, martial
arts devices, and related accessories, or that provide information on their
use or modification. Does not include sites that promote weapons
collecting, or groups that either support or oppose weapons ownership.
Category Description
Page 37

6-1
Chapter 6
Getting Support
This chapter has the following sections:
• Help with Home Network Security Services on page 6-1
• Help with Trend Micro Internet Security starting on page 6-2
Help with Home Network Security Services
Trend Micro provides the following free support resources for Home Network Security
Services users:
• Online help. To access online help from any dashboard screen, click the icon.
• User's Guide. To download the latest version of this User’s Guide, click the link on the
dashboard's Service Summary screen.
• Knowledge Base. On the dashboard's Service Summary screen, click Search our
Knowledge Base. On the Knowledge Base page, select "Search by Product". In the
product list, click Home Network Security.
• Frequently Asked Questions (FAQs). On the Service Summary screen, click FAQ . On the
FAQ page, click Home Network Security.
• Home Network Security support portal. This site contains links to all available Home
Network Security Services support information. To access the support portal, visit
http://www.trendmicro.com/en/support/tmss/overview.htm
• Home Network Security technical support hotline. Send technical support questions to
tmss@support.trendmicro.com. In the United States, call the support team toll-free at
1-866-787-TMSS (1-866-787-8677).
Note: For information on configuring your router, consult the documentation that came with your
router or visit the manufacturer’s Web site.
Page 38

Getting Support
6-2
Help with Trend Micro Internet Security
Trend Micro provides the following free support resources for Trend Micro Internet Security
users:
• Online help. On any Internet Security screen, click the icon to access online help.
• Knowledge Base. On the Trend Micro dashboard's Service Summary screen, click Search
our Knowledge Base. On the Knowledge Base page, select "Search by Product". In the
product list, click PC-cillin Internet Security.
• Frequently Asked Questions (FAQs). On the dashboard's Service Summary screen, click
FAQ. On the FAQ page, click PC-cillin Internet Security.
• Customer Care Center. The Customer Care Center contains the latest information about
Trend Micro Internet Security. To visit the Customer Care Center, start Internet Security
and then click Help > Customer Care Center. At the login screen, type the user ID
(email address) and password you used to open your Trend Micro customer account.
 Loading...