

Page 1
Collapsible Dam Installation Instructions
For Modular Showers with Radius Corners
Fits all fi berglass reinforced models including: Acrylic, Gelcoat, Vikrel, Solid Surface, Composite, Cultured
Marble
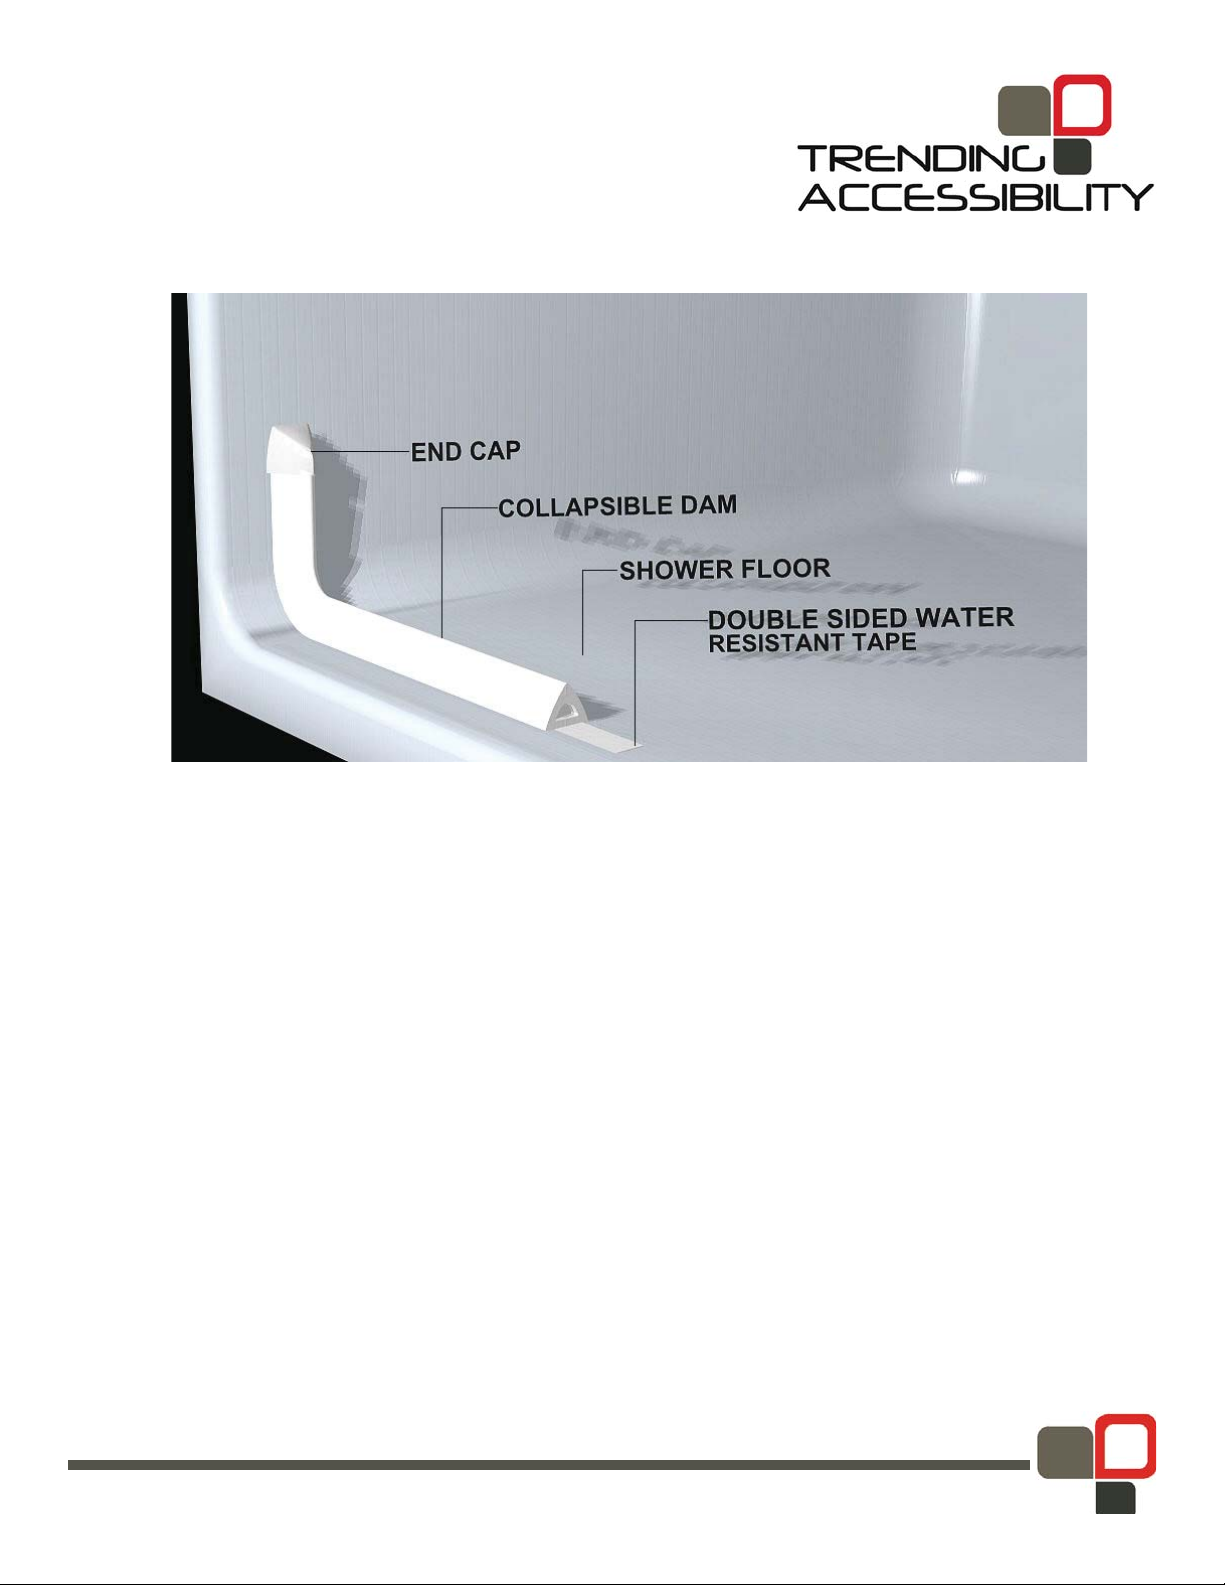
Important considerations before you begin: Most manufactured units are designed with a radius
where the fl oor transitions or meets the wall. This is to ensure proper structural strength where the wall
meets the fl oor. The installation of end caps is highly recommended on radius models for proper fi t and fi n-
ish. The caps will also help to keep your curtain inside the water barrier. A properly sized curtain with heavy
tape weights combined with a water retainer is the most complete and effective system available today.
ORDER THE CORRECT LENGTH: Make sure you have ordered the correct length. Order one foot
longer. The water retainer strip is designed to travel along the fl oor to the wall radius until vertical, then
capped.
Identifying proper mounting location: It will be helpful to determine whether your fi berglass reinforced shower
unit has a small molded ridge or “water runoff assist” design on your unit. You will fi nd this feature on the fl oor of ap-
proximately 1-3 inches from the front entry edge of your shower unit. The inside edge of the water retainer should
rest on the crown of the ridge allowing the water to run off properly. Use this ridge as your guide to mounting the
retainer parallel with the water run-off ridge.
Models less the water run-off design ridge: All name brand barrier free showers that may not have water
run-off a ridge and applications such as tile, marble or cement fl oor surfaces, purchaser must determine the proper
mounting location and length.
www.TrendingAccessibility.com | 856-488-9535
1
2013/2/18
Page 2

Tools & Materials required: Utility Knife, Tape measure, Straight edge, Clear or White Silicone Adhesive caulk, Masking
tape, Rubbing Alcohol, bucket of water and clean rags.
Installation Steps with Finished Radius End Caps
1. Thoroughly clean threshold surface of all soap scum and debris using standard bath cleanser. Chemically clean surface with rubbing alcohol.
2. Verify the required length anticipating the vertical rise, making certain there is enough retainer strip to make a
vertical rise on the end walls.
3. Determine and mark center point of shower.
4. Determine and mark center point of water retainer strip.
5. Turn over water retainer strip and make cut on orange peel off strip at half way mark. Peel off a portion (approx.
4”) of the orange peel off strip in one direction exposing the adhesive.
6. Align strip with pre-determined pencil mark or molded ridge crown of shower unit starting at the half way mark.
Press on and adhere approximately 4” of strip. Pull and stretch to wall and align before removing remainder of orange peel off strip. Press into place.
7. Peel, stretch, alien and pull remaining half to wall. Press into place.
8. Push in the male end of your end cap into the water retainer. Adhere end cap to unit with adhesive caulk and wipe
clean. White or clear adhesive type caulk is recommended.
9. Use masking tape to temporarily hold cap in place until adhesive cures.
10. Optional: The outer edges beneath the retainer may be caulked if desired to prevent soap and shower debris
from lodging beneath the retainer. The adhesive tape does not extend to the edge (by design) to allow the retainer
to absorb the impact energy of a rolling shower chair in high use applications. Wipe off excess caulk and let cure (according to caulk specifi cations) prior to shower use.
For Tile Showers or Manufactured Shower Pans with Square
Corners
Fits all TILE SHOWERS and manufactured SHOWER PANS: Acrylic, Gelcoat, Vikrel, Solid Surface, Cultured Marble
Important considerations before you begin: The installation of horizontal end caps is highly recommended for
proper fi t and fi nish at corners. The caps will provide proper fi t and fi nish to the where the dam meets the side walls.
Finished caps also prevent water from being trapped in the dam itself or exiting the shower area insuring a lasting easy to
maintain water seal. A properly sized curtain with heavy tape weights combined with a water retainer is the most complete and effective system available today.
ORDER THE CORRECT LENGTH: Make sure you have ordered the correct length. The water retainer strip is designed to travel along the fl oor to the wall radius until vertical, then capped.
2
www.TrendingAccessibility.com | 856-488-9535
Page 3

Determine Location: applications such as tile, marble or cement fl oor surfaces, purchaser must determine the proper
mounting location and length.
Tools & Materials required: Utility Knife, Tape measure, Straight edge, Clear or White 100% Silicone Adhesive caulk,
Masking tape, Rubbing Alcohol, bucket of water and clean rags.
Installation Steps with Square End Caps
1. Thoroughly clean threshold surface of all soap scum and debris using standard bath cleanser. Chemically clean surface with rubbing alcohol.
2. Dry Fit: measure the required length. Be sure to include inserted end caps in overall measurement.
3. Trim Caps on backside wall & fl oor mating surfaces if necessary to the contour of the corner for tight fi t and fi nish
to minimize caulking.
4. Determine and mark center point of shower.
5. Determine and mark center point of water retainer strip.
6. Turn over water retainer strip and make cut on orange peel off strip at half way mark. Peel off a portion (approx.
4”) of the orange peel off strip in one direction exposing the adhesive.
7. Align strip with pre-determined half way mark.
8. Press on and adhere approximately 4” of strip.
9. Pull and stretch to wall and align before removing remainder of orange peel off strip.
10. Press into place.
11. Peel, stretch, alien and pull remaining half to wall. Press into place.
12. Dry fi t end caps to insure proper fi t. (Trim length if required after stretching & adhering dam)
13. Once proper fi t is verifi ed, prepare to apply silicone adhesive caulking.
14. Apply quality silicone adhesive caulking to fl oor, side wall and male insert end of cap. Push in the male end of your
end cap into the water retainer.
15. Wipe clean with rubbing alcohol.
16. Allow 12 hours until adhesive cures before use.
17. Tile Application Grout Line joints: The grout joints or entire outer edge beneath the retainer must be
caulked to prevent soap and shower debris from lodging beneath the retainer. The adhesive tape does not extend to
the edge (by design) to allow the retainer to absorb the impact energy of a rolling shower chair in high use applica-
tions. Wipe off excess caulk and let cure (according to caulk specifi cations) prior to shower use.
www.TrendingAccessibility.com | 856-488-9535
3
 Loading...