

Page 1
PH/JIG/AK
PH/JIG/BK
Dear Customer
Thank you for purchasing this Trend product,
we hope you enjoy many years of creative and
productive use.
Please remember to return your guarantee card
within 28 days of purchase.
CONTENTS
TECHNICAL DATA ____________________ 1
SAFETY PRECAUTIONS _______________ 2
ITEMS ENCLOSED ___________________ 3
POCKET HOLE CONCEPT _____________ 3
DESCRIPTION OF PARTS ______________ 4
ASSEMBLY & ADJUSTMENT
– Setting up the Jig ____________________ 5
– Fitting the Slide Adjusters _____________ 5
– Screw Chart ________________________ 5
– Measuring the Thickness of Workpiece ___ 6
– Setting the Drill Bit Depth ______________ 6
– Adjusting the Position _________________ 7
– Setting the Slides For Timber Thickness __ 7
OPERATION
– Drilling the Pocket Holes _____________ 8-9
– Clamping Arrangements _______________ 9
– Drilling the Pocket Holes _____________ 10
APPLICATIONS ___________________ 11-13
ACCESSORIES _____________________ 14
MAINTENANCE _____________________ 15
ENVIRONMENTAL PROTECTION_______ 15
GUARANTEE _______________________ 15
PARTS
– Spare Parts List ____________________ 16
– Spare Parts Diagram ________________ 17
TROUBLE SHOOTING ________________ 18
TECHNICAL DATA
Material thickness: Min. 12.7mm
Max. 38mm
Material width: Min. 38mm
Screw length: 25mm-63mm
Drill bit size 9.5mm
Hole pitch 30mm
50mm
The following symbols are used throughout this
manual:
Denotes risk of personal injury, loss of
life or damage to the tool in case of nonobservance of the instructions in this
manual.
Denotes risk of electric shock.
Refer to the instruction manual of
your power tool.
This unit must not be put into service until it has
been established that the power tool to be
connected to this unit is in compliance with
2006/42/EC (identified by the CE marking on the
power tool).
INTENDED USE
This accessory is to be used with a drill with
minimum 10mm chuck capacity to allow pocket
hole jointing of softwoods and hardwoods.
If you require further safety advice,
%
technical information or spare parts,
please call Trend Technical Support
or visit www.trend-uk.com
-1-
Page 2

PH/JIG/AK
SAFETY
WARNING:
Observe the safety regulations in the
instruction manual of the power tool
to be used. Please read the following
instructions carefully. Failure to do so
could lead to serious injury. When using
electric tools, basic safety precautions,
including the following should always be
followed to reduce the risk of fire, electric
shock and personal injury. Also observe
any applicable additional safety rules.
Read the following safety instructions
before attempting to operate this product.
PLEASE KEEP THESE
INSTRUCTIONS IN A SAFE PLACE.
The attention of UK users is drawn to The
Provision and Use of Work Equipment
Regulations 1998, and any subsequent
amendments.
Users should also read the HSE/HSC
Safe Use of Woodworking Machinery
Approved Code of Practice and Guidance
Document and any amendments.
Users must be competent before using
our products.
IMPORTANT NOTE:
Residual Risk. Although the safety
instructions and operating manuals for
our tools contain extensive instructions
on safe working with power tools, every
power tool involves a certain residual risk
which cannot be completely excluded
by safety mechanisms. Power tools
must therefore always be operated with
caution!
General
1. Disconnect power tool when making
any adjustments. When not in use,
before servicing and when changing
accessories such as cutters,
disconnect power tool and attachment
from power supply. Ensure the
machine is switched off before
plugging tool in or connecting to a
power supply.
2. Always mount the power tool,
accessory or attachment in conformity
with the present instructions. The tool
should not be modified or used for any
application other than that for which it
was designed.
3. Keep children and visitors away. Do
not let children or visitors touch the
tool, accessory or attachment. Keep
children and visitors away from work
area. Make the workshop child proof
with padlock and master switch.
4. Dress properly. Do not wear loose
clothing or jewellery, they can be
caught in moving parts. Rubber
gloves and non-skid footwear
is recommended when working
outdoors. Wear protective hair
covering to contain long hair.
PH/JIG/BK
5. Consider working environment. Do
not use the product in the rain or
in a damp environment. Keep work
area well lit. Do not use power tools
near gasoline or flammable liquids.
Keep workshop at a comfortable
temperature so your hands are not
cold. Connect machines that are used
in the open via a residual current
device (RCD) with an actuation
current of 30 mA maximum. Use only
extension cables that are approved for
outdoor use.
6. The accessory or attachment must be
kept level and stable at all times.
7. Keep work area clean. Cluttered
workshops and benches can cause
injuries. Ensure there is sufficient
room to work safely.
8. Secure idle tools. When not in use,
tools should be stored in a dry and
high or locked up place, out of reach
of children.
9. For best control and safety use
both hands on the power tool and
attachment. Keep both hands away
from cutting area. Always wait for the
spindle and cutter to stop rotating
before making any adjustments.
10. Always keep guards in place and in
good working order.
11. Remove any nails, staples and other
metal parts from the workpiece.
12. Maintain tools and cutters with care.
Keep cutters sharp and clean for
better and safer performance. Do
not use damaged cutters. Follow
instructions for lubricating and
changing accessories. Keep handles
dry, clean and free from oil and
grease.
13. Maintain accessories. Do not use
damaged accessories. Only use
accessories recommended by the
manufacturer.
14. Check damaged parts. Before
operation inspect the attachment,
the power tool, the cable, extension
cable and the plug carefully for signs
of damage. Check for alignment of
moving parts, binding, breakage,
mounting and any other conditions
that may effect its operation. Have any
damage repaired by an Authorised
Service Agent before using the tool or
accessory. Protect tools from impact
and shock.
15. Do not use tool if switch does not turn
it on or off. Have defective switches
replaced by an Authorised Service
Agent.
16. Don’t over reach. Keep proper footing
and balance at all times. Do not use
awkward or uncomfortable hand
positions.
-2-
17. Don’t abuse the cable. Never carry
power tool or accessory by cord or
pull it to disconnect from the socket.
Keep cord from heat, oil and sharp
edges. Always trail the power cord
away from the work area.
18. Connect dust extraction equipment.
If devices are provided for the
connection of dust extraction and
collection facilities, ensure these are
connected and properly used.
19. Check all fixing and fastening nuts,
bolts and screws on power tool,
attachment and cutting tools before
use to ensure they are tight and
secure. Periodically check when
machining over long periods.
20. Stay alert. Watch what you are doing.
Use common sense. Do not operate
tools when you are tired, under the
influence of drugs or alcohol.
21. Personal Protective Equipment
(PPE). All PPE must meet current UK
and EU legislation.
22. Do not leave tools running
unattended. Do not leave tool until it
comes to a complete stop.
23. Always clamp workpiece being
machined securely.
24. Only use cutting tools for
woodworking that meet EN8471/2 safety standards, and any
subsequent amendments.
25. Vibration levels. Hand held power
tools produce different vibration
levels. You should always refer to the
specifications and relevant Health &
Safety Guide.
26. Use the attachment with the power
tools and accessories specified in this
manual only. Do not force the tool or
attachment to do a job for which it is
not designed.
Version 6.1 01/2014 PT1
Page 3

PH/JIG/AK
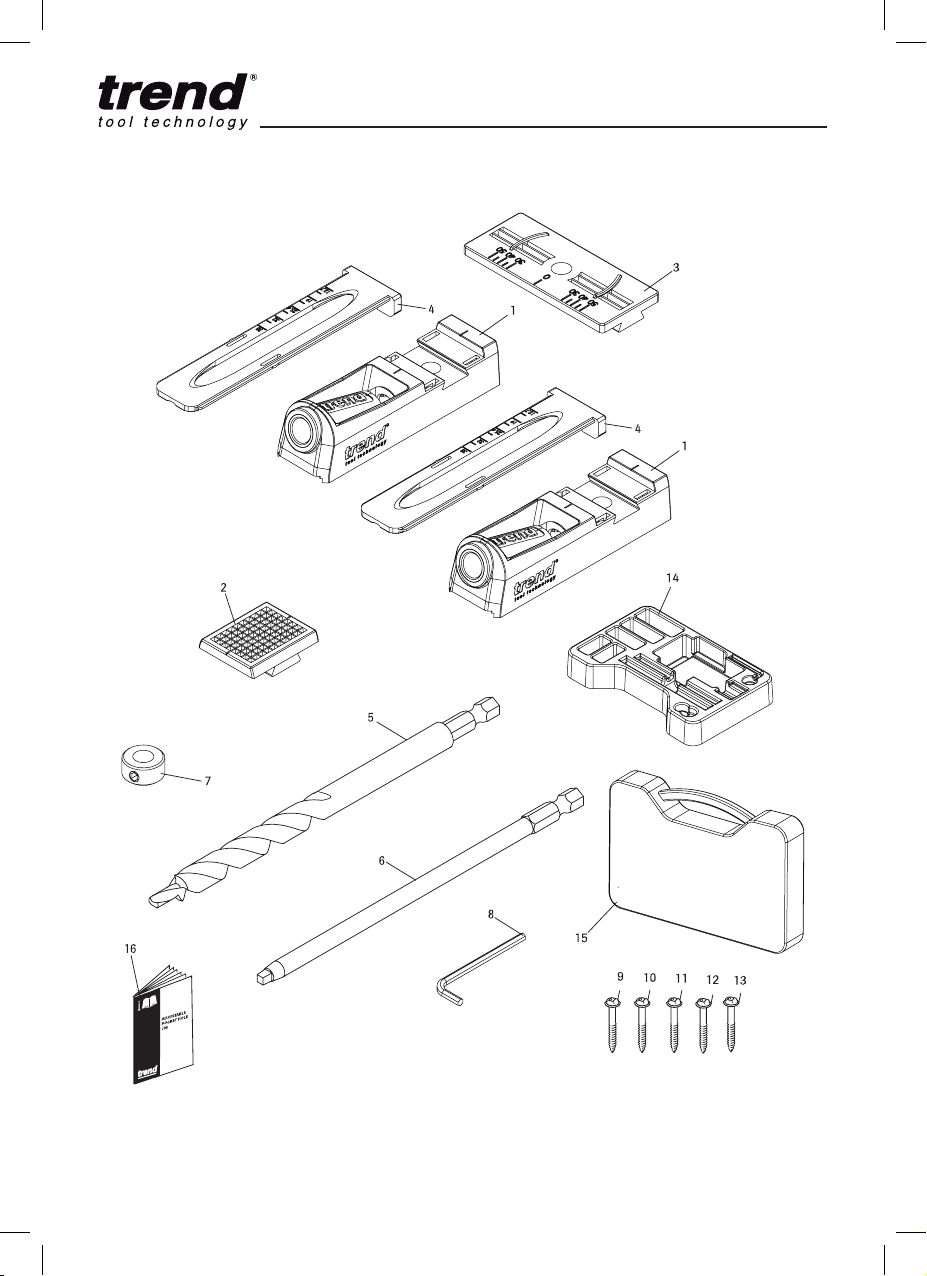
2 x Pocket hole jig body
2 x Slide Adjusters
1 x Single jig clamping pad
1 x Twin jig clamping pad
1 x Hex shank quick release stepped drill
9.5mm (3/8”) diameter HSS
1 x Depth collar for stepped drill
1 x Square drive screwdriver bit
No.2 x 150mm long
50 x Self-tapping square head screws:
10 x No.7 x 25mm (1”) coarse
10 x No.7/8 x 30mm (11/4”) coarse
10 x No.8 x 37mm (11/2”) coarse
10 x No.8 x 50mm (2”) coarse
10 x No.8 x 63mm (21/2”) coarse
1 x Hex key 3mm A/F
1 x Manual
1 x Guarantee registration card
1 x Plastic carry box
PH/JIG/BK
POCKET HOLE CONCEPT
A pocket hole involves clamping one piece of the
material to be joined to the jig and boring one or
two counter-bored holes with a special stepped
drill. This piece of material is joined to the other
piece and assembled with self-tapping screws.
Once driven into the material will provide a
strong joint is made. The screw removes the
need for clamping during the gluing process.
The component can be handled whilst the glue
is drying. The jig can be adjusted to suit different
thicknesses of material, to keep the screw
centred in the workpiece to ensure a good joint.
-3-
Page 4
PH/JIG/AK
PH/JIG/BK
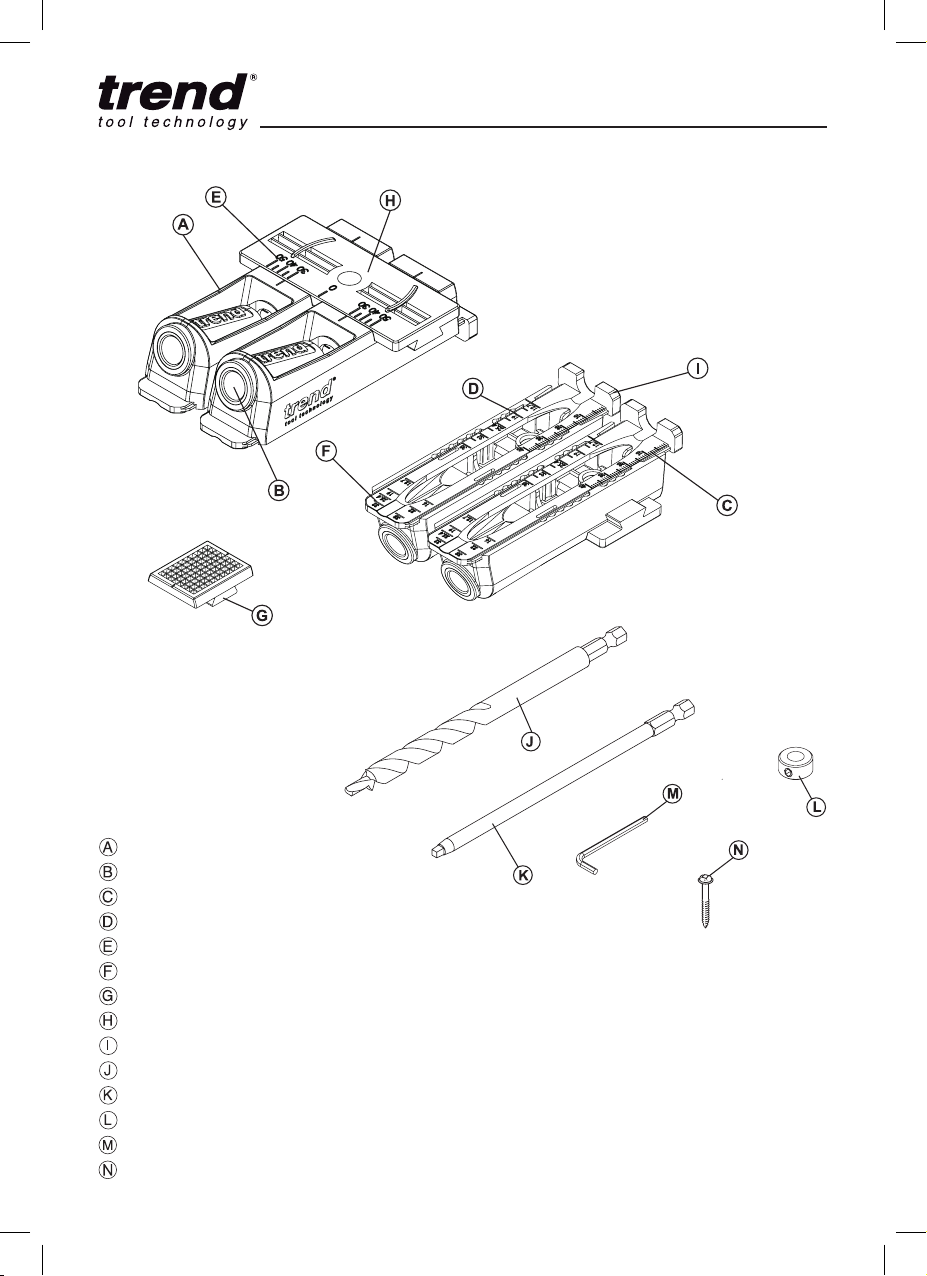
DESCRIPTION OF PARTS
Pocket hole jig body
Solid bush drill guide hole
Material thickness side scale
Guide block workpiece thickness scale
Between centres setting scale
Drill depth setting scale
Single jig clamping pad
Twin jig clamping pad
Jig placement slide adjuster
Hex shank quick release stepped drill
Square drive screwdriver bit No.2 x 150mm
Stepped drill depth collar
Hex key 3mm A/F
Self-tapping square head screws
-4-
Page 5
PH/JIG/AK
ASSEMBLY & ADJUSTMENT
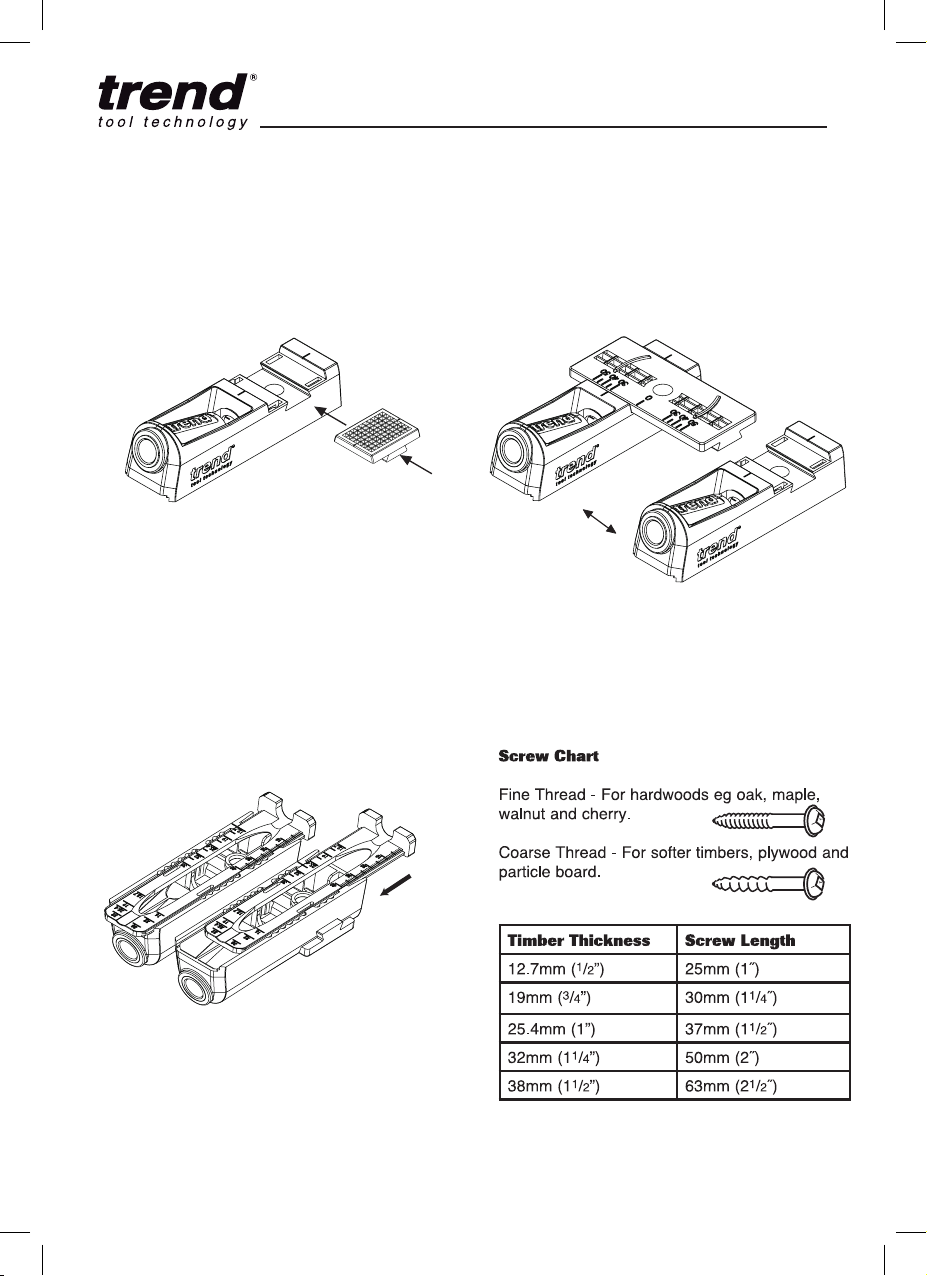
Setting up the Jig
PH/JIG/BK
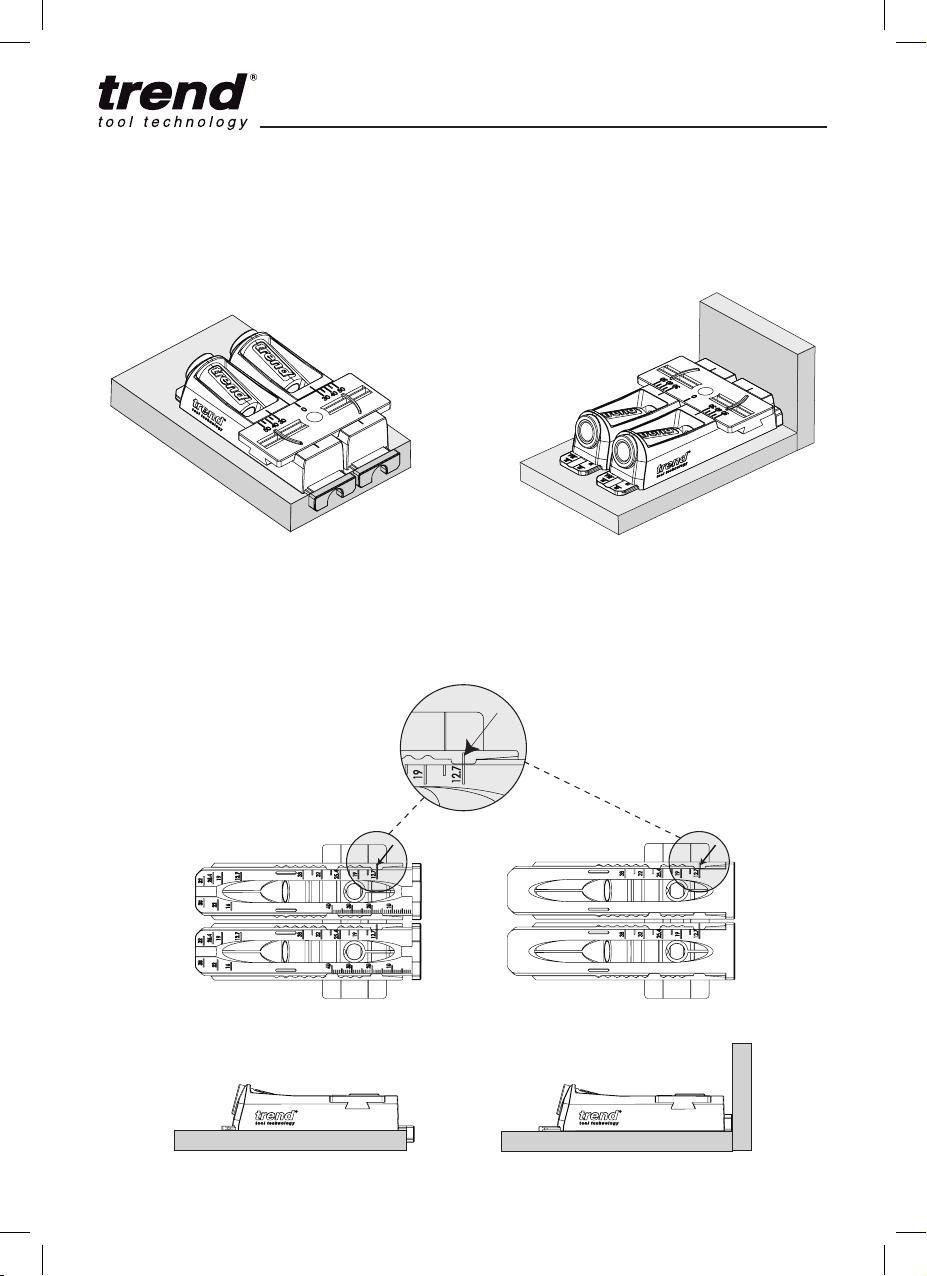
For Single Column Set-Up
Fitting The Slide Adjusters
For Two Column Set-Up
-5-
Page 6
PH/JIG/AK
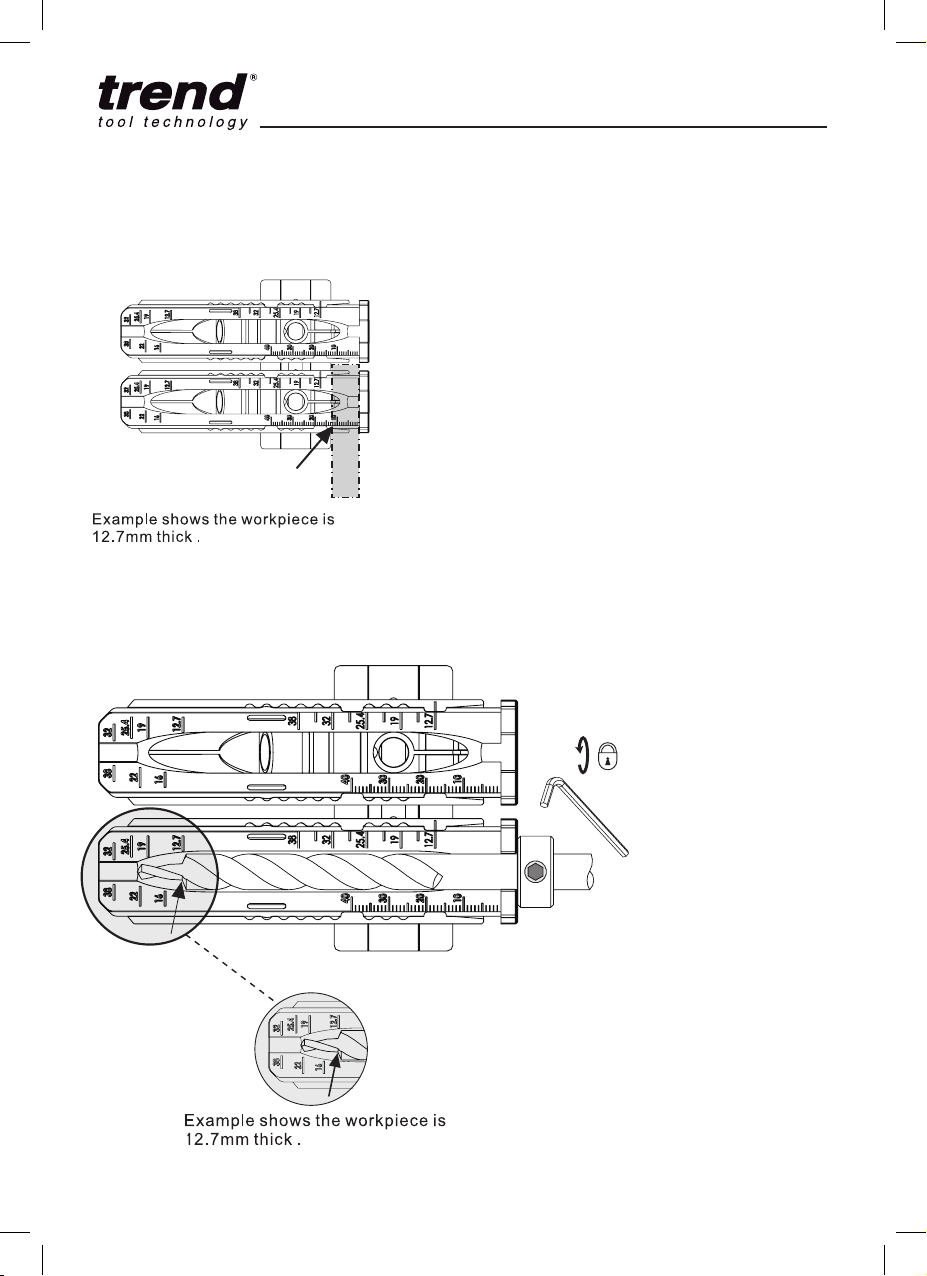
Measuring the Thickness of Workpiece
Setting the Drill Bit Depth
PH/JIG/BK
-6-
Page 7
PH/JIG/AK
Adjusting the Jig Position
PH/JIG/BK
New Set-Up
Sliding Adjusters Faced Down Sliding Adjusters Faced Up
Setting The Sliding Adjusters For Timber Thickness
Repair Set-Up
-7-
Page 8
PH/JIG/AK
PH/JIG/BK
OPERATION
Check the collar position is correct before
drilling. If the depth collar is set too deep the
screw may protrude through the face of the
jointing piece. If too shallow the screw may not
enter into the joint sufficiently. When working
with thin material and mitres, the counterbored
hole will need to be shallower than standard.
Shallow counterbored holes will result in the
head of the screw being closer to or above the
surface, this is acceptable in certain applications
where the head of the screw is invisible from
view. Put the stepped drill into the bushed hole
in the column.
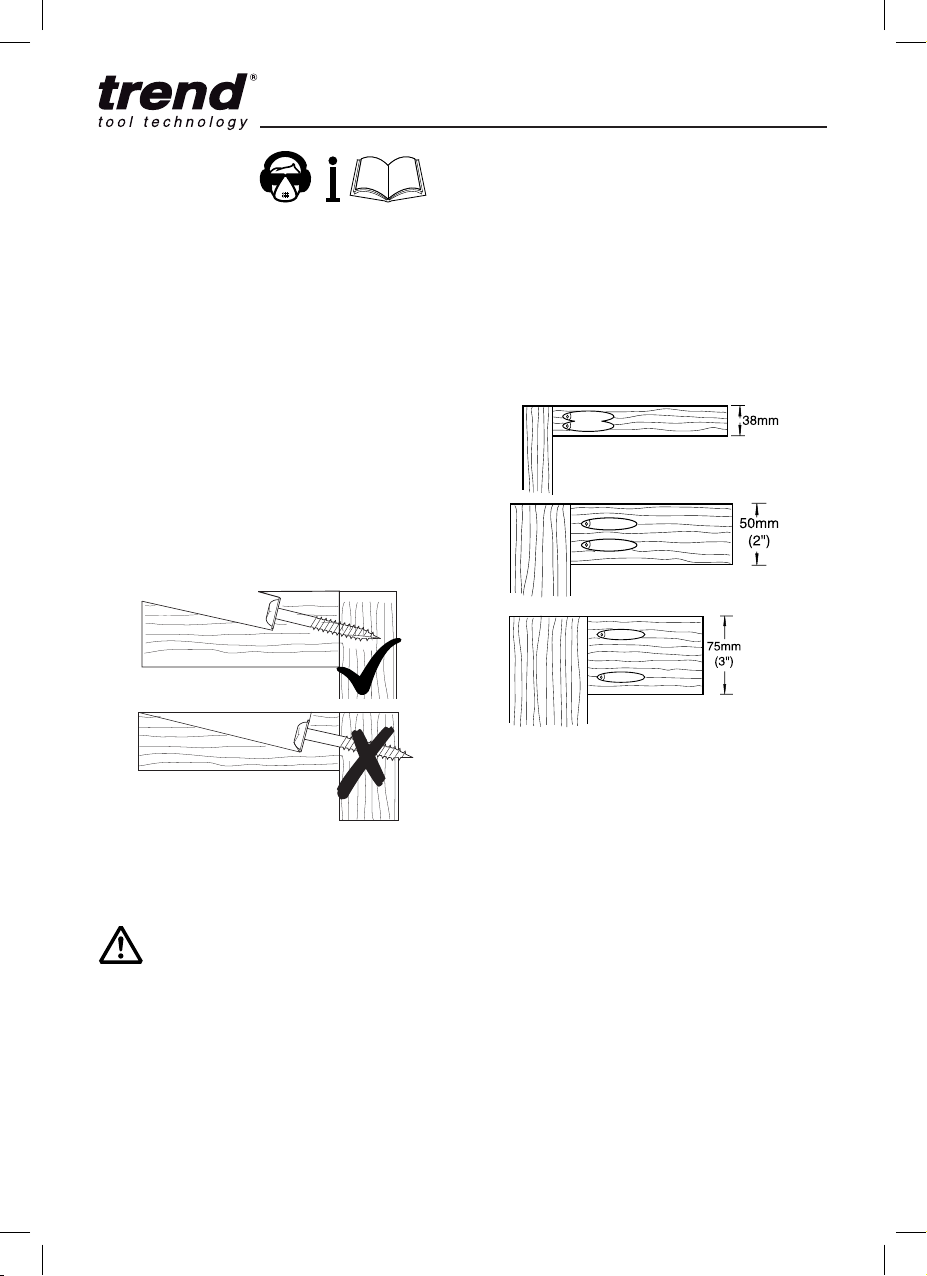
Pocket Hole Spacing
When boring framing material, two pocket holes
should be used to keep the timber from twisting.
When working with long pieces of timber to
create a board (jointing edge to edge) to make
a table top for example, single pockets can be
drilled at between 150mm and 200mm centres.
Before using the pocket hole jig for the
first time, it is recommended that a number
of trial cuts are made in waste timber as
this will allow the drill to bed into the drill
guide bushes in the columns. During the
bedding in process there will be evidence
of some metal swarf.
-8-
Page 9
PH/JIG/AK
PH/JIG/BK
Drilling the Pocket Holes
Boring the counter-bored hole involves drilling
with a stepped drill into one of the joint pieces.
Offer the jig to the material to be drilled and
clamp tightly
Make sure the component is clamped securely
before drilling.
Set the collar to the drill in correct position
before fitting drill to chuck.
Place drill bit into top section of the bush hole in
drill guide. Do not place the drill tip against the
component.
Switch on drill at full speed (clockwise direction)
and drill into the component until the collar
touches the bush. Gently pulling drill in and out
whilst drilling will allow wood chips to clear more
easily.
Once depth is reached switch off drill and
withdraw drill bit from guide.
Repeat for other pocket hole and then remove
component.
Repeat operation for remaining pieces.
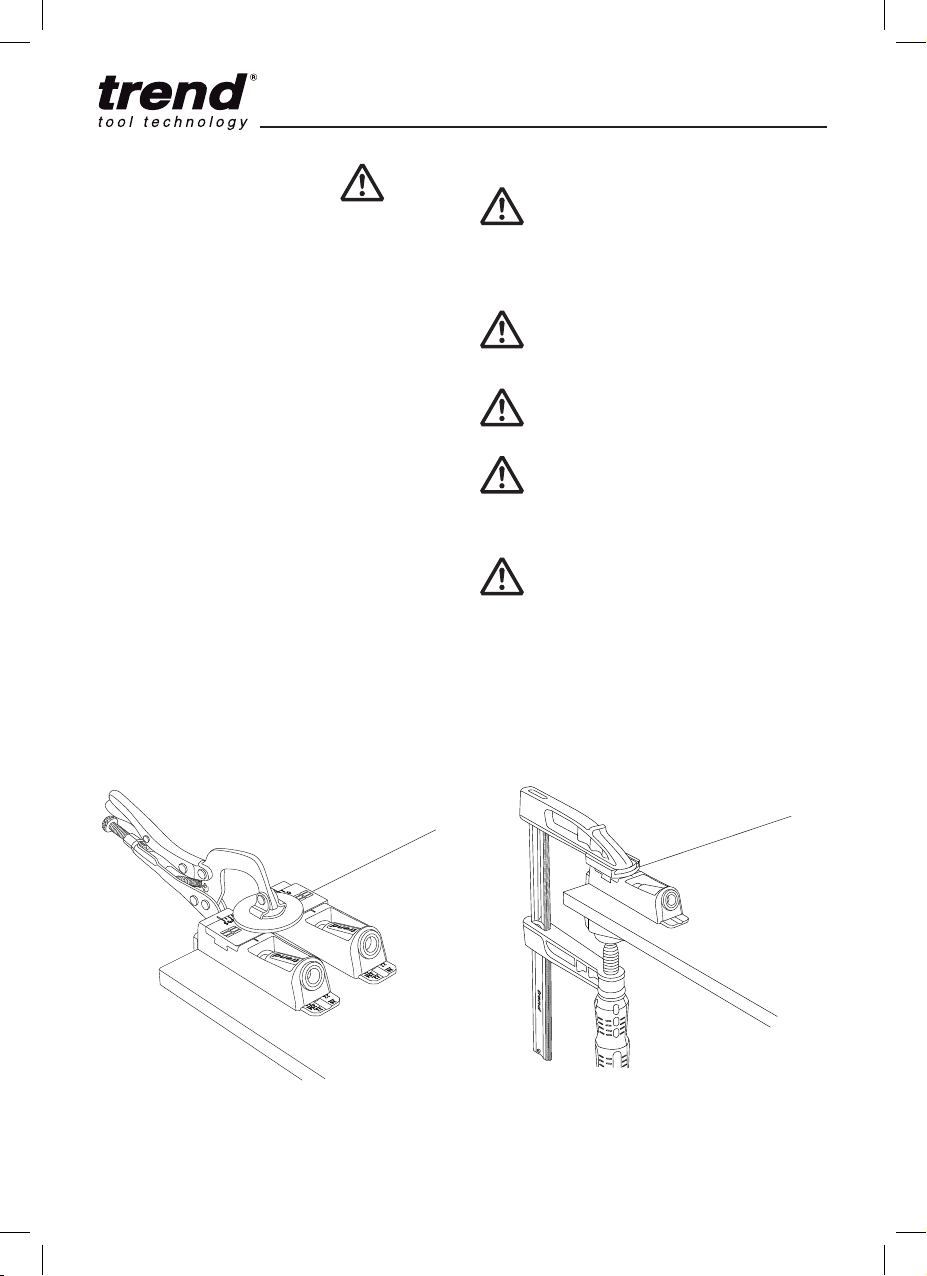
Clamping Arrangements
Do not push hard on the drill
until the drill pilot tip of the
drill bit is fully into the work
piece and the counterbore
section is actually cutting.
Use a high drilling speed to
increase drill life (2000 rpm
or higher).
Keep the drill bit sharp.
Make sure drill bit is held in
chuck securely. If the drill
spins loose in the chuck the
shock can break the drill bit tip.
Place the drill bit into the
top section of the drill guide
hole before spinning. Do not
place the drill tip against the
component until the drill is at
full speed.
Face Clamp (not supplied)
Ref. PH/CLAMP/F6
F Clamp (not supplied)
Ref. FC/200
-9-
Page 10
PH/JIG/AK
Assembling the Joint
Self-tapping pocket hole screws do not need
to have pilot holes drilled, even in hardwoods.
Other types of screws can work in the jig but
the self-tapping screws reduce splitting in the
timber and are hardened to reduce breakage.
Whenever possible use glue on the joint unless
it is necessary to disassemble the joint.
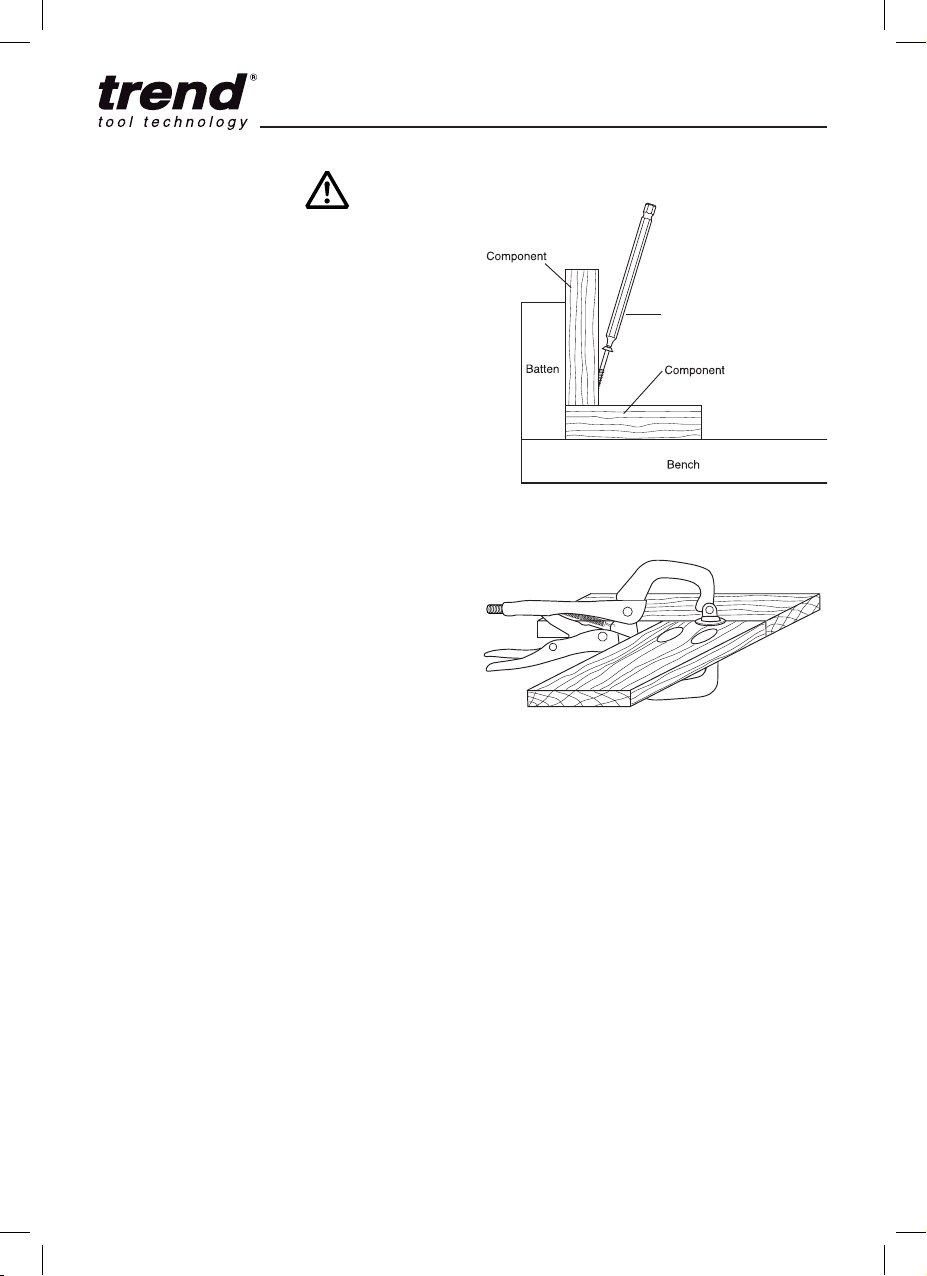
To aid assembly on corner joints, it is advisable
to use a high batten, clamped to the bench. The
components can be pushed against it to keep
the two parts flush to each other, whilst screwing
them together.
When assembling edge to edge joints it
is advisable to use a face clamp (sold as
accessory, Ref: PH/CLAMP/F6) to keep both
parts flush. The face clamp can be adjusted to
suit material thickness by adjusting the locking
nut on the handle of the face clamp. The larger
pad on the face should be on the face side of
the material.
The screw should be driven into the component
using a torque control screwdriving drill. The
torque control allows control of the tightness
of the screws into the wood and minimises the
possibility of stripping the screw. The square
driver bit has a 1/4” quick change shank and
can be used directly into a drill chuck or more
conveniently into a Trend Snappy quick change
drill chuck Ref. SNAP/QC.
If a torque control screwdriver is not available
start to screw with a conventional drill and then
finish off by hand using a square drive hand
screwdriver or the Trend Snappy Hand driver
Ref. SNAP/HAND/1.
If access to the screws are tight the screwdriver
bits can be fitted into a 1/4” socket fitted to a
ratchet or use a flexible shaft screwdriver.
After use, store jig carefully.
PH/JIG/BK
Square drive bit
-10-
Page 11
PH/JIG/AK
PH/JIG/BK
APPLICATIONS
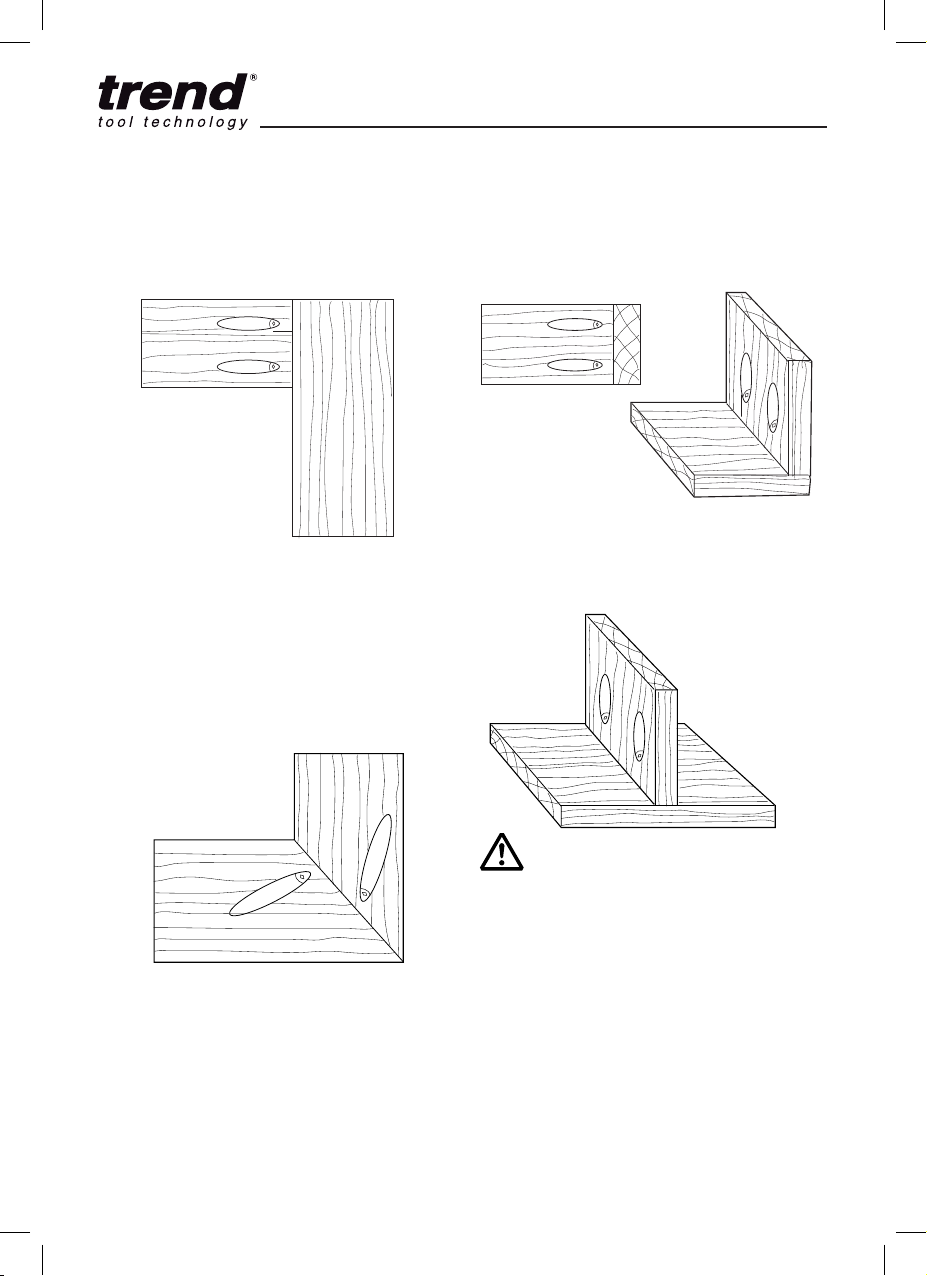
Frame Corner Joints – faster and stronger than
dowel and biscuits. Self clamping whilst glue
is drying.
Mitred Frame Corner Joints – for narrow
frames a single pocket hole is necessary. Cut
the mitre and rout any rebates before boring
the pocket holes. For material less than 50mm
wide it may be necessary to tilt the pocket hole
piece so that the hole is not perpendicular to the
mitred edge.
Square Corner Joints – faster and stronger
than dowel and biscuits. Self clamping whilst
glue is drying.
T- Joints – faster and stronger than dowel and
biscuits. Self clamping whilst glue is drying.
When changing material or joint
application, test the depth of the drill
and collar before drilling into the
workpiece. Test drill in waste pieces
of the same thickness. Then drill a
screw into the pocket joint only and
lay it against the jointing piece to see
if screw depth is correct.
-11-
Page 12
PH/JIG/AK
PH/JIG/BK
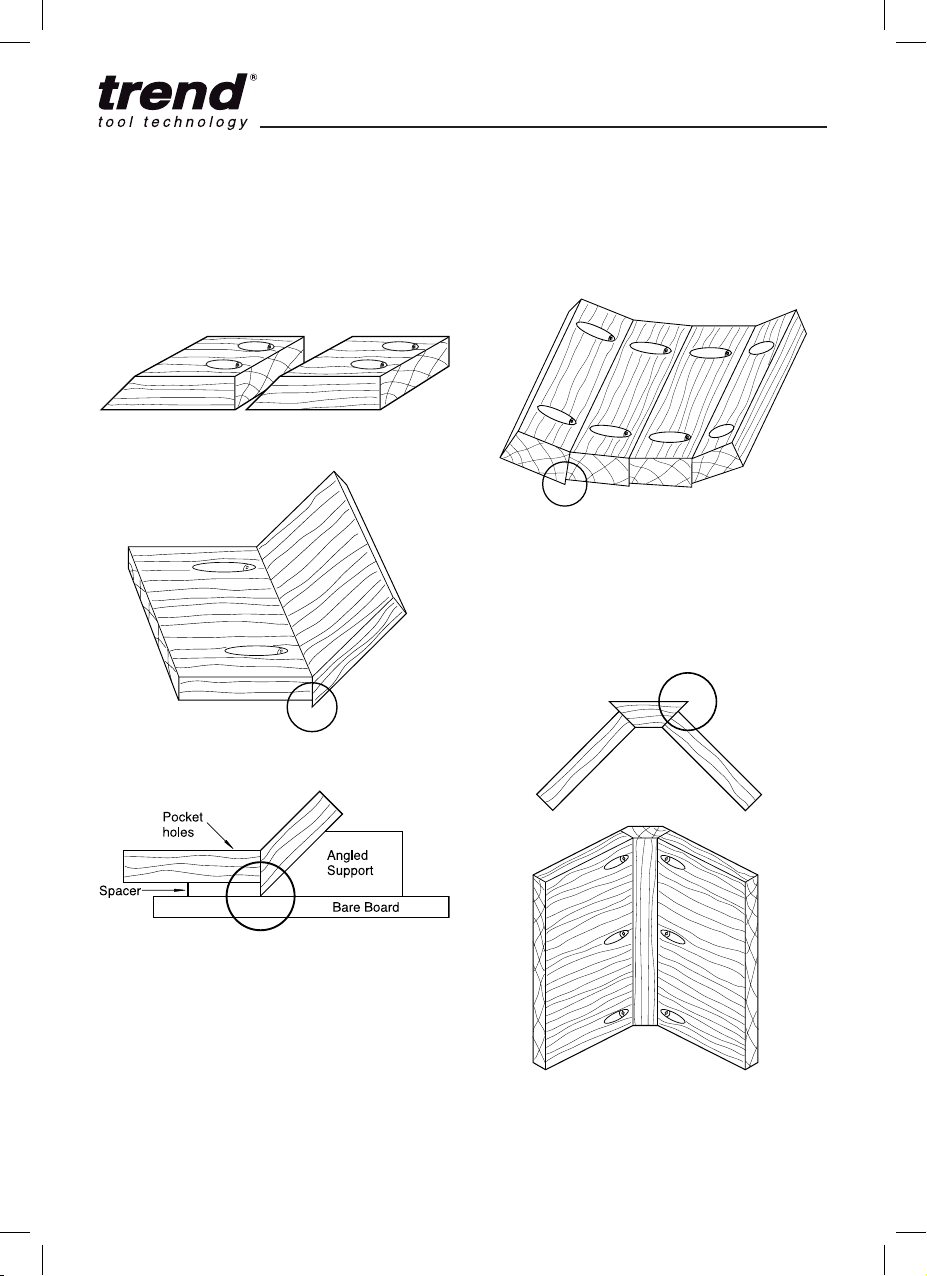
Angled Joints – eliminates difficult clamping
up. The joint is created not by cutting each mitre
to half the angle but by cutting angle on one
jointing piece and drilling pocket holes into the
square piece. The method results in the mitred
edge having an overhang, which will need to be
removed by plane or sander.
Curved Joints – this uses the same technique
as the angled joint, but the angles will be
shallower (5° to 15°). The overhang will need to
be removed as previous.
Mitred Corner Joints – joining two pieces with
45° mitres with the pocket jig is not advisable,
however a 90° change of direction can be
created by using a bevel-jointing piece. The joint
comprises of a 90° infill piece with 45° mitres on
both sides.
Plinths – faster and stronger than dowel
and biscuits.
-12-
Page 13
PH/JIG/AK
PH/JIG/BK
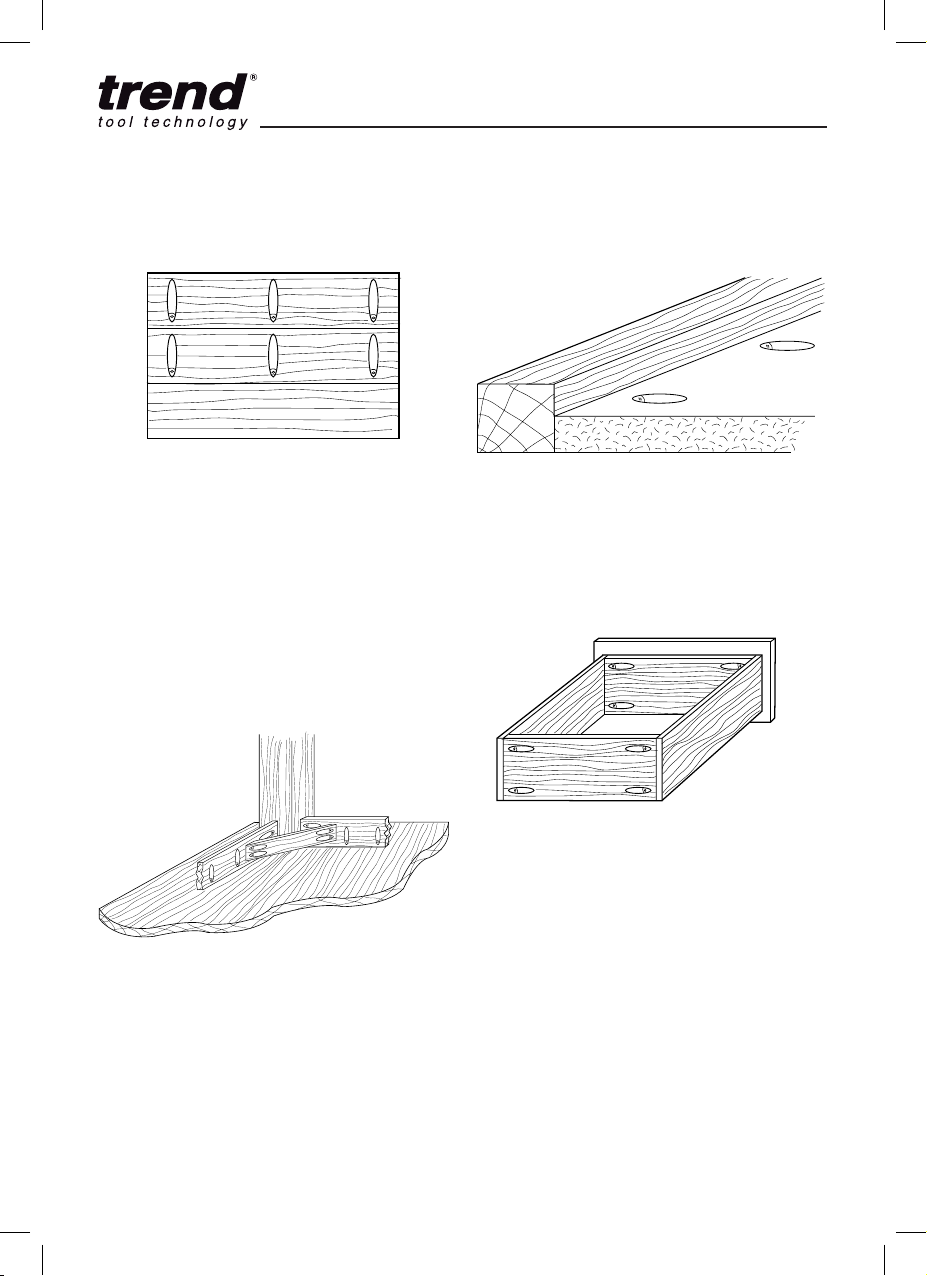
Edge to Edge Joints – allows narrow strips
to be jointed to create wider boards such as a
table top.
Post and Rail Joints – pocket holes allow
strong table and chair joints. For fitting table
tops to rails, the rails will need to be pocket
hole drilled. To allow for the movement of the
timber as it expands and contracts the hole must
be slightly over size. This is achieved by lifting
the rail about 3mm off the base of the jig. This
should allow the pilot tip of the drill to break
through the end of the timber, giving the screw
space for some movement. Alternatively move
the rail sideways slightly to drill another pocket
hole (interlocking) allowing a slot for the screw.
Edging of countertops or shelving – quick and
easy way to join edging onto plywood, MDF or
Particle board shelves.
Jig making – very useful for jig making and
temporary assembly operations. Ideal for
routing jigs.
Framed Panel (Cabinet) Joints – pocket
holes can be used for almost all framed cabinet
carcass construction.
-13-
Page 14

PH/JIG/AK
PH/JIG/AK
PH/JIG/BK
ACCESSORIES
Please use only Trend original accessories.
Self Tapping Screws Square Drive
Fine Thread
No.6 (3.4mm) x 25mm (1˝). Pack 500.
Ref. PH/6X25/500
No.7 (3.6mm) x 30mm (1¼˝). Pack 500.
Ref. PH/7X30/500
Self Tapping Screws Square Drive
Coarse Thread
No.7 (3.6mm) x 25mm (1˝). Pack 500.
Ref. PH/7X25/500C
No.7/8 (4.3mm) x 30mm (1˝). Pack 500.
Ref. PH/7X30/500C
No.8 (4.3mm) x 37mm (1½˝). Pack 200.
Ref. PH/8X37/200C
No.8 (4.3mm) x 50mm (2˝). Pack 200.
Ref. PH/8X50/200C
No.8 (4.3mm) x 63mm (2½). Pack 200.
Ref. PH/8X63/200C
Pocket Hole Screws Mixed Box 850pcs
Fine Thread
No.6 x 25mm (200pcs)
No.7 x 25mm (100pcs)
Ref. PH/SCW/PK1
Pocket Hole Drills
Standard Parallel Shank.
Ref. PH/DRILL/95
178mm Quick Change - for deeper pockets.
Ref. PH/DRILL/95Q
Pocket Hole Plug Cutter
A tool steel pellet cutter that is used in a pillar
drill to allow plugs to be made to cover the
pocket hole. Allows plugs up to 52mm long to be
created in end grain.
Ref. PH/PC/95
Clamps
Ref. FC/200 - 200mm F Clamp
Ref. PH/CLAMP/F6 - Face Clamp
Coarse Thread
No.7 x 25mm (200pcs)
No.7/8 x 30mm (125pcs)
No.8 x 37mm (75pcs)
No.8 x 50mm (75pcs)
No.8 x 63mm (75pcs)
MAINTENANCE
Please use only Trend original spare parts
and accessories.
The accessory has been designed to operate
over a long period of time with minimum of
maintenance. Continual satisfactory operation
depends upon proper tool care and regular
cleaning.
Cleaning
n Keep the threads and clamp mechanism clear
of sawdust and resin build-up.
n Regularly clean with a soft cloth.
Lubrication
n Periodically lubricate the holes in the guide
columns with PTFE dry lubricant.
Drill Bit Care
n Ensure the drill bit is sharp.
n Check tightness of depth collar set screw.
Storage
n After use store jig in its packaging
or in a cupboard.
ENVIRONMENTAL PROTECTION
Recycle raw materials instead of disposing
as waste.
Packaging should be sorted for environmentalfriendly recycling.
The product and its accessories at the end of its
life should be sorted for environmental-friendly
recycling.
GUARANTEE
All Trend products are guaranteed against
any defects in either workmanship or material,
except products that have been damaged due to
improper user or maintenance.
-14-
Page 15
PH/JIG/AK
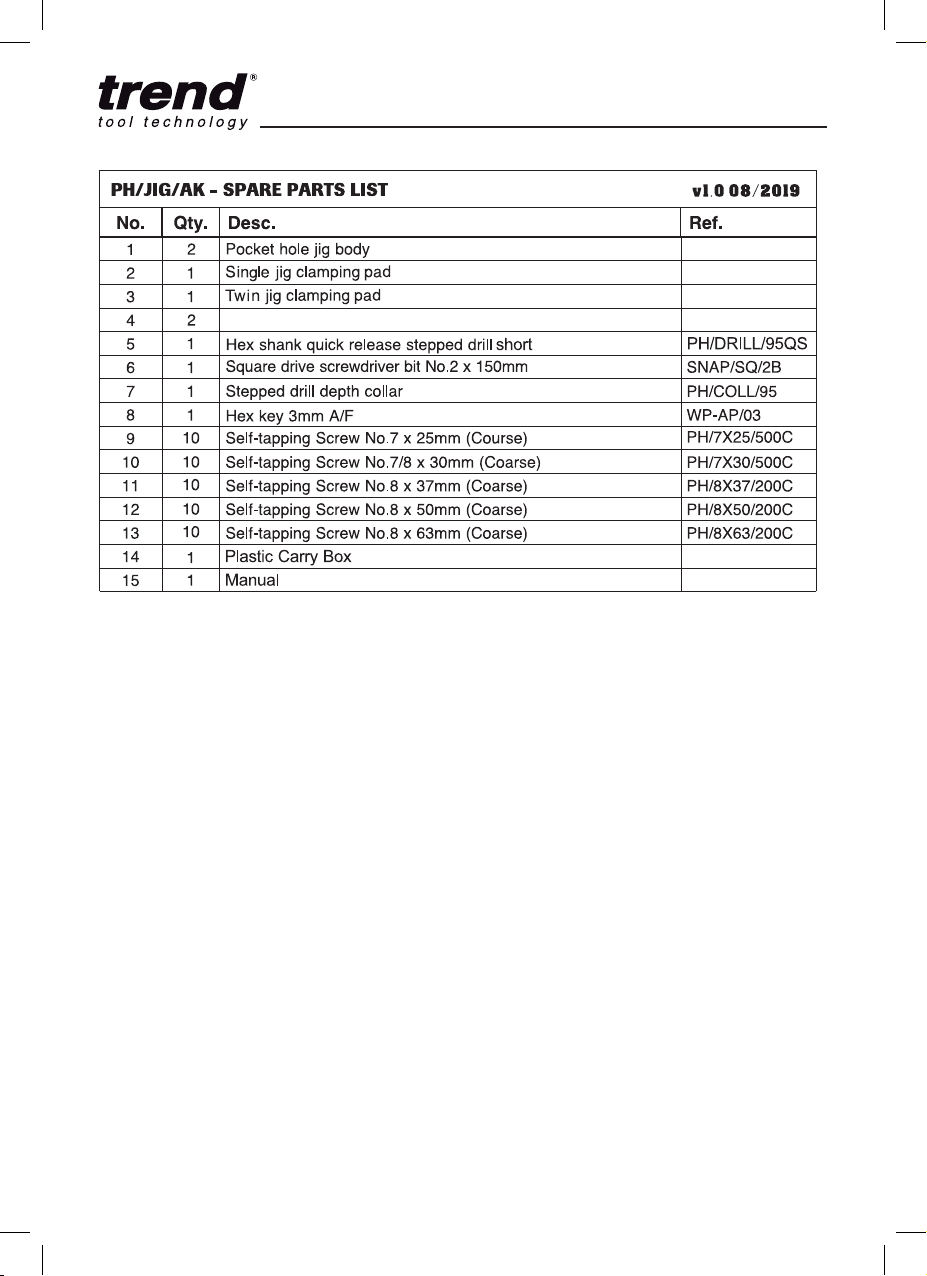
Jig placement slide adjuster
PH/JIG/BK
WP-PHB/01
WP-PHB/02
WP-PHB/03
WP-PHB/04
WP-PHB/06
MANU/PH/BK
-15-
Page 16
PH/JIG/AK
PH/JIG/BK
PH/JIG/BK - SPARE PARTS DIAGRAM v1.0 08/2018
-16-
Page 17

PH/JIG/AK
PH/JIG/BK
TROUBLE SHOOTING
Fault Cause Remedy
n Screw protrudes through
face of mating piece.
n Workpieces will not pull
together tightly when
being assembled.
n Workpieces do not sit
flush or move when
being assembled.
Depth collar set too high causing
drill bit to drill too deep.
Can occur on very hard woods,
when thread of self-tapping
screws are holding on both
pieces of material and pushing
them apart.
Screws tend to follow grain of
the wood.
Adjust height of collar on
drill bit.
Clamp material more tightly or
adjust collar so drill point nearly
breaks through first piece of
material.
Clamp more securely to prevent
material movement when
assembling. Use face clamp for
edge to edge joints.
-17-
Page 18

Trend Machinery & Cutting Tools Ltd.
Odhams Trading Estate St Albans Road
Watford WD24 7TR England
Tel: 0044(0)1923 249911
MANU/PH/BK V1.0
5 027654 065785 >
© Copyright Trend 2019. No part of this publication may be reproduced, stored or transmitted in any form without prior permission.
Our policy of continuous improvement means that specifications may change without notice. Trend Machinery and Cutting Tools
cannot be held liable for any material rendered unusable or any form of consequential loss. E&OE
RECYCLABLE
[email protected]
www.trend-uk.com
Page 19
3-in-1
tool technology
POCKET HOLE JIG
Please read these instructions before use.
 Loading...