

Page 1
1
User Manual
TREKMATE
GAL-002 & GL-002
Page 2

2
Page 3

3
Thank you for purchasing this product
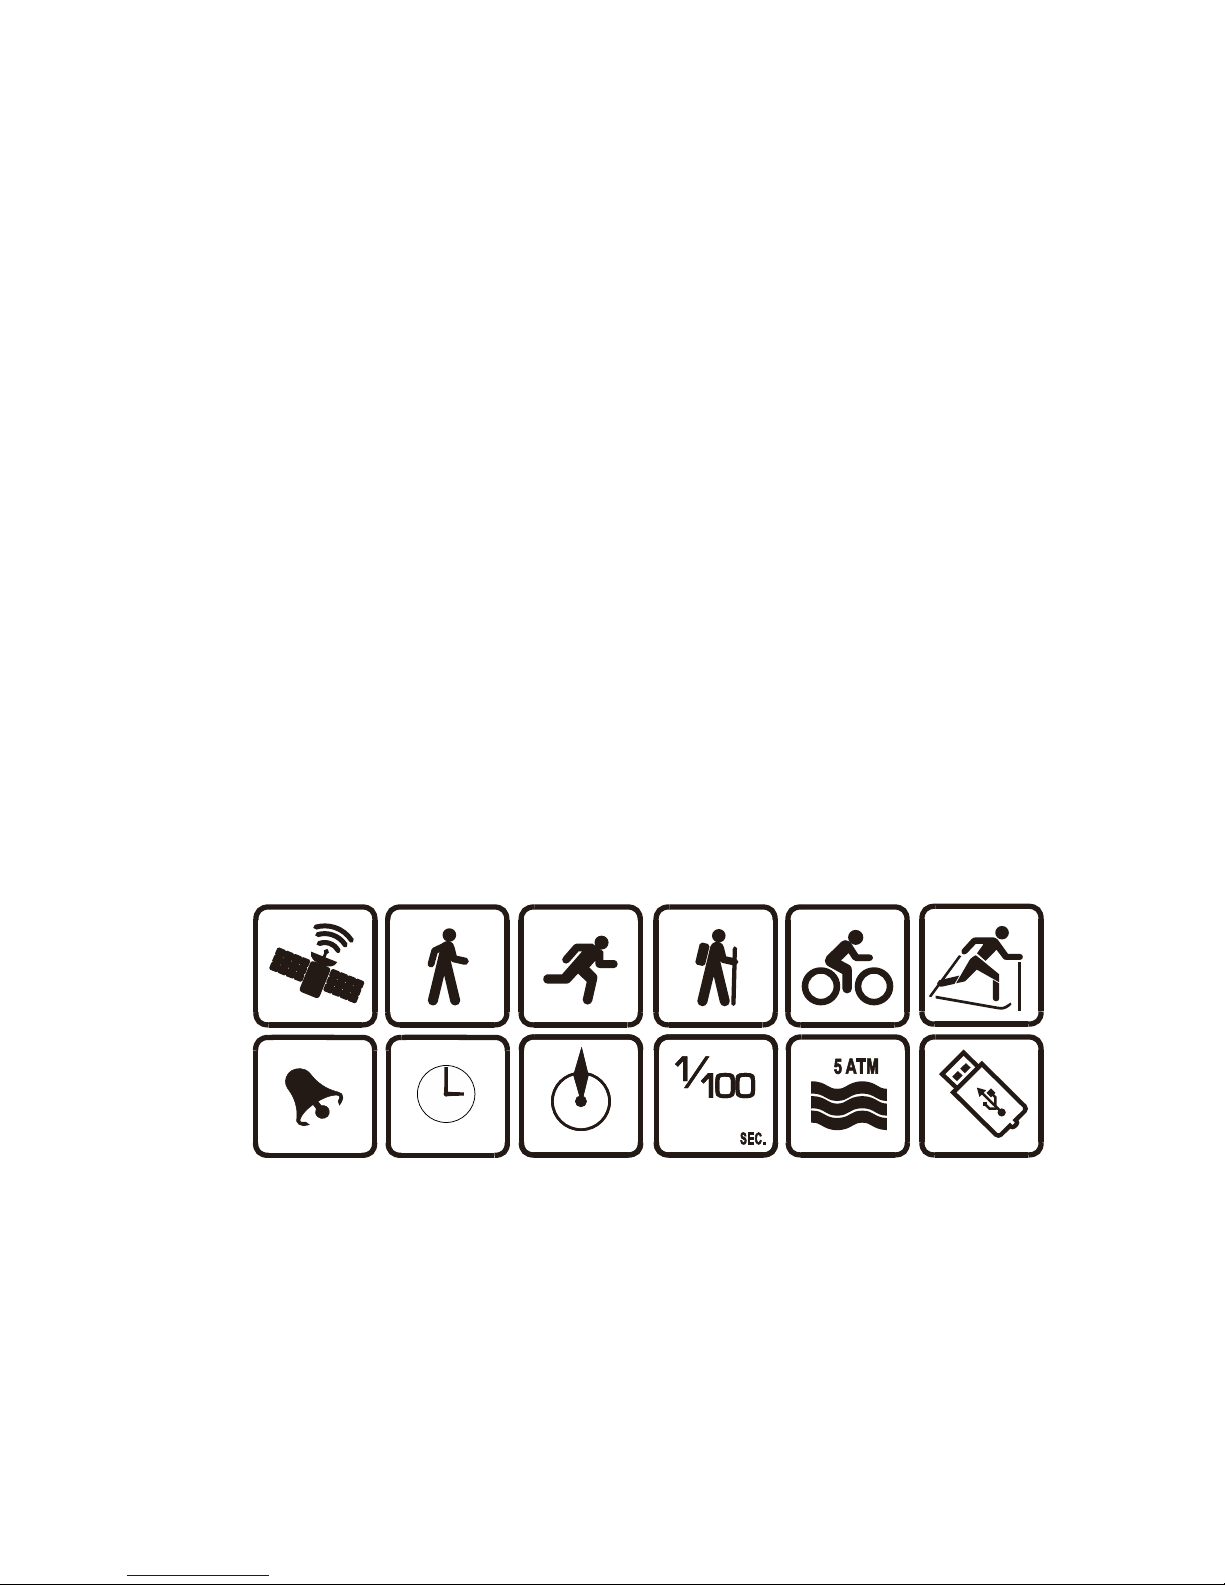
TREKMATE is a water proof, analog (GAL) and digital (GL) GPS watch for
sport applications. Please read this user manual for using this sport watch
efficiently.
Care and maintenance
Please follow care and maintenance instructions described in this user guide. Do
not attempt to disassemble or repair your TREKMATE watch. Do not hit your
product. Do not expose your product to extreme high temperature or direct
sunlight. Keep your product in a clean, dry and of room temperature
environment. Clean your product with clean cloth (soaked with warm water).
Apply mild soap to clean off dirt or smears if necessary. Keep your product away
from strong chemicals such as: gasoline, acetone, alcohol, pesticides, adhesives
and paints as they may damage seals, case and coatings of your product.
Water proof
Your TREKMATE watch is water proof at 5ATM. That is, you may wear it for
swimming or other water sports but not deep water or free diving.
Important!
Do not press any button when swimming or when in contact with water.
Press any button of your product when submerged under water may lead
to product failure. Application software: Track Star.
中文操作手
Page 4

4
Operation System
Windows XP SP2、Windows Vista、Windows 7
Hardware requirements:
Pentium III CPU 1GHz or better / RAM 1GB / Space of hard disk 500
MB.
Page 5

5
Contents
Thank you for purchasing this product ................................... 3
Care and maintenance .............................................................. 3
Water proof .................................................................................................. 3
Operation System ...................................................................... 4
Contents ..................................................................................... 5
Product overview ....................................................................... 7
Features and functions ................................................................................. 7
Specification ................................................................................................ 8
Operation instruction ................................................................................. 10
Use your product for the first time ............................................................. 12
Charge the internal battery of your watch ............................ 14
Charge with external power cord ............................................................... 14
Charge with backup battery ....................................................................... 14
Charge your watch ..................................................................................... 15
Set up time of T1 and T2 ......................................................... 17
How to set up the T1 time zone.................................................................. 19
How to set up year, month, day and hours and minutes ............................. 19
How to reset seconds to 00 ........................................................................ 20
How to set up DST of T1 time zone ........................................................... 20
How to set up key tone (TONE) ................................................................. 20
How to set up the T2 time zone.................................................................. 20
How to exit setup function ......................................................................... 21
How to use the stopwatch function ........................................ 21
How to do split timing ............................................................................... 22
How to do lap timing ................................................................................. 23
Navigation function ................................................................ . 23
Page 6

6
How to access the navigation function ....................................................... 24
How to store destination data ..................................................................... 25
How to navigate to selected destination ..................................................... 26
How to delete a destination record ............................................................. 28
Sport mode ............................................................................... 29
How to enter the sport mode ...................................................................... 29
How to review your exercise data in real time ........................................... 30
How to review historical exercise data ....................................................... 32
Set up automatic GPS signal receiving interval .................... 33
Alarm Function ....................................................................... 35
Memo Function........................................................................ 37
Hourly Chime Function .......................................................... 39
How to adjust position of dials (GAL exclusive) ................... 40
Disclaimer ................................................................................ 41
Users’ liabilities ......................................................................................... 41
CE .............................................................................................................. 41
ISO 9001 compliant limited warranty ........................................................ 41
Disclaimer .................................................................................................. 42
Disposal of old product ........................................................... 42
City Name List ......................................................................... 43
Page 7

7
Product overview
Features and functions
● Analog and digital (GAL)
An innovative timepiece with both analog and digital features in combination
with synchronized GPS clock, a practical sport watches that merges high-tech
design with leisure activities.
● Digital (GL)
Digital time display with synchronized GPS clock, powered by high-capacity
battery that lasts up to 7-hour GPS actions, the GL model integrates all-weather
sporting more comprehensively, a practical sport watch that equally merges
high-tech design with leisure activities.
● GPS
Embedded mini and powerful GPS chips can receive and decode satellite signals,
record and display coordinates of location, and even provides navigation
services.
● Dual time
Your TREKMATE watch can display two time data, T1 and T2, in different time
zones concurrently. You may select any two desired time zones and have them
automatically calibrated at specified time.
● Sports mode
This is a powerful product for managing your outdoor exercise activities. You
may set up and review variety of data of each exercise session including: time,
speed, peak speed, distance, elevation, location coordinates and directions. You
may keep up to 10-20 hours of exercise tracking data. You may upload your
exercise tracking data to Track Star platform for management and permanent
record keeping.
Page 8
8
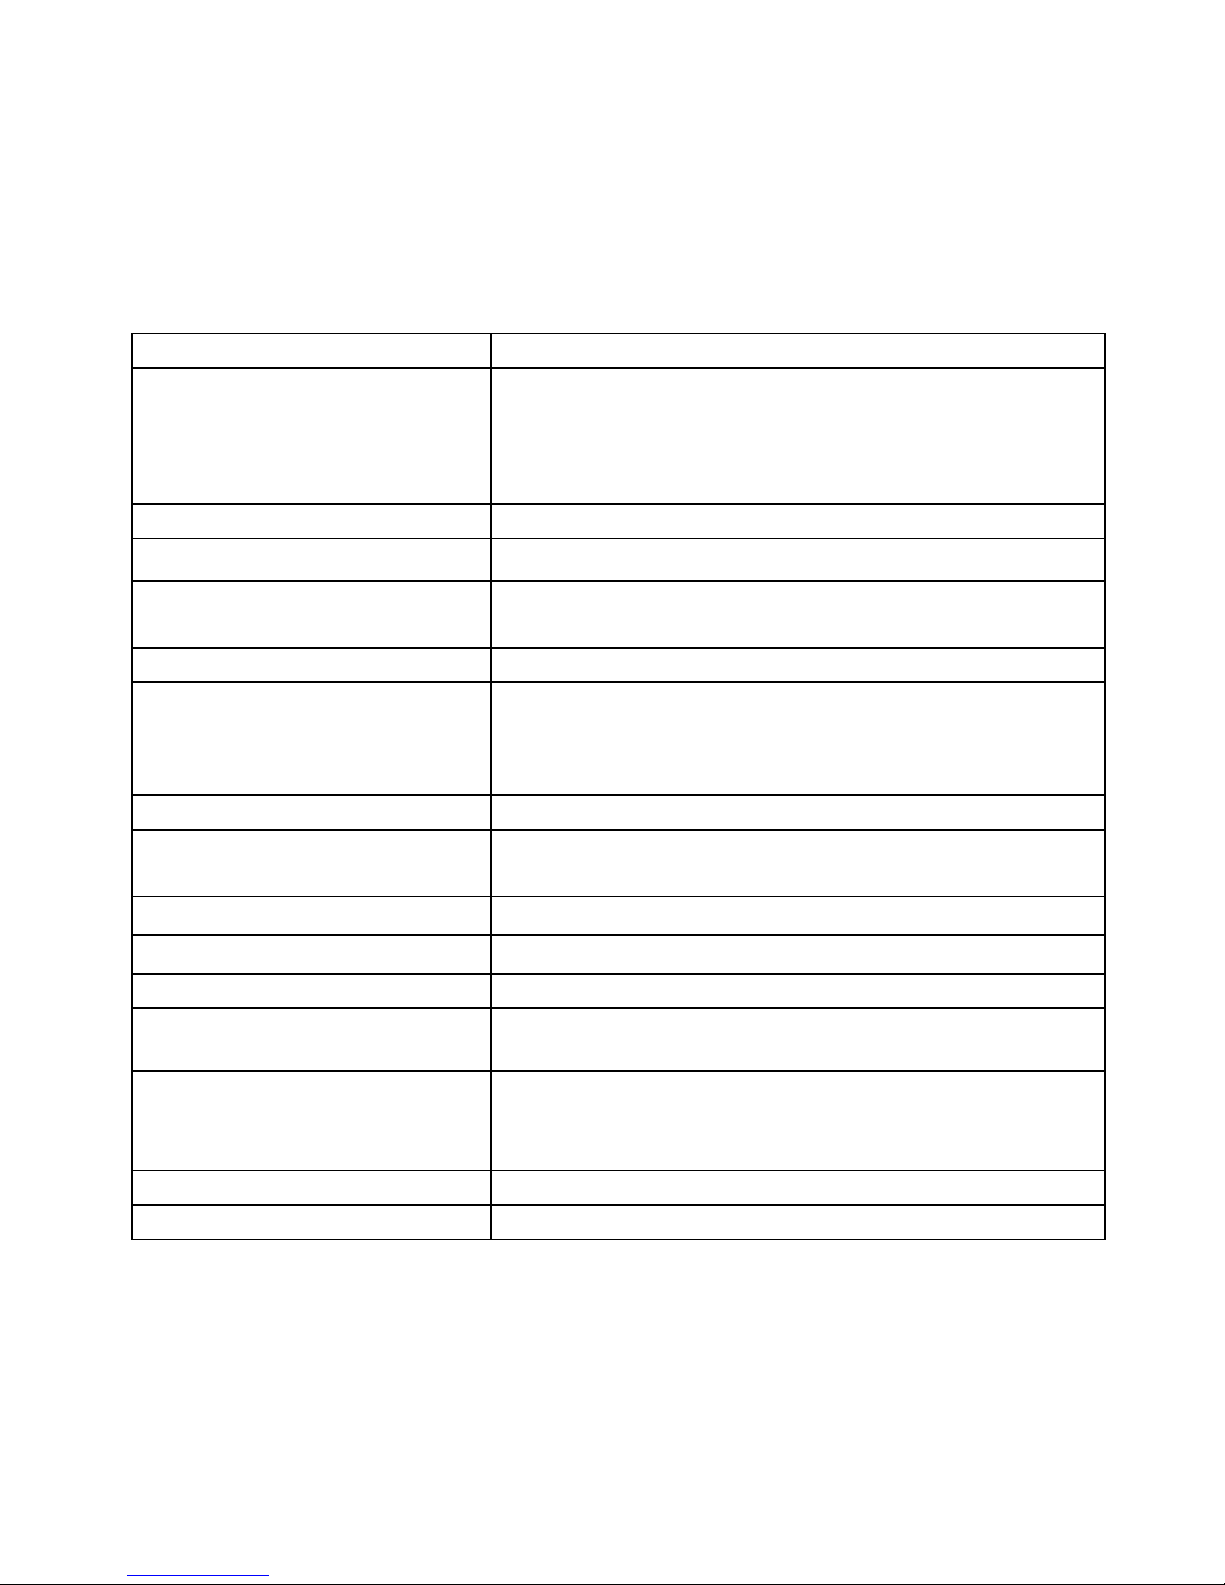
Specification
Analogue (GAL)
Displays hour, minute and second (12hr format)
Digital (GAL & GL)
Displays year, month, day, weekday,hour, minute
and second (24 hr format). Provides stopwatch,
navigation, exercise modes, alarm clock, memo,
and around-the-clock time report functions.
Max. number of destinations
9
Storage space
up to 10-20 hours.
Positioning accuracy
<25m radius
Antenna
Embedded
Power
Rechargeable lithium battery
GAL: PD3032(180mAh)
GL: PD3048(300mAh)
Dimensions
Φ51 XH18.8 mm
Weight
About 76.8 grams (GAL)
About 76.2 grams (GL)
Operating temperature
-10℃~45℃
Charging temperature
0℃~45℃
Water proof
50 meter depth (5ATM)
Battery life
GAL: 4 hours with GPS on, 60 days with GPS off.
GL: 7 hours with GPS on, 90 days with GPS off.
Other
Max. Navigation Distance 9999km, approx.
Speed display: max. 250 km
Altitude display: max. 9999m
Timing accuracy
GPS accuracy
Stop watch accuracy
1/100 second
Page 9
9
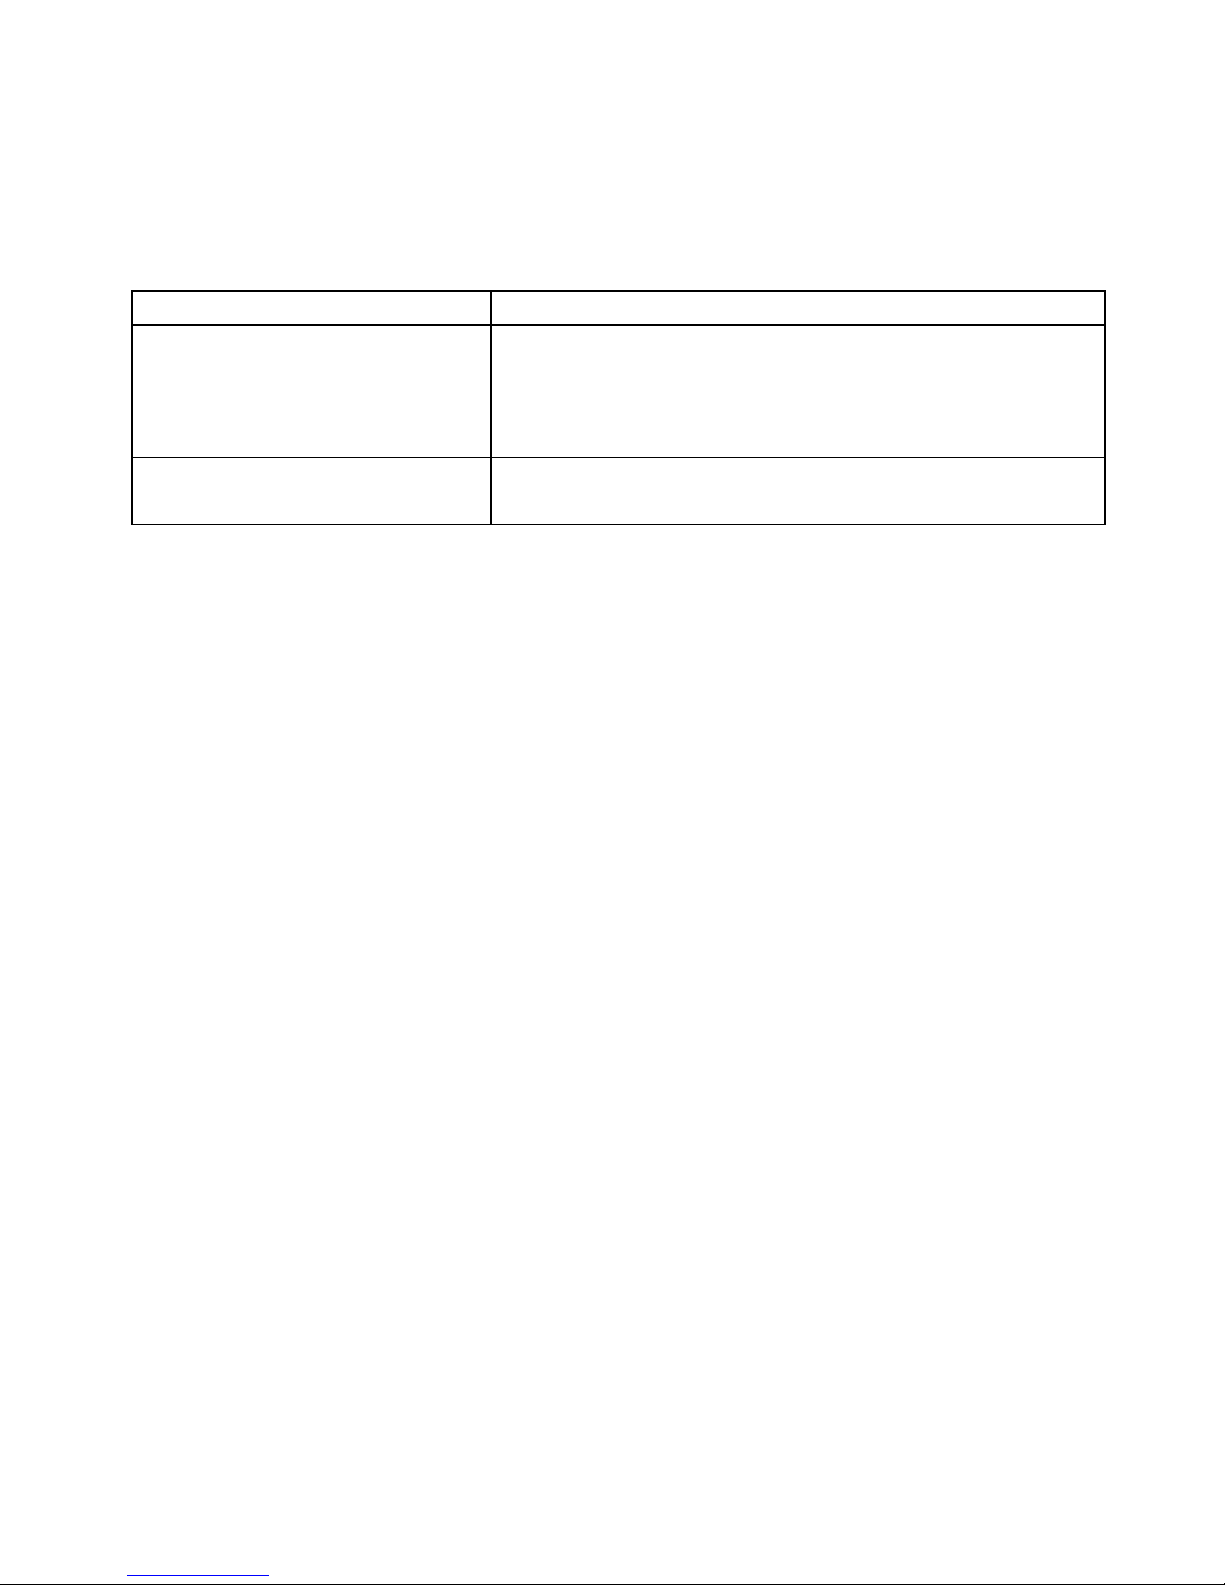
Background light
EL Backlight
Standard accessories
Charger
USB cable
Application software CD
User manual
Optional accessories
(Not supply)
3.7V Li-ion Rechargeable Battery
(Model: Nokia BL-5B)
Notes:
Specifications and functions of this product are subject to changes without
notice.
Department of Defense may selectively interrupt GPS signals on “as
require” basis and may downgrade positioning accuracy to more than 100
meters away from the actual location.
User information, including exercise tracking and destination location data,
can be permanently kept in memory of your product without external
power supply.
Page 10
10
Operation instruction
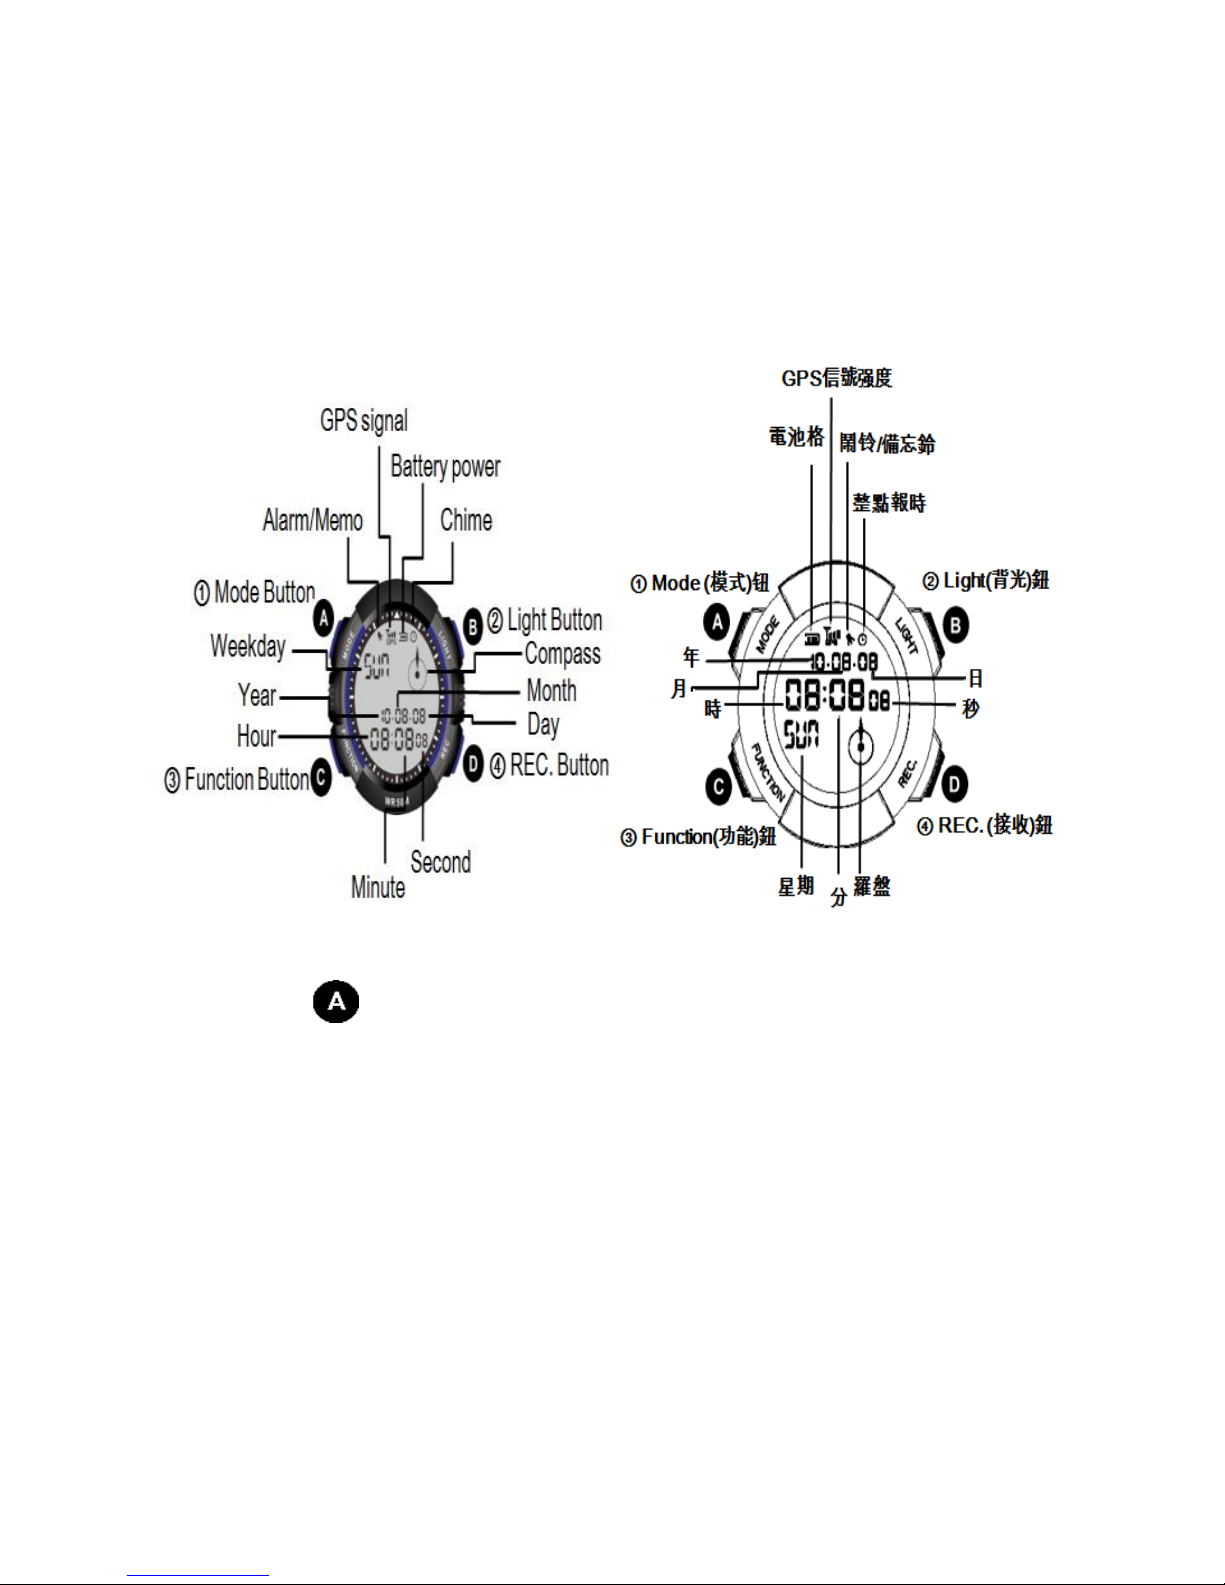
Buttons
Mode button ( ):
Press this button in standard time mode to switch between T1 or T2
display.
Press and hold to this button in standard time mode to enter the T1 or T2
setup screen.
Press this button to confirm your modifications or back to last screen.
GAL
GL
Page 11
11
Light button ( ):
Press this button in standard time mode to turn on the background light.
Press and hold this button in GPS mode to turn on the background light.
Press and hold to this button in standard time mode to use stopwatch
function.
Press or press and hold this button in menu mode to select next option or
to increase values of selected item.
Function button ( ):
Press this button to open the menu page.
Press this button in time adjustment mode to switch between settings.
REC. button ( ):
Press this button twice in standard time mode to check receiving time and
location coordinates.
Press and hold to this button in standard time mode to do a forced signal
receiving.
Press or press and hold this button in menu mode to select last option or to
decrease values of selected item.�
Page 12

12
Use your product for the first time
Step 1: charge your battery
Your product is set at sleep mode to save battery power when delivered to you.
Please fully charge the battery with supplied charger before you use product for
the first time.
Please fully charge your battery at least 6 hours for the first time. Your battery
life varies with its use method. In continuous GPS mode:
GAL: max. 4 hours; 60 days (1440 hours) in standby mode; approx.
GL: max. 7 hours; 90 days (2160 hours) in standby mode; approx
See charging your battery for information about how to charge your
battery.
Step 2: set up your product
Place the watch on the charger and connect the USB cable to PC,
this will power on the watch (the Figure shows normal charging
state).
See Page 17 on how to set up date and time for T1 and T2 (default time
zone is UTC).(T1 and T2 time setting)
GAL
GL
Page 13

13
For the first time using your product, the analog digital watch (GAL) must
be manually set for its hand-positions, otherwise the hands will display
incorrectly. See Page 41 (Adjusting Hands).
After one minute the digit section of your watch switches to time mode
and the dial section starts moving if no operation run at your product.
(This function is not provided in the digital model (GL)).
Step 3: receive GPS signal, calibrate date and time
(1) Date and time data are received at your product through satellite signal.
Please move to an open outdoor space after setup to do GPS data
detecting.
(2) For best receiving quality please make sure that your product’s antenna is
not blocked and is pointing to the sky above.
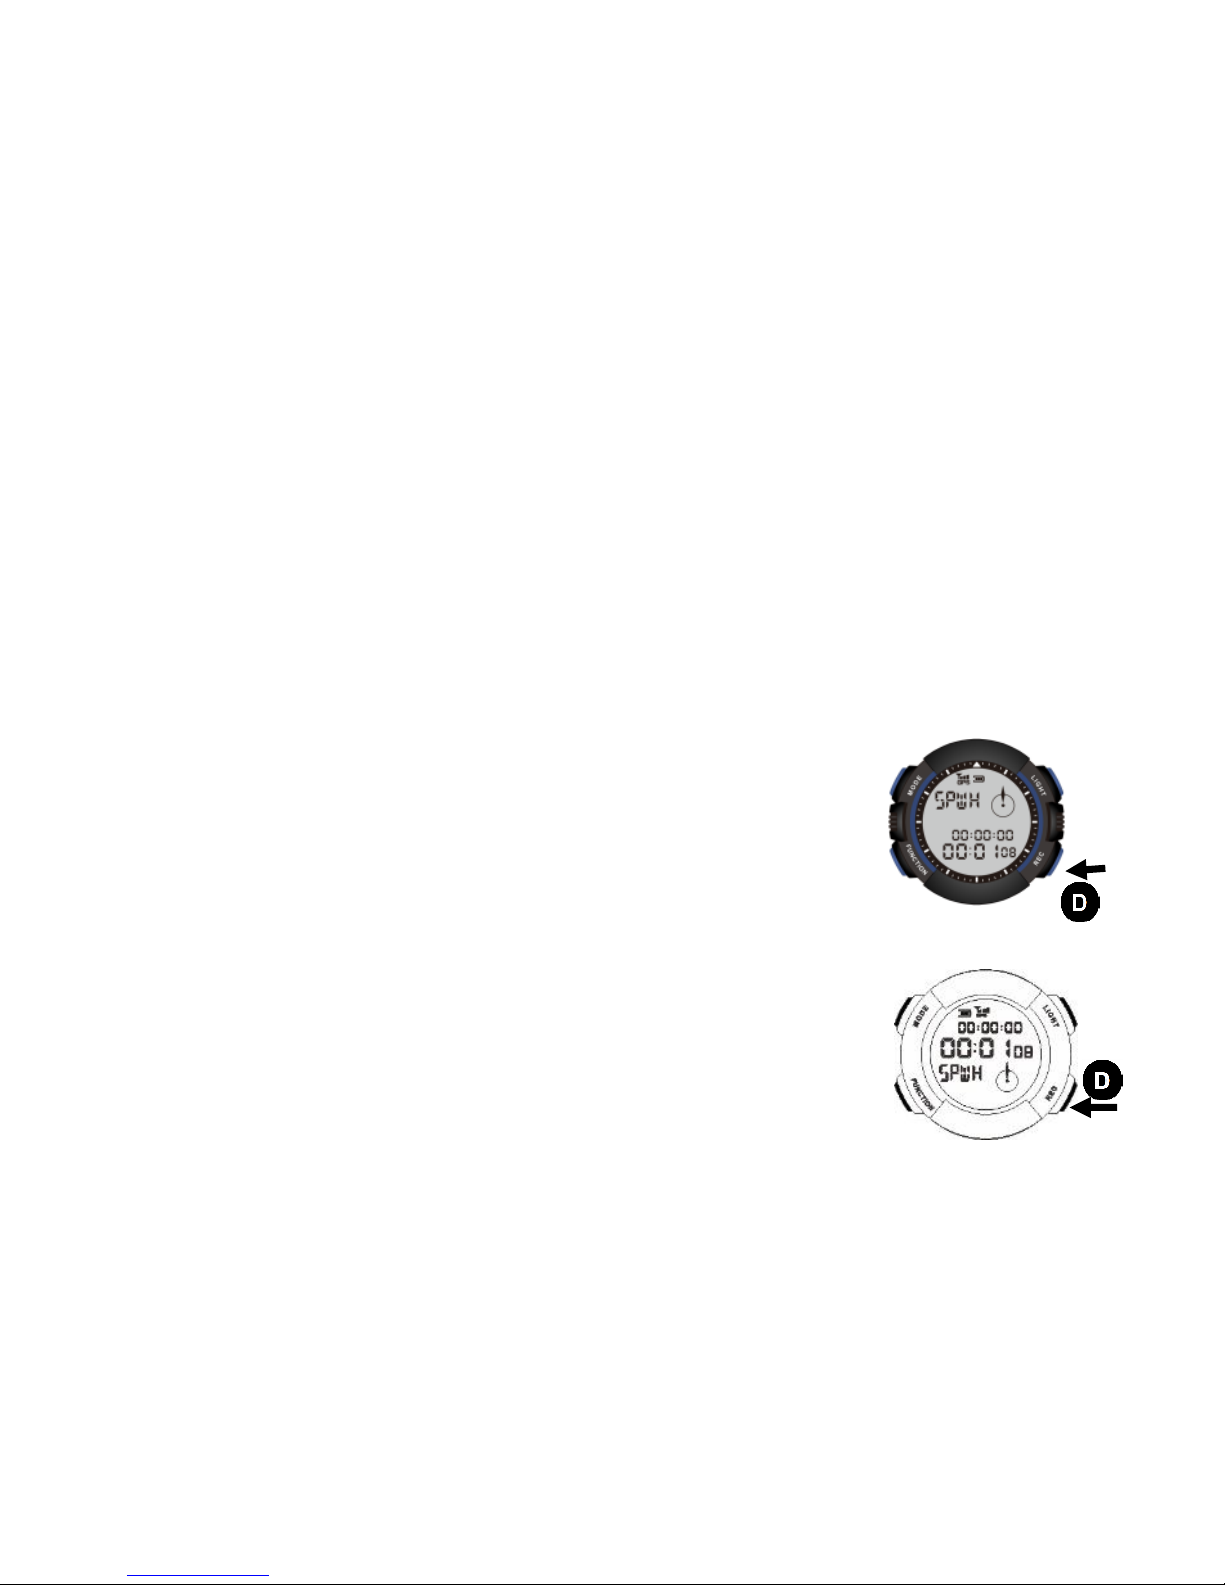
(3) Press and hold the D button for 2 seconds in time mode until the GPS
detecting screen displays.
(4) Remain at the same place and wait for detecting. It may take longer time
to complete the detecting if you are moving. You can move around after
the GPS detection is completed.
(5) After the GPS detection is completed, press the D button in time mode to
check the time and coordinates of signal receiving.
Page 14
14
Charge the internal battery of your watch
When message "LOW" appears and battery capacity icon is flashing, or start
using your watch for the first time please do one of the following to charge its
internal battery.
Charge with external power cord
Connect the USB cable’s mini plug to the charger and the other end to a
computer’s USB port.
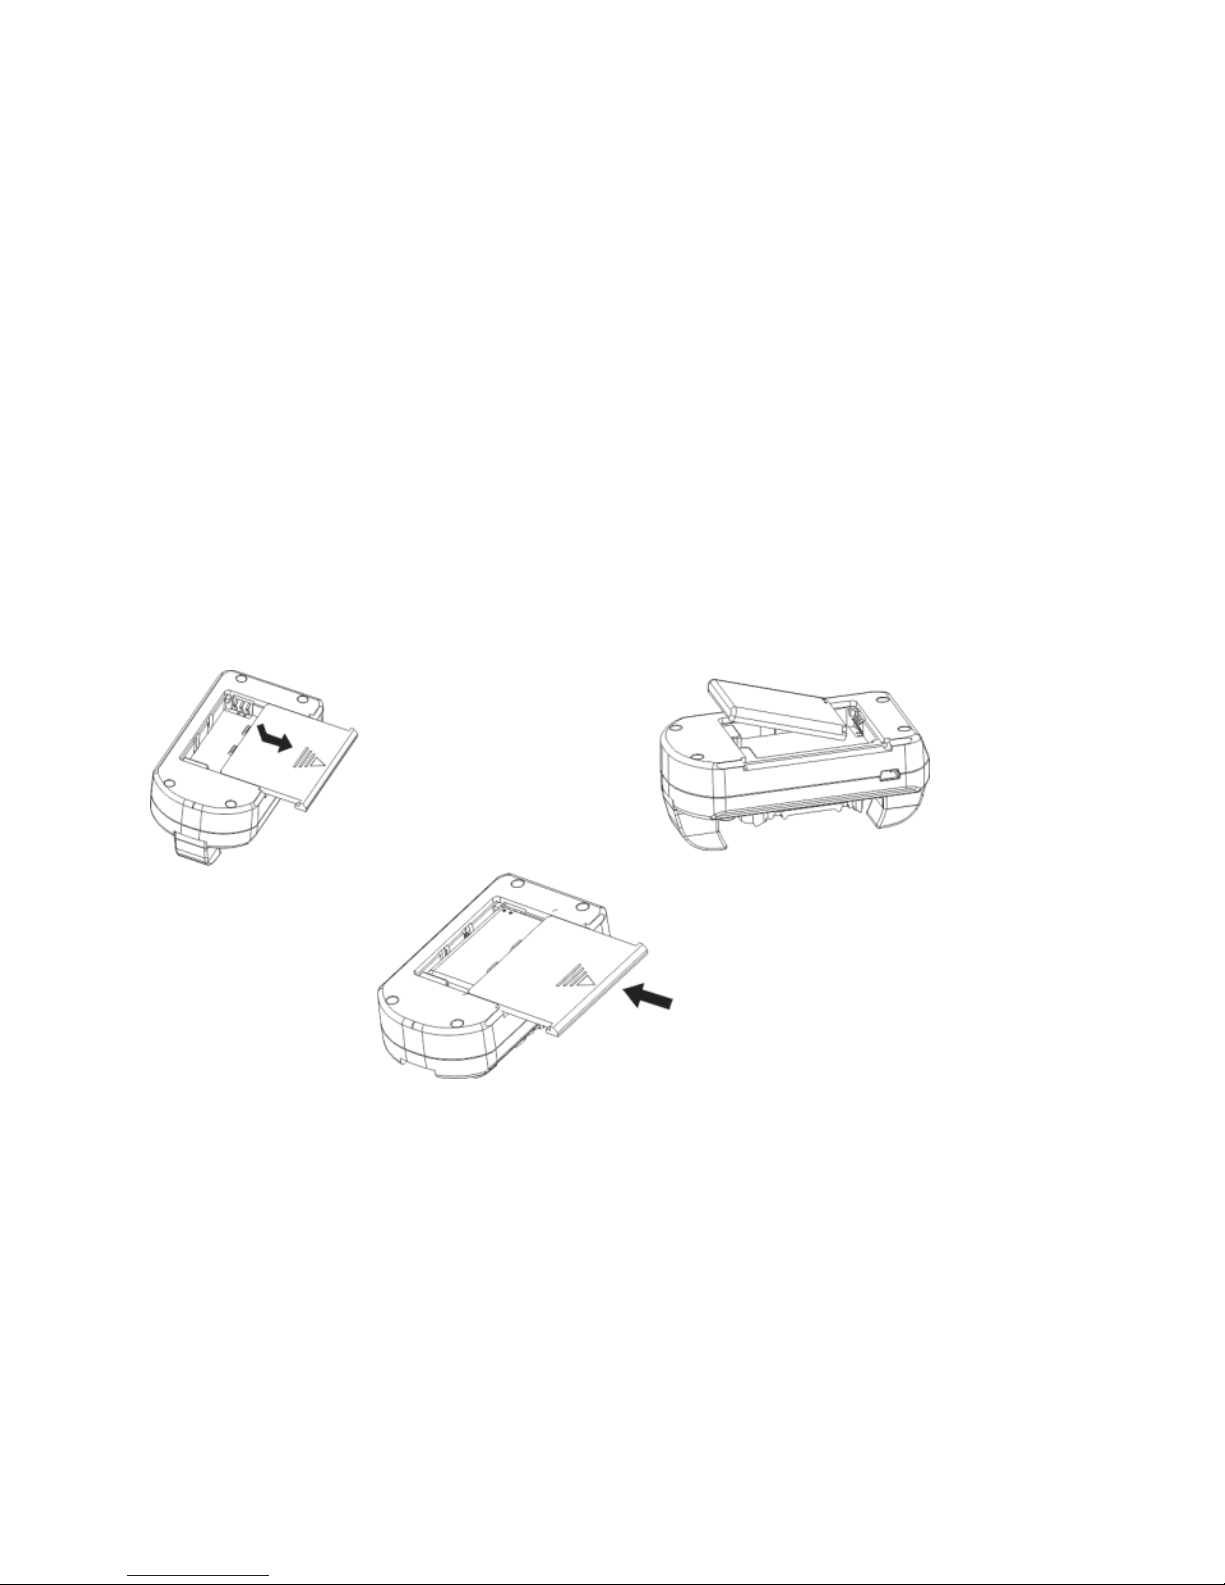
Charge with backup battery
① Open battery
cover
② Insert battery
③ Close battery cover
Page 15
15
Charge your watch
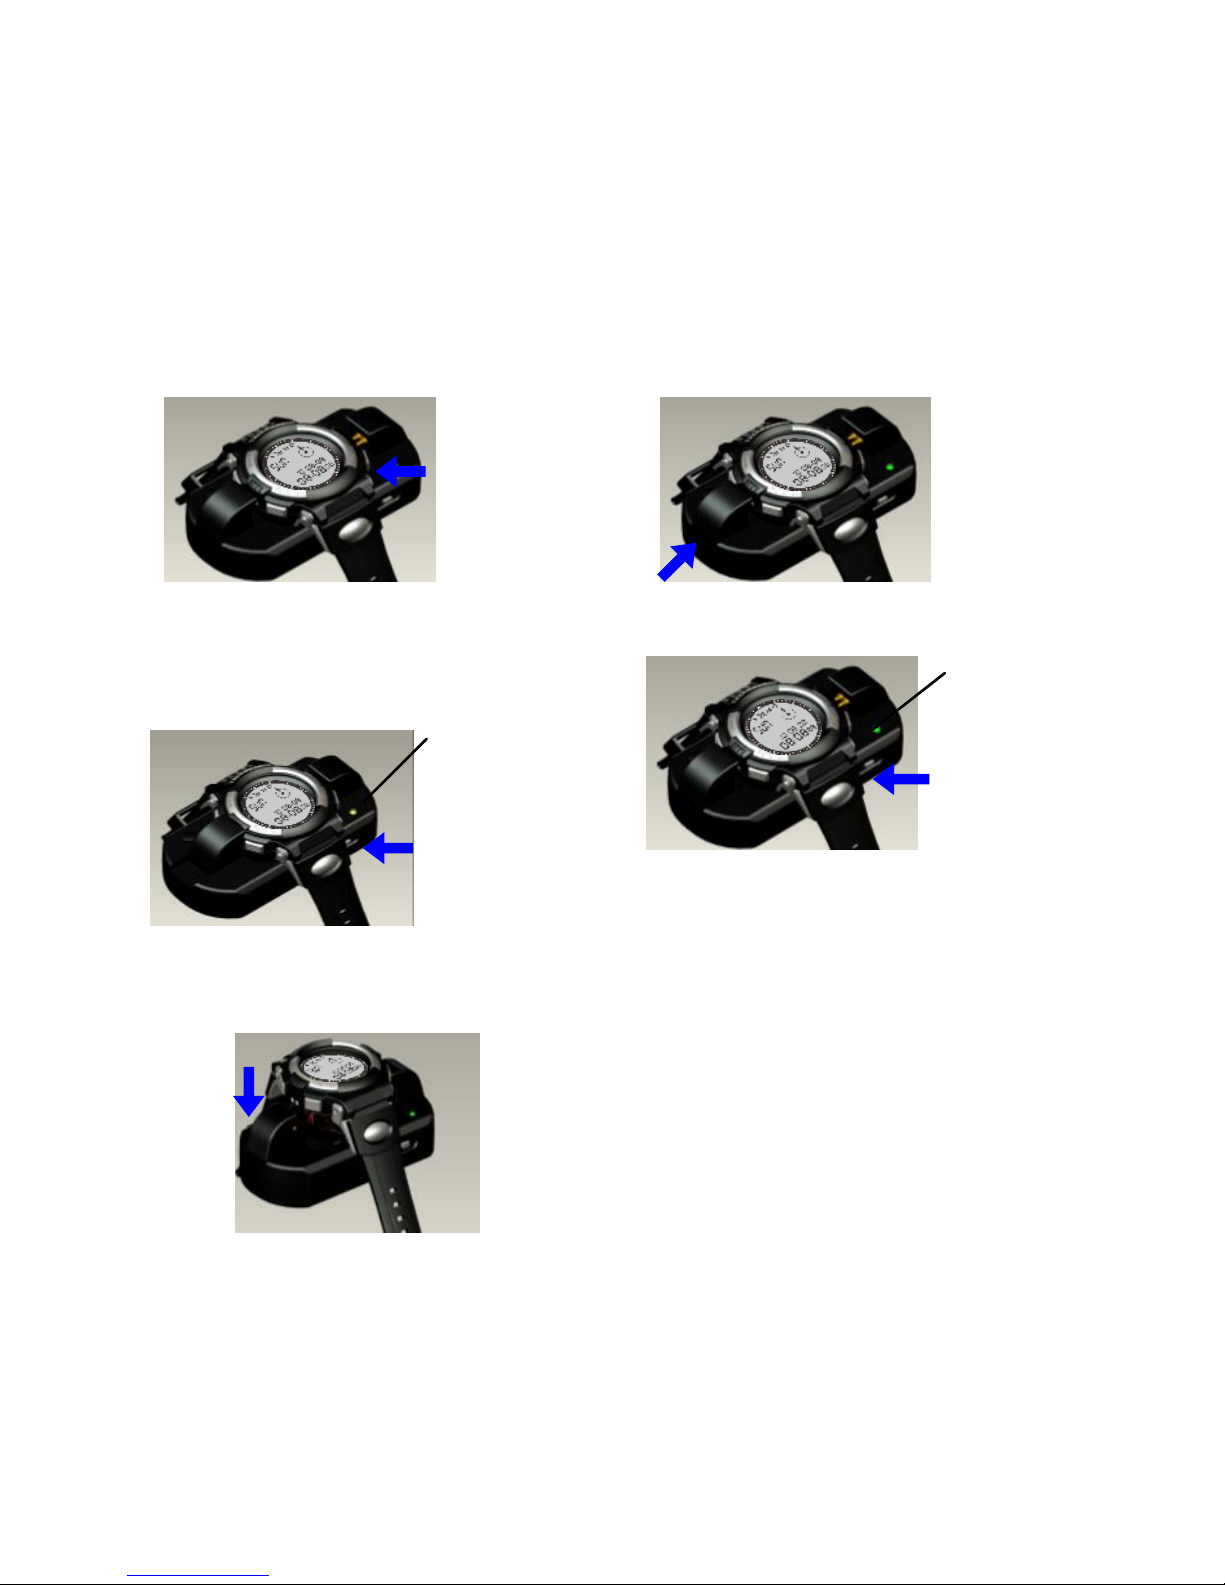
(1) Place your watch on top of the
charger’s charging tray.
(2) Press your watch to until it is firmly
attached to the charger.
(3) Press the charging button and
the charging indicator light turns
on in orange color.
(5) Remove your watch from the
charger.
(4) The battery is fully charged when the
Important!
If a battery remains in the charger
the later charges both the battery and
the watch. The battery is fully
charged when the indicator light
turns green.
You may charge only the battery in
charger by switch on the charging
button. The battery is fully charged
when the indicator light turns
green.
The watch will reset (resume
default setting) if you place the
water on the charger reversely.
Note the right
position
Green
Switch to OFF
position
Orange
Switch to
ON position
Press
down
Page 16

16
Time required for a fully charge
It takes 4 hours to fully charge a watch having a low-power battery.
Charging times of your backup battery
A fully charged backup battery can fully charge your GAL watch for three
times or GL watch for 2 times.
After a watch is removed from the charger and the LED indicator turns
green when the charging switch is ON, then there is enough remaining
capacity in the backup battery for another charging.
If the LED indicator turns off then the backup battery is exhausted. Please
recharge it before charging another watch.
How long the internal battery of your watch can last
Around 60 days (GAL)/ 90 days (GL) for time mode only.
Up to 4 hours (GAL)/ 7 hours (GL) for continuous GPS detection.
Actual power supply time of the internal battery depends upon several
usage conditions.
Charge and discharge repeatedly may shorten the power supply time of the
internal battery.
Capacity of the internal battery
Internal battery’s capacity is low when battery capacity icon turns blank.
Please charge it immediately.
When battery capacity is low a “LOW” message displays, indicating
capacity is not enough, if you turn on the GPS function.
GPS function cannot be initiated when remaining battery capacity is low
and will be aborted when battery capacity gets low.
Page 17
17
Life of the internal battery
After 400 times of charging and discharging the internal battery’s capacity
may decrease to 70% of its original one. Its actual life depends upon
several different operation conditions.
Operation
Please keep contacts of your charger clean. Smeared contacts may cause
poor connection. Wipe these contacts clean with clean cloth or lint free
paper. Do not touch these contacts with needles, pins or other metal
objects.
Performance of your internal battery may deteriorate in a low temperature
environment and speed up the prompting of "LOW" message.
Temperature range for charging is 0℃ to 45℃.
If your charger does not charge, please turn of the charging switch of your
charger and turn on again for another try. If the problem persists please
contact with your local dealer.
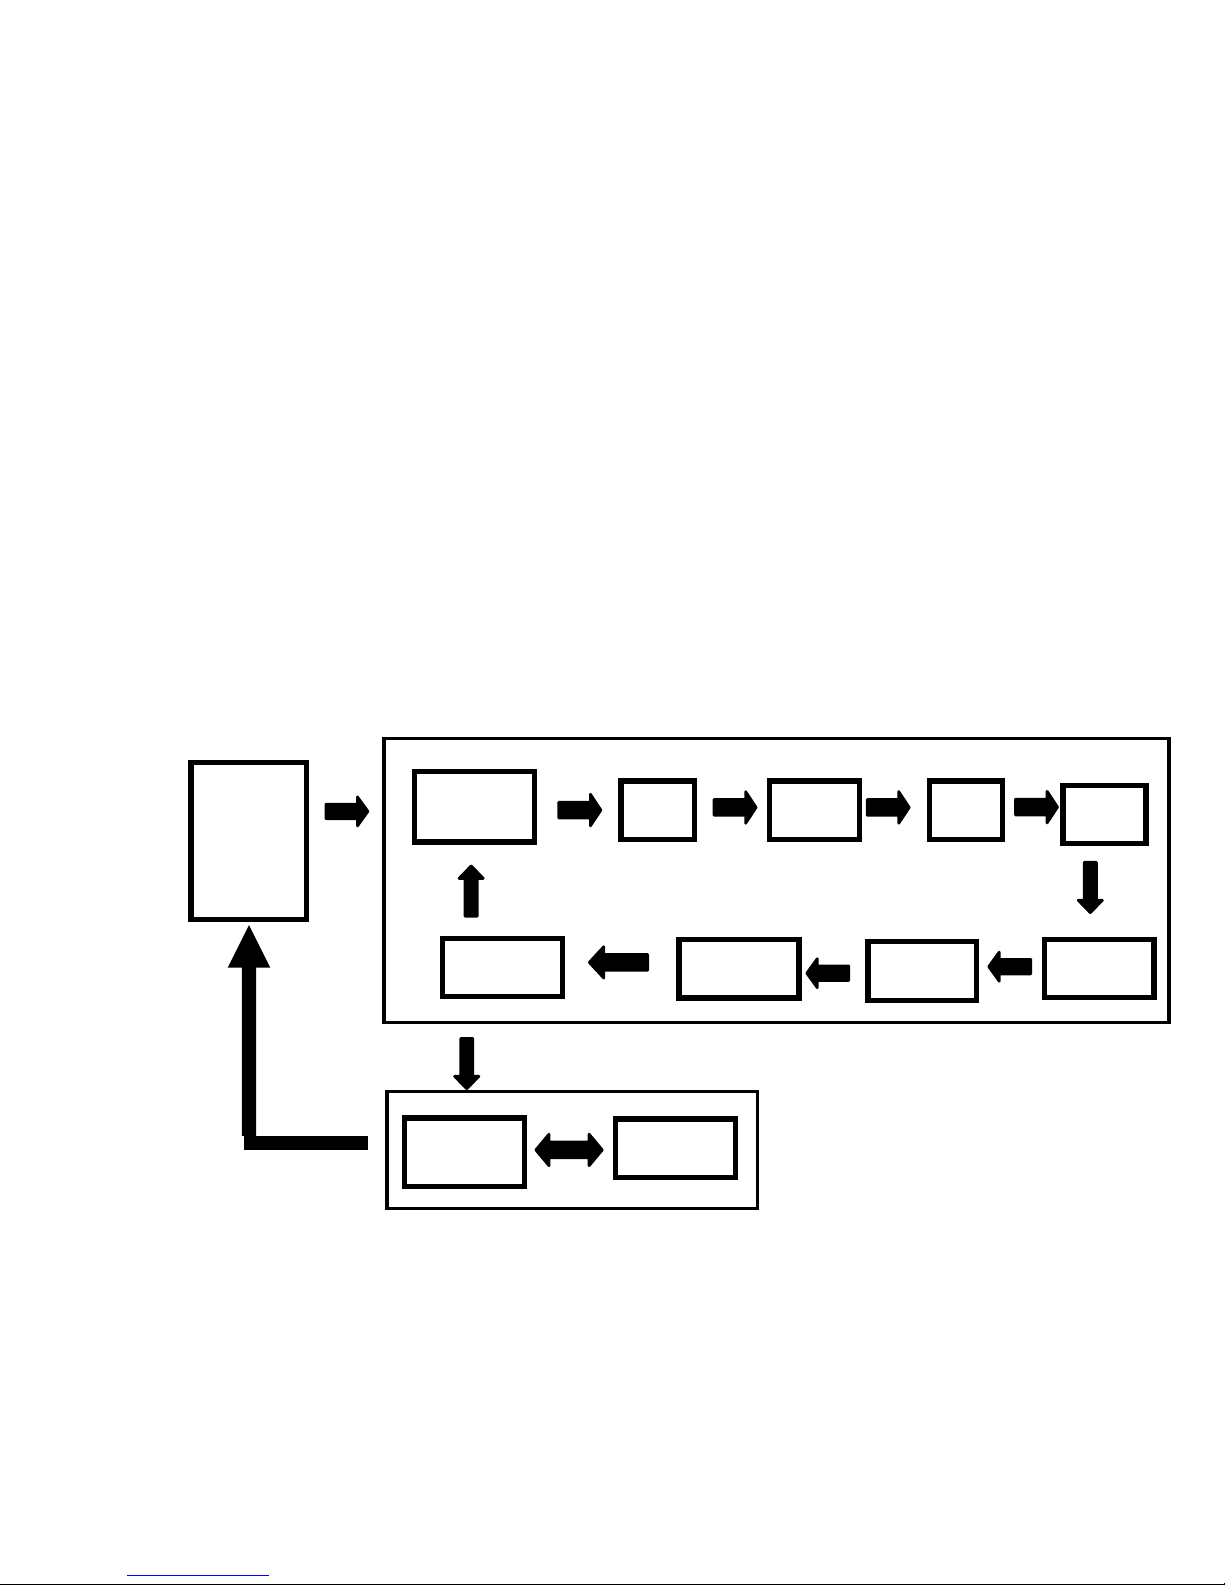
Set up time of T1 and T2
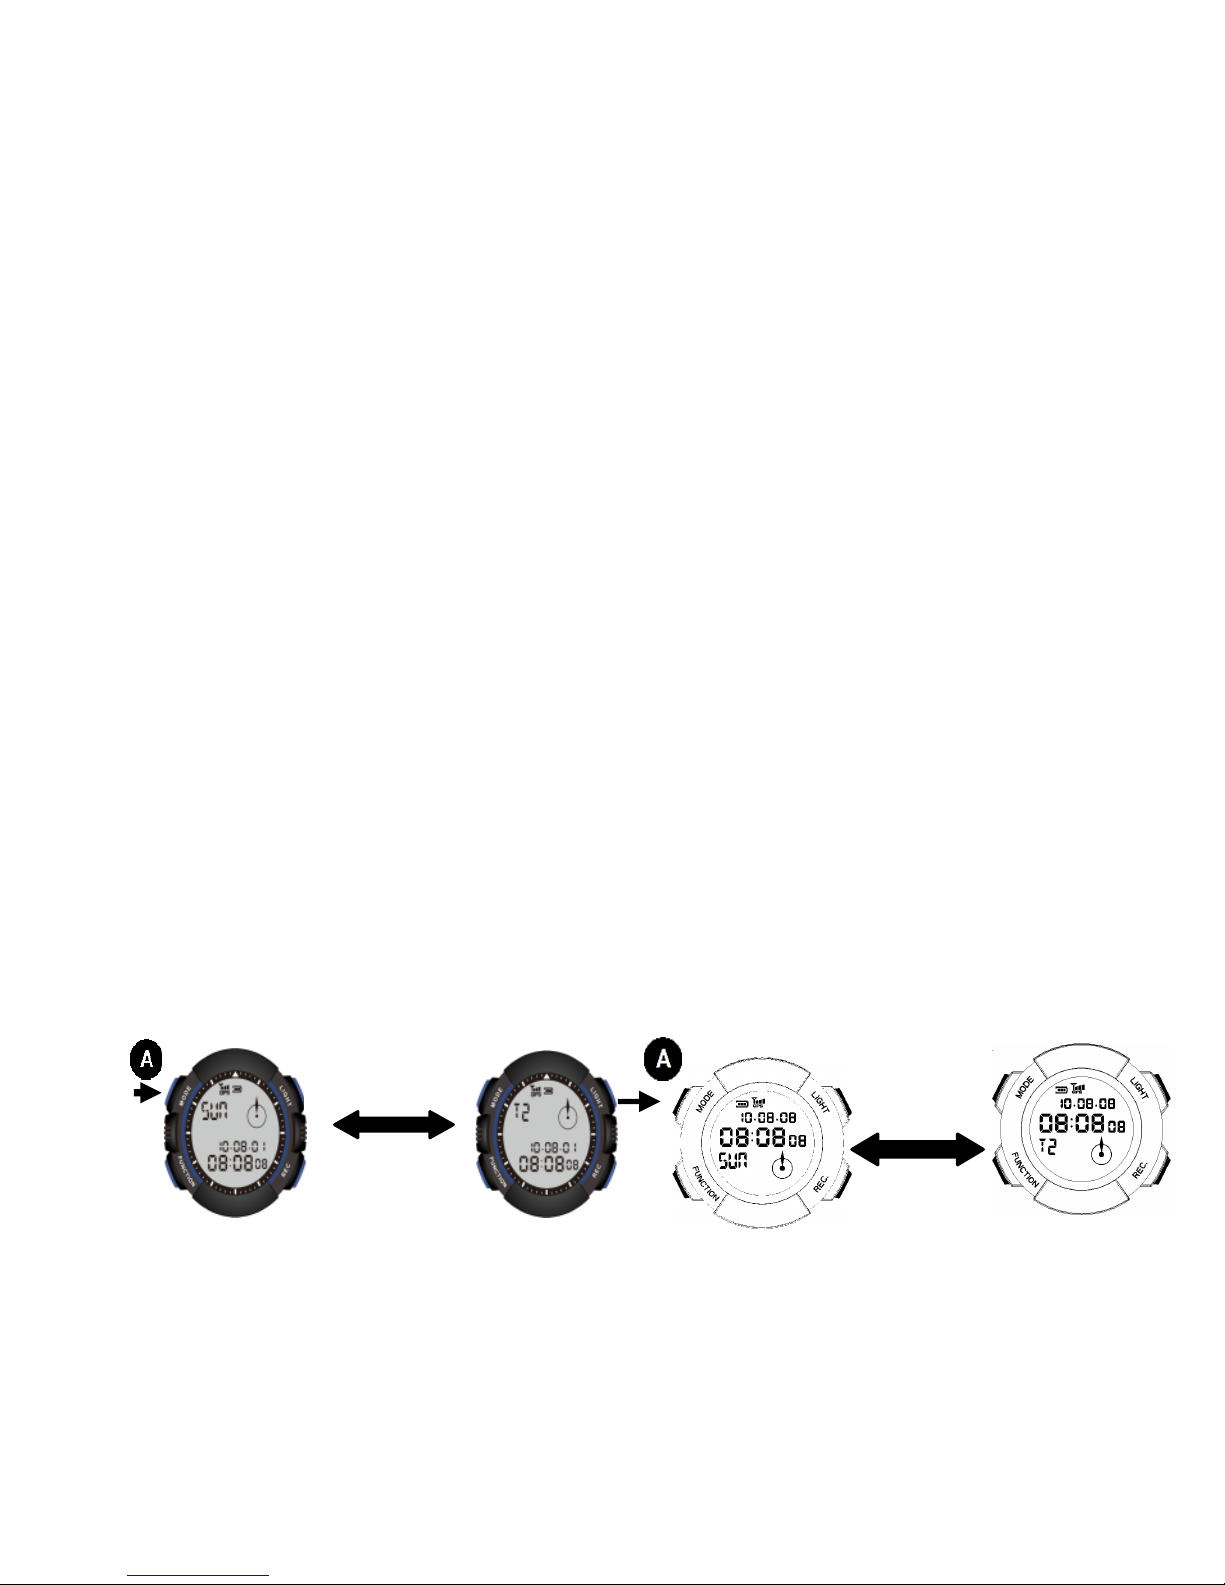
Your TREKMATE watch features dual display of time: T1 and T2.
The dial section display time of T1.
Illustration: Switching between T1 and T2 times.
Click
Click
Button A
GAL
GL
Page 18
18
T2 time
zone
DST
C
C
T1 time
zone
Year
Month
Day
Hours
Minutes
Seconds
DST
A
A
C
C
C
C
TONE
Time
function
screen
A
C
C
Basic setting of T1 and T2 are described below.
Location
Resident time zone: time zone where you use your product.
This setup value may affect each time value in the global time function.
Current date and time
You are required to manually set up date and time if the location you are in does
not support automatic time setup by GPS.
DST: open and close the daylight saving time function.
T1 and T2 setup flowchart:
Page 19
19
How to set up the T1 time zone
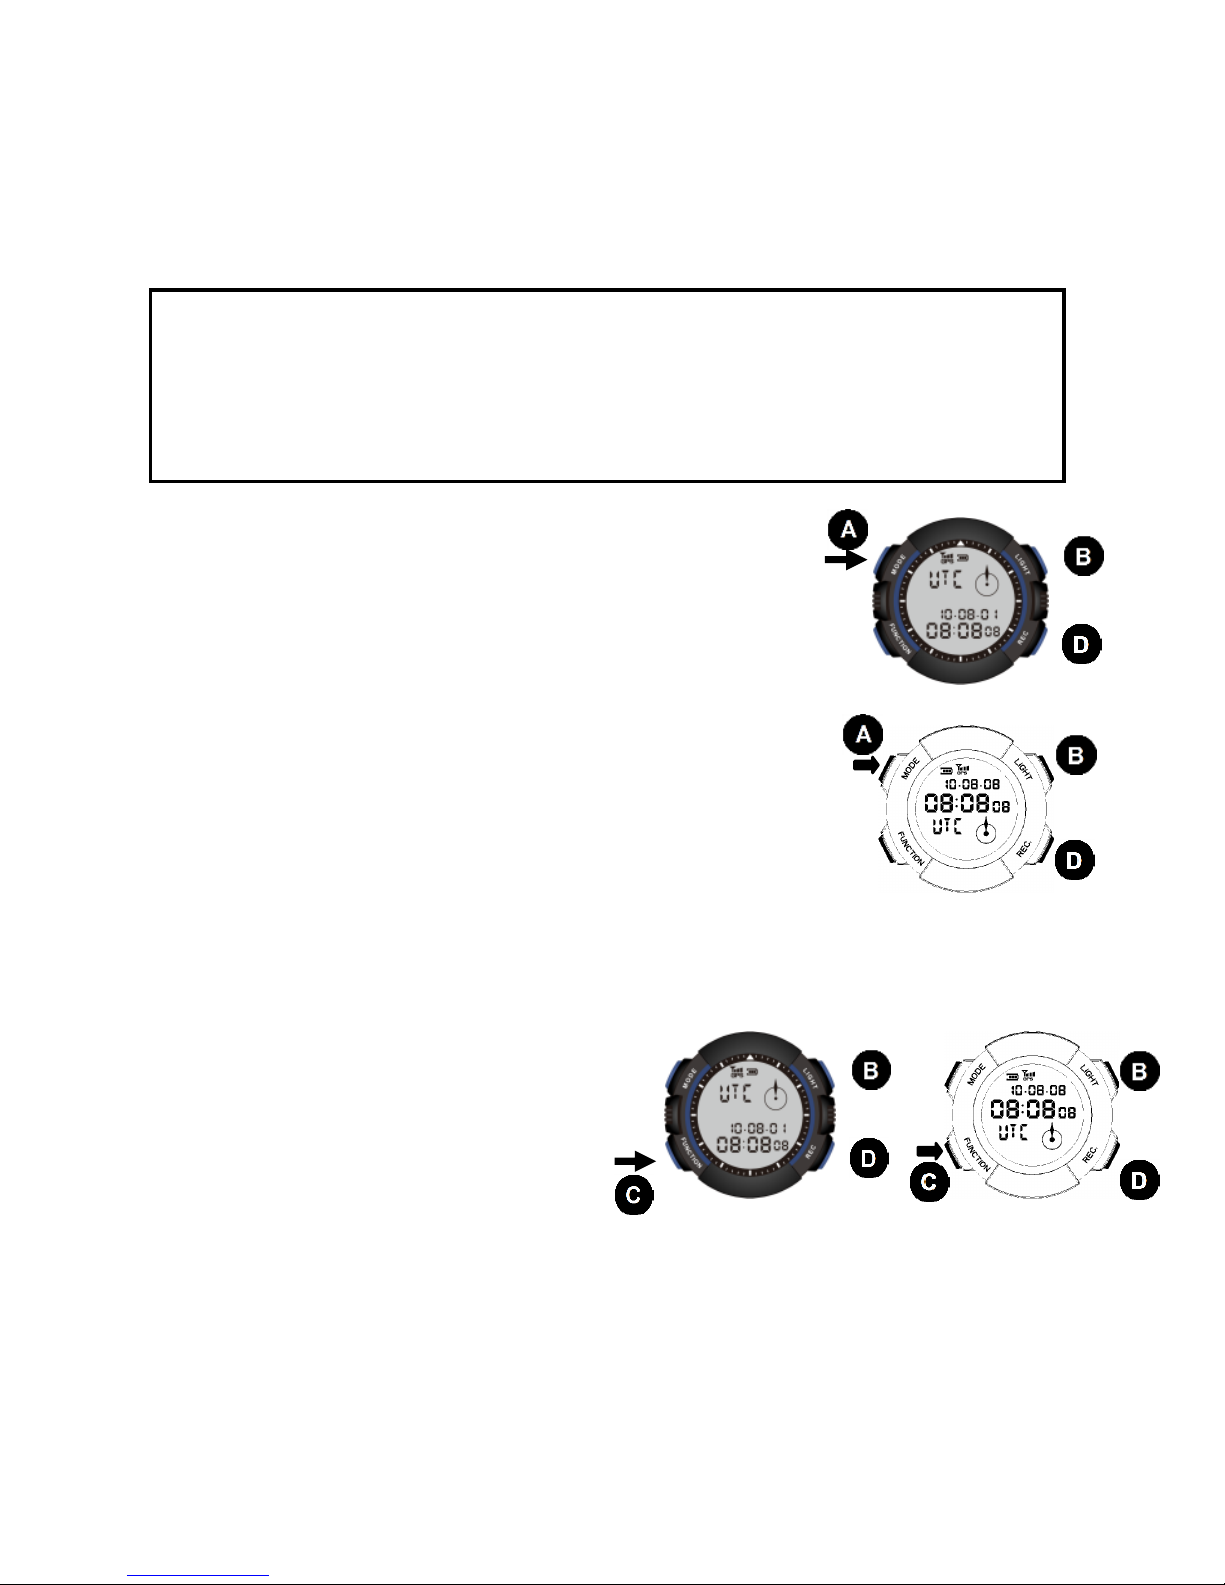
(1) Press and hold button A in Time screen until T1
and time zone screens flash alternatively.
(2) Press button B (eastward) and D (westward) to
scroll and select desired time zone.
Press and hold button B and D to scroll in fast speed.
See the City Name List section in this Manual for
details about time zone.
How to set up year, month, day and hours and minutes
Press button C to scroll and select desired setup for year,
month, day and hours and minutes
Press button B (+) or D (-) to adjust setup
value.
Date (2000/1/1~2099/12/31)
Weekday changes with date
automatically.
Daylight saving time (DST)
Sumer time, also named Daylight saving time (DST), is the practice of
temporarily advancing clocks during the summertime.
Note: This is a practice varies in different with countries/districts.
GAL
GL
GAL
GL
Page 20
20
How to reset seconds to 00
Press and hold button C for several seconds then press button B or D to reset
seconds to 00.
When reset seconds from 30~59 to 00 minutes increases by 1.
When reset seconds from 00~29 to 00 minutes remains intact.
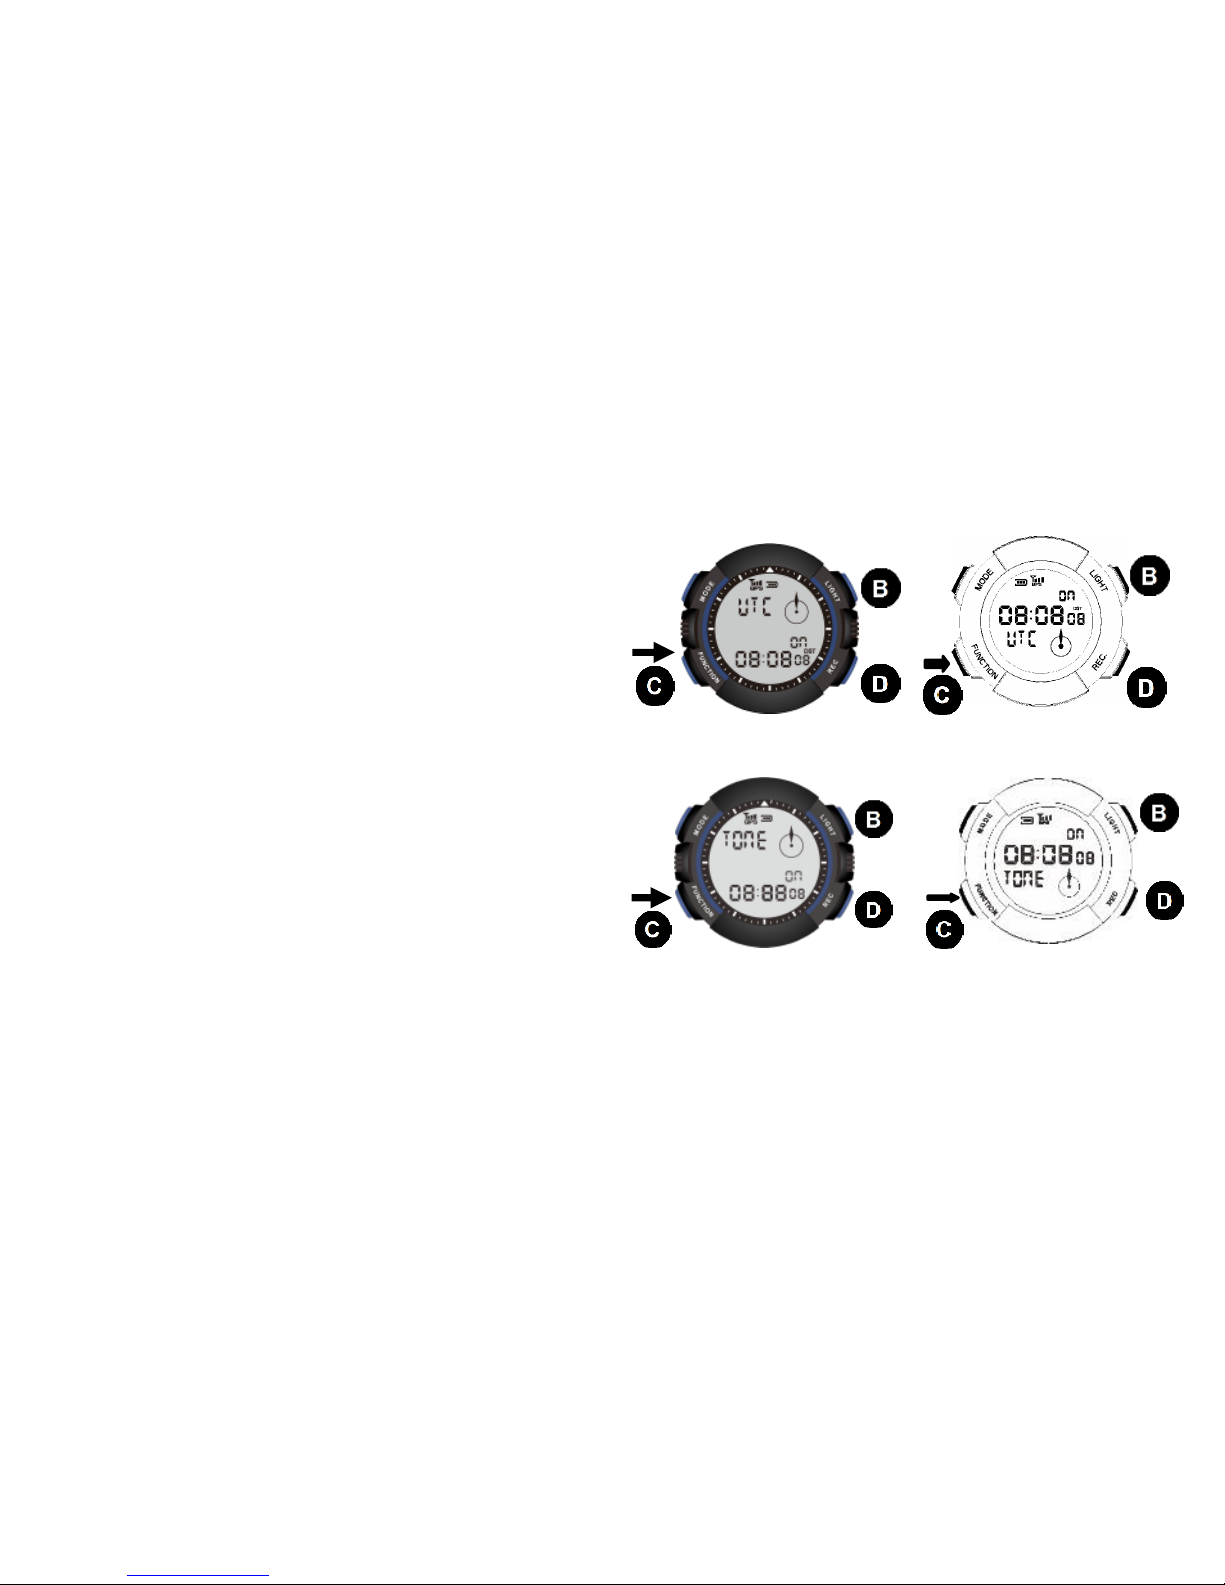
How to set up DST of T1 time zone
Press and hold button A in time screen for 2 sec.
and than press button C 7 times to scroll to
Summer Time (DST) option.
Press button B or D to switch on or
off the DST.
How to set up key tone (TONE)
Press and hold button A in time
screen for 2 sec. and than press
button C 8 times to scroll to TONE
option
Press button B or D to switch
on or off the key tone.
How to set up the T2 time zone
(1) Press button A to switch to T2 time zone setup function after the T1 time
setup is completed.
(2) Press button B (eastward) and D (westward) to scroll and select desired
time zone.
(3) Press button C to scroll to Summer Time (DST)
option. Press button B or D to switch on or off the
DST option.
Press and hold button B and D to scroll in fast speed.
GAL
GL
GAL
GL
Page 21
21
How to exit setup function
After T2 setup is completed press button A to exit the setup menu and back to
time mode.
Your watch may exit the setup menu and back to
time mode automatically after one minute of idle time.
After exit the setup menu dials of your watch synchronize
with the newly set T1 time quickly and back to normal
dialing speed afterwards.
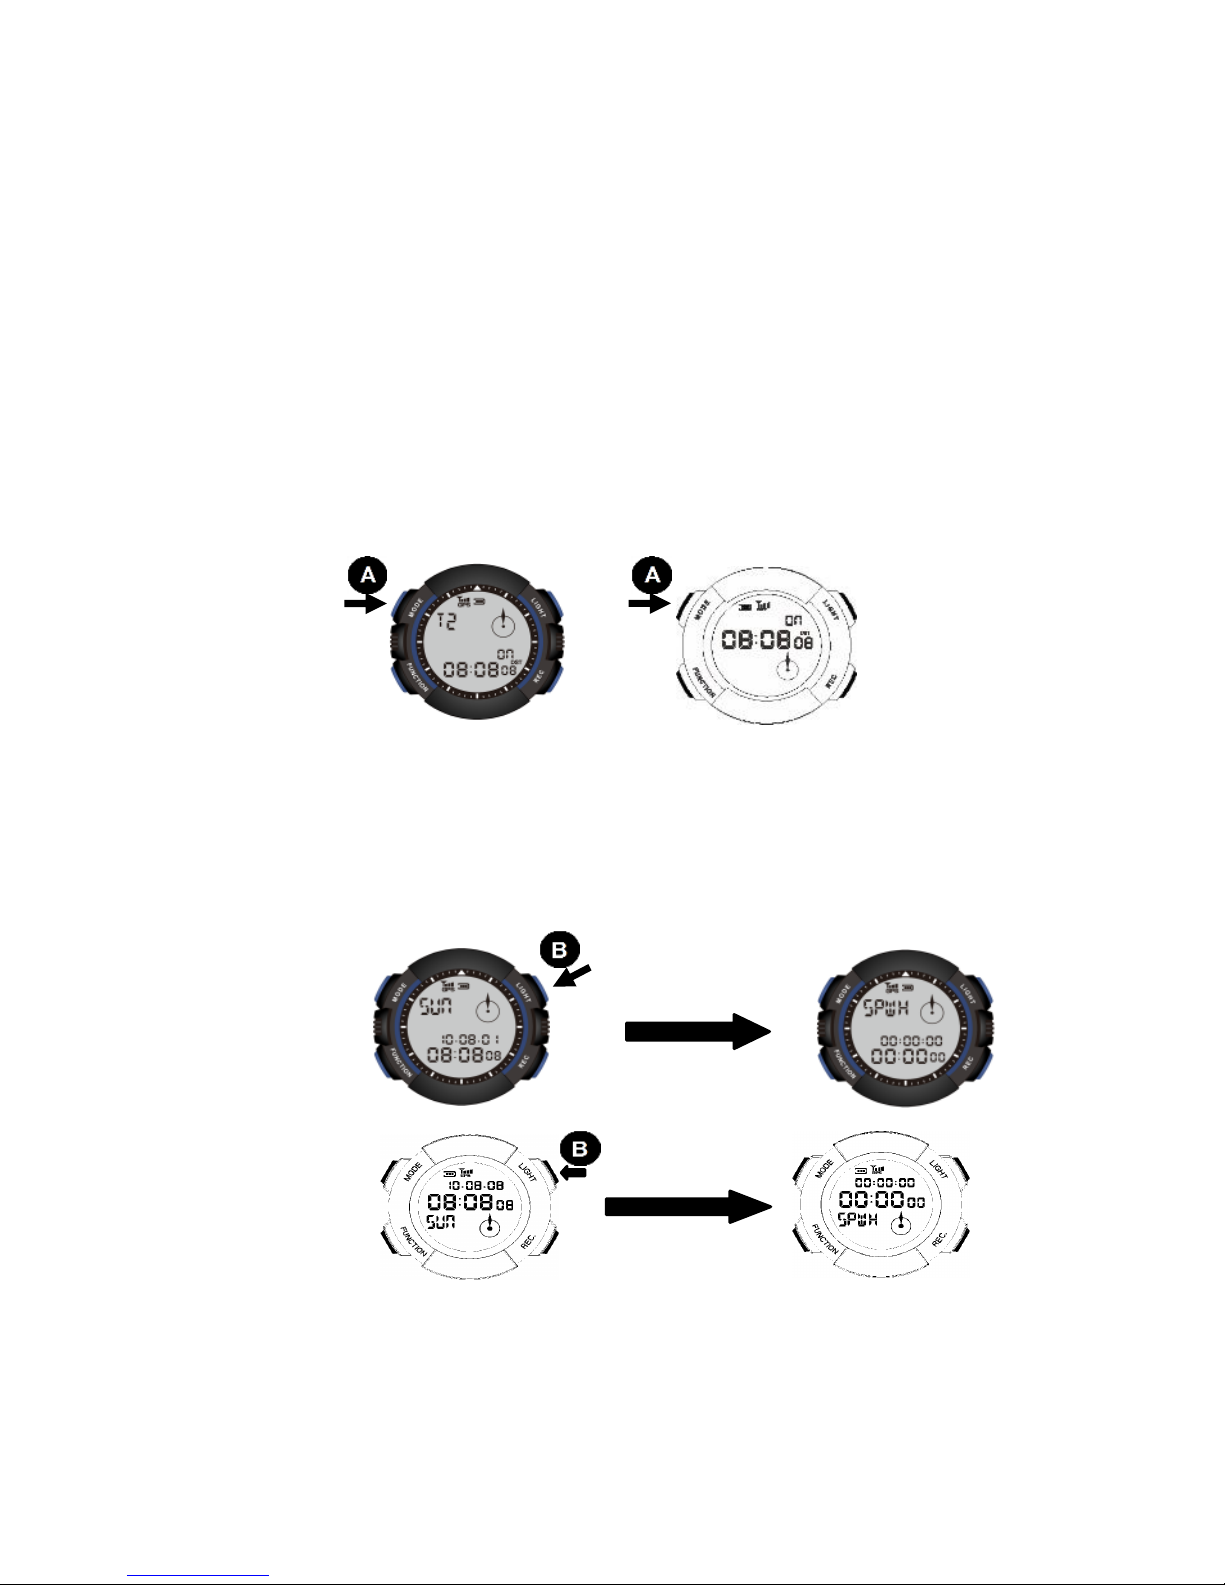
How to use the stopwatch function
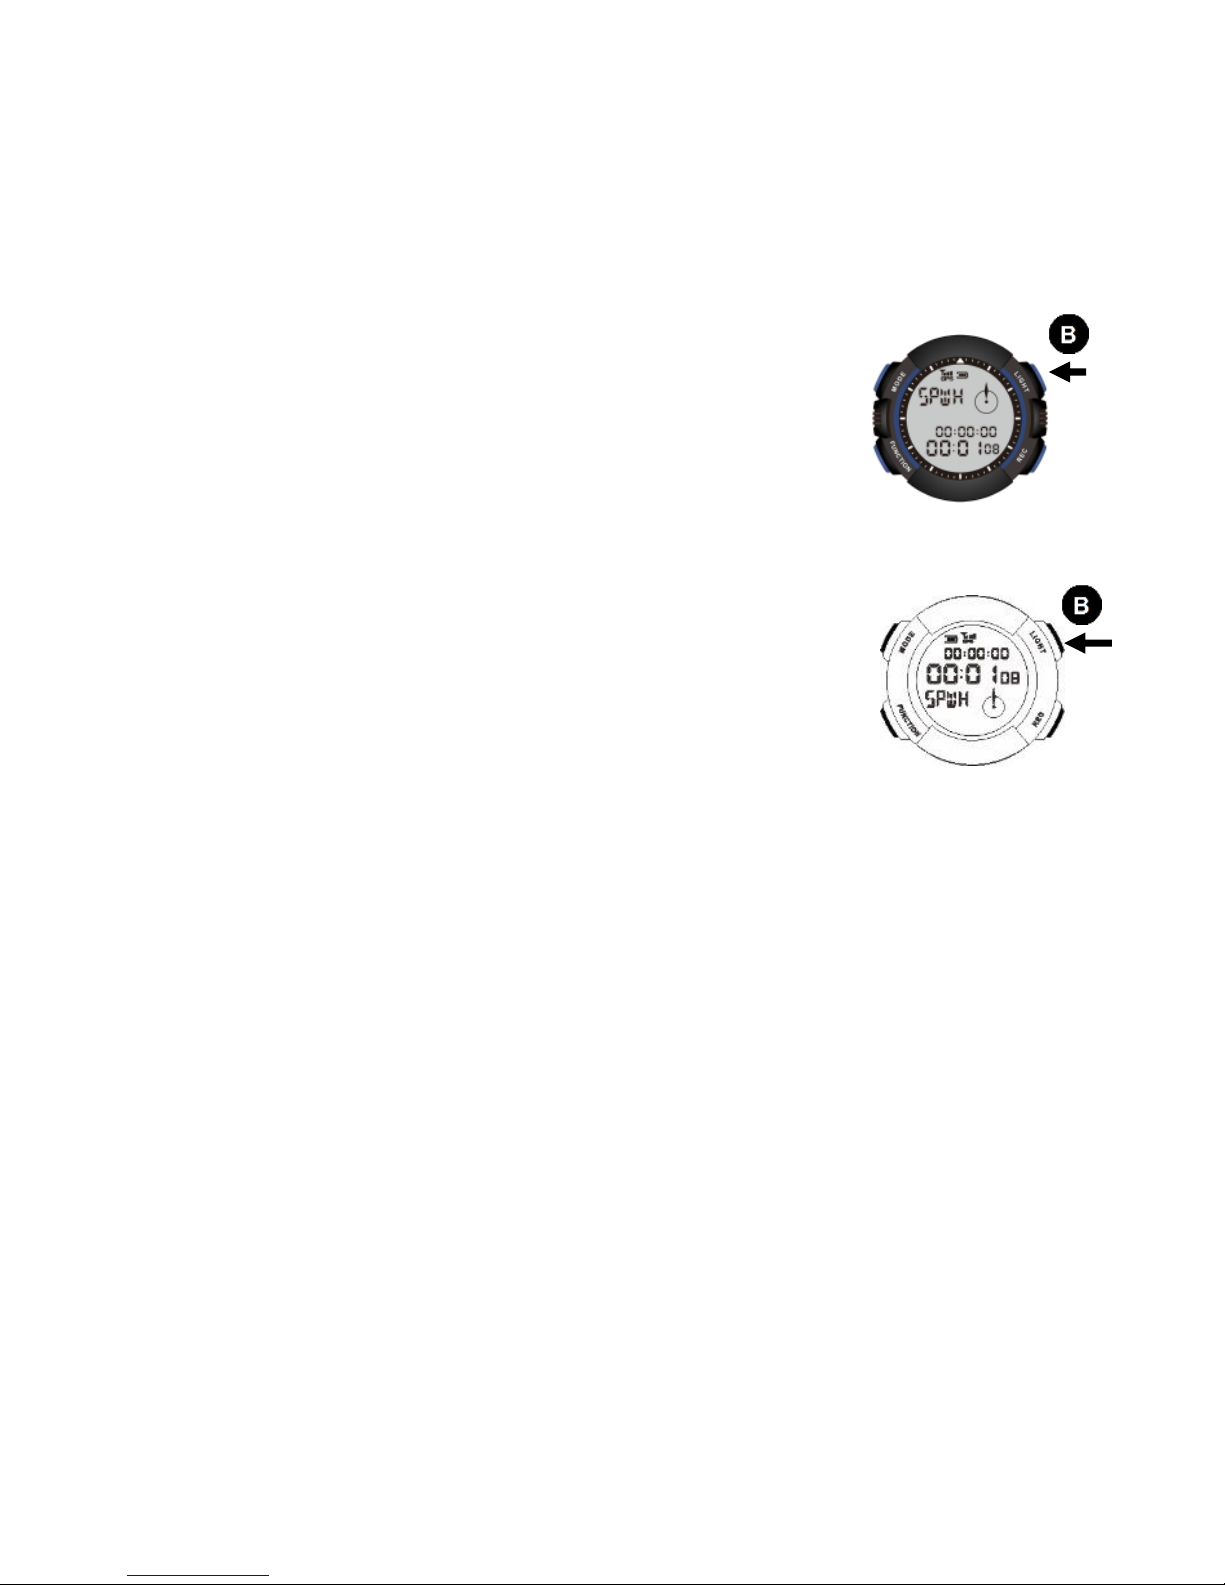
Press and hold button B for 2 seconds in time mode to open the stopwatch
function.
Press and hold
Button B for
2 seconds
GAL
GL
GAL
Press and
hold
GL
Page 22
22
GAL
GL
Timing
Unit of timing: 1/100 second
Length of timing: 23:59'59.99" (24 hours)
Memory capacity
You can store up to ten timing data for each timing session.
Time display of stopwatch
Your stopwatch displays minutes, seconds and 1/100 second in the first hour
after timing started. After that it changes to display hours, minutes and seconds.
How to do split timing
Split timing is a practice for continuous timing.
(1) Press button D in stopwatch mode to access the
split timing function. The time screen displays
and the split timing function starts.
(2) Press button D once to record one piece of
timing data. The screen displays entry number and
time. You can keep up to 10 timing data.
(3) Press button B to stop timing.
(4) Press button C to read timing records.
(5) Press button D clear off timing records and back to
stopwatch starting screen. Press button A to close
stopwatch function.
Page 23
23
GAL
How to do lap timing
Split timing is a practice for discrete timing.
(1) Press button B in stopwatch mode to access the lap
timing function. The timing screen displays and
the lap timing function starts.
(2) Press button B once to record one piece of
timing data. The screen displays entry number and
time. You can keep up to 10 timing data.
(3) Press button D to stop timing.
(4) Press button C to read timing records.
(5) Press button B clear off timing records and back
to stopwatch starting screen. Press button A to close
stopwatch function.
Navigation function
The navigation function renews distance and direction data between predefined
destination and newly positioned current place.
Both locations required for this renewal calculation are positioned by the
GPS function.
GL
Page 24
24
How to access the navigation function
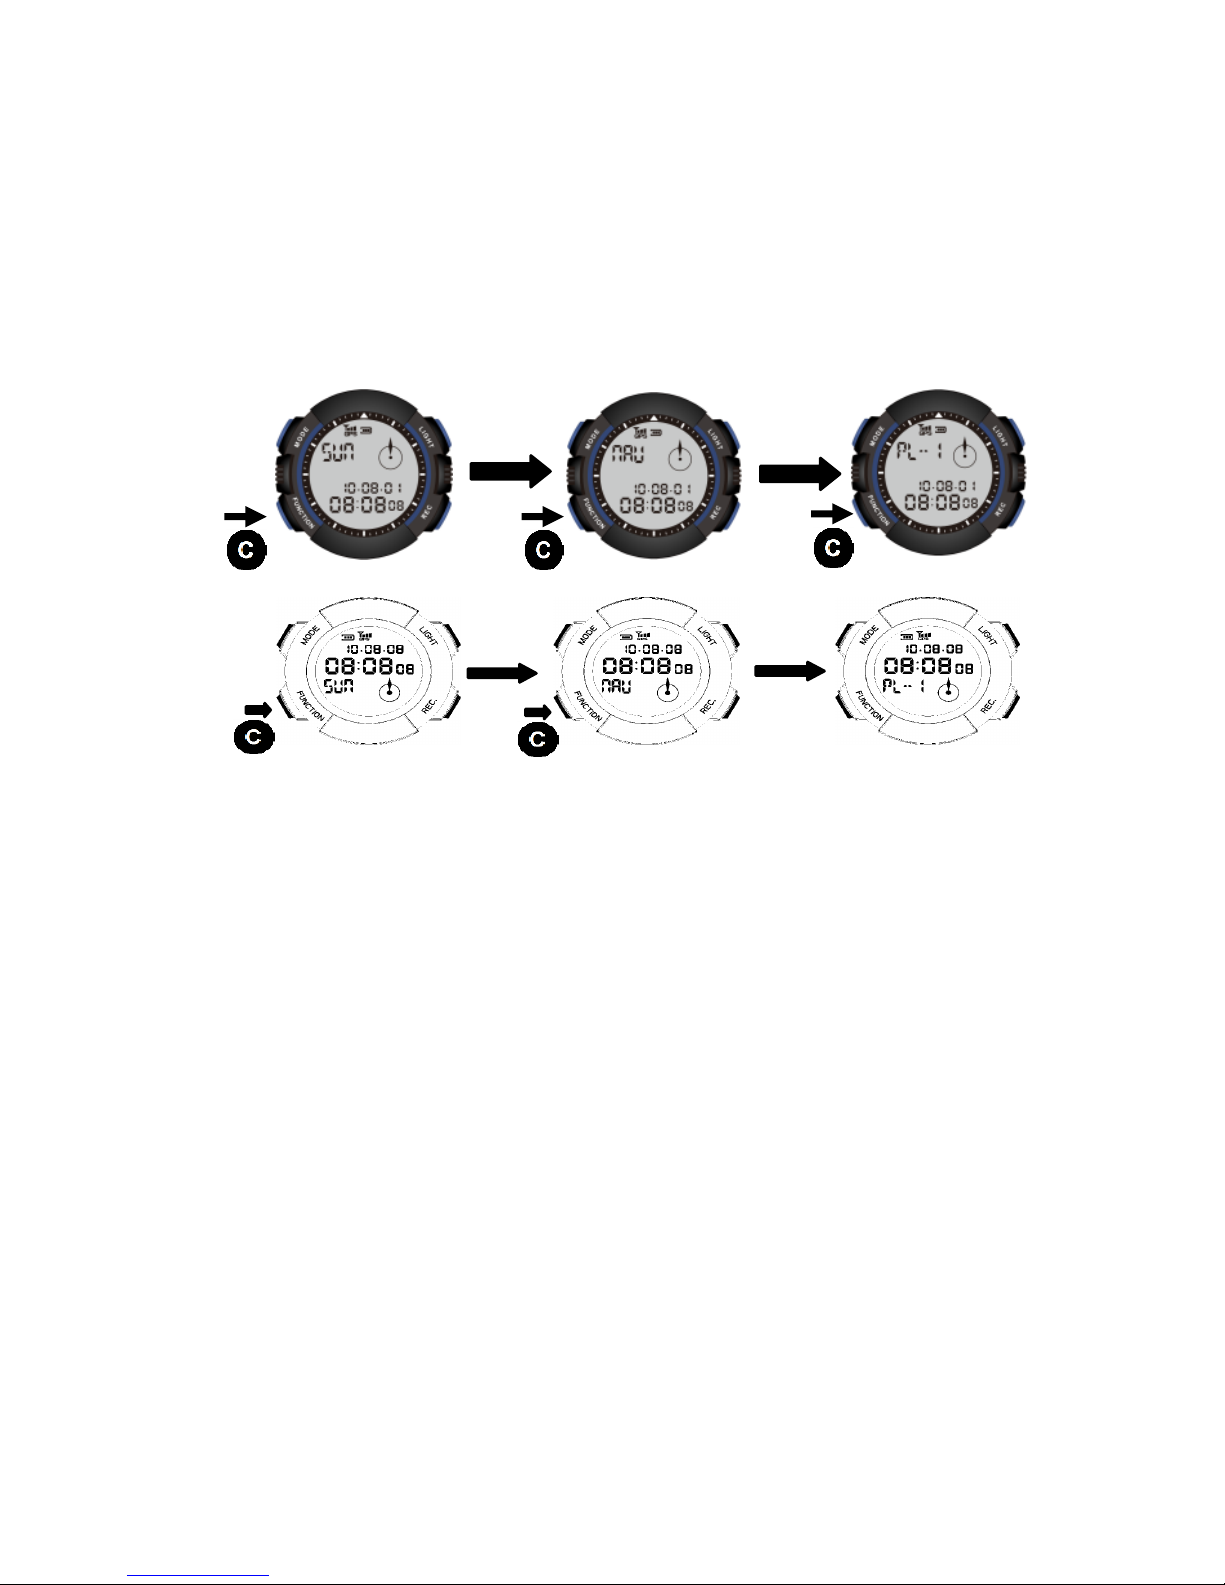
Press button C twice in time mode to display the destination data entry screen.
Important!
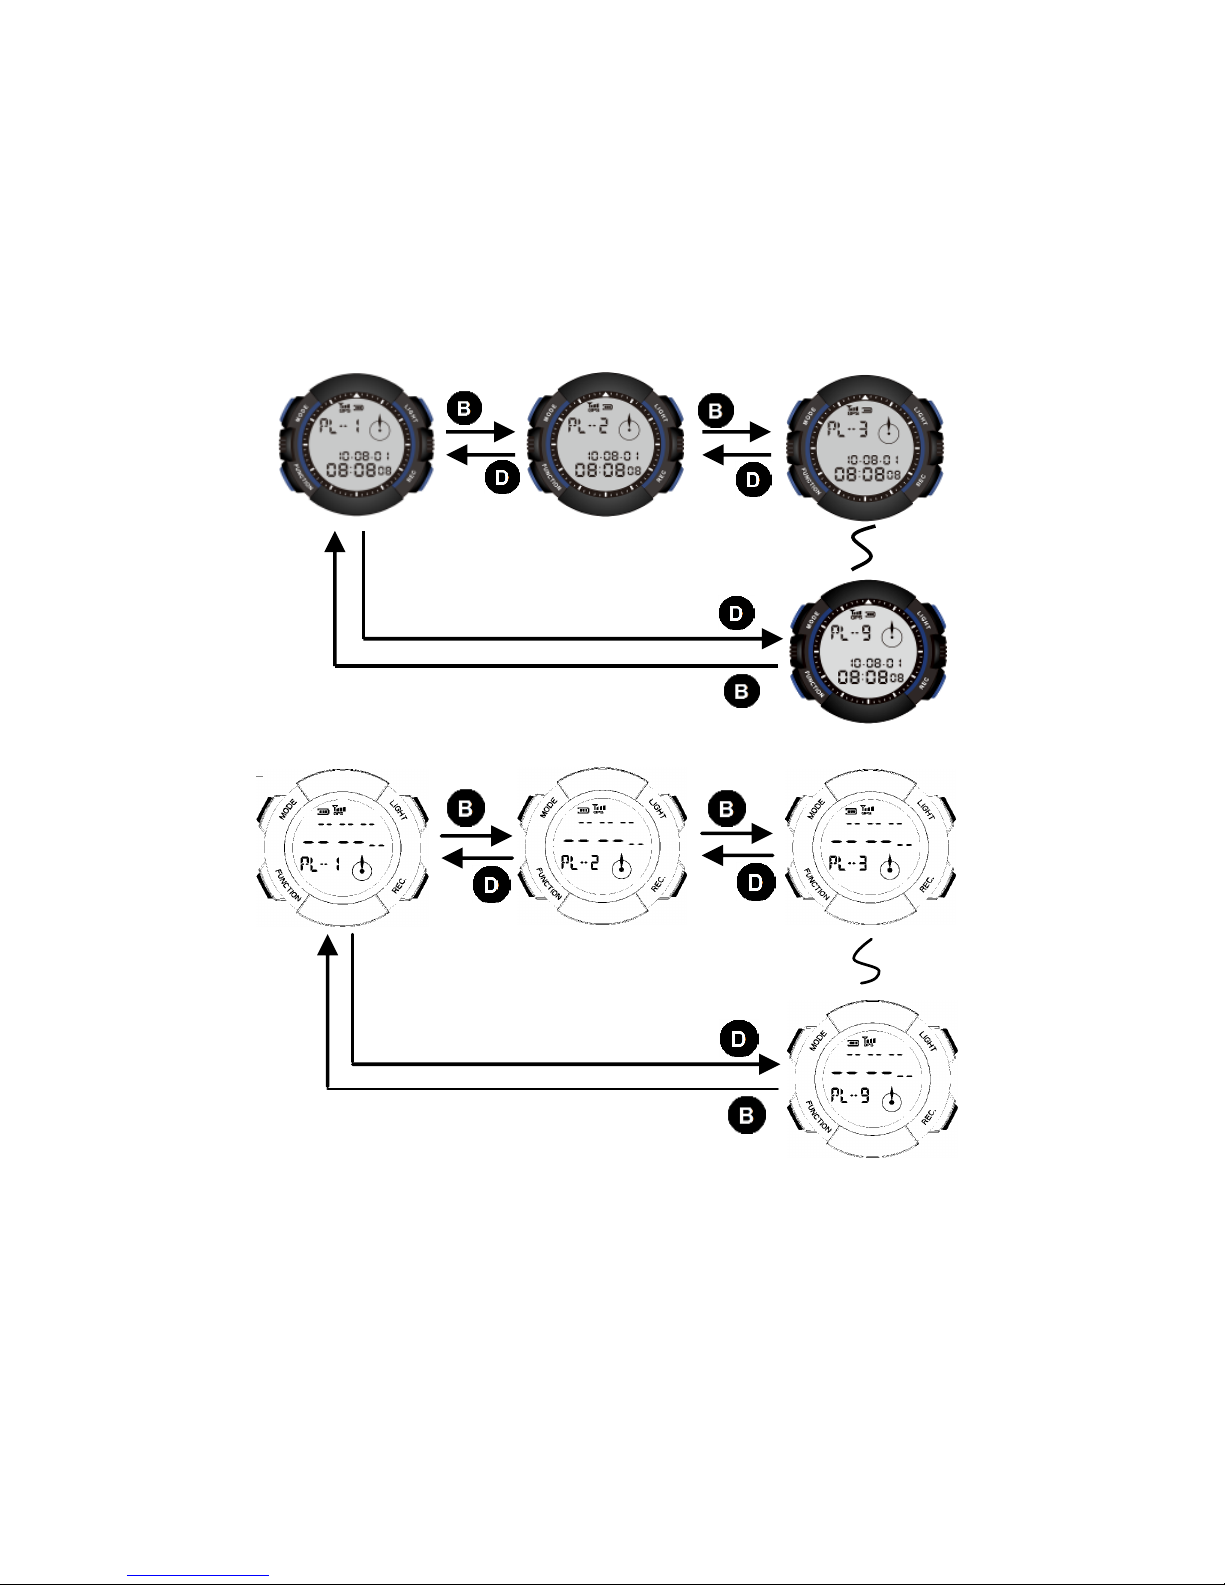
Your product may store up to 9 sets of destination entries composed of
destination number, from PL-1, PL-2… to PL-9 and entry date. You may
edit destination data with the proprietary software Track Star.
GL
GAL
Page 25
25
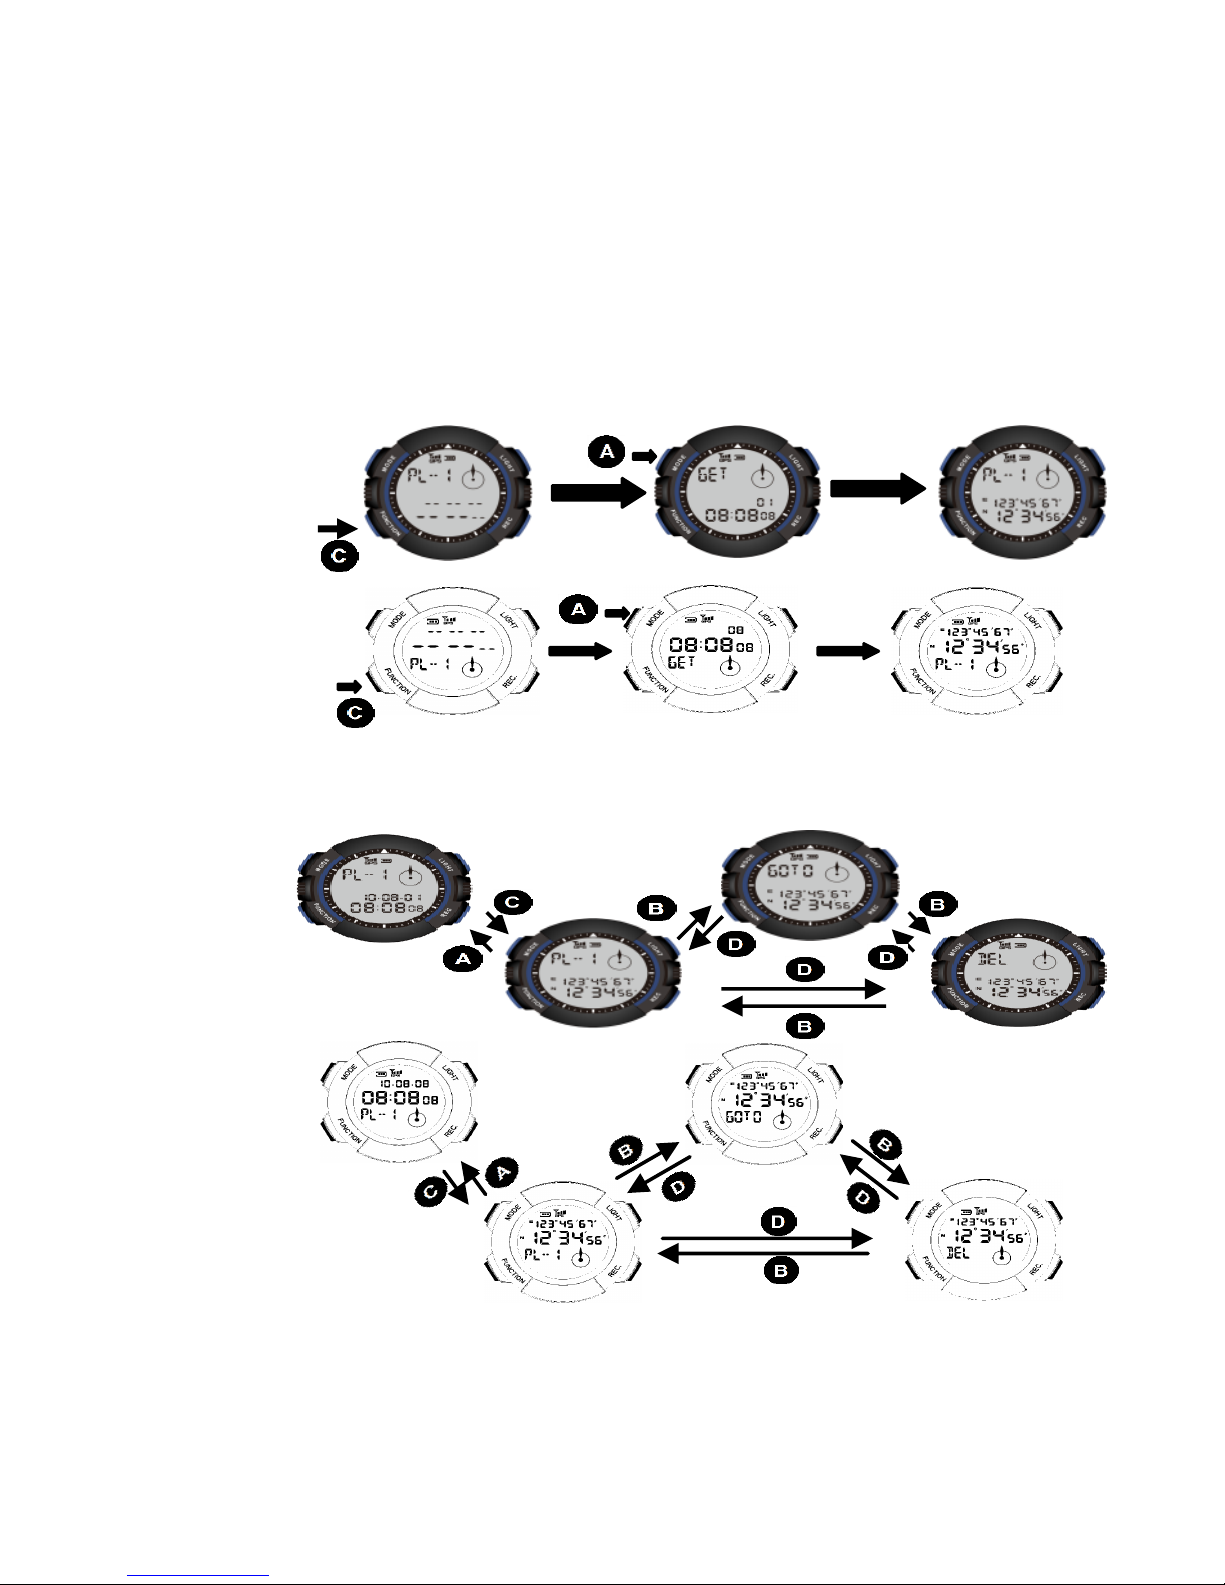
How to store destination data
(1) Select a storage position.
(2) Press button C to position current location by GPS after selected storage
position screen displayed.
GAL
GL
Page 26
26
(3) After current location is positioned your watch saves the coordinates data
automatically.
Press button A to exit GPS positioning if you do not want to
continue with destination data entry.
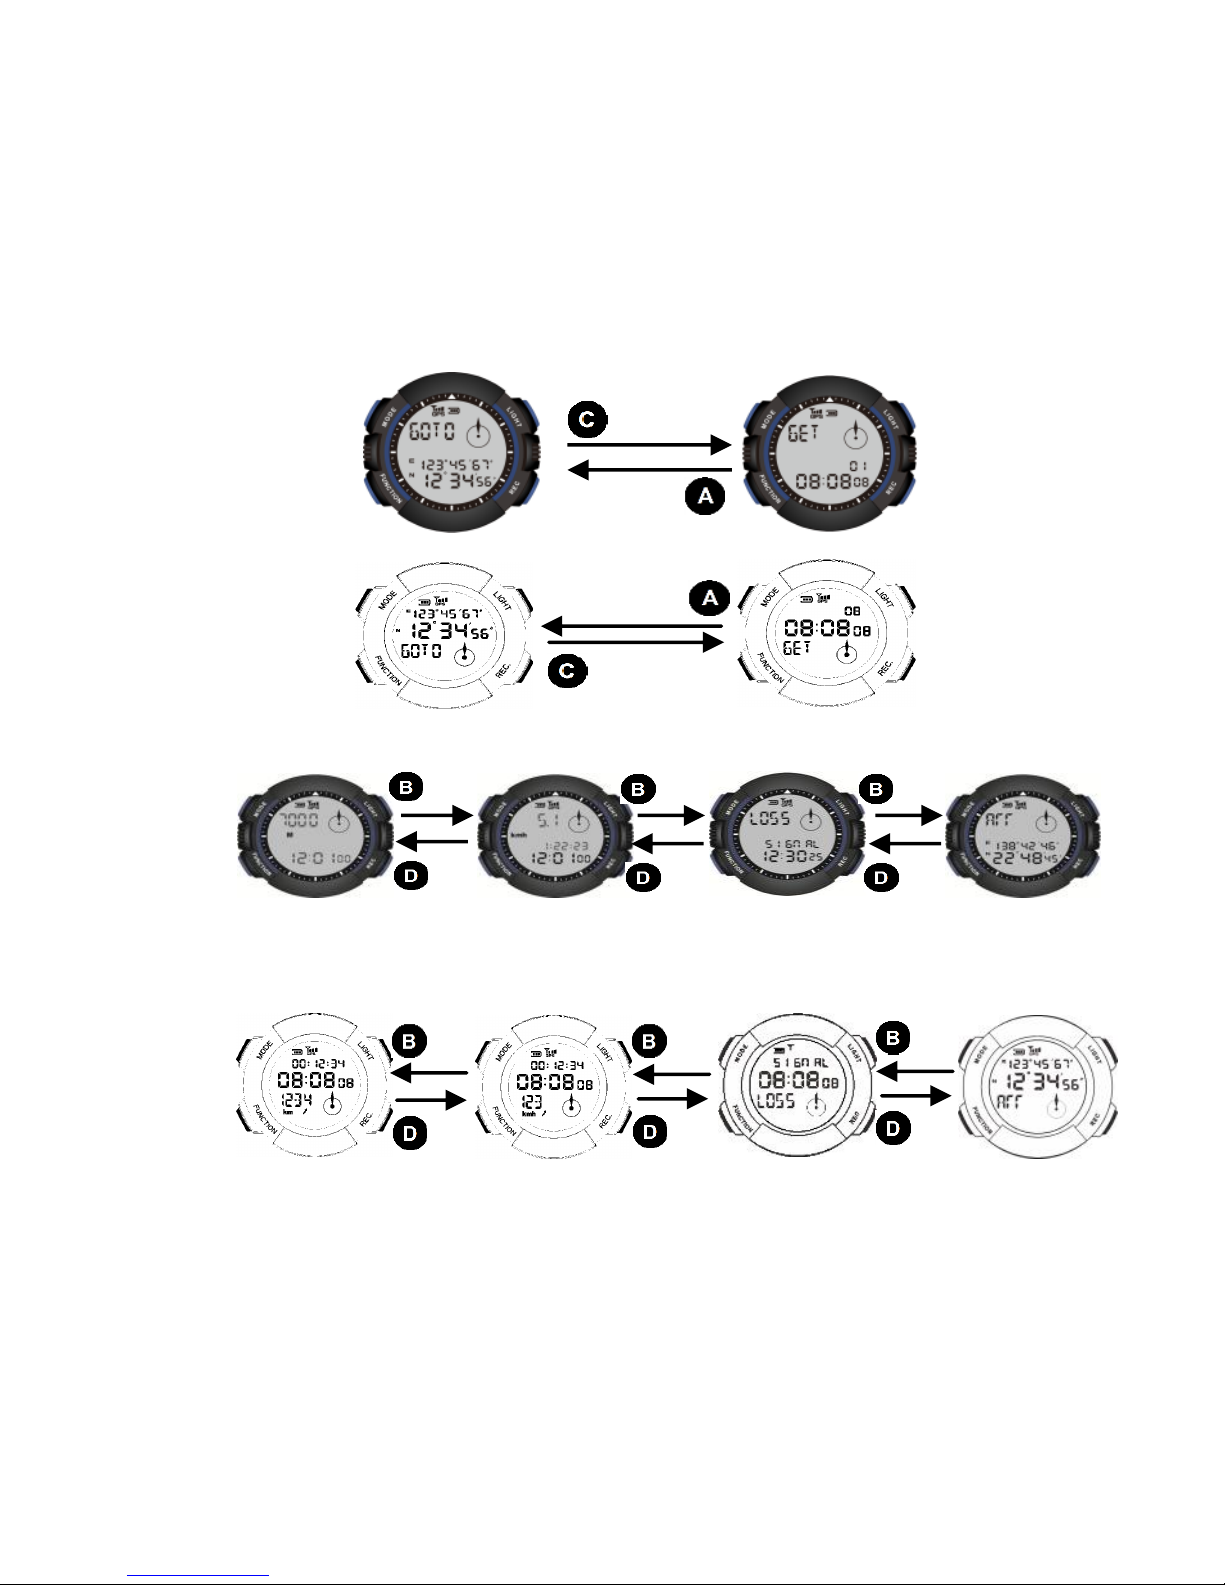
How to navigate to selected destination
(1) Select a destination position and switch to the “navigation to” screen.
GAL
GAL
GL
GL
Page 27
27
(2) Press button C to position current location by GPS after the “navigation
to” screen displayed.
(3) The navigation screen appears after GPS positioning.
GAL
GL
Est. Dist.
Est. t of arr.
Current time
Alarm at
interruption of
GPS signal during
navigation
Reaching the
destination
GAL
Current speed
Est. t of arr.
Current time
Est. t of arr.
Current time
Est. Dist.
Est. t of arr.
Current time
Speed
Alarm at
interruption of
GPS signal during
navigation
Reaching the
destination
GL
Page 28
28
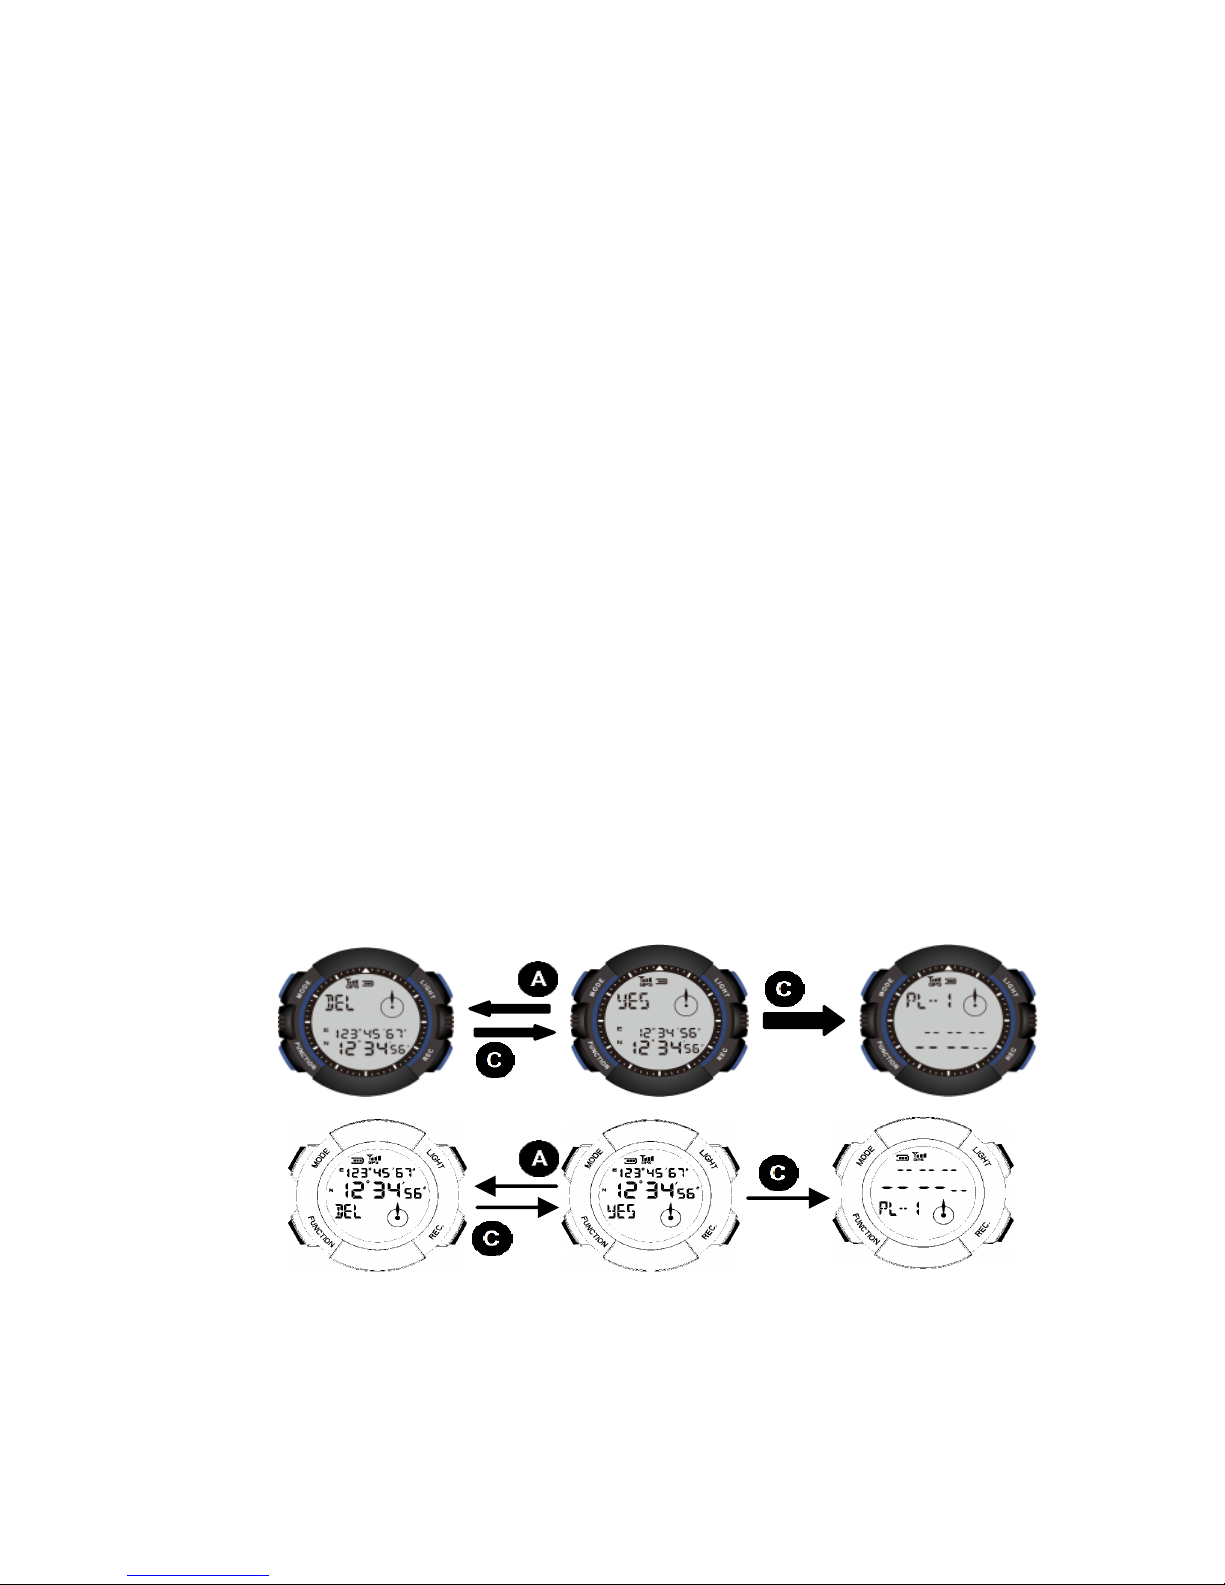
Important!
The navigation screen displays time, distance, speed, required time and
direction.
Press button B and D to switch between total distance and current speed
displays.
In navigation screen the direction dial always pointing to the given
destination.
In case the navigation signal interrupts during the exercise, the screen will
show “LOSS”, and an alarm lasting 5 seconds will be given. (Pressing
button B, C or D will stop the alarm.) You can exit Navigation mode by
pressing Button A. (System will automatically exit Navigation mode if
“LOSS” display sustains exceeding 5 minutes.
When current and destination positions are within a range of 30 meters a
message “ARR” prompts you that you have arrived. about the message
will last about 10 seconds, with a 5 seconds alarm (Pressing B, C or D key
will stop the alarm.) The message disappears after 10 seconds and the
system returns to time mode automatically.
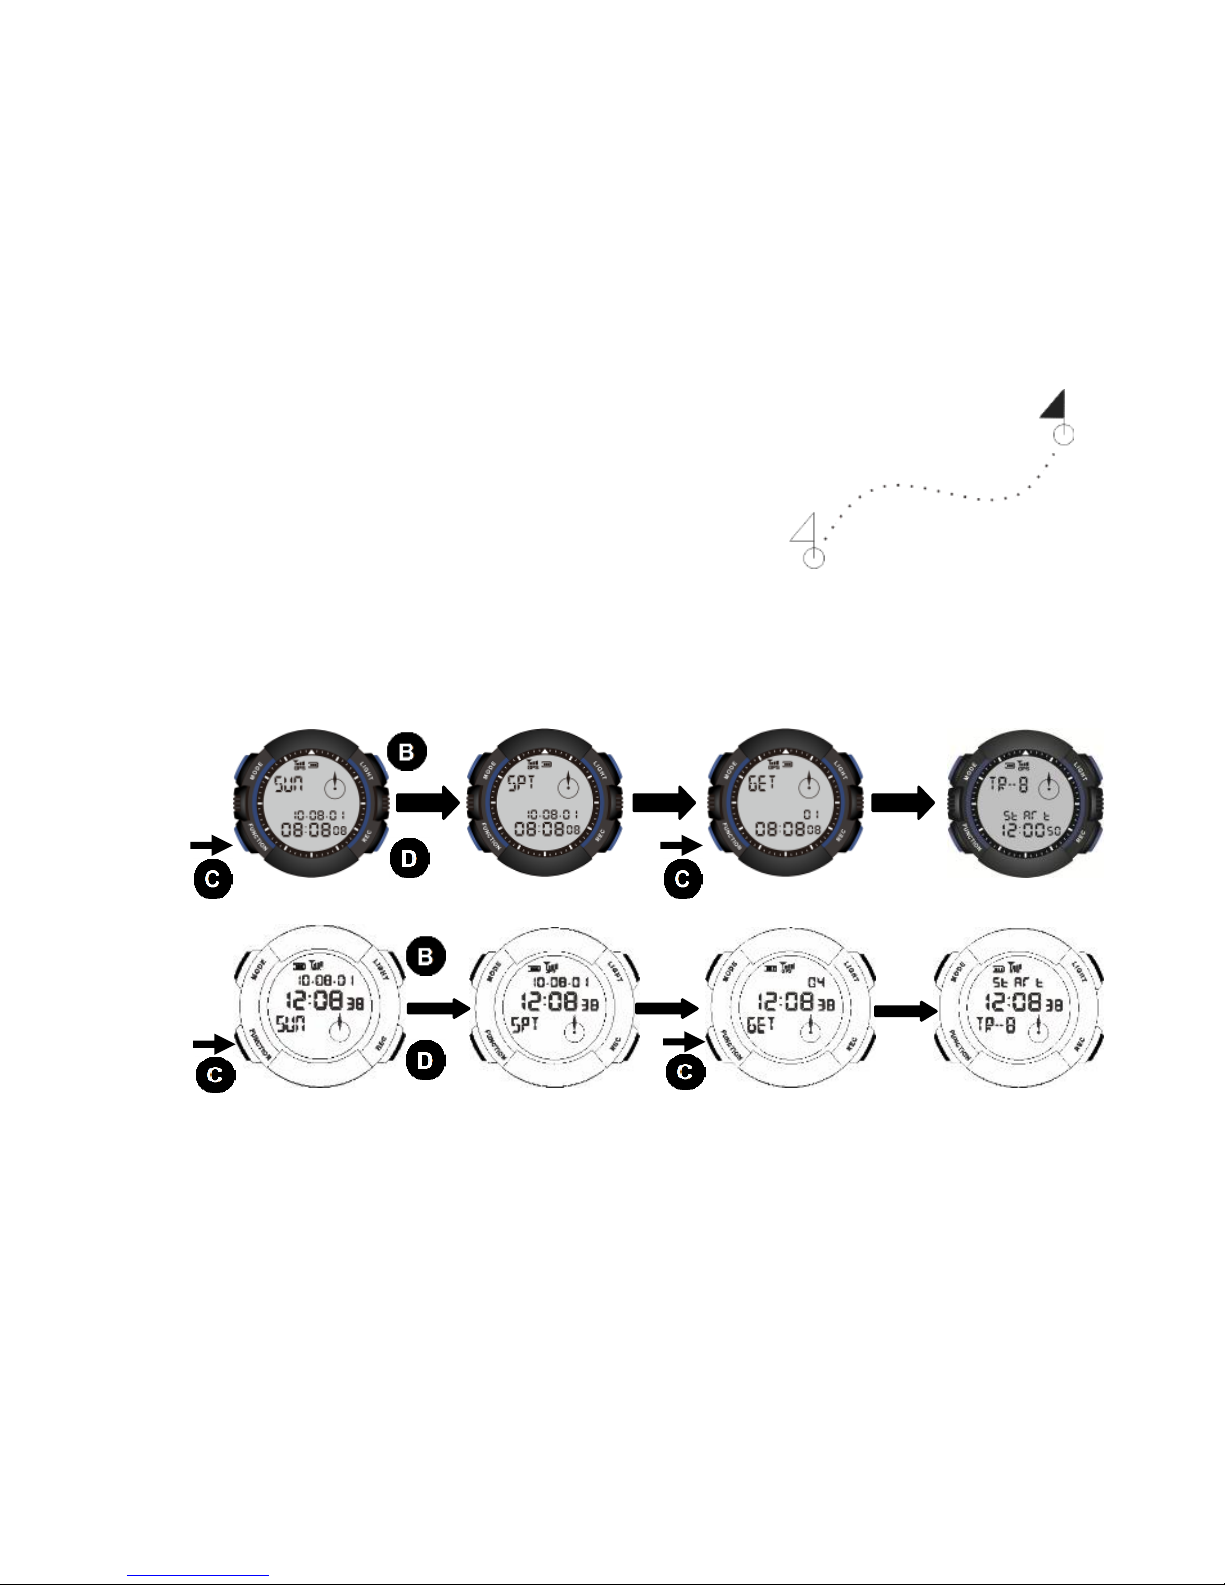
How to delete a destination record
(1) Select a destination and switch to the “delete destination” screen. (See
How to navigate to selected destination for detailed instructions.)
(2) After the delete destination screen displays press button C to the delete
menu with flashing “YES” message.
(3) Press button C, when message "YES" is flashing, to confirm deletion or
press button A to cancel.
GAL
GL
Page 29
29
Sport mode
The sport function stores your exercise data: time,
distance, speed, elevation, and routes of outdoor
exercises: Walking, Jogging, Hiking, Biking, Skiing
and the like, in memory of your watch. These data
then can be managed by client software to make your
exercises more interesting and recreational.
How to enter the sport mode
Press button C in time mode to access the function menu. Press button B once or
button D six times to enter the sport mode.
Exercise routes
GL
GAL
Page 30
30
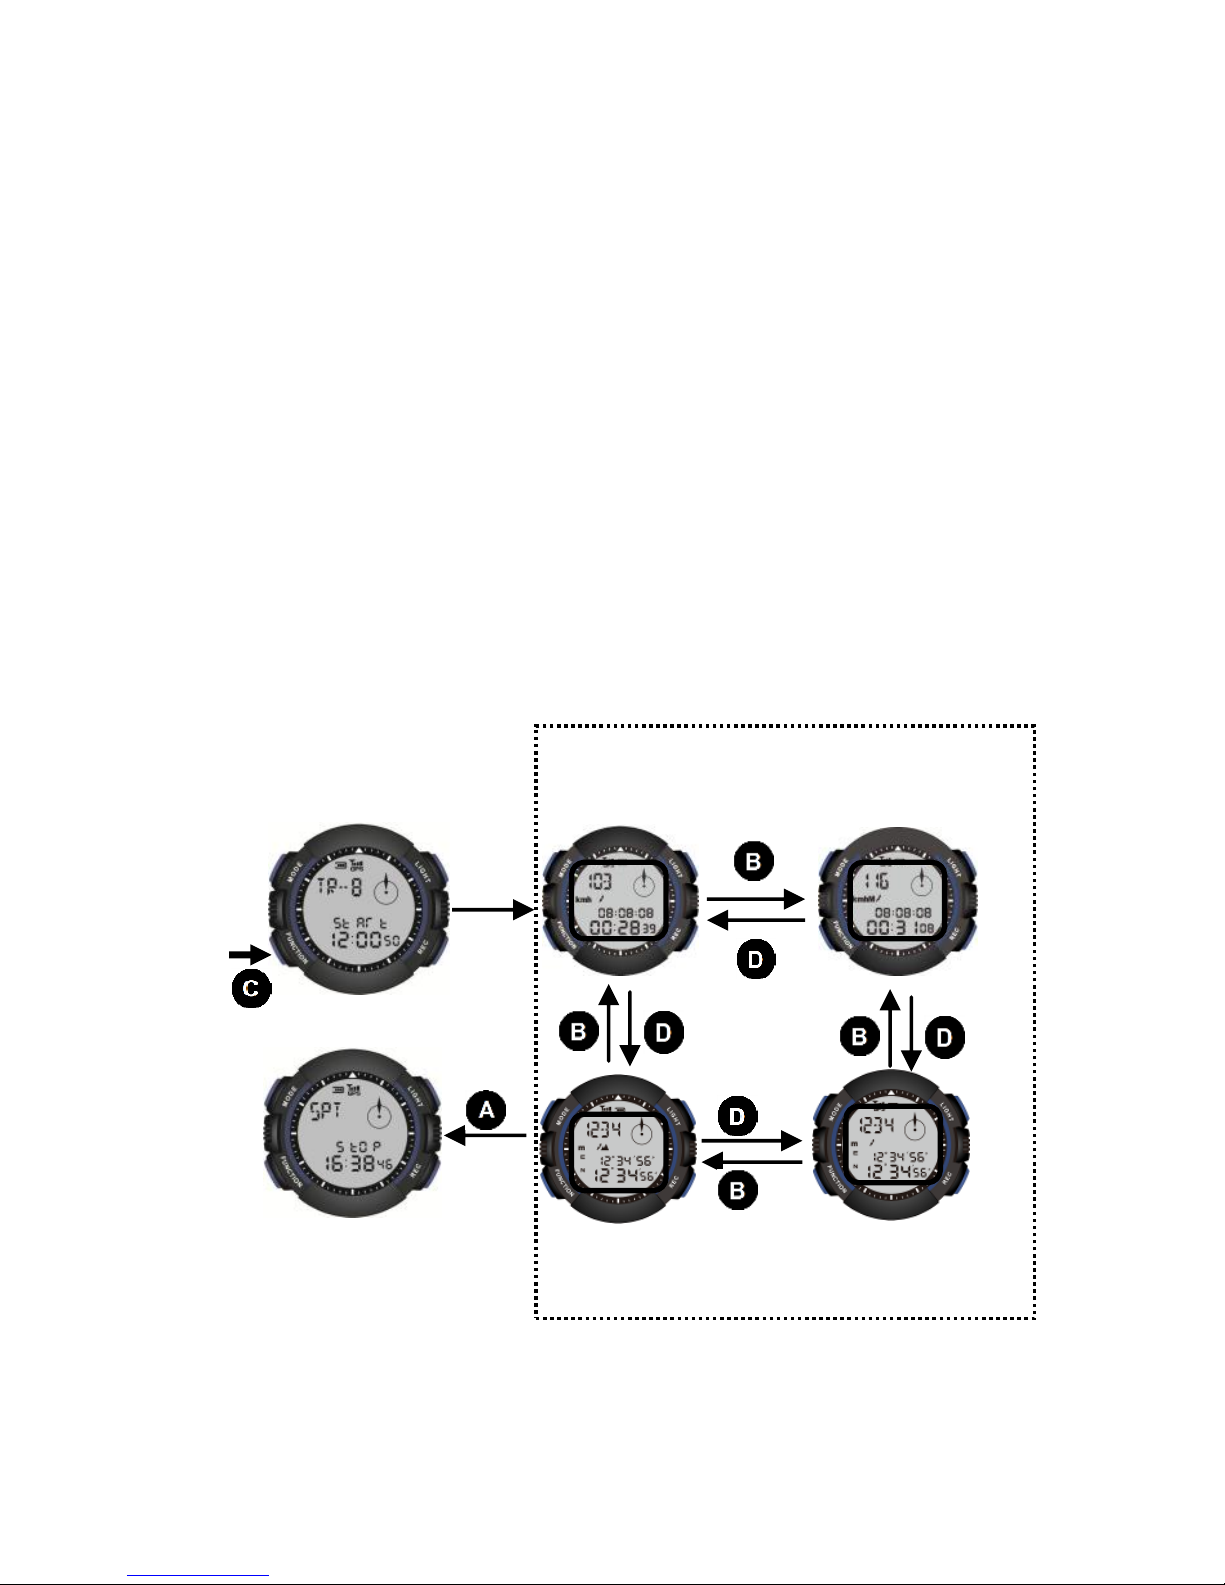
Press button C in sport mode to position current location by GPS.
After GPS positioning, LCD displays track number (TR-XX) and starts to
flash. Press button C to start recording the speed, distance, altitude and
coordinates of the track.
In case the navigation signal interrupts during the process, the screen will
show “LOSS”, and an alarm lasting 5 seconds will be given. (Pressing
button B, C or D will stop the alarm.).
How to review your exercise data in real time
Your product enters “TR-XX” and “START” screen after successful current
location positioning. Press button C to start exercise. Press button B or D to
review instant exercise data of: current time, speed, elevation, and coordinates as
well as maximum speed and total distance up to now.
Accumulated mileage
Coordinate
Current speed
Current time
Sport time
Maximum speed
Current time
Sport time
Altitude
Coordinate
Page 31
31
Important!
Your product is not equipped with electronic compass. In sport mode no direction
data is available if there is no movement. Your product can provide movement
direction only based on changing coordinates caused by your movements.
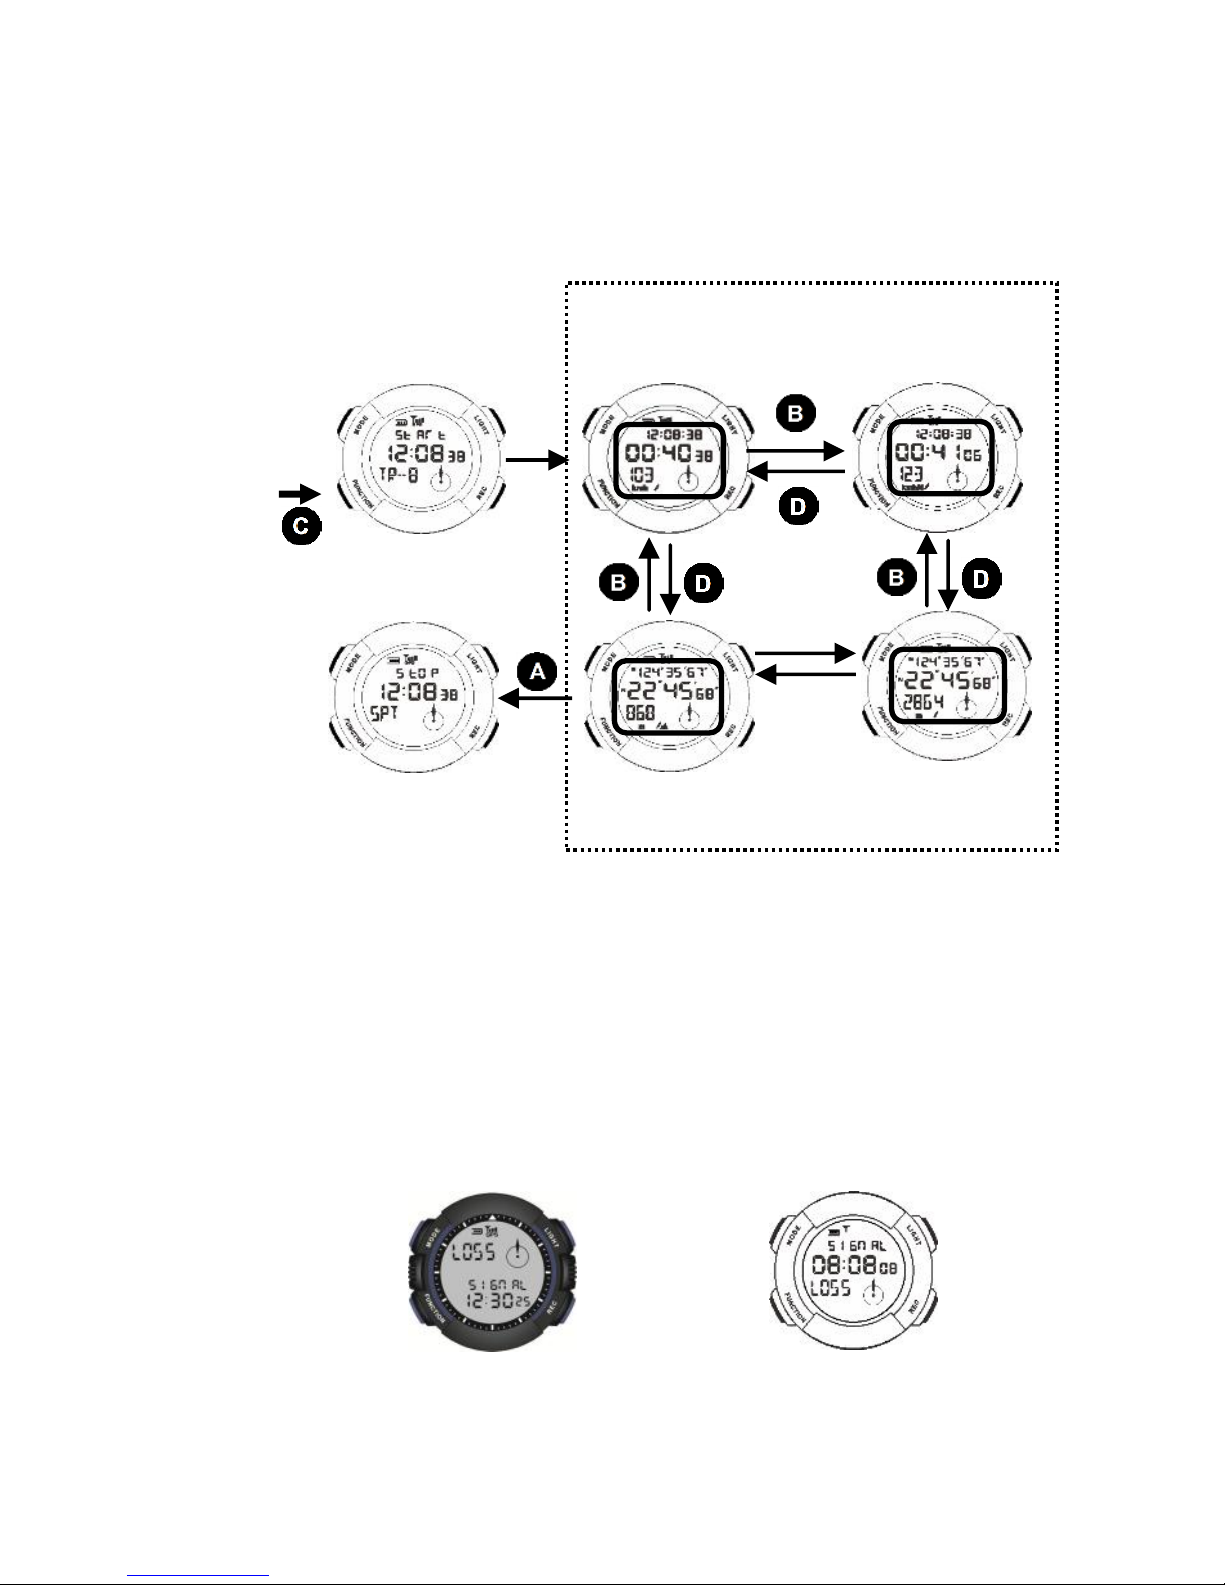
Press button A to exit Sport mode and enter STOP screen. You may press buttons B
and D to query data of the current exercise. (3 minutes after entering STOP screen the
system returns to normal clock function.)
In case the navigation signal interrupts during the exercise, the screen will show
“LOSS”, and an alarm lasting 5 seconds will be given. Your may press button A to
exit Sport mode. (Automatic exit from the Sport mode will activate when “LOSS”
display exceeds 5 minutes.)
Coordinate
GL
GAL
Sport time
Current time
Maximum speed
Coordinate
Altitude
Sport time
Current time
Current speed
Page 32

32
How to review historical exercise data
After the sport mode is started your product starts saving your exercise data in
the flash memory of your watch. The flash memory can keep up to 10-20 hours
of detailed tracking data of: latitude and longitude, time, speed, total distance and
elevation.
(1) Install the TREKMATE exclusive application software, Track Star,
supplied with your product on your personal computer.
(2) Install driver of your charger and connect the later to your computer with a
piece of USB cable. When you are prompted that the connected hardware
is ready for use, firmly attach your watch with the charger.
(3) Open Track Star software to upload data stored in your watch to connected
computer for historical data reviewing.
Important!
When the memory of your watch is full, the system automatically exits the
Sport mode. A warning message “FULL” appears when the system enters
Sport mode again. Please upload the data to your PC and delete the data
from the memory.. Please have data in flash memory uploaded to and
saved in your computer periodically. (For an exercise frequency of 2 hours
per day it is recommended to upload your flash data at least once per
week.)
Please refer to the User manual supplied with your Track Star software for
detailed information on how to use it efficiently!
Page 33
33
Set up automatic GPS signal receiving interval
Your product can calibrate time automatically if the auto GPS signal receiving
function is turned on.
You can set up separate signal receiving options for T1 and T2 time respectively.
Please set up the calibration time when doing outdoor activities for successful
GPS signal receiving.
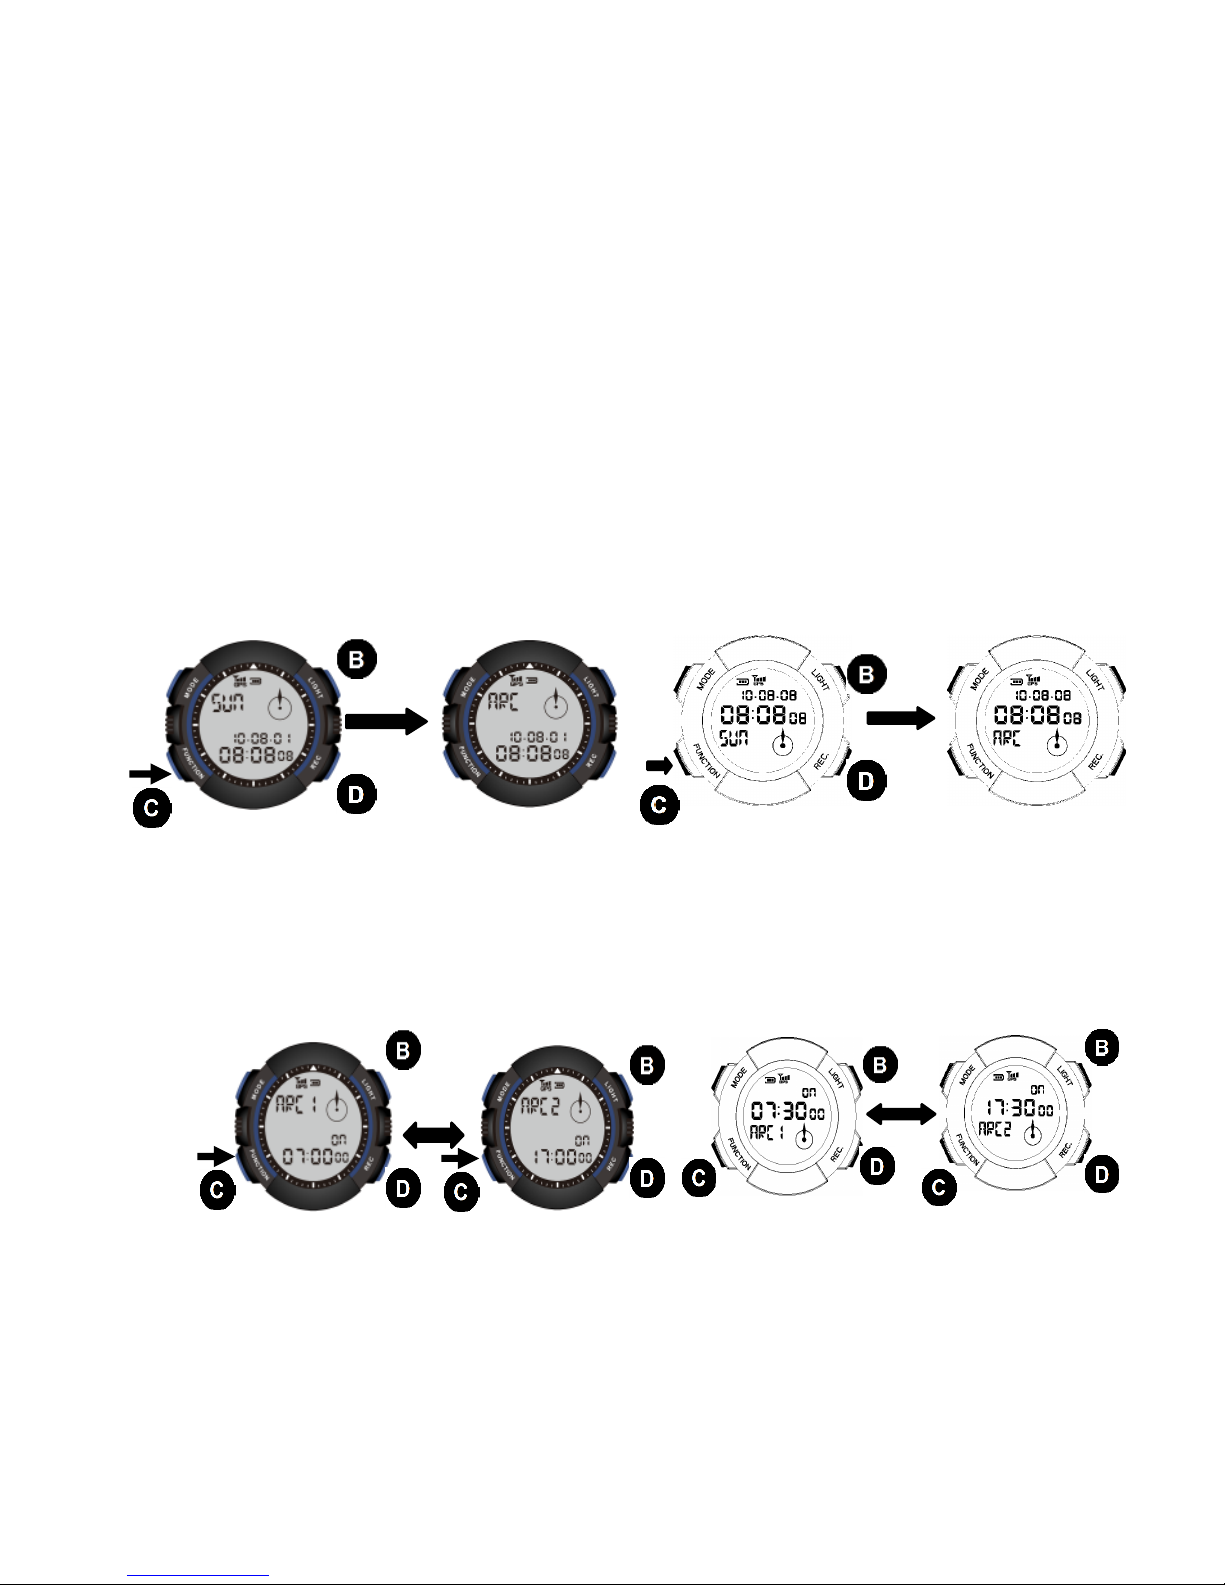
(1) Press button C in time mode to access the function menu. Press button B
twice or button D five times to enter the auto receiving setup screen.
(2) Press button C in auto receiving setup screen and the ARC1 (T1 time setup)
indicator flashes. Press button B or D again and the ARC2 (T2 time setup)
indicator flashes.
GAL
GL
GL
GAL
Page 34
34
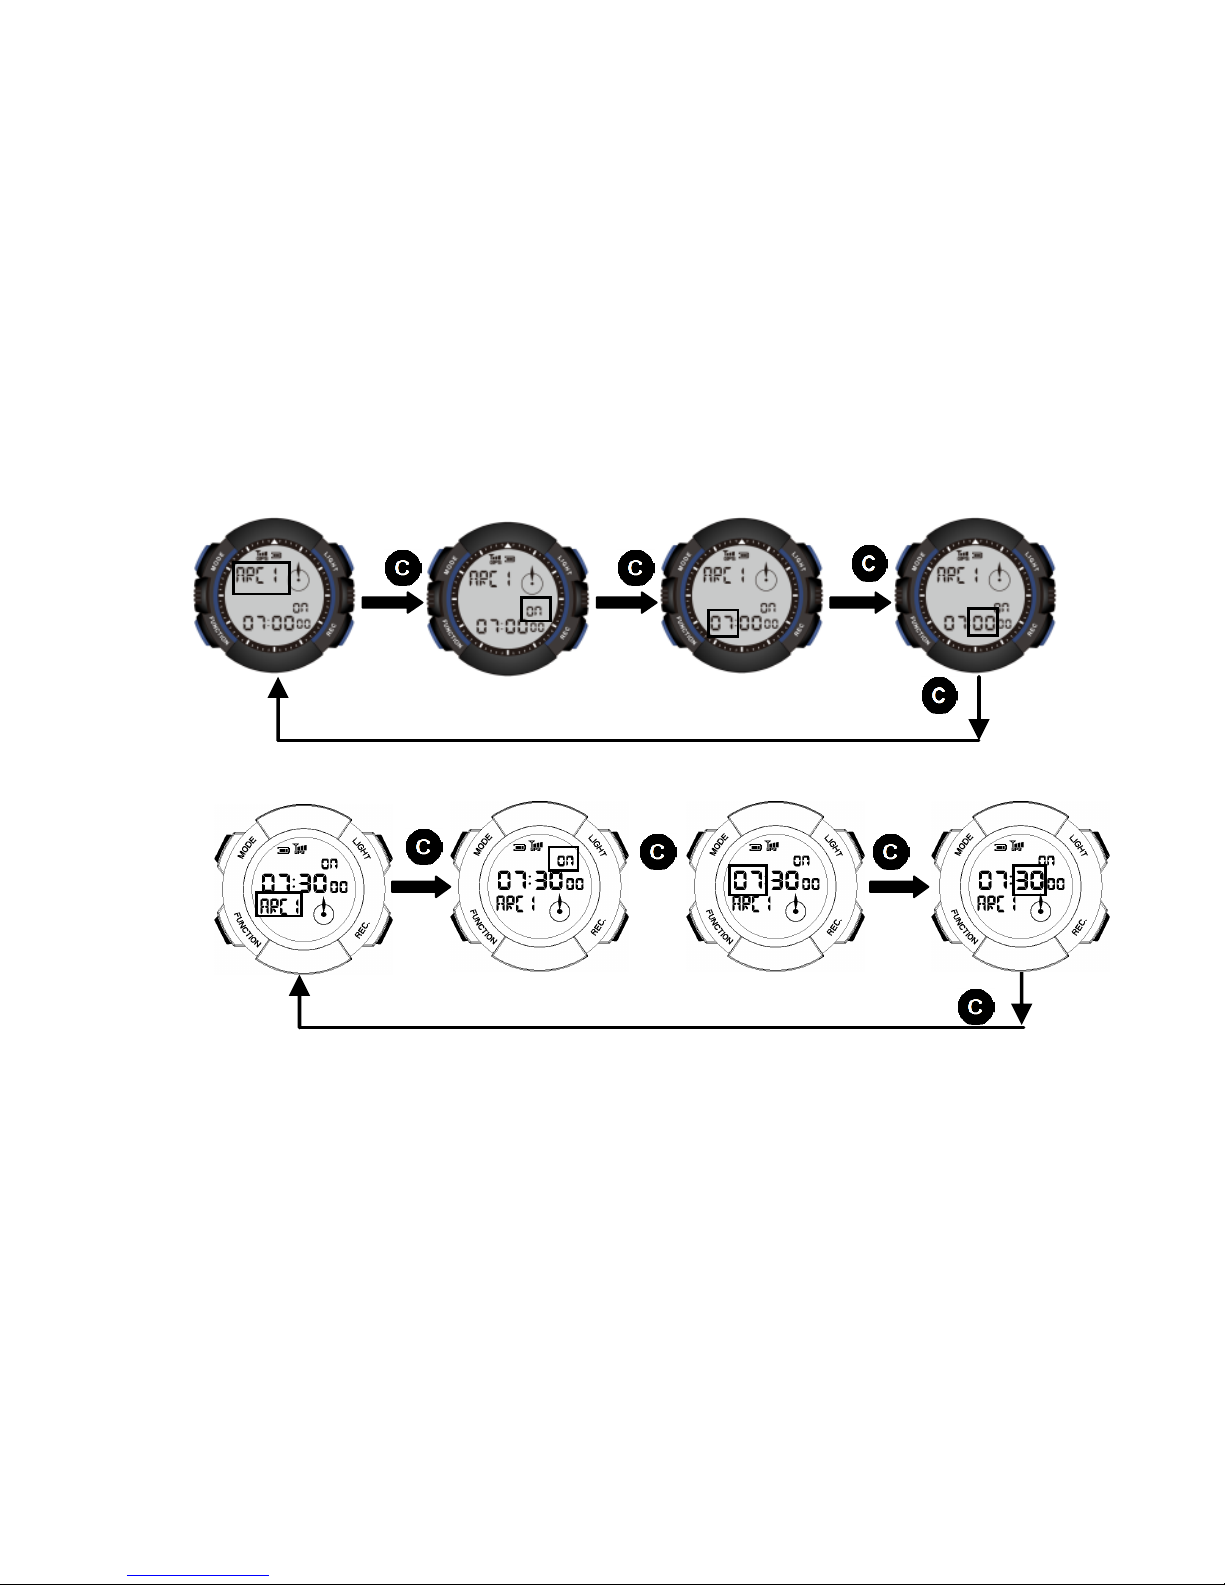
(3) Press button C to scroll hours, minutes and ON/OFF options.
(4) Press B (+) or D (-) button to adjust values of selected settings.
(5) Press and hold button B or D to adjust values in fast speed.
(6) Press button A to finish and exit setup function.
Your watch may return to the setup screen automatically after one minute
of idle time.
GL
GAL
Page 35
35
Alarm Function
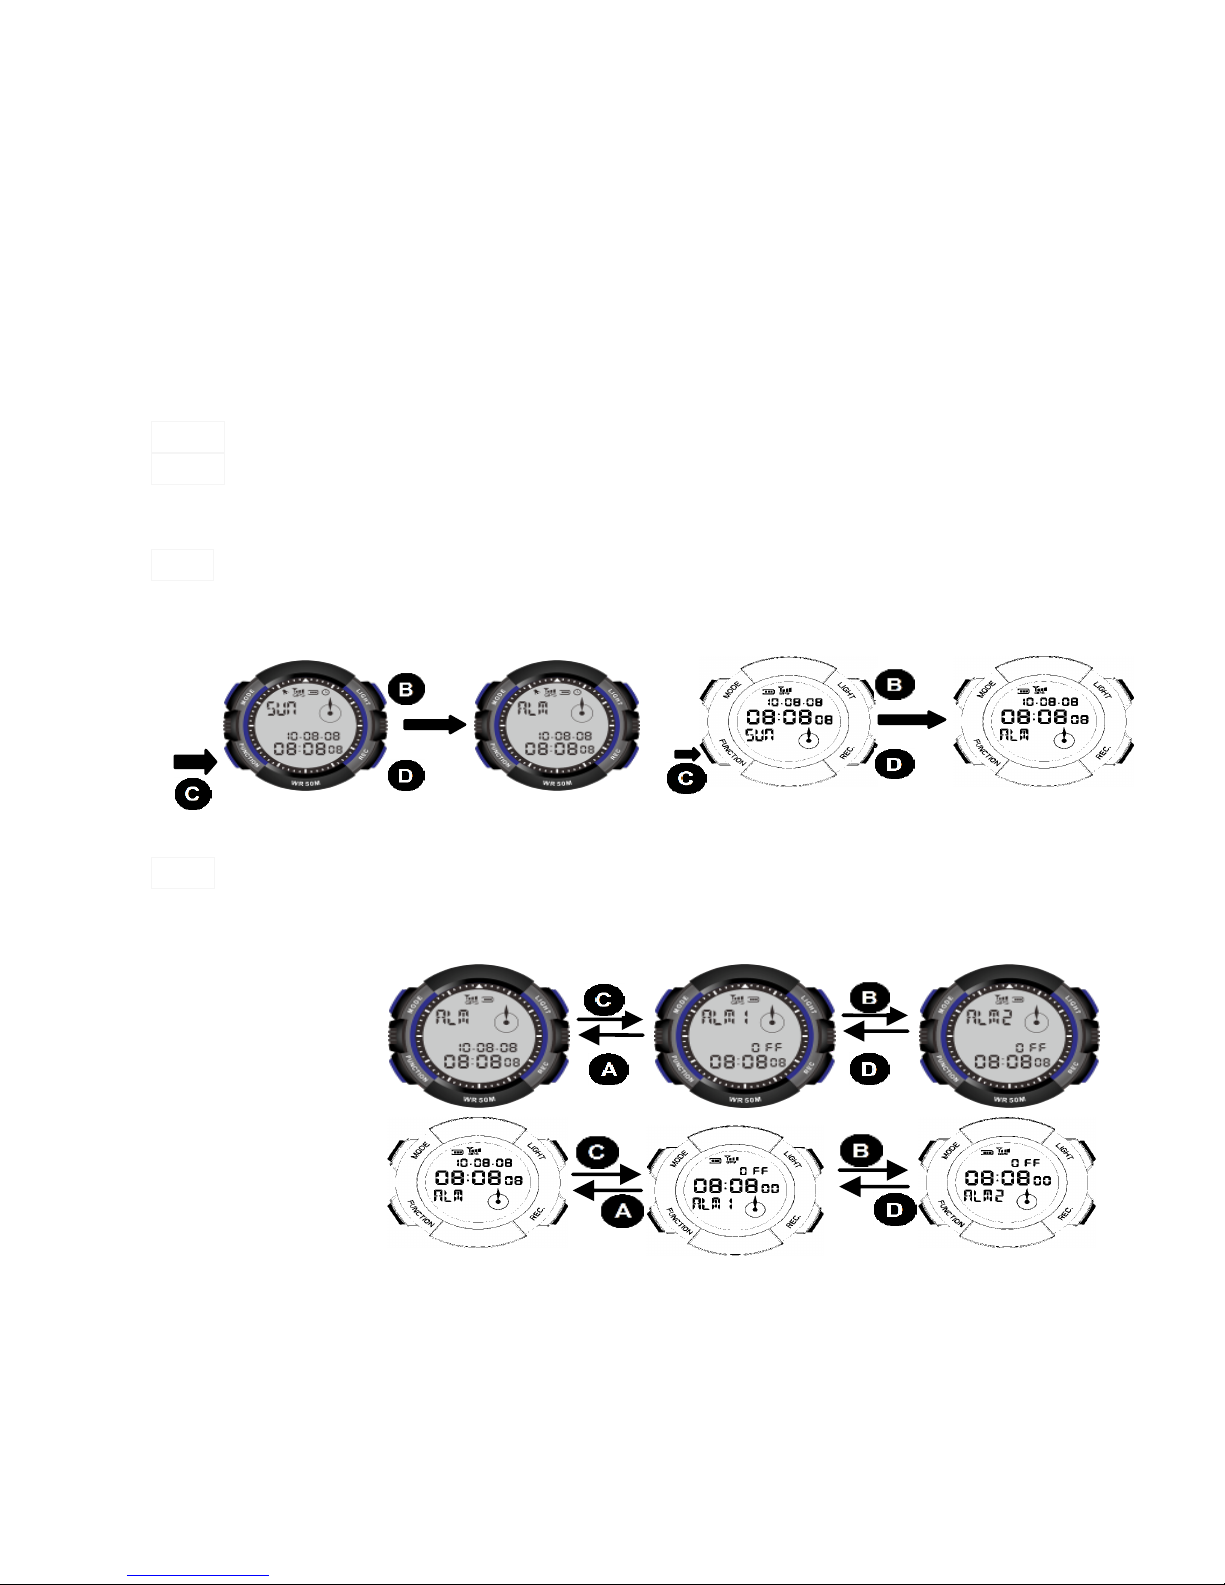
This watch is equipped with three separately using a daily alarm. After opened
the alarm, the watch will be issued for about 20 seconds at the alarm time, and
press any button can be stopped the alarm tone.
Alarm screen expressed by ALM, Alarm number is ALM1 to ALM3.
Enter the alarm function picture, the last exit the function display
information will appear first.
(1) Under the normal display, press C button for one time, then press
B button for triple times or press D for four times, choose watch
interface to ALM picture.
(2) In the ALM interface, press C button for one time, then enter
into ALM1 interface. and press B or D button can be choose
ALM2 or ALM3 picture.
GL
GAL
GL
GAL
Page 36
36
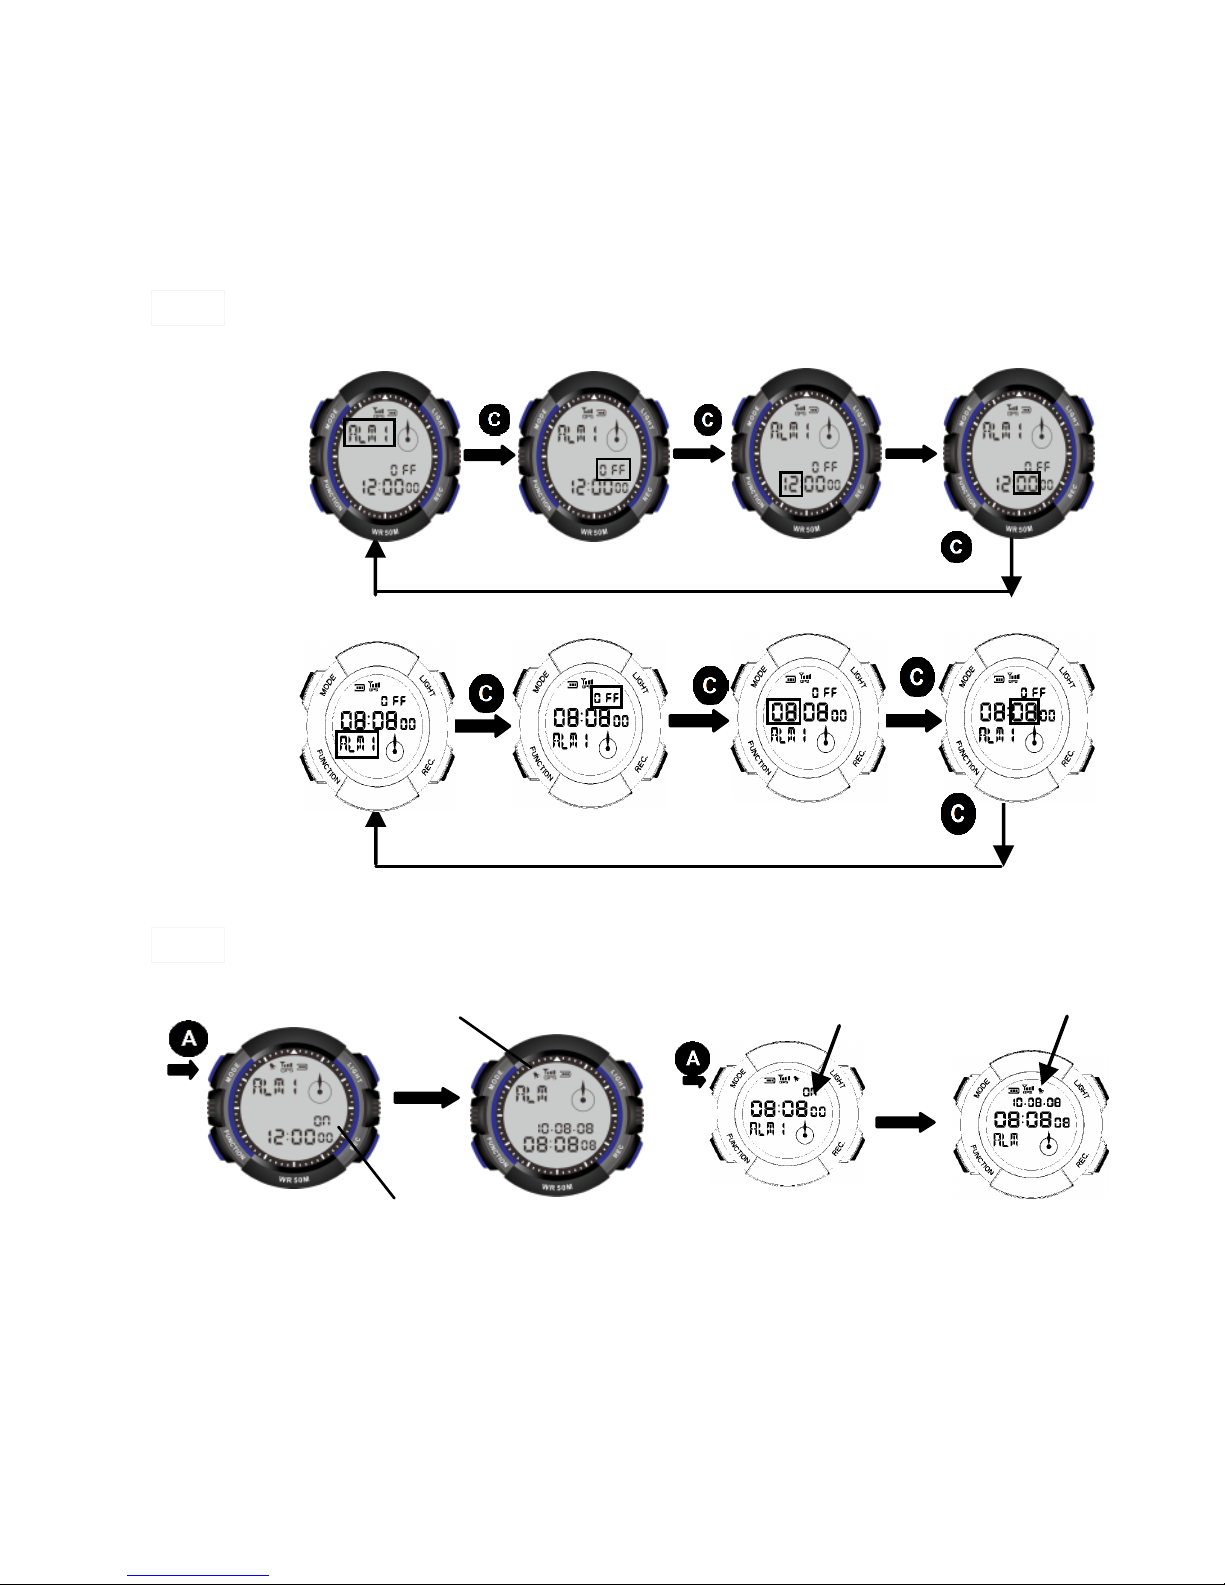
(3) Press C button to switch hour and minute, open or relieve alarm. press B
(+)or D(-)button to change set value.
(4) Press A button to exit setting interface.
GAL
GL
Alarm Symbols
Alarm
GAL
Alarm ON
Alarm Symbols
GL
Page 37
37
Memo Function
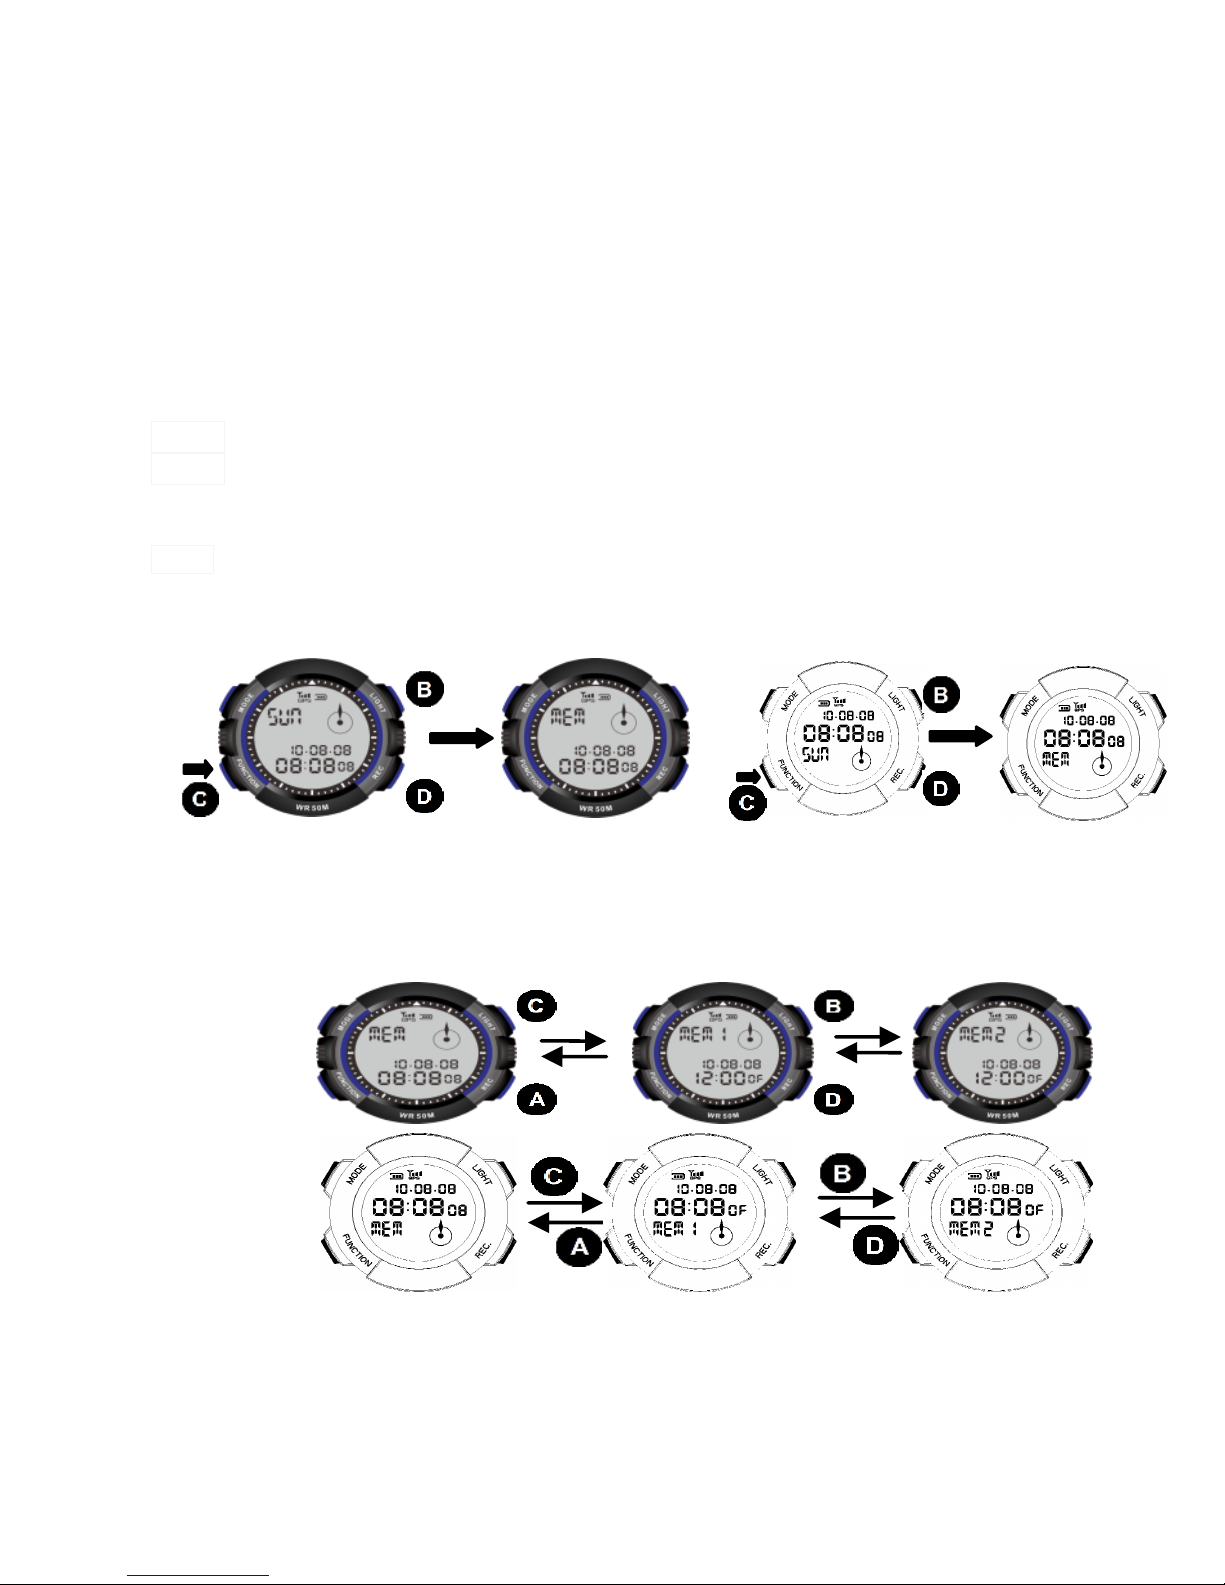
This watch is equipped with two separate memorandums. After opened the
memo, the watch will be issued for about 20 seconds at the memo time, and
press any button can be stopped the alarm ring.
Memo screen expressed by MEM, Memo number is MEM1 to MEM2.
Enter the memo function picture, the last exit the function display
information will appear first.
(1) Under the normal display, press C button for one time, then press
B button for four times or press D for triple times, then choose watch
interface to MEM picture.
(2) In the MEM interface, press C button for one time, then enter
into MEM1. Press B or D button can be choose o MEM2 picture.
GAL
GL
GAL
GL
Page 38
38
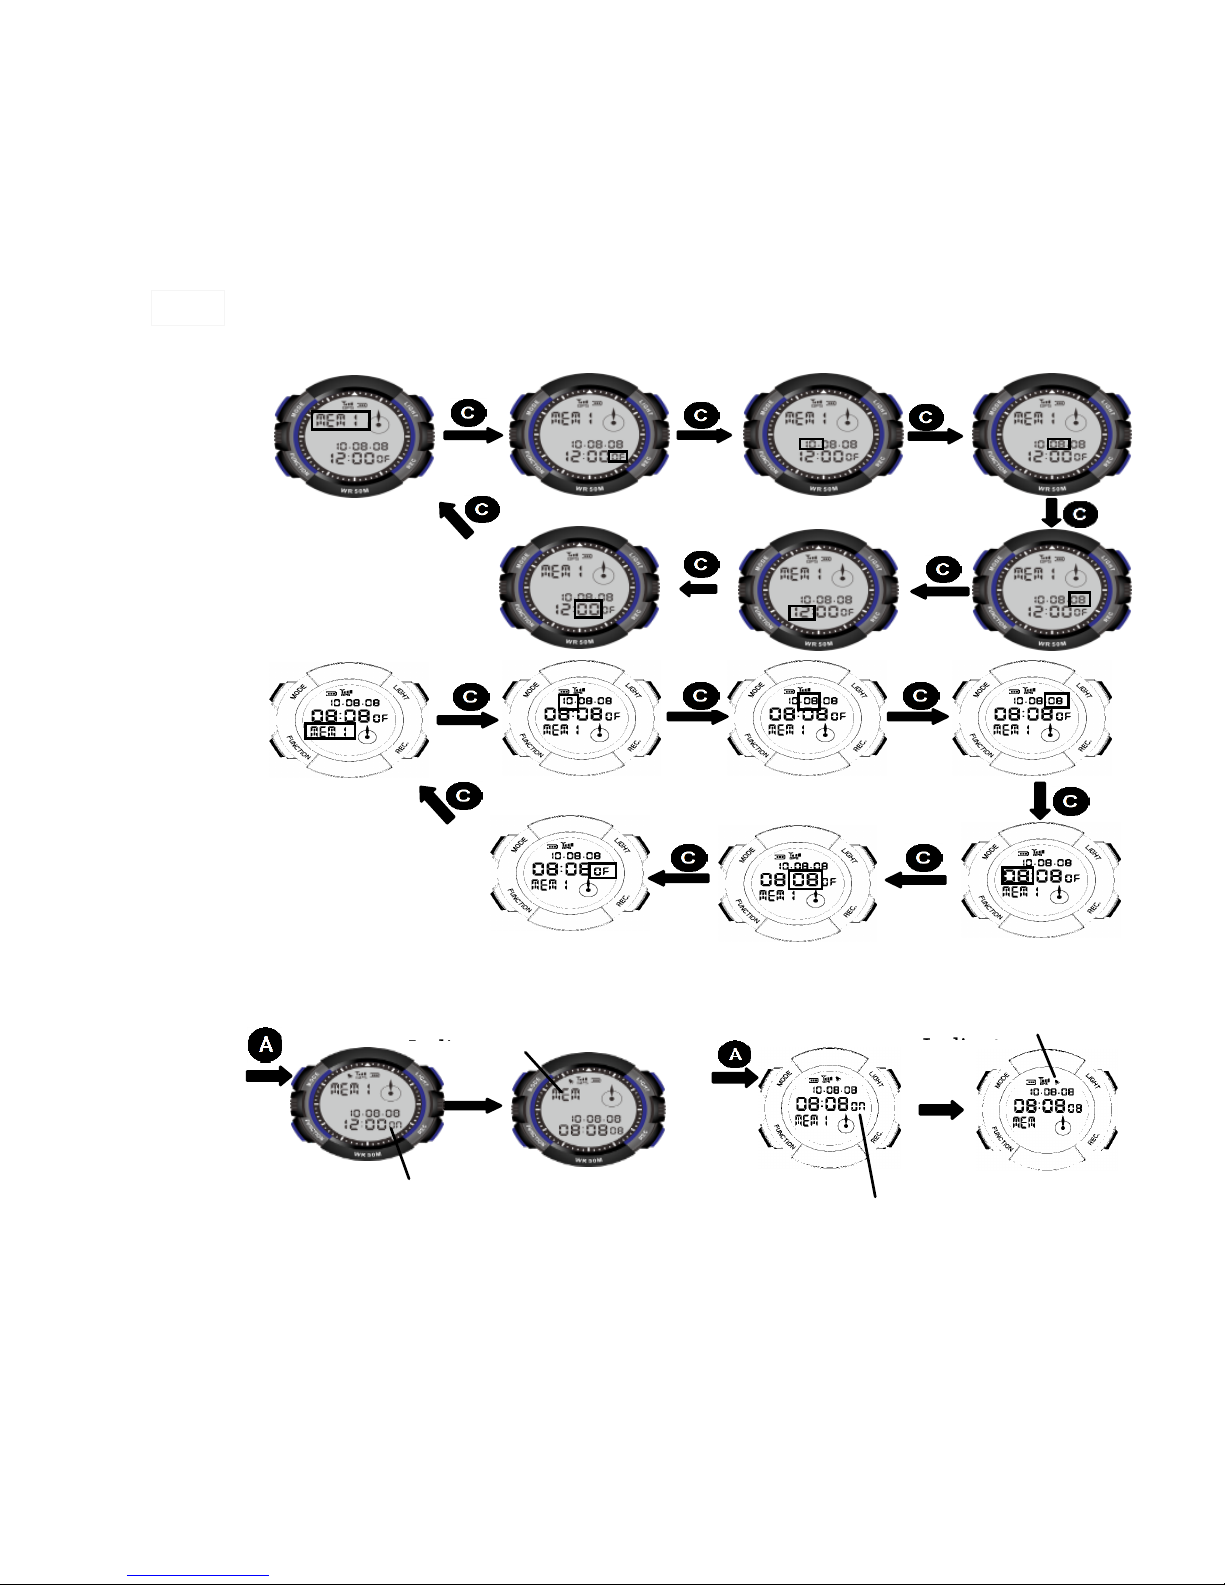
(3) Press C button to switch hour and minute, open or relieve memorandum.
press B(+)or D(-)button to change set value.
(4) Press A button to exit setting interface.
GAL
GL
Memo Activated
Memo in
ON state
GL
Memo in
ON state
GAL
Memo Activated
Page 39
39
Hourly Chime Function
This watch is equipped with the whole point timekeeping function, the whole
point timekeeping turned on, the time arrived when the whole point will be
issued "Didi" twice timekeeping.
The whole point timekeeping function of the screen from the hourly
chime, said the whole point of time only to open and lift the two states.
Into the whole point timekeeping function, last exited the mode appears
first display of information.
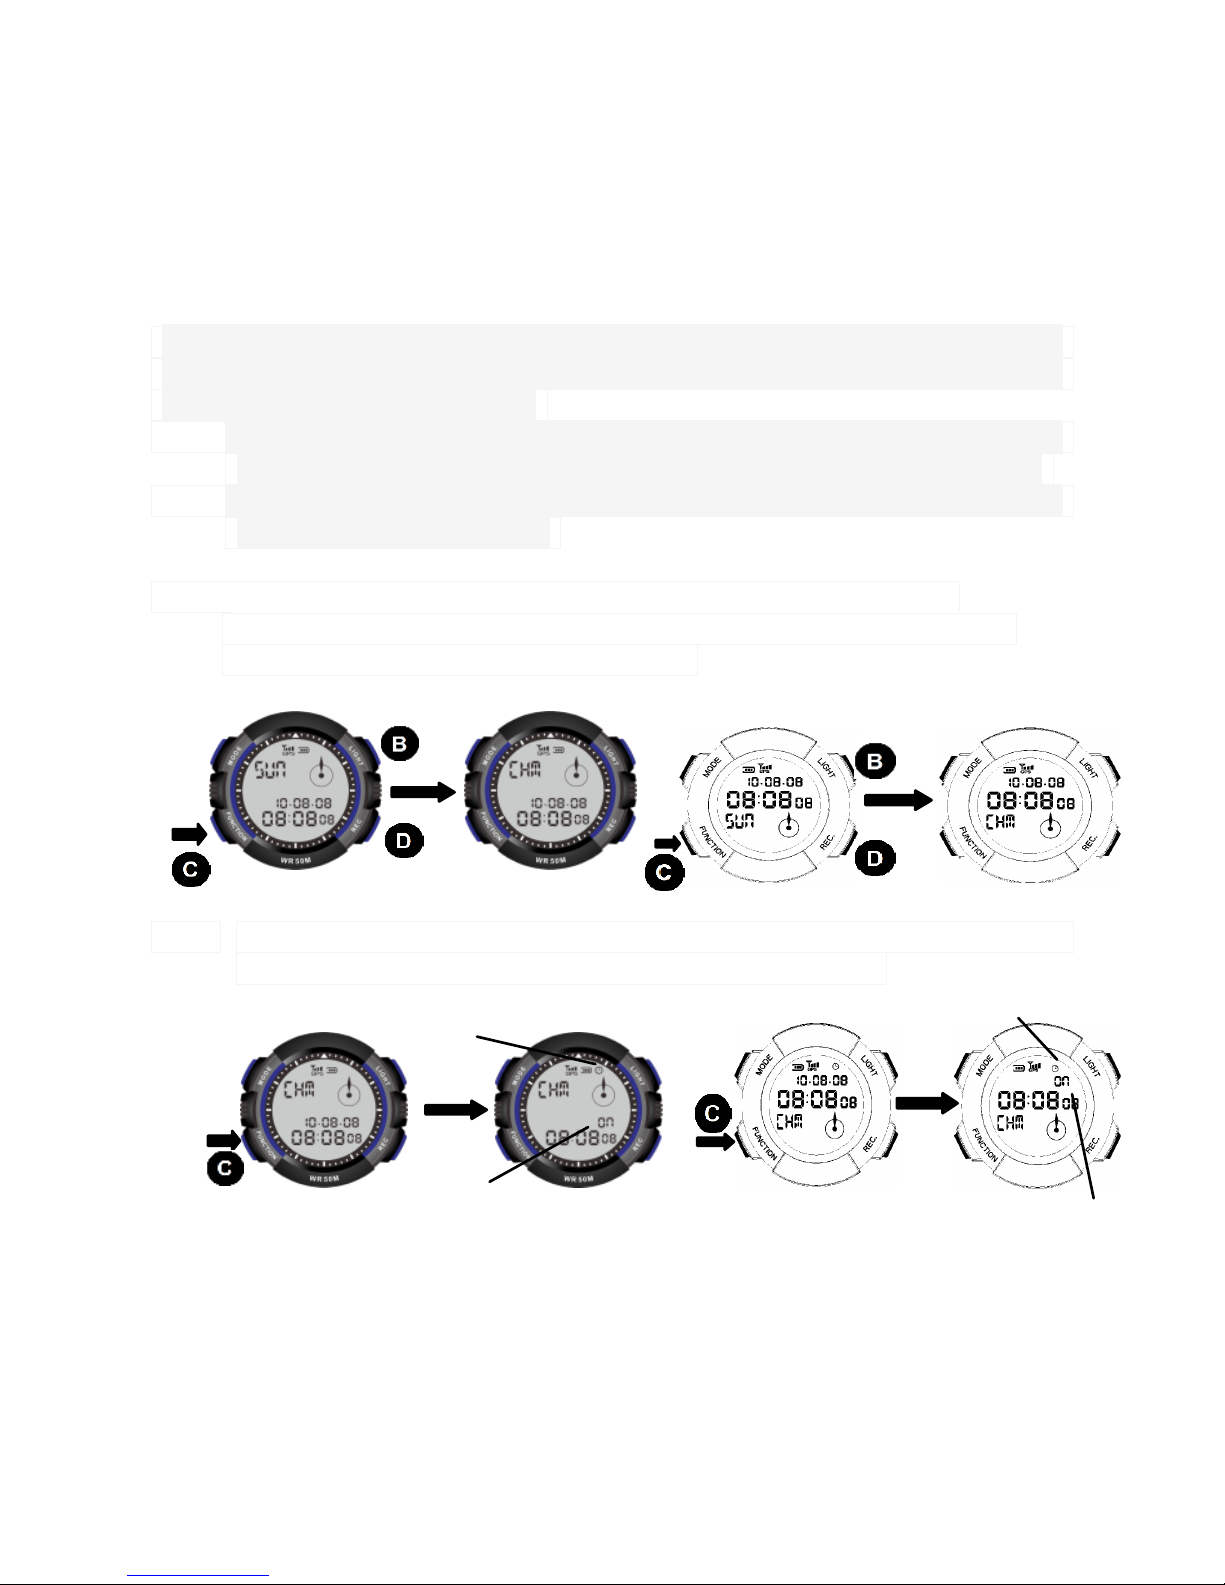
(1) Under the normal display, press C button for a time, then press
B button for five times or press D for once times, and then chooses
watch interface to hourly chime picture.
(2) In the hourly chime screen, press C to enter the hourly chime function
setting screen, Press B or D button to open or removed.
Chime Symbols
Chime ON
GAL
GL
GL
Chime Symbols
Chime ON
GAL
Page 40
40
How to adjust position of dials (GAL exclusive)
Dials of your TREKMATE watch may shift positions when subjects to magnetic
field or powerful vibration. Please make appropriate calibrations to keep correct
time dialing.
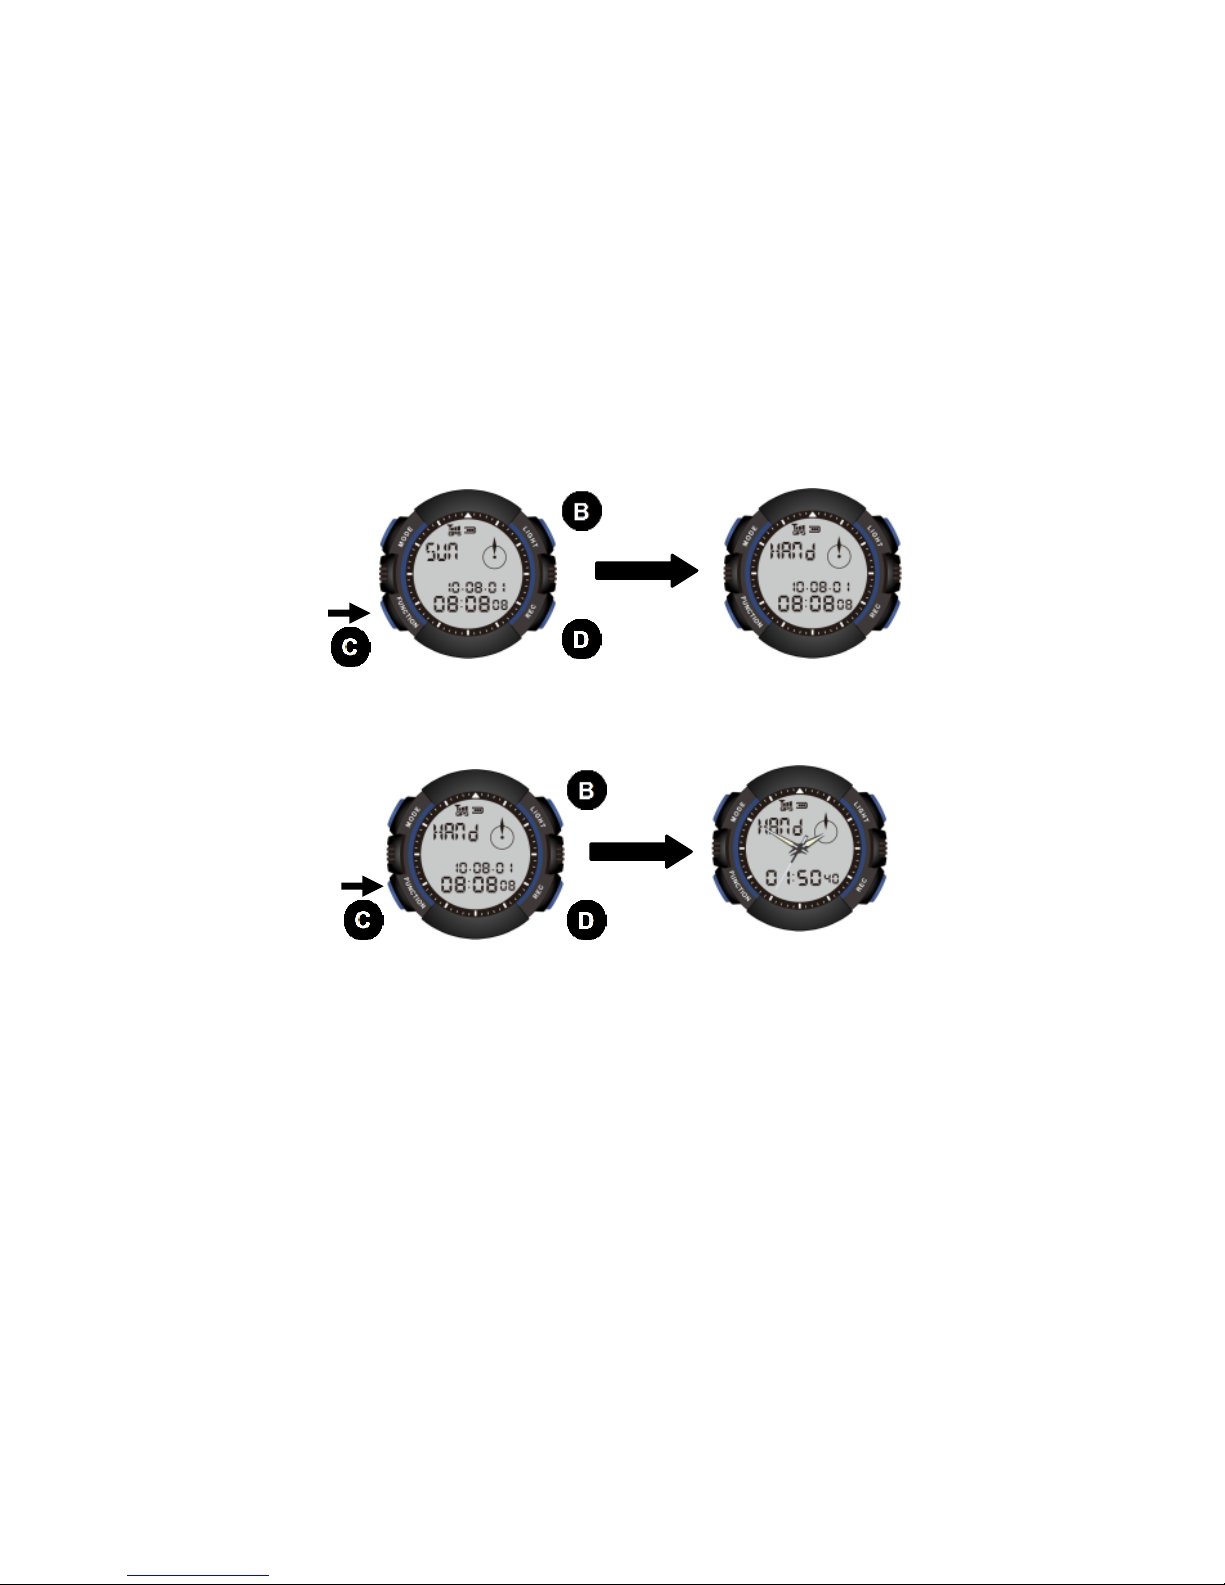
(1) Press button C in time mode to access the function menu. Press button B
six times or button D once to display the "HAND" screen.
(2) Press button C in "HAND" screen to start adjusting dials. The dials stop
moving and T1 time is displayed in 12 hour format. If these two times do
not match please adjust screen time to the same as the dial time.
(3) Press button C to scroll hours, minutes and seconds options. Press B (+) or
D (-) button to adjust values of selected settings.
(4) Press button A to confirm your adjustments and the dial catches up with
the T1 time.
Your watch may return to the setup screen automatically after one minute
of idle time.
Press and hold button B or D to adjust values in fast speed.
Page 41

41
Disclaimer
Users’ liabilities
Do not use your TREKMATE watch as the unique navigation tool. Please use all
available navigation tools of map, compass and visual inspection and compare
with navigation data provided by your TREKMATE product. Please ensure that
there is no conflicting data in existence before navigating further.
Your TREKMATE watch is for entertainment and recreation purposes only. DO
NOT use it with any measurement that mandates professional or industrial
accuracy.
CE
We fulfill the requirements of CE logo and the 89/336/EEC and 99/5/EEC CE
Directive of EMC.
ISO 9001 compliant limited warranty
Subject to normal usage of your product, company warrants your product to be
free from defects in material and workmanship at the time of its original
purchase by a consumer and for a subsequent period of one (1) year. If, during
the warranty period, your product fails to operate under normal use and service,
due to defects in material and workmanship, company will, at its option, either
repair your product or replace components or replace your product with new
product. This warranty does not cover battery and battery replacements. Nor
does this warranty cover any failure of the product due to accidents, abuse,
carelessness, misuse, alteration or modification, or use in other than the normal
and customary manner. There are no express warranties other than this printed
limited warranty. In no event shall company be liable for incidental or
consequential damages of any nature caused by using or unable to use this
product. Nor shall company be liable for any third party loss or claim.
Page 42

42
Disclaimer
GPS is the abbreviation of Global Positioning System. This is a system
developed, managed, and controlled by the Department of Defense; U.S. Based
on requirements imposed by policy and national security of the US government
may change functions and positioning accuracy of the whole system without
notice or announcement. Company shall not re-claim this product on account of
changes in GPS service.
NOTE: This equipment has been tested and found to comply with the limits for
a Class B digital device, pursuant to Part 15 of the FCC Rules. These limits are
designed to provide reasonable protection against harmful interference in a
residential installation. This equipment generates uses and can radiate radio
frequency energy and, if not installed and used in accordance with the
instructions, may cause harmful interference to radio communications.
However, there is no guarantee that interference will not occur in a particular
installation.
If this equipment does cause harmful interference to radio or television reception,
which can be determined by turning the equipment off and on, the user is
encouraged to try to correct the interference by one or more of the following
measures:
Reorient or relocate the receiving antenna;
Increase the separation between the equipment and receiver;
Connect the equipment into an outlet on a circuit different from
that to which the receiver is connected.
Consult the dealer or an experienced radio/TV technician for
Repair of this product should be performed by company authorized service
personnel. Repairs performed by unauthorized technician will void the warranty.
Disposal of old product
Please check local regulations concerning electronic wastes for disposal of this
product. This product shall not be treated as household waste. If possible please
return your old watch to a product dealer near you.
Page 43
43
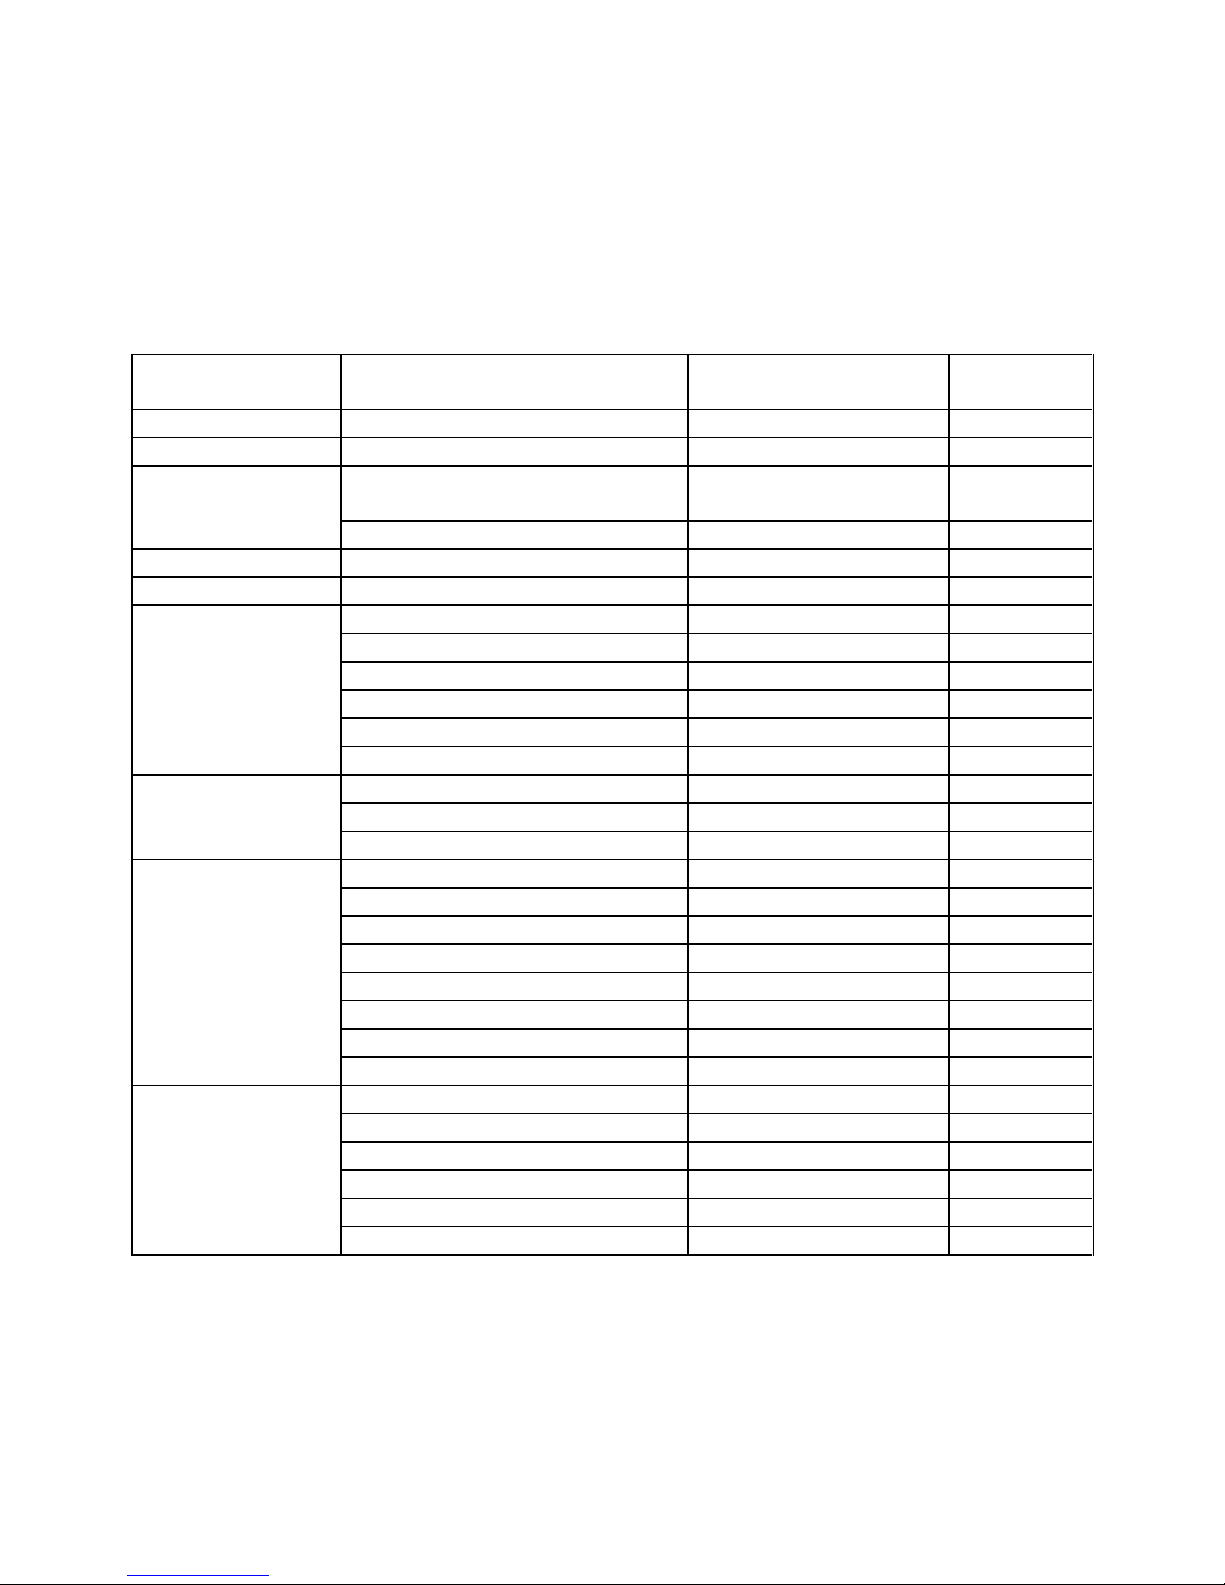
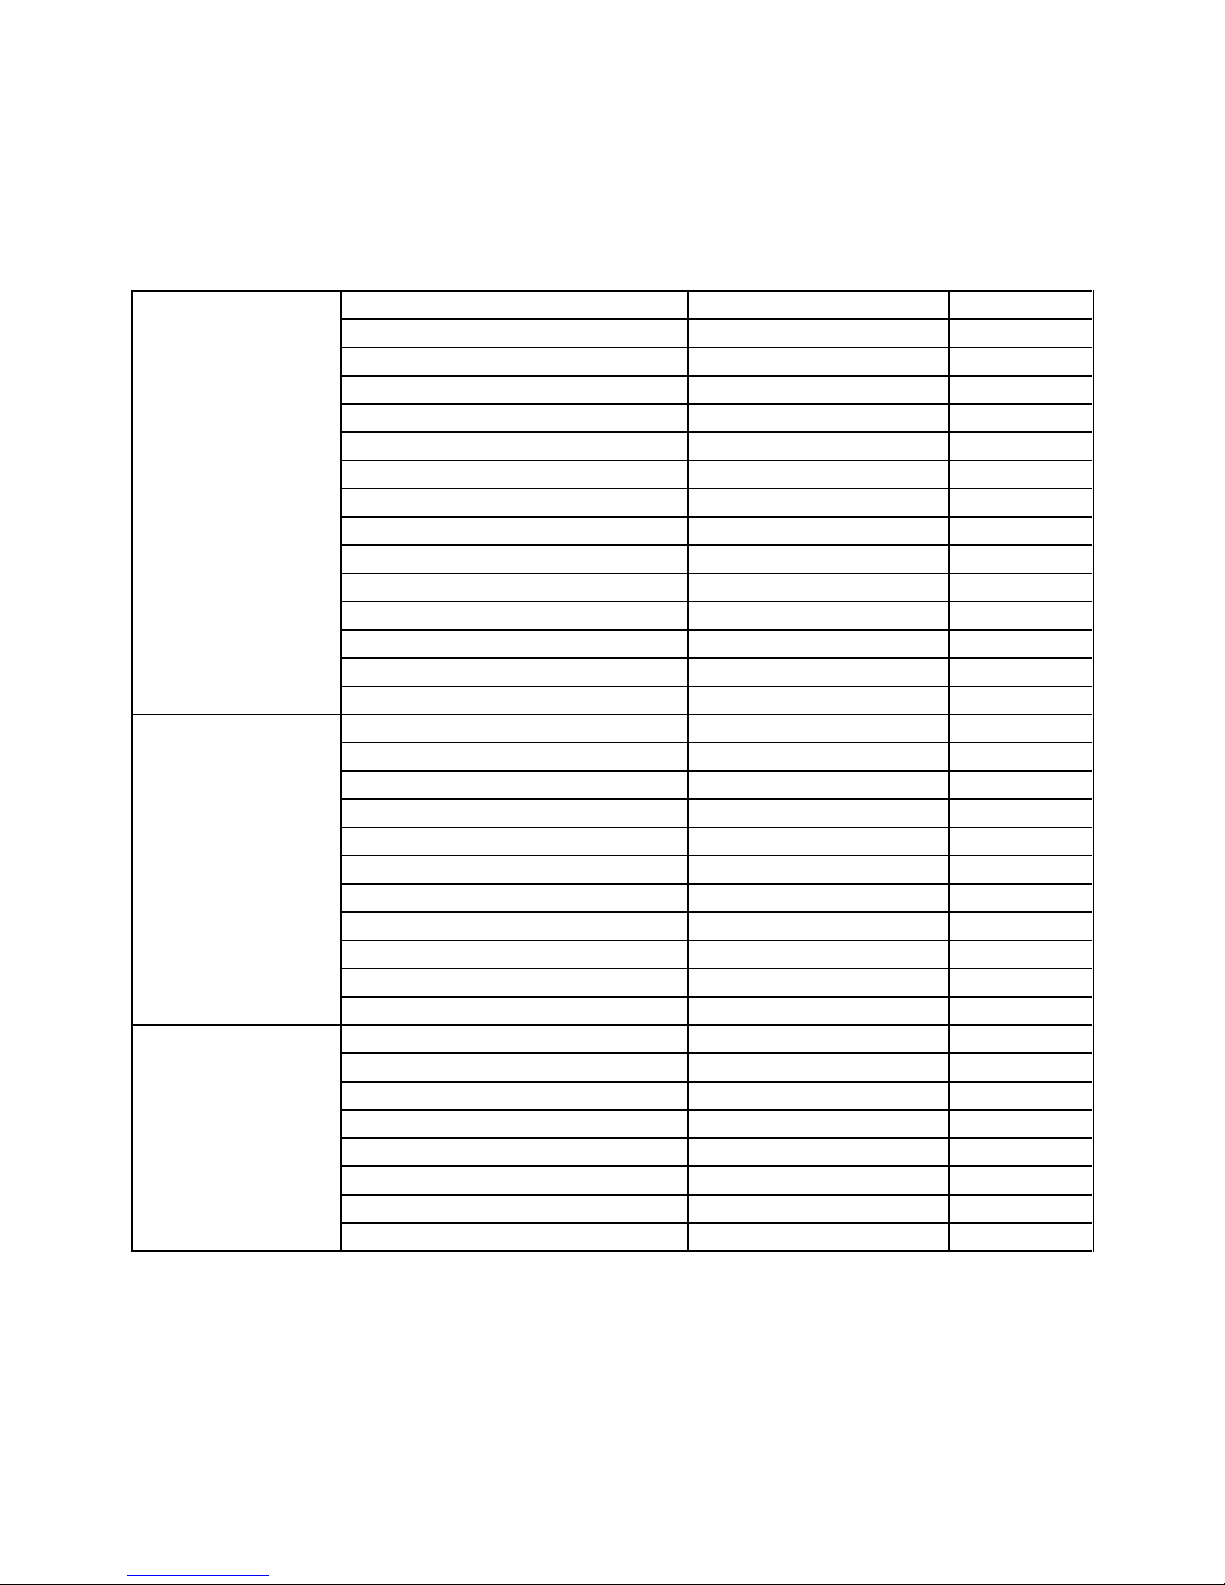
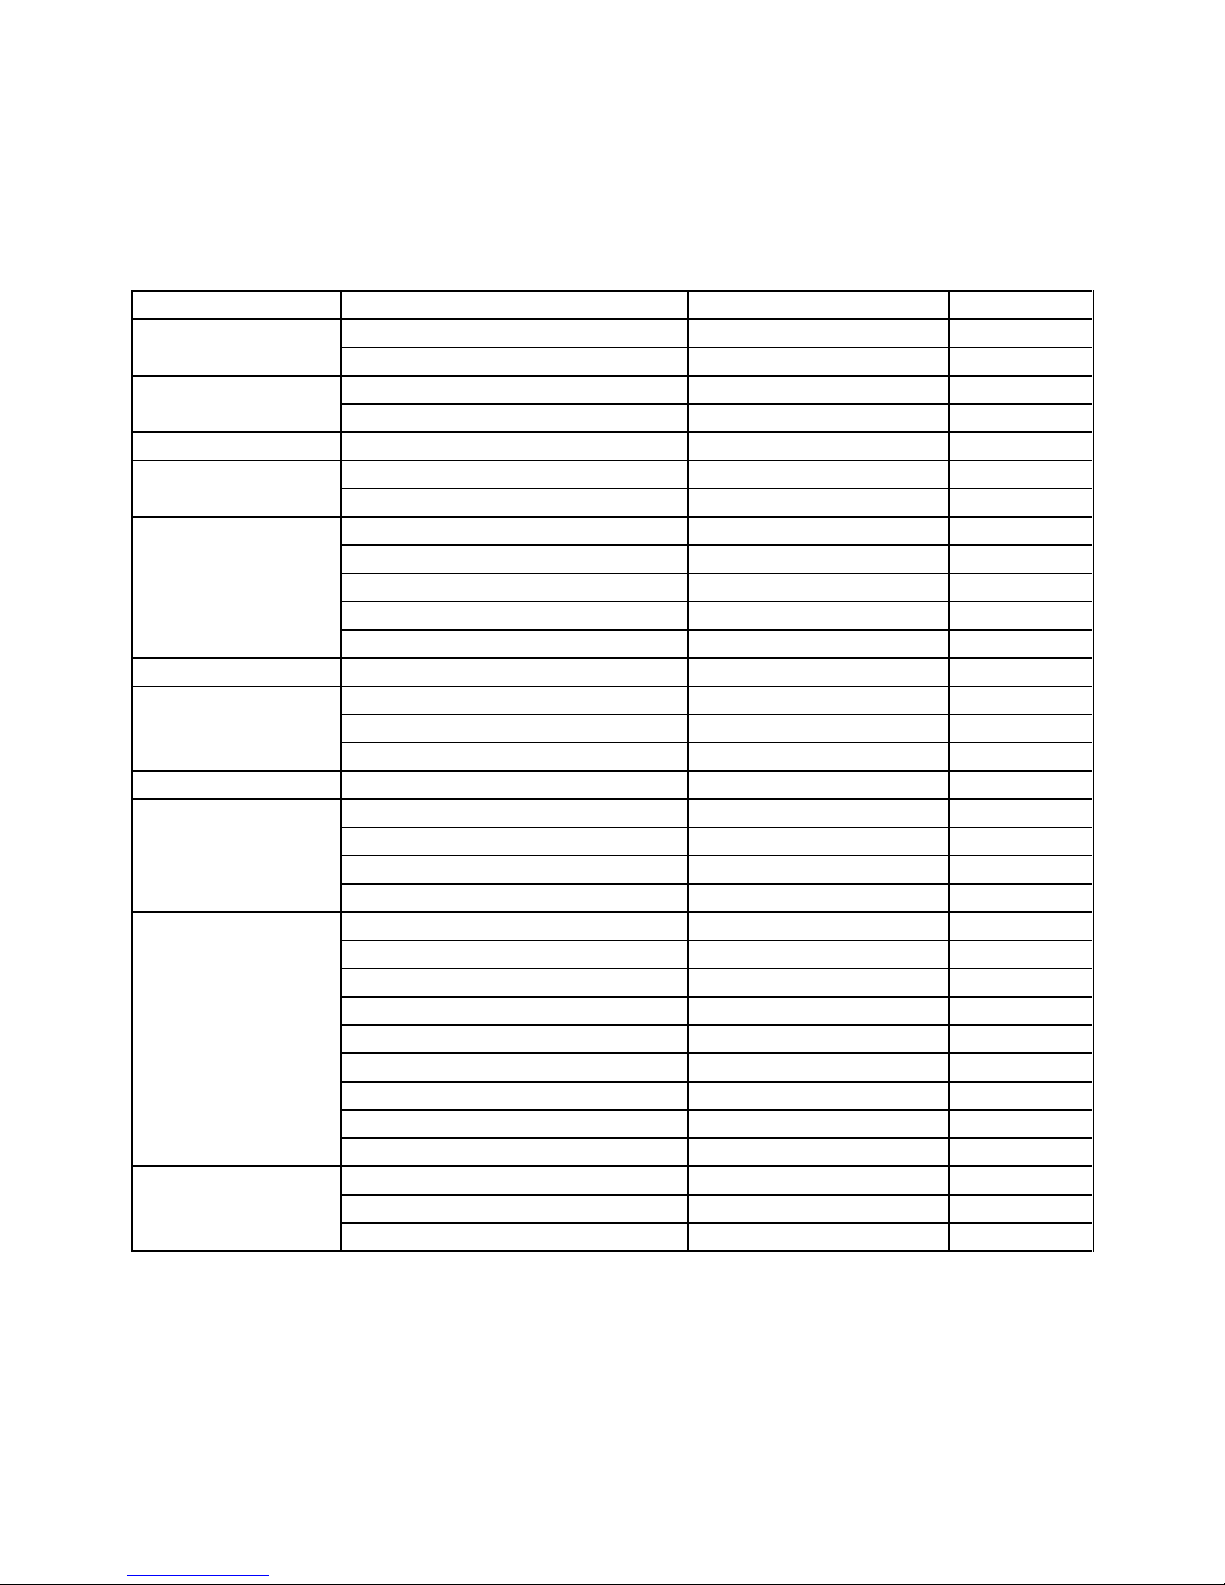
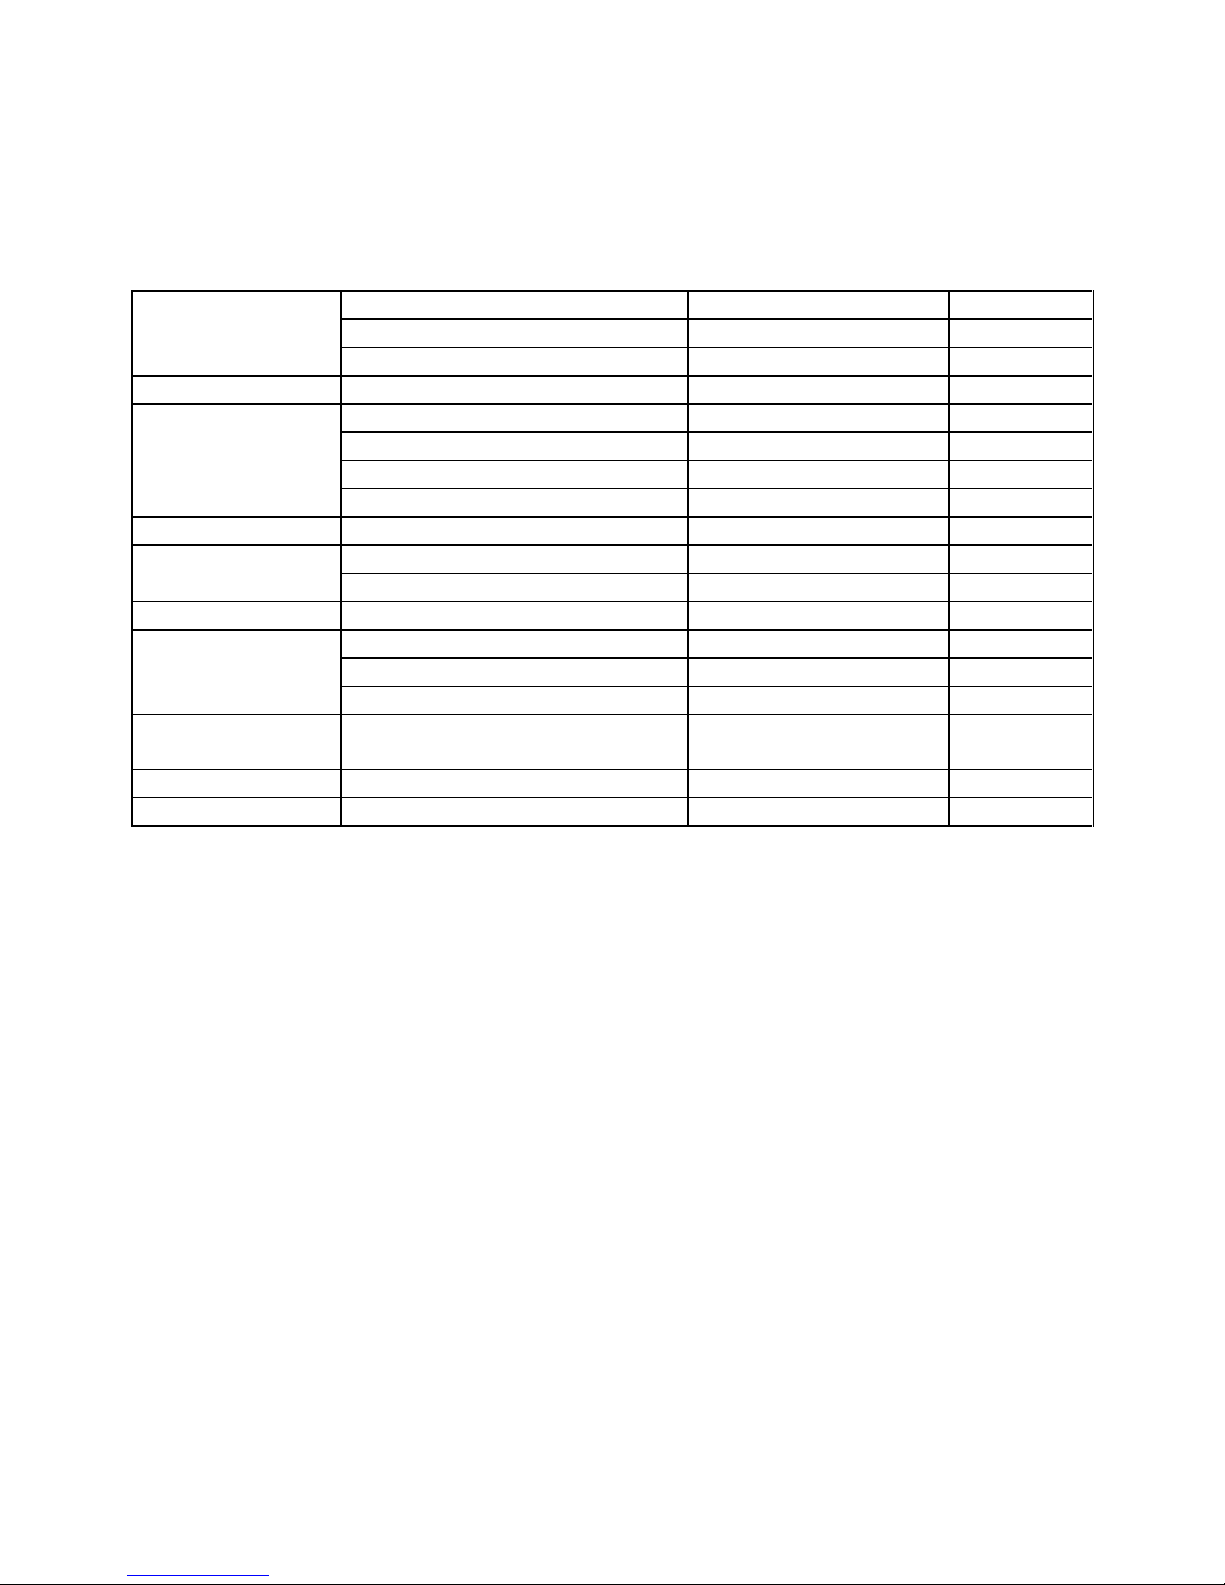
City Name List
UTC
Differential
City Name
Country Name
DST
-12
Eniwetok Atoll
-11
Pago Pago
American Samoa
-10
Papeete
Tahiti(French
Territory
Honolulu
United States
-9.5
Marquises
-9
Anchorage
United States
1
-8
Vancouver
Canada
1
Las Vegas
United States
1
Los Angeles
United States
1
San Francisco
United States
1
San Diego
United States
1
Seattle-Tacoma
United States
1
-7
Edmonton
Canada
1
Denver
United States
1
Phoenix
United States
1
-6
Winnipeg
Canada
1
San Jose
Costa Rica
Guatemala City
Guatemala
Mexico City
Mexico
1
Chicago
United States
1
Dallas
United States
1
Houston
United States
1
New Orleans
United States
1
-5
Rio Blanco
Brazil
Montreal
Canada
1
Toronto
Canada
1
Bogota
Columbia
Havana
Cuba
1
Panama
Panama
Page 44
44
Lima
Peru
Washington
United States
1
Atlanta
United States
1
Boston
United States
1
Detroit
United States
1
Indianapolis
United States
1
Miami
United States
1
New York
United States
1
Philadelphia
United States
1
-4
La Paz
Brazil
Manaus
Brazil
Halifax
Canada
1
San Diego
Chile
1
Caracas
Venezuela
-3.5
St.John’s
Canada
1
-3
Buenos Aires
Argentina
Rio de Janeiro
Brazil
1
Sao Paulo
Brazil
1
Montevideo
Uruguay
1
-2
South Georgia Islands
-1
Praia
Cape Verde
0
Las Palmas
Canary Islands
(Spanish Territory)
1
Dublin
Ireland
1
Casablanca
Morocco
Lisbon
Portugal
1
Dakar
Senegal
London
England
1
Edinburgh
U.K.Scotland
1
UTC
+1
Vienna
Austria
1
Brussels
Belgium
1
Prague
Czech Republic
1
Copenhagen
Denmark
1
Page 45
45
Paris
France
1
Berlin
Germany
1
Frankfurt
Germany
1
Hamburg
Germany
1
Munich
Germany
1
Rome
Italy
1
Milan
Italy
1
Amsterdam
Holland
1
Lagos
Nigeria
Oslo
Norway
1
Warsaw
Poland
1
Madrid
Spain
1
Barcelona
Spain
1
Stockholm
Sweden
1
Zurich
Switzerland
1
+2
Cairo
Egypt
1
Helsinki
Finland
1
Athens
Greece
1
Amman
Jordan
1
Beirut
Lebanon
1
Tripoli
Libya
Cape Town
South Africa
Johannesburg
South Africa
Damascus
Syria
1
Istanbul
Turkey
1
Jerusalem
1
+3
Bahrain
Bahrain
Addis Ababa
Ethiopia
Baghdad
Iraq
1
Nairobi
Kenya
Kuwait
Kuwait
Doha
Qatar
Moscow
Russian Federation
1
Jeddah
Saudi Arabia
Page 46
46
+3.5
Teheran
Iran
+4
Muscat
Oman
Samara
Russian Federation
1
+4
Abu Dhabi
Arab Emirates
Dubai
Arab Emirates
+4.5
Kabul
Afghanistan
+5
Karachi
Pakistan
Yekaterinburg
Russian Federation
1
+5.5
Delhi
India
Chennai
India
Calcutta
India
Mumbai
India
Colombo
Sri Lanka
+5.75
Katmandu
Nepal
+6
Dhaka
Bangladesh
1
Almaty
Kazakhstan
1
Novosibirsk
Russian Federation
+6.5
Yangon
Myanmar
+7
Jakarta
Indonesia
Krasnoyarsk
Russian Federation
1
Bangkok
Thailand
Ho Chi Minh
Vietnam
+8
Perth
Australia
Beijing
People's Republic of China
Hong Kong
People's Republic of China
Shanghai
People's Republic of China
Taipei
Taiwan
Kuala Lumpur
Malaysia
Ulaanbaatar
Mongolia
1
Irkutsk
Russian Federation
1
Singapore
Singapore
+9
Tokyo
Japan
Fukuoka
Japan
Osaka
Japan
Page 47
47
Sapporo
Japan
Seoul
Republic of Korea
Yakutsk
Russian Federation
1
+9.5
Adelaide
Australia
1
+10
Melbourne
Australia
1
Sydney
Australia
1
Guam
Guam(U.S. Territory)
Vladivostok
Russian Federation
1
+10.5
Lord Howe Island
(Australia)*1
30minutes
+11
Noumea
Caledonia(French Territory)
Magadan
Russian Federation
1
+11.5
Norfolk Island
+12
Wellington
New Zealand
1
Auckland
New Zealand
1
Anadyr
Russian Federation
1
+12.75
Chatham Island (New
Zealand)
1
+13
Nuku'alofa
Tonga
+14
Republic of Kiribati
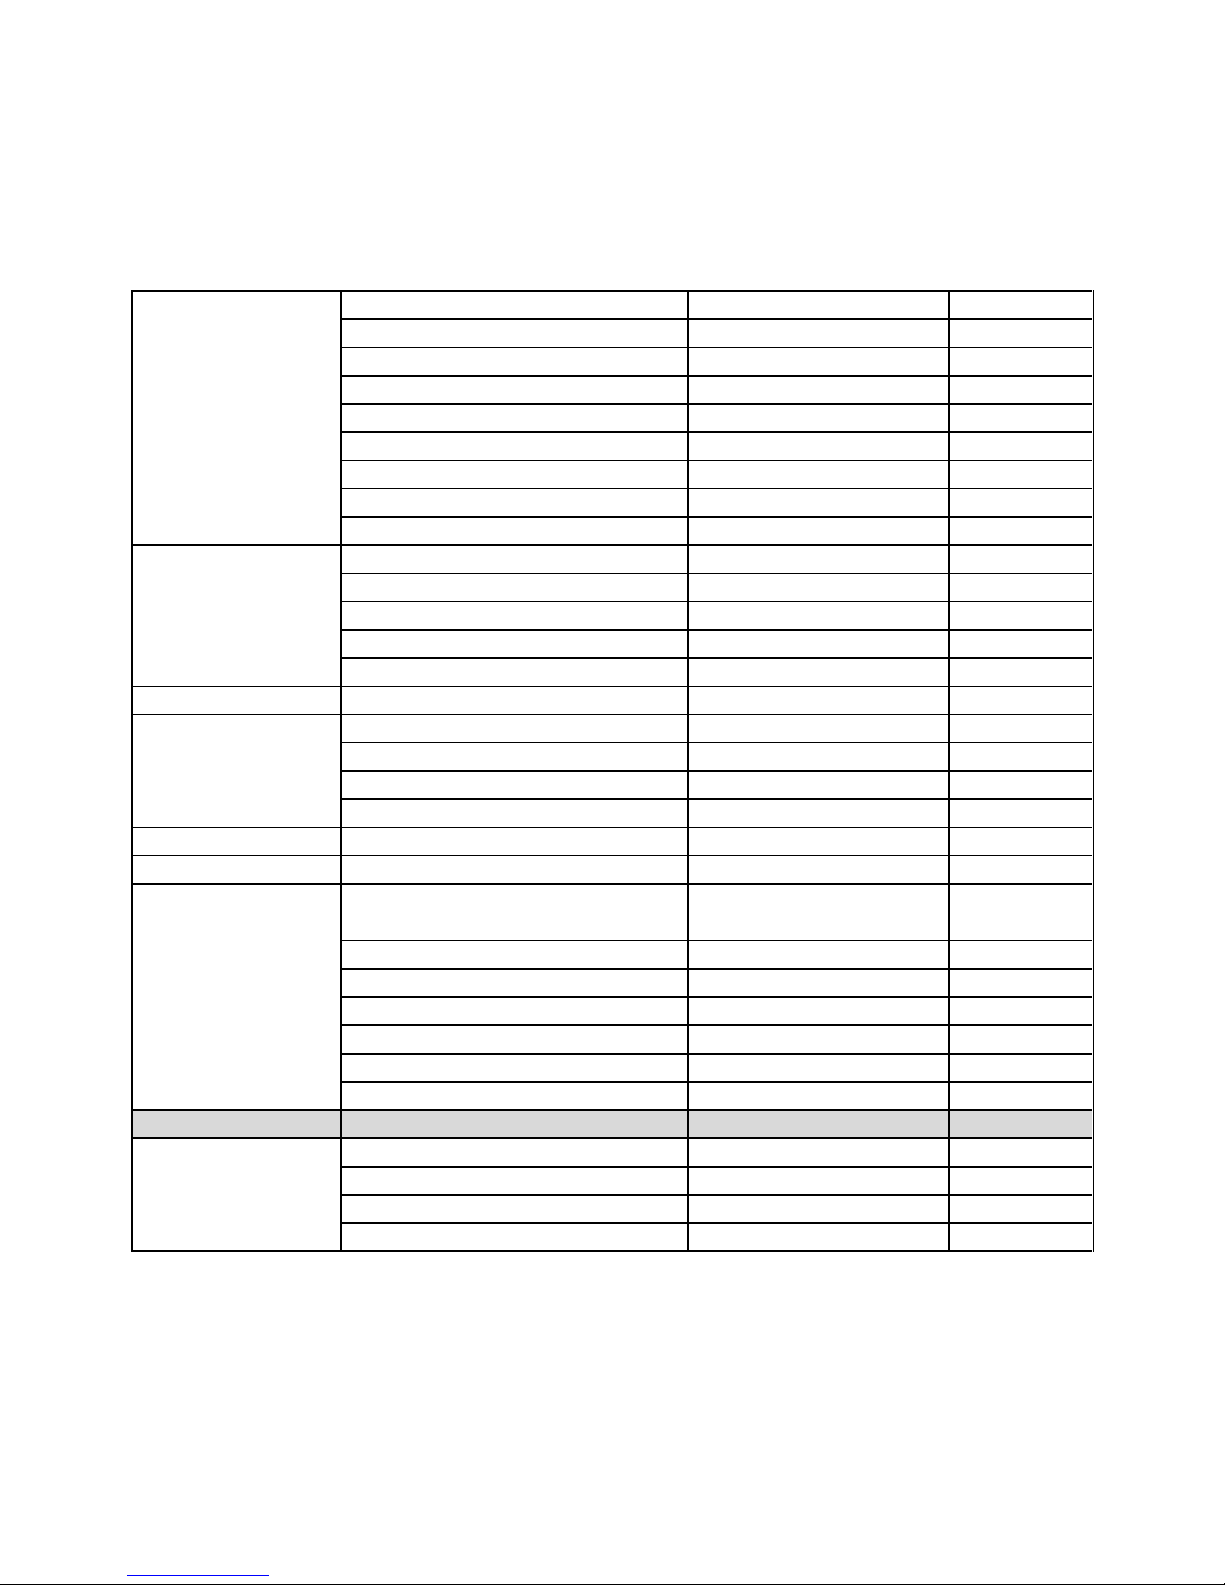
*1Summer time in Lord Howe Island advances the time by 30 minutes.
Based on data as of June 2006.
Time differentials in the above table are in accordance with Universal Coordinated
Time (UTC).
Page 48
48
 Loading...