

Page 1
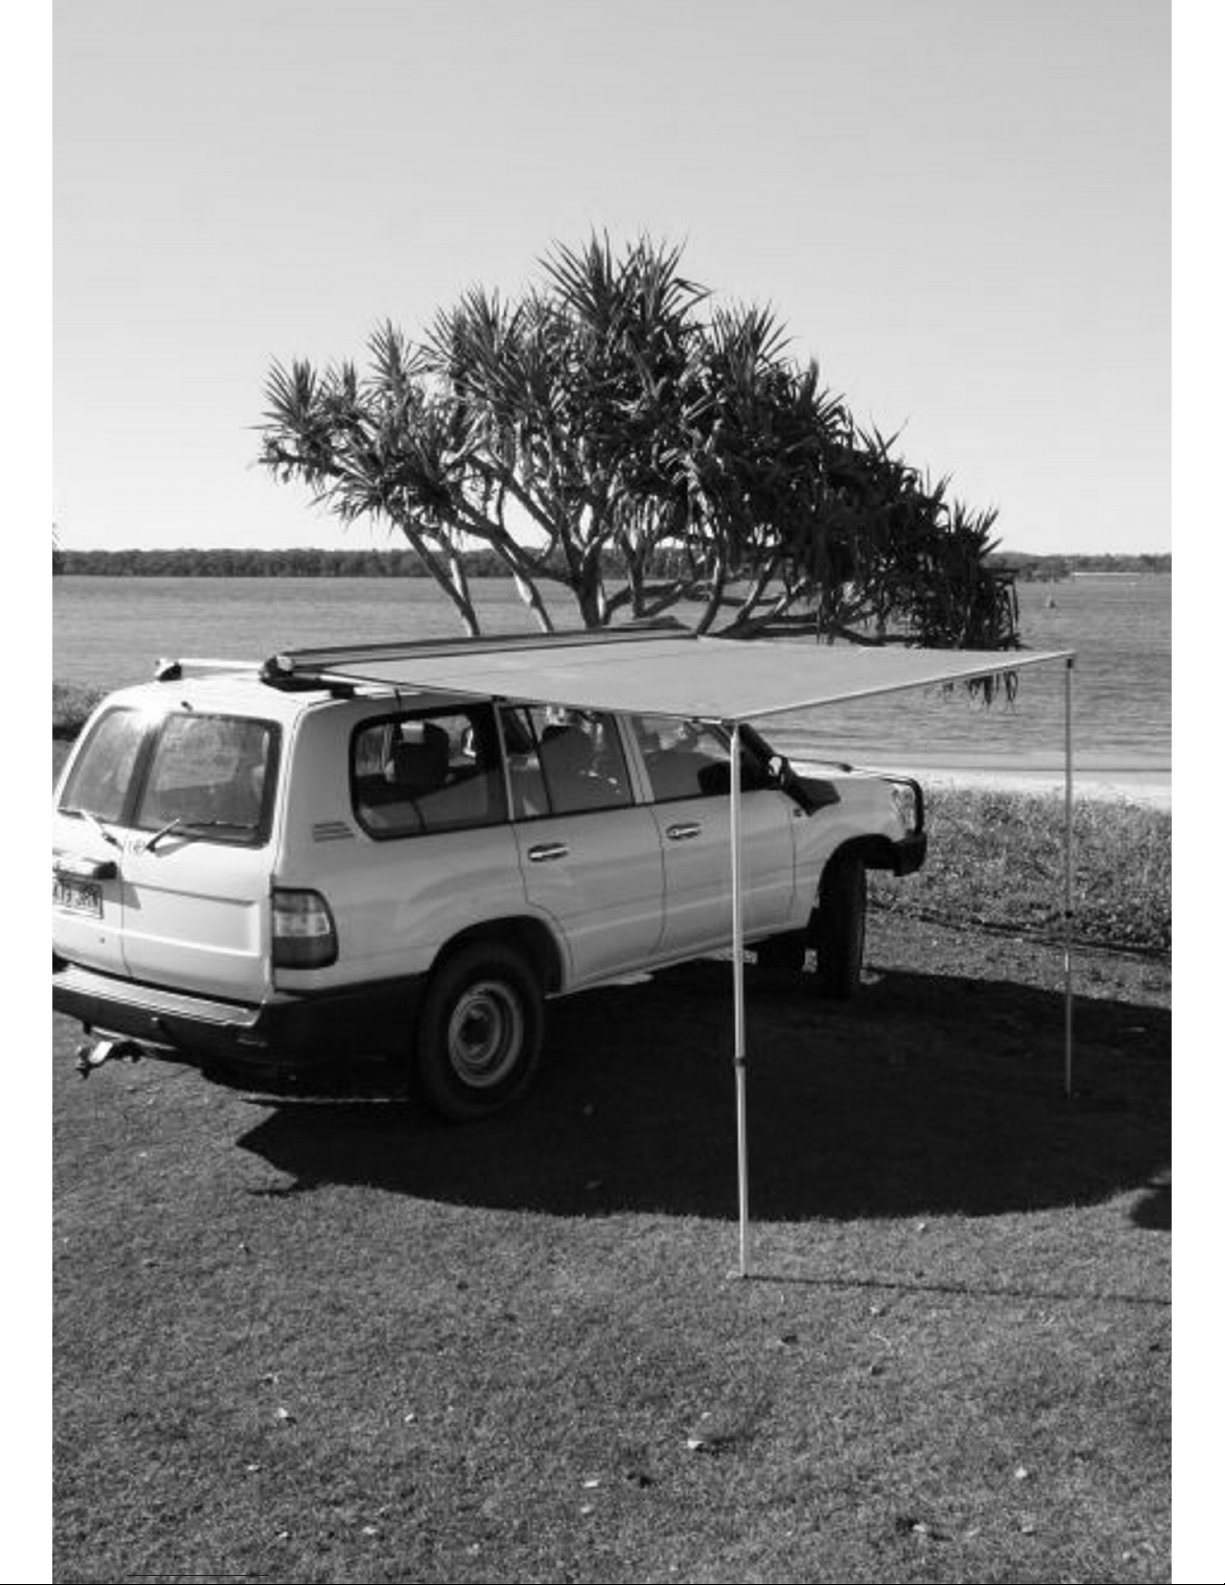
User Manual
Page 2

- 2
Thank you very much for buying a awning. We and countless satisfied
customers worldwide believe that you have exercised excellent judgment in your selection.
Our products have been designed to give you many years of comfort and reliability during
your adventures. The greenline team tries t he outmost to meet the highest expectations
by designing and crafting highly functional, flexible and durable products that withstand
and support your active lifestyle. Successful operation and long product life depends on
proper maintenance and correct operating techniques. We recommend that you carefully
read this entire manual before installing and operating the awing or accessories. Keep this
manual handy for future reference.
Index of contents:
Delivery content
Page 3
Awning installation
Page 3
Awning operation
Page 8
Gumtree mesh room
Page 11
Gumtree tent room
Page 12
Storage and handling guidelines
Page 13
Important and helpful hints
Page 14
Warranty and contact details
Page 17
Page 3
- 3
Delivery content
Before you start to fix your awning to your car take a minute and organise all parts
provided.
Included in delivery:
Pre-assembled awning
2 x L-shaped mounting brackets
6-8 x M6 bolts and nuts (depending on awning model)
2 x Ropes and Pegs
Awning installation
Your awning comes pre-assembl ed but needs some easy to handle final steps
before it is ready to be mounted to your car.
Step by Step mounting:
Hint:
There are basically four ways how to fix the mounting brackets to your car.
With the use of a Roof Tent you simply slide them into the existing tent rails.
Alternatively, you need to fix the brackets directly to your roof rack by either drilling holes,
make use of your racks mounting tracks or fix them directly to your basket without any Lbrackets.
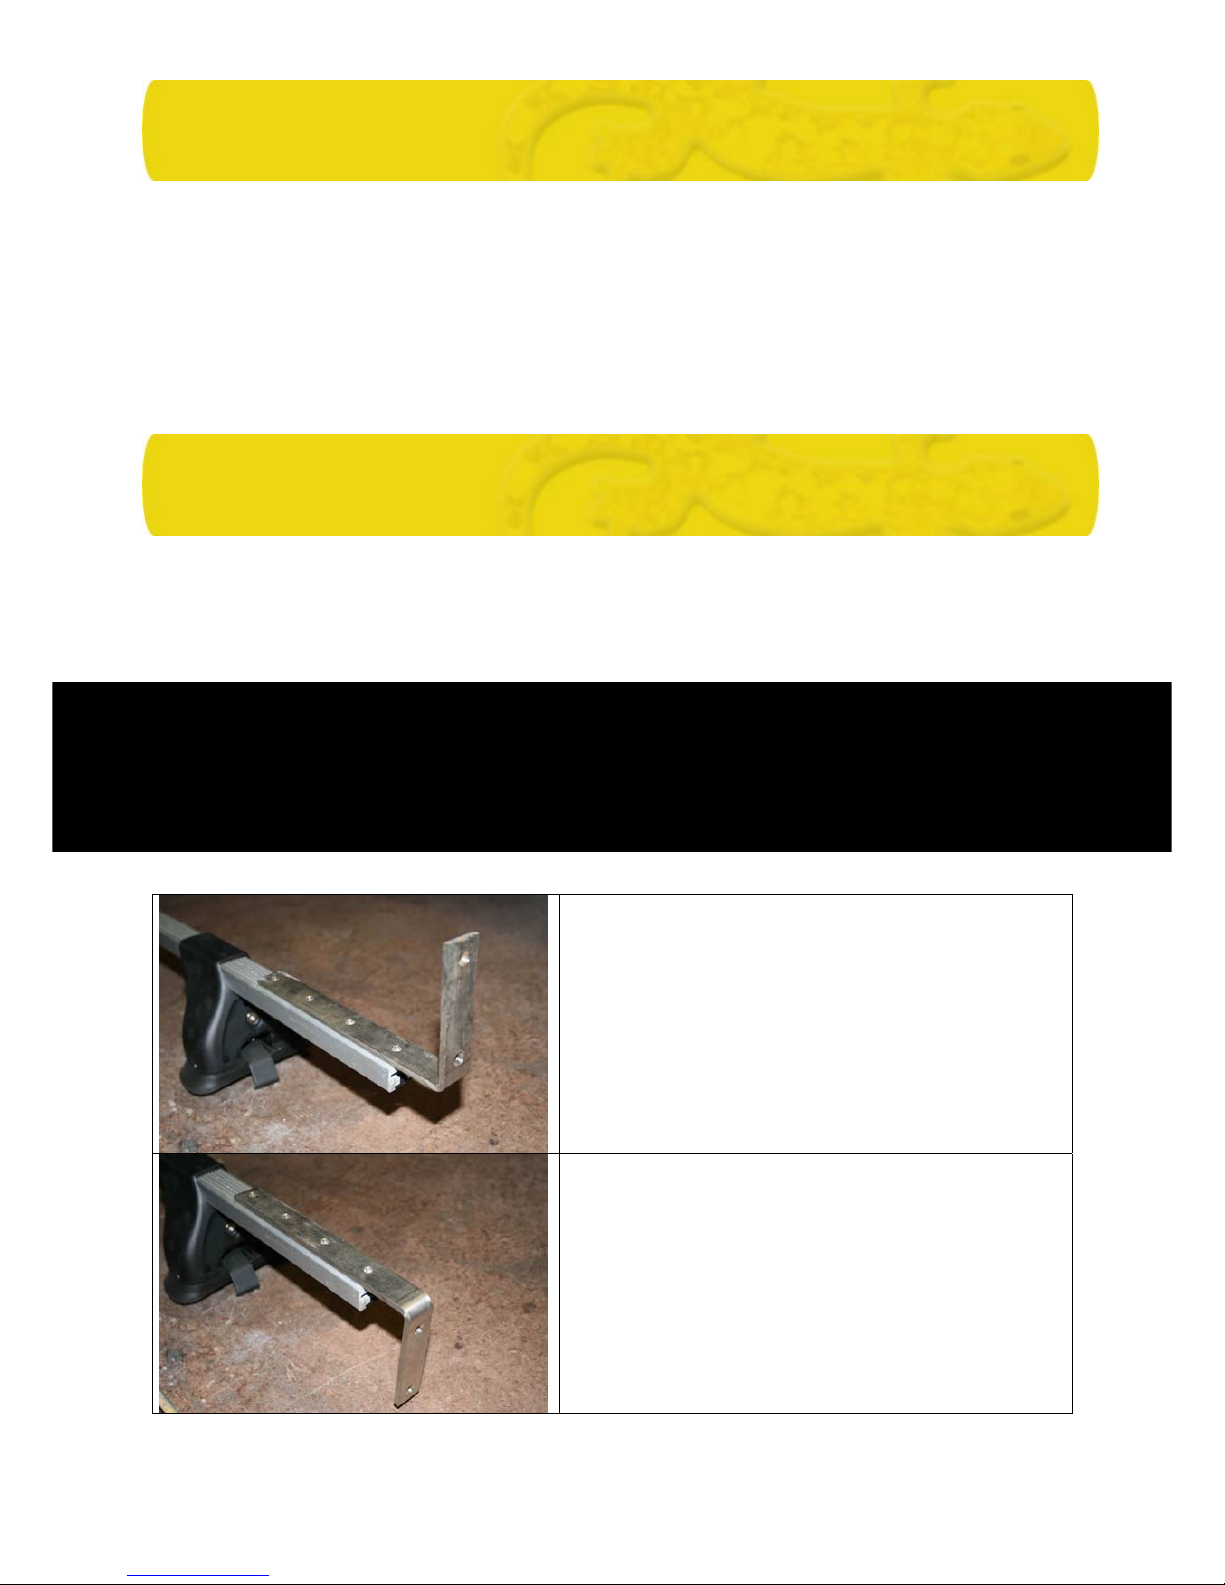
The position of the mounting brackets has an effect on the height of your awning:
You can adjust the height by installing the
brackets facing up or downwards.
Please make sure downwards facing brackets are
not in the way of your side doors.
Page 4
- 4
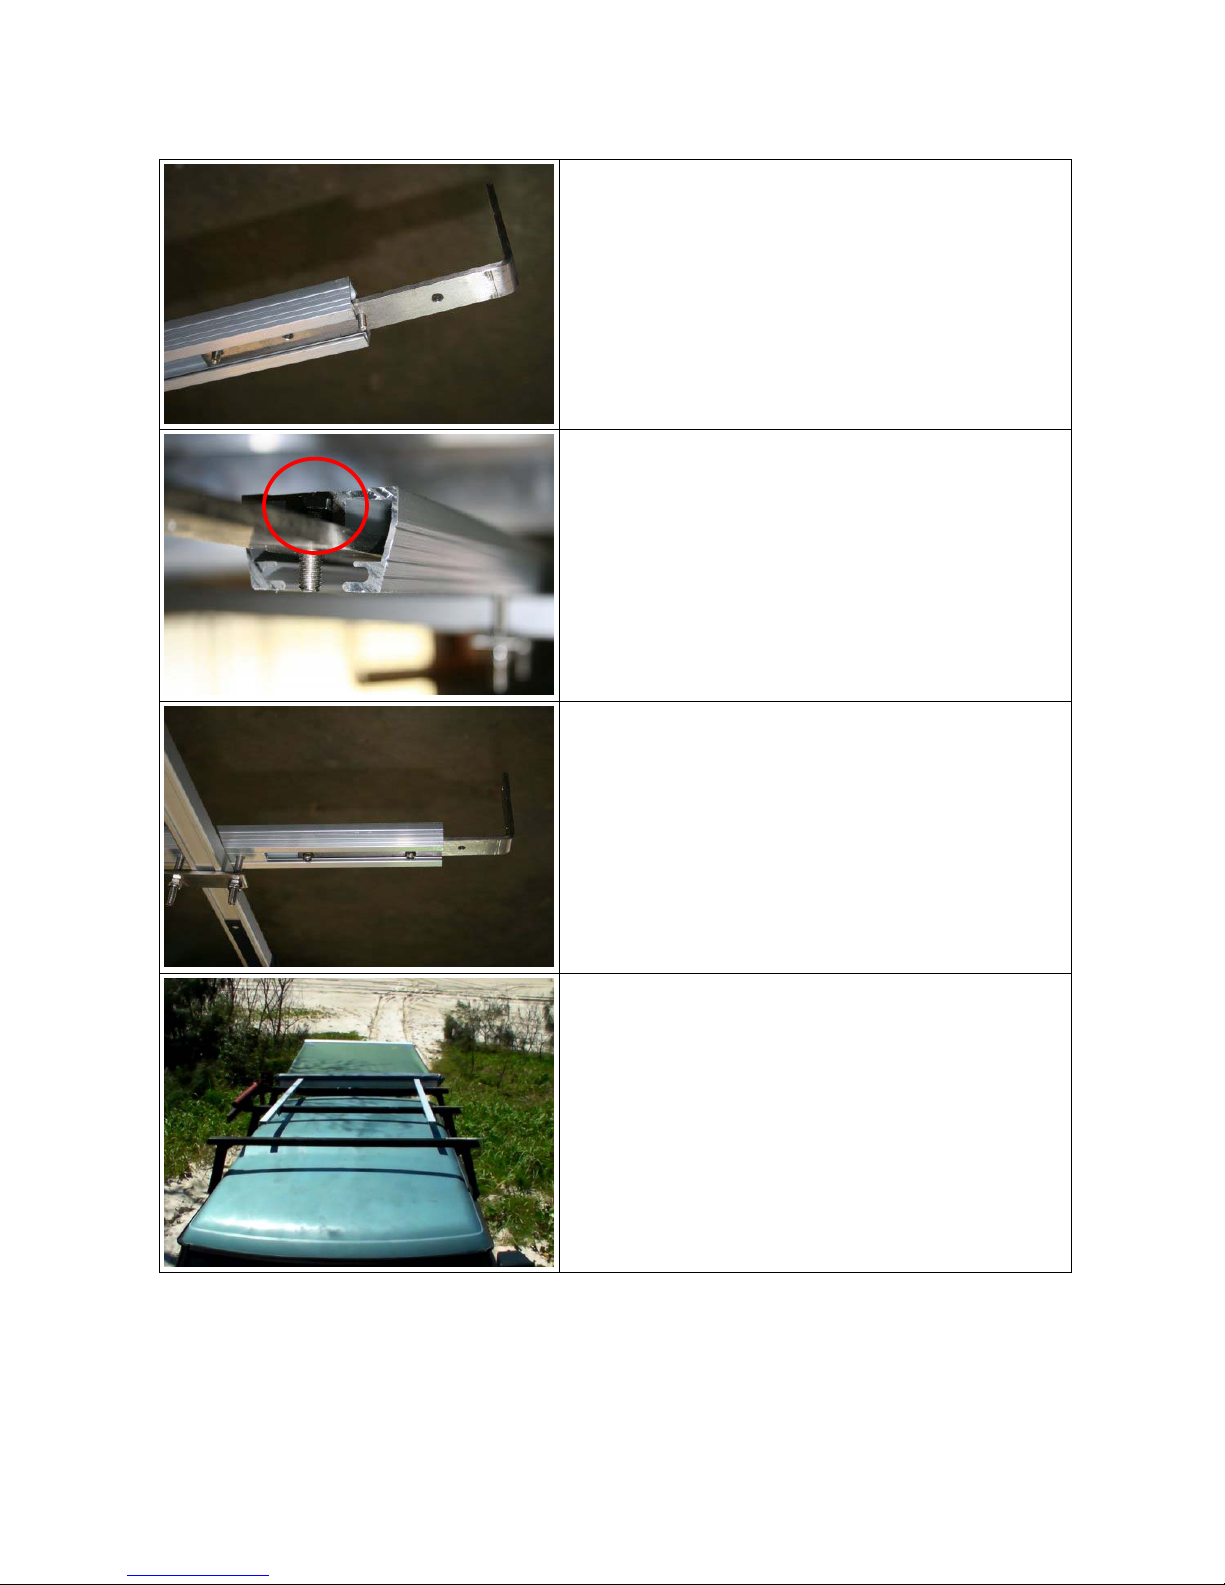
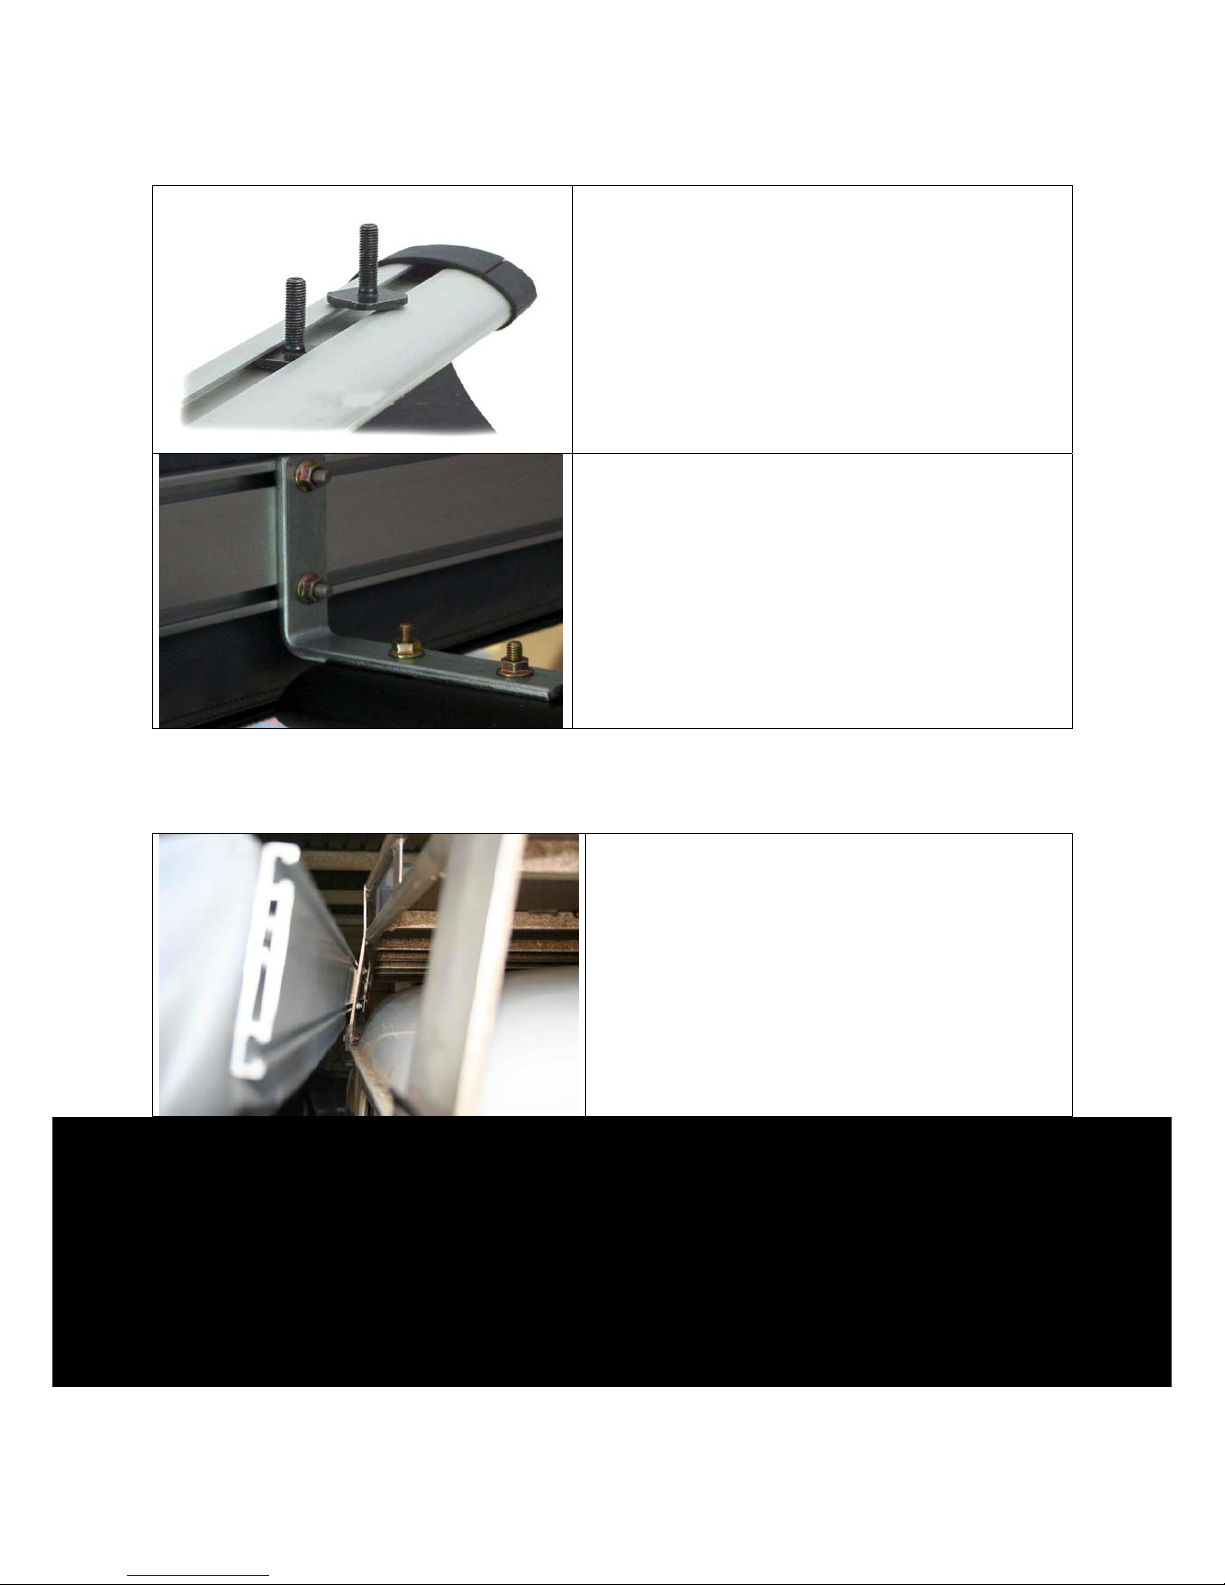
Fix awning mounting brackets to roof tent rails:
Use the groove of the roof tent mounting rail to
slide in the mounting brackets with the M6 bolts in
place.
The head of the bolt will be held in place from the
roof tent mounting rail.
Slide them to the desired position and fix the
bracket with fitting nuts to the mounting rails.
We recommend to use roof tent mounting rails to
fix our 1.4m awning to the rear of your
car.
Page 5
- 5
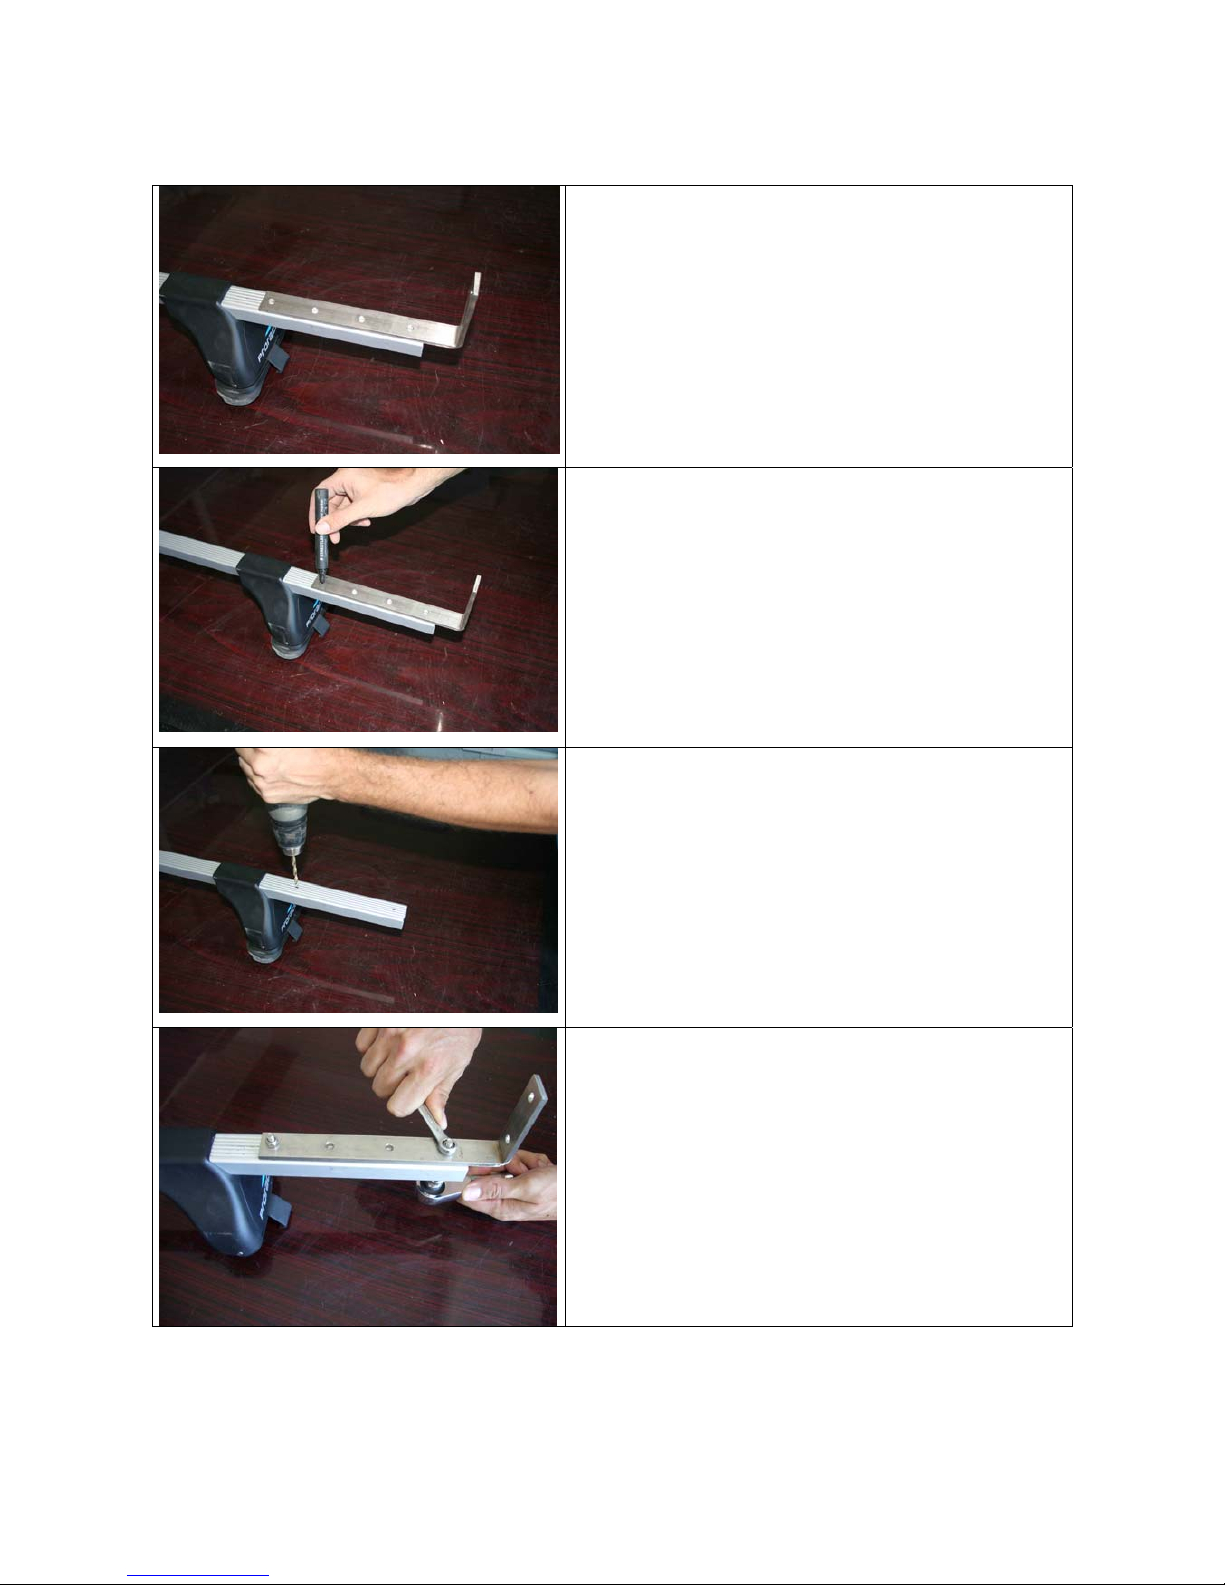
Fix awning mounting brackets to roof racks without mounting tracks:
Place the L-brackets on top of your rack.
Make sure all L-brackets are aligned and have
the desired distance to your car before you mark
the drilling holes on your rack.
Drill at least 2 holes for each bracket. We highly
recommend to take the racks off your car for this
procedure.
Fix the brackets to your rack by using M6 bolts at
the necessary length and tensile strength.
Page 6
- 6
Fix awning mounting brackets to roof racks with mounting tracks:
Many roof racks have a mounting track system
that allows to use sliding bolts to fix the Lbrackets.
Make sure the sliding bolts have the necessary
size (M6) to fit the mounting brackets.
Position the brackets on top of the rack and fix
them with washer, split ring and nut.
Fix awning directly to a roof basket:
You can fix the awning on a vertical surface by
simply drilling 4 holes with the desired distance
and use the sliding bolts to fix the awning
directly to your car/basket.
Check the integrity of the surface you plan to
mount the awning to first.
IMPORTANT:
We recommend that the awning has on neither side no more than 50cm overhang to avoid
any kind of wobble during driving. It may be necessary to use 3 mounting brackets for long
awnings and/or heavy off-road use. Prepare and choose your roof rack accordingly.
Page 7
- 7
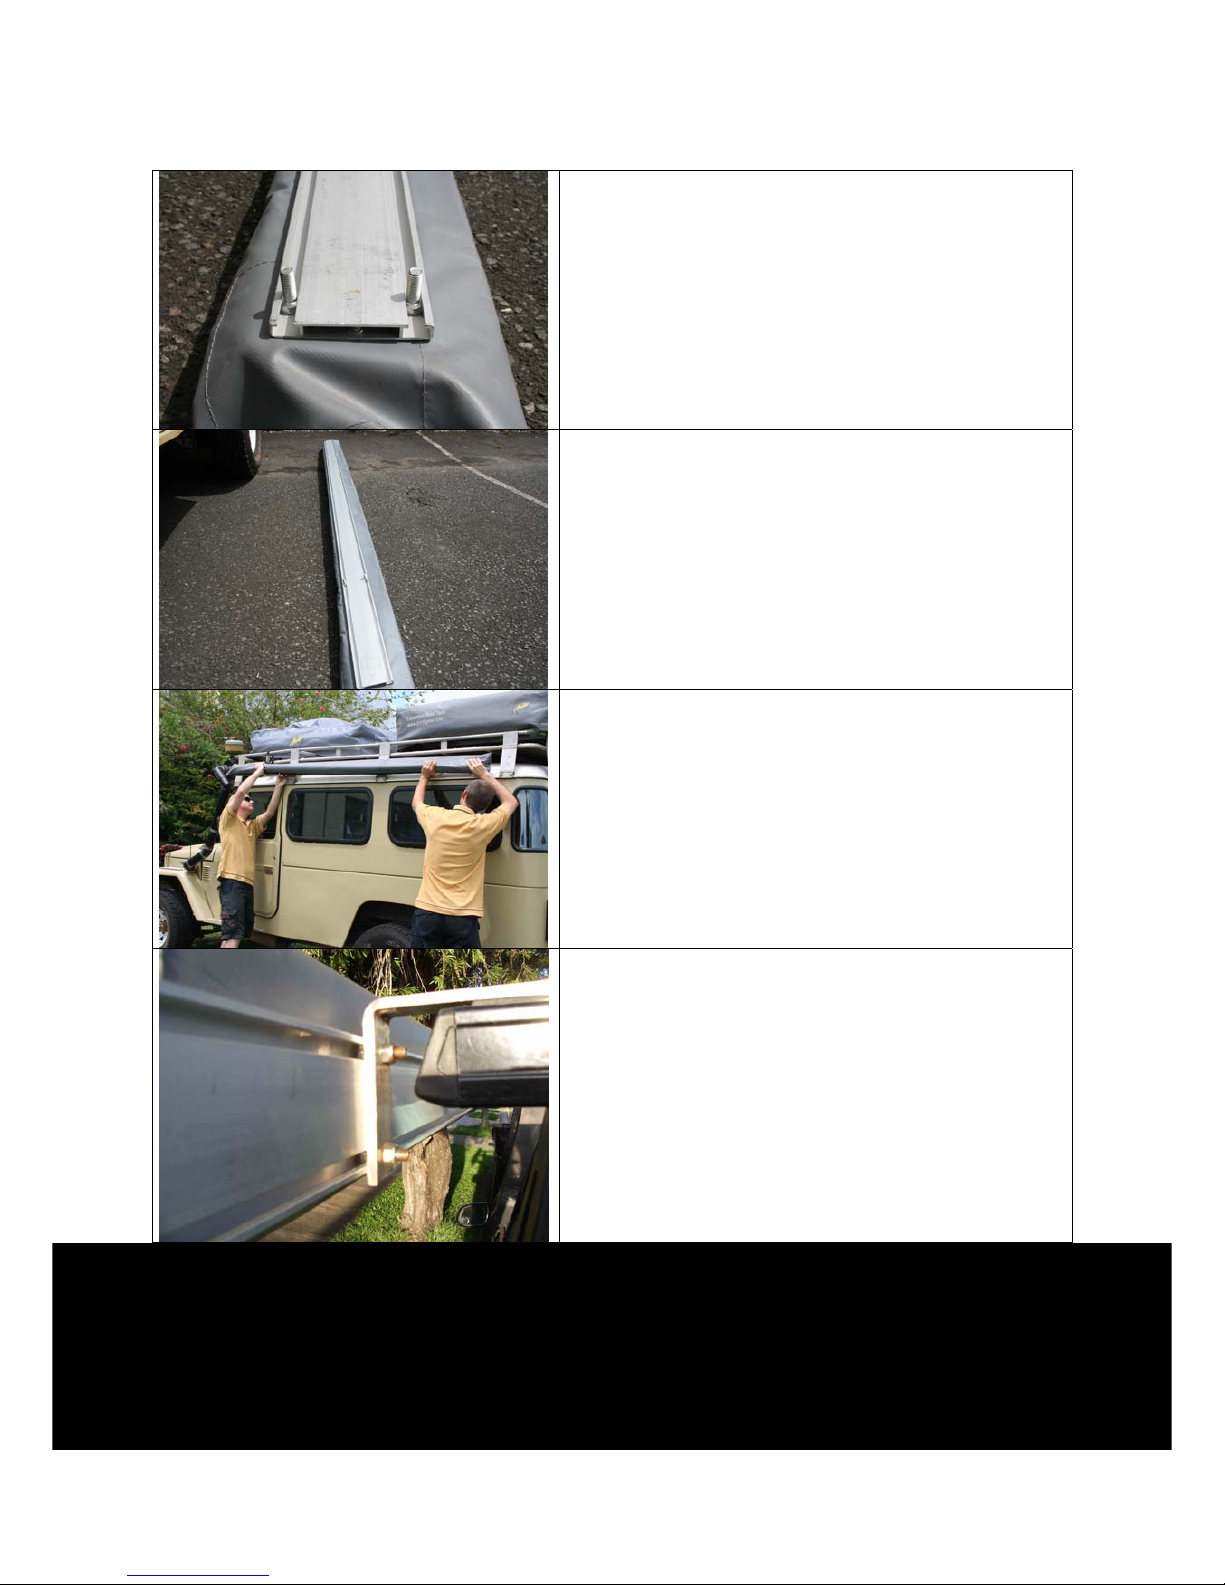
Fix the awning to the mounting brackets:
Now that the brackets are in place, you need to
put the remaining 4 M6 bolts into the groove of
the backside of the awning.
Space the bolts to the distance of your mounting
brackets on the car.
Make sure the awning is the right way around.
Use two persons to lift it in place and fix the bolts
at the back of the mounting plate to the mounting
brackets.
Fix the awning to the mounting brackets with M6
bolts.
IMPORTANT:
Tighten all the nuts and make sure your Awning is securely fixed.
It is mandatory to check the awning before, during and after each trip that it is securely
mounted.
Page 8
- 8
Awning operation
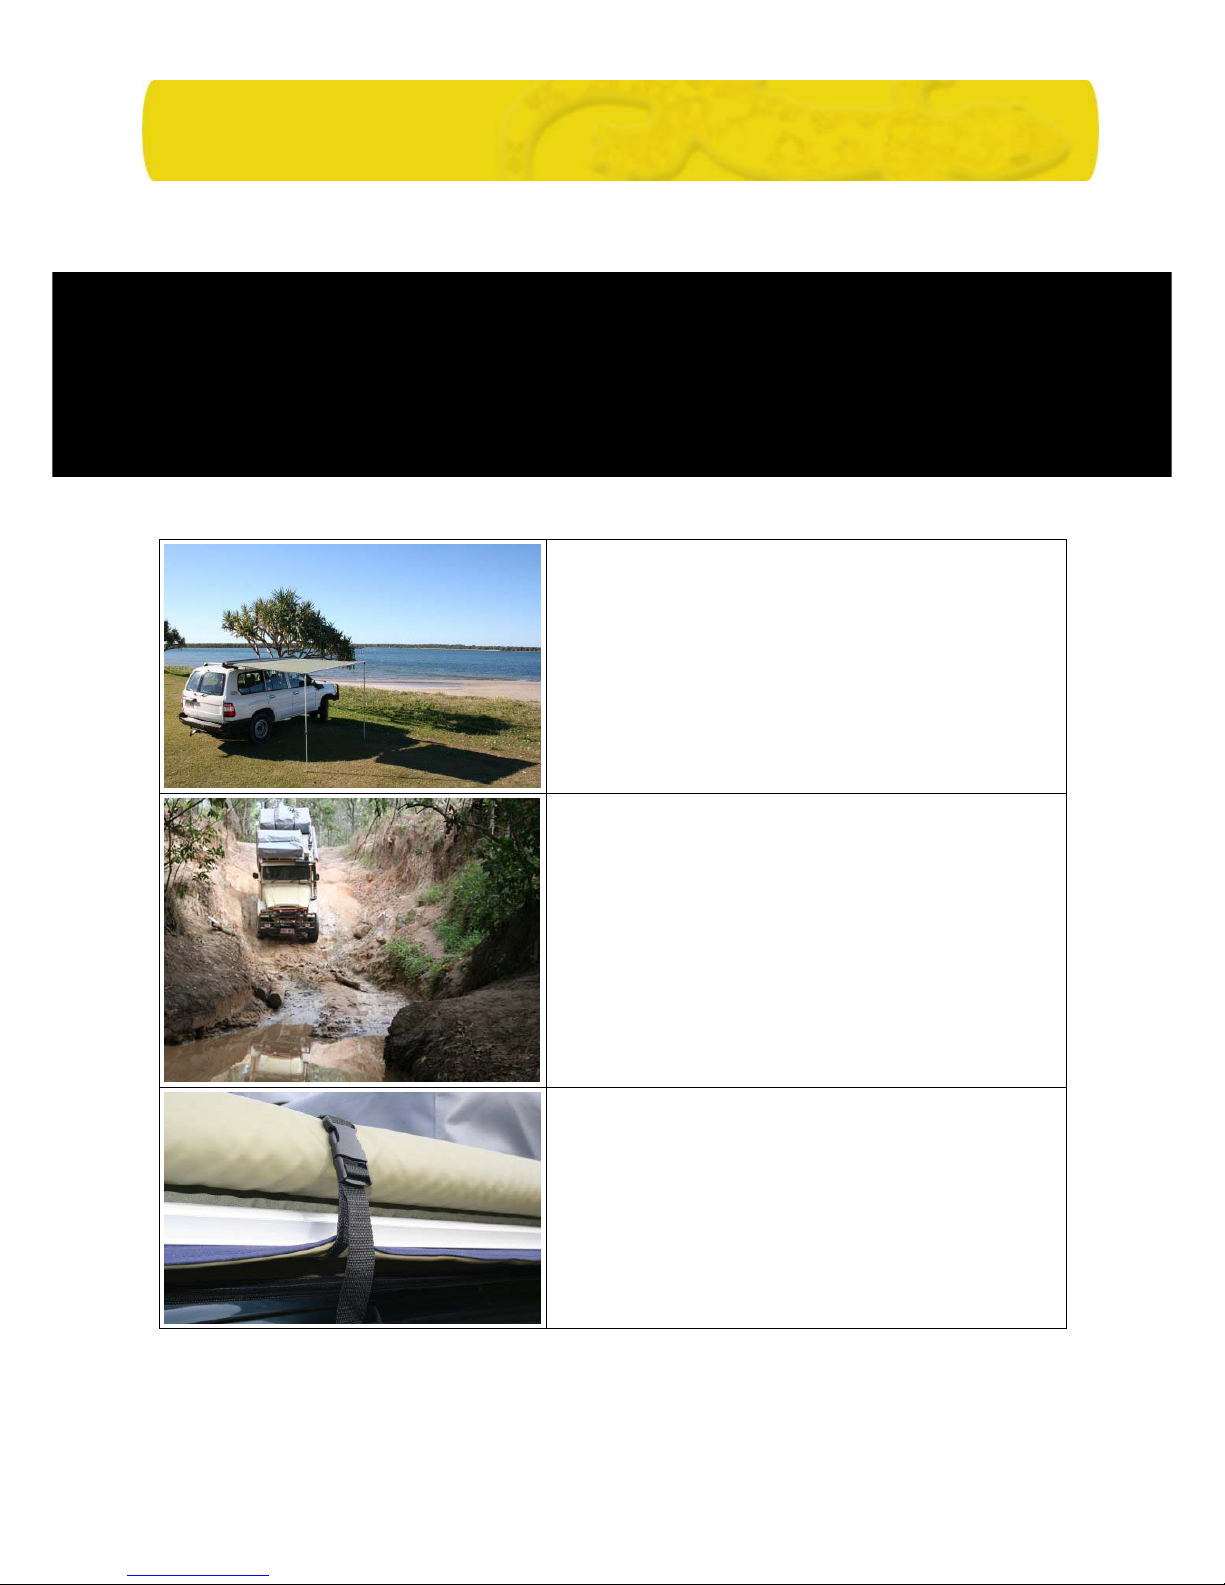
Our awnings are designed to provide
reliable shelter in an instant, be it for a
quick roadside rest or to pitch camp at a remote location for the long term.
IMPORTANT:
All our products are manufactured to the highest standards and precision. They do not
require any form of force during the process of opening or closing of your awning. In case
you face a problem, please check for obstacles, fouling, foreign objects or to much tension
first.
Step by step instruction how to open your awning:
Choose a beautiful spot to park your car.
Make sure the surface is flat and not in the risk of
falling branches or flooding.
Secure your car by keeping it in first gear or
parking AND put on the hand brake.
Avoid unsafe places.
Open the travel cover and release the straps.
Page 9
- 9
Hint:
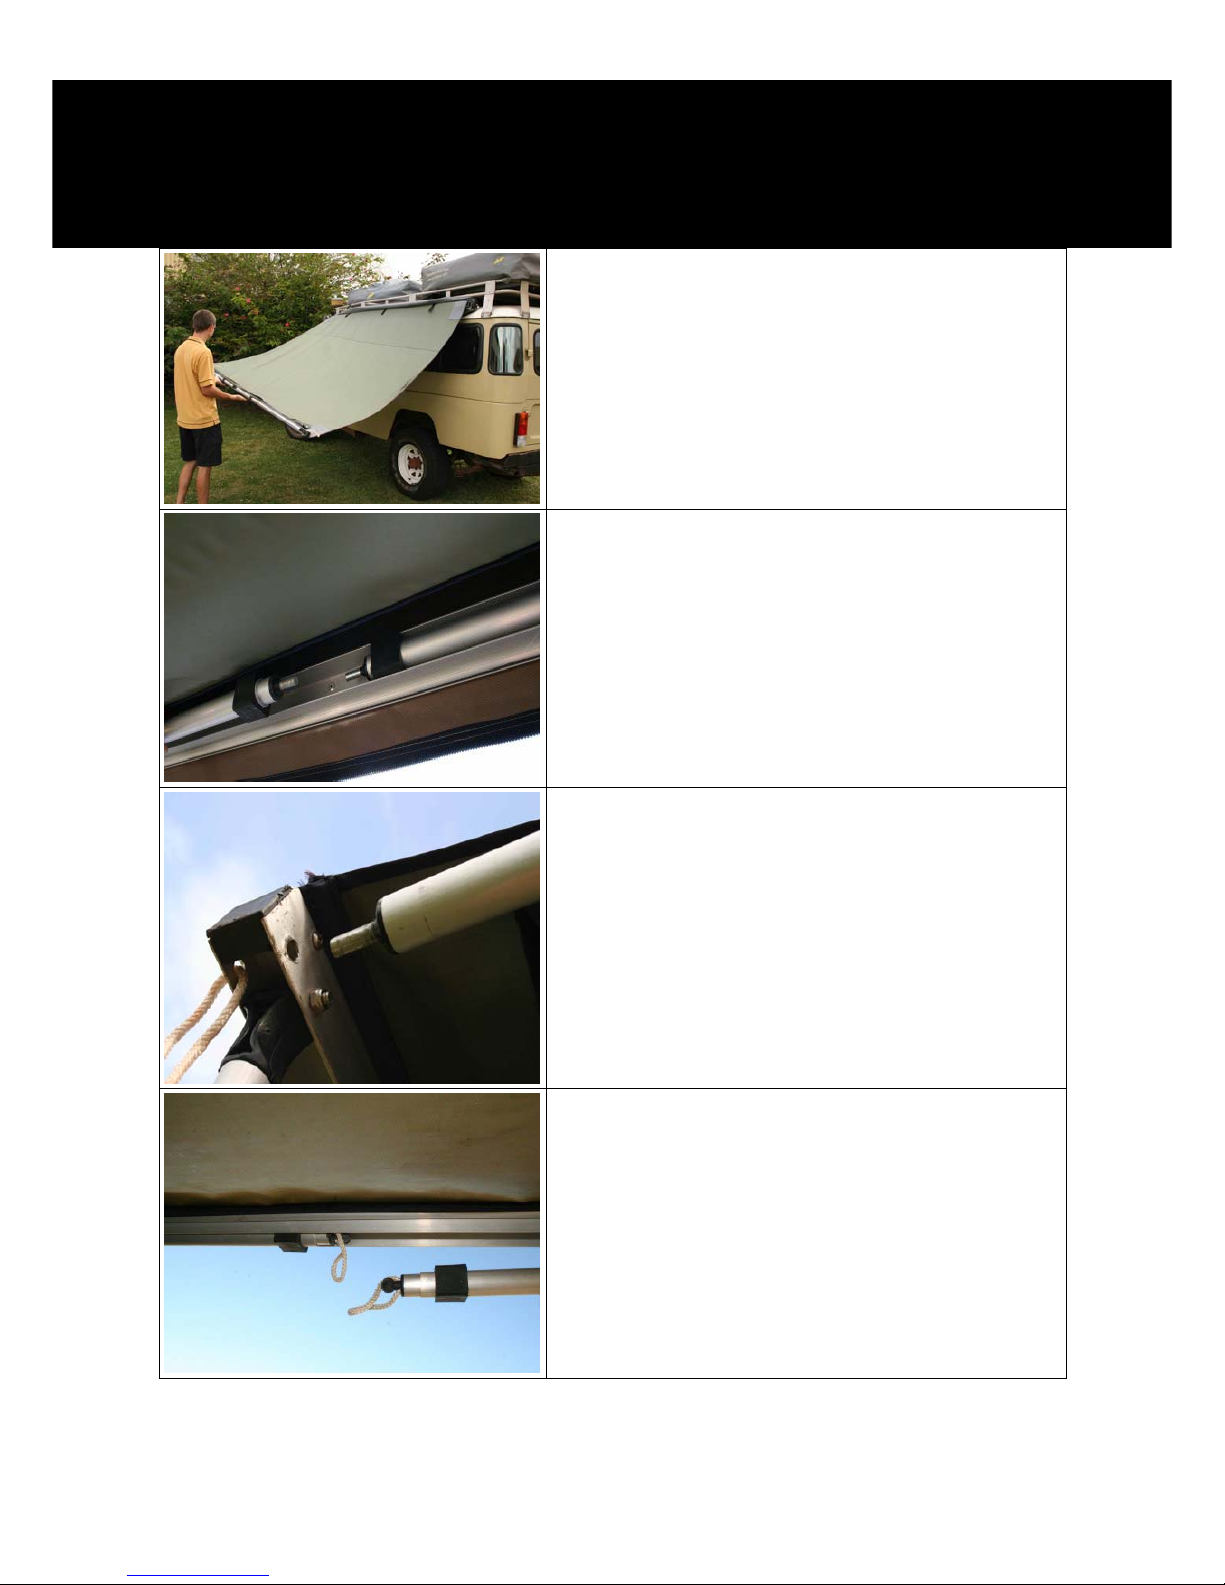
We recommend two persons to open and close the awning.
One person should hold the awning in place whilst the other one is installing the frame
work.
Unroll the awning completely and hold it in place.
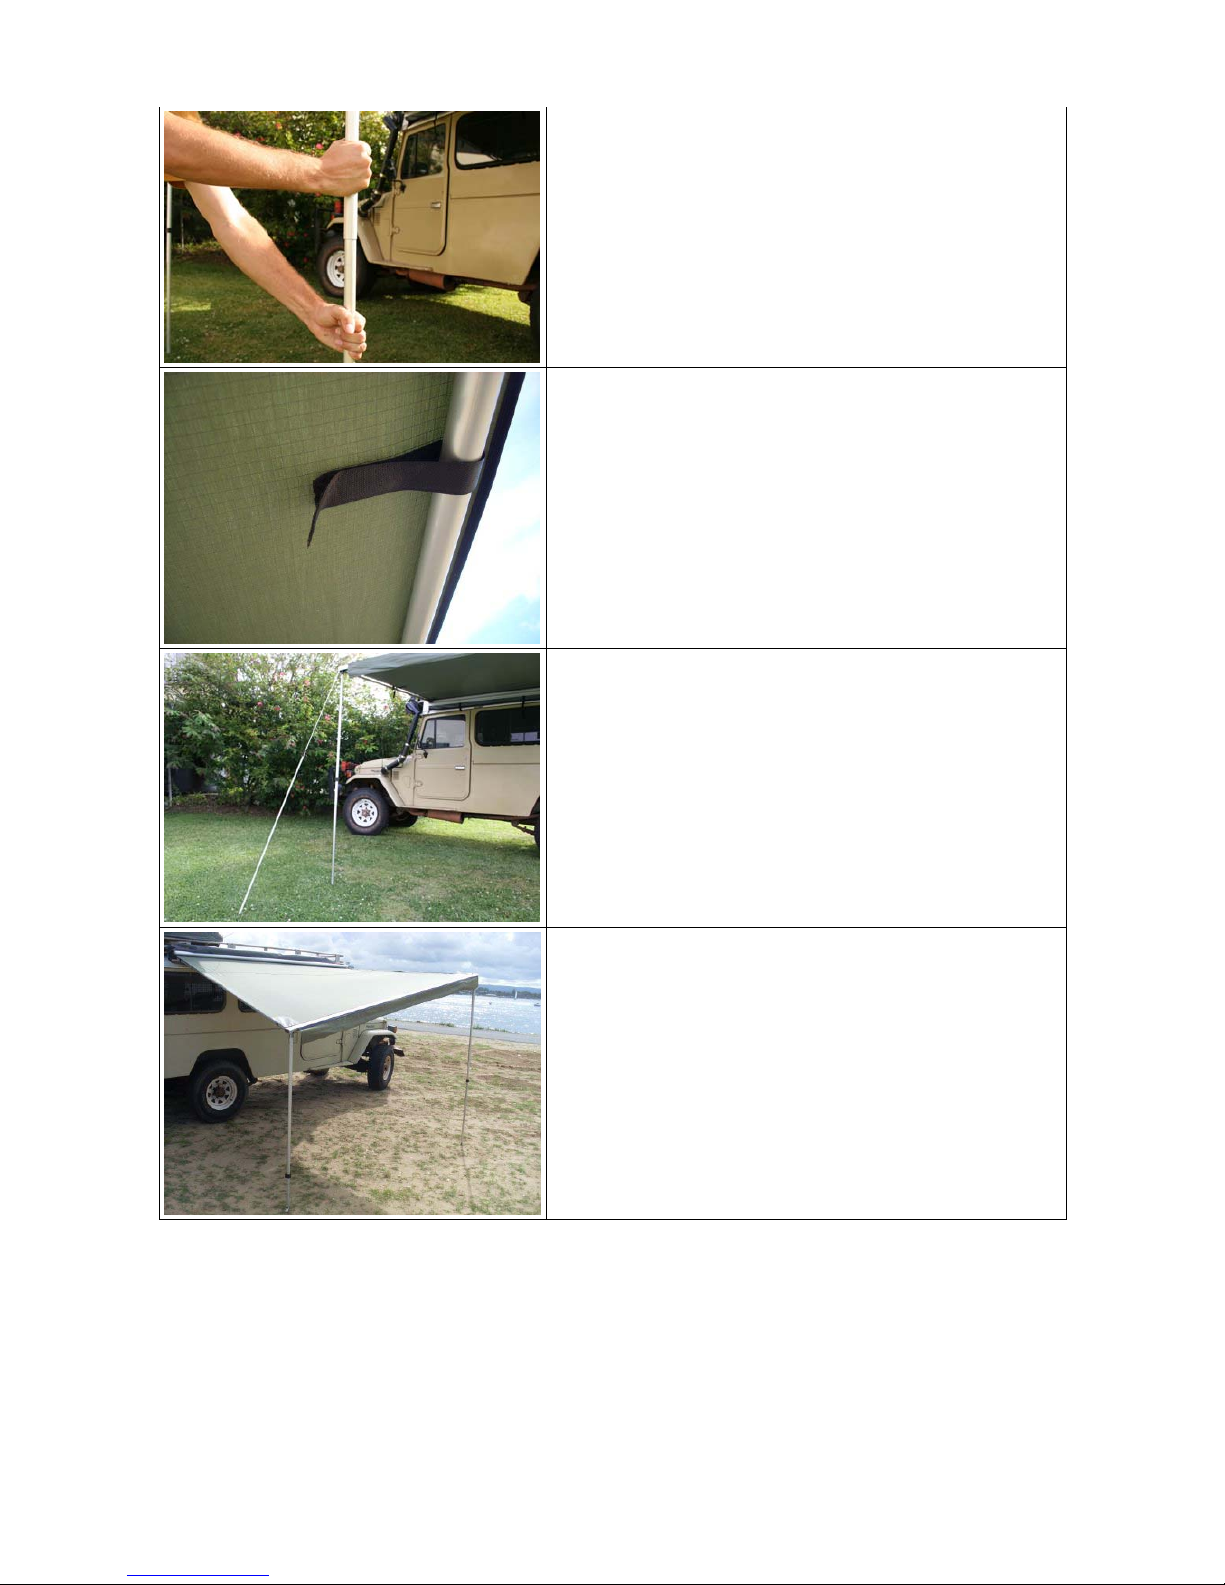
All poles are hinged and telescopic.
They lock and unlock with a slight twist.
Unfold the horizontal poles.
Feed them into the designated opening on the
outer frame and extend them to tension the awning
material.
Unfold the vertical poles and put them on the
ground.
Page 10
- 10
Lock them at the desired hight with a slight twist
movement.
Fix the awning material to the frame with the
Velcro fasteners.
Use ropes and pegs to fix the awning securely to
the ground.
During rain and unsupervised periods, always
lower one leg to allow rainwater to run off the
awning and avoid pooling.
Page 11
- 11
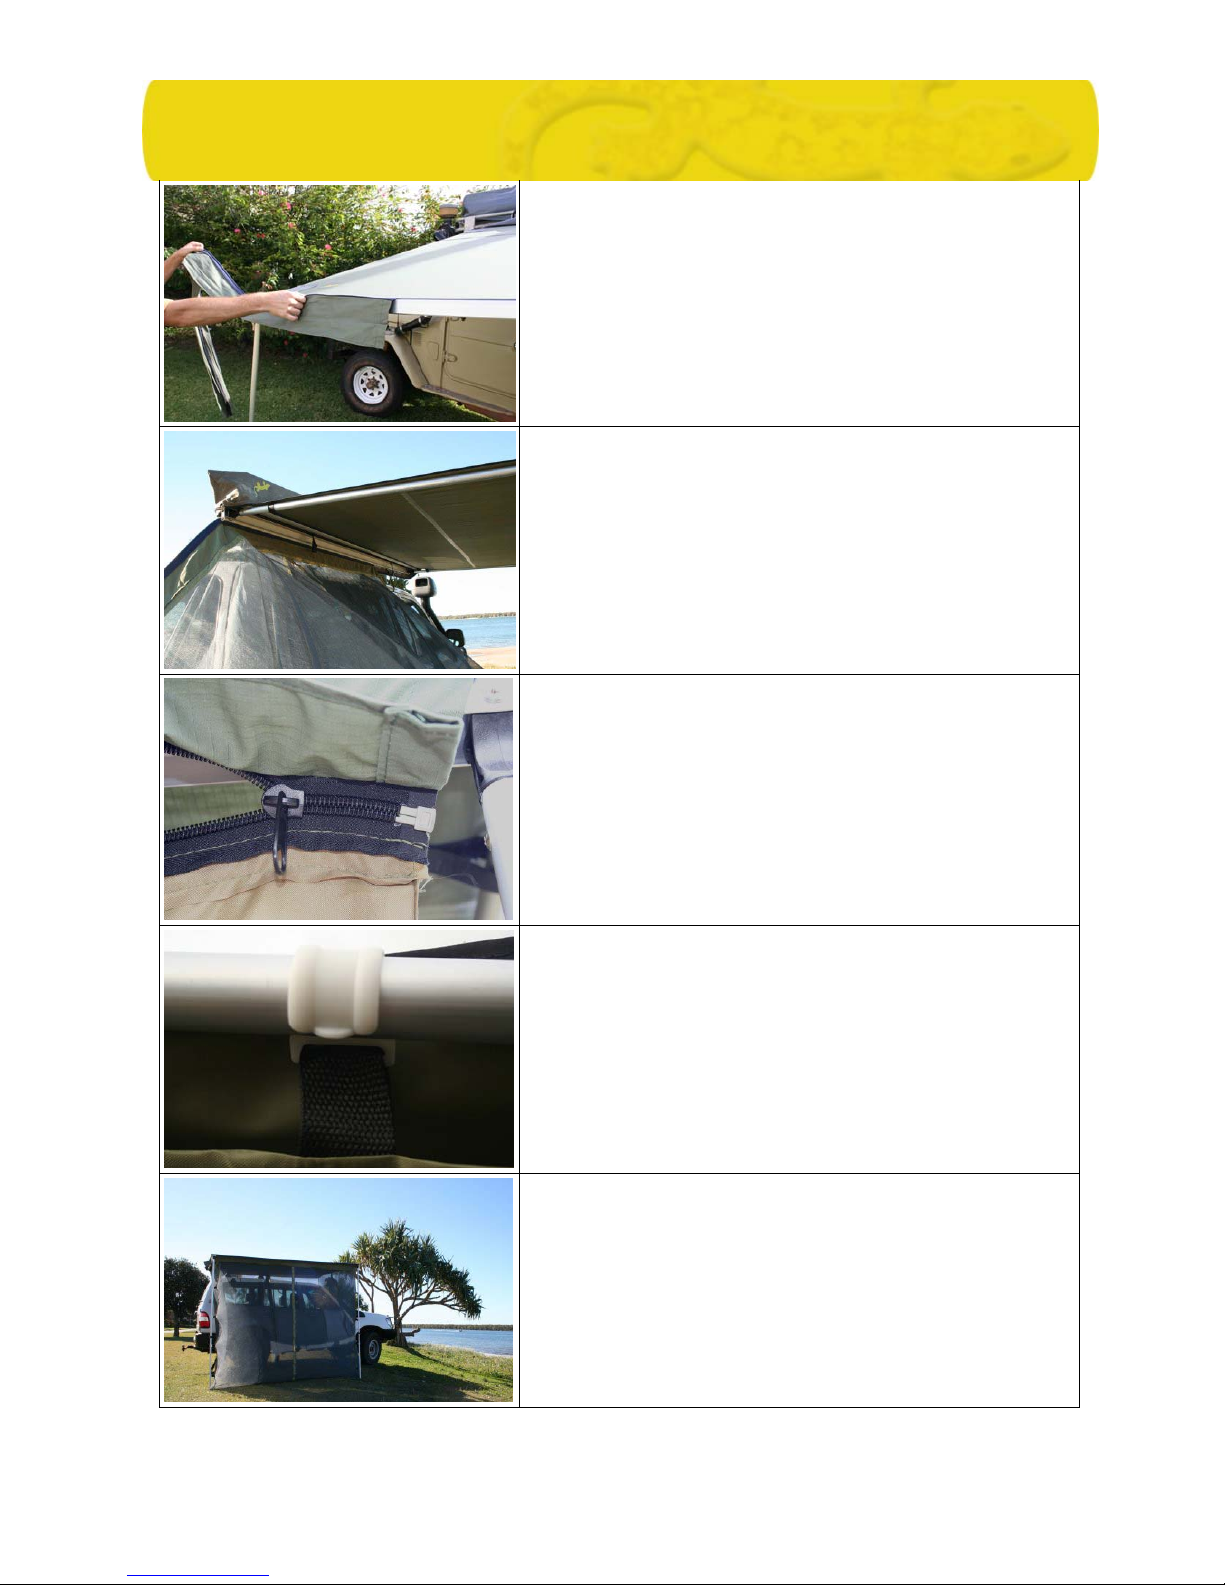
Mesh Room
Feed the outer zip flap into the sail track of the awning.
This part needs to be fixed for the very first assembly
only and can remain on the awning.
Slide the mosquito net into the sail track at the bottom
of the awning mounting plate.
Zip the other side of the awning to the zip flap you
installed at the very beginning.
Fix the mosquito net to the side poles of the awning
with the clip connectors.
Peg the mosquito net to the ground.
Page 12
- 12
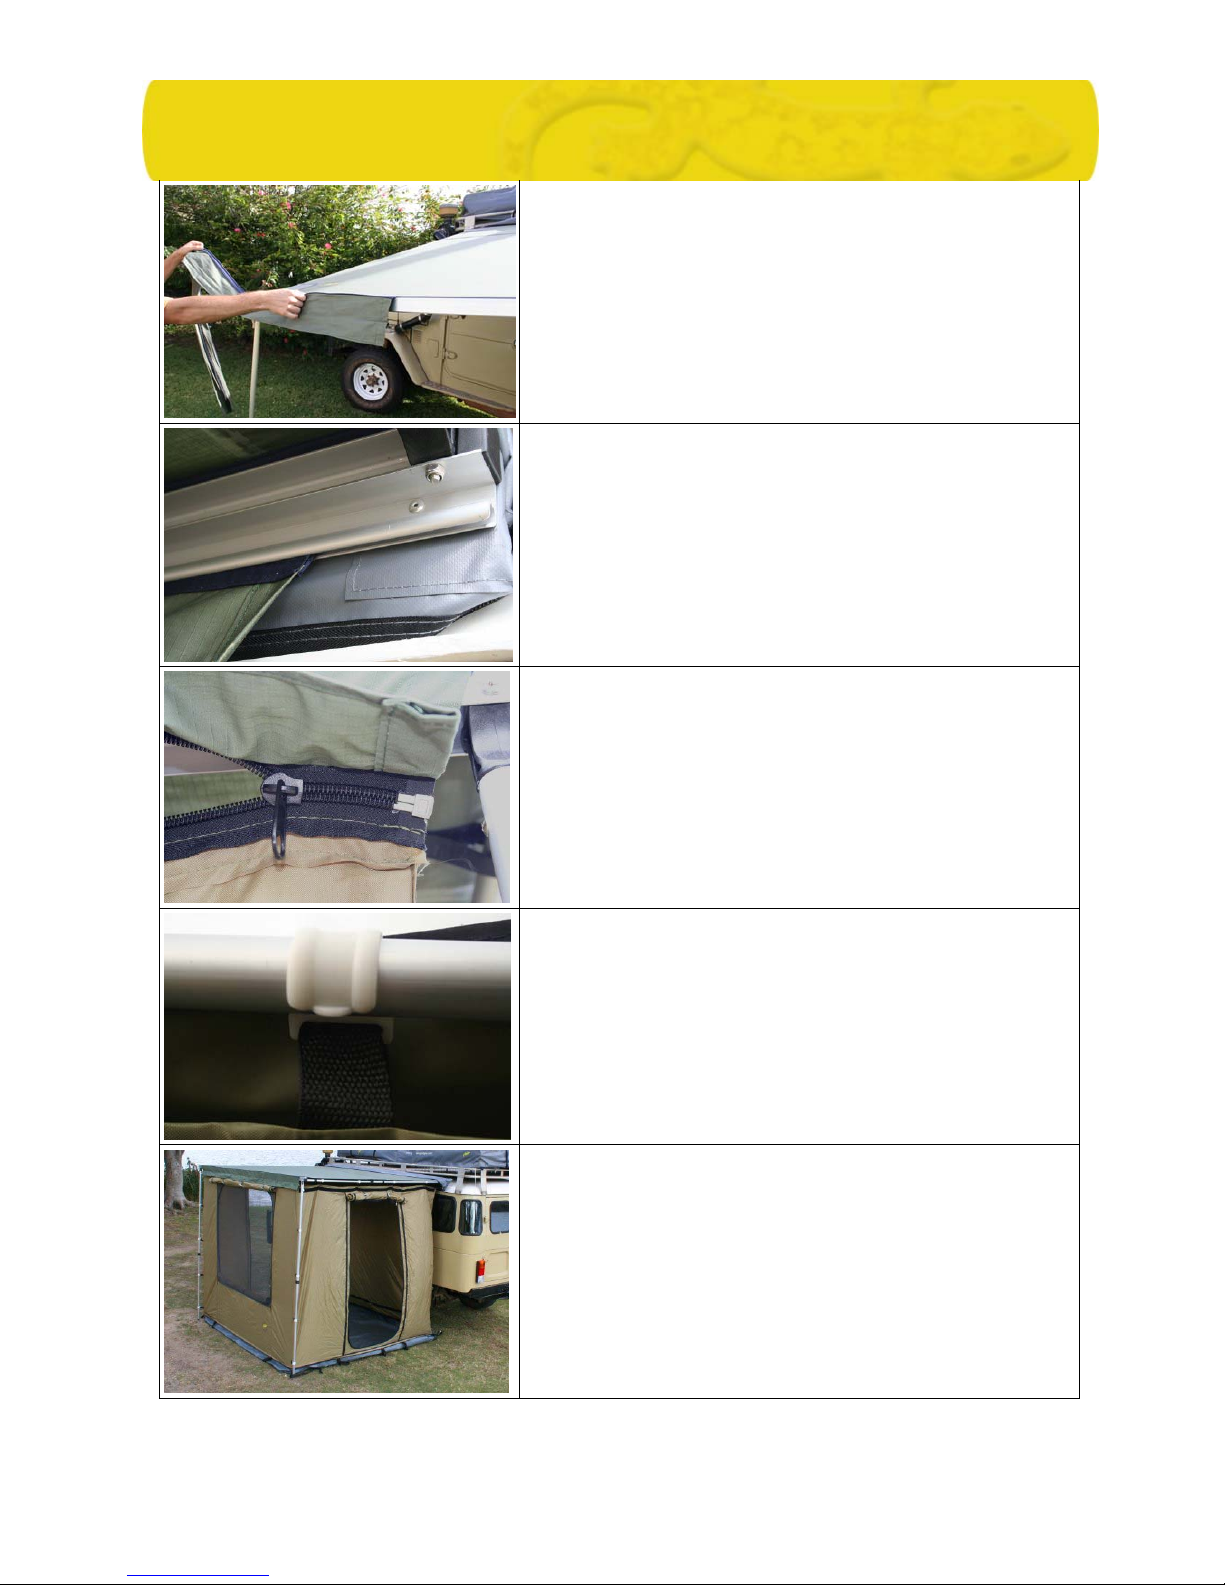
Tent Room
Feed the outer zip flap into the sail track of the awning.
This part needs to be fixed for the very first assembly
only and can remain on the awning.
Slide the tent walls into the sail track at the bottom of
the awning mounting plate.
Zip the other side of the awning to the zip flab you
installed at the very beginning.
Fix the mesh room to the side poles of the awning with
the clip connectors.
Peg the floor securely to the ground.
Page 13

- 13
Storage and handling guidelines
What to do with my awning / tent in between trips?
If you are not using your awning / tent for a long period, it is advised to remove it from the
vehicle. Always ensure that the awning / tent is completely dry if it is stored for longer
periods.
Do not store the awning / tent wet. As soon as you can, within a few days, open the
awning / tent and let it dry out thoroughly to prevent moisture damage.
Can I pack the awning / tent together when it is wet?
You can pack the awning / tent together when wet and reopen it several hours later. If you
do so, make sure it dries completely when reopened. We advise that you should always
ensure that the awning / tent is dry if it is packed up for longer periods of time to prevent
mould. Although our material is mould resistant, it still might develop mould if stored wet
for extended periods.
Do I need to reseal the canvas?
This will very much depend on how much you use the product. We have customers that
have travelled for months on end, using the awning / tent every day and they still find that
it is as waterproof as on the day they bought it. However, it is a good idea to reseal if it is in
frequent use. Only utilise quality protective agent from your local camping/outdoor shop or
run a block of beeswax around the seams to revitalise the seam protection.
How should I take care of my Gordigear awning / tent?
Clean with cold water only. A brush can be used if required. Do not use chemicals, soap or
detergents. Using a silicon spray on all zips from time to time will extend their life. It is
recommended to thoroughly wet the canvas and allow to dry before first usage. Repeat up
to three times to ensure sealing of the material.
Mildew:
To avoid mildew, never put your awning / tent away wet or damp. However, if mildew
occurs, use a soft bristle brush or sponge to clean. Let the tent dry in the sunlight and re
apply seam sealer compound on the inside of the seams.
Repairing a tear:
For small tears, use a self adhesive patch kit. We recommend a canvas or awning repairer
for larger tears.
Removing pegs
Pegs should be pulled with another peg, hammer or a peg puller, never by pulling on the
tent. Avoid pegging your tent so tight that it stresses the fabric. Overstretching may cause
peg loops and fabric to tear.
Floor condensation
Page 14

- 14
A ground sheet underneath the tent prevents the floor from feeling damp and helps
prolong its life. The ground sheet should be smaller than the tent’s floor to prevent rain
from running under the tent.
Fading fabric:
Do not leave your tent set up in direct sunlight for prolonged periods of time as this
weakens and fades the fabric.
Faulty zipper
All our tents are manufactured with highest quality zips. However, dust and sand are the
main reasons for zip tear and wear. If the zipper separates, you can fix the zipper by
moving the slider to the beginning of the zipper tape and reworking the zipper. If
separation continuous undo the zip, give the slider a slight squeeze with pliers and rework
the zipper.
Important and helpful hints
Speed Limit.
To avoid damage to your awning / tent or car and considering general safety, we do not
recommended to exceed a speed limit of 100km/h.
Pre Trip Inspection:
Before, during and after each trip, please check that the awning / tent is securely mounted
to your roof rack, as well as the roof racks to your car.
Centre of gravity.
The attachment of a awning / tent to your vehicle (similar to any other load on your roof
rack) will alter its centre of gravity. Adjust your driving accordingly, especially off-road and
on deep surfaces like sand or snow.
Overall height.
Be aware that with an awning / tent fitted to your vehicle the overall height could be
increased. You should measure the overall height of your vehicle with the roof tent fitted as
you will need this information to decide if the vehicle can enter car parks etc.
How to set the awning / tent up in different environmental conditions?
In windy conditions it is advised to find a location with less exposure. Always use your car
to shield the awning / tent and peg it securely to the ground. Also, don't forget to be
mindful of trees in such conditions. Just in case a branch falls.
During rain, make sure you lower one leg of the awning to assist water drainage.
Otherwise water will pool within the awning and damage the frame.
Page 15

- 15
Camp Safe – Safety Habits
The fabric may burn if left in continuous contact with a flame from any source. Also, the
application of any foreign substance to the tent fabric may render the flame resistant
properties ineffective.
To prevent injury caused by gas poisoning or suffocation
- Do not use fuel burning, oxygen consuming devices inside. This includes candles,
gas lanterns, kerosene lamps, stoves, cooking and heating appliances
- Do not use gas appliances of any kind inside.
To prevent injury caused by fire
- Do not pitch the awning / tent near a camp fire or any other flame source
- Do not use candles, matches or any other flame source in or near the awning / tent
(this includes stoves, cooking equipment, lighting and heating appliances)
- Only use recommended water repellent compounds
- Do not spray tent fabrics with insecticides
To prevent injury caused by electricity
- Always exercise care when using electricity and electric lighting in and near awning
/ tent. Only use 12 volt lighting.
To prevent injury caused by your camping environment
- Do not pitch your awning / tent on an area that could get flooded
- Do not leave your awning / tent erected in strong winds – collapse it and seek
refuge in your vehicle
- Do not pitch your awning / tent near cliffs in case of collapse or rock fall
- Do not pitch your awning / tent under trees with dead branches or under trees
known to drop branches
- Do not pitch your awning / tent near rivers, lakes or the sea known to inhabitant
crocodiles
Understanding your tent and awning.
- This product is designed as a temporary structure; it is not designed to be a
permanent structure or dwelling
- Intermittent use only. Although our fabrics are treated for extra UV resistance,
continuos exposure to sun light will break the fabric down. Fading of colour is an
early warning sign. These tents and awnings are not designed as permanent
dwellings or structures.
- Do not leave this product unattended if bad weather is expected. If assembly
instructions are followed correctly, this product will withstand winds and rain. In
gusty winds and storms you must collapse the awning / tent.
- During rain always lower one leg to avoid water pooling on awnings.
- Never store a wet and/or soiled awning / tent, as mildew and corrosion is likely to
form. This condition is not covered by warranty. Always allow tent and awning to dry
completely before packing and stowing.
- During strong winds and storm collapse the awning / tent and seek refuge in your
vehicle. Damage caused by storms is not covered by warranty.
- We recommend that you discuss adding this investment to your household
Insurance Policy with your Insurance Agent.
Page 16

- 16
IMPORTANT:
This product is to be assembled once before going camping to ensure that all parts are
present and to become familiar with the assembly of the awning / tent.
Understand how your tents and awnings keeps waterproof:
We uses waterproof and water repellent fabrics. However, with the addition of
seams, zips and other desirable features a awning / tent will not be as waterproof as a car,
house or other solid structures. The following are common examples of how water can
enter a tent:
Condensation:
When warm moist air meets cooler air, clouds (condensation) occurs. A tent fly is an
impermeable layer between the warm moist air inside the tent and the cooler air outside
the tent. The warm moist air condenses on the inside surface of the fly. Condensation can
be reduced if the tent is well ventilated.
Seams:
All tents are manufactured by experts and all seams are
treated and/or factory
tape sealed. However, seams could leak over time by overstressed webbing lines or wear
and tear. If leakage at these points becomes a problem, simply use a recommended seam
sealant or bee wax.
Zips:
All care is taken in the design to cover zips with rain flaps. At times wind driven rain could
force water through the zips. To minimise this, make sure all doors are closed correctly and
that the flaps cover the zips.
Rain Flaps:
All awnings / tents use rain-flaps
to provide a second layer of protection to
especially vulnerable points like zips and floor seams.
Please make sure all rain flaps are used correctly and cover zips and seams. Make sure
all flaps are supporting rain water to flow off the tent. Wrong directed flaps act like a gutter
and have the opposite effect.
Structural integrity
A perfectly pitched awning / tent on a flat ground is structurally strong and waterproof.
During prolonged wind and rain it may be necessary to tighten guy lines and reset tent
pegs to prevent the fly from sagging or flapping and attend to drainage around the
perimeter of the awning / tent. Sagging and incorrect pitching weakens the awning / tent
structure and could allow water to pool placing undue forces on the tent causing leaking
and breakages.
Page 17

- 17
Warranty and contact details
Please check our web page for detailed warranty information:
eMail:
T:
F:
http://www
 Loading...