

Page 1

Trek Sensor 2.0
Cycling Computer Owners Manual
Congratulations and thank you for purchasing your Trek Cycling Computer.
Before operation please read this instruction manual carefully and retain it for
future reference. We recommend setting the speed scale and wheel
circumference before installing the computer.
Precautions
Remember to watch the road or trail while riding. Watching your bicycle
computer makes it difficult to see upcoming obstacles. Awareness of potential
road, trail or traffic problems should be your main concern.
Main Unit/Accessories
Contents:
1. Main Unit
2. Bracket
3. Wire
4. Wheel Sensor
5. Magnet
6. Wire Securing Tape
7. Zip Tie
8. Bracket Rubber Pad
9. Mounting Clamp
10. Rubber Pad for Clamp
Page 1
1
2
3
4
5
6
7
8
9
10
Page 2
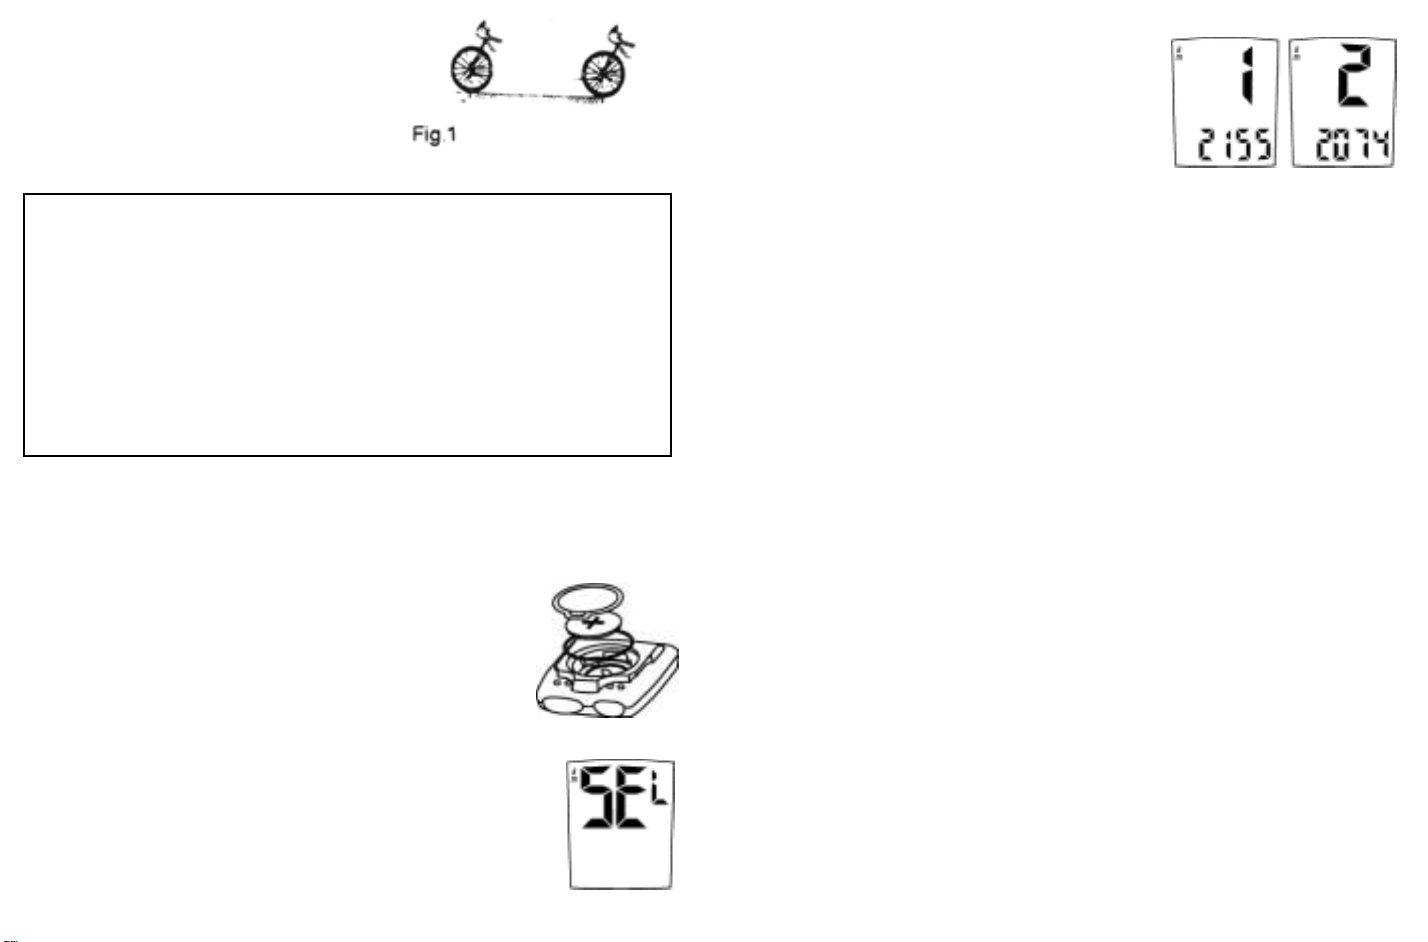
Table 1. Setting values reference table
Preparation - Must be completed before operation
1. Measure the wheel circumference before setup
Refer to fig. 1 (25.4 mm equals 1 inch) or Table 1 to get the wheel
circumference in millimeters. Confirm and note this number in the manual
for later use here:__________
2. Installing/Replacing the battery.
Remove the battery cover by using a narrow flat blade
or similar opener as illustrated in fig. 2. Insert a new
battery (3v) CR2032, position the (+) pole upward as
illustrated. Place the battery properly into the case and
close the cover securely. After the battery is installed
speed scale and wheel size can be set.
3. Setting Speed Scale Choose KM for Kilometers
or MI for Miles.
After installing the battery, all displays will be
illuminated, the “SEL km” will remain on the screen
as in fig 3. Press either the Left (L) or Right (R)
Page 3Page 2
Wheel/Tire Size Wheel size Setting Wheel/Tire Size Wheel size Setting
16” 1300 700 X 20C 2074
20” X 1.75” 1600 700 X 23C 2085
24” X 1.95” 1920 700 X 25C 2100
26” X 1” 1950 700 X 28C 2135
650 X 20C 1945 700 X 32C 2155
650 X 23C 1990 700 X 35C 2175
26” X 1.5” 2030 700 X 38C 2180
26” X 1.9” 2055 700 X 40C 2190
26” X 2.0” 2074 700 X 1-1/4” 2160
26” X 2.2” 2100
Measure the distance which
is your circumference
First
Point
Second
Point
button to switch between miles and
kilometers. Press both L & R buttons to
confirm and enter Wheel-Circumference
setting as shown in fig 4.
If incorrect data appears on the screen,
please re-install battery again.
4. Setting the wheel circumference (100mm-2999mm)
Sensor 2.0 has 2 wheel circumference settings. The display shows 1/2155
and the last two digits “55” will flash. Advance them rapidly by holding
down the R button, or one at a time by pressing the R button ( or go
backward by holding the L button). When desired number (confirmed and
marked from fig. 1 or Table 1 and between 100mm-2999mm) has been
achieved, press both L & R buttons for confirmation and the next two
digits will flash. Repeat the same method to set up the completed
numbers. Press both L & R button to confirm then go to Odometer program
function (screen will show “ODO 00000”. Please see the following method
a. to complete Odometer setting). The display will show 2/2074, follow the
method of bike 1 to complete setting circumference & odometer for bike 2.
a. Dual Odometer (Settable)
When “00000” shows & blinks press L & R buttons at the same time, the
last two digits will flash. Advance them rapidly by holding down the R
button, or one at a time by pressing the R button. When desired number
has been achieved press both L & R buttons for confirmation and the next
three digits will flash. Repeat the same method to complete. Press both L
& R buttons to confirm and enter “ODO” function. If “ODO” program is not
necessary, press L or R for next function setting. Note: Dual Odometer
function is used for 2 bikes separate odometers. Bike 1 & bike 2 have their
own Odometer record. (The maximum distance of the odometer is 9,999
km or 6,213 mi.)
b. Review wheel-circumference value
Go to (ODO) Odometer function, press both L & R buttons at same time to
review display wheel-circumference value ( will last for 3 seconds) when
needed.
fig 2
fig 3
fig 4
Page 3

4. Slide the cyclometer into the bracket until it snaps up.
5. Remove the screw from the magnet and install it on one of the feasible
spokes opposite the wheel sensor.
6. Install screw then tighten.
7. Mount the wheel sensor on the fork blade opposite the magnet using the
zip tie provided.
8. Adjust the sensor until it is 3-5mm from the magnet, then tighten it. Cut
the excess zip tie off.
Tes t
Mount the computer in the bracket. Lift the front wheel off the ground and
spin the wheel checking if current speed is displayed. If not, adjust positions
of wheel magnet and fork sensor as described in installation steps 7-8. Refer
to the following steps for the operation of your sensor computer.
c. Bike 1 or 2 selecting & resetting the wheel-circumference value
When you are in wheel-circumference value review mode, press L or R
button to select bike 1 or 2. For wheel-circumference resetting, press L & R
at the same time again until the last two digits blink. Repeat steps as
above ( point 4) to reset the wheel circumference as your bike. This
convenient design is handy for switching between different size bike tires.
5. Setting clock time
Under any display mode except Stopwatch, press R button for 1 second.
Clock time displayed. Repress either L or R button to return to “Odometer
(ODO)” mode. Follow step 2 to complete setting clock time and 12/24 hour
alternate.
a. 12/24 hours alternative.
When clock is displayed, press both L & R buttons at the same time. Clock
will blink then press L or R button to switch between 12 hours and 24
hours. To reset clock, press L & R at the same time ( as following b.); after
3 seconds, clock will stop blinking automatically.
b. Resetting clock time
After choosing 12 or 24 hours, press L & R at the same
time, minutes “MM” will blink (fig. 5). Advance them
rapidly by holding the R button, or one at a time by
pressing the R button (to go backward hold or press
the L button). At the correct number press both L & R
buttons to confirm. Follow the same method to adjust hour “HH” to
complete the whole setting. Press R button to move to other display
modes after clock is set.
Installation
1. Use the attached rubber pad between the bracket and handlebar to
provide a secure fit.
2. Slide the zip tie into bracket, position the bracket to the handlebar on
either side or the stem.
3. Cut the excess zip tie off.
Page 5Page 4
fig 5
Spoke
Screw
Spoke
Channel
Page 4

Riding time
( 0:00:00-99:59:59) — RT
The Elapsed Time is measured from the start point to the
current point. It starts counting automatically when signals are
received, it stops when signals have stopped for over two
seconds. When 10 hours have been reached, screen will display
“HH” hr & “MM:SS” alternative for 1 second. When 100 hours have been
reached, it will be recounted from zero. Average Speed (AVS), Distance (DIS)
and Maximum Speed (MAX) will also reset and recount from Zero.
To Clear: Press L & R buttons at the same time to clear RT. Also Distance
(DIS), Average Speed (AVS) and Maximum Speed (MAX) will be cleared.
Odometer will count until cleared.
Maximum Speed
(0.00-99.9 miles or kms) – MAX
The maximum speed is calculated as the highest speed during
the current trip. It is stored and displayed as requested until
next reset or when the battery is changed.
Average Speed
(0l.0-99.9 miles or kms) – AVS
The Average Speed is calculated as DIS (Trip Distance) /RT
(Riding Time) The minimal display unit is 0.1 mile/h or km/h.
Maximum Speed & Average Speed are operated in the same
way as Trip Distance. Please refer to the instruction for Trip
Distance function.
Km/mi. alternative
Under any display mode, hold L button for 3 seconds, the speed scale Km or
mi. will automatically reverse. Once the speed scale has been changed, the
data of ODO, DIS, AVS, & MAX will also be reversed.
Display Functions
Current Speed
(0.0-70 miles or 99 kms)-S
The current speed is displayed on the upper line of display and updated every
second. Minimum display unit will be automatically adjusted according to
speed.
Odometer (total Distance)
(0.0-9999 kms or 6213 miles)-ODO
The total distance is continuously measured, accumulated and
displayed until next reset or the battery is changed. When
9,999 kms or 6,213 miles is reached the odometer returns to
zero and counting begins anew.
Trip Distance
(0.0-999.9 kms)-DIS
The starting point to the current point is calculated as Trip
Distance. The Trip Distance will record automatically when
riding.
To Clear: Clear the record at the end of each trip. Press L & R buttons at the
same time, the record will be cleared to zero.
Pacer
Compare the current speed to the average speed. If the current speed is
greater or equal to the average speed, the display shows +. Otherwise, it
shows -. This function is active whenever the device receives a signal.
Page 7Page 6
Speed 0-30km/h 31-60km/h over 60 m/h
Minimal display unit 0.1km/h(mile/h) 0.5km/h(mile/h) 1km/h(mile/h)
Page 5

Trouble Check Items Remedy
Missed setting for speed
scale or wheel
circumference
The entire liquid crystal
screen is dark and unusual
display is seen.
Display response is slow.
Incorrect data appears.
No Display
Current Speed does not
appear.
Was it left for a long time
under direct sunlight?
Is it at a low temperature
under 32.0F (0.8C)?
Has the battery in the main
unit worn out?
Is there anything on the
contact of the main unit or
on the bracket?
Are the wheel sensor and
magnet too far apart?
Are the marking lines of the
wheel sensor and the center
of the magnet aligned?
Is the wire broken?
Execute “All Clear”
operation Re-install battery.
It returns to normal state
by leaving it in the shade.
No adverse effect on data.
It returns to normal state
when temperature rises.
Re-insert the battery
Replace the battery with a
new one. (3V/DC)
Wipe the contact clean
Refer to “installation fig.
8” and re-adjust correctly.
Refer to “installation fig.
8” and re-adjust correctly.
Replace the bracket wire
& wheel sensor with a
new one.
12/24 – hour Clock
Under any display mode, press R button for 1 second. Clock
time will displayed. Re-press either L or R button to return to
“Odometer (ODO)” mode. Refer to the instruction of “Setting
clock time” for 12/24- hour selecting and resetting.
Auto Start/Stop
All functions (ODO, DIS, AVS, RT, MAX) automatically start when a signal is
detected, and stop when there is no signal detected. The Clock function is the
only exception.
Auto Scan
Under any display mode, press the L button to enter the auto scan function.
All display modes will cycle with each display mode lasting 3 seconds. Press L
or R button to return to the current display mode in use.
Auto Power Saving
In any display mode, the unit will go into power-save
mode after the computer has not received any input
signal for 10 minutes. The last mode in use will disappear
and be saved. The time will display automatically as fig.
6. The Current Speed/Odometer mode will resume once
any button is pressed or you begin pedaling.
Auto Clear/Reset
Under any display mode, press L & R buttons for 10 seconds, km or Mile will
flash quickly, then all data stored in memory will be erased except Odometer
data. All displays will illuminate for 1 second, then the km/h symbol displayed
alone. This operation should only be executed after replacing the battery or
when you change different bikes and need to program Odometer data or when
an irregular display of the information occurs due to static electricity, etc.
Since all the memories are erased, reset the main unit again according to
“Preparation”.
Page 9Page 8
fig 6
TROUBLE SHOOTING
The following situations do not indicate malfunction of the computer. Check
the following before taking unit for repair.
Page 6

SPECIFICATIONS
Controller 4-bit 1-chip Microcomputer
(Crystal Controlled Oscillator)
Display Liquid Crystal Display (LCD)
Sensor No Contact Magnetic Sensor
Power Supply CR2032 x1 (3V)
Operating Temperature Range 0.0 C to 40.0 C (32.0 F to 104.0 F)
Storage Temperature Range -20.0 C to 50.0 C (-40 F to 122.0 F)
Applicable wheel circumference 100mm-2999mm
Battery Life Approx. 1 year
©1999 Trek Bicycle Corporation. All rights reserved.
Page 10
 Loading...