

Page 1

TRULY WIRELESS
BLUETOOTH EARBUDS
User’s Manual
Please re ad this
manual before
using the product
Page 2
Page 3
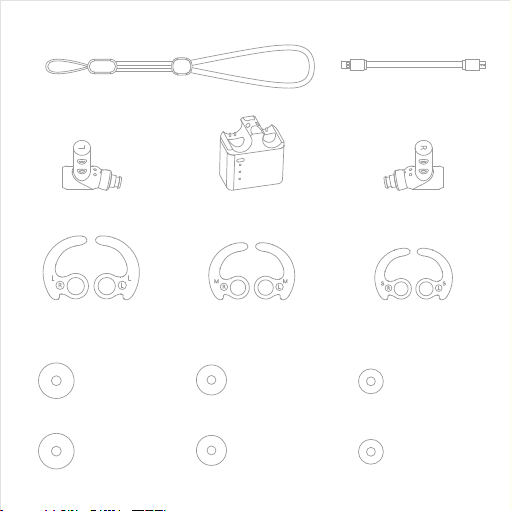
Strap
Charging c able
Left earbud Right earbud
Large E ar-fins Medium Ear-fins Small Ear-fins
Large silicone
Eart ips
Large foam
Eart ips
Charging do ck
Medium silicone
Eart ips
Medium foam
Eart ips
Small silicone
Eart ips
Small foam
Eart ips
Page 4
Wearing method
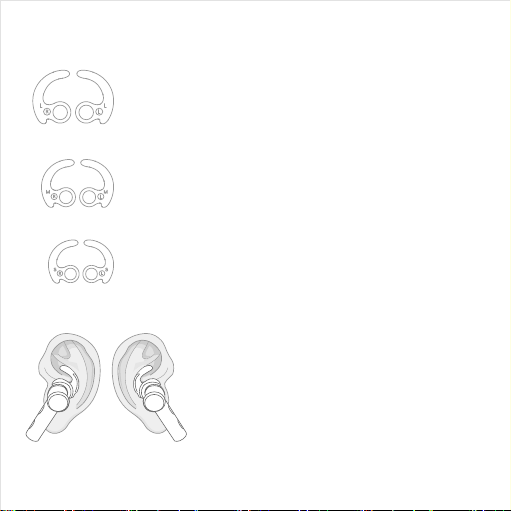
Large
Ear-fi ns
L-RL-L
Medium
Ear-fi ns
M-RM-L
Small
Ear-fi ns
S-RS-L
Using the correct size eartips and
ear-fins is critical for maximum external
noise isolation and a snug, secure fit . It
is also common to have different sized
ear canals so try the eartips and
ear-fins one at a time to find the best fit
for each side.
1. Identify the left and right earbuds. Look
for L/R mark near the round hole in the
ear-fin, which is used to fix it on the
earphone. Then choose the size that best
fits each ear - S, M or L .
2. Place the assembled earbud with the
eartip in your ear c anal and tuck the ear-fin
into the fro nt ear fold facing up. Adjust the
eartips to a suitable angle until you have a
tight and snug fit.
3. Please try various supplied eartips and
ear-fins to find comfort able and b etter fit.
Left
Right
Page 5
Earbuds introduction
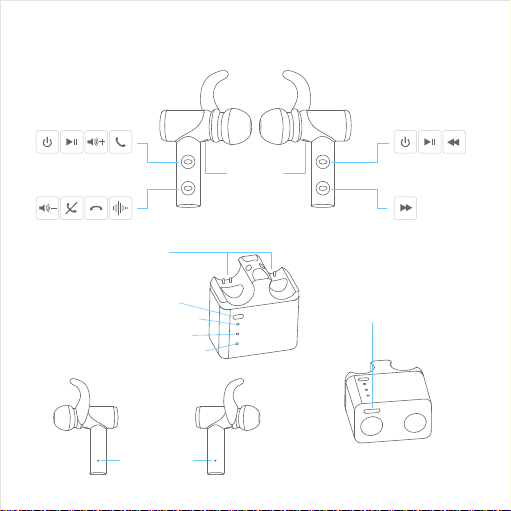
Right Lef t
POWER button
(Volume up)
POWE R button
(Previous track)
MODE but ton
(Volume down)
Charging po rts for e arbud
Charging do ck power but ton
Right earb ud charging indic ator
Left e arbud chargin g indicator
Charging do ck charging indic ator
Microphone
Charging
port
MODE but ton
(Next tr ack)
Charging do ck
MICRO USB
charging po rt
Page 6
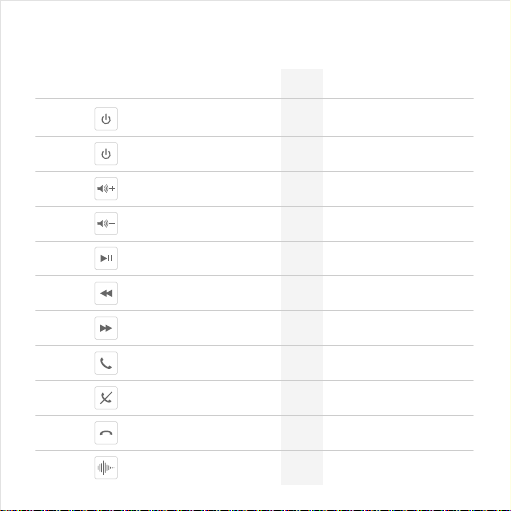
Earbuds function
ICON
Power on
Power off
Volume +
Volume -
Play /
pause
Previous
track
Answer
phone call
Reject
phone call
Hang up
Siri
Long pres s left & rig ht POWER
button s for 1 sec.
Long pres s left & rig ht
POWE R buttons f or 4 sec.
Single click r ight MODE bu tton
Long pres s left or ri ght
POWE R button for 1 s ec.
Single click le ft POW ER button
Single click r ight POW ER butto n
when there is an inc oming call
Single click r ight MODE bu tton
when there is an inc oming call
Long pres s right MOD E butto n
for 1 sec. w hen on the line
Long pres s right MOD E
button f or 1 sec.
VOICE
PROMPTS
Indicator Operating method Function
Indicator ke eps blue for 1 sec.,
“POWER
ON”
then slowly fl ashes
“POWER
Indicator ke eps red for 1 sec.,
OFF”
then goes of f
NO
Blue light flashe s every 7 sec .Single click r ight POW ER butto n
NO
Blue light flashe s every 7 sec .
BEEP
Blue light flashe s every 7 sec .
SOUND
NO
Blue light flashe s every 7 sec .
Blue light flashe s every 7 sec .Single click le ft MODE b utton Next trac k
NO
Indicator fla shes ever y 3 sec.
BEEP
SOUND
instead of flas hing every 7 sec .
BEEP
Blue light flashe s every 7 sec .
SOUND
BEEP
Indicator fla shes ever y 7 sec.
SOUND
instead of flas hing every 3 sec .
BEEP
Blue light flashe s every 7 sec .
SOUND
Page 7

Using the Charging Dock
1
Charging dock power ON/OFF
a. Charging dock power on/off - Single click power button to turn on the
charging dock, left and right earbud charging indicators will continuo usly and
slowly flash for several times while the earbuds are charging: 4 times = full
batter y, 3 times = 75% battery, 2 times = 50% battery, 1 time = 25% batter y.
b. Long press power button for 1 second until left & right earbu d charging
indicators quickly flash 3 times and go off, the chargi ng dock is now turned off.
c. The charging dock will turn OFF auto matically after being idle for 8 hours
(After taking t he earbuds out from charging dock or the earbuds get fully
charged)
d. You can use the chargin g dock to charge your earbuds while it's connecte d
to a power source. Also, your chargin g dock has a built-in battery and it can be
used to recharge you r earphones.
2
Charge the earbuds with charging dock
a. Earbud battery low - On iPhone and some Androi d smartphones, you can
check earbud battery level o n the phone
b. When earbud battery is at low level, there will be a 'Battery Low' voice
prompti ng every 2 minutes in your earbuds until you put them to charge,
and a red light flashing instead of the Bluetooth connection blue indicator.
Page 8
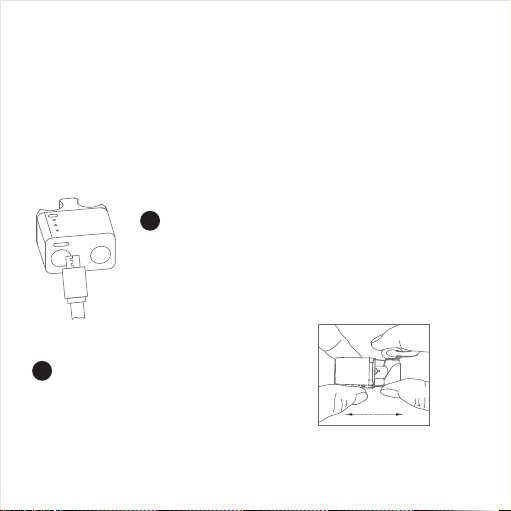
Using the Charging Dock
c. Plug left & right earbuds into the correct slots on charging dock (the pins
on charging dock should touc h the copper sheet on earbuds).
d. Turn ON the charging dock. Earbuds will be turned OFF automatically,
now chargin g dock starts to charge the earb uds. Left and right charging
indicators on the charging dock will flash every 1 second. When earbuds
are fully charged, the charging indicators will stop flashing and go OFF.
3
Charging the dock
When charging dock gets connected to power source,
red charging indicator of the charging dock will turn ON.
The indic ator will go OFF after the dock is fully charged.
4
How to put in/take out the earbuds
from the charging dock.
As shown in the picture, direct the effort
perpendicularly to the charging dock.
Directi on of effor t
when put ting earbuds
in/out of th e dock
Page 9
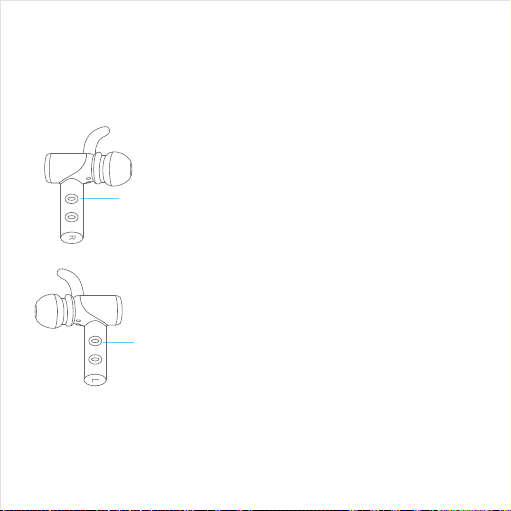
Turning the earbuds ON/OFF
Right
Right ea rbud
power butto n
Left
Left ear bud
power butto n
1. Turn ON - Long press the POWER button
for 1 second. You will hear “Power ON”
voice prompt, blue LEDs will start flash ing.
2. Turn OFF - Long press the POWER
button for 4 seconds. You will hear “Power
OFF” voice prompt, red LEDs will light up
for 1 second and the n go off.
3. Put the earbud s to the charging dock,
they will turn OFF auto matically.
4. Take the earbuds out from cha rging
dock, they will turn ON automati cally.
Page 10

Pairing
You can pair X2 earbuds to your device either together or sep arately.
Please read the instructions below to make thi s process smooth and easy.
1
Pairing 2 earbuds .
a. Conn ecting Right a nd Left ea rbuds.
Left and right earbuds were previously paired with each othe r on the factory.
• Turn ON your right earbud by long pressing the POWER button, you will hear
the “Power ON” voice prompt, then release the button.
• Turn ON you left earbud by long pressing the POWER button, you will hear
the “Power ON” voice prompt, then release the button.
• The left earbud will automatic ally connect to the right earbud. You will hear
"Conne cted" voice prompt in left earbud after successfully connectin g.
b. Re-connect ing Righ t and Left e arbuds.
If left and right earbud do not get recon nected automatically, you will need
to pair them again.
• Long press POWER buttons on left and right earbuds simultaneo usly for 1
second until you hear "Power ON" voice prompt.
• Double click both POWER buttons continuously, you will hear “Beep” sound
from both earb uds. Red and Blue LED-li ghts will start flashing quickly.
• Put both earbuds close to each other and wait for them to connect. After
successful conne ction, both earbuds will start flashing blue ever y 7 seconds.
c. Conn ecting e arbuds to the device
• Long press POWER button on the right earbud for 4 seconds .
• You will hear “Power ON” in the right earbud. Keep pressing POWER until you
Page 11

hear “Pairing” voice prompt; red and blue LED lights will fla sh rapidly.
• Activate Bluetooth on your device and keep it within 3 feet / 1 meter from the
earbuds while pairing.
• Using your Bluetooth enabled device, scan/search for avail able Bluetooth
devices (che ck your device’s manual if you’re unsure how to do this).
• Select TREBL AB X2 from the device list
• If prompted by your device to connect, select Yes.
• You will hear “Connected” from right earbud after successful connection.
• Long press POWER button on the left earbud for 1 second.
• You will hear “Power ON” voice prompt in the left earbud.
• Wait 5-10 sec., the left earbud will autom atically connect to the right earbud.
• You will hear “Connected” from left earbud afte r connecti ng.
• When paired, LED indicators on both earbuds will flash blue every 7 seconds .
• The next time you switch on the earbuds, they will automatically search for and
attempt to c onnect to the la st paired devic e.
2
Pairing only right earbud
• Long press POWER button on the right earbud for 4 seconds .
• You will hear “Power ON” voice prompt in the right earb ud. Keep pressi ng
POWER button until you hear “Pairing” voice prompt.
•Red and blue LED lights will flash rapi dly.
• Activate Bluetooth on your device and keep it within 3 feet / 1 meter from the
earbud while pairing
• Using your Bluetooth enabled device, scan/search for avail able Bluetooth
devices (che ck your device’s manual if you’re unsure how to do this).
• Select TREBL AB X2 from the device list .
• If prompted by your device to connect, select Yes.
• You will hear “Connected” from right earbud after successful connection.
Page 12

3
Pairing only left earbud
• Long press POWER button for 1 second until you hear "Power ON ".
• Long press MODE button for 4 second s until you hear "pairing mode ". Red
and blue LED light s will flash rapidly.
• Activate Bluetooth on your device and keep it within 3 feet / 1 meter from the
earbud while pairing.
• Using your Bluetooth ena bled device, scan/search for available Bluetooth
devices (che ck your device’s manual if you’re unsure how to do this).
• Select TREBLAB X2 from the device list.
• If prompted by your device to connect, select Yes.
• You will hear “Connected” from right earbud after connecting.
When you are using only left earbud, some remote control functions ( answer
call / reject call / hang up call / volume up / volume down) will not be
available. You will still be able to answer / reject phone cal ls or control volume
using yo ur device.
Phone calls
Note: Even when you use both earbuds, only the right earbud produces sound
during pho ne calls, this is completely norm al.
• To answer an incoming call: Single click right POWER button .
• To reject an incoming call: Single cli ck right MODE button.
• To finish the conversation: Long press right MODE button for 1 second .
while on the line
Siri
TREBL AB X2 headpho nes are Siri-compatible. To use Siri: Long
press right MODE button for 1 second.
Page 13

Troubleshooting
Device doesn’t find TRE BLAB X2
• Ensure the X2 are in pairing mode, and LEDs are flashing blue and red.
Refer to previous section on how to enter into the pairing mode.
• If X2 is in pairing mode and flashes blue and red, but is still not found
by your device, please restart your device and the headset.
Frequent disconnection and noise
Frequent disconne ction and noise
• Ensure the distance between your device and the headphones is less
than 38 feet
• Ensure nothing is blocking the signal between your device and your
Bluetooth earbuds.
• If the earbuds are ON, but disconnected from the device for longer
than 3 minutes, they will automatically go OFF to save power.
Can’t turn the headph ones ON
Please ma ke sure the earbuds are charged, if not – charge them , and try again.
Can't connect the earbuds to your device
• Ensure TREBLAB X2 are fully charged .
• Go to your device's Bluetooth menu and delete all saved devices from
the list by clicking “Forget this device”.
• Turn your device's Bluetooth OFF, then turn it back ON: TREBL AB X2
won't be on the list of devices .
• Power OFF device, then turn back ON.
• Take TREBLAB X2 off the charging dock, this will set them to Power
ON.
• Enter the earbuds into the pairing mode and follow instructions for
connecting (page 10).
/ 12 meters .
Page 14

Safety Rules
• Never disassemble or modif y your headset for any reason. Doing this
may cause the headset to malfunction or become combustible. The
damage to your device can void your manufacturer’s warranty.
• Do not allow your device to get wet - liquids can caus e serious
damage. Water damage to your device can void your manufacturer’s
warranty.
• Excessive sweating may damage the product. Make sure to wipe the
headphones dry before charging.
Avoid exposing TREBL AB X2 to extreme temp eratures (below 37° F /
3°C or above 11 2°F / 45°C). Ex treme temperatures can cause
deformation of X2 com ponent s, reduce batter y life and the lifespan of
your new earphones.
• Avoid putting device's LED lights close to the eyes of children or
animals.
• Do not use your X2 during a thunderstorm. Thunder storms can cause
serious malfunction and increase the risk of electric shock.
NOTE: Use only the provided USB/micro USB cable to charge.
Page 15

Battery Information
• Your device is powered by a rechargeable battery.
• Unplug the charging dock from the electrical plug when not in use.
• If left unused, a fully charged battery will lose it s charge over time.
• We recommen d a full charge twice a month to ensure battery
int egr ity.
• Please do not leave the device (and ch arging dock) in hot or cold
places, such as in a closed car in summer or winter con ditions
because this will reduce the capacity and lifetime of the bat tery.
• Do not dispose of the batteries in a fire as they may explode.
• Batteries may also explode if damaged.
Page 16

Specications
Speaker unit - φ8.2MM,22Ω
Frequency response - 20Hz-20kHz
Bluetooth version - Bluetooth 4.2
Bluetooth proles - HFP/HSP/A2DP/AVRCP
Operating distance 33ft / 10m
Sweat-proof (waterproof level IPX4)
Secure t
Play time 10H / Standby 200H
Handsfree calls
Siri-compatible
1 year warranty
Reliable support
Page 17

Thank you
We truly appreciate that you chose TREBLAB as your trusted
brand of Bluetooth truly wireless earbuds and sincerely hope
that you enjoy the great sound and seamless usability TREBL AB
X2 provides. We love making our customers happy by providing
true value with our products.
If for any reason, you are not completely satisfied with your
purchase, or have any questions , please let us know by
contacting us at [email protected]. We care about our
customers more than anything and are always here to serve you.
1 YEAR WARRANTY
1 YEAR PARTS AND LABOR WARRANTY.
Please visit TREBLAB.COM to register
for your warranty and get a 10%OFF
coupon for your next purchase!
Manufactured by:
Productech Corp www.treblab.com
Contact us:
[email protected]
Page 18

 Loading...