

Treasure Cove TC3X Operating Manual

Stand
Handle Unit
w/ Trigger Pinpointing
Pistol Grip
w/ Strap
Arm Cuff
Display
Compartment
Touch Screen
Battery
Top Rod
Bracket
Lock Bracket
Bottom Rod
Camouflage 11” DD Coil
Wire

Table of Contents
CONGRATULATIONS! ................................................................................................................................. 1
Getting Started............................................................................................................................................ 2
Assembly ..................................................................................................................................................... 2
Understanding the LCD Display .................................................................................................................. 5
True Touch Screen Operation ..................................................................................................................... 8
Using the GPS Function ............................................................................................................................ 10
Operating Modes……….…………………………………………………………………………………………..…………………………..11
Getting Started the Right Way ................................................................................................................. 13
Let’s Find Something ................................................................................................................................ 14
Identifying Targets Before You Dig with Tone ......................................................................................... 15
Target Recovery........................................................................................................................................ 16
Detecting Tips........................................................................................................................................... 16
Care & Maintenance ................................................................................................................................ 17
Troubleshooting ....................................................................................................................................... 18
Treasure Commander TC3X Specifications ...............................................................................................18
Treasure Hunters Code of Ethics.............................................................................................................. 19
Warranty & Service Information...............................................................................................................20
Metal Detector Terminology ....................................................................................................................21
Pleas
Successful metal detector users will be the first to tell you to Read and then Re-Read your Instruction Manual if
you want to get the most fun and “Treasure Finds” using your new metal detector. If you are new to metal
detecting or even an experienced detectorist, it will help you more easily understand all the functions of this
detector and how they work with you to find treasure of all types including coins, rings, jewelry, relics, artifacts,
gold and more!
e Read this Instruction Manual

1
CONGRATULATIONS ON YOUR PURCHASE
of your new Treasure Commander
detectors designed to help you find treasure no matter where you live and what your
experience lev el i s w hen it comes to treasure hunt ing.
Designed by an experienced engineering team using input from veteran treasure hunters
including Phil’s brother “Uncle” Si Robertson of the Duck Commanders TV show. Treasure
TM
Commander
metal detectors will let you start finding lost valuables as soon as you
unpack the box. The TC3X is the first metal detector to feature a True Touch Screen LCD.
The “Flagship” of the Treasure Commander Digital Metal Detector Series is the Phil
Robertson Signature Edition endorsed by Phil Robertson himself. Phil Robertson started a
small company in Louisiana called “Duck Commanders” making duck calls in a small shed.
Through hard work and producing high quality products that really worked as advertised,
his company “Duck Commanders” is now the largest manufacturers of duck calls in the
world. Phil Robertson’s signature says it all. The NEW Treasure Commander TC3X is a high
quality metal detector that will work as advertised. You can find treasures while
eliminating most trash and junk!
TM
TC3X metal detector is part of a new series of metal
We welcome you to America’s fastest growing sport - hunting for treasures with a metal
detector. Metal Detecting is an Ad venture that you, your family and friends will enjoy for
years to come. It’s fun and exciting to find old valuable silver and gold coins, gold and
diamond rings and gold jewelry. Recover relics from the Civil War and other historic
battles. Discover lost and hidden buried treasures. All these treasures and more are
waiting to be found with the latest and most advanced metal detectors now available.
Your Treasure Commander
TM
TC3X is capable of meeting your needs in a wide range of
treasure hunting situations. As with any other metal detector, familiarity with this
instrument is probably the limiting factor in determining how successful you can be. I
recommend that you read this manual and fu lly understand how to operate this detector
before attempting to use it in the field. As you become more familiar with your detector
through practice, your rate of success will increase dramatically.
TM
Your new Treasure Commander
TC3X is a quality electronic device that will last for
years. We hope your adventure is one that brings excitement every time you use your
new metal detector!
Phil Robertson and the Kellyco staff!
2
Getting Started
Your Treasure Commander TC3X comes complete and ready to use. The first step is to
unpack the box and check to make sure you have all the items needed to quickly
assemble the detector. You should find the following parts inside the box:
• Handle Unit with Arm Cuff and Stand
• Top Rod with Locking Collar
• Bottom Rod
• Search Coil with Bolt Assembly
• Cable Pulling Tool
• Operator Instruction Manual
• Warranty Card
If any of these items are missing, contact Kellyco Detectors immediately. It is
recommended that you make a record of your detector's serial numbe r and store it along
with your proof of purchase in a safe place in case you ever need this information for
warranty service.
Assembly
Assembly of your new Treasure Commander TC3X is very s imple and requires no special
tools.
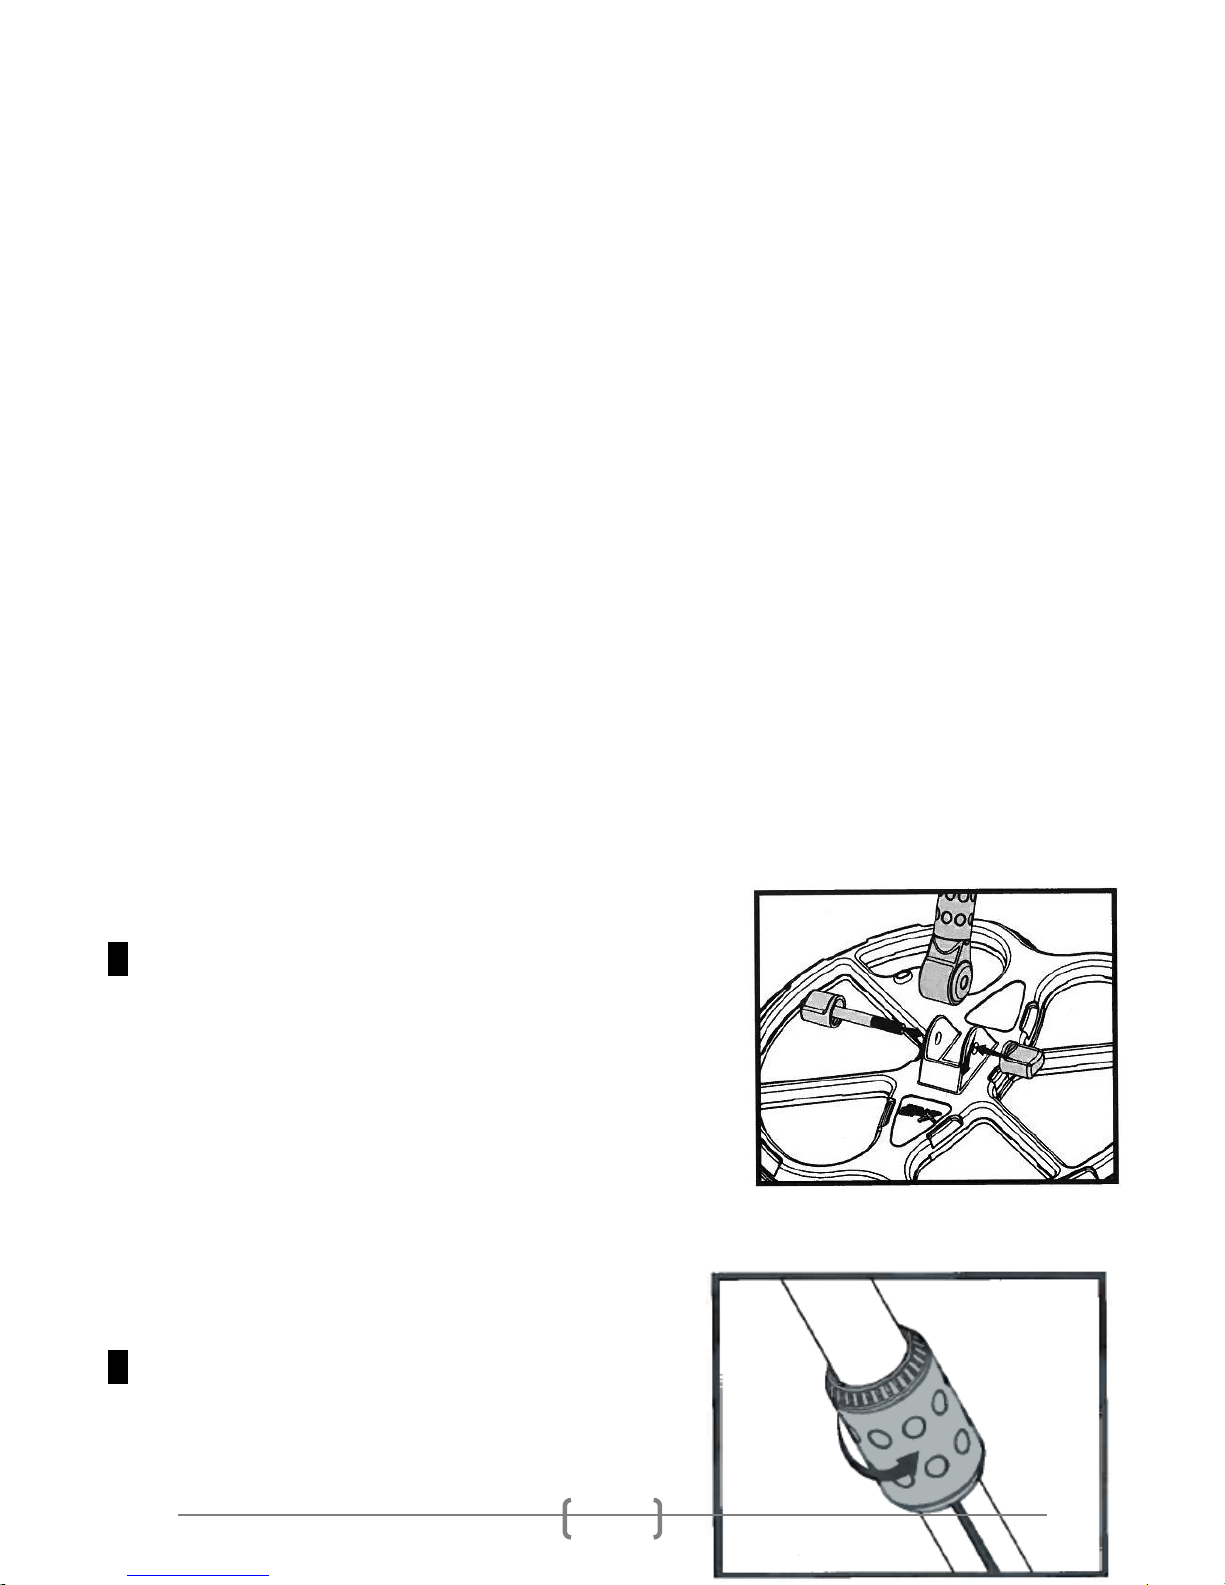
1 Connect the Search Coil and Bottom Rod:
Unscrew the bracket from the bottom rod as it comes
shipped from the factory. Place the bottom rod ins ide
the tabs on the search coil and insert the bolt through
the hole. Tighten the bolt until snug but take care not
to over tighten it as you can damage the coil or the
bolt.
NOTE: The large hole in the end of the bottom rod
must be facing downwards - this is where the searc h coil cable will enter the rod and be
fed upwards to connect into the control housing.
2 Connect the Bottom and Top Rods:
Loosen the locking collar on the top rod (do not

3
remove it) and slide the bottom rod into the top rod.
Adjust the rods to the desired length and tighten the locking collar by turning it cou nter-
clockwise until snug. Do not over tighten as it may be difficult to adjust the length or
disassemble the detector for storage.
NOTE: The groove on the top rod needs to face away from you when you perform this
step. Align the grooves to ensure the rods remain properly positioned.
3 Connect the Search Coil Cable to the Control Housing: The Treasure
Commander TC3X's search coil cable is run through the inside of
the bottom and top rods which keeps it from being caught by
branches or underbrush when searching for treasure in
overgrown areas. This is yet another feature that was added
with the active treasure hunter in mind.
Take the Cable Pulling Tool and slide it down the inside of the
rods starting from the top end. When the end with the screw
connector appears in the large hole on the bottom rod, connect it
to the Search Coil Cable and slowly pull the cable back up the
inside of the rods.
Once the connector on the Search Coil Cable has ex ited the Top
Rod, remove the Cable Pulling Tool.
Lineup the white arrow imprinted on the Search
Coil Cable Connector with the alignment arrow on
the corresponding connection at the base of the
Control Housing. Push the two connections
together but take care not to force them as this
indicates the connectors are not properly aligned.
Once they have mated, screw the metal collar until
snug to ensure the ca b le does not come loose.
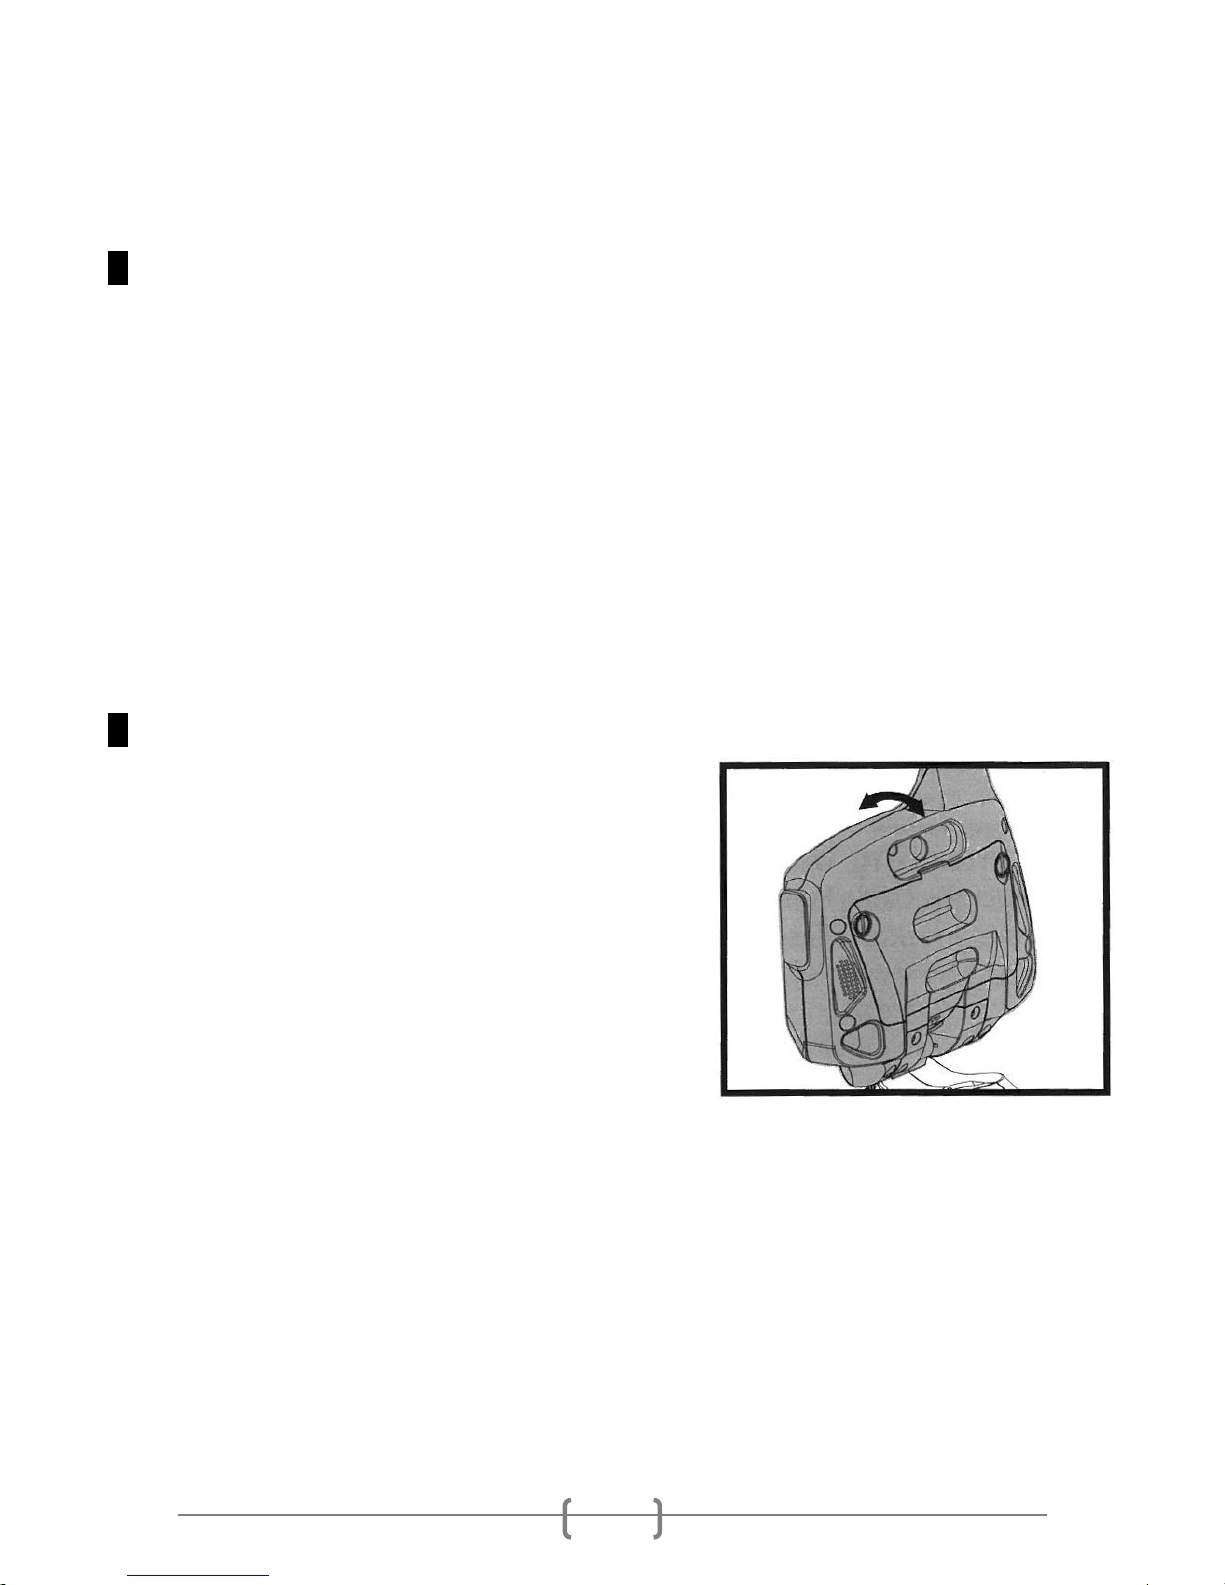
4 Securing the Top Rod to the Control
Housing: The Top Rod is connected to the
Handle Unit through the use of a cam-lock
fitting located at the base of the LCD Assembly.
Pull the cam-lock lever downward and slide the
Top Rod into the Handle Unit. When the Top
Rod is fully seated, press the cam-lock lever
upwards so that it is flush with the rod.
4
5 Installing the Batteries: Your Treasure Commander TC3X is powered by six (6)
AA batteries contained in the compartment found on the rear of the LCD Assembly pod.
To access the battery compartment, unscrew the two (2) screws found on the top of the
cover. Insert the batteries according to the markings inside the compartment making
sure that the batteries are properly aligned . Replace the battery compartment cover and
tighten the screws.
Either standard AA or rechargeable AA batteries can be used on the TC3X. Alkaline AA
batteries are recommended for optimal performance and service life.
NOTE: The Treasure Commander TC3X features a continuous battery strength indicator
on the LCD screen which will help ensure you do not find yourself with dead batteries
miles from the nearest store. If the display indicates less than 25% of battery strength
remains, either replace the batteries or bring a spare set with you when you head out into
the field.
6 Adjusting the Display: The TC3X offers a fu ll range of adjus tment to provide us ers
with optimal screen visibility. To adjus t the angle of
the LCD Assembly pod for viewing under different
lighting conditions, you can tilt the pod forwards or
backwards.
NOTE: Be careful not to force the pod into position
in order to avoid damaging the adjustment point.
5
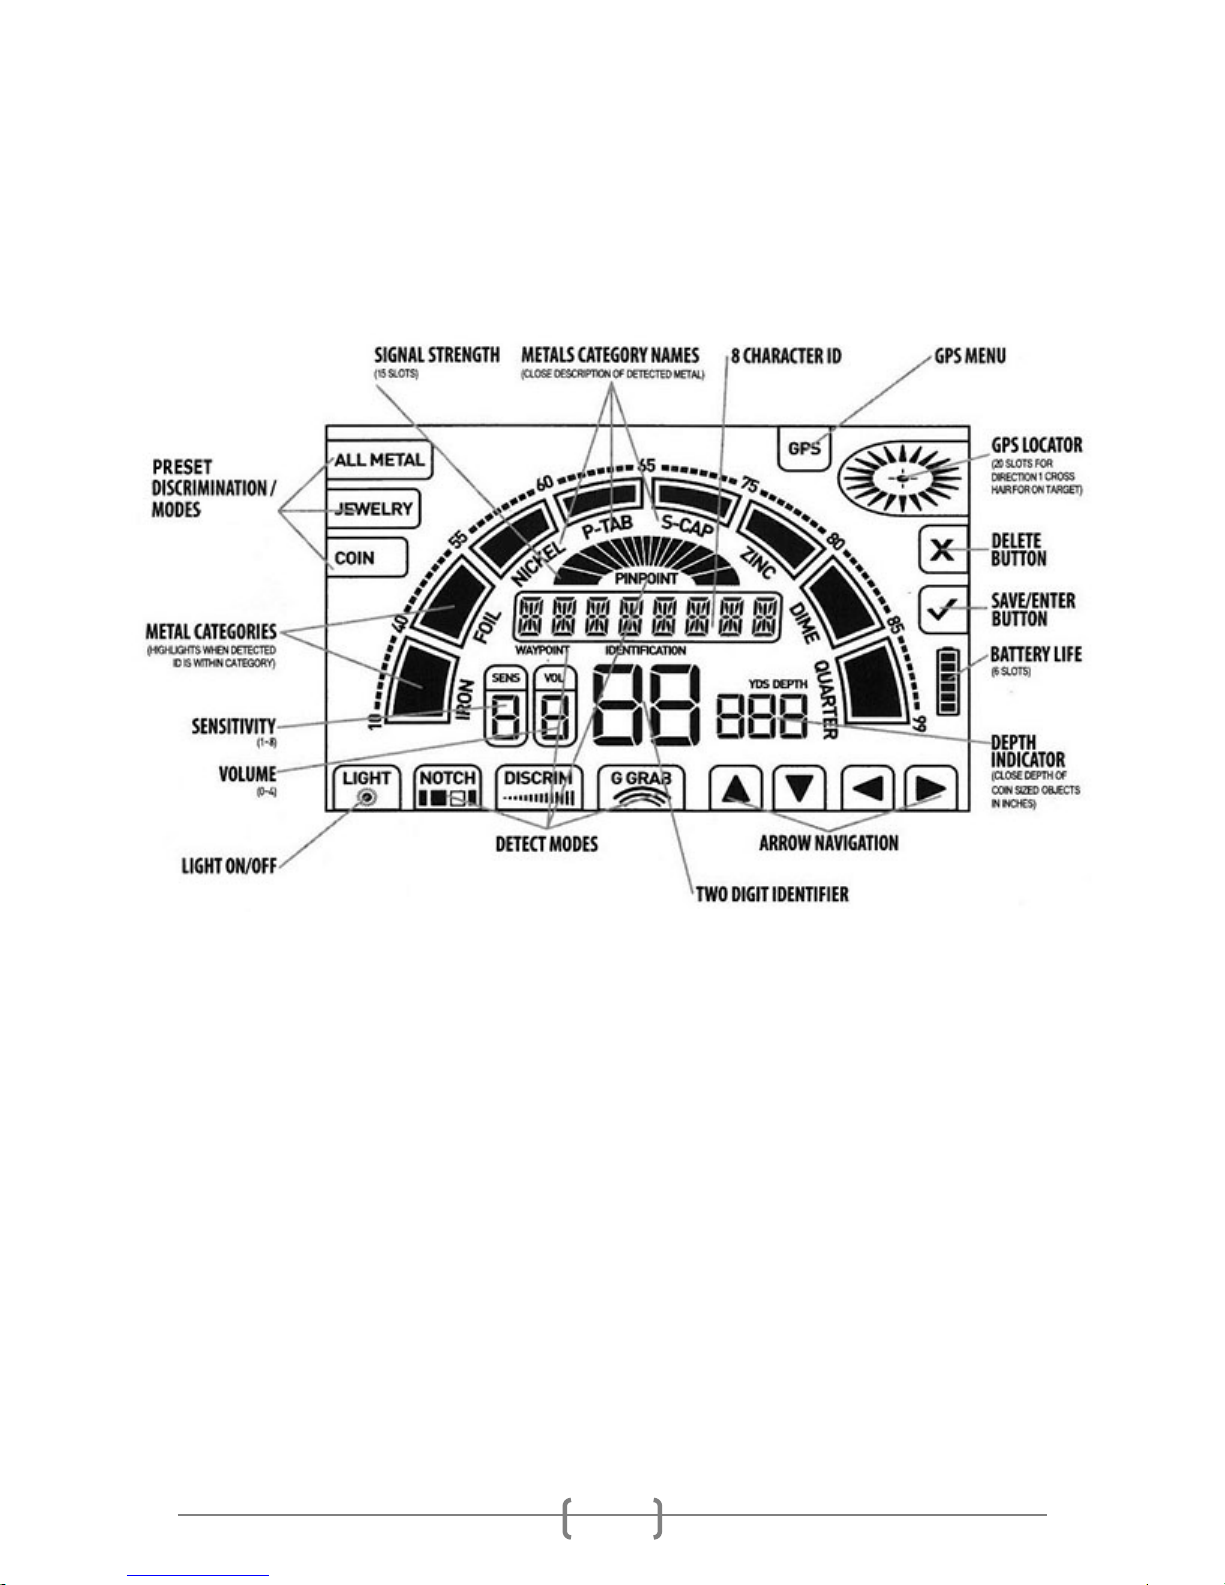
Understanding the LCD Display
The LCD True Touch screen on the Treasure Commander TC3X provides a wealth of
useful information that will help you find more treasure while ignoring unwanted trash
targets such as aluminum, rusted iron and the like. The figure above shows all of the
information that is available on the LCD screen; however, not all of the information is
provided at all times; i.e., the information displayed will depend on the mode selected
(more on that subject will follow). The information includes the following:
• Battery Life: The battery symbol in the lower right area of the display shows the
strength of the batteries. New or fully charged rechargeable batteries will be
indicated by 6 dark segments. As the batteries discharge, the number of dark
segments will decrease. When only two s egment remains, the batteries should be
replaced or recharged.
• GPS Locator: The half circle in the upper right area of the display is used to
provide GPS-based directional information when the GPS option is activated and a
waypoint has been saved. Additional details on this function are provided in the
Operating Modes section.
 Loading...