

TRAYNOR DG10, YS1051 User Manual
O w n e r ’ s M a n u a l
D
y
n
a
G
a
i
n
Manual-Owners-DG-Series-1v20.pdf
G u i d e d e l ’ u t i l i s a t e u r
Traynor DG-Series
S O L I D - S T A T E G U I T A R A M P L I F I E R S
D G 1 0 • D G 1 5 • D G 1 5 R • D G 3 0 D
DG10 MODEL TYPE: YS1049
DG15/DG15R MODEL TYPE: YS1050
DG30D MODEL TYPE: YS1051

IMPORTANT SAFETY INSTRUCTIONS
safety-4v3.eps • Oct. 26/05
CAUTION:
TO REDUCE THE RISK OF ELECTRIC SHOCK, DO
NOT REMOVE COVER (OR BACK).
NO USER SERVICEABLE PARTS INSIDE.
REFER SERVICING TO QUALIFIED
SERVICE PERSONNEL.
INSTRUCTIONS PERTAINING TO A
RISK OF FIRE, ELECTRIC SHOCK,
OR INJURY TO PERSONS
Read Instructions
The Owner’s Manualshould be read and understood
before operation of your unit. Please, save these instructions for future reference.
Packaging
Keep the box and packaging materials, in case the unit
needs to be returned for service.
Warning
When using electric products, basic precautions should
always be followed, including the following:
Power Sources
Your unit should be connected to a power source only of the voltage
specified in the owners manual or as marked on the unit. This unit has a
polarized plug. Do not use with an extension cord or receptacle unless
the plug can be fully inserted. Precautions should be taken so that the
grounding scheme on the unit is not defeated.
Hazards
Do not place this product on an unstable cart, stand, tripod, bracket or
table. The product may fall, causing serious personal injury and serious
damage to the product. Use only with cart, stand, tripod, bracket, or
table recommended by the manufacturer or sold with the product.
Follow the manufacturer’s instructions when installing the product and
use mounting accessories recommended by the manufacturer.
The apparatus should not be exposed to dripping or splashing water;
no objects filled with liquids should be placed on the apparatus.
Terminals marked with the “lightning bolt” are hazardous live; the
external wiring connected to these terminals require installation by an
instructed person or the use of ready made leads or cords.
Ensure that proper ventilation is provided around the appliance.
No naked flame sources, such as lighted candles, should be
placed on the apparatus.
Power Cord
The AC supply cord should be routed so that it is unlikely that it will be
damaged. If the AC supply cord is damaged DO NOT OPERATE THE UNIT.
Service
The unit should be serviced only by qualified service personnel.
AVIS:
AFIN DE REDUIRE LES RISQUE DE CHOC ELECTRIQUE,
N’ENLEVEZ PAS LE COUVERT (OU LE PANNEAU ARRIERE)
NE CONTIENT AUCUNE PIECE
REPARABLE PAR L’UTILISATEUR.
CONSULTEZ UN TECHNICIEN QUALIFIE
POUR L’ENTRETIENT
INSTRUCTIONS RELATIVES AU RISQUE
DE FEU, CHOC ÉLECTRIQUE, OU
BLESSURES AUX PERSONNES
Veuillez Lire le Manuel
Il contient des informations qui devraient êtres comprises
avant l’opération de votre appareil. Conservez S.V.P. ces
instructions pour consultations ultérieures.
Emballage
Conservez la boite au cas ou l’appareil devait être
retourner pour réparation.
Attention:
Lors de l’utilisation de produits électrique, assurezvous d’adhérer à des précautions de bases incluant
celle qui suivent:
Alimentation
L’appareil ne doit être branché qu’à une source d’alimentation
correspondant au voltage spécifié dans le manuel ou tel qu’indiqué sur
l’appareil. Cet appareil est équipé d’une prise d’alimentation polarisée.
Ne pas utiliser cet appareil avec un cordon de raccordement à moins
qu’il soit possible d’insérer complètement les trois lames. Des
précautions doivent êtres prises afin d’eviter que le système de mise à
la terre de l’appareil ne soit désengagé.
Risque
Ne pas placer cet appareil sur un chariot, un support, un trépied ou une
table instables. L’appareil pourrait tomber et blesser quelqu’un ou subir
des dommages importants. Utiliser seulement un chariot, un support,
un trépied ou une table recommandés par le fabricant ou vendus avec
le produit. Suivre les instructions du fabricant pour installer l’appareil et
utiliser les accessoires recommandés par le fabricant.
Il convient de ne pas placer sur l’appareil de sources de flammes
nues, telles que des bougies allumées.
L’appeil ne doit pas être exposé à des égouttements d’eau ou des
éclaboussures et qu’aucun objet rempli de liquide tel que des vases
ne doit être placé sur l’appareil.
Assurez que lappareil est fourni de la propre ventilation.
Les dispositifs marqués d’une symbole “d’éclair” sont des parties
dangereuses au toucher et que les câblages extérieurs connectés à
ces dispositifs de connection extérieure doivent être effectivés par un
opérateur formé ou en utilisant des cordons déjà préparés.
Cordon d’Alimentation
Évitez d’endommager le cordon d’alimentation. N’UTILISEZ PAS
L’APPAREIL si le cordon d’alimentation est endommagé.
Service
Consultez un technicien qualifié pour l’entretien de votre appareil.
Traynor DynaGain
0510
VOLUME
0510
Tre ble
0510
Mid dle
0510
Bas s
Input CD Input Phones
Ove rdr ive
POWER
Guitar Amplifiers
Tube-like tone is now available in solidstate guitar amplifiers. The Traynor
DynaGain Series provides unparalleled
tube-like tone from a solid-state amplifier
by using unique three-stage dynamic tubeemulation circuitry.
It didn’t stop there. Pushing the
boundaries of modern technology, Yorkville
discovered how to use dynamic-gain
control in the preamp to ensure the best
tube emulation possible (from an entirely
solid-state circuit design). DynaGain
amplifiers make the perfect guitar amplifier
for the gigging and practicing musician.
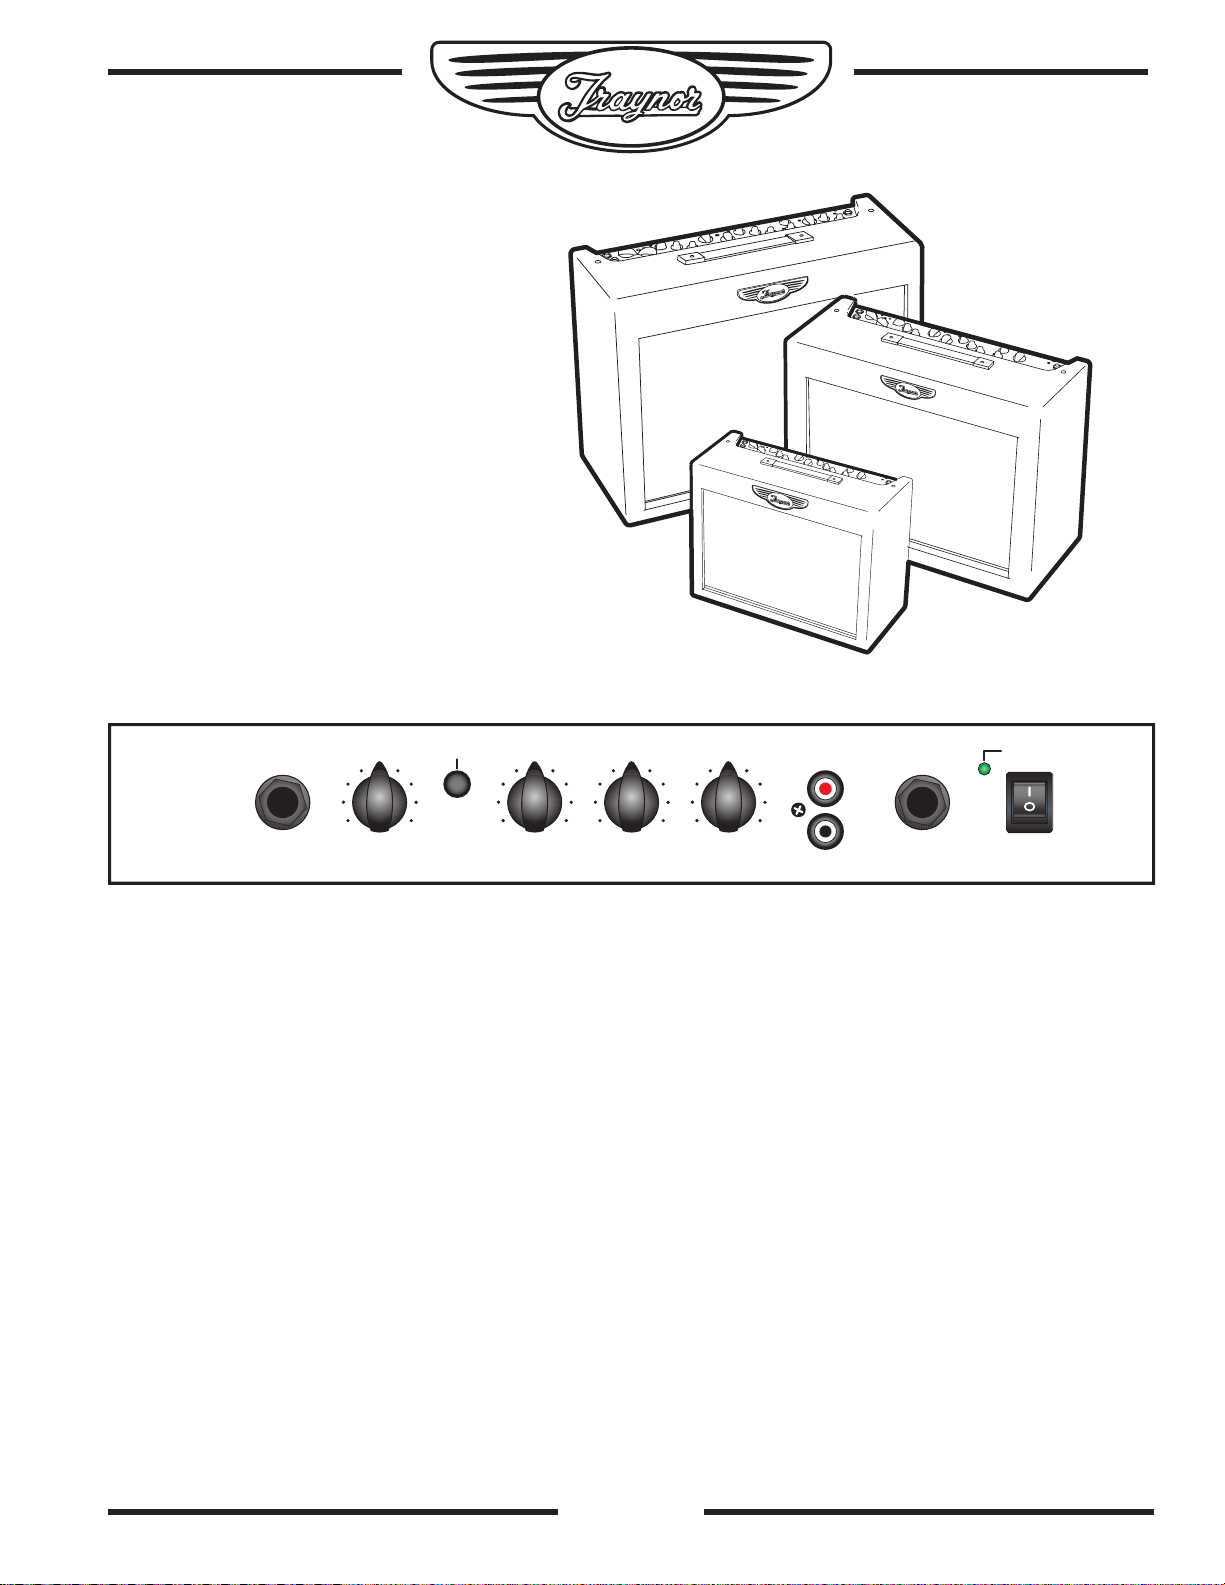
DG10 - 10w / 8-inch
The Traynor DynaGain DG10 delivers a full 10-watts
through its high quality 8-inch Celestion™ speaker.
Capable of delivering pristine clean tones or searing
overdrive at the touch of a switch, the DG10 is ready for
any style of music. Perfect for the budding guitarist. Playalong practicing has been made easier by including RCA
line inputs to quickly connect a CD player, MP3 player
or other audio device. A 1/4-inch headphone jack, with
speaker defeat, makes the Traynor DynaGain DG10 an
ideal amplifier for private practicing.
Features
• 10-Watts
• 8-inch Celestion™ Speaker
• Selectable Overdrive
• Bass / Mid / Treble Tone Controls
• Auxiliary Line Inputs for a CD, MP3 Player or
another audio device.
• 1/4-inch TRS Headphone Jack, with speaker defeat.
1. Input
Connect your guitar using a shielded ¼-inch guitar
2. Volume
The Volume control determines how loud the
amplifier will be.
3. Overdrive Switch
Engaging this switch activates the amplifier’s
overdrive circuit.
4. Tone Controls
Bass/Middle/Treble Use these controls to shape
your tone.
5. CD Input
This input can be used to connect a CD player, MP3
Player or other audio device enabling you to jam along
with your favourite tunes.
6. Phones
Connect a pair of ¼-inch stereo headphones to this
jack; the internal speaker will automatically be defeated
for practicing silently.
7. Power Switch
This switch turns your amplifier on or off. The green LED
next to the switch illuminates when amplifier power is on.
cable to this jack.
1

DG15 - 15w / 10-inch
0510
Gain
0510
VOLUME
0510
VOLUME
0510
Trebl e
0510
Midd le
0510
Bass
LoHi
CD Input
POWER
1 2
CHAN NEL
SELE CT
0510
Master
Volume
Input
EXTERNAL
SPEAKER
PHONES
INTERNAL
SPEAKER
DEFEAT
The Traynor DynaGain DG15 delivers a
full 15-watts through its high quality 10-inch
Celestion™ speaker. A two-channel design
allows the player to switch between a pristine
clean tone and searing overdrive (for awesome
leads at the touch of a switch). Perfect
for play-along practice, the Traynor DG15
includes RCA line inputs to quickly connect
a CD, MP3 player or other audio device. A
1/4-inch headphone jack, with speaker defeat,
makes the Traynor DynaGain DG15 an ideal
amplifier for practicing privately.
Features
• 15-Watts
• 10-inch Celestion™ Speaker
• Clean and Overdrive Channels
• Bass / Mid / Treble Tone Controls
• Auxiliary Line Inputs for a CD, MP3 Player
or another audio device.
• 1/4-inch TRS Headphone Jack, with
speaker defeat.
1. Hi and Lo Input Jacks
Connect your guitar using a shielded ¼-inch
guitar cable to this jack. For a bright, high gain
sound, use the jack labelled Hi. For a darker,
lower gain sound use the jack labelled Lo. If
you use both jacks simultaneously, both jacks
will be high gain.
2. Gain
The Gain control varies the amount of
overdrive for channel 1. Channel 1 uses the
Gain control to allow more flexibility when
trying to achieve the perfect amount of
distortion. For greater distortion
turn the dial clockwise; for
less distortion, dial the control
counter-clockwise.
3. Channel 1 Volume
This controls the loudness of channel 1.
4. Channel Select Switch
This switch allows toggling between
channels 1 and 2.
5. Channel 2 Volume
This controls the level of channel 2. A bluesy
tone, with a bit of crunch, can be achieved by
increasing this control’s setting.
6. Tone Controls
Bass/Middle/Treble Use these controls to
shape your tone
7. Master Volume
The Master control adjusts the overall
loudness of the DG amplifier.
8. CD Input
This input can be used to connect a CD player,
MP3 Player or other audio device enabling you
to jam along with your favourite tunes.
9. Power Switch
This switch turns your amplifier on or off. The
green LED next to the switch illuminates when
amplifier power is on.
10. Phones
Connect a pair of ¼-inch stereo headphones
to this jack.
11. External Speaker
Connect an extension speaker cabinet using
this jack (8-ohms minimum).
12. Internal Speaker Defeat
This switch to turns off the DG amplifier’s
internal speaker. This enables the amplifier
to drive an extension speaker
cabinet without using the DG’s
internal speaker or can be used
for silent practice.
2

DG15R - 15w / 10-inch / Spring Reverb
0510
Gain
0510
VOLUME
0510
VOLUME
0510
Reverb
0510
Trebl e
0510
Midd le
0510
Bass
LoHi
CD Input
POWER
CHAN NEL
SELE CT
1 2
0510
Master
Volume
Input
EXTERNAL
SPEAKER
PHONES
INTERNAL
SPEAKER
DEFEAT
The Traynor DynaGain DG15R delivers a full 15watts through its high quality 10-inch Celestion™
speaker. A two-channel design allows the player
to switch between a pristine clean tone and
searing overdrive for awesome leads at the touch
of a switch. The Traynor DG15R’s real spring
reverb adds an authentic vintage vibe to your tone
pallet. Perfect for practice, the Traynor DG15R
has RCA line inputs for quick connection of a CD,
MP3 Player or other audio device, allowing any
audio source to be mixed with the guitar for playalong practice. The 1/4-inch headphone jack, with
speaker defeat, makes the Traynor DynaGain
DG15R an ideal amplifier for practicing privately.
Features
• 15-Watts
• 10-inch Celestion™ Speaker
• Clean and Overdrive Channels
• Bass / Mid / Treble Tone Controls
• An authentic vintage-style Spring Reverb
• Auxiliary Line Inputs for a CD, MP3
Player or other audio device.
• 1/4-inch TRS Headphone Jack, with
speaker defeat.
1. Hi and Lo Input Jacks
Connect your guitar using a shielded ¼-inch guitar
cable to this jack. For a bright, high gain sound,
use the jack labelled Hi. For a darker, lower gain
sound use the jack labelled Lo. If you use both
jacks simultaneously, both jacks will be high gain.
2. Gain
The Gain control varies the amount of overdrive
for channel 1. Channel 1 uses the Gain control
to allow more flexibility when trying to achieve
the perfect amount of distortion.
For greater distortion turn the dial
clockwise, for less, dial the control
counter-clockwise.
3. Channel 1 Volume
This controls the loudness of
channel 1.
4. Channel Select Switch
This switch allows toggling between
channels 1 and 2.
5. Channel 2 Volume
This controls the level of channel 2. A bluesy
tone, with a bit of crunch, can be achieved by
increasing this control’s setting.
6. Tone Controls
Bass/Middle/Treble Use these controls to
shape your tone.
7. Master Volume
The Master control adjusts the overall loudness
of the DG amplifier.
8. Reverb
The Reverb control sets the level of
reverberation mixed with the guitar signal.
9. CD Input
This input can be used to connect a CD player,
MP3 Player or other audio device enabling you
to jam along with your favourite tunes.
10. Power Switch
This switch turns your amplifier on or off. The
green LED next to the switch illuminates when
amplifier power is on.
11. Phones
Connect a pair of ¼-inch stereo headphones
to this jack.
12. External Speaker
Connect an extension speaker cabinet using this
jack (8-ohms minimum).
13. Internal Speaker Defeat
This switch to turns off the DG amplifier’s internal
speaker. This enables the amplifier to drive an
extension speaker cabinet
without using the DG’s
internal speaker or can be
used for silent practice.
3

DG30D - 30w / 12-inch / Digital DSP and Digital Reverb
0510
Gain
0510
VOLUME
0510
Master
Volume
0510
Effects
Level
0510
VOLUME
0510
Trebl e
defeat
0510
Middl e
0510
Bass
LoHi
CD Input
POWER
CHANN EL
SELEC T
0510
Reverb
1 2
Effects
Select
Input
C
H
O
R
U
S
V
I
B
R
A
T
O
S
P
E
C
I
A
L
F
L
A
N
G
E
R
The Traynor DynaGain DG30D delivers a full 30watts through its high quality 12-inch Celestion™
speaker, making it perfect for rehearsals with the
band and personal practice. The two-channel
design allows switching between a pristine clean
tone and a searing lead tone; the optional AFS2
footswitch allows you to switch between channels
on the fly or for remote effects defeat. You can
also use the Channel Selector switch on the main
panel. The Traynor DG30D’s 24-bit digital multieffects processor offers chorus, flange, vibrato
and four special effects. The Traynor DG30D has
RCA line inputs for quick connection of a CD,
MP3 Player or other audio devices, allowing any
audio source to be mixed with the guitar for playalong practice. The 1/4-inch headphone jack also
makes the Traynor DynaGain DG30D an ideal
amplifier for practicing privately.
Features
• 30-Watts
• 12-inch Celestion™ Speaker
• Footswitchable* Clean and Overdrive Channels
• Bass / Mid / Treble Tone Controls
• On-board 24-bit Digital Effects Processor
(Chorus, Flange Vibrato and Special Effects)
with footswitchable defeat*
• 24-bit Digital Reverb with footswitchable defeat*
• Auxiliary Line Inputs for a CD, MP3 Player or
other audio devices.
• 1/4-inch TRS Headphone Jack that also
doubles as a Line Out.
* Using the optional AFS2 footswitch
1. Hi and Lo Input Jacks
Connect your guitar using a shielded ¼-inch
guitar cable to this jack. For a bright, high gain
sound, use the jack labelled Hi. For a darker,
lower gain sound use the jack labelled Lo. If you
use both jacks simultaneously, both jacks will be
high gain.
2. Gain
The Gain control varies the amount of overdrive
for channel 1. Channel 1 uses the Gain control
to allow more flexibility when trying to achieve
the perfect amount of distortion. For greater
distortion turn the dial clockwise, for less, dial the
control counter-clockwise.
3. Channel 1 Volume
This controls the loudness of channel 1.
4. Channel Select Switch
This switch allows toggling between
channels 1 and 2.
5. Channel 2 Volume
This controls the level of channel 2. A bluesy
tone, with a bit of crunch, can be achieved by
increasing this control’s setting.
6. Tone Controls
Bass/Middle/Treble Use these controls to
shape your tone.
7. Master Volume
The Master control adjusts the overall loudness
of the DG amplifier.
8. Digital Effects Section: a. Reverb
The Reverb control sets the amount of
reverberation mixed with the guitar signal.
b. Effects Select
This sixteen-position selector let’s you
choose from a variety of useful and
interesting effects. The effect types are
labelled on the chassis and include a variety
of choruses, flangers, vibrato effects, and a
selection of four special effects.
c. Effects Level
The Effect Level control adjusts the amount
of the selected effect, mixed with the
guitar’s dry signal.
NOTE: The Red LED between the reverb control
and the Effect Select control indicates that the
digital effects section is functioning. If a footswitch
is connected you can bypass the effects
(including the reverb); this LED will turn off to
indicate when the effects have been bypassed.
9. CD Input
This input can be used to connect a CD player,
MP3 Player or other audio device enabling you
to jam along with your favourite tunes.
10. Power Switch
This switch turns your amplifier on or off. The
green LED next to the switch illuminates when
amplifier power is on.
11. Footswitch
An optional two-button latching-type footswitch
can be used for channel select and effects defeat.
(Yorkville Sound Part AFS-2 recommended).
4
 Loading...