

Page 1
NiMH/LiPO FAST CHARGER INSTRUCTIONS
Thank you for purchasing the Traxxas EZ-Peak Live™ charger.
This charger features exclusive Traxxas innovations that make
charging batteries easier and safer than ever. If you have any
questions or concerns about your charger, please contact our
customer support team for fast, friendly answers and solutions.
Contact information is at the bottom of this page.
WARNING! For best charging results and your safety, it is
essential that you read and understand these instructions,
warnings, and precautions before using the charger. Charging
and discharging batteries has the potential for serious injury
and damage to property. Use care when charging and follow all
instructions and cautions.
H
Covers Part #2971
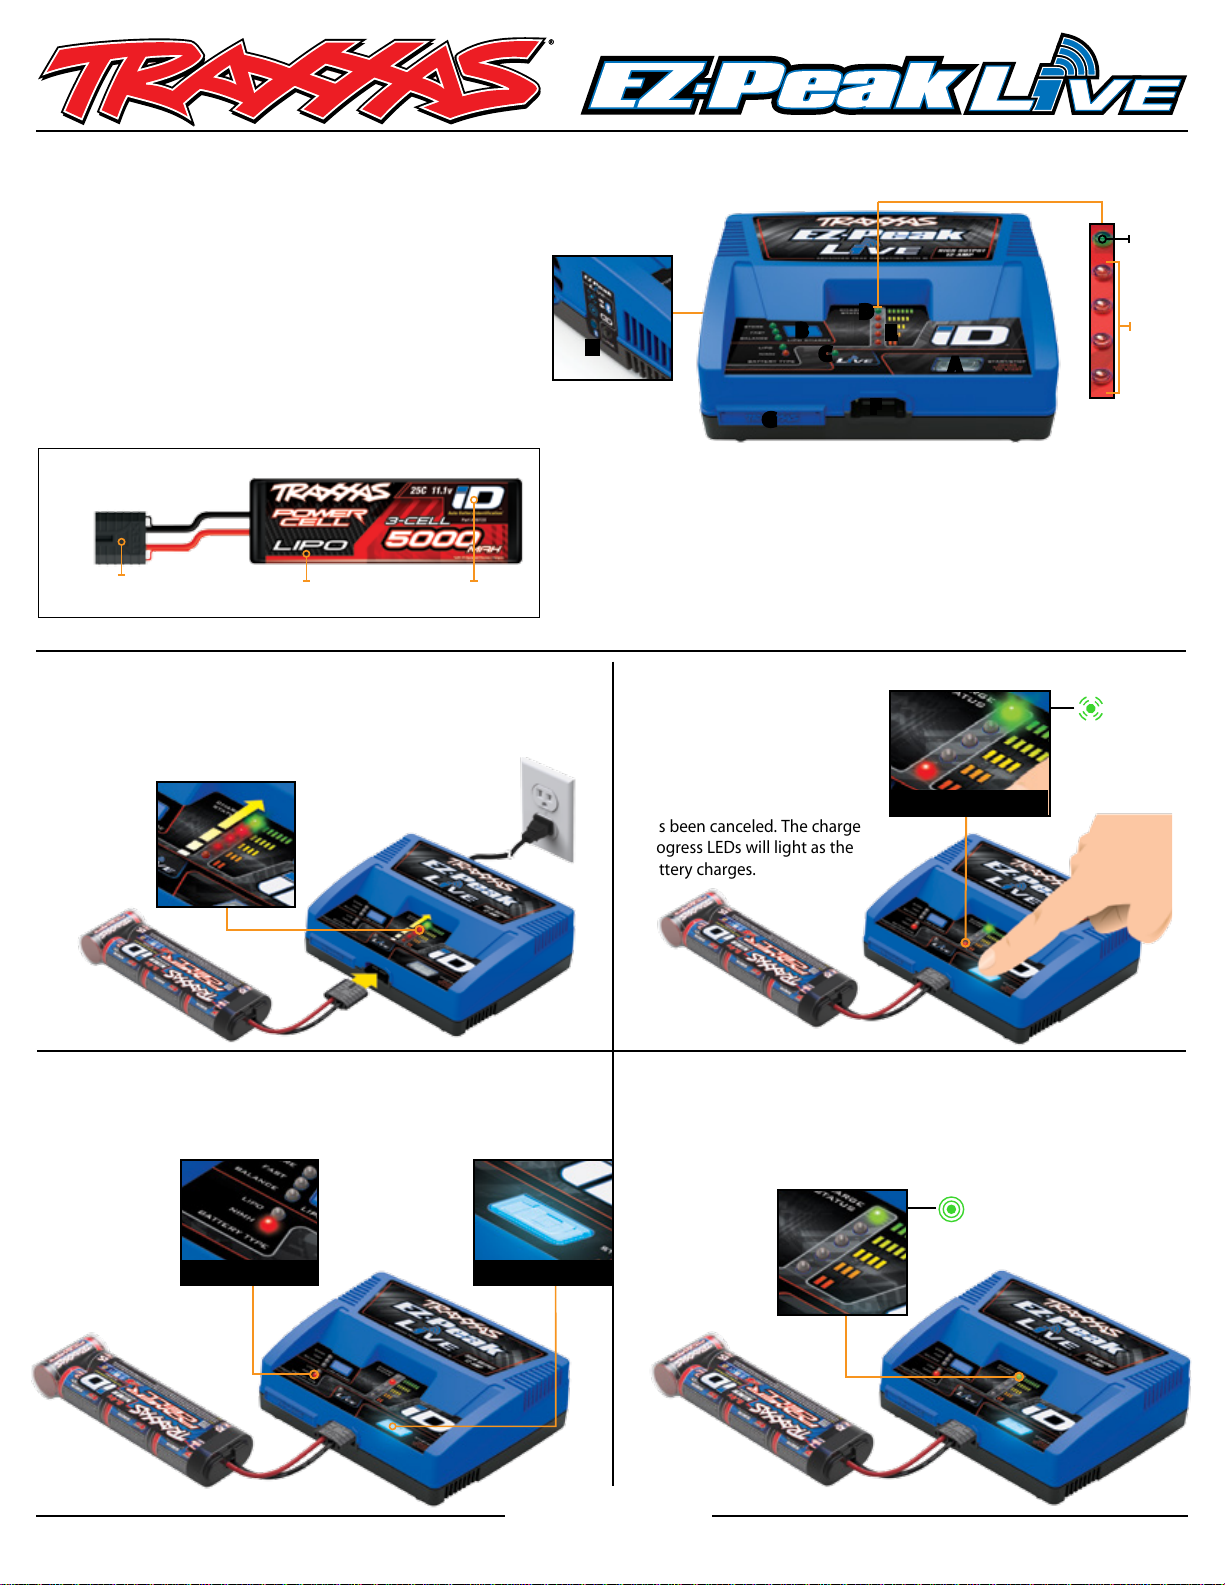
Intelligent battery charger
2971
Charge
Status
B
C
G
E
A
F
D
Charge
Progress
Identifying iD Batteries
Traxxas High-Current
Connector
LiPo battery shown, NiMH battery similar
iD LogoBattery Type
Charging Traxxas iD NiMH Batteries
1. Plug the charger into an AC wall outlet and connect the battery
The charger will recognize the iD battery
and show you the charge settings.
A. Battery iD Start/Stop
B. LiPo Charge Mode Select
C. App Live LED
D. Charge Status LED
3. Charging
Press and hold the Start button
for 2 seconds. The charger will
play a tone, indicating that
charging has started. Press once
to stop. The charger will play a
tone, indicating that charging
has been canceled. The charge
progress LEDs will light as the
battery charges.
E Charge Progress LEDs
F. Charger Output Port (Traxxas High-Current Connector)
G. 2S/3S/4S Lipo Balance Ports (pull to remove cover)
H. Bluetooth® Button
Charging
(flashing)
Charge Cycle Progress
2. Verify the charge settings
Battery type selected must match the battery type shown on the battery.
Battery Type
TRAXXAS.com
Traxxas, 6250 Traxxas Way, McKinney, TX 75070,
Phone: 1-888-TRAXXAS (Toll-free, US only) or 972-549-3000, Fax: 972-549-3011, e-mail: support@Traxxas.com
4. Charge cycle complete
The charger will play a complete tone, followed by a beep to indicate
charging is complete.
The EZ-Peak Live will trickle charge your NiMH battery at a minimum of
100mA for 12 hours after the charge cycle is complete.
Cycle Complete
(solid)
Start
HKC16014-R00 160818
Page 2
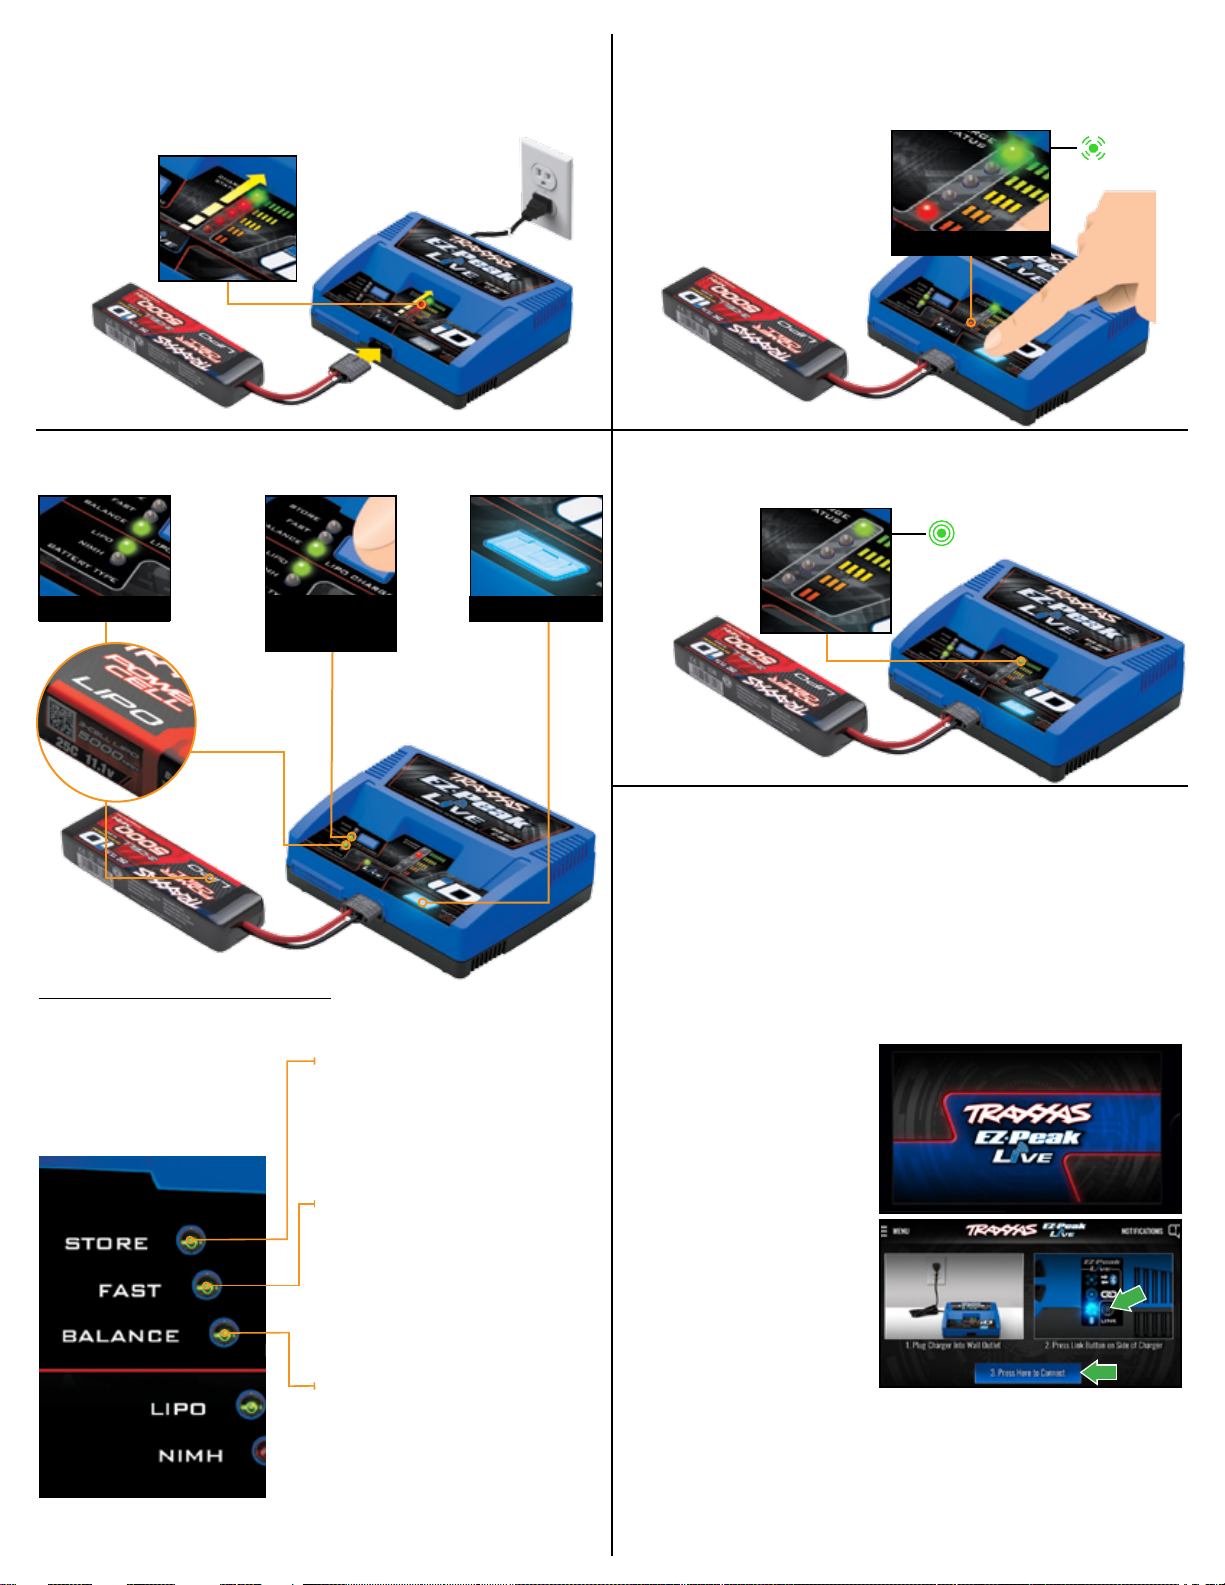
Charging Traxxas iD LiPo Batteries
1. Plug the charger into an AC wall outlet and connect the battery
The charger will recognize the iD batteries
and show you the charge settings.
3. Charging
Press and hold the Start button for 2 seconds. The charger will play a tone,
indicating that charging has started. Press once to stop. The charger will play
a tone, indicating that charging has been canceled. The charge progress LEDs
will light as the battery charges.
Charge Cycle Progress
Charging
(flashing)
2. Verify the charge settings
Battery type selected must match the battery type shown on the battery.
Battery Type
Charge Mode
(the default is
Balance)
Start
LiPo Charging Modes
Change your LiPo charging mode, if desired.
The default setting for iD LiPo batteries is Balance Charge.
Storage Charge
Makes it easy to charge or discharge
the battery to the proper storage
voltage. Use this mode whenever the
battery will be stored unused
for more than 7 days.
Fast Charge
Fast charges your battery without
balancing your cells. Stops charging
when battery is fully charged or
when the first cell reaches peak
voltage. Depending on the battery,
this may reduce the charge time by
a few minutes.
Balance Charge
Always balance charge your LiPo
batteries for maximum capacity,
voltage, and battery life. This is
the default setting for Traxxas
iD batteries. The EZ-Peak Live
performs a balance charge quickly
and efficiently.
4. Charge cycle complete
The charger will play a complete tone, followed by a beep to indicate
charging is complete.
Cycle Complete
(solid)
Pairing the EZ-Peak Live Charger with
the EZ-Peak Live App for the first time
The EZ-Peak Live charger is equipped with Bluetooth®. This transforms your
Apple® iPhone®, iPad®, iPod touch®, or Android™ device into a powerful tool
that equips the charger with an intuitive, high-definition, full-color graphical
user interface. The powerful EZ-Peak Live App (available in the Apple App
Store℠ or on Google Play™) makes it easy to learn, understand, and access
available charging options. Adjust the charger settings by simply touching and
dragging the sliders on the screen. Note: You can pair your mobile device with
multiple EZ-Peak Live chargers and use the app to toggle between the paired
chargers to select charge settings and monitor charge progress.
1. Launch the EZ-Peak Live App
on your mobile device. Plug
the charger into an AC wall
outlet.
2. Press the Bluetooth® button
on the side of the charger.
The blue LED will blink.
3. Within 10 seconds, tap “Press
Here to Connect”.
4. The Bluetooth® icon in the
status bar will turn blue and
the blue Bluetooth® LED on the
side of the charger will
glow solid blue.
5. The EZ-Peak Live charger and
the EZ-Peak Live App are now
paired. The charger and app will automatically connect when the charger is
powered up and the app is running. The green App Live LED on the charger
will glow solid green when the paired charger is selected using the EZ-Peak
Live App.
Page 3

Charging Traxxas iD NiMH or LiPo
Batteries using the EZ-Peak Live App
1. Open the EZ-Peak Live App on your mobile device; plug the
charger into an AC wall outlet and connect the battery
The charger will recognize the iD battery and the charge
settings will be displayed in the EZ-Peak Live App.
App Live LED
3. Charging
Press and hold the Start button
for 2 seconds. The charger will
play a tone, indicating that
charging has started. Press once
to stop. The charger will play a
tone, indicating that charging
has been canceled. The charge
progress LEDs will light as the
battery charges.
Charging
(flashing)
Charge Cycle Progress
2. Verify the charge settings
Battery type displayed in the app must match the battery type
shown on the battery. Use the app to select the charge rate and
4. Charge cycle complete
The charger will play a complete tone, followed by a beep to indicate
charging is complete.
to select Balance, Fast, or Storage Charge for LiPo batteries.
Battery Type
Charge Mode
(the default is
Balance)
Start
Charging Traxxas Batteries without iD using the EZ-Peak Live App
1. Open the EZ-Peak Live App on your mobile device; plug the charger into an AC wall
outlet and connect the battery
When a battery is connected for charging
that does not have Traxxas Battery iD, the red
charge progress LEDs will sweep in a scanning
motion and the charger buttons will be
disabled. The EZ-Peak Live App will indicate
that a battery without Traxxas iD is connected
to the charger. The app must be used to select
LiPo Only
the charge settings.
2. Use the EZ-Peak Live App to select
the battery type, charging mode,
battery capacity, and charge rate.
Cycle Complete
(solid)
WARNING: DO NOT attempt to charge LiPo batteries with missing or damaged balance connectors. If
you fail to plug in the balance connector, or attempt to charge a LiPo battery with a damaged or missing
balance connector, you create the risk of accidentally selecting to charge a LiPo battery in NiMH mode,
resulting in fire and possible injury to yourself and others. Always make sure to select the battery type that
matches the connected battery. If you do not understand what this warning means, contact Traxxas for
more information.
Once the app sends these charge
settings to the charger, the Start button
will blink green.
Note:
If the LiPo battery type is selected,
a balance plug connection is required
by the charger and the EZ-Peak Live
App before displaying the LiPo charging
options. Once the charger detects a
balance plug connection, the EZ-Peak
Live App will display the charging
options and you can select your
preferred charging mode:
or Storage Charge
. If the LiPo and NiMH
Balance, Fast,
LEDs alternately blink, then the balance
connector is either disconnected or
damaged. Do not attempt to charge
this LiPo battery.
Page 4

3. Charging
Press and hold the Start button for
2 seconds. The charger will play a
tone, indicating that charging has
started. Press once to stop. The
charger will play a tone, indicating
that charging has been canceled.
The charge progress LEDs will
light as the battery charges.
Charge Cycle Progress
Charging
(flashing)
4. Charge cycle complete
The charger will play a complete tone, followed by a beep to indicate
charging is complete.
Cycle Complete
(solid)
Charger Error Codes
If the charger detects an error during the charge process, the charge status LEDs will ash an error code.
Error
Code
Explanation
The detected battery
type does not match the
charger conguration.
The battery or cell voltage
is too high or too low to
The charge cycle
timed out without
reaching the target
battery voltage.
The Traxxas battery iD
is detected but is not
readable by the charger
or the charger detected a
potential battery iD error.
The internal charger
temperature is too high.
charge safely.
a. Press the Battery iD Start/Stop button to return to
charger conguration.
b. Verify that the battery matches the selected type (LiPo
or NiMH).
c. Verify that the balance connector is plugged into the
charger (if charging a non-iD LiPo battery) or fully
plugged into the charger (if charging an iD LiPo battery).
d. Inspect the battery for any signs of damage.
a. Verify that the balance connector is plugged into the
charger (if charging a non-iD LiPo battery).
b. Disconnect the battery and check its condition.
Ensure it is within safe voltage levels.
c. Use the EZ-Peak Live App to verify charge settings.
Disconnect the battery and check its condition.
Contact Traxxas Customer Support.
Power o the charger and allow it to cool before
attempting to charge the battery again.
Solution
Updating Firmware
Your EZ-Peak Live charger has the ability to receive firmware updates that can add new features and
capabilities. Firmware updates are performed via the EZ-Peak Live App. Visit Traxxas.com for the latest
firmware updates and instructions for how to install them on your charger.
WARNING! CAUTION! DANGER!
FIRE HAZARD! CHARGING AND DISCHARGING BATTERIES HAS THE POTENTIAL FOR FIRE,
EXPLOSION, SERIOUS INJURY, AND PROPERTY DAMAGE IF NOT PERFORMED PER THE
WARNINGS, AND PRECAUTIONS. NEVER ALLOW CHILDREN UNDER THE AGE OF 14 TO CHARGE OR
USE LIPO BATTERIES WITHOUT THE SUPERVISION OF A RESPONSIBLE, KNOWLEDGEABLE ADULT.
Important warnings for users of Lithium Polymer (LiPo) batteries
Lithium Polymer (LiPo) batteries are significantly more volatile than other rechargeable batteries.
INSTRUCTIONS . BEFORE USE, READ AND FOLLOW ALL MANUFACTURER’S INSTRUCTIONS,
ONLY use a Lithium Polymer (LiPo) balance charger with a balance adapter port to charge LiPo batteries. Never use
NiMH or NiCD-type chargers or charge modes to charge LiPo batteries.
of a NiMH or NiCD charger or charge mode will damage the batteries and may cause fire and personal injury.
Never charge LiPo battery packs in series or parallel. Charging packs in series or parallel may result in improper charger
cell recognition and an improper charging rate that may lead to overcharging, cell imbalance, cell damage, and fire.
• ALWAYS inspect your LiPo batteries carefully before charging. Look for any loose leads or connectors, damaged wire
insulation, damaged cell packaging, impact damage, fluid leaks, swelling (a sign of internal damage), cell deformity,
missing labels, or any other damage or irregularity. If any of the above conditions are observed, do not charge or use the
battery pack. Follow the disposal instructions included with your battery to properly and safely dispose of the battery.
• Do not store or charge LiPo batteries with or around other batteries or battery packs of any type, including other LiPos.
• Store and transport your LiPo batteries in a cool dry place. Do not store in direct sunlight. Do not allow the storage
temperature to exceed 140°F or 60°C or the cells may be damaged and create a fire risk.
• Do NOT disassemble LiPo batteries or cells.
• Do NOT attempt to build your own LiPo battery pack from loose cells.
• ALWAYS proceed with caution and use good common sense at all times.
DO NOT charge with a NiMH-only charger.
The use
TRAXXAS.com
Traxxas, 6250 Traxxas Way, McKinney, TX 75070,
Phone: 1-888-TRAXXAS (Toll-free, US only) or 972-549-3000, Fax: 972-549-3011, e-mail: support@Traxxas.com
Warranty Information
Traxxas electronic components are warranted to be free from defects in materials and workmanship for
a period of 30 days from the date of purchase.
Limitations: Any and all warranty coverage does not cover replacement of parts and components
damaged by abuse, neglect, improper or unreasonable use, crash damage, water or excessive
moisture, chemical damage, improper or infrequent maintenance, accident, unauthorized alteration or
modification or items that are considered consumable. Traxxas will not pay for the cost of shipping or
transportation of a defective component to us. This warranty is limited to the charger only and does not
cover batteries, vehicles and other accessories used in conjunction with the charger.
Traxxas Lifetime Electronics Warranty
After the expiration date of the warranty period, Traxxas will repair electronic components for a
flat rate. Please visit Traxxas.com/support for a current schedule of warranty costs and fees. The
covered repairs are limited to non-mechanical components that have NOT been subjected to
abuse, misuse, or neglect. Products damaged by intentional abuse, misuse, or neglect may be
subject to additional charges. Traxxas liability, in no case, shall be greater than the actual purchase
price of this product. For replacement, product must be returned in brand new condition, with
packaging and itemized sales receipt.
Charging and handling precautions for all battery types:
• ALWAYS proceed with caution and use good common sense at all times.
• Charge only NiMH packs or 2S–4S LiPo battery packs.
• This appliance is not intended for use by persons (including children) with reduced physical, sensory or mental
capabilities, or lack of experience and knowledge, unless they have been given supervision or instruction concerning
use of the appliance by a person responsible for their safety. Children require adult supervision while using this charger.
• DO NOT let any exposed battery contacts or wires touch each other. This will cause the battery to short circuit and
create the risk of fire.
• While charging, ALWAYS place the battery in a fire retardant/fire proof container and on a non-flammable surface
such as concrete.
• DO NOT operate the charger inside of an automobile.
• NEVER charge batteries on wood, cloth, carpet or on any other flammable material.
• ALWAYS charge batteries in a well-ventilated area.
• REMOVE flammable items and combustible materials from the charging area.
• DO NOT operate the charger in a cluttered space, or place objects on top of the charger or battery.
• If any battery or battery cell is damaged in any way, do NOT charge, discharge, or use the battery.
• Keep a Class D fire extinguisher nearby in case of fire.
• BEFORE you charge, ALWAYS confirm that the charger settings exactly match the type (chemistry), specification,
and configuration of the battery to be charged.
• DO NOT exceed the battery manufacturer’s maximum recommended charge rate.
• DO NOT disassemble, crush, short circuit, or expose the batteries or cells to flame or any other source of ignition.
• If a battery gets hot to the touch during the charging process, disconnect the battery from the charger and discontinue
charging immediately.
• DO NOT leave the charger and battery unattended while charging, discharging, or any time that the charger is
ON with a battery connected. If there are any signs of a malfunction or in the event of an emergency, unplug the
charger from the power source and disconnect the battery from the charger.
• ALWAYS unplug the charger and disconnect the battery when not in use.
• Never connect more than one battery at a time to the charger.
• DO NOT disassemble the charger.
• REMOVE the battery from your model or device before charging.
• DO NOT expose the charger to water or moisture.
• ALWAYS store battery packs safely out of the reach of children and pets.
• DO NOT charge batteries under ANY of the following conditions:
- Batteries that are hot to the touch.
- Batteries that are not expressly stated by the manufacture to be suitable to accept the power output (voltage
and amperage) the charger delivers during the charging process.
- Batteries that are damaged or defective in any way. Examples of damage or defec ts include, but are not limited
to, batteries with dented cells, damaged or frayed wires, loose connections, fluid leaks, corrosion, plugged vents,
swelling, cell deformity, impac t damage, missing labels, melted components, or any other signs of damage.
- Battery packs that have been altered from original manufacturer configuration.
- Non-rechargeable batteries (explosion hazard).
Apple, the Apple logo, iPhone, iPad, iPod touch, and iTunes are trademarks of Apple Inc., registered in the U.S. and other
countries. App Store is a service mark of Apple Inc. Android and Google Play are trademarks of Google Inc.
The Bluetooth word mark and logos are registered trademarks owned by Bluetooth SIG, Inc., and any use of such marks
by Traxxas is under license. Other trademarks and trade names are those of their respective owners.
Page 5

FCC Statement
Changes or modifications not expressly approved by the party responsible for compliance could void the user's authority to
operate the equipment.
This equipment has been tested and found to comply with the limits for a Class B digital device, pursuant to Part 15 of the FCC
Rules. These limits are designed to provide reasonable protection against harmful interference in a residential installation.
This equipment generates uses and can radiate radio frequency energy and, if not installed and used in accordance with the
instructions, may cause harmful interference to radio communications. However, there is no guarantee that interference will
not occur in a particular installation. If this equipment does cause harmful interference to radio or television reception, which
can be determined by turning the equipment off and on, the user is encouraged to try to correct the interference by one or
more of the following measures:
-- Reorient or relocate the receiving antenna.
-- Increase the separation between the equipment and receiver.
-- Connect the equipment into an outlet on a circuit different from that to which the receiver is connected.
-- Consult the dealer or an experienced radio/TV technician for help
This device complies with part 15 of the FCC rules. Operation is subject to the following two conditions (1)this device may not
cause harmful interference, and (2) this device must accept any interference received, including interference that may cause
undesired operation
This equipment should be installed and operated with the minimum distance of 20cm.
 Loading...