

Page 1

owner’s manual
manuel du propriétaire
MODELS / MODÈLES 6507R, 6509R
Visite la página TRAXXAS.com/manuals para
descargar el Manual del usuario en su idioma.
Auf TRAXXAS.com/manuals können Sie eine
Bedienungsanleitung in Ihrer Sprache downloaden.
Page 2
WARRANTY AND PRECAUTIONS
3
TRANSMITTER
AND RECEIVER
4 GETTING STARTED
Basic Adjustments ........................4
Battery Installation .......................4
Model Profiles ................................5
6 USING THE
RADIO SYSTEM
Range-Testing ................................6
Binding Instructions .....................7
Traxxas Stability Management ..7
8 ADVANCED
TUNING GUIDE
Available Tuning Adjustments ...8
Traxxas Link Wireless Module ..11
Transmitter LED Codes ...............13
Traxxas Link Model Memory .....14
15 MENU TREE5
Entire contents ©2016 Traxxas.
Other brand names and marks are the
property of their respective holders
and are used only for purposes of
identification. No part of this manual
may be reproduced or distributed in
print or electronic media without the
express written permission of Traxxas.
Specifications are subject to change
without notice.
2 • TQi RADIO SYSTEM
Important Radio System Precautions
• For maximum range, always point the front of the transmitter toward the model.
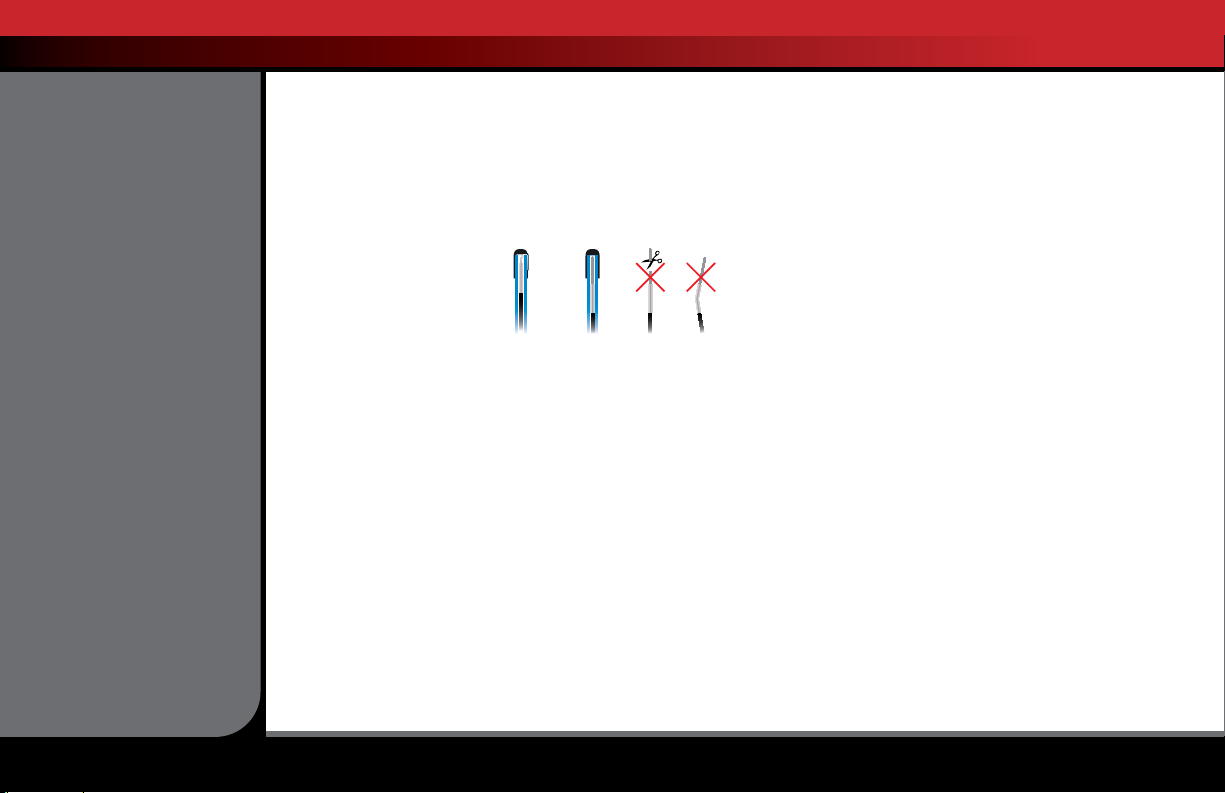
• Do not kink the receiver’s antenna wire. Kinks in the antenna wire will reduce range.
• DO NOT CUT any part of the receiver’s antenna wire. Cutting the antenna will reduce
range.
• Extend the antenna wire in the model as far as possible for maximum range. It is not
necessary to extend the antenna wire out of the body, but wrapping or coiling the
antenna wire should be avoided.
• Do not allow the antenna wire to extend outside the body without the protection of
an antenna tube, or the antenna wire may get cut or damaged, reducing range. It is
recommended to keep the wire inside the body (in the antenna tube) to prevent the
chance of damage.
To prevent loss of radio range do not kink
•
or cut the black wire, do not bend or cut
the metal tip, and do not cut the white
wire at the end of the metal tip.
Warranty Information
Traxxas warrants your Traxxas electronic
components to be free from defects in materials
or workmanship for a period of thirty (30) days
from the date of purchase. Before returning any product for warranty service, please contact our
service department at 1-888-TRAXXAS (U.S. residents only) to discuss the problem you are having
with the product. After contacting Traxxas, send the defective unit along with your proof of purchase
indicating the date purchased, your return address, e-mail, a daytime phone number, and a brief
description of the problem to:
Traxxas, 6200 Traxxas Way, McKinney, Texas 75070
Phone: 972-549-3000 Internet: Traxxas.com E-mail: support@Traxxas.com
Detailed Limitations for Electronic Components:
• Allowing water, moisture, or other foreign material to enter the component or get onto the PC board.
• Exceeding the maximum input voltage of the electronic component.
• Reverse voltage application.
• Incorrect installation or wiring.
• Components worn from use.
• Splices to the input or switch harnesses.
• Disassembling the case.
• Excessive force when adjusting, pressing, or turning any of the controls.
• Tampering with the internal electronics.
• Incorrect wiring of an FET servo.
• Allowing exposed wiring to short circuit.
• Any damage caused by crash, flooding, or act of God.
Limitations
Any and all warranty coverage does not cover replacement of parts and components damaged by
abuse, neglect, improper or unreasonable use, crash damage, water or excessive moisture, chemical
damage, improper or infrequent maintenance, accident, unauthorized alteration or modification, or
1/16
Models
All Other
Traxxas Models
No No
items that are considered consumable. Traxxas will not pay for the cost of shipping or transportation
of a defective component from you to us.
Limitations of Liability
Traxxas makes no other warranties expressed or implied. Traxxas shall not be liable for any special,
indirect, incidental, or consequential damages arising out of the assembly, installation, or use of
their products or any accessory or chemical required to use their products. By the act of operating/
using the product, the user accepts all resulting liability. In no case shall Traxxas’ liability exceed the
actual purchase price paid for the product. Traxxas reserves the right to modify warranty provisions
without notice. All warranty claims will be handled directly by Traxxas. The Traxxas warranty gives
the customer specific legal rights and possibly other rights that vary from state to state. All dollar
amounts stated are in United States dollars. The term “lifetime” shall refer to the product’s production
life at Traxxas. Traxxas is not obligated to provide upgraded products at a reduced rate when a
previous product’s production cycle has ended.
Traxxas encourages you to register your model online at Traxxas.com/register.
Traxxas Lifetime Electronics Warranty:
After the expiration date of the free warranty period, Traxxas will repair electronic components for
a flat rate. The electronic products covered by this extended service plan include electronic speed
controls, transmitters, receivers, servos, and battery chargers. Motors, batteries, and mechanical
speed controls are not covered. The covered repairs are limited to non-mechanical components that
have NOT been subjected to abuse, misuse, or neglect. Products damaged by intentional abuse,
misuse, modification, or neglect, may be subject to additional charges. Visit Traxxas.com or call
1-888-TRAXXAS (1-888-872-9927) for details on extended warranty service and rates.
FCC Compliance
This device contains a module that complies with the limits for a Class B digital device as described
in part 15 of the FCC rules. Operation is subject to the following two conditions: (1) this device may
not cause harmful interference, and (2) this device must accept any interference received, including
interference that may cause undesired operation.
The limits for a Class B digital device are designed to provide reasonable protection against harmful
interference in residential settings. This product generates, uses and can radiate radio frequency
energy, and, if not operated in accordance with the instructions, may cause harmful interference to
radio communications. The user is cautioned that changes or modifications not expressly approved
by the party responsible for compliance could void the user’s authority to operate the equipment.
Canada, Industry Canada (IC)
This Class B digital apparatus complies with Canadian ICES-003 and RSS-210. This device complies
with Industry Canada license exempt RSS standard(s). Operation is subject to the following
two conditions: (1) this device may not cause interference, and (2) this device must accept any
interference, including interference that may cause undesired operation of the device.
Radio Frequency (RF) Exposure Statement
For body-worn operation, this device has been tested and meets FCC and Industry Canada RF
exposure guidelines when used with an accessory that contains no metal and that positions the
device a minimum of 5mm from the body. Use of other accessories may not ensure compliance with
RF exposure guidelines. To comply with the RF exposure compliance requirements, this device and its
antenna must not be co-located or operated in conjuction with any other antenna or transmitter.
Page 3

TRANSMITTER AND RECEIVER
#6507R - 4-channel with Traxxas Link Wireless Module
Throttle Neutral Adjust
Set Button
Menu Button
Red/Green
Status LED
Steering
Trim
Multi-Function
Knob
Rocker Switch
(Channel 3)
Model 6507R only
Power Switch
#6507R Transmitter contains FCC ID: XVE-TRX1018, IC: 8668A-TRX1018 Wireless Module
Battery Compartment
3-Position Switch (Channel 4)
Model 6507R only
Steering Wheel
Throttle Trigger
Traxxas Link Wireless Module
Model 6507R only
#6509R - 2-channel, Traxxas Link Enabled
T
U
R
N
R
I
G
H
T
T
U
R
N
L
E
F
T
Neutral
Brake/Reverse
Forward
#6533 - TQi Receiver
Sensor Expansion
Port**
V/T - Voltage/Temp Sensor Port*
RPM - RPM Sensor Port*
Link Button
LED
*Accessory sensor ports for use with standard voltage/temperature and RPM telemetry sensors.
**Accessory sensor expansion port for use with the Telemetry Expander Module (see Traxxas.com for more information).
TQi RADIO SYSTEM • 3
Page 4
GETTING STARTED
Traxxas Link Wireless Module and Traxxas Link App
A Traxxas TQi transmitter with the Traxxas Link™ Wireless Module
installed is required to set up Traxxas Stability Management (TSM) for your
specific vehicle model using the Traxxas Link App. The Traxxas Link Wireless
Module (part #6511) is included with the #6507R TQi transmitter (available
separately for easy installation in the #6509R TQi transmitter). The Traxxas
Link App is available in the Apple App Store℠ or on Google Play™.
If you do not have the Traxxas Link Wireless module installed, then you will
not be able to use the Traxxas Link App to access the specific software for
your model. TSM will function, but it will not be optimized for your model
and you may experience some unexpected behavior from the vehicle. If you
do see undesirable effects, turn the multi-function knob counterclockwise
to reduce TSM’s assistance until you are satisfied with the performance or
turn TSM completely off (see page 7 for additional information).
TQi Radio System Basic Adjustments
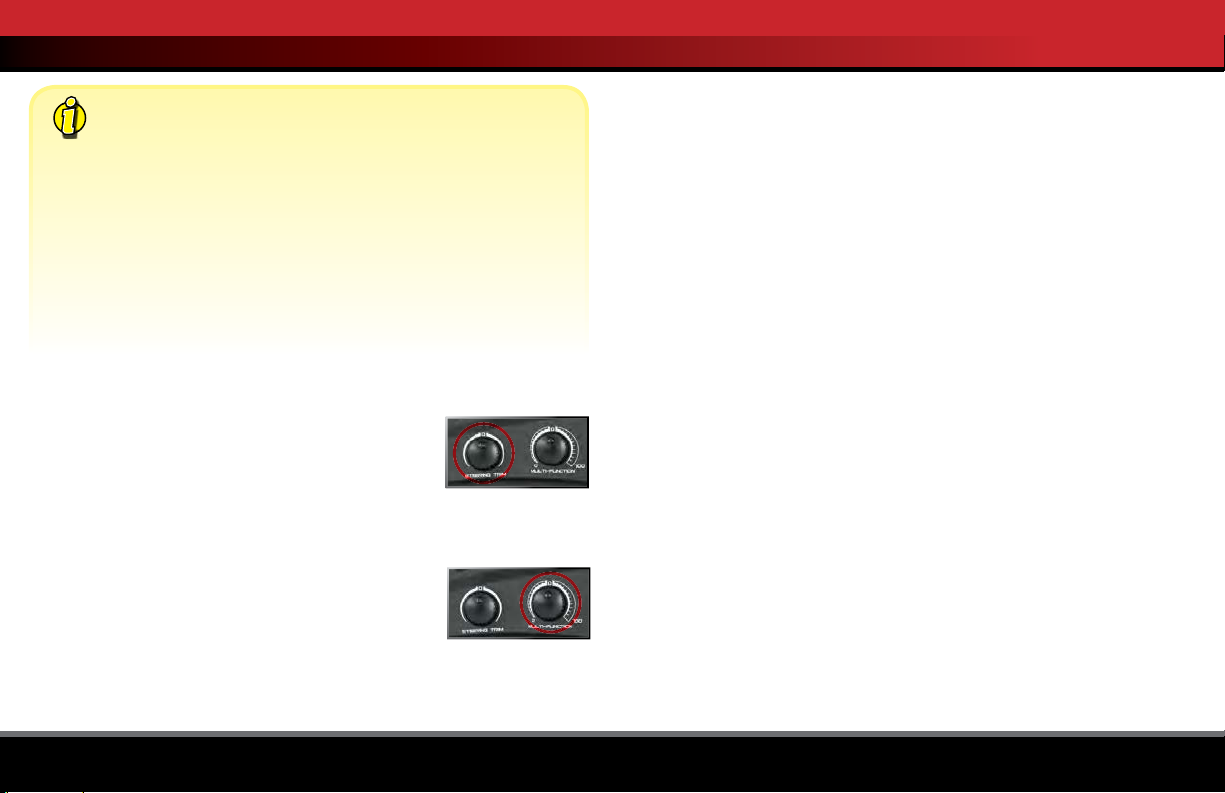
Steering Trim
The electronic steering trim located on the face of
the transmitter adjusts the neutral (center) point of
the steering channel.
Note: Traxxas Stability Management (TSM) must be completely turned
off while adjusting steering trim. See page 7 for TSM adjustments.
Multi-Function Knob
The Multi-Function knob can be programmed to
control a variety of functions. From the factory,
the Multi-Function knob controls Traxxas Stability
Management (TSM). For more detail on TSM, refer to page 7.
Throttle Neutral Adjustment
The throttle neutral adjustment is located on the transmitter face and
controls the forward/reverse travel of the throttle trigger. Change the
adjustment by pressing the button and sliding it to the desired position.
There are two settings available:
50/50: Allows equal travel for both acceleration and reverse.
70/30: Allows more throttle travel (70%) and less reverse travel (30%).
We strongly recommend to leave this control in its factory location until
you become familiar with all the adjustments and capabilities of your
model.
Note: 50/50 is the default factory setting and the required setting for
Traxxas nitro models. To change the throttle neutral adjust position for
an electric model, turn the transmitter off before adjusting the neutral
position. You will need to reprogram your electronic speed control to
recognize the 70/30 setting. See your speed control’s instructions.
Receiver Installation
For best performance, it is recommended that the receiver be installed in the
same orientation as the original receiver (with the label facing upward).
Refer to the vehicle owner’s manual for additional information, wiring
diagrams, and detailed instructions on maintaining a watertight seal.
Use double-sided adhesive foam tape to install the receiver into the
receiver box. Once installed, plug the wires into the receiver.
4 • TQi RADIO SYSTEM
Page 5
GETTING STARTED
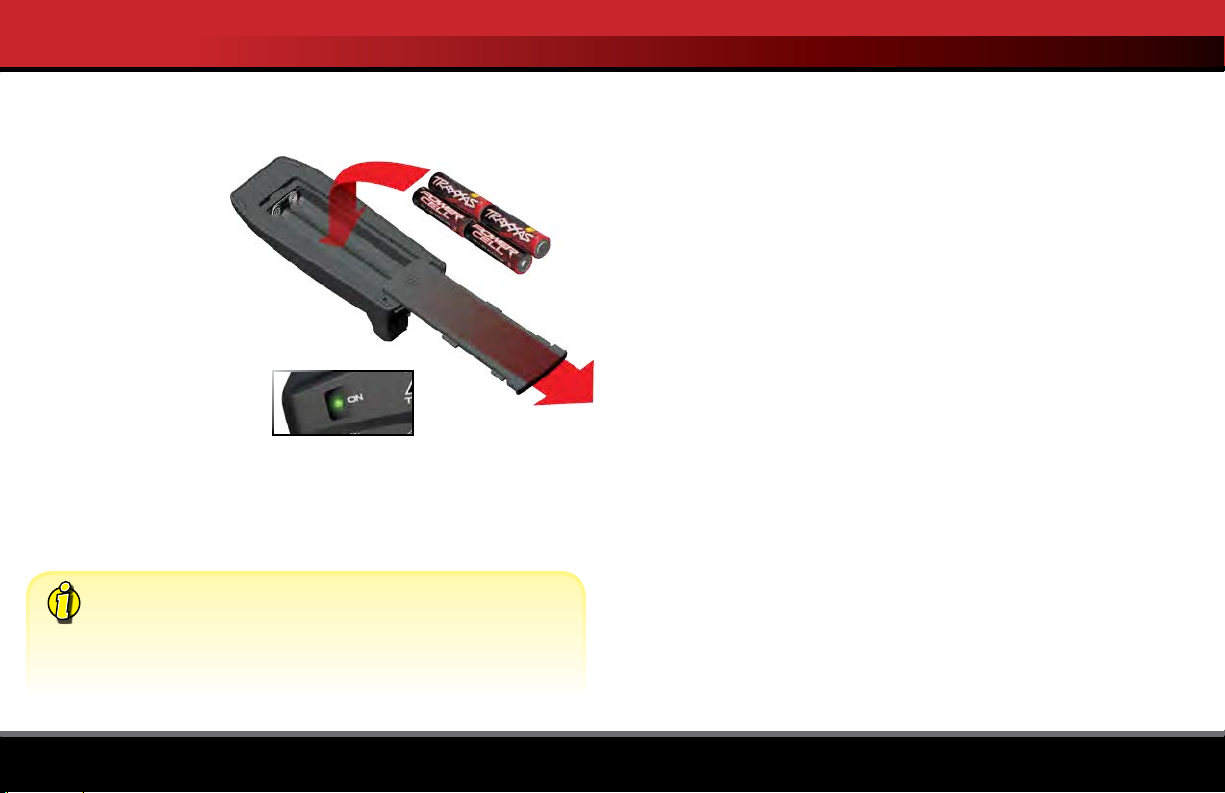
Installing Transmitter Batteries
Your TQi transmitter uses 4 AA batteries. The battery compartment is
located in the base of the transmitter.
1. Remove the battery
compartment door by
pressing the tab and
sliding the door open.
2. Install the batteries
in the correct
orientation as
indicated in the battery
compartment.
3. Reinstall the battery door
and snap it closed.
4. Turn on the transmitter
and check the status LED
for a solid green light.
If the status LED flashes red, the transmitter batteries may be weak,
discharged or possibly installed incorrectly. Replace with new or
freshly charged batteries. The power indicator light does not indicate
the charge level of the battery pack installed in the model. Refer to
the Troubleshooting section on page 13 for more information on the
transmitter status LED codes.
Use the Right Batteries
Your transmitter uses AA batteries. Use new alkaline batteries.
Do not use rechargeable AA cells to power the TQi transmitter, as they
will not provide sufficient voltage for optimum transmitter performance.
Caution: Discontinue running your model at the first sign of weak
batteries (flashing red light on the transmitter) to avoid losing control.
Selecting Your Model Profile
Home screen (see page 11 for additional information).
If you do not have the Traxxas Link Wireless Module installed, then you will
not be able to use the Traxxas Link App to access the specic prole for your
model and the servo direction will need to be set manually.
Follow the
instructions on page 15 to change these setting(s) to suit your model.
Using the Traxxas TQi Radio System with non-Traxxas Models
The TQi radio system can be used with all popular servos in any hobbygrade RC vehicle. Follow the instructions on page 15 to change the servo
setting(s) to suit your model.
TQi RADIO SYSTEM • 5
Page 6

USING THE RADIO SYSTEM
Before installing the TQi radio system in your model, make certain
the steering trim knob is centered. After you have installed and
bound the radio system, confirm the steering servo and throttle servo
(if installed) operate properly: turning the steering wheel right makes
the front wheels turn right (and vice-versa), and pulling the trigger
to the grip opens the throttle of your nitro engine. If either control
operates “backwards,” follow the menu tree on page 15 or use the
Traxxas Link App to reverse the servo’s operation.
After confirming correct servo operation, turn off TSM (see page 7) and
use the TQi’s steering trim knob to center your model’s front wheels so
it drives straight with the steering wheel at its neutral position; then,
return the multi-function knob to the desired TSM setting.
If there is not enough adjustment to achieve this with the steering trim
knob, reset the steering trim to its center position, then remove and
reinstall the servo’s steering horn to center the steering system as close
as possible. The steering trim knob can now be used to make the final
adjustments.
Repeat this process for the throttle servo. To access throttle trim, follow
the steps in the menu tree on page 15.
If your model is equipped with an electronic speed control, it will
have to be calibrated to the TQi radio system. Follow the instructions
included with your vehicle or your speed control to calibrate it properly.
Range-Testing the Radio System
Before each running session with your model, you should range-test
your radio system to ensure that it operates properly.
1. Turn on the radio system and check its operation as described in the
previous section.
2. Have a friend hold the model. Make sure hands and clothing are
clear of the wheels and other moving parts on the model.
3. Walk away from the model with the transmitter until you reach the
farthest distance you plan to operate the model.
4. Operate the controls on the transmitter once again to be sure that
the model responds correctly.
5. D o not attempt to operate the model if there is any problem with
the radio system or any external interference with your radio signal
at your location.
Higher Speeds Require Greater Distance
The faster you drive your model, the more quickly it will near the limit
of radio range. At 60mph, a model can cover 88 feet every second! It’s
a thrill, but use caution to keep your model in range. If you want to see
your model achieve its maximum speed, it is best to position yourself
in the middle of the model’s running area, not the far end, so you drive
the model towards and past your position. In addition to maximizing
the radio’s range, this technique will keep your model closer to you,
making it easier to see and control.
No matter how fast or far you drive your model, always leave
adequate space between you, the model, and others. Never drive
directly toward yourself or others.
6 • TQi RADIO SYSTEM
Page 7
USING THE RADIO SYSTEM
TQi Binding Instructions
For proper operation, the transmitter and receiver must be
electronically ‘bound.’ This has been done for you at the factory.
Should you ever need to re-bind the system or bind to an additional
transmitter or receiver, follow these instructions. Note: the receiver
must be connected to a 4.8-6.0v (nominal) power source for binding
and the transmitter and receiver must be within 5 feet of each other.
1. Press and hold the transmitter’s SET button as you switch the
transmitter on. The transmitter’s LED will flash red slowly. Release the
SET button.
2. Press and hold the receiver’s LINK button as you switch the model
on. Release the LINK button.
3. When the transmitter’s and receiver’s LEDs turn solid green, the
system is bound and ready for use. Confirm that the steering and
throttle operate properly before driving your model.
TRAXXAS STABILITY MANAGEMENT (TSM)
Your radio system is equipped with
a new feature, Traxxas Stability
Management or TSM. TSM allows
you to experience all the speed and
acceleration that was engineered
into your Traxxas model by helping you to maintain control of the
vehicle in low-traction situations. TSM helps provide straight ahead
full-throttle acceleration on slippery surfaces, without fishtailing,
spinouts, or loss of control. TSM also dramatically improves braking
control. High speed cornering and control is also made possible as TSM
makes corrections for you, without intruding on your fun, or creating
unexpected side effects.
The Multi-Function knob on the TQi
transmitter has been programmed
to control TSM. The recommended
(default) settin g for TSM is to rotate
Recommended setting
the knob to the 12:00 position (the
zero mark on the dial).
Turn the knob clockwise to
increase assistance; turn the knob
counterclockwise to decrease
assistance. Turn the knob
counterclockwise to its stop to
turn TSM completely off.
Note: TSM is deactivated
automatically when driving or
Decrease
assistance
Increase
assistance
braking in reverse.
When driving on surfaces with some
TSM off
traction, decrease the TSM setting
to allow the vehicle to feel more
“loose” for power sliding, drifting, and so on. On surfaces with very
little traction (loose dirt, smooth concrete, ice/snow), increase TSM to
maximize acceleration and control.
Drive with TSM on and off to test how it is making your control of the
vehicle easier and more precise. For more information, visit Traxxas.
com/tsm.
Note: TSM must be completely turned off while adjusting steering
trim.
TQi RADIO SYSTEM • 7
Page 8

ADVANCED TUNING GUIDE
Available Tuning Adjustments
All the features described below may also be accessed using the menu
and set buttons on the transmitter and observing signals from the LED. An
explanation of the menu structure follows on page 15. The following items
can be adjusted most easily using your mobile device with the Traxxas Link
Wireless Module and the Traxxas Link App (see page 11).
Your Traxxas transmitter has a programmable Multi-Function knob that
can be set to control various advanced transmitter functions (set to
Traxxas Stability Management (TSM) by default, see page 7). Experiment
with the settings and features to see if they can improve your driving
experience.
Steering Sensitivity (Exponential)
The Multi-Function knob on the TQi transmitter can be set to control
Steering Sensitivity (also known as exponential). The standard setting
for Steering Sensitivity is “normal (zero exponential),” with the dial full
left in its range of travel. This setting provides linear servo response:
the steering servo’s movement will correspond exactly with the input
from the transmitter’s steering wheel. Turning the knob clockwise
from center will result in “negative exponential” and decrease steering
sensitivity by making the servo less responsive near neutral, with
increasing sensitivity as the servo nears the limits of its travel range.
The farther you turn the knob, the more pronounced the change in
steering servo movement will be. The term “exponential” comes from
this effect; the servo’s travel changes exponentially relative to the
input from the steering wheel. The exponential effect is indicated as
a percentage—the greater the percentage, the greater the effect. The
illustrations below show how this works.
Normal Steering Sensitivity (0%
exponential):
In this illustration, the steering servo’s
travel (and with it, the steering motion
of the model’s front wheels) corresponds
precisely with the steering wheel. The
ranges are exaggerated for illustrative
purposes.
Decreased Steering Sensitivity (Negative
Exponential):
By turning the Multi-Function knob
clockwise, the steering sensitivity of the
model will be decreased. Note that a
relatively large amount of steering wheel
travel results in a smaller amount of servo
travel. The farther you turn the knob, the
more pronounced the effect becomes.
Decreased steering sensitivity may be
helpful when driving on low-traction
surfaces, when driving at high speed, or on tracks that favor sweeping turns where gentle
steering inputs are required. The ranges are exaggerated for illustrative purposes.
Turning Range
at Transmitter
Effective Turning
Range on Model
Throttle Sensitivity (Throttle Exponential)
The Multi-Function knob can be set to control Throttle Sensitivity.
Throttle Sensitivity works the same way as Steering Sensitivity, but
applies the effect to the throttle channel. Only forward throttle is
affected; brake/reverse travel remains linear regardless of the Throttle
Sensitivity setting.
8 • TQi RADIO SYSTEM
Page 9
ADVANCED TUNING GUIDE
Steering Percentage (Dual Rate)
The Multi-Function knob can be set to control the amount (percentage)
of servo travel applied to steering. Turning the Multi-Function knob
fully clockwise will deliver maximum steering throw; turning the
knob counterclockwise reduces steering throw (note: turning the dial
counterclockwise to its stop will eliminate all servo travel). Be aware that
the steering End Point settings define the servo’s maximum steering
throw. If you set Steering Percentage to 100% (by turning the MultiFunction knob fully clockwise), the servo will travel all the way to its
selected end point, but not past it. Many racers set Steering Percentage
so they have only as much steering throw as they need for the track’s
tightest turn, thus making the model easier to drive throughout the rest
of the course. Reducing steering throw can also be useful in making a
model easier to control on high-traction surfaces, and limiting steering
output for oval racing where large amounts of steering travel are not
required.
Braking Percentage
The Multi-Function knob may also be set to control the amount of brake
travel applied by the servo in a nitro-powered model. Electric models do
not have a servo-operated brake, but the Braking Percentage function
still operates the same way in electric models. Turning the MultiFunction knob full clockwise will deliver maximum brake throw; turning
the knob counterclockwise reduces brake throw (Note: Turning the dial
counterclockwise to its stop will eliminate all brake action).
Throttle Trim
Setting the Multi-Function knob to serve as throttle trim will allow you
to adjust the throttle’s neutral position to prevent unwanted brake drag
or throttle application when the transmitter trigger is at neutral.
Note: Your transmitter is equipped with a Throttle Trim Seek mode to
prevent accidental runaways. See below for more information.
Throttle Trim Seek Mode
When the Multi-Function knob is set to throttle trim, the transmitter
remembers the throttle trim setting. If the throttle trim knob is moved from
the original setting while the transmitter is off, or while the transmitter was
used to control another model, the transmitter ignores the actual position of
the trim knob. This prevents the model from accidentally running away. The
LED on the face of the transmitter will rapidly blink green and the throttle trim
knob (Multi-Function knob) will not adjust the trim until it is moved back to its
original position saved in memory. To restore throttle trim control, simply turn
the Multi-Function knob either direction until the LED stops blinking.
Steering and Throttle End Points
The TQi transmitter allows you to choose the limit of the servo’s travel
range (or its “end point”) independently for left and right travel (on the
steering channel) and throttle/brake travel (on the throttle channel).
This allows you to fine-tune the servo settings to prevent binding
caused by the servo moving steering or throttle linkages (in the case
of a nitro model) farther than their mechanical limits. The end point
adjustment settings you select will represent what you wish to be the
servo’s maximum travel; the Steering Percentage or Braking Percentage
functions will not override the End Point settings.
TQi RADIO SYSTEM • 9
Page 10

ADVANCED TUNING GUIDE
Steering and Throttle Sub-Trim
The Sub-Trim function is used to precisely set the neutral point of the
steering or throttle servo in the event that simply setting the trim knob
to “zero” does not completely center the servo. When selected, Sub-Trim
allows finer adjustment to the servo output shaft’s position for precise
setting of the neutral point. Always set the Steering Trim knob to zero
before making final adjustment (if required) using Sub-Trim. If Throttle
Trim has been previously adjusted, the Throttle Trim will need to be
reprogrammed to “zero” before making final adjustment using Sub-Trim.
Setting Lock
Once you’ve adjusted all of these settings the way you like them, you
may want to disable the Multi-Function knob so none of your settings
can be changed. This is especially handy if you operate multiple vehicles
with a single transmitter via Traxxas Link
™
Model Memory.
Multiple Settings and the Multi-Function Knob
It is important to note that settings made with the Multi-Function
knob are “overlaid” on top of each other. For example, if you assign the
Multi-Function to adjust Steering Percentage and set it for 50%, then
reassign the knob to control Steering Sensitivity, the transmitter will
“remember” the Steering Percentage setting. Adjustments you make
to Steering Sensitivity will be applied to the 50% steering throw setting
you selected previously. Likewise, setting the Multi-Function knob to
“disabled” will prevent the knob from making further adjustments, but
the last setting of the Multi-Function knob will still apply.
Failsafe
Your Traxxas radio system is equipped with a built-in failsafe function
that returns the throttle to its last saved neutral position in the event of
signal loss. The LED on the transmitter and the receiver will rapidly flash red
to indicate the failsafe has been activated.
10 • TQi RADIO SYSTEM
Page 11

ADVANCED TUNING GUIDE
Traxxas Link Wireless Module
The #6507R TQi transmitter is equipped
with the Traxxas Link Wireless Module
(part #6511, available separately for easy
installation in the #6509R TQi transmitter).
This innovative accessory transforms your
iPhone®, iPad®, iPod touch®, or Android™
device into a powerful tuning tool that
equips your TQi with an intuitive, highdefinition, full-color graphical user interface.
Traxxas Link
The powerful Traxxas Link App (available in the Apple App Store℠
or on Google Play™) gives you complete control over the operation
and tuning of your Traxxas model with stunning visuals and absolute
precision. Install Traxxas Link telemetry sensors on the model, and
Traxxas Link displays real-time data such as speed, RPM, temperature,
and battery voltage.
Intuitive iPhone, iPad, iPod touch, and Android interface
Traxxas Link makes it easy to
learn, understand, and access
powerful tuning options.
Control Drive Effects settings
such as TSM assistance
percentage; steering and
throttle sensitivity; steering
percentage; braking strength;
and throttle trim by simply
touching and dragging the
Tap and slide to adjust TSM, Steering Sensitivity,
Throttle Trim, Braking Percent, and more!
sliders on the screen.
Real-Time Telemetry
With the installed telemetry
sensors, the Traxxas Link
dashboard comes to
life showing you speed,
battery voltage, RPM, and
temperature. Set threshold
warnings and log maximums,
minimums, or averages. Use
the recording function to
document your dashboard
The customizable Traxxas Link dashboard delivers
real-time RPM, speed, temperature, and voltage data.
view, with sound, so that you can keep your eyes on your driving and not
miss a single apex.
Manage up to 30 Models with Traxxas Link
The TQi radio system automatically keeps track of what vehicles it has
bound to and what settings were used for each--up to 30 models total!
Traxxas Link provides a visual interface to name the models, customize
their settings, attach profiles, and lock them into memory. Simply choose
a model and any previously bound transmitter, power them up, and start
having fun.
TQi RADIO SYSTEM • 11
Page 12

ADVANCED TUNING GUIDE
Pairing the TQi transmitter with the Traxxas Link Wireless Module
and the Traxxas Link App® for the first time:
1. Turn the transmitter switch on.
2.
Open the Traxxas Link App
on your mobile device. Touch
A
the Garage button, and then
touch the Wireless Module
button (A).
3.
Press the button on the Traxxas
Link Wireless Module. The blue
LED on the module will blink (B).
4. Within 10 seconds, touch the “Press here to search for Traxxas Link
Wireless Module” button on your mobile device (C).
B
C
5.
The Bluetooth®
D
icon in the status
bar will turn blue,
and the blue LED
on the module will
glow solid blue (D).
6. The Traxxas Link
Wireless Module
and the Traxxas Link App are now paired, and will automatically
connect when the transmitter is turned on and the app is running.
TRAXXAS LINK MODULE LED CODES
LED Color / Pattern Name Notes
Blue LED off Connecting mode
Slow blue
(0.5 sec on / 0.5 sec off)
Solid blue Connected
Pairing mode
Traxxas Link App is not running on
a paired device.
See above for information on pairing
the module with Traxxas Link App.
See page 3 for information on how
to use your transmitter controls.
12 • TQi RADIO SYSTEM
Page 13

ADVANCED TUNING GUIDE
TRANSMITTER LED CODES
LED Color / Pattern Name Notes
Solid green Normal Driving Mode
Slow red (0.5 sec on / 0.5 sec off) Binding See page 7 for more information on binding.
Flashing fast green (0.1 sec on / 0.15 sec off) Throttle Trim Seek Mode
Flashing medium red (0.25 sec on / 0.25 sec off) Low Battery Alarm Put new batteries in the transmitter. See page 4 for more information.
Flashing fast red (0.125 sec on / 0.125 sec off) Link Failure / Error
Programming Patterns
or
Counts out number (green or red), then pauses Current menu position See Menu Tree for more information.
x
Fast green 8 times Menu setting accepted (on SET)
8
Fast red 8 times Menu SET invalid User error such as trying to delete a locked model.
x
8
Turn the Multi-Function knob right or left until the LED stops flashing.
See page 9 for more information.
Transmitter and receiver are no longer bound. Turn the system off and then
back on to resume normal operation. Find source of the link failure (i.e., out of
range, low batteries, damaged antenna).
RECEIVER LED CODES
LED Color / Pattern Name Notes
Solid green Normal Driving Mode
Slow red (0.5 sec on / 0.5 sec off) Binding See page 7 for more information on binding.
Flashing fast red (0.125 sec on / 0.125 sec off) Fail-Safe / Low-Voltage Detect
Consistent Low-Voltage in the receiver triggers Fail-Safe so there is enough
power to center the throttle servo before it completely loses power.
TQi RADIO SYSTEM • 13
Page 14

ADVANCED TUNING GUIDE
Traxxas Link Model Memory
Traxxas Link Model Memory is an exclusive, patent-pending feature
of the TQi transmitter. Each time the transmitter is bound to a new
receiver, it saves that receiver in its memory along with all the settings
assigned to that receiver. When the transmitter and any bound receiver
are switched on, the transmitter automatically recalls the settings for
that receiver. There is no need to manually select your vehicle from a
list of model memory entries.
Model Lock
The Traxxas Link Model Memory feature can store up to 30 models
(receivers) in its memory. If you bind a thirty-first receiver, Traxxas Link
Model Memory will delete the “oldest” receiver from its memory (in
other words, the model you used the longest time ago will be deleted).
Activating Model Lock will lock the receiver in memory so it cannot
be deleted.
You may also bind multiple TQi transmitters to the same model making
it possible to pick up any transmitter and any previously bound model
in your collection and simply turn them on and drive. With Traxxas Link
Model Memory, there is no need to remember which transmitter goes
with which model, and there is never a need to select any model from
a list of model memory entries. The transmitter and receiver do it all for
you automatically.
To activate Model Lock:
1. Switch on the transmitter and receiver you wish to lock.
2. Press and hold MENU. Release when the status LED blinks green.
3. Press MENU three times. The status LED will blink green four
times repeatedly.
4. Press SET. The status LED will blink green in single-flash intervals.
5. Press SET once. The status LED will blink red once repeatedly.
6. Press MENU once, the LED will blink red twice repeatedly.
7. Press SET, the LED will blink rapidly green. The memory is now
locked. Press MENU and SET to return to driving mode.
Note: To unlock a memory, press SET twice at step 5. The LED will
blink rapidly green to indicate the model is unlocked. To unlock all
models, press MENU twice at step 6 and then press SET.
To delete a model:
At some point, you may wish to delete a model you no longer drive
from the memory.
1. Switch on the transmitter and receiver you wish to delete.
2. Press and hold MENU. Release when the status LED blinks green.
3. Press MENU three times. The status LED will blink green four
times repeatedly.
4. Press SET once. The status LED will blink green once repeatedly.
5. Press MENU once. The status LED will blink green twice repeatedly.
6. Press SET. The memory is now selected to be deleted.
7. Press SET to delete the model. Press and hold MENU to
return to driving mode.
14 • TQi RADIO SYSTEM
Page 15

MENU TREE
The menu tree below shows how to navigate through the
TQi transmitter’s various settings and functions. Press and
hold MENU to enter the menu tree, and use the following
commands to navigate through the menu and select options.
MENU: When you enter a menu, you always start at the top.
Press MENU to move down the menu tree. When you
reach the bottom of the tree, pressing MENU again will
return you to the top.
SET: Press SET to move across the menu tree and select
options. When an option is committed to the transmitter’s
memory, the status LED will rapidly blink green.
BACK: Press both MENU and SET to go back one level in the
menu tree.
EXIT: Press and hold MENU to exit programming. Your
selected options will be saved.
ECHO: Press and hold SET to activate the “echo” function. Echo
will “play back” your current position on the Menu Tree,
should you lose your place. For example: If your current
position is Steering Channel End Points, holding SET will
cause the LED to blink green twice, green once, and then
red three times. Echo will not alter your adjustments or
change your position in the programming sequence.
Below is an example of how to access a function in the menu
tree. In the example, the user is setting the Multi-Function knob
to be a Steering % (Dual-Rate) control.
To set the Multi-Function knob to control STEERING % (DUAL-RATE):
1. Switch the transmitter on.
2. Press and hold MENU until the green LED lights. It will blink in single intervals.
3. Press SET. The red LED will blink in single intervals to indicate Steering
Sensitivity
(Expo) has been selected.
4. Press MENU twice. The red LED will blink three times repeatedly to indicate
Steering % (Dual-Rate) has been selected.
5. Press SET to select. The green LED will blink 8 times fast to indicate
successful selection.
6. Press and hold MENU to return to driving mode.
Restoring Factory Defaults:
When programming your transmitter, you may feel the need to
start over with a clean slate. See Selecting Your Model Profile on
page 5 for instructions.
*Torque Control is a feature designed only for use with the power system in the Traxxas Funny Car Race Replica (Model #6907).
Enter Programming
Press and hold
MENU for 3 seconds
Multi-Function Knob
1
One Blink Green
Press
MENU
Channel Setup
2
Two Blinks Green
Press
MENU
Mode Selection
3
Three Blinks Green
Press
MENU
Traxxas-Link
4
Four Blinks Green
* 4-Channel transmitter only
Press
SET
Press
SET
MENU
Press
SET
Press
SET
Press MENU to move through options.
Press SET to select an option.
Steering Sensitivity (Expo)
1
One Blink Red
Throttle Sensitivity (Expo)
2
Two Blinks Red
Steering % (Dual Rate)
3
Three Blinks Red
Braking %
4
Four Blinks Red
Throttle Trim
5
Five Blinks Red
Knob Disabled
6
Six Blinks Red
Torque Control*
7
Seven Blinks Red
TSM
8
Eight Blinks Red
Steering (Channel 1)
1
One Blink Green
Throttle (Channel 2)
2
Two Blinks Green
Shift (Channel 3)*
3
Press
Three Blinks Green
Front T-Lock (Channel 4)*
4
Four Blinks Green
Rear T-Lock (Channel 5)*
5
Five Blinks Green
Press SET to select an option.
Electric
1
One Blink Red
Nitro
2
Two Blinks Red
Model Locking
1
One Blink Green
Press
MENU
Delete Model
2
Two Blinks Green
Note: The transmitter is “live” during programming
so you can test the settings real time without having
to exit the menu tree.
Press MENU to move through options.
Press SET to select an option.
Servo Reversing
1
One Blink Red
Sub-Trim
2
Two Blinks Red
End Points
3
Three Blinks Red
Turn left to desired end point and press set to save.
To reset max throw: Let go of controls and press SET.
Reset End Points
4
Press
SET
Press
SET
Press
SET
Press
SET
Press
SET
Four Blinks Red
Servo Reversing
1
One Blink Red
Sub-Trim
2
Two Blinks Red
End Points
3
Three Blinks Red
forward to desired end point and press set to save.
To reset max throw: Let go of controls and press SET.
Reset End Points
4
Four Blinks Red
Servo Reversing
1
One Blink Red
Unlock
1
One Blink Red
Lock
2
Two Blinks Red
Unlock All
3
Three Blinks Red
Confirm Deletion
1
One Blink Red
Press SET to reverse
servo direction.
Use knob to adjust
sub-trim. Press SET to save.
Use steering wheel to
adjust. Turn right to desired
end point, press set to save.
Press SET to restore factory
default end points.
Press SET to reverse
servo direction.
Use knob to adjust
sub-trim. Press SET to save.
Use trigger to adjust. Pull
back to desired end point,
press set to save. Push
Press SET to restore factory
default end points.
Press SET to reverse
servo direction.
Page 16

Set Multi-Function
knob for STEERING
SENSITIVITY (Expo)
Set Multi-Function
knob for THROTTLE
SENSITIVITY (Expo)
Set Multi-Function
knob for STEERING
DUAL RATE (%)
Set Multi-Function
knob for BRAKING
PERCENTAGE (%)
Set Multi-Function
knob for
THROTTLE TRIM
To DISABLE (Lock)
the Multi-Function
knob
To REVERSE
the direction of
STEERING servo
To set the SUB-TRIM
of the STEERING
servo
To set the END
POINTS of the
STEERING servo
To reset the END
POINTS of STEERING
servo to defaults
To REVERSE
the direction of
THROTTLE servo
To set the SUB-TRIM
of the THROTTLE
servo
To set the END
POINTS of the
THROTTLE servo
To reset the END
POINTS of THROTTLE
servo to defaults
To REVERSE the
direction of SHIFT
servo
Press/hold MENU
green LED blinks
Press/hold MENU
green LED blinks
Press/hold MENU
green LED blinks
Press/hold MENU
green LED blinks
Press/hold MENU
green LED blinks
Press/hold MENU
green LED blinks
Press/hold MENU
green LED blinks
Press/hold MENU
green LED blinks
Press/hold MENU
green LED blinks
Press/hold MENU
green LED blinks
Press/hold MENU
green LED blinks
Press/hold MENU
green LED blinks
Press/hold MENU
green LED blinks
Press/hold MENU
green LED blinks
Press/hold MENU
green LED blinks
Press SET
red LED blinks
Press SET
red LED blinks
Press SET
red LED blinks
Press SET
red LED blinks
Press SET
red LED blinks
Press SET
red LED blinks
x
2
Press MENU
green LED blinks (x2)
x
2
Press MENU
green LED blinks (x2)
x
2
Press MENU
green LED blinks (x2)
x
2
Press MENU
green LED blinks (x2)
x
2
Press MENU
green LED blinks (x2)
x
2
Press MENU
green LED blinks (x2)
x
2
Press MENU
green LED blinks (x2)
x
2
Press MENU
green LED blinks (x2)
x
2
Press MENU
green LED blinks (x2)
x
8
Press SET to confirm
green LED blinks (x8)
x
2
Press MENU to confirm
red LED blinks (x2)
x
3
Press MENU twice
red LED blinks (x3)
x
4
Press MENU 3 times
red LED blinks (x4)
x
5
Press MENU 4 times
red LED blinks (x5)
x
6
Press MENU 5 times
red LED blinks (x6)
Press SET
green LED blinks
Press SET
green LED blinks
Press SET
green LED blinks
Press SET
green LED blinks
Press SET
green LED blinks
Press SET
green LED blinks
Press SET
green LED blinks
Press SET
green LED blinks
Press SET
green LED blinks
Press/hold MENU
returns to driving mode
x
8
Press SET to select
green LED blinks (x8)
x
8
Press SET to select
green LED blinks (x8)
x
8
Press SET to select
green LED blinks (x8)
x
8
Press SET to select
green LED blinks (x8)
x
8
Press SET to lock
green LED blinks (x8)
Press SET
red LED blinks
Press SET
red LED blinks
Press SET
red LED blinks
Press SET
red LED blinks
x
2
Press MENU
green LED blinks (x2)
x
2
Press MENU
green LED blinks (x2)
x
2
Press MENU
green LED blinks (x2)
x
2
Press MENU
green LED blinks (x2)
x
3
Press MENU twice
green LED blinks (x3)
Press/hold MENU
returns to driving mode
Press/hold MENU
returns to driving mode
Press/hold MENU
returns to driving mode
Press/hold MENU
returns to driving mode
Press/hold MENU
returns to driving mode
x
Press SET to reverse servo
8
direction
x
2
Press MENU
red LED blinks (x2)
x
3
Press MENU twice
red LED blinks (x3)
x
4
Press MENU 3 times
red LED blinks (x4)
Press SET
red LED blinks
Press SET
red LED blinks
Press SET
red LED blinks
Press SET
red LED blinks
Press SET
red LED blinks
Adjust the Multi-Function
knob until the LED turns
solid green.
Press/hold MENU
returns to driving mode
Use Multi-Function knob
to set neutral
Turn steering wheel
to desired max left and
right travel
x
8
Press SET
to reset end points
x
Press SET to reverse servo
Press SET to reverse servo
8
direction
x
2
Press MENU
red LED blinks (x2)
x
3
Press MENU twice
red LED blinks (x3)
x
4
Press MENU 3 times
red LED blinks (x4)
x
8
direction
MENU TREE FORMULAS
To select functions and
make adjustments to the TQi
transmitter without referencing
the menu tree, turn your
transmitter on, find the function
in the left column you wish to
adjust, and simply follow the
corresponding steps.
x
8
Press SET
to save position
x
8
Press SET
to save each position
Press/hold MENU
returns to driving mode
Press/hold MENU
returns to driving mode
Use Multi-Function knob
to set neutral
Use throttle trigger to
set desired max throttle
or brake
x
8
Press SET
green LED blinks (x8)
Press/hold MENU
returns to driving mode
Press/hold MENU
returns to driving mode
Turn steering wheel
to test settings
x
8
Press SET
to save position
Press SET to save
Use trigger to test
Press/hold MENU
returns to driving mode
Always turn your
transmitter on first.
IF END POINTS
ARE OK:
Press/hold MENU
returns to driving mode
Press/hold MENU
returns to driving mode
IF END POINTS
ARE OK:
Press/hold MENU
returns to driving mode
1
IF END POINTS
NEED TO BE
CHANGED:
Press SET
and repeat steps 6-8
IF END POINTS
NEED TO BE
CHANGED:
Press SET
and repeat steps 7-9
Page 17

GARANTIE ET PRÉCAUTIONS
Mesures de sécurité importantes relatives au système radio
• Pour obtenir la portée maximale, orientez toujours l'avant du transmetteur vers le modèle.
• Ne nouez pas le fil d'antenne du récepteur. Tout nœud sur le fil d'antenne en diminue la portée.
• NE COUPEZ aucune partie du fil d'antenne du récepteur. Couper l'antenne en réduit la portée.
• Étendez le fil d'antenne du modèle aussi loin que possible pour obtenir la portée maximale.
Il n'est pas nécessaire d'étendre le fil d'antenne hors de la carrosserie, mais il faudrait éviter
d'emballer ou d'enrouler le fil d'antenne.
• N'étendez pas le fil d'antenne en dehors de la carrosserie sans le protéger d'un tube d'antenne,
autrement le fil peut être coupé ou endommagé, diminuant ainsi la portée de l'antenne. Nous
vous recommandons de garder le fil à l'intérieur de la carrosserie (dans le tube d'antenne) pour
éliminer le risque de dommages.
• Pour éviter la perte de la portée radio,
ne nouez ni ne coupez le fil noir, ne pliez
ni ne coupez la pointe métallique et ne
pliez ni ne coupez le fil blanc au bout de la
pointe métallique.
Informations sur la garantie
Le composant électronique de Traxxas est
garanti par Traxxas contre tout défaut de
matériaux et de fabrication pendant trente
(30) jours à partir de la date de l'achat. Avant de retourner le produit pour le service sous garantie,
veuillez communiquer avec notre service après-vente au +1-972-549-3000 pour discuter de ce
qui ne va pas avec ce produit. Après avoir contacté Traxxas, envoyez l'appareil défectueux avec
la preuve d'achat indiquant la date de l'achat, votre adresse, votre courriel, votre numéro de
téléphone de journée et une brève description du problème à :
Traxxas, 6200 Traxxas Way, McKinney, TX 75070
Téléphone : +1-972-549-3000 Internet : Traxxas.com Courriel : support@Traxxas.com
Limitations détaillées pour les composants électroniques :
• La pénétration de l'eau, de l'humidité, ou de tout autre matériel étranger dans le composant ou la
carte de circuit imprimé.
• Le dépassement de la tension d'entrée maximum du composant électronique.
• L'on applique une tension inverse.
• Installation incorrecte ou câblage incorrect.
• Les composants sont usés.
• Il y a des épissures à l'entrée ou aux commutateurs.
• Le boîtier a été démonté.
• L'utilisation d'une force excessive en ajustant, en serrant ou en tournant les commandes.
• Tripoter les composants électroniques internes.
• Le câblage incorrect d'une servo de transistor à effet de champ.
• Le court-circuitage du câblage exposé.
• Tout dommage provoqué par collision, inondation ou force majeure.
Limitations
Toute garantie ne couvre pas le remplacement des pièces et des composants endommagés par
mauvais traitement, négligence, utilisation incorrecte ou déraisonnable, collisions, inondation
ou humidité excessive, dégradations chimiques, entretien incorrect ou irrégulier, accident,
modifications non autorisées, ni des articles qui sont considérés consommables. Traxxas n'assume
pas les frais d'expédition ou de transport d'un composant défectueux de vos locaux aux nôtres.
1/16
Modèles
Tous les autres
modèles Traxxas
Non Non
Limitations de responsabilité
Traxxas
ne fait aucune autre garantie explicite ou implicite. Traxxas n'est pas responsable des
dommages spéciaux, indirects, fortuits ou accessoires résultant de l'assemblage, de l'installation
ou de l'utilisation de ses produits ou de tout accessoire ou produit chimique nécessaire pour
utiliser leurs produits. En mettant en marche ou en utilisant ce produit, l'utilisateur accepte toute
la responsabilité en découlant. La responsabilité de Traxxas n'excédera en aucun cas le prix réel
auquel le produit a été acheté. Traxxas se réserve le droit de modifier des dispositions de garantie
sans préavis. Toute réclamation au titre de la garantie est traitée directement par Traxxas. La
garantie de Traxxas donne au client des droits spécifiques et d'autres droits possibles en fonction
de l'État. Tous les montants indiqués sont en dollars américains. L'expression « à vie » se rapporte
au cycle de production du produit en question chez Traxxas. Traxxas n'a pas l'obligation d'offrir des
produits améliorés à un tarif réduit si le cycle de production d'un produit antérieur est terminé.
Traxxas vous encourage d’inscrire votre modèle en ligne à Traxxas.com/register.
Garantie à vie pour les composants électroniques de Traxxas :
Après la date d'expiration de la période de garantie, Traxxas réparera les composants électroniques
à un tarif forfaitaire. Les produits électroniques couverts par ce plan prolongé de service sont les
systèmes électroniques de contrôle de la vitesse, les transmetteurs, les récepteurs, les servos et
les chargeurs de piles. Les moteurs, les piles et les systèmes mécaniques de contrôle de la vitesse
ne sont pas couverts. Les réparations couvertes sont limitées aux composants non mécaniques
qui n'ont PAS été mal traités, incorrectement utilisés, ou soumis à des actes de négligence. La
réparation de tout produit endommagé à la suite de mauvais traitements, d'utilisation incorrecte,
de modifications ou de négligence intentionnelle peut être sujette à des frais additionnels. Visiteznous à Traxxas.com ou appelez-vous au +1-972-549-3000 pour obtenir des détails supplémentaires
concernant le service de la garantie et les taux.
Conformité avec la FCC (Commission fédérale des communications)
Ce dispositif contient un module conforme aux normes des dispositifs numériques classe B
décrits dans la 15e partie des règles de la FCC. Le fonctionnement en est assujetti aux deux
conditions suivantes : (1) ce dispositif ne doit pas causer d’interférences nuisibles et (2) ce dispositif
doit accepter toute interférence reçue, y compris les interférences qui peuvent mener à un
fonctionnement non souhaité.
Les normes des dispositifs numériques classe B sont conçues pour assurer une protection
raisonnable contre les interférences nuisibles dans les locaux résidentiels. Ce produit
émet, utilise et peut rayonner de l’énergie radioélectrique et, en cas de fonctionnement à
l’encontre des instructions, peut causer des interférences nuisibles aux radiocommunications.
L’utilisateur est averti que toute modification qui n’est pas expressément approuvée par la partie
responsable de la conformité peut annuler l’autorisation de l’utilisateur à actionner ’équipement.
Canada, avis d’Industry Canada (IC)
Cet appareil numérique de classe B est conforme aux norms canadiennes ICES-003 et RSS-210.
Son fonctionnement est soumis aux deux conditions suivantes: (1) cet appareil ne doit pas causer
d’interférence et (2) cet appareil doit accepter toute interférence, notamment les interférences qui
peuvent affecter son fonctionnement.
Déclaration sur l’exposition à la radiofréquence (RF)
Pour une utilisation portée sur le corps, ce dispositif a été testé et répond aux consignes
d’exposition à la radiofréquence de la FCC et d’Industrie Canada lorsqu’il est utilisé avec un
accessoire qui ne contient aucun métal et qui positionne le dispositif à un minimum de 5 mm
du corps. L’utilisation d’autres accessoires peut ne pas assurer la conformité aux exigences
d’exposition à la radiofréquence. Pour se conformer aux exigences de conformité d’exposition à
la radiofréquence, cet appareil et son antenne ne doit pas être colocalisé ou utilisé conjointement
avec une autre antenne ou un autre transmetteur.
18
TRANSMETTEUR
ET RÉCEPTEUR
19 POUR COMMENCER
Réglages de base ................... 19
Installation des piles .............. 19
Profils des modèles ................ 20
21 UTILISATION DU
SYSTÈME RADIO
Vérification de la portée ....... 21
Instructions sur la connexion 22
Gestion de stabilité Traxxas .... 22
23 GUIDE DE
RÉGLAGE AVANCÉ
Ajustements de
réglages disponibles ............. 23
Module sans fil Traxxas Link 26
Codes du témoin
DEL du transmetteur ............. 28
Mémoire du modèle
de Traxxas Link ....................... 29
30 ARBRE DE MENU
Contenu intégral ©2016 Traxxas.
D'autres noms de marque et marques
sont la propriété de leurs titulaires
respectifs et sont utilisés seulement aux
fins de l'identification. Aucune partie
de ce manuel ne peut être reproduite
ou distribuée dans les médias imprimés
ou électroniques sans la permission
écrite expresse de Traxxas. Les
caractéristiques sont susceptibles
d'être modifiées sans préavis.
TQi RADIO SYSTEM • 17
Page 18

TRANSMETTEUR ET RÉCEPTEUR
Bouton de
connexion
#6507R - 4 canaux avec module sans fil Traxxas Link
Commande de réglage du neutre
Bouton de réglage
Interrupteur à 3 positions (Canal 4)
Bouton de menu
Témoin DEL
rouge/vert
Réglage de
la direction
Bouton
multifonctionnel
Interrupteur
à bascule
(Canal 3)
Modèle 6507R
seulement
Commutateur
d’alimentation
Transmetteur #6507R contient FCC ID: XVE-TRX1018, IC: 8668A-TRX1018 module sans fil
Compartiment pile
Accélérateur
Bouton de
connexion
Module sans fil Traxxas Link
Modèle 6507R seulement
18 • TQi RADIO SYSTEM
Modèle 6507R seulement
Volant
#6509R - 2 canaux, Traxxas Link activé
T
O
U
R
N
E
Z
À
D
R
O
I
U
C
H
E
Neutre
T
E
Frein/marche arrière
V/T - Port du capteur de
tension/température*
RPM - Port de capteur RPM*
DEL
Avant
T
O
U
R
N
E
Z
À
G
A
#6533 - TQi Récepteur
Port d’expansion
de capteur**
Bouton de
connexion
*Ports de capteur accessoire à utiliser avec les capteurs standard de télémétrie pour la tension/température et RPM.
**Port d’expansion de capteur accessoire à utiliser avec le module d’extension de télémétrie (consultez Traxxas.com pour en savoir plus).
Page 19

POUR COMMENCER
Module sans fil Traxxas Link et l’application Traxxas Link
Un transmetteur TQi Traxxas avec un module sans fil Traxxas Link™
est nécessaire pour installer la gestion de stabilité Traxxas (TSM) sur le
modèle spécifique de votre véhicule utilisant l’application Traxxas Link.
Le transmetteur TQi #6507R est muni avec le module sans fil Traxxas Link
(pièce #6511, disponibles séparément pour une installation facile dans le
transmetteur TQi #6509R). L’application Traxxas Link est disponible dans
l’Apple App Store℠ ou sur Google Play™.
Si le module sans fil Traxxas Link n’est pas installé, vous ne pourrez pas
utiliser l’application Traxxas Link pour accéder au logiciel spécifique de votre
modèle. La TSM fonctionnera, mais elle ne sera pas optimisée pour votre
modèle, et votre véhicule pourrait avoir un comportement inattendu. Si vous
observez des effets indésirables, tournez le bouton multifonction dans le
sens antihoraire pour réduire l’assistance de la TSM jusqu’à ce que le résultat
vous convienne ou éteignez complètement la TSM (pour des renseignements
supplémentaires, voir la page 7).
Réglages de base du système radio TQi
Levier de direction
Le levier de direction électronique situé sur le panneau du
transmetteur règle le point neutre (central) du canal de
direction.
Note : La gestion de stabilité Traxxas (TSM) doit être complètement hors
tension durant la calibration du levier de direction. Voir la page 22 pour
réglages de TSM.
Bouton multifonctionnel
Le bouton multifonctionnel peut être programmé pour
contrôler une variété de fonctions. Par fabrication, le
bouton multifonctionnel contrôle la gestion de stabilité
Traxxas (TSM). Pour en savoir plus sur la TSM, référez-vous à la page 22.
Commande de réglage du neutre
La commande de réglage du neutre est située sur le panneau du transmetteur et
commande la course avant/arrière de l'accélérateur. Changez le réglage en appuyant sur
le bouton et en le glissant dans la position souhaitée. Il y a deux réglages disponibles :
50/50 : Permet une course égale de l'accélérateur et la marche-arrière.
70/30 : Permet une course plus grande de l'accélérateur (70%) et une course
plus petite de la marche-arrière (30%).
Traxxas recommande vivement de garder cette commande à l'endroit où elle
a été installée par fabrication jusqu'à ce que vous vous habituiez avec tous les
réglages et les possibilités du modèle.
Note : 50/50 représente le réglage d'usine par défaut de même que le
réglage requis pour les modèles nitro de Traxxas. Pour modifier la position
de réglage neutre de l'accélération d'un modèle électrique, il faut d'abord
éteindre le transmetteur. Vous devez reprogrammer le contrôleur de
vitesse électronique pour qu'il prenne en compte le réglage à 70/30. Voir les
instructions pour le contrôleur de vitesse électronique.
Installation du récepteur
Pour un meilleur rendement, nous recommandons que ce récepteur soit installé
dans la même orientation que le récepteur original (avec l’étiquette vers le haut).
Pour plus d’informations, voir le manuel du propriétaire, les schémas électriques
et les instructions détaillées concernant l’entretien d’un joint étanche.
Installer le récepteur dans la boîte en utilisant du ruban adhésif à double
face. Une fois installée, branchez les câbles au récepteur.
TQi RADIO SYSTEM • 19
Page 20

POUR COMMENCER
pile.
que
le
témoin
est
Installation des piles du transmetteur dans la base normale
Le transmetteur TQi utilise 4 piles AA. Le compartiment pile est situé dans la base du
transmetteur.
1. Enlevez la porte du
compartiment pile en appuyant
sur la languette et en faisant
glisser la porte pour l'ouvrir.
2. Installez les piles dans le sens correct
comme indiqué sur le compartiment pile.
3. Réinstallez la porte de la pile et refermez-la.
4. Allumez le transmetteur et vérifiez que le témoin est
allumé d'une couleur verte constante.
Si le témoin DEL clignote en rouge, les piles
du transmetteur sont faibles, déchargées ou probablement
installées incorrectement. Remplacez-les avec des piles toutes
neuves ou récemment chargées. Le voyant d'alimentation
n'indique pas le niveau de charge du bloc piles installé dans le modèle. Référez-vous
à la section de Dépannage à la page 28 pour plus de renseignements sur les codes
du témoin DEL du transmetteur.
Utiliser les bonnes piles:
de nouvelles piles alcalines. N'utilisez pas de piles à éléments rechargeables
AA afin d'alimenter votre transmetteur TQi; ces piles ne pourront pas fournir une
tension suffisante pour obtenir une performance optimale du transmetteur.
Attention : Arrêtez le modèle au premier signe que les piles sont faibles (le voyant
rouge du transmetteur clignote) pour éviter d'en perdre le contrôle.
Votre transmetteur utilise des piles AA. Utiliser
Sélection de votre profil de modèle
L’application Traxxas Link comprend des prols de modèles et paramètres de
gestion de stabilité Traxxas (TSM) personnalisés pour chaque modèle. Télécharger
l’application Traxxas Link sur un appareil Android™ ou iPhone®, iPad®, iPod Touch®
d’Apple® et choisissez le modèle sur l’écran d’accueil (voir plus de renseignements
à la page 26).
Si le module sans l Traxxas Link n’est pas installé, vous ne pourrez pas utiliser
l’application Traxxas Link pour accéder au prol spécique de votre modèle et la
servodirection doivent être réglée manuellement. Suivez les directives de la page 30
pour modifier ces paramètres pour mieux accommoder votre modèle.
Utiliser le système radio TQi de Traxxas avec des modèles de marque
différente
Le système radio TQi peut être utilisé avec tous les servos populaires dans tous
les types de véhicule R/C d’agrément. Suivez les directives de la page 30 si
vous souhaitez modifier ces paramètres des servos pour mieux accommoder
votre modèle.
20 • TQi RADIO SYSTEM
Page 21

UTILISATION DU SYSTÈME RADIO
Avant de mettre un système radio TQi en place dans votre modèle,
assurez-vous que le bouton de réglage de la direction est centré. Une fois
que le système radio a été installé et relié, confirmez que le servo direction
et le servo d'accélération (le cas échéant) fonctionnent correctement :
tourner le volant vers la droite fait pivoter les roues avant vers la droite
(et vice versa) tandis que d'appuyer sur la détente sur la prise permet
d'ouvrir le compartiment d'accélération de votre moteur nitro. Si l'une
des commandes fonctionne « à l'envers », suivez l'arbre de menu de la
page 30 ou encore utilisez l'application Traxxas Link afin de renverser le
fonctionnement du servo.
Une fois que le fonctionnement correct du servo est conformé, éteignez
la TSM (voir page 22) et utiliser le bouton de réglage de la direction du
TQi afin de centrer les roues avant de votre modèle pour assurer qu'il se
déplace en ligne droite lorsque le volant est en position neutre; ensuite,
restaurez le bouton multifonction à la réglage souhaitée de la TSM.
S'il n'y a pas suffisamment de jeu de réglage pour y parvenir avec le bouton
de réglage de la direction, remettez le bouton de réglage de la direction en
position centrale, puis retirez et réinstallez le klaxon de direction du servo
afin de centrer le système de direction autant que possible. Le bouton de
réglage de la direction peut alors être utilisé afin de faire les réglages finaux.
Répétez cette procédure pour le servo d'accélération. Pour accéder au
réglage de l'accélération, suivez les étapes énumérées sur l'arbre de menu
de la page 30.
Si votre modèle est doté d'un contrôleur de vitesse électronique, il devra
être étalonné en fonction du système radio TQi. Suivez les directives
incluses avec votre véhicule ou votre contrôleur de vitesse afin de
l'étalonner correctement.
Vérifiez la portée du système radio
Avant chaque session d'utilisation du modèle, vous devez tester la portée
du système radio pour vérifier qu'il fonctionne correctement.
1. Allumez le système radio et vérifiez qu'il fonctionne ainsi que décrit dans
la section précédente.
2. Faites tenir le modèle à un ami. Vérifiez que les mains et les vêtements
ne sont pas près des roues et des autres pièces mobiles du modèle.
3. Éloignez-vous du modèle le transmetteur à la main jusqu'à ce que vous
atteigniez la distance la plus lointaine à laquelle vous envisagez d'utiliser
le modèle.
4. Actionnez de nouveau les commandes du transmetteur pour vérifier que
le modèle répond correctement.
5. N'essayez pas d'utiliser le modèle s'il y a le moindre problème de
système radio ou tout brouillage externe du signal radio à l'endroit où
vous vous trouvez.
Une distance plus grande est nécessaire pour les vitesses supérieures
Plus vous le pilotez rapidement, plus le modèle s'approche rapidement de
la limite de la portée radio. À 60 mph, le modèle peut parcourir 88 pieds
en une seconde ! C'est palpitant, mais faites attention à garder le modèle
dans la portée radio. Si vous voulez que le modèle atteigne la vitesse
maximum, il vaut mieux vous placer au milieu du secteur où le camion
roule, pas au bout de ce secteur ; ainsi vous pouvez diriger le camion vers
vous et au-delà de votre position. Tout en élargissant la portée radio, cette
technique garde le modèle plus près de vous et vous pouvez donc le voir
et le contrôler plus facilement.
Peu importe la vitesse avec laquelle vous conduisez le modèle ou la
distance à laquelle vous le conduisez, laissez toujours suffisamment
d'espace entre vous, le modèle et les autres. Ne conduisez jamais
directement vers vous-même ou vers d'autres.
TQi RADIO SYSTEM • 21
Page 22

UTILISATION DU SYSTÈME RADIO
Instructions sur la connexion du TQi
Pour le meilleur fonctionnement, le transmetteur et le récepteur doivent
être électroniquement « liés ». Cette connexion a déjà été effectuée en
usine. Si jamais vous avez besoin de reconnecter le système ou d'effectuer
connecter un autre transmetteur et un autre récepteur, observez les
instructions suivantes. Remarque : le récepteur doit être relié à une source
d'énergie nominale de 4,8-6,0v pour cette opération; le transmetteur et le
récepteur doivent être à moins de 5 pieds l'un de l'autre.
1. Maintenez le doigt appuyé sur le bouton SET du transmetteur pendant
que vous l'allumez. Le témoin DEL du transmetteur clignote lentement
en rouge. Relâchez le bouton SET.
2. Appuyer et garder le bouton LINK du récepteur enfoncé si vous
souhaitez mettre le modèle en marche. Relâchez le bouton LINK.
3. Lorsque les témoins DEL du transmetteur et du récepteur deviennent
vert constant, le système est connecté et prêt à fonctionner. Confirmez
que la direction et l'accélération fonctionnent correctement avant
d'utiliser le modèle.
GESTION DE STABILITÉ TRAXXAS (TSM)
Votre système radio est équipé d’une
nouvelle fonctionnalité, la gestion de
stabilite Traxxas ou TSM. TSM vous
permet de pleinement profiter de la vitesse
et de l’accélération pour lesquelles votre
modèle Traxxas a été conçu en vous laissant la pleine maîtrise de votre
véhicule dans des situations de faible adhérence. La TSM permet d’atteindre
la pleine accélération en ligne droite sur les surfaces glissantes sans
zigzaguer, dériver ou perdre le contrôle. La TSM améliore aussi radicalement
la maîtrise du freinage. Il est dorénavant possible d’effectuer des virages
à grande vitesse grâce à la TSM et ses corrections, sans vous déranger ni
provoquer des imprévus indésirables.
Le bouton multifonctionnel du
transmetteur TQi a été programmé
pour commander la TSM. La
configuration recommandée (par
Réglage recommandé
défaut) pour la TSM est sur la position
de midi (le zéro sur le cadrant).
Tournez le bouton dans le sens des
aiguilles d’une montre pour augmenter
l’assistance; tournez-le dans le sens
contraire pour réduire l’assistance.
Tournez complètement le bouton dans
le sens contraire des aiguilles d’une
montre jusqu’à l’arrêt pour éteindre la
TSM.
Réduire
l’assistance
Augmenter
l’assistance
Note : La TSM se désactive
automatiquement lors du pilotage ou
Éteignez la TSM
du freinage en marche arrière.
Lorsqu’on conduit sur des surfaces offrant une certaine adhérence,
il peut être souhaitable d’atténuer le réglage de la TSM pour obtenir des
sensations de pilotage plus « libres » lors des dérapages contrôlés, des
glissades, etc. Sur les surfaces offrant très peu d’adhérence (terre meuble,
béton lisse, glace/neige), augmentez la TSM pour une accélération et un
contrôle maximaux.
Tester le pilotage tour à tour avec la TSM activée ou non pour éprouver la
simplicité et la précision du contrôle du véhicule qu’elle permet. Consultez
Traxxas.com/tsm pour en savoir plus.
Note : La TSM doit être complètement hors tension durant la
calibration du compensateur de la direction.
22 • TQi RADIO SYSTEM
Page 23

GUIDE DE RÉGLAGE AVANCÉ
Réglages disponibles
L'accès à toutes les fonctions décrites ci-dessous se fait par les boutons de menu
et de réglage du transmetteur et en observant les signaux du témoin DEL. Une
explication de la structure de menu suit à la page 30. Les articles suivants peuvent
être réglés plus facilement à l'aide de votre portable avec le module sans fil Traxxas
Link et l'application Traxxas Link, voir page 26.
Le transmetteur Traxxas a un bouton multifonctionnel programmable qui peut
être réglé pour actionner de différentes fonctions avancées du transmetteur (réglé
par défaut pour la
gestion de stabilité Traxxas (TSM)
, voir la page 22). Faites
l'expérience des réglages et des fonctions disponibles pour voir s'ils peuvent
améliorer le pilotage du véhicule.
Sensibilité de la direction (Exponentiel)
Le bouton multifonctionnel du transmetteur TQi peut être réglé pour commander
la sensibilité de la direction (connue aussi sous le nom d’exponentiel). Le réglage
standard de la sensibilité de la direction est «normale (exponentiel zéro), » où
le cadran se trouve complètement à gauche. Ce réglage produit une réponse
linéaire du servo : le mouvement de la servodirection correspond exactement
à la commande du volant du transmetteur. Tourner le bouton dans le sens des
aiguilles d’une montre à partir du centre produit un « exponentiel négatif » et
diminue la sensibilité de la direction en rendant la servo moins réactive près
de la position neutre, tandis que la sensibilité augmente au fur et à mesure
que le servo s’approche des limites de la course. Plus vous tournez le bouton,
plus le changement de mouvement de la servodirection est prononcé. Le
terme « exponentiel » vient de cet effet ; la course de la servodirection change
exponentiellement par rapport à la commande du volant. L’effet exponentiel est
indiqué en tant que pourcentage - plus le pourcentage est grand, plus l’effet est
grand. Les illustrations ci-dessous montrent comment cela fonctionne.
Sensibilité de direction normale
(exponentiel 0%):
Dans cette illustration, la course de la
servodirection (et donc le mouvement des
roues avant du modèle) correspond exactement
au mouvement du volant. Les plages sont
exagérées aux fins d’exemplification.
Sensibilité de direction diminuée
(exponentiel négatif):
En tournant le bouton multifonctionnel
dans le sens des aiguilles d’une montre,
la sensibilité de direction du modèle est
diminuée. Remarquez qu’une course
relativement grande du volant détermine une
plage réduite de la servo. Plus vous tournez
le bouton, plus l’effet devient plus prononcé.
La sensibilité de direction diminuée peut
être utile lorsque vous conduisez le modèle
sur des surfaces sans adhérence, à de grandes vitesses ou sur des pistes qui favorisent les
balayages et demandent des commandes légères du volant. Les plages sont exagérées aux
fins d’exemplification.
Portée de la rotation
au transmetteur
Portée de la rotation
effective du modèle
Sensibilité de l'accélération (exponentiel de l'accélération)
Le bouton multifonctionnel peut être réglé pour contrôler la sensibilité de
l'accélération. La sensibilité de l'accélération fonctionne tout comme que la
sensibilité de la direction, mais elle affecte le canal d'accélération. L'accélération
en avant est la seule affectée ; le freinage et la marche-arrière restent linéaires
indépendamment du réglage de la sensibilité de l'accélération.
TQi RADIO SYSTEM • 23
Page 24

GUIDE DE RÉGLAGE AVANCÉ
Pourcentage de la direction (taux double)
Le bouton multifonctionnel peut être réglé pour contrôler la quantité (le
pourcentage) de la course servo appliquée à la direction. Tourner le bouton
multifonctionnel complètement dans le sens des aiguilles d'une montre fournit
la course de direction maximale ; tourner le bouton dans le sens contraire des
aiguilles d'une montre réduit la course de la direction (note : tourner le cadran dans
le sens contraire des aiguilles d'une montre jusqu'à l'arrêt du modèle annule toute
course servo). Tenez compte du fait que les réglages de point final de la direction
définissent la course maximale de la servodirection. Si vous réglez le pourcentage
de direction à 100% (en tournant le bouton multifonctionnel complètement dans
le sens des aiguilles d'une montre), la course servo va jusqu'au point final établi,
sans le dépasser. Beaucoup de pilotes utilisent le pourcentage d'accélération pour
bénéficier seulement de la course de la direction dont ils ont besoin pour le virage
le plus serré de la piste, facilitant ainsi le pilotage du modèle sur le reste de la course.
Réduire la course de la direction peut également être utile à faciliter le contrôle d'un
modèle sur des surfaces très adhérentes et limiter la capacité de la direction sur les
circuits ovales où l'on n'a pas besoin d'une grande course de la direction.
Pourcentage de freinage
Le bouton multifonctionnel peut également être réglé pour contrôler la
course de freinage appliquée par la servo à un modèle alimenté au nitro. Les
modèles électriques n'ont pas de servofrein, mais la fonction de pourcentage de
freinage fonctionne de la même manière pour ces modèles. Tourner le bouton
multifonctionnel complètement dans le sens des aiguilles d'une montre produit la
course de freinage maximale ; tourner le bouton dans le sens contraire des aiguilles
d'une montre réduit la course de freinage ((Note: Tourner le cadran dans le sens
contraire des aiguilles d'une montre élimine tout freinage).
Réglage de l'accélérateur
Régler le bouton multifonctionnel pour fonctionner comme accélérateur permet
au pilote d'ajuster la position neutre de l'accélérateur pour empêcher tout
freinage non souhaité ou d'accélérer lorsque la commande du transmetteur
est au neutre. Note: Le transmetteur est muni d'un mode de recherche de
l'accélérateur qui prévient tout emballement accidentel. Voir ci-dessous pour plus
de renseignements.
Mode de recherche de l'accélérateur
Lorsque le bouton multifonctionnel est réglé pour l'accélération, le
transmetteur se rappelle le réglage. Si le bouton d'accélération change de
position pendant que le transmetteur est éteint, ou pendant que le transmetteur
commandait un autre modèle, le transmetteur ignore cette position du bouton.
Cela empêche le démarrage accidentel du modèle. Le témoin DEL sur le panneau
du transmetteur clignote en vert rapidement et le bouton d'accélération (bouton
multifonctionnel) ne produit aucun effet jusqu'à ce qu'il soit remis à la position
enregistrée dans la mémoire. Pour repositionner le levier de l'accélérateur, tournez
le bouton multifonctionnel dans une direction ou l'autre jusqu'à ce que le témoin
cesse de clignoter.
Point final de la direction et de l’accélérateur
Le transmetteur TQi te permet de choisir la limite de la course servo (ou de son «
point final ») indépendamment pour la course à gauche et à droite (sur le canal de
direction) et la course de l’accélération et du freinage (sur le canal d’accélération).
Grâce à cette fonction, vous pouvez effectuer le réglage fin du servo pour empêcher
tout grippage provoqué par les tringleries actionnant la servodirection ou
l’accélérateur (dans le cas d’un modèle alimenté nitro) plus loin que leurs limites
mécaniques. Les réglages de point final que vous effectuez représentent votre
choix de la course servo maximum ; les fonctions de pourcentage de direction et de
pourcentage de freinage n’annulent pas les réglages de point final.
24 • TQi RADIO SYSTEM
Page 25

GUIDE DE RÉGLAGE AVANCÉ
Réglage secondaire de la direction et de l'accélérateur
La fonction de réglage secondaire s'utilise pour fixer avec précision le point
neutre de la direction ou de l'accélérateur au cas où le réglage du bouton de
commande à « zéro » ne ramènerait pas la servo complètement au centre. Lorsqu'il
est sélectionné, le réglage secondaire ajuste plus finement la position de l'arbre
de sortie de la servo, ce qui précise davantage le point neutre. Mettez toujours le
bouton de réglage de la direction à zéro avant d'effectuer le réglage final (s'il y a
lieu) à l'aide du réglage secondaire. Si l'accélérateur a été réglé antérieurement,
il doit être remis « à zéro » avant d'effectuer le réglage final à l'aide du réglage
secondaire.
Réglage du verrouillage
Après avoir effectué tous ces réglages à votre souhait, vous pouvez désactiver
le bouton multifonctionnel pour que vos réglages ne soient pas changés. Cette
fonction est particulièrement utile si vous utilisez plusieurs véhicules avec un seul
transmetteur par l'intermédiaire la Mémoire du Modèle de Traxxas Link™.
Réglages multiples et le bouton multifonctionnel
Il est important de noter que les réglages effectués avec le bouton
multifonctionnel sont « revêtus » l'un sur l'autre. Par exemple, si vous commandez
au bouton multifonctionnel de régler le pourcentage de la direction à 50%
et ensuite vous lui commandez de contrôler la sensibilité de la direction, le
transmetteur « se rappellera » le réglage du pourcentage de la direction. Des
réglages de la sensibilité de direction s'appliqueront aux 50% de la course de
direction que vous avez sélectionnés antérieurement. De même, « désactiver »
le bouton multifonctionnel le rend incapable de faire tout autre réglage, mais le
dernier réglage effectué par le bouton multifonctionnel reste applicable.
Sécurité intégrée
Votre système radio de Traxxas est muni d'une fonction de sécurité intégrée qui
remet l'accélérateur à la dernière position neutre enregistrée en cas de perte du signal.
Le témoin DEL du transmetteur et du récepteur clignotera rouge à une cadence rapide
pour indiquer que la sécurité intégrée a été activée.
TQi RADIO SYSTEM • 25
Page 26

GUIDE DE RÉGLAGE AVANCÉ
Module sans fil Traxxas Link
Le transmetteur TQi #6507R est muni avec le module
sans fil Traxxas Link (pièce #6511, disponibles
séparément pour une installation facile dans le
transmetteur TQi #6509R). Cet accessoire innovateur
transforme votre iPhone®, iPad®, iPod touch®, ou
votre appareil Android™ en puissant outil de réglage
qui équipe votre TQi avec une interface utilisateur
intuitive, haute définition et complètement
graphique.
Traxxas Link
La puissante application Traxxas Link (disponible au magasin Apple App
Store℠ ou Google Play™) assure le contrôle total du fonctionnement et
du réglage du modèle Traxxas avec des graphismes époustouflants et une
précision absolue. Avec les capteurs de télémétrie Traxxas Link installés
sur le modèle, Traxxas Link affiche des données en temps réel telles que la
vitesse, les rpm, la température et la tension de la pile.
Interface intuitive iPhone, iPad, iPod touch, et Android
Traxxas Link facilite
l'apprentissage, la compréhension
et l'accès à de puissantes options
de réglage. Contrôlez facilement
vos effets de pilotage tels que le
pourcentage de l’assistance de
TSM; la sensibilité de la direction
et de l'accélération ; le rapport de
direction ; la force de freinage et le
réglage de l'accélération en touchant
et déplaçant les curseurs sur l'écran.
Tapez et glissez pour régler la TSM, la
sensibilité de la direction, l'accélérateur, le
pourcentage du freinage et bien encore !
Télémétrie en temps réel
Une fois que les capteurs de télémétrie
sont installés, le Traxxas Link prévu
de capteurs s'anime et affiche la
vitesse, la tension de la pile, les rpm
et la température. Établissez des
avertissements de seuil et notez
les valeurs maximum, minimum
ou moyennes. Utilisez la fonction
d'enregistrement pour retenir l'image
du tableau de bord avec son, de
Le tableau de bord personnalisable de
Traxxas Link affiche en temps réel les RPM,
la vitesse, la température et la tension.
sorte que vous puissiez vous concentrer sur le pilotage sans manquer les
moments importants.
Traxxas Link vous permet de gérer 30 modèles
Le système radio TQi suit automatiquement tous les véhicules auxquels il
est lié et tous les paramètres utilisés pour chacun d'entre eux - jusqu'à un
total de 30 modèles! Traxxas Link utilise une interface visuelle permettant
de nommer les modèles, personnaliser leurs paramètres, joindre des
profils et les fixer dans la mémoire. Vous n'avez qu'à choisir un modèle
et un transmetteur connecté antérieurement, mettez-les en marche et
amusez-vous !
26 • TQi RADIO SYSTEM
Page 27

GUIDE DE RÉGLAGE AVANCÉ
Couplez le transmetteur TQi avec le module sans fil Traxxas Link et
l’application Traxxas Link pour la première fois :
1. Mettez en marche le
transmetteur.
2. Ouvrez l’application Traxxas
A
Link sur votre périphérique
mobile. Touchez le bouton
Garage, puis bouton Wireless
Module (module sans fil) (A).
3. Appuyez sur le bouton du
module sans fil Traxxas Link.
La DEL bleue du module clignotera (B).
B
4. Sous 10 secondes,
appuyez sur le
D
C
bouton “Press
here to search
for Traxxas Link
Wireless Module”
(Rechercher pour
module sans fil
Traxxas Link) sur votre périphérique mobile (C).
5. L’icône Bluetooth® dans la barre d’état s’allume d’une couleur bleu
constant, et le voyant DEL du module s’allume d’une couleur bleue
constant (D).
6. Le module sans fil Traxxas Link et l’application Traxxas Link sont
connectés, et peut établir la connexion automatique sur le transmetteur
est allumé et l’application fonctionne.
CODES DU TÉMOIN DEL
DU MODULE SANS FIL TRAXXAS LINK
Couleurs ou schéma lumineux
du témoin DEL
Le voyant DEL
bleu éteint
Blue lent (0,5 sec
allumé / 0,5 sec éteint)
Bleu constant Connecté
Nom Remarques
Mode de liaison
Mode de couplage
L’application Traxxas Link ne
fonctionne pas sur un
dispositif couplé.
Retrouvez plus d’informations sur
le couplage du transmetteur avec
l’application Traxxas Link ci-dessus.
Retrouvez plus d’informations sur
l’utilisation des commandes du
transmetteur dans ce manuel.
TQi RADIO SYSTEM • 27
Page 28

GUIDE DE RÉGLAGE AVANCÉ
CODES DU TÉMOIN DEL DU TRANSMETTEUR
Couleurs ou schéma lumineux du témoin DEL Nom Notes
Vert constant Mode de pilotage normal
Rouge lent (0,5 sec allumé / 0,5 sec éteint) Connexion Voir plus de renseignements sur la connexion à la page 22.
Vert à clignotements rapides (0,1 sec allumé / 0,15
sec éteint)
Rouge à clignotements moyens (0,25 sec allumé /
0,25 sec éteint)
Rouge à clignotements rapides (0,125 sec allumé /
0,125 sec éteint)
Schémas de programmation
ou
Numérote (vert ou rouge) puis pause Position actuelle du menu Voir l'arbre de menu pour plus de renseignements.
Vert rapide 8 fois Réglage du menu accepté (sur SET)
x8
x8
Rouge rapide 8 fois Menu SET invalide Erreur d'utilisateur, comme la tentative de supprimer un modèle verrouillé.
Mode de recherche de
l'accélérateur
Alerte de pile faible
Connexion impossible / Erreur de
connexion
Tournez le bouton multifonctionnel à droite ou à gauche jusqu'à ce que le
témoin cesse de clignoter. Voir plus de renseignements à la page 24.
Mettez de nouvelles piles dans le transmetteur. Voir plus de renseignements à
la page 19.
Le transmetteur et le récepteur ne sont plus connectés. Arrêtez le système et
rallumez-le. Trouvez la source de l'erreur de connexion (par exemple, hors de
portée, piles faibles, antenne endommagée).
CODES DU TÉMOIN DEL DU RÉCEPTEUR
Couleurs ou schéma lumineux du témoin DEL Nom Notes
Vert constant Mode de pilotage normal
Rouge lent (0,5 sec allumé / 0,5 sec éteint) Connexion Voir plus de renseignements sur la connexion à la page 22.
Rouge à clignotements rapides (0,125 sec allumé /
0,125 sec éteint)
Sécurité intégrée / détecteur de
basse tension
Un niveau constant de basse tension dans le récepteur déclenche le système
de sécurité intégrée qui assure suffisamment d'énergie pour mettre la servo
d'accélération au centre avant de perdre toute l'énergie.
28 • TQi RADIO SYSTEM
Page 29

GUIDE DE RÉGLAGE AVANCÉ
Mémoire du modèle de Traxxas Link
La Mémoire du modèle de Traxxas Link est une fonction exclusive, à brevet
déposé, du transmetteur TQi. Chaque fois qu'il est connecté à un nouveau
récepteur, le transmetteur enregistre ce récepteur dans sa mémoire,
tout comme tous les réglages assignés à ce même récepteur. Lorsque le
transmetteur et tout récepteur connecté sont allumés, le transmetteur
se rappelle automatiquement les réglages du récepteur. Aucun besoin
de sélectionner manuellement le véhicule dans une liste de mémoire du
modèle.
Verrouillage du modèle
La mémoire du modèle de Traxxas Link peut stocker jusqu'à trente modèles
(récepteurs). Si vous connectez le trente et unième récepteur, la mémoire
du modèle de Traxxas Link supprime le récepteur « le plus ancien » (en
d'autres termes, le modèle que vous avez utilisé depuis plus longtemps sera
supprimé). En activant le verrouillage du modèle, le récepteur sera enregistré
dans la mémoire de façon permanente : il ne peut pas
être supprimé.
Vous pouvez aussi connecter plusieurs transmetteurs TQi au même modèle,
sélectionner tout transmetteur et tout modèle connecté antérieurement
dans votre collection, les allumer et commencer à conduire. Grâce à la
fonction de mémoire du modèle de Traxxas Link, vous n'avez plus à vous
rappeler quel transmetteur est connecté à quel modèle et vous n'aurez
jamais besoin de sélectionner un modèle dans une liste de mémoire du
modèle. Le transmetteur et le récepteur font tout cela automatiquement.
Pour activer le verrouillage du modèle :
1. Allumez le transmetteur et le récepteur que vous souhaitez verrouiller.
2. Maintenez le doigt appuyé sur MENU. Relâchez quand le témoin clignote
en vert.
3. Appuyez sur MENU trois fois. Le témoin DEL clignote en vert
quatre fois à plusieurs reprises.
4. Appuyez sur SET. Le témoin DEL clignote en vert une fois à intervalles.
5. Appuyez sur SET une fois. Le témoin DEL clignote en rouge une fois à
plusieurs reprises.
6. Appuyez sur MENU une fois et le témoin clignote en rouge deux fois à
plusieurs reprises.
7. Appuyez sur SET et le témoin clignote en vert rapidement. La mémoire
est maintenant verrouillée. Appuyez sur MENU et SET pour retourner au
mode de conduite.
Note: Pour déverrouiller la mémoire, appuyez sur SET deux fois dans
l'étape 5. Le témoin clignote en vert rapidement pour indiquer que le
modèle est déverrouillé. Pour déverrouiller tous les modèles, appuyez sur
MENU deux fois dans l'étape 6, puis appuyez sur SET.
Pour supprimer un modèle :
Tôt ou tard, vous souhaiterez supprimer de la mémoire un modèle que vous
ne conduisez plus.
1. Allumez le transmetteur et le récepteur que vous souhaitez supprimer.
2. Maintenez le doigt appuyé sur MENU. Relâchez quand le témoin clignote
en vert.
3. Appuyez sur MENU trois fois. Le témoin DEL clignote en vert
quatre fois à plusieurs reprises.
4. Appuyez sur SET une fois. Le témoin DEL clignote en vert une fois à
plusieurs reprises.
5. Appuyez sur MENU une fois. Le témoin DEL clignote en vert deux fois à
plusieurs reprises.
6. Appuyez sur SET. La mémoire sera supprimée.
7. Appuyez sur SET pour supprimer le modèle. Maintenez le doigt appuyé sur
MENU pour retourner au mode de conduite.
TQi RADIO SYSTEM • 29
Page 30

ARBRE DE MENU
L'arbre de menu ci-dessous montre le système de navigation
parmi les réglages et les fonctions du transmetteur TQi.
Maintenez le doigt appuyé sur MENU pour entrer dans l'arbre
de menu, puis effectuez les commandes suivantes pour
naviguer au menu et faire des options.
MENU : Quand vous accédez à un menu, commencez toujours
en haut. Appuyez sur MENU pour faire défiler l'arbre de
menu. Quand vous avez atteint le fond de l'arbre, vous
pouvez revenir en haut en appuyant encore une fois sur
MENU.
SET : Appuyez sur SET pour vous déplacer à travers l'arbre
de menu et faire des options. Lorsqu'une option est
communiquée à la mémoire du transmetteur, le témoin
DEL clignote en vert rapidement.
RETOUR : Appuyez sur MENU et SET en même temps pour
remonter un niveau dans l'arbre de menu.
SORTIE : Maintenez le doigt appuyé sur MENU pour sortir de la
programmation. Les options que vous avez faites seront
enregistrées.
ÉCHO : Maintenez le doigt appuyé sur SET pour activer la
fonction « écho ». Écho vous ramène à position actuelle
dans l'arbre de menu si vous vous égarez.
Par exemple : Si votre position actuelle est Points
limites du canal de direction, maintenez le doigt
appuyé sur SET pour que le témoin DEL clignote deux
fois en vert, une fois en vert, puis trois fois en rouge.
L'écho ne change pas vos réglages ou votre position
dans la séquence de programmation.
Voici un exemple de la façon d'accéder à une fonction dans l'arbre
de menu. Dans l'exemple ci-dessous, l'utilisateur configure le bouton
multifonctionnel en tant que commande de direction % (taux double).
Comment régler le bouton multifonctionnel pour commander la DIRECTION %
(TAUX DOUBLE) :
1. Allumez le transmetteur
2. Maintenez le doigt appuyé sur MENU jusqu'à ce que le témoin DEL s'allume en
vert. Il clignotera à des intervalles simples.
3. Appuyez sur SET. Le témoin DEL rouge clignote à des intervalles simples pour
indiquer que la sensibilité de la direction (exponentiel) a été sélectionnée.
4. Appuyez sur MENU deux fois. Le témoin DEL rouge clignote trois fois à plusieurs
reprises pour indiquer que la direction % (taux double) a été sélectionné.
5. Appuyez sur SET pour
rapidement pour indiquer que la sélection a réussi.
6. Maintenez le doigt appuyé sur MENU pour retourner au mode de pilotage.
Restaurer les paramètres par défaut :
Au moment de programmer votre transmetteur, vous pourriez
avoir besoin de recommencer à zéro. Voir la section Sélectionner
le profil de votre modèle (réinitialiser les paramètres) qui se trouve
à la page 20 pour obtenir des directives.
*Le contrôle de couple est une fonction conçue uniquement pour le système d’alimentation dans
la reproduction de course Funny Car de Traxxas (Modèle #6907).
sélectionner. Le témoin DEL vert clignotera 8 fois
Saisissez Programmation
Appuyez et maintenez appuyé sur
MENU pendant 3 secondes
Bouton multifonctionnel
1
Un clignotement vert
Appuyez sur MENU
Configuration des canaux
2
Deux clignotements verts
Appuyez sur MENU
Sélection des modes
3
Trois clignotements verts
Appuyez sur MENU
Traxxas-Link
4
Quatre clignotements verts
* Transmetteur à 4 canaux uniquement
Appuyez
sur SET
Appuyez
sur SET
Appuyez
sur
MENU
Appuyez
sur SET
Appuyez
sur SET
Appuyez sur MENU pour faire défiler les options.
Appuyez sur SET pour choisir une option.
Sensibilité de la direction (Exponentiel)
1
Un clignotement rouge
Sensibilité de l'accélérateur (Exponentiel)
2
Deux clignotements rouges
Pourcentage de la direction (taux double)
3
Trois clignotements rouges
Pourcentage de freinage
4
Quatre clignotements rouges
Réglage de l'accélérateur
5
Cinq clignotements rouges
Bouton désactivé
6
Six clignotements rouges
Contrôle de couple*
7
Sept clignotements rouges
TSM
8
Huit clignotements rouges
Direction (Canal 1)
1
Un clignotement vert
Accélérateur (Canal 2)
2
Deux clignotements verts
Changer de vitesse (Canal 3)*
3
Trois clignotements verts
T-Lock avant (Canal 4)*
4
Quatre clignotements verts
T-Lock arrière (Canal 5)*
5
Cinq clignotements verts
Appuyez sur SET pour choisir une option.
Électrique
1
Un clignotement rouge
Nitro
2
Deux clignotements rouges
Verrouillage du modèle
1
Un clignotement vert
Appuyez
sur MENU
Supprimer le modèle
2
Deux clignotements verts
Appuyez
sur SET
Appuyez
sur SET
Appuyez
sur SET
Appuyez
sur SET
Appuyez
sur SET
Note : Le transmetteur est « actif » pendant la
programmation, donc vous pouvez mettre à l'épreuve
les réglages en temps réel sans devoir sortir de l'arbre
de menu.
Appuyez sur MENU pour faire défiler les options.
Appuyez sur SET pour choisir une option.
Inversion de servo
1
Un clignotement rouge
Réglage secondaire
2
Deux clignotements
rouges
Points limites
3
Trois clignotements
rouges
jusqu'au point final souhaité, puis appuyez sur SET pour enregistrer.
Pour remettre à zéro la course maximale : Relâchez les commandes
appuyez sur SET.
Remettez à zéro
4
les points limites
Quatre clignotements rouges
Inversion de servo
1
Un clignotement rouge
Réglage secondaire
2
Deux clignotements
rouges
Points limites
3
Trois clignotements
rouges
puis appuyez sur SET pour enregistrer. Pour remettre à zéro la
course maximale : Relâchez les commandes appuyez sur SET.
Remettez à zéro
4
les points limites
Quatre clignotements rouges
Inversion de servo
1
Un clignotement rouge
Déverrouillez
1
Un clignotement rouge
Verrouillez
2
Deux clignotements rouges
Déverrouillez tout
3
Trois clignotements rouges
Confirmez la suppression
1
Un clignotement rouge
Appuyez sur SET pour inverser
la servo direction
Actionnez le bouton pour effectuer
le réglage secondaire. Appuyez sur
SET pour enregistrer.
Réglez à l'aide du volant. Tournez
à droite jusqu'au point final
souhaité, puis appuyez sur SET
pour enregistrer. Tournez à gauche
Appuyez sur SET pour restaurer
les points limites par défaut.
Appuyez sur SET pour inverser
la servodirection
Actionnez le bouton pour
effectuer le réglage secondaire.
Appuyez sur SET pour enregistrer.
Réglez à l’aide du levier. Tirez
jusqu’au point final souhaité, puis
appuyez sur SET pour enregistrer.
Poussez jusqu’au point final souhaité,
Appuyez sur SET pour restaurer
les points limites par défaut.
Appuyez sur SET pour
inverser la servo direction
Page 31

Réglez le bouton
multifonctionnel pour la
SENSIBILITÉ DE LA DIRECTION
(Expo)
Réglez le bouton
multifonctionnel pour la
SENSIBILITÉ DE LA DIRECTION
(Expo)
Réglez le bouton
multifonctionnel pour
commander LA DIRECTION À
TAUX DOUBLE (%) :
Bouton multifonctionnel réglé
pour le POURCENTAGE DE
FREINAGE (%)
Réglez le
bouton multifonctionnel pour
L'ACCÉLÉRATEUR
Pour DÉSACTIVER (verrouiller)
le bouton multifonctionnel
Pour INVERSER le sens de la
SERVODIRECTION
Pour régler le RÉGLAGE
SECONDAIRE de la
SERVODIRECTION
Pour régler les POINTS LIMITES
de la SERVODIRECTION
Pour remettre les
POINTS LIMITES de la
SERVODIRECTION au réglage
par défaut
Pour INVERSER le sens de la
servo D'ACCÉLÉRATION
Pour régler le RÉGLAGE
SECONDAIRE de la servo
D'ACCÉLÉRATION
Pour régler les POINTS LIMITES
de la servo D'ACCÉLÉRATION
Pour remettre les POINTS
LIMITES de la servo
D'ACCÉLÉRATION au réglage
par défaut
Pour INVERSER le sens de la
servo de changeur de vitesses
Appuyez sur MENU et maintenez
appuyé Le témoin DEL clignote d'une
couleur verte
Appuyez sur MENU et maintenez
appuyé Le témoin DEL clignote d'une
couleur verte
Appuyez sur MENU et maintenez
appuyé Le témoin DEL clignote d'une
couleur verte
Appuyez sur MENU et maintenez
appuyé Le témoin DEL clignote d'une
couleur verte
Appuyez sur MENU et maintenez
appuyé Le témoin DEL clignote d'une
couleur verte
Appuyez sur MENU et maintenez
appuyé Le témoin DEL clignote d'une
couleur verte
Appuyez sur MENU et maintenez
appuyé Le témoin DEL clignote d'une
couleur verte
Appuyez sur MENU et maintenez
appuyé Le témoin DEL clignote d'une
couleur verte
Appuyez sur MENU et maintenez
appuyé Le témoin DEL clignote d'une
couleur verte
Appuyez sur MENU et maintenez
appuyé Le témoin DEL clignote d'une
couleur verte
Appuyez sur MENU et maintenez
appuyé Le témoin DEL clignote d'une
couleur verte
Appuyez sur MENU et maintenez
appuyé Le témoin DEL clignote d'une
couleur verte
Appuyez sur MENU et maintenez
appuyé Le témoin DEL clignote d'une
couleur verte
Appuyez sur MENU et maintenez
appuyé
Le témoin DEL clignote d'une
couleur verte
Appuyez sur MENU et maintenez
appuyé Le témoin DEL clignote d'une
couleur verte
Appuyez sur SET
Le témoin clignote d'une
couleur rouge
Appuyez sur SET
Le témoin clignote d'une
couleur rouge
Appuyez sur SET
Le témoin clignote d'une
couleur rouge
Appuyez sur SET
Le témoin clignote d'une
couleur rouge
Appuyez sur SET
Le témoin clignote d'une
couleur rouge
Appuyez sur SET
Le témoin clignote d'une
couleur rouge
x2
Appuyez sur MENU
Le témoin DEL clignote d'une
couleur verte (x2)
x2
Appuyez sur MENU
Le témoin DEL clignote d'une
couleur verte (x2)
x2
Appuyez sur MENU
Le témoin DEL clignote d'une
couleur verte (x2)
x2
Appuyez sur MENU
Le témoin DEL clignote d'une
couleur verte (x2)
x2
Appuyez sur MENU
Le témoin DEL clignote d'une
couleur verte (x2)
x2
Appuyez sur MENU
Le témoin DEL clignote d'une
couleur verte (x2)
x2
Appuyez sur MENU
Le témoin DEL clignote d'une
couleur verte (x2)
x2
Appuyez sur MENU
Le témoin DEL clignote d'une
couleur verte (x2)
x2
Appuyez sur MENU
Le témoin DEL clignote d'une
couleur verte (x2)
x8
Appuyez sur SET pour confirmer
Le témoin DEL clignote d'une
couleur verte (x8)
x2
Appuyez sur MENU pour
confirmer Le témoin clignote d'une
couleur rouge (x2)
x3
Appuyez sur MENU deux fois
Le témoin clignote d'une couleur
rouge (x3)
x4
Appuyez sur MENU 3 fois
Le témoin clignote d'une couleur
rouge (x4)
x5
Appuyez sur MENU 4 fois
Le témoin clignote d'une couleur
rouge (x5)
x6
Appuyez sur MENU 5 fois
Le témoin clignote d'une couleur
rouge (x6)
Appuyez sur SET
Le témoin DEL clignote d'une
couleur verte
Appuyez sur SET
Le témoin DEL clignote d'une
couleur verte
Appuyez sur SET
Le témoin DEL clignote d'une
couleur verte
Appuyez sur SET
Le témoin DEL clignote d'une
couleur verte
Appuyez sur SET
Le témoin DEL clignote d'une
couleur verte
Appuyez sur SET
Le témoin DEL clignote d'une
couleur verte
Appuyez sur SET
Le témoin DEL clignote d'une
couleur verte
Appuyez sur SET
Le témoin DEL clignote d'une
couleur verte
Appuyez sur SET
Le témoin DEL clignote d'une
couleur verte
Appuyez sur MENU et maintenez
appuyé
Retourne au mode de pilotage
x8
Appuyez sur SET pour
sélectionner Le témoin DEL
clignote d'une couleur verte (x8)
x8
Appuyez sur SET pour
sélectionner Le témoin DEL
clignote d'une couleur verte (x8)
x8
Appuyez sur SET pour
sélectionner Le témoin DEL
clignote d'une couleur verte (x8)
x8
Appuyez sur SET pour
sélectionner Le témoin DEL
clignote d'une couleur verte (x8)
x8
Appuyez sur SET pour verrouiller
Le témoin DEL clignote d'une
couleur verte (x8)
Appuyez sur SET
Le témoin clignote d'une
couleur rouge
Appuyez sur SET
Le témoin clignote d'une
couleur rouge
Appuyez sur SET
Le témoin clignote d'une
couleur rouge
Appuyez sur SET
Le témoin clignote d'une
couleur rouge
x2
Appuyez sur MENU
Le témoin DEL clignote d'une
couleur verte (x2)
x2
Appuyez sur MENU
Le témoin DEL clignote d'une
couleur verte (x2)
x2
Appuyez sur MENU
Le témoin DEL clignote d'une
couleur verte (x2)
x2
Appuyez sur MENU
Le témoin DEL clignote d'une
couleur verte (x2)
x3
Appuyez sur MENU deux fois
Témoin DEL clignote d'une couleur
verte (x3)
Appuyez sur MENU et
maintenez appuyé
Retourne au mode de pilotage
Appuyez sur MENU et
maintenez appuyé
Retourne au mode de pilotage
Appuyez sur MENU et
maintenez appuyé
Retourne au mode de pilotage
Appuyez sur MENU et
maintenez appuyé
Retourne au mode de pilotage
Appuyez sur MENU et
maintenez appuyé
Retourne au mode de pilotage
x8
Appuyez sur SET pour
inverser la servo direction
x2
Appuyez sur MENU
Le témoin clignote d'une
couleur rouge (x2)
x3
Appuyez sur MENU deux fois
Le témoin clignote d'une
couleur rouge (x3)
x4
Appuyez sur MENU 3 fois
Le témoin clignote d'une
couleur rouge (x4)
Appuyez sur SET
Le témoin clignote d'une
couleur rouge
Appuyez sur SET
Le témoin clignote d'une
couleur rouge
Appuyez sur SET
Le témoin clignote d'une
couleur rouge
Appuyez sur SET
Le témoin clignote d'une
couleur rouge
Appuyez sur SET
Le témoin clignote d'une
couleur rouge
Réglez le bouton
multifonctionnel jusqu'à ce que
le témoin DEL s'allume d'une
couleur verte constante.
Appuyez sur MENU et
maintenez appuyé
Retourne au mode de pilotage
Utilisez le bouton
multifonctionnel pour régler la
position neutre
Tournez le volant pour régler
la course maximale souhaitée à
gauche et à droite
x8
Appuyez sur SET
pour remettre à zéro les
points limites
x8
Appuyez sur SET pour inverser
la servodirection
x2
Appuyez sur MENU
Le témoin clignote d'une
couleur rouge (x2)
x3
Appuyez sur MENU deux fois
Le témoin clignote d'une
couleur rouge (x3)
x4
Appuyez sur MENU 3 fois
Le témoin clignote d'une
couleur rouge (x4)
x8
Appuyez sur SET pour inverser
la servodirection
FORMULES D'ARBRE DE MENU
Pour sélectionner les fonctions
et régler le transmetteur TQi
sans se référer à l'arbre de menu,
allumez votre émetteur, trouvez
la fonction dans la colonne
gauche que vous souhaitez
régler et suivez les étapes
correspondantes.
Appuyez sur MENU et
x8
maintenez appuyé
x8
x8
Retourne au mode de
pilotage
Tournez le volant
pour mettre à l'épreuve
les réglages
x8
Appuyez sur SET
pour enregistrer la position
Appuyez sur SET pour
enregistrer
Actionnez le levier pour
mettre à l'épreuve
Appuyez sur MENU et
maintenez appuyé
Retourne au mode de
pilotage
Appuyez sur SET
pour enregistrer la position
Appuyez sur SET
pour enregistrer chaque
position
Appuyez sur MENU et
maintenez appuyé
Retourne au mode de
pilotage
Appuyez sur MENU et
maintenez appuyé
Retourne au mode de
pilotage
Utilisez le bouton
multifonctionnel pour
régler la position neutre
Actionnez
l'accélérateurpour régler le
niveau maximum souhaité
d'accélération ou de frein
Appuyez sur SET
Le témoin DEL clignote
d'une couleur verte (x8)
Appuyez sur MENU et
maintenez appuyé
Retourne au mode de
pilotage
SI LES POINTS LIMITES
SONT
Appuyez sur MENU et
maintenez appuyé
Retourne au mode de pilotage
Appuyez sur MENU et
maintenez appuyé
Retourne au mode de pilotage
SI LES POINTS LIMITES
SONT
Appuyez sur MENU et
maintenez appuyé
Retourne au mode de pilotage
1
Allumez toujours
le transmetteur en
premier lieu.
CORRECTS :
CORRECTS :
et répétez les étapes 6-8
DOIVENT ÊTRE
et répétez les étapes 7-9
SI LES POINTS LIMITES
DOIVENT ÊTRE
CHANGÉS :
Appuyez sur SET
SI LES POINTS LIMITES
CHANGÉS :
Appuyez sur SET
Page 32

MODELS / MODÈLES 6507R, 6509R
owner’s manual
manuel du propriétaire
6200 TRAXXAS WAY, McKINNEY, TEXAS 75070
1-888-TRAXXAS
Compatible with/Compatible avec :
iPod touch (5th generation and later)
iPad (3rd generation and later)
iPad mini
Android 4.4 (and later)
160309 KC2310-R02
iPhone 4S
iPhone 5
iPhone 5C
iPhone 5S
Apple, the Apple logo, iPhone, iPad, and iPod touch are trademarks of Apple Inc., registered in the U.S. and other countries.
App Store is a service mark of Apple Inc. Android and Google Play are trademarks of Google Inc.
Apple, le logo Apple, iPhone, iPad, et iPod touch sont des marques déposées d’Apple Inc., enregistrées aux États-Unis et dans d’autres pays.
App Store est une marque de service de Apple Inc. Android et Google Play sont des marques déposées de Google Inc.
 Loading...