

Page 1
OPERATING INSTRUCTIONS
COVERS MODELS 3504, 3510
Page 2

INTRODUCTION
Thank you for purchasing the new Traxxas Nitro Vee offshore
racing boat. This manual contains the instructions you will need
to operate and maintain your new Nitro Vee boat. Look over the
manual and examine the Nitro Vee carefully before running
it. If for some reason you think the Nitro Vee is not what you
wanted, then do not continue any further. Your hobby dealer
absolutely cannot accept a Nitro Vee for return or exchange after
it has been run, or after any of the parts bags have been opened
(kit version).
Please read all of the Operating Instructions and Precautions
before attempting to drive your new Nitro Vee. These instructions
are written with the assumption that this is your first radio-controlled model. Even if you are an experienced R/C enthusiast,
please continue reading to learn about the special features that
make the Nitro Vee unique. Pay special attention to the mechanical and safety precautions outlined in this manual.
This manual includes steps for operating the radio system
which is only included on Nitro Vee model 3510. Other models
may not include the radio system.
If you have any questions about your new model, then call Traxxas’
technical support line at 1-888-TRAXXAS or 1-800-323-0069
(U.S.A. residents only. Outside U.S. call 972-613-3300). Technical
support is available Monday through Friday, from 8:30 AM to 5:30
PM Central Time. We hope that you will enjoy many hours with
your Nitro Vee.
PERSONAL SAFETY PRECAUTIONS
If the precautions are followed, and your Nitro Vee is operated
sensibly and with care at all times, it is exciting, safe, and fun for
you and your spectators. Failure to operate your Nitro Vee in a
safe and responsible manner could result in property damage
and injury.You alone must see to it that the instructions are followed and the precautions are adhered to.
The Nitro Vee is not intended for use by children without the
supervision of a responsible adult. Every precaution outlined in
this manual should be followed to help ensure safe operation.
Traxxas Corporation shall not be liable for any loss or damages, whether direct, indirect, special, incidental, or consequential, arising from the use, misuse, or abuse of this product and any chemical or accessory required to operate this
product.
• The fuel is dangerous and poisonous. Follow all of the direc-
tions and precautions on the fuel container.
• The fuel can look like a cool drink to a young child. Keep it out
of children's reach.
• The fuel is flammable Do not allow sparks, flame, or smoking
in the presence of model fuel.
• The engine emits poisonous carbon monoxide gas just like a
real automobile engine. Always run the model in a well-ventilated
area. Never attempt to run the engine indoors unless there is
adequate ventilation.
• The engine and exhaust system become extremely hot during
use. Be careful not to touch these parts, especially when re-
fueling or reaching for the EZ-Start connector.
• Do not drive the Nitro Vee at night.
•Never, under any circumstances, operate the Nitro Vee in any
water where people are swimming or wading. The Nitro Vee is
fast and could cause injury if allowed to collide with anyone.
• Because the Nitro Vee is controlled by radio, it is subject to radio
interference from many sources that are beyond your control.
Since radio interference can cause momentary losses of radio
control, always allow a safety margin in all directions around
the boat in order to prevent collisions.
• Do not reach underneath the rear of the Nitro Vee. The propellers
could spin unexpectedly. Always pick up the boat from the front
or the side.
• Because of the many dangers involved with any body of water,
Tr axxas recommends that you never try to wade or swim to
retrieve the boat. Another section in this manual outlines safer
alternative methods for boat retrieval.
• The engine produces a fair amount of noise. If the noise makes
you uncomfortable, wear ear protection. Be considerate of your
neighbors by not running your model early in the morning or
late in the evening. Try to find a place to run your model where
no one will be disturbed by its noise.
• Most importantly, use good, common sense when you are
around the water to avoid mishaps such as slipping on a
muddy bank. Always observe water safety rules and regulations.
WHERE TO RUN
Select a body of water which is calm and free of debris, tree
stumps, moss, etc. Also, find a clean, stable area of shoreline to
launch from. The water must be at least 10-inches deep. Be
aware that some ponds restrict the use of model boats. Always
choose a launch site which is downwind so that the wind and
waves will drift the boat back to you if it should ever flip. Running
the Nitro Vee in salt water is not recommended. Damage
from corrosion is not covered by the warranty.
REQUIRED EQUIPMENT
To operate the Nitro Vee, you will need the following equipment. All of it should be available from your hobby shop. Some
models also require a two-channel radio system.
1. Model engine fuel (see fuel recommendations below)
2. Fuel dispensing bottle (4 oz. or larger)
3. 7.2 volt rechargeable nicad battery pack and charger
3. “AA” size batteries for your transmitter(8) and receiver(6)
5. Small phillips head and flat screwdrivers (for making
adjustments)
6. After-run oil (to protect the engine from corrosion)
7. Spare glow plugs (Traxxas part #3230)
8. In-line fuel filter (recommended)
9. Spare fuel line (recommended)
Model 3504 also requires a two-channel radio system.
FUEL
Fuel is the most critical component for making your engine
perform properly. Improper fuels will cause hard starting, poor
performance, and excessive wear on the engine. Do not use
fuels which only contain synthetic oil. Use a high-quality,
castor/synthetic blended plane/boat fuel. Most airplane fuels
contain the proper oil/fuel ratio necessary for the Nitro Vee’s high
RPM, high load running. Do not use car fuels in your Nitro Vee.
Although Traxxas cannot guarantee the quality and consistency
of other manufacturers’ fuels, at the time of this publication,
Tr axxas has tested the fuels listed below and found them to be satisfactory for use in the TRX-15 marine engine.
Omega 10 and 15%
Some fuels are capable of destroying your TRX-15 engine!
Straight synthetic fuels can damage your engine and void
your warranty! If you must use a fuel other than those listed,
contact TRAXXAS, at 1-888-TRAXXAS, to find out if the fuel is
safe for use with TRX engines.
CAUTION:
ALWAYS FOLLOW THE PRECAUTIONS PRINTED ON
THE CONTAINER OF FUEL. KEEP IT AWAY FROM
FLAMES AND CHILDREN. THE MIXTURE IS FLAMMABLE
AND POISONOUS.
2
Page 3
FUEL BOTTLE
Fuel is usually purchased by the gallon or quart, so a smaller
bottle with a dispensing tube is required to fill the fuel tank. The
fuel tank has a capacity of 120cc. The fuel bottle should be
capped to prevent the fuel from evaporating and becoming contaminated with debris or moisture. The alcohol and nitro contents of
the fuel will evaporate, thus upsetting the fuel balance and spoiling the fuel. Do not use old or dirty fuel!
7.2v BATTERY PACK AND CHARGER
The EZ-Start electric starter requires a 7.2 volt rechargeable
nicad battery pack to operate. The battery pack straps to the bottom of the EZ-Start control box with the supplied tie wraps. The
battery pack can be recharged with a simple overnight “wall charger”,
a peak-detecting charger (most expensive), or a 15-minute quick
charger. These chargers are all available from your hobby dealer.
RADIO SYSTEM INSTALLATION
{Model 3504 only}
The model 3504 Nitro Vee is fully assembled without the radio
system. Refer to the exploded view diagrams for details on
installing other manufacturers’ radio systems
THE RADIO SYSTEM (Model 3510)
TWO-CHANNEL RADIO SYSTEM - The radio system in your model
consists of the RECEIVER, the TRANSMITTER, the steering
SERVO, the ELECTRONIC SPEED CONTROL, and the CRYSTALS.
It has two channels, one to operate the throttle, and one to operate
the steering. (Unassembled kits do not include the radio system.)
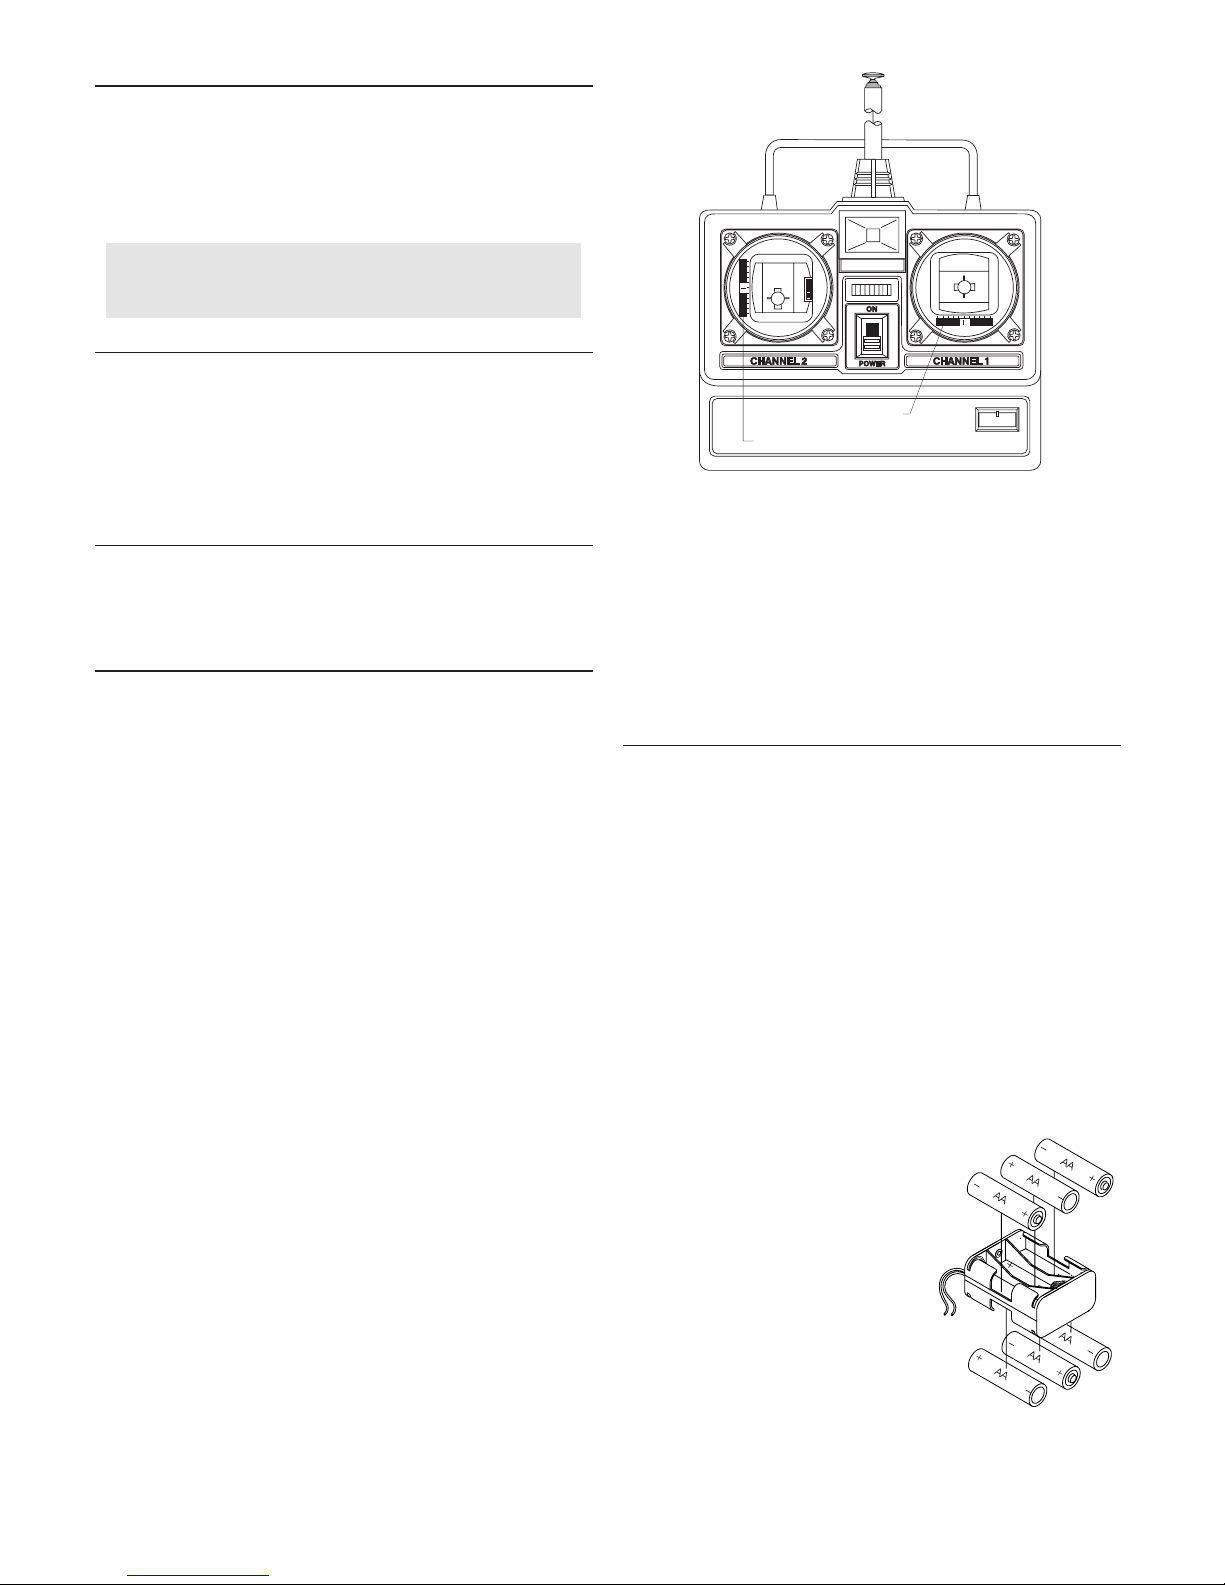
TRANSMITTER - The TRANSMITTER is the hand-held radio unit
which sends throttle and steering instructions to the model.
RECEIVER - The RECEIVER is the radio unit inside the model
which receives signals from the TRANSMITTER, and relays them
to the SERVOS.
SERVO - The SERVO is the small motor unit in the model which
operates the steering mechanism.
FREQUENCY BAND - The FREQUENCY band is the radio
frequency that the transmitter uses to send signals to the model.
The FREQUENCY BAND for radio control vehicles is 27 MHZ
(mega-hertz).
CHANNEL - The 27 MHZ FREQUENCY BAND is divided into 6
CHANNELS so that up to six boats can be operated simultaneously.
These CHANNELS are referred to by their number and flag color.
The chart below lists the channels and their flag colors.
CRYSTAL (X-TAL) - The CRYSTAL is the plug-in device that
determines which channel (1-6) that the RADIO SYSTEM will
operate on. For Each CHANNEL, there are two CRYSTALS; one
for the RECEIVER and one for the TRANSMITTER. Of those two
CRYSTALS the one marked with the lower number (.455 MHZ
lower) must be inserted in the RECEIVER.
NICAD (Ni-Cd) - These terms stand for rechargeable, nickel cadmium batteries. These batteries are the most economical and
can be recharged up to 500 times.
NEUTRAL POSITION - The NEUTRAL POSITION is the standing
position that the SERVO seeks when the TRANSMITTER
controls are at neutral.
TRIM - TRIM is the fine-tuning adjustment of the NEUTRAL
POSITION of the SERVOS. This adjustment is made by moving the
throttle and steering trim sliders on the face of the TRANSMITTER.
PREPARING TO RUN
• INSTALLING TRANSMITTER BATTERIES
Yo ur transmitter uses 8 “AA” size batteries.They should be alkaline
dry cells or nicad rechargeable batteries. The battery compartment
is located in the back of the transmitter. To remove the battery
door, push down and slide in the direction of the arrow. Be sure
that the switch is turned off before installing the batteries. Insert
the batteries into the battery compartment, making careful note of
the polarity. Now, slide the battery door back in place.
• OPENING THE TOP COVER
The top cover is held in place by inserting the front tab into the
slot and fastening the back of the cover to the Velcro™ strips
near the transom. Removing the top cover provides access to the
battery compartment and radio system. For engine tuning
access, the driver figures may also be removed separately.
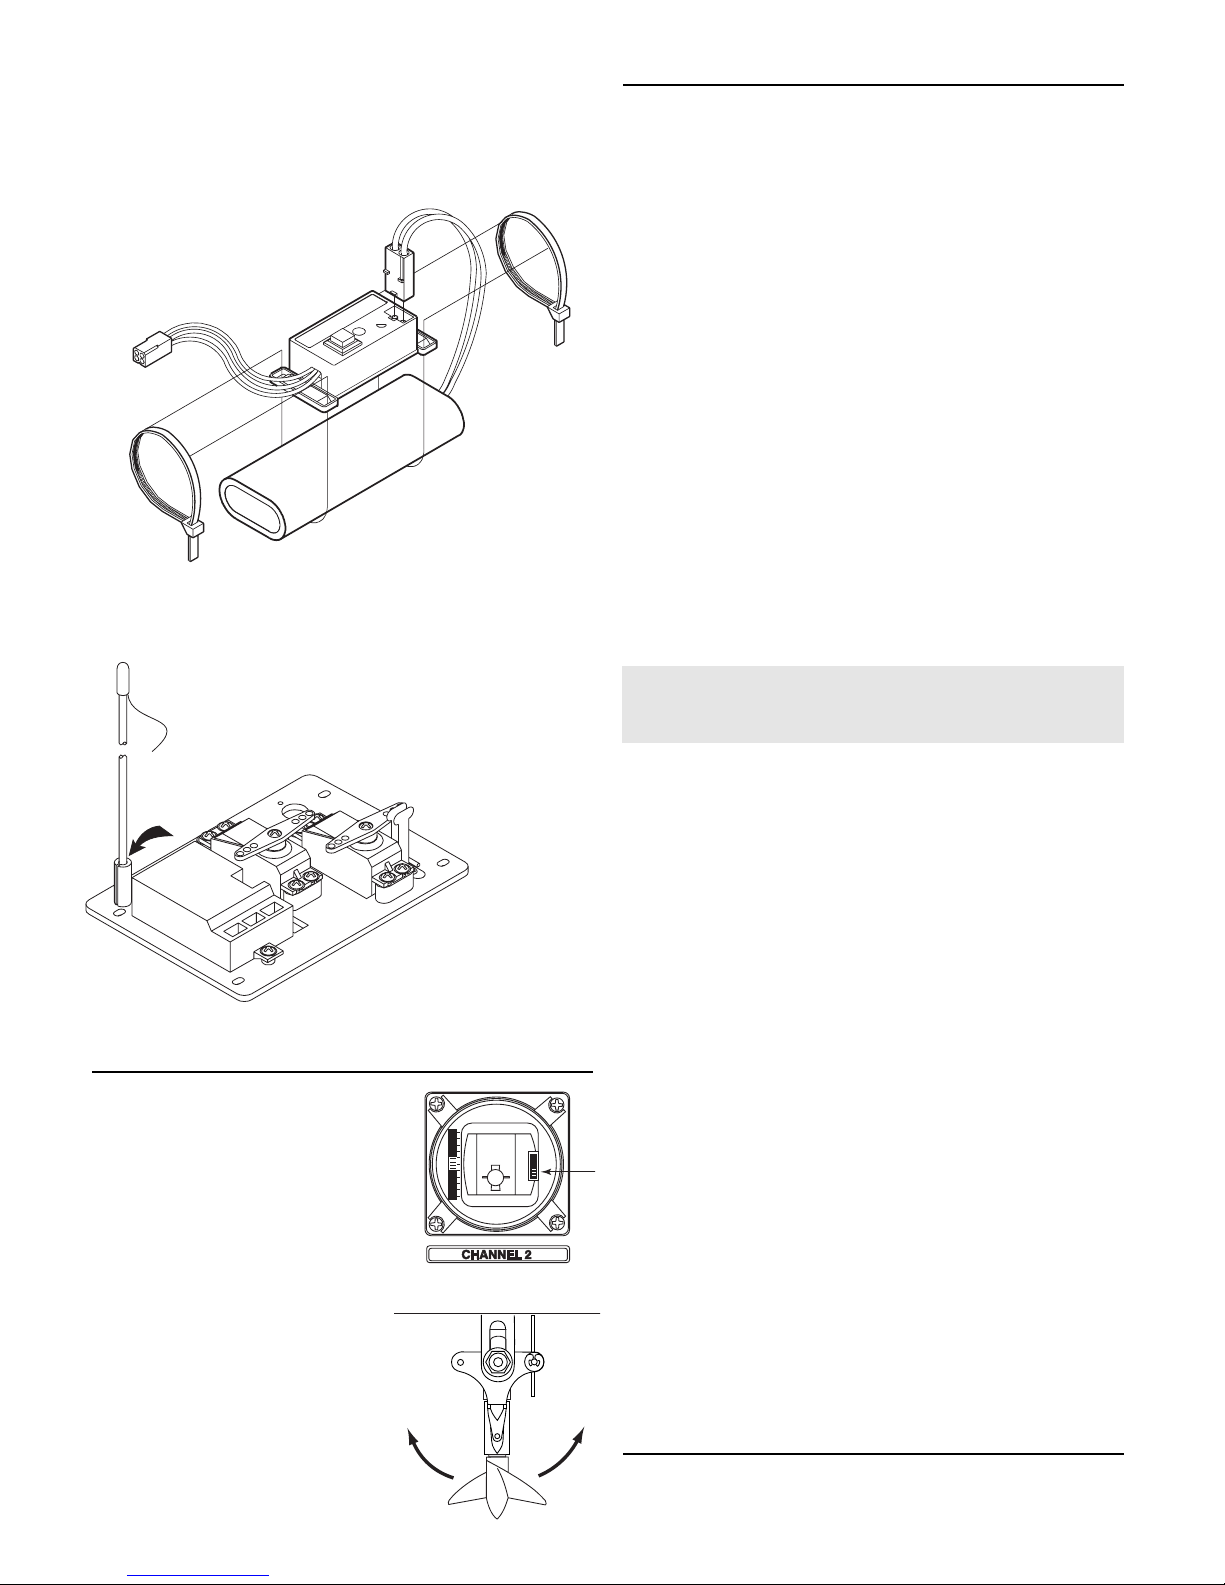
• INSTALLING THE RECEIVER BATTERIES
Install 6 “AA” alkaline batteries into the battery holder in your model. Tape or rubberband the batteries into the holder to prevent them from falling out during rough
running. Stretch a rubber balloon over
the battery holder to prevent fuel and
water contamination. Install the battery
holder into the boat and secure it with
the nylon tie wrap. Position the tie wrap
so that its end will not interfere with the
top cover. Make sure the battery holder
is secure in the model and will not come
loose. These batteries power both the radio
system and the Return-To-Shore system.
DO NOT ATTEMPT TO OPERATE YOUR NITRO VEE
WITH WEAK BATTERIES OR IT COULD RUN OUT OF
RANGE RESULTING IN LOSS OF CONTROL.
CAUTION:
KEEP THE FUEL CONTAINERS CAPPED AT ALL TIMES
WHEN NOT IN USE.THE FUEL CAN SPOIL VERY QUICKLY.
3
THROTTLE TRIM CONTROL
CRYSTAL
STEERING TRIM CONTROL
27MHZ FLAG COLOR CH# TRAXXAS CRYSTAL PART#
26.995 BROWN 1 2031
27.045 RED 2 2032
27.095 ORANGE 3 2033
27.145 YELLOW 4 2034
27.195 GREEN 5 2035
27.255 BLUE 6 2036
Available crystal sets
Page 4
• INSTALLING THE EZ-START BATTERY
Use tie wraps to secure a fully-charged 7.2 volt battery back
to the EZ-Start control box. Plug the battery connector into the
face of the control box. The plug will only go in one way
• ANTENNA SETUP
Locate the 12” plastic antenna tube and the rubber
antenna tip that came with your boat. Now, locate the
black antenna wire which comes out of the receiver
inside the boat. Thread the antenna wire through the
antenna tube and then install the tube into the slotted
post on the radio tray (drawing). Fold the excess
antenna wire over the top
of the antenna tube
and install the vinyl
antenna tip. Do not
shorten the
length of the
receiver’s
antenna.
On top of the transmitter,
insert the chrome telescopic
antenna into the hole in the top of the
transmitter and screw it down until it
stops. Do not overtighten.
TRANSMITTER CONTROLS
• THROTTLE NEUTRAL ADJUST:
The throttle neutral adjust, is located on
the right of the throttle stick (channel 2). It
controls the amount of desired forward
and reverse travel of the throttle stick. It
should stay in the down position as
shown in the drawing (arrow). If you
change this adjustment, your transmitter
throttle trim will have to be reset.
• THROTTLE TRIM/ STEERING TRIM:
Adjust the throttle trim control so that
the RTS motor in the Nitro Vee does not
run after the switch is turned on. Adjust
the steering trim so that the Nitro Vee will
drive straight without veering to the left or
right.
RADIO SYSTEM ADJUSTMENT
Your radio system was pre-adjusted before it left the factory however, the adjustment should be checked prior to running the Nitro
Vee. These instructions are for Traxxas radio systems only. If you
installed your own radio, refer to your radio system’s instructions.
1) Before you ever turn your radio system on, you must “clear”
your frequency. Clearing your frequency means checking to be
sure that no one else in the area is operating on the same
channel as you. There are six different channels numbered 1
through 6. Each of the six channels is represented by a color.
Look at the crystal on the face of the transmitter to determine
which of the channels your Nitro Vee is operating on.
2) Always turn the transmitter on first, before you turn on the
receiver in the boat. If you do not, the boat could run out of
control. Slide the transmitter switch to the “on” position. The red
light should be on and not flashing. A flashing red light indicates
weak transmitter batteries. Weak batteries will cause the range
of your model to be limited, and you could lose control.
CAUTION: When nicad batteries begin to lose their charge, they
will fade much faster than alkaline dry cells. Stop immediately
at the first sign of weak nicad batteries.We recommend that
only alkaline batteries be used inside the boat.
3) Push the switch inside the boat to the “on” position.The steering
servo should jump and move to its idle (neutral) position. Keep
fingers and obstacles away from the propeller.
NEVER TURN THE TRANSMITTER OFF WHILE THE
ENGINE IS RUNNING. THE MODEL COULD RUN OUT
OF CONTROL.
4) Operate the steering control on the transmitter (channel 1).
Check for rapid operation of the steering servo and that none of
the steering mechanism is loose or binding. If the servo operates slowly, check for weak batteries. Slide the “steering trim”
control on the transmitter to adjust the servo so that the outdrive
and propeller are pointing straight back. Check to be sure that
the outdrive does not turn more in one direction than in the
other. If it does, then refer to the section “Centering Your
Servos.”
5) There is an adjustment to the right of the throttle lever (channel 2).
Make sure it is in the down position as shown in the drawing.
6) Operate the throttle lever on the transmitter to ensure that the
throttle servo is operating properly. When the servo is in the
neutral position, the carburetor should be in its idle position
(you will adjust the engine idle speed later). When the throttle
lever is pushed completely forward, the carburetor should be in
the fully open position. When the throttle lever is pulled all the
way back, the carburetor should close to idle and the switch for
the R.T.S. motor will be engaged. (CAUTION: The R.T.S. motor
will run during this test so be sure that your fingers are clear of
the propeller and drive mechanisms). Check to be sure that
none of the cooling and exhaust hoses interfere with the throttle or gear mechanisms.
7) The radio system should be range-tested before each session
of running. With the radio system on, have a friend carry the
boat away from you a distance equal to the maximum range you
plan to operate the the boat. Make sure your friend holds the
boat carefully to avoid contact with the propeller. At distance,
once again test for complete radio control. Never attempt to run
the boat if the radio appears to be malfunctioning in any way.
VISUAL INSPECTION
Form the habit of visually inspecting the mechanical integrity of
the Nitro Vee before each run.
4
Page 5
5
1) Some water may accumulate inside the boat. Empty any standing
water out of the boat between runs. Pour any water out the side
or front of the boat. Do not drain the water out of the back of the
boat (near the radio system).
2) Check the wiring for any frayed wires or loose connections.
3) Check the tightness of the grub screws in the collars on the
steering linkages, in the propellers, and in the universal joint
yokes (connecting the outdrives to the driveshafts). Threadlocking compound can be applied to these screws to prevent
them from loosening.
4) Check the mounting of the receiver and servos.
5) Check the driveshaft seals for damage. Do not attempt to run
the Nitro Vee if these seals are damaged in any way.
6) Check the tightness of the propellers. Visually inspect the props
for nicks, dings, and warpage. Replace if any damage is noticed.
7) Check the operation of the radio system, especially the condition of the batteries.
8) Visually inspect the hull for any cracks, damage, or possible leaks.
THE ENGINE
This section describes the basic operation, controls, and maintenance procedures for the Traxxas TRX Pro-15 marine engine.
Read it before attempting to start the engine. It is written with the
assumption that this is your first fuel-powered model. Even if you
are already experienced with model engines, please read this
information. Fuel requirements and break-in procedures for the
TRX Pro-15 may be different from other engines.
FUEL MIXTURES
The fuel mixture (ratio of air to fuel) is critically important. A mixture that is too “rich” means that there is too much fuel, and a mixture that is too “lean” means that there is not enough fuel for the
given amount of air.When the mixture is too rich, performance will
be sluggish and there will be an excessive amount of smoke. The
glow plug may also become fouled if the mixture is too rich. When
the mixture is too lean, there is not enough fuel to carry oil for cooling and lubricating the internal engine components. Damage is
almost certain when the fuel mixture is too lean. Set your carburetor’s high and low-speed mixture screws (needles) to the specifications in this manual.
STARTING THE ENGINE
STEP 1: FILLING THE FUEL TANK
Position the boat on its stand so that it is level. The fuel tank has
a capacity of 120 cc. Use small fuel bottle or bulb to put fuel into
the tank. Only fill the tank to the bottom of the fill neck. do not allow
the fuel to spill inside the boat. If any fuel does spill, wipe it off
immediately. Do not allow puddles of fuel to accumulate inside the
boat. Be especially careful not to allow the fuel to come in contact
with the foam flotation inside the bow of the boat, or stay in continuous contact with the plastic inner hull. The fuel can quickly
damage the plastic.
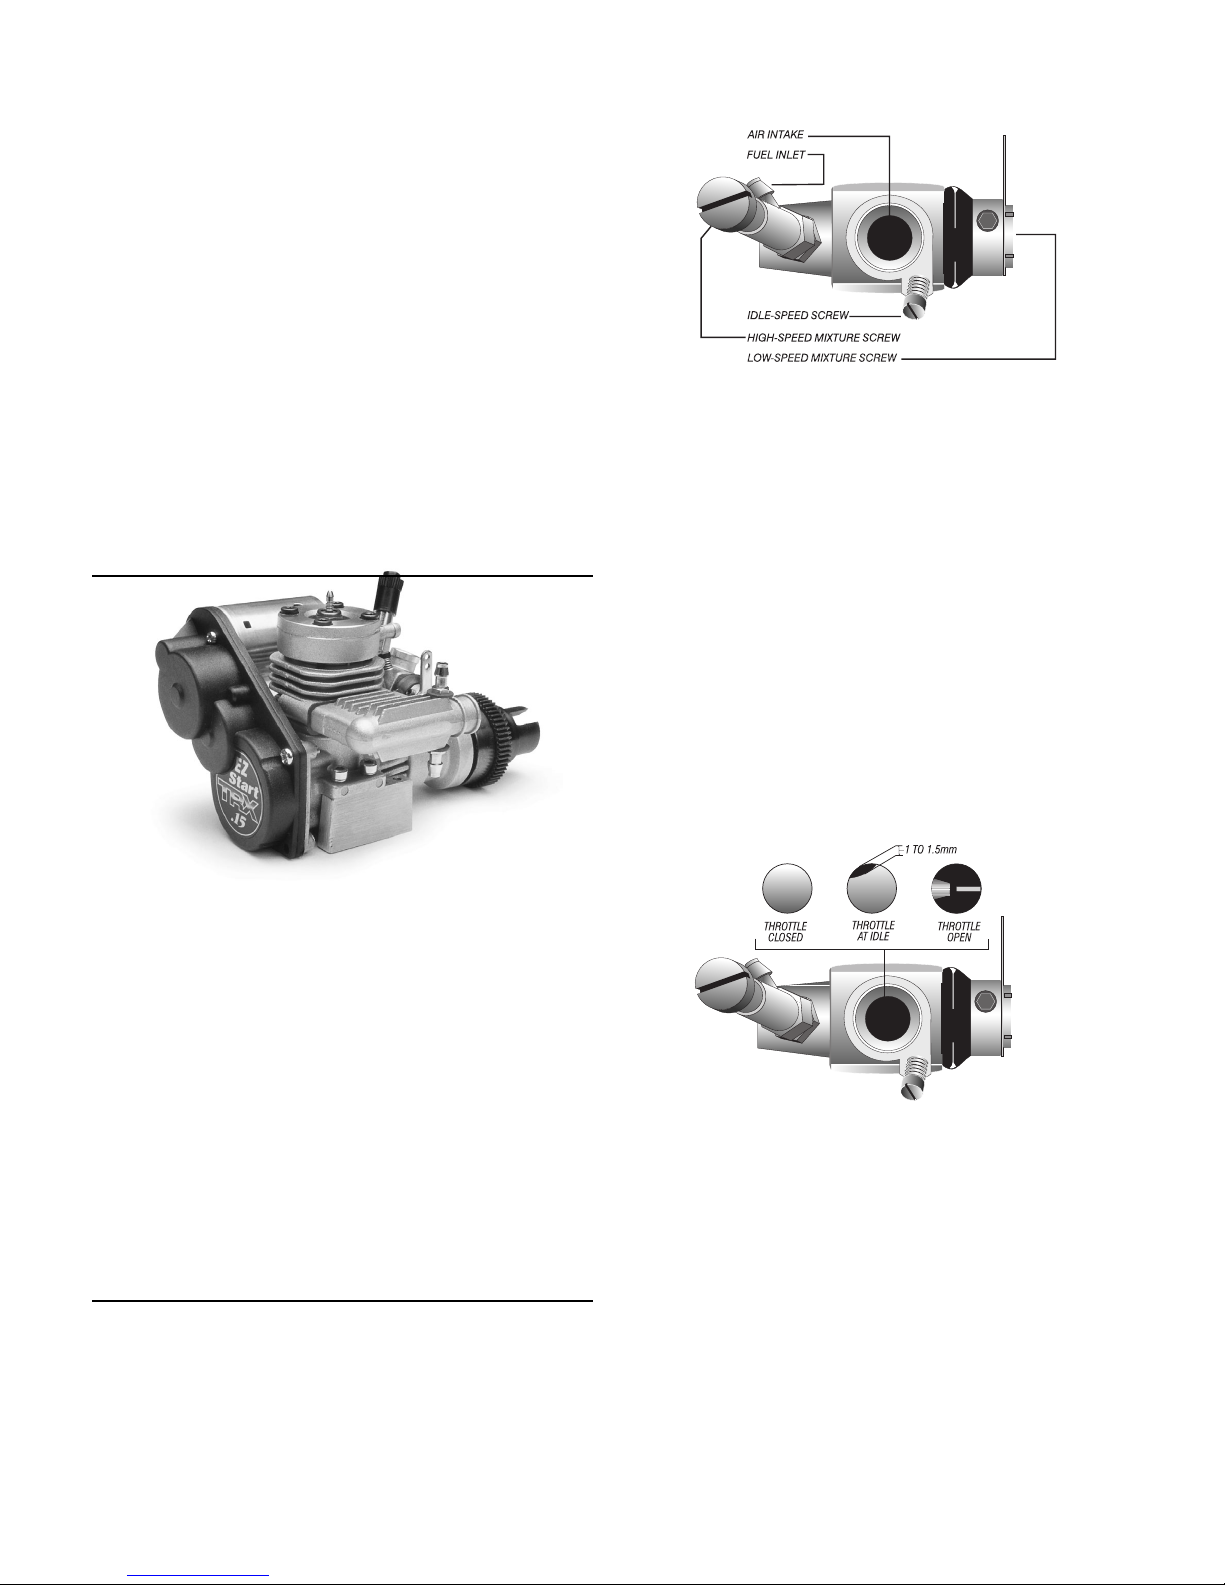
STEP 2: SETTING THE HIGH-SPEED MIXTURE
The mixture screw controls how much fuel enters the engine.
With the radio system on and the air filter removed, adjust the
throttle trim knob on the transmitter until the throttle just closes
against its stop. Now, turn the mixture screw clockwise, by hand,
until it stops (Do not tighten or the needle may be damaged). Now,
turn the mixture screw out, counter-clockwise, 2
1
/2complete turns.
Note: If you live in higher altitudes (3000 feet or higher above sea
level), it may be necessary for you to set your fuel mixture as lean
as 21/4turns out from closed. Call 1-888-TRAXXAS if you have
questions about setting your fuel mixture.
STEP 3: SETTING THE LOW SPEED MIXTURE
The low-speed mixture screw is located in the end of the carburetor, inside the throttle arm.This screw has been preset at the factory and it is not necessary to adjust it. If for some reason the setting gets changed, gently turn the screw clockwise until it stops
and back it out 1
3
/4complete turns. This setting may also need to
be set as lean as 11/4turns in higher altitudes.
STEP 4: SETTING THE IDLE SPEED
The throttle opening at idle should be set as shown in the drawing.
The opening should be 1 to 1
1
/2millimeters at the widest point in
the opening. The idle speed may need to be readjusted after the
engine is running and warmed up. Do not use the throttle trim
adjustment on the transmitter to adjust the final idle speed. Always
set it at the carburetor.
STEP 5: CONNECTING THE EZ-START
Remove the top cover and connect the EZ-start control box, with
a fully-charged battery pack, to the plug inside the boat. The plug
is keyed so it will only connect one way.
STEP 6: SHUTTING OFF THE ENGINE
Before starting the engine it is important to know how to shut it
off. The correct method is to pinch and hold the carburetor’s fuel
inlet line while running at idle speed.
Page 6

6
STEP 7: START THE ENGINE
Before starting your engine, read the safety and mechani-
cal engine precautions on pages 2 and 8.
1) Turn the radio system on (transmitter and receiver). Set the boat
securely in its stand.
2) With one hand, hold the throttle about half way open using the
throttle stick on the transmitter. With the other hand, press the start
button on the EZ-Start and hold for no more than 5-seconds.
Once the engine is running, hold the engine at a medium speed for
10-15 seconds.
Note: The red LED on the EZ-Start will light when the start button
is pressed. This indicates that the glow plug is hot (ignited). If the
LED does not light, make sure that the glow plug connector (blue
wire) is firmly attached to the center post of the glow plug. If the
connection is secure, and the LED still does not light, replace the
glow plug.
3) If the engine did not start in step 3, wait 20-seconds and restart.
Continue this sequence until the engine starts.
4) If, after many tries, the engine still will not start, there could be a
problem with the glow plug, the fuel, or the engine could be flooded.
Refer to the troubleshooting section for more information. Keep in
mind that the engine was run at the factory prior to being shipped,
so any starting problems are most likely fuel or glow starter related.
STEP 8: DETERMINING THE FUEL MIXTURE
Allow the engine to warm up for approximately 15-30 seconds.
If the engine will not idle, then re-adjust the idle speed.Turn the idle
screw clockwise to increase the idle speed.
Slowly advance the engine to full throttle, allow the engine to
“clean out” the excess fuel, and then return to idle. If full throttle is
applied rapidly to a cold engine, it will stall. If a cold engine stalls,
repeat the priming and starting procedure again. Do not operate
the engine at high RPMs for extended lengths of time while
the boat is out of the water (no load on the propeller). This could
damage your engine and drive system bushings. Avoid running the
engine for more that a minute out of the water or it could overheat.
If the engine will not accelerate without dying, then either the
high-speed fuel mixture is too rich, the engine is still cold, the throttle was advanced too quickly, or the low-speed mixture is too lean.
Lean the fuel mixture by slightly turning the high-speed mixture
screw clockwise. Repeat the acceleration test.
Once the engine will accelerate without dying (slight hesitation
is okay), then the Nitro Vee is ready to put in the water. Install the
top cover before driving. (Note: Do not run the Nitro Vee without
the top cover securely in place.)
STEP 10: IN THE WATER
Once again, check for proper radio system operation. Place the
boat in at least 10 inches of water (clear of weeds, sticks, trash,
etc.). Accelerate slowly to full throttle. The Nitro Vee should come
up on plane and begin to accelerate strongly after about 25 feet or
less. The steering will be unresponsive until the boat is up on plane.
Once on plane, a large amount of steering input is required to force
the Nitro Vee off the “bubble” of planing. After making the first turn,
the steering response will greatly improve.
Once on plane, drive the boat past you so that you can visually
check for cooling water exiting the outlet at the rear of the boat. If
you cannot see the small stream of water, retrieve the boat immediately to find the problem. The water-cooling system only functions when the boat is at speed, on plane. For this reason, do not
allow the boat to cavitate or idle for more than a minute, or the
engine could overheat.
DRIVING THE NITRO VEE
• The Nitro Vee is lighter and more agile than a comparably-sized
electric boat. Because of its lighter weight, it rides higher out of
the water. Care should be taken to operate the controls smoothly to avoid spin-outs as you turn. Drive cautiously in rough, choppy water, and in high winds. The “deep V” hull offers much more
stability than other designs however, the Nitro Vee can still flip if
it hits a wave at an unusual angle or if a gust of strong wind
catches it too high out of the water. It is best to drive your Nitro
Vee on calm days (winds less than 15mph).
• The Nitro Vee’s steering is very responsive. When the Nitro Vee
is in open water, adjust the steering trim on the transmitter until
the boat travels in a straight line on its own. (Note: The Nitro Vee
will only travel in a straight line on its own when it is headed
straight into or away from the wind. Crosswinds will require constant steering input to maintain a straight course.) A slight input
on the steering control will have a large effect on the boat. Do not
let the Nitro Vee “spin out,” or it could flip over.
• Always be ready to reduce the throttle if the Nitro Vee appears to
be unstable or “chine walking” (rocking violently from side to
side). Always reduce the throttle when turning, especially in
rough water. Jumping the Nitro Vee or towing anything with it
should not be attempted.
• Return the Nitro Vee to shore at the first sign of weak batteries. The Nitro Vee will begin to slow and the controls will
become sluggish.
• CAVITATION: If the Nitro Vee is running at full throttle, but is
only barely moving forward then the propeller is cavitating. Try
advancing the throttle slowly to get the Nitro Vee on plane.
If
you are having trouble with cavitation, check the propellers for
nicks or tangled debris. The Nitro Vee’s propeller is specially
designed for its application and is very sensitive to any changes
or modifications. Even the slightest nick can prevent your boat
from planing. If a prop is damaged it should be replaced.
BREAKING-IN THE ENGINE
Once your engine is running, it must be broken-in. The key to
breaking in your engine is patience. During the break-in period,
your engine may appear to malfunction with symptoms such as
stalling, inconsistent performance, and fouled glow plugs. Don’t
give up on it! These are just “break-in pains” that every new engine
has to go through, and which will disappear once you get through
the break in period. Just keep it running, and throttle on and off
as smoothly as you can. Sudden bursts or releases of the
throttle can stall your engine. Soon, after about the second tank
of fuel, your patience will pay off with solid, consistent, performance.
The break in time will take about 1 to 11/2 hours. During this
time, you should resist the temptation to tune the engine for performance and/or run for extended times at wide open throttle.
Completing the break in process as instructed will result in the
fastest, best-performing engine.
PLEASE READ THESE IMPORTANT NOTES BEFORE YOU BEGIN:
• Use fuel with the same percentage of nitro which you plan to
run every day. Special break-in fuels are not required.
• Do not allow the fuel tank to run completely empty. An
extremely low fuel level causes the fuel mixture to be too lean.
•Keep extra glow plugs handy.The break-in process can cause
deposits to form on the glow plug, leading to failure.
•Turn the mixture screw (needle) clockwise (in) to lean the
mixture and counter-clockwise (out) to richen the mixture.
CAUTION:
TRX ENGINES MUST BE BROKEN-IN FOR MAXIMUM LIFE
AND HIGHEST LEVEL OF PERFORMANCE. THIS PROCESS
MUST NOT BE SKIPPED. A SHORTCUT HERE COULD
SHORTEN THE ENGINE LIFE
Page 7
7
THE FIRST TANK OF FUEL
Once the engine is started, drive the boat slowly at first to warm
the engine. Ease in and out of the throttle slowly. Vary your
speed between low and medium throttle until about half of the
first tank of fuel is used. Do not run at full speed during the first
tank of fuel. Do not rev the engine when the boat is out of the
water. High, no-load RPMs can damage the engine.
The baseline setting of the high-speed mixture screw will vary
slightly with each engine. To know if your engine is set correctly for
break in, look for the following performance characteristics (on a
warm engine):
• The engine will accelerate sluggishly from a standing start and
may even try to stall if the throttle is applied too quickly.
• Blue-white smoke will be emitted from the exhaust.
• When the model is accelerating at full throttle, the engine will
never “clean out.” When an engine “cleans out”, the speed and
rpms will increase suddenly and dramatically, as if the engine
has gone into “second gear.” Also the amount of smoke emitted
from the exhaust will decrease. “Cleaning out” is a desirable
characteristic once the engine is broken-in; however, during the
first two tanks, it should be avoided.
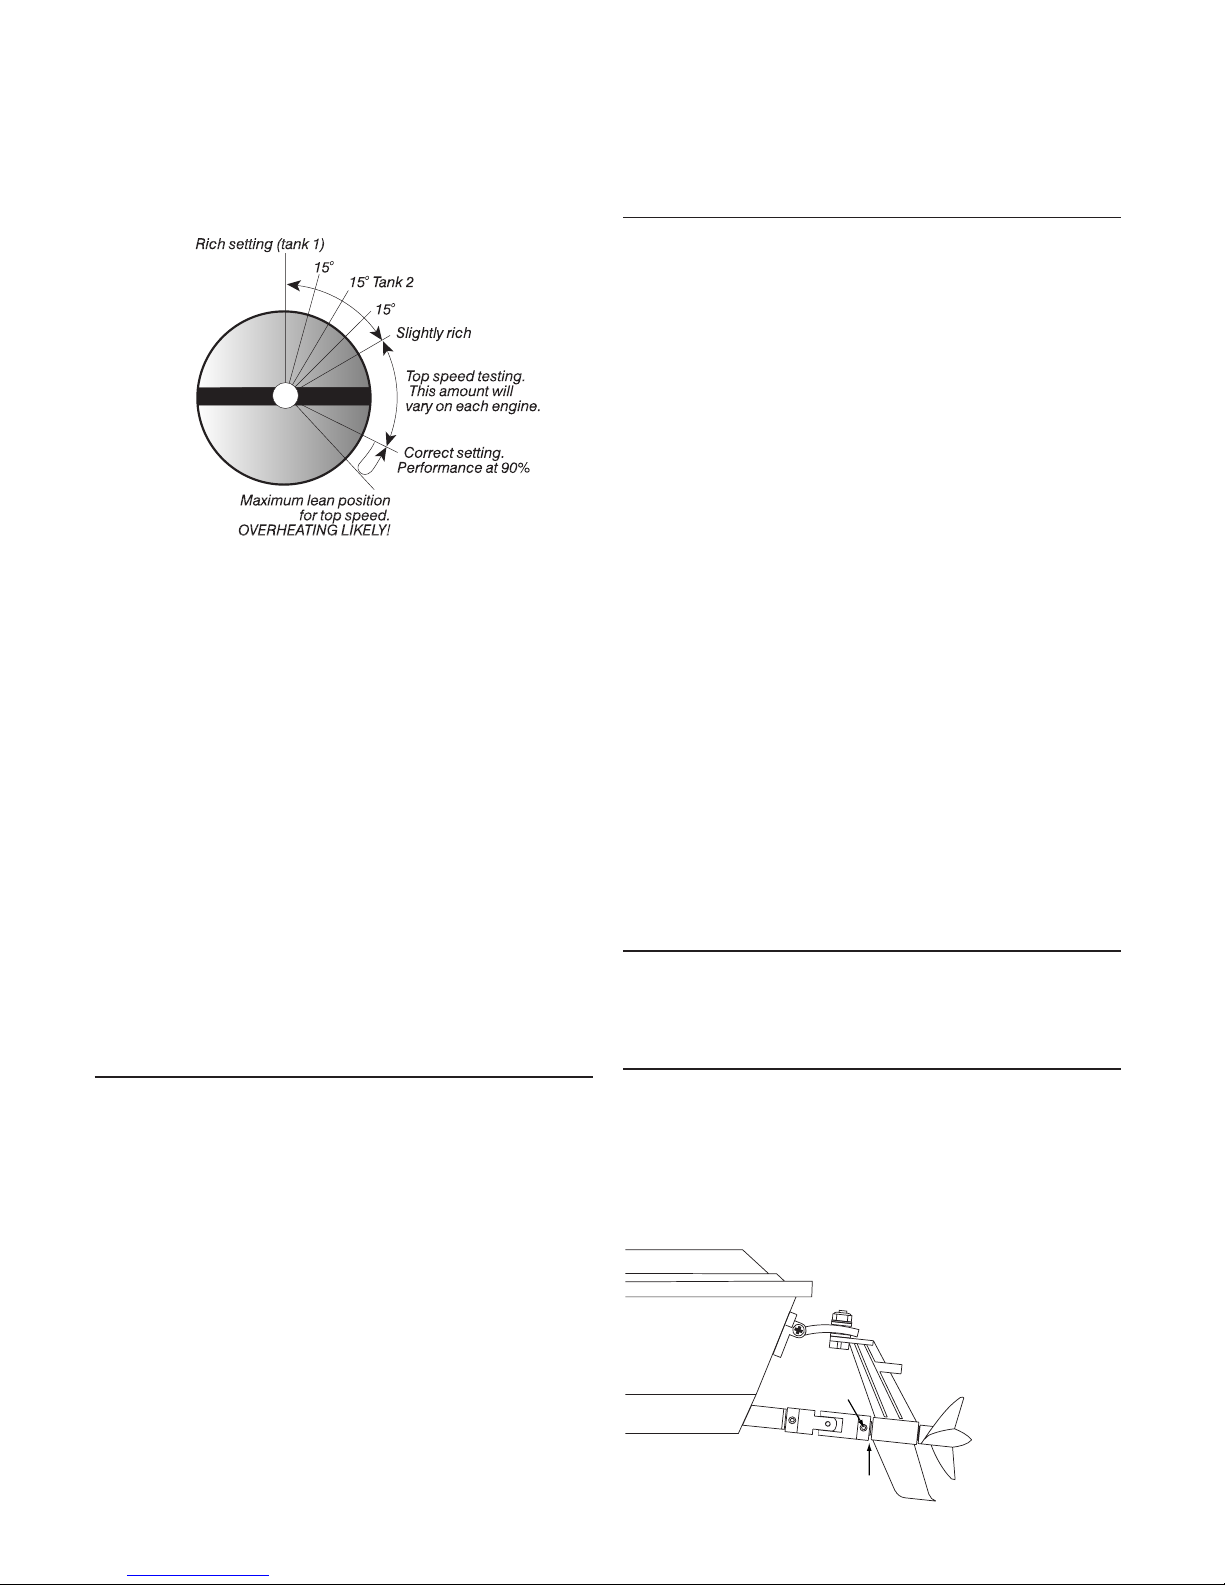
Halfway through the first tank of fuel, bring the boat in and lean
the fuel mixture by turning the high speed needle clockwise 15
0
.
As the engine reaches normal operating temperature, it will speed
up and performance will improve. This occurs because the fuel
mixture is becoming leaner with the increased temperature. You
may need to richen the fuel mixture very slightly so that the engine
continues to run as described above.
When the first tank is used, bring the model in, shut off the engine,
and allow it to cool for 7-10 minutes before continuing.
THE SECOND TANK OF FUEL
Tu rn the high-speed mixture screw clockwise 150and run through
half of the second tank of fuel.
Halfway through the second tank, bring the model in and lean
the fuel mixture another 150(see illustration).
During break in, watch closely for any signs of overheating.
These include:
• Steam or smoke emanating from the engine surfaces
• Lagging during acceleration (as if running out of fuel)
• Popping or clattering sound when decelerating (detonation)
• Idle speed will surge or possibly diminish to the point of stalling.
IF THE ENGINE STALLS WHILE YOU ARE DRIVING, BECAUSE
OF AN OVERHEATING CONDITION, SEVERE DAMAGE HAS
PROBABLY ALREADY OCCURRED. OVERHEATING IS
CAUSED BY THE FOLLOWING OPERATIONAL ERRORS:
• HIGH SPEED MIXTURE IS SET TOO LEAN
• EXCESSIVE NITRO IN THE FUEL
• INCORRECT OIL CONTENT IN THE FUEL
• POOR QUALITY FUEL
• EXCESSIVE LOADS PLACED UPON THE ENGINE (caused by
a bound drivetrain)
YOUR ENGINE WILL BE SHORT-LIVED IF ANY OF THE ABOVE
CONDITIONS ARE ALLOWED TO PERSIST.
TUNING FOR POWER
After the second tank of fuel, the internal engine parts should
be broken-in.You can now begin adjusting the fuel mixture to maximize performance for your normal driving needs.
The engine should never be run at more than 90-95% of its
maximum performance capacity. As you continue to lean the fuel
mixture, the engine will run faster, up to a point. When the engine
is set too lean, it will seem to run strong at first, but will bog, hesitate, or stall when running at speed. The engine will also rapidly
overheat when the setting is too lean.
At the optimum setting, the engine will have a strong-sounding,
high-pitched whine at full speed; and there will be a thin trail of
whitish smoke emitted from the exhaust. If there is no smoke, the
fuel mixture must be richened to ensure that the engine is getting
enough oil/fuel for adequate lubrication.
Find an area that will allow the engine to run at full throttle. Run
the model two or three passes at full throttle and note the top
speed and acceleration. Turn the high-speed mixture screw clockwise 150and retest the model, again noting the performance.
Continue to lean the mixture and retest the model until the Nitro
Vee bogs and starves for fuel at full throttle. When this occurs,
reduce the throttle immediately to medium speed and the boat
should regain its speed. Retrieve the boat, turn the high-speed
mixture screw counter-clockwise (richer), and re-test. Continue to
richen the mixture until the boat no longer hesitates and stalls at
full throttle. At that point, turn the mixture screw counterclockwise
10 to 150. This is the optimum setting that the engine should be
run.
If the boat takes an excessive amount of time to come on plane
but full-throttle (top speed) performance is good, the fuel mixture
might need to be slightly leaner. (Note: A damaged prop will also
cause this same symptom. Check it before leaning the mixture.)
SETTING THE IDLE SPEED
The idle speed may be set too high now that the engine mixture is
tuned. Turn the idle screw out (counter-clockwise) until the engine
will idle slowly and the propeller is not spinning.
ADJUSTMENTS
• ADJUSTING THE OUTDRIVE SHAFT END PLAY
There should be a slight amount of shaft endplay in the outdrive housing. To adjust the endplay loosen the grubscrew on the
U-joint yoke (see drawing). Pull the propeller shaft until there is
no more than 1mm of distance at arrow 2 in the drawing.
Retighten the grub screw.
Arrow 2
Loosen
Page 8
• ADJUSTING THE TRIM ANGLE
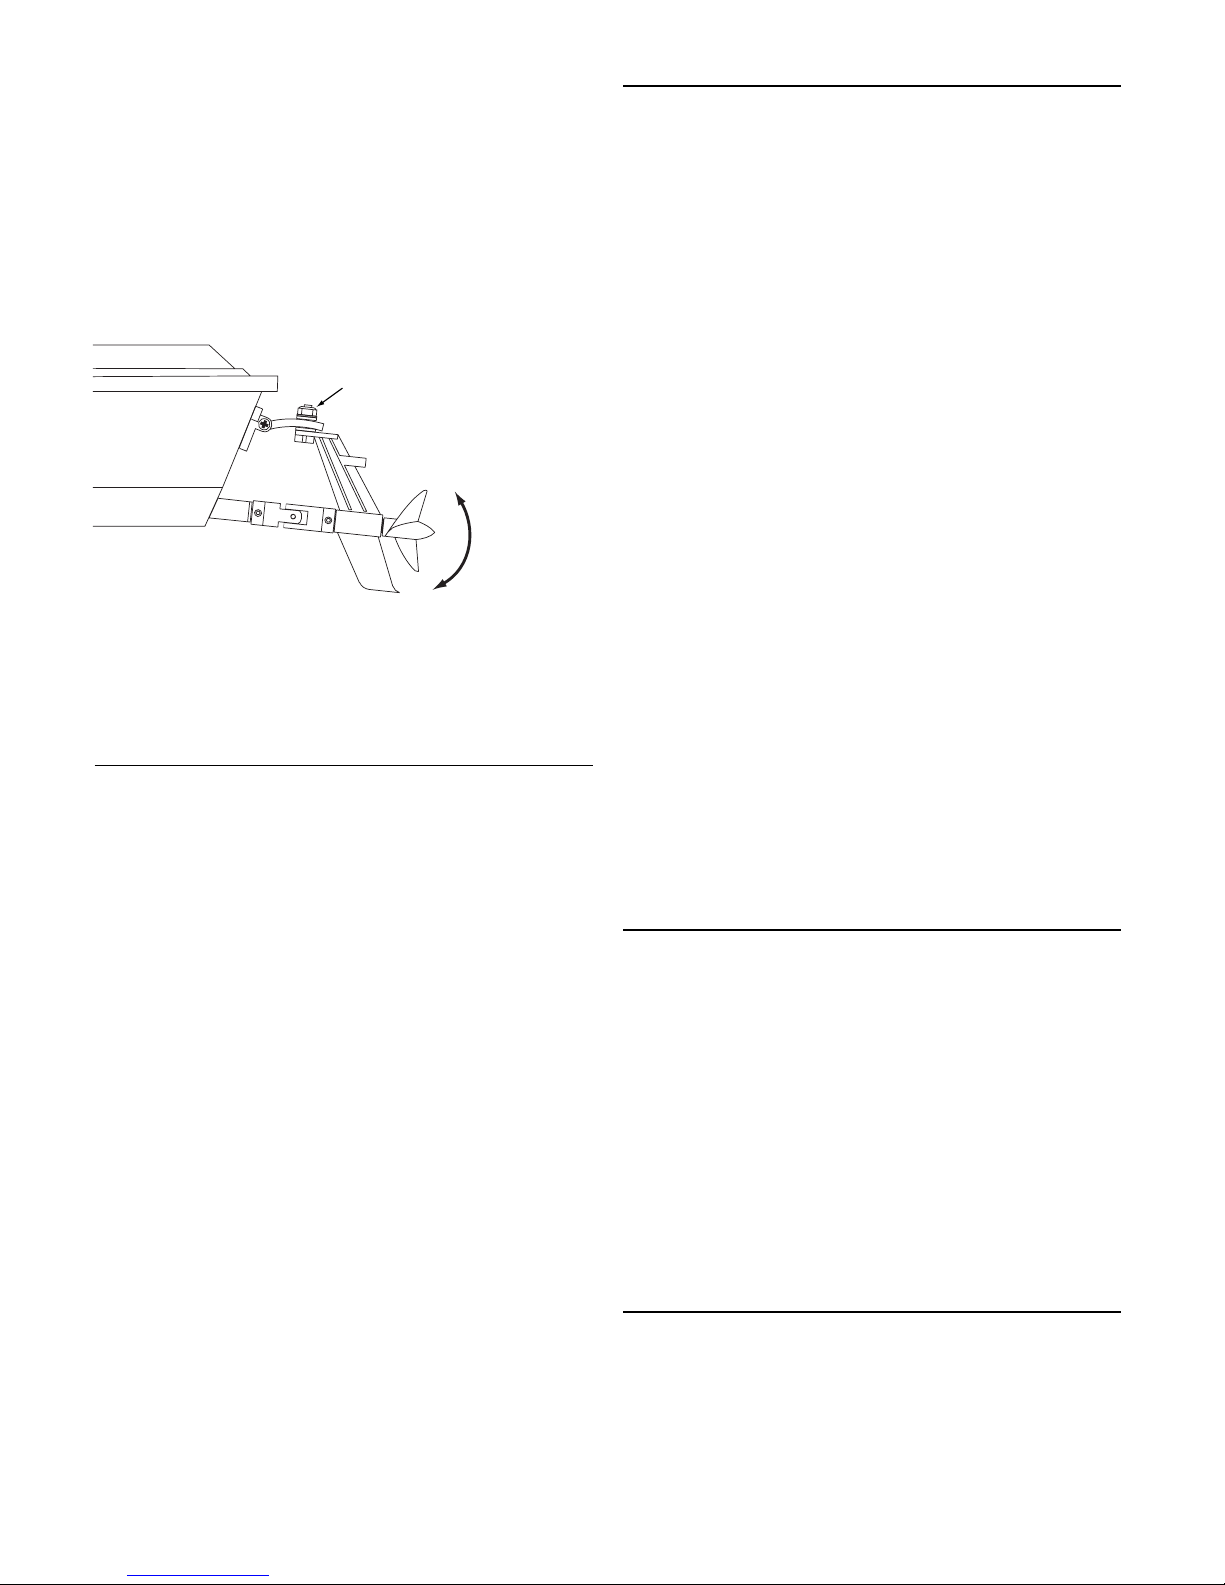
The outdrive strut on the Nitro Vee will allow you to adjust the
trim angle of the propeller. The trim angle changes how high the
bow of the boat rides out of the water. Setting the trim angle correctly will provide the maximum speed and efficiency from the
Nitro Vee. As the outdrive is trimmed up, the bow (front) of the
boat will ride higher. The Nitro Vee will run slightly faster however,
it will be more unstable in the wind. Do not trim the outdrive up
on windy days or when running in choppy water. If the trim is set
to high, then the bow will bounce up and down (“porpoise”), and
the prop may begin to cavitate.
As the outdrive is trimmed down, the bow of the boat is lowered thus increasing the wetted surface of the boat. This will slow
the Nitro Vee slightly but, stability and control will be improved.
Experiment with this adjustment to find out what works best for
your particular conditions.
RETURN TO SHORE SYSTEM (R.T.S.)
The R.T.S. system is provided to power the Nitro Vee back to
shore if the engine stops running. The R.T.S. system should only
be used in emergency situations. Frequent use of the R.T.S. system will greatly reduce the battery life. Avoid having to use the
R.T.S. system by maintaining the mechanical integrity of the boat
and by watching the fuel level. With experience, you will learn
about how long the boat can run between fuel stops.
To engage the R.T.S system, pull the throttle lever all the way
down. The Nitro Vee will then operate at a very slow speed.
NEVER ENGAGE THE R.T.S. SYSTEM WHILE THE ENGINE IS
RUNNING. THIS COULD DAMAGE THE GEARS.
The R.T.S. system may not have enough power to overcome a
strong headwind. In this case, turn the boat away from the wind
and retrieve it from the opposite shore (when possible).
After the R.T.S. system has been used for a total of 15 minutes,
all six of the receiver batteries in the boat should be replaced. After
the boat has been retrieved, flip the R.T.S. drive gear back to its
normal resting position before restarting the engine.
ALTERNATE RETRIEVAL METHODS
If the Nitro Vee accidentally flips over and fills with water, it is
equipped with foam flotation to help prevent it from sinking.
Traxxas does not recommend ever trying to swim or wade to
retrieve a boat. If you have chosen your launch sight carefully
(downwind), the Nitro Vee will probably drift back to you on its own.
If there is no wind, you will need a tennis ball and a length of
string. Tie the tennis ball securely to one end of the string and
then throw the ball over the drifting boat. Pull the ball in and try
to entangle the boat in the string. Pull the boat back slowly to
shore. If only the bow of the boat remains visible, try using a fishing lure with many hooks and a fishing pole. Try to snag the lip of
the upper deck or drive mechanism with the hooks.
MECHANICAL PRECAUTIONS
If the precautions are followed and your Nitro Vee is operated
sensibly and with care at all times, it poses very little danger to you
or your spectators. Failure to operate your fuel-powered model in
a safe and responsible manner could result in property damage
and injury. You alone must see to it that the instructions are followed and the precautions are adhered to.
• The engine is capable of turning 30,000 or more RPMs at full throt-
tle. Continuous full-throttle, high-speed operation will greatly
decrease the life span of the internal engine parts. For longer
engine life, vary your speed. If the engine will be run at high speeds
in a racing situation, expect to replace worn parts more often.
• Do not attempt to operate the engine using gasoline, alcohol,
naptha, or any other fuel besides model engine fuel.
• Do not allow the engine to overheat. This will damage the engine.
• Do not run excessively lean mixtures. A lean mixture will cause
engine overheating and damage.
• If the engine performance suddenly changes, stop at once and
find the cause for the change.
• Do not over-rev the engine. The engine will over-rev if the throttle
is left fully open with no load on the engine.
• Do not allow the engine to run out of fuel while it is running at
high RPMs. This could damage the glow plug.
•Test the radio system each time before you operate the model.
Always use strong batteries in the radio system. Stop running
immediately at the first sign of weak batteries.
•Do not drive the boat in mossy or grassy water. This puts exces-
sive loads on the engine and can block the cooling passages.
• The fuel used must meet the recommendations outlined in this
manual. Failure to use the correct fuel will damage the engine.
• Using fuels containing more than 20% nitromethane will cause
the engine to run hotter and decrease its longevity. It can also
increase the risk of fuel damage to the plastic hull.
•Avoid removing the boat from the water by picking it from the
front. This could cause water to enter the rear of the boat.
• Do not run the boat in rough water and/or high wind. Even at
moderate speeds, the boat could flip over in these conditions.
•Avoid running the boat in salt water. If you do run in salt water,
flush the boat clean with fresh water and then oil the metal components. This will help prevent corrosion. Damage caused by salt
water corrosion is not covered by warranty.
MAINTENANCE
•Keep the Nitro Vee clean of accumulated dirt and oil. Oil and fuel
residue will begin to accumulate inside the boat after a period of
time. Any excess fuel and oil should be wiped up with a soft cloth.
Do not allow puddles of fuel to remain inside the boat because
continuous exposure can damage the fuel-resistant properties of
the plastic. Do not use any solvents to clean the boat or the finish will be damaged. Use a cloth dipped in soapy water to
remove stains and oil. Denatured alcohol may also be used to
flush oil and fuel residue out of the boat. Do not allow it to contact the electronics or adhesive stickers (it will dissolve the adhesive). Do not allow water to enter the engine or the radio system
components. Use fine polishes made for plastics and acrylics on
the Nitro Vee to maintain its original finish.
•Periodically, re-oil the RTS and starter motor bushings. Use an
oil made for electric motors such as 3-in-1 OilTM.
•Frequently re-oil the bushings in the outdrive housings.
•Keep all of the screws in the drive system tight.
STORAGE
Use an after-run product in the engine anytime the model is
going to be stored. The chemicals in the fuel attract moisture and
can cause moisture and corrosion to form inside the engine. Drain
the fuel tank, connect the EZ-Start control box, and try to start the
engine until all of the remaining fuel is completely used up. Place
the recommended number of drops (usually 6) of after-run oil into
the carburetor. Run the starter for 3-5 seconds to circulate the oil.
Never store the boat with unused fuel in it.
TRIM UP
TRIM DOWN
Loosen nut to
adjust trim.
8
Page 9

Clean the boat as thoroughly as possible and allow it to dry fully.
Clean and oil the bushings in the drivetrain and remove all batteries. Store unused fuel in a tightly-capped container, away from
direct sunlight.
TROUBLESHOOTING:
GLOW PLUG PROBLEMS
The glow plug in your model engine is a consumable item
which must be replaced periodically to maintain peak performance and starting ease. Most often, any starting problems or
erratic performance can be traced back to the glow plug.The glow
plug should also be suspected if the engine’s acceleration and
high-speed performance suddenly become flat.
Glow plugs will be damaged by running the fuel mixture too
lean, applying more than 1.5 volts to the plug, or by running out of
fuel while the engine is running at high RPMs.
A leaking glow plug can cause many problems with engine performance, especially if the engine is not running well at speed.
While the engine is running, look for bubbles at the base of the
glow plug. Loosen the glow plug and then re-tighten. If the problem
persists, remove the glow plug and inspect the copper gasket for
nicks and scratches.
Whenever the glow plug is in question, simply replace it with a
new one to see if it solves your problem. Replacement glow plugs
are available from your hobby shop or Traxxas. From the factory,
your engine was equipped with a standard long-reach reach plug
(Traxxas part #3230). Do not use glow plugs with idle bars.
Always use the new gasket which comes with the glow plug.
FUEL PROBLEMS
You must use fuel which contains castor and synthetic oil.
Your engine will consume more fuel than you might expect. It will
run approximately 15 minutes on a tank of fuel. Run time will vary
greatly depending upon the mixture setting and the driving style.
Tr y not to let the fuel level drop below
1
/4of a tank. When the fuel
level is low, the engine will begin to draw air in with the fuel as the
fuel sloshes away from the fuel pickup point in the bottom of the
tank. The air in the line causes erratic performance and radical
leaning of the fuel mixture. In this case, the engine will lean out,
stall, and the glow plug may be damaged.
COOLING PROBLEMS
Engine overheating in the Nitro Vee is not likely to occur
because of the constant supply of cooling water. Problems can
exist if the Nitro Vee is not driven correctly, the cooling water pickup becomes blocked, or the fuel mixture is set too lean.The symptom of an overheating engine is a noticeable drop in performance,
similar to that which occurs when the mixture becomes lean. If you
suspect overheating, drive the boat past you and check for water
flow from the outlet at the rear of the boat. If water is flowing, then
the cooling system is functioning normally. Remember that the
cooling system only functions when the boat is being driven on
plane. Therefore, do not allow the boat to idle in or out of the water
for more than a minute with no cooling water flow.
If the cooling water is not flowing, check for blockage in the
hoses and fittings. Remove the hoses and blow through them to
make sure they are clear. It is possible for corrosion and debris to
build up inside the head over time. Remove the top cover and
clean out any corrosion.
If the cooling water is flowing and the engine still exhibits symptoms
of overheating then richen the fuel mixture
1
/4of a turn and retest.
If the fuel meets all of the requirements, the mixture is set rich, the
head is receiving adequate water-flow, and the engine continues to
overheat, then the drivetrain may be bound. Look for dirty bushings
or any other moving part which may have tightened. Check that
moss and fishing line have not become entangled in the propeller.
WATER DAMAGE
If the Nitro Vee flips and fills with water, it must have IMMEDIATE ATTENTION. If the water is allowed to remain in the engine
and radio system, they could be destroyed with rust and corrosion.
WATER IN THE ENGINE
1. Hold the boat nose up to drain all of the water from the hull and
exhaust system.
2. Look in the air intake of the carburetor for any debris or foreign
matter that may have entered the engine.
3. Remove the glow plug and gasket. Drain the water from the
cylinder and look for debris on top of the piston. If any debris is
visible, do not pull on the starter or cause the engine to turn
over. Temporarily fill the cylinder with after-run oil and replace
the glow plug and seal. Fill the crankcase with after-run oil
through the carburetor. The engine must be disassembled and
cleaned as soon as possible!
4. If no foreign material is found inside the engine, remove and plug
the fuel line and tank pressure line (from the exhaust header).
5. Turn the boat on its side, cover the glow plug hole with a rag,
move the servo to hold the throttle open, and press the starter
button for a few seconds. Continue until no more spray comes out.
6. Flush the engine with fuel by pouring it in the carburetor and
repeating the operation in step 5. Continue flushing until the fuel
coming out of the glow plug hole is no longer cloudy (milky
white).
7. Once all of the water has been flushed out, check the glow plug
with the glow starter. Reinstall it, if it is good, or replace it with a
new one. Reinstall the fuel and pressure lines.
8. Drain the fuel system completely (including the tank and lines).
Allow it to dry fully.
9. Now start the engine using the normal starting procedures. A
fully-open throttle and repeated attempts may be necessary
until the engine fires. Remember that the radio system is wet
and may not be functioning. Do not attempt to drive your boat
until the radio is dry.
10. Allow the engine to run at a fast idle until it is warm
(about 1minute). Pinch the fuel line to run the engine dry. Use
the after run oil as usual.
WET RADIO SYSTEM
There are some steps you can take that may return your radio
system to normal operation and prevent having to return it for service. Remove the receiver, two servos, and on/off switch from the
boat. Remove the back cover of the receiver and carefully pull the
circuit board out. Dry the circuit board off with a hair dryer and then
place it on a towel underneath a desk lamp. Allow it to dry for at
least one day. A wet servo will typically lock to one side and not
return to center. Lay the servo on a towel under a desk lamp and
allow it to dry for at least one day. If the servos and receiver do not
return to normal operation after 2 days of drying, then they should
be returned to Traxxas for service. The servos are very complex.
Do not attempt to disassemble the servos unless you are already
experienced at doing so. To prevent future water problems, many
hobby shops sell water displacing sprays such as “The Stuff.” This
product may be used to avoid future water contamination.
DETAILING THE HULL
If you wish to paint your hull some other color than the factory
white, then choose your paint with caution. Only use paint made
for plastic models (available from your hobby dealer). Test the
paint on an inconspicuous and non-critical area before painting
the entire boat. Also, test to make sure that the paint will not dissolve with the fuel. The paint on the bottom must be smooth to
prevent a loss of performance. Traxxas will not cover under
warranty any hull which has been painted. It is impossible to
know how each type of paint will affect the plastic.
The decals are printed on self-adhesive clear mylar. Carefully
cut the decals out as close to the printed edges as you can. Test
fit and trim each decal before removing the backing. Use the
9
Page 10
photos on the box as a guide for decal placement. To apply the
long decals, Place one end down, hold the other end up, and
gradually smooth the decal down with your finger as you go. This
will prevent air bubbles. Placing both ends of the decal down and
then trying to smooth it out will result in large air pockets. If you
do have air pockets, slice the center of the pocket with a hobby
knife and then smooth out the air.
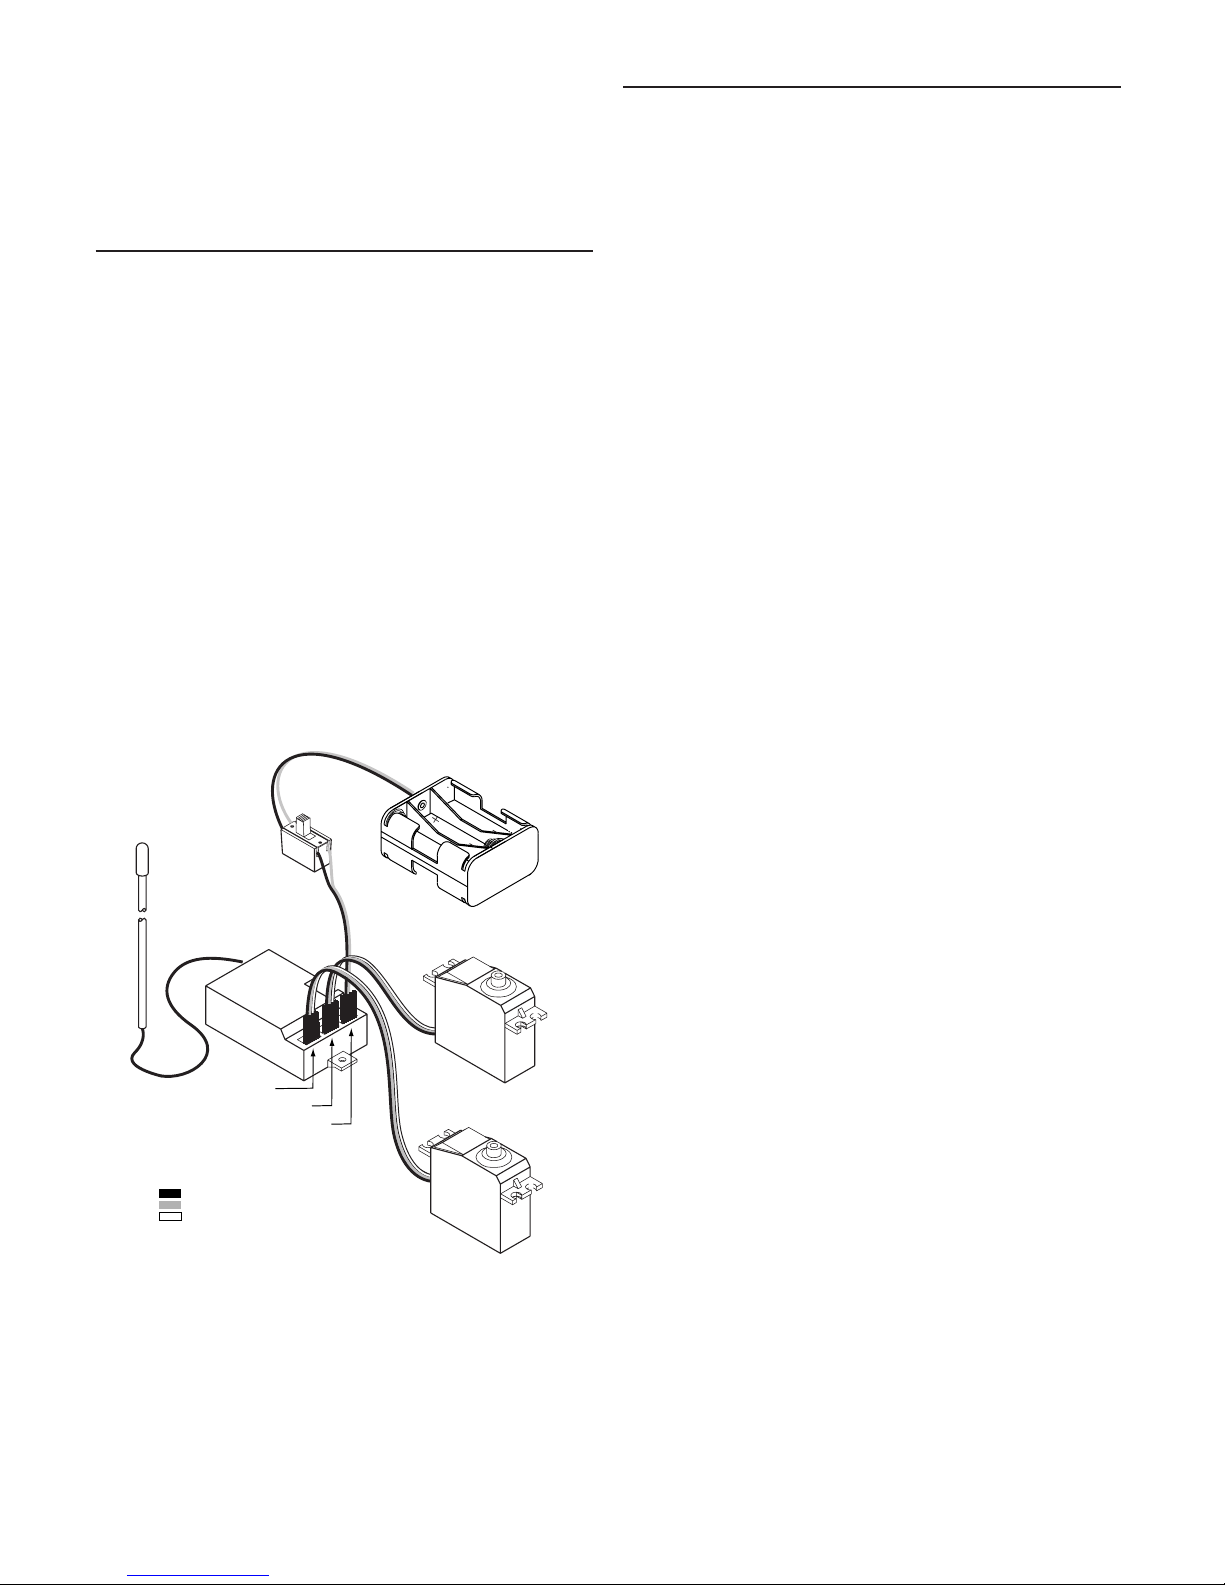
CENTERING YOUR SERVOS
Whenever your radio system has been removed for service or
cleaning, the servos must be re-centered prior to installing the
radio system in the model. If the radio system is installed in the
boat, disconnect the servo horns from the servos.
Connect the steering servo to channel 1 on your receiver and
the throttle servo to channel 2. The white wire on each servo cable
is positioned towards the crystal. Connect the red and black cable
from the battery holder to the “batt” terminal on the receiver. The
red wire is positive and the black wire is negative.
Place fresh “AA” batteries in the transmitter and turn the power
switch on. Slide the throttle and steering trim adjustments to to the
center position. Now install fresh “AA” batteries into the battery
holder and turn the power switch to the on position.The servos will
automatically jump to their center positions.
Tu rn off the battery holder switch followed by the transmitter.
The servos are now ready to be installed. Be careful not to move
the servo shaft when installing the servo horns.
LIMITED WARRANTY INFORMATION
Every effort has been made in component design and material
selection to make your model as durable as possible. Because
the model is intended to be a hobby-class model and operate at
a much higher level of performance than a “toy,” no warranties
can be expressed or implied relating to the longevity of the parts.
Parts will wear out and require replacement. If any part of the
model appears to be defective, or incorrectly assembled when it
is new (before it is used), it will be repaired or replaced at
Tr axxas’ discretion. This warranty will not cover damage from
wear, abuse, neglect, crashes, or water.
The radio system that is provided with the ready-to-run models
is covered by separate warranty on a separate page (included in
your documentation package). The radio system warranty does
not cover water damage.
This model is not intended for use by children without the
supervision of a responsible adult. Every precaution outlined in
this manual should be followed to help ensure safe operation.
Tr axxas Corporation shall not be liable for any loss or damages,
whether direct, indirect, special, incidental, or consequential,
arising from the use, misuse, or abuse of this product and any
accessory or chemical required to operate this product.
Tr axxas corporation reserves the right to make changes, modifications, and improvements to this product without notification,
and which may not be reflected in these documents. Upgrades
and improvements are not necessarily retroactive. Traxxas may
not provide improved or updated components free of charge for
models built prior to any change in specification.
• TO OBTAIN WARRANTY SERVICE
If it has been determined that your model is somehow defective,
return it to Traxxas with a note describing the problem, and a
copy of the purchase receipt or invoice. Remove all batteries.
Remember that the warranty only covers brand new products
which are defective right out of the box. All other service will be
estimated on an individual basis. Be sure to include a return
address and a daytime phone number.
MAIL OR SHIP TO:
TRAXXAS CORPORATION
12150 SHILOH ROAD
DALLAS, TEXAS 75228
For technical assistance, call 1-888-TRAXXAS or
(800) 323-0069.
For orders, other information, and service outside the U.S.A.,
call (972) 613-3300.
CHANNEL 1
STEERING
SERVO
CHANNEL-2
THROTTLE
SERVO
6-CELL
BATTERY HOLDER
PART# 3590
CHANNEL-1
ANTENNA
RECEIVER
ON/OFF
SWITCH
BLACK
NEGATIVE
RED
POSITIVE
CHANNEL-2
BATTERY
WIRE COLORS
BLACK
RED
WHITE
10
Page 11

Engine will not start
(starter operates)
Starter will not operate
EZ-Start L.E.D. does not light
Engine starts and then stalls
Engine sluggish/ poor performance
Engine overheats
Engine hesitates or stumbles at high speed
Engine stalls instantly when throttle is fully
opened from idle
Engine stalls while running for no apparent
reason
Loud clattering noise while running
Excessive propeller cavitation
Boat is unstable- difficult to drive
Out of fuel ............................................................
Improper or contaminated fuel..............................
Carburetor not primed ..........................................
Glow plug bad ......................................................
Engine flooded......................................................
Engine overheated................................................
Carburetor incorrectly adjusted ............................
Exhaust blocked....................................................
Air intake blocked..................................................
Battery not charged ..............................................
Battery not connected securely ............................
EZ Start control box not connected securely ......
Loose, damaged motor wire on the starter unit ..
Positive and negative polarity reversed on the
starter motor ........................................................
Glow plug is bad ..................................................
Idle speed set too low ..........................................
Air bubble in fuel line ............................................
Glow plug is fouled or weak..................................
Engine overheated................................................
Insufficient fuel tank pressure ..............................
High-speed fuel mixture is incorrect ....................
Leaking glow plug ................................................
Glow plug is fouled or weak..................................
Fuel bad or contaminated ....................................
Fuel filter blocked (optional)..................................
Carburetor dirty or blocked ..................................
Engine overheating ..............................................
Centrifugal clutch slipping ....................................
Model has bound up drivetrain ............................
Engine excessively worn ......................................
Idling and cavitating too long in the water ............
High-speed mixture too lean ................................
Cooling system blocked with debris ....................
Excessive nitro in the fuel ....................................
Incorrect oil content in the fuel ............................
Poor quality fuel....................................................
Excessive load on the engine ..............................
High-speed mixture too lean ................................
Engine overheated................................................
Air bubble in fuel line ............................................
Glow plug fouled ..................................................
Engine cold ..........................................................
Glow plug fouled or weak ....................................
Low-speed mixture too lean ................................
High-speed mixture too rich..................................
Out of fuel ............................................................
Glow plug fouled or weak ....................................
Engine overheated................................................
Fuel line blocked ..................................................
R.T.S. gear engaged ............................................
Prop damaged ......................................................
Tr im angle set too high ........................................
High-speed mixture too rich..................................
Rough water and/or high wind..............................
Tr im angle set too high ........................................
Tu rn fin is not in the down position ......................
Fill fuel tank
Replace fuel
Prime carburetor
Replace glow plug (see pg. 9)
Start engine with throttle fully open
Allow engine to cool (see pg. 9)
Readjust carburetor (see pg. 5)
Remove and clean exhaust system
Remove blockage
Charge the battery pack
Check connection
Check connection
Inspect wires and connection
Red wire attaches to the red dot terminal on
starter motor endbell
Replace glow plug
Increase idle speed (see pg. 5)
Press start button to force bubble throughcheck for a hole in the fuel lines (see pg. 5)
Replace glow plug (see pg. 9)
Allow engine to cool(see pg. 9)
Replace pressure hose- Clear blockage at
exhaust header fitting- check flow to and from
tank
Lean high-speed fuel mixture (see pg. 5)
Check glow plug gasket/ tighten glow plug
Replace glow plug (see pg. 5)
Replace fuel
Clean or replace fuel filter
Clean carburetor- (see pg. 5)
Stop at once. Allow engine to cool (see pg. 9)
Replace clutch shoes (return for service)
Find the bound item and repair
Return for service
Drive the boat to circulate the water
Richen high-speed mixture (see pg. 5)
Locate and remove the blockage
Use fuel with lower nitro content (see pg. 2)
Purchase correct fuel (see pg. 2)
Purchase correct fuel (see pg. 2)
Check for bound up drivetrain
Richen high-speed mixture (see pg. 5)
Stop at once. Allow engine to cool (see pg. 9)
Press start button to force bubble throughcheck for a hole in the fuel lines or low fuel level
Replace glow plug (see pg. 5)
Allow engine to warm
Replace glow plug (see pg. 5)
Richen low-speed mixture (see pg. 5)
Lean high-speed mixture (see pg. 5)
Refill fuel tank
Replace glow plug (see pg. 5)
Stop at once. Allow engine to cool (see pg. 9)
Replace fuel line- install fuel filter
Return gear to its resting position
Replace prop
Lower the trim angle (see pg. 8)
Lean high-speed mixture (see pg. 5)
Run on calmer days
Lower trim angle (see pg. 8)
Reset turn fin
11
 Loading...