

Traxon Washer Allegro AC XB DW, Washer Allegro AC XB RGB Installation Manual
Washer Allegro AC XB RGB / DW
INSTALLATION GUIDE
V1.0
Cover:
Washer Allegro AC XB RGB
Washer Allegro AC XB DW
www.traxontechnologies.com
©2017 TRAXON TECHNOLOGIES - AN OSRAM BUSINESS. ALL RIGHTS RESERVED. TRAXON™, TX CONNECT®, ARE TRADEMARKS OF TRAXON TECHNOLOGIES. U.S. PATENTS, E.U.
PATENTS, JAPAN PATENTS, OTHER PATENTS PENDING. SPECIFICATIONS ARE SUBJECT TO CHANGE WITHOUT NOTICE.
Installation Guide 03/17 V1.0 2 of 18
CONTENT
1. INTRODUCTION 3
2. INSTALLATION 5
3. SAFETY AND OPERATION 13
4. SYSTEM CONFIGURATION 14
5. CARE AND MAINTENANCE 15
6. TECHNICAL SPECIFICATION 16
7. TROUBLESHOOTING 17
8. WARRANTY STATEMENT 17
www.traxontechnologies.com
©2017 TRAXON TECHNOLOGIES - AN OSRAM BUSINESS. ALL RIGHTS RESERVED. TRAXON™, TX CONNECT®, ARE TRADEMARKS OF TRAXON TECHNOLOGIES. U.S. PATENTS, E.U.
PATENTS, JAPAN PATENTS, OTHER PATENTS PENDING. SPECIFICATIONS ARE SUBJECT TO CHANGE WITHOUT NOTICE.
Installation Guide 03/17 V1.0 3 of 18
1. INTRODUCTION
1.1 General
The Washer Allegro AC XB RGB / DW series is a compact, AC line powered high brightness
luminaire. The series is controllable via DMX512. The luminaire can be simply daisy-chained to
form long runs.
Model Number of LED Power Consumption (W)
Washer Allegro AC XB RGB / DW 36 52
Features:
•
Outdoor applications
• Suitable for coastal environments
• Protection Class IP66
• Tempered glass cover
• Integrated mounting platform with 135° vertical tilt and ±180° horizontal adjustment
• Light Output: RGB@1340lm, DW@2526lm
• DMX512
www.traxontechnologies.com
©2017 TRAXON TECHNOLOGIES - AN OSRAM BUSINESS. ALL RIGHTS RESERVED. TRAXON™, TX CONNECT®, ARE TRADEMARKS OF TRAXON TECHNOLOGIES. U.S. PATENTS, E.U.
PATENTS, JAPAN PATENTS, OTHER PATENTS PENDING. SPECIFICATIONS ARE SUBJECT TO CHANGE WITHOUT NOTICE.
Installation Guide 03/17 V1.0 4 of 18
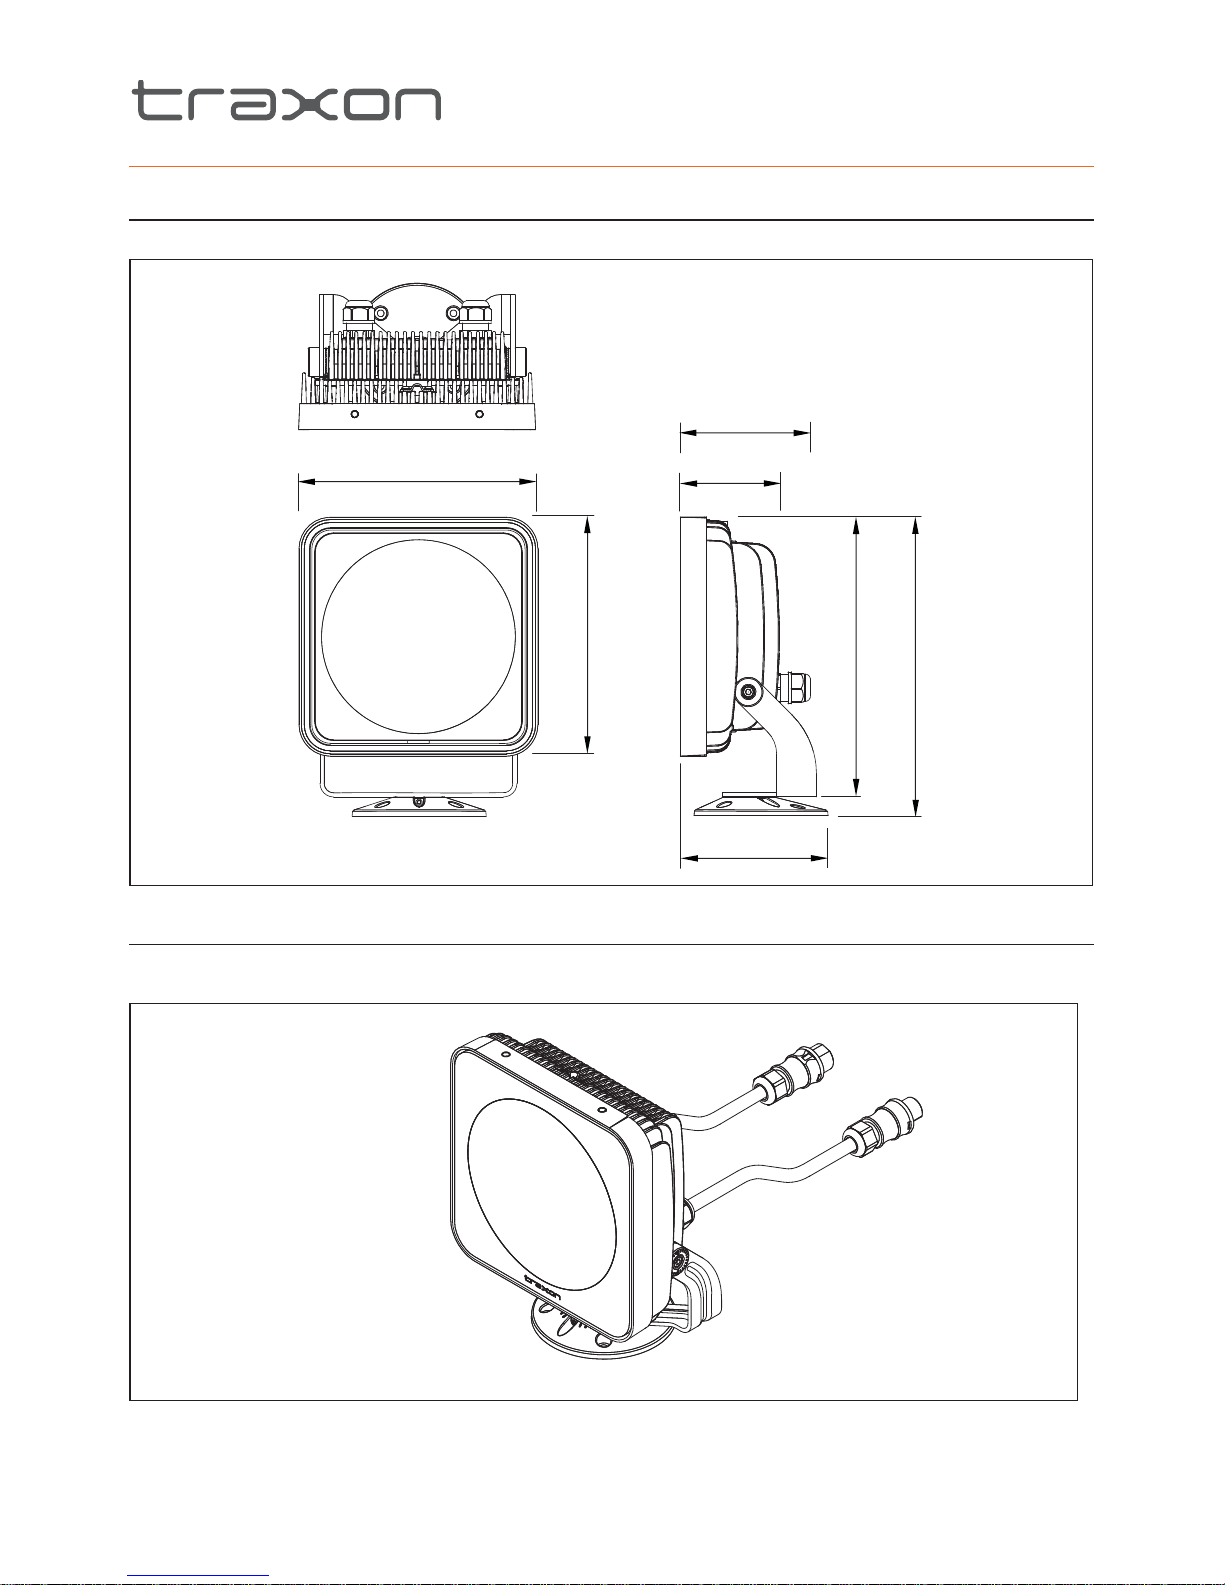
1.2 Dimensions
FIG.1: Washer Allegro AC XB RGB / DW
1.3 Packing Contents
FIG.2: Packing Contents
228mm / 9”
228mm / 9”
124mm
/ 4.9” (ref.)
95mm
/ 3.7”
267mm / 10.5”
285mm / 11.2”
141mm / 5.6”
1 x Washer Allegro AC XB RGB / DW
www.traxontechnologies.com
©2017 TRAXON TECHNOLOGIES - AN OSRAM BUSINESS. ALL RIGHTS RESERVED. TRAXON™, TX CONNECT®, ARE TRADEMARKS OF TRAXON TECHNOLOGIES. U.S. PATENTS, E.U.
PATENTS, JAPAN PATENTS, OTHER PATENTS PENDING. SPECIFICATIONS ARE SUBJECT TO CHANGE WITHOUT NOTICE.
Installation Guide 03/17 V1.0 5 of 18
2. INSTALLATION
2.1 Points To Consider
Plan your installation before mounting any Washer Allegro AC XB RGB / DWs. The following
should be considered for a successful installation:
• Weather conditions and ambient temperature of installation site.
• Installation distances and appropriate cable lengths. Please consult your local Traxon™
office or authorized agent for necessary aid.
• The number of Washer Allegro AC XB RGB / DWs and appropriate power sources.
• Distance between each Washer Allegro AC XB RGB / DWs for thermal expansion.
• Proper surge protection.
2.1.1 Installation Checklist
1. Prepare cables and all necessary accessories.
2. Perform functional check of Washer Allegro AC XB RGB / DWs. Take care not to damage
cables/connectors during pre-installation checks.
3. Ensure all pre-installation checks laid out below have been followed.
4. Mount the Washer Allegro AC XB RGB / DWs on-site. If the installation is to be left
uncompleted overnight, place all Washer Allegro AC XB RGB / DWs in an indoor
environment.
Ensure all the Interconnection Cables, Washer Allegro AC XB RGB /
DWs and power sources are initially stored in a dry area to guarantee the
complete sealing of the system from water before installation.
www.traxontechnologies.com
©2017 TRAXON TECHNOLOGIES - AN OSRAM BUSINESS. ALL RIGHTS RESERVED. TRAXON™, TX CONNECT®, ARE TRADEMARKS OF TRAXON TECHNOLOGIES. U.S. PATENTS, E.U.
PATENTS, JAPAN PATENTS, OTHER PATENTS PENDING. SPECIFICATIONS ARE SUBJECT TO CHANGE WITHOUT NOTICE.
Installation Guide 03/17 V1.0 6 of 18
2.2 Pre-Installation Checks
2.2.1 Sequence For Cable And Connector Preparation
1. Trim Cable.
2. Plan for any possible bending of cables.
3. Fix cable ends with connectors.
4. Complete sealing of connectors by tightening screw nut with spanner/wrench.
5. Unplug Dust Caps/Waterproof End Caps and keep safe for reuse.
6. Connect luminaries with power sources and Data Injector boxes with connection cables
in the daisy-chain manner described in the wiring diagram.
7. Open Short Test should be performed to ensure cable wires are connected correctly. Recrimping of wires should be done if any failures occur.
8. Perform functional check on all Washer Allegro AC XB RGB / DWs.
9. Report any functional defect found to your nearest Traxon Technologies office. DO NOT
attempt to install a Washer Allegro AC XB RGB / DW with functional defects on-site.
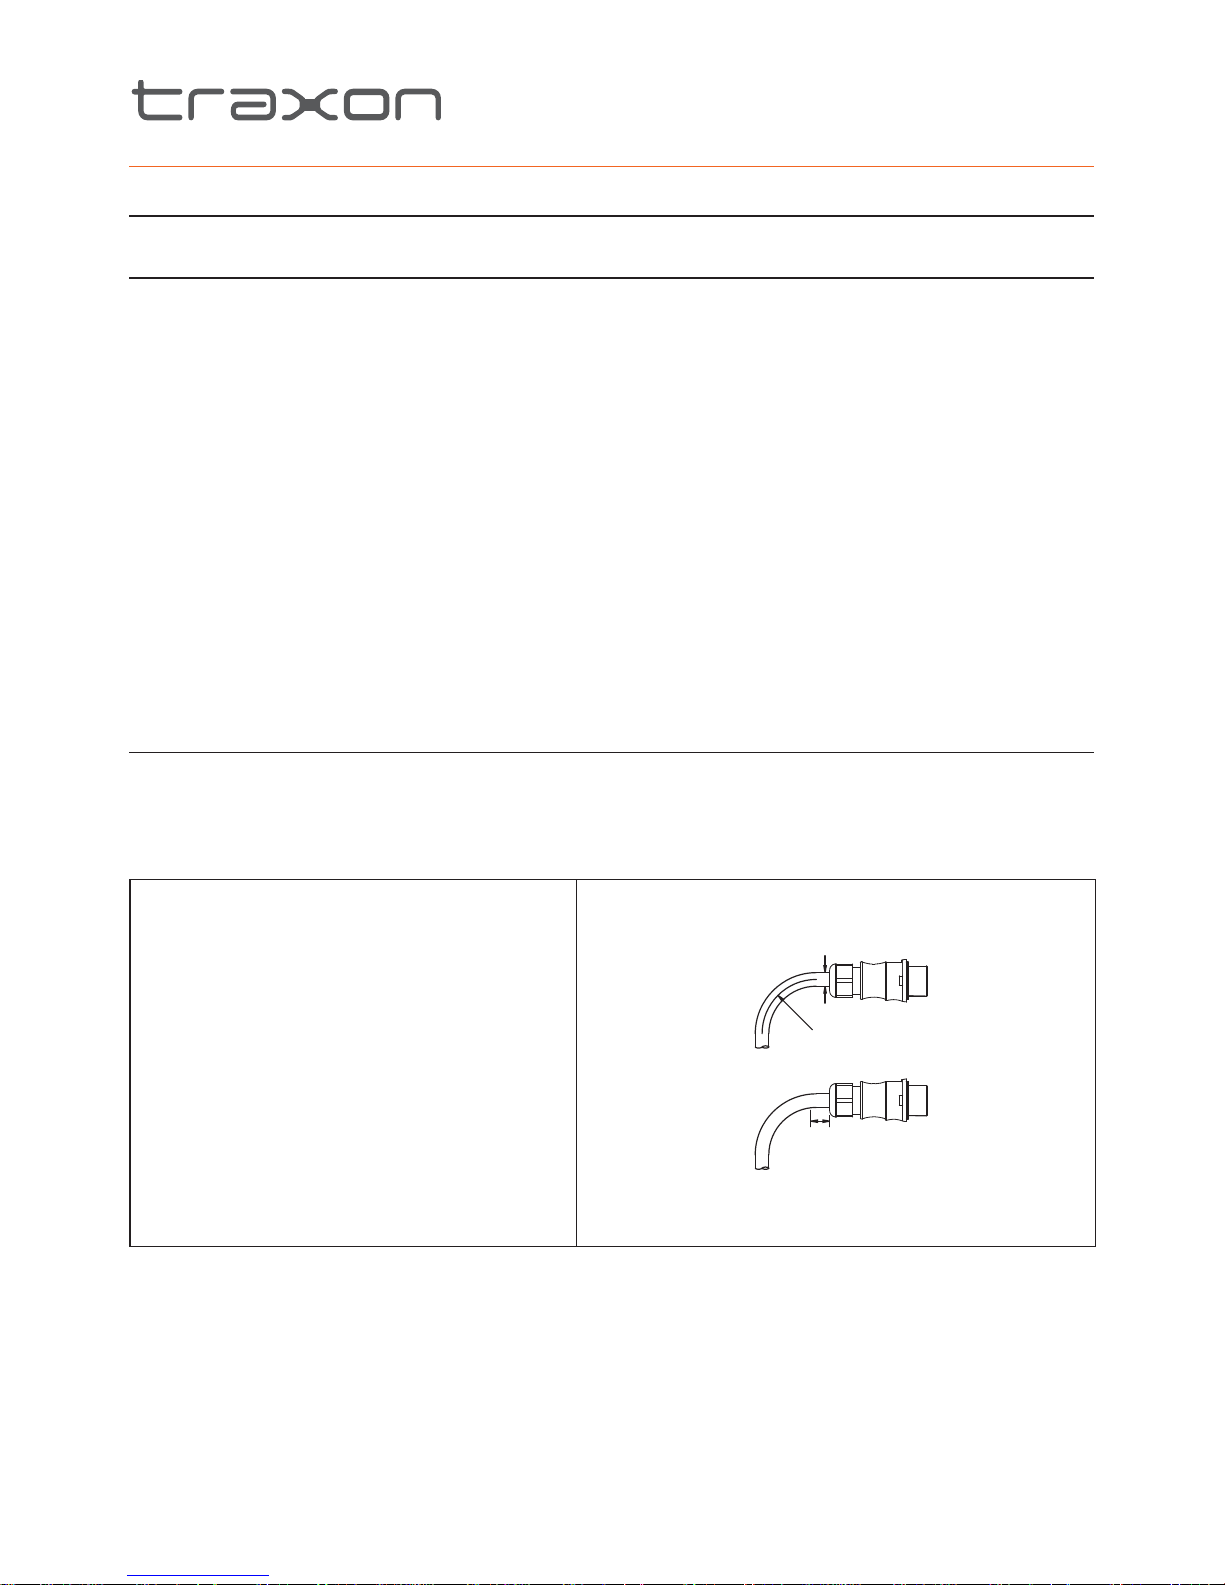
2.2.2 Cable Bending
Cable must NOT be bent below the Minimum Bending Radius (4 x Cable Diameter) as
specified by cable manufacturer and the Non-Bendable Length of 5cm near the connector
end MUST be adhered to.
Bending radius (for conductors)
Note the minimum bending radius for
conductors
> 1.5mm
2
.
Pull forces on the contact points can be
avoided by proceeding as follows:
a – Bend the wire as required
FIG.3: Cable Bending
a
5cm
(Minimum Bending Radius)
(Non-Bendable Length)
≥4D
D
 Loading...