

Page 1
Page 2

0 4
Page 3

light
energy that stimulates the sense of sight
mood
temporary state of mind
mood-light
The next dimension of light, style and self-expression.
The dawning of a new experience.
0 5
OPERATION MANUAL
& WARRANTY
Page 4
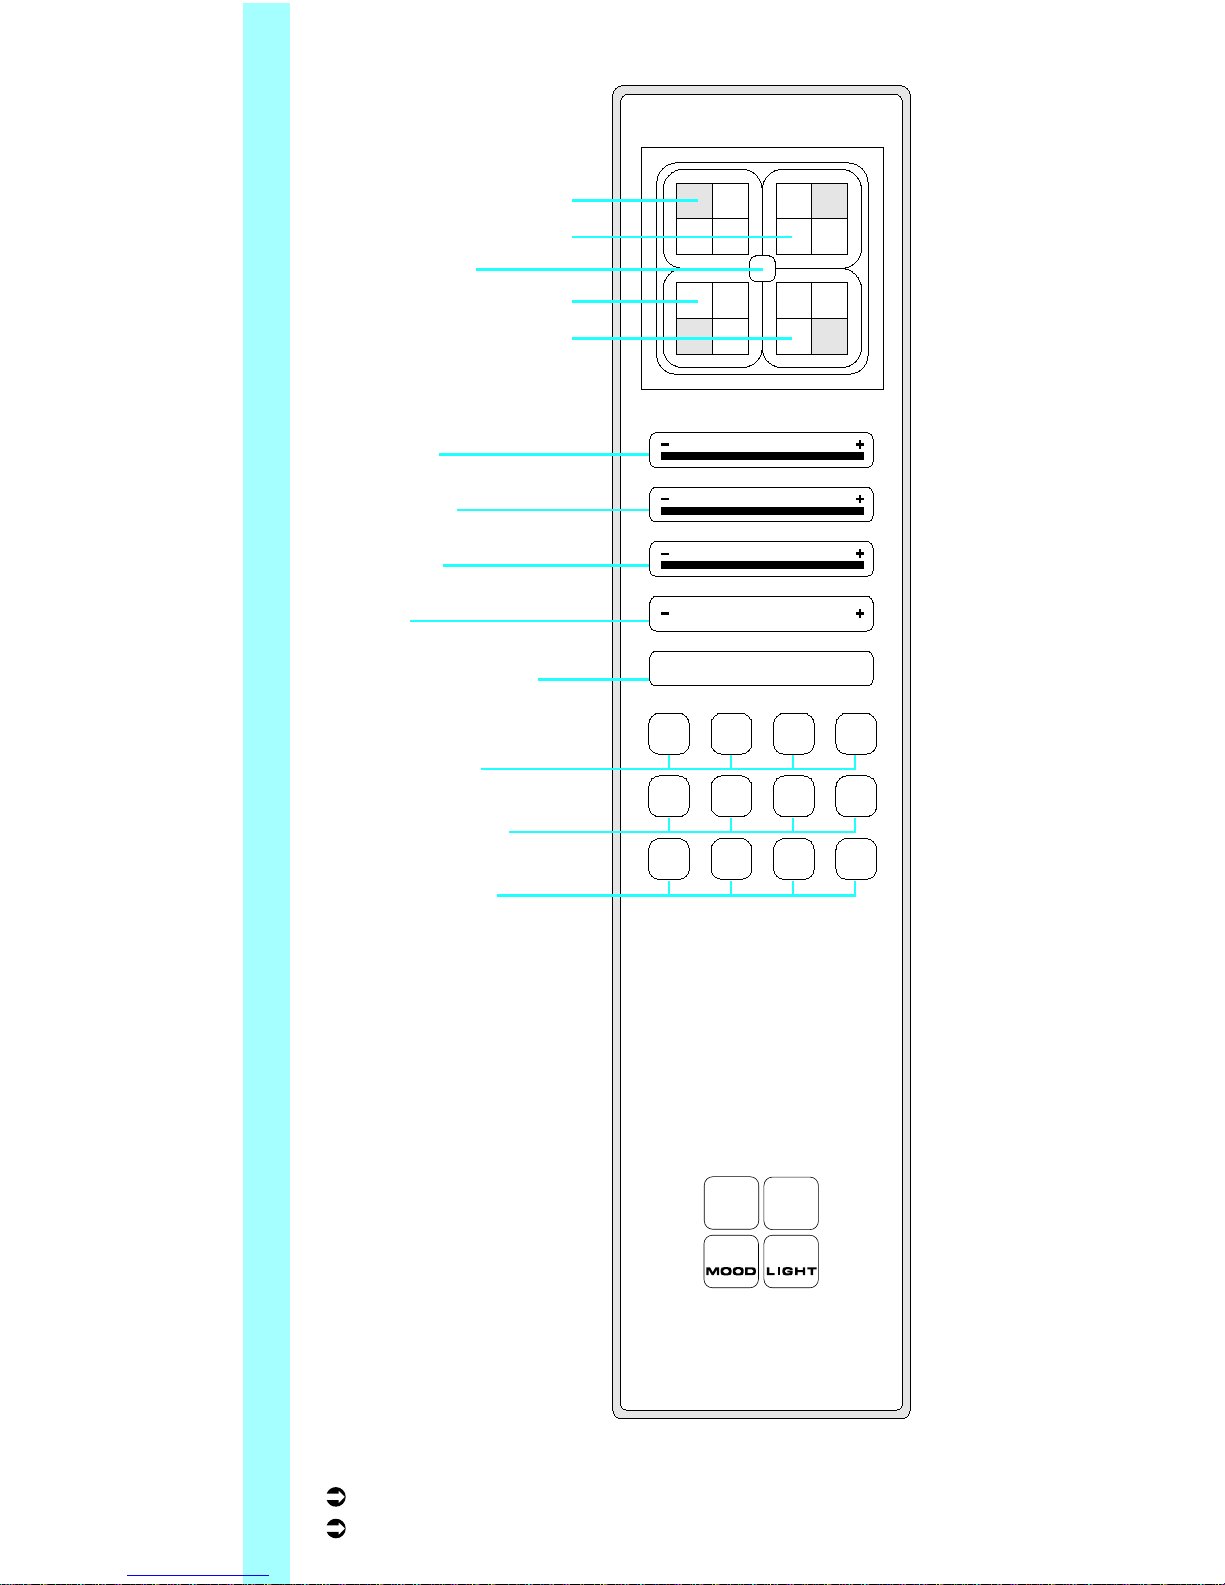
Sequence Modes: Chill (S1), Motion (S2), Action (S3), Sound (T)
Function Modes: Random (F1), Rainbow (F2), Fusion (F3), Pulse (F4)
SPEED
S1
M1
F1
S2
M2
F2
S3
M3
F3
T
M4
F4
OFF ON
Mood-Light Segment 01
Mood-Light Segment 02
Centre Button
Mood-Light Segment 03
Mood-Light Segment 04
Red Light
Green Light
Blue Light
Speed
Turn on/off the light
Mood Buttons
Sequence Modes
Function Modes
Page 5
YOUR MOOD-LIGHT
This Operation Manual gives you some important and detailed information on how to use your Mood-Light. Read through
the Operation Manual carefully and follow all steps to get started.
Contents/Accessories:
1) Mood-Light
2) Remote Control (optional models)
3) 2 AAA Batteries (with each remote)
4) Power Supply Adaptor (optional models)
5) AC Power Cord (optional models)
6) Operation Manual (with each remote)
7) 1 x CR1616 Lithium Battery
8) Interconnecting Cable (Master/Slave)
9) 2 x Mounting Brackets, 2 x Screws, 4 x Supporters
GETTING STARTED
A) Installation
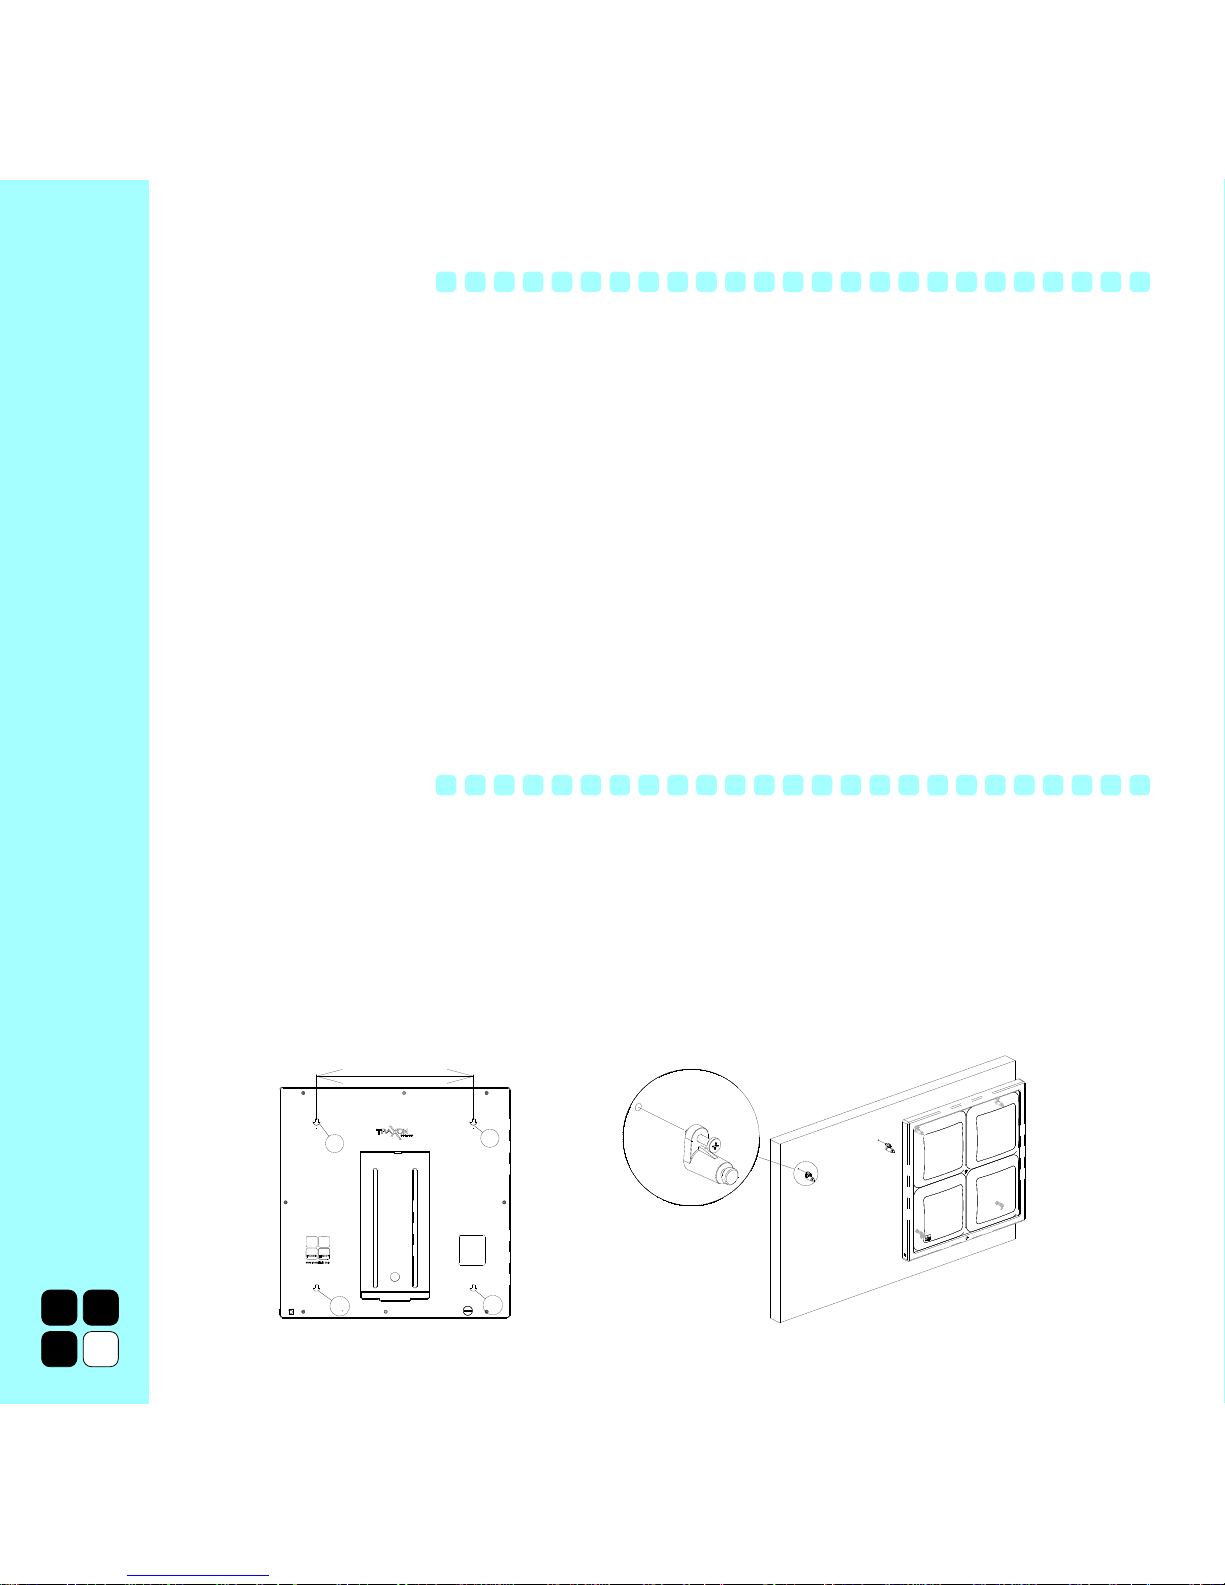
1) Install the CR1616 Lithium cell into the battery compartment located on the rear lower right-hand corner of the MoodLight. The ”+” sign on the battery should be facing outwards.
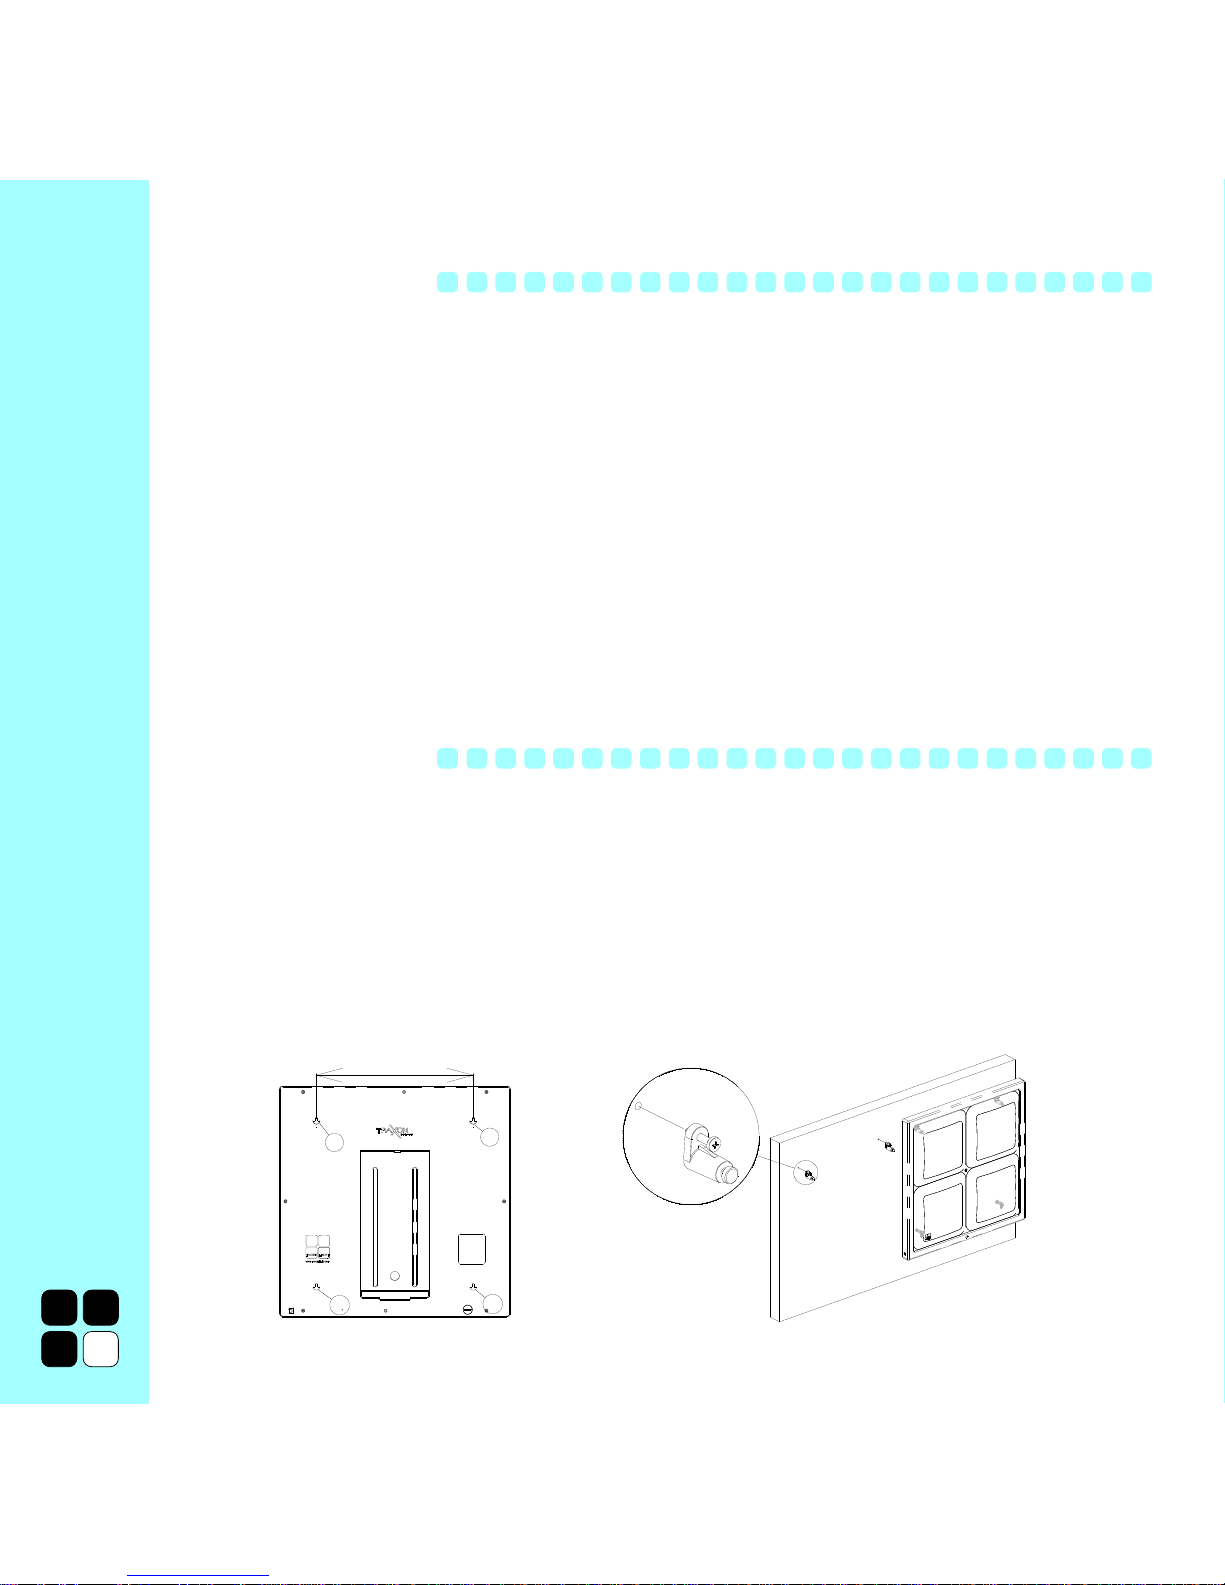
2) You can wall mount your Mood-Light as per Fig. 1:
- Screw and fix two ‘Mounting Brackets’ on the wall, amke sure that the dimension between two holes is exactly 340mm.
- Insert and fix two ‘supporters’ in the openings B1 and B2 on the reverse of the Mood-Light and suspend the Mood Light on the pre-installed Mounting Brackets into the openings T1 and T2.
0 6
(Fig.1)
340mm
T1
T2
B1
B2
Page 6
0 7
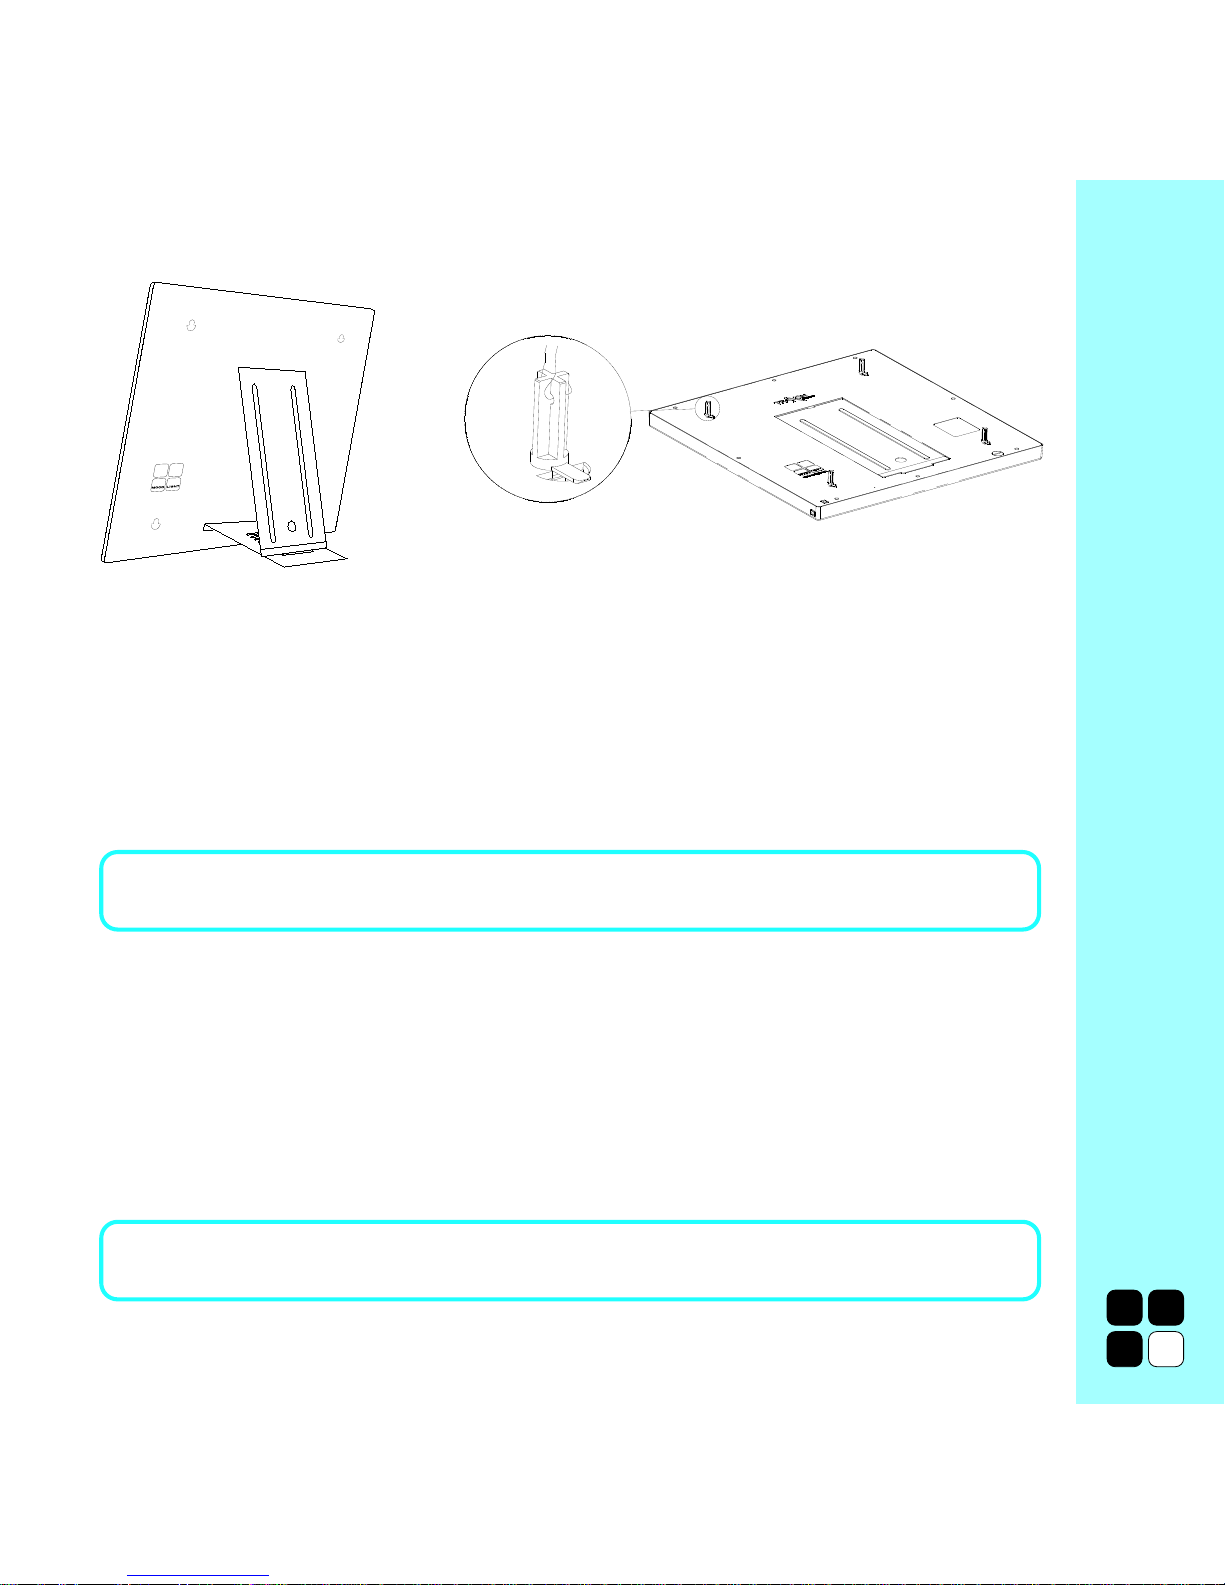
3) You can stand your Mood-Light on the floor, on a table or on a shelf. Open the stand on the reverse of your Mood-Light
as per Fig. 2 and insert the top plate into the bottom plate. You can adjust the standing angle by adjusting the degree of
the stand.
4) You can suspend your Mood-Light as per Fig. 3:
- Insert four ‘Supporters’ into the openings T1, T2, B1 and B2 on the reverse of the Mood-Light.
- Use a Standard Ceiling Mounting kit.
- Ceiling Mounting should only be done by a qualified personel or technician.
Caution: Make sure that your Mood-Light is properly positioned and securely installed before use.
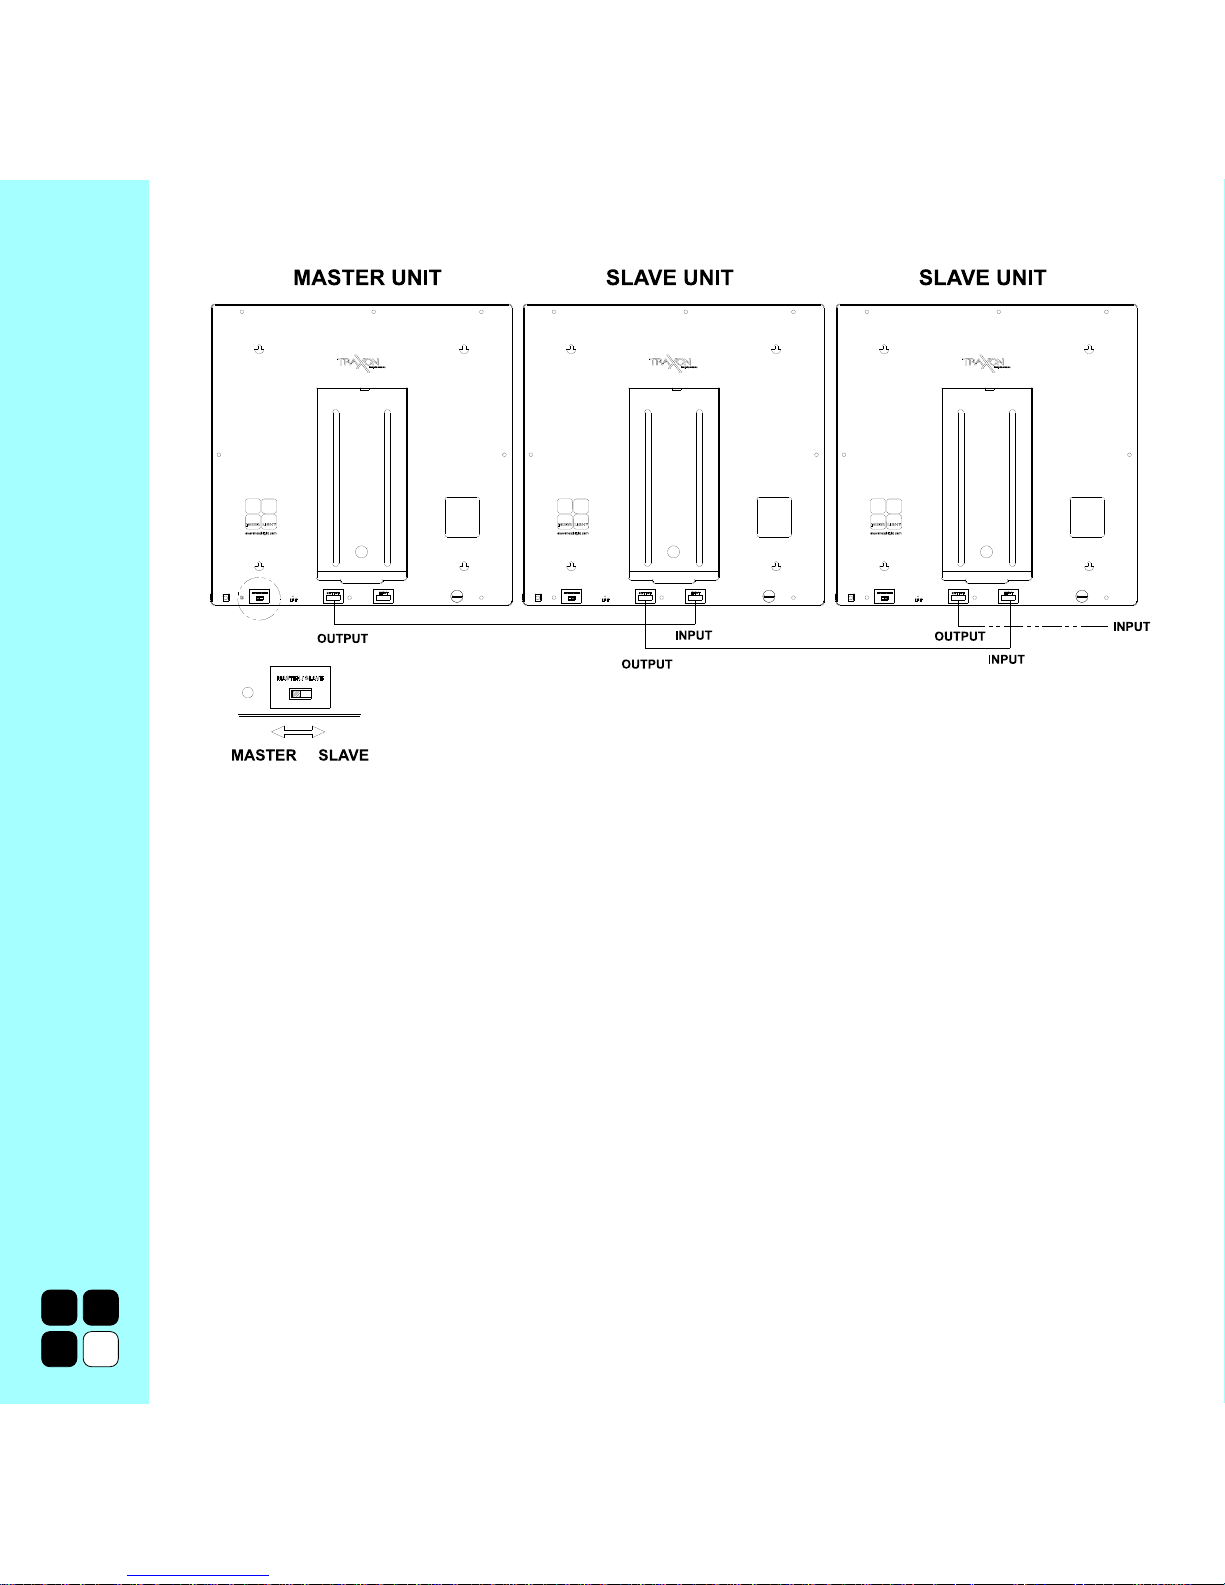
5) Each Mood-Light can be used optionally as a ‘Master’ or a ‘Slave’. For multiple unit installations you have to select one
‘Master’ unit with multiple ‘Slave’. Turn the switch on the rear of the ‘Master’ unit to the ‘Master’ position and place the
Interconnecting Cable into the ‘OUTPUT’ position on the reverse of your Mood-Light as per Fig. 4.
Turn the switch on the rear of the ‘Slave’ unit to the ‘Slave’ position and place the Interconnecting Cable from the ‘Master’
unit into the ‘INPUT’ position on the reverse of your next ‘Slave’ unit as per Fig. 4.
You can connect unlimited ‘Slave’ units in a row to the selected ‘Master’ unit.
Caution: To ensure simultaneous function for all Mood-Lights of your Mood-Light installation, make sure each unit has
been properly selected ‘Master’ or ‘Slave’.
(Fig.3)
(Fig.2)
Page 7
6) Connect the Power Supply Adaptor to the Mood-Light.
7) Connect the AC Power Cord to the Power Supply Adaptor and to your socket.
8) Insert the 2 AAA Batteries into your Remote Control.
B) Turn Mood-Light Power On/Off
Always point the Remote Control to the selected ‘Master’ unit in your installation.
Press the ON button on your remote control to turn-on your Mood-Light. Note: The default start up condition of your MoodLight will be ON when power is connected for the first time.
You can now start and operate all Mood-Lights in your installation simultaneously, use the Color Mode, the Sequence Modes,
the Function Modes or the Sound Mode as described below.
Press the OFF button on your remote control to turn-off your Mood-Light.
0 8
(Fig.4)
Page 8
0 9
MOOD-LIGHT FUNCTIONS
A) Color Mode
You can create and save any color combination for each or all of the four Mood-Light unit sections.
By changing the intensity of the three primary colors red, green, blue you can blend unlimited secondary colors for your MoodLight.
1) Create a Color Combination
All four unit section adjustment:
Press CENTRE BUTTON on your remote control to create one color for all four Mood-Light unit sections. All four MoodLight unit sections will blink once in acknowledgement of the command from your remote.
Single unit section adjustment:
Press any of the four Mood-Light unit sections (segment 01) or (segment 02) or (segment 03) or (segment 04)
on your remote control to chose any individual unit section for which you want to create a color. The selected MoodLight unit section will blink once in acknowledgement of the command from your remote.
Once you have selected to either adjust all four unit sections or just one, you can proceed to adjust the color as follows:
Press RED (+) or (-) to increase or decrease the intensity of the red color.
Press GREEN (+) or (-) to increase or decrease the intensity of the green color.
Press BLUE (+) or (-) to increase or decrease the intensity of the blue color.
See Illustration 1 (Color Chart Subtractive), page 26
See Illustration 2 (Color Chart Additive), page 26
Mix Chart: Magenta = mix Blue and Red
Yellow = mix Green and Red
Cyan = mix Green and Blue
White = evenly mix Red, Green and Blue
To return to the default Color Mode at any time, press CENTRE BUTTON on your remote control; this will reset any
previous setting you may have made. You can then proceed to adjust all sections or individual sections as described above.
Page 9

2) Save a Color Combination
To save your last color combination, press one of the MEMORY (M1 - M2 - M3 - M4) buttons on your remote control
continuously until all units blink once in acknowledgement of your command. You can save up to four different color
combinations in this fashion.
Press any of the four MEMORY buttons to show the previously saved Mood.
You can change a saved color combination with a new color combination, by again pressing the requested MEMORY
button until all units blink once. These settings are saved even during removal of power.
B) Sequence Modes
You can display three pre-programmed, animated light sequences: Chill, Motion and Action.
1) Chill
Seductive, tranquil, relaxed – Chill is a light sequence to sooth your mind and calm your soul.
Press CHILL (S1) on your remote control to start the Chill Sequence.
To stop the Chill Sequence and to start another mode– press any other button.
2) Motion
Interchanging waves crashing into psychedelic colors and effects – Motion is a light sequence to stimulate your senses.
Press MOTION (S2) on your remote control to start the Motion Sequence.
To stop the Motion Sequence and to start another mode - press any other button.
3) Action
Fusion of techno and beat effects – Action is a light sequence of intense energy that will thrill your mind.
Press ACTION (S3) on your remote control to start the Action Sequence.
To stop the Action Sequence and to start another mode - press any other button.
C) Sound Mode
Color effects pulse in sync with music beats using a built in sound sensor. Play your music and adjust the volume of your
audio device to maximize the effect.
Press SOUND (T) on your remote control to start the Sound Mode.
To stop the Sound Mode and to start another mode - press any other button.
1 0
Page 10

1 1
D) Function Modes
You can display four active light functions and control the speed of the functions.
1) Random
The Random Function is a display of unlimited and changing combinations of colors.
Press RANDOM (F1) on your remote control to start the Random Function.
Press SPEED (+) or (-) to increase or decrease the speed of the Random Function.
To stop the Random Function and to start another mode - press any other button.
2) Rainbow
The Rainbow Function is a display of colors in sequence of the rainbow colors.
Press RAINBOW (F2) on your remote control to start the Rainbow Function.
Press SPEED (+) or (-) to increase or decrease the speed of the Rainbow Function.
To stop the Rainbow Function and to start another mode - press any other button.
3) Fusion
The Fusion Function is a display of fading and gradually changing colors.
Press FUSION (F3) on your remote control to start the Fusion Function.
Press SPEED (+) or (-) to increase or decrease the speed of the Fusion Function.
To stop the Fusion Function and to start another mode - press any other button.
4) Pulse
The Pulse Function is a display of a pulsating light and can be displayed in four different colors and with interchanging
colors.
Press PULSE (F4) on your remote control to start the Pulse in red color.
Press PULSE (F4) again to change to green color.
Press PULSE (F4) again to change to blue color.
Press PULSE (F4) again to change to white color.
Press PULSE (F4) again to change to interchanging colors.
Press SPEED (+) or (-) to increase or decrease the speed of the Pulse Function.
To stop the Pulse Function and to start another mode - press any other button.
Page 11

CARE AND MAINTENANCE
Your Mood-Light is a product of superior design and quality, which should be treated with care. The suggestions below will
help you to fulfill any warranty obligations and to enjoy this product for many years.
To ensure simultaneous function for all Mood-Lights of your Mood-Light installation, make sure each unit has been properly
selected ‘Master’ or ‘Slave’.
When you encounter problems with a function of the Mood-Light the Mood-Light program must be reset.
Push the reset button, marked as ‘Reset’, on the reverse of your Mood-Light.
When installing and using your Mood-Light:
- Make sure it is installed properly and securely.
- Keep it and all its parts out of children’s reach.
- Use indoors only.
- Keep it dry. Precipitation and liquids contain minerals that will corrode electronic circuits.
- Do no use or store it in dusty or dirty areas. The lighting parts can lose brightness.
- Do not install or store in hot areas. High temperatures can shorten the life of electronic items, damage batteries, and
warp or melt certain plastics.
- Do not attempt to open, alter or tamper with your Mood-Light. Non-expert handling may damage the unit and may
cause injury to the user.
- Do not tamper with or replace LED bulbs.
- Do not drop, knock or shake the Mood-Light. Rough handling can break internal circuit boards and lights.
- Do not use harsh chemicals, cleaning solvents, or strong detergents to clean. Wipe with a soft cloth slightly dampened
in a mild soap-and-water solution.
- Do not paint or alter it in any way. This can alter the lighting effects and appearance.
If the Mood-Light or its accessories are not working properly, contact your nearest qualified service facility.
Personnel there will assist you, and if necessary, arrange for service.
1 2
Page 12

1 3
TECHNICAL SPECIFICATIONS
Color Range - millions of additive RGB colors with variable intensity
Source - ultra bright LED (light emitting diodes)
Source Life - predicted source life 50,000 hours under normal operating conditions
Control - IR Remote Control
Operating Temperature - range –15ºC ~ +55ºC
Storage Temperature - range –40ºC ~ +70ºC
Power Supply - 90 ~ 240V AC I/P, 5V DC, 3.5A Output
- Power Supply listed UL and CE
- Optional System Power Supply
AC Power Cord - detachable for worldwide use, listed UL and CE
DC Power Cord - listed UL and CE
Operation Voltage - DC 5V
Current Consumption - 3A Max.
Backup Battery - 3V Lithium cell / 2 Years
Testing Condition - Temperature +25ºC ~ -2ºC
- Humidity 80% RH+/- 5% as standard testing condition
LIMITED WARRANTY
Traxon guarantee that this Mood-Light is free from defects in material and workmanship according to the following terms and conditions:
- The warranty of the Mood-Light is valid for 12 months from the date of purchase of the product.
- This limited warranty does not cover damages due to improper installation or improper testing or problems with electrical power usage
not in accordance with specification.
- Traxon is not responsible for any damages due to unauthorized repair, unauthorized modifications and alteration of the Mood-Light.
- During the limited warranty period, Traxon or its authorized distributors will either repair or replace any defective product or parts thereof
with new or factory rebuilt replacement items, and return the product to the consumer in working condition. No charge will be made to
the consumer for either parts or labor in repairing or replacing the product.
- The repaired product will be guaranteed for the balance of the original warranty period, or for ninety days from the date of repair, whichever
is longer.
- Upon request from Traxon or its authorized distributors the consumer must provide the purchase receipt or other information such as the
product serial number to prove the date and place of purchase.
- Transportation, delivery and handling charges incurred in the return of the product to and from Traxon or its authorized distributors will be
borne by the customer.
The consumer shall have no coverage or benefits under this limited warranty if any of the following conditions are applicable:
- The product has been subject to abnormal use, abnormal condition, improper storage, exposure to moisture or dampness, exposure to
excessive temperature or other such environmental conditions, unauthorized modifications, unauthorized connection, unauthorized repairs,
Page 13

(SHOP DEALER’S STAMP AND DATE)
info@mood-light.com www.mood-light.com
misuse, neglect, abuse, accident, alteration, improper installation, acts of God, spillage of foods or liquids, maladjustment of customer controls
or other acts which are beyond reasonable control of Traxon, including deficiencies in consumable parts such as fuses. Breakage or damages
unless caused directly by defects in materials and workmanship and normal wear and tear of the product.
- Traxon was not notified by the consumer of the alleged defect or malfunction of the product during the applicable limited warranty period.
- The product serial number label on the reverse of the Mood-Light has been removed, defaced or altered.
- The product was used with or connected to accessories not supplied by Traxon.
If a problem develops during the limited warranty period the consumer should take the following steps:
1) The consumer shall contact his/her local and authorized distributor.
2) The consumer shall arrange for the product to be delivered to the authorized distributor. Expenses, related to removing the product
from an installation are not covered under this warranty. Expenses related to transportation to the distributor are not covered by
this warranty.
3) The consumer will be billed for any parts or labor charges not covered by this limited warranty.
4) The consumer shall be responsible for expenses related to reinstallation of the product.
5) If the product is returned to the nearest distributor after the expiration of the warranty period Traxon and its distributor’s normal
service policies shall apply and the consumer will be charged accordingly.
Any implied warranty of merchantability, or fitness for a particular purpose or use, shall be limited to the duration of the foregoing written
warranty. Otherwise, the foregoing warranty is the purchaser’s sole and exclusive remedy and is in lieu of all other warranties, express or
implied. Traxon shall not be liable for incidental or consequential damages or a loss of anticipated benefits or profits.
All warranty information, product features and specifications are subject to change without notice.
1 4
Page 14
1 5
light
eine Energieform, die den Sehsinn stimuliert
mood
ein vorübergehender Gemütszustand
mood-light
Die nächste Dimension in Leuchtendesign, Lifestyle
und persönlichem Ausdruck. Die Morgendämmerung
einer neuen Erfahrung.
BEDIENUNGSANLEITUNG
UND GARANTIE
Page 15
1 6
IHR MOOD-LIGHT
Diese Bedienungsanleitung gibt Ihnen einige wichtige und detaillierte Informationen zur Nutzung und Handhabung Ihres MoodLight. Lesen Sie die Betriebsanleitung sorgfältig durch und befolgen Sie genau alle beschriebenen Schritte, um die Lampe in
Betrieb zu nehmen.
Inhalt/Zubehör
1) Mood-Light
2) Fernbedienung (optional, modellabhängig)
3) 2 AAA Batterien (Microzellen) pro Fernbedienung
4) Netzadapter (optional, modellabhängig)
5) Netzkabel (optional, modellabhängig)
6) Bedienungsanleitung
7) 1 Lithiumbatterie Typ CR1616
8) Verbindungskabel (Master/Slave)
9) 2 x Montagehalterungen, 2 x Schrauben, 4 x Träger
INBETRIEBNAHME
A) Installation
1) Setzen Sie die Lithiumzelle vom Typ CR1616 in das Batteriefach ein, das sich an der hinteren unteren rechten Ecke des
Mood-Light befindet. Das Pluszeichen (+) sollte dabei nach außen zeigen.
2) Sie können Ihr Mood-Light - wie in Abbildung 1 beschrieben - an der Wand befestigen.
- schrauben und fixieren Sie zwei Montagehalterungen an die Wand und versichern Sie sich, dass der Abstand zwischen
den beide
n Löchern genau 340 mm beträgt.
(Fig.1)
340mm
T1
T2
B1
B2
Page 16

1 7
-
befestigen und fixieren Sie zwei TrÅger in die Öffnungen B1 und B2 auf der Rückseite des Mood-Lights und hängen
Sie das Mood-Light auf die vorinstallierten Montagehalterungen in die Öffnungen T1 und T2.
3) Sie können Ihr Mood-Light auf dem Boden, auf dem Tisch oder in einem Regal aufstellen. Öffnen Sie den Ständer auf
der Rückseite des Mood-Lights und stecken Sie die obere Platte in die untere Platte (siehe Abbildung 2). Sie können den
Stellwinkel verändern, indem Sie den Winkel des Ständers entsprechend einstellen.
4) Sie können Ihr Mood-Light - wie in Abbildung 3 beschrieben - aufhängen.
- befestigen Sie vier Halterungen / Träger in den Öffnungen T1, T2, B1 und B2 auf der Rückseite Ihres Mood-Lights
- benutzen Sie eine Standard-Deckenbefestigung
- Deckeninstallationen sollten nur von einem qualifizierten Techniker vorgenommen werden
Achtung: Für beide Arten der Aufhängung Ihrer Mood-Light ist zu beachten, daß die Mood-Light richtig positioniert
und sicher befestigt ist!
5) Jedes Mood-Light kann optional als Master- oder als Slave-Modul genutzt werden. Bei größeren Installationen müssen
Sie sich für ein Master-Modul entscheiden und die weiteren Module als Slave-Module ergänzen. Drehen Sie den Master/Slave-Schalter des Master-Mood-Lights auf die “Master-Position" und platzieren Sie das Verbindungskabel in die
Ausgangsposition auf der Rückseite Ihres Mood-Lights (siehe Abbildung 4).
Drehen Sie den Master-/Slave-Schalter der Slave-Module auf die “Slave-Position" und platzieren Sie das Verbindungskabel
des Master-Mood-Lights in die Eingangsposition auf der Rückseite Ihres nächsten Slave-Moduls, wie in Abbildung 4
gezeigt.
Sie können beliebig viele Slave-Module an das Master-Modul anreihen.
(Fig.3)
(Fig.2)
Page 17

1 8
Achtung: Um den gleichzeitigen Betrieb aller Ihrer Geräte zu ermöglichen, stellen Sie sicher, daß jedes Gerät gemäß der
vorangehenden Beschreibung entweder als Haupt- oder Nebengerät definiert wurde
6) Verbinden Sie den Netzadapter mit dem Mood-Light.
7) Verbinden Sie das Netzkabel mit dem Netzadapter und Ihrer Steckdose.
8) Legen Sie die beiden mitgelieferten AAA-Batterien (Microzellen) in Ihre Fernbedienung.
B) Ein- und Ausschalten des Mood-Light
Richten Sie Ihre Fernbedienung stets auf das Gerät, das Sie zum Hauptgerät bestimmt haben.
Drücken Sie ON auf Ihrer Fernbedienung, um Ihre Mood-Light einzuschalten. Beachten Sie: Bei der ersten Inbetriebnahme
Ihres Mood-Light ist das Gerät eingeschaltet, sobald es an das Stromnetz angeschlossen wurde.
Nun können Sie mit der Bedienung Ihres Mood-Light beginnen und die verschiedenen Betriebsarten (Farbe, Sequenz, Funktion,
Ton) benutzen, wie unten beschrieben.
(Fig.4)
Page 18

1 9
Drücken Sie OFF, um Ihr Mood-Light auszuschalten.
FUNKTIONEN DES MOOD-LIGHT
A) Farbmodus
Im Farbmodus können Sie jede beliebige Farbkombination selbst wählen und abspeichern für die vier Einheitssektionen der
Mood-Light.
Durch Veränderung der Intensität der drei Primärfarben Rot, Grün und Blau können für Ihr Mood-Light eine unbegrenzte Zahl
von Sekundärfarben mischen.
1) Entwerfen Sie eine Farbkombination
Gleichzeitige Abstimmung aller vier Einheitssektionen:
Drücken Sie die Taste CENTRE BUTTON auf Ihrer Fernbedienung, um eine einzige Farbe für alle vier Einheitssektionen
der Mood-Light zu erzeugen. Alle vier Einheitssektionen des Mood-Light blinken einmal als Bestätigung des
Fernbedienungsbefehls.
Abstimmung einzelner Einheitssektionen:
Um die Einheit zu wählen, für die Sie eine Farbkombination entwerfen möchten, drücken Sie eine der Tasten (segment
01), (segment 02), (segment 03) oder (segment 04) auf Ihrer Fernbedienung. Die gewählte Einheit wird einmal aufblinken
als Bestätigung des Fernbedienungsbefehls.
Wenn Sie entweder alle vier oder eine einzelne Einheitssektion angewählt haben, können Sie die Farbe wie folgt regulieren:
Drücken Sie RED (+) oder (-), um die Intensität der Farbe Rot zu erhöhen oder zu vermindern.
Drücken Sie GREEN (+) oder (-), um die Intensität der Farbe Grün zu erhöhen oder zu vermindern.
Drücken Sie BLUE (+) oder (-), um die Intensität der Farbe Blau zu erhöhen oder zu vermindern.
Siehe Abbildung 1, Seite 26
Siehe Abbildung 2, Seite 26
Mischkarte: Magenta darstellen = Blau und Rot mischen
Gelb darstellen = Grün und Rot mischen
Cyan darstellen = Grün und Blau mischen
Weiß darstellen = Rot, Grün und Blau in gleicher Intensität mischen
Sie können jederzeit in die Ausgangseinstellung des Farbmodus zurückkehren, indem Sie die Taste CENTRE BUTTON
auf Ihrer Fernbedienung drücken; dadurch wird jede von Ihnen vorgenommene Einstellung gelöscht, und Sie können mit
Page 19

2 0
dem Entwurf einer neuen Farbkombination für einzelne oder alle Sektionen, wie oben beschrieben, beginnen.
2) Speichern einer Farbkombination
Um Ihre zuletzt eingestellte Farbkombination abzuspeichern, halten Sie eine der MEMORY-Tasten (M1 - M2 - M3 - M4)
auf Ihrer Fernbedienung gedrückt, bis alle 4 Einheiten zur Bestätigung des Befehls einmal blinken. Auf diese Weise können
Sie bis zu vier verschiedene Farbkombinationen abspeichern.
Sie können eine abgespeicherte Stimmung jederzeit durch eine neue Farbkombination ersetzen, indem sie die betreffende
MEMORY-Taste erneut drücken, bis alle Einheiten einmal blinken. Diese Einstellungen bleiben auch dann erhalten, wenn
die Stromzufuhr unterbrochen wird.
B) Sequenzmodus
Im Sequenzmodus können Sie die drei vorprogrammierten Farbsequenzen darstellen: Chill, Motion und Action.
1) Chill
Als ruhiger, verführerischer, entspannter Gemütszustand ist Chill eine Lichtsequenz, die Geist und Seele beruhigt.
Drücken Sie die CHILL-Taste (S1) auf Ihrer Fernbedienung, um die Chill-Sequenz zu starten.
Um die Chill-Sequenz zu stoppen und einen anderen Modus zu starten, drücken Sie eine beliebige Taste.
2) Motion
Mit wechselnden Wellen, die in psychedelische Farben und Effekte hineinplatzen, ist Motion eine Lichtsequenz, die die
Sinne stimuliert.
Drücken Sie die MOTION-Taste (S2) auf Ihrer Fernbedienung, um die Motion-Sequenz zu starten.
Um die Motion-Sequenz zu stoppen und einen anderen Modus zu starten, drücken Sie eine beliebige Taste.
3) Action
Mit der Verschmelzung von Techno- und Beat-Effekten ist Action eine Lichtsequenz von intensiver Energie, die Ihren Geist
beflügeln wird.
Drücken Sie die ACTION-Taste (S3) auf Ihrer Fernbedienung, um die Action-Sequenz zu starten.
Um die Action-Sequenz zu stoppen und einen anderen Modus zu starten, drücken Sie eine beliebige Taste.
C) Tonmodus
Durch einen eingebauten Musiksensor pulsieren Farbeffekte im Gleichklang mit musikalischen Rhythmen. Spielen Sie Ihre
eigene Musik ab und regulieren Sie die Lautstärke des Abspielgerätes, um den bestmöglichen Effekt zu erzielen.
Drücken Sie die SOUND-Taste (T) auf Ihrer Fernbedienung, um den Tonmodus zu starten.
Um den Tonmodus zu stoppen und einen anderen Modus zu starten, drücken Sie eine beliebige Taste.
Page 20

2 1
D) Funktionsmodi
Sie können vier aktive Lichtfunktionen darstellen und das Tempo der Funktionen kontrollieren.
1) Random
Die Zufallsfunktion stellt eine unbegrenzte Zahl wechselnder Farbkombinationen dar.
Drücken Sie die RANDOM-Taste (F1) auf Ihrer Fernbedienung, um die Zufallsfunktion zu starten.
Drücken Sie SPEED (+) oder (–), um die Geschwindigkeit der Zufallsfunktion zu erhöhen oder zu vermindern.
Um die Zufallsfunktion zu stoppen und einen anderen Modus zu starten, drücken Sie eine beliebige Taste.
2) Rainbow
Die Regenbogenfunktion stellt Farben in der Abfolge der Regenbogenfarben dar.
Drücken Sie die RAINBOW-Taste (F2) auf Ihrer Fernbedienung, um die Regenbogenfunktion zu starten.
Drücken Sie SPEED (+) oder (–), um die Geschwindigkeit der Regenbogenfunktion zu erhöhen oder zu vermindern.
Um die Regenbogenfunktion zu stoppen und einen anderen Modus zu starten, drücken Sie eine beliebige Taste.
3) Fusion
Die Fusionsfunktion stellt verblassende und langsam wechselnde Farben dar.
Drücken Sie die FUSION-Taste (F3) auf Ihrer Fernbedienung, um die Fusionsfunktion zu starten.
Drücken Sie SPEED (+) oder (–), um die Geschwindigkeit der Fusionsfunktion zu erhöhen oder zu vermindern.
Um die Fusionsfunktion zu stoppen und einen anderen Modus zu starten, drücken Sie eine beliebige Taste.
4) Pulse
Die Pulsfunktion stellt pulsierendes Licht wahlweise in vier verschiedenen Farben oder mit wechselnden Farben dar.
Drücken Sie die PULSE-Taste (F4) auf Ihrer Fernbedienung, um die Pulsfunktion mit roter Farbe zu starten.
Drücken Sie die PULSE-Taste (F4) nochmals, um zu Grün zu gelangen.
Drücken Sie die PULSE-Taste (F4) nochmals, um zu Blau zu gelangen.
Drücken Sie die PULSE-Taste (F4) nochmals, um zu Weiß zu gelangen.
Drücken Sie die PULSE-Taste (F4) nochmals, um zu Wechselfarben zu gelangen.
Drücken Sie SPEED (+) oder (–), um die Geschwindigkeit der Pulsfunktion zu erhöhen oder zu vermindern.
Um die Pulsfunktion zu stoppen und einen anderen Modus zu starten, drücken Sie eine beliebige Taste.
Page 21

PFLEGE UND WARTUNG
Ihr Mood-Light ist ein Erzeugnis von überlegenem Design und höchster Qualität und sollte deshalb mit Sorgfalt behandelt
werden. Die untenstehenden Vorschläge werden Ihnen helfen, Ihre Pflichten aus der Garantieerklärung zu erfüllen und über
viele Jahre an diesem Produkt Ihre Freude zu haben.
Um den gleichzeitigen Betrieb aller Ihrer Geräte zu ermöglichen, stellen Sie sicher, daß jedes Gerät ordnungsgemäß entweder
als Haupt- oder Nebengerät definiert wurde.
Sollten wider Erwarten Probleme mit einer Funktion des Mood-Light auftreten, muß das Programm wieder in seine
Ausgangsstellung gebracht werden. Drücken Sie dazu die Taste mit der Bezeichnung RESET of der Rückseite Ihres MoodLight.
Während Inbetriebnahme und Gebrauch Ihres Mood-Light:
- Stellen Sie sicher, daß die Anlage ordnungsgemäß und sicher aufgestellt wurde.
- Halten Sie die Anlage und all ihre Teile außerhalb der Reichweite kleiner Kinder.
- Betreiben Sie die Anlage nur in Innenräumen.
- Halten Sie die Anlage trocken. Niederschlag und Flüssigkeiten enthalten Mineralien, die zur Korrosion der Schaltkreise
führen können.
- Lagern Sie die Anlage nicht an staubigen oder schmutzigen Stellen. Dadurch könnten die leuchtenden Teile ihre Leuchtkraft
verlieren.
- Die Anlage sollte auch nicht an Orten mit großer Hitze aufgestellt oder gelagert werden. Hohe Temperaturen verkürzen
die Lebensdauer von Elektronikteilen, schädigen Batterien und verformen oder schmelzen bestimmte Kunststoffteile.
- Versuchen Sie niemals, die Geräte zu öffnen oder zu verändern. Eingriffe durch Laien könnten sie beschädigen oder den
Benutzer verletzen.
- Versuchen Sie niemals, Leuchtdioden zu reparieren oder zu ersetzen.
- Die Geräte sollten niemals fallengelassen, gestoßen oder geschüttelt werden. Grober Umgang kann die Schaltplatinen im
Innern und die Lampen zerstören.
- Verwenden Sie zur Reinigung keine aggressiven Chemikalien oder Reiniger. Die Leuchte sollte mit einem weichen Tuch
gereinigt werden, das in einer milden Seifenlauge angefeuchtet wurde.
- Bemalen oder verändern Sie die Geräte nicht. Dadurch können sich Lichteffekte und Erscheinungsbild verändern.
Sollten das Mood-Light oder sein Zubehör nicht ordnungsgemäß arbeiten, wenden Sie sich an Ihren nächstgelegenen
Kundendienst. Das Personal dort wird Ihnen gerne behilflich sein und, wenn nötig, eine Reparatur veranlassen.
2 2
Page 22

2 3
TECHNISCHE ANGABEN
Farbspektrum - Millionen additiver RGB-Farben mit variabler Intensität
Lichtquelle - ultrahelle Leuchtdioden (LEDs)
Lebensdauer der Lichtquelle/
Prognose: - 50.000 Stunden unter normalen Betriebsbedingungen
Bedienung - Infrarotfernbedienung
Arbeitstemperatur - zwischen -15 und +55 °C
Lagerungstemperatur - zwischen -40 und +70 °C
Stromversorgung - 90 ~ 240 V Wechselstrom, 5 V Gleichstrom, 3.5A Ausgangsleistung,
Stromversorgung unter UL- und CE-geprüft
optionale Systemstromversorgung
Wechselstromkabel - abnehmbar für weltweiten Gebrauch, UL- und CE-geprüft
Gleichstromkabel - UL- und CE-geprüft
Betriebsspannung - 5 V Gleichstrom
Stromstärke - maximal 3 A
Reservebatterie - 3 V Lithiumzelle / 2 Jahre haltbar
Testbedingungen - Temperatur zwischen +25 und –2 °C
relative Luftfeuchte 80% ±5% als Standardtestbedingung
BEGRENZTE GARANTIE
- Traxon garantiert gemäß den nachfolgenden Bedingungen, daß dieses Mood-Light frei ist von Fehlern in Material und Herstellung.
- Die Garantie für das Mood-Light besitzt 12 Monate Gültigkeit ab Kaufdatum.
- Die Garantie deckt keine Schäden ab, die durch unsachgemäße Aufstellung, unsachgemäßes Testen oder Probleme mit der Stromversorgung
entstanden sind.
- Traxon haftet nicht für Schäden, die durch nichtautorisierte Reparaturen oder Veränderungen des Mood-Light verursacht wurden.
- Innerhalb der begrenzten Garantiefrist werden Traxon oder die von ihr autorisierten Händler ein defektes Gerät oder defekte Teile entweder
reparieren. Die Garantie besteht weiter für das reparierte Gerät während der verbleibenden Zeit der ursprünglichen Garantiefrist, mindestens
aber für 90 Tage ab dem Zeitpunkt der Reparatur.
- Auf Anfrage von Traxon oder ihrer autorisierten Vertreter muß der Kunde anhand eines Kassenbelegs oder anderer geeigneter Dokumente
(z.B. Seriennummer) nachweisen, wo und wann er den zu reparierenden Gegenstand erworben hat.
- Verpackungs- und Versandkosten, die im Zusammenhang mit der Beförderung des Gegenstandes zur Firma Traxon oder einem ihrer
autorisierten Händler entstehen, gehen zu Lasten des Verbrauchers.
Der Verbraucher verwirkt den in dieser Garantieerklärung festgelegten Schutz, wenn eine der folgenden Bedingungen zutrifft:
- Das Erzeugnis wurde unvorschriftsmäßig oder unter unvorschriftsmäßigen Bedingungen gebraucht, war unsachgemäß gelagert oder installiert,
war hoher Feuchtigkeit oder hohen Temperaturen ausgesetzt, unterlag vergleichbar widrigen Umweltbedingungen, wurde unberechtigt
Page 23

2 4
(FELD FÜR HÄNDLERSTEMPEL UND KAUFDATUM)
info@mood-light.com www.mood-light.com
modifiziert, angeschlossen oder repariert, mißbraucht, mißhandelt, verändert, oder wurde Opfer höherer Gewalt, eines Verschüttens von
Flüssigkeiten oder Speisen, wurde an den Bedienelementen falsch eingestellt oder in anderer Weise einer Behandlung ausgesetzt, die
außerhalb der Kontrolle der Firma Traxon lag, einschließlich Defekten in Verbrauchsmaterialien wie Sicherungen, sowie bei Bruch oder
Schaden, sofern sie nicht das unmittelbare Resultat von Fehlern in Material oder Verarbeitung sind oder von gewöhnlicher Abnutzung des
Produkts.
- Traxon wurde nicht innerhalb der betreffenden Garantiefrist von dem angeblichen Defekt oder der angeblichen Fehlfunktion des Gerätes in
Kenntnis gesetzt.
- Die Seriennummer des Gerätes auf der Rückseite des Mood-Light wurde entfernt, verändert oder unkenntlich gemacht.
- Das Produkt wurde benutzt oder angeschlossen mit oder an Zubehör, das nicht von Traxon geliefert wurde.
Sollte während der begrenzten Garantiefrist ein Problem auftreten, sollte der Verbraucher folgende Schritte unternehmen:
1) Der Kunde bringt das Gerät zum Zwecke der Reparatur oder des Umtauschs an den Ort des Kaufs zurück.
2) Der Kunde sorgt dafür, daß das Gerät an den autorisierten Händler geliefert wird. Kosten, die durch das Entfernen des Geräts
aus einer Befestigung oder den Transport zum Händler entstehen, werden nicht von der vorliegenden Garantie abgedeckt.
3) Dem Kunden werden Ersatzteile und Arbeitsleistung in Rechnung gestellt, die von dieser begrenzten Garantie ausgenommen
sind.
4) Der Kunde trägt die Kosten für die erneute Anbringung/Aufstellung des Gerätes.
5) Sollte das Gerät nach Ablauf der Garantiefrist beim nächstgelegenen Händler eintreffen, kommt das übliche Kundendienstverfahren
der Firma Traxon zur Anwendung, und die Kosten werden dem Kunden dementsprechend in Rechnung gestellt.
Jegliche implizierte Garantie der Marktgängigkeit oder Eignung für einen bestimmten Zweck oder Gebrauch beschränkt sich auf die Dauer
der vorgenannten schriftlichen Garantie. Darüber hinaus ist die vorgenannte Garantie einziges und ausschließliches Rechtsmittel des Käufers,
unter Ausschluß aller anderen ausdrücklichen oder implizierten Garantien. Traxon haftet nicht für Begleit- oder Folgeschäden oder den Verlust
erwarteten Gewinns oder Nutzens.
Sämtliche Garantieinformationen, Produkteigenschaften und -angaben können
Page 24

2 5
Page 25

2 42 6
Subtractive
Color Chart: Illustration 1 Color Chart: Illustration 2
Additive
Page 26

2 52 7
CIE Chromaticity CIE Chart
Page 27

2 8
Page 28

light
una energía estimulante del sentido visual
mood
un estado de animo
mood-light
Otra dimensión de iluminación, estilo y expresión.
El nacimiento de una nueva experienca.
2 9
MANUAL DE UTILIZACIÓN
& GARANTÍA
Page 29

SU MOOD-LIGHT
Este manual contiene informaciones importantes y detalladas de su Mood-Light. Para disfrutar plenamente del Mood-Light,
le aconsejamos lean atentamente las noticias y sigan paso a paso las instrucciones.
Contenido/Accesorios
1) Mood-Light
2) Mando a distancia (opción según modelo)
3) 2 x pilas AAA (modelo con mando a distancia)
4) Adaptador de corriente (opción según modelo)
5) Cable AC POWER (opción según modelo)
6) Manual de utilización (modelo con mando a distancia)
7) 1 pila lithium CR 1616
8) Cable de unión (Master/Slave)
9) 2 x Instalación de los ganchos, 2 x tornillos, 4 x suportes
PREPARACION
A) Instalación
1) Coloque la pila Lithium CR 1616 en el sitio previsto, detrás del Mood Light en el ángulo inferior derecho. El siglo + deberá
quedarse hacía la parte exterior.
2) Se puede colgar el Mood-Light como en Fig. 1:
- Atornillar y fijar en la pared los 2 ganchos, asegurándose que la distancia entre los 2 sea bien de 340 mm.
- Introducir y fijar los 2 suportes en los orificios B1 y B2 situados tras el Mood Light y colgarlo de los ganchos, previamente
instalados, por los orificios T1 y T2.
3 0
(Fig.1)
340mm
T1
T2
B1
B2
Page 30

3 1
3) Se puede posar el Mood-Light sobre un soporte liso, al suelo, sobre una mesa o estantería. Abrir el pie que se encuentra
detrás del Mood-Light, como indicado en ver Fig. 2, e introducir la parte superior en una de las entallas de la parte inferior.
Se puede ajustar el ángulo inclinando el pie.
4) Se puede colgar el Mood-Light como en Fig 3:
- Introducir los 4 suportes en los orificios T1, T2,B1 y B2 situados en la parte trasera del Mood Light.
- Utilizar el kit de montaje estándar para techo
- La instalación de techo deberá de ser efectuada por una persona cualificada o un técnico.
Atención: En todo caso asegúrense que el Mood-Light este muy bien fijado!
5) El Mood Light pude utilizarse (en opción) como “Master” o “Slave” (maestro o esclavo). En el caso de la instalación de
varias pantallas deberá de elegir un Maestro para los esclavos. Posicionar el interruptor “Master” en posición “Master” y
enchufar el cable de unión en el enchufe OUTPUT que se encuentra detrás del Mood Light, ver Fig. 4.
Elegir un esclavo posicionando el interruptor “Slave” en posición “Slave” y enchufando la otra parte del cable de unión
al enchufe INPUT que se encuentra detrás del Mood Light Slave, ver Fig. 4.
Se puede unir una cantidad ilimitada de esclavos a un solo Maestro.
Precaución: Para una buena sincronización de los Mood Light, deberá de controlar que la selección Maestro o esclavo esta
echa en cada uno de los paneles.
(Fig.3)
(Fig.2)
Page 31

6) Enchufar el adaptador al Mood-Light.
7) Enchufar el cable AC POWER al adaptador y a la corriente.
8) Coloquar las 2 pilas AAA en el mando a distancia.
B) Mood-Light On/Off
Siempre dirigir el mando a distancia hacía el Mood Light MASTER (Maestro)
1) Pulse el botón ON del mando a distancia para encender su Mood-Light. Nota: tratándose de la primera utilización, el
Mood-Light se encenderá aleatoriamente.
Puede, ahora, activar y programar el Mood-Light, utilizando las funciones Color, Séquense, Function o Sound como
indicado a continuación.
2) Pulse el botón OFF del mando a distancia para apagar su Mood-Light.
3 2
(Fig.4)
Page 32

3 3
FUNCIONES DEL MOOD-LIGHT
A) Modo Color
Se puede realizar y memorizar distintos colores o combinaciones de colores de las 4 zonas de su Mood-Light.
Utilizando los 3 colores de base: rojo, verde y azul se puede obtener un numero ilimitado de mezclas de colores.
1) Realizar un combinado de colores
Selección grupada de las zonas:
Pulse el botón CENTRE BUTTON para realizar un nuevo color, en las 4 zonas simultáneamente. Las 4 zonas se apagaran
una vez brevemente.
Selección individual de las zonas:
Para elegir la zona en la cual desea realizar un nuevo color, pulse el botón correspondiente a la zona, (segment 1) o
(segment 2) o (segment 3) o (segment 4) del mando a distancia. La zona elegida se apagará una vez brevemente.
Una vez elegida la o las zonas se puede realizar el cambio de color :
Pulse RED (+) o (-) para aumentar o disminuir la intensidad del color ROJO.
Pulse GREEN (+) o (-) para aumentar o disminuir la intensidad del color VERDE.
Pulse BLUE (+) o (-) para aumentar o disminuir la intensidad del color AZUL.
Ilustración 1 (Abanico de colores), page 26
Ilustración 2 (Abanico de colores), page 26
Abanico de mezclas: magenta = mezcla de azul y rojo
amarillo = mezcla de verde y rojo
cyan = mezcla de verde y azul
blanco = mezcla de rojo, verde y azul
Para volver en modo “Color” pulse el botón CENTRE BUTTON de su mando a distancia. A continuación puede hacer
una nueva selección y un nuevo color.
Page 33

2) Programación de un combinado de colores
Para programar un combinado de colores, pulse el botón MEMORY (M1 - M2 - M3 - M4) de su mando a distancia
manteniéndolo asta que se confirme la selección con un parpadeo. El combinado de colores que aparece en su MoodLight esta entonces programado. Puede programar asta 4 distintas combinaciones de colores.
Para visualizar un color o combinado de colores programado anteriormente, pulse uno de los 4 botones MEMORY.
Para cambiar y programar en cualquier momento un nuevo color pulse el botón MEMORY hasta la señal de parpadeo.
B) Modo Sequence
Con el modo Séquense aparece en la pantalla 3 animaciones distintas pre-programadas: Chill, Motion y Action.
1) Chill
Seducción, tranquilidad y relajación. El modo - Chill – es una suave animación que procura un sentimiento de tranquilidad
espiritual y relajación mental.
Pulse el botón CHILL (S1) de su mando a distancia para activar el modo de la animación.
Para desactivar el modo Chill y activar otro modo – pulse otro botón.
2) Motion
Una variación de oleadas de colores y efectos psicodélicos . El modo – Motion – es una animación de colores y
movimientos que estimula los sentidos.
Pulse el botón MOTION (S2) de su mando a distancia para activar la animación.
Para desactivar el modo Motion y activar otro modo – pulse otro botón
3) Action
Un efecto “techno” y “beat”. El modo – Action – es una animación de fusiones tecnicolores y efectos «beat» que
procura una extraordinaria energía mental.
Pulse el botón ACTION (S3) de su mando a distancia para activar la animación.
Para desactivar el modo Action y activar otro modo – pulse otro botón
C) Modo Sound
Efectos de colores sincronizados al ritmo de la música percibido por un captor de tonalidades musicales.
Para utilizar esta función, ponga música y ajuste el volumen audio hasta obtener el mejor efecto.
Pulse el botón SOUND (T) de su mando a distancia para activar el modo Sound.
Para desactivar el modo Sound y activar otro modo – pulse otro botón.
3 4
Page 34

D) Modo Function
Se puede visualizar en la pantalla 4 animaciones distintas y ajustar la velocidad de cada una.
1) Random
Aparición simultáneamente de un numero ilimitado de combinaciones de colores.
Pulse el botón RANDOM (F1) de su mando a distancia para activar la animación.
Pulse el botón SPEED (+) o (-) para aumentar o disminuir la velocidad del modo Random.
Para desactivar el modo Random y activar otro modo – Pulse otro botón.
2) Rainbow
Cambio de un color a otro, pasando por todos los colores del arco iris: Rojo, Naranja, Amarillo, Verde, Azul cielo, Azul
oscuro y Púrpura, utilizando las 4 zonas del Mood-Light simultáneamente.
Pulse el botón RAINBOW (F2) de su mando a distancia para activar la animación.
Pulse el botón SPEED (+) o (-) para aumentar o disminuir la velocidad del modo Rainbow.
Para desactivar el modo Rainbow y activar otro modo – pulse otro botón.
3) Fusion
Escala progresiva de cambios de colores.
Pulse el botón FUSION (F3) de su mando a distancia para activar la animación.
Pulse el botón SPEED (+) o (-) para aumentar o disminuir la velocidad del modo Fusion.
Para desactivar el modo Fusion y activar otro modo – pulse otro botón.
4) Pulse
La función Pulse aparece en la pantalla como un parpadeo de varios colores.
Pulse el botón PULSE (F4) de su mando a distancia para obtener pulsaciones rojas.
Pulse una vez mas el botón PULSE (F4) para obtener pulsaciones verdes.
Pulse una vez mas el botón PULSE (F4) para obtener pulsaciones azules.
Pulse una vez mas el botón PULSE (F4) para obtener pulsaciones blancas.
Pulse una vez mas el botón PUSLE (F4) para obtener pulsaciones de distintos colores.
Pulse el botón SPEED (+) o (-) para aumentar o disminuir la velocidad del modo Pulse.
Para desactivar el modo Pulse y activar otro modo – pulse otro botón.
3 5
Page 35

MANTENIMIENTO Y CUIDADOS
Su Mood-Light es un aparato Diseño, de máxima calidad que deberá de utilizarse con mucho cuidado.
Para satisfacer a las condiciones de garantía y aprovechar plenamente durante años de su Mood-Light, le recomendamos
lean con mucha atención los consejos de utilización.
Si durante la utilización del Mood-light encuentra alguna anomalía de funcionamiento, haga un “reset” pulsado el botón “reset”
detrás del Mood-light.
Instalando y utilizando su Mood-Light:
- Asegúrense que este bien instalado y bien fijado.
- No dejar el Mood-Light o sus componentes a mano de niños pequeños.
- Utilice el Mood-Light únicamente en el interior.
- Mantenerlo en un lugar seco. No instalar el Mood-Light bajo una proyección de liquido, ni en un lugar húmedo, podría
dañar la parte electrónica y causar problemas de corrosión.
- Mantener el Mood-Light en un lugar limpio. El polvo disminuye la luminosidad.
- No almacenar o instalar el Mood-Light en un lugar demasiado caliente. Las temperaturas muy elevadas pueden disminuir
la duración de vida del aparato, dañar las pilas y desalterar las partes de plástico.
- No abrir el aparato. La intervención de una persona no autorizada puede dañar el \Mood-Light y hacer su utilización
peligrosa.
- No intentar sacar o cambiar los diodos.
- No dejar caer ni golpear el aparato. El maltrato podría dañar los diodos y la parte electrónica.
- No utilizar productos detergentes o químicos. Para limpiarlo solo es necesario pasar un trapo suave y eventualmente
húmedo.
- No pintar o modificar en ningún caso el Mood-Light, podría cambiar los efectos luminosos.
En caso de defecto del Mood Light o de sus accesorios, contacten directamente su proveedor.
Le informará y le aconsejará si necesario un servicio técnico de reparación.
3 6
Page 36

3 7
INFORMACIONES TECNICAS
Abanico de colores - millones de colores RVB additives con intensidad variable
Origen - Diodos ultra luminosos
Duración de vida - estimada a 50000 horas en uso normal
Mando - Mando a distancia IR
Temperatura de funcionamiento - de –15ºC ~ +55ºC
Temperatura de almacenamiento - de –40ºC ~ +70ºC
Alimentacion - 90 ~ 240V AC I/P, 5V DC, 3,5 A Output
- Alimentación homologada UL y CE
Cable AC - 2 metros de largo, utilización mundial, homologado UL y CE
Cable DC - 2 metros de largo, homologado UL y CE
Voltaje operacional - DC 5V
Corriente de consume - 3A Max.
Pila - 3V Lithium cell / 2 ans
Pruebas - Temperatura +25ºC ~ -2ºC
- Humedad 80% RH+/- 5% en condiciones normales
CONDICIONES DE GARANTIA
Traxon garantiza el aparato Mood-Light (Traxon) contra todo defecto posible de producción o de material, bajo las condiciones siguientes:
- El Mood-Light tiene una garantía de 12 meses a partir de la fecha de compra.
- Esta garantía limitada no cubre los daños causados por maltrato, utilización abusiva y problemas eléctricos que no sean conforme a las
especificaciones del aparato.
- La garantía de Traxon no cubre los problemas debidos a una modificación efectuada por una persona no autorizada por el fabricante.
- Durante el tiempo de la garantía limitada, Traxon o sus distribuidores oficiales harán el cambio o la reparación del aparato o parte defectuosa,
con piezas de recambio del fabricante. Traxon devolverá el aparato al consumidor en buen estado de funcionamiento. La mano de obra y
piezas de recambio no serán a cargo del consumidor.
- El aparato arreglado será garantizado por el tiempo de la garantía limitada, o 90 días a partir de la fecha del arreglo, según el tiempo más
largo.
- A la demanda de Traxon o de sus distribuidores oficiales, el consumidor deberá presentar una factura de su proveedor u otro documento
demostrando la prueba de la fecha y lugar de compra del aparato.
- Los gastos de envió hasta Traxon o sus distribuidores oficiales serán a cargo del consumidor.
La garantía no será de aplicación en los siguientes casos:
Si el aparato ha sido utilizado anormalmente, en condiciones anormales, si ha sido almacenado o instalado de manera no conforme, si estuvo
en un lugar húmedo y tiene marcas de moho, si estuvo bajo temperaturas muy elevadas o en malas condiciones de medio ambiente, si ha
sido modificado o transformado por una persona no autorizada, si a recibido malos tratos, si a recibido proyecciones de liquido o otros
productos o si ha sido manipulado de manera considerada como impropia por la empresa Traxon. La garantía no cubre los daños causados
Page 37

por problemas eléctricos tal como defecto de fusibles o problemas de corriente, excepto si los problemas han sido causados por el aparato
mismo, habiendo sido utilizado correctamente.
Si Traxon no ha sido informado, por el consumidor, del mal funcionamiento o defecto del aparato, en el período de la garantía limitada. Si
la etiqueta con el numero de serie detrás del aparato, ha sido despegada o encolada o modificada. Si el aparato ha sido utilizado a pesar
de su defectuosidad causando daños mas importantes.
Si el aparato a sido conectado con otros accesorios que los de Traxon.
Para garantizar el aparato, deberá el consumidor:
1) devolver el aparato donde lo ha comprado.
2) tomar a su cargo los gastos de envió hasta el distribuidor autorizado, y tener en cuenta que los gastos de desmontaje o de instalación
no son cubiertos por la garantía limitada.
3) tomar a su cargo todos gastos de mano de obra y otros que los indicados en la garantía limitada.
4) tomar nota que la garantía limitada no cubre la instalación del aparato.
5) tomar a su cargo los gastos y consecuencia si el aparato no ha llegado al distribuidor en el período de la garantía limitada.
Toda garantía o promesa de venta que no sean las mencionadas en este documento no serán aceptadas por Traxon. La única garantía valida
es la formulada por el fabricante. Traxon no será responsable de perdidas debidas a una acción promocional que no ha dado el resultado
esperado por el cliente.
Toda información o especificación podrá ser cambiada sin preaviso.
3 8
(SELLO DEL DISTRIBUIDOR Y FECHA)
info@mood-light.com www.mood-light.com
Page 38

3 9
light
une énergie qui stimule le sens visuel
mood
un état d´esprit temporaire
mood-light
Une autre dimension de lumière, style et expression.
La naissance d’une nouvelle expérience.
GUIDE D’UTILISATION
ET GARANTIE
Page 39

4 0
VOTRE MOOD-LIGHT
Ce mode d’emploi vous procure toutes les informations importantes et détaillées sur l’utilisation de votre Mood-Light. Afin
de profiter pleinement de votre Mood-Light, nous vous recommandons de lire attentivement la notice et d’en suivre les
instructions étape par étape.
Contenu/Accessoires:
1) Mood-Light
2) Commande à distance (en option suivant model)
3) 2 x piles AAA (s’il y a une commande à distance)
4) Adaptateur de réseau (en option suivant model)
5) Câble AC POWER (en option suivant model)
6) Mode d’emploi (pour model avec commande à distance)
7) 1 pile lithium CR 1616
8) Cable de raccord (Master/Slave)
9) 2 x Placement des crochets, 2 x vis, 4 x supports
PREPARATION
A) Installation
1) Placer la pile lithium CR 1616 dans le compartiment prévu à cet effet, situé dans l’angle inférieur droit à l’arrière du
Mood-Light. Le signe + doit rester vers le côté extérieur.
2) Vous pouvez fixer votre Mood-Light comme en Fig. 1:
- Visser et fixer au mur les 2 crochets, s’assurer que la distance entre les 2 est bien de 340 mm.
(Fig.1)
340mm
T1
T2
B1
B2
Page 40

4 1
- Insérer et fixer les 2 supports dans les orifices B1 et B2 situés à l’arrière du Mood Light et suspendre celui-ci par les
orifices T1 et T2 aux crochets préalablement fixés .
3) Vous pouvez pauser le Mood-Light sur une surface lice, au sol, sur une table ou sur une étagère. Ouvrez le
clapet situé à l’arrière du Mood-Light comme indiqué en, voir Fig. 2. et glissez la plaque supérieure dans une rainure de
la plaque inférieure. Vous pouvez ajuster l’angle d’inclinaison en changent de rainure.
4) Vous pouvez suspendre votre Mood-Light comme en Fig. 3:
- Insérer les 4 supports dans les orifices T1, T2, B1 et B2 situés à l’arrière du Mood Light.
- Utiliser le kit de montage standard pour plafond
- Le montage au plafond doit être effectué par une personne qualifiée ou un technicien.
Attention: Assurez-vous pour chacune des méthodes que votre Mood-Light est placé correctement et fixé solidement!
5) Le Mood Light peut être utilisé (suivant l’option) en «Master» ou «Slave» (maître ou esclave). Dans le cas d’une installation
de plusieurs unités Il faut sélectionner un «Master» pour les esclaves. Placer le switch situé à l’arrière du Mood Light
«Master» en position «Master» et connecter le câble fourni à la sortie «OUTPUT» située à l’arrière du Mood Light
voir Fig. 4.
Placer le switch situé à l’arrière du Mood Light «Slave» en position «Slave» et connecter le câble venant du
«Master» à la sortie «INPUT» située à l’arrière du Mood-Light «Slave», voir Fig. 4.
Il est possible de connecter un nombre infini de Mood Light Slave à un seul Mood Light Master.
(Fig.3)
(Fig.2)
Page 41

4 2
Précaution: Pour une bonne synchronisation des Mood Light, s’assurer que la sélection Master ou Slave a été correctement
effectuée sur chaque écran.
6) Connectez le contact de l’adaptateur au Mood-Light
7) Connectez le câble AC POWER à l’adaptateur et une prise de courant.
8) Insérez les 2 piles AAA dans votre commande à distance.
B) Position Mood-Light On/Off
Toujours diriger la commande à distance vers l’écran sélectionné comme Maître.
1) Appuyez sur la touche ON de votre commande à distance pour allumer votre Mood-Light. Note: Le Mood-Light s’allume
par défaut lors de la première utilisation.
Vous pouvez maintenant activer et programmer votre Mood-Light, en utilisant les fonctions Color, Sequence, Function ou
Sound comme indiqué dans la notice.
2) Appuyez sur la touche OFF de votre commande à distance pour éteindre votre Mood-Light.
(Fig.4)
Page 42

FONCTIONS MOOD-LIGHT
A) Mode Color
Vous pouvez créer et sauvegarder des couleurs ou combinaisons de couleur dans les 4 zones de votre Mood-Light.
En utilisant les 3 couleurs de bases rouge, vert et bleu vous pouvez obtenir une palette de couleurs infinies.
1) Créer une combinaison de couleurs
Sélection groupée des 4 zones:
Appuyez sur la touche CENTRE BUTTON pour créer une couleur dans les 4 zones en même temps. Les 4 zones sélectionnées
vont clignoter une fois.
Sélection individuelle des 4 zones:
Pour choisir la zone dans laquelle vous voulez créer une couleur, appuyez sur la touche de votre commande à distance
correspondante à la zone (segment 1) ou (segment 2) ou (segment 3) ou (segment 4). La zone choisie va clignoter
une fois.
Lorsque vous avez sélectionné une ou plusieurs zones vous pouvez procéder à l’ajustement de la couleur:
Appuyez sur RED (+) ou (-) afin d’augmenter ou diminuer l’intensité de la couleur ROUGE.
Appuyez sur GREEN (+) ou (-) afin d’augmenter ou diminuer l’intensité de la couleur VERTE.
Appuyez sur BLUE (+) ou (-) afin d’augmenter ou diminuer l’intensité de la couleur BLEUE.
Ilustracion 1 (Choix de couleurs), page 26
Ilustracion 2 (Choix de couleurs), page 26
Choix de mélanges: magenta = mélange bleu et rouge
jaune = mélange vert et rouge
cyan = mélange vert et bleu
blanc = mélange rouge, vert et bleu
Pour retourner à tout moment dans le mode “Color”, appuyez sur la touche CENTRE BUTTON de votre commande à
distance. Vous pouvez ensuite procéder à une nouvelle sélection et choix de couleur.
4 3
Page 43

4 4
2) Sauvegarder une combinaison de couleurs
Pour sauvegarder une combinaison de couleurs, appuyez sur une des touches MEMORY (M1 - M2 - M3 - M4) de votre
commande à distance jusqu’à la confirmation effectuée par un clignotement. La combinaison de couleurs affichée sur
votre Mood-Light est sauvegardée. Vous pouvez sauvegarder jusqu’à 4 combinaisons de couleurs différentes.
Pour visualiser une couleur ou combinaison de couleurs précédemment sauvegardée, appuyez sur une des 4 touches
MEMORY.
Pour remplacer une combinaison de couleur précédemment sauvegardée, il suffit d’appuyer sur la touche MEMORY
correspondante à la combinaison que vous désirez remplacer, jusqu’à obtenir un signal d’un clignotement.
B) Mode Sequence
Vous pouvez obtenir sur votre écran 3 animations différentes, pré-programmées: Chill, Motion et Action.
1) Chill
Séduction, tranquillité et relaxation - Le mode - Chill - est une douce animation qui procure une tranquillité d’esprit et
paix de l’âme.
Appuyez sur la touche CHILL (S1) de votre commande à distance pour activer cette animation.
Pour arrêter le mode Chill et activer un autre mode – appuyez sur une autre touche.
2) Motion
Une alternance de vagues qui s’écrasent tour à tour, aux couleurs et effets psychédéliques. Le mode – Motion – est une
animation qui procure une stimulation des sens.
Appuyez sur la touche MOTION (S2) de votre commande à distance pour activer cette animation.
Pour arrêter le mode Motion et activer un autre mode – appuyez sur une autre touche.
3) Action
Un effet «techno» et «beat». Le mode – Action – est une animation qui procure une intense énergie suivie du grand
frisson.
Appuyez sur la touche ACTION (S3) de votre commande à distance pour activer cette animation.
Pour arrêter le mode Action et activer un autre mode – appuyez sur une autre touche.
C) Mode Sound
Des effets de couleurs synchronisés au rythme de la musique captée par un sensor de tonalité. Mettez de la musique et ajustez
le volume audio afin de maximiser l’effet.
Appuyez sur la touche SOUND (T) de votre commande à distance pour activer cette fonction.
Pour arrêter le mode Sound et activer un autre mode – appuyez sur une autre touche.
Page 44

4 5
D) Mode Function
Vous pouvez faire paraître sur votre écran 4 différentes animations de couleurs dont la vitesse d’animation est réglable.
1) Random
Apparition d’une combinaison infinie de changement de couleurs.
Appuyez sur la touche RANDOM (F1) de votre commande à distance pour activer l’animation.
Appuyez sur la touche SPEED (+) ou (-) pour augmenter ou diminuer la vitesse du mode Random.
Pour arrêter le mode Random et activer un autre mode – appuyez sur une autre touche.
2) Rainbow
Passage d’une couleur à une autre reprenant les couleurs de l’arc en ciel: Rouge, Orange, Jaune, Vert, Bleu ciel, bleu
foncé et Pourpre, en utilisant les 4 zones du Mood-Light simultanément.
Appuyez sur la touche RAINBOW (F2) de votre commande à distance pour activer le mode Rainbow.
Appuyez sur la touche SPEED (+) ou (-) pour augmenter ou diminuer la vitesse du mode Rainbow.
Pour arrêter le mode Rainbow et activer un autre mode – appuyez sur une autre touche.
3) Fusion
Dégradé progressif de changement de couleurs.
Appuyez sur la touche FUSION ( F3) de votre commande à distance pour activer le mode Fusion.
Appuyez sur la touche SPEED (+) ou (-) pour augmenter ou diminuer la vitesse du mode Fusion.
Pour arrêter le mode Fusion et activer un autre mode – appuyez sur une autre touche.
4) Pulse
Palpitations de couleur ou de variations de couleurs
Appuyez sur la touche PULSE (F4) de votre commande à distance pour activer le mode Pulse et obtenir des pulsations
rouges.
Appuyez à nouveau sur la touche PULSE (F4) pour obtenir des pulsations vertes.
Appuyez à nouveau sur la touche PULSE (F4) pour obtenir des pulsations bleues.
Appuyez à nouveau sur la touche PULSE (F4) pour obtenir des pulsations blanches.
Appuyez à nouveau sur la touche PULSE (F4) pour obtenir des pulsations de différentes couleurs.
Appuyez sur la touche SPEED (+) ou (-) pour augmenter ou diminuer la vitesse du mode Pulse.
Pour arrêter le mode Pulse et activer un autre mode – appuyez sur une autre touche.
Page 45

4 6
ENTRETIEN ET MAINTENANCE
Votre Mood-Light est un appareil Design, de haute qualité qui doit être utilisé avec le plus grand soin.
Afin de satisfaire aux conditions de garantie et de profiter pleinement durant de longues années de votre Mood-Light, nous
vous recommandons de suivre attentivement les conseilles d’installation et d’utilisation.
Si vous rencontrez un problème de dysfonctionnement du Mood-Light, faites un reset en appuyant sur le bouton marqué
«reset» situé à l’arrière de votre Mood-Light.
Lors de l’installation et utilisation de votre Mood-Light:
- Assurez-vous qu’il soit installé ou fixé en toute sécurité.
- Gardez le Mood-Light et tous composants hors de porté des enfants.
- Utilisez le Mood-Light uniquement à l’intérieur.
- Gardez le Mood-light dans un endroit sec. Les projections de liquide, l’humidité et toutes autres solutions contenant des
minéraux, peuvent attaquer les circuits électroniques.
- Ne pas utiliser ou entreposer le Mood-Light dans un endroit sale ou poussiéreux qui diminuerait la luminosité de celuici.
- Ne pas l’entreposer ou le placer dans un endroit trop chaud. Des températures trop élevées pourraient réduire la durée
de vie des composants électroniques, endommager les piles et déformer ou faire fondre les éléments en plastique.
- Ne pas ouvrir l’appareil. L’intervention d’une personne non qualifiée peut endommager le Mood-Light et le rendre
dangereux à l’utilisation.
- Ne pas essayer d’enlever ou de changer les diodes.
- Ne pas laisser tomber, secouer ou brutaliser l’appareil. Une manipulation brutale pourrait endommager les diodes et les
circuits intérieurs.
- Ne pas utiliser de produits détergents , chimiques ou d’entretiens. Pour le nettoyer passez un chiffon doux, légèrement
humide si nécessaire.
- Ne pas peindre ou modifier en aucune façon le Mood-Light, cela pourrait avoir des conséquences sur ses effets lumineux.
En cas de dysfonctionnement du Mood Light ou de ces accessoires, nous vous invitons à contacter votre vendeur.
Il vous informera et si nécessaire vous dirigera vers un service de réparation compétant.
Page 46

4 7
SPECIFICATIONS TECHNIQUES
Gamme de couleurs - des millions de couleurs RVB additives avec une intensité variable
Source - Diodes lumineuses ultra vives
Durée de vie - durée de vie estimée à 50 000 heures sous des conditions normales d’utilisations
Commande - Commande à distance IR
Température de fonctionnement - de -15ºC ~ +55ºC
Température de stockage - de -40ºC ~ +70ºC
Alimentation - 90 ~ 240V AC I/P, 5V DC, 3,5 A Output
- Alimentation agréée UL et CE
Câble AC - détachable pour une utilisation mondiale, agréé UL et CE
Câble DC - agréé UL et CE
Voltage opérationnel - DC 5V
Courant consommé - 3A Max.
Pile - 3V Lithium cell / 2 ans
Testes - Température +25ºC ~ -2ºC
- Humidité 80% RH+/- 5% dans des conditions normales
CONDITIONS DE GARANTIE
Traxon garantie l’appareil Mood-Light (Traxon) contre les défauts possibles de production ou de matériel aux conditions suivantes:
- Le Mood-Light est garanti 12 mois à compter de la date d’achat.
- Cette garantie limitée ne couvre pas les dégâts dus à une mauvaise utilisation, manipulation ou autres problèmes électriques non conformes
aux spécifications de l’appareil.
- Traxon ne prend pas en garantie des problèmes survenants d’une réparation ou modification effectuée par une personne non autorisée.
- Pendant la période de garantie limité, Traxon ou ses distributeurs officiels se chargent de remplacer ou réparer tout l’appareil ou partie de
l’appareil défectueux, par de nouvelles pièces ou des pièces de rechanges venant du fabricant. Traxon retournera l’appareil au consommateur
en bon état de fonctionnement. La main-d’œuvre et pièces détachées ne seront pas à charge du consommateur.
- L’appareil réparé sera garantie jusqu’à la fin de la période de garantie initiale, ou pendant 90 jours à partir de la date de réparation, suivant
la période la plus longue.
- A la demande de Traxon ou de ses distributeurs officiels, le consommateur devra fournir une facture ou autres documents prouvant la date
et lieu d’achat de l’appareil.
- Les frais d’envoi de l’appareil vers Traxon ou ses distributeurs officiels, seront à charge du consommateur.
La garantie ne sera pas d’application dans les cas suivants :
Si l’appareil à subit une utilisation anormale, dans des conditions anormales, un stockage ou installation incorrecte, s’il a été exposé à l’humidité
et contient des traces de moisissures, s’il a été exposé à des températures excessives ou autres mauvaises conditions d’environnement, s’il
a subit des modifications ou transformations par une personne non autorisée, s’il a subit un choc ou mauvais traitement, s’il a subit des
Page 47

4 8
(CACHET DU DISTRIBUTEUR ET DATE)
info@mood-light.com www.mood-light.com
projections de liquides et autres produits ou s’il a subit des manipulations considérées comme impropre par la société Traxon. La garantie
ne couvre également pas les dommages causés par des problèmes électriques tel que fusibles, coupure de courant, excepté si ce problème
provient directement d’un défaut de l’appareil ayant été utilisé normalement.
Si Traxon n’a pas été informé du mauvais fonctionnement ou défauts de l’appareil, par le consommateur, dans cette période de garantie
limitée. Si l’étiquette comprenant le numéro de série à l’arrière de l’appareil a été retirée, recollée ou modifiée. Si le défaut ou la destruction
de l’appareil est du à une utilisation malgré son mauvais fonctionnement ou défaut.
Si l’appareil a été utilisé ou connecté avec des accessoires non fournis par Traxon.
Pour que l’appareil soit pris en garantie, le consommateur devra :
1) retourner l’appareil au lieu d’achat.
2) prendre à sa charge les frais d’envoi vers son distributeur autorisé, tenant compte que les frais de démontage de l’installation
ne sont non plus pas couverts par la garantie limité.
3) assumer tous frais de main d’œuvres et autres que ceux repris dans la garantie limité.
4) tenir compte que les éventuels frais de réinstallation de l’appareil ne sont pas couvert par la garantie limité.
5) assumer tous les frais et conséquences, si l’appareil est retourné au distributeur après la date limite de garantie.
Toutes garanties ou promesses de ventes non conformes à celles mentionnées ci-dessus, ne seront pas prises en charges par Traxon. La
seule garantie valable est celle fournie par le fabricant. Traxon n’est en aucun cas responsable de pertes dues à une action promotionnelle
qui n’aurait pas apporté le résultat espéré par le client.
Toutes informations ou spécifications de la garantie, pourront être changées sans avis au préalable.
Page 48

4 9
Page 49

 Loading...