

USER'S MANUAL
HIGH DEFINITION SET TOP BOX
Please read this User's Manual carefully.
The menu structure and specification can be changed without notice

Table of Contents
Safety-------------------------------------------- - 2
General Introduction------------------------------ ------ 2
Front/ Rear Panel------------------------------------------ --------3
Remote Control Unit------------------------------------------ ---------4
Full Channel Search------------------------------------------- --------- 5
Basic Operation------------------------------------------------- ------5
Main Menu------------------------------------------------------------ ---- 6
1. Installation------------------------------------------------------ -----6
1.1. Dish Setup------------------------------------------------ ------- 6
1.2. Satellite Setup---------------------------------------- -------- 7
1.3. Transponder Setup------------------------------------ ------- 7
1.4. Channel Scan---------------------------------------- ---------- 8
2. Channel Manager----------------------------------- ------------------ 8
2.1. Service List Editor-------------------------- ---------------------- 8
2.2. Edit Favorite list---------------------------------------------------- 9
2.3. Delete ALL------------------ ----------------------------------- 9
3. System Setup----------------- ---- 10
3.1. Language Setup
3.2. Time Setup
3.3. AV Setup
3.4. System Control
3.5. Network Setup
3.6. Factory Default
4. USB------------------------------------------ -------------- 12
4.1. File Viewer-------------------------------------- 12
4.2. Recordings--------------------- ------- - 12
4.3. Updating---------------------- --- 13
4.4. Backup Date-------------------------------------------------------- 13
5. Conditional Access ---------------------------------------------------- 13
6. Accessory----------------------------------------- 14
6.1. Information---------------------------- ------------ - 14
6.2. Advanced Setup--------------------- --- 14
Specification------------------------------------------------------------------ 15
------------------------------
--------------------
-----------
------
-----
--------
----
-----
---
------
------
-----
--
-
-----
----------------------------------------
----------------------------------------------------- 10
---------------------------------------------------------- 10
------------------------------------------------------------- 10
------------------------------------------------------ 11
------------------------------------------------------11
----------------------------------------------------- 12
---------------
-------------------
---------------------------- -
-----------------------------------
-
-----------------------
------------- ---
----------------------------
-1-

Safety
This receiver has been manufactured to satisfy the international safety
standards. Please read the following safety precautions carefully.
Main Supply: 110/240V, 50/60Hz, 25W. Do not overload a wall outlet,
extension cord or adapter as this may result in fire or electric shock.
Warning: Unplug this receiver from the wall outlet before cleaning, only
use a short-dry soft cloth. Do not use the receiver where contact with or
immersion in water is possible. Do not use the receiver in the rain or the
moist atmosphere.
Warning: In order to keep proper airflow to this receiver, the slots on top
of the receiver must be left uncovered. Do not place the receiver on an
unstable object. Do not expose the receiver to direct sunlight or do not
place it near a heater.
Warning: Do not use any attachments not recommended by the product
manufacturer as they may cause hazards. Disconnect the receiver from
the power supply before connecting or disconnecting the cable from the
dish or TV, failure to do so may cause damage to the LNB or TV. Be sure
that the cable to the dish has been grounded to the system earth.
This manual will help you learn basic function such as selecting channels
and many other functions of the receiver. All functions can be performed
on the remote control. The remote control is designed for easy access to
all the functions and is a comfortable fit for your hand. The receiver is
designed for your convenient use and you can easily upgrade software
and parameters.
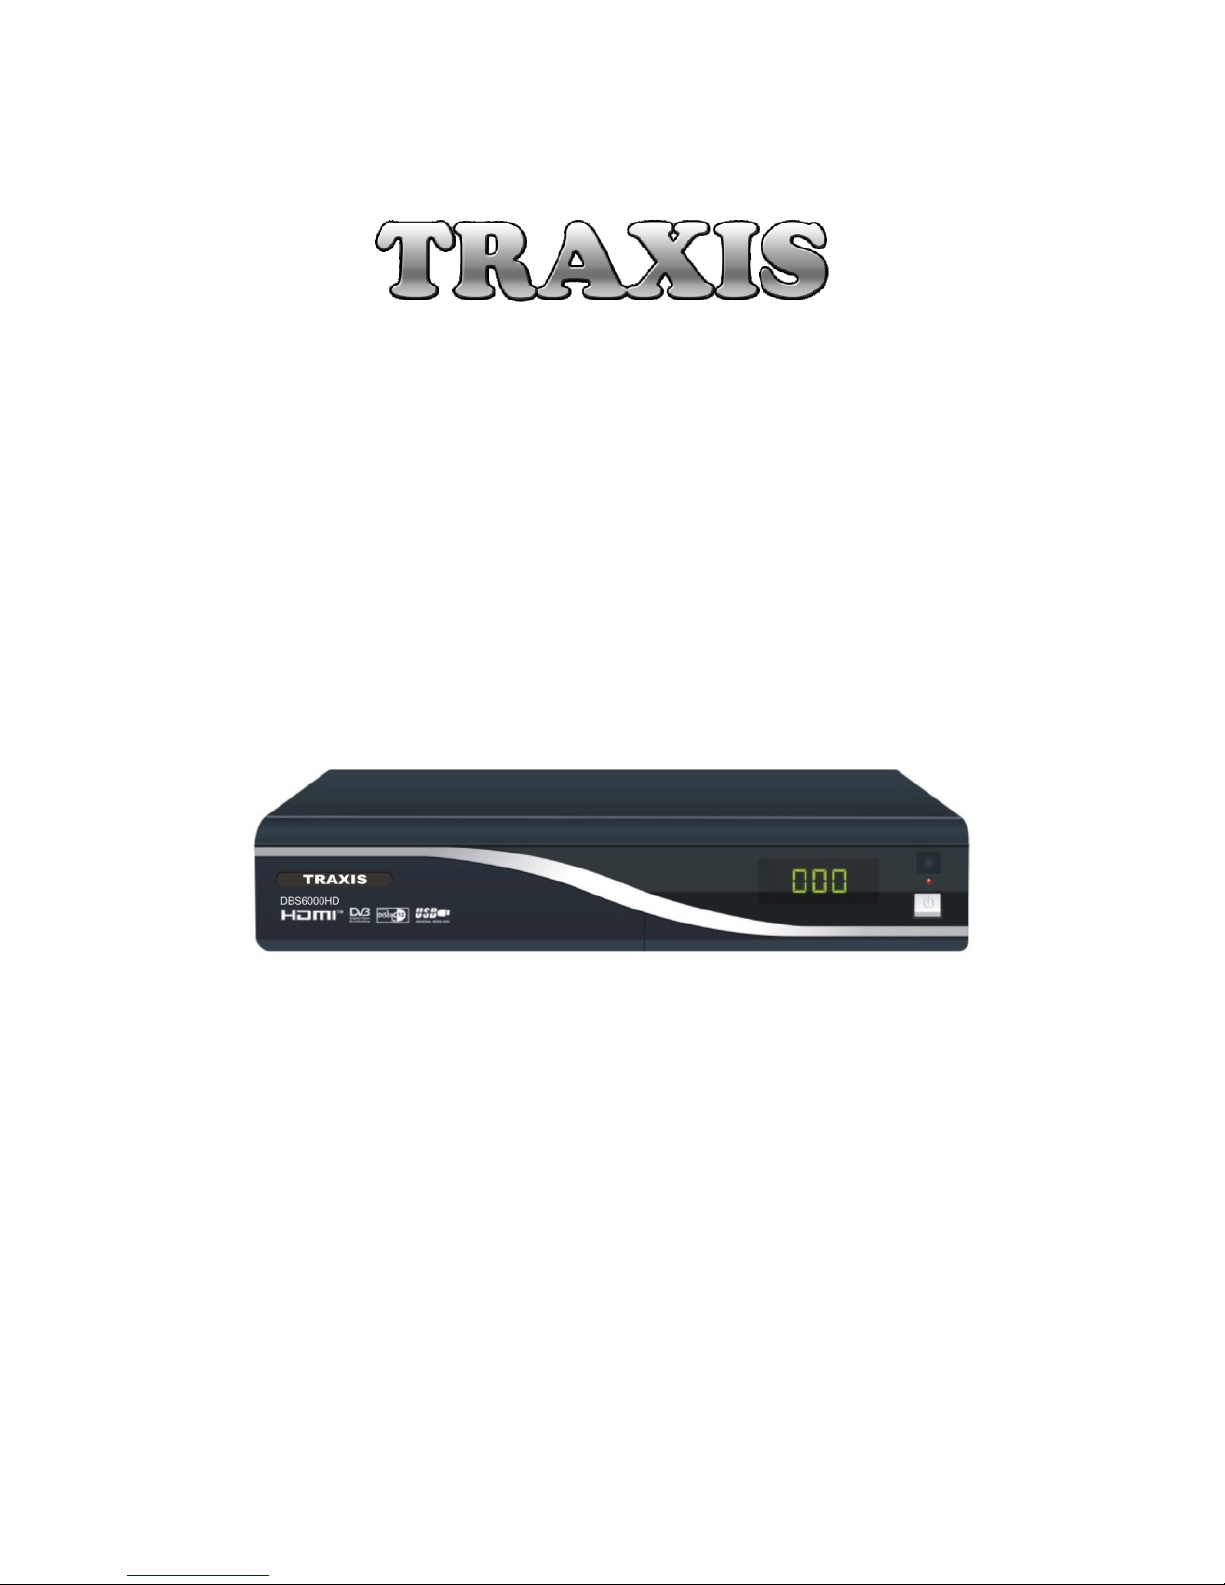
General Introduction
Safety
-2-
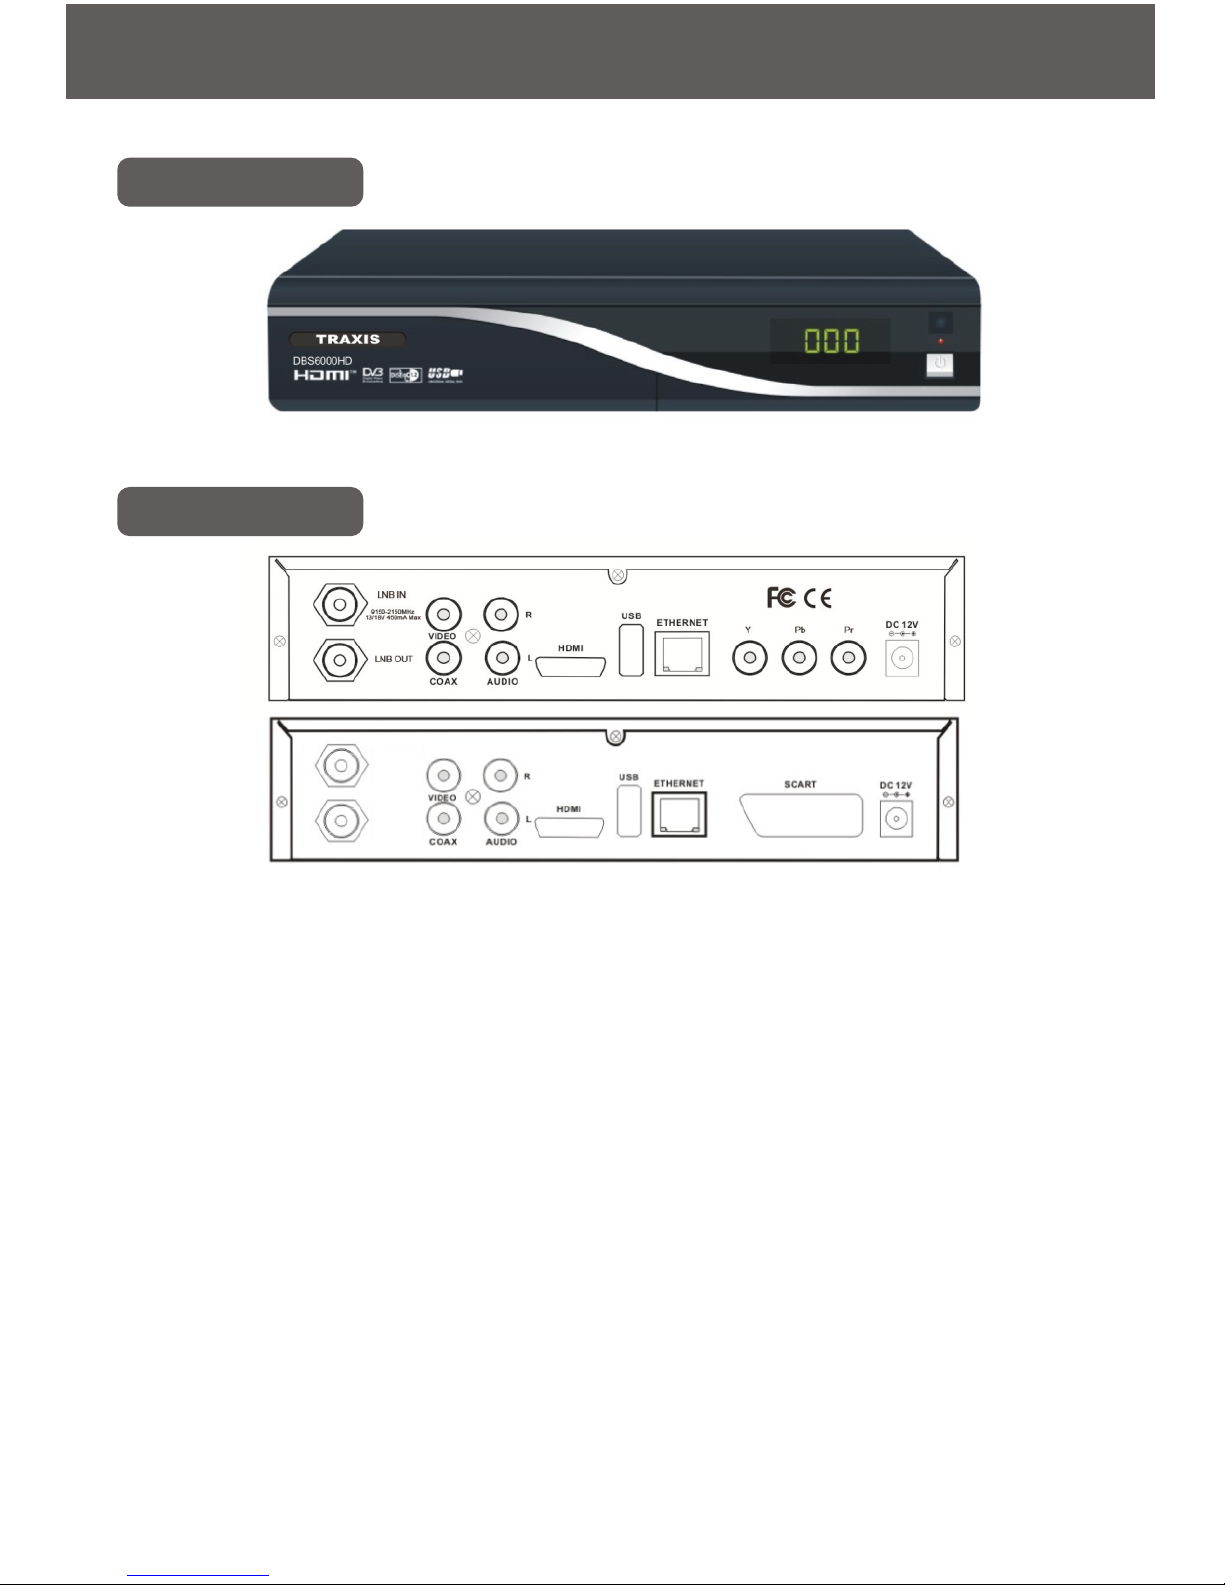
1. LNB IN: Connect to satellite antenna
2. LNB OUT: Connect to the other receiver
3. VIDEO: Connect to TV through RCA
4. AUDIO R/L: Connect to TV or audio tuner through audio cable
5. COAX: Connect to a digital amplifier (Hi-Fi)
6. HDMI: Connect to TV through HDMI cable
7. USB: Connect to USB or USB-HDD device
8. ETHERNET: Connect to the Internet
9. Y Pb Pr/ SCART
Y Pb Pr: Connect to TV set or video projector by Component Video
connector
SCART: Connect to TV through SCART cable
10. DC 12V: Power supply
Front/ Rear Panel
Front Panel
Rear Panel
-3-
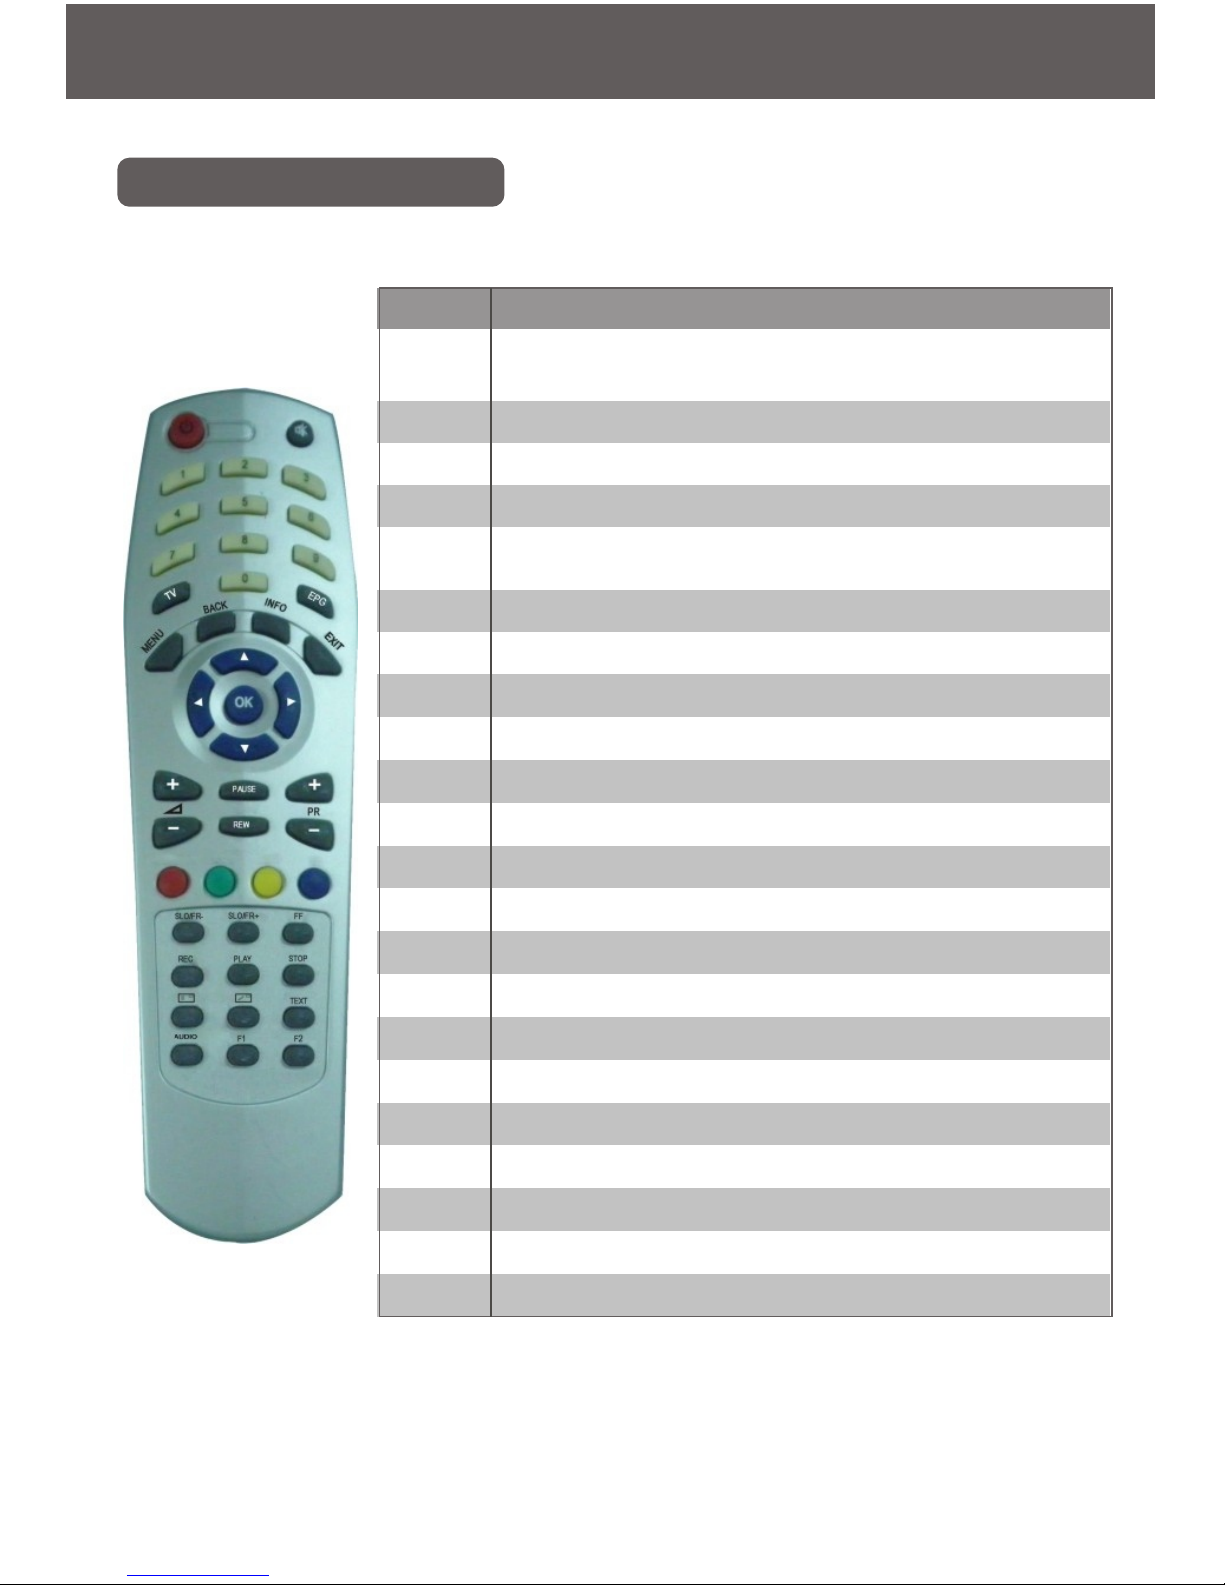
Remote Control Unit
Remote Control Unit
Key
Function
To turn STB on/off.( Switch between operation and
standby modes)
To cut off the sound temporarily, press again to resume
Number keys
To switch between TV program and Radio
To display the TV/RADIO program guide. ( Electronic
Program Guide)
To display the main menu on the screen
To display the current program information on the screen
Volume control, or more cursor left/right in menu
To change channels up / down
To confirm the item you choose or edit
To pause the ongoing Video, press again to continue
To return to the previous menu and Screen
To Stop Playing
To Start Playing
Record
Play back
Slow play backward
Slow play forward
Fast forward
Select Audio output type (L,R,STEREO)
Reservation
Reservation
Function key
StandBy
Mute
0-9
TV
EPG
Menu
Info
Vol+ Vol-
PR+ Pr-
OK
PAUSE
EXIT
STOP
PLAY
REC
REW
SLO/FR-
SLO/RR+
FF
OPT
TEXT
F1F2
Color key
-4-

Full Channel Search
Full Channel Search
You can automatically detect and save all TV, Radio channels:
Connect your STB to all peripheral devices, turn on the power of all
devices, select full band scan in installation menu, press start scan
function key and STB will automatically search all TV/Radio channels
and save them into channel list.
Basic Operation
Turn on STB
First, connect STB with power supply and correlative devices such as TV
set correctly and turn all of them on. If the STB is first used, it will play
the program of the first channel from the default channel list, otherwise,
STB will play the program of last channel before turning off.
Information
In full screen, press [INFO] key, the parameters of the program you are
watching will be on shown.
Channel Up/Channel Down
In full screen, press [CH+/CH-] to change channel.
Volume Control
In full screen, press [VOL+/VOL-] to adjust volume.
Mute
To turn off the sound temporarily, press the mute button; to cancel mute,
press the mute button again.
Number
In full screen, use number key and press [OK] on the remote control unit
to change channels directly.
Pause
In playing mode, press [PAUSE] key to stop the picture. (Note: the sound
of the channel will still continue)
Press [PAUSE] key again, the picture will start again in real time.
Recall
Press [BACK] key to switch to the previous channel.
-5-

Main Menu
Press [MENU] key on the Remote Control and the main menu will show.
Press [←/→] key to switch between sub-menu such as Installation,
System setup etc., and press [▲/▼]key to select items from one of the
sub-menus shown currently. Press MENU key again to exit.
1. Installation
Press [▲/▼] key to switch between the Dish
Setup, Satellite Setup, Transponder Setup,
Channel Scan, press [Ok] button to enter.
1.1 Dish Setup
◆ Select satellite: Press [←/→] key or
[ok] button to select the satellite you want
◆ Transponder: Press [←/→] key or [ok]
button to select the transponder you want
◆ LNB Type: Press [←/→] key to select
and press [Ok] button to display all LNB type
◆ LNB Power: Press [←/→] key to
switch between Auto/ Off/13/18.
◆22K: Press [←/→] key to switch between Auto/On/Off.
◆ DiSEqC1.0: Press [←/→] key to switch between Off and LNB
Port 1-4
◆ DiSEqC1.1: Press [←/→] key to switch between Off and LNB
Port 1-16
◆DiSEqC1.2: Press [←/→]key to switch between Off and On
-6-

Main Menu
1.2 Satellite Setup
◆ Select Satellite: Press [←/→] key to
select satellites, press OK key to display
satellites list.
◆Name: Press [OK] button to access the
pop-up keyboard and then edit the satellite
name.
◆Orb.pos(Deg): Press [Ok] button to edit
satellite position degree.
◆West/East: Select satellite position.
◆ In this menu, Press RED key to remove selected satellite; press
GREEN key to add a new satellite; Press YELLOW key to dish setup
submenu; press BLUE key to channel scan submenu.
1.3 Transponder Setup
◆ Select Satellite Position: Press [←/→]
key to select satellites, press [OK] button to
display satellites list.
◆Select transponder: Press [←/→] key to
select a specified transponder offered from the
satellite or press [OK] button to display
transponders list.
◆ Frequency: Press 1-9 number key to
enter Frequency parameter.
◆ Symbol rate: Press 1-9 number button to enter Symbol rate
parameter.
◆Polarization: Press [←/→] key to choose the Polarization.
◆NIT Search: Press [←/→] key to choose ON/OFF.
◆ Kind of service: Press [←/→] key to choose All/Only Free/Only
Encrypted.
◆In this menu, Press RED key to remove selected transponder; press
GREEN key to add a new transponder; Press YELLOW key to start
scanning; press BLUE key to remove all transponders.
-7-

Main Menu
1.4 Channel Scan
◆ Select satellite: Press [←/→] key to
select satellites, press [OK] button to display
satellites list,
◆ Scan Method: Press [←/→] key to
select between the Auto/Manual/Blind mode.
◆ Kind of service: Press [←/→] key to
select between the All Services/Only free
services/Only encrypted services.
◆ TV/Radio:Press [←/→] key to select between the TV+Radio/TV
only/Radio only.
Press YELLOW key start scan directly.
Press Red Button: Stop Scanning.
2. Channel Management
Press [▲/▼] key to switch between the
Service list editor/Edit FAV List/Delete All,
press Ok to enter.
2.1 Service List Editor
Press Red Function key to choose
Browse/Rename/Move/Lock/Delete/Sort
function
-8-

Main Menu
2.2 Edit Favorite list
Press [▲/▼] key to select item from FAV
list, you can press [OK] button to edit the
name or press [←/→] key to TV services item
to select a desired channel and then press
[OK] button to add to FAV services item.
2.3 Delete ALL
Select Ok or Cancel to confirm Deleting
All program
-9-

Main Menu
3. System Setup
Press [▲/▼] key to switch between the
Language Setup/Time Setup/AV Setup/System
Control/Network Setup/Factory Default, press
[Ok] button to enter.
3.1 Language Setup
In this sub-menu, you can press [←/→]
key to select a different language or press
[OK] key to display language list and then
select a language you want.
3.2 Time Setup
In this sub-menu, you can select
Automatic time “Yes” or “No”, if “Yes”
selected, the STB will adjust system time and
date automatically, If “No” selected, you can
modify the Date and Time by yourself using
[←/→] key or [OK] button to enter. You can
adjust your Summer Time and Time Zone
using [←/→] key or [OK] button.
3.3 AV Setup
◆ Display format: Press [←/→] key to
select display format at 4:3/16:9.
◆ Scaling method: Press [←/→] key to
s e l e c t s c a l i n g m e t h o d a t P i l l a r /Letterbox/Fullscreen(Zoom)/Fullscreen(CCO
)/Let TV Scale.
-10-

◆ HDMI signal: Press [←/→] key to select HDMI signal at
1080i/720p/480/576p/480/576i.
◆SDTV standard: Press [←/→] key to select SDTV standard at
PAL/NTSC/SECAM/PAL-M/PAL-N/PAL-N ARGENT.
◆ Digital audio output: Press [←/→] key to select digital audio
output at PCM/Original.
◆ Lip sync mode: Press [←/→] key to select Lip sync mode at
Auto/Manual.
3.4 System Control
◆OSD display time: Press [←/→] key to
modify.
◆ Menu lock: Press [←/→] key to select
menu lock On or Off.
◆Change password: Press [OK] button to
modify, using 1-9 number keys to set
password.
◆Viewing age: Press [←/→] key to modify.
◆Parental Control: Press [←/→] key to select between ON/OFF.
3.5 Network Setup
◆DHCP: Right or Left key to change the
DHCP mode for network.
◆ IP address: IP address, you can input
the IP address when DHCP is off mode
>Subnet mask: IP mask, change by number
key 0-9.
◆Default gateway: network gate way, change by number key 0-9.
◆DNS mode: Right or Left key to change.
◆Preferred DNS server: DNS server, change by number key 0-9.
◆Alternate DNS server.
◆MAC address: can change MAC address by number key 0-9.
In this submenu, you can select the appropriate network setting
parameters according to different network formation, such as DHCP,
DNS etc..
Main Menu
-11-

3.6 Factory Default
Select OK to restore factory setting, any
of your modifications will be lost, or select
EXIT to preserve your modifications and exit.
Main Menu
4.USB
Press [▲/▼] key to switch between the File
viewer/Recordings/Updating/Backup Data,
press [Ok] button to enter
4.1 File Viewer
◆ Musicbox: Play the MP3 files in USB
or USB HDD-disk.
◆ Picture: Play the *.JPG/*.PNG /*.BMP
files in USB or USB HDD-disk .
◆ Media viewer: Play *.MKV /*.FLV/
*.MP4/*.TS files USB or USB HDD-disk.
4.2 Recordings
◆ Playback list: Press [Ok] button to
browse all files in USB device, you can select
one to play, rename or remove.
◆ Time programming: Press [OK] button
to modify recording plan, you can set, or
select one to active or deactivate.
-12-

4.3 Updating
In this sub-menu, we offer the functions
for user to update system ware/system
date/user date/CAMD.
4.4 Backup Date
In this sub-menu, the user can backup the
user data to USB memory stick by press RED
key to start.
Main Menu
5.Conditional Access
Press [Ok] button to show the card information.
-13-

Main Menu
6.Accessory
Input password to show the new items.
Press [▲/▼] key to choice INFOR/Advanced
Setup/SDS INFOR menu.
6.1 Information
Entering this item, user can browse the
detail of software version and decide to update
or not.
6.2 Advanced Setup
TWIN: Press Left/Right button to choose
TWIN function OFF/ON status.
CAMD: Show the Net-share ON/OFF
status.
-14-

Specification
STA N DA RD RE CEIVER
STA N DA RD
DV B-S 2 STA ND ARD (ETS I E N 302 307)
Inpu t
Inpu t Frequ ency 950~2150M Hz
Connector F-T ype
Inpu t Im ped ance 75Ohm s
Inpu t Level -25~ -65dB m
LNB Pow er 13/18 V
LNB Con trol 22KH z
DiSEqC Ver 1.0/1 .1/1.2/USA LS
Dem o du lation QPSK ,8PS K
Symbo l R ate 2~45M bau d(SC PC /M CPC )
Tran sport Stream MP EG-2 ISO /IEC 13818-1
MP EG Pro file Level MP EG-2 M P@ HL , M PE G -4 M P@ L4 H .264
Aspect Ratio 4:3, 16:9
Video Resolution
1080i 50/60Hz, 72 0p 50/60Hz,576p 50Hz, 57 6i (P AL),
480p 60 H z, 480i (NTS C)
Conditional A ccess S ystem 1 CA Card Reader Slots
A/V Output ports
RCA with CV B S, HD M I(HD CP), Y PbPr or SCA R T
with CV BS
Left/Right analog audio output(R CA), D igital audio
outpu t(Coaxial)
Audio D eco d ing
MP EG1 layer I, M PEG 1 layer II, M PEG 1 lay er III,
MP EG2, A C3
Audio M ode Stereo/M O NO/Left/Right
DV R Sup p orting DV R w ith U SB HD D, Time shifting with U S B H DD
USB 2.0 High Speed Host 1 U SB 2 .0 P ort
File S ystem
FAT 1 2, FAT16 , FAT3 2, N TFS(only support first
partition)
Media S up p orting JP G, BM P, M P3, W M A
Eth ernet Interface 10/100M bit
Power S up p ly Inpu t DC1 2V 2A
Power C onsu mption 28W M ax / 1W Standby
Dimension 230 (W ) ×140 (D ) ×39 (H ) mm
Operating T em perature 00C to +500C
Specification
-15-
 Loading...