

Page 1
Page 2

CoPilot
®
2003 Quick Start
If you're in a hurry to begin using CoPilot 2003:
1. Install
Application: Boot up your computer. After Windows
®
(98, NT®, 2000,
ME®, XP) has finished booting up, install CoPilot 2003 by placing the Install Disk
into your CD-ROM drive. (If the Installation menu does not automatically appear,
see Installation on page 5).
NOTE: You must uninstall any previous versions of CoPilot before installing
CoPilot 2003.
2. Install Speech
: During CoPilot installation, you will be prompted to install
speech software. Click OK and follow the on-screen instructions.
NOTE: You must install speech to enable CoPilot's two-way voice technology.
3. Install Data
: You can install the entire US map database, which requires about 700
MB of space, to your hard drive.
4. Attach GPS
Receiver: Plug the GPS receiver into your laptop (see page 8-9).
Serial
: If you are using a GPS receiver with a serial connection, attach the
receiver to both the serial port and the PS/2 port.
USB
: If you are using a receiver with a USB connection simply plug the
receiver into the USB port.
5. V
erify Computer Settings: Make sure the date and time are set correctly on your
computer. This is extremely important for CoPilot to function properly. To
check and/or change the date and time, go to the Windows Start button, Settings,
Control Panel, Date/Time.
Page 3

6. Start
Application: Double-click on the CoPilot 2003 icon on your desktop. If your
GPS receiver is plugged in the first time you start the program, you will be greeted
and asked to enter a nearby city for the initial satellite search. A dialog box will
then appear with a variety of options for entering your destination. Click on any
button to enter that type of destination. After just a few seconds, CoPilot will
generate a route for you highlighted in green on the map. This is the
recommended route to your destination.
7. S
tart Driving
: Start driving and listen for CoPilots spoken instructions.
Additional Tips:
From the Navigation Control Panel (on the right side of the Passenger screen in
Guidance Mode), you can activate various features.
NOTE: In the Passenger screen, your map will always be shown. In the Driver
Safety screen, your map will not be shown when you drive at more than 10 m.p.h.;
however, you will still receive verbal instructions as well as simple printed
directions on-screen. The driver should pull over to the side of the road when
looking at the map and/or the Navigation Control Panel. Even if a passenger
operates the computer, for safety reasons, the driver should never look at the
computer screen while driving.
If you happen to go off route, CoPilot will automatically give you new
directions. While this may take a few seconds, continue driving as CoPilot updates
your directions.
You must disable your screen saver before using CoPilot. In the Start menu
go to Settings, Control Panel, double-click on the Display icon, and select the
Screen Saver tab. To deactivate the screen saver go to the drop-down bar and
select (None).
Page 4

Table of Contents
CoPilot®2003 Quick Start . . . . . . . . . . . . . Inside front cover
Requirements . . . . . . . . . . . . . . . . . . . . . . . . . .1
How Reliable Is CoPilot 2003? . . . . . . . . . . . . . . . . . . . . . . .2
About GPS Technology . . . . . . . . . . . . . . . . . . . . . . . . . . . . . . . . . . . . . . 3
Installation . . . . . . . . . . . . . . . . . . . . . . . . . . . . . . . . . . . . . . 5
Uninstalling . . . . . . . . . . . . . . . . . . . . . . . . . . . . . . . . . . . . . . 6
Setting Up the Hardware. . . . . . . . . . . . . . . . . . . . . . . . . . . .7
CoPilot 2003 Overview. . . . . . . . . . . . . . . . . . . . . . . . . . . . 10
Initializing Your GPS Receiver. . . . . . . . . . . . . . . . . . . . . . . . . . . . 11
Guidance Mode . . . . . . . . . . . . . . . . . . . . . . . . . . . . . . . . .12
Using the Navigation Control Panel . . . . . . . . . . . . . . . . . . . . . . . . . .13
Map Display . . . . . . . . . . . . . . . . . . . . . . . . . . . . .14
Entering a Destination . . . . . . . . . . . . . . . . . . . . . . . . . .15
Editing Stops . . . . . . . . . . . . . . . . . . . . . . . . . .19
Detour . . . . . . . . . . . . . . . . . . . . . . . . . . . . . . . . .20
Save Current Location . . . . . . . . . . . . . . . . . . . . . . . . . . . . . . .21
Selective Routing . . . . . . . . . . . . . . . . . . . . . . . . . . . . . . . . .22
Options . . . . . . . . . . . . . . . . . . . . . . . . . . . . . . . . .23
Routing Preferences . . . . . . . . . . . . . . . . . . . . . . . . . . . . . . . . .24
RV Routing . . . . . . . . . . . . . . . . . . . . . . . . . . . . . . . . .24
Voice Commands . . . . . . . . . . . . . . . . . . . . . . . . . . . . . . 25
A Sample Trip . . . . . . . . . . . . . . . . . . . . . . . . . . . . . . 26
Planning Mode . . . . . . . . . . . . . . . . . . . . . . . . . . . . . . 28
Trip Options . . . . . . . . . . . . . . . . . . . . . .31
Printing Your Map or Driving Directions . . . . . . . . . . . . . . . . . . . . . .32
Beyond the Basics . . . . . . . . . . . . . . . . . . . . . . . . . . . . . . 33
Picking Stops from the Map . . . . . . . . . . . . . . . . . . . . . . . . . . 33
Adding Custom Places . . . . . . . . . . . . . . . . . . . . . . . . . . . . . . 34
Page 5

Editing Street Restrictions . . . . . . . . . . . . . . . . . . . . . . . . . . . .34
Customizing Driving Directions . . . . . . . . . . . . . . . . . . . . . . . .34
Importing Address Data . . . . . . . . . . . . . . . . . . . . . . . . . . . .37
Helpful Hints . . . . . . . . . . . . . . . . . . . . . . . . . . . . . . . . . . . .39
Trouble-shooting . . . . . . . . . . . . . . . . . . . . . . . . . . . . . . . . .40
Legend: Planning Mode Buttons . . . . . . . . . . . . . . . . . . . . . . . . . . . . . . . . . 46
Using the Help Files. . . . . . . . . . . . . . . . . . Inside back cover
Page 6
Requirements
System Requirements:
-- Microsoft®Windows®98, 2000, ME®, XP, or Windows NT®(4.0 or higher)
-- An IBM®compatible PC (portable required for in-vehicle navigation)
-- Pentium®II processor (or faster)
-- 4X CD-ROM (12X recommended if using Data Disk as data source)
-- 32 MB of RAM and a hard drive with at least 130 MB of available disk
space. For best performance of talking maps and GPS track files, we
recommend 64 MB RAM.
-- A USB or Serial port
-- A Soundblaster compatible sound card and speaker for talking maps. For
best results, a CD cassette adapter which broadcasts sound into your car
stereo speakers is recommended.
-- CoPilot 2003's voice recognition requires a microphone and a low-noise
environment. For best results, an external microphone is recommended
(plug in before starting CoPilot).
-- Minimum 800 x 600 resolution.
Package Contents:
-- CoPilot high-performance GPS antenna/receiver and cable (USB or Serial)
-- Two CD-ROMs (1 Install Disk and 1 Data Disk)
-- A suction cup for securing GPS receiver to windshield
- 1 -
Page 7

How Reliable is CoPilot
®
2003?
The CoPilot map database is remarkably accurate, providing comprehensive, detailed street
information for the entire United States. From the most populated cities to the smallest hamlets,
CoPilot map data has been created to support your travels wherever they may take you.
Data Quality
Due to the complexity and constantly changing face of the United States road system, you
may encounter roads that have not been updated in the CoPilot map database. That said, the
CoPilot map database boasts the following statistics:
-- Over 7 million miles of roads
-- Over 3 million Points of Interest
-- Over 300 million addresses
-- One-way street coverage in more than 100 metropolitan areas
Club CoPilot
As you drive CoPilot can record your GPS tracks. Club CoPilot is a free program through
which you can receive discounts and prizes when you submit these GPS tracks.
GPS tracks can be used to check road alignment and positioning. With so many CoPilot
users already submitting their GPS tracks we have an excellent source for refining the
CoPilot map database. Visit Club CoPilot online for more information:
http://www
.travroute.com/clubcp
Data Corrections
TravRoute continually updates the CoPilot map database as we strive to provide you with
the highest quality product. If you encounter missing or inaccurate map data, please email,
fax or mail those corrections to us so that we can include it in our updates.
- 2 -
TRAVROUTE
Attn: Data Corrections
1000 Herrontown Rd.
· Princeton, NJ · 08540
Fax: 609-252-8166
· email: [email protected]
Web: www.travroute.com/about/rspform.html
Page 8

About GPS Technology
The Global Positioning System (GPS) is a tracking and navigation system developed by the
U.S. Department of Defense. The system uses 24 satellites that orbit the earth, sending out
radio waves that can be picked up by GPS sensors (hardware devices for receiving data).
Normally, a GPS sensor relies on receiving signals from four satellites simultaneously to
track its position. Each signal contains an identifier for the satellite that emitted it and the
exact time it was emitted (to the nanosecond). GPS relies on the fact that radio waves travel
at the speed of light to calculate distances and the exact location of the sensor is figured by
combining the data received from three or four satellites.
Given the right conditions, a GPS sensor can identify your geographic position anywhere in
the world. GPS is able to give you the latitude, longitude and elevation of your present
location, as well as your road speed and direction of travel on a route.
GPS Accuracy
The GPS signal CoPilot receives from the constellation of satellites has a rated accuracy of
10 meters. This means that 95% of the time the reported location is within 10 meters (30
feet) of your exact position. CoPilot takes this location information and enhances it further
by "snapping" it to our street and highway network. Occasionally, CoPilot will place you on
the wrong road. If this occurs, keep driving and CoPilot will automatically correct itself and
find your proper position.
At times, CoPilot's GPS tracking will be less accurate or fail to work at all because the unit
is unable to receive satellite signals. However, the unit is resilient; eventually, it finds itself.
Its ability to report your location is directly proportional to its ability to receive accurate
line-of-sight satellite signals. Heavy foliage, buildings, tunnels, or any other structures
- 3 -
WARNING:
CoPilot navigation instructions are only computer-generated advisories
and may contain errors. Obey all traffic regulations even if they are
completely contradictory to the navigation suggestions. Keep your eyes
on the road and hands on the wheel! Do not attempt to look at the
screen if you are the driver. TravRoute
®
assumes no responsibility for
any damage or injury resulting from the use of this product.
Page 9

obstructing satellite communications will interfere with CoPilot's ability to track your
location. Like your car radio, GPS tracking can also be affected by weather conditions if
severe. CoPilot will continue tracking as soon as adequate signals are available.
NOTE: The GPS unit should be placed far forward on the dashboard to maximize the
satellite reception area.
How CoPilot Uses GPS
CoPilot uses the GPS positional data it receives from the GPS receiver to display your
current position and route on a map as you drive. This is called tracking. CoPilot also
uses the GPS data it receives to navigate, that is, to guide you along your planned route,
provided you enter a destination. If you enter a destination you will be given navigation
instructions, and your route will be tracked on the map. If you do not enter a destination,
your route will be tracked as you drive, but you will not be given directions as CoPilot has
no way of knowing your destination.
A Safety Warning
Do not use this product in any way that interferes with safe and attentive operation of a
vehicle. When used in a vehicle, do not place the GPS receiver, antenna, power supply, or
your computer where it may strike the driver or passengers if the vehicle turns sharply or
stops abruptly. This product is designed, manufactured, and intended as an aid to planning,
tracking, and following routes in privately owned vehicles. The accuracy of the map data,
driving directions, and GPS tracking system is insufficient for this product to be used for
automated navigation or in any situation in which the failure of the product could lead
directly to death, personal injury, or physical or environmental damage. The driver must
remain alert at all times to actual road conditions and obey all posted signs and traffic
regulations. TravRoute
®
and its suppliers specifically disclaim any express or implied
warranty of fitness of this product for automated navigation or for aiding in the operation of
other than a privately owned vehicle.
- 4 -
Page 10

Installation
NOTE: If you are updating from an older version of CoPilot®, you will need to uninstall the
older version first. Refer to the Uninstalling section, pages 6-7.
To install CoPilot, first turn on your computer (and the external CD-ROM drive if
necessary) and insert the Install Disk. Have the Installation Key Code from the front of
the CoPilot CD holder ready.
NOTE: Do not lose this number. You will need it for installation and registration.
Windows 98, 2000, If the Installation menu does not automatically open, click on the
ME, or XP: Start box and choose Run from the menu. Type your CD-ROM
drive letter, a colon, and \setup (example: d:\setup).
Windows NT 4.0: Choose Run from the File menu, then type your CD-ROM drive
letter, a colon, and \setup (example: d:\setup).
Choose Next in the panel that appears and follow the installation instructions. During
CoPilot installation, you will be prompted to install the speech software. Click OK and
follow the on-screen directions.
It is recommended that you install the US Map Data to your hard drive. A full
installation of the US map data requires approximately 700 MB of available space. If space
in unavailable, you can run the program by inserting the Data Disks into your CD-ROM.
To start CoPilot, double-click on the CoPilot 2003 icon that was created on your laptop
when you installed the program. To quit at any time, select Exit from the File menu in
Planning Mode, or Quit CoPilot in Guidance Mode.
NOTE for XP Users: If you are installing CoPilot on a computer running Windows XP,
you will be prompted to connect your GPS receiver during installation. If you are using the
USB GPS receiver, Windows XP will pop up a messag warning you about Windows Logo
testing. Click Continue Anyway if this warning appears.
- 5 -
Page 11

- 6 -
Uninstalling
The following steps outline the procedure for uninstalling CoPilot®2003 and older versions
of CoPilot:
To uninstall the CoPilot software:
1. Exit out of any programs that are running.
2. On your desktop, double-click on My Computer.
3. Double-click on Control Panel.
4. Double-click on Add/Remove Programs.
5. Scroll down the list of applications until you see TravRoute CoPilot [Version].
Click on it to highlight it, then click on the Add/Remove button. You will then be
asked Are you sure you want to completely remove the selected application and all
of its components? Click Ye s . This will start the uninstall process. If prompted
to remove all shared files select No to All.
6. When this is finished, click on Finish. Then restart your computer.
To uninstall the Watson speech software:
1. Exit out of any other programs that are running.
2. On your desktop, double-click on My Computer.
3. Double-click on Control Panel.
4. Double-click on Add/Remove Programs.
5. Scroll down the list of applications until you see Watson V 2.1 Gold
Redistributed. Click on it to highlight it, then click on the Add/Remove button.
You will then be asked Are you sure you want to completely remove the
selected application and all of its components? Click Ye s. This will start the
uninstall process. If prompted to remove all shared files select No to All.
6. When this is finished, click on Finish. Then restart your computer.
Page 12

- 7 -
To Uninstall Data From Previous Versions of CoPilot:
1. Exit out of any other programs that are running.
2. On your desktop, double-click on My Computer.
3. Double-click on Control Panel.
4. Double-click on Add/Remove Programs.
5. Scroll down the list of applications until you see CoPilot 2001 Data CD or Data
CD setup for CoPilot 2000. Click on it to highlight it, then click on the
Add/Remove button. You will then be asked Are you sure you want to
completely remove the selected application and all of its components?
Click Yes. This will start the uninstall process. If prompted to remove all shared
files select No to All.
6. When this is finished, click on Finish. Then restart your computer.
NOTE: Data is automatically removed as part of the CoPilot 2002 or 2003 uninstall.
This process is only required if you are uninstalling an earlier edition of CoPilot.
Setting Up the Hardware
The first time you use your GPS receiver CoPilot will ask you to enter a city and state to
speed up the initial GPS acquistion. This may take up to 15 minutes. After you use it once,
the receiver should initialize within a few minutes.
After the first time you use your GPS receiver, CoPilot may prompt you again to enter a city
and state if its been more than two hours since your last satellite fix.
The GPS receiver works like a radio antenna, so place it at least two feet away from
possible sources of interference (for instance, a cellular phone antenna).
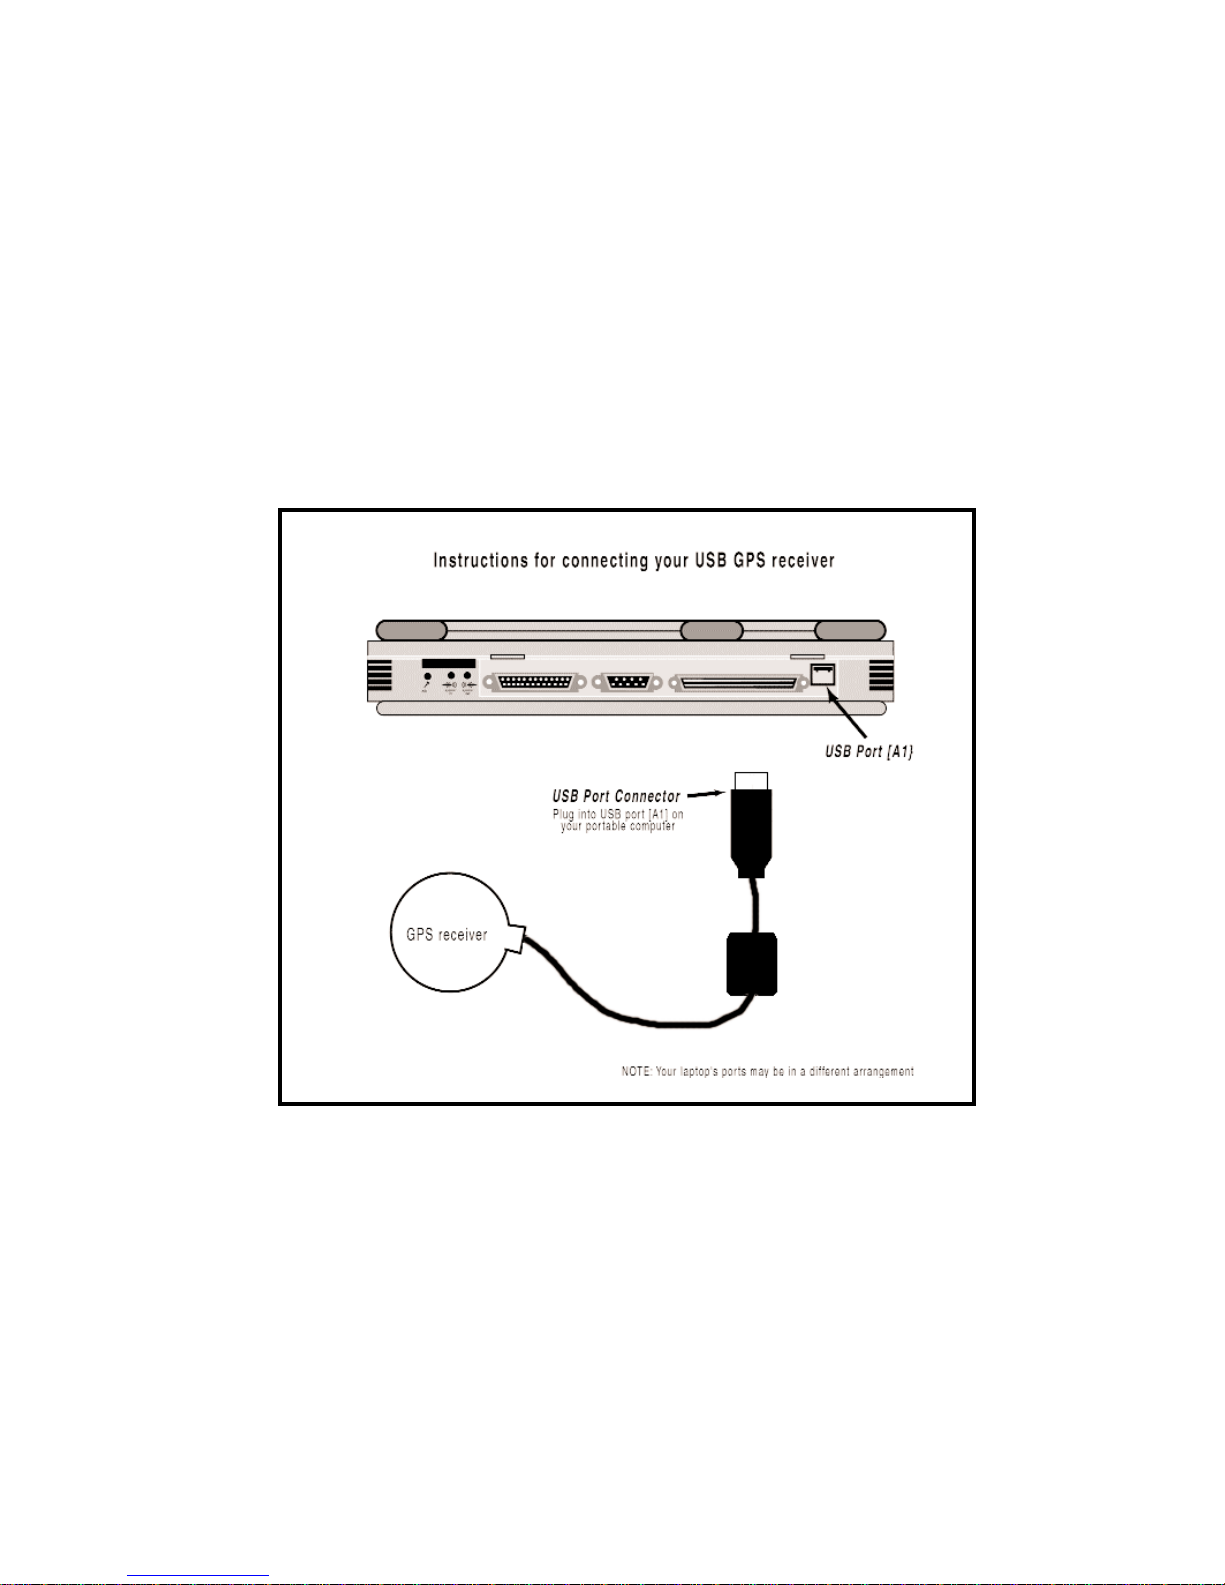
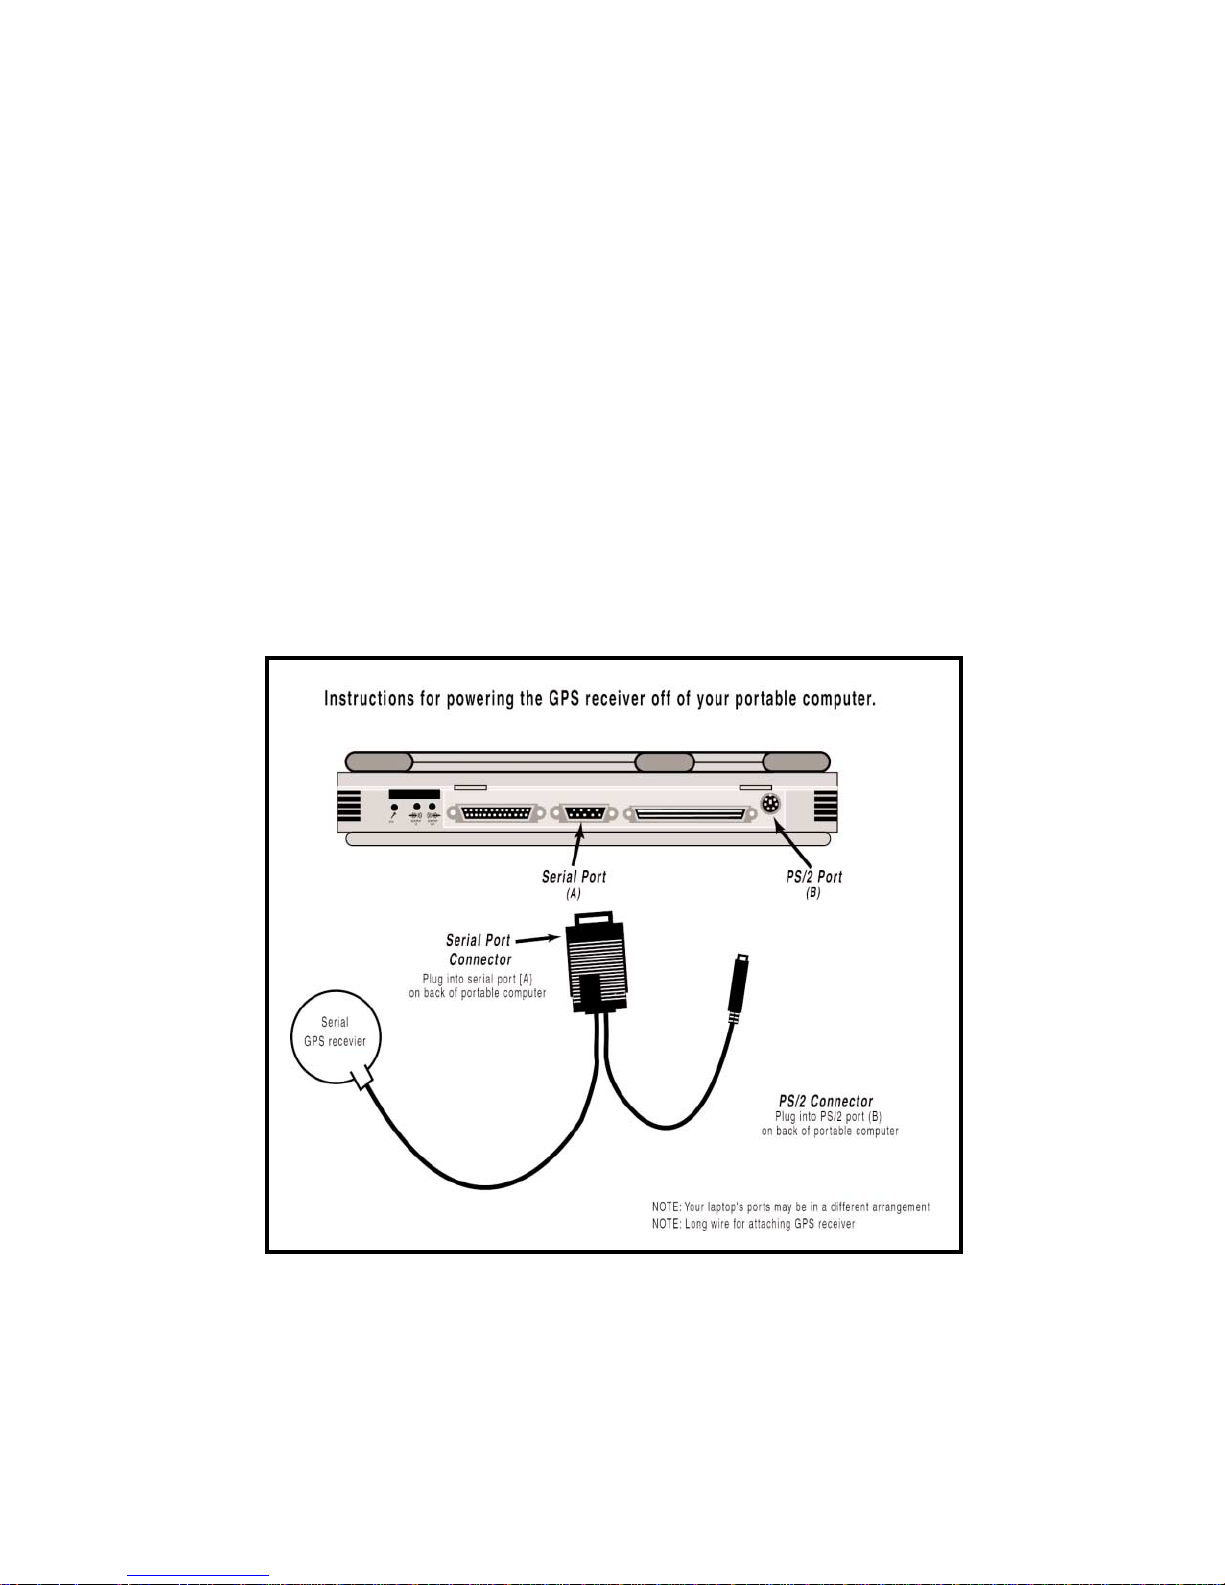
See page 8 for a diagram detailing how to set up a USB receiver. See page 9 for a diagram
detailing how to set up a Serial receiver.
Page 13
USB Connection
If you are using a USB connection you will have one wire which attaches the GPS receiver
to the laptop through its USB port. Plug the receiver into the laptop after Windows is
finished booting up.
- 8 -
Page 14
- 9 -
Serial Connection
When connecting to a laptop through a serial port the receiver is powered through the
laptops battery. Plug the PS/2 port connector on your GPS unit into the PS/2 port of your
laptop. Do not plug the serial port connector into your laptop until after Windows has
finished booting up.
TIP: To see the serial ports available on your PC, open the Control Panel, select System,
click on the Device Manager tab, then click on the plus sign next to Ports in the list of
devices. The Settings box displays the hardware settings used by the COM port. The
setting for your COM port should be 4800,8,N,1. See diagram below for connection
instructions.
Page 15
- 10 -
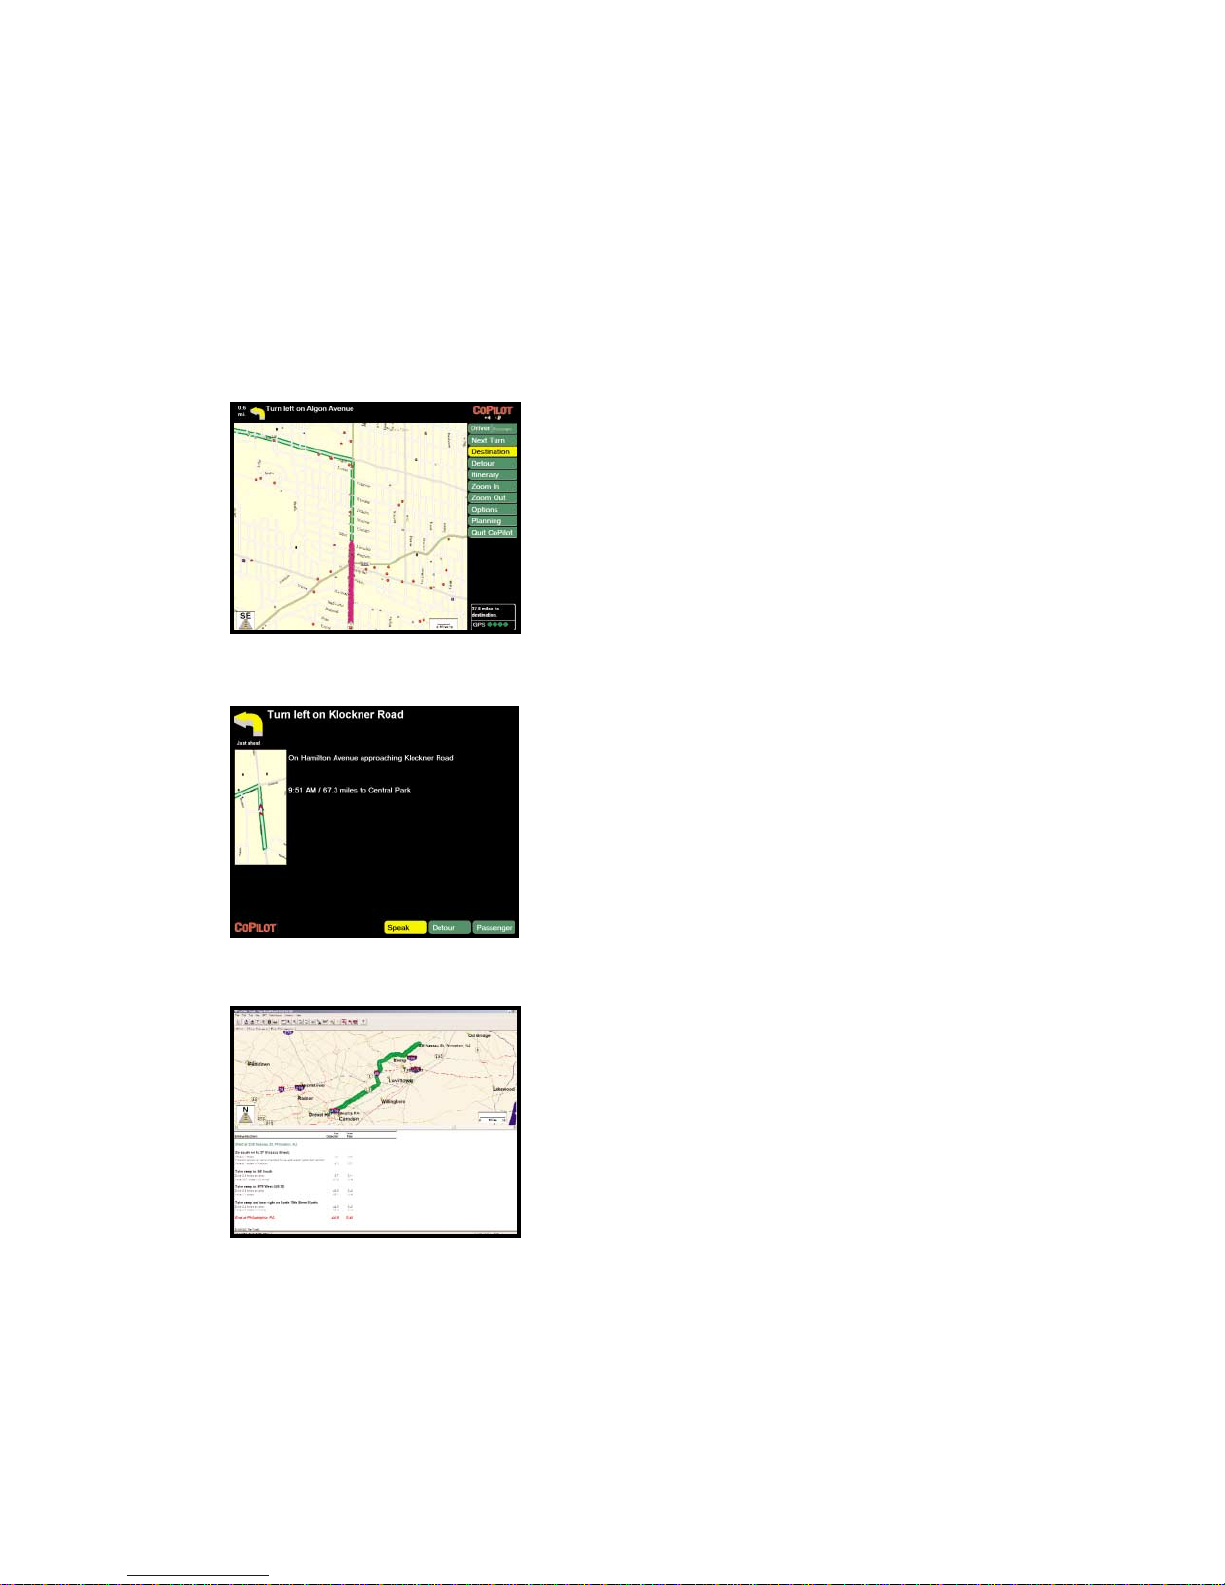
CoPilot can be used for both in-vehicle
navigation (Guidance Mode) and trip planning
(Planning Mode).
To move from Planning Mode to Guidance
Mode at any time, select Driver Mode from the
Window menu or click the CoPilot icon on the
tool bar. To move from Guidance Mode to
Planning Mode, click the Planning button in
the control panel.
Guidance Mode is for in-vehicle navigation.
For this mode to function you need to have
your GPS receiver attached to your laptop and
you must be receiving signals. CoPilot will
guide you to your destination and any stops
along the way using voice prompts and simple
on-screen instructions.
Planning Mode is for trip planning; you do not
need to have your GPS receiver attached in
order to utilize Planning Mode. In this mode
you can plan trips, print directions and maps,
search for points of interest, add places to your
database, and change settings such as street
restrictions.
Planning Mode
Guidance Mode
(Passenger screen)
Guidance Mode
(Driver Safety screen)
CoPilot 2003 Overview
Page 16
- 11 -
Initializing Your GPS Receiver
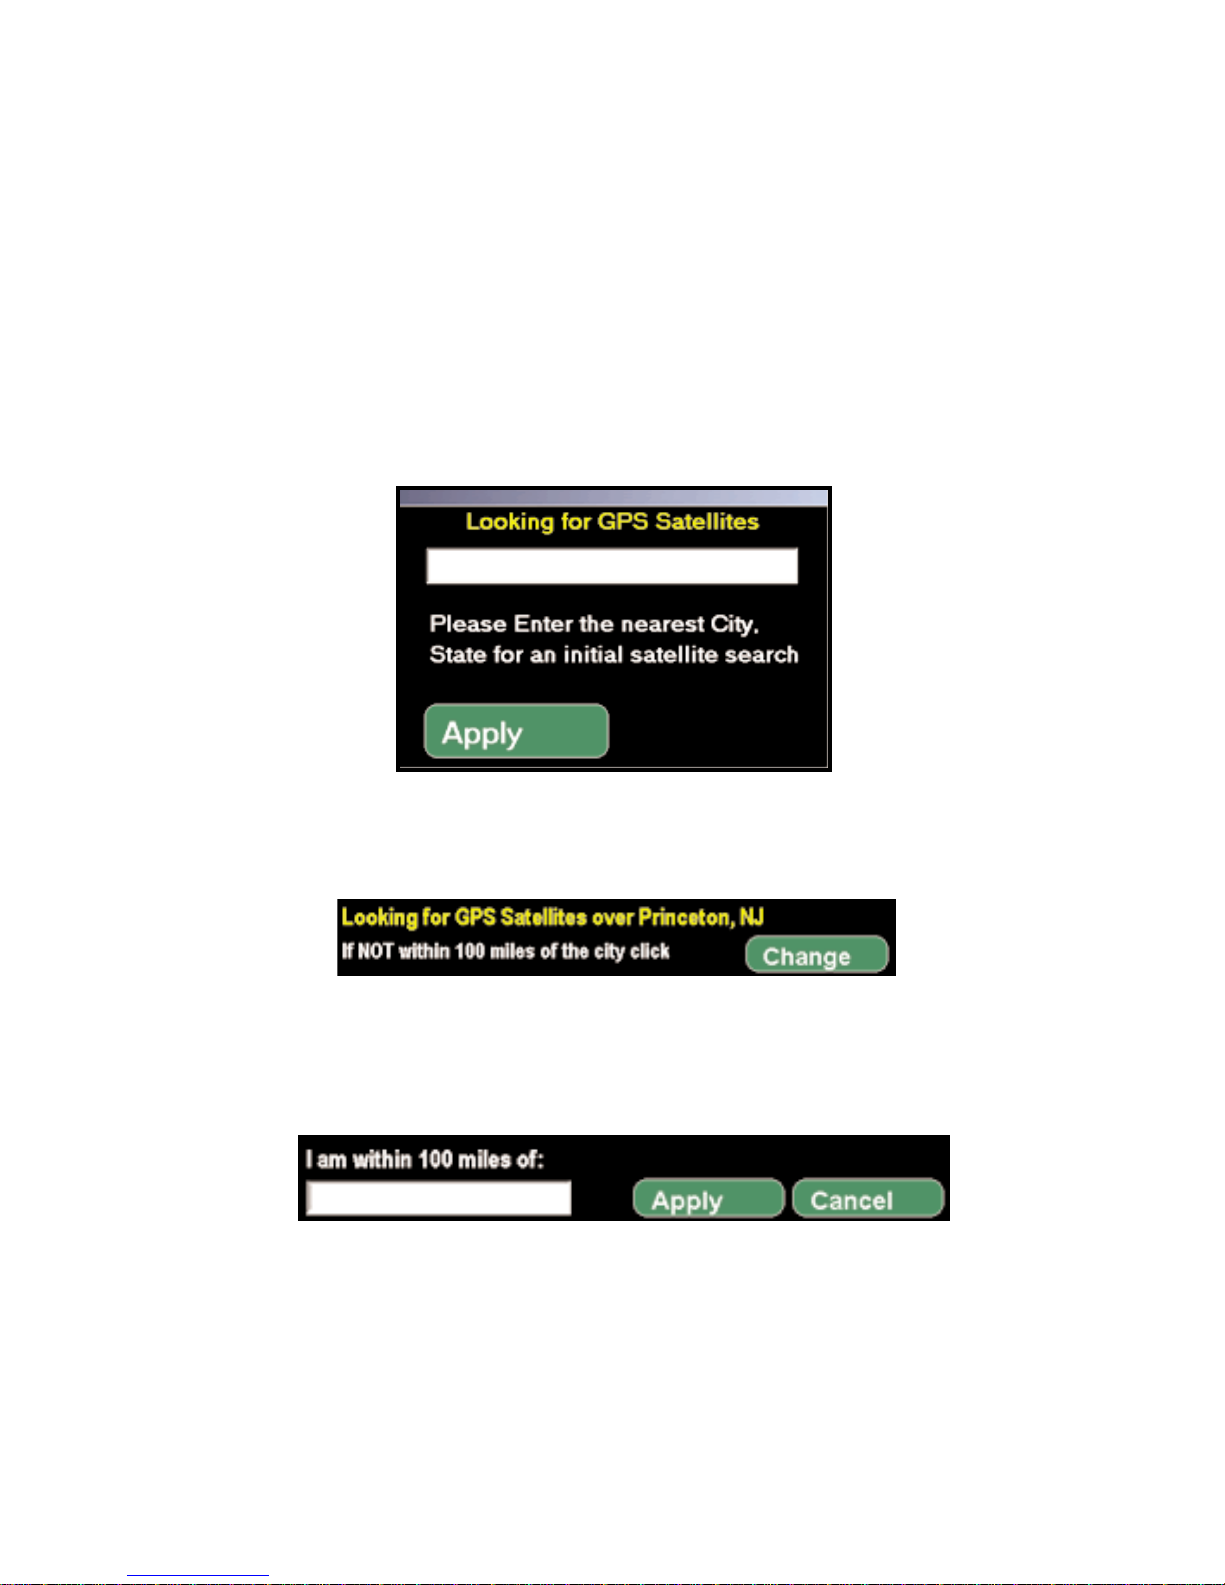
In order to decrease the amount of time needed for an initial satellite acquisition, CoPilot
will ask you to enter a nearby city and state the first time the program is started with a GPS
antenna attached. This request may also appear if its been more than two hours since your
last satellite fix.
After you enter a city and state, a dialog in the upper left corner of the Passenger Screen
will be present while CoPilot searches for a satellite fix.
If you dont acquire a satellite fix within a few minutes, you can change the city to a closer
location. If you click Change, you will see another prompt. Enter a closer city and click
Apply to speed up satellite acquisition.
Page 17

- 12 -
Guidance Mode
Start Navigating
If your GPS receiver is attached you're ready to start driving! The CoPilot navigation
system will guide you to the destination(s) you enter and recalculate your route should you
miss a turn.
Because CoPilot needs to know where you're going in order to give you navigation advice,
you must enter a destination. (You do not need to enter an origin. If your GPS receiver is
picking up signals, CoPilot will automatically fill in the start place.) In Guidance Mode, the
Passenger screen will open and a highlighted route will appear on the map that starts at your
current position, and ends at your next stop. Your route will also be tracked on the map
while you drive. NOTE: If Driver is set in the control panel, the Driver Safety screen will
appear at more than 10 m.p.h., but CoPilot voice technology will remain active and you'll
receive simple turn instructions on the screen.
If you deviate far enough from your pre-planned route (you might make a wrong turn or
choose to follow your own variation of the route), CoPilots Dynamic Directions will
automatically recalculate a new path to your destination from your current position.
Navigating With Dynamic Directions
1. Enter a destination, with or without a street address. You may enter intermediate
stops before entering a destination if you like -- CoPilot will route you to each
stop, beginning with the stop that was entered last. In the Passenger screen, the
control panel will be visible to the right of the map. You'll see your highlighted
route drawn on the map from your current position to the destination you entered.
2. Start driving! As your GPS unit receives signals, arrows will appear on the map
beginning at your start place and track you as you drive. CoPilot will automatically
prompt you and tell you when your next turn is coming up. If you go off route,
CoPilot's Dynamic Directions will reroute you to the next stop from your
current position.
CoPilot also incorporates Side-of-Street Address Detail to let you know what side of the
street your destination is on. Also, while driving on major highways, CoPilot will give you
a Lane Change Warning if your next turn is a left exit off the highway.
Page 18
- 13 -
Using the Navigation Control Panel
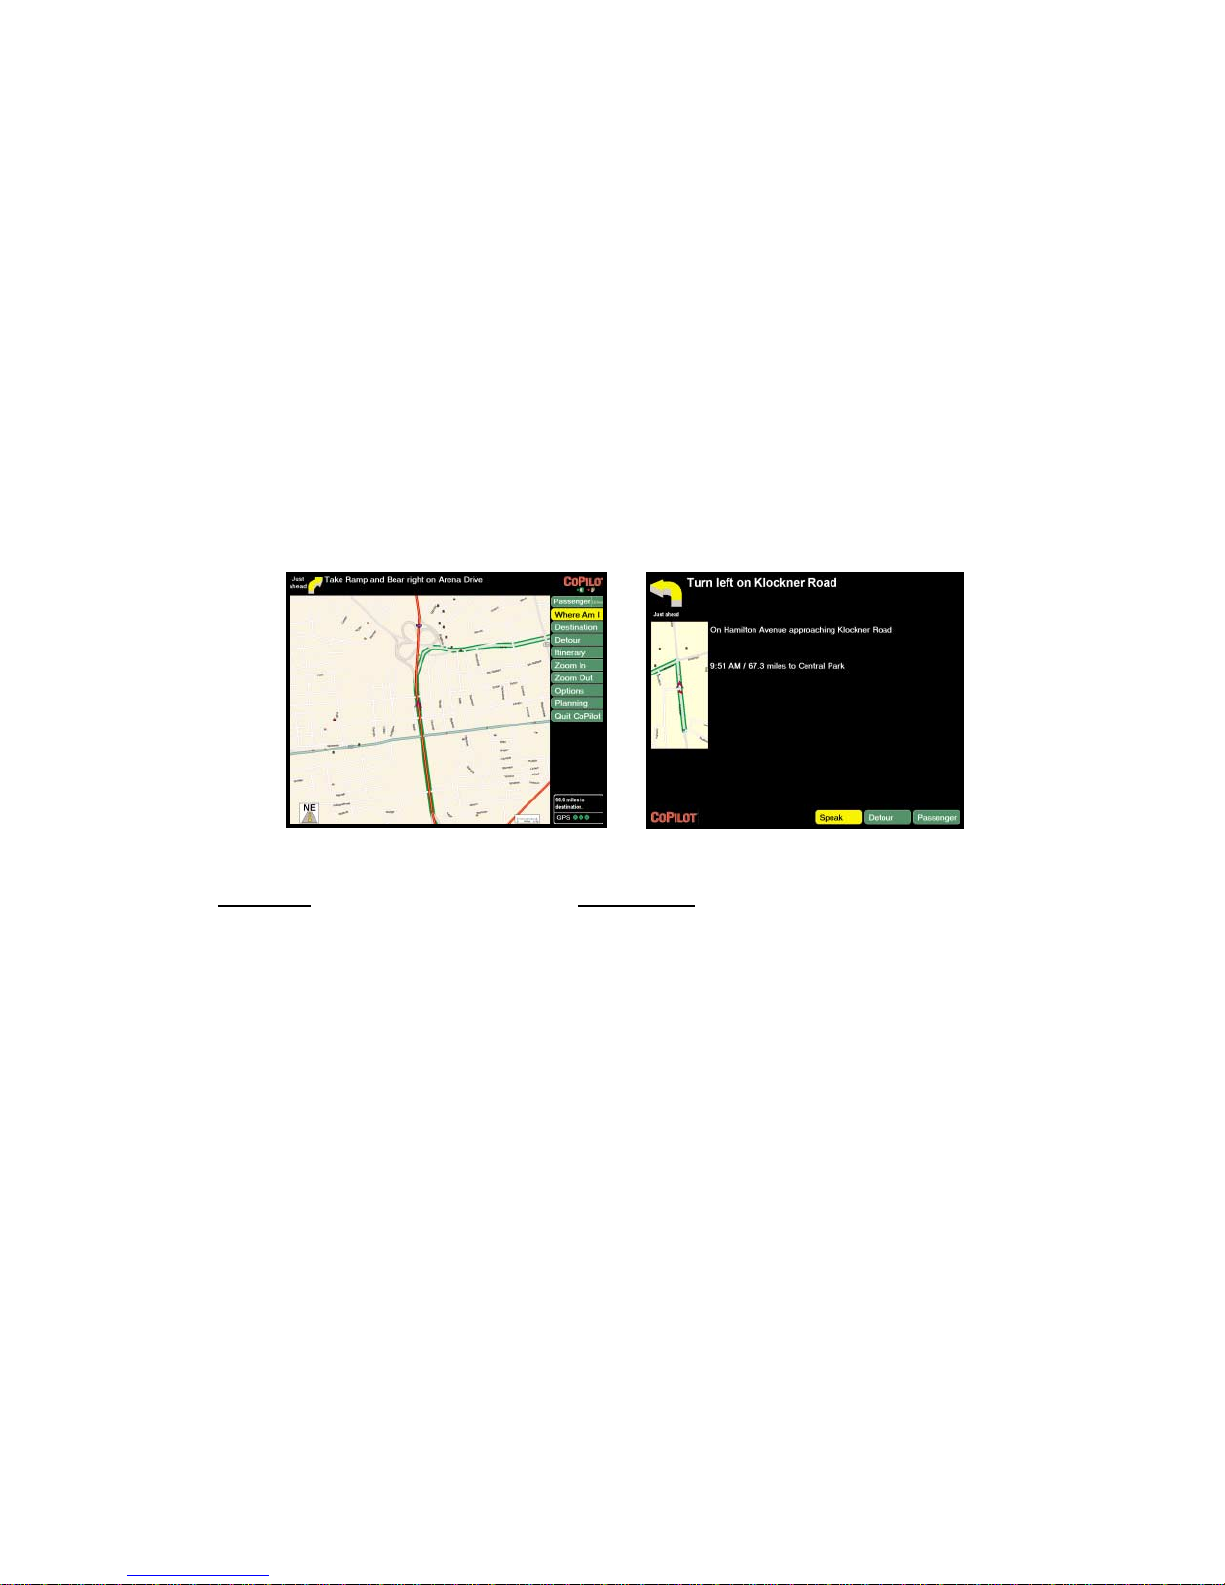
At the top of the control panel, Passenger/Driver may be clicked to toggle between one
screen and the other. The active screen will be shown in larger print. To exit CoPilot at
any time, click Quit CoPilot.
In the Driver Safety screen, at over 10 m.p.h. the background will be black and you will
receive simple turn instructions on screen, as well as receiving voice commands. In the
Passenger screen, the map will always be shown.
Passenger screen Driver Safety screen
BUTTON FUNCTION
Where Am I/Next Turn/Going To Zooms the map display to include your current
location , next turn, or current destination. Click to
cycle through the different views.
Destination Informs you of your current destination and allows
you to change it if necessary.
Detour In case of traffic delays, enables you to run an
alternate route.
Itinerary Displays the directions to your next stop.
Zoom In Zooms in on the current map.
Zoom Out Zooms out on the current map.
Options Enables you to view GPS status and modify routing
preferences, voice options, and map orientation.
Planning Switches you to Planning Mode.
Quit CoPilot Exits the program.
Page 19
Map Display
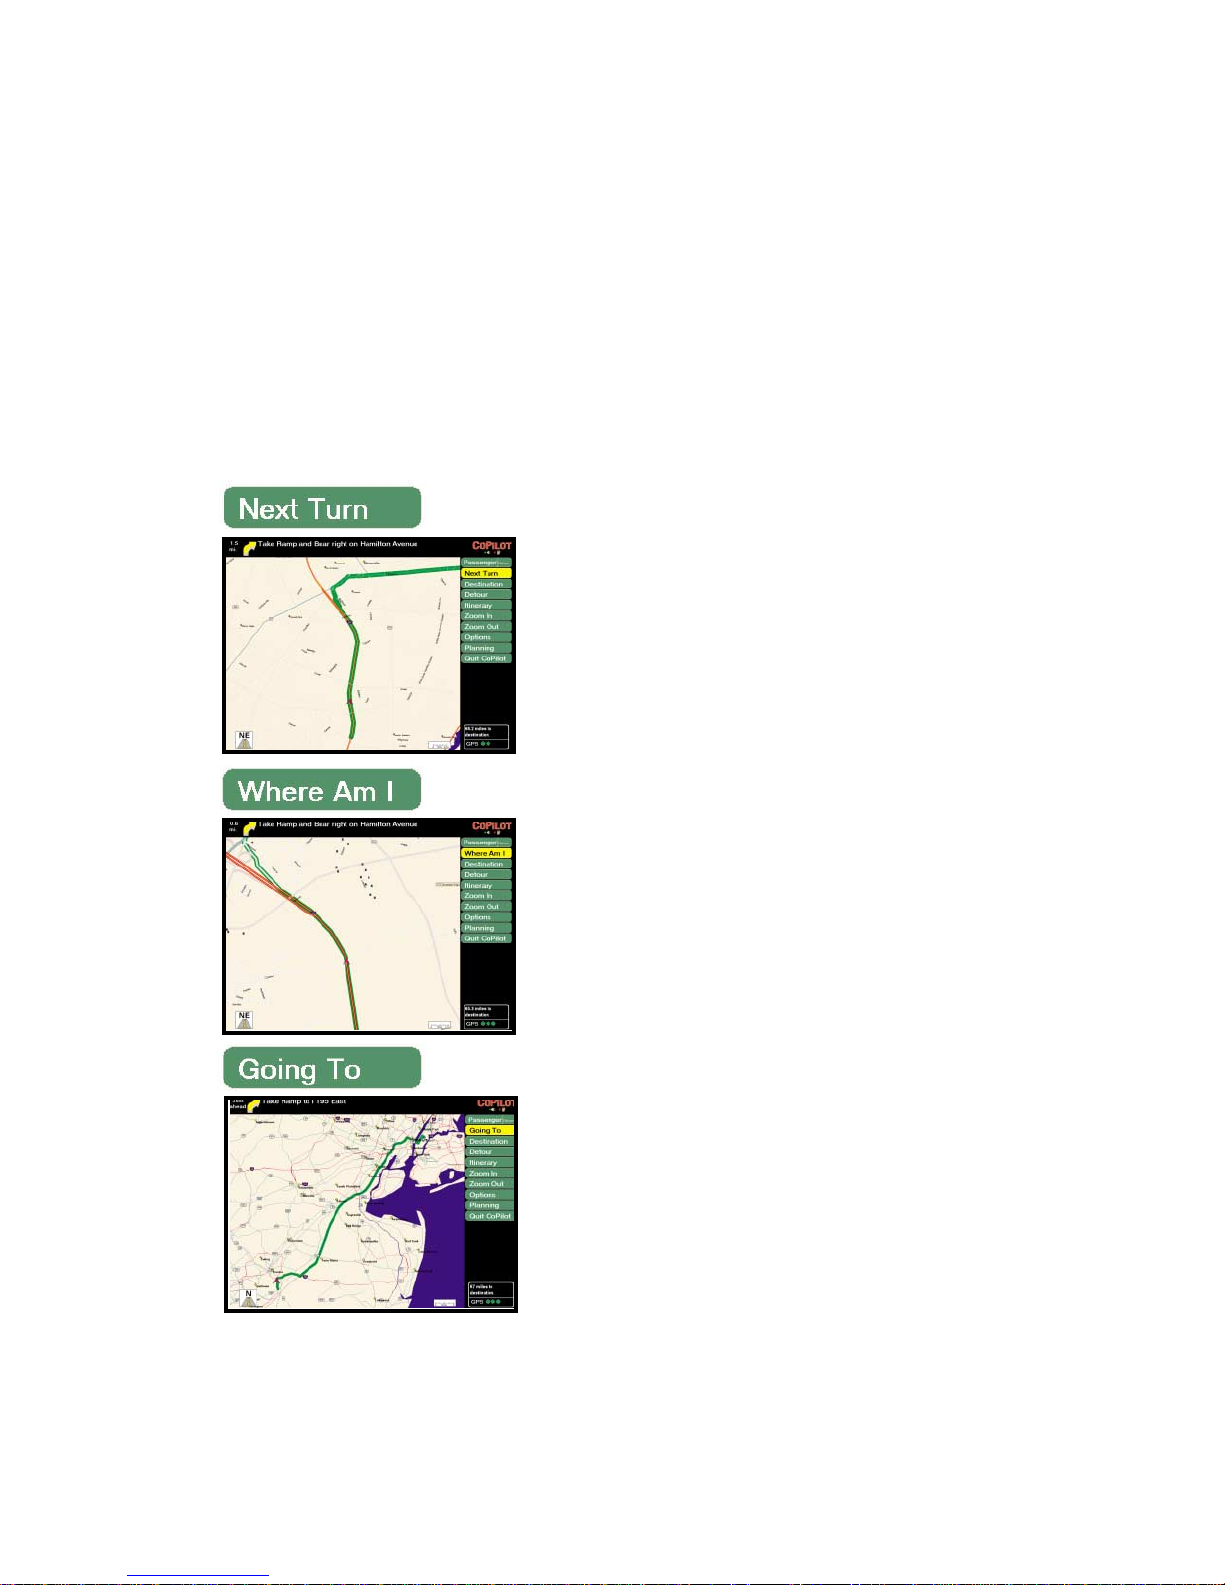
In the control panel, the button below Passenger/Driver allows you to toggle
between three different map views. To switch from one view to the next you simply click
on the button or use the <Enter> key on your keyboard to cycle through Next Turn, Where
Am I, and Going To.
- 14 -
Next Turn: This view shows your upcoming turn and
the immediate area between your current location and
the turn.
Where Am I: This view shows your current location
along the highlighted route, and also shows the
surrounding area.
Going To: This view shows you a map of the route
ending at your next stop. In this example the next
stop is far away so the map is zoomed out to fit the
entire route.
TIP: CoPilot defaults to hiding the Windows Taskbar
when in Guidance Mode. To change this, switch to
Planning Mode and go to Edit > Preferences >
CoPilot and place a checkmark next to Show
Windows Taskbar.
Page 20
- 15 -
Entering a Destination
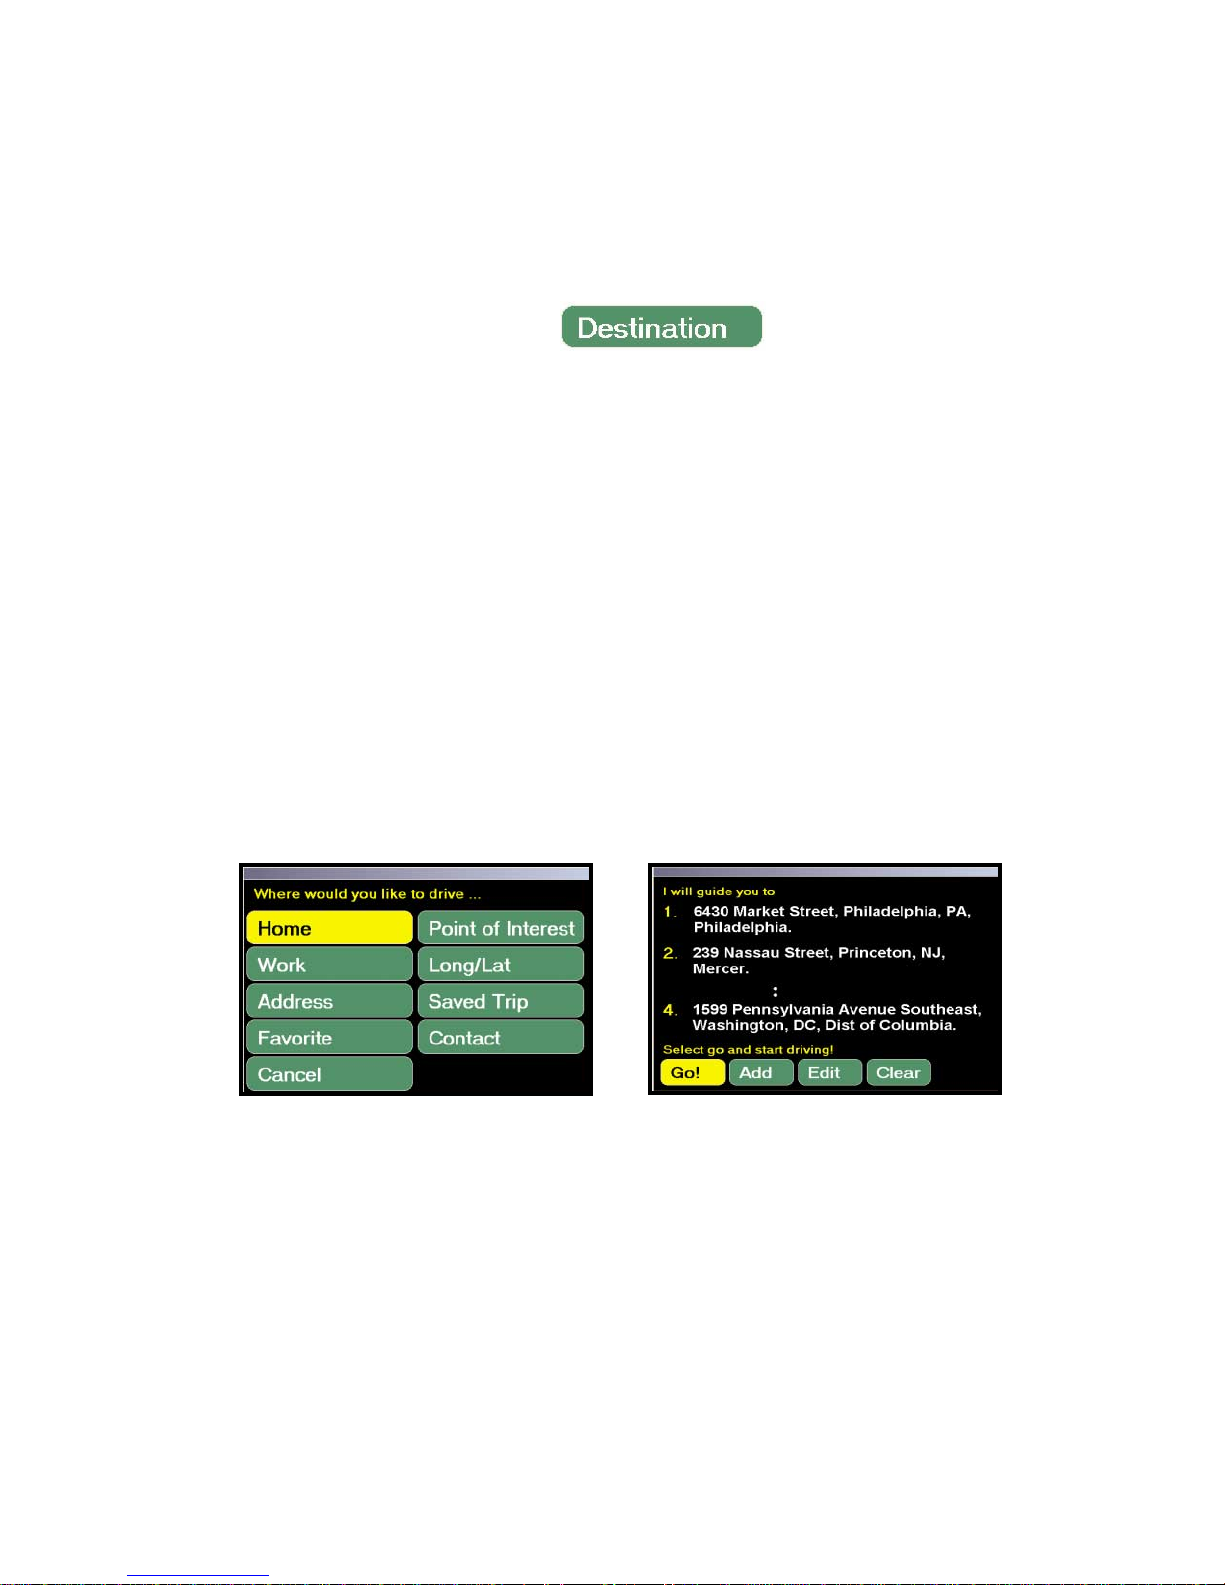
When you launch CoPilot for the first time with the GPS receiver attached, you will be
prompted to enter a destination (refer to Destination Entry window below). Select any one
of the destination options, and enter your destination. When entering a City/State, enter the
city name and state abbreviation separated by a comma and space, then hit Enter. Case is
not important (e.g. princeton, nj <Enter> is a valid entry). For more specific guidance you
can also enter a street address, with or without a building number, and hit the Enter key on
your keyboard (e.g. 158 nassau st <Enter>).
TIP: Usually you will need to spell out words like "Saint", "Mount", "Fort", etc. Place
names generally need to be spelled out: "John F. Kennedy International Airport" instead
of "JFK Airport". If you are having problems finding an address, try different ways of
spelling out words and/or place names.
In subsequent uses, when a destination has already been entered, you will be prompted to
confirm or change your destination. You can choose to Go! to that destination, Add, Edit
stops, or Clear (see page 18).
Trip Confirmation WindowDestination Entry Window
Page 21
- 16 -
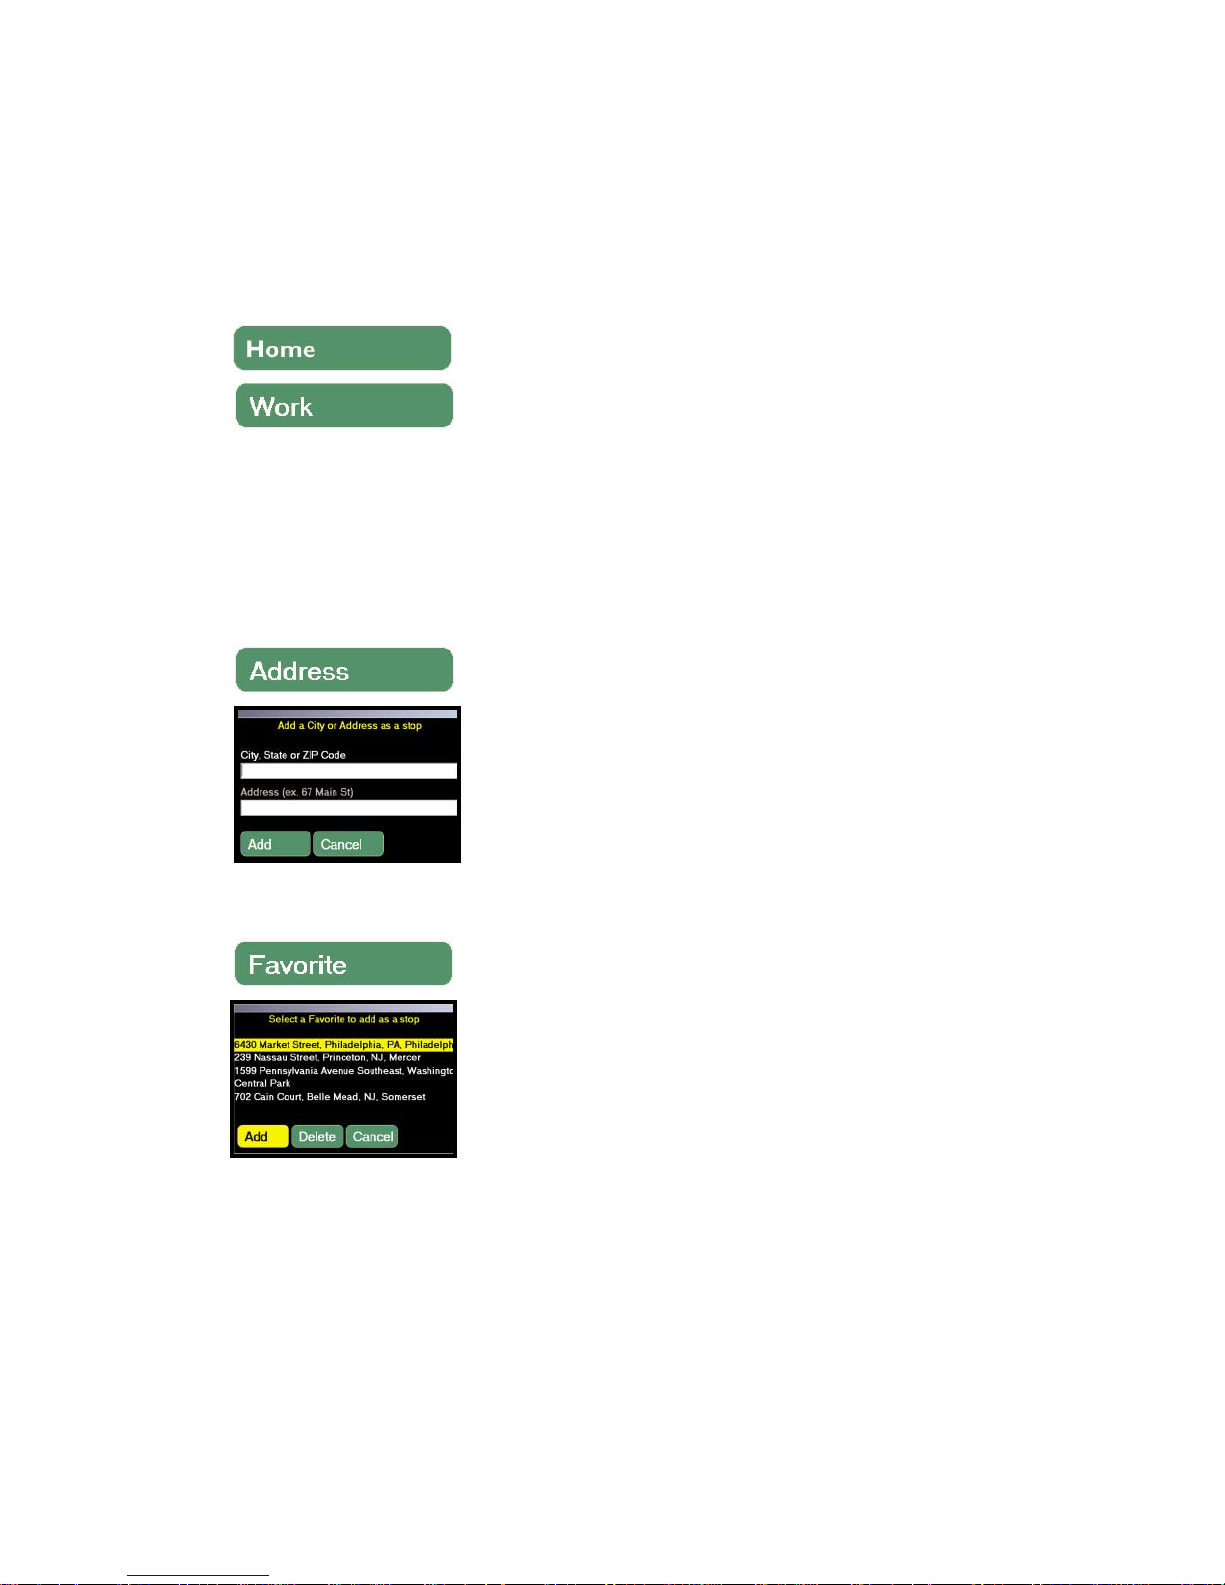
The first time you select the Home or Work buttons you
will be prompted with an Address Entry window like the
one shown here in which you can enter your home and/or
work addresses. In subsequent selections, choosing these
buttons will automatically enter your home or work address
as your destination.
NOTE: To edit your Home or Work address, switch to
Planning Mode and use the Favorites tab in the Trip
Planner window (see pages 29-30).
Selecting Address opens a window in which you can enter
a city name and state, a ZIP code by itself, and a street
address if you wish.
Any time you add an address to your itinerary it will
automatically be added to a list of Favorites. The
maximum number of Favorites that will be stored is 25. To
access this list click on the Favorite button. You then have
the option of adding a stop to your itinerary, deleting it
from the saved list, or returning to the previous window. If
you exceed 25 favorites, the new Favorite will replace the
oldest one (the one that has not been accessed for the
longest amount of time).
Page 22
- 17 -
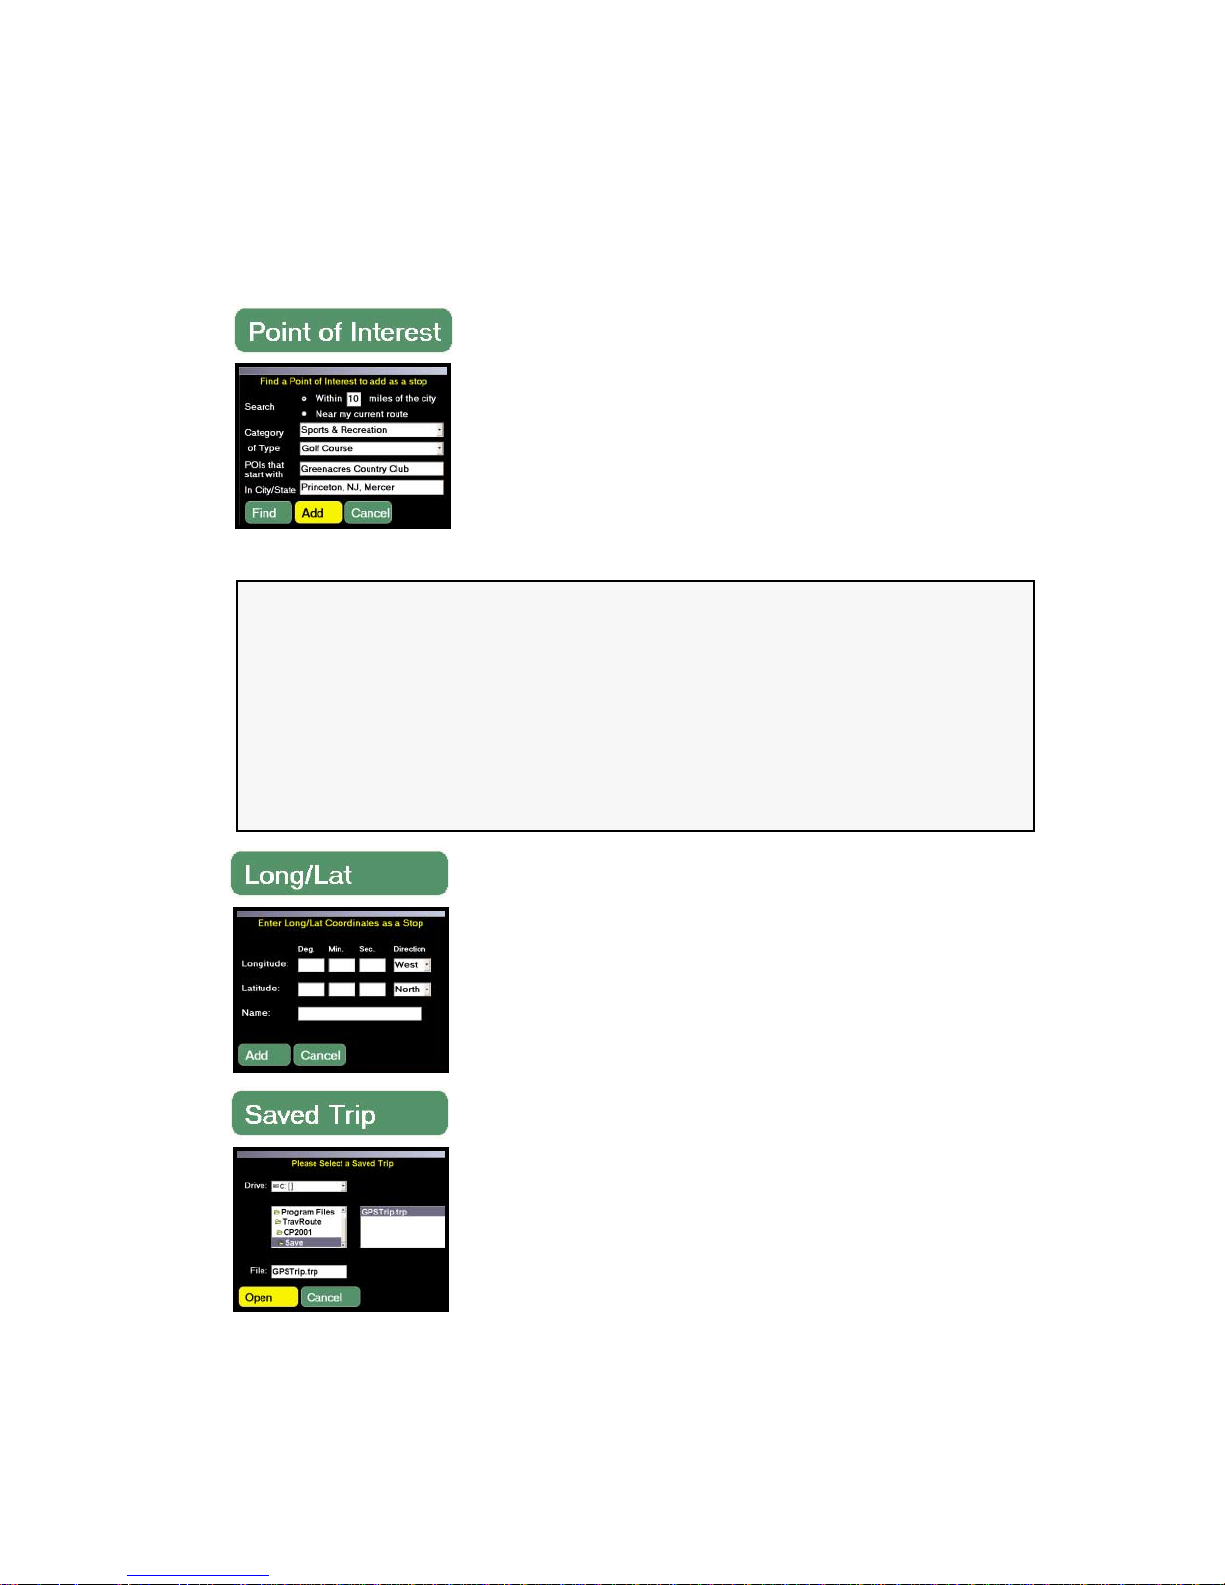
When you select the Point of Interest button you will be
prompted with an entry window. In the City/State box you
will see the city in which you have most recently been
navigating. If you want to find POIs in a different location,
simply edit the City/State entry. You can also use a Smart
POI search during a trip. If you select Near my current
route, the City/State box will be removed and the POI
search will find matches close to your current route.
NOTE: This option is only available when you are
navigating along a route.
TIP: Whether you use a City/State or the Smart POI search option, the other fields used to
perform a POI search are optional. If you want to narrow the POIs that are returned do one or
all of the following: select a POI Category, select an of Type option, or enter the first few
letters of the Place name.
NOTE: During the initial installation of the software you have to choose between installing
the Typical or Compact POI set. The Typical set gives you more POIs to choose from. In
order to go back and change this option at a later time, click on Start > Settings > Control
Panel and double-click Add/Remove Programs. Select CoPilot 2003 from the list and click
on Change/Remove > Modify. Select the POI set you want and deselect the other one.
In Planning Mode you have the option of pre-planning trips
and saving them to your hard drive. Clicking on Saved
Trip will give you access to the list of these previously
saved trips so that you can enter a whole trip rather than
individual stops.
You also have the option of entering places by using the
Long/Lat button. You will be prompted to enter
coordinates in the appropriate boxes. These coordinates are
shown in the status bar at the bottom of the map in
Planning Mode so if you were to find a place on the map
and not have an exact address for it, you could make note
of the Long/Lat coordinates and enter them in this box.
Page 23
- 18 -
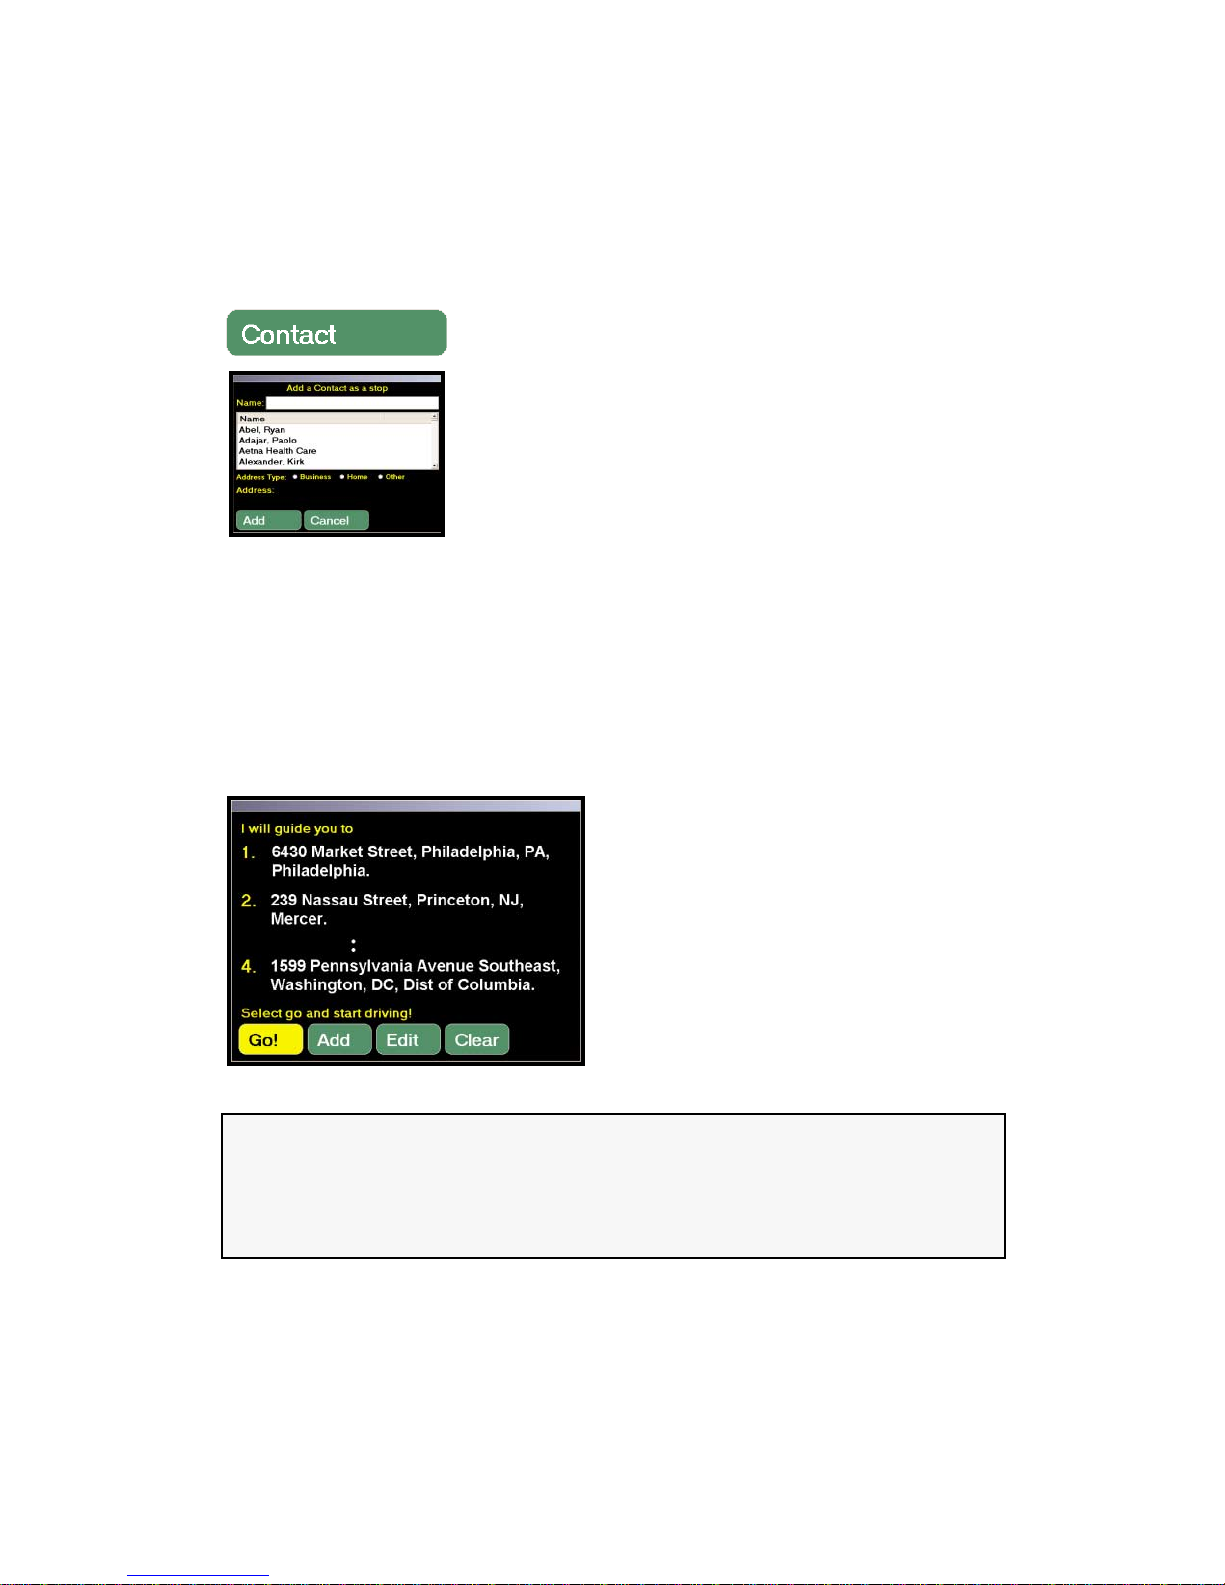
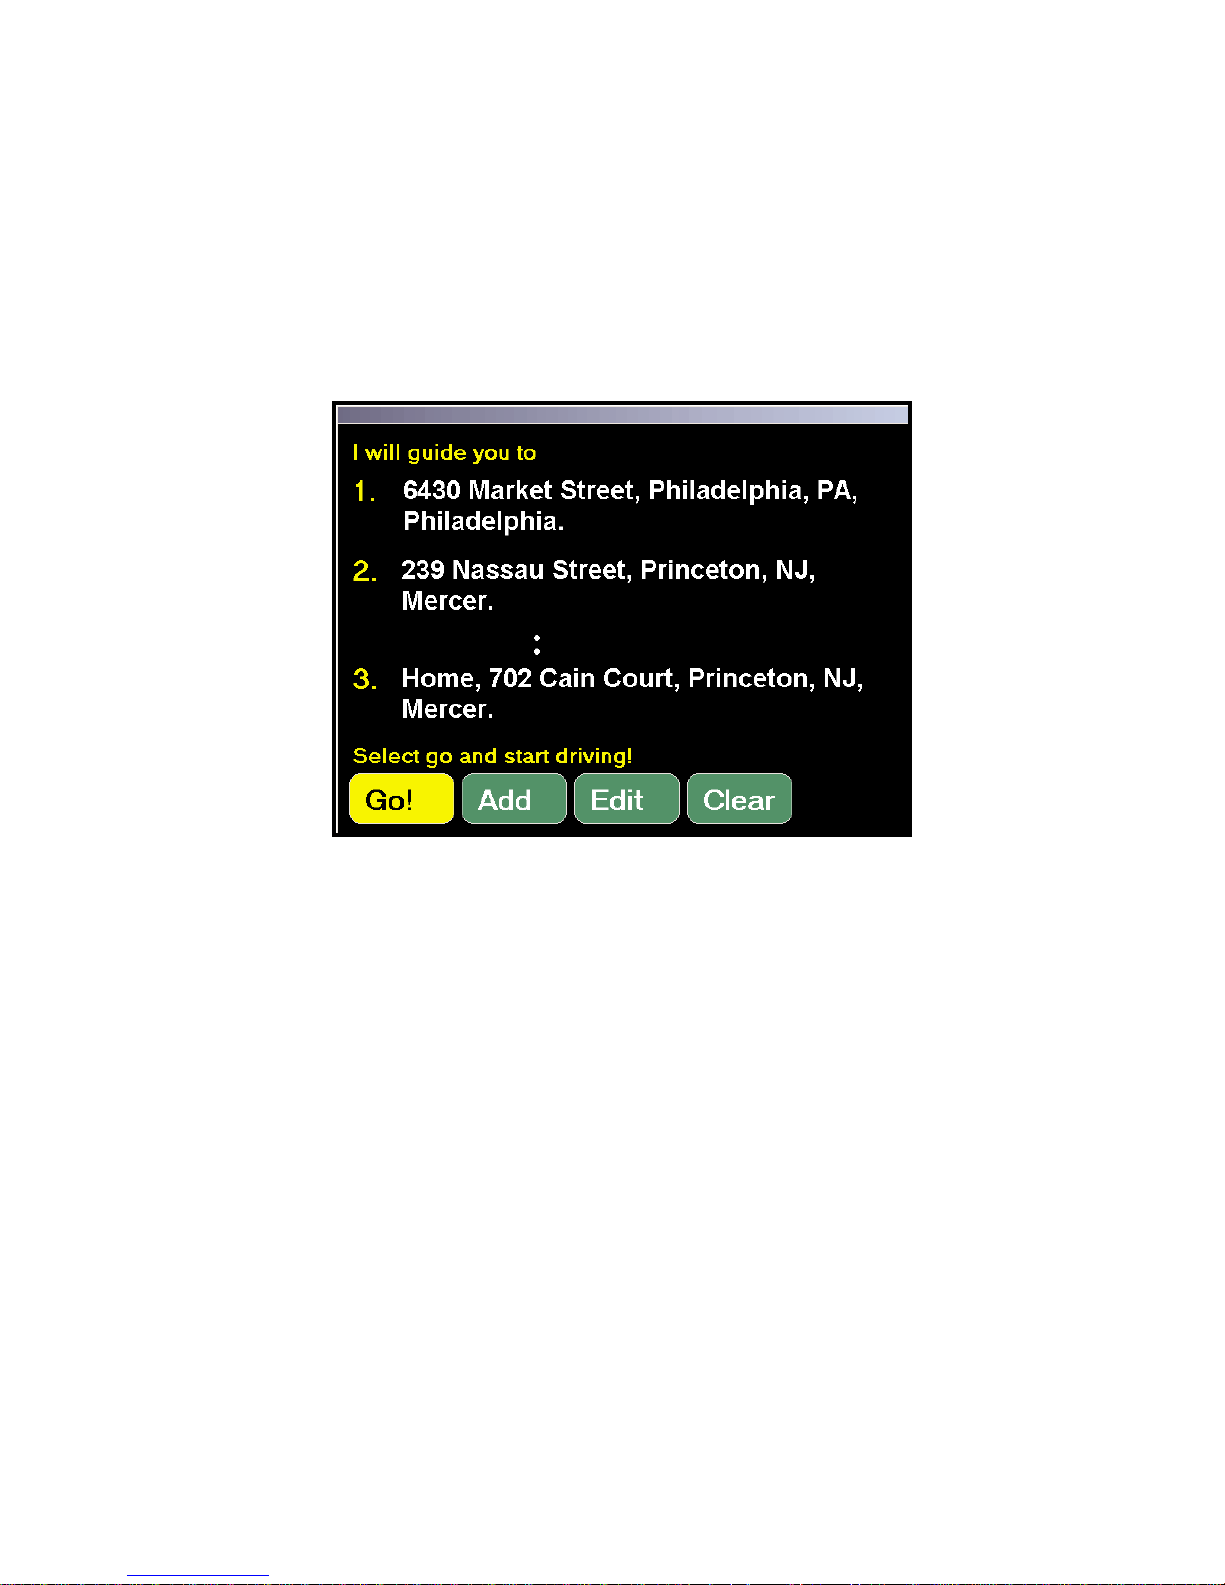
Trip Confirmation
The Trip Confirmation window appears
every time you enter a new stop in an active
trip. You can enter as many as 50 stops in
any given trip. The screen will display your
next few stops, and your final destination.
In this screen you also have the option of
selecting Go! to go immediately into the
Passenger screen, Add to add stops to your
trip, Edit to change the order or remove
stops, and Clear to delete all stops.
NOTE: If you are making a quick stop, there is no need to exit the application.
Simply close the lid on your laptop and the operating system will enter Suspend
mode. When you return to your vehicle, simply open the lid and press any button
and the operating system will resume.
You can access your Microsoft®Outlook Contacts database
by clicking on the Contact button.
Narrow down your contact search by typing in the first few
letters of the contacts first or last name and hit the
<Enter> or <Space> key on your keyboard. Select the
contact from the list and preview the Business, Home, or
Other address by selecting the corresponding radio button.
Click on the Add button and CoPilot will search for that
contacts address. If an exact match is found, CoPilot will
automatically update your itinerary. If an exact match is
not found, CoPilot will display a list of possible address
matches to choose from.
Page 24
- 19 -
Editing Your Stops
In Guidance Mode you will be given the option to alter your trips by clicking Edit. When
this is selected the dialog box above will appear on your screen. From this screen you can
manually change the order of your stops using the Up/Down arrows to the right of the
itinerary, you can delete stops using the Delete Stop button, or you can take advantage of
the Optimize feature. This function will automatically order your stops (if you have three
or more of them) to create the most efficient route that includes all of them.
Select OK to return to the previous screen where you will have the option of selecting Go!
(Guidance), Add, Edit, or Clear.
Page 25
- 20 -
Detour
In Guidance Mode, clicking the Detour button will enable you to specify what the road
conditions are in front of you so that CoPilot can generate an alternate route. This is useful
when you need to get around traffic jams, roadwork, or other unexpected traffic slow-downs
but dont know whether or not youll save any time by turning off your current route.
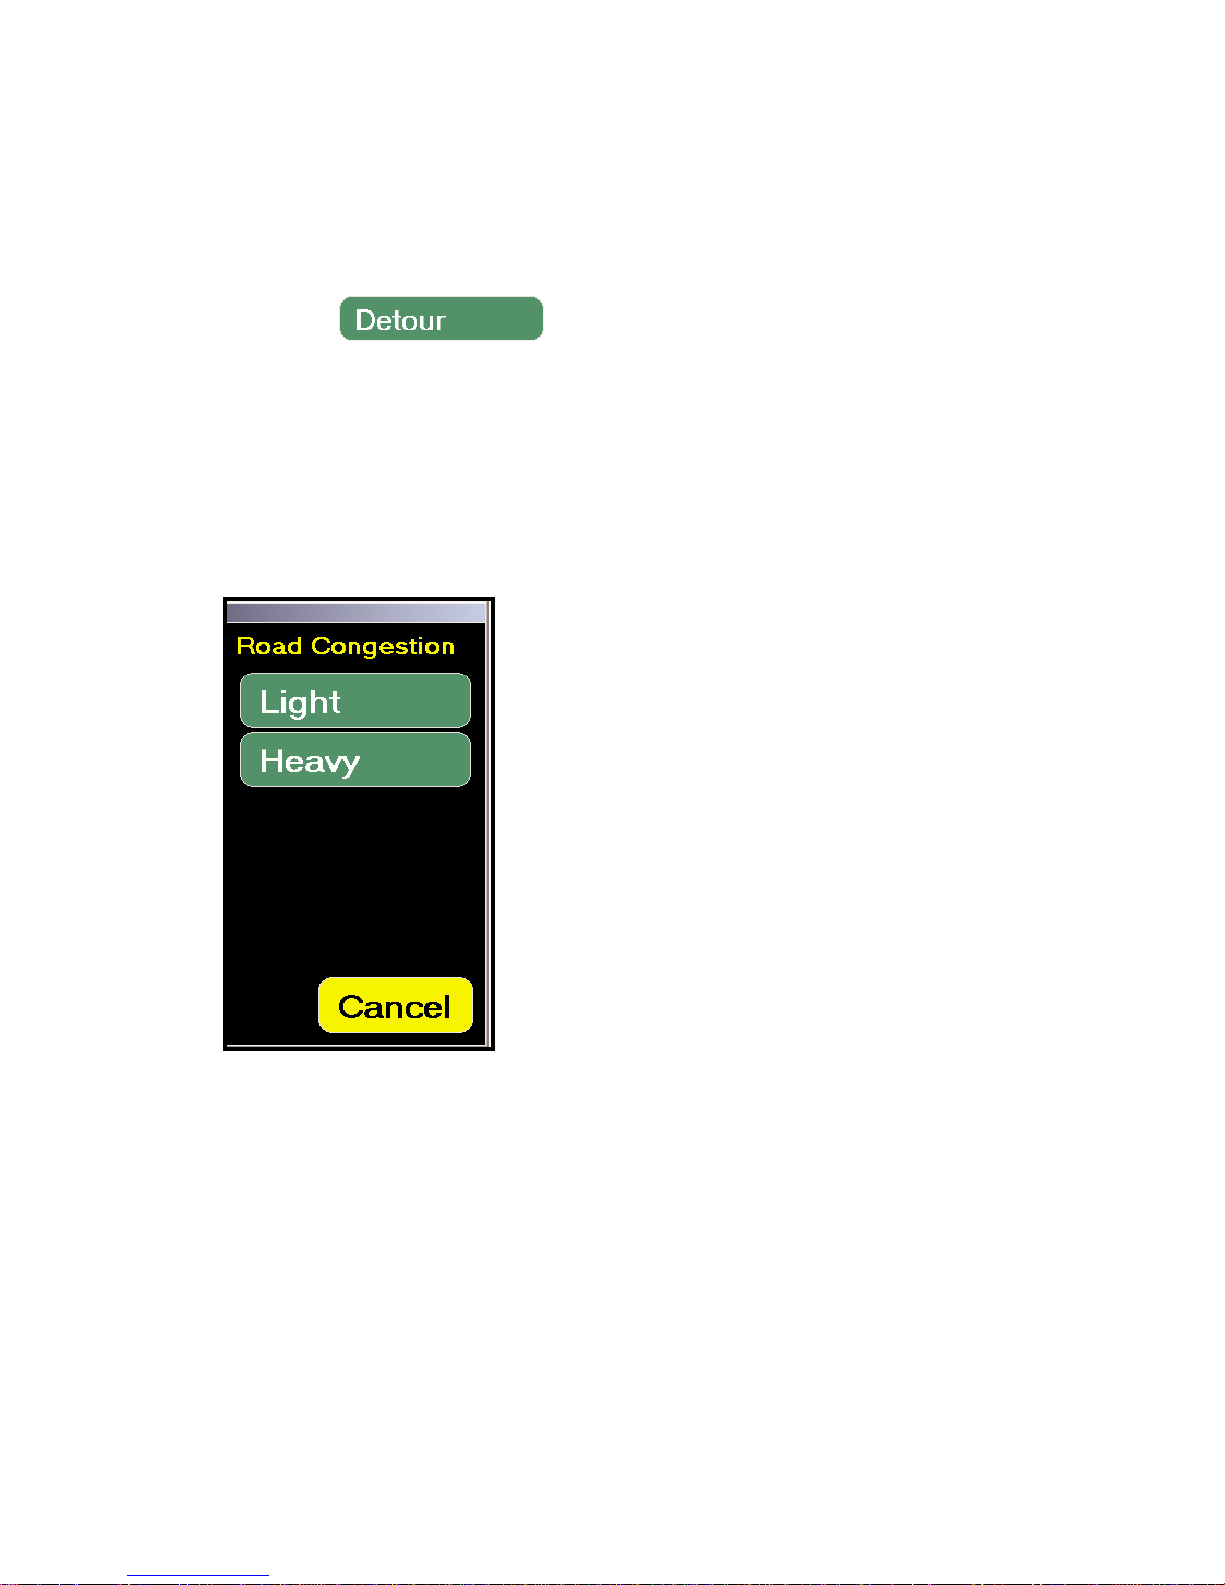
When you click Detour, a window opens that asks you to describe the road congestion
ahead of you:
The Light Congestion option takes you off the
original course if theres a quick way around the
road up ahead. For example, you might want to
use it when theres a long line at a traffic light.
The Heavy Congestion option will get you
around extended delays caused by traffic
accidents and other obstructions that slow traffic
to a stand-still. This option only keeps you on
your original route if the alternatives are
extremely out of the way.
Page 26
- 21 -
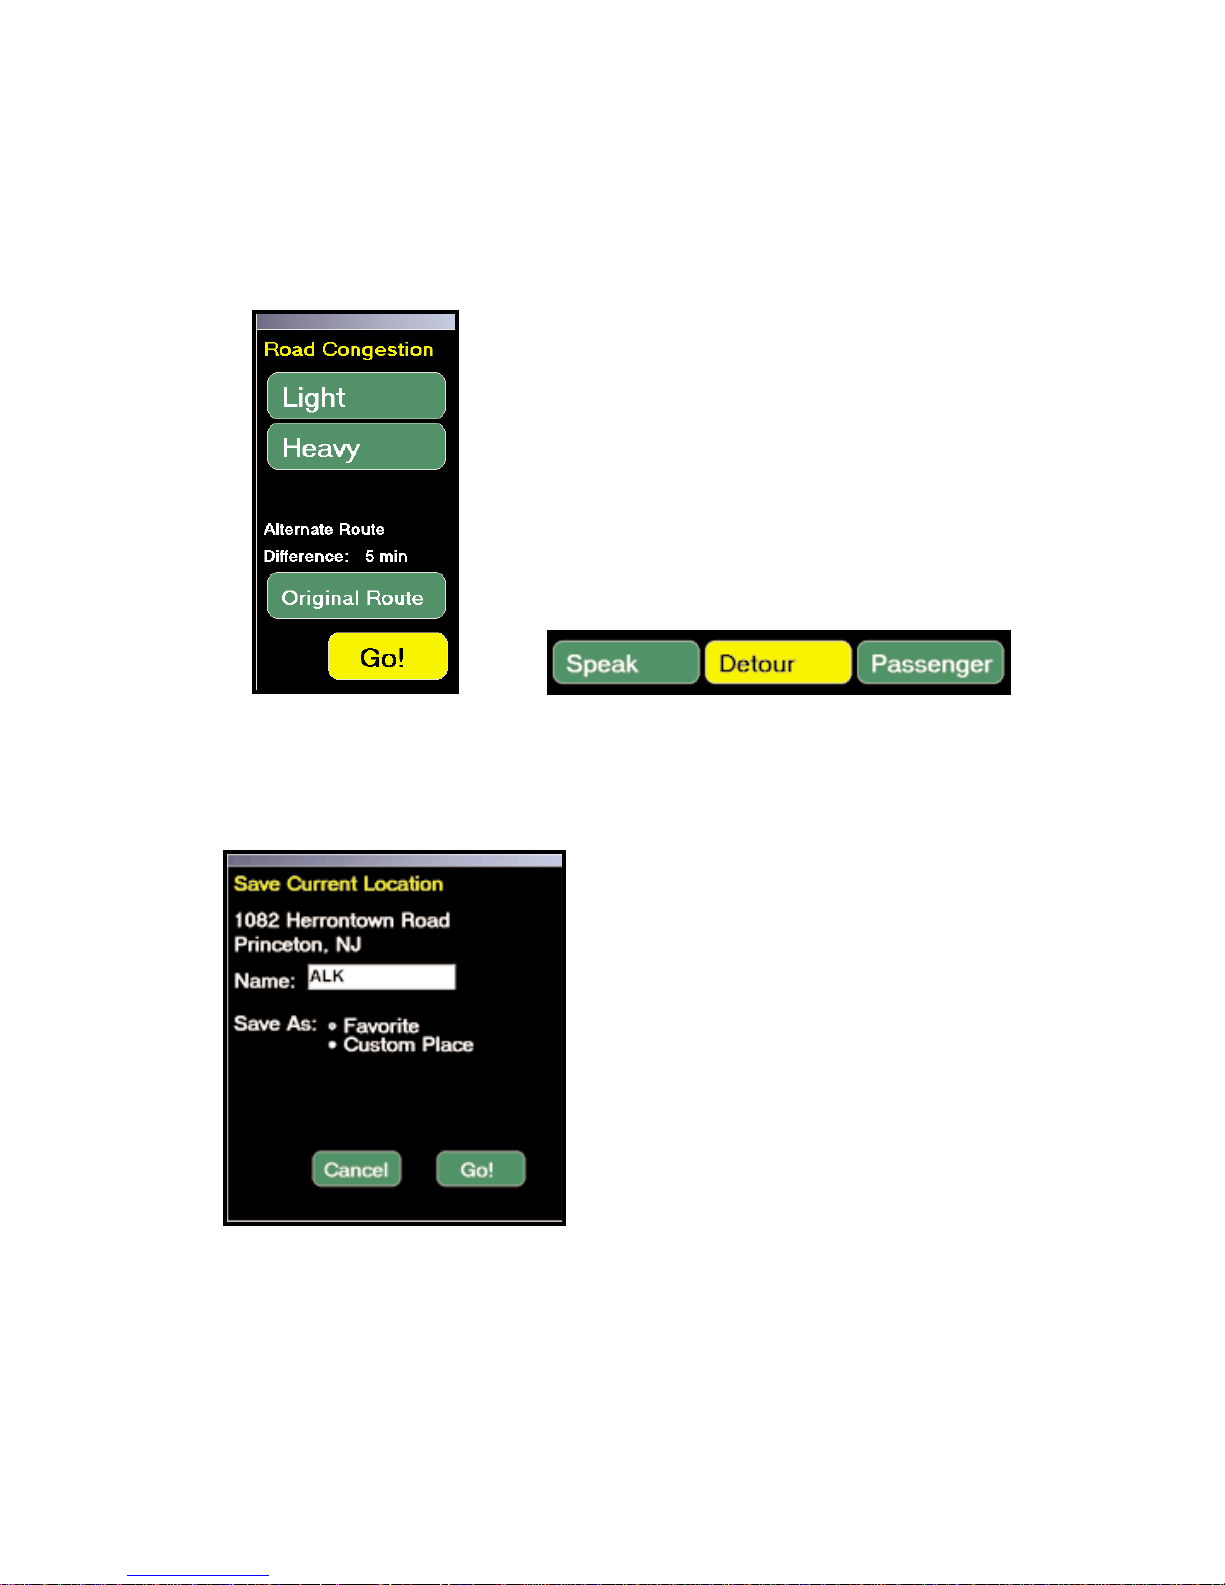
After selecting one of the alternate route options,
the difference between your original route and the
new route is displayed. You can either accept the
new route or return to your original route.
Detour functionality is also available from the
Driver Safety screen (lower right corner). When
the Detour button is selected in the Driver Safety
screen, the display will automatically switch to the
Passenger screen.
Save Current Location
When you have a GPS fix in Guidance
Mode, you can press the F2 key on your
keyboard to save your current location.
CoPilot will ask you to give the location a
name and will add it to either your Favorites
or Custom Places list.
Page 27
- 22 -
Selective Routing
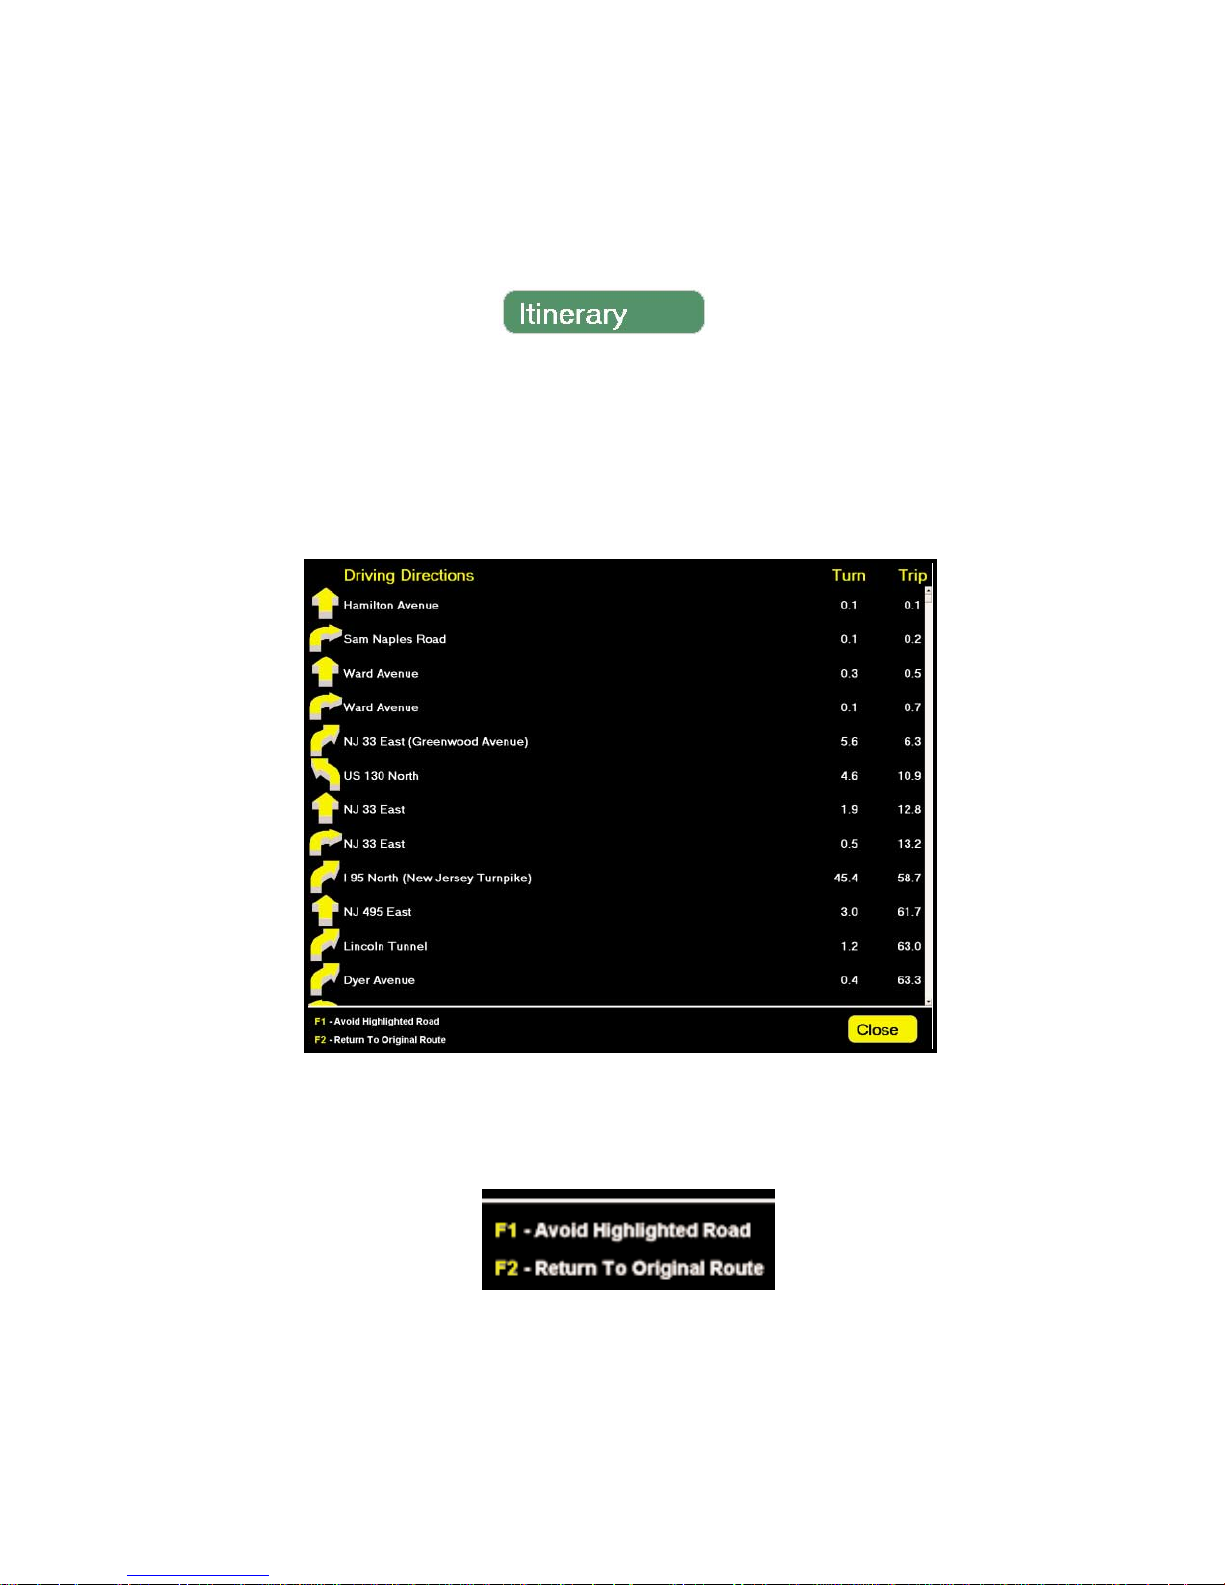
CoPilot enables you to be selective about the roads you take on your trip. From the
Passenger screen you can customize your Driving Directions so that entire segments of a
trip can be avoided if you dont want to travel along the roads CoPilot has you taking.
To do this, in the Passenger screen click the Itinerary button to bring up your turn-by-turn
Driving Directions.
In the Itinerary screen, highlight the road you want to avoid, then press the F1 key on your
keyboard to avoid the highlighted road. You can return to your original route at any time
during the trip by pressing F2.
Page 28
- 23 -
Options
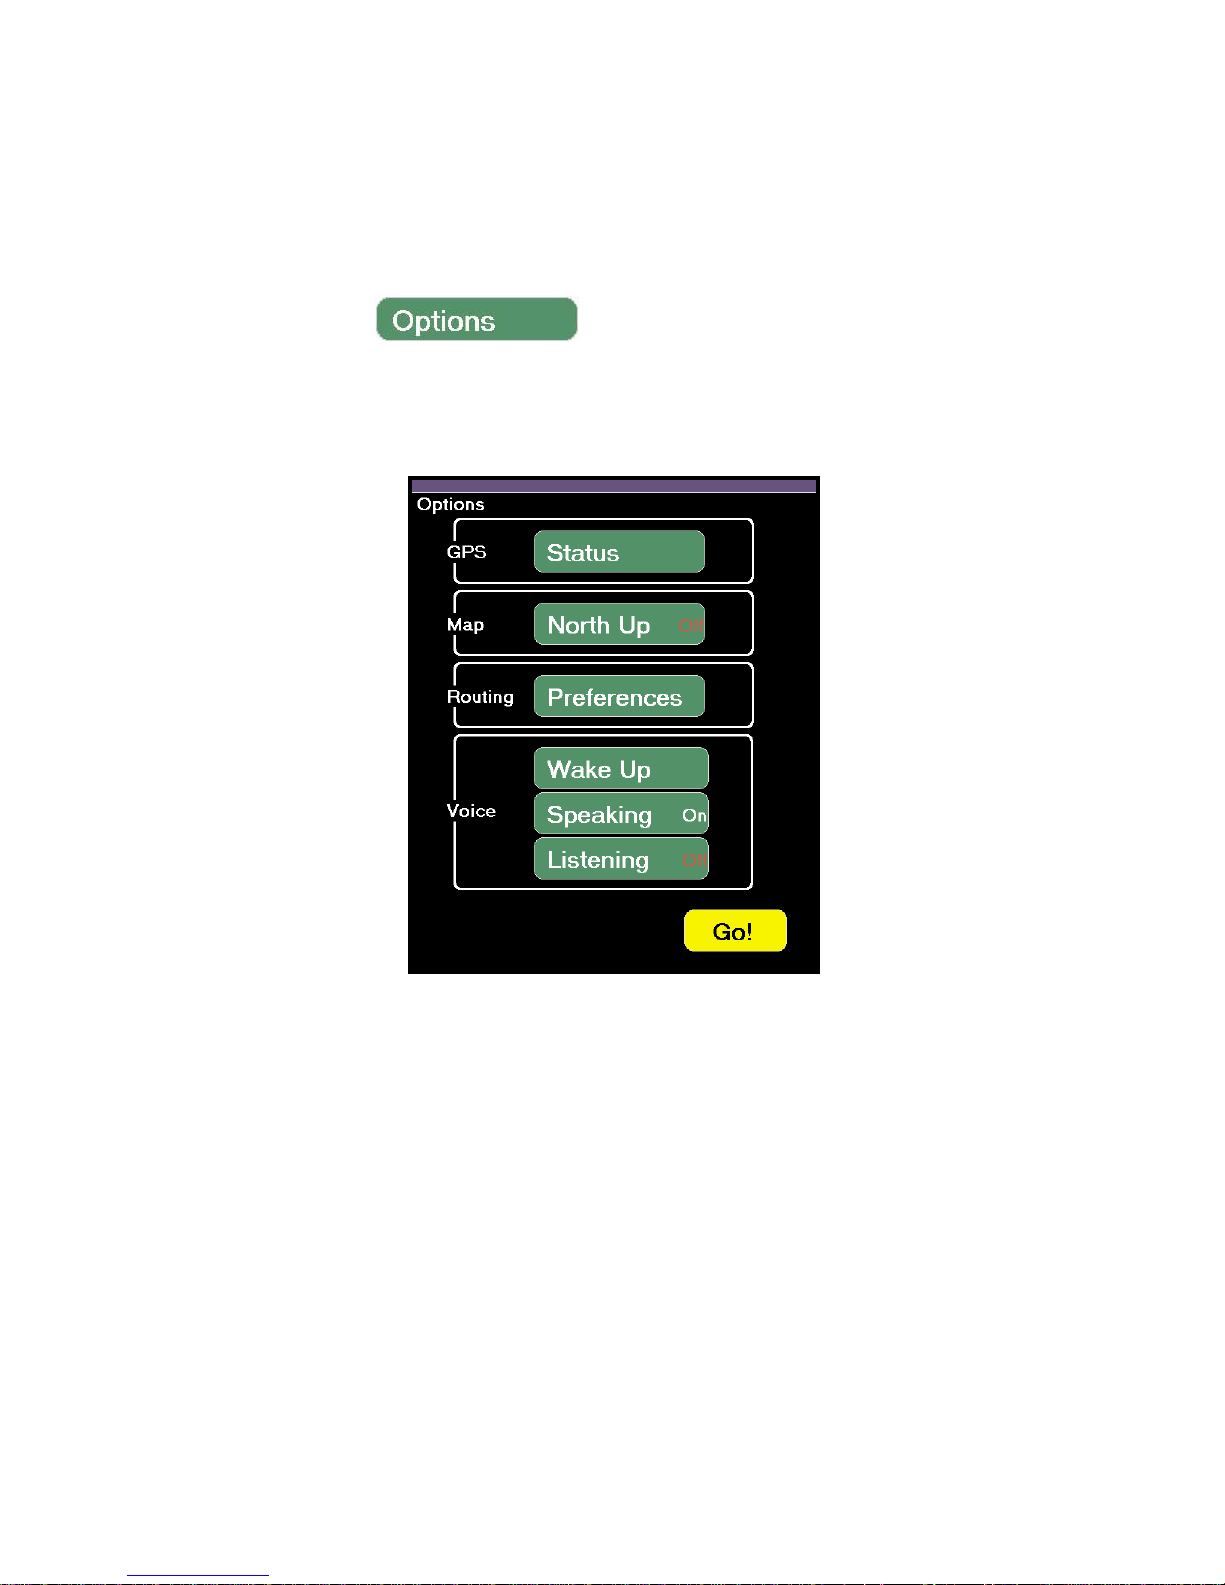
Click the Options button in Guidance Mode to open a window that enables you to view
GPS status and change settings such as map orientation, voice options, and routing
preferences.
In the Options window, the Status button opens a dialog box that allows you to view and
change advanced GPS settings see CoPilots Help Files for more information. North Up,
when toggled on, sets the map view so that north will always be at the top of your computer
screen when you are driving in Guidance Mode.
Click Wake Up to reactivate CoPilots voice technology when it has been asleep. Toggle
Speaking to On if you want CoPilot to speak directions out loud. Toggle Listening to
On if you want CoPilot to respond to your voice commands (see page 25 for a list of
voice commands that will get responses).
Page 29
- 24 -
Routing Preferences
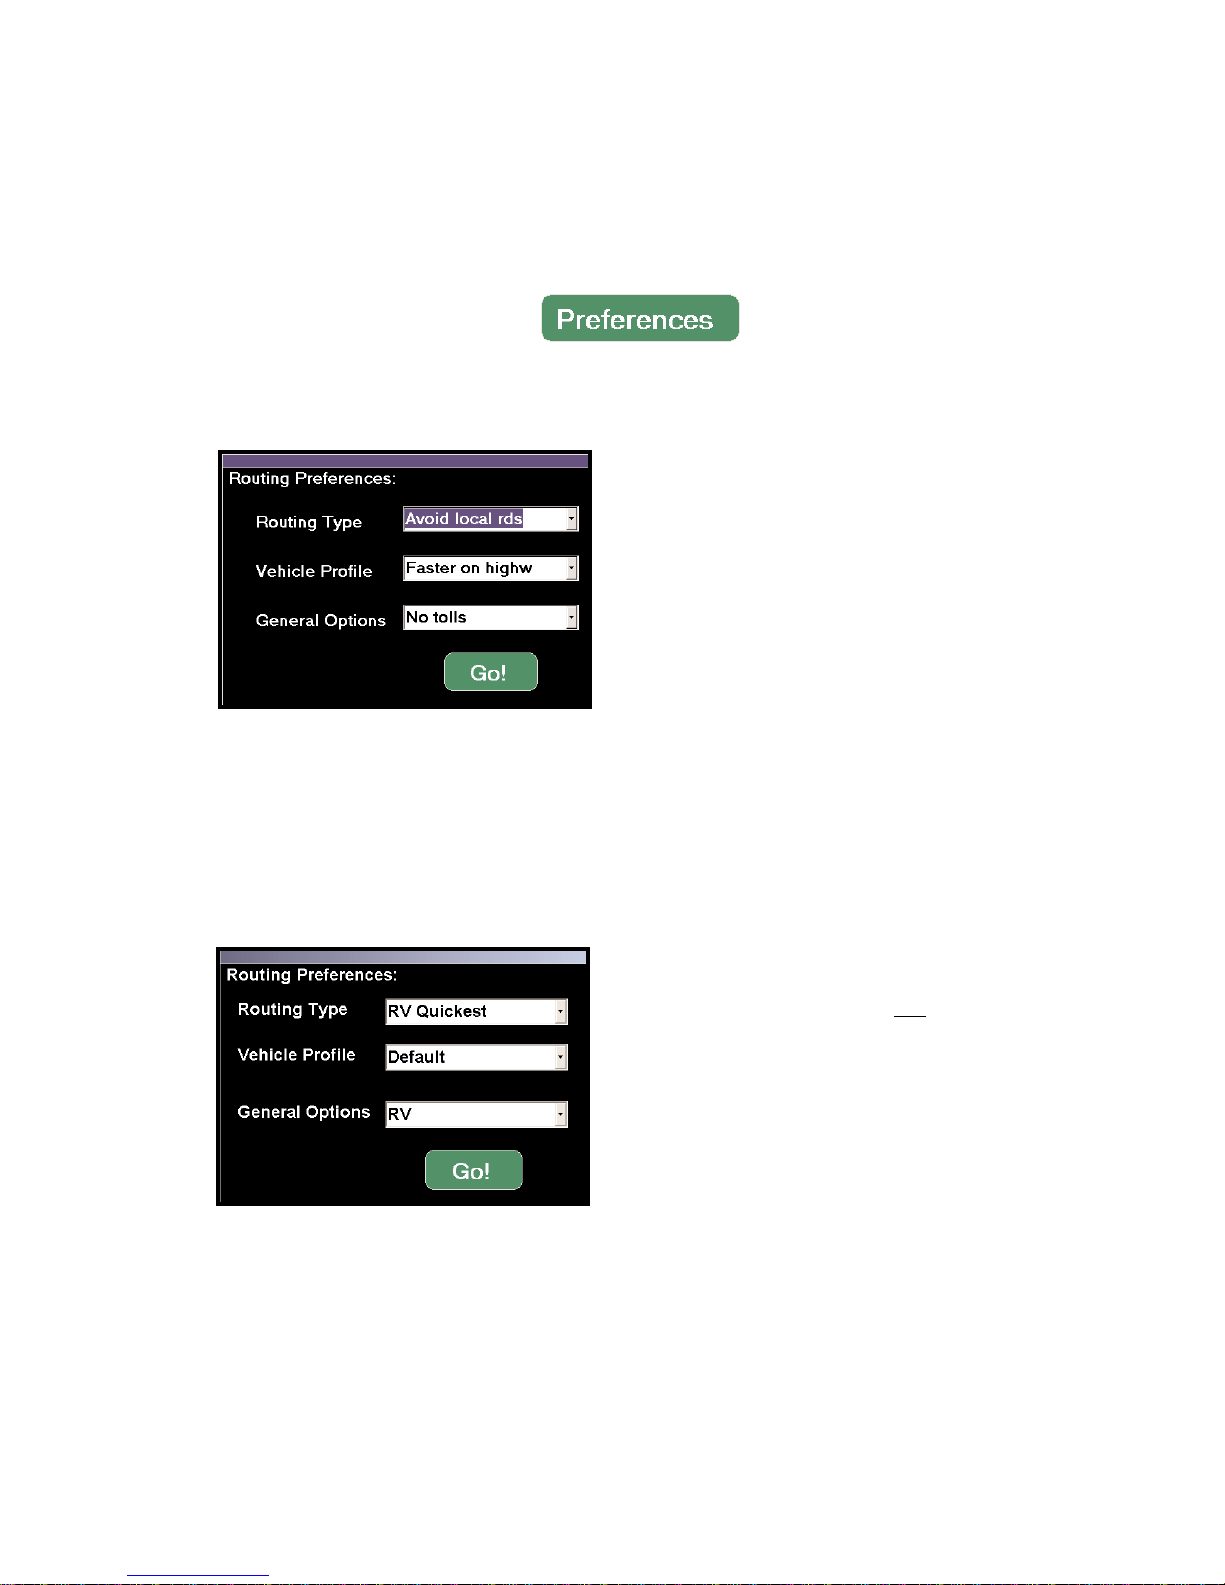
Click Preferences to open a window that enables you to set routing preferences for
Guidance Mode.
These preference categories are the same
ones found in the Trip Options dialog box in
Planning Mode, and the choices in each pick
list will reflect sets of customized
preferences that you have created using that
dialog. To create such sets, switch to
Planning Mode, then click on the New Trip
tool bar button to open the Trip Planner
window and click the Options button in that
window (see page 28 for details).
RV Routing
CoPilot comes with pre-defined routing options that provide RV-friendly routing. Narrow
roads, tight turns, and U-turns are all minimized to provide you with the safest and easiest
way to drive your RV or other large vehicle.
NOTE: In order to get true RV routing,
you must change your Routing Type to
RV Quickest or RV Shortest and your
General Options to RV.
Page 30

- 25 -
Voice Commands
CoPilot will not only speak to you to inform you of upcoming turns, but also respond to a
number of commands you speak out loud.
NOTE: Background noise may affect CoPilots ability to recognize spoken commands. It is
strongly recommended that you use an external microphone with noise-cancellation
technology to optimize your experience with CoPilots listening device.
To activate or deactivate the listening option select the Options button from the control panel
and click on Listening to toggle it on or off.
Voice commands that CoPilot will respond to are the following:
COMMAND
RESPONSE
After that Tells you what to be aware of after making your next turn.
Clear track Restarts your track on the screen with your current location.
Detour CoPilot automatically gives a Detour route using the Heavy
Congestion option (see page 20 for details).
ETA Tells you your Estimated Time of Arrival at your destination.
Heading Informs you of the direction in which you are traveling.
How far Gives you the distance to your next stop.
More detail/Less detail Each time spoken, the map will show more or less detail.
Next turn Tells you when and where you will make your next turn.
Pan left/Pan right/ Will move the view of the map in the direction you request.
Pan up/Pan down
Resnap Resets GPS to your actual location if it happens to be
getting an inaccurate reading.
Speed Provides the speed at which you are currently traveling.
Wake up/Go to sleep Either cause CoPilot to enter Sleep mode, or awaken from it.
Where am I CoPilot will give you your current location along the route
Zoom in/Zoom out Each time spoken, the view of the map will change one
level.
Page 31

- 26 -
A Sample Trip
Suppose you and a friend want to go to a concert on the campus of Princeton University in
Princeton, New Jersey. You know the approximate location of your destination, but you're
unfamiliar with the area. There's no need to worry about the trip: CoPilot will guide you
every step of the way!
First, you enter your destination. (You wont need to enter a starting place if your GPS
receiver is picking up signals, CoPilot already knows where you're starting from.) In
Guidance Mode, your friend clicks Destination, then Add, then Point of Interest. She
types Princeton University in the POIs that start with box and clicks Find. In a few
seconds, CoPilot finds Princeton University in the database and your friend clicks Select,
then Add, and then Go!
Now you're ready to drive to your destination!
Once the car is moving, your location shows up as a series of arrows drawn on the map. A
green-highlighted line from your present location to your destination shows the route for
you to follow. In addition, CoPilot prompts you before each turn if Speaking is turned on.
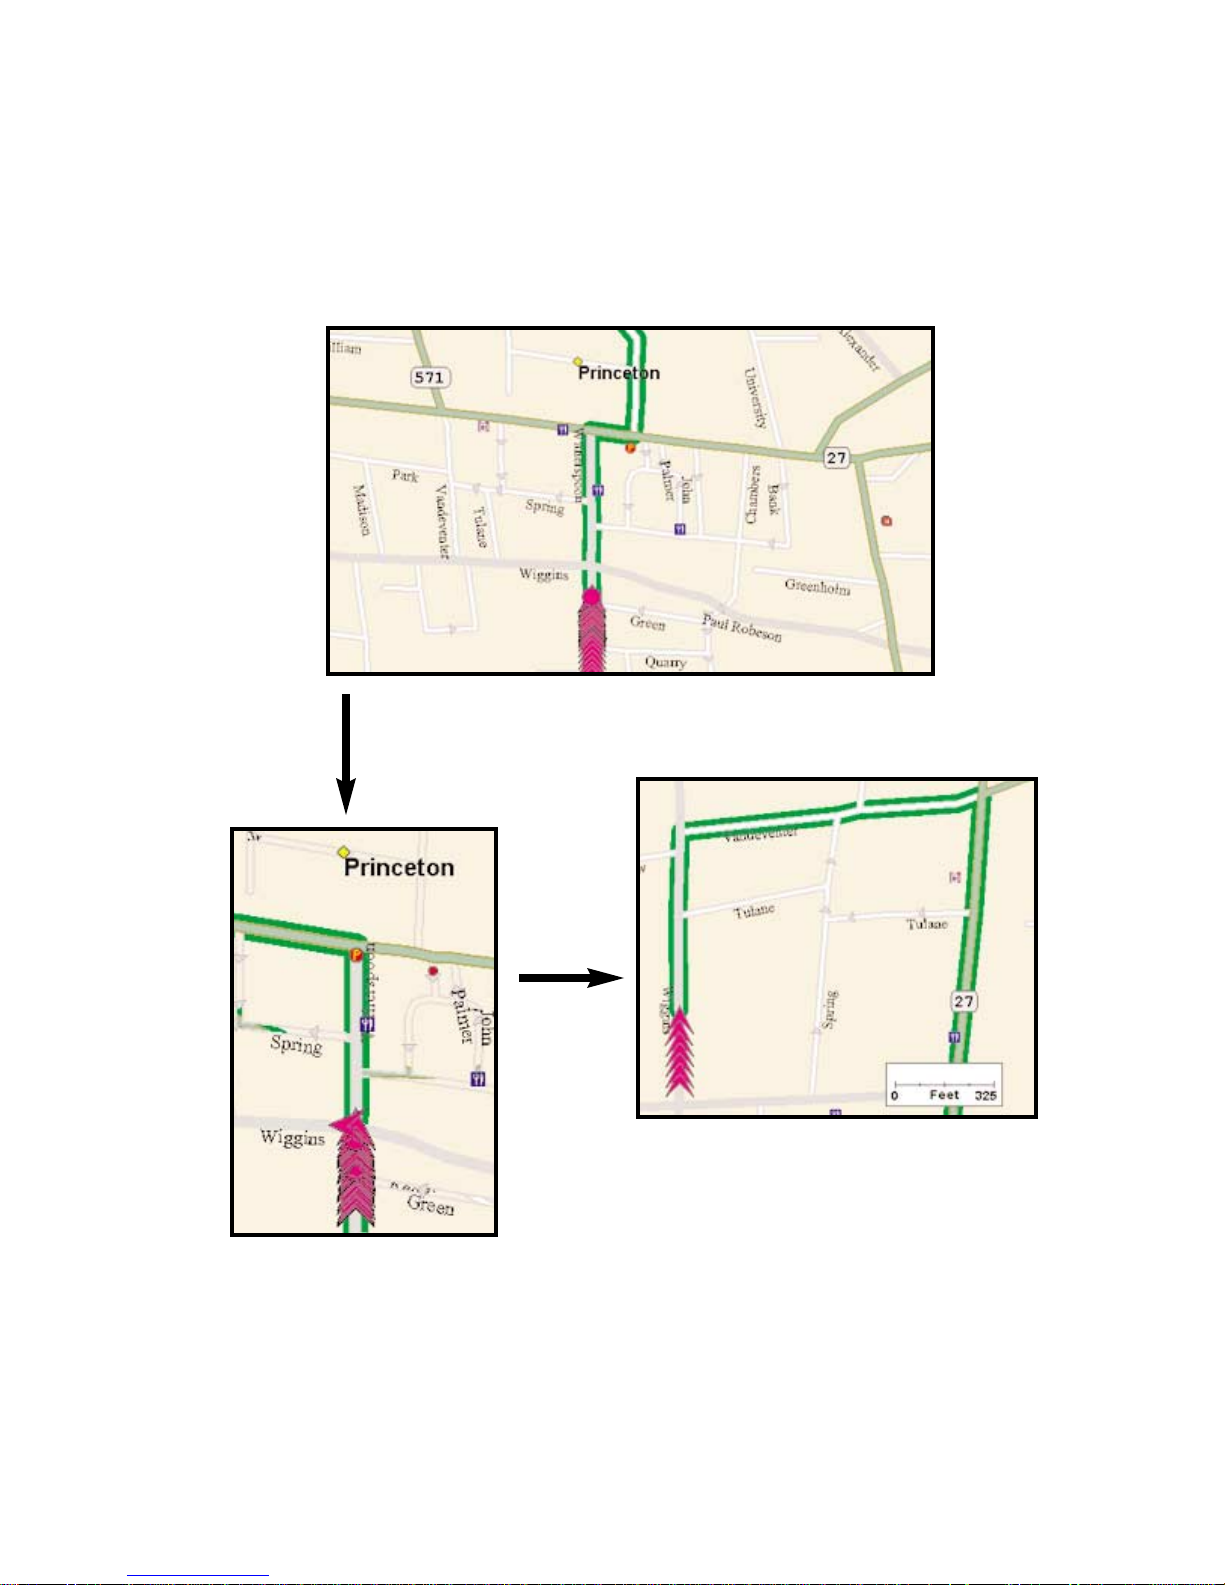
CoPilot leads you into Princeton without a problem. However, as you drive along
Witherspoon Street approaching the center of town, you see a traffic jam caused by an
accident up ahead. You decide to turn onto Wiggins Street in order to save some time.
No Problem! Within seconds, CoPilot tells you that you are no longer on the correct route
and automatically gives you new directions to follow from your new position (illustrated on
the next page). You still get to the concert on time and enjoy a relaxing trip!
Page 32
- 27 -
1. Driving on Witherspoon Street into Princeton, NJ
3. CoPilot creates a new route from your
current position
2. Turning off CoPilots route onto Wiggins Street
Page 33
Planning Mode
After launching CoPilot you can access Planning Mode by clicking the Planning Mode
button from the welcome screen or the Planning button in the Passenger screen. In
Planning Mode you can run trips on your desktop to print and take with you or save for a
later time, search for points of interest, add favorite places, edit street restrictions, add
custom places, and much more. For additional information on Planning Mode see CoPilots
Help files (select Help Contents and Search from the Help menu).
The Trip Planner Window
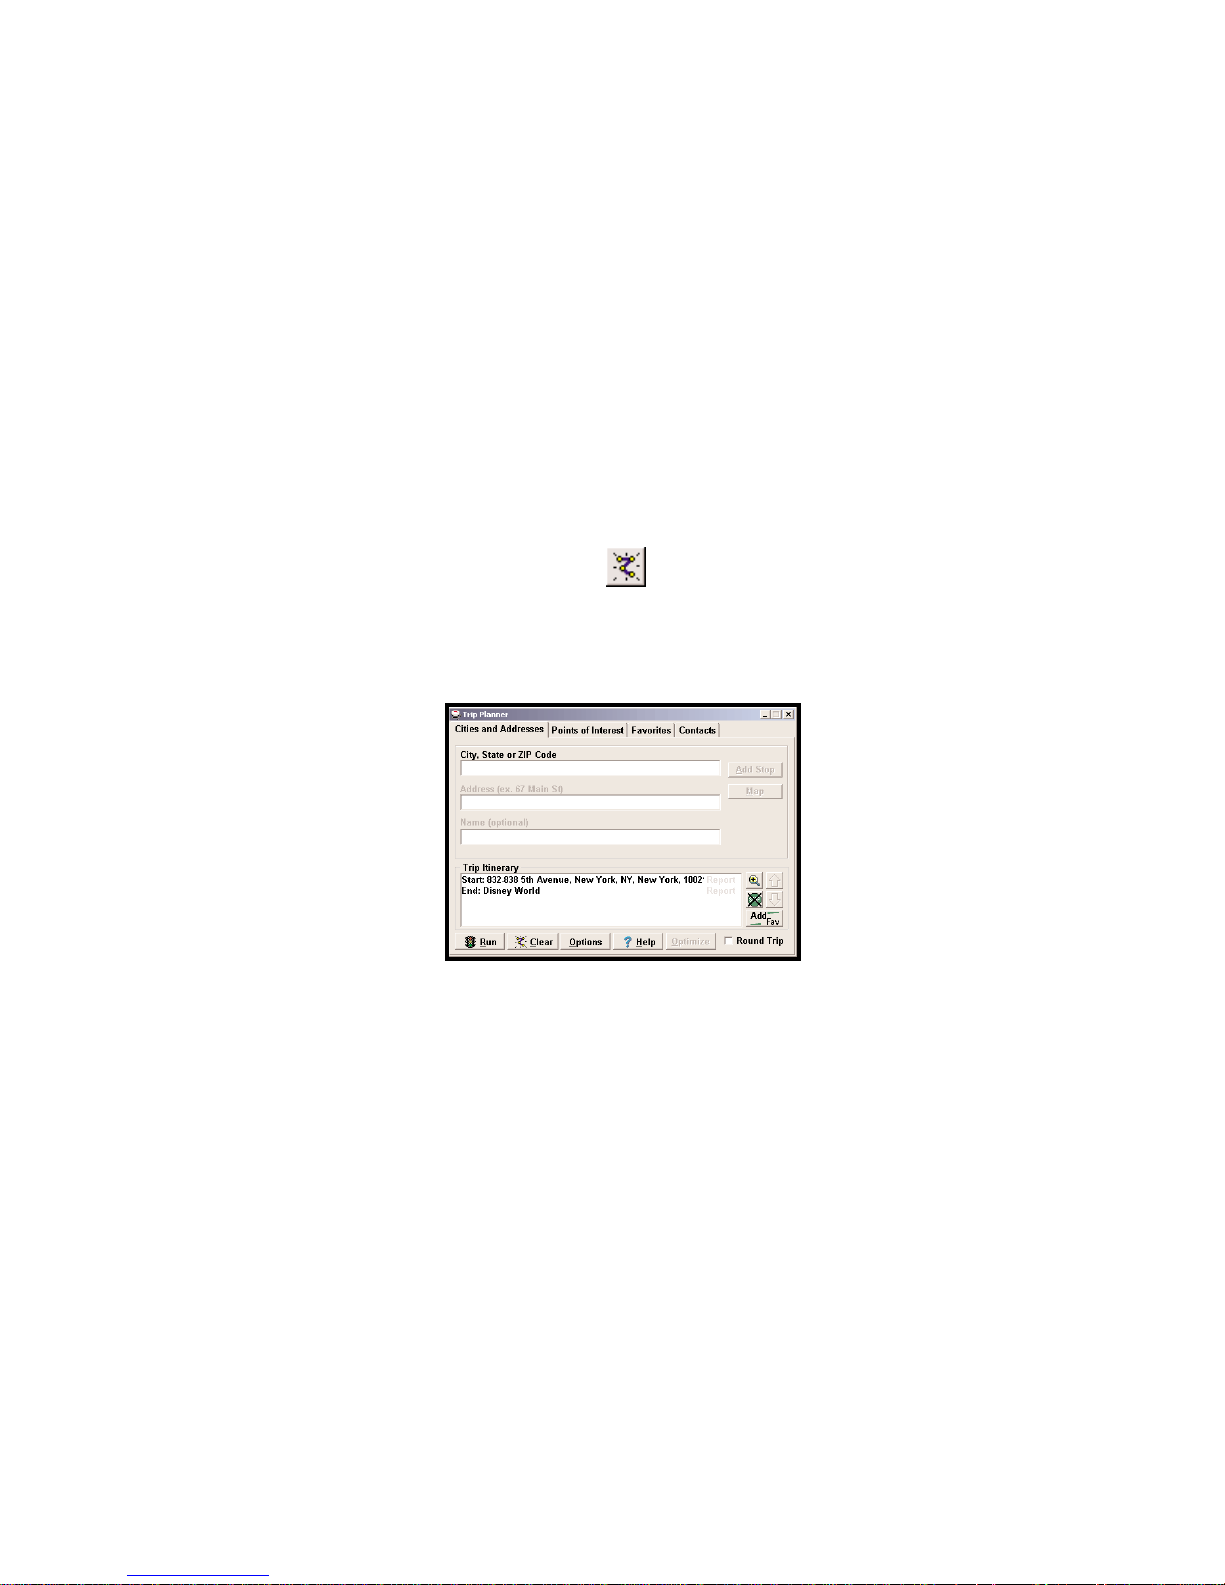
To access the Trip Planner window use either the New Trip button on the tool bar, or select
New Trip from the drop-down Tr ip menu.
Cities and Addresses
To enter a trip, begin by typing the name of the place where your trip will start or type a ZIP
code in the City, State or ZIP Code box, then press the <Enter> key (e.g. princeton, nj).
Do not include periods in the state abbreviation. A list of matches to your entry may appear;
if so, highlight the one you want on the list and click Select.
NOTE: If an exact match is not found, CoPilot will open a window with a list of possible
matches. Highlight the one you want and click Select.
You can enter a street address by clicking in the Address box. (This is not required. If no
street address is entered, CoPilot 2003 will route from a point at the center of the city or
- 28 -
Page 34

town you selected.) Again, a list of matches to your entry may appear; if so, highlight the
one you want on the list and click Select, or click Map to see it on the map. If you enter a
street address you can also assign a name to the address by typing it into the Name box.
Click the Add Stop button to put the place you entered on the Trip Itinerary. Once a place
is listed in the Trip Itinerary, you may highlight it and click the Zoom To button to see that
place on the map.
TIP: Usually you will need to spell out words like "Saint", "Mount", "Fort", etc. Place
names generally need to be spelled out; for example, "John F. Kennedy International Airport"
instead of "JFK Airport". Try alternate spellings if your entry isn't accepted the first time.
HINT: If you need help with the spelling of a city name, type the first few letters (at
least two) plus the state abbreviation and press <Enter>. Then highlight the place on the
list and click Select. Spelling help for street names is accessed by entering the first two
or more letters of the street name. The pick list will take longer to come up when there
are more matches to your entry in the database.
Points of Interest
When you select the Points of Interest tab, it will open with the cursor in the POIs that
start with box. The only field that is required to perform a POI search is the City/State
box; all other fields are optional. Once you have entered your City/State, you can do one or
more of the following to narrow down your search: select a POI Category, select an of Type
option, or enter the first few letters of the Place name. You can also change the distance
within which you want to search.
When you are finished entering in your search information, click the Find button to get a list
of all possible matches within the database. To select one, highlight it by clicking on it and
choose Select to add the place to your itinerary, Cancel to return to the search, Map to show
the places location on a map, or Clear to change your selection. For information on
changing the POI set, see page 17.
Favorites
To save a place as a favorite you must first add it to your Itinerary using the Cities and
Addresses or Points of Interest tab and then click Add Fav. When you click on the
Favorites tab you will see a list of your previously saved favorite places. To add a favorite
- 29 -
Page 35
- 30 -
place to your trip, highlight it and click Add Stop. In this tab, you can also specify a Home
and Work address. To do this, highlight an address on the list of favorites and click the
circle next to Home or Work under the list. Now your home or work address can be
quickly selected as a destination in Guidance Mode (see page 16). Remember that while
you can access your Home and Work address from Guidance Mode, they can only be
changed through the Favorites tab in Planning Mode.
Contacts
You can access your Outlook Contacts database by clicking on the Contacts tab. Narrow
down your contact search by typing in the first few letters of the contacts first or last name
and hit the <Enter> or <Space> key. Select the contact from the list and preview the
Work, Home, or Other address by selecting the corresponding radio button. Click on the
Add Stop button and CoPilot will search for that contacts address. If an exact match is
found, CoPilot will automatically update your itinerary. If an exact match is not found,
CoPilot will display a list of possible address matches to choose from.
Itinerary Buttons
Regardless of the tab you select, the same commands will remain in the bottom of the Trip
Planner window. To the right of the Itinerary you will see five buttons. Using the
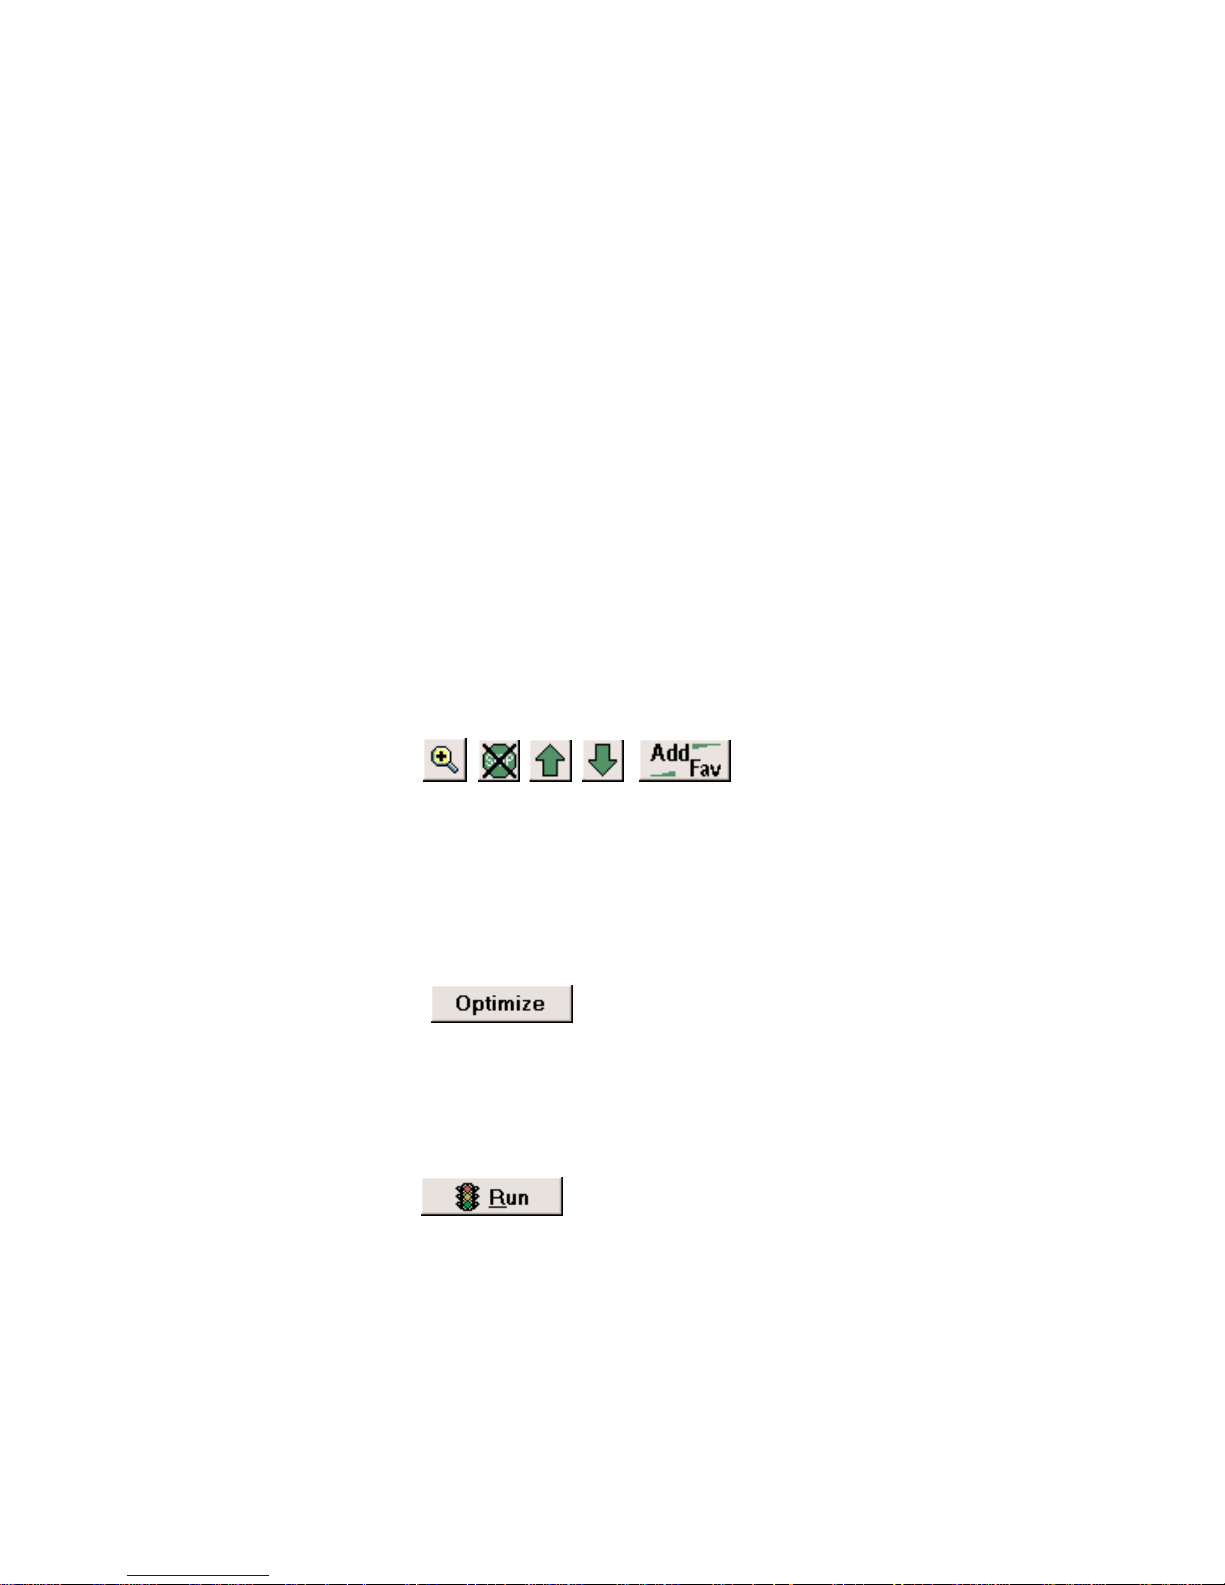
Up/Down arrows you can alter the order of the stops on your Itinerary. Using the Zoom
button you can zoom to the selected stop on a map. The Delete Stop button allows you to
remove stops from your trip. And the Add Fav button lets you add a stop entered on your
Itinerary to your saved list of favorite places (see above).
Stop Optimization
When you are finished adding all your stops to the Trip Itinerary, you can click the
Optimize button and CoPilot will automatically re-order the stops to create the most
efficient route. Otherwise your trip will be routed in the order in which the stops appear on
the Trip Itinerary.
Running the Trip
To see a complete map of your trip, as well as detailed, turn-by-turn driving directions, click
Run. To generate a round trip, click the Round Trip check box before clicking Run. A
Page 36
- 31 -
round trip includes all intermediate stops on the way to your destination, but routes directly
from your destination back to your starting place.
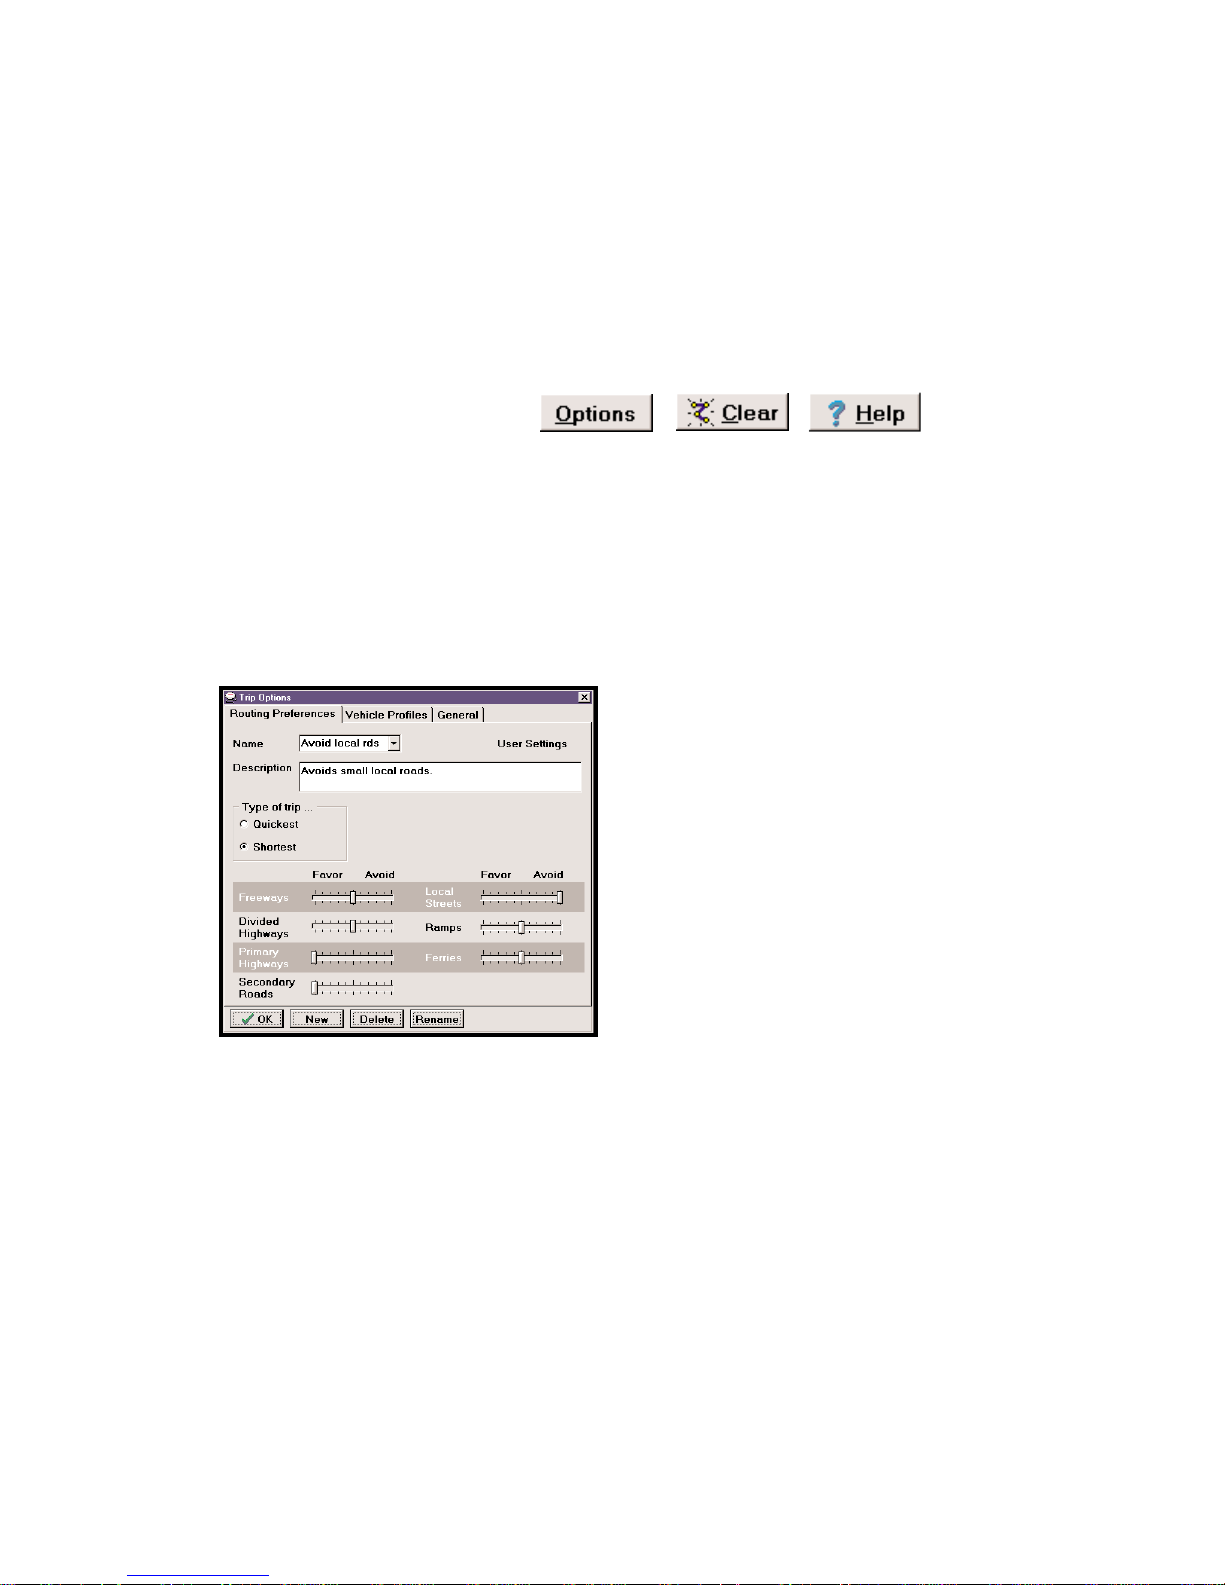
Routing Options, Clear, Help
Click the Options button to change your travel speeds, route type, and road preferences
(see below for more information on the Trip Options dialog box). The Clear button cancels
the trip you have been planning and allows you to start a new one. For more information
about the Trip Planner window and trip planning, click the Help button.
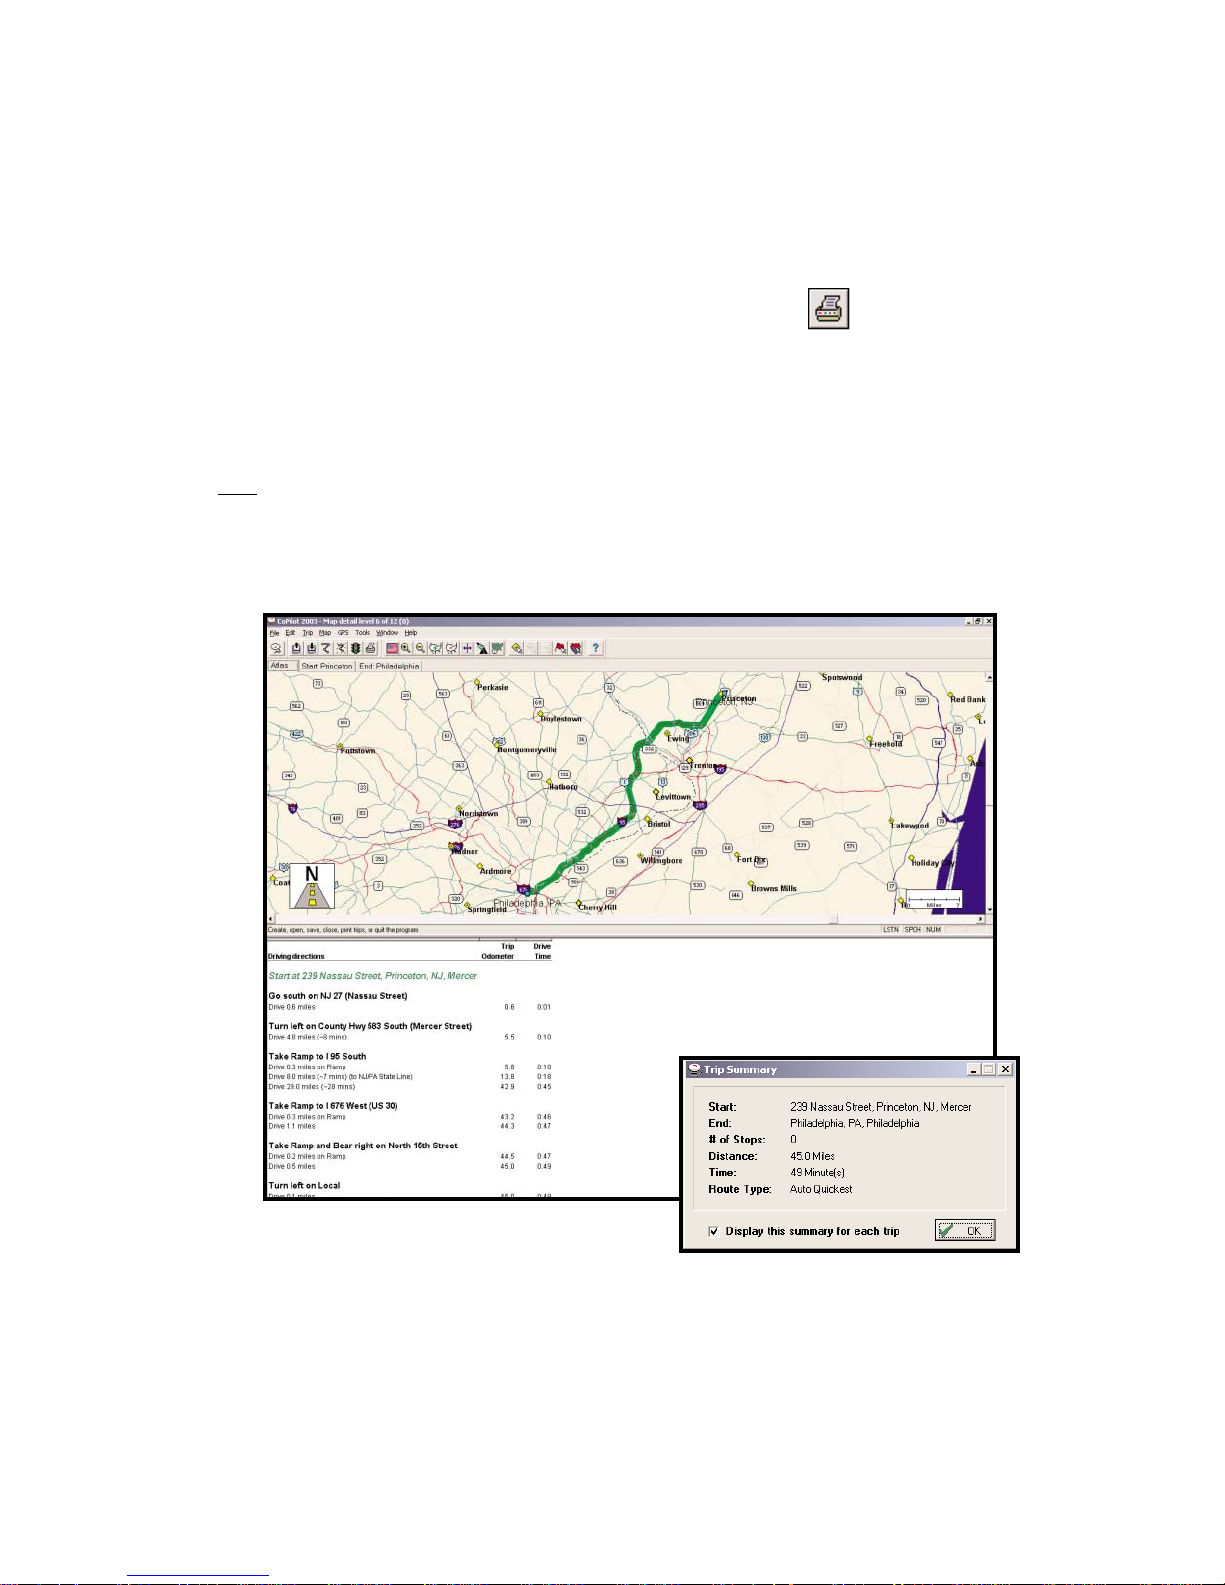
Trip Options
The Trip Options window enables you to
create sets of preferences that impact how
CoPilot calculates routes. There are three
categories that affect different aspects of
CoPilots routing: Routing Preferences,
Vehicle Profile, and General. Each
category has a default set that cannot be
edited. In order to create a new set under
any category, select New, give the new set a
name, edit the settings, and save changes.
Routing Preferences enables you to favor
or avoid specific road types such as small,
local roads, and choose whether to travel
via the Quickest or Shortest route.
Vehicle Profile allows you to set your own road speeds for different types of roads when
you expect to be travelling faster or slower than CoPilots default driving speeds. The road
speeds that you set will affect CoPilots time estimates for your trip.
General options lets you select miles or kilometers for the measure of distance, and how
much to favor or avoid toll roads when calculating a route.
Page 37
- 32 -
Printing Your Map or Driving Directions
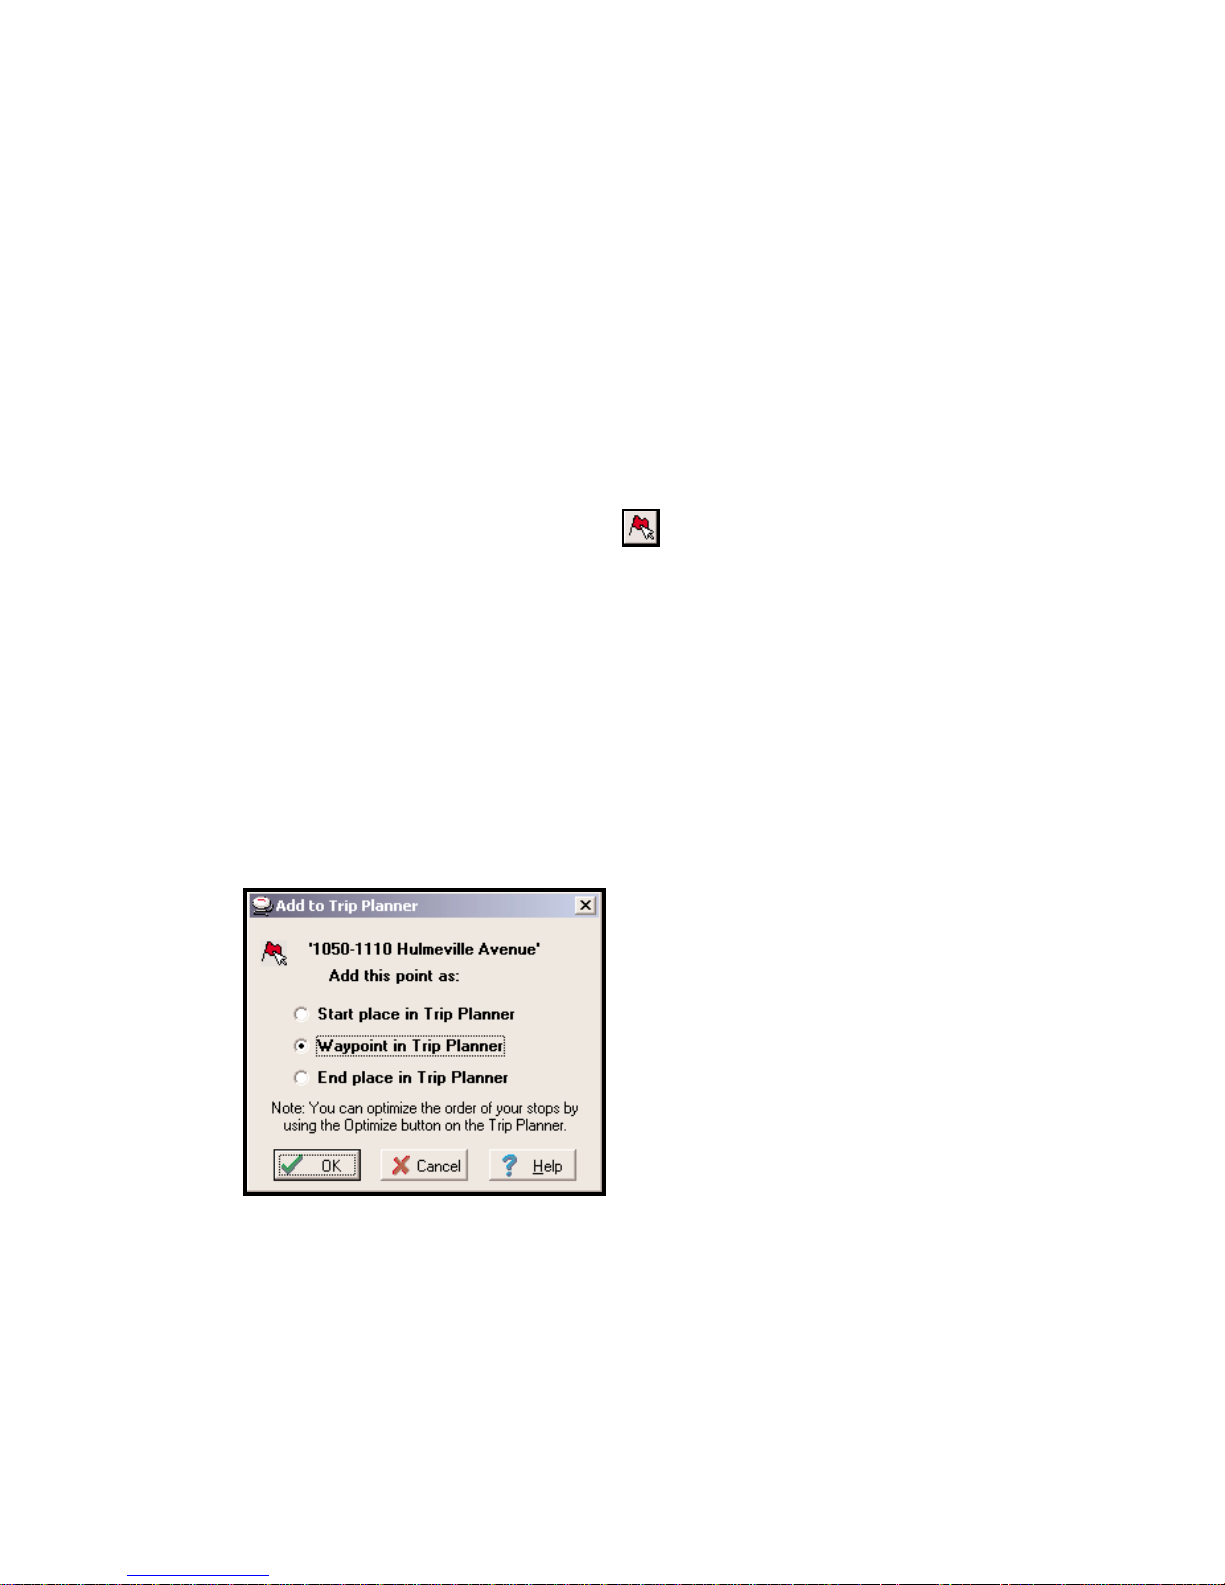
After you Run a trip, the Trip Summary window will pop up over a split screen displaying
the map of your trip, and detailed driving directions. Although the Trip Summary cannot be
printed, both the map and the directions can. Click OK to hide the Summary window. To
alter the size of either the map window or the directions window, drag the gray bar in the
center in the appropriate direction. To activate the window you must click on it. Note that
only
the active window will be printed. To print the active window, click the Print button
on the tool bar or select Print from the File menu. You can also select Print TravPak from
the File menu. This will print a series of maps for your trip and detailed driving directions.
Page 38
- 33 -
Beyond the Basics
If you are familiar with the basic features of CoPilot, you are probably ready to try some of
the advanced features. For more information on these features see the Legend on page 46
of this manual, or see Trip Planning: Beyond the Basics in the Help Files (under Planning
Mode in the Contents tab).
Picking Stops from the Map
To pick a stop from the map with the mouse, first zoom into the area from which you want
to select a location. Then open the Map menu and select Pick Stops from the sub-menu of
Mouse Modes, or click on the Pick Stops button on the tool bar. With Pick Stops turned
on, click with the left mouse button on the location you want to add to your trip (it can be a
city or any location, including a local address or latitude/longitude point).
When you pick a stop, the Add to Trip Planner dialog box will appear. You may add the
location as 1) the start place, 2) a stop, or 3) the end place. (Note that any previouslyentered start or end place will become a waypoint if a new start or end place is chosen.)
Now click on OK to close the dialog box, then select Edit Trip from the tool bar to bring
the Trip Planner window forward. You'll see that the stop you picked now appears as either
the start or end place, or an intermediate
stop on your Trip Itinerary. Click on the
Run button to rerun your trip with the
new stop. You can pick multiple stops
from the map before re-running the trip if
you wish.
Page 39

- 34 -
Adding a New Place (Add Custom Places)
CoPilot gives you the ability to add new places with your own custom names to the map
database. After adding your custom place to the map database, you'll be able to enter it as a
start place, end place, or waypoint for any trip you run.
To add a new place, click on the Add Custom Places button on the tool bar or select Add
Custom Places from the sub-menu of Mouse Modes in the Map menu. The map window
should be open and active, and be at a zoom level of 10 or higher (look at the title bar, e.g.
"Detail Level 10 of 12").
Now click on the spot on the map where you want your new place to be added. An Add
Custom Place dialog box will appear. Type your custom name for the place in the
PlaceName box. The name you enter must be 50 characters or less, including spaces, and
must start with a letter (not a number or symbol). You must also enter the address of the
custom place. It does not need to be exact, it is only used to describe the custom place.
Then using the scroll bar you can specify the type of place for storage in your POI database.
To access this place at a later time either search for it as a Point of Interest, or select
Manage Custom Places... from the Tools menu.
Adding and Removing Street Restrictions (Edit Streets)
You can alter a road segment on the map and in the database by changing a two-way street
to one-way and vice versa, and by marking a segment to be avoided. Any change you make
will potentially affect how your trips are routed until you reverse the change by re-editing.
To make these changes, you must have the map window active and be at a zoom level of 10
or higher (the title bar of the map window shows the current zoom level, e.g. "Detail Level
7 of 12"). Click on the Edit Streets button on the tool bar. Now point to a road segment
with the cursor and press the right mouse button. A menu of choices will be shown; select
an item from the menu to implement your choice.
You can also mark a two-way segment as one-way or blocked without using the menu. Click
on the Edit Streets button, point to the segment with your cursor, then click on the left
mouse button. The first click marks the street as one-way, the second click reverses the
one-way direction, the third click marks the street to be avoided with an X, and the fourth
click returns the street segment to its original two-way status. NOTE: Adding or removing
street restrictions only works for local roads. Editing highways will not affect how CoPilot
calculates your routes.
Page 40
- 35 -
Customizing Your Driving Directions
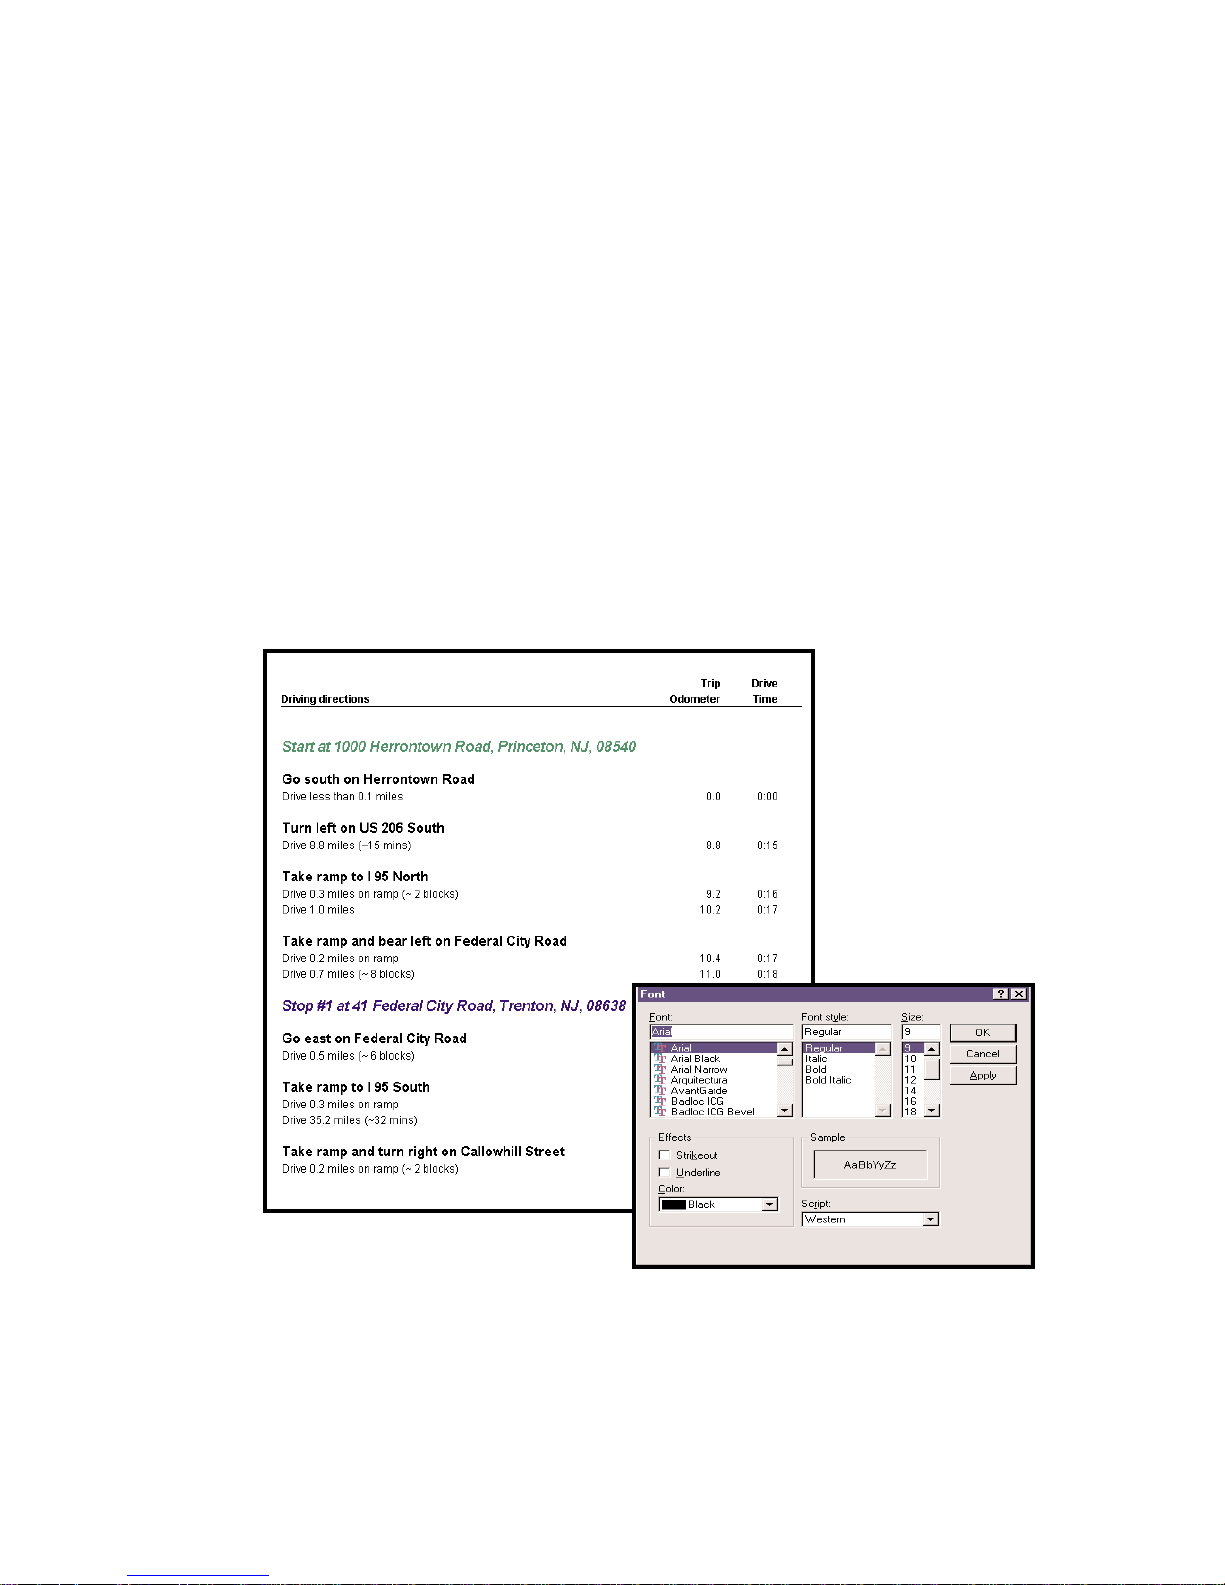
CoPilot gives you precise, turn-by-turn driving directions, plus time and distance
calculations for every trip you run between a start place and a destination. Print these
directions, and/or customize them by editing the font CoPilot uses and by controlling the
number of nearby places -- that is, landmarks or places of interest in the area surrounding
your route -- that appear in the report.
To change the appearance of your driving directions, choose Change Fonts from the submenu of Itinerary Fonts in the Edit menu. This opens a standard Windows dialog box that
allows you to change the size and style of the font in the driving directions as you would in
any Microsoft Word document.
Page 41
- 36 -
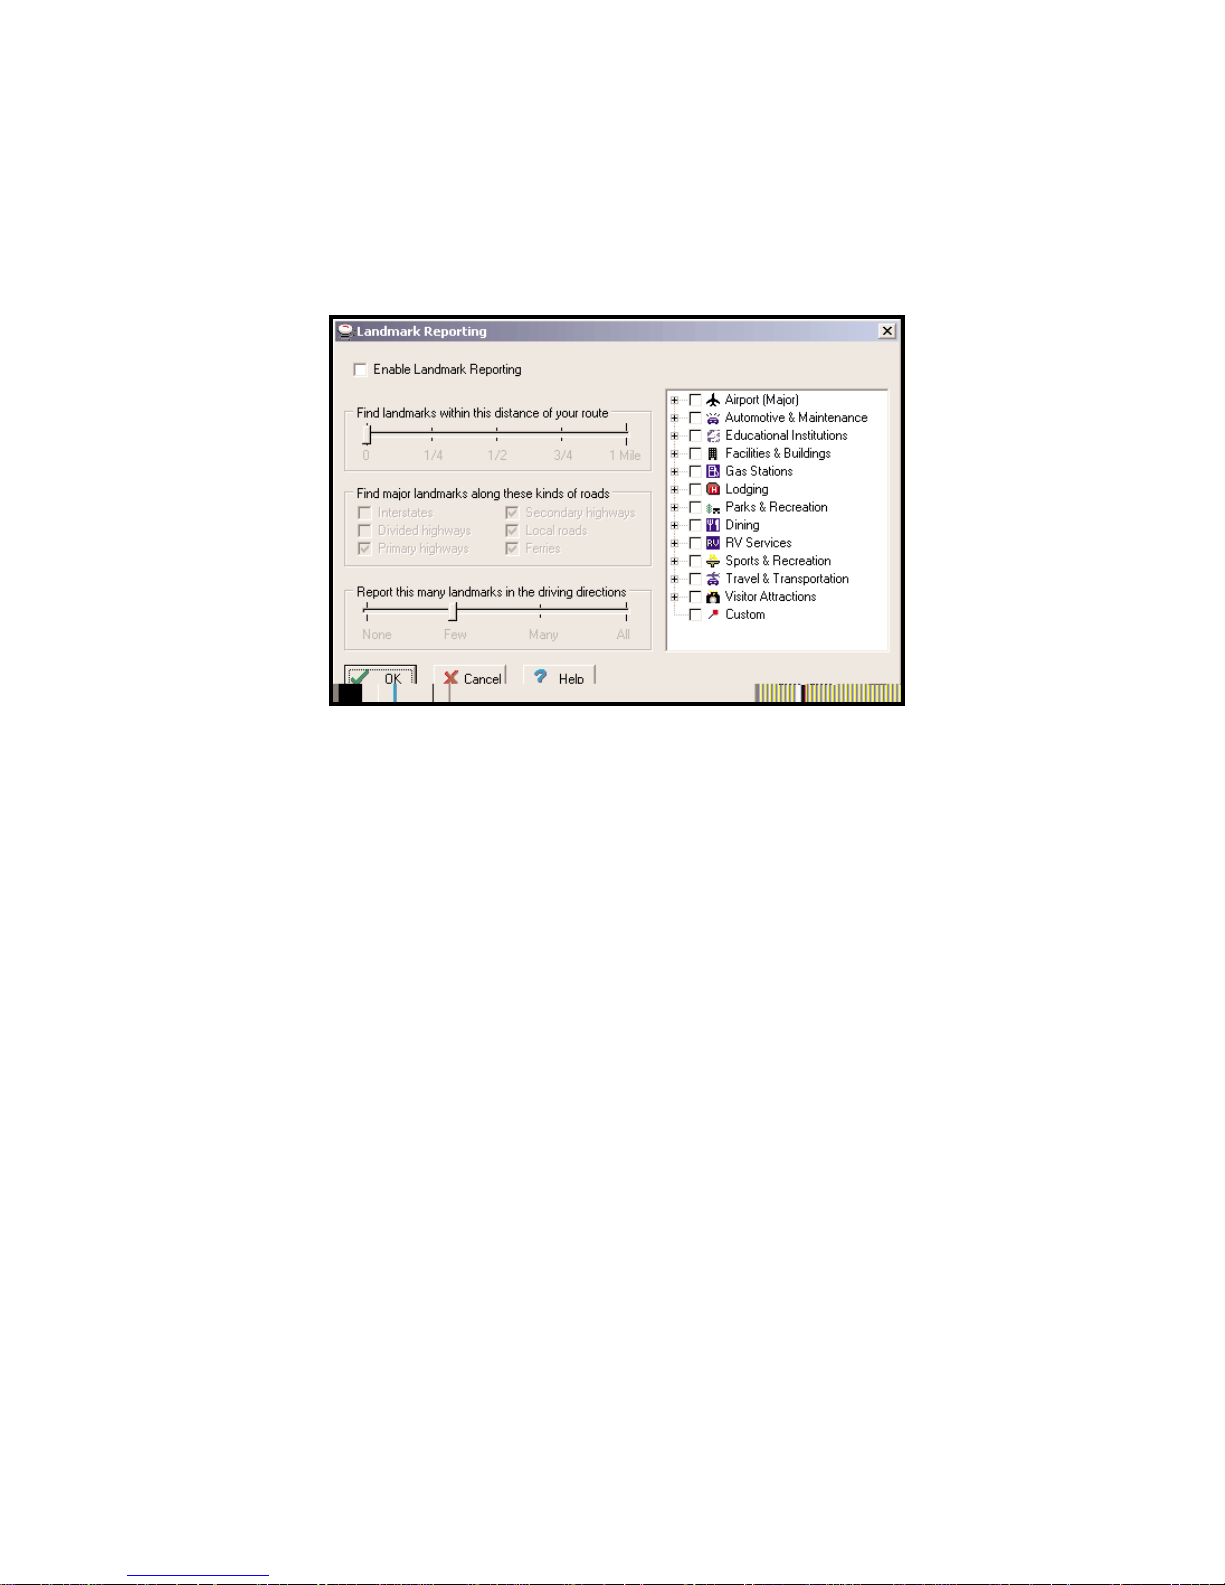
To control the number and type of landmarks reported, select Landmark Reporting from
the Trip menu to open the Landmark Reporting dialog box.
NOTE: You can use these options in Planning Mode, but not in Guidance Mode.
Use the slide bar under Find landmarks within this distance of your route to control the
size of the area around your route in which landmarks should be reported. If you simply
want to exclude all landmarks from your driving directions to avoid clutter, move the slide
to 0 and click OK to close the dialog box. You can also have landmarks reported only along
certain types of roads. Under Find landmarks when driving on these kinds of roads, use
the check boxes to include or exclude the listed road types.
To increase or decrease the number of landmarks reported, use the slide bar under Report
this quantity of landmarks in the driving directions.
TIP: The more places you want reported, the more time it will take to generate the driving
directions and map for your trip.
You can also select which categories of landmarks you want reported. Place a checkmark
next to each category to be included by clicking in the box next to the category name.
Page 42
- 37 -
Importing Address Data
CoPilot gives you two options for importing address data from outside sources: the Import
Custom Places and Import POI Set Wizards. Both options are available in Planning Mode
via the Tools menu. Using either option results in addresses that are displayed as pushpins
on the map and can be searched for using the Points of Interest address entry tab in the Trip
Planner window.
Custom Places vs. POIs
Custom Places refers to a limited set of addresses (less than 1000) that you can add to
CoPilot by using the Import Custom Places Wizard or the Add Custom Places mouse
mode (see page 34). You can edit custom places at any time through the Manage Custom
Places Wizard found in the Tools menu in Planning Mode. The custom place name,
address, and POI category assignment can all be edited.
POI Set refers to a set of addresses stored as a separate POI data set. You can have only
one POI set at a time, but there is no limit to the number of addresses in that set. You
cannot edit the addresses in the POI set once they have been imported.
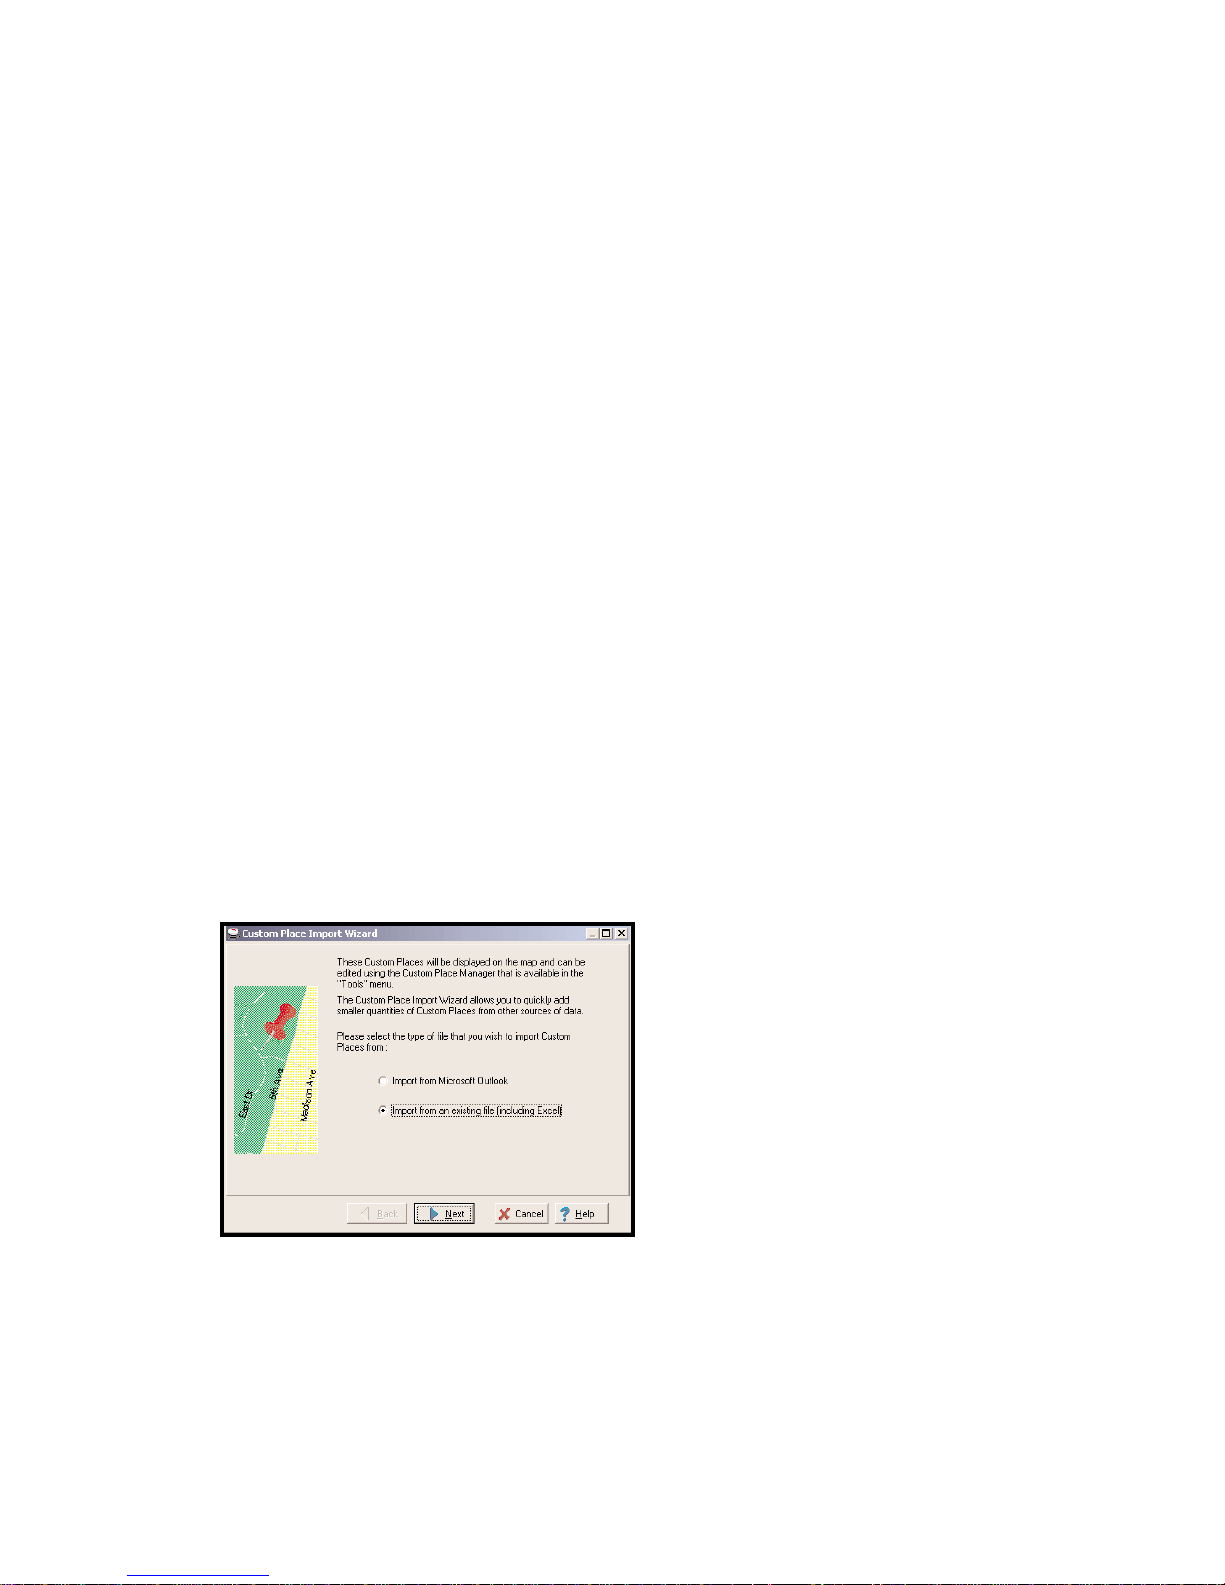
Import Custom Places
The Import Custom Places Wizard
enables you to import addresses from
your Outlook Contacts database, an
Excel file, or text file. If you are using
another type of database or contact
manager, you can export your
contacts/locations as an Excel or text
file before importing them into CoPilot.
By default, addresses entered as POI
Custom Places are assigned to the
Custom POI category, but you can
change this assignment at any time.
Page 43
- 38 -
Import POI Set
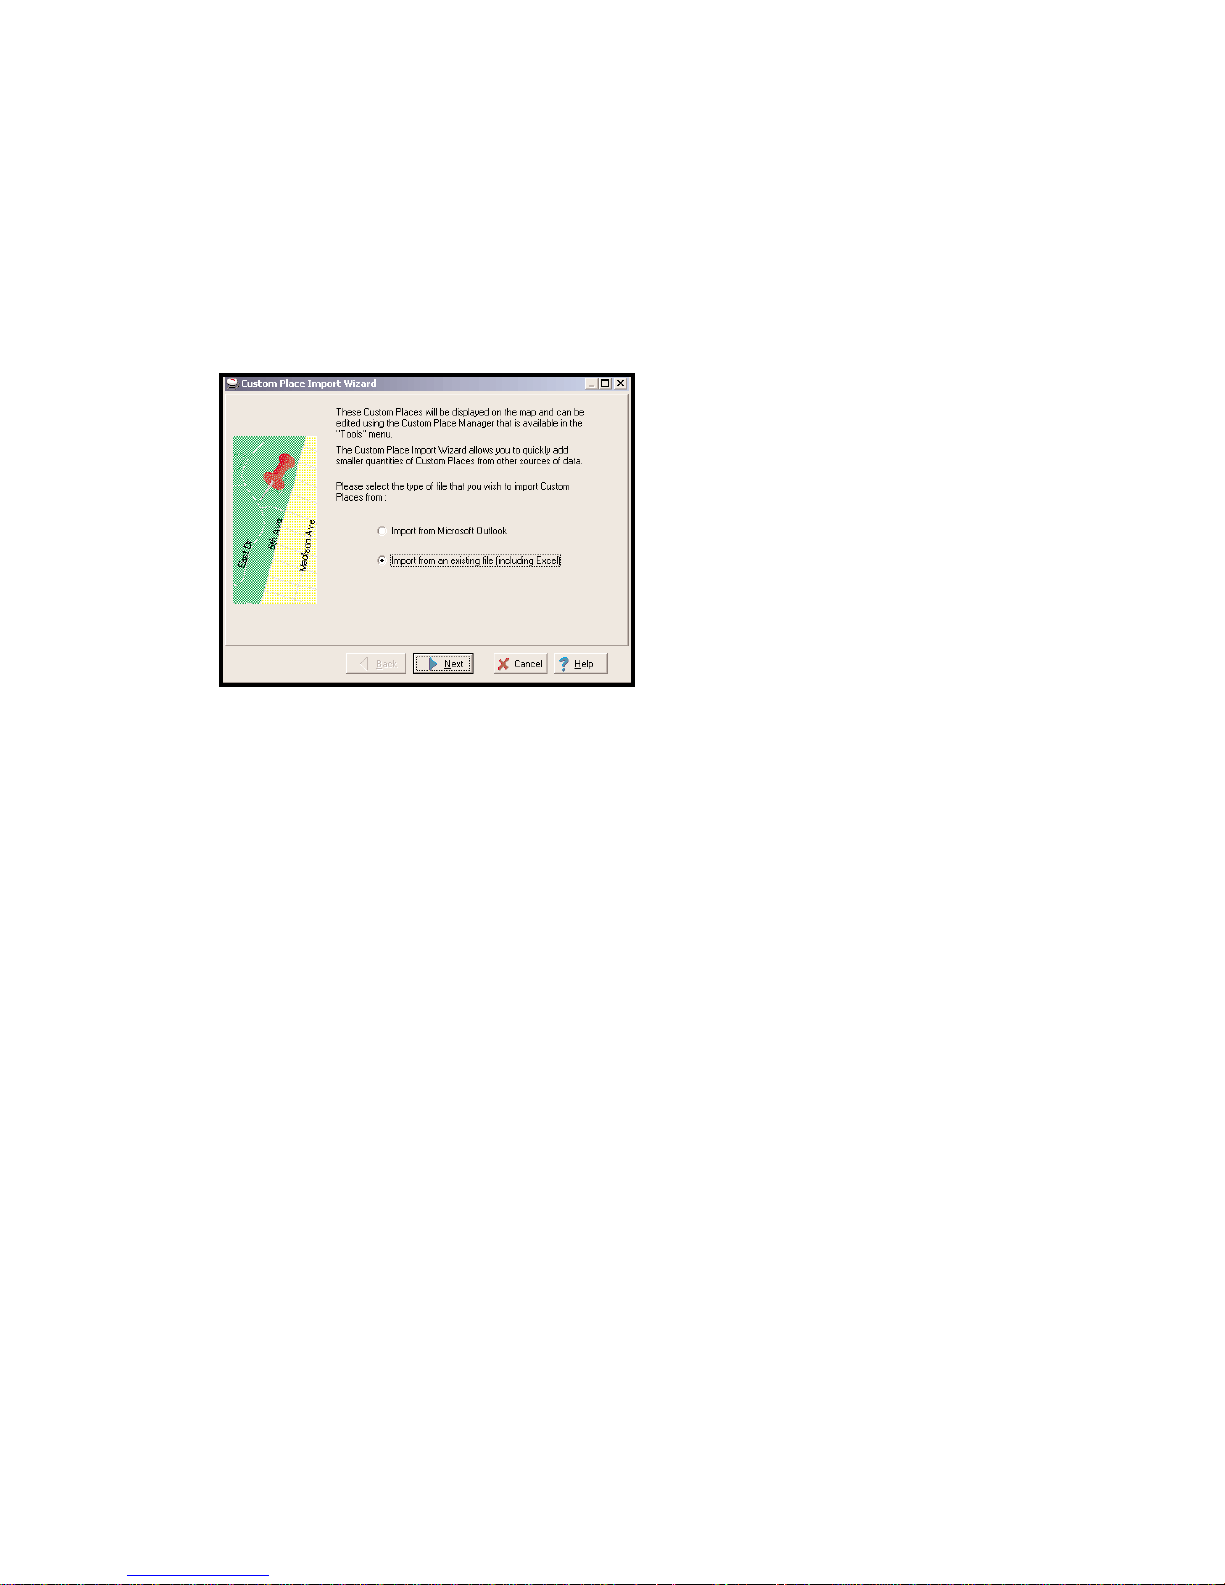
The Import POI Set Wizard allows
you to import a set of addresses from an
Excel or text file. As with the Import
Custom Places Wizard, you can export
data from other sources into Excel or
text format before importing into
CoPilot.
You can only have one active POI set
imported at a time. If you import a POI
set a second time it will completely
overwrite and replace your existing
imported POI set.
NOTE: Importing a POI set in no way affects the CoPilot POI database or the addresses
youve added as Custom Places.
Addresses in an imported POI set are automatically assigned to the Custom POI category.
This assignment cannot be changed.
Page 44

- 39 -
Helpful Hints
ENTERING LOCATION NAMES THAT INCLUDE ABBREVIATIONS: Usually you
will need to spell out words like Saint, Mount, Fort, etc. Place names generally need
to be spelled out; for example. John F. Kennedy International Airport instead of JFK
Airport. Try alternate spellings if your entry isnt accepted the first time, or pick your
place from the list under Your search found.
ENTERING INTERSECTIONS AS ADDRESSES: To enter an intersection of two streets
as a start or end place, or a stop, type the names of the streets separated by a space and
ampersand; e.g. Washington & Nassau or washington rd & nassau st.
ENTERING ROUND TRIPS: To run a round trip automatically, click on the Round Trip
check box in the lower right hand corner of the Trip Planner window before running your
route. To turn off the round trip option, click on the box again. The round trip will include
all intermediate stops on the way to your destination, but go directly from your destination
back to the start place.
ROUTING THROUGH SELECTED PLACES: CoPilot gives you the option to route
through locations that dont show up as stops on your driving directions. We call these via
stops. To the right of each stop on the Trip Itinerary youll notice the word Report. To
change a reported stop to a via stop, highlight it and press the <space bar> on your
keyboard. To change it back to a reported stop, press the <space bar> again.
MAKING A LIST OF FAVORITE PLACES: CoPilot lets you create a favorite places
list of up to 25 places, with or without street addresses, for faster trip entry. To add a place
to the list, first enter it in your Trip Itinerary, highlight it, and click Add Fav. The next time
you want to enter this place as a stop on your trip click on the Favorites tab and doubleclick the place name. When the number of places on the list reaches 25, each new place
will eliminate a place from the bottom of the list.
ADDING CUSTOM PLACES: CoPilot gives you the ability to add your own custom
names to the map database. A custom place name can be entered as a start place, end place,
or intermediate stop (see page 34).
IMPORTING A LARGE POI SET: If you have a large database of addresses, you can use
CoPilots POI Import Wizard for batch importing (see pages 37-38).
Page 45

- 40 -
Trouble-shooting
First things to check: Are all cables properly secured? Do all components have adequate
power? Does your GPS receiver have a clear view of the sky? (Buildings, mountains and
heavy foliage may block your satellite reception.)
Why can't I get a satellite fix the first time I use CoPilot?
The first time the GPS receiver is used it can take approximately 15 minutes to acquire a
signal. This should not be the case with subsequent uses.
Why does it take so long to find the satellites
?
When the GPS unit is first initialized it can take several minutes for the receiver to locate
the satellites in orbit. Be sure that the GPS receiver has an unobstructed view of the sky.
What do I do if the computer will not recognize my voice commands?
First make sure the necessary speech software is installed. From the Windows Start menu,
go to Settings/Control Panel, then Add/Remove Programs, and check for Watson on the
list in the Install/Uninstall tab. If it is not there, you will need to uninstall/reinstall CoPilot,
being sure to click OK when prompted to install the speech software. Next, in Planning
Mode go to the Edit menu. Select Preferences and then select Speech. Make sure the
boxes next to Listen for voice commands and Speak feedback out loud are both checked.
I have two hard drives and would like to install the Data to my second hard drive.
How do I do this?
Note: For the instructions below, C represents your first hard drive and D represents your
second hard drive.
Once CoPilot has been installed on the first hard drive (C) follow these simple instructions:
1. Insert the Data Disk into the CD-ROM drive.
2. Double-click on My Computer
3. Double-click on your CD-ROM drive.
4. Double-click on the Install folder.
Page 46

- 41 -
5. Double-click on the SETUP.exe file and an "Installation Wizard" window will appear and
guide you through the process.
6. In the "Choose a Data CD Location" window click on BROWSE.
7. Delete the default drive letter and replace it with the letter of your 2nd hard drive (D in
this example) that you want to install the Data Disk to and click on OK.
8. Click Yes to create the directory if prompted.
When I try to run CoPilot I get a message that says CoPilot 2003 Can't Find the
Data Disk, and the program won't start. What can I do?
1
. Is the Data Disk in the CD-ROM drive?
A. If yes, see question 2 below.
B. If no, place the Data Disk in your CD-ROM drive and try using CoPilot again. If you
are still having trouble once the Data Disk is in your CD-ROM drive, see question 2
below.
2. Is the underside (the side without artwork) of the Data Disk clean?
A. If yes, see question 3 below.
B. If no (you see lint or finger prints), you can clean the CD by using a soft, clean piece
of lint free material slightly moistened with water. Place the Data Disk in the CD-ROM
drive once it is dry and try using your TravRoute program again.
If you're still having trouble, see question 3 below.
3. Is CoPilot looking at the right drive when trying to read the Data Disk? To check,
please follow the instructions listed below:
A. First, we need to determine the drive letter of your CD-ROM drive. (If you already
know your drive letter, move to step B on the next page.)
To do this:
1. Go to your Start button/Programs/Windows Explorer. In the upper left hand
corner of your screen, you'll see a white box (it may have a drive displayed in it)
with a black arrow just to the right of the white box.
Page 47

- 42 -
2. Click once on the black arrow so that all of your drives are shown. Your CD-
ROM drive is the one that has the CD-ROM icon next to it. And next to the
CD-ROM icon, there should be a letter - this is your CD-ROM drive letter.
Please remember it and move to section B.
B. Next, you need to check that CoPilot is looking to this drive to locate the Data Disk.
To do this:
1. Go to your Start button/Programs/Windows Explorer and click on the drive
letter which corresponds to your hard drive (usually C).
2. Within drive C, find the folder Program Files and double-click on it so that
all of your program folders are listed.
3. Find the "TravRoute" folder and double-click on it.
4. Find the folder "CP2003" and double-click on it.
5. Find the folder APP and double-click on it
6. You'll see a file named "data.cfg" listed among other folders. Double-click on the
data.cfg file--Windows will open a new window and prompt you to select a
program to open the file with. Scroll down the list of programs and select
Notepad.
7. The second line of the file should read: "LRGridDir"="E:\Data". Make sure the
letter between "=" and ":" is your CD-ROM drive letter. If the drive letter is
incorrect, change it to the correct letter. Go to file and click on SAVE AS, and
then click Save, and then click on Yes to save over existing file.
8. Close Windows Explorer and run CoPilot normally.
CoPilot keeps saying "No GPS signal. Please check the power connections".
What should I do?
This indicates that CoPilot is not getting GPS data from the antenna/receiver either because
the GPS unit is not getting power, or because the GPS data is not getting from the antenna/
receiver into your laptop.
1. Is the GPS unit getting power?
A. If you are powering the GPS unit through your car's cigarette lighter, you car needs
to be turned on and the adapter needs to fit snugly into the cigarette lighter.
Page 48

- 43 -
B. If you are powering the GPS unit through your laptop's PS/2 port, make sure the
connection is snug and that your laptop's battery has enough power. If you've checked
the power supply, and it is sufficient, see question 2.
2. Is the GPS unit plugged into the serial or USB port?
A. The serial port is a 9-pin port usually on the back of your laptop. One end of the
GPS unit cord should have a 9-pin head that should plug easily into your serial port. If
you've checked the port connection, see question 3.
3. Are the port settings correct for the Com port?
Note: CoPilot uses Com 1 as the default Com port. Some computers may have more
than one Com port. You will need to test each Com port starting with Com 1.
A. Click on the Start button, Settings, Control Panel.
B. Double-click on the System icon.
C. Click on the Device Manager tab.
D. Click on the "+" sign next to Ports.
E. Click on Com 1 so it's highlighted and click on the Properties button below.
F. Under the General tab in Device Manager make sure it says this device is working
properly under Device Status. Next, under Device Usage make sure there is no check
mark in the box Disable in this hardware profile.
G. Click on the Port Settings tab. The settings should read as follows
-- Bits Per Second = 4800
-- Data Bits = 8
-- Parity = None
-- Stop Bits = 1
-- Flow Control = Hardware
If the settings are different you need to make the necessary changes, then click
OK and restart your computer.
4. Are you using the correct Com port for the GPS unit?
To check which Com port to use with the GPS unit follow the directions below:
A. Go to your Start button/Programs/Accessories/Communications/Hyperterminal
B. Double-click on the file Hyperterm.exe to open the program.
C. Enter a name (any name) and click OK.
Page 49

- 44 -
D. Next at the bottom where it says Connect using select direct to Com 1 and click OK.
E. Next in the Com Port Properties window the settings should read:
-- Bits Per Second = 4800
-- Data Bits = 8
-- Parity = None
-- Stop Bits = 1
-- Flow Control = Hardware
If the settings are different you need to make the necessary changes and then click
OK. If the GPS unit has power and is able to connect, you will see information flowing
across the screen (random letter and numbers). If you do not see any information
flowing across the screen, go back to step E above and repeat those same steps, trying
other Com ports (2,3,4) until you find the correct one.
F. Once you have found the right Com port (1,2,3, etc.), please do the following:
1. Open CoPilot.
2. Go to the GPS menu and click on the Status tab.
3. Make sure that the Com port number is the same one you found above (1,2,3, etc.)
in the Hyperterminal. If it is different use the drop down menu to change the Com
port and click the Close button. Next exit the program to accept the changes. You
should now be able to use CoPilot normally.
4. If you have a Palm Pilot, you need to close Hot Sync. Note: Hot Sync manager may
be in your Start up folder causing the Hot Sync manager to enable each time you
start your computer. If you do not wish to manually disable the Hot Sync manager
each time you will need to delete it from the Start menu:
a. To disable the Hot Sync manager click on My Computer.
b. Click on your C: Drive or the drive Windows is installed to.
c. Click on the Windows folder.
d. Click on the Start Menu folder. (If no folders appear click on Show Files.)
e. Click on the Programs folder.
f. Click on the StartUp folder.
g. Now highlight the Hot Sync icon and delete it from the StartUp folder.
Page 50

- 45 -
Can I use a different GPS unit with the CoPilot? If not, why?
There are three main reasons why our software is designed to work with our hardware only:
1. Product quality. Because our software and hardware are developed as a complete
navigation solution, the two components can be tightly integrated to give our customers the
best overall user experience.
There are a lot of GPS manufacturers out there and not everyone adheres to the same
standard of high quality. For one version of our laptop product we did indeed sell the
software so that it was compatible with the industry standard GPS receiver, but found that a
number of users had negative experiences with incompatible or low-quality "industry
standard" receivers.
We couldn't guarantee a positive experience for our customers and the slight increase in
sales did not seem to balance the dissatisfaction of our loyalcustomer base.
2. Product reliability and safety. If we can't predict the exact hardware configuration our
customers are using, we can't predict the performance of our product. This poses a serious
safety issue since our customers are typically driving cars or large RVs while using our
product. If a laptop starts throwing errors and distracting our customers while they're
driving 65 mph, it can lead to dangerous scenarios for our customers that we just aren't
willing to risk.
3. Copyright protection. TravRoute's software is what truly separates it from the rest of the
pack. We strive to protect our intellectual property just as any other software developer
does; this is especially important given the ease with which software can be replicated
today.
Page 51
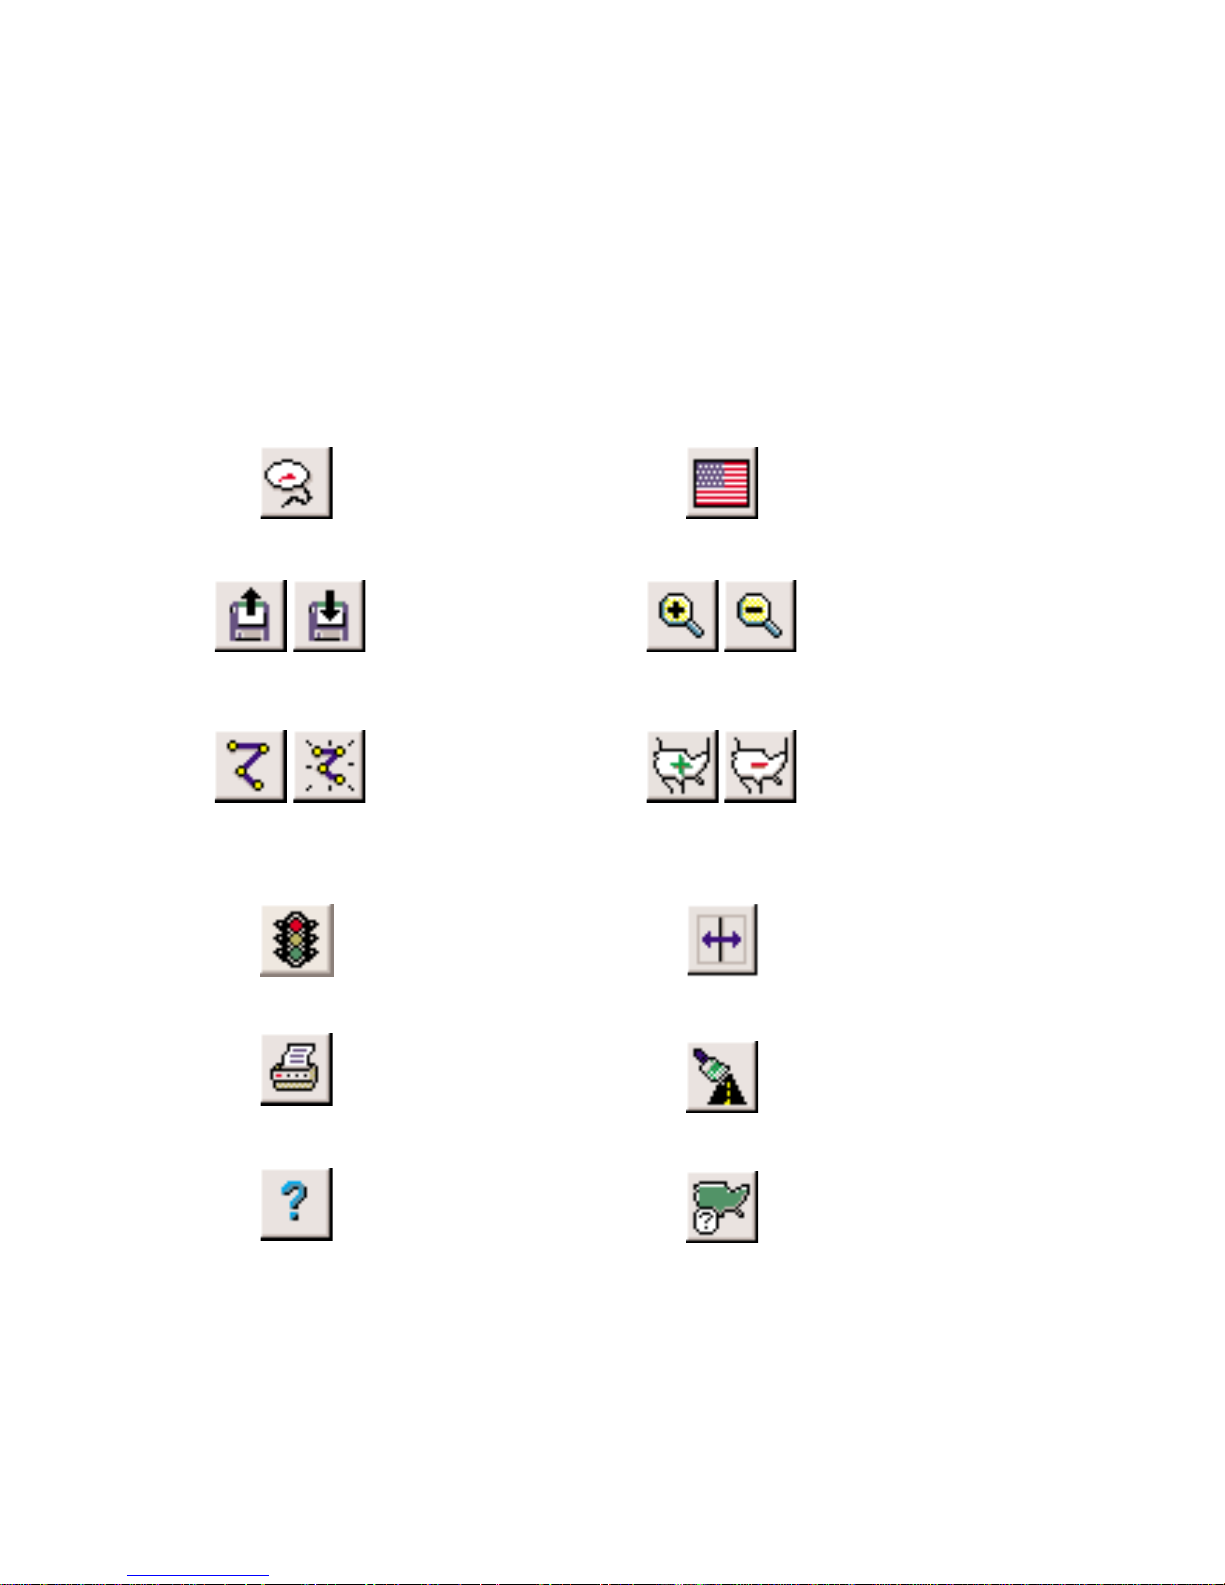
Legend
Planning Mode Tool Bar Buttons:
- 46 -
CoPilot: Takes you from
Planning Mode to Guidance
Mode.
Open/Save Trip: Allows
you to save a trip you have
outlined in Planning Mode,
or access a previously saved
trip.
Edit/New Trip: Prompts
the Trip Planner window
where you can enter
addresses, search for points
of interest, and recall
favorites.
Run: After finalizing your
Itinerary the Run button will
calculate your trip and give
you detailed instructions.
Print: Prints the active
screen in Planning Mode.
You can also use the Print
command in the File menu.
Help: In any window, the
Help button will direct you
to the Help topic that
describes how to use that
window.
U.S.: Zooms to a map of the
entire United States.
Zoom In/Out: Allows you
to zoom in or out for various
views of your map.
More/Less Detail: Allows
you to view the map with
more or less detail. The
more detail, the longer the
map will take to load.
Toggle Trip Views: Cycles
the window display from a
split screen (Trip Map and
Itinerary) to map only to
itinerary only (available only
after a trip has been run).
Refresh Map: Immediately
redraws the current map for
you.
Map Features: Prompts a
dialog box where you can
activate or deactivate certain
features on your map.
Page 52
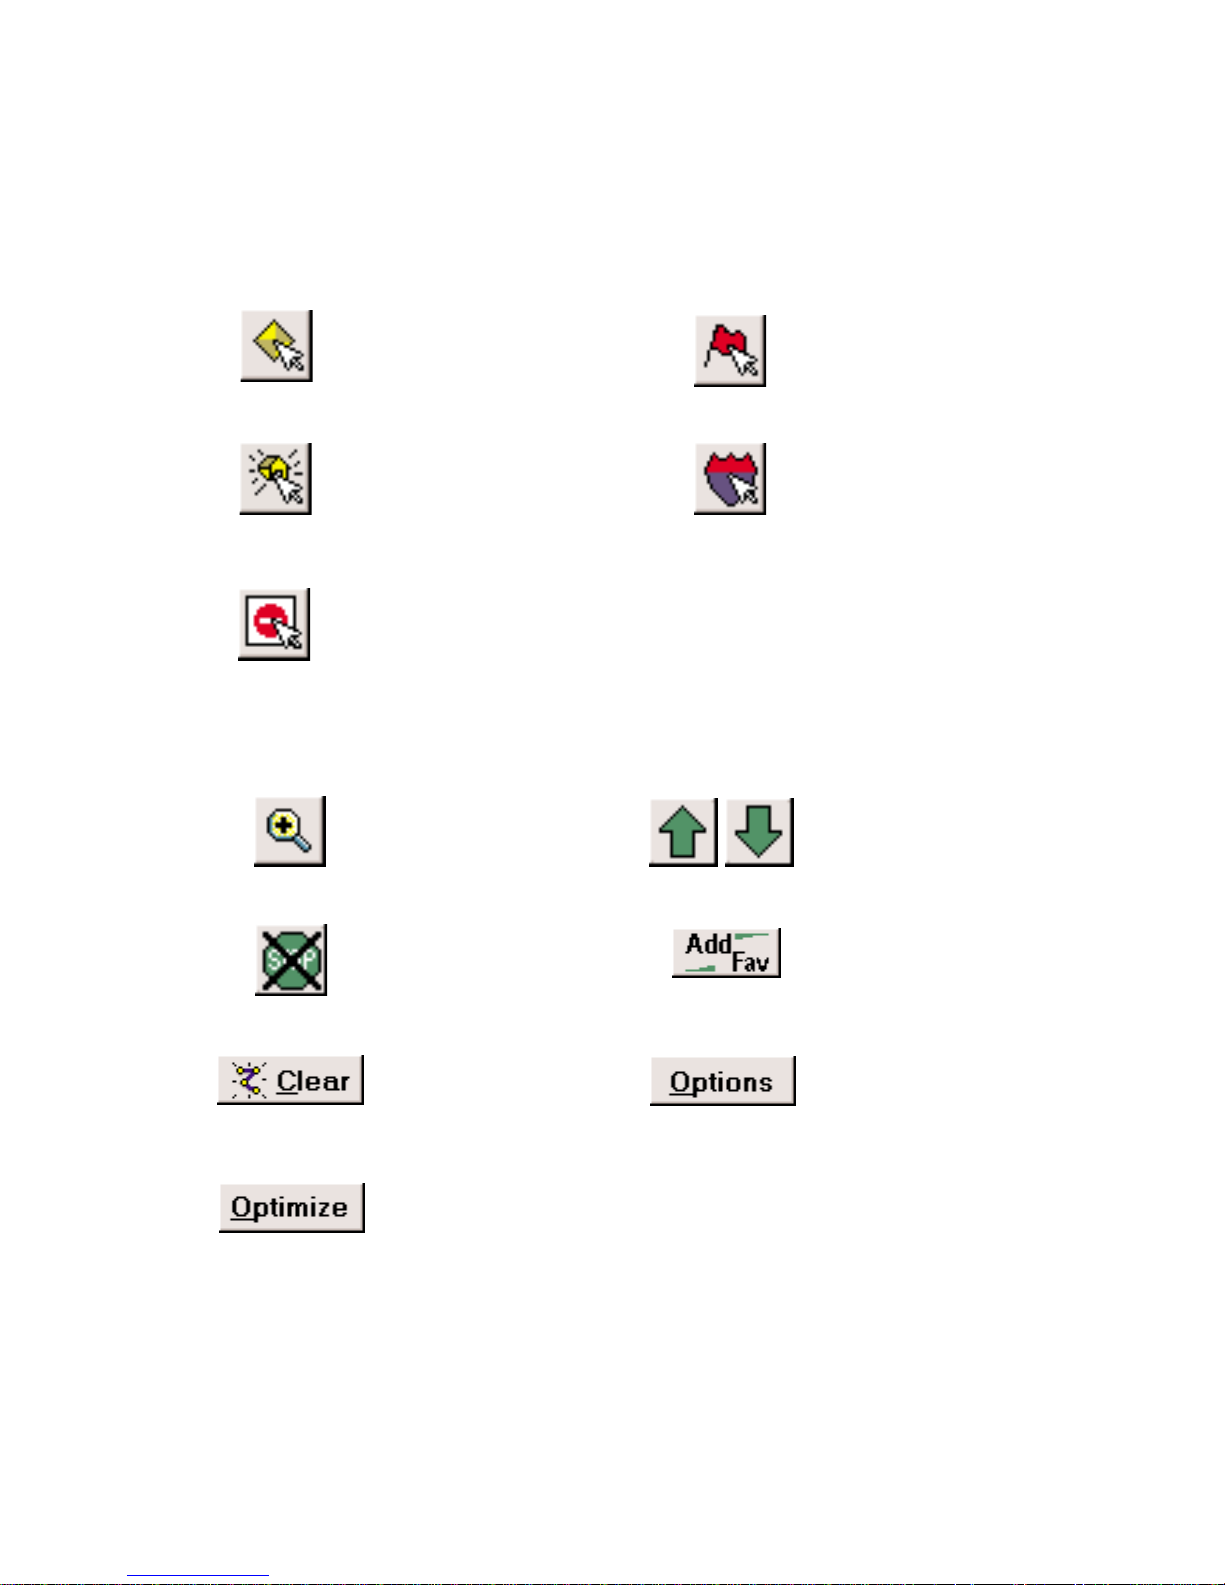
Buttons in the Trip Planner Window:
- 47 -
Label Cities and Places:
Allows you to label or
unlabel cities within your
map.
Add Custom Places:
Allows you to label specific
places on the map and save
them in your Points of
Interest database (map detail
level must be at least 7.)
Edit Streets: Lets you
change street restrictions to
make them one way, two
way, or blocked off entirely.
Zoom to Stop: Zooms your
map view to the stop that is
highlighted on the Trip
Itinerary.
Delete Stop: Removes the
highlighted stop from your
Itinerary.
Clear: Clears all stops
entered in the Trip Planner
window to enable a new trip
to be entered.
Optimize: Click this button
to reorder the stops in the
Itinerary for the most
efficient route (requires at
least one stop).
Pick Stops: Allows you to
pick stops directly from the
map and add them to your
trip Itinerary.
Label Roads: Lets you
determine whether individual
roads on the map will be
shown with or without
names.
Scroll Up/Down: Moves the
currently highlighted stop up
or down in the Trip Itinerary.
Add Fav: Adds the
highlighted stop to your list
of favorite places once it has
been entered into the Trip
Itinerary.
Options: Lets you change
your trip type, travel speed,
and roads which you want to
favor or avoid.
Page 53

- 48 -
Notes:
Page 54

Using the CoPilot Help Files
CoPilot provides extensive built-in Help to guide you through the program as you use it.
Click on the Help button in a window to open a Help topic that describes how to use that
window. For example, if youre entering a stop in the Trip Planner window, the Help button
will open the Help Files at the topic Entering Additional Stops. From there, you can
navigate through other Help topics, or do a search on a topic using the Search dialog box.
Another way to access the Help Files is through the Help menu. Contents and Search will
display the main topics available and allow you to enter a search using the Search dialog
box. How to Use Help provides Microsoft instructions about using the Help Files.
You also have the option of activating bubble help which automatically provides brief
hints as you pass the cursor over certain areas. In the Edit menu, select Preferences and
check Show hints in the Preferences dialog box.
Technical Support
After registering your software, you're entitled to technical support and discounts on future
updates. You may fax any questions you have to 609-252-8166, or e-mail them to
[email protected].
Check out our Internet site http://www.travroute.com for technical support documentation
and posted answers to common questions. If the Web site does not provide an answer to
your question, technical support for registered users is available by calling 609-252-8197,
Monday-Friday, 9:00 a.m.-5:30 p.m. EST. You should be at your computer when you call.
Page 55

 Loading...