

Travelux Quest User Manual
User Manual
Travelux Quest Mid-Wheel

User Manual
BEFORE USING YOUR NEW TRAVELUX QUEST POWER CHAIR YOU MUST READ
AND FULLY UNDERSTAND THIS USER MANUAL
General information
You have just purchased an Van Os Medical UK ltd. power chair and we want to
thank you for the confidence in our Travelux products. The power chair is a quality
product.
The policy of Van Os Medical UK ltd. is to continually improve the quality and reliability
of our products. We reserve the right, therefore without prior notification, to alter this
guide.
It is important that your guide for the use is read carefully. The manual contains
important information about the safe use and maintenance of your power chair. We
recommend that you keep this guide, it is also your proof of warranty and you will find
it useful for referring to it at a later date.
The safety instructions in this guide are general guidelines that must be seen as
broad guidelines.
Your new power chair requires frequent maintenance, much of which you can do
yourself. We advise you to take your power chair once a year to be inspected by a
professional.
Caution!
In this guide you will find information and warnings. These are clearly identified by
the symbols below and the appearance of the text.
Tip
Information.
'D Warning
To avoid personal injury, warnings must be followed.
~ 1 ~
© 2013 VAN OS MEDICAL B.V., Koperslagerij 3, 4651 SK, Steenbergen, Nederland
Tel. +31-(0)167-573020, Fax +31-(0)167-573381, E-mail: info@vanosmedical.nl,
www.vanosmedical.nl
User Manual
Fill out the information on your authorized dealer below:
Company:
Address:
Telephone number:
Fax number:
Email address:
Website:
~ 2 ~
© 2013 VAN OS MEDICAL B.V., Koperslagerij 3, 4651 SK, Steenbergen, Nederland
Tel. +31-(0)167-573020, Fax +31-(0)167-573381, E-mail: info@vanosmedical.nl,
www.vanosmedical.nl

User Manual
1 IDENTIFICATION ............................................................................................................ 4
2 GENERAL EXPLANATION CONCERNING YOUR POWER CHAIR ........................................ 5
2.1 COMPONENTS OF THE POWER CHAIR ..................................................................................................................... 5
2.2 GENERAL EXPLANATION OF THE FUNCTION AND POSSIBILITIES OF YOUR POWER CHAIR ...................................... 6
3 SAFETY REGULATIONS ................................................................................................... 6
3.1 GENERAL SAFETY REGULATIONS ............................................................................................................................. 6
3.2 WARNINGS FOR SAFE USE ..................................................................................................................................... 6
4 INSTRUCTIONS FOR USE ................................................................................................ 7
4.1 JOYSTICK .................................................................................................................................................................. 8
4.2 GETTING ON AND OFF .......................................................................................................................................... 10
4.3 FREEWHEEL MODE ............................................................................................................................................... 11
4.4 INDICATORS .......................................................................................................................................................... 11
4.5 LOCKING / UNLOCKING THE POWER CHAIR ......................................................................................................... 12
4.6 CONTROL THROUGH TIGHT SPOTS ....................................................................................................................... 12
4.7 MOTOR BRAKING SYSTEM ................................................................................................................................... 13
4.8 EMI / RFI ................................................................................................................... 13
5 INSTRUCTIONS FOR USE AND MOUNTING OPTIONS .................................................... 15
5.1 TECHNICAL INFORMATION ................................................................................................................................... 15
5.2 ARMREST ADJUSTMENTS ..................................................................................................................................... 15
5.3 SEAT ADJUSTMENTS ............................................................................................................................................. 17
5.4 FOOTPLATE ADJUSTMENTS .................................................................................................................................. 18
5.5 JOYSTICK ADJUSTMENTS ...................................................................................................................................... 19
5.6 DISASSEMBLY ....................................................................................................................................................... 20
5.7 ASSEMBLY ............................................................................................................................................................ 22
6 TRANSPORT AND TRANSIT IN CAR ............................................................................... 23
7 CARE AND MAINTAINANCE ......................................................................................... 24
8 PROBLEM ANALYSIS AND SOLUTIONS ......................................................................... 27
9 WARRANTY ....................................................................................................................... 28
9.1 WARRANTY APPLICATION .................................................................................................................................... 28
9.2 WARRANTY DEFINITION....................................................................................................................................... 29
10 GENERAL MAINTENANCE INSTRUCTIONS .................................................................... 30
~ 3 ~
© 2013 VAN OS MEDICAL B.V., Koperslagerij 3, 4651 SK, Steenbergen, Nederland
Tel. +31-(0)167-573020, Fax +31-(0)167-573381, E-mail: info@vanosmedical.nl,
www.vanosmedical.nl
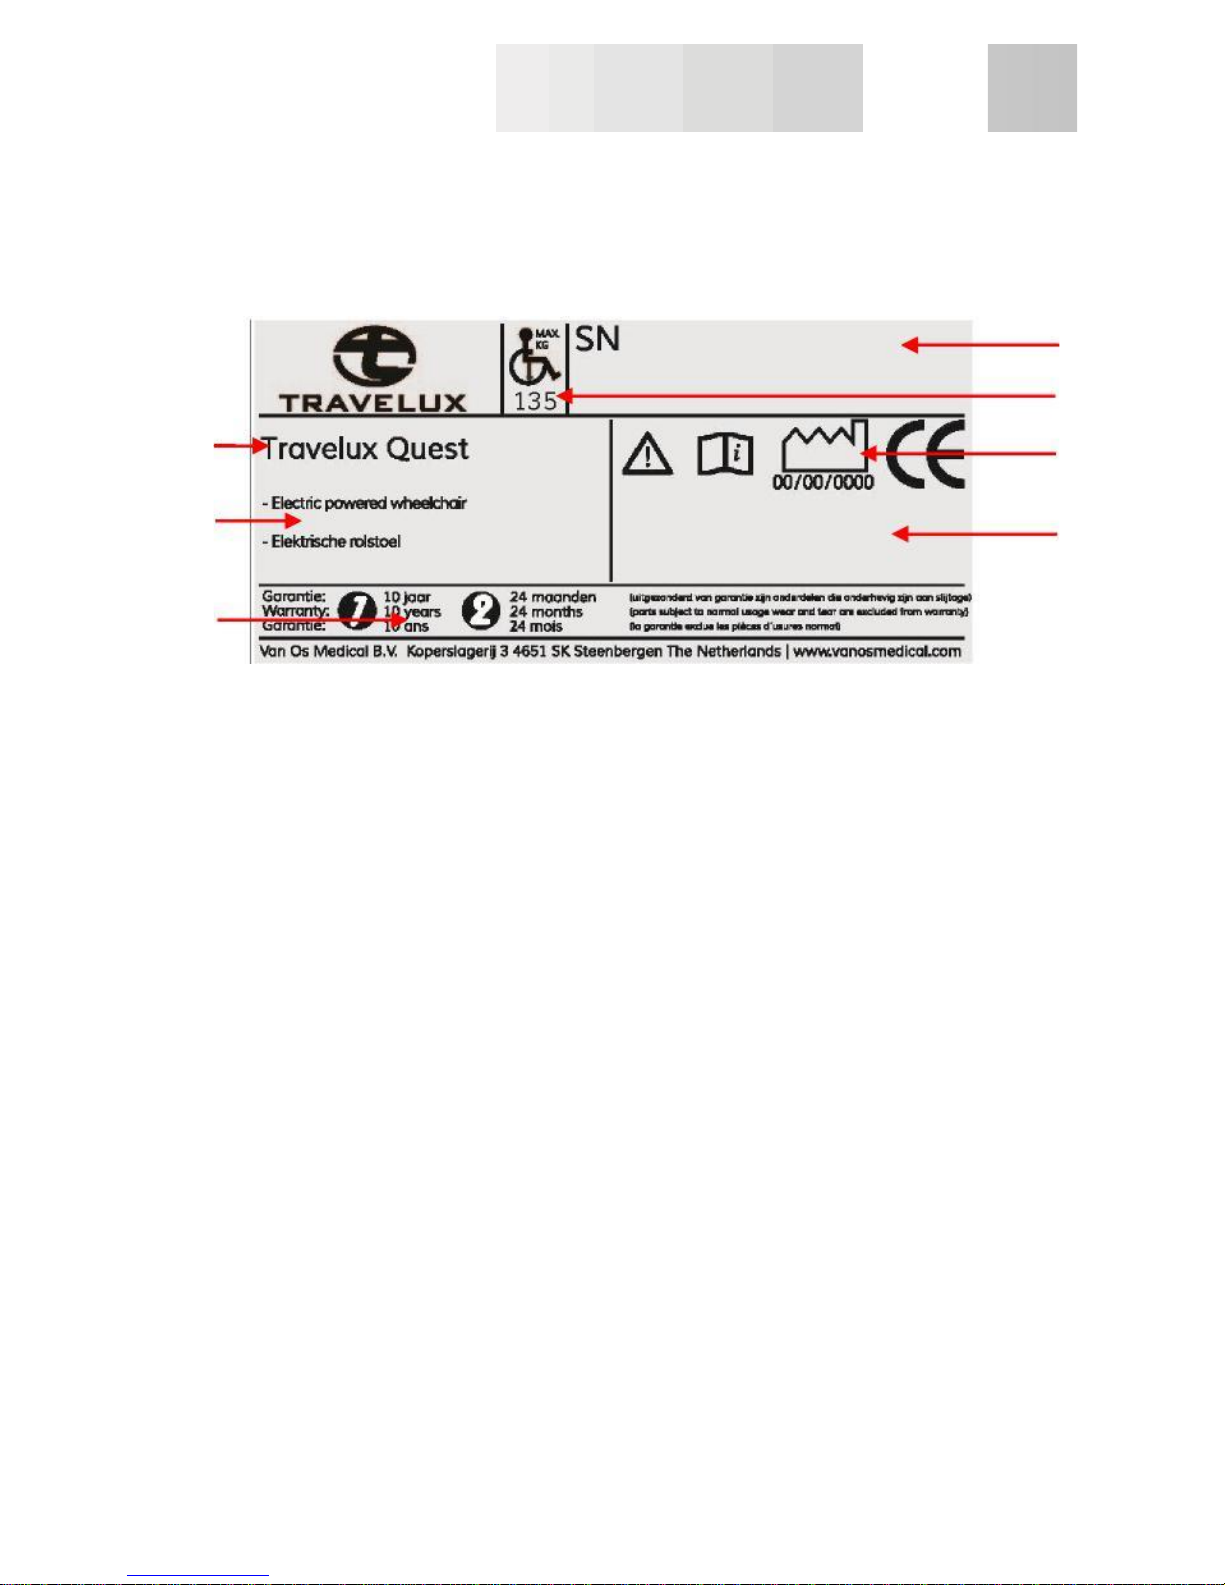
1 IDENTIFICATION
User Manual
7
6
5
1
2
3
4
Your Travelux Quest power chair is equipped with a unique serial number. You can
find this number on the frame of your power chair. Below is an example of the frame
label on which you can find the serial number. Furthermore you will find the
explanation of the various data stored on the frame label listed below.
1. Serial number Every power chair has its own unique serial
number. You must have this number when
making technical requests or if warranty parts
are required for your power chair.
2. Maximum user weight The largest occupant weight allowed for
protection of power chair and the user.
3. Production date P r o du c ti o n d at e o f y ou r p o we r c ha i r.
4. Type number This number indicates which model of power
chair you have, again this is always required
when making technic al calls.
5. Warranty This is the warranty period. Chapter 9
describes your warranty terms and
conditions in more detail.
6. Desc ription D e s c r i p t i o n o f t h e d e s i g n o f y o u r p o w e r
c h a i r .
7. Mod e l n a m e T h e m o d e l n a m e o f y o u r p o w e r c h a i r .

~ 4 ~
© 2013 VAN OS MEDICAL B.V., Koperslagerij 3, 4651 SK, Steenbergen, Nederland
Tel. +31-(0)167-573020, Fax +31-(0)167-573381, E-mail: info@vanosmedical.nl,
www.vanosmedical.nl
User Manual
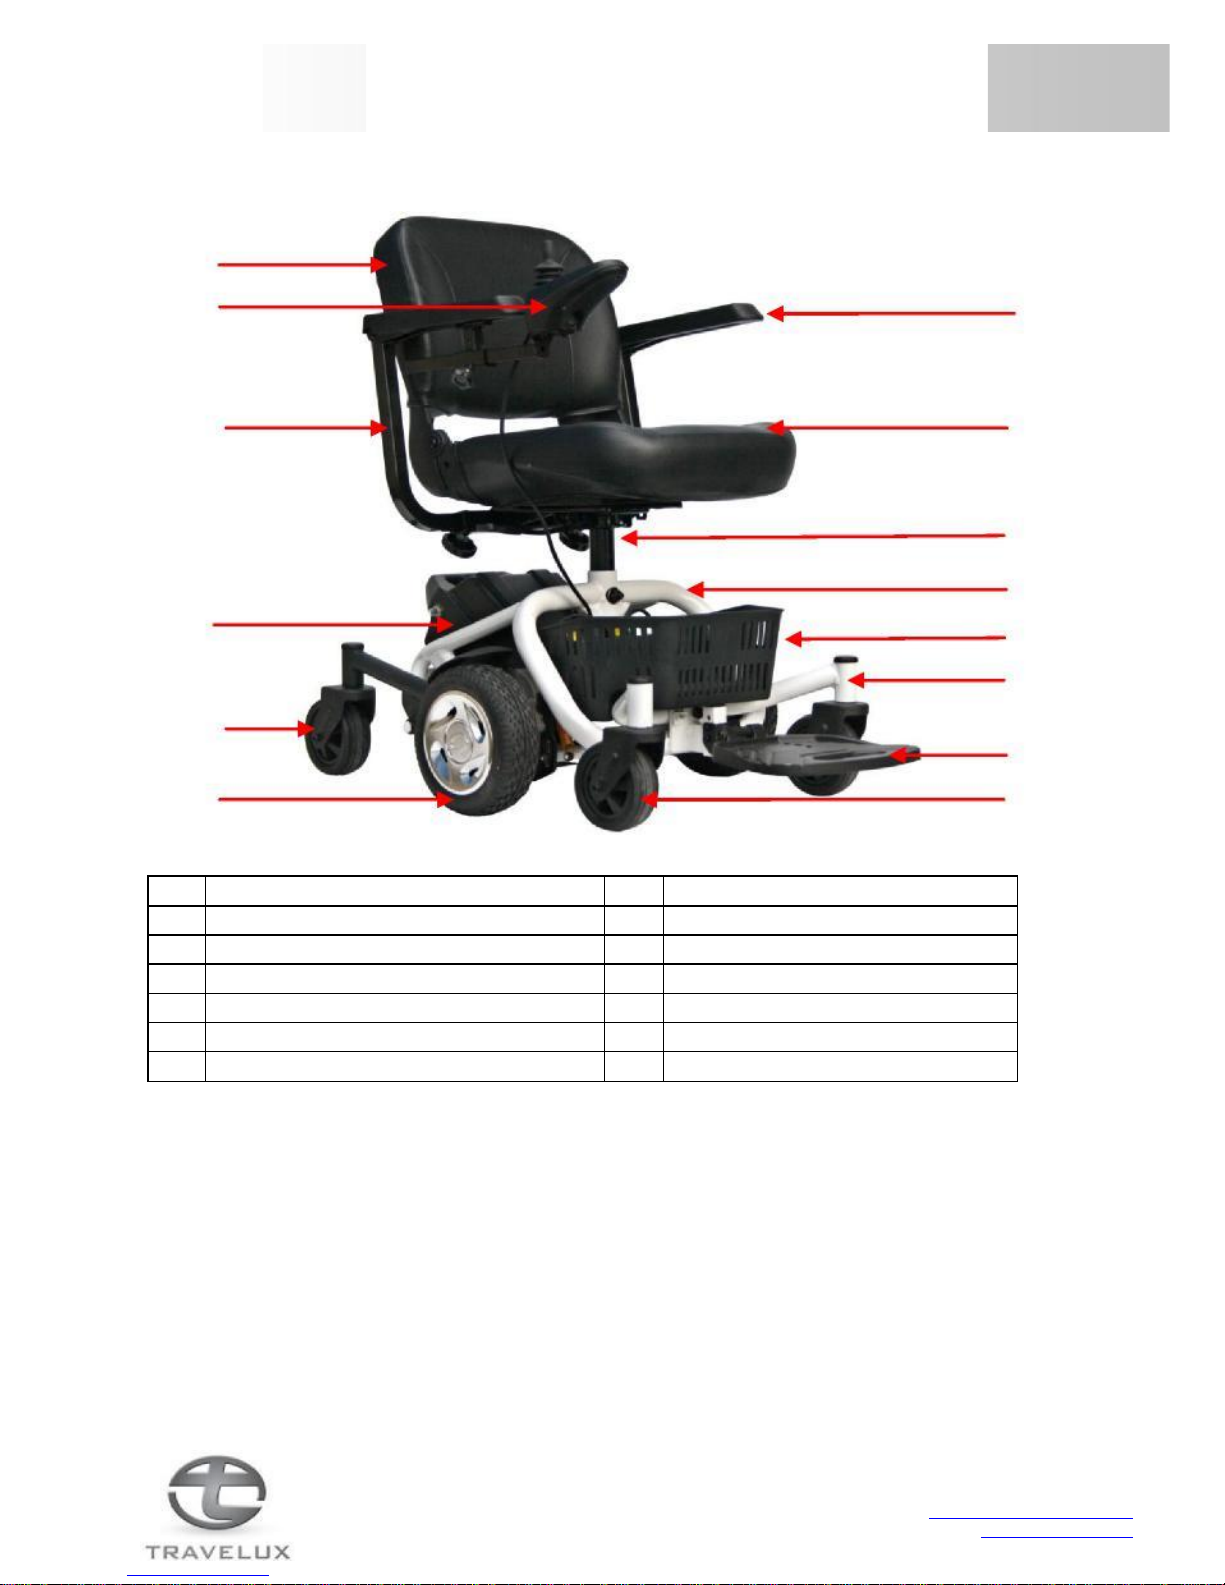
2 GENERAL EXPLANATION CONCERNING YOUR POWER CHAIR
14
13
12
11
10
9
1
2
3 4 5 6 7
8
2.1 Components of the power chair
1
Armpad
8
Front wheel
2
Seat
9
Middle Wheel (Drive wheel)
3
Seat post
10
Rear wheel
4
Frame
11
Battery pack
5
Basket
12
Armrest
6
Ball head
13
Joystick
7
Footplate
14
Backrest
Your power chair is equipped with a number of elements and parts. You should know
these before continue reading this user manual. Designs and specifications may
change without prior notice.
~ 5 ~
© 2013 VAN OS MEDICAL B.V., Koperslagerij 3, 4651 SK, Steenbergen, Nederland
Tel. +31-(0)167-573020, Fax +31-(0)167-573381, E-mail: info@vanosmedical.nl,
www.vanosmedical.nl

User Manual
2.2 General explanation of the function and possibilities of your power chair
The power chair is equipped with multifunctional brakes and stable wheels which roll
easily. The power chair is especially developed so that it can be adjusted to every
individual user. Your power chair is a medical equipment product and is not a standard
consumer product. You must follow this user manual completely to ensure good,
optimal and safe use of your power chair.
3 SAFETY REGULATIONS
Van Os Medical UK ltd. specifically disclaims any responsibility for body injury or
property damage which may occur during any use which does not comply with laws
or ordinances. If used correctly, the Travelux Quest is an utmost safe and stable
product, if the instructions for use as described in this manual are followed.
However, it is possible when the power chair is not used correctly, dangerous
situations may occur.
3.1 General safety regulations
Protect your power chair by checking it regularly. When a part of your power chair is
not functioning properly, a dangerous situation could occur.
W Warning:
You must keep your power chair in a good state to guarantee safe use.
3.2 Warnings for safe use
W Warnings:
4 Failure to follow all the instructions in this manual may result in damage to the
power chair or serious injury;
4 Always operate your power chair with thought, care and safety;
4 Do not drive into curbs;
4 Never connect anything to the wheels;
4 The maximum weight capacity has been indicated on the frame label;
4 Before using, always check if the brakes are working correctly;
4 Unauthorized modification and or use of parts not supplied by Travelux will
invalidate the warranty of this power chair and may lead to injury to the user
and or damage to the power chair;
4 Do not let children play with or on your power chair;
4 Do not turn your power chair suddenly at full speed;
4 All wheels must be in contact with the floor at all times during use. This will
ensure the power chair is properly balanced;
~ 6 ~
© 2013 VAN OS MEDICAL B.V., Koperslagerij 3, 4651 SK, Steenbergen, Nederland
Tel. +31-(0)167-573020, Fax +31-(0)167-573381, E-mail: info@vanosmedical.nl,
www.vanosmedical.nl

User Manual
Do not use your power chair when it is damaged or has any malfunction;
Do not attempt to use your power chair on an escalator. Always use an
elevator;
Do not mount or dismount your power chair unless the brake is engaged;
Always make sure that the power chair is turned off before mounting of
dismounting your power chair;
Do not carry passengers under any circumstances;
Do not drive backwards on an incline or across an uneven surface;
Always make sure the seat is locked forward before operating your power
chair;
Always come to a full stop before changing direction from forward to reverse
or from reverse to forward;
Do not operate your power chair where you could not safely or legally walk;
Do not climb ramps or curbs that exceed your power chairs capacity;
Always approach inclines straight on;
Always be aware of and careful near mechanical pinch points especially when
assembling and disassembling your power chair;
Always fasten down your power chair securely with an approved tie-down
system while transporting your power chair;
Always use caution when driving on soft or uneven surfaces such as grass
and gravel. Also use caution on decks where there is no railing;
Always cross streets at intersections and use crosswalks or the most direct
route, making sure that your path is clear and that you are visible to motor
traffic;
Never back up or down a step or curb;
Never drive your power chair up or down a step or curb that is higher than 4
cm;
Never drive your power chair over a gap greater than 7,5 cm;
Never drive on the roadway, except when you must cross the street;
Do not drive your power chair in icy or salted conditions;
Never operate your power chair while you are under the influence of alcohol;
Never sit on your power chair when it is being transported;
Always check with your physician to determine if any of the medications you are
taking may affect your judgment and or your ability to operate your power
chair;
Also check with your physician concerning your physical ability to operate a
power chair.
4 INSTRUCTIONS FOR USE
Your Travelux Quest is a battery working personnel mobility vehicle. Before you take
your first trip, you should familiarize yourself well with the operation of the vehicle and
with all operating elements. Take your time to test all functions and driving modes. To
guarantee your and others safety.
~ 7 ~
© 2013 VAN OS MEDICAL B.V., Koperslagerij 3, 4651 SK, Steenbergen, Nederland
Tel. +31-(0)167-573020, Fax +31-(0)167-573381, E-mail: info@vanosmedical.nl,
www.vanosmedical.nl
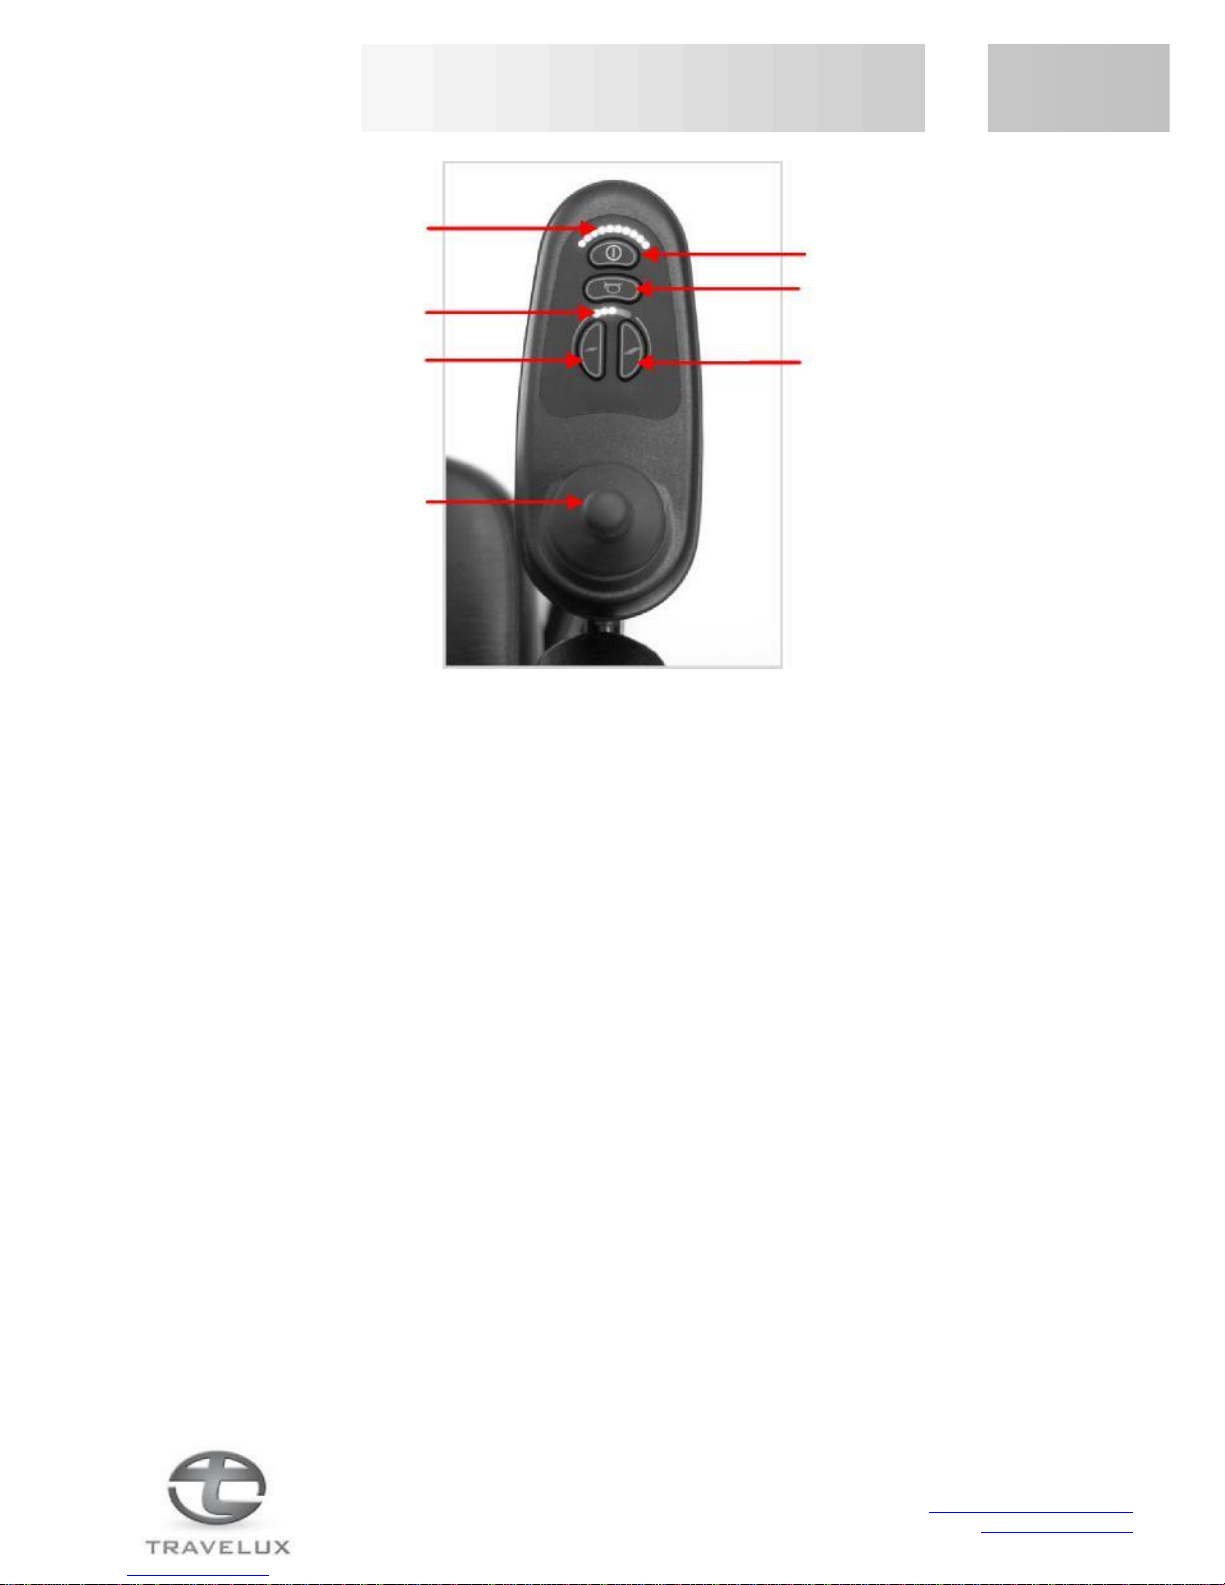
4.1 Joystick
User Manual
On/Off Button
Horn
Speed Setting FASTER
Speed Setting indicator
Speed Setting SLOWER
Battery indicator /
Joystick display
Joy stick
Picture 1
On / off button
Push the on / off button to turn on the power, see picture 1. The 10 LED lights will
flash once and a number of LED lights will remain depending on the state of the
battery charge. Pressing the on / off button again will turn off the power of your
power chair, the LED lights will not lit.
The speed control buttons
These buttons provide you with a way to control the maximum speed of your power
chair. Push the slower button repeatedly to set your chair’s speed to the slowest
setting. This is indicated by one LED light section on the speed indicator scale. Push
the faster button repeatedly to set your power chair’s speed to its highest setting.
This is indicated by five LED lights sections on the speed indicator scale.
Joystick
The joystick controls the speed and direction of your power chair. When you are not
pushing against the joystick, or when you release the joystick, the joystick will
automatically return to the neutral position. The power chair will decelerate, as the
electromagnetic brakes are applied, and come to a smooth stop.
Pushing the joystick away from the neutral position will move your power chair in the
direction that the joystick is pushed. The farther forward or backward you push the
joystick, the faster your power chair will go.
~ 8 ~
© 2013 VAN OS MEDICAL B.V., Koperslagerij 3, 4651 SK, Steenbergen, Nederland
Tel. +31-(0)167-573020, Fax +31-(0)167-573381, E-mail: info@vanosmedical.nl,
www.vanosmedical.nl

User Manual
The joystick display
The joystick display is a multifunctional
visual display. This display provides three
types of information:
4 On / Off status;
4 Battery indicator;
4 Fault diagnostics.
Battery indicator
The joystick LED array is composed of 10 LED lights:
4 Three: Red;
4 Four: Orange;
4 Three: Green.
When all LED lights are lit continuously, there is a full charge on the batteries. As
you use your power chair the batteries will discharge The LED lights in the array
will begin to turn off in descending order. A single red LED light indicates the
lowest state of operable charge on the batteries. The batteries should be charged
immediately.
Control system status indication
The joystick LED array is also designed to help you diagnose any problems with the
electrical components of your power chair. The LED array does this by flashing on
and off in a coded sequence. The battery gauge and maximum speed/ profile
indicator show the status of the control system.
Battery indicator is steady
This indicates that all is well.
Battery indicator flashes slowly
The control system is functioning correctly, but you should charge the batteries as
soon as possible.
Battery indicator steps up
The power chair batteries are being charged. You will not be able to drive the power
chair until the charger is disconnected and you have switched the control system off
and on again.
Battery indicator ripples
The joystick has been displaced out of the neutral position while the control system is
switched on. Release the joystick to clear the fault. Note that this is not a fault. If the
condition persists after removing your hand, the joystick may be damaged. Contact
your Travelux dealer.

~ 9 ~
© 2013 VAN OS MEDICAL B.V., Koperslagerij 3, 4651 SK, Steenbergen, Nederland
Tel. +31-(0)167-573020, Fax +31-(0)167-573381, E-mail: info@vanosmedical.nl,
www.vanosmedical.nl

User Manual
Battery indicator flashes rapidly The
control system safety circuits have operated and
the control system has been prevented from moving the power chair. This indicates a
system trip, i.e. the VR2 has detected a problem somewhere in the power chair’s
electrical system.
Please follow this procedure
4 Place the joystick in the neutral position and turn the control system off and on
again to clear the fault. If the fault does not clear go to the next step;
4 Switch off the control system;
4 Disconnect and reconnect all connectors on the power chair and the control
system to make sure they are mated securely;
4 Check the condition of the battery;
4 If you can’t find the problem, see chapter 8;
4 Switch on the control system again and try to drive the power chair. If the
safety circuits operate again, switch off and do not try to use the power chair.
Contact your Travelux dealer.
4.2 Getting on and off
W Warning:
4 When getting on or off your power chair, keep your weight toward the middle
of the deck. Putting most or all of your weight on the edge of the deck may
cause an unstable condition!
4 Never transfer on or off of the power chair using the seat backrest for support
during transfer. The seat back may fold down and may cause you to lose your
balance and could result in personal injury.
Before getting on your power chair:
4 Check to be certain that the power chair is turned off. This will eliminate the
possibility of accidentally moving the joystick and causing injury to yourself or to
others;
4 Check to be certain that your power chairs brake is engaged;
4 Flip up the armrests;
4 Flip up the footplate.
Getting on your power chair:
4 Position the seat for safe and easy mounting;
4 Fasten the seatbelt (if your power chair equipped with one);
4 Flip down the armrests;
4 Flip down the footplate.

~ 10 ~
© 2013 VAN OS MEDICAL B.V., Koperslagerij 3, 4651 SK, Steenbergen, Nederland
Tel. +31-(0)167-573020, Fax +31-(0)167-573381, E-mail: info@vanosmedical.nl,
www.vanosmedical.nl
 Loading...