

Travel Chef PRI5590DP User Manual And Product Specifications
USER MANUAL AND PRODUCT SPECIFICATIONS
VACUUM SEALER
Part No. PRI5590DP
12V
DUAL P OWE R
240V

GENERAL INFORMATION AND SAFETY INSTRUCTIONS
When using this electrical appliance, safety
precautions should always be obser ved, including
the following:
• Store the appliance in a cool and dry place,
away from children when not in use.
• Do not use this appliance for any other purpose
other than for its intended use.
WARNINGS
CARE FULLY READ ALL IN STRUCTI ONS BEFOR E
USIN G THIS A PPLIAN CE AND K EEP T HIS
INST RUCTION M ANUAL FOR FUT URE RE FERENC E.
• Before connecting or disconnecting the power
cords from power outlet, ensure the cover of the
machine is unlocked.
• Switch off and disconnect the appliance from the
power outlet when not in use or before cleaning.
• If the power cords or plug becomes damaged,
stop using the appliance immediately and have
it repaired by a professional repairer only.
• Keep bags away from children.
• Any repairs required to this appliance are to be
completed by a professional repairer only. DO NOT
attempt to repair this appliance yourself.
• Do not drop or hit the appliance against hard
surfaces. If the appliance appears to be
externally or internally damaged, do not use it.
• Do not pull or carry the appliance by its power
cords or use cords as a handle, close a door
on the cords or pull cords around sharp edges
or corners.
• Do not operate the appliance near water, wet
surfaces or if the power cords or plug are wet.
• Do not operate this appliance on or near
hot surfaces or near a heat source.
• Keep appliance away from hot surfaces
or heat generating appliances (e.g. stove).
• Do not place the appliance on top of
another appliance.
• Keep hands away from moving parts.
• Ensure power cords are not hanging over the
edge of a table or bench.
• Regularly check appliance, power cords and
plug for any damage before use.
• Ensure your hands are dry before operating
the appliance.
• Do not use an extension cord with this
appliance.
• Ensure appliance is on a stable, at surface
such as a table or bench top before use. Avoid
using on metal sur faces (e.g. sink).
• Do not immerse any part of this appliance,
power cords or plug in water or any other liquid.
• This appliance is for indoor use only, do not
allow to be exposed to outdoor conditions.
• This appliance is not intended for use by
persons (including children) with reduced
physical, sensory or mental capabilities, or
lack of experience and knowledge, unless they
have been given supervision or instruction
concerning use of the appliance by a person
responsible for their safety.
• Children should be supervised to ensure that
they do not play with the appliance or vacuum
bags.
• Do not use the appliance for a long continuous
period as this may cause over-heating and
potential damage to it. Allow appliance to
cool before continuing.
• Ensure power outlet or power source is
switched off before connecting this appliance.
• Store 240V power cord in compartment in base
of appliance and hook power plug into place to
avoid any damage to cord or plug.
• Regularly check appliance, power cords and
plug for any damage before use.
2

USER MANUAL AND PRODUCT SPECIFICATIONS
CAUTION HOT
DO NOT touch the sealing element located
on edge of top cover of the appliance when
in use. This may get hot which could cause
burns to skin.
*Images for illustrative purposes only
BENEFITS OF VACUUM SEALING
• Less food spoilage.
• Prepare food or meals in advance and use as
required - ideal for camping or picnics.
• Eliminate freezer burn.
• Portion food according to required size.
• Saves on fridge and freezer space.
Sealing Element
240V compartment
SELECT YOUR POWER SOURCE
AC 240V
The power cord is tucked away in a compartment
at the base of your unit. Simply plug into a
household socket.
DC 12V
Simply attach the 12V plug into the socket located
on the side of the unit as shown. Insert the 12V
plug into a 12V DC power outlet.
12V socket
*Images for illustrative purposes only
3

Positional only
PRODUCT OVERVIEW AND PARTS LIST
Control Panel
1
7
6
2
1. Vacuum + Seal/Cancel
This button per forms t wo functions:
• Vacuuming and sealing bags - press this
button to begin operation.
• Cancelling current operation
of the appliance.
2. Pressure
This button offers the choice of two different
vacuum pressures:
• Normal: for items that will not crush or
damage easily such as meat, coffee
beans, nuts and hard vegetables.
• Gentle: for delicate items such as
strawberries, soft cheese, pastries
and cakes.
NOTE: Default setting is NORMAL. Check
settings are suitable for bag contents before
vacuum sealing. Once settings are changed,
appliance will NOT revert back to default
settings during use.
3. Food
This button is used for adjusting the heat
sealing timing.
Setting options:
• Dry: suitable for dry contents and items
without moisture (e.g. coffee beans, nuts).
This setting has a shorter sealing time.
• Moist: suitable for moist foods
(e.g. cheese, pastries) This setting has
a longer sealing time.
Below is an indication of vacuum pressures
applied based on settings selected:
• normal (pressure) and dry (food) settings:
-80kPa (maximum).
3 5
• gentle (pressure) and dry (food) settings:
• normal (pressure) and moist (food) settings:
• gentle (pressure) and moist (food) settings:
NOTE: Default setting is DRY setting with
shorter seal time.
4. Canister
This function allows the vacuuming of canisters
using a hose attachment (canisters and hose
attachment sold separately).
5. Marinate
This function provides a pre-determined sequence
of vacuuming pulses that create optimum avour
infusion in a quick and efcient manner - for use
with canisters only.
6. Seal Only
This button per forms t wo functions:
• Manually seals the open end of a bag
without vacuuming; use this button when
making a bag.
• Allows the operator to control the vacuum
pressure to avoid crushing delicate items
during vacuuming.
NOTE: When the automatic “Vacuum + Seal”
function is in use, pressing the “Seal Only”
button stops the motor pump and immediately
starts to seal the bag.
7. LED Indicators
Indicates the status of vacuum or seal process
and the current appliance settings selected.
4
-41kPa (maximum).
-82kPa (maximum).
-44kPa (maximum).
4
USER MANUAL AND PRODUCT SPECIFICATIONS
7
6
10
Underside of
vacuum sealer
9
1
5
3
4
2 1
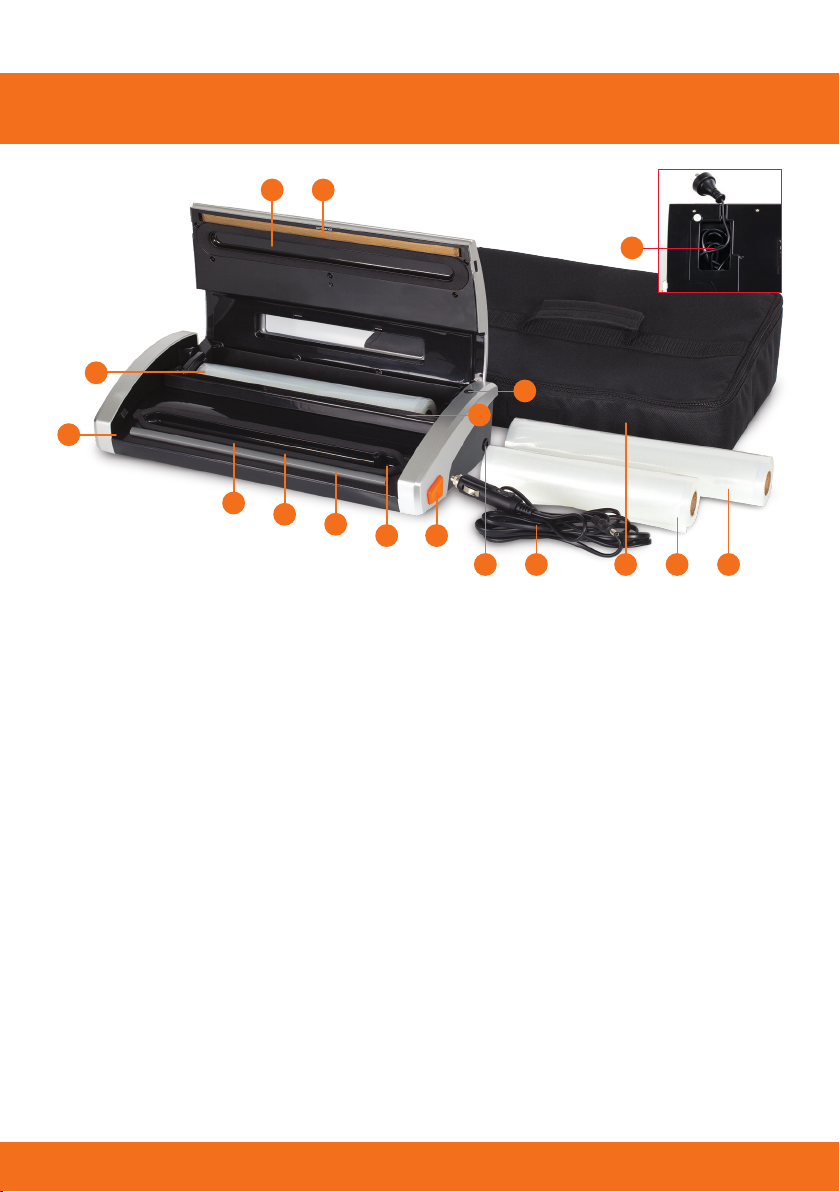
1. Release Buttons: There are two buttons found
on opposite sides of the appliance. Press both
buttons at same time to release the lid.
2. Air Intake: Air intake vacuum chamber and
pump. Do not place bag over this area or it will
not seal.
3. Vacuum Chamber: Position the open end of the
bag inside the chamber. This draws air out of bag
and catches any liquid overow from the bag.
Clean any excess liquid before continuing use.
4. Sealing Strip: Place the bag to be sealed over
this strip, it is removable for easy cleaning.
5. Lower Gaskets: When cover is locked in place,
the lower and upper gaskets join to create an
airtight vacuum chamber. The lower gasket must
be free of any damage in order for the appliance
to operate correctly.
6. Upper Gaskets: When cover is locked in place,
the lower and upper gaskets join to create an
airtight vacuum chamber. The upper gasket
must be free of any damage in order for the
appliance to operate correctly.
7. Sealing Element: Teon-coated heating
element may become hot during use - avoid
contact during use.
13
8
11 12 161514
8. Slide Cutter: Feed roll under the slide cutter
to cut bag to required length. The cutter can
also be used to open vacuum sealed bags.
9. Roll Storage Compartment: Holds roll in place
for the slide cutter.
10. 240V Power Cord Storage Compartment:
Power cord folds neatly away into its
compartment.
11. 12V Power Port: For 12V DC operation.
12. 12V Power Cord: For 12V DC operation.
13. Hose Port: For canister vacuuming (canisters
and hose attachment sold separately).
14. Carr y Bag: Compar tment for storing your rolls
and sealing unit. Padded and heavy duty.
15. Small Roll: 1 x 22Wcm x 3Lm.
16. Large Roll: 1 x 28Wcm x 3Lm.
5
 Loading...