

Page 1
Traulsen & Co., Inc.
Quality Refrigeration
OWNER’S MANUAL
Instructions for the installation, operation,
and maintenance of all Blast Chill Models:
Undercounter Model: RBC50
Reach-In Model: RBC100
Roll-In Models: RBC200 & RBC400
Roll-Thru Models: RBC200RT & RBC400RT
This Traulsen unit is built to our highest quality standards. We build our refrigerators, freezers and heated
cabinets this way as a matter of pride. This philosophy has made T raulsen the leader in commercial refrigeration since 1938. We thank you for your choice and confidence in T raulsen equipment and we know you
will receive many years of utility from this equipment.
All Traulsen units are placed on a permanent record file with the service department. In the event of any
future questions you may have, please refer to the model and serial number found on the name tag affixed
to the unit. Should you need service, however, call us on our toll free number, 800-825-8220 between 7:30
am and 4:30 pm CST, Monday thru Friday. It is our pleasure to help and assist you in every possible way.
INSTALLER
COMPLETE THE FOLLOWING INFORMATION PRIOR TO UNIT INSTALLATION
INITIAL START DATE: SERIAL NO.
MODEL TYPE:
COMPANY/INDIVIDUAL NAME:
INSTALLER:
RBC DOC REV. 12/02 P/N 375-60180-00
Page 2
TABLE OF CONTENTS
I. The Serial Tag Page 1
II. Receipt Inspection Page 2
III. Installation
a-Location Page 2
b-Packaging Page 2
c-Wiring Diagram Page 2
d-Installing Legs or Casters Page 2
e-Cord & Plug Page 3
f-Electrical Requirements Page 3
g-Proper Clearances Page 3
h-Condensate Removal Page 4
i-Remote Unit BTU Requirements Page 4
j-Remote Unit Cut-Out Settings Page 4
k. Sealing Roll-In/Roll-Thru Units Page 4
l. Installing RBC50 Control Panel Page 5
m. Attaching RBC400 Units Together Page 5
IV. Care & Maintenance
a-Cleaning The Condenser Page 6
b-Cleaning The Exterior Page 6
c-Cleaning The Interior Page 6
d-Installing Printer Paper Page 6
V. Other
a-Service Agency Check & Start-Up Page 6
b-On-Site Blast Chill Training Page 6
c-Service Information Page 6/7
d-Demonstrations Page 7
e-Blast Chill Video Page 7
f-Blast Chill Data Communications Kit Page 7
VI. Blast Chill Operation
a-Loading Food Into Pans Page 7
b-Covering Foods Page 7
VI. Blast Chill Operation (cont’d)
c-Grouping Foods To Form Batches Page 7
d-Maximum Load Per Batch Page 8
e-Pan Placement In Unit Page 8
f-Food Probe Placement Page 9
g-Example Batches For RBC50 Page 9
h-Example Batches For RBC100 Page 10
i-Example Batches For Roll-In/Roll-Thru Models Page 11
VII. Operating The Blast Chill Control
a-Operating Modes Page 12
b-Continuous Batching Page 13
c-Probe Temperatures Page 13
d-Lock Function Page 13
e-Unlock Function Page 13
f-Defrost Function Page 13
g-Printout Data Page 13
h-Resetting Date & Time Page 13
i-Programming A New Batch Page 13/14
j-Control Panel Configuration Page 15
k-Probe Temperature & Alarm Warnings Page 16
VIII. Understanding Printouts
a-Current Data Printout Page 16
b-Constant Chill Cycle - Batch Data Page 16
c-Blast Chill Cycle - Batch Data Page 17
d-72-Hour Data Log Page 18
e-Food Probe Failure Warnings Page 19
IX. Trouble Shooting Guide Page 20
X. Wiring Diagrams Page 21-24
XI. Warranty Information Page 25
XII. Parts List Page 26
XIII. Index Page 26
FORT WORTH, TX.
SERIAL MODEL
VOLTS Hz PH
TOTAL CURRENT AMPS
MINIMUM CIRCUIT AMPS
MAXIMUM OVERCURRENT PROTECTION AMPS
LIGHTS WATTS
HEATERS AMPS
REFRIGERANT TYPE OZ
DESIGN PRESSURE HIGH LOW
REFRIGERANT TYPE OZ
DESIGN PRESSURE HIGH LOW
370-60294-00 REV (A)
R
R
I. THE SERIAL TAG
The serial tag is a permanently affixed sticker on
which is recorded vital electrical and refrigeration data
about your Traulsen product, as well as the model
and serial number. This tag is located inside the
door on the right interior wall of the cabinet.
READING THE SERIAL TAG
• Serial = The permanent ID# of your Traulsen
• Model = The model # of your Traulsen
• Volts = Voltage
• Hz = Cycle
• PH = Phase
• Total Current = Maximum amp draw
• Minimum Circuit = Minimum circuit ampacity
• Lights = Light wattage
• Heaters
• Refrigerant = Refrigerant type used
• Design Pressure = High & low side operating
pressures and refrigerant charge
• Agency Labels = Designates agency listings
AW-03118
-1-
Page 3
II. RECEIPT INSPECTION
III. INSTALLATION (continued)
All Traulsen products are factory tested for performance and are free from defects when shipped. The
utmost care has been taken in crating this product to
protect against damage in transit. All interior fittings
have been carefully secured and the legs or casters
are boxed and strapped inside to prevent damage.
Door keys will be attached to the handle with a nylon
strip. The handle is protected by an easily removable
nylon netting.
You should carefully inspect your Traulsen unit for
damage during delivery. If damage is detected, you
should save all the crating materials and make note
on the carrier’s Bill Of Lading describing this. A freight
claim should be filed immediately. If damage is subsequently noted during or immediately after installation, contact the respective carrier and file a freight
claim. Under no condition may a damaged unit be returned to Traulsen & Co. without first obtaining written permission (return authorization).
III. INSTALLATION
III. a -
LOCATION:
Select a proper location for your Traulsen unit, away
from extreme heat or cold. Allow enough clearance
between the unit and the side wall so that the door (s)
may open a minimum of 90°.
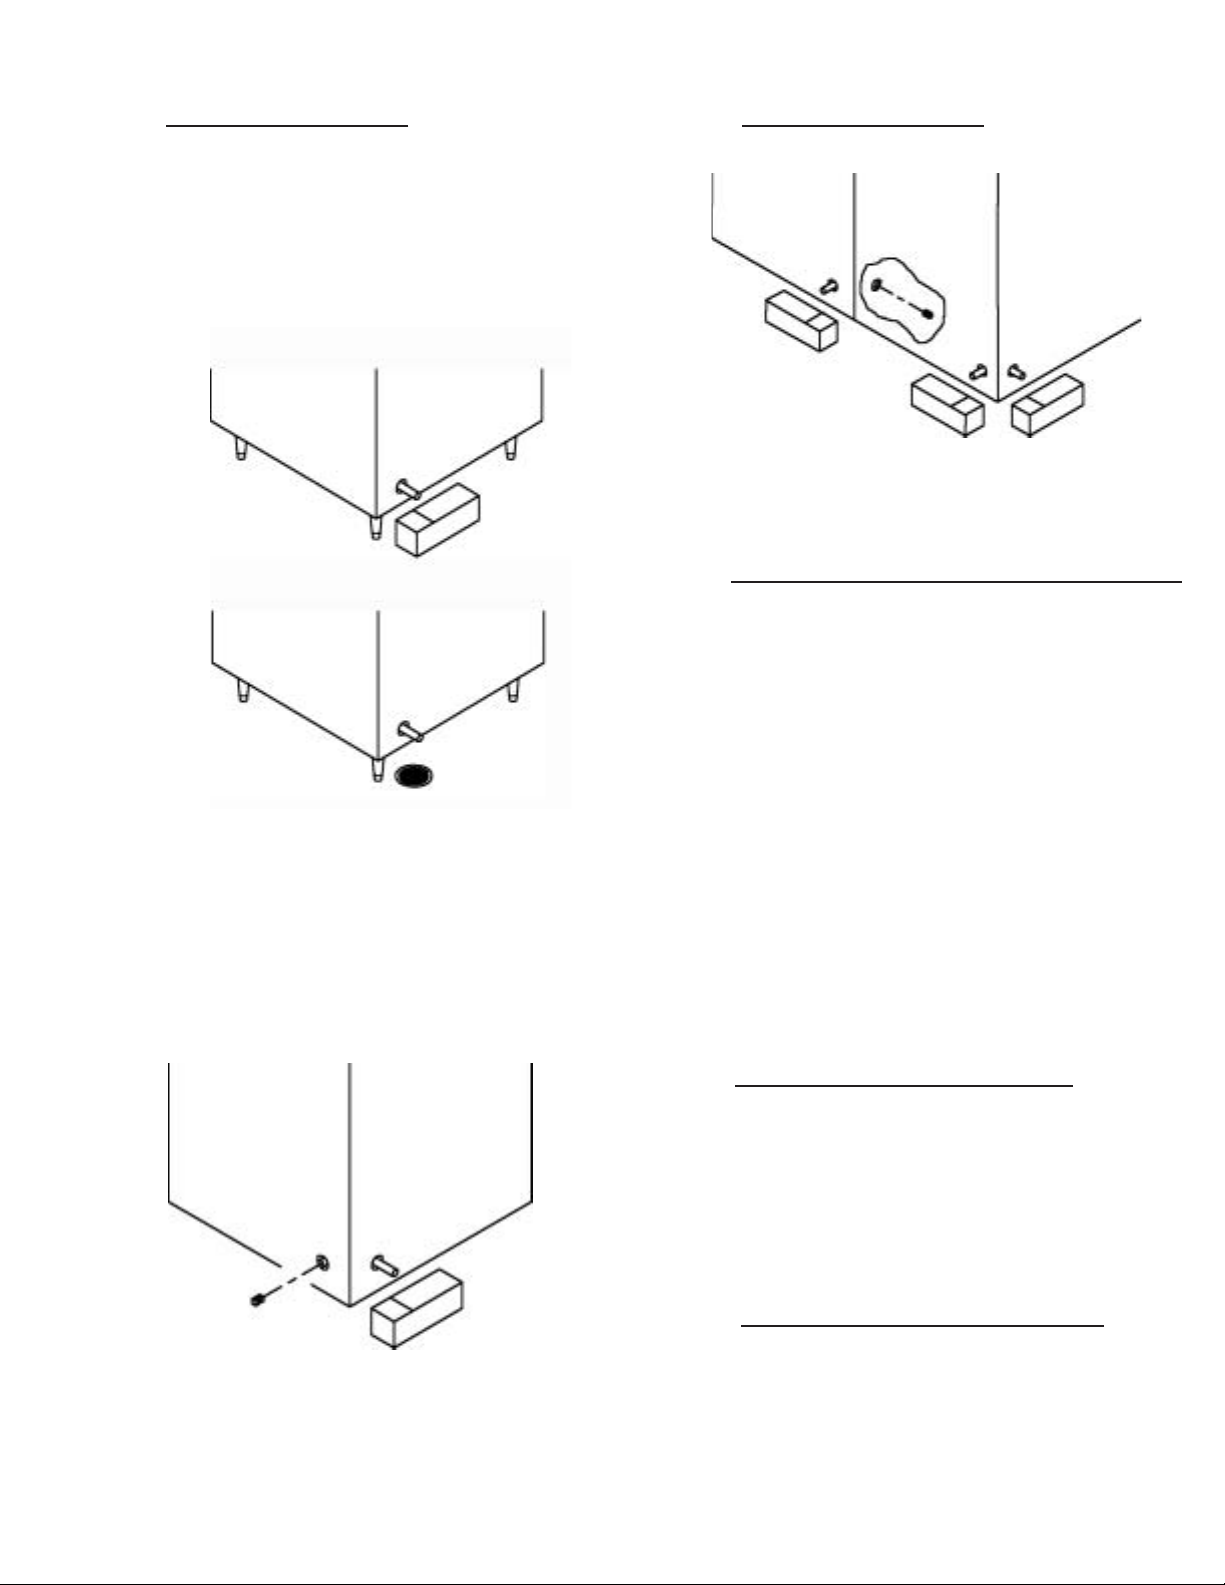
III. d - INSTALLING LEGS OR CASTERS:
6” high stainless steel legs are supplied standard for
models RBC50 and RBC100. Casters in lieu of legs
are available as an optional accessory for the same
models. These are shipped from the factory packed
inside a cardboard box which is strapped to one of
the shelves (two boxes for model RBC50 which requires either eight legs or casters). Remove the nylon
strap and open the box(es), it should contain either
four (4) legs or four (4) casters and sixteen (16) bolts.
WARNING: THE CABINET MUST BE BLOCKED AND
STABLE BEFORE INSTALLING LEGS OR CASTERS.
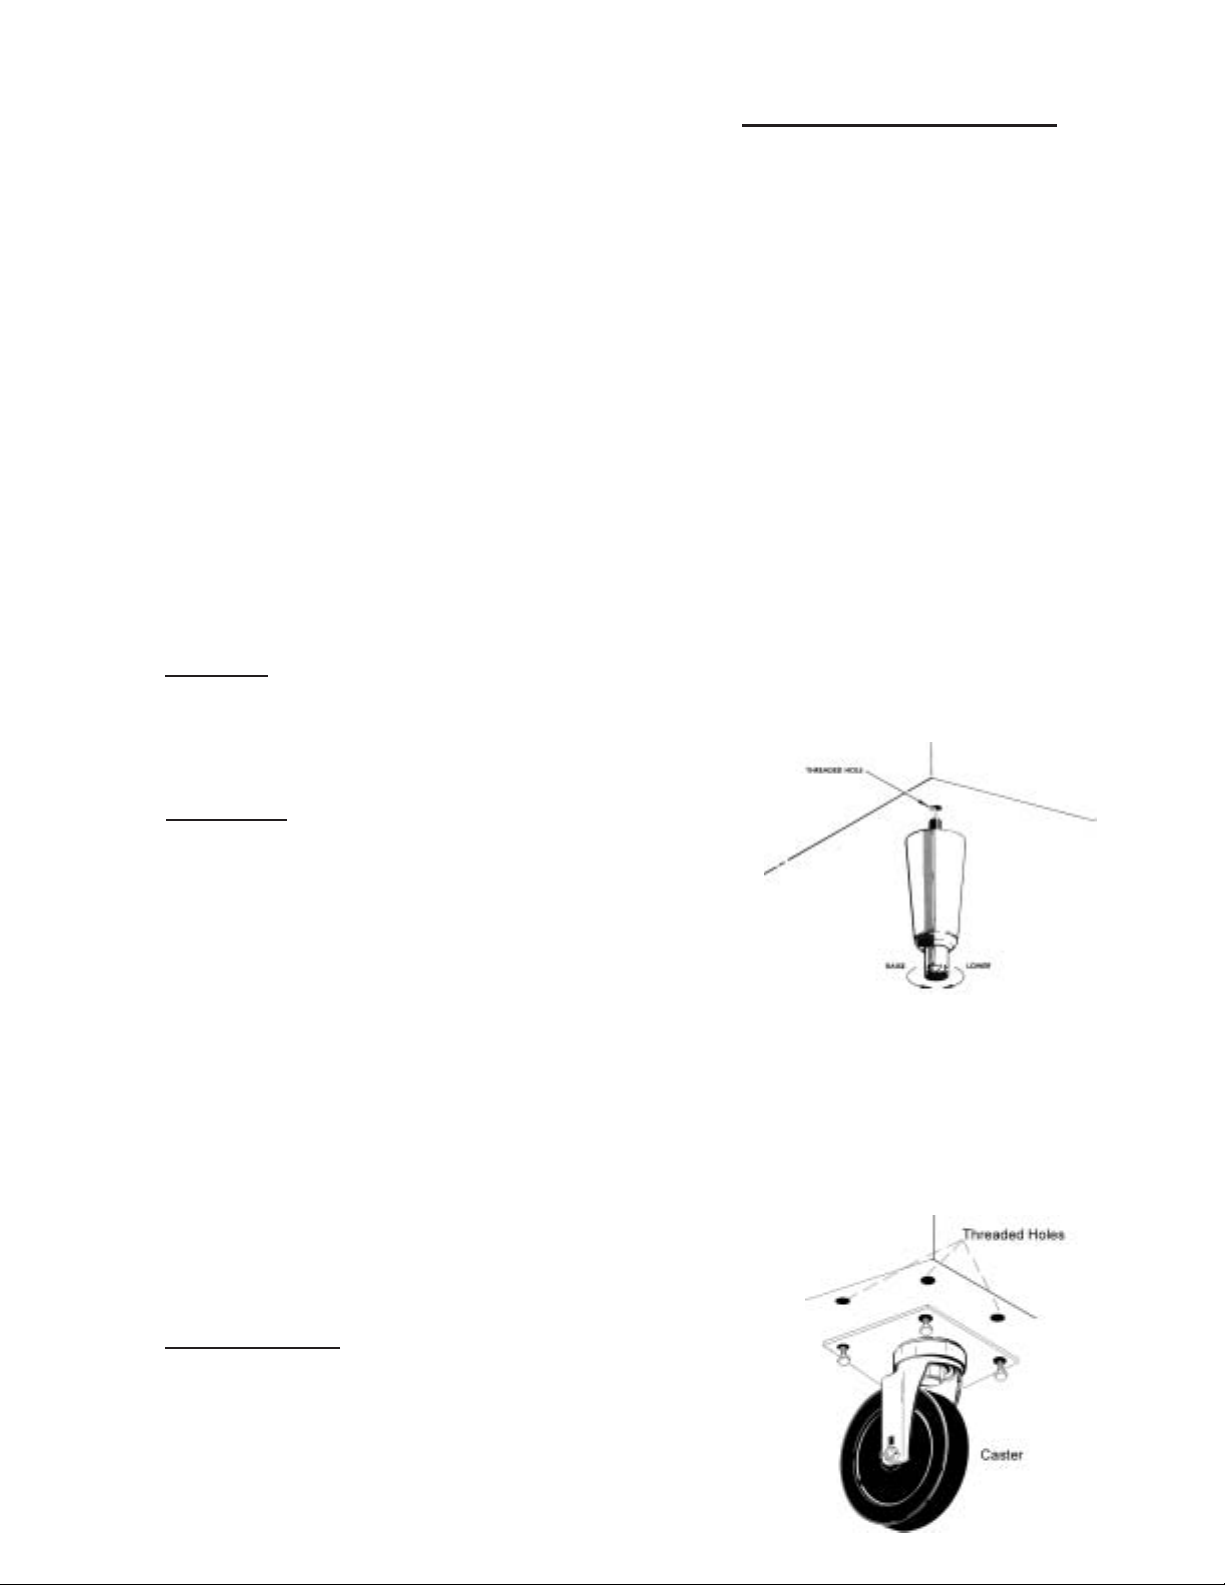
To install the legs or casters, first raise and block the
unit a minimum of 7” from the floor. For installing
legs, thread the legs into the threaded holes on the
bottom of the cabinet (see figure 1). Be certain that all
legs are tightly secured (legs and casters should be
tightened to 300 inch/pounds, max). When the unit is
set in its final position, it is important for proper operation that the unit be level. The legs are adjustable
for this purpose, turn the bottom of the leg counterclockwise to raise it, clockwise to lower it. Level the
unit from front to back as well as side to side in this
manner, using a level placed in the bottom of the cabinet.
III. b - PACKAGING:
All Traulsen units are shipped from the factory bolted
to a sturdy wooden pallet and packaged in a durable
cardboard container. The carton is attached to the
wooden skid with the use of large staples. These
should first be removed to avoid scratching the unit
when lifting off the crate.
To remove the wooden pallet, first if at all possible, we
suggest that the cabinet remain bolted to the pallet
during all transportation to the point of final installation. The bolts can then be removed with a 3/4” socket
wrench. Avoid laying the unit on its front, side or
back for removal of the pallet.
NOTE: Traulsen does not recommend laying the unit
down on its front, side or back. However, if you must
please be certain to allow the unit to remain in an upright position afterwards for 24 hours before plugging
it in so that the compressor oils and refrigerant may
settle.
III. c - WIRING DIAGRAM:
Refer to the wiring diagram for any service work performed on the unit. These are located on pages 21
thru 24 of this manual. Should you require a wiring
diagram for a non-standard configuration unit, please
contact Traulsen Service at (800) 825-8220, and provide the model and serial number of the unit involved.
Fig. 1
Please note that Traulsen units are not designed to be
moved while on legs. If the unit requires moving, a
pallet jack or forklift should be used to prevent damage. For installing casters, the casters are “plate”
type, and require the use of four (4) bolts each to secure them firmly to the cabinet bottom at each corner
(see figure 2). The caster bolts are tightened using a
1/2” socket wrench.
Fig. 2
-2-
Page 4
III. INSTALLATION (continued)
CORD & PLUG:
III. e All Traulsen Blast Chill models (except model RBC100
which is supplied with a cord set but no plug) are supplied with a cord & plug attached. It is shipped coiled
at the top of the cabinet, secured by a nylon strip. For
your safety and protection, all units supplied with a
cord and plug include a special three-prong grounding plug on the service cord. Select only a certified
electrical outlet with grounding plug for power source.
NOTE: Do not under any circumstances, cut or remove
the round grounding prong from the plug, or use an
extension cord.
III. f -
ELECTRICAL REQUIREMENTS:
Model RBC50 is normally provided with two (2) grounding type cords with plugs (NEMA 5-15P). T wo (2) separate 115/60/1 volt, 20 amp, grounded circuits with receptacle must be provided by a certified electrician to
assure proper operation of the equipment.
Model RBC100 is normally provided with a grounding
type cord without a plug. A 220/60/1 volt, 4 wire, 20
amp grounded circuit with receptacle should be provided by a certified electrician to assure that the computerized control is not adversely affected by the operation of other equipment.
6” Clearance
In Rear
Air
Intake
4”
Models RBC200 and RBC200RT are normally provided
with a grounded cordset (NEMA 5-20P). A separate
115/60/1 volt, 20 amp, grounded circuit should be provided by a certified electrician to assure that the computerized control is not adversely affected by the operation of other equipment.
Models RBC400 and RBC400RT are normally provided
with two (2) grounded cordsets (NEMA 5-20P). T wo (2)
separate 115/60/1 volt, 20 amp, grounded circuits
should be provided by a certified electrician to assure
that the computerized control is not adversely affected
by the operation of other equipment.
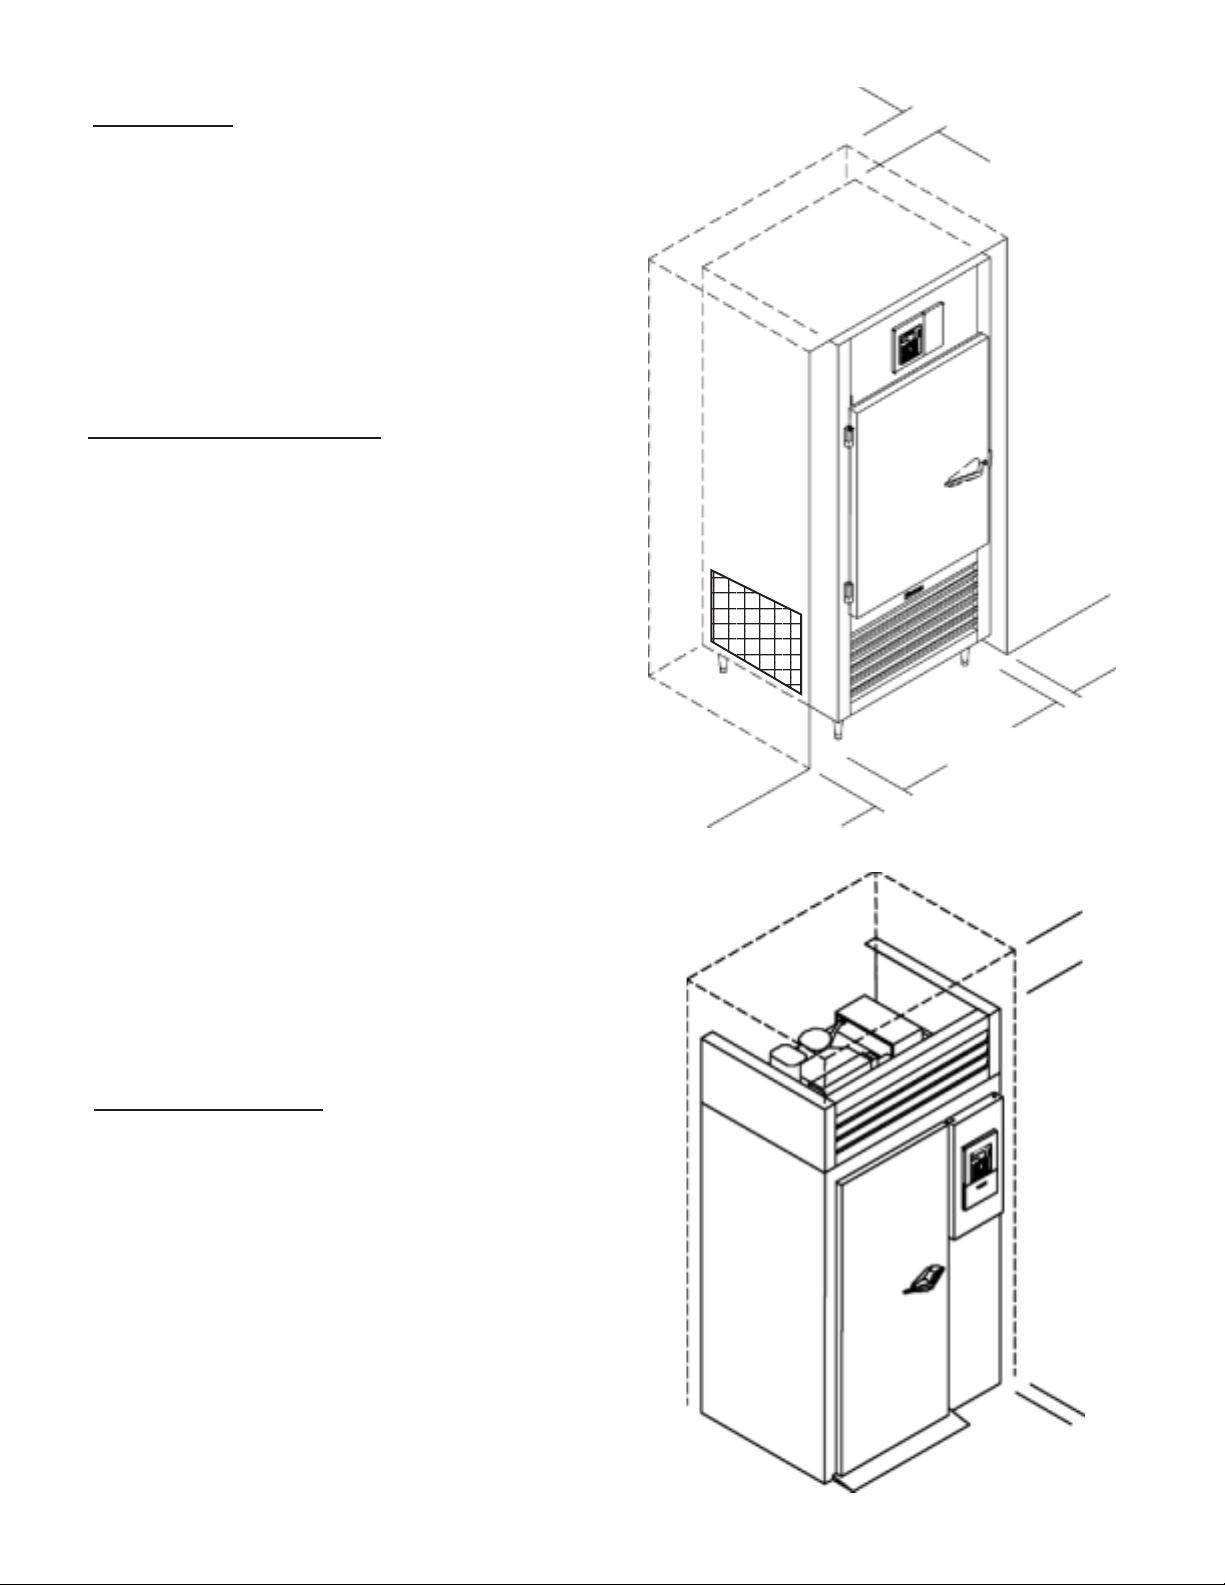
III. g - PROPER CLEARANCES:
Model RBC50: Make certain that there are no obstructions in front of the louver panels on the left and right
front sides of the unit. This will allow for sufficient air
flow to the refrigeration system and maintenance access.
Model RBC100: A minimum of 4” clearance on the right
side, 6” on the left side and 6” clearance in the rear
(see figure 3). This will allow for sufficient air flow to
the refrigeration system and maintenance access.
4” Clearance
In Rear
↑
↑
Fig. 3
6”
12” Clearance
On T op
↓
↑
Models RBC200, RBC200RT, RBC400 & RBC400RT:
Insure an overhead clearance of 12” and a rear clearance of 4”(see figure 4). This will allow for sufficient
air flow to the refrigeration system and maintenance
access.
-3-
Fig. 4
↑
↑
4” Clearance On Right
Side For Drain Tube
Page 5
III. INSTALLATION (continued)
III. h - CONDENSATE REMOVAL:
All Traulsen Blast Chill models (except model RBC50)
require the use of a floor drain or floor mounted electric condensate evaporator.
Model RBC100 requires a floor drain for condensate
removal or the use of a condensate evaporative pan
kit (p/n 329-60018-00). The drain port is located at the
rear of the unit (see figure 5).
Front
↑
Of Unit
Evaporative
Pan Kit
Front
↑
Of Unit
Floor
Drain
Models RBC200 and RBC200RT require a floor drain
for condensate removal or the use of a condensate
evaporative pan kit (p/n 329-60018-00). T wo drain ports
are provided, located at the right side and rear of the
unit. Plug the unused drain port with the male pipe
thread plug supplied (see figure 6).
III. h - CONDENSATE REMOVAL (cont’d):
plug supplied (see figure 7).
For Unit 1 of either 400 lb. capacity model, location of the evaporative pan kit is required at the side
drain port location.
For unit 2, on model RBC400 the
second pan kit can be placed either at the side or rear drain ports.
For model RBC400RT this second
pan kit must be placed at the side
drain port.
Unit 1 Evaporative
Pan Kit for RBC
400 & RBC400RT
(REQUIRED)
Fig. 7
Front
↑
Of Unit
Unit 2 Evaporative
Pan Kit for
RBC400 &
RBC400RT
NOTE: Local code should be consulted when plumbing to drain port.
III. i -
REMOTE CONDENSING UNIT REQUIREMENTS:
This section applies only to models RBC200,
RBC200RT, RBC400 and RBC400RT. A remote condensing unit, operating on R-404A refrigerant, is required for Blast Chill operation on these models (two
for RBC400 and RBC400RT). The remote condensing
unit(s) should be capable of providing 18,700 BTU/hr
@ -10°F suction and 90°F ambient at the evaporator
coils of the Blast Chill section.
4 HP air-cooled and 3 HP water-cooled remote condensing units are available from Traulsen as an optional accessory, but please note that these are rated
for use only within a 25 foot radius of the cabinet. Increased capacity of the remote condensing unit and
line sizing will depend on the length and layout of the
connecting piping from the remote condensing unit
to the Blast Chill unit. Proper line sizing should be
defined by a qualified refrigeration engineer or technician.
Unit 2 Evaporative Pan Kit for
RBC400
Front
↑
Of Unit
Pipe
Thread
Plug
Fig. 6
Evaporative
Pan Kit
Models RBC400 and RBC400RT require a floor drain
for condensate removal or the use of a two (2) condensate evaporative pan kits (p/n 329-60018-00). T wo
drain ports are provided, located at the right side and
rear of the unit. Plug the unused drain port with the
III. j - REMOTE UNIT CUT-OUT SETTINGS:
This section applies only to models RBC200,
RBC200RT , RBC400 and RBC400RT. The low pressure
cut-out of the remote condensing unit should be adjusted to obtain an evaporator coil temperature NO
LOWER THAN -15°F. If the length of the connecting
piping is 40 feet or less, the condensing unit low pressure cut-out settings will be approximately 15 +/- 2
PSIG cut-out and 25+/- 3 PSIG cut-in.
III. k - SEALING ROLL-IN/ROLL-THRU UNITS:
This section applies only to models RBC200,
RBC200RT , RBC400 and RBC400RT. Roll-In and RollThru cabinets set on the floor require the floor area to
be flat and level. In addition, after the cabinet is set in
place, sealant should be used around the perimeter of
the base to comply with National Sanitation Foundation requirements. After sealing the unit, the enclosed
ramp should then be installed.
-4-
Page 6
III. INSTALLATION (continued)
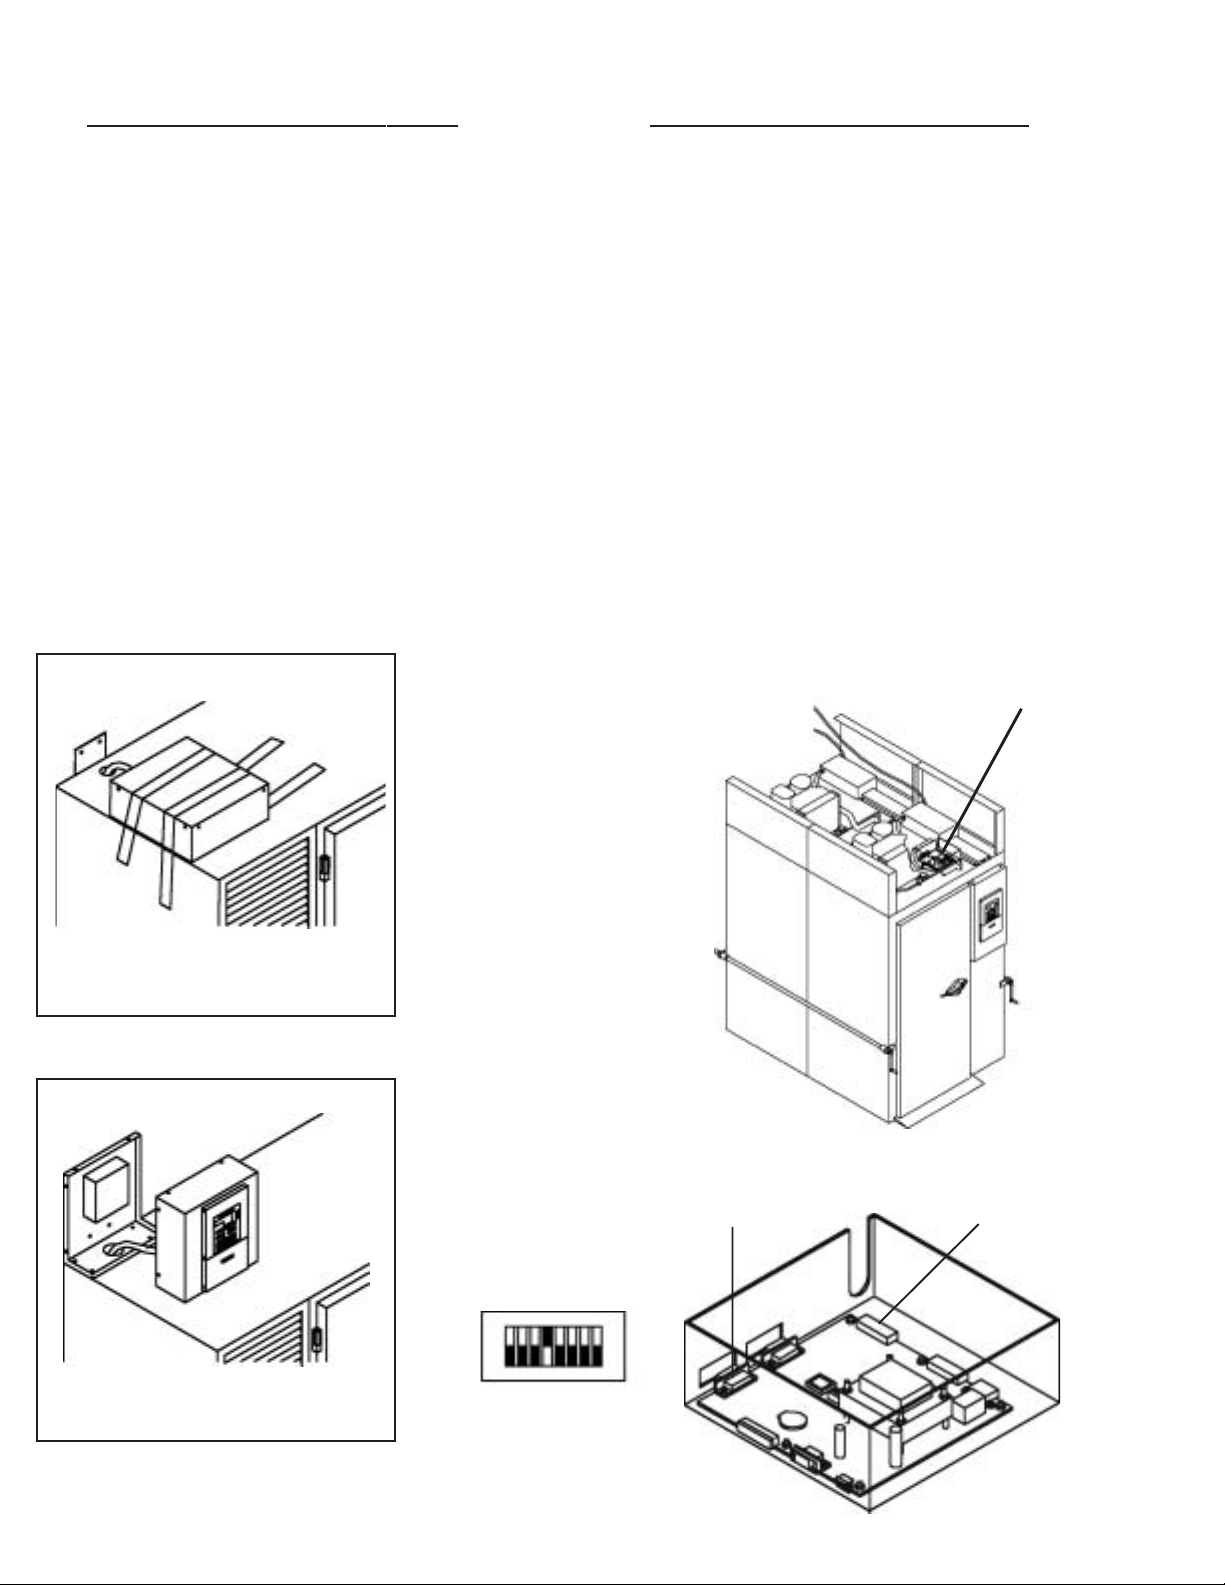
III. l - INSTALLING RBC50 CONTROL PANEL:
Model RBC50 is shipped with the control panel detached, and laid flat, taped to the cabinet top (see figure 8). This must be installed before use. To install:
Remove the packing material and tape holding the
control to the top. Remove and retain the six (6) Phillips
head screws attaching the control cover to the frame.
Also, remove and retain the 14”- 20x1/2” screws found
in the cabinet top. Next, position the control frame
over the hole in the unit top and attach using 1/4-20x1/
2” screws (see figure 9).
NOTE: Ensure that grommet is firmly in place, aligning round hole in bottom of control housing with round
hole in unit top.
Inspect paper roll and spindle from rear of control panel
before installing panel. Reattach the control cover to
the frame using the six (6) Phillips head screws previously removed.
III. m - ATTACHING RBC400 UNITS TOGETHER:
This section applies only to models RBC400 and
RBC400RT. First, place the front and rear cabinets in
close proximity to each other being careful to align the
drain from the front of the rear unit to the drain of the
front unit. It will be necessary to level both units together
at this time.
The liquid line solenoid and TXV are provided. The temperature control and defrost functions are performed by
the blast chill digital control.
Next, using two pipe clamps, pull the units together(see
figure 10). Install the covers over the gap formed between the units From inside the cabinets, using the
screws provided, install the breaker strips using the strip
as a template.
Connect both the probe harness and control harness from
unit two (the rear unit) to their dedicated connectors on
unit one (see figure 10a). Set #4 DIP switch to the ON
position as shown (see figure 10b).
CONTROL BOX
LOCATION
Fig. 8
Fig. 9
Fig. 10
USING TWO PIPE CLAMPS, PULL
THE TWO UNITS TOGETHER AND
USING THE SCREWS PROVIDED.
ALIGN THE BREAKER STRIPS AS
A TEMPLATE FOR THE SCREW
PATTERN INSIDE AND OUTSIDE
THE CABINET.
CONTROL BOX - RBC400
(wiring connections)
Fig. 10b
SET #4 DIP SWITCH
TO ON POSITION
AS SHOWN FOR RBC400
AND RBC400RT.
UNIT 2
PROBE HARNESS
CONNECTOR
UNIT 2 CONTROL
HARNESS
CONNECTOR
Fig. 10a
-5-
Page 7
IV. CARE & MAINTENANCE
CLEANING THE CONDENSER:
IV. a The most important thing you can do to insure a long,
reliable service life for your Traulsen is to regularly
clean the condenser coil. The self-contained condensing unit requires regularly scheduled cleaning to keep
the finned condenser clean of lint and dust accumulation. Keeping the condenser clean allows the cabinet
to operate more efficiently and use less energy.
To clean the self-contained condenser, first disconnect electrical power to the cabinet and lift up the front
louver assembly. To lift this, remove the two thumb
screws located on both sides at the bottom of the louver assembly . Once the screws are removed, the panel
can be pivoted upwards allowing full access to the
front facing condenser (for model RBC50, remove the
four Phillips head screws from the front louver panel,
and lift-off). Vacuum or brush any dirt, lint or dust
from the finned condenser coil, the compressor and
other cooling system parts. If significant dirt is clogging the condenser fins, use compressed air to blow
this clear. Lower louver assembly and replace thumb
screws to hold it in place. For care of the remote condensing unit(s) used for models RBC200, RBC200RT,
RBC400 and RBC400RT, consult the manufacturer’s
product literature.
IV. b -
CLEANING THE EXTERIOR:
Exterior stainless steel should be cleaned with warm
water, mild soap and a soft cloth. Apply with a dampened cloth and wipe in the direction of the metal grain.
Avoid the use of strong detergents and gritty, abrasive cleaners as they may tend to mar and scratch the
surface. Do NOT use cleansers containing chlorine,
this may promote corrosion of the stainless steel.
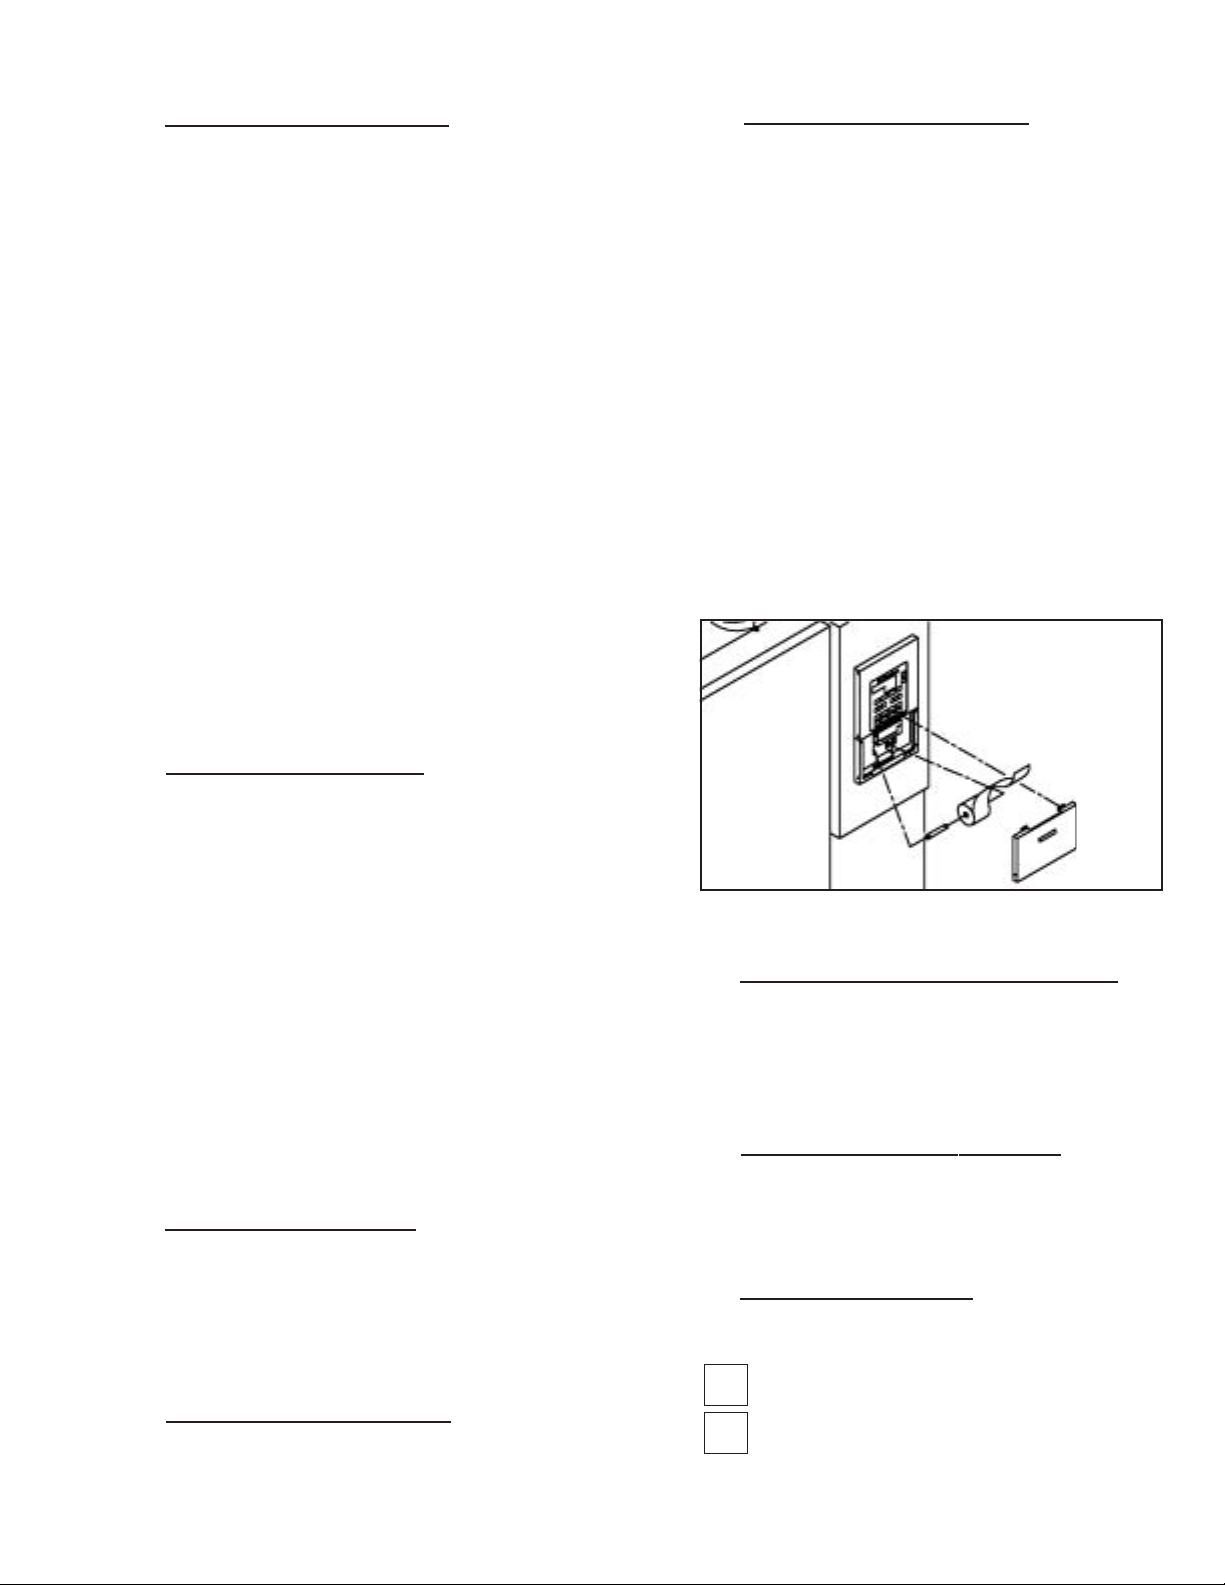
IV. d - INSTALLING PRINTER PAPER (cont’d):
the paper opening with the spindle in the paper roll.
Position the paper so it is fed out from the bottom of
the roll. Feed the paper into the bottom of the printer
enough to start the edge of the paper and press the
print button on the key pad (this will draw the paper
up through the printer and feed the paper out through
the front of the printer).
Feed the printer paper through the slot in the printer
cover and position the printer cover in place. Secure
the printer cover with the original screws (see figure
11).
Test the printer by pressing the print button and make
sure the paper feeds normally and the text is clear.
Printer paper is standard 2-1/4” wide x 100’ long “small
diameter,” Office Depot #451 - 310. Printer ribbon
Traulsen service part number SPR-00001-00 is Epson
#ERC-09, or Office Depot #626-602.
Fig. 11
2-14” wide
x 100’ long
“small
diameter”
paper roll
V. OTHER
Care should also be taken to avoid splashing the unit
with water, containing chlorinated cleansers, when
mopping the floor around the unit. For stubborn odor
spills, use baking soda and water (mixed to a 1 TBSP
baking soda to 1 pint water ratio).
WARNING: DISCONNECT ELECTRICAL POWER
SUPPLY BEFORE CLEANING ANY PARTS OF THE
UNIT.
IV. c - CLEANING THE INTERIOR:
For cleaning stainless steel interiors, the use of baking soda as described in section “IV. b” is recommended. Use on breaker strips as well as door gaskets. All interior fittings are removable without tools
to facilitate cleaning. A defrost cycle is the ideal time
for performing interior cleaning.
IV. d - INSTALLING PRINTER PAPER:
Remove the two (2) thumb screws on either side of
the printer cover. Pull the printer cover out and up to
expose the printer. Cut a clean edge on the end of a
roll of printer paper. Install the printer paper in through
V. a - SERVICE AGENCY CHECK & START-UP:
After installation and start-up, contact Traulsen’ s Service Department at (800) 825-8220 to arrange for a
“Mechanical Installation and Operation Inspection,”
which is required by Traulsen to validate the warranty .
On-site inspection not required for model RBC50.
V. b - ON-SITE BLAST CHILL TRAINING:
Traulsen offers the operator comprehensive one and
two day, on-site training in the proper operation of
your Blast Chiller. Contact your authorized Traulsen
equipment dealer for more information.
V. c - SERVICE INFORMATION:
Before calling for service, please check the following:
Is the electrical cord plugged in?
Is the fuse OK or circuit breaker on?
If after checking the above items and the unit is still
not operating properly, please contact an authorized
-6-
Page 8

V. OTHER
SERVICE INFORMATION (cont’d):
V. c Traulsen service agent. A complete list of authorized
service agents was provided along with your Traulsen
unit. If you cannot locate this, you may also obtain the
name of a service agent from the Service/Contact page
of our website: www.traulsen.com.
If service is not satisfactory, please contact our inhouse service department at:
VI. BLAST CHILL OPERATION
VI. b - COVERING FOODS (cont’d):
cess. NOTE: The plastic wrap or foil should be placed
directly onto the food surface. DO NOT place a lid
over the pan, or stretch the plastic wrap tightly across
the rim of the pan. This will create an insulating layer
of air above the food surface which will slow the cooling of the center of the food, while the outside edges
are cooling rapidly due to being in contact with the
pan surfaces (see figure 13).
Traulsen
4401 Blue Mound Road
Fort Worth, TX 76106
(800) 825-8220
Traulsen & Co., Inc. reserves the right to change specifications or discontinue models without notice.
V. d -
DEMONSTRATIONS:
Traulsen sales representatives perform in-service operational training for the end-user. Contact the T raulsen
Service Department (after completion of the service
agency start-up) to arrange this at (800) 825-8220.
V. e - BLAST CHILL VIDEO:
Traulsen supplies each Blast Chiller sold with an operational video (VHS format).
V. f - BLAST CHILL DATA COMMUNICATIONS KIT:
To obtain information about downloading batch data
to a PC, please contact the factory.
VI. BLAST CHILL OPERATION
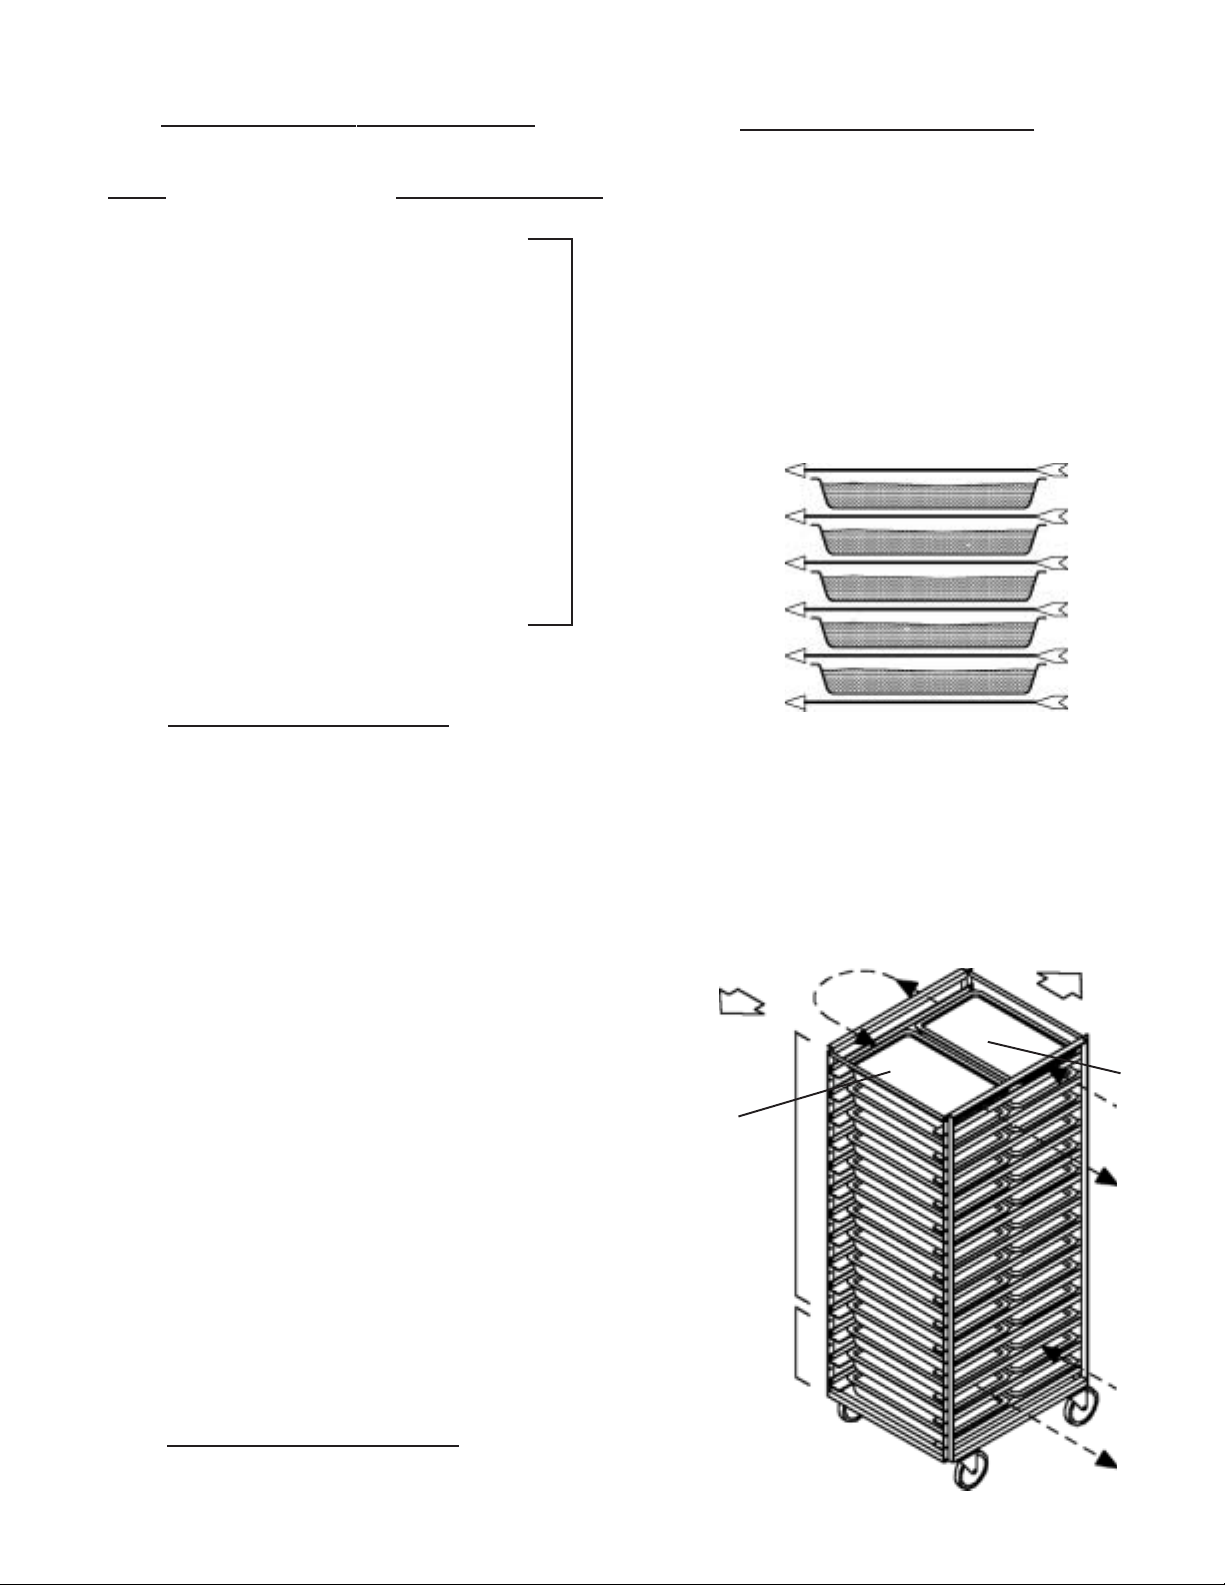
VI. a - LOADING FOOD INTO PANS:
The food product to be blast chilled should be placed
into metal pans (generally 12” x 20” x 2-1/2”) to a
DEPTH NOT TO EXCEED 2”. This will assure the fastest blast chilling cycle. NOTE: Use of deeper pans
and/or plastic containers can cause freezing and if
product is too thick or deep, the surface will freeze
and the center of the product will be insulated, preventing proper chilling (see figure 12).
NOT RECOMMENDEDRECOMMENDED
2” Maximum
Food Depth
More Than
2” Depth
RECOMMENDED NOT RECOMMENDED
Solid Lid
Over Pan
Plastic Wrap In
Contact With Food
Plastic Wrap Stretched
Across Food
Fig. 13
AIR
AIR
VI. c - GROUPING FOODS TO FORM BATCHES:
In order to achieve the best utilization of the Blast
Chiller Unit, it is possible to group foods with similar
cooling properties to form “Batches”. This will allow
one of the food probes to be inserted into one pan of
food product within the “batch” and represent the
cooling rate of the entire batch.
Based on our testing, we have found that foods with
higher levels of water content will cool much faster
than foods that have lower water content. If more than
three (3) types of foods are to be blast chilled at the
same time, it will be necessary to form one or more
batches to make best utilization of the three (3) probes
available. Below is a list of guidelines to follow when
forming batches.
1) Do not combine hot food and room temperature
foods within the same batch, even though they may
be similar (i.e. hot tuna casserole and cool tuna salad).
This is because it will take longer to cool from cooking temperatures to 40°F (5°C) than it will take from 70
°F to 40°F (21°C to 5°C). CAUTION: Coupling hot foods
with cold foods run the risk of the cold food remaining at dangerous temperatures too long as hot foods
cool.
2) The chart on page 8 shows the relative cooling times
of various foods compared to water (generally the fastest to cool). It can also be used as an approximate
guideline when forming batches.
VI. b - COVERING FOODS:
It is recommended that all food product be covered
with plastic wrap or foil for hot foods to minimize moisture loss from product during the blast chilling pro
3) Sliced meats placed in layers will cool more rapidly
than whole meats due to the ratio of surface area to
content (volume) allowing for greater heat dissipation.
-7-
Page 9
VI. BLAST CHILL OPERATION (cont’d)
VI. c - GROUPING FOODS TO FORM BA TCHES (cont’d):
AVG. COOLING TIME
FOOD RELATIVE TO WATER
LASAGNA +89%
SLOWER
CHILI +64%
MASHED POTATOES +64%
MEAT LOAF (WHOLE) +61%
RICE +61%
CREAM OF WHEAT +60%
KERNEL CORN +58%
SOUP (THICK TYPES) +49%
BAKED POTATOES +47%
CHOPPED STEAKS/GRAVY +43%
REFRIED BEANS +43%
SPAGHETTI/MEAT SAUCE +39%
GREEN BEANS +39%
SCRAMBLED EGGS +36%
MACARONI & CHEESE +33%
CHICKEN BREASTS +12%
WATER 0%
FASTER
VI. e - PAN PLACEMENT IN THE UNIT (cont’d):
Bottom). This will facilitate easier removal from the
unit if more than one batch is being blast chilled at the
same time, but have different completion times.
In the RBC50 model, air flows through the unit in a
horizontal plane from right to left, and left to right, therefore, there is no significant difference if the pans are
placed toward the rear of the unit or toward the door.
In the RBC100 model, air flows through the unit in a
horizontal plane from right to left, therefore, there is
no significant difference if the pans are placed toward
the rear of the unit or toward the door (see figure 14).
AIR FLOW
VI. d -
MAXIMUM LOAD PER BATCH:
Model RBC50 has a maximum recommended capacity
of 50 lbs. of food. This would be approximately five (5)
12” x 20” x 2-1/2” pans with 2” thick product.
Model RBC100 has a maximum recommended capacity of 100 lbs. of food. This would be approximately
ten (10) 12” x 20” x 2-1/2” pans with 2” thick product.
Models RBC200 and RBC200RT have a maximum recommended capacity of 200 lbs. of food. This would be
approximately twenty (20) 12” x 20” x 2-1/2” pans (one
cart) with 2” thick product.
Models RBC400 and RBC400RT have a maximum recommended capacity of 400 lbs. of food. This would be
approximately forty (40) 12” x 20” x 2-1/2” pans (two
carts) with 2” thick product.
All Blast Chiller units will provide more uniform cooling of the food if they are setup close to their capacity
of food with each blast chill cycle. This is due to the
fact that the heat being removed from the food tends
to moderate the temperature of the air being circulated.
Lightly loaded blast chill cycles tend to run with colder
air temperatures, which can cause the food to freeze
near the outside surfaces of the pans. The soft chill
cycle should be used if the chiller is loaded less than
50% of capacity.
Fig. 14
On the Roll-In and Roll-Thru models, it is recommended
that the slower cooling foods within the batch be placed
in the area of the cart which will be toward the rear of
the Blast Chill interior (away from the door). This area
of the unit receives the incoming air from the blowers
and is slightly cooler than the air passing over the pans
nearest the doors (see figure 15).
Rear Of
Door
Faster
Cooling
Food
BATCH
#1
BATCH
#2
Interior
Slower
Cooling
Food
VI. e - PAN PLACEMENT IN THE UNIT:
All pans of food with a batch should be grouped together in the same area of the unit (i.e. T op, Middle, or
-8-
Fig. 15
Page 10

VI. BLAST CHILL OPERATION (cont’d)
VI. f - FOOD PROBE PLACEMENT:
The food probes should be placed into the food product so that the tip of the probe is near the core (absolute center) of the food in the pan. The food probe
senses temperature in the last 1” of metal tip. The
core area will be the slowest to cool, therefore is used
to monitor the completion of the blast chill cycle (see
figure 16).
Sensing area of probe
should be inserted as
close to center of food
product as possible.
Fig. 18 - Batch #1, 2 probes (1 & 2) assigned &
placed in pans at top & bottom batches. Batch #2, 1
probe assigned and placed in pan at middle batch.
REAR OF
INTERIOR
Batch
#1
Batch
#2
DOOR
Fig. 18
Temperature
Sensing Area
↑
1”
↑
Fig. 16
Food
Probe
Care should be taken to assure that the food probe tip
is not touching the bottom or sides of the pan since
these areas will cool much faster than the core area,
prematurely terminating the blast chill cycle before the
core has reached the desired temperature.
VI. g - EXAMPLE BATCHES FOR RBC50:
Three food probes are available for assignments of 1,
2 or 3 separate batches of food. They may be assigned
in a variety of combinations. Please review some of
the various combinations shown in figures 17, 18, 19
& 20.
Fig. 17 - Batch #1, 3 Probes Assigned &
Placed In Pans At Top, Middle & Bottom
REAR OF
INTERIOR
Fig. 19 - Batch #1, 1 probe assigned & placed in
pans at middle. Batch #2, 2 probes (1 & 3) assigned
and placed in pans at top & bottom of each batch.
REAR OF
INTERIOR
Batch
#1
Batch
#2
DOOR
Fig. 19
Fig. 20 - Batch #1, 1 probe (2) assigned &
placed in pan at middle of batch. Batch #2 & #3, 2
probes (1 & 3) assigned and placed in pans at top of
each batch.
Batch
#1
Batch
#2
REAR OF
INTERIOR
Batch
#1
DOOR
-9-
Batch
#3
DOOR
Fig. 20Fig. 17
Page 11

VI. BLAST CHILL OPERATION (cont’d)
EXAMPLE BATCHES FOR RBC100:
VI. h Three food probes are available for assignments of 1,
2 or 3 separate batches of food. They may be assigned
in a variety of combinations. Please review some of
the various combinations shown in figures 21, 22, 23
& 24.
Figure 21 - Batch #1, 3 probes assigned & placed
in pans at top, middle & bottom of batch.
REAR OF
INTERIOR
Batch
#1
DOOR
Fig. 21
Figure 22 - Batch #1, 2 probes (1 & 2) assigned &
placed in pans at top & bottom of batch. Batch
#2, 1 probe (3) assigned & placed in the middle of
batch.
Figure 23 - Batch #1, 1 probe (1) assigned & placed in
pans at middle of batch. Batch #2, 2 probes (2 & 3) assigned & placed in the top & bottom of batch.
REAR OF
INTERIOR
Batch
#1
Batch
#2
DOOR
Fig. 23
Figure 24 - Batch #1, 1 probe (1) assigned & placed in
pans at middle of batch. Batch #2 & #3, 2 probes (1 &
3) assigned & placed in the top of each batch.
Batch
#1
Batch
#2
DOOR
Fig. 22
REAR OF
INTERIOR
Batch
#2
Batch
#3
DOOR
Batch
#1
REAR OF
INTERIOR
Fig. 24
-10-
Page 12

VI. BLAST CHILL OPERATION (cont’d)
VI. i - EXAMPLE BATCHES FOR ROLL-IN MODELS:
Three food probes are available for assignments of 1,
2 or 3 separate batches of food. They may be assigned
in a variety of combinations. Please review some of
the various combinations shown in figures 25, 26, 27
& 28.
Figure 25 - Batch #1, 3 probes assigned & placed
in pans at top, middle & bottom of batch.
REAR OF
DOOR
Batch
#1
INTERIOR
Figure 27 - Batch #1, 1 probe (1) assigned & placed in
pans at middle of batch. Batch #2, 2 probes (2 & 3)
assigned & placed in the top & bottom of batch.
REAR OF
DOOR
Batch
#1
Batch
#2
INTERIOR
Figure 26 - Batch #1, 2 probes (1 & 2) assigned & placed
in pans at top & bottom of batch. Batch #2, 1 probe (3)
assigned & placed in the middle of batch.
REAR OF
DOOR
Batch
#1
Batch
#2
INTERIOR
Figure 28 - Batch #1, 1 probe (1) assigned & placed in
pans at middle of batch. Batch #2 & #3, 2 probes (1 &
3) assigned & placed in the top of each batch.
REAR OF
DOOR
Batch
#1
Batch
#2
Batch
#3
INTERIOR
-11-
Page 13

VII. OPERATING THE BLAST CHILL CONTROL
EMPLOYEE
NUMBER
PROGRAM A
NEW BATCH
FOOD PROBES
1,2 & 3
PRODUCT TEMPS
PROGRAMMED
CHILL CYCLES
• BLAST CHILL
• SOFT CHILL
• FLASH CHILL
• CONSTANT CHILL
LOCK KEY PAD
SETS DATE & TIME
VII. a - OPERATING MODES:
The Digitraul II (control panel) performs the following
five basic functions:
1. Maintenance Mode
2. Blast Chill Mode
3. Soft Chill Mode
4. Flash Chill Mode
5. Constant Chill Mode
6. Continuous Batching Mode
MAINTENANCE MODE - Operates as a holding refrigerator. Fail safe temperature holding range, preset at
the factory of 34°F to 38°F (1.1°C to 3.3°C) and has an
adjustable range of 30°F to 41°F (-1°C to 5°C).
BLAST CHILL MODE - Input temperatures from 140°F
to 180°F (60°C to 82°C). Range of completion of Blast
Chill cycle is adjustable between 35°F to 41°F (2°C to
5°C). Blast chill mode should be used for high density
food such as meat, vegetables and starches.
SOFT CHILL MODE - Designed for light loads or low
density products. Product is always setup using
probes. As food temperature reaches 70°F (21°C), the
fan speed is reduced. This will allow respiration, which
will increase pull down times to control Blast Chilling
effects. When air temperature reaches 34°F (1°C), the
compressor cycles off and back on at 38°F (3°C). When
food temperature reaches settings of 35°F to 41°F (2°C
to 5°C), the cycle is complete.
TIME OF DAY
ADJUST PROGRAM
SETTINGS UP OR DOWN
INTERIOR TEMPERATURE
CLEARS BATCH DATA
DISPLAYS REMAINING
TIME IN CONSTANT
CHILL BATCH
MANUAL DEFROST
PRINT CURRENT
TIME & TEMP
FLASH CHILL MODE - Product is always setup with
probe/probes. This mode reduces product temperature to 0°F (-18°C) and is adjustable between 0° to +5°F
(-18°C to -15°C). When the alarm sounds, product is
ready to be removed. Cabinet automatically returns to
34°F to 38°F (1°C to 3°C) normal operating tempera-
ture. NOTE: All product will be frozen in this mode.
Freezing times will vary depending upon the product.
All product must be removed after cycle is complete.
The chiller will not hold product in frozen state.
CONST ANT CHILL MODE - This mode is similar to Blast
Chill except that the food probes do not control the
cycle. It is a time controlled operation, reverting to
maintenance mode at the end of the timeframe set.
Food probes can be used to monitor product temperature. System will automatically defrost every three (3)
hours. T o perform a “Constant Chill Operation” press
the NEW BATCH, then the CONSTANT CHILL button.
The display will change to a digital clock reading of
(1:30) with the hour flashing. Use the up & down arrow
buttons to change the hours up or down and then push
ENTER. Now the minutes will be flashing. Set the minutes desired with the arrow buttons and then press
ENTER. Now press the ST ART button to run the batch.
When the amount of time set in the display is reached,
the unit will sound the alarm and return to maintenance
mode. Note: Pressing “TIMER” button during the batch
will display the time remaining in the current cycle.
-12-
Page 14

VII. OPERATING THE BLAST CHILL CONTROL (cont’d)
VII. b - CONTINUOUS BATCHING FOR BLAST CHILL
AND FLASH CHILL MODES (CANNOT BE USED WITH
SOFT CHILL):
This allows you to start a batch using probe (1), then
start a second batch using probe (2), and later still
another batch using probe (3). When a batch is complete, the batch can be cleared and another batch can
be started causing the unit to run continuously in
“Blast Chill” mode. While operating in this mode, the
unit will defrost automatically every 3 hours. The control is shipped from the factory configured with this
feature OFF. To activate this see section “VII. j”.
CAUTION: Use of this process can extend the product
chill times.
VII. c - PROBE TEMPERATURE:
To check a temperature of a probe during operation,
press that probe number (1, 2, or 3) button and release.
The current probe temperature will come up in the display for 30 seconds.
VII. d - LOCK FUNCTION:
Pressing the lock button will lock out all functions
except for the temperature probes. All batches in process will complete.
VII. e - UNLOCK FUNCTION:
Press the hidden button behind the “T” on the Traulsen
logo to unlock the lock function.
VII. f - DEFROST CYCLE:
A. AUTOMATIC DEFROST - will occur every three (3)
hours between batches. The control will default to
defrost at the start of a programmed batch if the
unit is within one (1) hour of the scheduled threehour (3) defrost cycle. The blower fans are off during the defrost cycle, allowing the product to be
loaded and a new batch programmed during the
defrost. The programmed chill cycle will start automatically after the completion of the defrost
cycle. Product is held at safe temperatures in the
blast chiller during defrost.
B. MANUAL DEFROST - Pressing the “DEFROST”
button in any mode will initiate the defrost cycle
and cancel any batch in progress.
VII. g - PRINTOUT DATA:
To print data at any time, press PRINT. Output will include: Date & Time, Software V ersion, Interior Air T emperature and the Three Probe Temperatures. Also, included in the blast/ soft/ and flash modes, is a printout
of a graph with batch data.
NOTE: At the end of a batch, all of the above data is
printed out. System will store the previous 72 hours
of temperature data printed out in 5-minute increments.
VII. g - PRINTOUT DATA (contined):
Note: Up to three copies of the Batch Data can be
printed automatically. See section “VII. j” to adjust
the number of batch copies required
VII. h - RESETTING DATE AND TIME:
Press “Time of Day” button. Notice MM/DD/YY in the
display with the “MM” flashing, adjust the month using the up/down arrows. To advance to next setting
press enter and adjust using the up/down arrows.
Repeat process for the day , year , hours, minutes, and
am/pm selections.
VII. i - PROGRAMMING A NEW BATCH:
STEP 1: T o operate the unit in Blast Chill mode, press
the button labeled “NEW BA TCH”. Notice that the first
two (2) digits start to flash in the display (see figure
29). These two digits can represent an employee’s
number to identify the person running the batch. To
change the numbers in the display, use the UP and
DOWN arrows to set specific numbers. When the number is set, press ENTER to proceed to the next step.
Employee
Number
New Batch
Enter
Fig. 29
STEP 2:The next four (4) digits in the display are now
flashing (see figure 30). These numbers will represent a batch identification number. To proceed on to
the next batch in sequence, press ENTER. The display will automatically display the next number set in
sequence. Proceed to the next step.
NOTE: If you do not want to accept the next batch
number assigned, you may set in the display , any four
(4) digit number desired using the UP and DOWN arrows. After a preferred batch number has been set,
press ENTER to lock in that specific number and proceed to the next step.
.
-13-
Page 15

VII. OPERATING THE BLAST CHILL CONTROL (cont’d)
Batch
Number
Enter
Fig. 30
STEP 3: Notice that the word BLAST is flashing directly above the SOFT/FLASH button. If you wish to
blast chill product, press ENTER. If a soft chill is preferred, press the SOFT/FLASH button once, and then
press ENTER. If a flash chill is required, press the
SOFT/FLASH button twice, and then press ENTER.
NOTE: Whichever chill cycle mode is selected, there
will be a light illuminated “stating” the mode that has
been chosen. This will be the mode in which the unit
will run (see figure 31).
are only using one or two of the three probes, the
probe(s) not selected will automatically drop out on
startup. Now that the probes have been selected, press
ENTER (see figure 32).
Enter
Food
Probe
Lights
Fig. 32
STEP 5: The Blast Chiller unit is now ready to run. Press
the ST ART button now. NOTE: To stop the chill cycle,
press the RESET button. This will clear all of the programmed settings and return the unit to maintenance
mode (see figure 33).
Start
Enter
Blast
Fig. 31
STEP 4: There are now three probe lights flashing directly above the “numerical buttons” of unit 1. To select the probes in which you intend to use for the batch,
individually push the “color coordinated buttons” that
match the color of the individual probes placed into
the food product. The lights will stop flashing and remain on continuously for the probes selected. If you
Reset
Fig. 33
STEP 6: After completion of the chill cycle the assigned
food probe light on the central panel will flash and the
“batch data” will automatically print. NOTE: To clear
end of batch data, (food probe lights are flashing), press
the RESET button (food probe lights are off).
-14-
Page 16

VII. OPERATING THE BLAST CHILL CONTROL (cont’d)
VII. j - CONTROL PANEL CONFIGURATION:
INTRODUCTION - The Traulsen Blast Chiller Unit is
preset and tested at the factory to be fully functional
using default settings programmed into the unit.
Therefore, it is advised that the following procedures
should be performed by an experienced blast chill operator, or an approved blast chill technician.
STEP 1: Start configuration by pressing the “T” on
the Traulsen logo (see figure 34). The display will show
U1A, which is the maintenance air temperature, 3438°F is typical during operation. Press the “T” again,
now U1E1 is displayed. This displays the current maintenance evaporator coil temperature. Press again, notice U1E2 is displayed. This displays current chill
evaporator coil temperature. Press again, and notice
the “F” for Fahrenheit begins to flash next to the display screen. Y ou have now accessed the first set function. Using the UP/DOWN arrows, you can change the
settings for Fahrenheit to Celsius (F
° to C°, see figure
35).
Press “T” on
logo to start
configuration
and unlock.
STEP 5: The display shows the temperature flashing.
This is the cut out air temperature of the maintenance
mode. Using the UP/DOWN arrows, adjust setting from
37°F to 41°F (-3°C to 5°C). Default setting is 38°F (3 °C).
STEP 6: Press ENTER.
STEP 7: The word “BLAST” is flashing above the SOFT/
FLASH button. Using the UP/DOWN arrows, adjust the
temperature range in the display from 35°F to 41°F
(-2°C to 5°C). This is the blast chill and soft chill end
point temperature. Default setting for “BLAST CHILL”
is 41°F (5°C).
STEP 8: Press ENTER.
STEP 9: The word “FLASH” is flashing above the SOFT/
FLASH button. Using the UP/DOWN arrows, adjust the
temperature range in the display from 0°F to 5°F
(-18°C to -15°C). This is the flash chill end point tem-
perature. Default setting for “FLASH CHILL” is 5°F
(-15°C).
STEP 10: Press ENTER.
STEP 11: “H” will display on the screen. UP/DOWN
arrows will change solid display to flashing “H” display and back.
Fig. 34
STEP 2: Press ENTER.
STEP 3: The display shows the temperature flashing.
This is the cut out air temperature of the maintenance
mode. Using the UP/DOWN arrows, adjust setting from
30°F to 34°F (-1°C to 1°C). Default setting is 34°F (1°C).
STEP 4: Press ENTER.
Fahrenheit
Solid “H” = Normal factory setting to support a
HACCP operating mode.
Flashing “H” = Allows Continuous Batching
mode of operation. See Continuous Batching
for Blast Chill and Flash Chill Modes (cannot
be used with Soft Chill, see figure 36).
Fig. 36
STEP 12: Press ENTER.
STEP 13: Number 1,2 or 3 will appear on the screen.
use the UP/DOWN arrows to select the desired number of Printed Batch Data copies.
Fig. 35
STEP 14: Press ENTER. This completes the control
panel configuration process. The unit is now ready
for operation.
-15-
Page 17

VII. OPERATING THE CONTROL (cont’d) VIII. UNDERSTANDING PRINTOUTS
VII. k -
PROBE TEMPERA TURE & ALARM W ARNINGS:
The food probes sense temperatures in the last 1” of
the probe (nearest the tip). There are three food probe
warnings that can occur during a programmed batch.
The warnings will flash the “red” ALARM light, the au-
dible alarm will sound, and a printout noting a probe
failure has occurred during completion of a batch.
Should a probe failure occur during a programmed
batch, the blast chiller unit will automatically switch
to the remaining probes for that batch. If only one
probe was programmed for the batch and fails, the
blast chiller will automatically switch from the programmed batch to constant chill for a 1 hour and 30
minute timed chill cycle. The three (3) warning conditions are:
a) Over T emperature - exposing the food probe to product that is 212
°F (100°C). An over temperature alarm
will occur if food temperature is above 212°F (100°C)
at loading. Pressing the PRINT button will print all
food probe temperatures, a defective or unplugged
food probe will print 500°F (260°C).
b) Under T emperature - exposure to product with a temperature below -5°F (-21°C). Pressing the PRINT but-
ton will print all food probe temperatures, a defective
or unplugged food probe will print -99°F (-73°C).
c) Food Probe Open Circuit - should the food probe
fail or become unplugged creating an open circuit, it
will sound the alarm. Pressing the PRINT button will
print all food probe temperatures, a defective or
shorted food probe will print -99°F (-73°C).
VIII. UNDERSTANDING PRINTOUTS
VIII. b - CONSTANT CHILL CYCLE - BATCH DATA:
THE BATCH DATA WILL PRINT OUT AUTOMATICALLY AT THE
END OF A COMPLETED BATCH
Program
Chip
Revision
Operator
Number
Automatic New
Batch Number
Unit 1 or 2
Batch Mode:
Constant Chill
Start of Batch
Date & Time
End of Food Batch
Probe Temperatures
Total Time
Programmed
For The Constant
Chill Cycle
End of Constant
Chill Cycle
Date & Time
VIII. a - CURRENT DATA PRINTOUT:
PRESS THE PRINT BUTTON TO
PRINT THE CURRENT DATA
Current
Date & Time
Current
Interior Air
Temperature
Current
Food Probe
Temperatures
-16-
Page 18

VIII. UNDERSTANDING PRINTOUTS (cont’d)
VIII. c - BLAST CHILL CYCLE - BATCH DATA:
THE BATCH DATA WILL PRINT OUT AUTOMATICALLY
AT THE END OF A COMPLETED BATCH
Program Chip
Revision
Operator
Number
Automatic New Batch Number
Unit 1 or 2
Batch Mode: Blast Chill
Soft Chill
Flash Chill
Graph of Batch Probe Data
Key Temperature vs. Time
Identification
140
°F, 70°F, end (41°F)
Time Required To Chill Product
From 140°F to 70°F
Time Required To Chill Product
From 70°F to 41°F
End of Batch Food Probe Temperature
The Warmest Probe Must Reach The
End of Batch Temperature (41°F) To
Complete The Chill Cycle
Total Time To Complete The Chill Cycle
From Start Temperature (above 141°F)
Down To End Temperature (41°F)
End of Constant Chill Cycle Date & Time
(batch is complete). System Returns To
Normal Refrigeration 35°F to 38°F (maint-
enance mode)
-17-
Page 19

VIII. UNDERSTANDING PRINTOUTS (cont’d)
VIII. d - THE 72-HOUR DATA LOG:
Constant Chill
PRINTS THE TEMPERATURE IN 5-MINUTE
INCREMENTS STARTING WHEN CURRENT
DATA WORKING BACK
Notes The Time & Date From Power OFF
To Power ON
Soft Chill
Maintenance
Refrigeration Mode
Defrost Cycle
Blast Chill
Alarm Mode
Flash Chill
Failed Or Un-Plugged Food Probe
Chill Cycle Evaporator Coil
Maintenance Evaporator Coil
1, 2, & 3 Food Probe
-18-
Air Probe
Page 20

VIII. UNDERSTANDING PRINTOUTS (cont’d)
VIII.e - FOOD PROBE FAILURE WARNINGS:
FOOD PROBE FAILURE WARNING:
Alarm occurs only during a programmed batch.
Failed Food Probe
Unit Number Location of Failed Probe
Alarm Date & Time
Employee Number
Batch Number
CHILL CYCLE BATCH OVER 6 HOURS:
Alarm occurs when a programmed batch runs for more
than 6 hours. The chill cycle will continue to run until
complete or cancelled/
6-Hour Batch Warning Notification
Alarm Date & Time
REFRIGERATION FAILURE:
Alarm occurs when interior temperature remains over
100°F (37.8°C) for more than 20 minutes. CAUTION: The
blast chill unit will shut down and requires power OFF
and then back ON to reset normal operation (reset
button will not work).
Unit Number With Refrigeration Failure
Refrigeration Failure Over Temperature Warning
Alarm Date & Time
POWER LOSS NOTIFICATION:
Alarm occurs as a result of a power loss, immediately
after power is restored.
Power Loss Warning
NOTES: Days
Power Loss
Date & Time
Power Is Restored
Date & Time
Hours
Minutes
-19-
Page 21

IX. TROUBLE SHOOTING GUIDE
SYMPTOM PROBABLE CAUSE/SOLUTION
1. Condensing unit fails to start when programming a new
batch.
2. Batch requires too much time to chill product down to
40° F. “Chill Cycles Batch Over 6-Hours” will ALARM
and a printout will note the chill cycle has exceeded
maximum safe time.
3. “Food Probe Failure” - ALARM will occur during a
chill cycle batch with printout noting the “Food Probe
Failure Warning.”
4. “Refrigeration Failure” - ALARM with a printout
noting the warning will occur when the interior
temperature exceeds 100° F for more than 20-minutes.
Blast Chill refrigeration system will shut down as a
safety default. The compressors and blower fans are
shut off and the control key pad is locked out.
a. Check power supply to condensing unit.
b. Batch was not programmed properly, was START pressed after programming batch? If
“YES” the display should return to TIME and TEMPERATURE.
c. System problem. Call for service.
a. Is the door closed properly? If not, close door completely.
b. Too much product loaded. Adjust the load to not exceed capacity of the unit.
c. Product depth in pan exceeds 2-1/2”. Reduce pan load per guidelines on page 7.
d. Has pan been covered with a lid, plastic wrap or foil, and is this not in direct contact with
the product? Cover product correctly as per guidelines on page 7.
e. Perhaps the product loaded is of a high density. Allow additional chilling time.
f. Dirty condenser coil. Clean condenser as per instructions on page 6.
g. Evaporator coil iced. Allow to defrost (press DEFROST to initiate a manual defrost).
a. “Food Probe Failure” - printer will notify the operator that it is converting to Constant Chill
mode. Food probe(s) may not have been assigned while programming the chill cycle batch.
Review new batch procedures on page 13.
b. Press the food probe button, if the display reads “---”, press “PRINT.” If a (-99°) F probe
temperature is displayed then there is an open circuit. Check the probe plug connection.
c. Press the food probe button, if the display reads “---”, press “PRINT.” If a 500° F probe
temperature is displayed then there is an open circuit. Check the probe plug connection.
d. Food probe was placed in excessively hot product. Product temperatures exceeding
210° F can result in the probe reporting false temperatures. Cool food probe and test again.
f. Food probe fails and will then operate correctly at a later time. Program a Blast Chill batch
using the suspect probe. Wiggle the food probe wire. If a second “Food Probe Failure”
occurs the food probe is defective. Replace with new food probe.
g. Damaged or defective food probe. Replace with new food probe.
“Refrigeration Failure” CORRECTION - Remove power from the unit. Unplug and then
replug the unit or reset the circuit breaker (OFF and back ON). The Blast Chiller will reset
and turn ON. “Power Loss Failure” will printout when reset.
a. Batch programming was incomplete or incorrect and chill cycle did not start. Try programming batch again.
b. Too much product loaded. Adjust the load to not exceed capacity of the unit.
c. Dirty condenser coil. Clean condenser as per instructions on page 6.
d. Refrigeration system failure, unit will not cool after having been reset. Call service for
repair.
5. “Power Loss Notification” - Printout notes the time
power was lost and the time in which it was restored.
6. Cannot program a new batch.
7. Printer not printing.
8. No display on control.
9. Condensation on exterior surface.
a. Power was lost to the Blast Chill unit. If product was inside the unit see the 72-Hour Data
Log to determine if product temperature was compromised.
NOTE: Always press the “RESET” button twice to clear the old complete batch data from
memory before programming a new batch.
a. The LOCK feature may be activated. See page 13 to unlock the control.
b. Unit may be in a defrost cycle. Batch can be programmed at this time and will Auto Start
after the Defrost Cycle is complete.
c. Program chill cycle batch is in process, a new batch can be programmed after completion
of current batch.
d. A batch may have been only partially programmed. Press “RESET” twice to clear any
incomplete batch information.
a. Printer is out of paper. Replace printer paper roll as per instructions on page 6.
b. Printer ribbon is out of ink. Replace printer ribbon cartridge.
c. Printer paper may be installed incorrectly, allowing the paper to feed behind the printer
ribbon. Remove the paper from the printer and reinstall the paper as per instructions on
page 6.
d. Paper does not feed or jams behind the paper feed slot in the cover. Remove paper and
reinstall as per instructions on page 6.
a. Check power supply and circuit breaker.
b. Confirm unit is correctly plugged into a working power outlet.
c. System problem. Call for service.
Condensation on the exterior surface of the unit is perfectly normal during periods of high
humidity, otherwise refer below for other possible causes.
a. Check door alignment and gasket for proper seal.
b. On Roll-In/Roll-Thru models, check bottom door sweep for proper adjustment.
c. Electric door heater malfunction. Call for service.
-20-
Page 22

X. WIRING DIAGRAM - RBC50
-21-
Page 23

X. WIRING DIAGRAM - RBC100
-22-
Page 24

X. WIRING DIAGRAM - RBC200 & RBC200RT
-23-
Page 25

X. WIRING DIAGRAM - RBC400 & RBC400RT
-24-
Page 26

XI. WARRANTY INFORMATION
STANDARD DOMESTIC WARRANTY
TRAULSEN & CO., INC. warrants new equipment to the original purchaser, when installed within the
United States against defective material and workmanship for one (1) year from the date of original
installation. Under this warranty, TRAULSEN & CO., INC. will repair or replace, at its option, including
service and labor, all parts found to be defective and subject to this warranty. The compressor part is
warranted for an additional four (4) years. During this period TRAULSEN & CO., INC. will supply replacement compressor(s) if deemed defective, however, all installation, recharging and repair costs will remain the responsibility of the owner.
This warranty does not apply to damage resulting from fire, water, burglary, accident, abuse, misuse,
transit, acts of God, terrorism, attempted repairs, improper installation by unauthorized persons, and
will not apply to food loss.
The remote compressor(s) used on models RBC200, RBC200RT, RBC400 and RBC400RT (when purchased from Traulsen) are warranted only for the original one (1) year period. Optional extended four (4)
year warranties may be purchased at time of original equipment purchase.
THERE ARE NO ORAL, STATUTORY OR IMPLIED WARRANTIES APPLICABLE TO TRAULSEN, INCLUDING BUT NOT LIMITED TO, ANY IMPLIED WARRANTY OF MERCHANTABILITY OR FITNESS FOR ANY
PARTICULAR PURPOSE WHICH EXTEND BEYOND THE DESCRIPTION ON THE F ACE HEREOF . TRAULSEN
SHALL HA VE NO OBLIGATION OR LIABILITY FOR CONSEQUENTIAL OR SPECIAL DAMAGES, GROWING
OUT OF OR WITH RESPECT TO THE EQUIPMENT OR ITS SALE, OPERATION OR USE, AND TRAULSEN
NEITHER ASSUMES NOR AUTHORIZES ANYONE ELSE TO ASSUME FOR IT ANY OBLIGATION OR LIABILITY IN CONNECTION WITH THE EQUIPMENT OR ITS SALE, OPERA TION OR USE OTHER THAN AS ST A TED
HEREIN.
INTERNATIONAL COMMERCIAL WARRANTY
(for Canadian warranties see domestic US warranty)
TRAULSEN & CO., INC. warrants to the original purchaser the Refrigeration Equipment manufactured and sold
by it to be free from defects in material and workmanship under normal use and service for a period of one (1)
year from date of shipment. Under this warranty, TRAULSEN & CO., INC. will reimburse the purchaser for the
replacement of any part of said equipment (excluding dryers & refrigerant gas) which then proves to be defective. This warranty does not apply to damage resulting from fire, water, burglary, accident, abuse, mis-
use, transit, acts of God, terrorism, attempted repairs, improper installation by unauthorized persons,
and will not apply to food loss.
TRAULSEN’S standard warranty does not apply to Export Sales. Rather, for a period of one (1) year from
date of original installation not to exceed Fifteen (15) months from date of shipment from factory, TRAULSEN:
will replace, F.O.B. factory, any defective parts normally subject to warranty.
will not cover the cost of packing, freight or labor such costs being the sole responsibility of the dealer.
THIS WARRANTY IS IN LIEU OF ALL OTHER WARRANTIES EITHER EXPRESSED OR IMPLIED AND
CONSTITUTES TRAULSEN’S FULL OBLIGATION AND LIABILITY. WARRANTIES NOT AVAILABLE ON
REMOTE MODELS.
-25-
Page 27

XII. PARTS LIST
PART/DESCRIPTION PART #
Condensate Evaporator Pan Kit 329-60018-00
Interconnect Harness (for RBC400/RBC400RT) 333-60082-00
Ribbon Cable 333-60083-00
Red Food Probe 333-60086-01
Blue Food Probe 333-60086-02
Green Food Probe 333-60086-03
Shelf To Fit Blast Chill Racks 340-05337-03
Keyboard/Printer/Board (RBC200) 950-60118-00
Keyboard/Printer/Board (RBC100) 950-60119-00
Racks, Roll-In (Roll-In/Roll-Thru models) OTR-TRA-13
Printer Ribbon SER-00001-00
XIII. INDEX
A
Ambient Temperature 4
B
BTU Requirements 4
C
Casters 2
Cleaning - The Condenser 6
Cleaning - The Exterior 6
Cleaning - The Interior 6
Clearances 3
Compressor - Oil 2
Condensate Evaporator 4
Condensate Removal 4
Condensing Unit 6
Control Box 5
Control - Electronic 5
Control Harness (RBC400) 5
Cord & Plug 3
Cut Out Settings (remote models) 4
D
Damage - Freight 2
Data Download 7
Defrost, Automatic 13
Defrost, Manual 13
Dip Switch, Setting The 5
Drain Port 4
E
L
Legs 2
Lock Function 13
Louver Panel 6
M
Maintenance Mode 12
N
NEMA, Plug Configuration 3
O
On-Site Training 6
P
Pallet - Shipping 2
Pans, Food 7
Plug, Drain 4
Printer 6
Printout 16 - 17,
Probes 9 -11, 13, 16
Probe Harness (RBC400) 5
R
Remote Condensing Units 4
Return Authorization 2
S
Sealant 4
Solenoid (liquid line) 5
Spindle 5, 6
F
Floor Sink 4
Foil 7
Freight Claim 2
G
Grommet 5
H
Harness, Probe (RBC400) 5
I
J
K
T
TXV 5
U
Unlock Feature 13
V
Video, Blast Chilling 7
W
Warranty 6, 25
Wiring Diagram - RBC50 21
Wiring Diagram - RBC100 22
Wiring Diagram - RBC200/200RT 23
Wiring Diagram - RBC400/400RT 24
X
Y
Z
-26-
Page 28

HOURS OF OPERATION:
Monday thru Friday 7:30 am - 4:30 pm CST
EXTENDED WARRANTY SERVICE HOURS
Monday thru Friday 4:30 pm - 6:00 pm CST
Traulsen & Co., Inc.
4401 Blue Mound Road Fort Worth, TX 76106
Phone: (800) 825-8220 Fax-Svce: (817) 740-6757
Website: www.traulsen.com
Quality Refrigeration
 Loading...