

Page 1
TRAULSEN BLAST CHILLERS
Models: RBC50, RBC100, RBC200, RBC200RT, RBC400 & RBC400RT
training guide
Page 2
1 TRAULSEN RBC50, RBC100 & RBC200 BLAST CHILLER TRAINING GUIDE
Table of Contents
Page
Programming The Control....................................................... 2
Placing Probes/Loading Pans................................................. 3
Basic Operation....................................................................... 4
Ending the Cycle/Printing........................................................ 5
Care & Cleaning...................................................................... 6
Troubleshooting....................................................................... 7
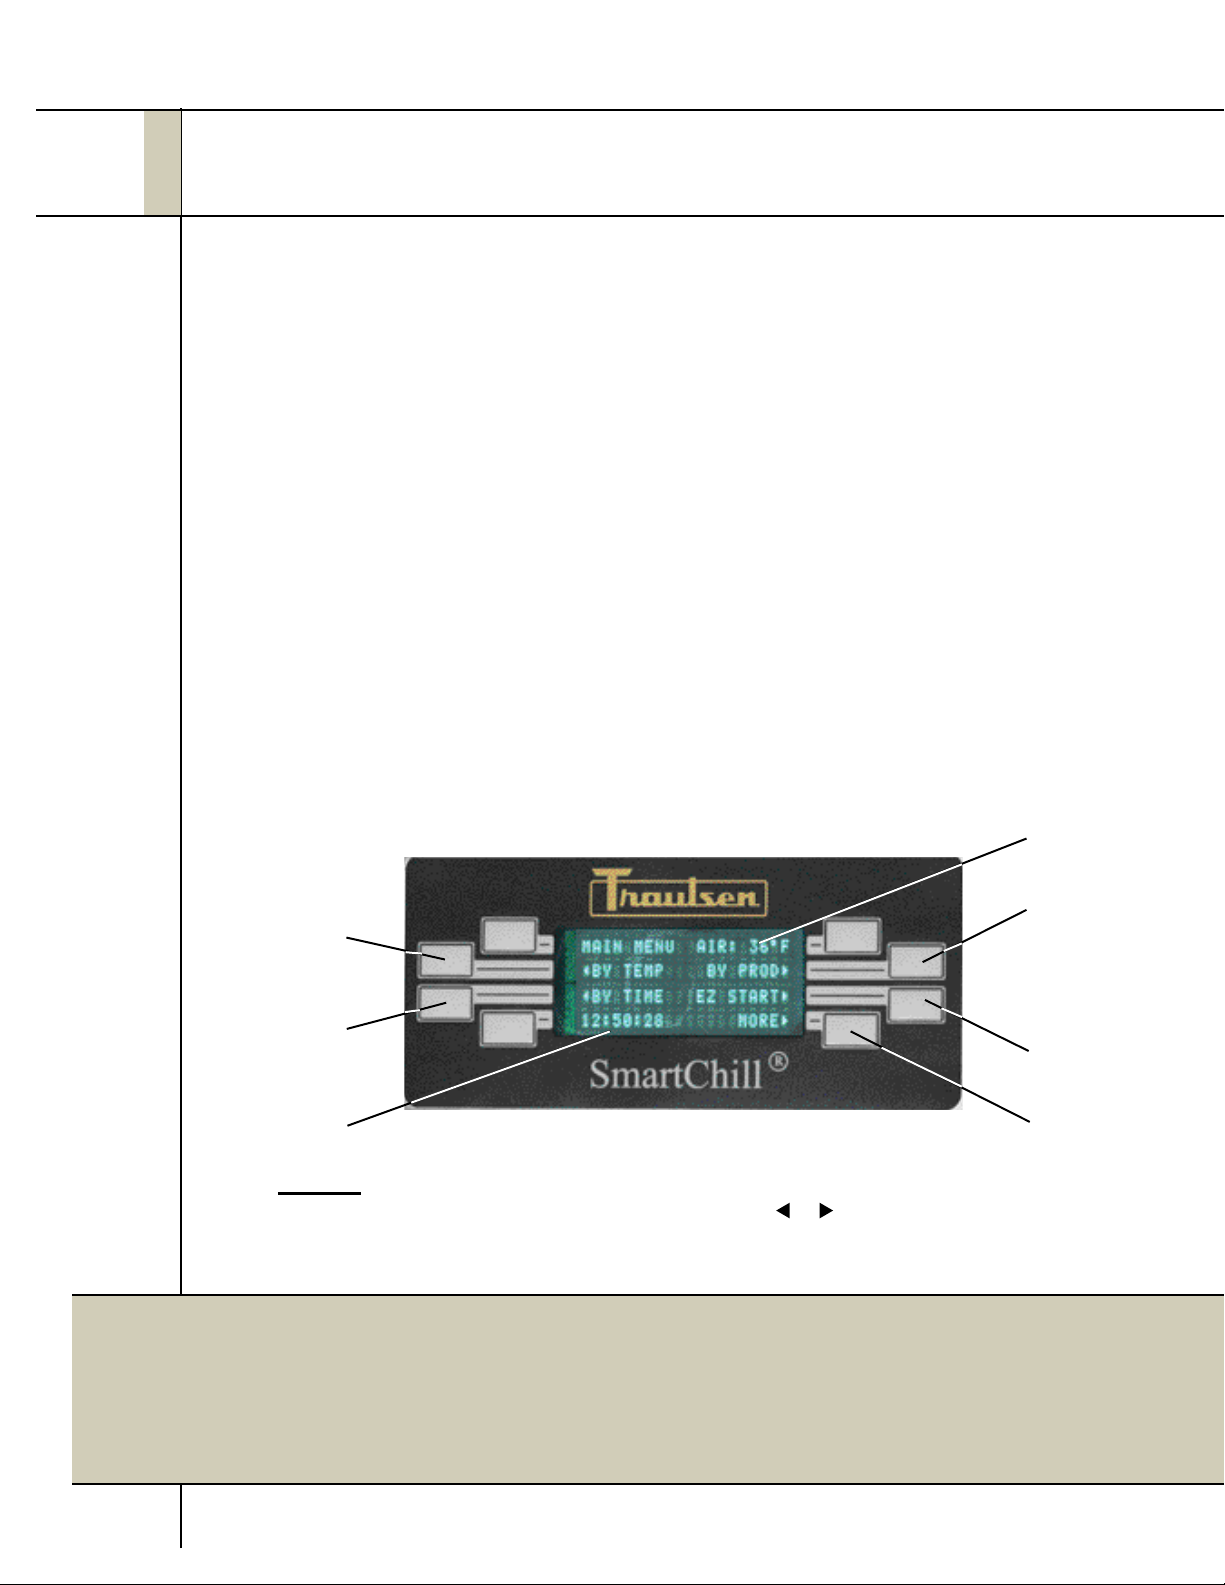
Press to chill
BY TEMP
Press to start
a chill cycle
BY TIME
Time of Day
LEGEND:
Push button to left or right of any feature marked by or to select that feature.
Push button to left or right of any feature marked by or to change value of that feature.
Main Menu
↓ ↑
One button start
Interior air
temperature
Press to chill BY
PRODUCT
Press to quickly
start a Chill Cycle
Press to access
additional menus
means safe food every cycle!
Page 3
Programming the Control
How to Set Correct Date & Time
2
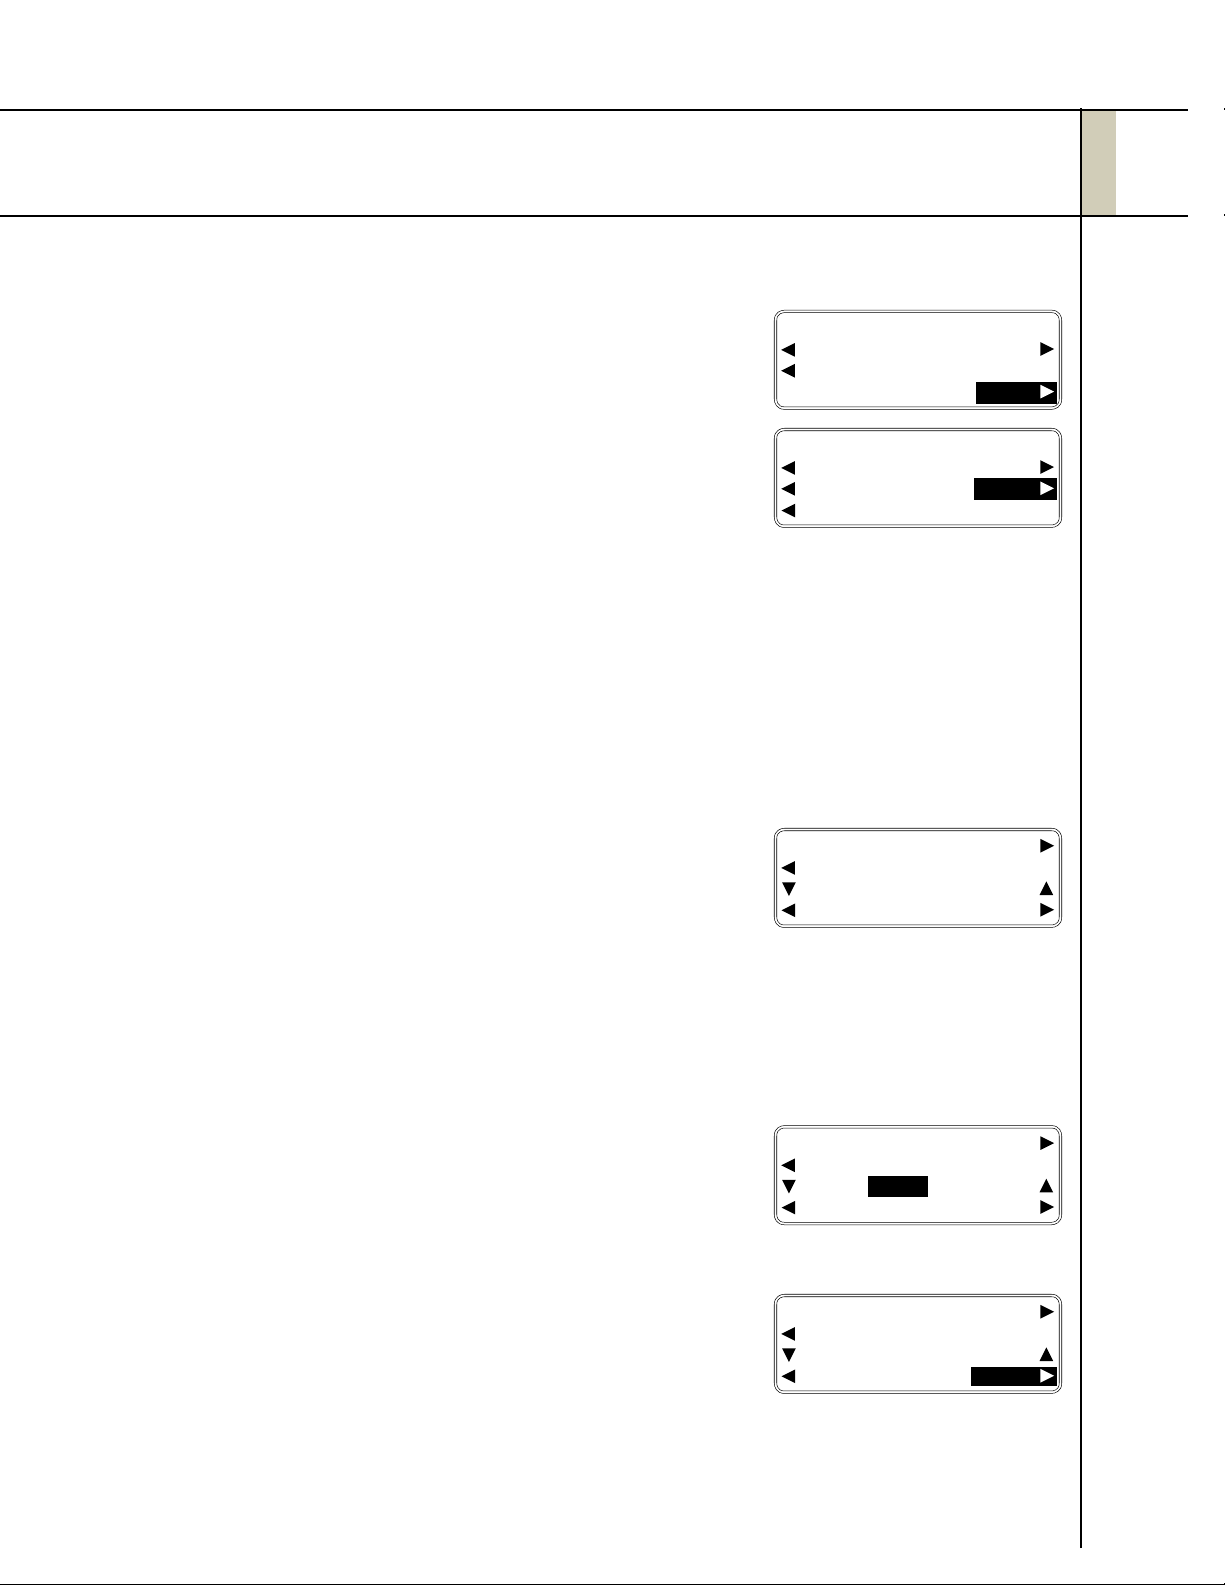
1. From the Main Menu Screen press MORE, then
SETUP. The display will change to the Password
Screen.
MAIN MENU AIR 35°F
BY TEMP BY PROD
BY TIME
08:05:01 MORE
MAIN MENU 08:05:01
HOLD PROD PRINT
DEFROST SETUP
BACK
2. From the Select Supervisor Screen, use the UP and
DOWN arrows to the left and right of PASSWORD to
select 57. Press ENTER. The display will change to
the Set Up Screen.
3. From the Set Up Screen press the button to the right
of SYSPAR.
4. The ITEM list will display date and time elements in
the following order.
a) MONTH (JANUARY – DECEMBER)
b) DATE (1 – 311 )
c) YEAR (2003 – 2079)
d) DAY OF WEEK (SUNDAY – SATURDAY)
e) HOUR (0 – 23)
f) MINUTE (0 – 59)
g) DLS - Daylight Savings TIme (ENABLED – DISABLED)
e) LOW ALARM (-30 – 0)
SYS PAR: SET CLOCK
ITEM: MONTH
VALUE: APRIL
CANCEL ENTER
5. Press the button to the left of ITEM to select between
the different items. Adjust the VALUE for each ITEM
using the UP and DOWN buttons.
6. Press ENTER to return to the MAIN MENU.
SYS PAR: SET CLOCK
ITEM: MONTH
VALUE: APRIL
CANCEL ENTER
SYS PAR: SET CLOCK
ITEM: MONTH
VALUE: APRIL
CANCEL ENTER
Page 4

3 TRAULSEN RBC50, RBC100 & RBC200 BLAST CHILLER TRAINING GUIDE
Placing Probes/Loading Pans
Basic Probe Placement
• Place probes into thickest part of the product.
• With product like chicken the probe should not be placed
where it is touching bone.
• With full pans of product such as casseroles locate the
probe in pan center.
• In all cases probe tip should not touch pan bottom. Use
probe adapters (shown below) with soft products.
NOTE
Using probes with small size
products (like chicken strips) is
not recommended. See CHILL
BY TIME for correct chilling
method.
Probe 1
Probe 2
Probe 3
Properly placed
Probe
Probe Adapter
Detail
Probes & Multi-Batching
• It is OK to load more than one type of product.
• When loading more than 3 pan levels it will be
necessary to group like products together, using one
probe for each product group (see example at left).
Proper Probe Placement
Probe 1: Grouped product (2 pans whole roast chicken)
Probe 2: Other Product One (1 pan chicken cutlets)
Probe 3: Other Product Two (1 pan baked beans)
Covering Product
• Covering product is recommended but
not absolutely required.
• If used, plastic wrap/aluminum foil must
be placed in direct contact with product
surface.
• Some starch products are likely to dry
out if not covered (ex. mashed
potatoes, pasta, rice, cous cous, etc.).
• Covering is recommended to prevent
drying if product will not be removed
when done or left inside overnight.
Page 5

Basic Operation
Starting A Chill Cycle (using EZ Start)
1. Load product into chiller.
2. Insert probe(s) and close door.
3. Press EZ START (see gure 1).
NOTE: To manually start a cycle, after Step 2
press BY TEMP - select cycle type
(ex. chill), adjust target temp (if desired)
then press START.
Adding More Products To A Chill Cycle In Progress
1. Place probe in product, close the door.
4
g. 1
2. Press ADD/REMOVE.
3. On the control, press the button next to the added probe #.
4. Press ADD/REMOVE.
5. Press CONTINUE.
NOTE: Failure to press CONTINUE will result in inaccurate data.
Chilling By Time (use for small, portion size products)
1. After placing product in chiller press BY TIME.
2: Press CHILL.
3: Adjust cycle time using the buttons to the
left and right of CYCLE TIME.
4: Press START.
NOTE: It is necessary to manually verify
and log product temp(s) before and after
chilling in order to complete documentation.
NOTE: If at end of cycle food temp is not
below 40°F chill for additional time by repeating steps 1 thru 4.
Defrost Notes
1. Defrost WILL occur automatically every 3-hours while in refrigerated mode.
2. Defrost WILL NOT occur until all probes reach 37°F. The chiller will beep for 20
seconds and a defrost cycle will begin if needed (even with product inside).
3. Food remaining in the chiller WILL remain safe during defrost because:
a) The inside air temperature is approx. 10-14°F, and...
b) Defrost time is generally less than 40-minutes.
4. Chill cycle data WILL be available after defrost. Press: MORE - PRINT, then
select the required probe number, then press RECORD and/or LABEL.
Page 6

5 TRAULSEN RBC50, RBC100 & RBC200 BLAST CHILLER TRAINING GUIDE
Ending The Cycle/Printing
Printing
1. When a probe reaches target temp (37°F)
an alarm will sound for 30-seconds. The
display the will continuously ash DONE.
2. Press the button alongside the probe
ashing DONE.
3. The print menu will appear. Press...
PRINT PROBE #1
NONE BOTH
Paper
Cycle
Data
Printout
RECORD
LABEL
Adhesive
Cycle
Data
Label
- RECORD to receive a paper printout.
- LABEL to receive an adhesive label.
- BOTH to receive both a paper printout
and adhesive label.
4. Repeat for additional probes.
5. Press NONE when complete to select next
probe or return to Main Menu (after last
probe).
6. Properly sanitize probes prior to next use.
Changing The Paper and/or Label Rolls
1. Access printer,
remove paper roll
and place a new
roll on the spindle
Load paper with thermal side facing up.
PAPER:
Traulsen P/N 400-60003-00 • Ofce Depot #302-224 • Staples #PMF-5233
The label printer uses a special peel-off label stock, Traulsen part number 400-60004-00.
Each roll contains 225 labels.
2. Lift feed roller
tension arm
NOTE
3. Place paper edge
into the printer at
the feed roller
4. Close feed roller
tension arm then
press the red
button to load
paper
Page 7

Probes
1. Remove probes by turning the
circular locking ring which
secures these inside the chiller.
2. Wash/sanitize probes.
NOTE: Probes can be
immersed in water during
cleaning.
3. Allow probes to air dry before
replacing in chiller.
6
Care & Cleaning
Interior/Exterior
1. Disconnect power supply.
2. Clean both interior and exterior with a soft cloth as you
would any other stainless steel surface.
3. Do not...
• Use cleansers containing chlorine.
• Clean with anything abrasive.
• Hose off the blast chiller.
Condenser
Cleaning the condenser is critical to insuring proper
performance and long compresor life.
1. Disconnect power supply.
2. Lift-up or remove louvers covering coil location:
• RBC50: Front/Left (see gure 1)
• RBC100: Bottom/Left (see gure 2)
g. 1
• RBC200: Front/Top
3. Wipe coil ns clear of any dust or debris present using
a dry shop cloth or pot brush.
4. Replace louvers.
5. Restore power.
g. 2
Page 8

7 TRAULSEN RBC50, RBC100 & RBC200 BLAST CHILLER TRAINING GUIDE
Troubleshooting
PROBLEM: Upon starting a chill cycle, probe temp(s) displayed appear cooler than
expected (i.e. cooked temperature).
a. Product temp within cooked batches vary. Verify actual product temp with
thermometer (using same probed piece).
b. Probe placed incorrectly. Relocate probe per instructions on page 3.
c. Very small product (ex. chicken tender). Use chill by time (see page 4).
d. Product held too long at room temp prior to chilling. Verify actual product temp
with thermometer (using same probed piece).
PROBLEM: Defrost appears to have occured before chill cycle completion.
Defrost will not occur until all food probes have reached target temp and displayed DONE.
a. Chiller completed chill cycle for all probes. Retrieve cycle data after defrost.
PROBLEM: Control displays “Defrost sensor warning.”
Coil did not defrost to target temp, usually the result of too much ice build-up from either:
a. Previous chill cycle was very long and/or very large product load.
b. Starting a new chill cycle close to the regularly scheduled time when the chiller would
automatically defrost.
c. Product releasing much moisture during chilling. Cover product (see page 3).
d. A combination of 2 or more of the above issues.
PROBLEM: Incorrect date/time shown on display and/or printouts.
a. Incorrect time and/or date setting. Correct date and/or time settings.
PROBLEM: Cannot print probe data after chill cycle, or probe data on printout
appears incorrect (i.e. time and/or temperature differ from actual start time and/or
product temperature).
a. Product (probe) added to active chill cycle incorrectly (i.e. failure to press
ADD/REMOVE and/or CONTINUE).
PROBLEM: Product freezing.
a. Previously chilled product not removed and new chill cycle started. Remove DONE
product before starting a new chill cycle.
b. Chill cycle By Time set for too long. Reduce chill time.
c. High water content product (ex. soup). Use SOFTCHILL.
d. High water content food chilled uncovered. Cover food prior to chilling.
PROBLEM: Extended or unsafe chill times.
a. Excessive product load. Reduce product loaded.
b. Product too large or loaded too deep in pans. Reduce product size or depth.
c. Too much ice on evaporator coil. Cover product (if not already) and/or run manual
defrost prior to next chill cycle.
TR35918 (rev. 09/11)
4401 Blue Mound Road, Fort Worth, TX 76106 • (800) 825-8220 •www.traulsen.com
© 2010 Traulsen. All rights reserved.
 Loading...