

Page 1
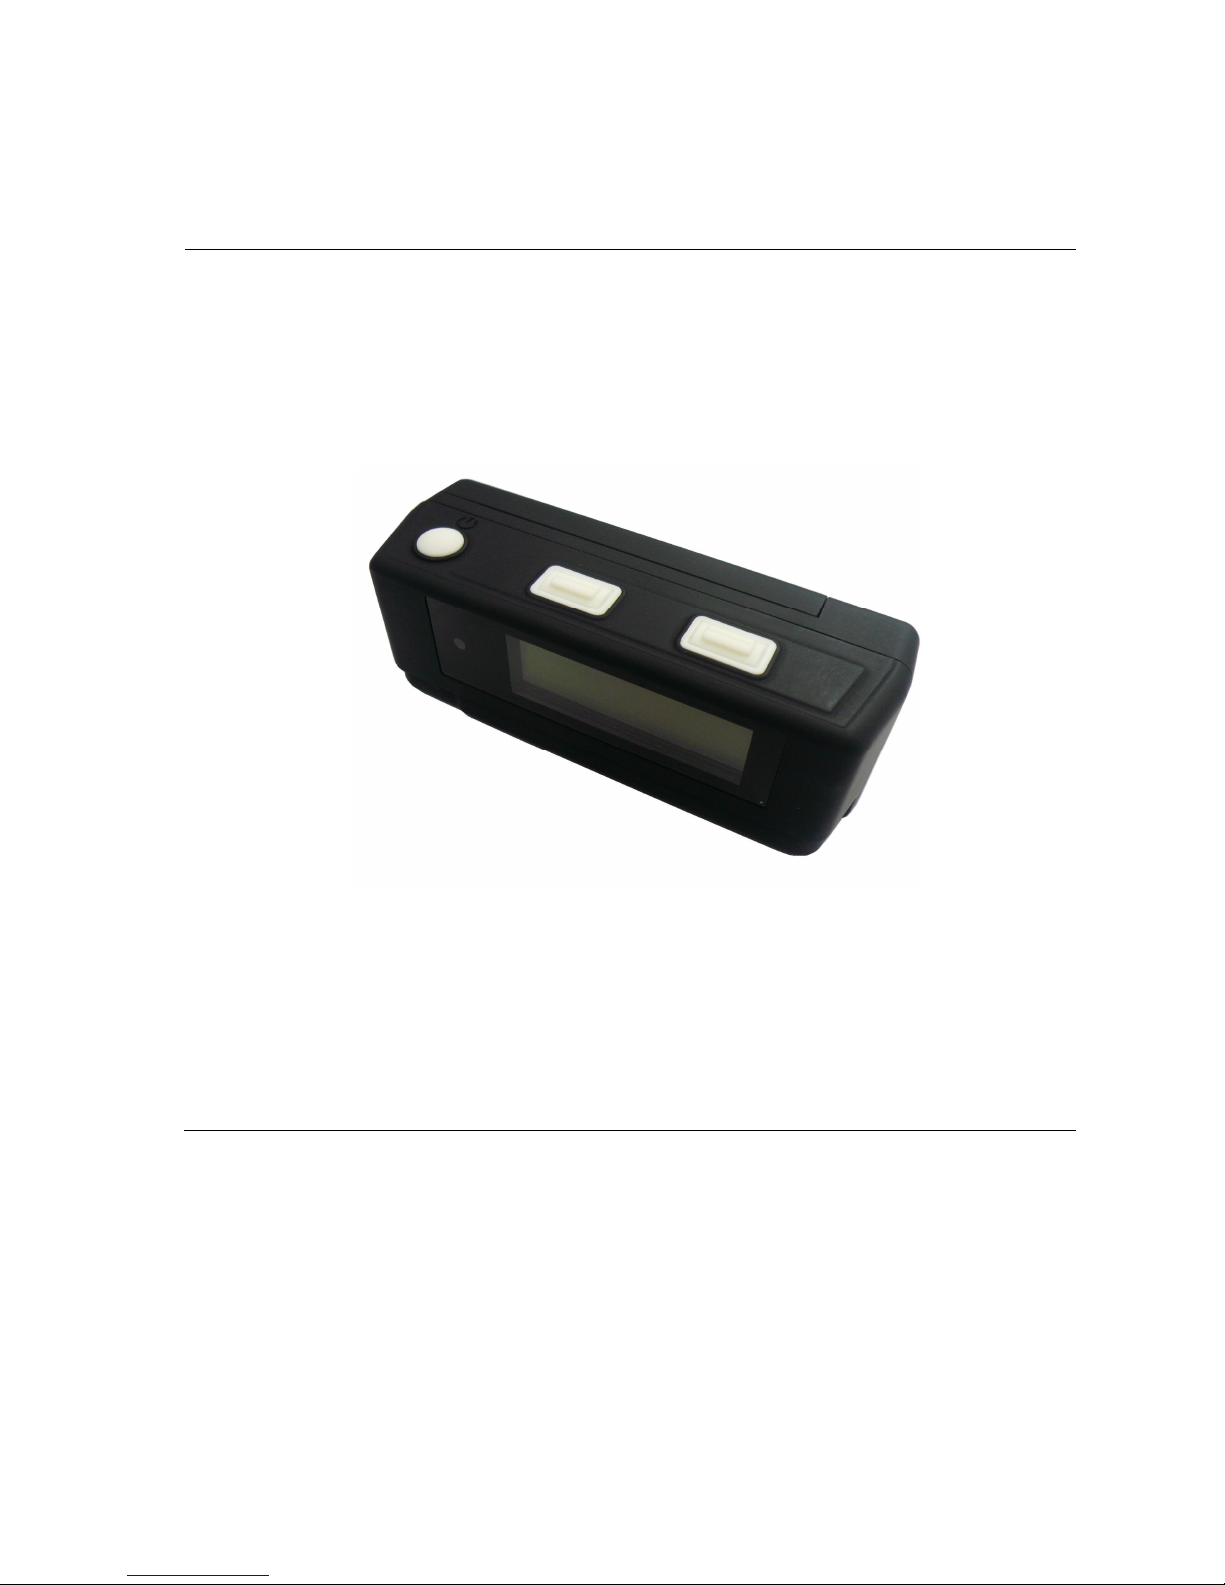
TripMate850
User’s Manual
Published on 05-December-2009
Rev. 1.0
Page 2

1
Note and Warning
- TripMate850 uses AAA battery*2. If TripMate850 is used in temperature lower than
-10°C or higher than 60°C, the battery capability will decrease. Please leave
TripMate850 far from heat or high temperature environment. In addition, do not
expose your TripMate850 in temperature higher than 140°C/60°C. If you do not
follow these rules, the battery may become heat, explode or burn itself, and this will
lead to very serious damage.
- While in the hospital, turn off TripMate850 is recommended. Like other common
equipments do, wireless GPS receiver may also interfere medical equipments which
use radio frequency.
- Remove batteries from TripMate850 when not using it for a long period of time.
- Keep TripMate850 and all accessories out of small children’s reach for safety
caution.
- We assume no responsibility for any damage and loss resulting from the use of this
manual and also by deletion of data as a result of malfunction, dead battery, or
misuse of the product in any way.
- Use only the supplied and approved accessories. Unauthorized accessories, antenna,
modifications or attachments could damage TripMate850, and may violate
regulations governing radio devices.
- Use a dry, clean soft cloth to clean your TripMate850. Do not use harsh cleaning
solvents, chemicals, or strong detergents.
- Do not attempt to open TripMate850 by yourself. Unauthorized hacking may
damage the unit, and void your warranty.
Rev. 1.0
Page 3

Table of Contents
Chapter1. Before you begin..................................................................................................3
1.1 Introduction.......................................................................................................3
1.2 Feature Overview ..............................................................................................3
1.3 Specifications.....................................................................................................3
1.4 Buttons and Description....................................................................................5
1.5 Accessories.........................................................................................................5
Chapter2. Getting Started....................................................................................................6
2.1 Turn on/off TripMate850 ..................................................................................6
2.2 Main Flow..........................................................................................................6
2.3 Flow Diagram....................................................................................................7
2.4 ICON Introduction............................................................................................8
2.5 Functional description ......................................................................................8
2.5.1 Battery, Satellite, Log memory Mode ...................................................8
2.5.2 Time Mode .............................................................................................9
2.5.3 Position Mode ........................................................................................9
2.5.4 Speed & Direction Mode .....................................................................10
2.5.5 Distance Measurement Mode..............................................................10
2.5.6 Track Back to POI ...............................................................................11
2.5.7 Setting Mode ........................................................................................12
2.5.8 Connecting with your handheld device...............................................18
2.5 Software upgrade ............................................................................................20
2.6 Helpful Tips.....................................................................................................22
Chapter3. How to configure your GPS Record?...............................................................23
3.1 GpsView software............................................................................................23
3.1.1 Using GpsView Program .....................................................................23
3.1.2 Download AGPS ..................................................................................24
Chapter4. Using Photo Tagger software ............................................................................26
4.1 Execute and install software utility Photo Tagger..........................................26
4.2 Google Earth ...................................................................................................26
4.3 Software Utility - TripMate850.......................................................................26
Chapter5. Power description..............................................................................................26
Appendix A. Locr GPS Photo ............................................................................................27
Appendix B. Certification ..................................................................................................28
Appendix C. Warranty Information..................................................................................30
2 Rev. 1.0
Page 4
3
Chapter1. Before you begin
DGPS(WAAS,EGNOS,MSAS):
DGPS(WAAS,EGNOS,MSAS):
DGPS(WAAS,EGNOS,MSAS):
1.1 Introduction
TripMate850 features an all-in–one, cost-effective portable GPS logger solution. When you
travel in different country, it allows you to record your routes by ways of time/ distance/ speed.
The TripMate850 includes a one inch LCD, as the real time, moving speed, distance
measurement and position information, all of the message always can be shown on the screen.
Through user friendly software utility, it can combine your pictures and record routes, and
show on the map. This recorder is small and robust, ideal to carry everywhere for applications
such as route tracking, mountain climbing or fleet management.
1.2 Feature Overview
◎ MTK 3329 chip
◎ Smart log function
◎ Receiver & data logger dual function design
◎ Track back function
◎ Vibration sensor for power saving
◎ Micro SD card for unlimited storage
◎ 1” LCD easy display
◎ Support AGPS
◎ Powered by AAA battery*2
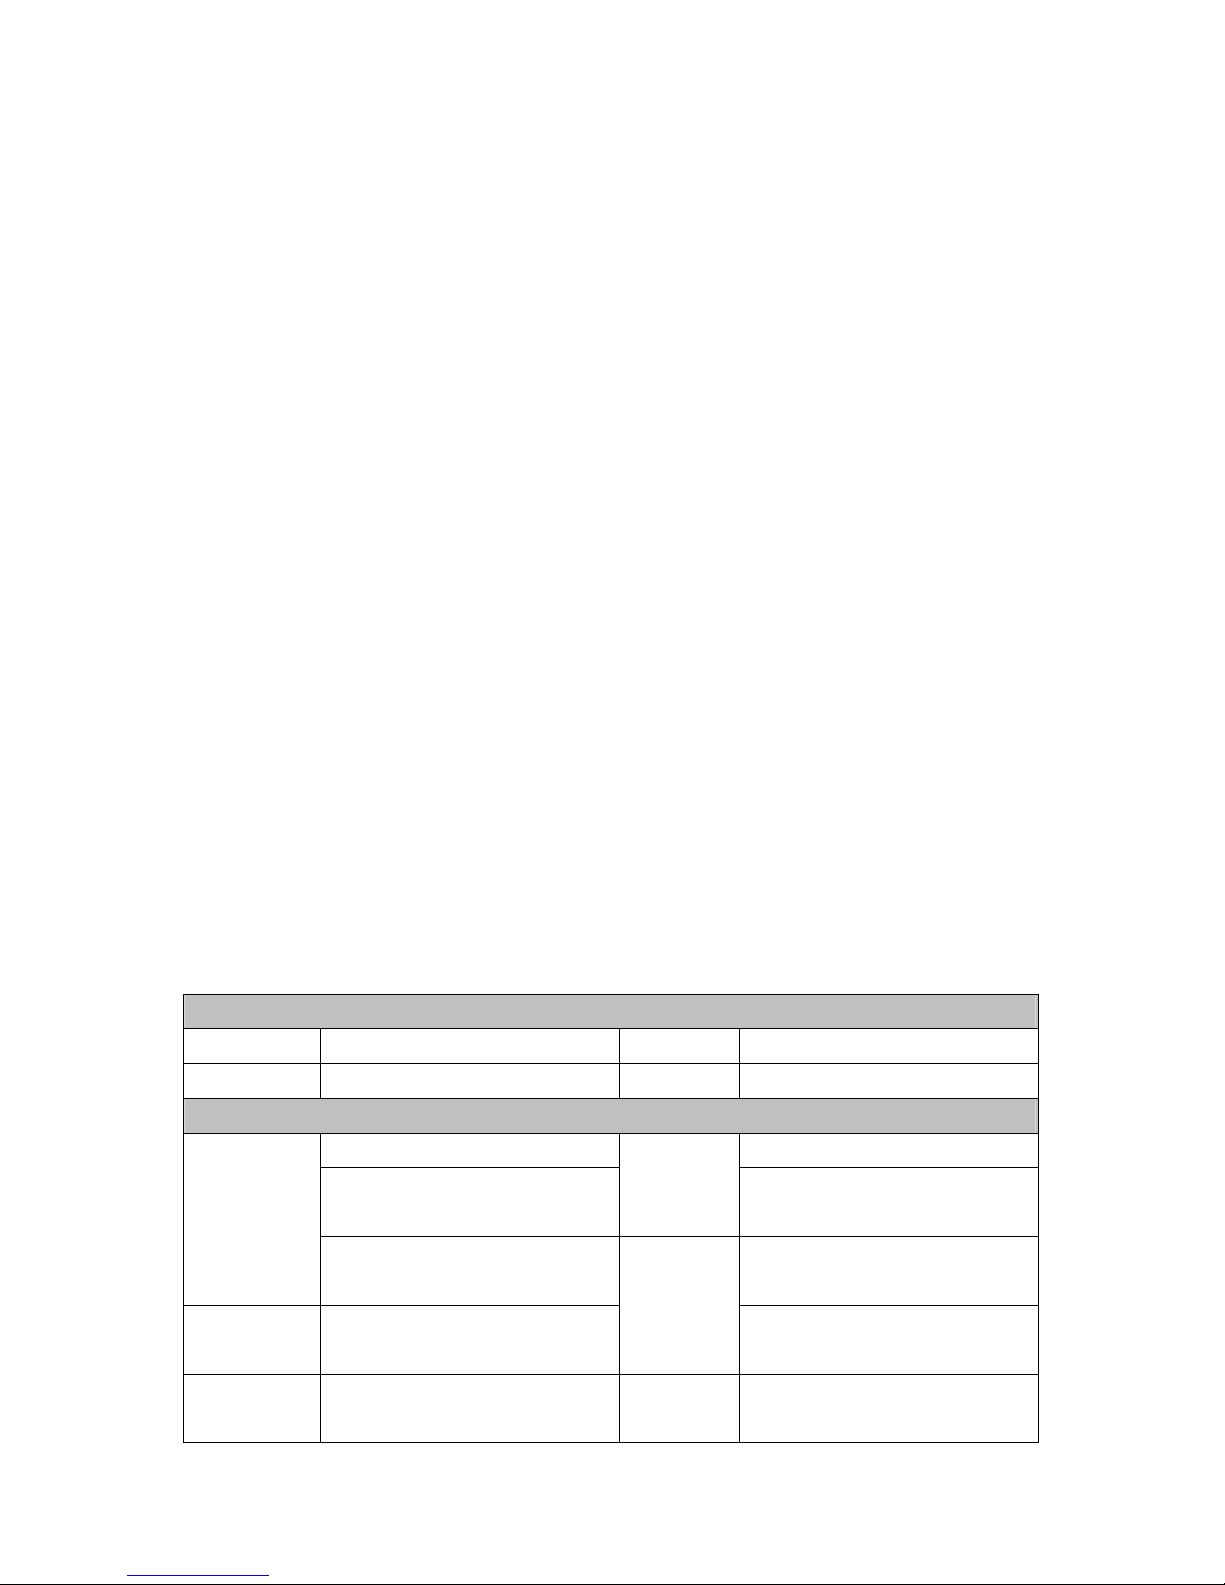
1.3 Specifications
General
Frequency L1,1575.42MHz C/A Code 1.023Mhz
Datum WGS84
Performance Characteristics
Without aid: 3.0m 2D-RMS Without aid: 0.1m/s
<3m CEP(50%) without
Position
SA(horizontal
Accuracy
2.5m
Timing
50ns RMS
Accuracy
Reacquisition
<1s Hot start 1.5s
Time
Velocity
Accuracy
0.05m/s
Without aid: <4g
Acceleration
<4g
Rev. 1.0
Page 5

Warm start 34s Cold start 35s
AGPS <15s Acquisition: -148dBm Max.
Update 1Hz
Altitude Maximum 18,000m Acceleration Maximum 4g
Velocity Maximum 515m/s
Operation
Up to 12 hours Battery AAA battery*2
Time
Baudrate 115200 bps Protocol NMEA 0183 v3.01
Size 28 x 8.5mm Pixel 128 x 32 pixel
Environment
Operation
-10° to 50°
Temperature
Fully compliant with USB2.0
USB Bridge
12Mbps
SD Micro SD card Up to 10 meters
Sensitivity
Tracking: -165dBm Max.
Dynamic
Power
I/O
LCD
Interface
Fully compliant with Bluetooth
V1.2
0dBm(Typical), Class II
Bluetooth
Serial Port Profile(SPP)
Others
57.5g(with battery) Dimension 72*27x25mm
Weight (g)
36.5g(without battery) NMEA GGA,GSA,GSV,RMC
2.4GHz~2.4835GHz ISM Band
4 Rev. 1.0
Page 6
5
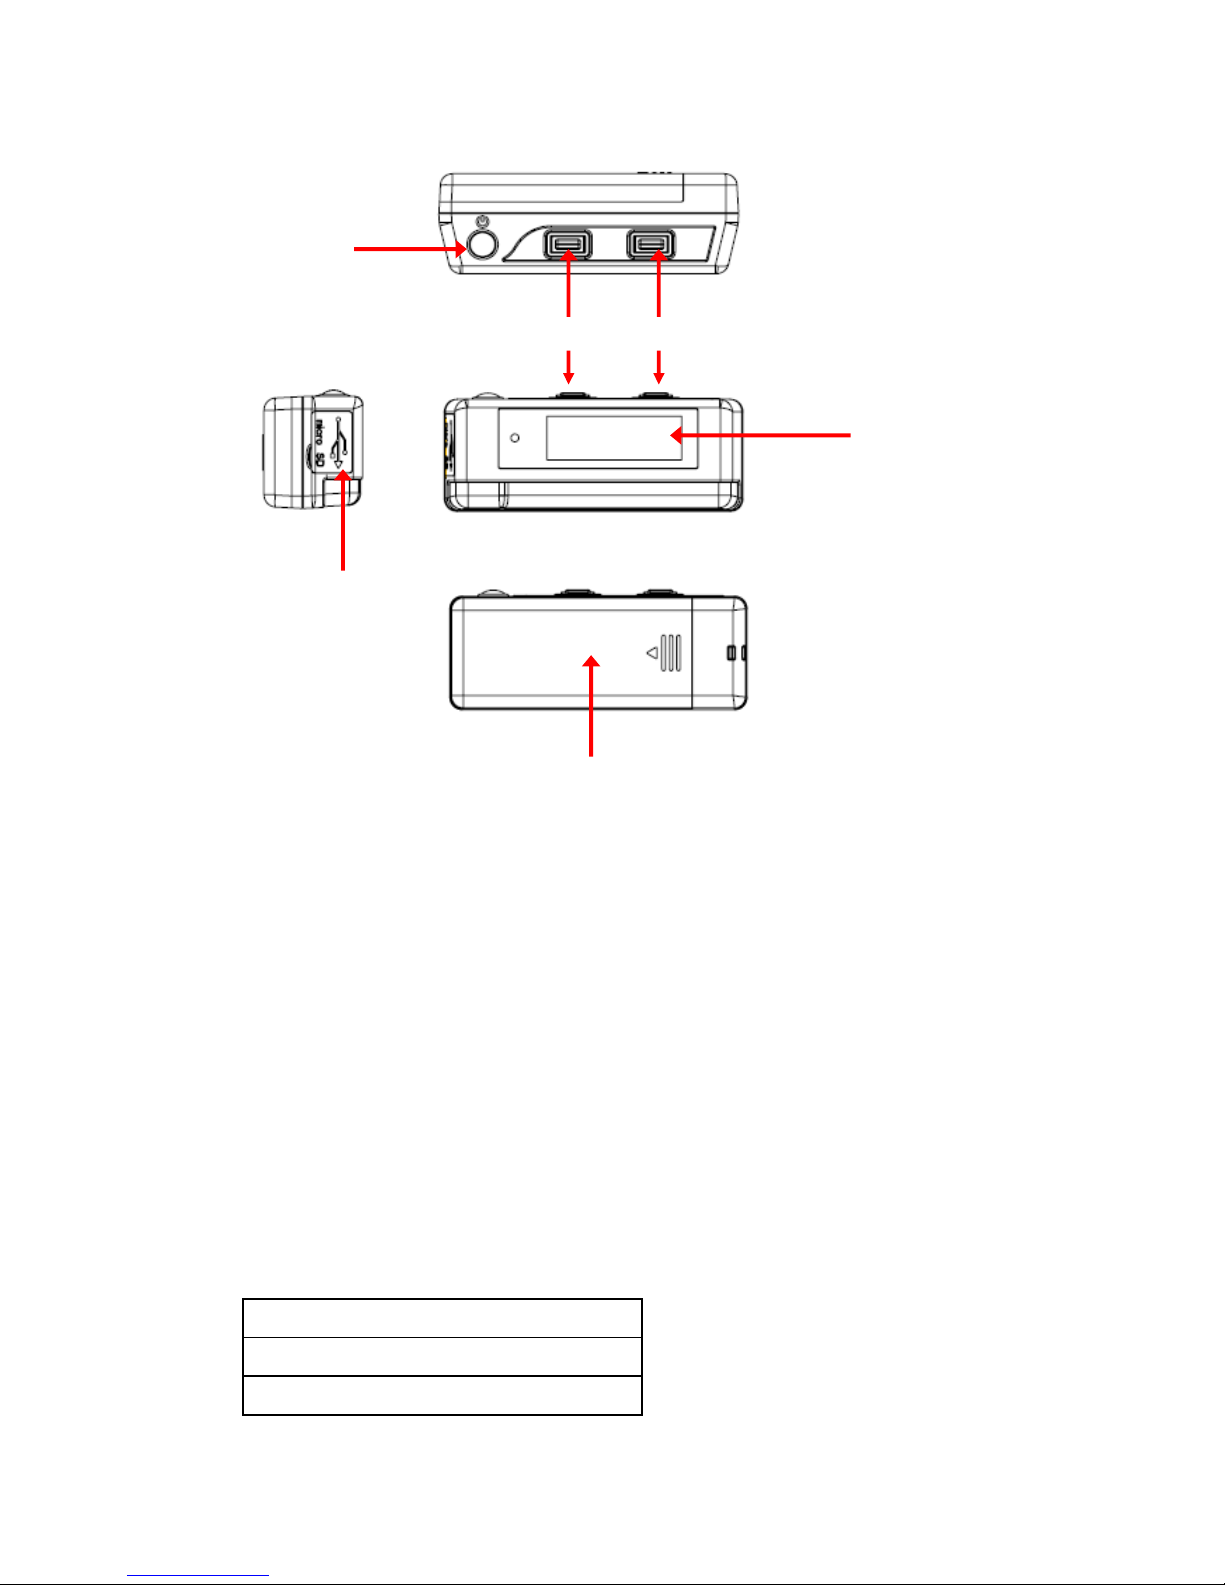
1.4 Buttons and Description
Power on/off
/Enter
USB & Micro SD
MENU ADJUST
Battery Cover
LCD
1.5 Accessories
Congratulations on your purchase of the TripMate850. Before you start using TripMate850,
please make sure if your package includes the following items. If any item is damaged or
missing, please contact your dealer at once.
◎ Mini USB cable x1
◎ AAA battery x2
◎ Quick start guide x1
◎ Strap x1
◎ Micro SD card x1 (inside the TripMate850)
[Note] Unit package contents may vary depending on countries without prior notice.
Micro SD card compatible table
2G: Lexar、KINGMAX、Apacer
4G: Apacer、KINGMAX
8G: Apacer
Rev. 1.0
Page 7

Chapter2. Getting Started
POWER OFF
POWER ON
2.1 Turn on/off TripMate850
Before you start to use TripMate850 to log data, please check if Micro SD card is inside the
TripMate850.
Press “POWER” button for 3 sec, LCD screen will show battery, satellite, log memory status.
When Tripmate850 connects to PC/Laptop via USB cable, it works as a USB2.0 mass storage
device (support Window2000 above / MAC v8.5 above operation system) and all function
are inactive at this moment. It does not support G-mouse function via USB cable. Through
USB cable, you are not able to charge TripMate850 but to download recorded data from
device to PC/Laptop only.
2.2 Main Flow
Battery, Satellite, Log memory Mode
Time Mode
Position Mode
Speed & Direction Mode
Distance Measurement Mode
Track back Mode
Setting Mode
6 Rev. 1.0
Page 8
7
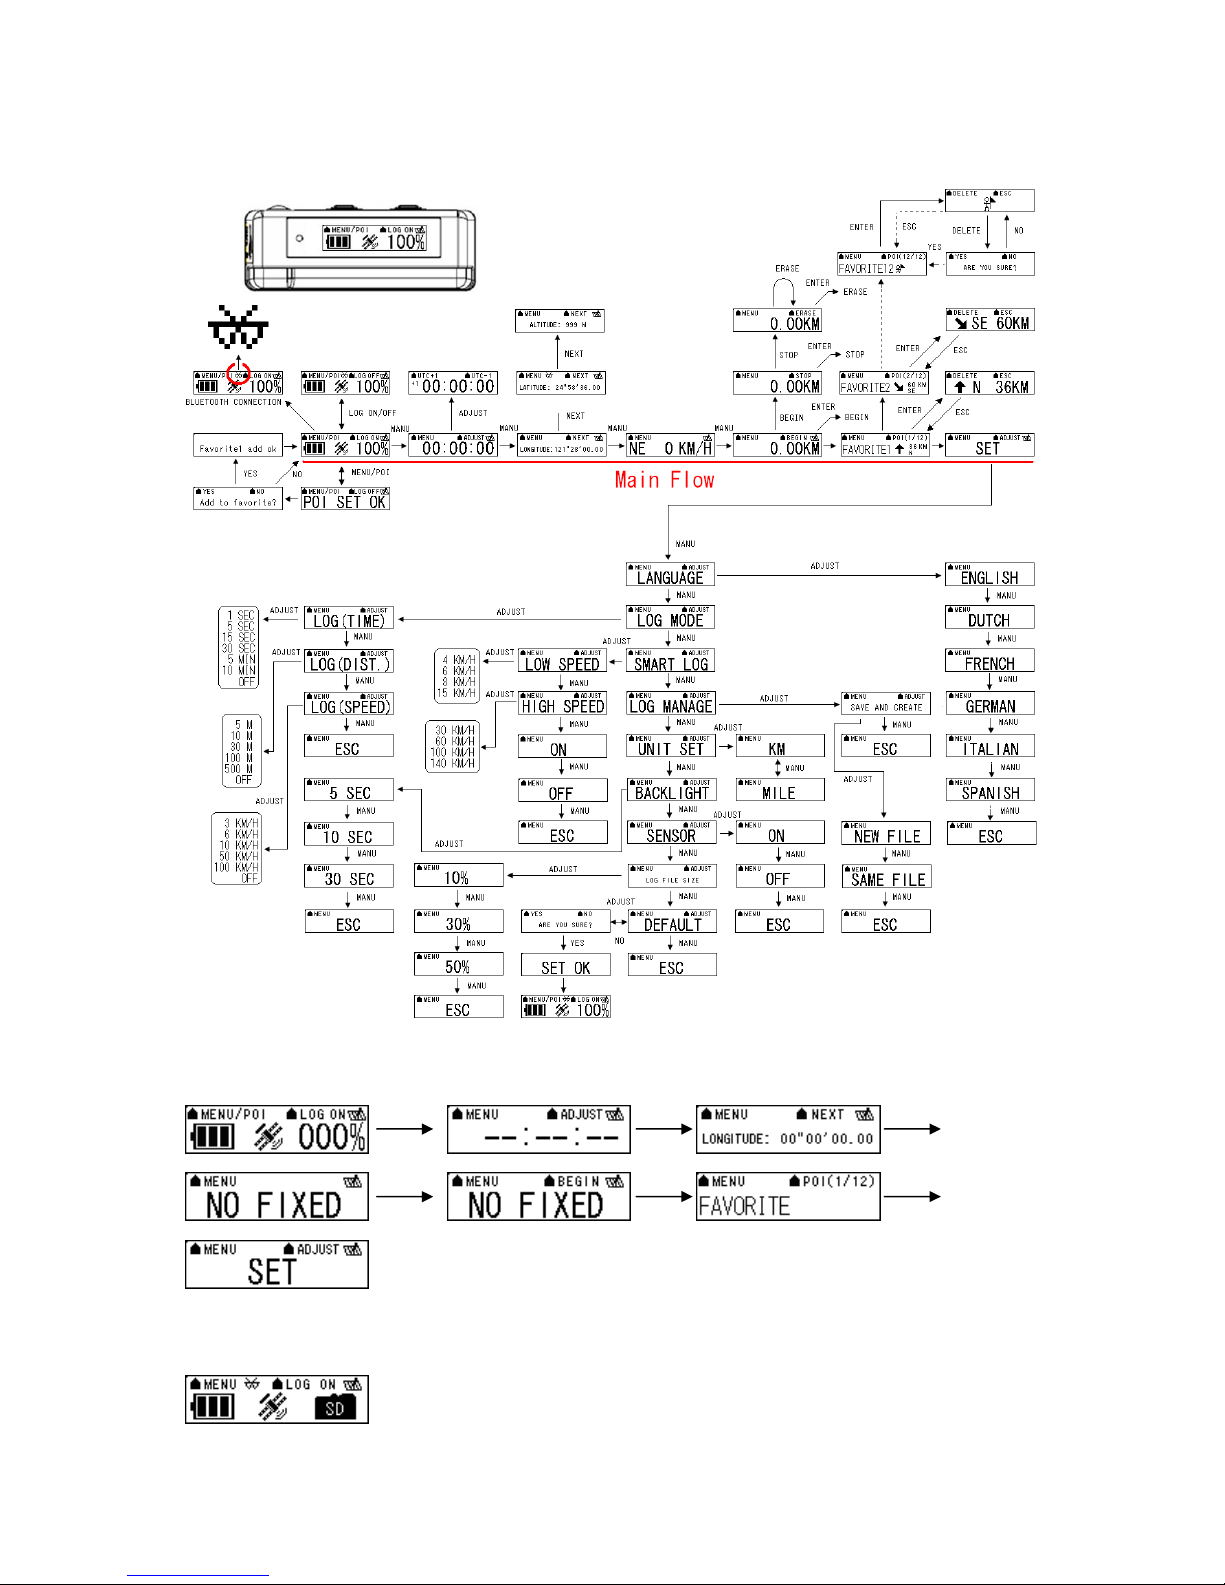
2.3 Flow Diagram
POWER
/ENTER
Please press “ENTER” button to confirm your selection of Menu item.
MENU ADJUST
For detail information, please see functional description in section 2.5.
When TripMate850 does not have location fix, the screen will show below image.
If there is no Micro SD card inside the TripMate850, the device will not be able to store
logged data. The screen will show below image.
[Note] TripMate850 can be used as a mass storage device with Micro SD card inside.
Rev. 1.0
Page 9
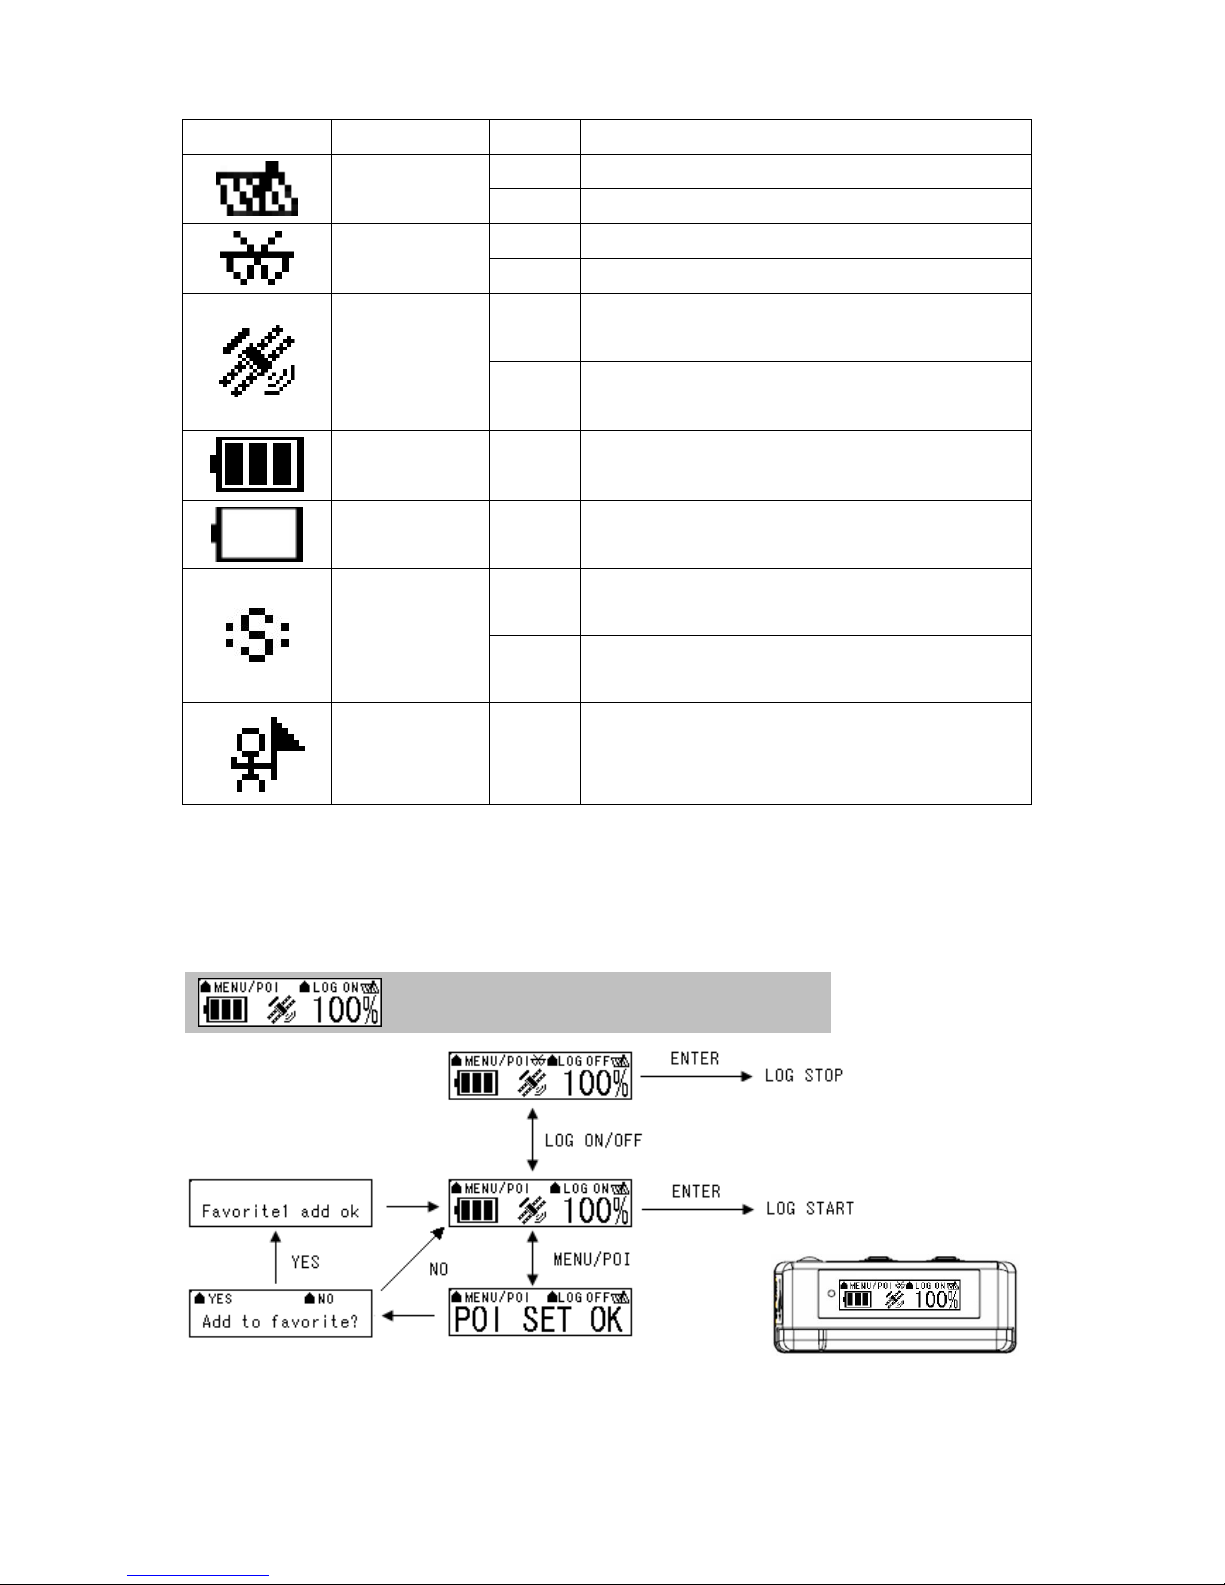
2.4 ICON Introduction
Symbol Category Status
Function
LOG
BLUETOOTH
SATELLITE
BATTERY On The battery capacity is full.
BATTERY On Low battery.
SMART LOG
GOAL On
On Device is not in log mode yet.
Blinking In LOG mode.
Off Not yet connected to any Bluetooth device.
Blinking Bluetooth is connected for data transmission.
Acquiring satellite signal, GPS position not
On
fixed.
GPS position fixed, ready for Log data and
Blinking
navigation with Smartphone/PDA.
On Start smart log function.
Off Shut down smart log function.
Reach POI position which you have recorded
as a favorite position in your POI list before.
(Favorite1~Favorite12)
2.5 Functional description
2.5.1 Battery, Satellite, Log memory Mode
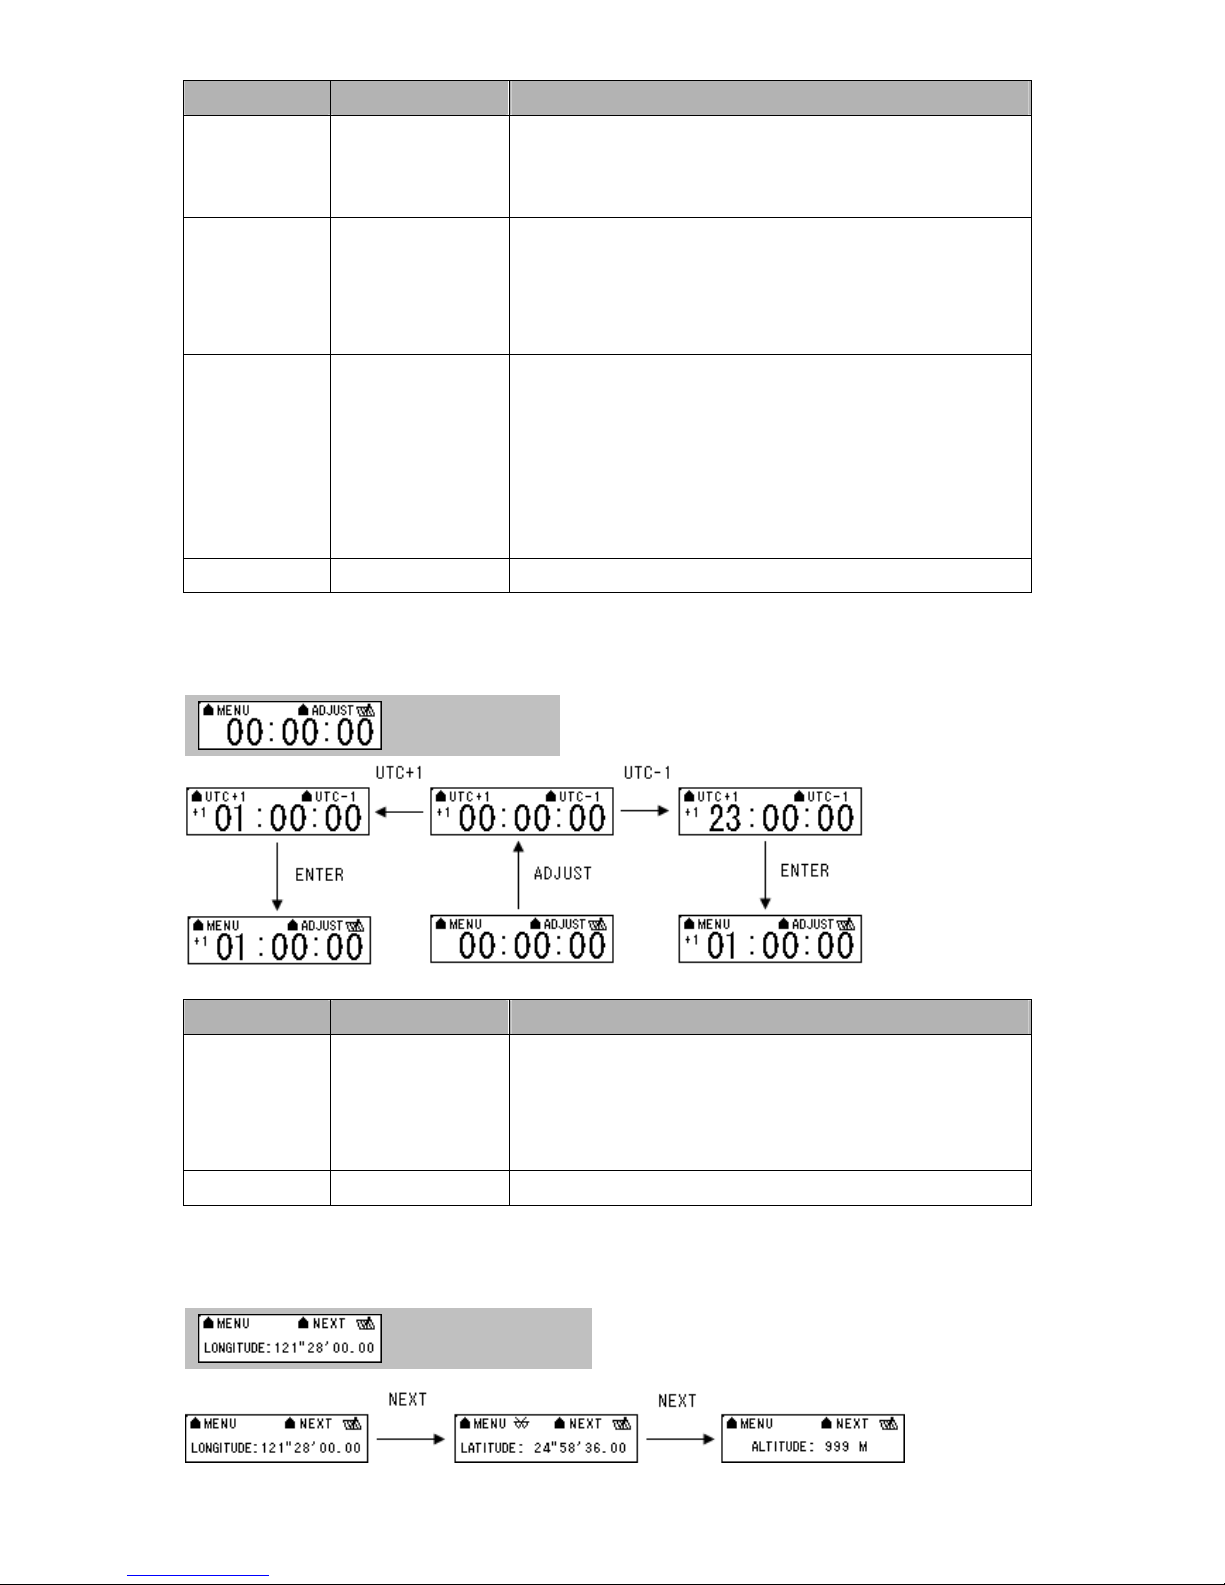
< Battery, Satellite, Log memory Mode >
POWER
/ENTER
[Note] If the TripMate850 can not obtain GPS fix, it will be unable to record POI.
MENU LOG ON/OFF
8 Rev. 1.0
Page 10
9
Function Button Detail Description
When you want to start log data, please check the upper right hand corner
START LOG LOG ON > ENTER
STOP LOG LOG OFF > ENTER
POI (point of
MENU/POI
interest)
NEXT SECTION MENU Press “MENU” button to next section.
of the screen which is staying in “LOG ON”, and then please press
“ENTER” button. The log icon will blink 1 time / per second.
After you turn on the TripMate850, the screen will show log memory from
0% to 100%. When log memory increase to 100%, the TripMate850 will
stop logging. If you want to stop logging data, please press “LOG
ON/OFF” button to “LOG OFF” and then press “POWER” button.
Press “MENU/POI” button for 3 seconds, the TripMate850 will record POI
and show “POI SET OK”. After that the screen will show “Add to
favorite?”, you can select “YES” or “NO” to make your decision.
If you select “YES”, TripMate850 will record the POI as one of the 12 sets
favorite position in your POI list. If you select “NO”, TripMate850 will go
back to main page.
2.5.2 Time Mode
< Time Mode >
Function Button Detail Description
The time mode uses UTC time which receives from GPS ephemeris. You
TIME
ADJUSTMNET
NEXT SECTION MENU Press “MENU” button to next section.
ADJUST > UTC+1 or
UTC-1 > ENTER
can set local time manually. After you press “ADJUST” button, the screen
will show “UTC+1” and “UTC-1”. When the time is adjusted successfully,
please press “ENTER” button.
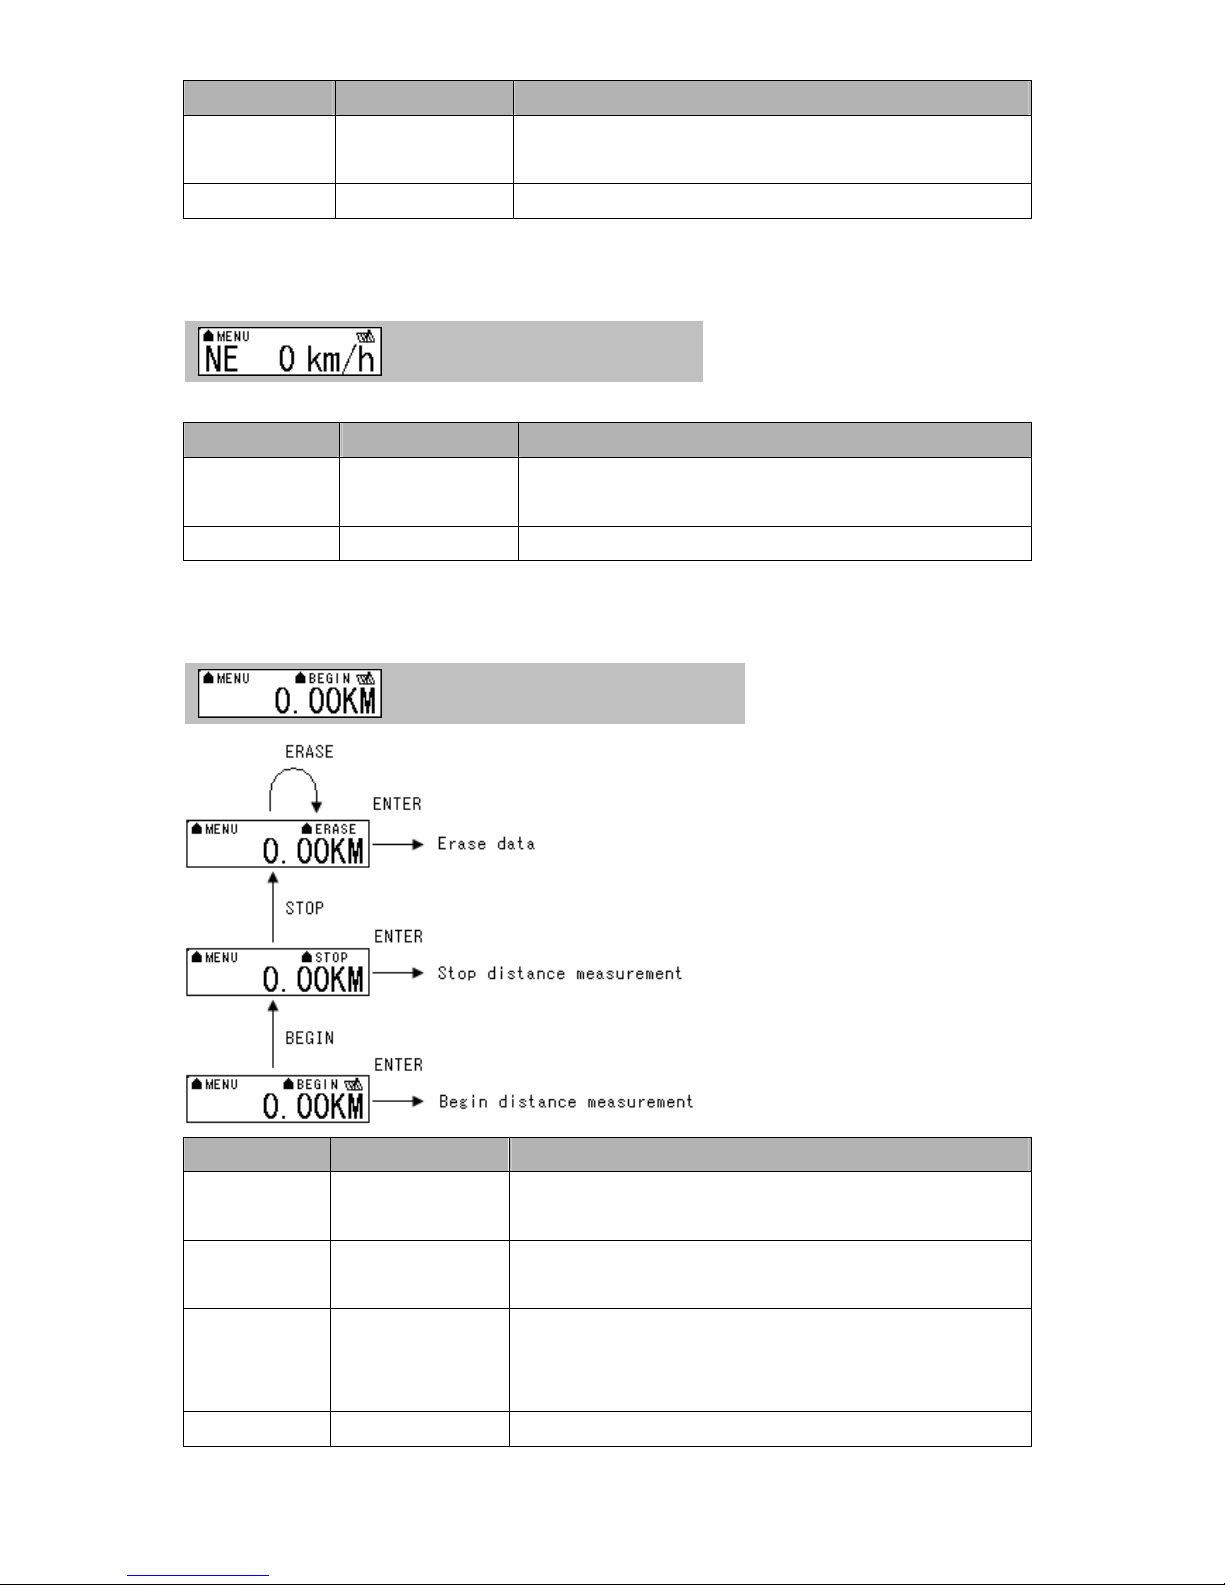
2.5.3 Position Mode
< Position Mode >
Rev. 1.0
Page 11
Function Button Detail Description
POSITION
NONE
INFORMATION
NEXT SECTION MENU Press “MENU” button to next section.
When the GPS position is fixed, the TripMate850 will show
longitude / latitude / altitude information on the screen.
2.5.4 Speed & Direction Mode
< Speed & Direction Mode >
Function Button Detail Description
SPEED AND
NONE
DIRECTION
NEXT SECTION MENU Press “MENU” button to next section.
In this mode, the TripMate850 will indicate current speed and direction on
the screen.
2.5.5 Distance Measurement Mode
< Distance measurement Mode >
Function Button Detail Description
Begin distance
BEGIN > ENTER
measurement
Stop distance
STOP > ENTER
measurement
Select "BEGIN" among “BEGIN”, "STOP", or "ERASE" function and
press “ENTER” button, TripMate850 will start to measure distance.
Select "STOP" among “BEGIN”, "STOP", or "ERASE" function and press
“ENTER” button, TripMate850 will stop measuring distance.
Erase data ERASE > ENTER
NEXT SECTION MENU Press “MENU” button to next section.
Select "ERASE" among “BEGIN”, "STOP", or "ERASE" function and
press “ENTER” button, TripMate850 will erase the measured distance data
and the figure shown on the screen will return to zero.
10 Rev. 1.0
Page 12
11
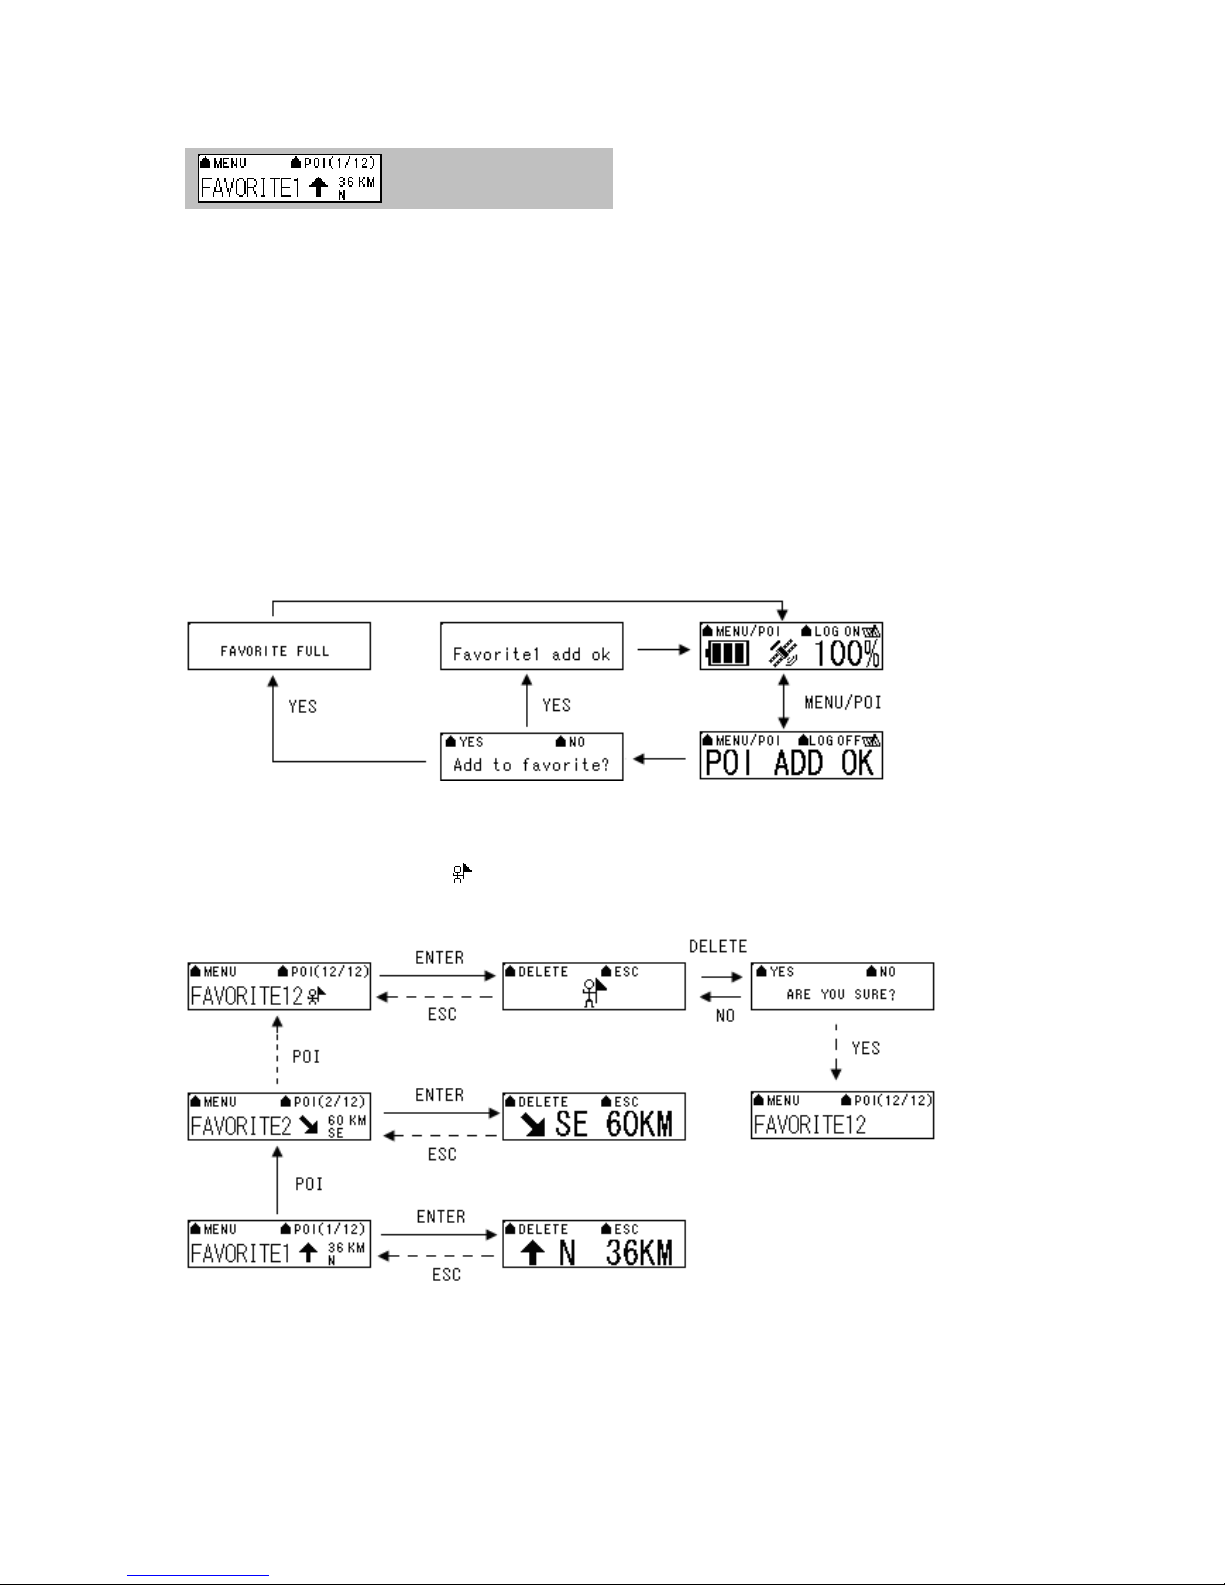
2.5.6 Track Back to POI
<Track back mode >
In this mode, the TripMate850 can track back to POI. According to the recorded favorite position in the
POI list, TripMate850 will give you a reference direction and distance to tell you how far you’re away
from the POI position.
If you want to create a new POI into TripMate850, please press “MENU/POI” button for 3 seconds in
main page, the device will show “POI ADD OK” and the screen will show “Add to favorite?”. If you select
“YES”, TripMate850 will record the POI as one of the favorite position in your POI list. If you select “NO”,
TripMate850 will go back to main page.
Please be noticed that you are allowed to create 12 sets favorite position. If the favorite position is over
12 sets number, the TripMate850 will show "Favorite full" on the screen as a reminder. If you want to
record one more new POI, please delete one of the 12 sets favorite positions to release the space for
the storage of the new POI.
In addition, if you would like to track back to POI position, please go to “Find POI position mode” to
choose one of the POI positions which you want to go back. If you arrive the POI position, the
TripMate850 will show the icon “ ” to tell you that you have reached the POI.
[Note] The maximum distance of the measured POI shown on the screen is 9999km. Therefore, if the
distance between the POI and your current position is more than 9999km, the TripMate850 only show
“9999km” on the screen maximally.
Rev. 1.0
Page 13
Function Button Detail Description
Track Back to POI
POI (*/12) > ENTER
mode
You can select favorite position when press “POI (*/12)” button. Also you
can press “ENTER” button to zoom in for clear view.
Delete POI position
NEXT SECTION MENU Press “MENU” button to next section.
POI (*/12) > ENTER >
All the favorite position can be deleted in this mode.
DELETE
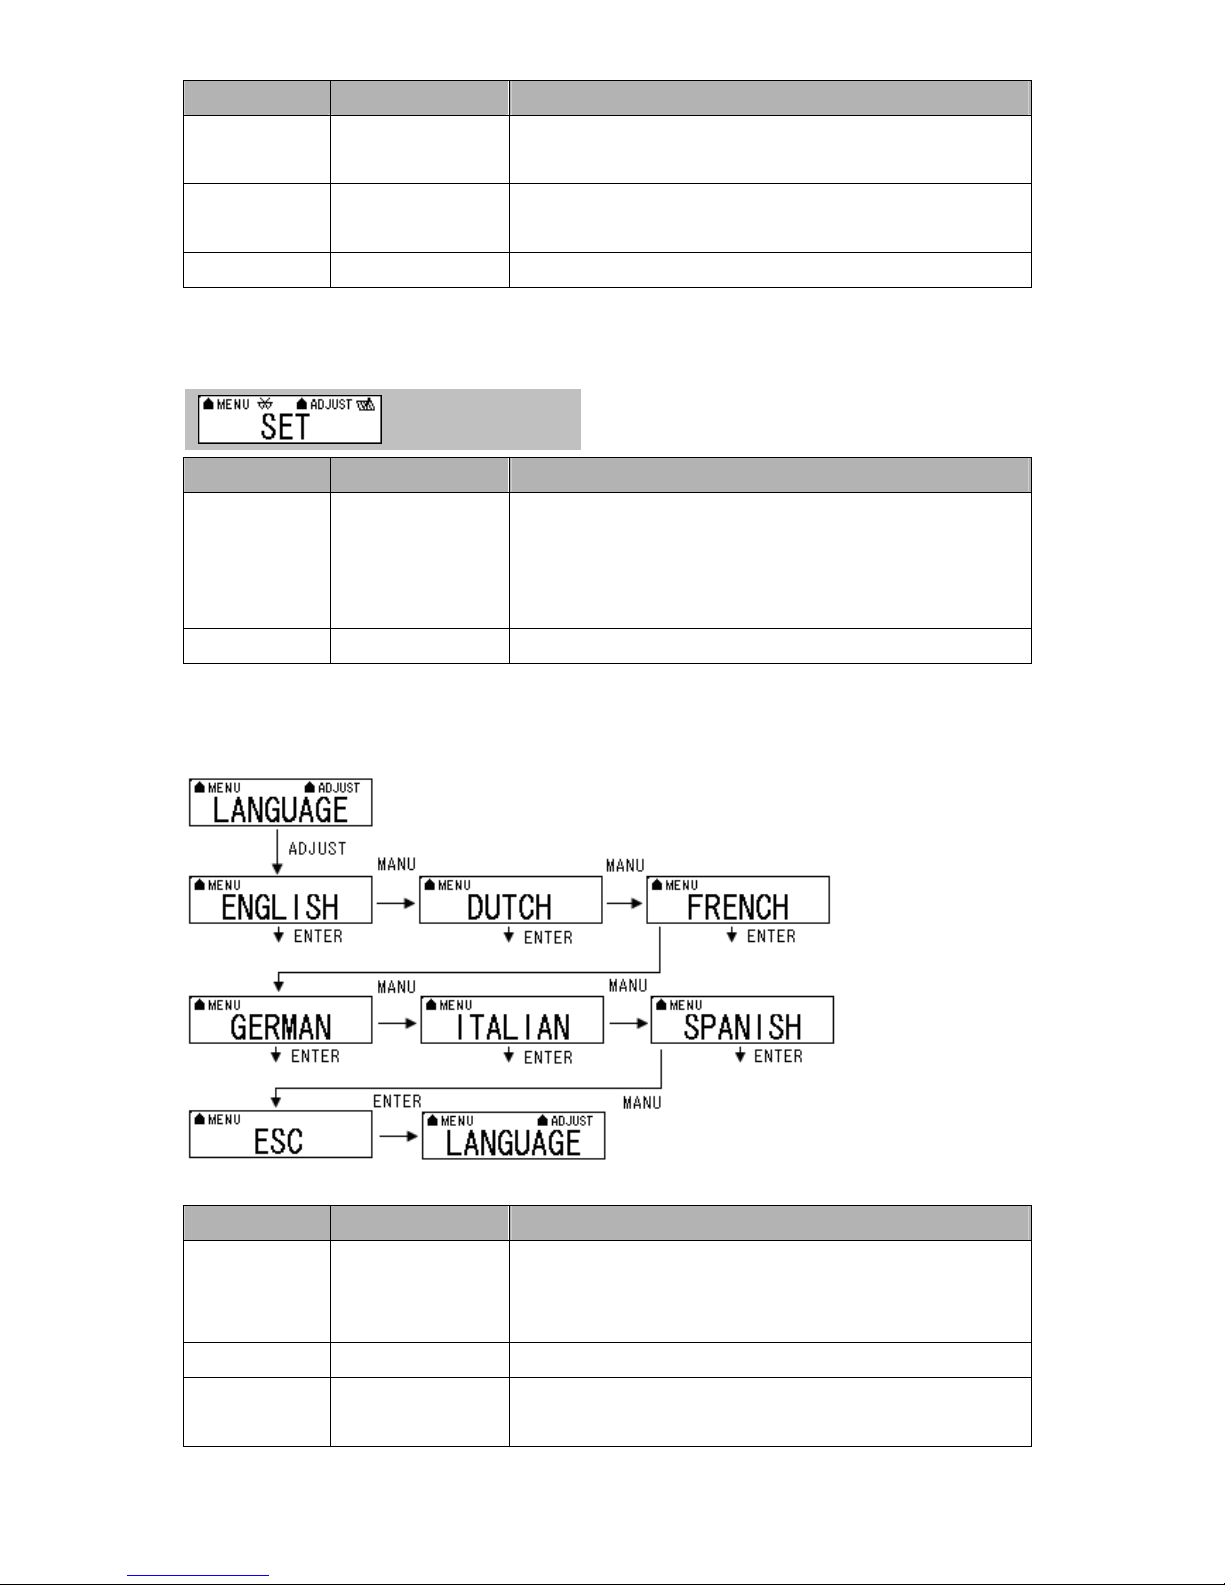
2.5.7 Setting Mode
< Setting Mode >
Function Button Detail Description
Press “ADJUST” button to go to option of the setting mode. In “SET”
FURTHER SET ADJUST
NEXT SECTION MENU Press “MENU” button to next section.
mode, there are “LANGUAGE”, “LOG MODE”, “SMART LOG”, “LOG
MANAGE”, “UNIT SET”, “BACKLIGHT”, “SENSOR”, “LOG FILE
SIZE”, and “DEFAULT”, which allow you for further setting.
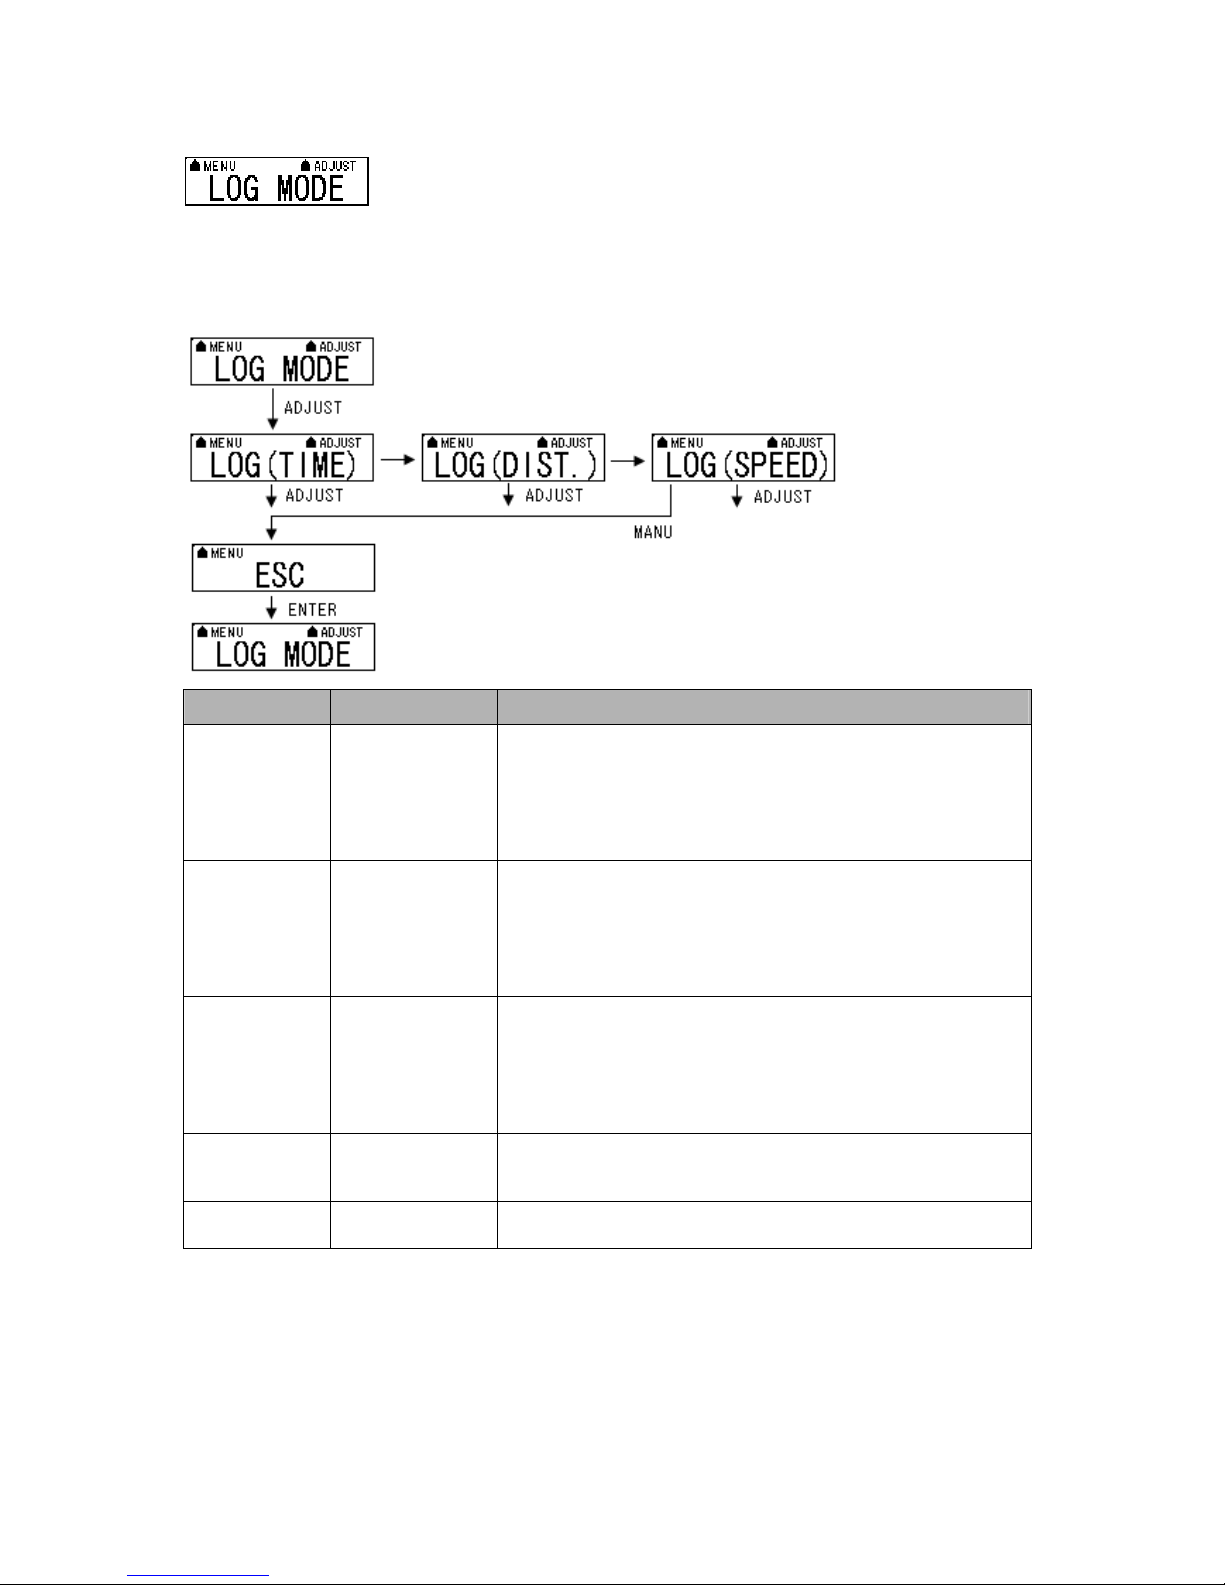
2.5.7.1 Several Language Setting
Function Button Detail Description
LANGUAGE
SETTING
NEXT SECTION MENU Press “MENU” button to next section.
Go back to language
ADJUST > MENU (TO
YOUR LANGUAGE) >
ENTER
MENU (TO ESC)>
ENTER
Please press “ADJUST” button, and then press “MENU” button to select
several language selections. When you make sure your selection, please
press “ENTER” button.
When you jump to “ESC” and then press “ENTER” button, the
TripMate850 will go back to “LANGUAGE” mode.
12 Rev. 1.0
Page 14
13
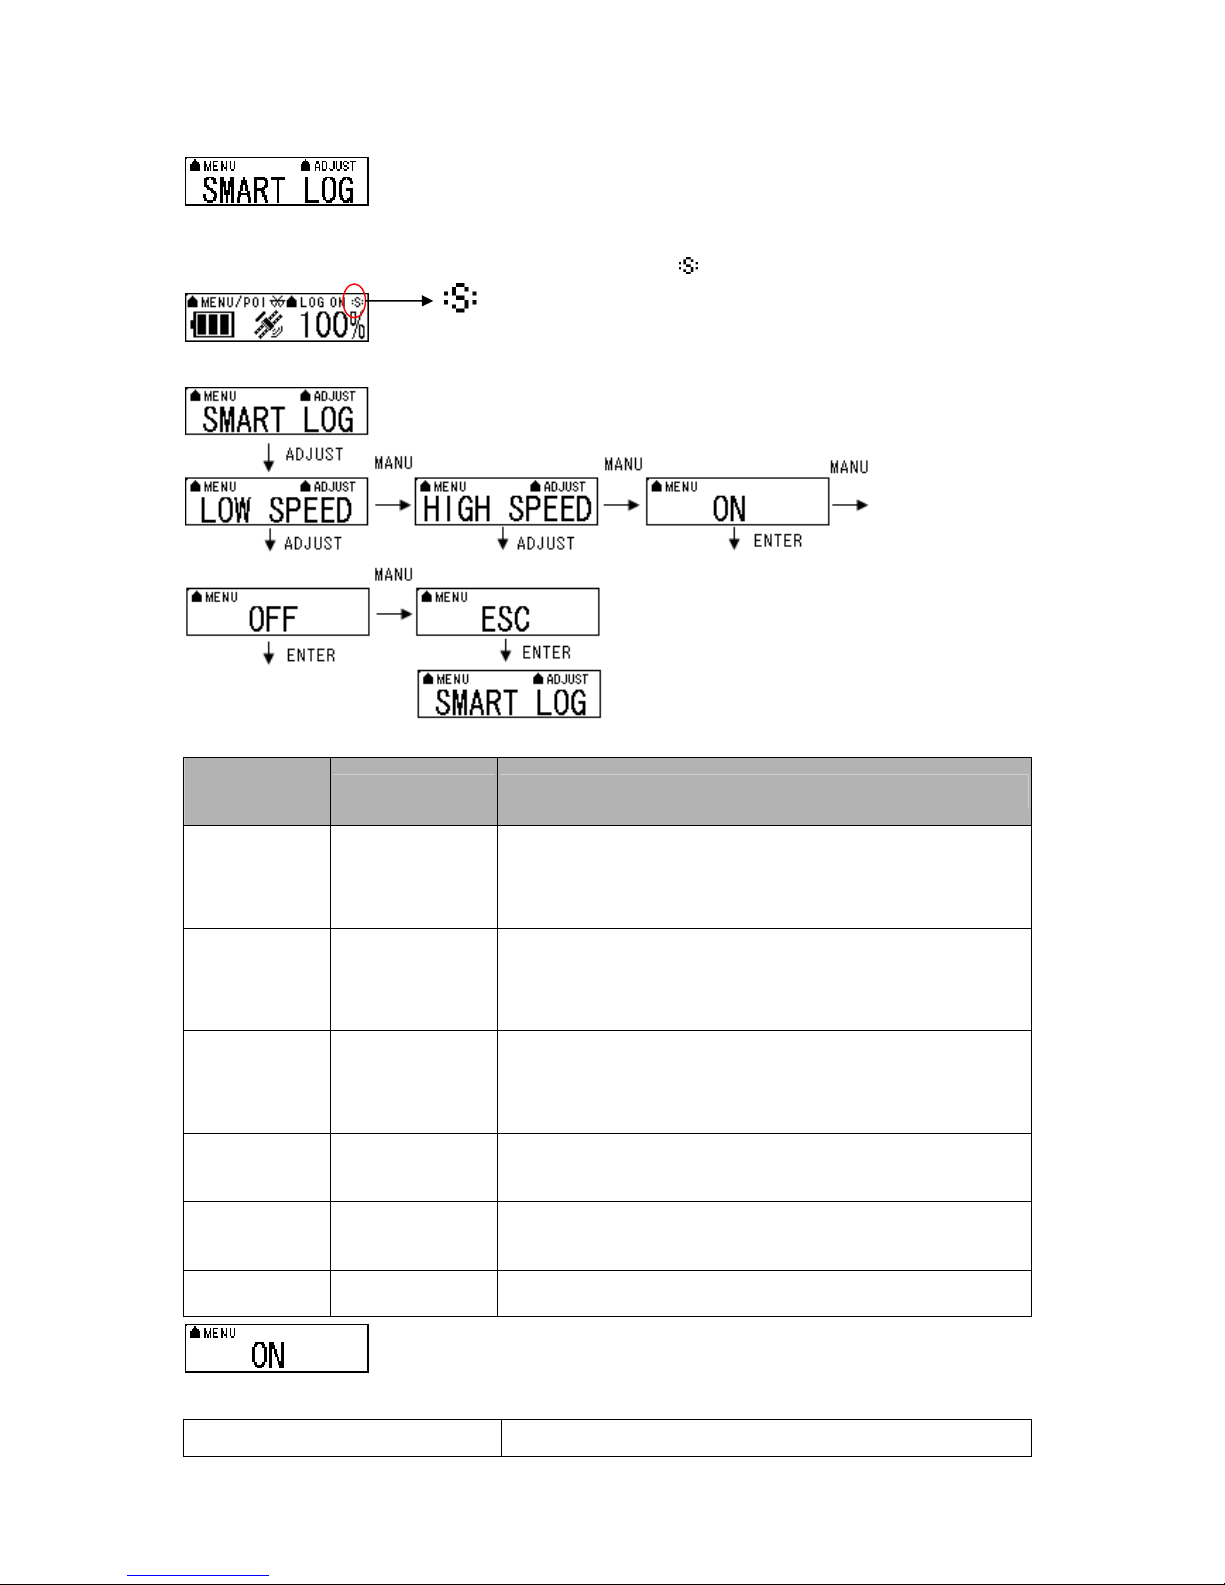
2.5.7.2 Log Mode Setting
In log mode, you can set log criteria by time, distance or speed. Please press “ADJUST”
button and then press “MENU” button to select different setting of log criteria. When you
make sure your selection, please press “ENTER” button to save the log criteria.
Function Button Detail Description
In log time mode, the TripMate850 can set log criteria from following
LOG BY TIME ADJUST > ENTER
LOG BY
DISTANCE
LOG BY SPEED ADJUST > ENTER
GO BACK TO
LOG MODE
NEXT SECTION MENU Press “MENU” button to next section.
ADJUST > ENTER
MENU (to ESC)>
ENTER
options, to log one time every 1 second / 5 seconds / 15 seconds / 30 seconds
/ 5 minutes / or 10 minutes. When you make sure your selection, please press
“ENTER” button.
In log distance mode, the TripMate850 can set log criteria from following
options, to log one time every 5 meters / 10 meters / 30 meters / 100 meters
/ or 500 meters. When you make sure your selection, please press “ENTER”
button.
In log speed mode, the TripMate850 can set log criteria from following
options, to log one time when speed is over than 3km/h / 6km/h / 10km/h
50km/h / or 100km/h. When you make sure your selection, please press
“ENTER” button.
When you jump to “ESC” and then press “ENTER” button, the TripMate850
will go back to “LOG” mode.
[Note] TripMate850 can not support 5Hz log feature.
Rev. 1.0
Page 15
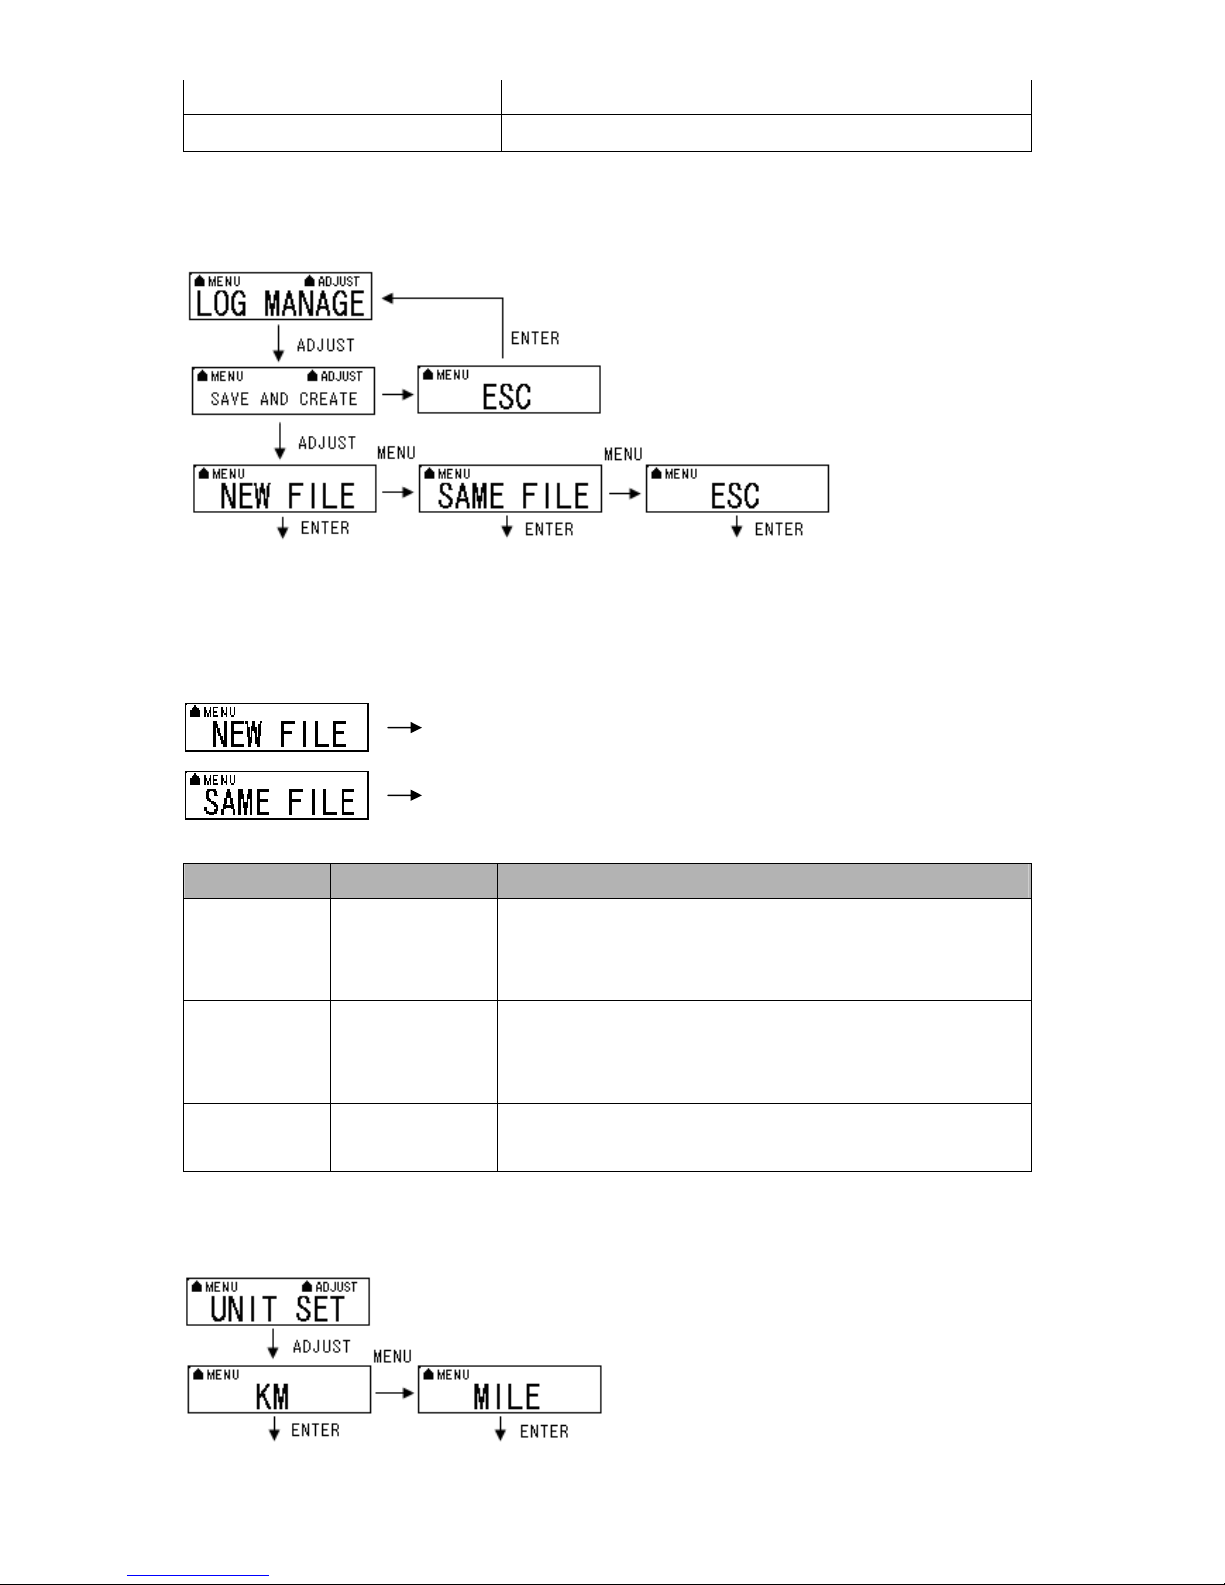
2.5.7.3 Smart Log Setting
button
When the smart log function is on, the TripMate850 will go into different log manner which
depends on speed per hour. And the screen will show “ ” icon.
Button Detail Description
Function
MENU (to LOW
LOW SPEED
HIGH SPEED
START SMART
LOG FUNCTION
STOP SMART
LOG FUNCTION
GO BACK TO
SMART LOG
NEXT SECTION MENU Press “MENU” button to next section.
SPEED) > ADJUST >
ENTER
MENU (to HIGH
SPEED) > ADJUST >
ENTER
MENU (to ON) >
ENTER
MENU (to OFF) >
ENTER
MENU (to ESC)>
ENTER
In low speed, please press “ADJUST” button, and then press “MENU”
to select 4km/h, 6km/h, 8km/h, or 15km/h. When you make sure your
selection, please press “ENTER” button.
In high speed, please press “ADJUST” button, and then press “MENU”
button to select 30km/h, 60km/h, 100km/h or 140km/h. When you make sure
your selection, please press “ENTER” button.
When it shows “On” on the screen, press “MENU” button, the TripMate850
will start smart log function. And it will show "s" icon on the upper right
hand corner of the screen.
When it shows “Off” on the screen, press “MENU” button, the TripMate850
will stop smart log function.
When you jump to “ESC” and then press “ENTER” button, the TripMate850
will go back to “SMART LOG” mode.
When you select “ON” and then press “ENTER” button, please see
below description.
> 6km/h (LOW SPEED) Log 1 time / per 15 sec
14 Rev. 1.0
Page 16
15
60>Middle SPEED>6km/h Log 1 time / per 10 sec
rack and create another track
60km/h (HIGH SPEED) > Log 1 time / per 5 sec
2.5.7.4 Log Manage Setting
If you want to create a new track, you can press “ADJUST” button to “save and create”
function.
In “save and create” mode, there are two options:
To save current track and create another track in new file.
To save current track and create another track in same file.
And TripMate850 will stop logging.
Function Button Detail Description
Create new track
and save in new file.
Create new track
and save in same
file & stop logging
Go back to
LOG MANAGE
ADJUST > ADJUST
(to NEW FILE) >
ENTER
ADJUST > ADJUST >
MANU (to SAME
FILE) > ENTER
MENU (to ESC)>
ENTER
In “SAVE AND CREATE” mode, please press “ADJUST” button, it will
show “NEW FILE”, if you want to save current t
in new file., please press “ENTER” button.
In "SAME FILE" mode, if you want to save current track and create another
track in same file, please press “ENTER” button. And also TripMate850 will
stop logging.
When you jump to “ESC” and then press “ENTER” button, the TripMate850
will go back to “LOG MANAGE” mode.
2.5.7.5 Unit Set
Rev. 1.0
Page 17
Function Button Detail Description
ADJUST > MENU (to
Unit setting
NEXT SECTION MENU Press “MENU” button to next section.
KM or MILE) >
ENTER
In “Unit setting” mode, please press “ADJUST” button, and then press
“MENU” button to select “km” or “mile” as unit of measurement for the
TripMate850. When you make sure your selection, please press “ENTER”
button, and the TripMate850 will go back to “Unit setting” mode.
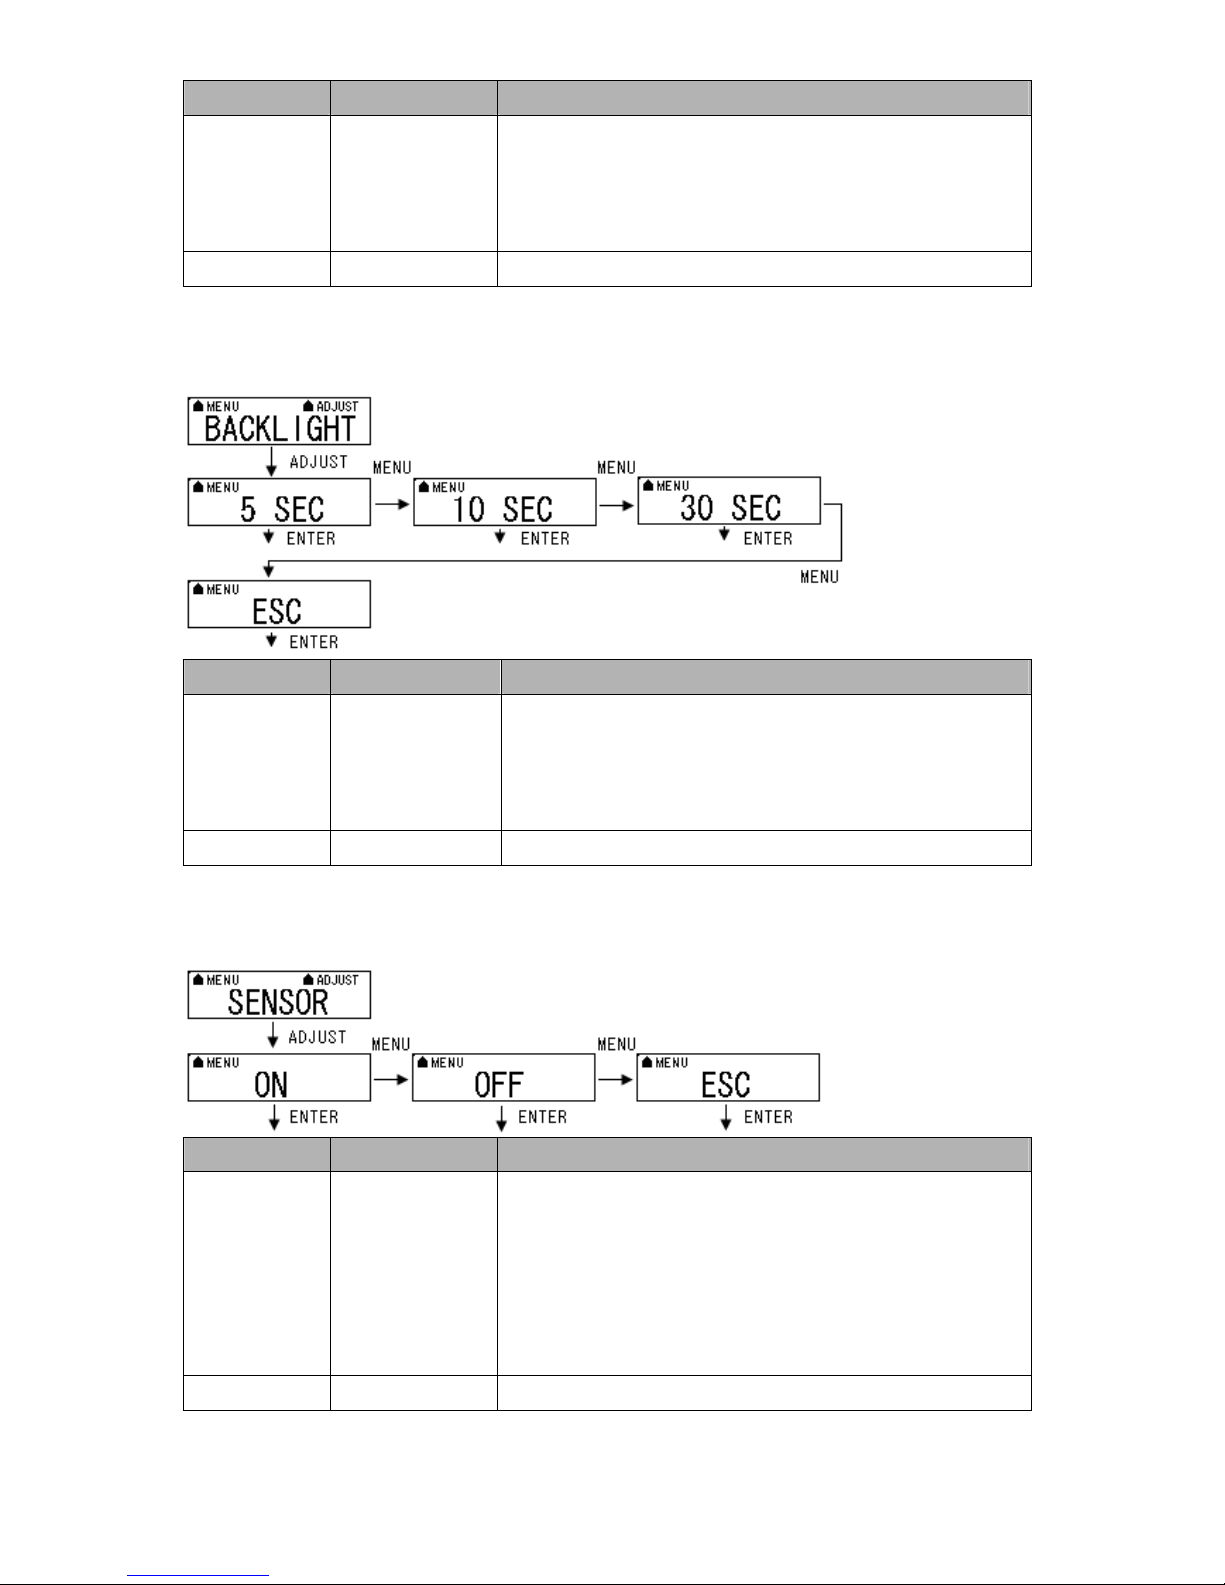
2.5.7.6 Backlight Set
Function Button Detail Description
Please press “ADJUST” button and then press “MENU” button to select
time-out setting for backlight. You can set backlight time-out in 5 sec / 10
sec / or 30 sec. When you make sure your selection, please press “ENTER”
button, and the TripMate850 will go back to “Backlight” setting mode.
Backlight setting
ADJUST > MENU (to
5 SEC, 10 SEC or 30
SEC) > ENTER
NEXT SECTION MENU Press “MENU” button to next section.
2.5.7.7 Sensor Set
Function Button Detail Description
Please press “ADJUST” button and then press “MENU” button to select
“On” or “Off” for vibration sensor setting. When you make sure your
Vibration sensor
setting
NEXT SECTION MENU Press “MENU” button to next section.
ADJUST > MANU (to
ON or OFF) > ENTER
selection, please press “ENTER” button. When you enable the sensor
function, without moving the TripMate850 for ten minutes, the device will go
into power saving mode, shut down screen and stop logging data. After you
move the TripMate850, it will start log again.
16 Rev. 1.0
Page 18
17
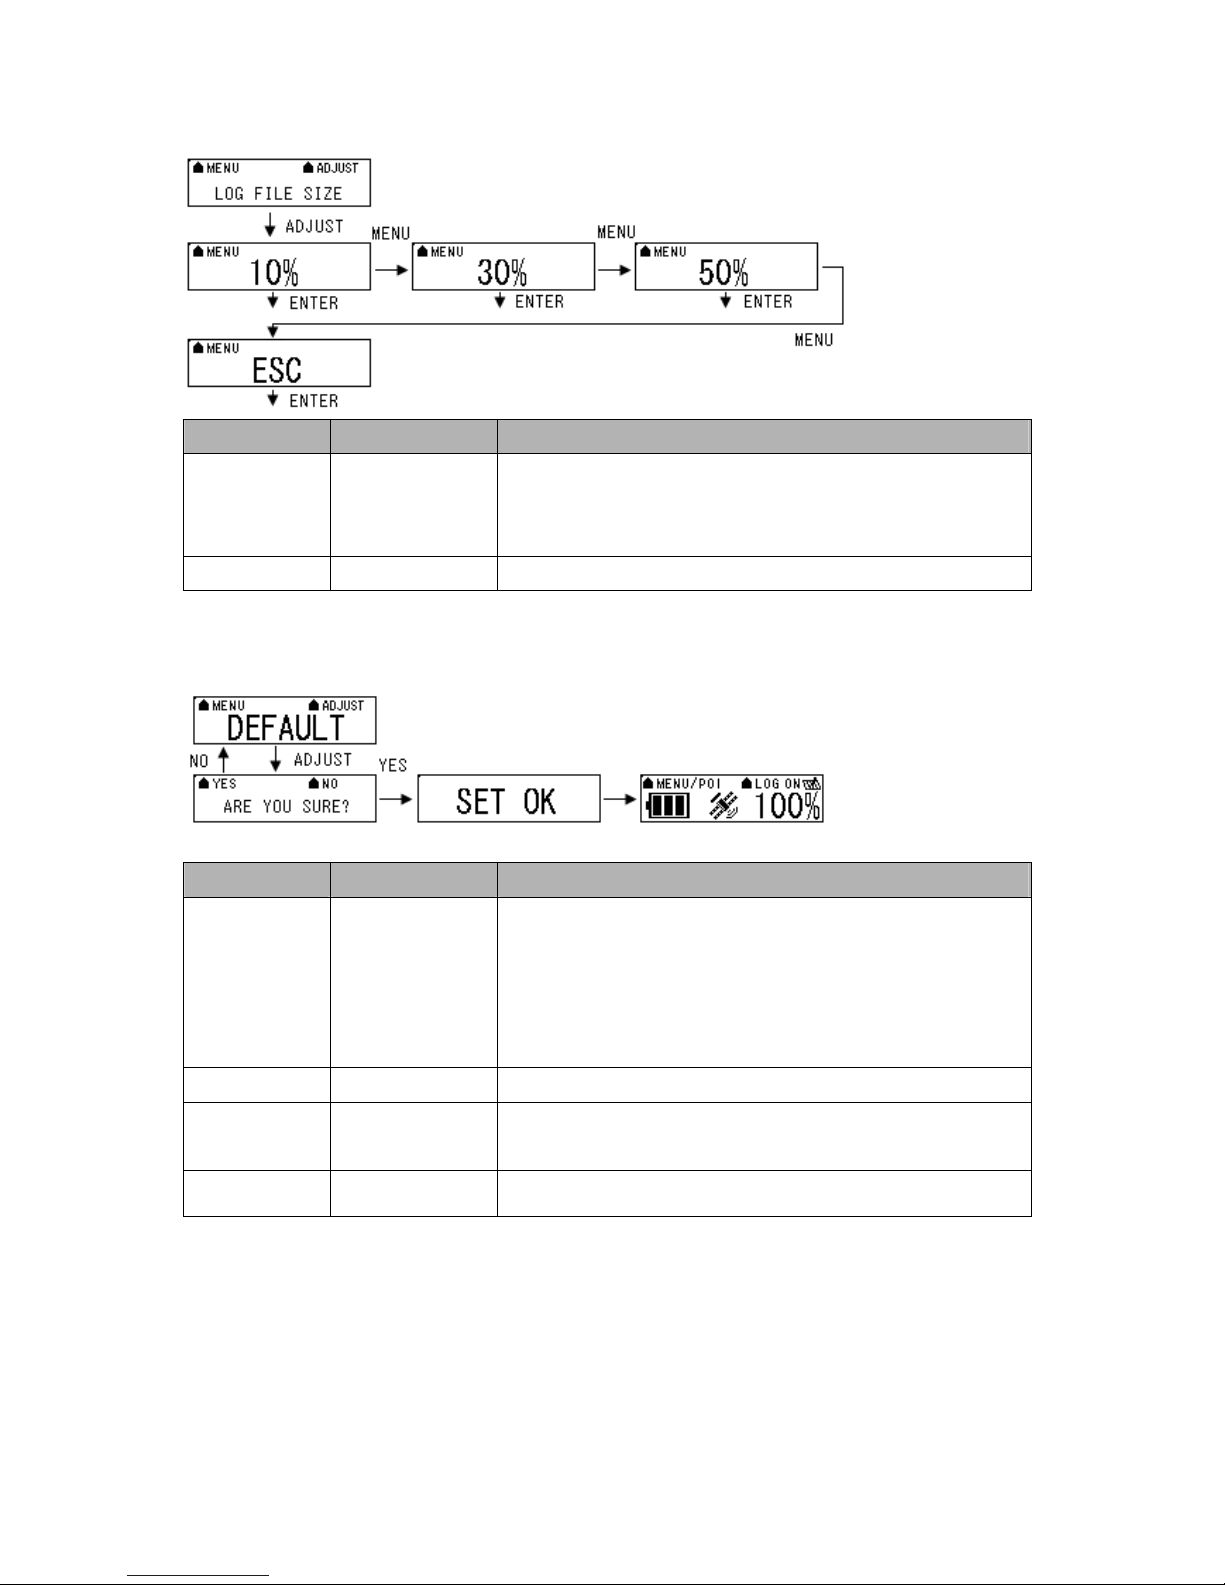
2.5.7.8 Log File Size Set
ADJUST > YES or NO
Function Button Detail Description
ADJUST > MANU (to
Memory size setting
NEXT SECTION MENU Press “MENU” button to next section.
10%, 30% or 50%) >
ENTER
Please press “ADJUST” button and then press “MENU” button for selection.
You can set 10%, 30% or 50% of total memory size for storing log data.
When you make sure your selection, please press “ENTER” button.
2.5.7.9 Default Set
Function Button Detail Description
Please press “ADJUST” button and it will show “Are you sure?”, if you
select “YES”, the screen will show “SET OK”. And the TripMate850 will
Recover to default
NEXT SECTION MENU Press “MENU” button to next section.
Go back to setting
mode
NEXT SECTION MENU Press “MENU” button to next section.
MENU (to ESC)>
ENTER
recover to default setting and go back to Battery, Satellite, Log memory
mode. If you select “NO”, the TripMate850 will go back to “DEFAULT”
mode.
When you jump to “ESC” and then press “ENTER” button, the TripMate850
will go back to “Setting” Mode.
Rev. 1.0
Page 19
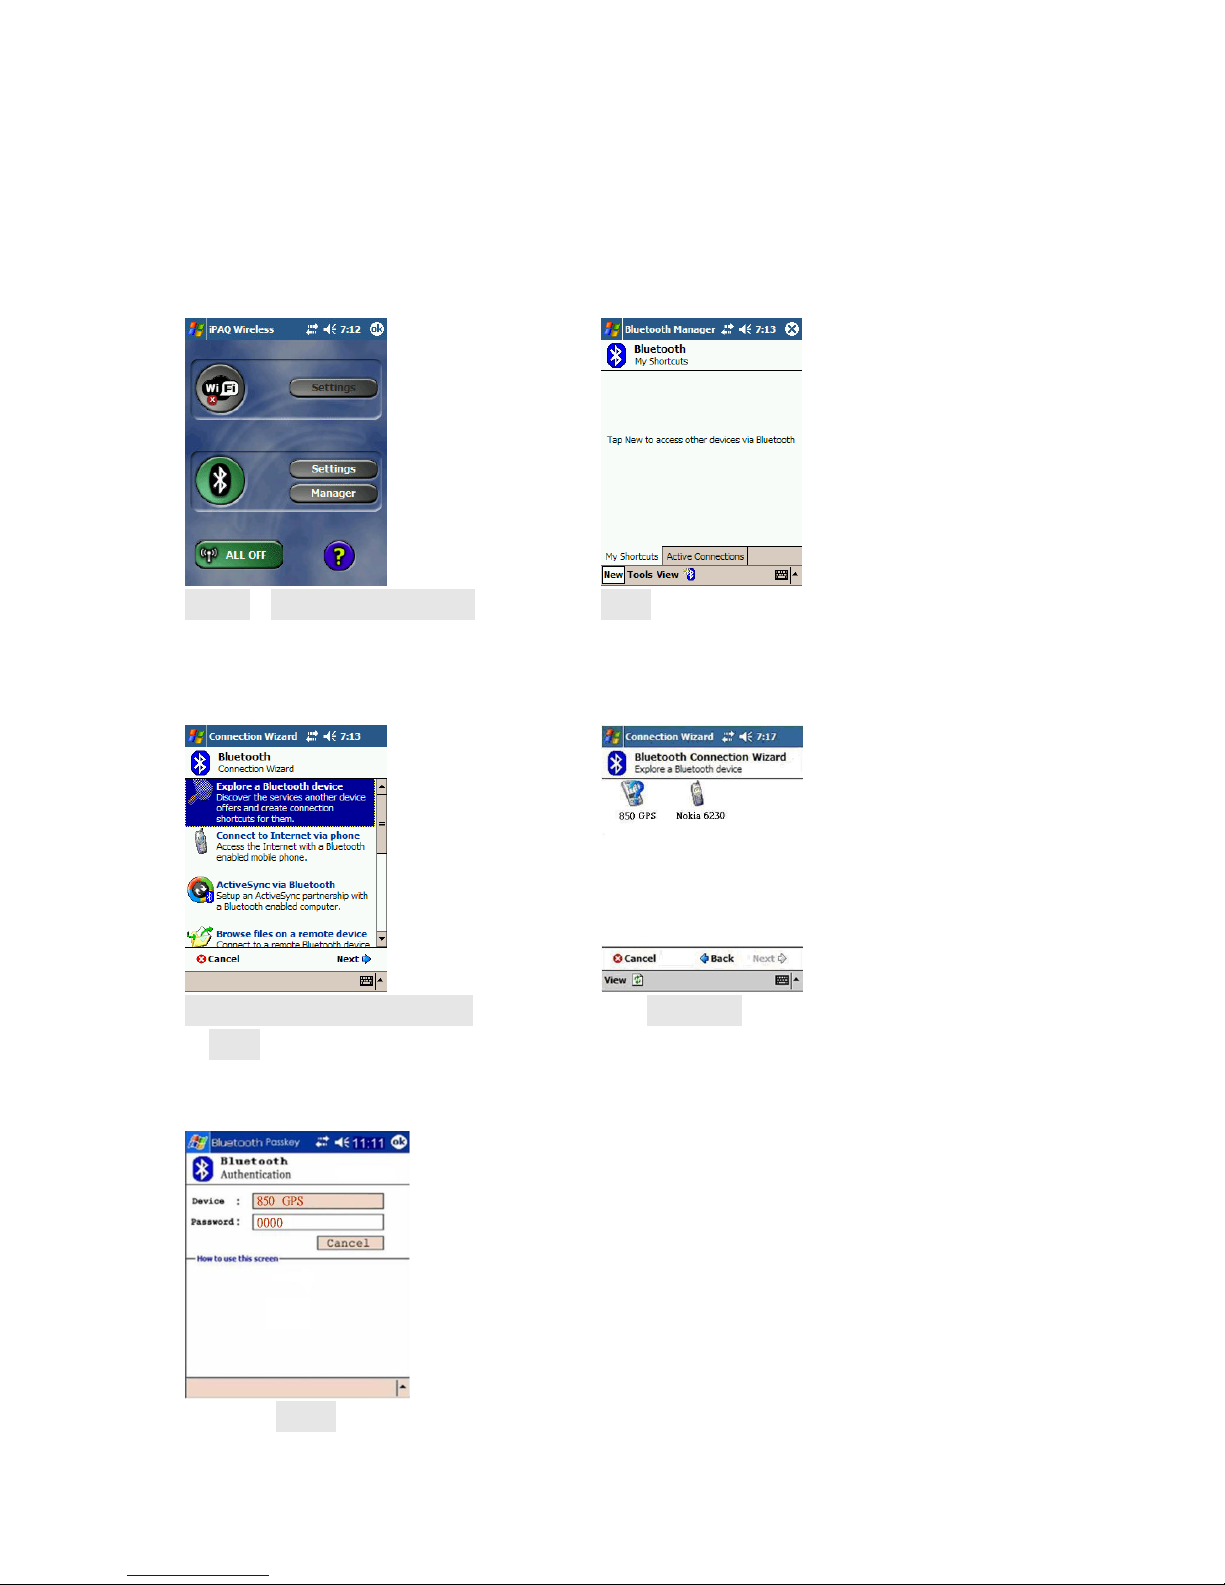
2.5.8 Connecting with your handheld device
Please refer to the user manual of PDA/Smartphone to enable the Bluetooth connectivity.
Below, we provide a common procedure of software installation to set up your
PDA/Smartphone. (For other PDA/Smartphone, the steps may be different. Bluetooth
Manager is a popular program used on Bluetooth device.)
-->
Start -> Bluetooth Manager New
A. Open “Bluetooth Manager” on your pocket pc, and establish a
new connection.
-->
Explore a Bluetooth device
Tap 850 GPS
->Next
B. Explore a Bluetooth device, and find the “850 GPS”
Passkey 0000 (if your PDA
asks for the passkey)
18 Rev. 1.0
Page 20
19
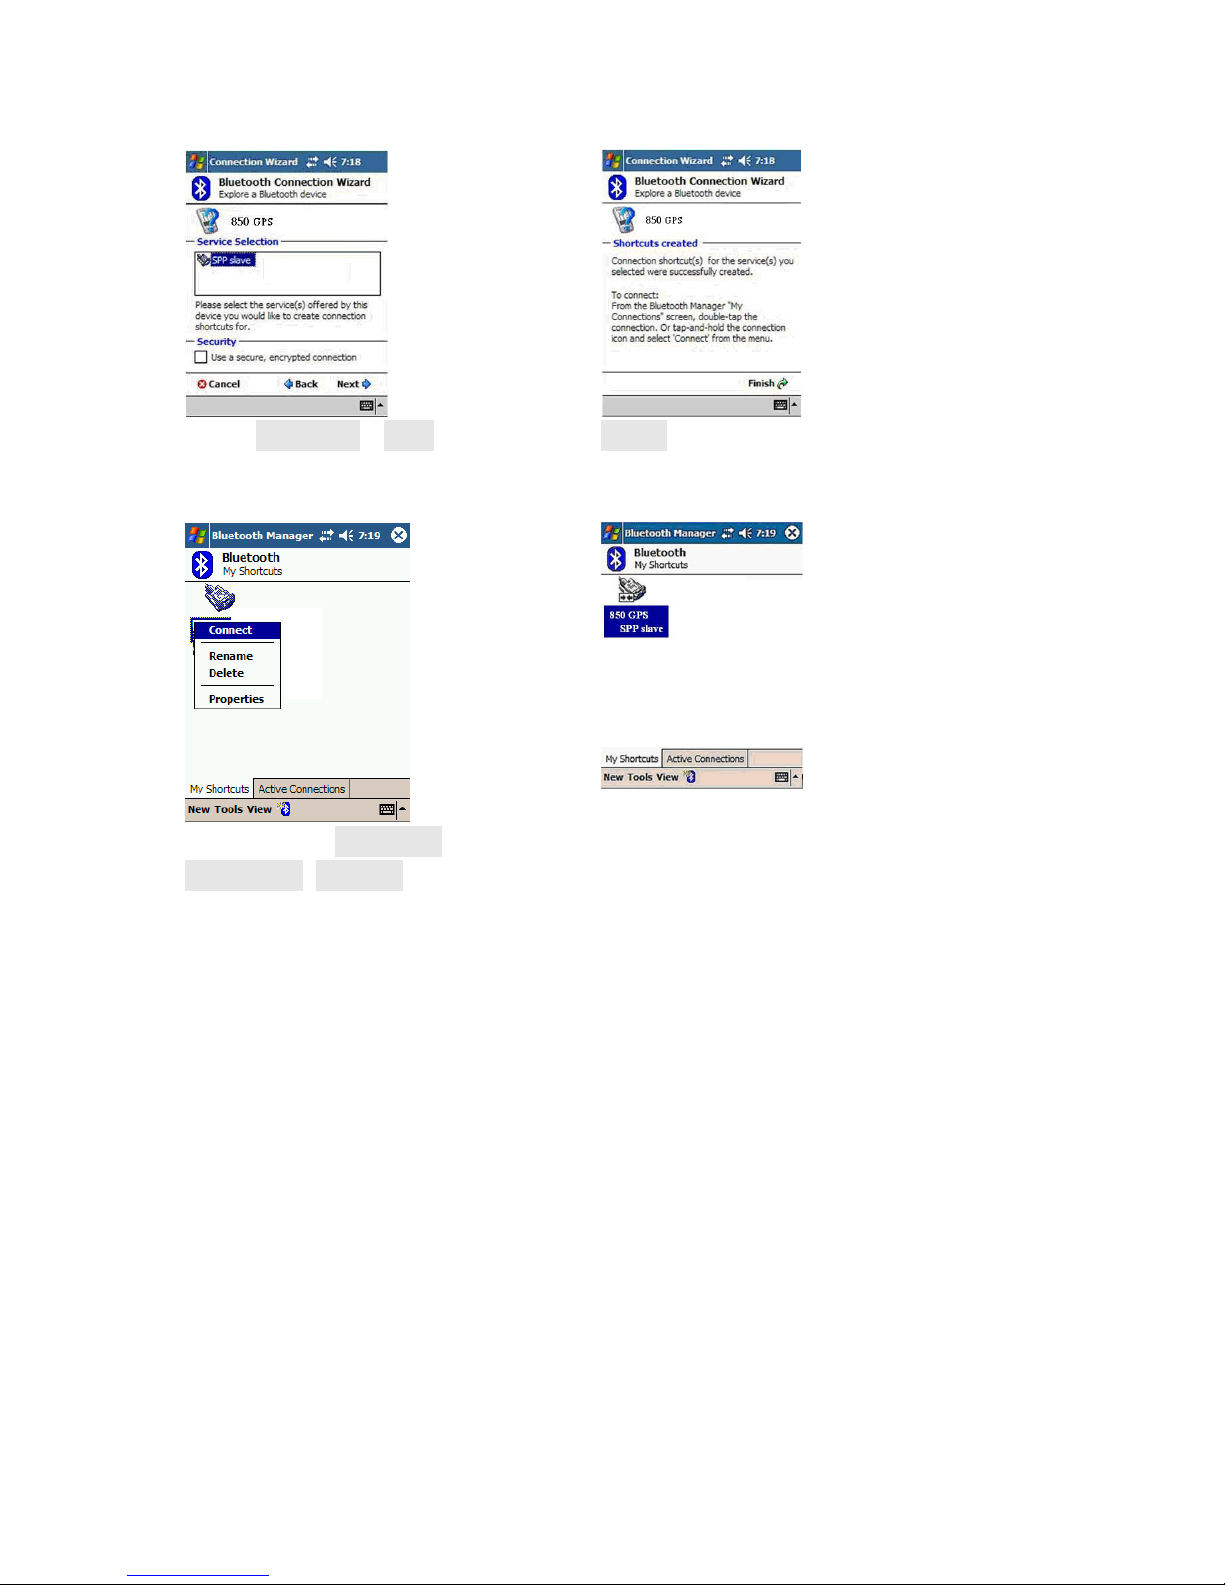
C. (Optional)
-->
Select SPP slave->Next Finish
D. Connect to Serial Port Profile (SPP) Slave
-->
Tap and Hold 850 GPS
Done
: SPP slave, Connect
E. Finish Bluetooth Manager Setup
1. Loading your GPS mapping or routing software
You should have mapping software on your PDA/ Smartphone/ laptop or you need to install it
before using the TripMate850 for navigation.
2. Starting the application
Select the correct COM port & baud rate within the application.
[Note] The Bluetooth device in most of the applications has an “auto-detect” feature so that
you do not need to select the Baud Rate.
Rev. 1.0
Page 21
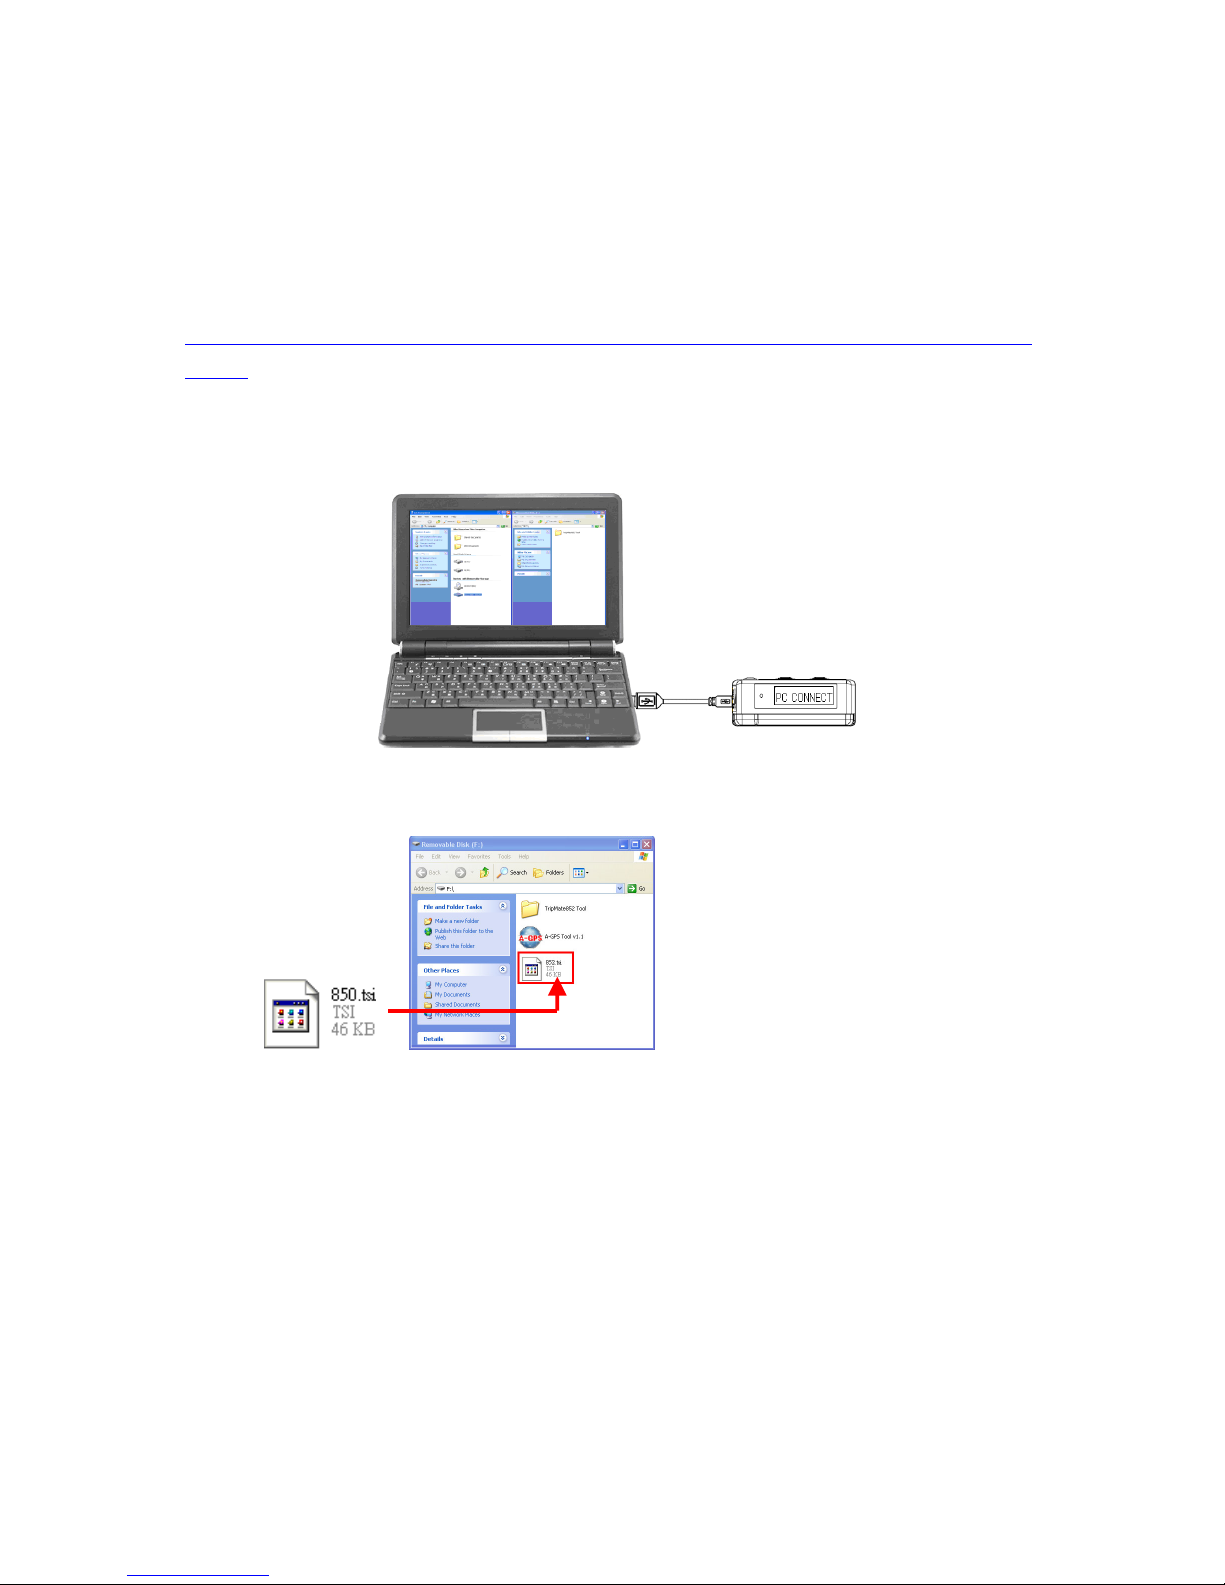
2.5 Software upgrade
TripMate850 is feasible to update its device software manually by yourself. Through this
service, you can get and enjoy new features just like our upgrade version.
Please follow below steps to upgrade software for TripMate850.
Step1. Please download latest software file from TripMate850 product page of TSI website.
http://www.transystem.com.tw/products/index_detail.php?mcat_no=2&cat_no=33&pno=58&
ver=en
Step2. Build a connection between TripMate850 and PC/Laptop via USB cable, the
TripMate850 will work as mass storage.
Step3. Put the software file inside micro SD card.
Step4. After complete above steps, please TURN OFF TripMate850.
And please press “ADJUST” button and then press “ENTER” button, the TripMate850 will
update its software.
20 Rev. 1.0
Page 22
21
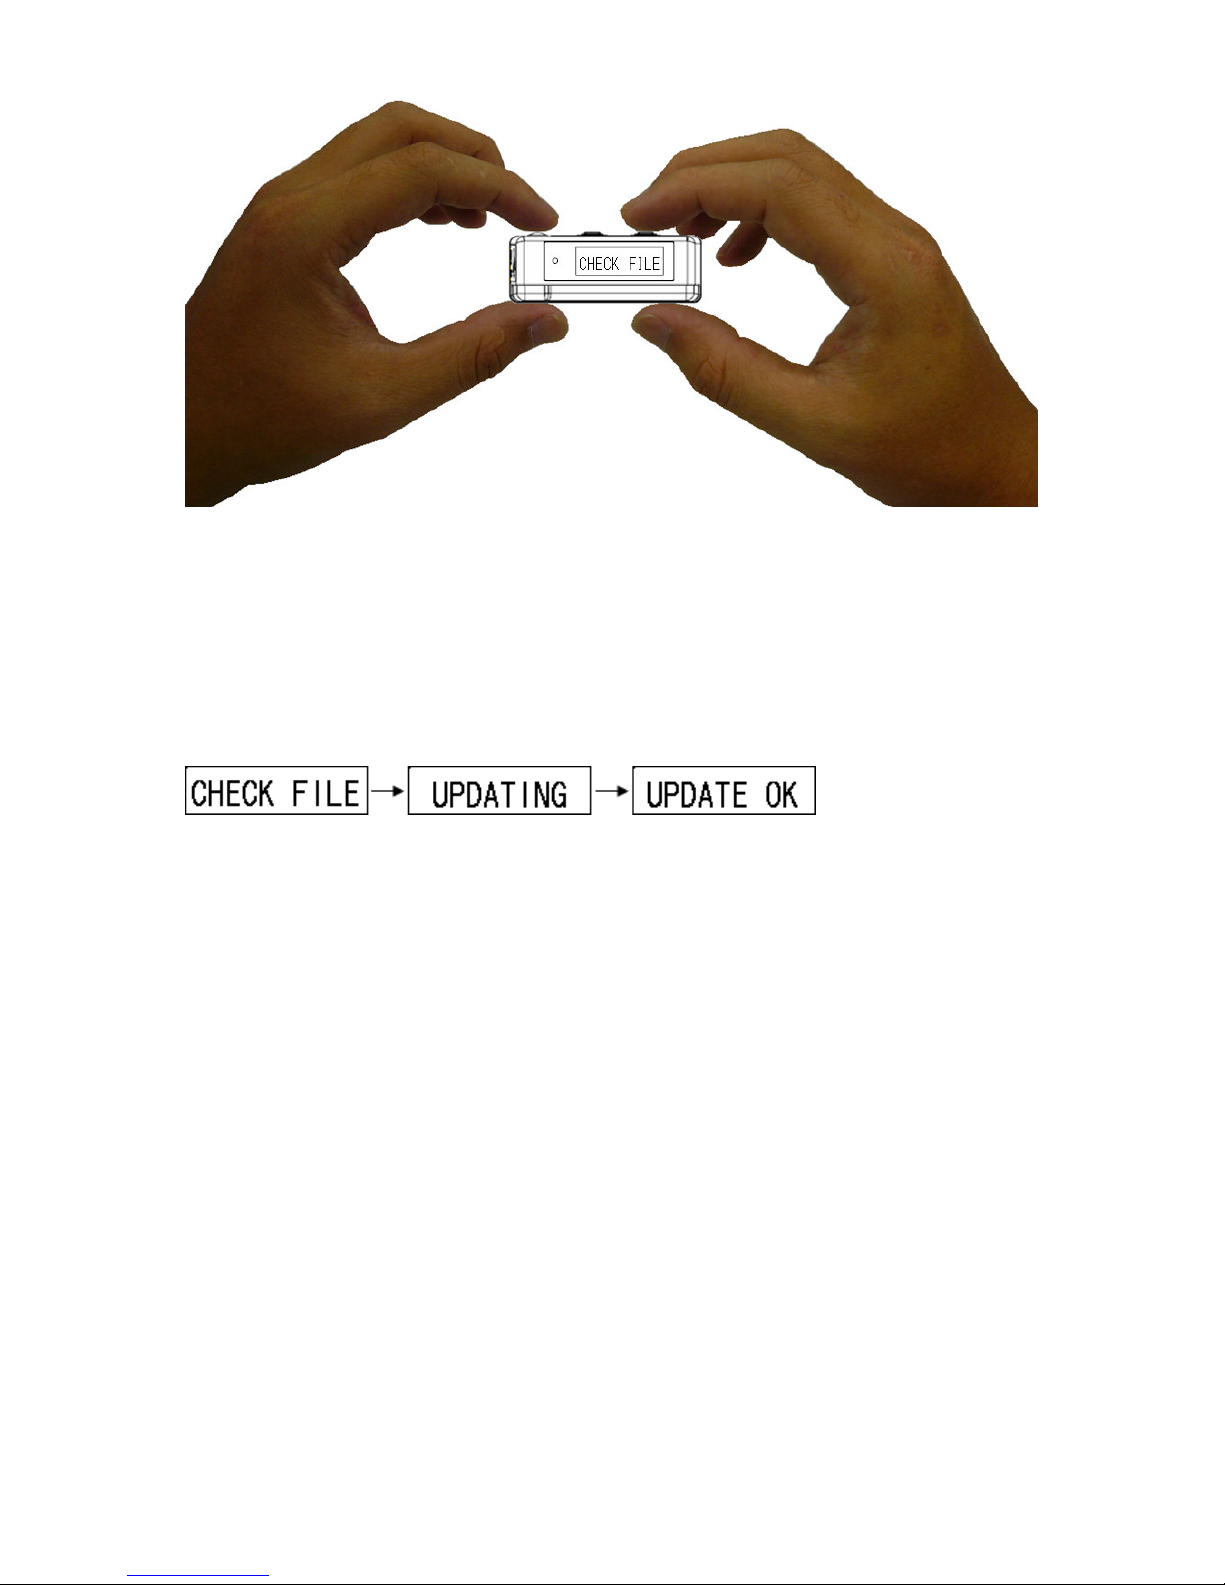
Step5. During the software upgrade procedure, the TripMate850 will check file first to detect
if there is a “software file” inside micro SD card. At this moment it will show “CHECK
FILE” on the screen. After that TripMate850 will start to upgrade its software, and it will
show “UPDATING” on the screen. When the software upgrade procedure is complete, it will
show “UPDATE OK”. Afterward the screen will shut down and TripMate850 will turn off
automatically. TripMate850 upgrade its software successfully.
Rev. 1.0
Page 23

2.6 Helpful Tips
− It’s better to turn off the TripMate850 when you don’t use it, or the serial Flash's life can’t
last long.
− Some vehicles having heavy metallic sun protecting coating on windshields may affect
GPS signal receptions
− Driving in and around high buildings may affect GPS signal receptions.
− Driving in tunnels or indoor parking may affect signal reception.
− In general, any GPS receiver performs best in open space where it can see clean sky. Also
weather will affect GPS reception – rain & snow contribute to worse sensitivity.
− Low battery of PDA or TripMate850 may affect signal reception.
− Please check the correct “COM” and “Baud rate” of your PDA.
− TripMate850 output data every second, therefore the actual position and the position
shown in your map may have slight time delay. This may happen when you drive at high
speed or make a turn around a corner.
− TripMate850 may not work indoors where it can not see the sky.
− For the 1st time you use TripMate850, it will take 1 to 3 minutes to obtain the satellite
constellation information and fix your position, this is called “Cold Start”. If you replace
the battery, TripMate850 will do Cold Start again.
− If your TripMate850 can’t fix your position for more than 20 minutes, we suggest you
change to another spot with open space and then try again.
22 Rev. 1.0
Page 24
23
Chapter3. How to configure your GPS Record?
The GpsView program only supports the Microsoft Windows based platform. Before you start
to use GpsView software, it only supports use of Bluetooth connection between your PC and
TripMate850.
3.1 GpsView software
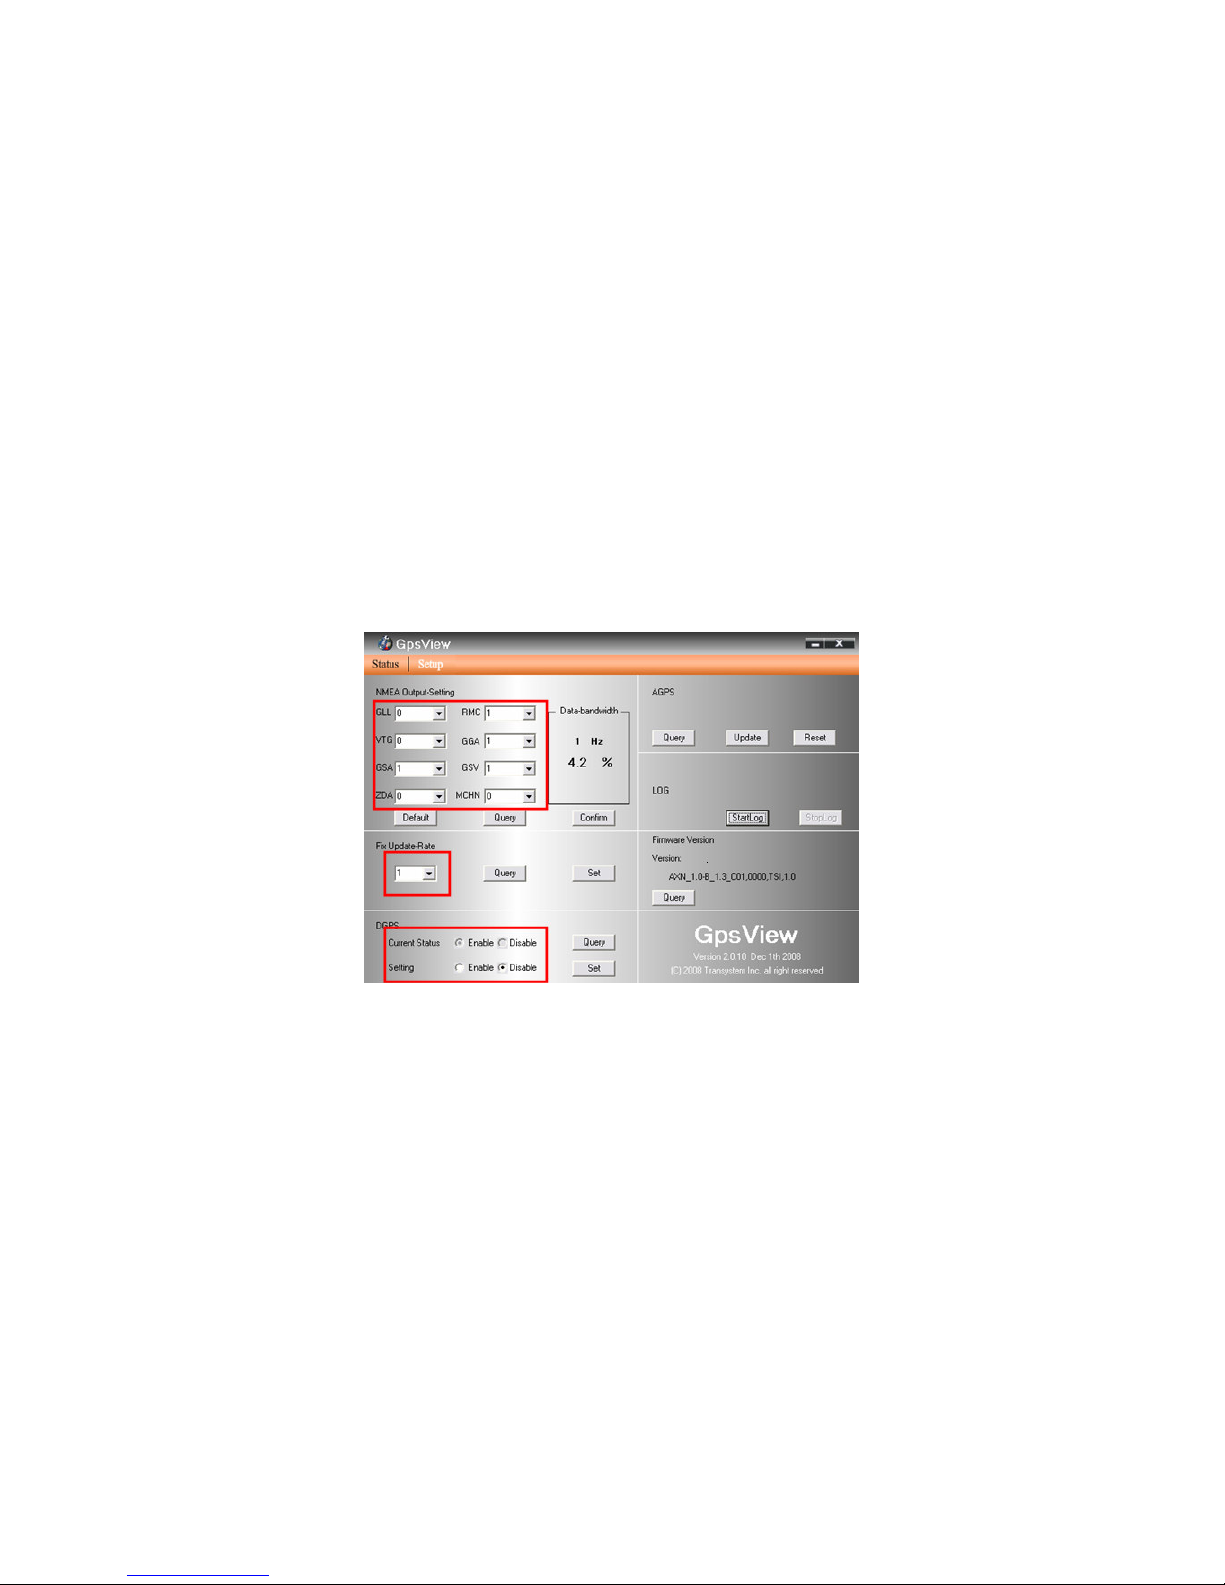
Open the GpsView software, please select correct COM port and Baud Rate (Bluetooth:
115,200 bps) to configure GPS.
3.1.1 Using GpsView Program
Click “Command” tap. Update Rate 1 ~ 5Hz is user configurable. And still more options for
choice of NMEA output, DGPS…etc. all available through pull-down menus.
Rev. 1.0
Page 25
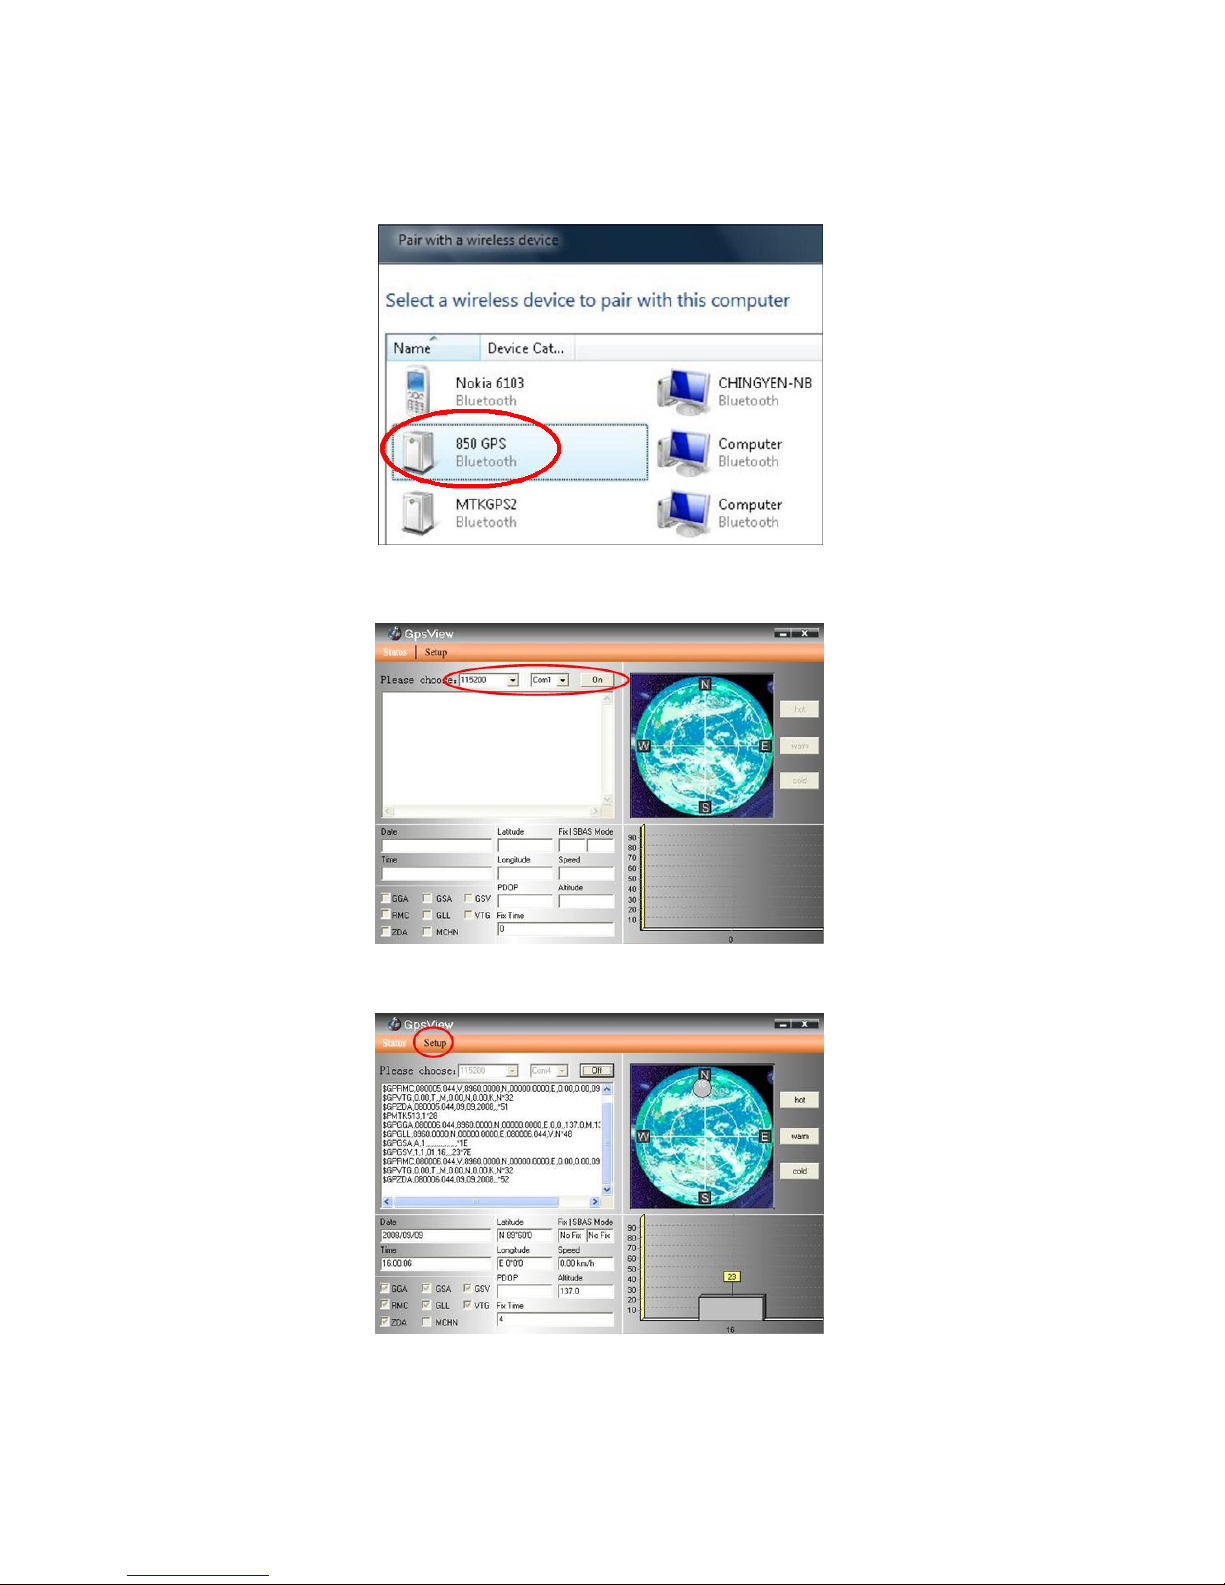
3.1.2 Download AGPS
1. Build a Bluetooth connection between your PC and TripMat850 →
Check Com Port
2. Open GpsView.exe → Check Baud Rate and Com port
→ click “On”
3. Choose “Setup”
24 Rev. 1.0
Page 26
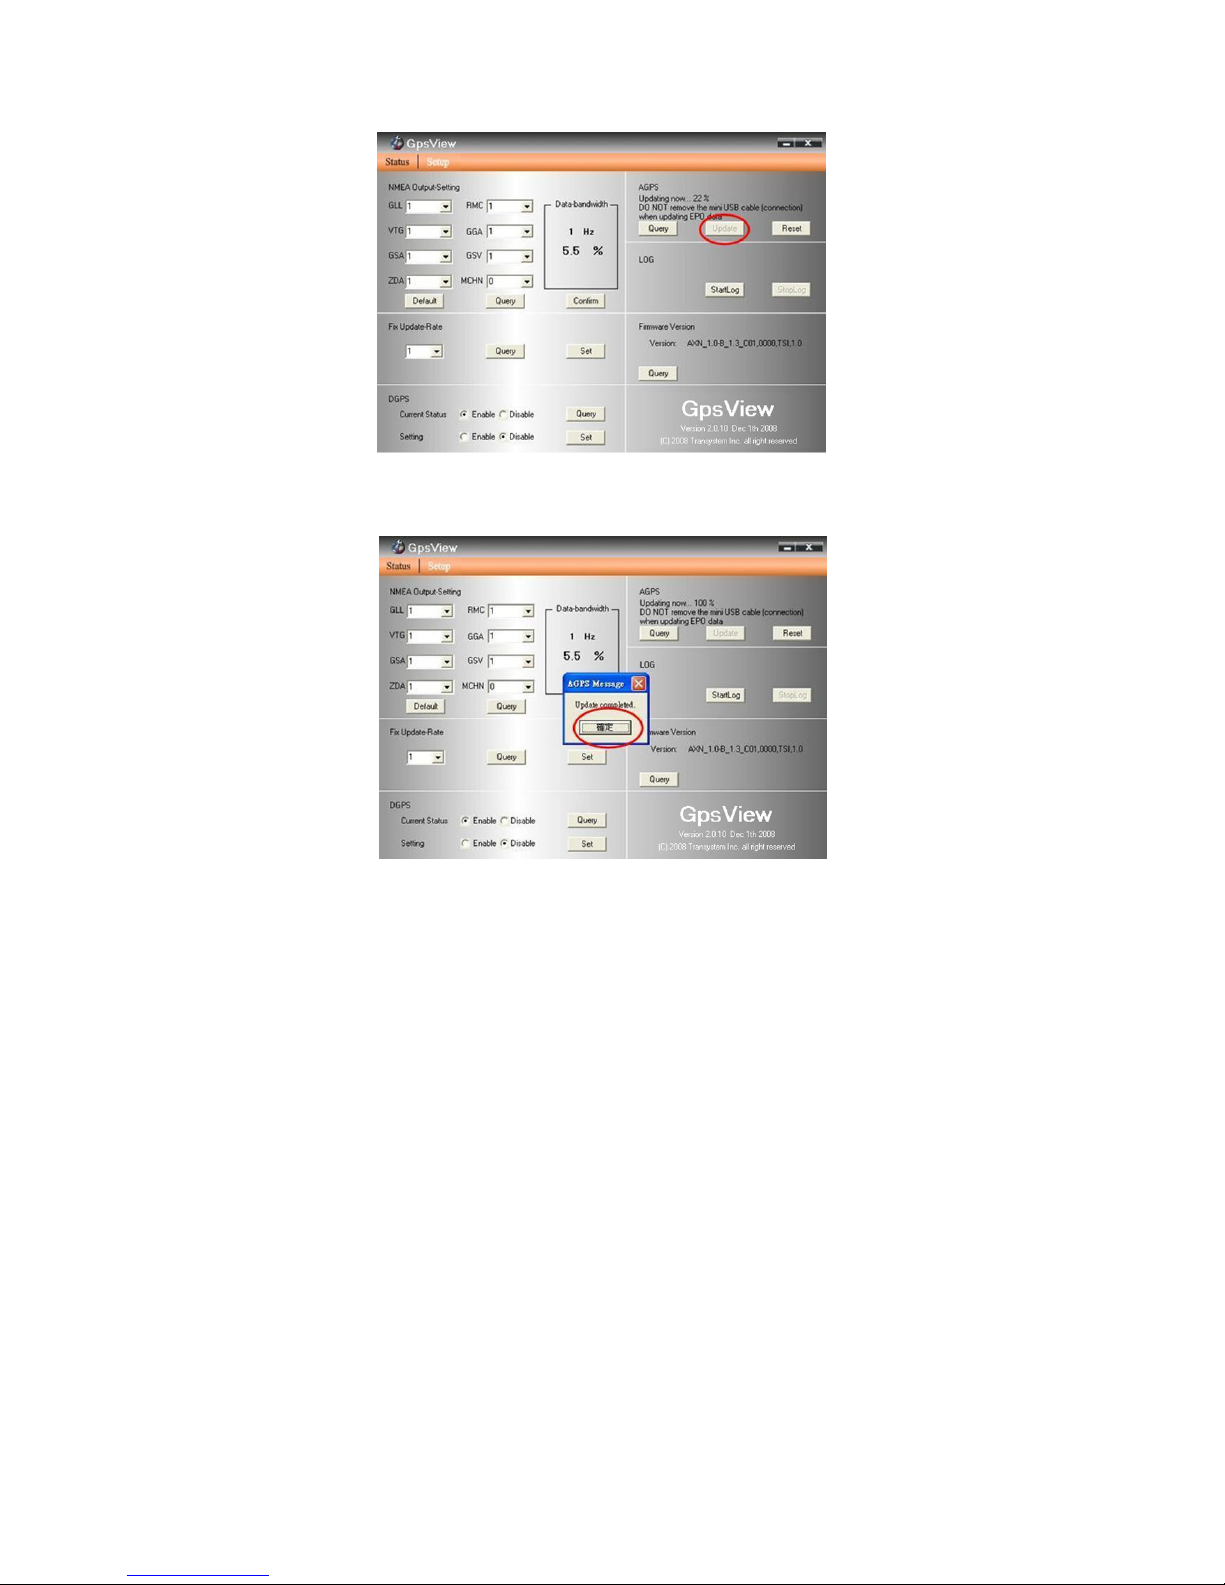
25
4. Choose “Update” to download AGPS data
5. When Updating now…100% → click “Enter” to complete
[Note] When you use GpsView software to download AGPS data, it only
supports use Bluetooth connection between your PC and TripMate850.
AGPS data has six days time limited.
Rev. 1.0
Page 27

Chapter4. Using Photo Tagger software
4.1 Execute and install software utility Photo Tagger
Complete GPS Photo Tagger installation
4.2 Google Earth
If your computer is not yet installed with Google Earth, Google Earth has free download
version, go download it in the internet first. For more information, please visit
http://earth.google.com/
4.3 Software Utility - TripMate850
For further function to use the Photo Tagger software in detail, please refer to Photo Tagger
user manual:
Photo Tagger software > Help > User Manual
To use a mini-USB cable to connect the TripMate850 to your PC, you have to power on the
TripMate850 unit.
Chapter5. Power description
Please be noticed that the operation time of TripMate850 will depend on the battery type you
use. In normal condition, we suggest use alkaline battery for TirpMate850 because alkaline
battery is able to contribute longer operation time which last up to 12 hours.
The following is the reference operation time table of diverse AAA battery for TripMate850.
Temperature (Typical)
Alkaline battery 12 hours
Rechargeable battery 11 hours
Dry battery 4 hours
26 Rev. 1.0
Page 28
27
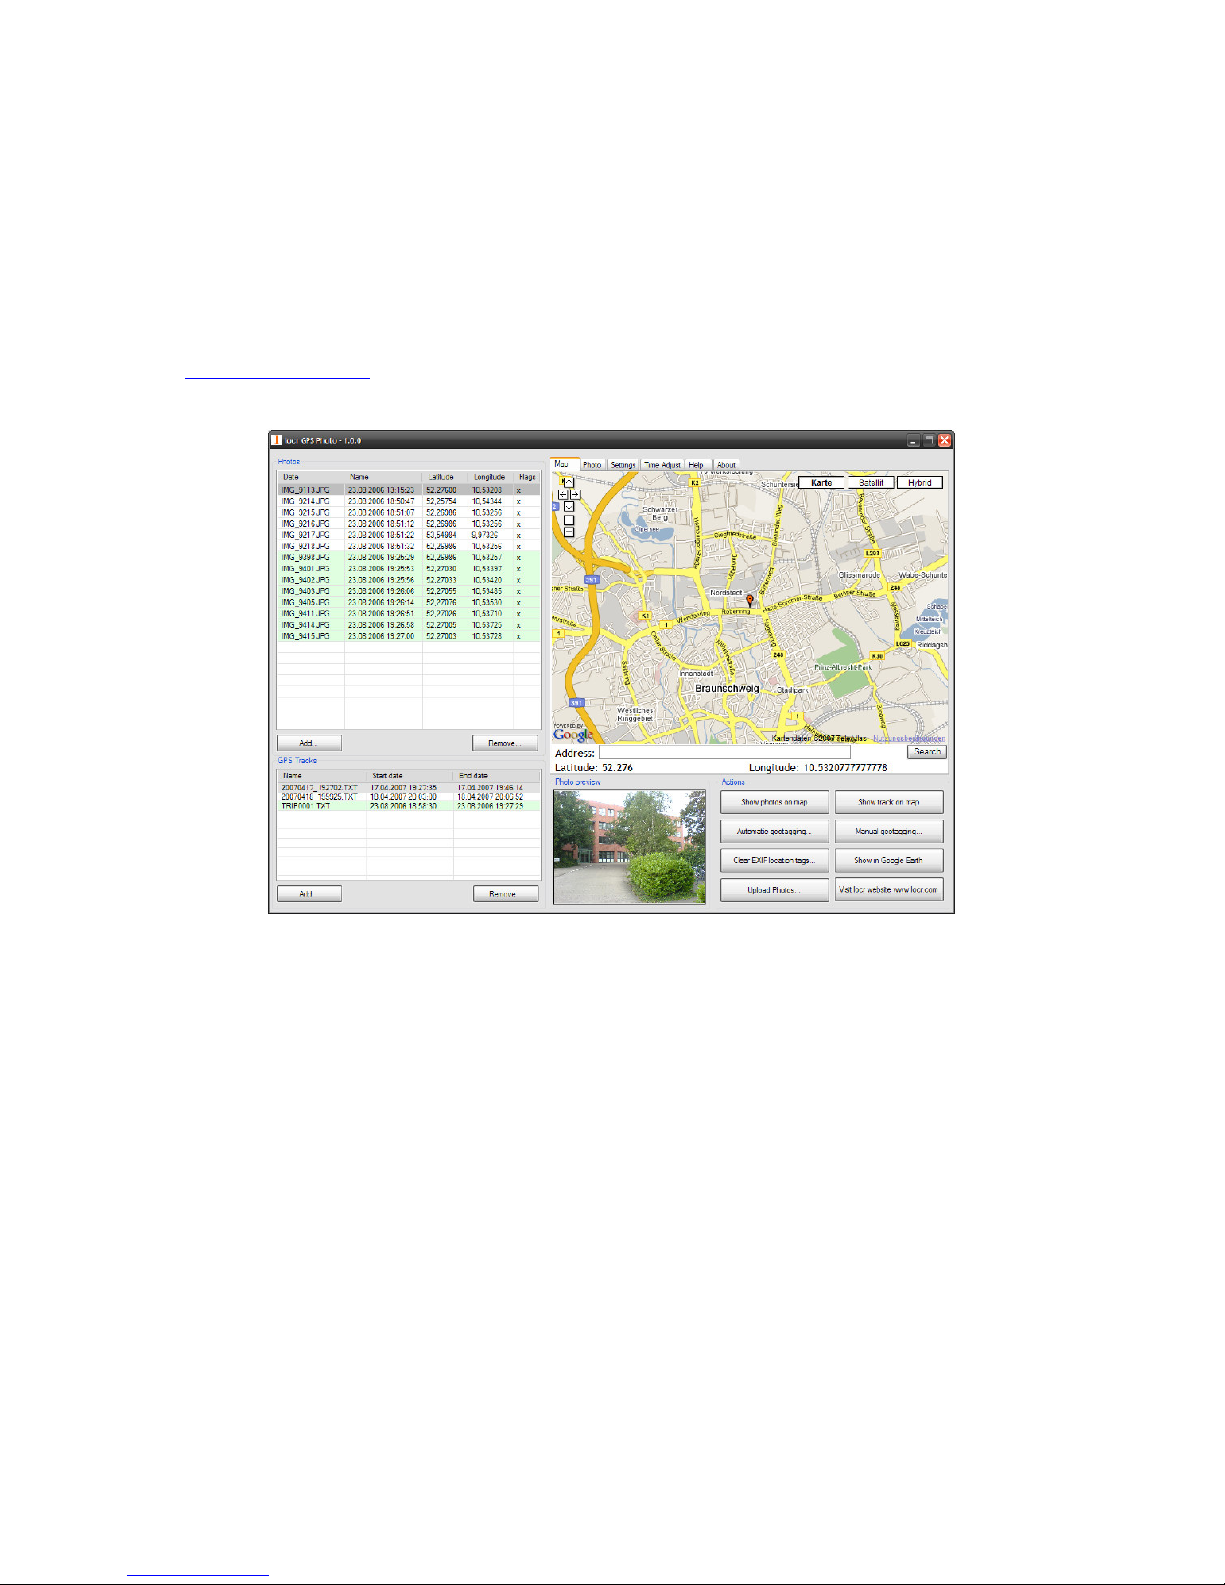
Appendix A. Locr GPS Photo
With TripMate850 and locr GPS Photo software, users are allowed to import geotagging adds
information to photos. The position (latitude/ longitude) then be written into the EXIF header
for the further application. Also, locr GPS Photo can integrate travel log and digital photos by
date/ time to show photos on the map directly.
Please find the installation file for Windows XP/ Vista in Micro SD card, or go to
http://www.locr.com for further information.
Rev. 1.0
Page 29

Appendix B. Certification
FCC Notice
This device complies with part 15 of the FCC rules. Operation is subject to the following two
conditions:
1. This device may not cause harmful interface, and
2. This device must accept any interference received, including interference that may cause
undesired operation.
FCC RF Exposure requirements:
This device and its antenna(s) must not be co-located or operation in conjunction with any
other antenna or transmitter.
NOTE: THE MANUFACTURER IS NOT RESPONSIBLE FOR ANY RADIO OR TV
INTERFERENCE CAUSED BY UNAUTHOURIZED MODIFICATION TO THIS
EQUIPMENT. SUCH MODIFICATIONS COULD VOID THE USER’S AUTHORITY TO
OPERATE THE EQUIPMENT.
28 Rev. 1.0
Page 30

29
CE Notice
Is herewith confirmed to comply with the requirements set out in the Council Directive on the
Approximation of the Laws of the Member States relating to Electromagnetic Compatibility
(89/336/EEC), Low-voltage Directive (73/23/EEC) and the Amendment Directive
(93/68/EEC), the procedures given in European Council Directive 99/5/EC and 89/3360EEC.
The equipment was passed. The test was performed according to the following European
standards:
- EN 300 328-2 V.1.2.1 (2001-08)
- EN 301 489-1 V.1.4.1 (2002-04) / EN 301 489-17 V.1.2.1 (2002-04)
- EN 50371: 2002
- EN 60950: 2000
Rev. 1.0
Page 31

Appendix C. Warranty Information
Thank you for your purchase of GPS product from the company.
The company warrants this product to be free from defects in materials and workmanship for
one year from the date of purchase. The warranty for accessories is six months. The stamp of
distributor or a copy of the original sales receipt is required as the proof of purchase for
warranty repairs. The company will, as its sole option, repair or replace any components,
which fail in normal use. Such repair or replacement will be made at no charge to the
customer for parts or labor. The customer is, however, responsible for any transportation
costs.
This warranty does not cover failures due to abuse, misuse, accident or unauthorized
alteration of repairs. The company assumes no responsibility for special, incidental punitive
or consequential damages, or loss of use.
30 Rev. 1.0
 Loading...