

Page 1

www.transtel.co
USER MANUAL
Installation and Set Up
Model: IP8100C
Compact IP-PBX extensions
197 System
Page 2

Notification is hereby given that Auto Telecom Company reserves the right to modify,
change, update or revise this document from time to time as required without the prior
obligation to notify any person, company or organization. Further, Auto Telecom
Company makes no warranty or representation, either express or implied, with respect
to merchantability, or fitness of its products for a particular purpose.
© 2017 Auto Telecom Company
This document or any parts thereof are not to be reproduced or transmitted in any
form or by any means, electronic or mechanical, including photocopying, recording,
or information storage and retrieval systems for any purpose whatsoever without the
express written permission of Auto Telecom Company.
Page 3

1. Description......................................................................................................................... 2
2. System Programming ......................................................................................................... 3
2.1 Default IP ..................................................................................................................... 3
2.2 Default NO Password ................................................................................................... 3
2.3 Default system ............................................................................................................. 3
2.4 Set system password .................................................................................................... 4
2.5 Into console programming ........................................................................................... 4
2.6 Default setting of IP Trunk ............................................................................................ 4
2.7 Default setting of IP extension ..................................................................................... 5
2.8 Trunk ringing assignment ............................................................................................. 5
2.9 Console Password ........................................................................................................ 5
3. System ............................................................................................................................... 7
3.1 Technical password setting ........................................................................................... 7
3.2 Technical password ...................................................................................................... 7
3.3 PSTN LINE Information ................................................................................................. 7
3.4 IP-Trunk Information .................................................................................................... 8
3.5 IP-extension Information.............................................................................................. 8
3.6 Access Trunk ................................................................................................................ 9
3.7 Trunk Enable PR ........................................................................................................... 9
4. Software update .............................................................................................................. 10
4.1 software update 1 ...................................................................................................... 10
4.2 software update 2 ...................................................................................................... 10
5. Use a file to program VoIP. ............................................................................................... 11
5.1 File programming ....................................................................................................... 11
5.2 Modify Setting ........................................................................................................... 11
5.3 Upload Configured File ............................................................................................... 12
5.4 System save and reboot ............................................................................................. 12
Page 4

1. Description
IP8100C is a small IP-PBX system; it can register up to 197 IP-Extension with two
IP-Trunks and one PSTN trunk. Easy to deploy and cost effective solution for
community intercom, home environments or small office application.
1. RESET: Reset button
2. STOP: Shutdown button. Pressing 2 seconds for safely power down.
3. RS232: RS232 port
4. Normal/Default: Normal Operation / Clear Flash Memory
5. WAN1: to set IP address on mode 15 (LAN1 10.10.10.xxx)
6. WAN2: to set IP address on mode 15 (LAN2 192.10.1.xxx)
7. +5CVD IN: Power for IP8100
8. FXO: FXO port
9. GPO1~GPO4: Dry connector for Relay1 ~ Relay4 (Normally Open
30VDC/1A) and refer setting on mode 06.
10. GPI1~GPI8: Sensors detection and refer setting on mode 06. GND with
GPI1~GPI8 are sensor connectors.
Page 5
3
www.transtel.co
2. System Programming
Software version
G-IP81-WF11cB1 and ip-8100c-003 (update via WinSock File Transfer Protocol
WS_FTP)
2.1 Default IP
Default IP is 10.10.10.5
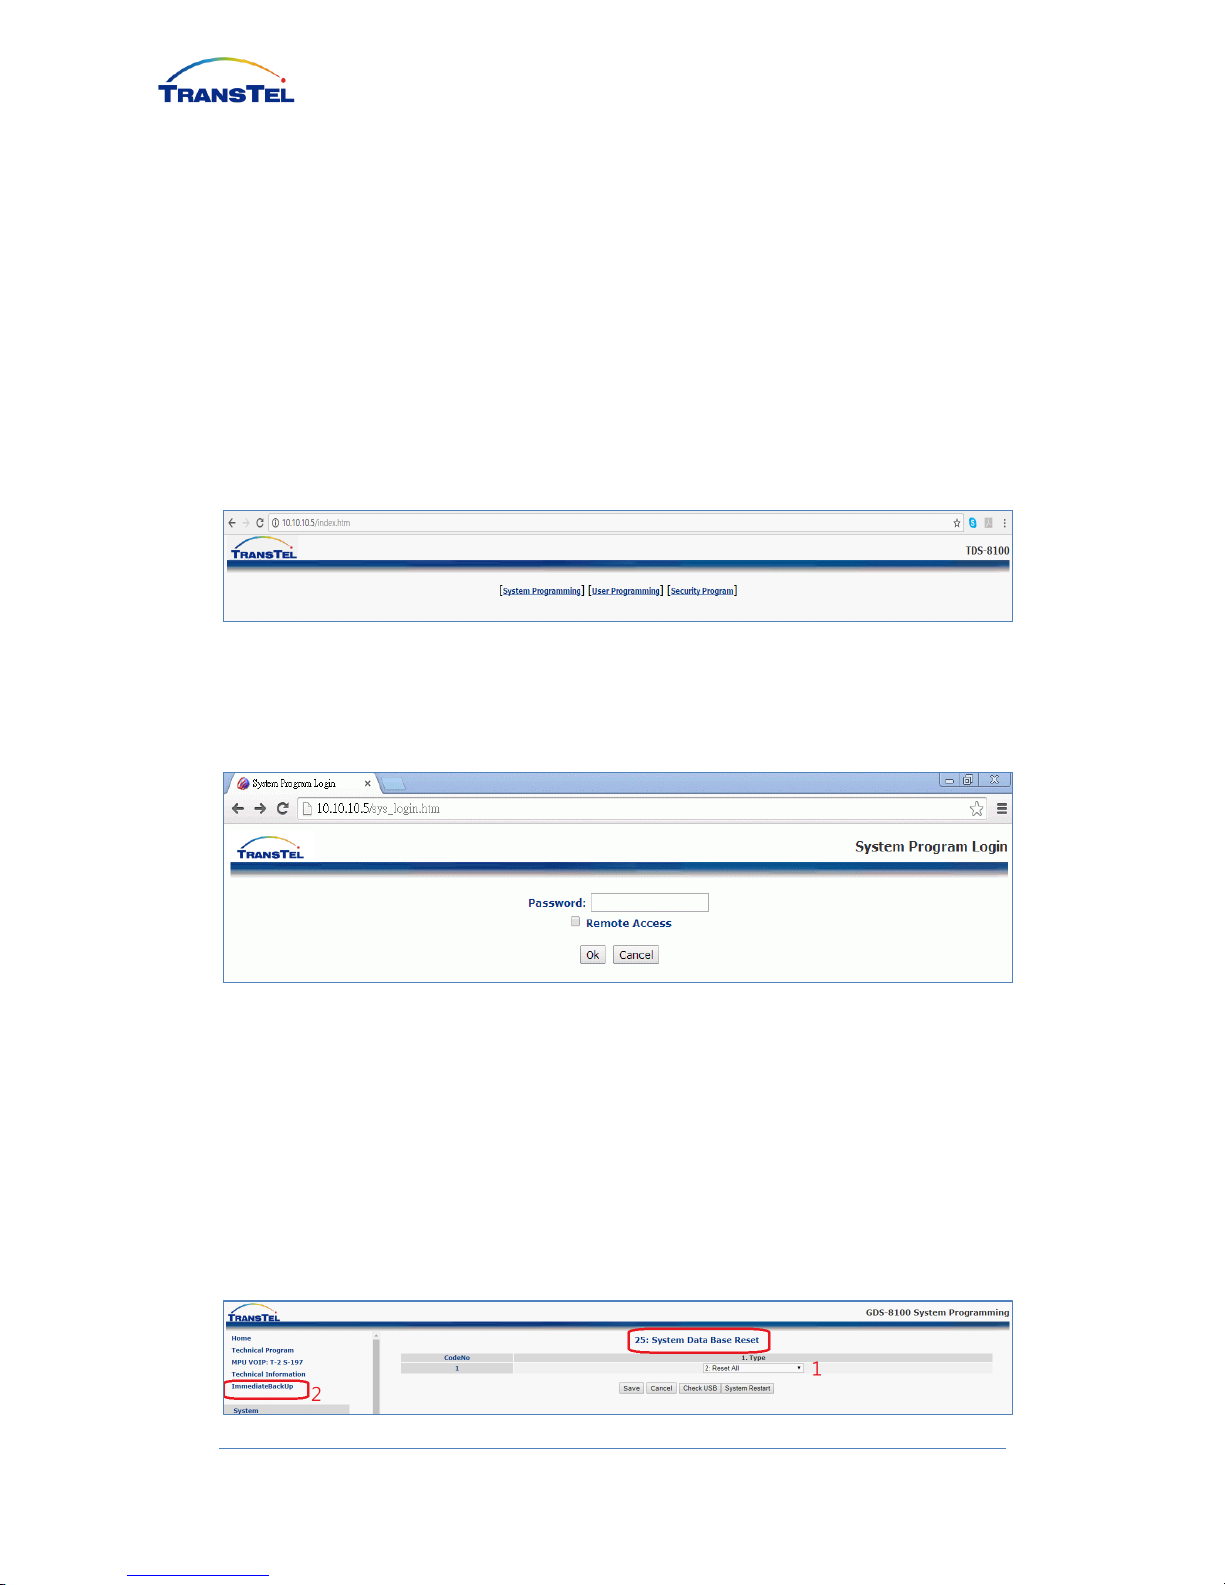
Power on and wait 40 seconds to start; Use Google Chrome to log onto the IP8100
setup page:
2.2 Default NO Password
Click “System Programming”, Default NO Password, click OK to proceed.
2.3 Default system
Please click SYSTEM tab, then click Mode: 25 System Data Base Reset; Ensure
pull down menu is showing 2: Reset All, then click SAVE button to auto configure
extension number, name and password in Numbering Plan and Port/Station
Number menu.
After configuration complete, click on ImmediateBackup to save setting.
Page 6

4
www.transtel.co
2.4 Set system password
Click SYSTEM tab, then click PASSWORD (Mode: 13), see 1st row
PROGRAM/FTP to set system password, then SAVE (Example password: 1234)
If password lost, user can press hardware DEFAULT switch located on the
back of IP8100C body to reset system.
2.5 Into console programming
After enter the set up page by “no password”, click HOME, then SYSTEM
PROGRAMMING, then click OK without enter password to enter Console
Programming page to see simplified menu to set IP extension and IP Trunk
2.6 Default setting of IP Trunk
Default setting of IP Trunk Account as below:
Page 7

5
www.transtel.co
Setting Example:
2.7 Default setting of IP extension
IP-Extension number, extension name and password can be changed in Port/Station
Number
2.8 Trunk ringing assignment
IP-Trunk and PSTN Trunk incoming call assignment setting
2.9 Console Password
Console password can be set in the Console Page under SYSTEM, then
PASSWORD
Page 8

6
www.transtel.co
Page 9

7
www.transtel.co
3. System
3.1 Technician password setting
Click SYSTEM tab, then click PASSWORD (Mode: 13), see 1st row
PROGRAM/FTP to set system password, then SAVE (Example password: 1234)
3.2 Technician password
When user enters password (example: 1234), complete program setting menu will
show on left column
3.3 PSTN LINE Information
Click NUMBERING PLAN, then click PORT/STATION NUMBER (Mode: 21) to
see default Port Number 171 with Number 801 for PSTN line
Page 10

8
www.transtel.co
3.4 IP-Trunk Information
Click NUMBERING PLAN, then click PORT/STATION NUMBER (Mode: 21)
select CAB/SLOT: 1a to see two default IP-Trunk 802 and 803 information
3.5 IP-extension Information
Click NUMBERING PLAN, then click PORT/STATION NUMBER (Mode: 21)
select CAB/SLOT to show remain 197 IP extensions slots information
Page 11

9
www.transtel.co
3.6 Access Trunk
For outgoing calls setting, click Trunk, then click Mode 36: TRUNK GROUP
ASSIGNMENT, 801 (PSTN), 802 & 803 (IP)
For general dial out: dial 9 + number + #
For assigned channel dial out: dial 802 + number + #
3.7 Trunk Enable PR
Click Trunk, then click Mode 35: TRUNK SPECIFICATION, please ensure all
outgoing trunk 1. Type: 2=CO, Enable PR is selected, or user cannot answer ITU
dial out calls
Page 12

10
www.transtel.co
4. Software update
4.1 software update 1
IP8100c Software update via WS_FTP
User ID is transtel (or hybrex) and default password is dddddddd
4.2 software update 2
After FTP connected, put new updates tgz file to /voip folder, it will auto update and
restart system
Page 13

11
www.transtel.co
5. Use a file to program VoIP.
5.1 File programming
Using PC to setup IP-extension and ITU configuration (197 extension and 2 ITU)
follow steps below:
Use WS_FTP to download /bin/app/UserAccount.CSV file to PC
5.2 Modify Setting
Use Microsoft Excel to open UserAccount.CSV, administrator can perform batch
setting with file (maximum 16 digits per cell; USER NUMBER use only numerical
value)
Page 14

12
www.transtel.co
5.3 Upload Configured File
Upload “UserAccount.CSV” file back to the same folder to replace original file,
/bin/app/UserAccount.CSV
5.4 System save and reboot
Please log in setup page using browser IP: 10.10.10.5, select SYSTEM
PROGRAMMING, and then MPU VOIP: T-2 S-197 to logon IP: 10.10.10.5:8080
Default User Name: admin
Default Password: 1234
Page 15

13
www.transtel.co
After save system will automatically restart; after restart, use SYSTEM
PROGRAMMING, NUMBERING PLAN, then PORT/STATION NUMBER
(Mode: 21) to confirm change
AUTO TELECOM COMPANY
www.transtel.co
www.hybrex.com
 Loading...