

Page 1
USER MANUAL
Installation and Programming
Model: IP37-71
v. 1.0
www.transtel.co
Page 2

Notification is hereby given that Auto Telecom Company reserves the right to modify,
change, update or revise this document from time to time as required without the prior
obligation to notify any person, company or organization. Further, Auto Telecom Company
makes no warranty or representation, either express or implied, with respect to
merchantability, or fitness of its products for a particular purpose.
© 2017 Auto Telecom Company
This document or any parts thereof are not to be reproduced or transmitted in any form or
by any means, electronic or mechanical, including photocopying, recording, or information
storage and retrieval systems for any purpose whatsoever without the express written
permission of Auto Telecom Company.
Page 3

1. Description ....................................................................................................................... 1
2. Make a Call ...................................................................................................................... 4
2.1 Dialing a Number ....................................................................................................................... 4
2.2 DSS Direct Dial ........................................................................................................................... 4
2.3 Last Number Redial ................................................................................................................... 4
3. Receiving a Call ................................................................................................................ 4
3.1 Answer ...................................................................................................................................... 4
4. Hold & Call Transfer ......................................................................................................... 4
4.1 Hold & Retrieve a Held Call ........................................................................................................ 4
4.2 Call Transfer (by Phone) ............................................................................................................. 4
5. During Conversation ........................................................................................................ 5
5.1 Mute ......................................................................................................................................... 5
5.2 Handset & Handsfree Modes Switch .......................................................................................... 5
5.3 Volume Adjustment ................................................................................................................... 5
6. Web Pages Setup ............................................................................................................. 6
6.1 User name: Admin, Password: 1234. .......................................................................................... 6
6.2 Enter the correct User Name and Password, and click Login into the home page as follows: ........ 6
7. Network ........................................................................................................................... 7
7.1 LAN ........................................................................................................................................... 7
7.2 Network / HTTPS ....................................................................................................................... 7
7.3 Network / RPS ........................................................................................................................... 7
7.4 Network / Auto Configuration .................................................................................................... 8
7.5 Network / Auto Update ............................................................................................................. 8
8. SIP ................................................................................................................................... 9
8.1 SIP / SIP Account: Only one account. .......................................................................................... 9
8.2 SIP / Ports ................................................................................................................................. 9
8.3 SIP / Audio Codecs ..................................................................................................................... 9
8.4 SIP / DTMF Settings ................................................................................................................. 10
8.5 SIP / SRTP Settings ................................................................................................................... 10
9. Telephony ...................................................................................................................... 10
9.1 Telephony / Phone Book .......................................................................................................... 10
9.2 Telephony / DSS Setting ........................................................................................................... 11
9.3 Telephony / Parameters ........................................................................................................... 11
9.4 Telephony / DND Setting .......................................................................................................... 12
9.5 Telephony / Call Forward Setting .............................................................................................. 12
Page 4

www.transtel.co
9.6 Telephony / Alarm ................................................................................................................... 12
10. System parameters.................................................................................................... 13
10.1 System Parameters/ Volume Setting .................................................................................... 13
10.2 System Parameters/ NTP and Time...................................................................................... 13
10.3 System Parameters/Ringer .................................................................................................. 14
11. Admin ....................................................................................................................... 14
11.1 Admin / Save Configuration file, and run TFTD32 first to get TFTP IP address. ....................... 14
11.2 Admin/ Save Configuration file, and enter TFTP IP address and click [Apply]. ........................ 15
11.3 Admin/ Save Configuration file, after click [Apply], the IP-Phone will create an ah99ipdb.tgz
file and save TFTP folder as below image. ........................................................................................... 15
11.4 Admin/ Restore Configuration File, and run TFTD32 first to get TFTP IP address, and put IP
address in TFTP Server. IP Address is shown below.............................................................................. 16
11.5 Admin/ Restore Configuration File. After click [Apply], the IP-Phone will download
ah99ipdb.tgz file from TFTP server, and automatically reboot. ............................................................ 16
11.6 Admin / Update .................................................................................................................. 17
11.7 Admin/ Set to Default ......................................................................................................... 17
12. PRG by Manual ......................................................................................................... 18
12.1 Phone Book ........................................................................................................................ 18
12.2 Call History ......................................................................................................................... 18
12.3 Phone Settings ................................................................................................................... 18
12.4 Network ............................................................................................................................. 18
12.5 Administrator ..................................................................................................................... 18
2
Page 5
www.transtel.co
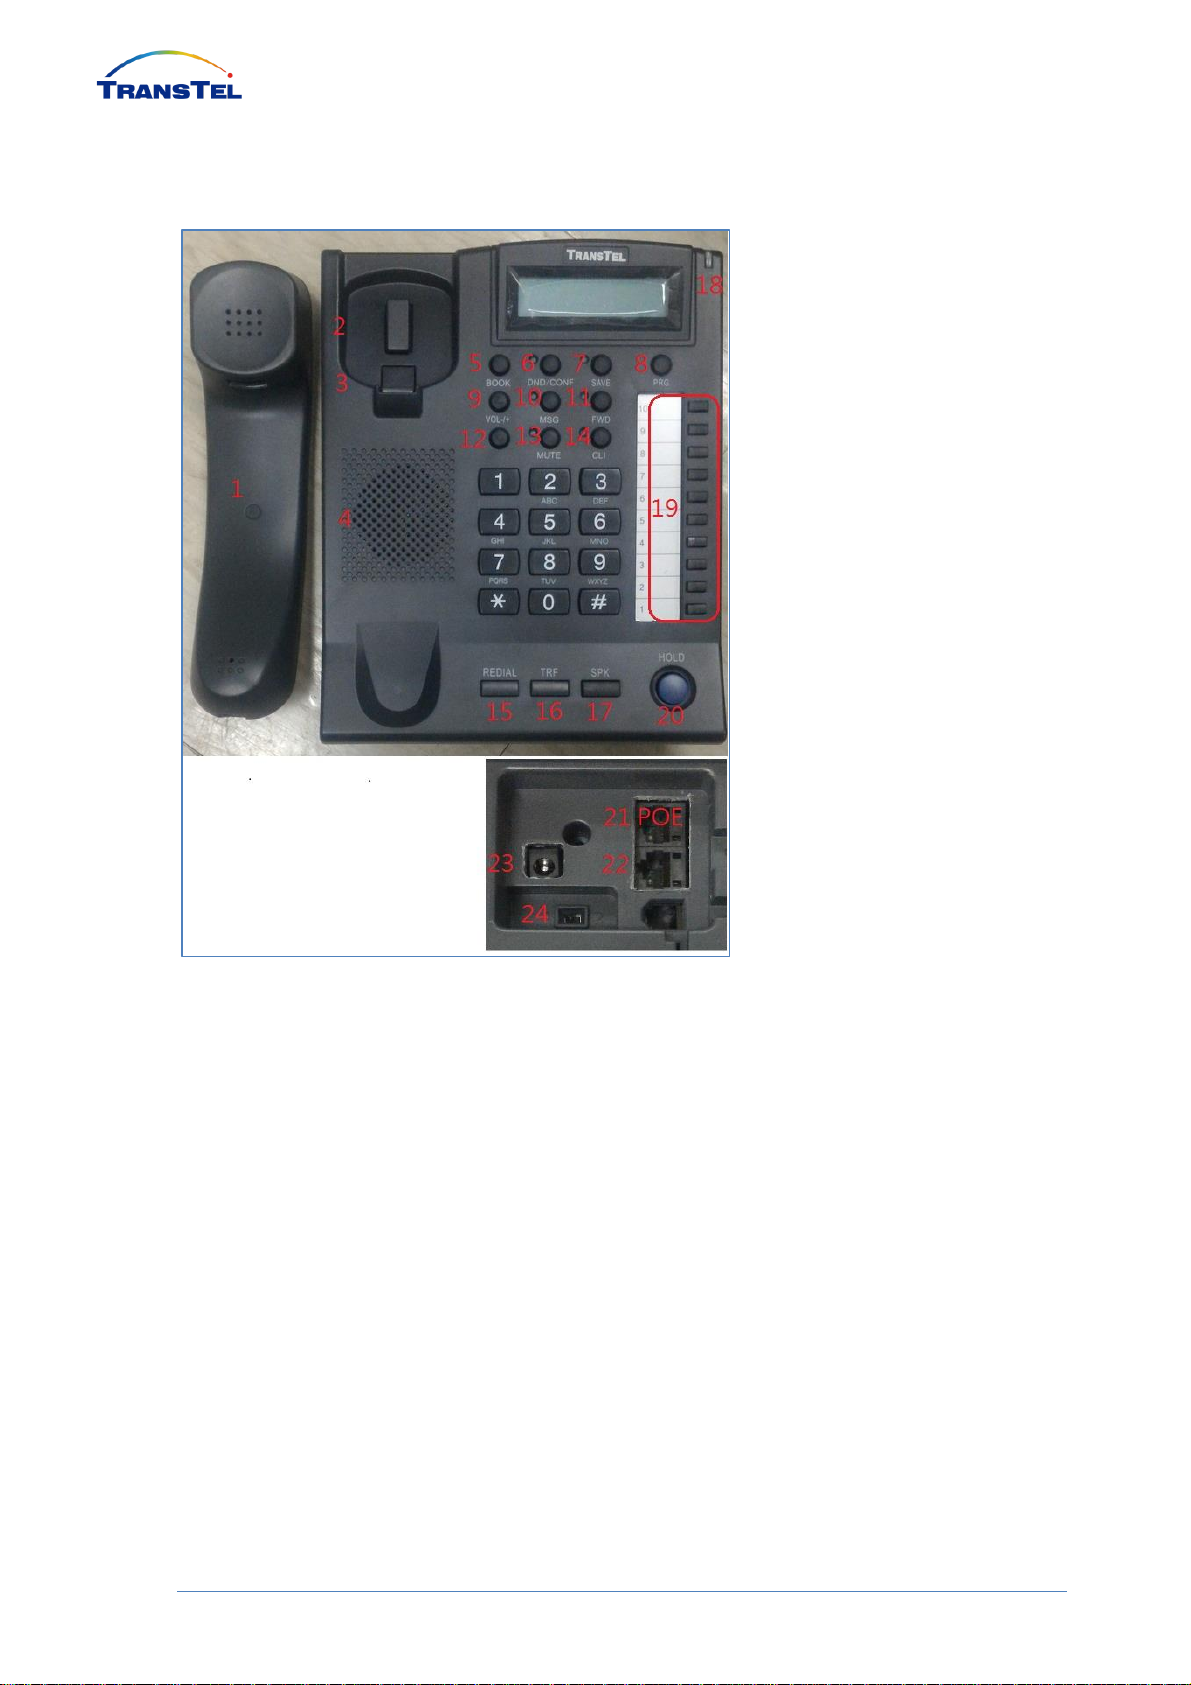
1. Description
Press [Save] key, the LCD will show current DHCP IP address.
1. Handset
2. Telephone Hook Switch
3. Wall Mount Hook
4. Speaker
5. PHONE BOOK
There are 100 sets, press Book and save key firstly, press VOL+ or VOL- to
select want number then press Save key to dial out.
6. DND/CONF
■ DND operation:
When IP-Phone is idle, press [DND] key, LED on and LCD showing “#
DND#”.
The IP-Phone is “Do Not Disturb” status.
■ Conference operation:
1
Page 6

www.transtel.co
a. Establish a call to party B, and put it on Hold.
b. Establish a call to party C; now the caller and party C are in a
conversation, press [CONF] key to initial 3-way conference.
7. SAVE
When IP-Phone is idle, press this [SAVE] key, the LCD will show IP address and
MAC.
8. PRG
If programming can be finished on phone, it is no need to go through the WEB
programming.
Please refer to 12. PRG by Manual on Page 18 for detailed information.
9. VOL+ (Volume Up)
It can adjust Speaker, Handset, and Ring tone volume.
10. MSG (Programmable 76)
When MSG LED is on, press this [MSG] key to call back, who does MSG will be
rung.
11. FWD (Call Forward feature only works on VP)
There are three status for this key, AF= All Forward, BF= Busy Forward, NF=No
Answer Forward.
12. VOL- (Volume Down)
1~8 level volume adjustment, when the phone restarts it will change to default
setting, default at WEB System Parameters\Volume setting.
13. MUTE
When IP-Phone is idle, press the [MUTE] key, and this IP-Phone is set at “Auto
Answer” status.
When on a call, press the [MUTE] key, this phone voice will not be sent out.
14. CLI
a. Check incoming calls, press [VOL+] or [VOL-] to check call history, press
redial to dial out.
b. Check dialed number, press [VOL+] or [VOL-] to check call history, press
redial to dial out.
c. Erase Records
15. Redial
When phone is idle, redial the previously dialed number.
16. TRF (DTMF set SIP INFO and ISU Hold)
During a VoIP call, this key offers the “Transfer” function.
Two ways to transfer a call:
a. TRF Method
a1. Extension A calls extension B. After B answers, A presses “HOLD” to
2
Page 7

www.transtel.co
put B on Hold, and B will hear music from the PABX.
a2. Extension A calls extension C, when A hears Ring Back Tone, the
extension A hook down will transfer C to B, before C answer, the B
Music On Hold will change to RBT.
b. Hold Method
b1. Extension A calls extension B. After B answers, A presses [Hold] key
to put B on Hold, and B will hear music from the PABX.
b2. Extension A calls extension C. When A hears Ring Back Tone, press
[TRF] key, A will get busy tone, and the B Music On Hold also change
to RBT, after C answers the ringing call, then B and C are in
conversation.
17. SPK
Answer the call without lifting the handset.
Deactivate the dialing function.
18. Front indicator light
When the IP-Phone is ringing and this front indicator light will flash rapidly.
When the IP-Phone gets a MSG, this front indicator light will slow flashing.
19. DSS
Direct Station Selection keys.
20. HOLD
During a VoIP call, put the current call on hold.
21. LAN Port with POE
These two RJ-45 port are bridge mode, it's also support WAN or LAN.
22. LAN Port
23. DC5V
24. Default IP-Phone switch
a. This switch always select to 1 in normal operation.
b. Firstly this IP-phone is in working; then change the switch to select 2 and
wait for 40 seconds. When IP-Phone restarts, (look at LCD display) change
the switch to 1.
c. After IP-Phone restarts and works, this IP-Phone is changed to default
DHCP setting, press “Save” Key the LCD will show current IP address and
MAC.
3
Page 8

www.transtel.co
2. Make a Call
Dialing a Number 2.1
To make a call by dialing a number on the Dial Keypad:
(1) Lift the handset, the dial tone will be heard.
(2) Dial the telephone number.
(3) Press the pound key [ # ] to send out the telephone number immediately, or
wait for a few seconds and the phone will send out the number automatically
DSS Direct Dial 2.2
The DSS feature of the IP-Phone must be set up before the user uses it.
The user can call that station by simply pressing the respective [DSS] button.
Last Number Redial 2.3
The IP-Phone automatically stores the last dialed number. To call that number again,
press [Redial] key to call the last dialed number.
3. Receiving a Call
Answer 3.1
When the IP-Phone is ringing (the front indicator light flashes rapidly), the user can
answer the call.
(1) Pick up the handset to answer the call directly.
(2) Or press the [SPKR] key to answer the call in handsfree mode.
4. Hold & Call Transfer
Hold & Retrieve a Held Call 4.1
(1) Press [HOLD] key while on a call to hold the call. The held caller will hear music
from the PABX.
Call Transfer (by Phone) 4.2
(2) Press [HOLD] key again to retrieve the held call.
(1) Press [HOLD] key while on a call to hold the call. The held caller will hear music
from the PABX.
(2) Dial the extension number of the transfer destination.
(3) Press [TRF] key to ring that extension and have the held call transferred to it.
4
Page 9

www.transtel.co
5. During Conversation
Mute 5.1
When on a call via the handset or in handsfree mode, the user can press [MUTE]
key to turn its LED light on or off.
Handset & Handsfree Modes Switch 5.2
(1) When talking on the handset, press [SPKR] key to have its LED light steadily,
and hang up the handset to switch to handsfree mode.
(2) When talking in handsfree mode, lift the handset to switch to talk on the handset.
The light of the [SPKR] key goes out.
Volume Adjustment 5.3
When talking on the handset or handsfree mode, press the [VOL- or VOL+] key to
adjust volume up or down. There is 1~8 level volume adjustment.
5
Page 10

www.transtel.co
6. Web Pages Setup
User name: Admin, Password: 1234. 6.1
Enter the correct User Name and Password, and click Login into the 6.2
home page as follows:
6
Page 11

www.transtel.co
NOTE: Default setting is DHCP.
7. Network
LAN 7.1
Network / HTTPS 7.2
Network / RPS 7.3
(1) Default setting is shown below:
(2) When setting Server Type = Disable, it doesn’t go through APS. Auto
Configuration and auto update also set off. (Automatic Provisioning Server).
7
Page 12

www.transtel.co
Network / Auto Configuration 7.4
Data below comes from APS.
The default settings are as follows. When the phone restarts, it will go through APS
to get data.
If the Server Type is set OFF, it won’t go through APS to get data.
Network / Auto Update 7.5
When the phone powers on, it needs a little time going through APS to check new
software.
8
Page 13

www.transtel.co
8. SIP
SIP / SIP Account: Only one account. 8.1
SIP / Ports 8.2
SIP / Audio Codecs 8.3
9
Page 14

www.transtel.co
SIP / DTMF Settings 8.4
SIP / SRTP Settings 8.5
9. Telephony
Telephony / Phone Book 9.1
There are 100 sets, press [Phone Book] and [Save] key first, then press [VOL+] or
[VOL-] to select the number you want and press [Save] key to dial out.
10
Page 15

www.transtel.co
NOTE: Do not set the last digit as #.
Telephony / DSS Setting 9.2
Telephony / Parameters 9.3
[Outcall No Answer Timeout] is for dial out.
[Outcall No Answer Forward Destination] is for dial out.
11
Page 16

www.transtel.co
Telephony / DND Setting 9.4
Do Not Disturb.
Telephony / Call Forward Setting 9.5
This feature only works with the VP.
Telephony / Alarm 9.6
When time’s up, the IP-Phone will keep ringing for one minute.
12
Page 17

www.transtel.co
10. System parameters
System Parameters/ Volume Setting 10.1
System Parameters/ NTP and Time 10.2
13
Page 18

www.transtel.co
System Parameters/Ringer 10.3
11. Admin
Admin / Save Configuration file, and run TFTD32 first to get TFTP IP 11.1
address.
14
Page 19

www.transtel.co
Admin/ Save Configuration file, and enter TFTP IP address and click 11.2
[Apply].
Admin/ Save Configuration file, after click [Apply], the IP-Phone will 11.3
create an
ah99ipdb.tgz
file and save TFTP folder as below image.
15
Page 20

www.transtel.co
Admin/ Restore Configuration File, and run TFTD32 first to get TFTP 11.4
IP address, and put IP address in TFTP Server. IP Address is shown
below.
Admin/ Restore Configuration File. After click [Apply], the IP-Phone 11.5
will download
reboot.
ah99ipdb.tgz
file from TFTP server, and automatically
16
Page 21

www.transtel.co
Admin / Update 11.6
We suggest you to use [Local PC] update.
Admin/ Set to Default 11.7
When set to default, some settings will change.
1. Network = DHCP
2. Auto Configuration and Auto update will follow the settings of APS.
17
Page 22

www.transtel.co
12. PRG by Manual
PRG Key= Back SAVE Key= OK
VOL+ = UP VOL- =Down
Phone Book 12.1
1. Search
2. Add Entry
3. Erase all
Call History 12.2
1. Incoming
2. Dialed Numbers
3. Erase Record
Phone Settings 12.3
1. Call Forward
1. All Forward
2. Busy Forward
3. No Answer FWD
2. Do Not Disturb
3. Alarm Setting
1. Activation
1. Enable
2. Disable
2. Alarm time
Alarm Time
4. Time Setting
1. Date & Time
5. Ringer
1. Ringer Volume
2. Ringer Type
Network 12.4
1. WAN Setup
1. IP Type
1. Fixed IP
2. DHCP
2. Fixed IP Setting
1. IP Address
2. Subnet Mask
3. Default Gateway
2. DNS
1. Primary DNS
2. Secondary DNS
3. Status
Administrator 12.5
1. Version
2. Default Setting
3. Restart
18
Page 23

AUTO TELECOM COMPANY
www.transtel.co
www.hybrex.com
 Loading...